 Reddit reviews Link Solar Weatherproof ABS Solar Double Cable Entry Gland for All Cable Types 2mm² to 6mm² for Solar Project on Rv, Campervan, Boat
We found 7 Reddit comments about Link Solar Weatherproof ABS Solar Double Cable Entry Gland for All Cable Types 2mm² to 6mm² for Solar Project on Rv, Campervan, Boat. Here are the top ones, ranked by their Reddit score.
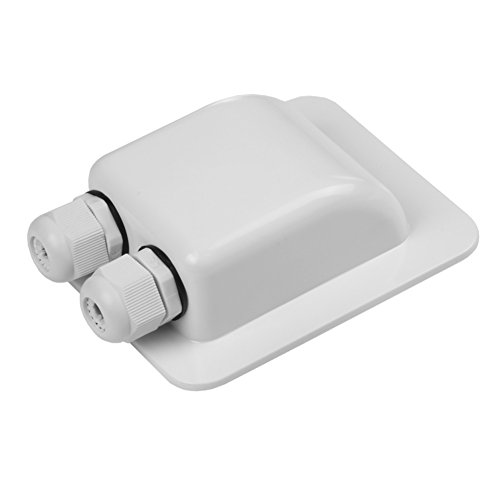
PG7 Waterproof cable gland used for all cable types 2mm² to 6mm² in Dia ,Widely used for solar project when routing the cablesSuitable for most round cables for Solar Panel,DC power, Aerial, satellite, Air conditioning, Lighting etcCan be fixed with Glue (not included) Sikaflex 221 Sikaflex 252, 291, dicor sealant, alike or stainless steel self-tapping screws (not included) depending on position and sealing requirements etcThe whole set is within 1 ABS white box, 2 cable glands ,2 rubber sealsAn ideal way for routing the cables while mounting solar panels on vehicles and boats, as well as other installations on buildings, garages, sheds etc
What about something like this
https://www.amazon.com/dp/B0111RNZDY/ref=cm_sw_r_cp_api_6NYryb63QQ67P
I drilled a hole through one of my vents and sealed it with polyurethane caulking. I don't recommend this option. Its starting to leak already.
Check out these mc4 glands:
http://www.amazon.com/LINKSOLAR-Weatherproof-Plastic-Connector-Campervan/dp/B0111RNZDY/ref=sr_1_1?s=industrial&ie=UTF8&qid=1456967919&sr=8-1&keywords=solar+gland+roof
Super cut a hole, and super be done with it. They have super glands for this. They are super.
https://www.amazon.com/dp/B0111RNZDY/
EDIT: Super!
I was concerned about drilling any holes in my roof. Being a born pessimist, I figured if anything can go wrong, it will go wrong. The fewer holes in my roof the better.
I started looking for a roof rack. What I really wanted was a full-length roof rack with a diamond-pattern, "hardware cloth" platform surface upon which to mount my solar panels. All the racks I could find were around $600. Getting a rack custom built was estimated at $1300. Too much.
I finally found a very heavy-duty-looking rack made of black-painted round tubing for $311. "That's more like it," I thought. I ordered it off the internet.
When it arrived, I was annoyed to see that all the parts weren't there. Two long side panels seemed to be missing. I called the vendor, and after a very confusing conversation, it turned out that I had only ordered "half" the rack. The other part number was the side panels. Guess how much they cost? $300. ($611 for the whole rack. Dammit.)
Once I got the whole rack at my house, and started trying to install it, I realized that it's a two-or-three-man job. I finally got it installed, but Lord, what a pain in the ass!
I bolted a piece of 4x8 plywood to the rack tubing using large U-bolts. The PV panels bolt to the plywood.
I feel pretty sure that bolting the panels directly through the roof would work just as well, maybe better.
A really good book that describes solar panel installation is "Photovoltaic Design & Installation for Dummies" by Ryan Mayfield. He is the president of the Renewable Energy Associates solar power company.
A solid wire is called a "wire." A bundle of wires together covered with plastic insulation is called a "cable." You want cables of at least 6 gauge diameter. (The smaller the gauge number, the larger the cable. I know, it seems backwards.) A lot of solar power kits come with 8 gauge or even 10 gauge cable. TOO SMALL. Cable this small is inefficient for DC current, for our purposes.
You will need a "cable gland" (Amazon) and a good quantity of "Dicor self-sealing lap sealant." (Amazon). Be generous with the Dicor. Every time a cable goes through a steel bulkhead or floor you MUST put a grommet of some kind (rubber, plastic) there to protect the cable insulation. If you ground out a positive cable, it could cause a fire. Ground the negative (black) cable of the system TO THE VEHICLE'S FRAME, directly to clean steel (NOT PAINTED STEEL), through the floor. Bolt the ground cable connection securely to the frame. Don't forget the grommet.
https://www.amazon.com/Link-Solar-Weatherproof-Project-Campervan/dp/B0111RNZDY/ref=sr_1_2_sspa?ie=UTF8&qid=1506480381&sr=8-2-spons&keywords=double+cable+gland&psc=1
https://www.amazon.com/Scosche-WPG8-10-Gauge-Waterproof-Grommets/dp/B00OYGLP32/ref=sr_1_12?ie=UTF8&qid=1506480517&sr=8-12&keywords=8+gauge+cable+grommet
https://www.amazon.com/Auto-ranging-Multimeter-Resistance-Capacitance-Frequency/dp/B01N014USE/ref=sr_1_14_sspa?s=automotive&ie=UTF8&qid=1506480598&sr=1-14-spons&keywords=clamp+style+multimeter&psc=1
https://www.amazon.com/dp/B00NWGZ4XC/ref=dp_cerb_2
Always use BLACK cable for the negative (ground) side of the circuit and RED cable for the positive side. This will prevent you from screwing up and short-circuiting your system. Hopefully.
Do not hook up the PV panels until everything else is installed and you have tested it for continuity with a digital multimeter (DMM.) The kind that has a "clamp", automatic ranging, and an audible alarm is best. (It looks kind of like a lobster claw and doesn't necessitate puncturing the insulation of the cables.) You start wiring from the storage battery bank and work backwards to the PV panels. Keep in mind--if those panels are exposed to the sun, they are GENERATING ELECTRICAL CURRENT POTENTIAL. Cover them with cardboard or heavy paper and tape until you are ready to energize the system. You don't want to get electrocuted accidentally. The risk of shock is small, but it does exist.
You need either a fuse (good) or a DC breaker (better) between the positive cable between the PV panels and the charge controller, and also between the charge controller and the battery bank. If you install an inverter, you need a breaker on the positive cable between the battery bank and the inverter. (Inverters burn amps just sitting there hooked up. You need to be able to "turn off" the DC power supply to the inverter. Turn the power to the inverter back on to use it.)
https://www.amazon.com/MidNite-Solar-Photovoltaic-Circuit-Breaker/dp/B004EQK8SA/ref=sr_1_7?s=automotive&ie=UTF8&qid=1506481155&sr=1-7&keywords=DC+breaker
Try to make the cable runs as short and direct as possible, within reason. The longer the cable run, the more resistance and the more voltage drop. All cables should be secured to the bulkhead with cable clamps in a neat, tidy, workmanlike fashion. If it's worth doing, it's worth doing correctly.
I just got done installing my panels and went with one of these entries: http://amzn.to/1rXdZsB. I drilled a 1" hole, primed the bare metal, put a 1" grommet in the hole to keep it from cutting my wires, cleaned the paint around the hole, put down VHB tape, stuck the thing I mentioned a second ago down on the tape, then used some Dicor around the perimeter to seal it all up.
So far it's working great and has survived a few days of rain with no leaks.
Solar gland?
https://www.amazon.com/dp/B0111RNZDY
https://www.amazon.com/Link-Solar-Weatherproof-Project-Campervan/dp/B0111RNZDY/ref=pd_cp_107_1?_encoding=UTF8&pd_rd_i=B0111RNZDY&pd_rd_r=EKHR6Y5N0NVKJF614FB2&pd_rd_w=9YXfC&pd_rd_wg=V6sqE&psc=1&refRID=EKHR6Y5N0NVKJF614FB2
This plus a shit ton of dicor over the holes that YOU HAVE TO DRILL (sorry)
I like this one better because it has the lip around the edge that you can put a few screws into
It's that or run it through the open window