 Reddit reviews Upgrade 1S LiPo Battery USB 3.8V/4.35V Charger 6 Channel 1S LiHV Charger for EMAX Tinyhawk Blade Inductrix Tiny Whoop Inductrix FPV Plus Battery Micro JST 1.25 JST-PH 2.0 mCX mCPX Connectors
We found 4 Reddit comments about Upgrade 1S LiPo Battery USB 3.8V/4.35V Charger 6 Channel 1S LiHV Charger for EMAX Tinyhawk Blade Inductrix Tiny Whoop Inductrix FPV Plus Battery Micro JST 1.25 JST-PH 2.0 mCX mCPX Connectors. Here are the top ones, ranked by their Reddit score.
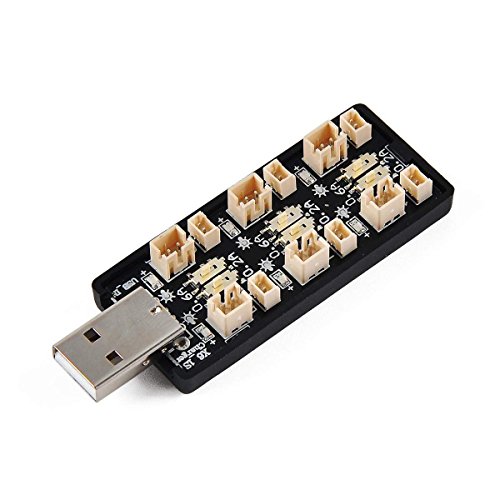
ONLY support LiHV 3.8V/4.35V 1S battery, not for 3.7V/4.20V 1S LiPo batterySupport 0.2A/0.6A charge current by switch button ( Suggest using 0.2A if you charge six at the same time and 0.6A if you only do 2)USB interface input suggested range: 5V±5% on 0.5-2.4A, suggested 2.4A or aboveCharger plug: Micro 1.25 and JST-PH 2.0, AKA mCX and mCPX, Charging max 6 batteries at the same time. ( Need to consider width of battery)The 6 LED lights indicate the charging state of the six channels independently, LED solid indicates charging, LED off indicates full charged.
I’m about two weeks ahead of you.
The Jumper is a solid choice, mostly for the reasons you mention. Here is the T16 thread. Everything you ever wanted to know.
As far as transmitter batteries, I’d suggest checking out this thread @ RCgroups. I’d have purchased the $35 in radio charging kit instead of the standard 18650 & charger.
I’ve also got a Tinyhawk S. Would highly recommend. This little thing is bulletproof. It’s currently getting 4 minutes flight time on a 450mah 1S (I bought 10 of them). Haven’t tried 2S yet, as it’s been quite windy outside. The charger shipped with it only charges two (1S) at a time, so I bought this 6 place charger from Amazon.
Can’t comment on the EV800, as I went all in on Fatshark HDO's & ImersionRC Rapidfire.
just so you know, this is the quality of an FPV camera and you will be getting breakup lines like this as bodies and stuff getting in the way will cause signal loss https://www.youtube.com/watch?v=nU96HLe-hcs
​
​
Here is stuff you can use from Amazon for the AIO Fpv Camera
​
https://www.amazon.com/Wolfwhoop-WT05-Transmitter-Antenna-Quadcopter/dp/B06XJMQQ6Y/
​
https://www.amazon.com/Crazepony-230mAh-Battery-Inductrix-Connector/dp/B01N0Z0ME2
​
https://www.amazon.com/Battery-Charger-Channel-Inductrix-Connectors/dp/B074M6G2MD
​
Here is how to hook it up to a battery https://www.youtube.com/watch?v=uOcxdVX6zYk
​
On the receving end, I assume you will then want to output to HDMI? The best/easiest way to do this is to buy two of these dock kings and hdmi adapters, one for each camera. If you have power nearby you can use a regular 5.5mm DC jack power adapter like for laptops. Or you can buy the battery packs for them. You will also want at least 2 antennas on each receiver, 1 omni and 1 patch antenna pointing in the direction of the actors
​
https://furiousfpv.com/product_info.php?cPath=56&products_id=669
​
https://furiousfpv.com/product_info.php?products_id=704
​
https://furiousfpv.com/product_info.php?cPath=42&products_id=687
​
https://www.amazon.com/Crazepony-Antenna-Protective-Covering-Multicopter/dp/B01N9QM409
​
https://www.amazon.com/RCmall-Accuracy-Directional-Circularly-Polarized/dp/B0772WJB5R
​
You will have to learn/read instructions on how to set each camera and receiver to their matching frequency bands
​
​
Thank you for all that! That was a useful YouTube video, too.
I had to make the purchases yesterday, since I'll be playing with actors in the studio on Monday. That said, I still have time to buy some things.
It's a comfort that I seem to be on the right track. The biggest difference between what I bought and your suggestions is that you suggested I buy the Dock-Kings and other pricier receiver/converting gear. I'd appreciate if you could look at my list of purchased items to determine if you think it will work, or if you see some some red flags.
I suppose in the long run, if this theatre show concept shows promise, we would then invest in more reliable gear, such as no-compression wireless HDMI tx/rx. For now, here it is:
​
4 cameras:
https://www.amazon.com/gp/product/B06Y5D8SPZ/ref=oh_aui_search_asin_title?ie=UTF8&psc=1 (1S LiPo)
2 x https://www.amazon.com/gp/product/B06Y56RL5P/ref=oh_aui_search_asin_title?ie=UTF8&psc=1 (1S LiPo)
https://www.amazon.com/gp/product/B0184DVN4G/ref=oh_aui_search_asin_title?ie=UTF8&psc=1 (2S or 3S LiPo)
​
3 receivers (should I buy different antennae?):
https://www.amazon.com/gp/product/B0774SMGQN/ref=ppx_yo_dt_b_asin_title_o03_s01?ie=UTF8&psc=1
2 x https://www.amazon.com/gp/product/B01H36AIGY/ref=ppx_yo_dt_b_asin_title_o03_s02?ie=UTF8&psc=1
​
3 AC/DC adapters for the receivers:
3 x https://www.amazon.com/gp/product/B01ISM267G/ref=ppx_od_dt_b_asin_title_s00?ie=UTF8&psc=1
​
3S LiPo (for 3S LiPo camera and try battery-powered Receiver)
2 x https://www.amazon.com/gp/product/B07GF63645/ref=ppx_od_dt_b_asin_title_s00?ie=UTF8&psc=1
​
Battery chargers
https://www.amazon.com/gp/product/B00466PKE0/ref=ppx_yo_dt_b_asin_title_o04_s00?ie=UTF8&psc=1
https://www.amazon.com/Battery-Charger-Channel-Inductrix-Connectors/dp/B074M6G2MD
​
Each receiver has an AV output + AV RCA cable. I'll plug in the RCAs from 2 or 3 receivers into this Switcher:
https://www.amazon.com/gp/product/B00KXVBB7C/ref=ppx_yo_dt_b_asin_title_o04_s00?ie=UTF8&psc=1
​
Using an RCA cable, connect the Switcher's Output to this RCA to HDMI converter:
https://www.amazon.com/gp/product/B07KTDG177/ref=ppx_yo_dt_b_asin_title_o04_s00?ie=UTF8&psc=1
​
Then HDMI to projector.
​
Ta-da?
DON'T get that kit - the pieces are ancient and on a 2200mAh battery that thing will barely fly.
Here's a suggestion: instead of a 5-inch, build a Whoop. The advantage of doing that is 1) it's much, much cheaper, and 2) you could fly the thing in the classroom if you wanted.
Shipping won't be a problem - we're getting everything from Amazon prime.
BetaFPV F4 FC - We start with this. My first thought was to use the much cheaper Silverware-based Lite board. However, the problem with that is getting a transmitter that works with it. So instead we're going to go with a Betaflight board. Part of what you can do is use the Project Mockingbird tune on it and explain how the settings impact flight.
Beta65S Frame (Package of 2) - Ideally, we would use the set that includes the frame and motors, but sadly that's currently out of stock so we're going to have to buy the frame and motors separately.
These 7x16 motors - The BetaFPV motors are better, but those are out of stock at the moment. Plus, you're not going to be racing this thing, so we're not going to worry about great motors for this project.
FPV Camera and VTX - Again, we're not going for the greatest quality here, just something that will work. If you have access to a 3D printer, you can print off a mount. Otherwise, we're going to secure this to the board with some outdoor mounting tape and small rubber band hair ties.
Props - We're going with 4-blade for thrust - You get 16 of them, so 4 pairs.
Now you have a quad. What's our total price (as of today on Amazon, all with Prime shipping)?
$87.94 - Yup, you have a Betaflight enabled quad with OSD for less than $100. And this quad will actually be a decent flying one too. The only thing you will need to solder are the power wires to the camera.
We also need batteries and a charger. For the charger we're going to go with a basic USB charger. Nothing fancy, but it will do. For batteries, these batteries will be fine for your purposes. And we get 4 of them. We're at $108.92, with Prime shipping.
Now we have our aircraft, battery, and charger. We still need a transmitter and some FPV gear. This is where stuff gets really expensive, but we have some options that will work for your project.
First, BETAFPV sells a really basic transmitter that uses FrSKY for $39. Normally, I'd say get a QX7, but we're artificially restricting ourselves to Amazon Prime for this. This really is a no-frills, toy-grade transmitter, but it works. And now our total cost is at $150.
For FPV, you have two options. The first is a bargain-basement headset. Here's one for $50. Is it going to be a great headset? Heck no! But it will work just fine.
The other option is to display the FPV feed on a TV. If you're going to do an in-class presentation, I'd go that way. Make sure you have a TV with an analog input though! Here's a cheap FPV receiver with analog output. $16! You don't get diversity, you don't get a great antenna, but again, we're just going for the basics. This receiver requires a 12V power supply, which could either be a 3S LiPo or a plug-in one. Since you don't have any LiPos, let's just go with a wall power supply. $13.
Either way, you're at under $200 all-in. For your project, you can show how to install Betaflight, show how different tuning parameters affect flight, and even fly indoors for an in-class demonstration! Plus, if you decide to get into the hobby, you can get yourself a QX7 and a better set of FPV goggles and have a decent quad for indoor flying.
I haven't included any soldering equipment - for this, you just need a fine-tip soldering iron. You just need to attach the four lines of the FPV camera to the board - red to positive, black to negative, the camera output to the camera input on the board, and the board video output to the VTX input on the camera. The connections will be VERY small, so this is where getting help would be a good idea.
For the camera mount, there are any number of them on Thingiverse that would work just fine. Otherwise, get some 3M mounting tape and the small rubber bands used for kid's hair. Put the mounting tape on the board and use the rubber band between the tiny little nubs on the side of the frame to secure the camera down. If you have access to a 3D printer, this camera mount will work just fine. 3D printing the parts can be part of your class project.
This would give you literally everything you need to fly, some opportunities to set up Betaflight and tune things, and is something you could actually use if you decide to fly FPV when the project is done. Plus, everything's on Amazon Prime so the shipping should not be a problem.