 Reddit reviews Wolfcraft 4525404 Multi-Angle Drill Guide Attachment For 1/4In. & 3/8In. Drills
We found 23 Reddit comments about Wolfcraft 4525404 Multi-Angle Drill Guide Attachment For 1/4In. & 3/8In. Drills. Here are the top ones, ranked by their Reddit score.
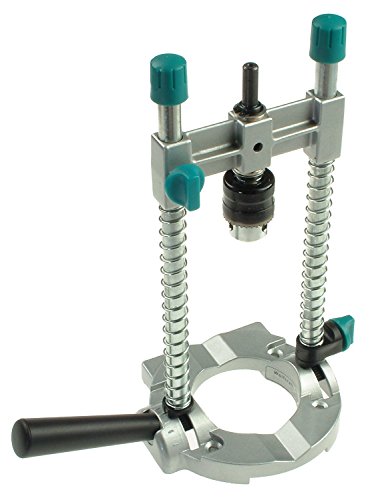
Drill guide that can be used in horizontal, vertical or angle positionsGuide-bars themselves have springs for a quick return when doing repetitive drillingDrill adapter itself slides up and down on guide-barsAngle positions can go up to 45 degrees, and rubber pads in the base hold the guide in placeFits all 1/4-inch or 3/8-inch drills
Hmmm.....
If you go to Home Depot, see if there are any scraps of pressure treated lumber you can pick up for cheap. If you can get, say, a 12" length of 4"x4" (actual: 3.5"x3.5"), and if we assume your tubes are 10mm outside diameter (about .4") then you can put...(does math stuff)...128 tubes into it.
Fair warning: I'd have to fucking kill you if I found this cache.
Pick any of the four "long" faces of the wood. Parallel to each edge, draw a line 1/4" from the edge. The large middle area will be 12" long by 3" wide. In that space draw a 3/4" grid; that'll give you a 4x16 grid. At each intersection inside the grid (not along the edges) drill a 1/2" hole straight down 1" into the wood. (The diameter of the hole should be slightly larger than the diameter of the tube so as to fit the tube and the glue that will hold it in. I'm assuming a 10mm tube, but if the tube diameter is different then the hole diameter should be different too.) That'll give you 45 holes.
Flip the wood over and repeat the process for another 45 holes.
Now turn the wood on its "side" (one of the two sides that have no holes) and repeat the process again — only this time drill only the middle column of 15 holes. (You can't do the other two columns because they'll intersect the previously-drilled holes.)
Flip the wood over and repeat for another 15 holes.
Stand the board on end (so you're looking at a cut end). Parallel to each 3.5" edge, measure out and draw lines 1 3/8" from each edge. You should have an out-of-proportion tic-tac-toe board. At each of the four intersections, drill another 1/2" hole 1" deep.
Flip the wood over (so you're looking at the opposite cut end) and repeat for another four holes.
Sand the surfaces lightly to remove all of your lines, and blow out any dust from the holes. Spray a bit of water into each hole, pour a couple of drops of Gorilla Glue inside, then press a tube into it. Repeat for the other 44 holes. When you're done flip it upside-down, put a weight on top of it, and let the glue set. Repeat for each of the other sides and the ends.
Make one (1) log scroll and put it randomly into a tube. Make 127 other scrolls that say nothing but "NOPE!" or "WRONG ONE!" or "SORRY!" or "TRY AGAIN!" and use them to fill up the other tubes. (Make sure the type is big and fat enough — and printed on both sides — so that people can't use them as logs to sign.)
Hide, publish, and prepare for (more) death threats.
EDIT: Call the cache "16 Bytes" because it has 128 bits in it. :-)
A drill guide like this will work. They lack the absolute precision of a drill press, and definitely not built for daily use, but for an occasional DIYer who can't justify drill press, it gets the job done.
You'd be better off with a guide like this:
Wolfcraft 4525404 Drill Guide Attachment for 1/4-Inch or 3/8-Inch Drills https://www.amazon.com/dp/B000JCIMEA/ref=cm_sw_r_cp_api_alA0xbMA692QH
this drill press attachment looks like your best option for me. Since you are doing a grid a standard drill press will not work. I'd say its either this for $25, or a cnc for $2500.
http://www.amazon.com/Wolfcraft-4525404-Attachment-4-Inch-8-Inch/dp/B000JCIMEA
https://www.amazon.com/Wolfcraft-4525404-Attachment-4-Inch-8-Inch/dp/B000JCIMEA
Perhaps this will get me flamed here for doing things the wrong way but it's working for me on my table-less setup (currently making a router table and saving up for a table saw so I can avoid relying so heavily on these techniques in the future).
A table saw is probably what you need to do this properly but this is sort of a "poor mans fence".
My current workaround is to draw my cut line, and then clamp a straight edge ruler (or other material that's perfectly straight) 1" to the side. When I make my cut I know it will be perfectly straight if I keep the metal guide flush to the clamped piece the entire time.
This is also how I'm using my router with straight bits to make dado cuts (measure up 2 3/4" from the center line for my router guide)...I know there are probably better ways to do this but again, no table saw so I'm making due with what I know and what I've got.
http://www.amazon.com/dp/B007K5HIFS/
http://www.amazon.com/dp/B000JCIMEA/
Those are both probably tools/adapters which are not going to be better than a table saw or drill press but they're also appealing for those with limited budget or limited work space.
Not the best option, but, it is relatively inexpensive, and will get to you in 2-days:
Wolfcraft 4525404 Drill Guide Attachment for 1/4-Inch or 3/8-Inch Drills https://www.amazon.com/dp/B000JCIMEA/ref=cm_sw_r_cp_api_i-ptxb4CC034N
Get an 18mm or larger forstner bit and a depth gauge or drill guide. http://www.rockler.com/jig-it-drill-guide or like this https://www.amazon.com/Wolfcraft-4525404-Attachment-4-Inch-8-Inch/dp/B000JCIMEA/ref=sr_1_1?ie=UTF8&qid=1484608162&sr=8-1&keywords=drill+guide
and one of these: https://www.amazon.com/CMT-537-180-31-Forstner-32-Inch-Diameter/dp/B000P4HLGC/ref=sr_1_1?ie=UTF8&qid=1484608191&sr=8-1&keywords=18mm+forstner
It might be worth while getting a bit slightly oversized for epoxy squeeze out or magnets with holes for screws in the center to hold everything in place.
DANGEROUS POPPER RECIPE!!!!!!!!!!!!!BEWARE!!!!!!THIS IS THE BOMB!!!!!!!!!
Cute title for this post huh?
Best thing about it? My hands are not shaking as much and I just put the poppers down. God, I adore these Isobutyl pops!
OK, let's get serious. As promised here's Popp-peeeeeeeeeeee Pig! Sorry, I digress and am still a lot spacey.
I will need to tweak this recipe because it is so very potent. You confirmed addicts will fall in love with this. It does have an acidic start to the huff. I should add more acid, me thinks. Will try for the next batch. I will tweak and report but not soon. This batch will last at least 4 days if tonight is any indication.
So let's start: If you do not know JimOakey's set up please go find it and do as it says. I re-posted it here: https://www.reddit.com/r/popperpigs/comments/3k1i6j/adventures_in_popper_production/
Those who do; I will give enough details so you will not need to review the posts.
http://www.amazon.com/gp/product/B00L74HO5M?psc=1&redirect=true&ref_=oh_aui_detailpage_o03_s00
JimOakey uses a portable drill press for mixing. He puts a hand drill in it and places the "J" corner cut from a plastic hanger inserted into the drill as a mixing tool. Take a plastic hanger, turn it upright. See the top and bottom corners look like a J ? Just cut out that J and force it into a hand drill bit slot. So that the little up turn of the J is at the bottom and is the portion that does the mixing - is in the blend. http://www.amazon.com/Wolfcraft-4525404-Attachment-4-Inch-8-Inch/dp/B000JCIMEA/ref=sr_1_1?ie=UTF8&qid=1452057063&sr=8-1&keywords=portable+drill+press
Step 5) After 10 minutes allow the mixing to continue. Add 1 ounce of battery acid. Add slowly. I added it slowly over a 4 minute duration. http://shop.advanceautoparts.com/p/autocraft-battery-acid-cycle-acid/2030000-P?searchTerm=battery+acid
I paint my container black and keep in a room temp, dark corner of my office.
I drew 23 ml from this batch, but tossed the rest - about 1 ml.
Lots of option here. From the incredibly simple (and not as accurate for a very deep hole) to the more secure to the more intricate setups where there is a separate chuck and you can set angles if you want to. Look around a bit and figure out what the easiest way for you to securely clamp the drumstick is gonna be then I guess decide from there what option you want to go with, that will also give you enough travel to be able to drill out the full length of the stick.
Edit: also something to keep in mind is the longer the hole, the more resistance you are gonna get so depending on the size of your hole the drag might get a bit excessive.
I used this guide for a project a few years ago. I wasn't thrilled with the build quality of this model when I opened it but it got the job (6, ~1.5"x6" deep holes 90deg to the surface) done.
https://www.amazon.com/dp/B000JCIMEA/
https://www.amazon.com/wolfcraft-4525404-Muilt-Angle-Attachment-Drills/dp/B000JCIMEA
http://www.amazon.com/Wolfcraft-4525404-Attachment-4-Inch-8-Inch/dp/B000JCIMEA/ref=sr_1_2?ie=UTF8&qid=1416019787&sr=8-2&keywords=sontax+drill
No comments on drill bushings, but I have something nearly identical to the linked guide, and with a better (corded) drill I think it'd be fairly accurate. I've only used it for rough work (deliberately). Might be worth considering. Certainly cheaper than bridge city stuff.
Use one of these.
That, with the proper speed (too slow is better than too fast) and some oil and you'll be fine.
I use this:
https://www.amazon.com/Wolfcraft-4525404-Attachment-4-Inch-8-Inch/dp/B000JCIMEA/ref=sr_1_1?ie=UTF8&qid=1466287521&sr=8-1&keywords=drill+press+attachment+for+hand+drills
It's a little small. It has a 208 mm swing, which is 8" in Freedom Units. That means its maximum depth is 4", which is too shallow for some bridge posts.
If you're looking to go cheap, and you're building from scratch instead of performing repairs and general shop projects, a cordless drill attachment will work for you.
There's only 6 or 8 holes to drill on a standard 6-string guitar, so while a drill press is very useful, it's not an absolute necessity.
That being said, having a drill press is awesome, and it's worth paying for a larger used one if you decide to invest in one. I have a used one with a 14" swing and it's an ideal size.
I did use a drill press. And even then not all the holes lined up perfectly. I be to do some fine tweeks at the end. I'd say either find a buddy with a drill press or save up and buy one. Some aren't all that expensive. Drill presses come in handy. Good luck with you build. This Or This
You can buy an attachable jig for a hand drill like this one
Also - I don't have a drill press, so I'm considering getting one of these drill-holder-guides from Milescraft or Wolfcraft in order to control the drill during this operation.
I would probably try to make a jig that incorporates a drill guide.
Basically, use scrap wood to knock together some kind of cradle to hold your blank perfectly horizontal, then find a way to mount the drill guide onto the cradle, rigidly and at perfect right angles, then drill away.
Forstner bit as mentioned, and one of these is key for making the hole level, straight, and better than by hand:
https://www.amazon.com/Wolfcraft-4525404-Attachment-4-Inch-8-Inch/dp/B000JCIMEA/
Too late for this, but easy outs are NOT for use with seized screws. They are only for use with screws whose head is buggered.
I wrote this up a while back, you should give it a read:
Best tools for removing broken or stripped screws.
As for getting the easy out OUT, there is another option, but you need some crazy tools. Mainly a drill-press stand for your hand held drill, and a hollow, diamond coring bit, like what you would use for drilling a hole through glass or ceramic. If you can cut around the easy out with the coring bit, then you can break it free. Next, you finish over-drilling the hole, and then insert a threaded insert to bring the hole back down to the correct size.
Parts I'm talking about:
Drill guide The drill guide is important because the coring bits will walk all over the place since they don't have a center point. The guide can be fastened, held, etc. in place better, and help guide the bit to where it needs to go.
Core bit
You can also use a more standard bimetallic hole saw, just without the pilot bit installed.
Threadsert (Choose the ID of the original fastener, and find it in SS, not carbon) Don't use a Helicoil, those things are shit. (Speaking from LOTS of experience here...)
Two taps that match the outside threading of the threaded insert. One a taper tap, and one a bottoming tap.
Depends on the material the face plate is made of. If it's metal get a step bit, a decent drill and a drill guide
https://www.amazon.com/Neiko-10194A-Titanium-Drill-Speed/dp/B000FZ2UOY
https://www.amazon.com/wolfcraft-4525404-Muilt-Angle-Attachment-Drills/dp/B000JCIMEA/ref=sr_1_5?s=hi&ie=UTF8&qid=1519142267&sr=1-5&keywords=drill+guide
those should work.
If it's plastic I'd get some forsner bits depending on what size buttons you want