Best 3d printer parts & accessories according to redditors
We found 2,474 Reddit comments discussing the best 3d printer parts & accessories. We ranked the 697 resulting products by number of redditors who mentioned them. Here are the top 20.
We found 2,474 Reddit comments discussing the best 3d printer parts & accessories. We ranked the 697 resulting products by number of redditors who mentioned them. Here are the top 20.


![[Gulfcoast Robotics] Y Carriage Plate Upgrade for Maker Select and Wanhao Duplicator i3 3D Printers](https://m.media-amazon.com/images/I/41LSqGT+KzL.jpg)


The plastic extruder is garbage. I've added the aluminum upgrade to three Creality printers and it has been perfect every time.
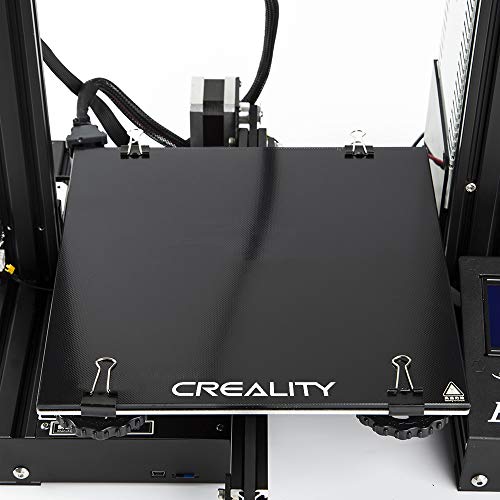
Creality 3D Printer Platform Heated Bed Build Surface Tempered Glass Plate for Ender 3/Ender 3 Pro 3D Printer 235x235x3mm https://www.amazon.com/dp/B07FSM8DK9/ref=cm_sw_r_cp_apa_i_Z0KGDbQPPRZFX
16.99 dollhairs to be exact.
First of all, you're going to want to update the firmware in the controller board. Creality has a history of shipping printers with older versions of Marlin that lack thermal runaway protection, which is kind of important if you value your home being not on fire. They may have already fixed this, but it's certainly something you'll want to check.
Here's a tutorial:
And here's the cheap programming adapter I used to complete the update:
https://www.amazon.com/gp/aw/d/B01IBFMJEA?psc=1&ref=ppx_pop_mob_b_asin_title
Beyond that, I printed a few upgrades for the printer itself.
A fan guard to keep scrap filament from the bed from falling into the controller fan. https://www.thingiverse.com/thing:2935204
A surprisingly useful tool tray to keep the various tools neat and contained https://www.thingiverse.com/thing:2883898
Some cable chains mostly for cable management aesthetics but also to prevent damage to cabling during use https://www.thingiverse.com/thing:2920060
A filament guide https://www.thingiverse.com/thing:2917932
Some retaining clips to keep the Teflon tube from moving around during retractions: https://www.thingiverse.com/thing:2845931
There are also tons of part cooling fan ducts to play with in order to get cleaner overhangs at various angles.
It's also commonly advised to upgrade to stiffer bed springs to avoid having to relevel the bed as often, but I haven't had an issue on this front yet.
Another common idea is to print on glass. But my bed came flat from the factory and I've been enjoying printing on the flexible removable build surface. And a pane of glass is more mass to sling around which may potentially cause ghosting. But if your bed does come warped, you'll want to run to the hardware store and get a few cut.
I upgraded the Teflon tube to one made by Capricorn. I haven't noticed any difference in print quality, but they advertise that their special Teflon blend has better temperature Resistance which, in the absence of the all metal hotend, adds a wider safety margin for higher printing temperatures.
But by far, the best upgrade was to put some cardboard shims underneath the feet of the printer. This dramatically reduced the amount of noise made by the printer.
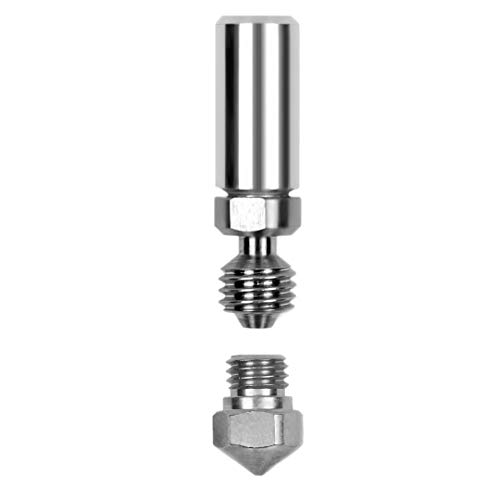
Also, if you want to upgrade to printing Zytel, you'll need an all metal hotend like this one: https://www.amazon.com/Micro-Hotend-Creality-Printers-TronXY/dp/B0789V2D7C/ref=mp_s_a_1_1_sspa?crid=D0IRZSZQ80PZ&keywords=ender+3+micro+swiss+hotend&qid=1556175003&s=gateway&sprefix=Ender+3+micr&sr=8-1-spons&psc=1
Hope this helps!
I've owned the Ender 3 for a few months now and have made a number of upgrades, both purchased and printed. Here's a list of what I have purchased and printed, sorted by importance/usefulness.
 
Purchased Parts:
 
Printed Parts:
 
Future Upgrades:
Spool Roller - One issue I've found is that the stock spool holder requires excessive force from the extruder to unwind filament. A replacement spool roller with bearings should reduce the friction significantly and produce more even extrusion.
Metal Extruder - A common problem with the Ender 3 is that it fails to maintain proper tension on the extruder gear, which leads to failure to feed and poor extrusion. An all-metal extruder has been known to fix the issue.
It's a super easy mod to do. The parts are like $8 on Amazon and you print the mount. This is the first thing I did on my Maker Select.
Mod link: https://letsprint3d.net/2017/01/29/guide-installing-a-mosfet-board-maker-select-v2/
Part: https://www.amazon.com/dp/B01HEQVQAK/ref=cm_sw_r_cp_apa_i_cZbPCbG4PRAN7
Here is a list of things that people will always need, I understand you can't stock everything as overhead is an issue with retail, and storage as well, but most of these are small enough that they can occupy the shelf space you currently have. As for the larger things, like the 2020 extrusions, you could sell them in common lengths of 500mm and 1000mm and let the customer cut them down to the size they need, or just don't carry these at all. It's not a niche item, but for a retail store like you it would be hard to store and maintain, but man, would it be nice to be able to get those locally if i needed a piece for a project instead of having to wait on mail order.
this is just a basic list, others have listed other things as well, Steppers, Belts, Pulleys, Bearings etc. If you want 3d printing as a reason for other people to go to your store, these items will satisfy the need. Just keep prices fair, I have no issue paying a bit more compared to amazon to get it today.
I got one of these:
https://www.amazon.com/gp/product/B00VB1U886
Super thin edge gets under the edge of prints without damaging the print or the buildtak.
I'm noticing a trend involving multi-tailed foxes...
Very cool, but I have a question. Do you think the filament would still be sensitive enough to heat if it was coated in epoxy such as this stuff to give it a nicer, more "sculpture"-like finish? It'd be fun to have something like this, but I typically do everything I can to obscure print lines on display pieces. Can't prime or paint this though, obviously.
I will give you my background before my opinions. As everyone has different goals, opinions, and experiences.
I got my printer near the end March of this year. I have something like 2500m of filament run though it, and no idea how much print time.
When I received my printer, my test prints failed and I was pissed. But this community helped improve my Cura settings and started producing usable parts. I then went nuts and printed out a BUNCH of mods. This is by far my most favorite thing. There's always something I can print to improve the quality of the prints.
THe down side is I went too far and got to a point where I couldn't produce anything of quality. So, 2 weeks of tweeking and researching later I'm printing in PETG with beautiful quality and very minimal visible layers.
My most recent project in PETG:
http://i.imgur.com/sVf7S2D.jpg?1
So, now to answer your question...
> How do you like your Maker Select?
I love it. It allowed me to buy a cheaper printer (One of the cheapest at the time @ $350) that produced amazing results. It also has upgrades you can purchase or print to improve the quality, so investing smaller amounts over time to make it better and better. I highly recommend it to anyone who is starting because it does require tweaking which forces you to learn and understand how exactly 3d printers work. A major plus was that this community has a lot of Maker Select users for support, which was a MAJOR plus for me.
As of today, I've purchased the following upgrades:
So, in the last ~3 months I've spent an additional $264... Oh god, don't tell my wife! All are totally not necessary, mind you. The only thing I'd 100% recommend you do are print out the following to mods:
DiiiCooler along with buying the 50mm blower fan. There are cheaper options out there, I just wanted it faster so I bought it through Amazon to get free 2 day shipping.
z-Brace - This is key, and will run you maybe $15 worst case scenario to get enough M4 screws and the threaded rods.
Edit: Forgot a couple more things I bought.
That's another $59, so $323... I have a problem. again, 95% of this is NOT NECESSARY. I'm just addicted to modding.
I'm at 2,000 meters of filament printed with my Maker Select, very happy with it, some tips:
-The Maker Select V2.1 is simply a re-brand and upgrade of the Wanhao Duplicator i3. You'll see that name "i3" thrown around more than Maker select, so just be aware they are nearly synonymous
-First, definitely get the blower fan upgrade: https://www.amazon.com/gp/product/B00MJU6JR2/ref=oh_aui_detailpage_o03_s00?ie=UTF8&psc=1
Buy two of them to have an extra in case of death
-Print out a blower fan housing for that fan: http://www.thingiverse.com/thing:1025471
The fan upgrade provides a huge improvement in print quality
-Get the all metal hot end from micro swiss: https://www.amazon.com/Hotend-Nozzle-WANHAO-FlashForge-Builder/dp/B01C3HEQZC
-THe "Z-Brace" mod reduces vibrations from the machines movements: http://www.thingiverse.com/thing:921948
Some people swear by it, but the print time for those parts is roughly 20-24 hours total. In my 2,000+ meters of print, I haven't bothered because of the print time, but still bought the extra pieces in case I decide to do it.
-I've been mass printing tiles for d&d too, I looked at openforge and decided against that line, but went with TrueTiles instead. https://www.youtube.com/watch?v=JUecWG1W-ss
Highly recommend truetiles over the other tile lines out there - the creator is a crafting genius (look him up on youtube - "wyloch"). They take less plastic, are more versatile, faster print time.
I found that Cura 15.04.x was much better than the recommended Cura 2.5.x. My setting for churning out tiles is something like 210C nozzle, 70 mm/s, 55C bed, 0.25 resolution, 0.8 shell, 10% fill, 2mm retraction, 20mm/s retract speed, 60mm/s travel speed, no brim/raft, no supports. You should print at resolution multiples of 0.04 (because of the way the filament feed gear works), ie. 0.08, 0.12, 0.16, 0.2, etc. I'm going to switch to 0.24 resolution for tiles. I do 0.12 for small figures. The printer can reliably print resolution 0.08 right out of the box (lower the speed to ~35 mm/s) but takes a long time to print.
-The black material on the heated bed is call Buildtak - be careful not to puncture it with the supplied putty knife. Get some blunt tools such as https://www.amazon.com/gp/product/B01A81FXMK/ref=oh_aui_detailpage_o06_s00?ie=UTF8&psc=1
-you don't need any tape, glue stick, hair spray, for buildtak
-Be sure not to use any acetone or alcohol on Buildtak - both will ruin it.
-Apparently you don't really even need to heat the bed with buildtak, the stuff is super effect with first layer adhesion running at room temp. I ruined my original buildtak by using the supplied putty knife to remove a print that was so super stuck to the bed because I kept it heated. Doesn't hurt to keep it heated though, but be aware heat + buildtak = much adhesion
-That slight lip on the butterfly's bottom layer is due to the settings of first layers being laid down slightly thicker than the others. Sometimes called "elephant's foot" it can also be caused by the nozzle being too close to the bed, which will smush those initial layers more than needed. Closer nozzle = more smushed first layer = better adhesion, but with buildtak you can get away with keeping the nozzle further away, and adjusting your cura settings for a first layer thickness equal to the rest of the print
FYI there is a PEI sheet with 3M already on it for much cheaper
Sure, no problem. I'll give you a bit more info as it may be relevant :)
That said, the biggest contributing factor to getting my prints to stick was the leveling. Once I nailed the leveling, I haven't had a failed print due to poor adhesion. Failures due to other things, sure. But not because of the glass :)
Install a sheet of PEI on top of the glass. No messing with glue or hair spray nonsense.
https://www.amazon.com/dp/B07GSJSDWR/ref=nav_timeline_asin?_encoding=UTF8&psc=1
http://www.amazon.com/ToyBuilder-Labs-Print-Removal-Tool/dp/B00VB1U886?ie=UTF8&psc=1&redirect=true&ref_=oh_aui_detailpage_o03_s00
sharpen the tip.
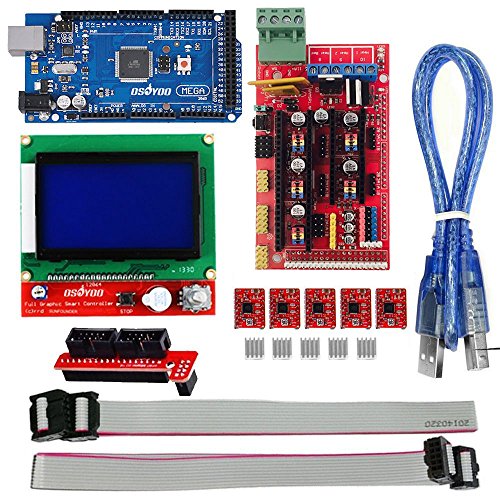
OSOYOO 3D Printer Kit with RAMPS 1.4 Controller + Mega 2560 board + 5pcs A4988 Stepper Motor Driver with Heatsink + LCD 12864 Graphic Smart Display Controller with Adapter For Arduino RepRap https://www.amazon.com/dp/B0111ZSS2O?ref=yo_pop_ma_swf
I have the Micro Swiss on my Maker Select and I love it.
https://www.amazon.com/gp/product/B01E1HANLS/ref=oh_aui_detailpage_o03_s00?ie=UTF8&psc=1
Here is my CR-10S.
I added the Petsfang fan fang. Added this fan to the fang.
I added these Z-Axis braces. Added these LEDs to the Z-Braces.
I'm printing on a mirror tile with a sheet of PEI bonded to it.
Last week I added the TH3D EZABL and have been encouraged by the results. It creates a Z-offset map of the build plate before every print. I can see the Z-steppers move during X-Y moves so I can tell it's working. Manual bed-leveling was working OK for smaller prints, but I could never get all 4 corners to agree with the center height. I suspect my aluminum bed plate is shaped like a Pringles chip.
I really like the Marlin Firmware over the OEM version. I don't mind not having auto-resume since I plugged my printer into a UPS system.
Right now my printer is about 20 hours into a 60-hour print of a T-Rex skull. I've been really happy with this printer! It was my first and I've been having a ball with it.
I’ve been using this one all year
Some folks use binder clips to keep their on, I prefer silicon thermal pads (see the frequently bought together section)
You’ll also want hairspray or glue sticks. I use a purpose-made product called magigoo that helps with adhesion at the start of the print, then pops right off once the build plate cools
Don't buy knockoff, buy genuine. I got a knockoff for my Wanhao i3, terrible milling, fake metal. Bough a genuine and had no issue.
Genuine one on Amazon
Micro Swiss All Metal Hotend Kit for Creality CR-10 / CR10 / CR10S / Ender 2 / Ender 3 Printers .4mm https://smile.amazon.com/dp/B0789V2D7C/ref=cm_sw_r_cp_apa_i_XJ9xCbBDQJ77A
Buy an new extruder, the plastic one will start to wear out after your first roll of PLA. Get one of the all metal ones like this
Batter to be safe than sorry . Got one of these and not disappointed
The carriage plate needs to be replaced (assuming you have the stock one) it's very thin and bends easily.
https://www.amazon.com/Gulfcoast-Robotics-Carriage-Duplicatior-Printers/dp/B07B251KBS/ref=sr_1_3?ie=UTF8&qid=1537520960&sr=8-3&keywords=i3+carriage+plate&dpID=41LSqGT%252BKzL&preST=_SX342_QL70_&dpSrc=srch
had the same problem you did with my i3 plus, installed that a few years ago, and it's been rock solid ever since.
I have 22 spools of filament lying about and 4 more arriving today. Of those I think 6 of them are Solutech. While I have some problems with the color in a couple of cases, I've never had any issues with getting them to print. Only filament I have that prints better is the Amolen stuff, but it's expensive.
Your under extrusion issue is one that I've been fighting for two months now. I would get a couple of good prints, then would load a different filament and get the under extruded layers that look just like the ones you're getting. Finally got to the bottom of the problem a couple of days ago.
Try this as an experiment. Pick out a model with a large flat surface like this and print it with a raft. If you're having the issue I was then you'll see diagonal bands of under extrusion, with the bands getting wider as you print larger parts.
I discovered that there was a lot of play in the spring that applies tension to the extruder pinion and when I changed filaments it would change position. No amount of adjustment to the screw that holds it would give me consistent results. I installed this improved all metal version of the extruder from Creality and those went away entirely. Print quality now is at least as good, and maybe better, than I'm getting off of my Tornado and that's saying a lot.
Project for the holiday weekend is to install the BLTouch, and I'll probably swap the extruder out again for the same Titan clone that my Tornado has. If that didn't require a firmware change I probably would have installed it instead of the Creality one. I like the Titan design a lot better.
Good luck and have a wonderful holiday!
https://www.amazon.com/CHPOWER-Extruder-Upgraded-Replacement-Extruders/dp/B079JZ374W
Yep, once you go blue...
Capricorn Bowden PTFE Tubing XS Series 1 Meter for 1.75mm Filament (Genuine Capricorn Premium Tubing) https://www.amazon.com/dp/B079P92HN9/ref=cm_sw_r_cp_api_i_RyguDbVRZAVKJ
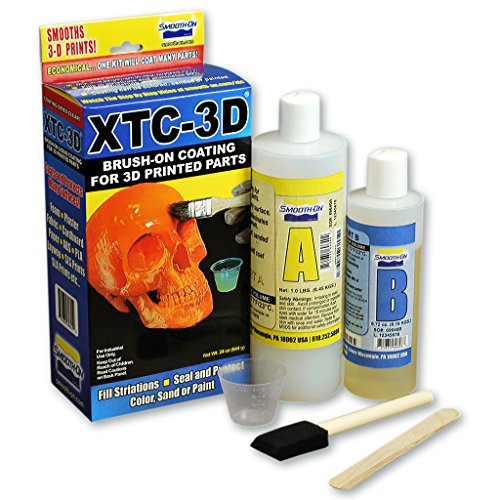
I would recommend saving yourself the effort and using something like [XTC-3D](https://www.amazon.com/Smooth-XTC-3D-Performance-Print-Coating/dp/B00PFXK4JY/ref=sr_1_3?ie=UTF8
) for smoothing out layer lines instead of sanding. PLA and PETG are painful to sand, and ABS is painful to print.
I've been experimenting with different things.
Plastruct Plastic Weld makes a pretty solid bond. The only time I've had trouble with it is lately while trying to bond sections of a sword blade that are 0.3" thick and 3" wide. The sections with the most stress on them can snap if I let it flex enough.
I used Gorilla Glue to glue together pieces that left gaps. It expands and fills, so that was handy. The bond seemed strong, so I'm going to try that on the blade pieces next.
I've also used Loctite gel control super glue and it worked fairly well, but I don't believe the bond is as strong as Plastic Weld.
As for finishing prints, my current method is to use XTC 3D to smooth the print. After that, I prime, sand, and paint using spray paints. I will probably get an airbrush soon to try for nicer looking paint jobs.
Not just from prusa, pick and choose. URLs for examples.
Digital caliper, 12" https://www.amazon.com/gp/product/B000EJUBBU/ref=oh_aui_detailpage_o02_s00?ie=UTF8&psc=1
Extra brass nozzles.
Hardened steel nozzle, 0.4mm to 0.6mm for printing abrasive exotics (wood, glow in the dark, carbon fiber etc)
Print removal tool https://www.amazon.com/gp/product/B00VB1U886/ref=oh_aui_detailpage_o02_s01?ie=UTF8&psc=1
Locktite blue bolt-fixer (Walmart, Home Depo, Lowes etc) to stop bed sensor from moving.
High temp anti-seize for nozzle threads https://www.amazon.com/gp/product/B0053ZS1Z8/ref=oh_aui_detailpage_o02_s01?ie=UTF8&psc=1
Raspberry Pi 3, 5v Pi 2A Power wart, Micro SD card, & Webcam for octoprint monitoring.
Relay board for Pi/octoprint to power up & down printer remotely. https://www.amazon.com/gp/product/B0057OC5O8/ref=oh_aui_detailpage_o04_s02?ie=UTF8&psc=1
1lb of silica gel to keep filament dry.
Filaments, various.
Fire extinguisher rated for electrical fires.
Dedicated smoke alarm.
I love the RAMPS 1.4 on my Makerfarm i3v, basically the same as the controller that comes with your printer, just slightly less contained. This one comes with the big screen and SD card reader, and it only costs 33 bucks. (Never heard of the brand though) Or you can get the full kit with brand name parts from Makerfarm for $130.
Amazon.
I'd recommend the RAMPS 1.4 board as there is already a guide to installing it on the Mini and a BLTouch mechanical probe sensor that is also on Amazon.
Also note you need someway to mount your probe the hot end so since no one has done it yet with Mini (publicly anyways), you'd probably have to design your own mount and print it.
https://www.amazon.com/gp/product/B0111ZSS2O/ref=oh_aui_detailpage_o04_s00?ie=UTF8&psc=1
https://www.amazon.com/gp/product/B017NEGTXC/ref=oh_aui_detailpage_o04_s01?ie=UTF8&psc=1
https://www.amazon.com/gp/product/B076PQG1FF/ref=oh_aui_detailpage_o08_s00?ie=UTF8&psc=1
Weird post to make an image, but go ahead and grab the first one.
https://www.amazon.com/gp/product/B00D7CWSCG
Keeps it all at ~12.5V. I managed to get one screw into it to hold it where the old one used to go.
Also get the mosfet to run the bed power completely independently of the controller board for another $10:
https://www.amazon.com/dp/B01HEQVQAK/
Use some ~14ga lamp cord to tie it in. :)
https://www.amazon.com/gp/product/B01HEQVQAK/ref=oh_aui_detailpage_o00_s01?ie=UTF8&psc=1
Epoxy and lots of sanding.
I see them so often, that I wonder if it is inevitable with the process. Another approach would be to just smooth them out and paint it. This is a good material for smoothing a print: http://www.amazon.com/XTC-3D-High-Performance-Print-Coating/dp/B00PFXK4JY
Most people are telling you it can't be done, but the truth is there are food grade filaments and techniques for printing food safe parts. I don't recommend you do this, but at the same time I'm happy to provide the following information.
https://all3dp.com/food-safe-3d-printing-material-filament-plastic/
https://www.3dhubs.com/talk/thread/overview-food-safe-3d-printing-materials
Slightly related, I've emailed Smooth-On to confirm their XTC-3D is not food grade.
My best results have been prints in clear resin, but "transparent" PLA can be enhanced as well.
I bought the following:
https://www.amazon.com/gp/product/B00PFXK4JY
You mix it like epoxy, and lightly coat the outside. I use my hands (with gloves). It removes minor blemishes, and makes for a "smoother, shinier" part.
It is not for everyone; sometimes I prefer the "frosted" look on a part.
PRO TIP: Buy a box of thumb tacks. Put a bunch of them point up so your part can dry without sticking to anything.
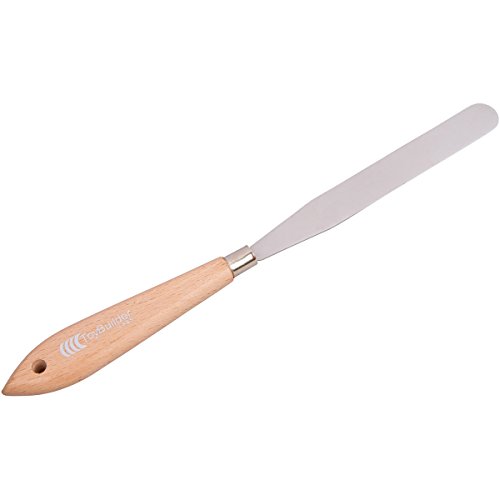
Hey, I highly recommend this spatula
the one that came with my 3d printer was dollar store garbage and would have gouged my buildtak if I hadn't had the lucky foresight to buy this one first.
This one is so thin that it can easily get under parts, just don't "pry" upwards or it'll bend it! (I bent mine but it still works like a champ)
> Thanks in advance for answering my questions.
I purchased it last August. (781 hours logged) It's almost litterly been printing out of the box since day one. The only issue I had out of the box is that the one screw on the build plate got bent as a result of the 2 free spools bouncing into it. I ordered a box of them from McMaster and had it fixed by the end of the week. I contacted Lisa on their google chat form and from what I understand, they now come with the screw as a result of my support ticket. This was an annoyance yes, but I've had more issues with my reprap and that costed me more than this pritner when I bought it. (I originally had a Makergear Prusa)
Most: I love the fact that it prints 100% of the times I try to print something. I rarely, and I mean RARELY have a failed print. I love that I can hit print before I go to bed and wake up to a completed part in the morning.
Least: This is small, and it took a while but I have since out grown the build platform (9x6x6 inches). I recently ordred an 8x12 plate from McMaster and that arrives on monday and we'll see how that works. (PSA this requires removing one of the extruders - if you want more info on this let me know)
Yes, no issues. Just close up the printer with the included panels.
No, I use a glass build plate and a thin coat of purple glue stick. I then spritz water on the plate before each print. I never have a sticking issue and I never have warpage. I personally prefer PLA though since Hatchbox has come to light and makes GREAT PLA
Like I said just above, I use a glass build plate, so I haven't had any warpage issues with the bp. Leveling the bed is a bit of a challenge but I'm fussy about it and I want it within 0.0005 or less so it takes me a while. The reason I'm fussy is because I've only had to level the bed 2 or 3 times since owning it.
The first was when I got it
The second was when I added the glass build plate
The third was when I removed one extruder and added an aluminum carriage.
That's it. It never lost it's level and it's gone through 3 moves (like I moved apartment to apartment)
The only experience I had was with that screw initially. I contacted Lisa on their Google Chat forum and she handled it mostly. Sadly, it wasn't as 'perfect' as I wanted since their solution was to send the printer back instead of sending me a new screw. Never the less, they did try to help on the matter and told me how I could go about getting money for the screw if I so desired. In the long run, it's a screw and I just ordered them from McMaster. I have zero regrets from it and I think I know my printer a bit beter because of it.
single extruder carriage (PSA: their single extruder block is not FF compatible.
My Thingiverse for example prints
Some things I would buy shortly after getting the printer:
Spare Extruder fan : I tend to slip and put a screw drive in the path of this, shattering the blades. If you're a clutz like me, get it. I've needed 4 so far. ::hangs head in shame::
Glass Build Plate : Best purchase I've made for my FF. Works great, easy to install and use. Also get thermal sheets and purple elmers glue, and print the spacer found on my Thingiverse page under "Flashforge Upgrades". Also get a spatula, and dikes
Simplify3D : A lot people tend to spend $X,XXX on a printer and then try to use free software with it and complain when it doesn't print right. To me that's like buying a car without tires. A Corvette ain't shit without a decent set of tires. It's kind of pricy compared to free, I know, but at real CAM programs (which is what this basically is) cost $8,000 or more. It truely is a great printer program and I wish I had purchased it much MUCH sooner than I had.
Last and most importantly, get the an active cooling fan. I originally printed this, and purchased a 12v power supply and added some fans to it. I have since moved on to the offical one from FF. It's not as good but I haven't really ran into an issue. If I had to print from my right extruder, it would be an issue though. What I liked about it, is that it's a plug and play added on. No "modifications" needed to added.
TL;DR / Closing thoughts: I would buy this printer again in a heartbeat. ESPECIALLY if they came out with one similar to the Replicator 2 with the 11.9" build plate. Instead it looks like they went a different way judging by CES but oh well, there's always next year. Further more, I think this is a great entry level printer for someone looking to have a printer help with projects and not be one of them. That doesn't mean you can't mod it or upgrade or whatever, it just means you don't have to if you don't want to.
Hope this helps and answers any questions you might have. Feel free to ask more though!
I use [these] (https://www.amazon.com/dp/B06XWFM1HJ/ref=cm_sw_r_sms_c_api_i_OYE.AbP0JQ8X9) brushes for cleaning filament off of the extruder because you will inevitably have prints that leave filament all over the hotend. [These] (https://www.amazon.com/gp/aw/d/B00VB1U886/ref=mp_s_a_1_2?ie=UTF8&qid=1526590824&sr=8-2&pi=AC_SX236_SY340_QL65&keywords=3d+print+removal+tool&dpPl=1&dpID=31vIt7tpDfL&ref=plSrch) are really cheap and good for removing prints from the bed. One of them should last you several months. You’ll also eventually need to clear out a clogged nozzle so some [nozzle cleaners] (https://www.amazon.com/gp/aw/d/B072JJ7H5P/ref=mp_s_a_1_3?ie=UTF8&qid=1526590910&sr=8-3&pi=AC_SX236_SY340_QL65&keywords=3d+printer+nozzle+cleaner) will come in handy.
Do you have anything that resembles this with a thin "blade". https://www.amazon.com/gp/aw/d/B00VB1U886/ref=mp_s_a_1_1?ie=UTF8&qid=1483243443&sr=8-1&pi=AC_SX236_SY340_FMwebp_QL65&keywords=Printer+removal&dpPl=1&dpID=31vIt7tpDfL&ref=plSrch
If you do you can try to slide the thin part under the part. If you don't have something like that you can remove the bed and put it in a freezer and it should just pop off or you could take off the tape with the print attached.
ya so experience has now taught me that:
https://www.amazon.com/gp/product/B00THZK97I/ref=oh_aui_detailpage_o07_s00?ie=UTF8&psc=1
is crap.
and https://www.amazon.com/gp/product/B00ZZRI0DC/ref=oh_aui_detailpage_o00_s00?ie=UTF8&psc=1
work really well.
It really depends on how comfortable you feel with electronics. Watch Youtube videos on the conversion and see if its something you are up for. If it were me, I'd do RAMPS (still with the mosfet mod) with Marlin firmware. Several people on this sub have done it and would mostly likely be nice enough to give you their Marlin firmware. If you go this route you'll have to set the current limit on the drivers, edit the configuration.h in Marlin, calibrate the e-steps, PID tune both hotend/bed and give the RAMPS board solder joints a carefully once over. Sometimes there are extra solder balls and shotty joints.
EDIT: you might also need to recrimp some connectors.
If you have Amazon available, this is by far the best price on the full setup (plus LCD and SD card slot)
www.amazon.com/dp/B0111ZSS2O/ref=cm_sw_r_cp_awd_ZITDwb43HXT2
I've bought about 5 of them, and these guys may actually have some quality control.
https://www.amazon.com/gp/product/B01MUAMRN7/ref=oh_aui_search_detailpage?ie=UTF8&psc=1
upgraded carriage plate, should be one of the first things you do, the stock one is flimsy and prone to warping, making the print bed extremely hard to level reliably.
https://www.amazon.com/Micro-Hotend-SLOTTED-Cooling-Wanhao/dp/B01E1HANLS/ref=sr_1_fkmr3_1?ie=UTF8&qid=1497736485&sr=8-1-fkmr3&keywords=i3+plus+all+metal+hotend
all metal hotend will enable you to print at much higher temp, and increase reliability of the print head. not strictly needed, but a great upgrade if you want to print abs, petg, or other higher temp filaments.
https://www.amazon.com/dp/B01HCVJ3K2/ref=sxr_rr_xsim_1?pf_rd_m=ATVPDKIKX0DER&pf_rd_p=3008523062&pd_rd_wg=sUxZ5&pf_rd_r=W5Q7RV181EJYGTBW4YDJ&pf_rd_s=desktop-rhs-carousels&pf_rd_t=301&pd_rd_i=B01HCVJ3K2&pd_rd_w=ZPXZq&pf_rd_i=tri+gorilla&pd_rd_r=F2X8G4XDPCVTNXX6J560&ie=UTF8&qid=1497736655&sr=1
heater bed mosfet upgrade. again, not strictly needed, but also useful for high temp filaments like abs, as you can run the heated bed at higher temps. also solves (small possibility, i3 plus supposedly fixed issue) of stock mosfet burning out and catching fire.
https://www.thingiverse.com/search?q=i3+plus+cooler&sa=&dwh=295945a7ab3d0cd
print a cooling fan shroud, i use the ciiicooler, the diiicooler is great as well. preferably in abs. BIG quality improvement, the stock fan is useless.
these are some of the ones i use, and there's a lot of other things you can do, extruder gear, improved bearings, too many to count really, just a matter of how far you want to go for incremental gains. the carriage plate and the cooling fan shroud are the only strictly necessary ones though.
oh and i made my own version of this z-brace, don't have the files anymore unfortunately, but this one is fine:
https://www.thingiverse.com/thing:1653631
that's also something you should do asap.
I would second the Microswiss. It will be my next nozzle after seeing all the recommendations both here on reddit and on the various other Wanhao/Maker boards. Find it here
I totally recommend the All-Metal extruder Hotend for the i3 as well, once I threw that on, my prints were beautiful.
https://www.amazon.com/gp/product/B01E1HANLS/
Basically, the printer currently pulls power from the PSU, runs it through the main control board, and out to the heated bed. The thing is, that's a lot of power to pull and push through such tiny connectors. The Mosfet is like a little light switch. The control board tells it to turn on, and it just lets electricity flow from the PSU to the heated bed, no issues.
Here is a good one. Just take the wires from the board, and put them where this one says "Hot Bed." Then, connect wires from the PSU (screw terminals) to the other 2 screws on the Mosfet. Finally, connect the 2 wires on the Mosfet to where you pulled out the wires from the control board.
https://www.amazon.com/dp/B01HEQVQAK
I used this one. Good for 15A.
Look, I am talking completely out of my ass here as I don't have any experience with your printer. I do have an A8 though and I don't trust it as far as I can throw it. That being said, the GT2560 looks orders of magnitude better than the board on the A8 and so is probably capable of driving the 12A or so for the heat bed.
Still, if you have one of these MOSFETs lying around it might be worth the piece of mind to take the load of the main board.
Again, I have no experience with your printer so I am probably 110% wrong.
The e3d V6 lite needed this carriage mount (and this is the direct-drive version, not the bowden setup) to be printed in ABS (and ONLY ABS, PLA will warp and eventually bust. Plus, ABS repairs with acetone really well and easily, so I've busted the one I printed a while back a couple times and just re-welded it together). This is the power supply I got, and I also got two of these MOSFETs. More info on the wiring here, I'd also recommend their advice in replacing the wiring to the bed and the mainboard with higher-gauge wires to prevent issues.
Ninja edit:
I also had to adjust my printer firmware to have the new center-point for the hotend set to actual center, for that I had to flash SkyNet3D firmware, a Marlin-based firmware made specifically for the board the A8 came with. If you're replacing the board with a RAMPS board, more than likely you'll be setting it up for all that anyways.
thank you for this post. i am not OP but just got a Maker Select, grabbed the board from amazon and the print from thingiverse and will upgrade my printer ASAP!
I'm working on this mod: https://gigdigit.com/extended-heat-bed-kits-120-x-250mm-print-area-3mm-thick-select-mini-v1-v2/
The double-sized hotbed takes more power than the stock power supply can put out (especially the newer 7 amp models, which I have)
So I decided to use one of the MOSFET drivers, through the existing power jack, to which I'll connect a beefier power supply. I chose this one: https://www.amazon.com/gp/product/B01HEQVQAK
The top two terminals tap into power as shown here: https://imgur.com/NYOGok9
The bottom two run through the braided cable (joined by the thermistor wires and run to the new platform. The small connector goes to the original board's hotbed connection.
If anyone else has done this mod, or something similar, I have a few questions.
I'll probably have more questions as I go. :-)
I want to clarify that when this person is saying "PEI over glass" that this person is saying to put PEI [on top of] borosilicate glass, not in place of glass.
A sheet of PEI with 3M 468MP adhesive tape to borosilicate glass is a game changer. Use simple binder clips to keep it on the bed.
------
Edit: I stand corrected. OP was genuinely saying to use PEI instead of glass. I don't suggest adhering PEI directly to your plate because you're not always going to want to print on PEI depending on your material, and PEI will eventually get bubbles and warp and you'll want to be able to replace it.
Source: Have used PEI for over a year now.
I sprung for a sheet of PEI and it's been great, buffed it with ultrafine steel wool and wipe the bed with isopropyl alcohol before each print. no tape, glue or hairspray needed.
I replaced the stock glass with mirrored tiles from Home Depot. I used to use tape and glue sticks but read a comment on how much better PEI sheets were to print on. No more glue or tape, just rub it down with rubbing alcohol between prints.
It sticks very well when heated up, and comes off almost effortlessly when cooled down. You also get a shiny surface on the part touching the PEI sheet which is nice. Well worth $21 from Amazon.
Amazon. Here is the links:
GO-3D PRINT 130mm x 160mm Borosilicate Glass Plate Bed Flat Polished Edge w/Corners Cut for Monoprice MP Select Mini 3D Print https://www.amazon.com/dp/B075XJ5ZP1/ref=cm_sw_r_cp_tai_-aUxDb3EP28M4
ZUPAYIPA 400mm x 210mm x 0.5mm Silicone Thermal Pad for CPU GPU Heatsink https://www.amazon.com/dp/B01N9HGKR1/ref=cm_sw_r_cp_tai_vbUxDb1VVQ706
Add tape or glue to the smooth surface of the glass for adhesion, yes, but if you get https://www.amazon.com/Official-Creality-3D-Tempered-235x235x3mm/dp/B07F16WPR5 you won't have to use tape or glue at all.
The hammer was a joke, please don't use a hammer for troubleshooting!
This is like the glass bed that I have on mine. It has a coating on one side to help prints stick, and the back side is bare glass. Did you have a piece of glass on yours already? I didn't notice it in the picture.
What you absolutely MUSTTTTTTT!!!! order? Nothing. The printer works as is. But if you want to do yourself a favour, here's a list of what I consider essentials:
- New springs, both bed and extruder. I don't have a link for an extruder one as I upgraded my entire extruder drive frame and that came with a better spring
- A new removable bed. Creality glass bed or glass with a PEI sheet is my bed of choice
- Thermal pad to avoid the annoying bed clamps. Cut squares out of it, lay them in a checkered pattern alternating between thermal pad and nothing and place your bed on top. They will hold the bed in place and help with heating
- Stepper dampers if your printer is anywhere near where you spend your time, it sounds like a bloody jackhammer right out of the box
- New tube fittings, the stock ones are terrible and will give out in a matter of weeks at best. They also barely hold onto the tube
There are a ton of other great upgrades, but I think a good idea is to get a feel for it yourself.
What you can do, however, is check out some printable upgrades. I have this thread where people contributed with their choice of printable upgrades. It's a great list you can refer to later. Essentials on that are the fan guard and LCD back cover simply because the Ender 3 as is has the fan and back of the LCD exposed and that makes it crazy vulnerable to dust and gook damage
I just ordered this one - should arrive tomorrow. I’ve read reviews saying it’s so much better than the stock one that this should ship with the Ender 3
https://www.amazon.com/gp/aw/d/B07FSM8DK9
i wish to share my experience with this advice.
I did this. went to lowe's, paid $4 for 2 pieces of 3mm mirror cut to size.
and proceeded to literally fail almost every cheap adhesion technique out there. so if that happens to you, dont be discouraged.
i failed clean glass (no adhesives), failed glue stick, failed hair spray, and finally failed sugar water. cleaned each religiously with 99% isoproyl, everything was fine. 5 point layer test showed perfect layers (https://imgur.com/a/JPZqbks#ueqqWi7 - im talking perfect,), but during an actual print, it would fail due to bed adhesion unless i had an obscene amount of brim/raft to secure things.
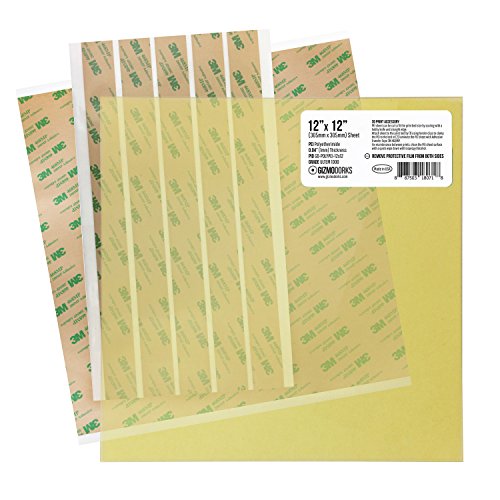
decided to head to amazon and pick up a piece of PEI sheet and have never looked back. put it on the mirror tile i was using and boom out of the last 40 or so prints ive not had 1 failed adhesion yet. i picked up the one from gizmo dorks as it already had the adhesive attached to the PEI and install was easy enough (this is the one i chose https://www.amazon.com/Gizmo-Dorks-Preapplied-Laminated-Adhesive/dp/B07GSJSDWR/ref=sr_1_3?keywords=pei+sheet&qid=1558833899&s=gateway&sr=8-3 )
so OP, take this story as you will, some people get away with no adhesives, but I could not for the life of me find out why nothing would stick to my cut mirror.
If I am understanding correctly, the prints stick everywhere else except the middle. This could be from the heated bed not being completely flat, from either a manufacturer defect, heating the bed can cause it to flex slightly, and also the act of leveling with 4 points will cause stress to the bed and cause it to not be flat.
If you want to resolve the issue there are a few thing you can do. First I recommend getting a glass bed of some kind. I use this: https://www.amazon.com/Glass-Print-Borosilicate-Printer-235x235x3-7mm/dp/B07JKGNB6W/ref=pd_bxgy_328_2/146-3360479-3249561?_encoding=UTF8&pd_rd_i=B07JKGNB6W&pd_rd_r=1be203f4-8159-11e9-8887-9b31b6cb4217&pd_rd_w=QkaU5&pd_rd_wg=lhVMV&pf_rd_p=a2006322-0bc0-4db9-a08e-d168c18ce6f0&pf_rd_r=MJKHHJRB1R0V6D2Q2C61&psc=1&refRID=MJKHHJRB1R0V6D2Q2C61
with this PEI sheet: https://www.amazon.com/gp/product/B07GSJSDWR/ref=ppx_yo_dt_b_asin_title_o07_s01?ie=UTF8&psc=1
​
Second you can do a bed conversion from 4 corners to 3-point leveling. Check this guide by Makeitmakeitmakeit for more info: https://www.thingiverse.com/thing:3415460
you will need this, made by rrwrex, if you do the conversion: https://www.thingiverse.com/thing:3193722
​
This is a make of my conversion which I have done on 2 Ender 3s and no longer have to level unless I mess with the bed: https://www.thingiverse.com/make:636770
​
Also check this guide out here tons of good info: https://www.thingiverse.com/thing:3574369
Yes my friend
Gizmo Dorks PEI Sheet 3D Printer Build Surface 235mm x 235mm (9.3" x 9.3") with Preapplied Laminated 3M 468MP Adhesive for Creality Ender 3 or CR 20 | Made in The USA
https://www.amazon.com/dp/B07GSJSDWR/ref=cm_sw_r_cp_apa_i_gbsPDbPNKDNM9
Glass Print Bed Borosilicate Glass 3D Printer Glass Print Bed 235x235x3.7mm for Ender 3 DC-01 Glass Print Bed Borosilicate Glass https://www.amazon.com/dp/B07JKGNB6W/ref=cm_sw_r_cp_apa_i_T-sPDbX4FQ8EG
Paying someone to do the full set will definitely run you more than the cost of this printer. It's the printer I have. It's a bit finnicky, but the price is right, and it prints well enough for me! I'd also highly recommend getting a glass bed for it. It's stupid easy to install the glass bed (you just lower the normal bed and clip the glass to it with binder clips), and it makes the prints come loose soooo much easier. You can also have a hardware store cut the glass for you and it will be a bit cheaper than that Amazon link.
I will say, though: I only recommend buying a 3D printer if you're willing to devote some time to it. It's not like an InkJet where you plug it in and it just works. It takes calibration, and learning which settings work best. You'll have to do some research to get the best quality for your prints.
I have a glass bed, too. What I do is, once the print's finished and cooled down to room temp, I throw it in the freezer for about 15 minutes. The print just pops off. In fact, most times it just falls off.
[edit] It also helps that I bought this, the edges are already fairly rounded, plus since it's the same material as Pyrex®, less chance of breakage. You can look his store name up on Google, he usually has them available there when he's out on Amazon.
This is the most important one IMO. Eventually you should switch to a glass bed. It's pretty trivial, you just print a shim to change the z end stop and clip a glass bed overtop the buildtak (at least that's what I did).
A new fan shroud is worth doing
As is this little plate
Speaking of, are you aware of the magic numbers? You can find them with an explanation here: https://www.mpselectmini.com/optimal_layer
https://smile.amazon.com/gp/product/B0761PGLZ4/ref=oh_aui_detailpage_o02_s00?ie=UTF8&psc=1
Extruder: get a microswiss hotend for it will be able to print flexible and other materials.
Parts cooling: Upgrade to the petsfang 5015 mod for better print cooling.
Auto bed leveling: Get the TH3D ezabl sensor for great bed leveling.
Other mods: motor dampers to reduce noise and vibration
To smoothers to smooth prints
Raspberry pi for octoprint
All metal extruder
Capricorn tubing
Hope I could help 😀
Links:
micro swiss hotend
petsfang part
ezabl sensor
motor dampers
tl smoothers
octoprint link
all metal extuder
capricorn tubing
Also this is what my petsfang with sensor looks like. https://i.imgur.com/sQahB69.jpg
I have this Micro Swiss hotend on my Ender 3 and it prints like a champ, even with nylon. I reused the nozzle from my stock hot end though as I wasn't a fan of the one that came with the Micro Swiss one. Voltage doesn't matter as you will be reusing the heater from the stock hot end.
i have an ender 3 pro and after saying no to any upgrades I finally started to see what everyone is talking about 6 months down the road. here is a list of things that you will see a lot of you tubers tell you to replace. the YouTube channel Tomb of 3D Printed Horrors is a great resource for everything about the ender 3.
the YouTube Chanel Tomb of 3D Printed Horrors has a step by step build guide for your ender 3 ( i used it for mine) he will recommend most of this list as well. He also has other videos on the slicer settings you will use for Cura. for D&D models you can use this google doc list https://docs.google.com/spreadsheets/d/1PemvBH7LC-hm4KoeA8OXVu5_k963Vpmw7kOEA_1tzWs/edit?pli=1#gid=0
I will give you my top 5.
1.The hard yellow springs $5 and you will have extras. These will help your bed stay level longer. I think I need to check mine once every.. 10 prints or so or every other week, maybe longer. https://www.amazon.com/dp/B013G5I4US/ref=cm_sw_r_cp_apa_i_vkE6Cb8SHNBVG
2.Glass bed. Lowes for $3 cut 2.5mm. Ender 3 bed known to be warped.
3.Pick up a Raspberry pi ~$50 and install octopi/ octoprint.. free, and a mini b to USB cable $5. Now you don't need the to fiddle with micro SD and can manage everything from PC. https://www.amazon.com/dp/B07BC6WH7V/ref=cm_sw_r_cp_apa_i_olE6Cb8J91Q1J
And
https://www.amazon.com/dp/B00P0GI68M/ref=cm_sw_r_cp_apa_i_umE6CbPGSR7T4
4.Raspberry pi cam $25 and longer cable $3 to go with your Raspberry pi octoprint. Now you can monitor prints while "away" .. aka relaxing in your lazy boy watching YouTube vids on how bad season 8 of GOT was. https://www.amazon.com/dp/B01ER2SKFS/ref=cm_sw_r_cp_apa_i_noE6CbXTHCPDS
And
https://www.amazon.com/dp/B00M4DAQH8/ref=cm_sw_r_cp_apa_i_ipE6Cb9RK6QNR
5.Bowden tube $11. Only if you plan on printing hotter then 240c. So petg, abs.. ECT ECT . https://www.amazon.com/dp/B079P92HN9/ref=cm_sw_r_cp_apa_i_KjE6CbDMX6SGE
Hope this helps.
>https://www.amazon.com/gp/product/B079P92HN9/ref=oh_aui_detailpage_o05_s00?ie=UTF8&psc=1
https://www.amazon.com/gp/product/B07F1K1LTC/ref=oh_aui_detailpage_o05_s00?ie=UTF8&psc=1 (a bit more than 20$ now sorry! lol)
You get enough from these two products to upgrade more than one printer as well, I love capricorn tubing, I wish it was just standard with every printer also just double checking that you're using 1.75mm filament I don't know the CR10 that well if that's an option that wont work with these products if you're using a larger filament. Good Luck!
There are several videos on youtube for first time ender 3 setup. Mostly they cover some detailed orientated techniques like...
https://www.amazon.com/Gulfcoast-Robotics-Carriage-Duplicatior-Printers/dp/B07B251KBS
This is what I use. After replacing the carriage plate and adjusting my Z-brace/lead screws a bit to level my bed once, I no longer bother to re-level it and it prints perfect every time after.
as someone brand new to 3d printing--
I just bought an ender 3 last week... I hear a glass bed and aluminum nozzle are crucial upgrades.. Looks like a couple third party ones are discounted for prime day-- are any of them worth while? Is there a difference?
https://www.amazon.com/Sovol-Creality-Replacement-Extruder-Aluminum/dp/B07KSS8FRQ/ref=sr_1_16?keywords=ender+3&psr=PDAY&qid=1563208182&s=prime-day&sr=1-16#customerReviews
https://www.amazon.com/3D-Extruder-Aluminum-Filament-Creality/dp/B07B96QMN2?tag=slicinc-20&ascsubtag=e4bbd68ca71e11e9b248d2e5958396b20INT
https://www.amazon.com/Extruder-Upgraded-Replacement-Aluminum-Filament/dp/B07NVBYKTY/ref=sr_1_22_sspa?keywords=ender+3&psr=PDAY&qid=1563208182&s=prime-day&sr=1-22-spons&psc=1#customerReviews
​
https://www.amazon.com/DIYE-Premium-Printer-Borosilicate-Creality/dp/B07NDJTV3V/ref=sr_1_17?keywords=ender+3&psr=PDAY&qid=1563208182&s=prime-day&sr=1-17
https://www.amazon.com/CHPOWER-Creality-Platform-Upgraded-235x235MM/dp/B07GL2NMV5?tag=slicinc-20&ascsubtag=e135e994a71e11e9b972a6226f9167e90INT
It's this one. Got it myself.
https://www.amazon.com/Official-Creality-3D-Tempered-235x235x3mm/dp/B07F16WPR5
I had to print at 13mm's for the first layer (or 2-3 layers depending on size) to get prints to stick.
For the glass bed I recommend getting a borosilicate glass. It’s that the old Pyrex is made of. Resist heat differences without shattering. Here’s the link of the one I got. 130mm x 160mm Borosilicate Glass Plate Bed Flat Polished Edge w/ Corners Cut for 3D Print https://www.amazon.com/dp/B075XJ5ZP1/ref=cm_sw_r_cp_apip_tn7G8jRd96iU2
I had this happen on mine. Scrape it off the best you can and use Goo-Gone to purge the remaining adhesive. Once you have a clean metal bed, painters tape works great and is cheap and easy to replace. If you are feeling up to it, you can install a glass bed on top of the metal like I did, just make sure to level the bed right if you do because the glass adds extra space. Then use a purple glue stick for some extra adhesion if you need it!
​
Here is the link to the bed I am using, and I am completely satisfied so far -> https://www.amazon.com/Borosilicate-Polished-Corners-Monoprice-Select/dp/B075XJ5ZP1/ref=sr_1_fkmr2_1?ie=UTF8&qid=1549203064&sr=8-1-fkmr2&keywords=monoprice+mini+v2+glass+bed
>oes stick hella hard if you use a glue stick, but when I've used no glue and PLA, then let the print cool down, it slides off with no effort
https://www.amazon.com/Borosilicate-Polished-Corners-Monoprice-Select/dp/B075XJ5ZP1/ref=sr_1_1?ie=UTF8&qid=1537446780&sr=8-1&keywords=mp+mini+select+glass+bed
​
So something like that? Id prefer to do as little mods as possible but im noticing glass it defiantly needed as the prints are hard to get off.
I had good luck with this glass with the corners pre-cut:
https://www.amazon.com/gp/product/B075XJ5ZP1/
Don't forget to get this to help transfer the heat from the aluminum to the glass, also helps as a non-slip surface to help hold the glass in place:
https://www.amazon.com/400mm-205mm-Silicone-Thermal-Heatsink/dp/B007PPEW52/
Print off a Z-Spacer (like this one: https://www.thingiverse.com/thing:1808029)Pull off the black mat, clean well with adhesive remover, and install glass. I use this one, which fits perfectly: https://www.amazon.com/gp/product/B075XJ5ZP1/ref=oh_aui_detailpage_o02_s00?ie=UTF8&psc=1
I've never had great luck getting adhesion straight on glass, but the glass will give you a flat bed. If you have adhesion issues, go with blue tape.
bed wayyyyyy to far from the nozzle. I got tired of dealing with that shit, so I got some borosilicate glass and use a glue stick...
Most of these are less about upgrading, and more about fixing possible issues. But all of these are great to have and extremely cheap.
As others have said the glass bed and yellow bed springs are great, just be aware the amazon listing on there I used was shipped from china and took almost a month to show up. So pay attention to the shipping times.
The couplers the E3 comes with are straight up garbage. If they are not causing problems yet... they will. These are way better and give you plenty of extras if you ever need them:
https://smile.amazon.com/Ivelink-PC4-M10-Straight-Pneumatic-Extruder/dp/B073TTWWN1/ref=sr_1_7?keywords=ender+3+coupler&qid=1558892247&s=gateway&sr=8-7
​
The PTFE tube it comes with is also not great, any replacement one is usually better, and like others said with Capricorn you can print higher temps, but they also are manufactured to tighter tolerances and have less slack in your system. As to if this is a noticeable difference, it's arguable, but upgrading has fixed problems for some people.
https://smile.amazon.com/Capricorn-Bowden-Tubing-1-75mm-filament/dp/B079P92HN9/ref=sr_1_3?keywords=capricorn+tubing&qid=1558892351&s=gateway&sr=8-3
​
Even more important than the tubing it self is the cutter you use, if you buy different tubing, make sure you get a good cutter so the ends don't get pinched. This can cause drag that causes underextrusion.
https://smile.amazon.com/Capricorn-Bowden-Tubing-Cutter-M-Bowden-Cutter/dp/B07N11H963/ref=sr_1_8?keywords=capricorn+tubing&qid=1558892424&s=gateway&sr=8-8
​
The plastic extruder on the E3 is know to wear out after a few months for some. A filament guide will help but a better aluminum extruder should fix it for good. They are cheap and easy to install:
https://smile.amazon.com/HICTOP-Upgraded-Replacement-Aluminum-Extruder/dp/B0761PGLZ4/ref=sr_1_1_sspa?keywords=ender+3+extruder&qid=1558892498&s=gateway&sr=8-1-spons&psc=1
​
Once you want to go deeper down the hole, the two big mods that you will be happy with are A auto bed leveler and quieter stepper motors. There are guides for both of these on youtube and they are much more complicated and a bit more expensive but give amazing results.
​
A BLTouch goes for about $80 with the extension cable so you don't have to cut wires. It will make it so you save an offset and basically rarely have to level your bed again and the machine will account for most of it. There is another type of leveler I think it's called EZABL or something like that, but I liked the BLTouch option better so I never did the research on it.
If you want to do more upgrades like a touch screen, filament rounout sensor, and etc. you need a different main board. Most people upgrade to the MKS Gen L. They are about $25 bucks but require you to also buy new stepper motor drivers, which i'll touch on next. The board has more memory and slots for upgrades that the stock board does not. It does require a lot more setup and printing a new housing for the board. Again there are great youtube videos, just search for 'Ender 3 MKS Gen L'
​
If you think the Ender 3 is loud and would like it to be WAY quieter you can install better stepper motor drivers. The TMC 2208 driver will make the movement almost silent. you will still hear the fans, but the movement sound will completely gone. To install them you will need to either use the above mentioned board (as the stock board has the drivers integrated) or if you want an easier way you can order the Ender 3 Silent Ver 1.4 board:
https://www.creality3donline.com/creality3d-new-upgrade-silent-114-mainboard-for-ender-3-pro-ender-5-customized-und-non-standard-matching_p0147.html
This won't give you the upgradabiliity of the MKS board, but is a direct drop in replacement that gives you the silent steppers.
​
Welcome to family, and I hope some of that was helpful
Yep Capricorn often rocks. I am in the U.S. so these links may or may not help.
BLtouch kit https://www.amazon.com/Creality-Upgraded-BLTouch-Leveling-Accessories/dp/B07WK3T7S7/ref=mp_s_a_1_2_sspa?keywords=bltouch&qid=1574763211&sprefix=bltou&sr=8-2-spons&psc=1&spLa=ZW5jcnlwdGVkUXVhbGlmaWVyPUEzNUtFTUhQUTcwMDc3JmVuY3J5cHRlZElkPUEwODcyMTkyM0RJVExFMUE4SVMyWiZlbmNyeXB0ZWRBZElkPUEwNDI0MTQ0MTEzOVNSVjZPOTNQQyZ3aWRnZXROYW1lPXNwX3Bob25lX3NlYXJjaF9hdGYmYWN0aW9uPWNsaWNrUmVkaXJlY3QmZG9Ob3RMb2dDbGljaz10cnVl
Bigtreetech SKR Mini E3 https://www.amazon.com/BIGTREETECH-Control-TMC2209-Printer-Creality/dp/B07XYW21J3/ref=mp_s_a_1_1?keywords=mini+e3&qid=1574763284&sr=8-1
Aluminum Extruder
https://www.amazon.com/HICTOP-Upgraded-Replacement-Aluminum-Extruder/dp/B0761PGLZ4/ref=mp_s_a_1_2_sspa?keywords=bowden+aluminum+Extruder&qid=1574763338&sr=8-2-spons&psc=1&spLa=ZW5jcnlwdGVkUXVhbGlmaWVyPUEyNTBSWEdBMFREUzZYJmVuY3J5cHRlZElkPUEwMTM0MzM4MkpCSFA3RFpRVzFZTCZlbmNyeXB0ZWRBZElkPUEwMDA2MDY2MlQ4TTRZVE5URzdTSSZ3aWRnZXROYW1lPXNwX3Bob25lX3NlYXJjaF9hdGYmYWN0aW9uPWNsaWNrUmVkaXJlY3QmZG9Ob3RMb2dDbGljaz10cnVl
You already have a magnetic bed since you grabbed the pro version. The board I linked is silent , you will be impressed if you get it. The BLtouch makes bed leveling much easier and in my opinion is worth the extra cash. It just makes things easier. The aluminum extruder negates having to worry about the plastic one wearing out. Also look into getting a raspberry pi and running octoprint. That's another must have upgrade as well. Your going to love the Ender 3, enjoy it!!
Check your extruder drive gear. If the gear is turning but the idler wheel isn't, that means there isn't enough pressure on the filament.
Steps to fix:
Though I recommend upgrading to an all aluminum set up like this one.
I've modified the hell out of my ender 3, but the only mods critical to running that cf nylon were to install an all-metal hotend (e3D V6) with a titanium heat break and hardened steel nozzle, then put the whole thing in an enclosure. If you've got an ender 3, this Micro-swiss hotend is the cheapest and easiest way to get the same capability. Just bear in mind that PLA can be problematic in all-metal hot ends. You can either switch back to the OEM hotend when you want to run it, or use an oiler to get PLA working again. And I made an enclosure out of a couple IKEA LACK tables, but a garbage bag works too. If running the stock hot-end fan, be sure to cover the opening on the bottom with foil tape when running nylon or ABS to prevent a draft from blowing on the part.
I actually replaced my whole extrusion path.
First, I found that the spring in the stock extruder assembly would fatigue resulting in under extrusion and jams. The BMG is a little pricey but worth it IMO. Comes with pretty good instructions.
Second, I switched to a Micro-swiss all metal hot-end. I probably didn't need to do this - given I almost never print high-temp materials but did it anyway.
Last, cheapest, and not least, Capricorn Tubing. Do not underestimate the difference this can make.
If you're up to the challenge, I highly recommend a BLTouch. It completely solved my first layer woes (warped bed on my CR-10s).
I ordered all of it on amazon. I got the dotbit bmg clone, although the triangle labs was recommended more, and the pancake stepper from stepper online via amazon. The direct drive kit I got was the basaraba dd upgrade kit. To attach a bmg style extruder to this kit, you’ll need a printed or machined adapter. I managed to have a connection and got someone to machine a mount for mine specifically
Stepper: STEPPERONLINE Nema 17 Bipolar Stepper Motor 0.7A 13Ncm (18.4oz.in) 17HS10-0704S https://www.amazon.com/dp/B01LESPDCQ/ref=cm_sw_r_cp_api_i_aeAWDbHDJ8A49
Bmg clone:
3D Printer Bowden Extruder,... https://www.amazon.com/dp/B07P6X7DKL?ref=ppx_pop_mob_ap_share
Ender 3 Direct Drive Upgrade Kit, Compatible with Creality Ender 3 & Ender 3 Pro, no firmware Modification Needed https://www.amazon.com/dp/B07P9S9KNC/ref=cm_sw_r_cp_api_i_rfAWDbZQWTYK1
It’s important to put the spacer in this dd kit in between the motor and bmg clone as the motor shaft will push against the outer shell of the extruder, and cause a lot of issues.
I also am using a microswiss hotend
Micro Swiss All Metal Hotend Kit... https://www.amazon.com/dp/B0789V2D7C?ref=ppx_pop_mob_ap_share
For me, the extruder assembly was the problem, and didn't grip the filament enough.
https://www.amazon.com/CHPOWER-Extruder-Upgraded-Replacement-Extruders/dp/B079JZ374W
I bought that and it worked great, then I upgraded to a bondtech extruder and have had zero issues since
I found this metal replacement for $11 on amazon when I had this issue a few weeks ago, such great value
CHPOWER CR-10 Extruder Upgraded Replacement, Aluminum MK8 Drive Feed 3D Printer Extruders for Creality Ender 3, CR-10, CR-10S, CR-10 S4, CR-10 S5 https://www.amazon.com/dp/B079JZ374W/ref=cm_sw_r_cp_apa_i_NzsODb9EGYASC
Second - some Amazon links for the upgrade pieces I mention:
Springs - https://smile.amazon.com/gp/product/B07SDDHYN4/ref=ppx_yo_dt_b_search_asin_title?ie=UTF8&psc=1
Bowden Tube - https://smile.amazon.com/gp/product/B079P92HN9/ref=ppx_yo_dt_b_asin_title_o00_s01?ie=UTF8&psc=1
Couplings - https://smile.amazon.com/Dorhea-Straight-Pneumatic-Fittings-Accessories/dp/B07NSRCH2W/ref=sr_1_15?keywords=3d+printer+fitting&qid=1574436375&sr=8-15
Extruder - https://smile.amazon.com/gp/product/B079JZ374W/ref=ppx_yo_dt_b_asin_title_o00_s02?ie=UTF8&psc=1
PEI Sheet - https://smile.amazon.com/gp/product/B07GSJSDWR/ref=ppx_yo_dt_b_asin_title_o00_s02?ie=UTF8&psc=1
Stepper Motor Dampeners - https://smile.amazon.com/gp/product/B07C7FRLNX/ref=ppx_yo_dt_b_asin_title_o00_s02?ie=UTF8&psc=1
Bootloader Flashing Kit - https://smile.amazon.com/Gulfcoast-Robotics-Bootloader-Flashing-Duplicator/dp/B07S5BBLKM/ref=sr_1_3?keywords=arduino+uno+ender+3+kit&qid=1574436535&s=industrial&sr=1-3
Note that I didn't buy this flashing kit, but this one seems to have everything you need to get a bootloader onboard the Ender. What happens is you go through a bunch of steps to attach this so the printer and then put a bootloader onto the Ender 3 board. You only have to do that one time, then you can update the firmware as often as you want - typically via a USB cable. I have Octoprint installed, so I can flash my firmware on my basement printers from my upstairs computer using wifi. Super easy and handy.
If it slipped out, then your part is malfunctioning. Go ahead and order those couplers they really do make a world of difference. Also this is the other part I was referring to:
CHPOWER CR-10 Extruder Upgraded Replacement, Aluminum MK8 Drive Feed 3D Printer Extruders for Creality Ender 3, CR-10, CR-10S, CR-10 S4, CR-10 S5 https://www.amazon.com/dp/B079JZ374W/ref=cm_sw_r_cp_api_i_UsYUDbSXJ318G
The hole where your filament feeds into the Bowden tube will wear down over time due to friction. This part needs to be stronger than your filament or it was start to jam/slip.
It looks like the extruder arm may be squeaking the filament against the extruder wheel so tight it is causing skipped steps and filament to wear off on the wheel.
I bit the bullet and got an aluminum extruder arm kit from amazon - CHPOWER CR-10 Extruder Upgraded Replacement, https://www.amazon.com/dp/B079JZ374W/ref=cm_sw_r_cp_api_i_kCaPCbF0AF0C3 - and have had good luck and no more skipped steps since changing.
I'm pretty new to this too, I bought my Ender 3 Pro around the same time as you. Quiet printing is pretty high on my list as well as being able to print high-temp exotic filaments in the long term while maintaining reliability.
First upgrades I purchased were stiffer bed springs so I would be less likely to throw the bed out of level while removing prints or working around the printer and Capricorn XS tube since it has a more consistent internal diameter, fits closer to the filament, and can work with slightly higher temps. I also picked up a pack of bowden couplers recently as I noticed the end nearest the extruder is sliding past the coupler jaws on de/retraction; don't worry about that unless it's an issue for you. That's about $30 alone since I don't have a supply shop locally and have to order those parts in bulk. I had a Pi 3B laying around unused and flashed Octoprint onto it. Highly recommended. I have a replacement Noctua hotend fan, buck converters, and 5015 blower on order to quiet the fan noise; about $32. Just replaced the Meanwell psu fan with a 60x25mm Noctua I had lying around (Note: there may be better options in the 92-120mm range to replace part of the PSU housing, but that's what I had laying around). Next upgrade coming is the SKR Mini E3 with TMC 2209 drivers ($28) to eliminate almost all of the stepper noise. Also looking into a replacement for the control board fan and some vibration isolating feet for the frame. As far as higher temp printing I haven't made a lot of progress aside from buying a titanium all-metal heat brake ($11) winch I have yet to install or inspect, and looking into enclosure and electronics relocation avenues.
Either way the mods I purchased came in at around $100 US which should quiet the printer and help with reliability. Also looking into picking up a good M3-M4 bolt kit if any exist in the US.
Here are some links to the things I picked up and will, which may be helpful if you're in the US. Mostly from Amazon.
Type | Name | Link | Price
---|---|----|----
Reliability | 8mm x 20mm yellow springs | Link | $6.98
Reliability | Capricorn XS Tubing | Link | $11.49
Reliability | PC4-M6 / PC4-M10 Pneumatic Bowden Fittings | Link | $11.99
Silence | Noctua 40mm x 10mm 3-pin fan | Link | $13.95
Silence/Various | LM2596 Adjustable Buck Converters | Link | $10.95
Silence | 24v 5015 Radial Ball Bearing Fans | Link | $7.19
Silence/Various | SKR Mini E3 w/ TMC 2209 drivers | Link | $28.81
High Temp | Titanium All-Metal Heat Brake | Link | $11.52
TOTAL: $102.88 US + Tax
Parts already purchased/ bought with printer
Type | Name | Link | Price
---|---|----|----
Reliability/High Temp | OEM Ender 3 Glass Bed | Link | $20
Reliability | Feeler Guage Set | Link | $5
Reliability | 608zz Bearings, using with this(My Remix), this, and this, though I like this design a bit better | Link | $5.98
QoL Improvement | Raspberry Pi 3B w/ Octoprint | Link | $34.46
Silence | Noctua 60mm x 25mm 3-pin fan, goes with this mod | Link | $14.95
TOTAL: $80.39 US + Tax
Future planned upgrades
are you using an all-metal hotend?
Heat creep was really bad on my CR-10 when I switched to a microswiss all-metal. Initially I fixed it by reducing my retraction distance and increasing my retraction speed, but on longer prints it still ended up being too much of a problem and I switched to a new heatbrake that allowed the bowden tube to go all the way down to the nozzle and used Capricorn bowden tube to avoid deformation.
I'm getting much cleaner prints now and zero jamming. I think this heatbrake works with the original CR-10 heatsink
You can get the extruder here with a halfway decent tube. That includes a tube but it isn't as good as the capricorn tube, which you can get here. I ended up getting the extruder with the not-as-good tube, and have been running that. I have a capricorn tube on standby in case I need it but so far haven't, so maybe the tube included with that extruder is good enough, but I may also just be lucky.
​
There's no instructions included with that kit, so you'll want to follow along with something online. Here's a video from the same channel I linked to earlier that should help.
Two things I would I highly recommend is to get a new extruder assembly and a new Bowden tube. I've had similar issues and they went away as soon as I changed these parts out.
Upgrade 3D Printer Parts MK8 Extruder Aluminum Alloy Block Bowden Extruder 1.75mm Filament for Creality 3D Ender 3,CR-7,CR-8, CR-10, CR-10S, CR-10 S4, and CR-10 S5 https://www.amazon.com/dp/B07B96QMN2/ref=cm_sw_r_sms_apa_i_6tWTDb1JYN38X
Capricorn Bowden PTFE Tubing XS Series 1 Meter for 1.75mm Filament (Genuine Capricorn Premium Tubing) https://www.amazon.com/dp/B079P92HN9/ref=cm_sw_r_sms_apa_i_vvWTDbKY7ZVTY
These or any other should work
Nozzles
PTFE. This is the cadillac option. Cheaper tubing is very cheap, like $5 for 5 feet or something.
I didn't mention these as I haven't installed them, but stepper dampeners. Please see the stickied thread on /r/ender3 about these, if you want to order them!
The springs I ordered. Note: I couldn't quite replace the one where the wires attach to the bed. I didn't play around too much, I just left that one on there. The other three have held solid, and the next time I'm adjusting my bed, I'll try to put that one on there as well.
Hope that helps!
Edit: Reddit markdown not liking my links, I'll try to fix them
I got my Ender 3 Pro about a month ago, performed some upgrades and ran into a few problems, but with some weird caveates.
I'm trying to print multiple miniatures on a single print, but seem to be getting a lot of oozing or stringing issues, but when I test with retraction tests, the test comes out perfect with identical settings. Additionally, when googling around, I couldn't find anything except for potentially a nozzle clog or potentially hydrated filament (possible, I'll test this later)
​
I've tested a few other prints as well, a benchy and a testcube, they print fine. Really curious about what's going on. Do I need to spread the prints out more, use different settings, or is it more of a mechanical issue?
​
I'd appreciate any help you guys have to recommend!
​
So, lets get down to it:
Printer: Creality Ender 3 Pro
Surface: Creality Glass surface
Upgrades: Aluminum extruder upgrade
Capricorn Tubing
New bed springs
In addition to these, I've tightened the X and Y bolts on the runners to reduce wobble -- there's no more wobble, maybe they're too tight? I don't think so, I've had good prints with these settings, but not with a few things.
Settings:
Basically the same as the "normal" settings for the Ender 3 on Cura 4.0.0
But in addition: (And what I think may be important is bolded)
adhesion_type = raft
layer_height = 0.12
support_tree_enable = True
support_type = buildplate
brim_outside_only = False
fill_outline_gaps = True
infill_pattern = cubic
infill_sparse_density = 25
material_final_print_temperature = 180
material_initial_print_temperature = 180
material_print_temperature = 185
optimize_wall_printing_order = True
raft_margin = 10
retraction_amount = 7.5
retraction_speed = 20
speed_print = 30
support_angle = 40
support_conical_enabled = True
support_infill_rate = 50
support_interface_enable = True
support_pattern = lines
** NOTE ** Standard supports are turned off, I'm using the tree supports
support_tree_collision_resolution = 0.15
travel_avoid_supports = True
travel_compensate_overlapping_walls_enabled = False
wall_thickness = 1.2
*may* not be your issue but you will need to recalibrate your estep is you swapped the hob gear (extruder gear) as they are different diameters than the stock one.
​
Total side note for anybody who wants to clean up their links: Anything after the ? is erroneous data for anybody else clicking the link unless it has multiple options to select. This works for most websites, including ebay.
​
Example:
https://www.amazon.com/gp/aw/d/B079P92HN9**?psc=1&ref=ppx_pop_mob_b_asin_title**
https://www.amazon.com/gp/aw/d/B079P92HN9 <-- Really only what is needed.
I was just doing some test prints to get the bed re-leveled and this fitting decided it didn't want to live any more.
Time to order some new parts, I guess.
My advice (first of all) is to install ADVi3++ if you haven't, the bed-leveing function (under the Tuning menu I think) is pretty good.
Some general advice for the actual leveling process:
If things still aren't leveling:
Once you can actually get things level, I highly recommend getting some M3 nyloc nuts and replacing the default bed leveling knobs with these. They don't look as nice as the metal/stock ones, but it will prevent vibration/movement from de-leveling your bed as quickly.
Good luck!
Its the carriage plate I am talking about not the build plate.
The plate that warps is that thin sheet metal under the build plate. Its what is connected to the bearings on the y axis.
You don't need to test it. I can already tell you it is fucked.
Here is a much better one.
This one. https://www.amazon.com/gp/aw/cr/B07B251KBS/ref=mw_dp_cr
I was going to link you the one I bought for my maker select v2 but it seems they're out of stock.
There is another seller though that has a few but it's a few dollars more than what I paid.
https://www.amazon.com/gp/aw/d/B07B251KBS
I ordered this one, and it got to me in Canada pretty quick for a decent price: https://www.amazon.com/gp/product/B07B251KBS/ref=oh_aui_detailpage_o01_s00?ie=UTF8&amp;psc=1
I've literally only done two prints since I got it installed though, so I can't say how big an improvement it is on the original yet.
here you go
Not endorsing this specific seller, but this is the part:
Upgrade 3D Printer Parts MK8 Extruder Aluminum Alloy Block Bowden Extruder 1.75mm Filament for Creality 3D Ender 3,CR-7,CR-8, CR-10, CR-10S, CR-10 S4, and CR-10 S5 https://www.amazon.com/dp/B07B96QMN2/ref=cm_sw_r_cp_apa_i_sWAoDbM7TR505
Just search for Ender 3 extruder upgrade.
You've absolutely chosen a perfectly good printer. The Pro is just sold with a few conveniences, nothing that will really change print quality and nothing that you can't make better yourself in the long-term.
I will be honest with you. There will be frustrating times ahead. Times when it feels like the bed won't level no matter what you do, when prints won't come out how you like them, when parts fail, etc. And that happens, and it's usually a good time to step away from it for a few days. Don't be discouraged!
Here's some planning ahead advice:
The Bowden Tube couplers that come stock are terrible. Absolutely terrible. They barely hold the tubes in and need plastic clips to function. Grab some replacements early. You may not need a 20 pack, but something in this vein.
The insulation on the heating block (yellow insulation cotton held on with tape) is a bit of a pain. Mine came off just by holding the heat block to change the nozzle. Some silicon socks are cheap as dirt and are easy to take on/off when you need to mess with the hotend.
If an electronic part fails (one of the fans, for example) and you don't want to go out and buy a soldering iron, solder sleeves are a quick and easy alternative.
And finally, the plastic extruder (the place where you feed the filament in) will 100% break. That is a promise. Save yourself some trouble and pick up a metal extruder to give you some peace of mind.
Keep in mind, these are absolutely not things that you need to go out and purchase right now, this is just some fixes to common problems you can reference should one of these issues crop up. You're entirely ready to print right out of the box!
So far I’ve added
A MK8 aluminum extruder (amazon )
Aokin PTFE tube w/ fittings (amazon )
A printed Fan Cover (thingiverse )
Cable clips (thingiverse )
Tool holders (thingiverse
Z axis motor spacings were the first print too. (thingiverse )
Underextrusion. I had that same issue until I upgraded to an all metal extruder and calibrated my extruder.
+1 for putting a glass bed on the printer. Also the stock extruder gear setup SUCKS! Go ahead and get an all-metal one because that plastic arm will break eventually. The debate rages on about putting sound dampeners on because some folks advocate just replacing the drive controllers (more $$$). Personally I put the dampers on and am really happy with the noise reduction, Also, the fans used stock are all sleeve bearing type. Not a good choice for the hotend which is constantly moving. I say run them until they get noisy/fail and then replace them with some good ball bearing fans (remember if you order replacements that they are 24v, not 12v). Oh and I also put stiffer springs under the bed as well. (See links below)
Links are what I used, there are many options out there....
Glass bed
Creality 3D Printer Platform Heated Bed Build Surface Tempered Glass Plate for Ender 3/Ender 3 Pro 3D Printer 235x235x3mm https://www.amazon.com/dp/B07FSM8DK9/ref=cm_sw_r_cp_tai_CvzBCbDCS9RHE
All Metal Extruder Gear
Luxnwatts Creality Aluminum MK8 Extruder Drive Feed Upgraded Replacement for CR-10 CR-10S S4 S5 3D Printer Part https://www.amazon.com/dp/B076PFHM1F/ref=cm_sw_r_cp_tai_gwzBCb17T787N
Noise dampers
CCTREE NEMA 17 Stepper Steel and Rubber Vibration Dampers with M3 Screw for Creality CR-10,10S 3D Printer,CNC (Pack of 3) https://www.amazon.com/dp/B07C7FRLNX/ref=cm_sw_r_cp_tai_.wzBCb0ANF2QJ
Stiffer bed springs
uxcell 8mm OD 20mm Long Light Load Compression Mould Die Spring Yellow 10pcs https://www.amazon.com/dp/B013G5I4US/ref=cm_sw_r_cp_tai_ZxzBCbGVJ10CA
These are the ones I bought, and they seem to work fine.
I replaced the spring belt tensioner and just zip tied the belts to stay tightened and it works great. On the Y axis I have an adjustable tensioner I printed. Planning on making one for the X axis soon.
Dampers installed pretty easy on the X axis, same as the 3 I used to have. The Y axis is a bit more work which I posted above. I used this exact kind.
https://smile.amazon.com/gp/product/B07C7FRLNX/ref=ppx_yo_dt_b_asin_title_o00__o00_s01?ie=UTF8&amp;psc=1
Nice ! I can see you've done your homework lol, all good choices. I'll just give you a few suggestions then since you've pretty much got it covered. The springs I used on my enders were these: https://www.amazon.com/gp/product/B07FY47BX7/ref=ppx_yo_dt_b_asin_title_o02_s00?ie=UTF8&amp;psc=1 You might need longer screws, not sure about that, but you can get those at any hardware store, probably around 35mm m3 screws should do the trick. And the motor vibration dampers i used were these: https://www.amazon.com/gp/product/B07C7FRLNX/ref=oh_aui_search_asin_title?ie=UTF8&amp;psc=1 you don't need them on the z-axis, just the x and y. As far as smoothers go, I think the creality boards currently use a4988 stepper drivers, so you'd probably not see any benefit from tl smoothers. I'd definitely recommend the glass bed, since ender 3 print beds are almost always warped to some extent which can make leveling the bed a real pain in the ass. The hardened steel nozzle is cool, just be aware it's not as good at transferring heat to the filament as a brass nozzle, so it prints slower, and it's only useful if you're planning on using abrasive filament like carbon fiber or glow in the dark filament. Pla, petg, wood pla, and abs don't need it. You can actually print anything you want with a brass nozzle, you'd just replace it more often depending on how much abrasive filament you use. Also, don't know which fan shroud you're planning on, but the bullseye is very good and it uses the stock fan : https://www.thingiverse.com/thing:2759439
Sorry about the wall of text lol.
Official Creality 3D Ender 3... https://www.amazon.com/dp/B07F16WPR5?ref=ppx_pop_mob_ap_share
Just to be clear, we're talking about this one, no?
Damn, then I definitely got the wrong bed -I bought a borosilicate glass plate and some glue sticks. I saw that bed on Amazon, but the description implied it only worked on ABS. Too bad, I liked the idea of the Build Tak, and now I'm not really in the mood to buy yet another bed and re-level it again.
But my laziness may win out in a week or so, so who knows.
I got this one. I started with a glue stick but found out just washing soap and warm water provides great adhesion. I did increase bed temp to 70 from 60 also.
https://www.amazon.com/Official-Creality-3D-Tempered-235x235x3mm/dp/B07F16WPR5?ref_=bl_dp_s_mw_17936569011
There is This glass bed with a coating on to that helps stuff to stick. I have it worked for a bit but after about a month stuff would not stick and I started to use hairspray to keep stuff stuck and its working great now. Here it is on amazon as well
sanding helps, but you need this
https://www.amazon.com/XTC-3D-High-Performance-Print-Coating/dp/B00PFXK4JY
This is the coating. It is liquid epoxy and can be very messy if you don't plan it out. https://www.amazon.com/XTC-3D-High-Performance-Print-Coating/dp/B00PFXK4JY/ref=sr_1_3?ie=UTF8&amp;qid=1511381617&amp;sr=8-3&amp;keywords=3d+print+finishing
This is the one I think he is printing - https://www.thingiverse.com/thing:404028
You could potentially do an acetone wash.
I use Smooth-On XTC-3D, but it might not be right for your application. It can add some thickness to parts, which in the case of Sledgefire shells might make them unusable.
Official Site
Amazon
Nice! I'm sure that'll look awesome. I suggest using bondo to fill cracks and divits and XTC-3D or a similar epoxy to cover the entire piece to smooth it out.
I can't say this is what the "best" method is, just what has worked for me in the past:
My biggest gripe with 3D printing was that the ridges were always present. This process makes it so the ridges are non-existent and easier to paint!
Edit: I should mention I've mostly worked with large scale cosplay props. This process might not work for everything, like you probably don't need to put epoxy on small stuff.
This is what you need to make it look 100% better http://www.amazon.com/XTC-3D-High-Performance-Print-Coating/dp/B00PFXK4JY/ref=sr_1_2?ie=UTF8&amp;qid=1451974721&amp;sr=8-2&amp;keywords=Xtc+3d
Not much really. The benefit of buying the mk2s is that you really don't need to modify or swap anything.
Here are a few things you might want in my opinion:
Looks good. I've been wanting to print up a car too.
You should look into XTC-3D.
I used this on my 3D printed upper/battery compartment
https://www.amazon.com/gp/product/B00PFXK4JY/ref=oh_aui_search_detailpage?ie=UTF8&amp;psc=1
It worked great! Took a couple hours to sand after but then just primered it and thats it.
http://imgur.com/a/yMRjP
You can order this stuff off Amazon and it's specifically made for 3d prints. The ones I've done have a mirror finish, and you can tint it directly to make candy automotive style finishes. Or you can prime it and paint it.
https://www.amazon.com/gp/aw/d/B00PFXK4JY/ref=mp_s_a_1_2?ie=UTF8&amp;qid=1525533010&amp;sr=8-2&amp;pi=AC_SX236_SY340_FMwebp_QL65&amp;keywords=xtc-3d&amp;dpPl=1&amp;dpID=51jOz30NOXL&amp;ref=plSrch
Works great.
https://smile.amazon.com/ToyBuilder-Labs-Print-Removal-Tool/dp/B00VB1U886/ref=redir_mobile_desktop?_encoding=UTF8&amp;dpID=31vIt7tpDfL&amp;dpPl=1&amp;keywords=3d%20printer%20knife&amp;pi=AC_SX236_SY340_QL65&amp;qid=1493570144&amp;ref=plSrch&amp;ref_=mp_s_a_1_1&amp;sr=8-1
https://www.amazon.com/ToyBuilder-Labs-Print-Removal-Tool/dp/B00VB1U886/ref=sr_1_1?ie=UTF8&amp;qid=1491502589&amp;sr=8-1&amp;keywords=3d+print+tool
I'm not sure how much help I'll be, but I also use a Flashforge Creator Pro...
1: If you're sick of dealing with abs, just put some blue painters tape on the bed and print PLA, once you open up the thing enough and modify your settings it does PLA perfectly well.
2: PVA glue stick, (though it looks like you are already using this) helps with bed adhesion with ABS and also gives you a bit of an ablative layer for when you are scraping things back off.
3: get a print removal tool like https://smile.amazon.com/ToyBuilder-Labs-Print-Removal-Tool/dp/B00VB1U886/ref=sr_1_4?ie=UTF8&amp;qid=1494526580&amp;sr=8-4&amp;keywords=print+removal+tool to help pry things off the bed without destroying the sheet.
4: rafts, these really help with getting things off the bed, you waste quite a bit of plastic, but it's much easier to get things off.
5: bed level (and height) adjustment (and this really should be number 1) the little plastic sheet they give you to slide under the nozzle is of no real value, you may just be printing the first layer way too close to the bed, and absolutely squishing the filament into the bed. It is far more useful to just print a leveling pattern and then see where the bed needs adjustment and how it's extruding than to even bother with pulling the sheet out from under the head. I use this one http://www.thingiverse.com/thing:97151 and generally will tweak things until the strands are attached but will come off with my fingernails.
Link
They work great, MUCH more reliable than the stock one. I replaced the extruder gear and got a new nozzle at the same time so I don't know which one helped, but it ended ALL clogs.
You might want to switch out the extruder gear as well. Switching the stock one out and calibrating my e-steps helped a lot. This is the one I got.
https://www.amazon.com/gp/product/B00ZZRI0DC/ref=oh_aui_detailpage_o08_s00?ie=UTF8&amp;psc=1
I have the same machine/hot end it was working great for around a year then I started having intermittent under extrusion issues and they it kept getting worse.
I finally fixed the problem by changing out the extruder gear for one of these https://smile.amazon.com/gp/product/B00ZZRI0DC/ref=oh_aui_search_detailpage?ie=UTF8&amp;psc=1 and replacing the extruder motor as well.
I don't think the extruder gear was the root cause, but all other things being equal the finer tooth gear definitely performs better for me.
I suspect the root cause was either the extruder motor wearing out, or maybe some material building up inside the hot end, creating more friction and making things harder for the extruder.
I found a clone board, which includes an LCD, Mega, motor driver, etc. I've got a Raspberry Pi lying around that I can use to run Octoprint. My only concern is, as it's a clone part, is it going to be worth the $37 US? Also, a question about the heated bed - I assume the builid plate sits above the heated bed, so must the build plate be the same size as the heated bed? Or can it be slightly larger? I'll get back to you after I get the parts (or worst case, my printer doesn't cancel). Thank you for all your help, xakh!
EDIT: Also, I'm having some trouble locating a bowden cable. Also, the printer's coming in around $50 over my $250 budget. Is it possible to cut that any lower?
EDIT2: This really, really sucks. My printer was shipped already and they won't cancel it. Well, this will be the first thing I print after I level the bed and test it out. Thank you for your help, I'll build a SmartRapCore as soon as I can. Sigh
For sure. http://www.soliforum.com/topic/2816/howto-converting-to-a-ramps-controller/
Pretty helpful sub, you can always ask me for help if you get stuck along the way. Also, I used the Makerfarm Pegasus instructions for putting the RAMPS together.
This is the kit I bought, it was mostly complete but I had to order some jumpers because I was short a few. http://www.amazon.com/OSOYOO-Printer-Controller-Stepper-Heatsink/dp/B0111ZSS2O?ie=UTF8&amp;psc=1&amp;redirect=true&amp;ref_=oh_aui_detailpage_o08_s00
Micro Swiss MK10 All Metal Hotend Kit .4mm Nozzle WANHAO, FlashForge, Dremel Idea Builder https://www.amazon.com/dp/B01C3HEQZC/ref=cm_sw_r_cp_apa_Xj7Dzb5FTEP7R this is the one I bought from amazon
Nozzles are all generally brass. Those should be expected to be replaced from time to time. They are relatively cheap. The Microswiss upgrade is more than just a nozzle. It replaces the stock hotend with all metal. In your stock hotend is a PTFE tube that can cause jams, will deform if heated too high, and prevents you from using certain materials. The microswiss is a relatively inexpensive and easy way to fix this.
I recommend the block too: https://www.amazon.com/Micro-Hotend-SLOTTED-Cooling-Wanhao/dp/B01E1HANLS/ref=sr_1_1?ie=UTF8&amp;qid=1503589251&amp;sr=8-1&amp;keywords=microswiss
However you can save a little money:
https://www.amazon.com/Hotend-Nozzle-WANHAO-FlashForge-Builder/dp/B01C3HEQZC/ref=sr_1_3?ie=UTF8&amp;qid=1503589251&amp;sr=8-3&amp;keywords=microswiss
This will work for your printer
Micro Swiss MK10 All Metal Hotend Kit .4mm Nozzle WANHAO, FlashForge, Dremel Idea Builder https://www.amazon.com/dp/B01C3HEQZC/ref=cm_sw_r_cp_api_i_88i.AbP0QGBHZ
If you can't get the piece of metal out all you really need is a new hotend, possibly just the nozzle but might as well upgrade. A common all metal hotend upgrade is the microswiss > https://www.amazon.com/gp/product/B01C3HEQZC/
How quickly were you printing your pieces? Some of the parts I saw in your album looked a bit on the rough side (overhangs, perhaps?). Meaning no disrespect of course, I think your projects are awesome! I have a Maker Select and I can get some really nice quality prints without going excruciatingly slow, so I was just curious.
Can I ask what mods you have on your printers? I saw one of them has the support braces, but have you experimented at all with other things? If so, how did they effect your prints?
The only mods I have done are installing an all metal hotend and printing off a new vent for the front fan. I used this one in particular (with a 40mm fan). The hotend mod on it's own significantly improved my print quality, and the vent made printing more intense overhangs a lot less messy.
Either way, those are some great builds! I love the look of the laser rifle. :)
Flash Forge Creator Pro. I had a lot of problems with it out of the box with clogging in the nozzles and things sticking to the build plate. After adding a metal hotend and magnetic build plate it has worked amazingly with no issues. I see the magnetic build plate is out of stock, so not sure where you can get those now, but being able to just flex the plate and have pieces pop right off is great.
I have the same printer. While everyone is correct in saying you can handle the higher temps, you need to be careful because of the PTFE hotend it comes with stock. The PTFE tubing in the hotend starts to get mushy around 245 and printing too long at this temperature will eventually result in a clog. I upgraded mine to the Micro Swiss All Metal Hotend and never looked back. Higher, more consistent print temps as well as better looking prints overall!
Alternate Amazon Link
I went with the MicroSwiss upgrade. Was quite painless to do. Just be sure to start your base retraction to .5 and tweak from there. The Cura given with the MP Select has its retraction set to 7mm from the start so you may want to look into adjusting it now before you clog again.
Amazon has the same one if you don't want to mess with the 'bay.
My MS is out of commission right now due to a motherboard issue - but that's not something that's common occurence with these machines. That aside - I love my MS, it's a damn good printer for the price and works really well. Plus it's on the cheaper side of things and can be upgraded pretty easily. I would suggest getting this printer, and a glass sheet for a bed upgrade. The buildtak stuff they put on it is fine for a little bit, but the glass just produces better results in my experience. And if you want to at a later point in time, a MK10 all metal hotend nozzle upgrade (with cooling block) is also a fairly cheap and easy buy/install. Just the core machine though, no mods - is really good and easy to install and calibrate. Totally would buy another one if I could right now.
Glass bed
Nozzle upgrade
That link looks like a Bowden extruder setup where the stepper motor is further upstream from where the plastic is melted/extruded.
I have a MS+ also, the recommended replacement for that part is the MicroSwiss all metal hotend.
Here is the block:
Micro Swiss All Metal Hotend with SLOTTED Cooling Block for Wanhao i3 https://www.amazon.com/dp/B01E1HANLS/ref=cm_sw_r_cp_tai_EPg0BbVAAANA1
Extruder plate:
Micro Swiss CNC Machined Aluminum Extruder Plate for Wanhao i3 https://www.amazon.com/dp/B06XMRFKRZ/ref=cm_sw_r_cp_tai_uQg0Bb6WV1GXG
Lever:
CNC Machined Lever for Wanhao i3 extruder https://www.amazon.com/dp/B01FWHH4DQ/ref=cm_sw_r_cp_tai_WQg0Bb10AFP5T
Important thing to remember: Nothing is -ever- mandatory unless it's a major safety issue. The closest thing to that on that printer is the mosfet. I believe your original message implies you replaced the buildtak, so the Mosfet upgrade would be a very good idea unless you plan to change out the control board entirely.
Everything else is Optional and Quality of Life/Print stuff. ^.^
The following are examples on Amazon. Other folks and posts may have better advice on where/what to get.
Y Carriage plate
https://www.amazon.com/dp/B01MUAMRN7/ (This is the part under the heated bed)
MicroSwiss all metal hotend (From other person's post):
https://www.amazon.com/dp/B01E1HANLS/
Linear bearings would be LM8LUU for the Y rods. If you have the plastic bearing holders, it's easy. If you have the aluminum block bearing holders, you'll have to find somebody else to source info on the circlips and how to not become sad with them.
You can print things just fine without any of these upgrades, so don't worry about the long print (unless you run out of filament).
A new controller board can do extra stuff and is required (Highly recommended, since you "can" make the probe work on the Melzi board, but poorly and at the cost of other things) for Z-Probe use, dual extruder, and with the heated bed on that printer, can remove the need for a separate MOSFET. It opens the path for other upgrades, can improve print quality to a degree in some cases, and can drive you absolutely nuts trying to set it up.
The inexpensive Quality of Life I'd recommend are thumbwheels with nylock nuts (hard to turn, but keep your level for a long time); corner-bracket spring cups (printed); and glass print bed. Two sets of printed things and about $12 at worst for the glass.
The bearing upgrade (If you can do it without fighting circlips) helps reduce Y-axis stutter and vibration. That upgrade brought my print quality up hugely. $25 or so if you get a lot of spares or higher quality ones.
The Y platform helps you with leveling and staying level.
The lack enclosure has some printed parts, $20-40 worth of Ikea furniture, and up to $50 worth of siding depending on your ability to cut glass and plexiglass.
So many things you CAN do. None that you MUST do. Some that you SHOULD do. And everything else is Just For Fun.
FYI, The Monoprice Maker select V2 is a rebranded Wanhao Duplicator i3 V2.1, and its also known as the Coccoon Create in other countries. If you see any of those names, thats your printer.
Your printer doesnt use an E3D V6 hotend, it uses a MK10 hotend.
You can use a V6, but you'll have to print a bracket for it, will probably require some firmware changes with requires flashing a bootloader with an arduino, and may require some additional hardware.
Normally its recommended to just heat up your hotend and carefully pull that plastic off with tweezers, but as your heating cartridge is damaged, that leaves you with two options-
I never used it, but this one from Gulfcoast Robotics looks well made as well. this is your whole setup minus a heating cartridge. A whole all metal hotend with nozzle and thermistor for $45 is a deal. They've even got installation instructions linked in the description. Side note- i assume it takes a 1/4in 6.35mm cartridge like the original but you might want to double check with them. You can never go wrong with well-manufactured American components.
Either way you'll need a new heater cartridge (and probably thermistor). Heres a link to a replacement cartridge. Heres a link to a store full of wanhao parts.
This printer uses an unusual sized heater cartridge- 1/4in, AKA 6.35mm.
Most (E3D) cartridges are 6mm.
Dont get a 6mm cartridge, get a 6.3-6.35mm cartridge. (A 6mm will be too loose and thats one of the reasons that the Anet A8 is such a fire hazard, the heater cartridge can fall out)
Good luck!
Yes, it's that z brace mod. Make sure you use the version with the adjustment nuts at the top AND bottom.
Here's the hot end.
I also recommend the 120mm fan mod to shut those noisy fans up, a glass bed because the leveling of the bed it comes with is horrible, an upgraded spool holder, and some lock nuts for the bed. (At a minimum.)
I bought this and it's helped with cloggs I used to get a lot.
https://www.amazon.com/gp/aw/d/B01E1HANLS/ref=mp_s_a_1_fkmr1_1?ie=UTF8&amp;qid=1493012482&amp;sr=8-1-fkmr1&amp;pi=AC_SX236_SY340_FMwebp_QL65&amp;keywords=Wanhao+duplicator+i3+cooling+block
When it happened to me I put in XT60 connectors and I figured while I was at it I'd install a MOSFET.
Guide I based my replacements on;
https://3dprinterwiki.info/di3-mods/heat-bed-terminal-burning-fix/
https://3dprinterwiki.info/heatbed-terminal-burning-fix-with-mosfet-board/
MOSFET I installed;
BIQU Heat Bed Power Module Expansion Hot Bed MOS Tube for 3D Printer https://www.amazon.com/dp/B01HEQVQAK?ref=yo_pop_ma_swf
It's ridiculously easy to do the mod and not that expensive (<$15). Unless you plan not to ever take your eyes off the machine, I suggest you do the mod. Even the time period you take for a bathroom break can be dangerous. My connector started smoking/melting and melted a bit of my board while I was waiting for the printer to preheat as I went out of my room to grab some water to drink.
All you have to do is remove the wires going to the bed from the labelled connector and attach it to the side of the mosfet that says hot bed, attach the smaller wires to the labelled connector and using another bit of high gauge wire that you can get from Home Depot/Lowes/local hardware store to connect it to a 12v(+) terminal on the power supply and another to the (-) terminal. All this is done with a screw driver and the included allen keys.
Or just get this all in one kit to make it even easier.
There are a couple ones I've seen in tutorials: I used this, but seen some youtubers use this.
https://www.amazon.com/BIQU-Power-Module-Expansion-Printer/dp/B01HEQVQAK/ref=sr_1_fkmr0_2?ie=UTF8&amp;qid=1487892943&amp;sr=8-2-fkmr0&amp;keywords=BIQU+Mosfet
The Monoprice maker select v2(.1?) Is a little over $300 on Amazon, but other than that, it fits all of your other needs. It uses standard metric screws and such, so fixing and modding the printer is easy. It's also has a respectable build volume of 200mm^2 and a height of 180mm, which is nice to have. It comes mostly assembled: you just need to use 4 included screws to attatch the gantry to the base and 2 more to attach the filament holder. It took me no time at all to start a test print. I'm coming up on six months with my printer now, and it hasn't given out on me once. For the best prints, you'll want to do some mods, but only the absolutely necessary MOSFET mod requires non-printed hardware that isn't just screws and nuts (or the standard M8 threaded rod used in AzzA's Z-brace mod).
Tl;dr: Monoprice Maker Select v2 on Amazon, order a MOSFET to go with it, 10/10 IGN
I went with this
this standoff made to fit that mosfet may be of interest as well.
https://www.amazon.com/gp/product/B01HEQVQAK/ref=oh_aui_search_detailpage?ie=UTF8&amp;psc=1
I ordered two of them, one is operating just fine on the A8 for the past 6 months or so. The other one is the topic of this conversation.
Ha: Reading that listing again, it says 15 amps max. I guess there is my answer.
Amazon, here's one: https://www.amazon.com/gp/product/B01HEQVQAK/ref=ya_st_dp_summary?ie=UTF8&amp;psc=1
I know this may seem like a silly question but it is nearly impossible without any knowledge to search for these connectors online. I am referring to the white connector with the cable installed. It looks similar to a JST but slightly different. Look at the link. This is a heatbed mosfet and I need to replace the cable due to a printer redesign. If anyone knows the style of connector I would be very grateful. The wire is about 20 gauge. Here's a link to the product page, I couldn't find any info there.
save yourself some headache and get one of these:
https://www.amazon.com/Gizmo-Dorks-Printing-Surface-Adhesive/dp/B01KGDTPQK/ref=sr_1_2?ie=UTF8&amp;qid=1484844933&amp;sr=8-2&amp;keywords=PEI
Here you go. Just buy the appropriate size for your printer!
for your size, this would be the easiest solution.
You just wouldn't be able to sand it. But it can still last a long time if you're careful with it.
It seems that your comment contains 1 or more links that are hard to tap for mobile users.
I will extend those so they're easier for our sausage fingers to click!
Here is link number 1 - Previous text "PEI"
----
^Please ^PM ^/u/eganwall ^with ^issues ^or ^feedback! ^| ^Delete
Gizmo Dorks PEI Sheet 12" x 12" 1 mm 3D Printer Build Surface with 3M 468MP Adhesive Tape
https://www.amazon.com/dp/B074XLD5QH
I bought this one and it's been working great. It's thick enough that it can take some prying and if it starts to lose adhesion you can lightly sand it with some 1000 grit to restore it.
Best thing to do is get some Mirror Tiles at any Home Improvement store. Cheap and flat (who wants a wavy mirror? LOL).
Lowes in the US has them $9 for Six. I had two not flat but 4 fine. Home Depot and Ace Hardware also have them IKEA is another source.
>Athorbot adhesive mats - Those are a knockoff clone of the BuildTak mats. They're OK, but do wear out.
I went down that road last year, ended up using PEI on my printers and haven't looked back:
https://smile.amazon.com/gp/product/B074XLD5QH
Sticks well when warm or hot, releases almost instantly when cool.
But BEFORE any of this works your Bed needs to be flat,most machines it's NOT. (Not the glass, the Aluminium bed).
A quick check with a known straight edge (like a 24" machinist's rule) will let you see. Put it edge on with a well lit white wall or sheet of paper and check the bed, front to rear, also side to side.
Most have a dip in the center, some are raised in the center.
Unless the glass is VERY thick, it will dip when clipped to the bed.
I did a couple posts / comments about how to properly flatten the bed. It's a bit of work, but you'll do your happy dance when it's nice & flat.
Most adhesion & first layer issues are caused by an unflat and un-trammed (proper name for "leveled") bed. Probably 50-60% of the "Help Me!" posts are this!
With a properly trammed bed you don't need glue or Hairspray, or tape or other "goop" in 90% of the cases. You can actually print straight onto the glass or PEI, many do. (including MOI) Super smooth bottoms.
Here's' the posts, first, some basics:
https://www.reddit.com/r/CR10/comments/86c47m/psa_a_must_read_by_anyone_who_levels_their_bed_or/
Then follow this to tram the bed:
https://www.reddit.com/r/CR10/comments/7rpq2x/can_i_simulate_a_print_without_damaging_the/
Let us know how it goes!! Trust me, it's worth the effort.
PuterPro
What I did was I got a nice thick borosilicate glass plate from amazon, the one with the corners cut off so it fits the bed perfectly without the heated bed bolts interfering. Then I got a sheet of PEI with 3M adhesive on the back. I cleaned the glass with alcohol and then carefully applied the PEI so there weren't any air bubbles.
&#x200B;
This is the glass:
https://smile.amazon.com/Gulfcoast-Robotics-Borosilicate-Duplicator-Printers/dp/B07B2YLWF9/ref=sr_1_5?crid=2640M0KDOPOV&keywords=borosilicate+glass+plate&qid=1555903635&s=gateway&sprefix=borosilicate+glass+pl%2Caps%2C153&sr=8-5
&#x200B;
And this is the kind of PEI:
https://smile.amazon.com/Gizmo-Dorks-Preapplied-Laminated-Adhesive/dp/B07GSJSDWR/ref=sr_1_4?keywords=PEI+sheet&qid=1555903728&s=gateway&sr=8-4
&#x200B;
I have gone through a handful of these borosilicate sheets, and have had one or two that were warped. All of them were thinner than the Gulf Coast Robotics one. Theirs is bang on flat and way tougher, hands down the best. When you apply the PEI, make sure you do it very carefully as to not create any bubbles underneath. I started on the center of one edge and slowly applied from one side to the other, peeling the backing off as I went. Press it down from the center out as you lay it down and you shouldn't get any bubbles. Lots of very tiny bubbles are to be expected and work their way out after a while (Im talking really tiny). As for attaching the glass to the bed, a set of four binder clips are perfect. Don't bother with the thermal pads some people suggest, they make it a pain to remove the glass in between prints and don't really do anything.
&#x200B;
This is a great way to have a removable build surface that everything sticks to. I have since moved up to a Prusa MK3, so I get to enjoy the luxury of the magnetic PEI build plate. You could get a similar thing going, BuildTak sells a magnetic build surface that you apply to the heated bed. The drawback of this is that if your bed is warped at all, the magnetic sheet does nothing to correct it. The thick glass on the other hand makes everything nice and flat.
&#x200B;
I should add that to put the glass sheet on, you will have to move your z endstop switch down. There are several mounting holes on the printer to do this already so its really not that hard, you just have to experiment. The glass is about 4mm thick so you have to adjust for it.
go to lowes and have a piece of glass cut for about 3 bucks, buy a sheet of PEI (like this one) slap it on the glass and never worry about bed adhesion problems, glue sticks, painters tape or any other stupid bed problems again. You hit print, it prints and sticks, it cools and you pop it off easily with the result of a butter-smooth first layer.
I just have the Creality glass bed from amazon https://www.amazon.com/gp/product/B07FSM8DK9/
It's been fantastic. Assuming your bed is properly leveled you don't even need to use adhesive, just make sure to clean it every once in awhile.
I ended up ordering a generic borosilicate glass bed and applied some GizmoDorks PEI to the top of it. Works excellent and I don't need to use any painters tape or glue stick with it. It was a great upgrade from stock and much easier to level. Haven't decided yet if I want to dump my dial indicator leveling for a BLTouch or equivalent. I might end up doing that though.
Link: Official Creality 3D Ender 3... https://www.amazon.com/dp/B07F16WPR5
Hi, I have the tempered glass one with ridges, they don't say it needs anything. I think If you use a glue-stick on it would stick forever. When I had it placed good it worked without anything, but something happend and it unleveled itself.
https://www.amazon.com/Creality-3D-Platform-Tempered-235x235x3mm/dp/B07FSM8DK9/ref=sr_1_4?keywords=ender+3+glass+bed&amp;qid=1566487149&amp;s=industrial&amp;sr=1-4
The idea on using the glass to space it is great! I will try it!
Thankyou for respoding :)
I went with the Crealitty Glass Bed Upgrade
There are mixed feelings on what to go with. A lot of people just use a mirror or similar, but to me it was worth $20 to know it wasn’t going to shatter on me at any point.
I bought a heated glass plate also: https://www.amazon.com/dp/B07FSM8DK9/ref=cm_sw_r_cp_apa_i_i-RBCbRVFQ0FN
All I do is maybe 8 back and fourths over where it's going to print then rub it in with my hand.
Hey I also new on this, got my printer a month ago, I was super exited as everyone here when receive their printer, I read a LOT while waiting for the printer, so I heard that the stock bed springs are crappy, so I ordered this ones FYSETC Bed springs, also ordered the Aluminium Extruder feeder, and read about the leveling, the paper sheath method, which I think you should already heard about, I did it at the first time the printer gave me a nearly perfect first print (demo dog) , after a few prints and on my third print I came home just to find a mess on my printer, so I did my research again, find out it was bed adhesion, and find out that the best way was glass bed + PEI sheet was the best option, while waiting to arrive I tried to clean the stock bed sheet with mineral spirits (did have rubbing alcohol) but it worsened the adhesion, so I used one adhesion sticker that comes with the overture filament, and again flawless adhesion, at least for the first 4 prints, then again the frustration, I tried some glue stick and worked but it leaves a mess on your print so I decided to try painters tape directly onto the aluminum bed (which lucky for me it is perfectly flat) this is the best adhesion I have tried, problem is also makes a mess with the down face of the print, Finally mi Gass-PEI arrived, (3 days ago), it has a great adhesion but is not perfect, also you have to raise the Z limit switch to compensate the 5~ mm of Glass-PEI, find out that it isn't perfectly flat it has a good adhesion and leaves a very smooth down face, but at some section it does't sticks well and leaves artifacts on the down face, I'm currently working to fix this.
Sorry for the long post, need to talk about my frustration and let you know you are not alone on this, once you manage to make a good print is very satisfying, I have a PETG filament waiting to be used but I don't think is a great idea to try it until a learn more about 3D printing and the Ender.
I recommend a PEI sheet
Gizmo Dorks PEI Sheet 3D Printer Build Surface 235mm x 235mm (9.3" x 9.3") with Preapplied Laminated 3M 468MP Adhesive for Creality Ender 3 or CR 20 | Made in The USA https://www.amazon.com/dp/B07GSJSDWR/ref=cm_sw_r_cp_apa_i_FVfVCb8Q5VK3N
I am confused by this issue, so many people seem to be using all kinds of different adhesives on the glass, I use none at all. Ender 3 with https://www.amazon.com/gp/product/B07F16WPR5/ref=ppx_yo_dt_b_asin_title_o03_s02?ie=UTF8&psc=1 glass bed, and mp select mini v2 with a random piece of glass and a piece of borosilicate, I've never had a problem with sticking, bed temps of all sorts. I wonder if this could be a climate type issue, I live in Fort Collins Colorado, it is fairly dry here and not to hot or cold, what type of climate are you guys printing in?
Amazon's where I got mine...
The problem is that people still refer to information from 10 years ago in regards to 3d printing and wont let go of it. Hairspray and glue stick are one of those ideas that needs to be buried.
Buy some PEI
https://www.amazon.com/Gizmo-Dorks-Preapplied-Laminated-Adhesive/dp/B07GSJSDWR/ref=sr_1_5?keywords=pei&amp;qid=1574003872&amp;sr=8-5
and apply this to your glass. Then just wipe it with isopropyl once and a while.
Then the only time you will use gluestick is when you want less adhesion. To give you an idea, I can turn on my heated bed and get old prints to stick again.
The stock bed is known to warp sometimes. Ever since I got the glass bed for mine it's been amazing. https://www.amazon.com/gp/product/B07F16WPR5/ref=ppx_yo_dt_b_asin_title_o07_s00?ie=UTF8&psc=1
I struggled with adhesion for the first couple weeks of printing. Then I swapped my stock bed for a glass + PEI combo. Got the flatness of the glass + the adhesion of the PEI. Once the plate cools down a few degrees, the parts come right off. No need for sticky hairspray to get things to stick, and no need to put the bed in the freezer to get things to unstick. Best upgrade I’ve made on my ender 3 (~$30 total). Always wipe down with isopropyl alcohol in between prints for best adhesion.
Tip: I also recommend gently wet sanding the PEI. Helps with adhesion and creates a very nice matte finish on the first layer.
Glass Bed:
Nearly Natural 4855 35in.... https://www.amazon.com/dp/B07JKGNB6W?ref=ppx_pop_mob_ap_share
PEI:
Gizmo Dorks PEI Sheet 3D Printer... https://www.amazon.com/dp/B07GSJSDWR?ref=ppx_pop_mob_ap_share
I bought a regular glass bed off amazon and really liked that but the textured surface started to fail after a while and I didn't like having to clean off adhesives or hairspray. I got this PEI build surface from amazon and stuck that on top of it. The ender 3 pro's magnetic bed base is enough to keep the glass in place and the PEI sheet has adhesive on the bottom of it so I don't need to use the binder clips like I thought I would have to at first. It all just stays in place without shifting and I have access to the full print bed. The glass is still on there to correct a warp in the base bed and the PEI is honestly such an upgrade from glass. Things stick with no effort and come off easily at the end, except PETG which sticks like nobody's business and is harder to remove.
Creality 3D Printer Platform Heated Bed Build Surface Tempered Glass Plate for Ender 3/Ender 3 Pro 3D Printer 235x235x3mm https://www.amazon.com/dp/B07FSM8DK9/ref=cm_sw_r_cp_apa_i_SxkoDb69RT69H.
If you print PLA, you're good to go. Any other you might need glue stick, (it ain't that bad).
Here's the aluminum extruder assembly. The plastic one that comes on the printer WILL break. It's just a matter of time. They crack from stress after a while and even before that they creep and you'll start getting missed extrusion.
Here's the stiffer bed springs. You won't have to compress these as much to get a good stiffness.
Another really popular upgrade is this glass build plate. It has a special coating that makes it so parts stick without adhesive, and it leaves a really smooth surface on your prints. Parts stick really well then when it cools down they self-release.
The 3 upgrades I linked are extremely popular upgrades. You can get by without the glass bed, it's just an option because the stock bed will wear out eventually.
Printed in two parts. You can see the seam right above where I redacted my PII. Printed in Overture PETG. I used CHEP's petg profile in Cura but had to turn the flow rate down on the printer to 65% because the infill was falling apart. took about 18 hours total I think. printed on the this glass bed because my build plate has a huge bulge in the center. 205C/50C. Going to CA glue and clamp it together and prime and paint it to look like aged/patinaed copper.
This is only about my fourth print and my first with PETG. I can't believe the quality and surface finish I can get out of this little workhorse
Yeah, that's kinda what I was worried about. This is what I purchased. https://www.amazon.com/gp/product/B07FSM8DK9/ref=ppx_yo_dt_b_asin_title_o01_s00?ie=UTF8&amp;psc=1
I was kinda hoping to be able to put the sticky build sheet on the back side, and leave the coated side against the heated plate. The reviews seem to suggest that the coating wears away very quickly. But I'm afraid that the coating will mess with the adhesion of the polycarb build sheet.
Ideally, it would be great if I could just put the polycarb sheet on the back, and just flip it back and forth and use both surfaces. Just don't know how safe it would be having either surface directly against the build plate.
I just ordered one today. https://www.amazon.com/dp/B07FSM8DK9/ref=cm_sw_r_cp_apa_i_ApDCCb7WCN032
I want to say it has a textured surface where you don't have to use hairspray and the like.
Thanks for the detailed reply.
&#x200B;
I need to read more to understand the z switch and z screws you are referring to. I have no idea what those are. I assembled by watching some channel on youtube do it. It was like a tales from the crypt vibe channel.
&#x200B;
As much as it sucks, I probably need to completely disassemble it and start over. There has to be something done incorrectly for it to be this difficult. I am definitely going to get one of those gauges before I get back into. I returned the springs today and ordered different springs on amazon. When they get here, I might sit down one night and try again.
&#x200B;
As for the bed, the glass one I got was scratched to hell from those stupid springs. I didn't know I had to raise or lower whatever switch you were talking about. Like I said earlier, I already ordered a SD card reader so that will be a definite mod. As for the octopi, is there a list somewhere on this subreddit of everything you need to purchase before starting? I have a raspberry pi at the house. I originally bought it to build a retropie but I haven't gotten around to it yet. I could use it for the printer if needed. I really like the idea of remote printing, having a webcam to see the print live, and putting a part on there that stops the print if there is a filament issue.
&#x200B;
I have to go into the city tomorrow so I was thinking of stopping by ikea and getting some Lack Tables for the eventual enclosure but now I don't know if I am even going to keep the Ender 3. I am debating on returning it and moving up a tier. I really want to get started on this but it seems like I am never going to be able to print any of this awesome stuff. So many awesome files on thingiverse and I can't use any of them.....
&#x200B;
Here are the parts I have purchased so far....
&#x200B;
SD Card Extension
&#x200B;
Glass Bed
&#x200B;
Springs that I bought that would not lower bed enough
&#x200B;
Most Recent Springs I am going to try
&#x200B;
Metal Extruder Upgrade
&#x200B;
Filament Black and Red
This is the one I bought.
https://www.amazon.com/gp/aw/d/B07FSM8DK9/ref=yo_ii_img?ie=UTF8&amp;psc=1
Its a great printer. Upgrade your springs and get an aluminum extruder. Those two things were so cheap, but definitely made a difference for me. I use a glass bed with a PEI sheet and have been very happy with it. I use eSun PLA Pro for my minis. Check out Tomb of 3d Printed Horros for their cura profiles and tips!
https://www.amazon.com/Gizmo-Dorks-Preapplied-Laminated-Adhesive/dp/B07GSJSDWR/ref=asc_df_B07GSJSDWR/?tag=hyprod-20&amp;linkCode=df0&amp;hvadid=312163444503&amp;hvpos=1o1&amp;hvnetw=g&amp;hvrand=3399292976891203176&amp;hvpone=&amp;hvptwo=&amp;hvqmt=&amp;hvdev=m&amp;hvdvcmdl=&amp;hvlocint=&amp;hvlocphy=9001880&amp;hvtargid=aud-801657747996:pla-584394961083&amp;psc=1
https://www.amazon.com/Creality-3D-Platform-Tempered-235x235x3mm/dp/B07FSM8DK9/ref=mp_s_a_1_6?crid=3FDMZV71B8DWJ&amp;keywords=ender+3+glass+bed&amp;qid=1551067444&amp;s=gateway&amp;sprefix=ender+3&amp;sr=8-6
Using this bed
Creality 3D Printer Platform Heated Bed Build Surface Tempered Glass Plate for Ender 3/Ender 3 Pro 3D Printer 235x235x3mm https://www.amazon.com/dp/B07FSM8DK9/ref=cm_sw_r_cp_api_i_4BwJDb8ZYB5F2
Mine came with 3m already on the backing so I just had to carefully apply it to the glass.
Gizmo Dorks PEI Sheet 3D Printer... https://www.amazon.com/dp/B07GSJSDWR?ref=ppx_pop_mob_ap_share
Directly. Creality 3D Printer Platform Heated Bed Build Surface Tempered Glass Plate for Ender 3/Ender 3 Pro 3D Printer 235x235x3mm https://www.amazon.com/dp/B07FSM8DK9/ref=cm_sw_r_cp_tai_s9RvDbM16RZ7Y is the one I got. It has a coating on it. I have been extremely happy, though it took me another 15 minutes to relieved since it’s thicker and you gotta reset everything.
Only real change is you should wait for it to cool before pulling stuff off, but once it cools, it doesn’t stick. Like... at all. It’s quite nice. Also, it doesn’t warp, which I only found out after, because I was only after a new bed and figured I’d upgrade. Then I read about it ;)
I'm considering this one
https://www.amazon.com/dp/B075XJ5ZP1/?coliid=IUXV0TTQ913KW&amp;colid=RQNFRG4K2XJ7&amp;psc=0&amp;ref_=lv_ov_lig_dp_it
This is the exact piece I bought
https://www.amazon.com/gp/product/B01LX3CS6Y/ref=oh_aui_search_detailpage?ie=UTF8&amp;psc=1
This one might be a bit better:
https://www.amazon.com/130mm-160mm-Borosilicate-Polished-Corners/dp/B075XJ5ZP1/ref=sr_1_1?s=industrial&amp;ie=UTF8&amp;qid=1520966311&amp;sr=1-1&amp;keywords=130+borosilicate
It specifically says the dimensions fit the MP Select Mini well, and the cut corners clear the adjustment screws. The biggest problem I have with the piece I bought is that I have to hold it in place with binder clips on the edges. In order to not rub on the printer axis parts, you need to take off the binder clip handles, and in order to clear the print head, you need to move them as far towards the edge as you can. So it's a bit of a pain when they happen to pop off from vibration or hitting the print head. The larger piece I linked should mean you can clip from the front and back instead where mechanical interference isn't a problem.
People will say it's dumb to spend $20 on a print surface for a $200 printer, and that you can get away with a piece of frame glass for $1.50 instead. They're right, but it's a pain, and $220 for a printer with an excellent surface doesn't seem like much of a ripoff to me.
This is what I am using
there is a z-spacer on thingiverse, and a glass plate that fits on amazon
glass bed:
https://www.amazon.de/dp/B075XJ5ZP1/ref=cm_sw_r_cp_api_i_7dVRCbQQP1926
z-spacer:
https://www.thingiverse.com/thing:1808029
For those looking for a glass bed: https://www.amazon.com/gp/product/B075XJ5ZP1/ref=oh_aui_detailpage_o03_s01?ie=UTF8&amp;psc=1
Borosilicate glass has high heat tolerance and is resistant to rapid heat changes. The one posted here fits perfectly on MPSMv2
I bought the glass off of amazon:
https://www.amazon.com/gp/product/B075XJ5ZP1/ref=oh_aui_search_detailpage?ie=UTF8&amp;psc=1
I'm using hairspray on the glass.
with the help of this awesome community, i got this one.... works like a champ..
https://www.amazon.com/gp/product/B075XJ5ZP1/ref=oh_aui_detailpage_o03_s00?ie=UTF8&amp;psc=1
Sorry I actually replaced the entire drive feed piece, not just the spring.
I got this one but also this other one for our other cr10 because I don't like the stock driver gear.
This was the last resort option for me after I've checked EVERYTHING. Leveling, clean nozzle, different temp/flowrates, different filaments, slower speeds, different slicers, etc. I even swapped consoles and motor steppers with other working cr10s to get down to the issue.
I decided to print vase mode and check the density of the print through a light. For a portion of it I held the spring out so that the gears will grip the filament better. During that portion the print was nice and solid and the other parts it was very see through and some layer separation. That was the final call that got me the new drive gear.
Ok seems it was $20.
Someone recommended this https://www.amazon.com/HICTOP-Upgraded-Replacement-Aluminum-Extruder/dp/B0761PGLZ4 in a reddit comment.
Since I was at that moment testing a calibration cube at 135% flow rate and still seeing random under extrusion I figured. Why not?
just barely mounted it last night so haven't done much printing.
Apart from a cube and a cable catcher that failed.
But the layer lines are excellent compared to before.
I think it might be an extruder problem because it only affects about 5 percent of the layers, probably more likely that the extruder slips and then recatches rather than the nozzle clogging and unclogging itself right? and if so would this be a good idea to fix it?
Here you just need one of these. Those plastic extruders feeds will eventually development a groove from the filament dragging and will cause what you are talking about. This is the same one I bought no problems since.
HICTOP Upgraded Replacement Aluminum MK8 Extruder Drive Feed for Creality 3D Printer Ender 3/3Pro CR-10, CR-10S, CR-10 S4, and CR-10 S5 https://www.amazon.com/dp/B0761PGLZ4/ref=cm_sw_r_cp_apa_i_IFPNDb5XJEYWF
This might work, but it's a different style. Amazon has these: https://www.amazon.com/dp/B0761PGLZ4/ref=cm_sw_r_cp_apa_i_Zg4LDbB1BRRG0 which are the same style, but aluminum.
I got this one and it's working great: https://www.amazon.com/gp/product/B0761PGLZ4
That's a real bummer :( it sounds like it needs a shim, or to be returned and replaced. I bought this one and other than needing an additional m3 screw to hold the spring in place (I think I just lost the other one during the install) it's worked flawlessly. I also picked up a set of stainless extruder gears. Together these parts are performing flawlessly. not a great example, but it was dark when I took the picture.
Ah thanks. Have you tried the aluminum extruder drive feeder mod ?
Extruder upgrade.
I found this one after doing a search for an hour tonight on different websites: https://www.amazon.com/gp/product/B0761PGLZ4/ref=ox_sc_act_title_3?smid=A2UHE58S2974CT&psc=1
UPDATE
After cleaning out my bowden tube between the tube itself and the nozzle, and removing the gunked up crud as well as trimming the end of the bowden tube where some filament was partially blocking, I put everything back together as it should be and set another test print for last night. I used the same model I had printed somewhat successfully but changed the following:
.2 less on wall thickness
10% less on density
10 added to Print speed
40 added to Travel speed
10% less on support density
And unfortunately, alittle more than halfway through the print this happened:
https://imgur.com/VbJXFJI
https://imgur.com/LrwHxlB
https://imgur.com/fcVClfZ
&#x200B;
This morning I pulled apart the bowden tube and nozzle again to check for that problem from before but this time everything was fairly clear, no gunk in between tube and nozzle. At this point, I think it may be the extruder or possibly even something to do with the feeding of the filament spool itself since it seems to be a problem occuring around the same height everytime. I ordered an upgraded extruder [aluminum body] and better bowden tube this morning. Has anyone else noticed this kind of problem occurring consistently around the same height?
&#x200B;
&#x200B;
&#x200B;
Yeah I've already upgrade to an all aluminum extruder.
Out of curiosity, which one are you using?
This guy: here super cheap and helps the printer grab onto the filament a little bit more. I noticed that mine would sometimes slip during retractions. I'd also make sure you are using the little clips that hold the ptfe tight into the coupler. Excess play here can also cause issues
Would this work? https://smile.amazon.com/Micro-Hotend-Creality-Printers-TronXY/dp/B0789V2D7C
First off, there is no perfect printer. There are only tradeoffs and choices. But between the gMax and the S5, we would choose the CR-10 S5. Why? Here are some of my thoughts about each...
gMax 1.5 XT+
Creatily CR-10 S5
The Bottom Line
That's our experience in a nutshell.
Micro Swiss All Metal Hotend Kit for Creality CR-10 / CR10 / CR10S / Ender 2 / Ender 3 Ender 5 Printers .4mm https://www.amazon.com/dp/B0789V2D7C/ref=cm_sw_r_other_apa_i_J-AFDb6CRKAMW
Is this hot end considered a good upgrade. Right now I'm having clogging, a lot of stringing. And I'm levelled well and all my settings are pre-loaded with this auto-leveling print. I'm lost, i feel like things aren't flowing well.
A genuine microswiss, sure https://www.amazon.com/Micro-Hotend-Creality-Printers-TronXY/dp/B0789V2D7C/ref=pd_cp_328_1/135-5486205-8497053?_encoding=UTF8&pd_rd_i=B0789V2D7C&pd_rd_r=e8b874f2-aefe-4408-a022-6a0c0272998d&pd_rd_w=RcLct&pd_rd_wg=Ravoy&pf_rd_p=0e5324e1-c848-4872-bbd5-5be6baedf80e&pf_rd_r=A9ZWV06R064NQD1A9VDT&psc=1&refRID=A9ZWV06R064NQD1A9VDT
But when it comes to clones, trianglelab is the only company that makes them as good or very close to the real thing.
I"m going to say no. That is a stock Ender 3 hotend. The PTFE bowden tube will break down at or before 240C and release potentially toxic fumes. You want a hot end that does not allow the bowden tube to get too close to the melt zone & heating element. You can replace the standard heatbreak with something that keeps the PTFE away from the heat zone like this one (not saying it works with the Ender 3, I haven't tried it but look at the drawing and you see the bowden tube is kept a fair distance from the nozzle end of the heatbreak) https://www.amazon.com/dp/B077GRX256/?coliid=IOHVUCVLQ020R&colid=130JFFKF5YAUO&psc=0&ref_=lv_ov_lig_dp_it
&#x200B;
Microswiss hot end ( https://www.amazon.com/Micro-Hotend-Creality-Printers-TronXY/dp/B0789V2D7C/ref=sr_1_1_sspa?keywords=microswiss+ender+3&qid=1555949725&s=industrial&sr=1-1-spons&psc=1 ) seems to be the gold standard for all metal hot ends.
I never had this happen, but I had a lot of clogging etc, until I switched to a Micro Swiss all metal hotend. It, plus printing out a fang cooling duct made things so much better. Search Thingiverse for "fang" and you will see a bazillion different flavors.
Thanks - I'll check that one out. Here's the hot end I got:
https://www.amazon.com/gp/product/B0789V2D7C/ref=oh_aui_detailpage_o04_s00?ie=UTF8&amp;psc=1
Mods:
Ended 3 official 1.1.5 from here. All mainboard settings are stock.
Aluminum extruded from here.
Capricorn tubing from here.
Cura 4.1 on Linux
Filament at 210 on hotend, 60 on bed.
Do you have this upgrade?
CHPOWER CR-10 Extruder Upgraded Replacement, Aluminum MK8 Drive Feed 3D Printer Extruders for Creality Ender 3, CR-10, CR-10S, CR-10 S4, CR-10 S5 https://www.amazon.com/dp/B079JZ374W/ref=cm_sw_r_cp_apa_i_HH5HDbJQ21BKB
That fixed my problem, tensioner stays very tight now
https://www.amazon.com/CHPOWER-Extruder-Upgraded-Replacement-Extruders/dp/B079JZ374W
I’m not logged in on mobile, 95% sure this is it. The only weird thing you need to do: break the lock tite seal on the knurled gear on the stepper [to get it off]. Otherwise you need to buy a special replacement bearing for the one that comes stock in the kit(dunno which one).
https://smile.amazon.com/gp/product/B079JZ374W/ref=ppx_yo_dt_b_search_asin_title?ie=UTF8&amp;psc=1
Can't speak to whether others have better/worse build quality, but this one's worked for me. I did keep the original screws/metal parts instead of what came with the new one.
Here: https://www.amazon.com/gp/product/B079JZ374W/ref=ppx_yo_dt_b_asin_title_o01__o00_s00?ie=UTF8&amp;psc=1
Ah my bad, wrong thread, this one
https://www.amazon.com/gp/product/B079JZ374W
This is the one that I got: Title of link (optional) I got a metal extruder housing as well but I honestly don't think it's necessary, just nifty.
There is an all metal extruder. Here's an Amazon link to a popular one that I was thinking of getting before I figured out my problem.
&#x200B;
Anyone got any others?
Hey Omnioji,
I am a big fan of yours, would love to help, but some more info would be needed.
I know you say FDG profile, but some things in those profiles are also kinda fluid and need to be adjusted by you. So in particular, what is your print temperature? What are your retraction settings?
One simple fix which would likely give you some improvement would be to upgrade your bowden tube to a smoother PTFE Tube which causes less friction on the filament and therefor reduces stringing.
Oh I know. I recently replaced mine with a Capricorn Bowden PTFE tube from Amazon. They give you enough to do about 2 or 3 tube swaps.
i think you forgot this?
https://www.amazon.com/Capricorn-Bowden-Filament-Genuine-Premium/dp/B079P92HN9/ref=sr_1_1_sspa?keywords=ender+3+bowden+tube&qid=1569894105&s=gateway&sr=8-1-spons&psc=1&smid=A1D7NBXHNTHOV9&spLa=ZW5jcnlwdGVkUXVhbGlmaWVyPUFJSUJYQ0tXSkpBRzMmZW5jcnlwdGVkSWQ9QTA0MTM1MjUxNkRURzdBN0VJVUc5JmVuY3J5cHRlZEFkSWQ9QTAxMDQwODYyRFE0U0dKQk82VUc5JndpZGdldE5hbWU9c3BfYXRmJmFjdGlvbj1jbGlja1JlZGlyZWN0JmRvTm90TG9nQ2xpY2s9dHJ1ZQ==
&#x200B;
This seems to be the one everyone uses, and I also have this installed on both of my printers.
All 3 as they are really cheap.
Bowden Tube
Aluminum Extruder
Bed springs
I bought some of this bowden tubing : https://www.amazon.com/gp/product/B079P92HN9/ref=ppx_yo_dt_b_search_asin_title?ie=UTF8&psc=1 for my Wanhao Duplicator clone. I think it makes a difference. (Definitely touches hot end and nozzle in this printer)
Here's my favorites!
Filament standoff arm to keep it from pulling straight down
https://www.thingiverse.com/thing:2917932
&#x200B;
And Complimentary filament guide:
https://www.thingiverse.com/thing:2894097
&#x200B;
Ribbon Cable Clips:
https://www.thingiverse.com/thing:2960375
&#x200B;
I added an SD card ribbon because the micro SD location and size Sucks!
https://www.amazon.com/gp/product/B01D9JIUU0/ref=ppx_yo_dt_b_asin_title_o01_s00?ie=UTF8&psc=1
&#x200B;
Fan cover to get rid of upwards draft, and keep little bits of filament out of the fan:
https://www.thingiverse.com/thing:2935204
&#x200B;
Immediately replace that crappy Plastic extruder with any metal one off amazon.
&#x200B;
Capricorn Bowden Tube:
https://www.amazon.com/gp/product/B079P92HN9/ref=ppx_yo_dt_b_asin_title_o02_s00?ie=UTF8&psc=1
&#x200B;
Powder Coated PEI Magnetic Build sheet! (Priceless!)
https://www.aliexpress.com/item/trianglelab-235-X-235-ender-3-Double-sided-Textured-PEI-Spring-Steel-Sheet-Powder-Coated-PEI/33008374363.html?spm=2114.search0104.3.8.221538feJjwDlN&ws_ab_test=searchweb0_0,searchweb201602_7_10065_10130_10068_10890_10547_319_10546_317_10548_10545_10696_453_10084_454_10083_10618_10307_537_536_10059_10884_10887_321_322_10103,searchweb201603_52,ppcSwitch_0&algo_expid=04b2bf81-a9de-45c6-9ea4-23cf0e249943-1&algo_pvid=04b2bf81-a9de-45c6-9ea4-23cf0e249943&transAbTest=ae803_3
&#x200B;
Change your fans over to Noctua fans, and the printer becomes nearly silent. (amazon)
&#x200B;
I got an EZABL bed leveling kit. Doing BL Touch soon, but The EZABL has pre-configured firmware, which made life easy!
Raspberry pi zero W or 3B+ with octoprint is a must!
&#x200B;
These got me into sexy print land pretty quick!
List of mods on my Ender 3 Pro:
I use Cura for my slicer, and use the default setting there for the Ender 3.
https://www.amazon.com/gp/product/B079P92HN9/ref=ppx_yo_dt_b_asin_title_o07_s00?ie=UTF8&psc=1
Meanwell power supply:
https://www.amazon.com/gp/product/B013ETVO12
Ferrules and crimper:
https://www.amazon.com/gp/product/B07LCF39W9
Stepper smoothers (3-pack):
https://www.amazon.com/gp/product/B0727QT316
Capricorn PTFE tubing:
https://www.amazon.com/gp/product/B079P92HN9
Performance 3-D MK8 Apollo 0.4mm extruder nozzle:
https://www.p3-d.com/collections/duraplat-3d-extruder-nozzles
Glass bed (appears to be produced by creality), ebay seller usbkits :
https://www.ebay.com/itm/Creality-3D-Ender3-Ultrabase-Heat-Bed-Glass-Plate-235x235mm-for-3D-Printer-X6W6/143049426638
Aluminum drive feed, ebay seller creality-3d-direct :
https://www.ebay.com/itm/Upgrade-Aluminum-Extruder-Drive-Feed-Frame-For-Creality-Ender-3-3D-Printer/223095519332
***the tube fitting in this kit did not work well, so I used the fitting from the stock creality assembly and it worked fine.
&#x200B;
THD Firmware:
https://www.th3dstudio.com/knowledgebase/th3d-unified-firmware-package/
That's possible if you're overconstraining the bed and warping it yourself. That's why people recommend 3 point leveling nowadays.
Instead of the bed, look to see if the y-carraige is bent. That's the thing under the bed that the bed rides on. https://www.amazon.com/Gulfcoast-Robotics-Carriage-Duplicatior-Printers/dp/B07B251KBS you can get replacments of those. And if that's bent, you'll run into issues too.
If all goes wrong or you want to upgrade your carriage this one comes pre-drilled for 4 point and 3 point
Thanks! I got my carriage plate from Amazon, this one specifically: https://www.amazon.com/gp/product/B07B251KBS
The buildtak that came on it was awesome for about 40 days or so of print time. No issues at all, everything stuck real nice but popped off easily with a woodworking chisel. Eventually it started to wear smooth, and the plate it's attached to started to warp pretty bad in the middle. That's when I switched to glass + gluestick. btw I put my glass right on top of the old buildtak rather than try to remove it because it was really stuck on there.
As for the carriage plate, things were good for around 70 days, but eventually what happened was the original plate bent up in the corners so bad that I wasn't able to keep the bed level for more than a single print, and then suddenly I couldn't level anything at all. Since installing the carriage plate, I haven't leveled it again yet.
I'm going to suck it up and print that dii cooler too lol. Might have a friend do my first one since he has awesome cooling already.
I have a maker select v2 and recently switched to 3 point leveling with one of these. Highly recommended.
This gives an excellent overview of the benefits of 3 point leveling.
I was having the same problems as you prior to the upgrade. I couldn't get even leveling across the bed which led to my printer collecting dust for a few months.
So far I've made the following Mods:
Z-Axis Stabilizer
https://www.thingiverse.com/thing:1549403
Cii Cooler
https://www.thingiverse.com/thing:2004629
Y-Carriage upgrade
https://www.amazon.com/gp/product/B07B251KBS/ref=oh_aui_detailpage_o03_s00?ie=UTF8&amp;psc=1
Glass Bed
https://www.amazon.com/gp/product/B07B2YLWF9/ref=oh_aui_detailpage_o05_s00?ie=UTF8&amp;psc=1
Y and X Belt Tensioners
https://www.thingiverse.com/thing:1784375
Adjustable Z stop
https://www.thingiverse.com/thing:2916757
Hotend replacement:
I replaced the stock hotend/PTFE tube setup with an all-metal Micro Swiss hotend ($50):Amazon link to the Micro Swiss all-metal hotend kit: https://amazon.com/gp/product/B01E1HANLS/ref=ppx_yo_dt_b_search_asin_title?ie=UTF8&psc=1
Bed leveling:
Frame Stabilization:
I printed the parts, and purchased the hardware at Home Depot for the Z-brace mod, which stabilized the printer frame:Thingiverse link for Z-brace mod for I3 Plus: https://www.thingiverse.com/thing:1653631(note the original Thingiverse link in comments, which is required for the other Z-brace parts: https://www.thingiverse.com/thing:921948)
Cooling:
I printed a Dii Cooler in PETG and replaced the stock cooler with one of those 24V "squirrel cage" fans, which provided much better cooling for all sides of my prints. Before that it really only cooled the front of prints, leaving the sides and especially the rear of prints looking pretty bad.Thingiverse link for Dii Cooler for i3 Plus: https://www.thingiverse.com/thing:1025471
Couple of thoughts -
Also, it will cost you some money but replacing the Y carriage and adding a good glass plate help too. I'll edit this in a sec with the links.
Edit!
Glass bed: https://www.amazon.com/gp/product/B07B2YLWF9
Y-carriage: https://www.amazon.com/gp/product/B07B251KBS
I originally was using thermal pads between the glass and the print surface. Eventually I found I had better results by skipping the pads, peeling off the print surface, and putting the glass directly on the metal bed with small binder clips on the left and right edges. I use Elmer's purple glue sticks for adhesion and rough it up with a sanding block between prints. Make sure your Y axis rods are level, as well.
Good luck!
Here's the extruder: https://www.amazon.com/dp/B07B96QMN2/ref=cm_sw_r_cp_apa_i_uSFjDbRH4ZQE4
Here's the springs: https://www.amazon.com/dp/B07GXC1G2B/ref=cm_sw_r_cp_apa_i_DTFjDb1KAPZ15
There's tons more. All you need to do is search Amazon. Glad I could help.
I have this one:
https://www.amazon.com/dp/B07B96QMN2/ref=cm_sw_r_cp_apa_i_xMgsDbWPWZ891
The spring that came with it was too weak and so filament was slipping.
Get a all metal extruder top like this: https://smile.amazon.com/3D-Extruder-Aluminum-Filament-Creality/dp/B07B96QMN2
If you don't mind spending, consider just moving over to a direct drive setup like this: https://www.youtube.com/watch?v=omXgJT5V0D4
Would you recommend getting the upgraded aluminum extruder parts (like this one)? And could you explain what you mean by "spring tensioners"?
I had the exact same problem with mine as well. Swapped out to an all metal extruded with a stronger spring.
https://www.amazon.com/dp/B07B96QMN2
Here's the extruder I bought
And here's the bowden tubing and connectors
There's a lot of similar items on Amazon that will work; I just personally went after the popular ones with the highest reviews
Also, if you get the tubing, don't forget to get cutters if you don't have any already
Got my printer in Jan, so still pretty new. I started having the same issue after doing a really long print. After messing with it for a few days and not getting anywhere I ended up replacing the entire extruder block with an all metal one. (
https://www.amazon.com/gp/product/B07B96QMN2/ref=ppx_yo_dt_b_asin_title_o07__o00_s00?ie=UTF8&amp;psc=1)
I feel like getting that gear off is going to be important, not sure i can give any advice as to how to get that off the motor shaft, but you will need to remove the gear to replace the block.
https://smile.amazon.com/gp/product/B07B96QMN2/
I think I only paid about $14 for it. But that's too much. I've seen it elsewhere for less than 1/2 that price.
Specifically I'm talking about these dampers:
https://www.amazon.com/CCTREE-Stepper-Vibration-Dampers-Creality/dp/B07C7FRLNX/ref=pd_ybh_a_52?_encoding=UTF8&psc=1&refRID=JG0WKDDM0VJE0BSHN7EF
I see instructions online about adding these to the stepper motors in order to make them a bit more quiet. The problem though is that my gears don't have the set screw shown in the screenshot there. So therefore I can't move the gear along the shaft. The result is that my gear is not aligned with the belt anymore once the damper is installed.
How do I fix this? I can't seem to pull the gear off by hand. I dunno if it's glued on or what.
https://www.amazon.com/dp/B07C7FRLNX/ref=cm_sw_r_cp_api_6zfOBbMX9DT8P
This is the one I bought and then watched a vid on YouTube and installed them. They worked for me so I don’t know if there’s better quality ones out there or not
Did you install dampers on the steppers (https://www.amazon.com/gp/product/B07C7FRLNX/ref=oh_aui_detailpage_o00_s01?ie=UTF8&amp;psc=1)? I started having that problem after doing that upgrade. I don't understand why it has the effect, but if you build up the "finger" on the switch with several layers of tape you should be able to get it working well enough again to print out a real bumper (https://www.thingiverse.com/thing:3003918)
I just installed these cheap dampers, like the ones you linked.
https://www.amazon.com/gp/product/B07C7FRLNX
The instructions I followed were here, and include good instructions for the extruder damper installation as well, if you choose to go that route:
https://letsprint3d.net/2018/07/07/how-to-install-stepper-motor-dampers-ender-3/
I did not bother with heatsinks, as the temp increase has been nominal, around 3-4c which is only 5-7 degrees F. This will still shorten the life of the stepper a bit, I am sure, but I doubt it will be terribly significant and for me the trade off is well worth it.
Additionally, I have noticed zero issues with my prints. I typically print at 0.2mm, but occasionally at 0.1 and my prints are still silky smooth at either res, enough that the tiny seam zits are the only defects I'm seeing. It did not effect precision either. My calibration items are usually within .00-.02mm in any direction, which is well within margin. That said, I calibrate regularly and at every filament change to keep things working as well as I can.
Wow, thanks for going though that!
Though I'm going with the advice that almost everyone is saying on this post and wait for the printer to arrive.
That said, I'm going to buy the dampeners anyway because I'm in an apartment that the walls are thinner than most apartments in my area. I know that it's a 3-5 db difference based on what I read, but the lower the sound, the better.
I'm going with these dampeners
&#x200B;
I'm also going to get the M3 Scews anyway as well just to have spares.
> My glass was warped. I used the tape it came with to flatten it but then got the mirror.
if the glass bed is warped when it arrives, I'll get a mirror tile after making sure that the printer is working fine.
> Mine came with large knobs already. And the print bed strain relief for the wires.
I've been told now that this is the case. Though I did buy this from the GearBest US Warehouse so I don't know if what they have is the latest. though I guess I'll find out on Thursday.
> I'm still using the stock clips. Or you could print new ones.
I wasn't aware that stock came with clips! So I'm going to skip getting clips until the printer arrives.
> Maybe. I've been using a mirror from Home Depot and it's been ok. I saw the creality magnetic mounted surface was only $22 on amazon so I actually ordered that today.
Can you let me know how that goes? I was wondering about those too.
> Mine came with the upgraded extruder that works better with TPU and such. The holes already started wearing larger though where the filament fed so I got a $20 aluminum setup.
did you order those upgrades or are they on the printer?
> I'm using this new hot end vent ring too this week and been liking it. https://www.thingiverse.com/thing:2912394
Dumb question but are you using PLA or ABS for that vent ring? Just curious.
&#x200B;
Thank you so much for the advice!
Yep - right off of Amazon.
&#x200B;
Stepper Dampers and TL-Smoothers.
Go glass.
PLA sticks with nothing for prep, smooth bottom surface, and very, very flat.
(edit) - with the upgraded yellow springs, I don't even need to level anymore - except when I change tips.
Yep. Just the standard Creality bed.
Official Creality 3D Ender 3 Ender 3 Pro Ender 5 Tempered Glass Upgraded Build Plate Printing Surface for Heated Bed 235x235mm https://www.amazon.com/dp/B07F16WPR5/ref=cm_sw_r_cp_apa_i_35VBDbA6SHFZB
Watch this video to help with assembly. The included instructions are full of engrish and hard to follow. This guy makes it easy, and adds some handy tips. If you're not replacing the bowden tube immediately (you don't need to, but it's a cheap and relatively easy upgrade), skip the steps in his video where he removes the tube and its couplers.
Read this comment for my advice on how to level the bed. Leveling is a misnomer - you don't want it level compared to gravity, but compared to the gantry. The usual advice involves sliding a piece of paper under the nozzle as a feeler gauge. That'll get you close - the steps in my comment will get you just about perfect.
Once you've done that, this fan shroud is one of the few things I'd call an essential upgrade. Also a glass bed.
or you can use this: https://www.amazon.com/XTC-3D-High-Performance-Print-Coating/dp/B00PFXK4JY/ref=sr_1_1?ie=UTF8&amp;qid=1467164171&amp;sr=8-1&amp;keywords=xtc+3d
or this and then epoxy sealer: https://www.amazon.com/DELUXE-MATERIALS-DLXBD044-Perfect-Plastic/dp/B0076LAVFK/ref=sr_1_1?ie=UTF8&amp;qid=1467164177&amp;sr=8-1&amp;keywords=perfect+putty
This stuff
I was gonna start with my own variation on a sledgefire shell and also do tests with this https://www.amazon.com/Smooth-XTC-3D-Performance-Print-Coating/dp/B00PFXK4JY/ to see if it could produce better results than just sanding alone.
I've had good results with the standard .4 nozzle. As long as it prints clean, I've had more success putting effort into post-processing. This stuff does wonders for painting. I've printed minis on .5 and .6 nozzles with similar results in quality.
It can be, though that looks rougher than any of mine. But there's a product called XTC-3D that automatically smooths the striations of 3d-printed objects by filling them in.
On a modern engine it would run rich due to the O2 sensors in the CAT telling the engine to pump more fuel and if terribly bad, throw faults when the CAT O2 sensors get too far outside of tolerance. Also any leaks could be entirely mitigated by coating the thing in XTC-3D:
https://www.amazon.com/XTC-3D-High-Performance-Print-Coating/dp/B00PFXK4JY
https://www.amazon.com/Smooth-XTC-3D-Performance-Print-Coating/dp/B00PFXK4JY
Its a self leveling resin used in certain forms of post processing.
Try This
Smooth-On XTC-3D High Performance 3D Print Coating - 24oz. Unit https://www.amazon.com/dp/B00PFXK4JY/ref=cm_sw_r_cp_apa_ztcRBbQYAWSST
You can use xtc-3d from smooth on to get a super nice smooth finish, that's what I did here
Are you familiar with this stuff for coating?
That looks pretty sick. Just FYI though, you can get rid of those print lines with something like this: 3d print goo
You should try XTC! Its fantastic at filling on 3d prints, 30 minute cure time. Only takes 1 careful coat for fine prints, or 2-3 regular coats for less detailed prints. You can sand it smooth with 400 grit
https://www.amazon.com/XTC-3D-High-Performance-Print-Coating/dp/B00PFXK4JY
Forgot about this for smoothing non-ABS prints: https://www.amazon.com/gp/product/B00PFXK4JY/
I'm not fantastic at 3d printing yet, but I highly recommend this. It's helped to get rid of the "layers" in a print without losing too much detail. You can get a TON out of a single bottle, so it's worth the price. https://smile.amazon.com/gp/product/B00PFXK4JY/ref=oh_aui_search_detailpage?ie=UTF8&amp;psc=1
Buy this
I've got two of these: https://www.amazon.com/ToyBuilder-Labs-Print-Removal-Tool/dp/B00VB1U886/
Work great.
Look at something like this :https://www.amazon.com/dp/B00VB1U886?ref=yo_pop_ma_swf
I used to just wreck prints trying to get it off with the stock scraper they send with the printer. It’s a thinner edge so it really seems to pop it off the bed a lot easier. I got that second one I linked a few posts back and I don’t use one of the tools but the longer one I’ll use after using the first tool on big prints outside of that this one really seems to get under prints with out to much effort.
Another solution that I have heard good results with but I not personally use is this stuff: https://www.amazon.com/dp/B01N2JGTWJ/ref=cm_sw_r_cp_api_xQdWAb79FZS82
It’s on my list to try but my current printer doesn’t really need anything to help with binding or release from the bed. Now I did pick up a bed surface called geckotek : www.geckotek.co it’s supposed to be a bed pad like on the printer already but is supposed to just release prints after the bed cools down. Might run around $20 so it’s not to bad of a loss not sure when I’ll get around to installing it but could be better than the current surface it has now.
For a camera/smart switch look into a octopi setup. It uses a raspberry pi but it acts as a print controller. From what I heard is you can start/stop prints as well as upload prints you sliced and just run it from there. But you are supposed to be able to remote view it with a camera as well. I just never got around to setting one up but I do have everything if I ever need it. I normally run my long prints on the days I know I’m home but I normally don’t have to many issues though I have failures in the middle of the night but with me being close by I can catch it before any chance of damage. I do have my printer on a ups but I think it’s on the end of its life span so I will most likely need to replace it or the batteries later this year.
I just slide this along the edge and it pops up. I don't know why a razor wouldn't work the same, unless you're cutting into the PEI. The tool has blunt edges, but anything rigid and thin should work the same. I only print in PLA, though, so maybe it's different with other materials.
This is what I'm using and it's been fine for the past 6 months; glossy finish. I think what Prusa includes is closer to 7 mil though.
I'm sure there are some differences in heat transfer properties or something with regards to using a thinner sheet; but the only things I've noticed are that the screen printing can distort the surface slightly (visible dimple, but can't feel it) and I need to be more careful with my removal tools so I don't accidentally scratch through it and into the heat bed. I had been using a super sharp putty knife, but switched to this recently (basically a thin metal kitchen spatula, with rounded corners).
you're doing something wrong, i've owned a FFCP for years and only once damaged the bed.
The key is not to try to get under the bed, but to apply a horizontal pressure with a wedge onto the print right where it touches the bed. I use this print removal tool:
https://www.amazon.com/ToyBuilder-Labs-Print-Removal-Tool/dp/B00VB1U886/ref=sr_1_3?ie=UTF8&amp;qid=1494530501&amp;sr=8-3
What usually causes this?
I've had my printer long enough to use up my first roll of filament and besides a mess up calibrating it (dug a little into the bed on one side), it's pretty clean and flat still. I use This tool to remove my prints.
Or is replacing your bed a common thing? I'm still getting used to everything.
I use these when leveling a heated bed so that it's trammed when hot and stable. Once the bed is trammed, I dial the screws down consistently to set the final elevation.
Disclaimer: we're the seller.
Here is the mobile version of your link
Sorry I can't answer all of your questions, but here's a few suggestions. Number one, a better part cooling fan. Just buy a cheap blower fan like this one, and print a radial cooling fan like this one. This should help a bit with your bottom screw holes being messy. For bigger prints this is a necessity. When it comes to getting prints off of the beds, I use a glass bed with a gluestick for adherence, and to remove prints I use this thing. Incredibly, incredibly useful. It's thin enough to get under prints without denting them, and the long design lets you move it underneath prints to free the whole this. The end is also sharp enough to scrape glue off of the printbed. Works a lot better than the scraper included with the printer.
I use a thin metal spatula for removing prints from the bed. It often tears the masking tape, but that's OK - That encourages me to put down fresh tape, and fresh tape makes for better prints.
I use this on my PEI sheet and it seems to work pretty well:
https://www.amazon.com/gp/product/B00VB1U886/ref=oh_aui_detailpage_o05_s00?ie=UTF8&amp;psc=1
I usually pull things off when the bed is 40-50C.
The first one is fine. Not sure if the last one is any different. That being said, I was able to print PETG pretty well with the stock heating block, though the MS is definitely better. While you're at it, pick up a new extruder gear. Definitely helps, but don't forget to re-calibrate your e-steps.
https://www.amazon.com/Signswise-Extruder-Driver-Makerbot-Printer/dp/B00ZZRI0DC/ref=sr_1_fkmr2_1?ie=UTF8&amp;qid=1495639138&amp;sr=8-1-fkmr2&amp;keywords=duplicator+extruder+gear
i buy all my printer parts off of amazon. [gears.] (https://www.amazon.com/Signswise-Extruder-Driver-Makerbot-Printer/dp/B00ZZRI0DC/ref=sr_1_2?ie=UTF8&amp;qid=1497980826&amp;sr=8-2&amp;keywords=extruder+gear)
No I don't think so, but poor extrusion consistency could be why my print quality goes down when I go under 0.60 layer height or slow speeds down below 20mm/s. Both of these changes would theorectically decrease extrusion pressure and cause problems with poor extrusion.
Here is the PLA I use: https://www.amazon.com/gp/product/B00J0ECR5I/ref=oh_aui_detailpage_o03_s02?ie=UTF8&amp;psc=1
One possible solution to poor extrusion is an upgrade to the extrusion gear. This is one of the upgrades I'm hoping to try in the future: https://www.amazon.com/Signswise-Extruder-Driver-Makerbot-Printer/dp/B00ZZRI0DC/ref=as_at?imprToken=aQzkLClLVwaOhO32jAnr3g&amp;slotNum=0&amp;SubscriptionId=AKIAJSOXNA2EGTA44JQA&amp;tag=letsprint3d-20&amp;linkCode=xm2&amp;camp=2025&amp;creative=165953&amp;creativeASIN=B00ZZRI0DC
Another option for making extrusion more consistent and smooth is to increase temperature.
I have the same printer. Same problem. This solved it:
https://www.amazon.com/Signswise-Extruder-Driver-Makerbot-Printer/dp/B00ZZRI0DC/
This site also helped: https://www.printer3d.one/en/wanhao-duplicator-6-monoprice-maker-ultimate-tips-improvements/
These guys: https://www.amazon.com/gp/product/B00ZZRI0DC/ref=oh_aui_detailpage_o01_s05?ie=UTF8&amp;psc=1
Print settings:
Printer: Wanhao Duplicator i3 Plus - Powerspec rebrand
Filament: Hatchbox PLA
Printing Temperature: 205 C
Layer Height: .2 mm
Nozzle Diameter: .4 mm
Other Modifications: Microswiss All Metal Hot End w/Hardened Steel Nozzle, Microswiss CNC extruder lever.
Trying to fix these little blobs that show up regularly in my prints. If I'm printing something with a little more curvature, they not as visible, but they show up regularly (i.e. with the same frequency related to the extrusion) along straight lines.
They're not due to retraction (like simplify3d is trying to tell me ) as that was disabled, there's no retraction in the object anyway, and these blobs occur during constant extrusion.
My initial thought was overextrusion, but I can bump my esteps from 94 steps/mm down to 60 steps/mm and still get them; anything lower than that and the (rather massive) underextrusion makes it hard to tell if the bumps are still there or not.
Next idea was a problem with my extruder gear. I checked it for any visible blemishes, and didn't notice any, and I swapped the gear (to this just to be on the safe side); no dice.
They seem to be less noticeable/disappear at a smaller layer height.
Any ideas?
Gears
Thats not the problem for me. It seems like there is something wrong with my printer retracting so much that it gets past the point of the inlet piece headed into the heating element.
This one should work fine, or any made for the MK10. Bought some from China to try, waiting for them to arrive. Don't forget to calibre the e-step.
https://www.amazon.com/gp/aw/d/B00ZZRI0DC/ref=mp_s_a_1_1?ie=UTF8&amp;qid=1487643503&amp;sr=8-1&amp;pi=AC_SX236_SY340_FMwebp_QL65&amp;keywords=mk10+extruder+gear&amp;dpPl=1&amp;dpID=31pamITDHBL&amp;ref=plSrch
https://www.amazon.com/gp/product/B00ZZRI0DC/ref=oh_aui_detailpage_o04_s00?ie=UTF8&amp;psc=1
I bought these.
You will have to re-calibrate your extrude steps. but it made a world of difference with my prints.
I’ve done some basic configuring on a pi before, but not an Arduino.
Is something like this a good place to start?
OSOYOO 3D Printer Kit with RAMPS 1.4 Controller + Mega 2560 board + 5pcs A4988 Stepper Motor Driver with Heatsink + LCD 12864 Graphic Smart Display Controller with Adapter For Arduino RepRap https://www.amazon.com/dp/B0111ZSS2O/ref=cm_sw_r_cp_api_VXi2AbTGH6C67
No problem, stuff happens. Anyway, if you want the bed to be totally static, it's rare you see that outside of delta designs. Typically the bed moves on the Z axis with CoreXY machines, just because I'm pretty sure moving the whole gantry would be a pretty strenuous process for the motor. The only kind of cartesian machine I can think of right now where all of the movement is done on the axes is a design by Printrbot meant to make an effectively infinitely extendable monstrous printer, called the Big E, so perhaps you could look to that for inspiration?
As for your electronics, I'd say start with a basic RAMPS board. I bought this recently, and it seems solid. I can't vouch for its quality yet as I've yet to actually use it. Given the sheer size of a machine you want to build, I'd think you might want to look into NEMA23s, though, and those require a beefier board, so I'm not sure where you'd begin to look for something like that. I think your best bet right now is to make a new post, to get some visibility.
I have an Anet A8 with Ramps 1.4 and a BLtouch sensor. I used the Anet A8 Config file and adjusted a few things to enable my BLtouch. This video helped me a lot to understand what each line of code is doing, so I wasn't just assuming everything was right. I do believe I have different stepper drivers though, if I'm not mistaken my drivers are the A4988's that came with this Ramps kit on Amazon.
Edit: Sorry I'm not much help I got mine to work by following countless videos and wikis. Some specific for Anet, some specific for the BLtouch, and some for general Marlin firmware. Then I compared all the above to fit my setup as well as going over my config file many times for reasureence. If this post doesn't make headway try r/aneta8
Sorry.. I fell asleep for a bit..
In the left pane at the top is "connection" where you set the port and baud rate. From other responses it seems the manufacturer screwed you on that though as it only does .gcode files. That is crazy.. I never heard of that as gcode is kind of an industry standard for CNC and 3D printers.
The ramps board is not too bad for most printers I've seen, but you would have to open up your printer controller and look at the plugs to gauge how hard it would be. Go on Amazon and search for "Ramps 3D mega". I got a kit with the RAMPS board, Arduino Mega 2560, 5 a4988 stepper controllers, 5 heatsinks, and a serial cable for $25. For $35 you can get one that includes a display and rotary encoder.something like this and then you just have to flash the firmware of your choice on there.
For reference, I'm using this kit, upgraded from the original melzi board.
https://www.amazon.com/OSOYOO-Printer-Controller-Stepper-Heatsink/dp/B0111ZSS2O/ref=sr_1_1?ie=UTF8&amp;qid=1487997525&amp;sr=8-1&amp;keywords=ramps+1.4
I don't know if you need any of those additional parts, but this also has Prime shipping, so you don't need to wait a month for aliexpress shipping.
Yeah, it was a printer i got for a good deal from china. My old board melted and shorted out so I had to get this new one.
Is there a way to enable eeprom on this board? I'm not having much luck finding any article online on how to enable it.
Also, is this everything I would need to convert it to the arduino with ramps? https://www.amazon.com/dp/B0111ZSS2O/ref=cm_sw_r_other_awd_ZNj3wbQV2DV9T
Any thoughts on if this would be okay to use? https://www.amazon.com/OSOYOO-Printer-Controller-Stepper-Heatsink/dp/B0111ZSS2O/ref=sr_1_1?ie=UTF8&amp;qid=1491874832&amp;sr=8-1&amp;keywords=ramps+kit
I don't want to get something that might go all sparky sparky poof poof
Oh yeah most definitely. Here is a link to the RAMPS kit that I bought and Here is a link to the E3D clone I bought. For this clone to work I printed an insert for the heatsink.
so i put marlin firmware on it that was from a Facebook group for my printer and it screen was fuzzie no text at all on it i have this
https://www.amazon.com/gp/product/B0111ZSS2O
I just built my i2 I've had laying around and ordered some cheap electronics kit off amazon, This one. I'm using a 12v 30 power supply off amazon as well. I configure marlin and after messing with the endstops finally I get the motors to move. next onto the thermistors. both the bed and the extruder are working and reading 25c at room temp as long as the 12v power supply is turned off. as soon as I turn it on the extruder goes to 0c and the bed remains at 25c. I tested the thermistor and im getting ~99-98k ohms at around 25c room temp. I also went into marlin and changed the temp pins for the extruder from t0 to t2 in the ramps_pin.h script. same result.
Do I have a bad ramps/Mega? or has anyone seen this problem before? am I missing somthing in the firmware that might fix this or should I buy a less cheap ramps and mega?
Thanks
Well you can ask if they will take the melzi board and replace. You can go to wanhao site and under replacement they sell melzi board plug and play for $108 but you will have the bad melty connectors again.
https://www.amazon.com/gp/aw/d/B0111ZSS2O/ref=sxts1?ie=UTF8&amp;qid=1479852532&amp;sr=1&amp;pi=AC_SX236_SY340_QL65
Doing this you can even update to the bltouch and have auto bed leveling.
210-215 so far. The printer auto heated to 215, then I tried at 210 since that's what the Hatchbox directions said. Is this the hotend? I actually already purchased this but didn't install it yet. So I should purchase this as well? Thanks so much for the help!
I used the replacement PTFE as well and it didn't work. I then tried cutting my own and still couldn't get it quite right. here's everything you need for the all metal replacement. It's incredibly painless to switch over and my prints are extremely consistent. I will say though that I know people have had troubles with the microswiss occasionally, so it's not a miracle worker.
I am using the Micro Swiss mk10... https://www.amazon.com/Hotend-Nozzle-WANHAO-FlashForge-Builder/dp/B01C3HEQZC
Looks like you have a clog in your nozzle. Happened to me recently and i had to end up swapping the whole thing out.
Do your self a favor and grab one of these: http://www.amazon.com/Hotend-Nozzle-WANHAO-FlashForge-Builder/dp/B01C3HEQZC/
Its an all-metal hot end upgrade that is all sorts of better than what came stock on your printer and really easy to install. It will also fix the issue you're having right now.
Otherwise you need to figure out a way to get what ever is clogging your print head and causing you to under extrude out.
https://www.amazon.com/Hotend-Nozzle-WANHAO-FlashForge-Builder/dp/B01C3HEQZC
Edit: AS much of a clone the QIDI is, I personally can't guarantee it'll be compatible.
Got two of them.
The $50 version includes a replacement for the cooling block. I got the $38 version and reused the original cooling block, and it works fine. Here's a link to the cheaper one: https://www.amazon.com/dp/B01C3HEQZC
The OEM in mine was a shroud of metal with a plastic feed tube. The material of that tube melts slightly below ABS temps (230C).
Original
New
I did this one
I am already running this but have not yet recieved this
EDIT: I just saw the Microswiss extruder plate. I have not purchased that. If you have it, do you recommend it?
I bought the Maker Select V2 a few weeks ago, so I'll give you a dump of what I've bought so far:
MOSFET - You'll also need some 14 gauge wire, spade connectors, and something (like velcro) to mount it inside the case.
PEI Sheet - After going through tape/hairspray/glue this is what you'll end up wishing you started with. I bought some standard window glass from a big box store and had them cut it to size. I used the thermal pads at first, but I prefer just clipping it on. This way I can have 4 different glass beds to swap among.
Raspberry Pi 3 - OctoPrint is so much nicer than transferring the sd card back and forth.
Fan - DiiCooler or CiiCooler or a few others you can print out that are compatible with this fan (I think, I haven't finished printing them yet).
Y carriage plate - Not sure what the difference between this and yours is - I haven't installed mine yet).
MicroSwiss
Also ordered a couple rolls of Inand PLA from MicroCenter online.
Did you print using the generic filament they give you? I also just purchased this printer and printed the same thing but I used Hatchbox filament and it printed perfect. I wish I had a better answer but I'm also new to printing. If you haven't ordered one of these yet https://www.amazon.com/gp/product/B01C3HEQZC/ref=oh_aui_detailpage_o04_s00?ie=UTF8&amp;psc=1 order it right meow well worth the $$ and a glass bed will make your print bottoms butter smooth https://www.amazon.com/gp/product/B00QQ5Q3BI/ref=oh_aui_detailpage_o02_s00?ie=UTF8&amp;psc=1
Had to get spare aluminum strip, and aluminum blocks from FFCP directly.
my glass bed from amazon https://www.amazon.com/gp/product/B00NY8F172/ref=oh_aui_search_detailpage?ie=UTF8&amp;psc=1
thermocouples from amazon as well https://www.amazon.com/gp/product/B00QKQ8G0E/ref=oh_aui_search_detailpage?ie=UTF8&amp;psc=1 note they are 4mm and 24volt, thats unique to flashforge, my model at least.
and heating elements from amazon as well https://www.amazon.com/gp/product/B00SUYVLYC/ref=oh_aui_search_detailpage?ie=UTF8&amp;psc=1 again note the 24v specialty, apparently flashforge is one of the few that uses that, everyone else is on 12v or something?
and lastly but most importantly, the all metal hot end. https://www.amazon.com/gp/product/B01C3HEQZC/ref=oh_aui_search_detailpage?ie=UTF8&amp;psc=1 dual printing sucks, i just run 1 nozzle.
Which one did you buy this one?
https://www.amazon.com/gp/aw/d/B01C3HEQZC/ref=mp_s_a_1_4?ie=UTF8&amp;qid=1526789946&amp;sr=8-4&amp;pi=AC_SX236_SY340_FMwebp_QL65&amp;keywords=micro+swiss+mk10+all+metal+hotend+kit&amp;dpPl=1&amp;dpID=31PL9jMit-L&amp;ref=plSrch
its abrasive so you will need a hardened nozzle. I just did the entire microswiss upgrade
I got this full setup from Amazon and I have been very happy with it. When I performed the swap I noticed that the heatsink facing side of my cooling block had a REALLY shitty surface on it. I think I was getting poor conduction to the heatsink and experiencing heat creep after a couple hours. The face on the slotted block is beautiful. No more heat creep.
OK good info! I can get loads of 3mm hardware easily so no worries there.
I found this hot end and cooling block in the related items: Micro Swiss All Metal Hotend with SLOTTED Cooling Block for Wanhao i3 https://www.amazon.com/dp/B01E1HANLS/ref=cm_sw_r_cp_apa_d.w0xb2R481VR is this good for the price? I'll look online but are there specific enclosure designs that work best?
Also found a laptop cooling fan that is supposed to fit, and borosilicate glass for the bed.
I'm going to start slow with PLA and see where my adventures take me but I might get a reel of ABS too, hopefully I can make RC car parts and stuff like that the some point.
Go ahead and grab the Micro Swiss All Metal Hotend with Slotted Cooling block. Like $50 on Amazon with Prime. An all-metal is necessary for printing PETG/ABS/anything above 230 really.
Also, the 3DPrinting nerd fairly recently uploaded a full tutorial on installing this thing if you're uncomfortable with the (well) written instruction.
Another user mentioned that they swapped in an E3D, but that is a) probably a bit overkill, and b) a huge hassle.
The nozzle on that printer is a MK10 nozzle. There's a bunch on Amazon.
https://www.amazon.com/s?k=mk10+nozzle&amp;sprefix=mk10&amp;ref=nb_sb_ss_i_0_4.
Unless you've been really abusive, it could just use a nice clean. I use a brass brush on mine. Just pre heat the hot end and scrub away. It'll be fairly clean when you're done.
But if you want to change the nozzle, you may want to go ahead and upgrade to an all metal setup with the Micro Swiss hot end. This comes with a new nozzle and some other stuff.
https://www.amazon.com/Micro-Hotend-SLOTTED-Cooling-Wanhao/dp/B01E1HANLS/ref=mp_s_a_1_1?keywords=micro+swiss+maker+select&amp;qid=1562131663&amp;s=gateway&amp;sprefix=microswiss+maker+&amp;sr=8-1
I personally have the Micro Swiss kit with their plated nozzle. After scrubbing it, it always looks good as new.
Im thinking of getting these, will they be compatible?
https://www.amazon.com/gp/product/B07KB1QJGJ/ref=ox_sc_act_title_2?smid=A39S0U3UP1U7UG&psc=1
https://www.amazon.com/gp/product/B01E1HANLS/ref=ox_sc_act_title_3?smid=A36KNDPALTN82Y&psc=1
https://www.amazon.com/6-35mm-Ceramic-Cartridge-Printer-Extruder/dp/B071K8Z9KF/ref=sr_1_1_sspa?ie=UTF8&qid=1549548097&sr=8-1-spons&keywords=wanhao+i3+heater+cartridge&psc=1
&#x200B;
Would this be better for number 3?
https://www.amazon.com/Micro-Hotend-SLOTTED-Cooling-Wanhao/dp/B01E1HANLS
Edit: also which hairspray do you use?
Set it up and use the existing hotend to print out a z-brace kit, I printed for days without it but it really helps. This will also help you understand and appreciate the difference when you upgrade the hotend :) People run into the connector problem when heating the bed up for ABS and other higher-temp filaments, I have had no issue running PLA. I also never leave the house when it's running, but that's a general distrust of robots thing. Now, with z-braces, allmetal hotend, and a pei sheet, I have had awesome prints every time.
Wanhao i3 Duplicator v2.1 by way of Amazon.
I have two of them, easy to use and improve machine.
Here's a Facebook group dedicated to them.
If you get this printer, this is a highly recommended upgrade. It's a hardened steel nozzle and slotted cooling block kit. Very easy to install, improves holding a given temp in the hot end.
And here is a good deal on filament that's made in America, a grab bag of four rolls for $60, your choice on type.
Micro Swiss All Metal Hotend with SLOTTED Cooling Block for Wanhao i3 https://www.amazon.com/dp/B01E1HANLS/ref=cm_sw_r_cp_apa_i_LlgdBbFBW6CVE. This should solve your issue.
I recently went through exactly this same situation. I was ready to upgrade to a microswiss all-metal hotend and the catastrophic failure of the print leaving gunk all over my heater block forced the issue. In my case, I opted to replace everything I could including the thermistor and heating element. They are both very inexpensive and you should have a spare laying around anyway in case you need one in a hurry. So...how to clean your heating block...
Fire. Seriously. I used a combination of blowtorch and solvent to remove all the gunk (and mine was a LOT worse than yours...it basically encapsulated one entire end of my heater block, entombing the thermistor, heater and associated wiring).
I used your typical propane torch, holding my heater block in a vise or vise grips. I'd heat it up then quickly wipe away the melted PLA with a clean cloth. Heat, repeat. Then I'd soak the whole thing in some solvent (acetone, MEK, etc). Repeat until clean. Pay careful attention to the tiny setscrew that holds the heater in place...work it free with a hex wrench while it is hot...chances are you got some PLA stuck on there, too. Obviously be super careful when you do this. Ventilation, fire-extinguisher handy, your mom on speed-dial.
When you replace the thermistor and heating element you'll need to do some soldering. This is pretty unavoidable. Those elements come with very long wires attached to them and the Wanhao/MP print heat doesn't need that length. Clip it short, make good solders and use heatshrink over your joints. For the thermistor I simply cut out the center section of the wire and spliced the connector back to the component at the length i needed.
Now, when you put it all back together you will have the option of re-wrapping the heater block with cotton and Kapton tape. People seem split on if this is necessary, but since I'd battled heat creep before I didn't want to introduce any more heat up the block...so I opted to do it. It's a bit tricky if you get the non-punched cotton strips like I did. Luckily I had hole punches handy to make the provision for the hotend and nozzle to get thru the insulation. If you don't have these tools (or don't quite know how to do it), i'd shop around for pre-punched sets.
good luck. Let me know if you need any more help.
here are the parts i used:
https://www.amazon.com/gp/product/B071K8Z9KF/ref=oh_aui_detailpage_o00_s00?ie=UTF8&amp;psc=1
https://www.amazon.com/gp/product/B01N4KY6TR/ref=oh_aui_detailpage_o01_s00?ie=UTF8&amp;psc=1
https://www.amazon.com/gp/product/B076NW3GNH/ref=oh_aui_detailpage_o02_s00?ie=UTF8&amp;psc=1
https://www.amazon.com/gp/product/B01E1HANLS/ref=oh_aui_detailpage_o03_s00?ie=UTF8&amp;psc=1
https://www.amazon.com/gp/product/B01E1HANLS/ref=ppx_yo_dt_b_asin_title_o08_s01?ie=UTF8&psc=1
Had almost the same problem on my Monoprice clone - would stop feeding, changed brands, etc. until finally the filament had fused to the PTFE tube in the hot end. Required a complete tear down to find it. I figured as long as I'm in there, upgrade the extruder plate
https://www.amazon.com/gp/product/B06WVB6CYD/ref=ppx_yo_dt_b_asin_title_o08_s00?ie=UTF8&psc=1
and the thermistor
https://www.amazon.com/gp/product/B07B3ZYBTM/ref=ppx_yo_dt_b_asin_title_o08_s01?ie=UTF8&psc=1
Follow the instructions - do not skip the "tight, then back off 1/4 turn. Heat up to 250 and then tighten the nozzle" steps.
Strip off the Kapton tape (if it hasn't already torn off) and use these instead
https://www.amazon.com/gp/product/B07B9KW1L1/ref=ppx_yo_dt_b_asin_title_o05_s00?ie=UTF8&psc=1
Yes I would say the heated bed is a necessity if you want to print ABS the stock bed only reaches 45-50c and takes along time to heatup , the bed I bought is from folgertech it's the 12v silicone heated bed 300x300 and yes you could do a separate PSU as well I just didn't need to and the mosfet I bought is the trigorilla mosfet on Amazon, I would recommend that mosfet over any other as I bought a DCDC SSR and it didn't work, i then bought a BIQU mosfet on Amazon and it started smoking so I returned it but the trigorilla mosfet has had no issues so far, to add to my heated im going to add some cork to insulate it to hold the heat better.. hope this helps
Do you have a specific board that you would recommend? This was one I saw linked on thingiverse earlier:
https://www.amazon.com/BIQU-Power-Module-Expansion-Printer/dp/B01HEQVQAK/ref=sr_1_3?ie=UTF8&amp;qid=1510026227&amp;sr=8-3&amp;keywords=mosfet
https://www.amazon.com/BIQU-Power-Module-Expansion-Printer/dp/B01HEQVQAK/ref=sr_1_1?ie=UTF8&amp;qid=1523253301&amp;sr=8-1&amp;keywords=biqu+mosfet&amp;dpID=51EjkDUUZYL&amp;preST=_SX342_QL70_&amp;dpSrc=srch
Actually, the parts are pretty standard, so it doesn't really matter where you buy from.
I bought them from various sources (electronics markets, amazon, and some local shops), so my links are just to be seen as examples:
Printed upgrades:
There is one small error in the assembly videos: The bed mounting plate (the H-shaped thing) is mounted upside down in the video. The bar that goes across the axes and connects both outer plates should be under the plates, not above as in the assembly videos.
I'll start with the non-printable mods:
Replaced the PSU with a 750w ATX PSU I had lying around.
If you do this, you will more than likely need to add a power resistor to the 5v rail. I also removed all the original wires and connectors from the PSU and resoldered just what I needed with better rated wire.
Glass bed on top of the aluminum. I just went to Lowes and got them to cut a few pieces of single pane glass.
Mosfet circuit for the heated bed:
https://www.amazon.com/BIQU-Power-Module-Expansion-Printer/dp/B01HEQVQAK/ref=sr_1_1?ie=UTF8&amp;qid=1493092441&amp;sr=8-1&amp;keywords=3d+printer+mosfet
Upgraded Y Carriage:
https://reprapchampion.com/collections/heated-beds/products/anodized-aluminum-y-carriage-plate-upgrade-v2-for-prusa-i3-reprap-3d-printer
New Belts:
https://reprapchampion.com/collections/linear-motion/products/10-meters-6mm-width-gt2-timing-belt-for-reprap-delta-3d-printer-kossel-rostock
Geared Pulley to replace the smooth one:
https://reprapchampion.com/collections/linear-motion/products/3d-printer-idler-pulley-aluminum-dual-ball-bearing-3mm-bore-16-teeth-gt2-belt
Upgraded Heated Bed, this bed heats up slow and I also lost a little bit of build volume. I plan on getting something better here very soon. Once it's up to temp it works well though.
https://reprapchampion.com/collections/heated-beds/products/new-improved-mk3-aluminum-reprap-3d-printer-prusa-i3-heated-hot-bed-build-plate
Inductive Sensor for auto level:
https://www.amazon.com/gp/product/B01LWNCY4C/ref=oh_aui_search_detailpage?ie=UTF8&amp;psc=1
Copper Tape Because the inductive sensor can't see glass I put this on the bottom side.
https://www.amazon.com/Tapes-Master-10ft-Copper-Foil/dp/B00Z8MCJW2/ref=sr_1_6?s=industrial&amp;ie=UTF8&amp;qid=1493092625&amp;sr=1-6&amp;keywords=copper+tape
Firmware:
To get the sensor working, you'll have to change the firmware unless you only want to use it as a limit switch. The only option that i'm aware of is Skynet which is based on Marlin and works fairly well. You can find that on their facebook page: https://www.facebook.com/skynet3ddevelopment/
Blue LED Extruder Fan (because the original broke). I don't remember where I got this from. I'd like to find an RGB one! ha
I added a bunch of WS2812 LEDs controlled by an Arduino at the moment, I am using OctoPi so eventually i'll have that control them but at this point they're set to UV colors because it looks cool.
Printed mods:
Frame braces:
http://www.thingiverse.com/thing:1857991
http://www.thingiverse.com/thing:1430727
Y Carriage Risers:
The Y carriage sits too low and will smack into the Y axis motor so I made these risers to solve that:
http://www.thingiverse.com/thing:2226564
Y Belt Clamp: You'll need one for the new carriage, but I cannot find the one that I used.
Auto level bracket: Though I only have PLA and it kept warping so I made a metal version of it:
http://www.thingiverse.com/thing:2006986
Anti-Z Wobble I modified this but no longer have the file, I also printed a cylinder to wedge into the hole above the lead screws.
http://www.thingiverse.com/thing:1858435
Bearings I used:
https://www.amazon.com/Beerings-Malt-ABEC-Skateboard-Bearings/dp/B005NFXHQG/ref=sr_1_2?ie=UTF8&amp;qid=1493094188&amp;sr=8-2&amp;keywords=beerings
Belt Tentioners I can't remember which ones I finally used.
I think this is everything. If I remember something else i'll post it.
I installed this one: https://www.amazon.com/dp/B01HEQVQAK/ref=cm_sw_r_cp_apa_F7zKBbSQY2CMQ
Few months no problems. Heats up very quickly. Provides very steady temps. Hardest part of doing the mod is getting the board to slide out and not snag a wire.
There are ways to make it cheaper.
A MOSFET (basically a relay that switches the circuit for the heated bed) would be a huge upgrade.
You can flash the firmware of the board with proper security measures in place. Lookup Marlin firmware.
That would be your number one tasks and a huge safety upgrade.
There are lots of tutorials on how to do both.
Yeah, I've been researching the most recommended upgrades and the mosfet is on that list. Is this all I would need for that? or are there additional screws/wires I would need as well?
This specific item would work right? I'm going to attribute the poor reviews and burnt circuits to user error. And I'll be directly wiring the power connections and avoid using the green connectors. Any kind of risk involving fire is too much of a risk.
https://www.amazon.com/BIQU-Power-Module-Expansion-Printer/dp/B01HEQVQAK
I believe it's this one: https://www.amazon.com/BIQU-Power-Module-Expansion-Printer/dp/B01HEQVQAK/ref=sr_1_1?ie=UTF8&amp;qid=1493406781&amp;sr=8-1
Sounds good. Any recommendations for specific mosfets?
This one is the first one that pops up.
Yeah, maybe my post wasn't clear.
Printer board is an MKS Gen 1.4: https://reprap.org/wiki/File:MksGenV14-Pinout.png
Mosfet board is one of those cheap things from Amazon: https://www.amazon.com/BIQU-Power-Module-Expansion-Printer/dp/B01HEQVQAK
This is a DIY printer that started life as an Anet A8, but now is a mix between an AM8 mod (bed and frame) and a Prusa MK3S clone (extruder), all running Klipper and Octoprint.
Currently this external Mosfet is controlled by D7 (the onboard Mosfet output for the second extruder) and powers the bed. The hotend is on D8 (because its Mosfet is a bit beefier), the extruder fan is on D9 and the print fan is on D10.
Filament sensor and BLTouch are on D10 and D6.
I'd like to use D7 to power an enclosure fan, but to do this I need to control the external Mosfet from a different pin, ideally D4 or D5 (which are marked as "servo" pins on the pinout diagram). I've tried various other pins and combinations with +5V and GND and various resistors in between, but I can't get the Mosfet to switch.
https://www.amazon.com/BIQU-Power-Module-Expansion-Printer/dp/B01HEQVQAK/ref=br_lf_m_96yocbyvco627h6_ttl?_encoding=UTF8&amp;s=industrial
Would this one be fine ?
>Any chance you could be more specific on the dupont connectors required?
You'll need 4 pin dupont housings and dupont female connectors and a crimper for them. That's assuming you have something to strip the wires as well. You can find the dupont female pins and housings cheaper places like aliexpress, ebay, etc.. but I recommend buying a quality crimper instead of whatever is the cheapest you can find as a quality tool will make the job a lot easier. If you're really strapped for cash, there's video's of people crimping dupont connectors with pliers online instead of the crimp tool.
>So <motor><cA> => <cB><cable><cC> => <cD><RAMPS board>
The wires transfer over to the same place from melzi to ramps, and pretty much any board. You'll have a X endstop, y endstop, z endstop, then connectors for the X motor Y motor Z motor and extruder motor, and so on and so forth. A ramps guide will help you visualize what to connect where.
>Any idea how big a cable for the power?
IIRC, the stock wires at 18ga, which is fine for the ramps board since it only draws 5A for all the motors, hotend, etc. The only other larger gauge connectors are for the heatbed, which I believe are also stock 18GA. FWIW, I'd go with a external mosfet instead of using the ramps on board ones which are rated for 11A, which is just within spec of what the bed draws.
$10 Mosfet with 2 day shipping: https://www.amazon.com/BIQU-Power-Module-Expansion-Printer/dp/B01HEQVQAK
PSU: https://www.amazon.com/gp/product/B00D7CWSCG/ref=oh_aui_detailpage_o04_s01?ie=UTF8&amp;psc=1
Fused Switch: https://www.amazon.com/gp/product/B00ME5YAPK/ref=oh_aui_detailpage_o04_s01?ie=UTF8&amp;psc=1
Mosfet: https://www.amazon.com/gp/product/B01HEQVQAK/ref=oh_aui_detailpage_o04_s00?ie=UTF8&amp;psc=1
The PSU has a built-in fan that kicks on and off when the PSU gets warm. I don't plan on printing things with any crazy high temperatures, so these upgrades were probably a bit overkill, but I'd rather have components that are a bit more trustworthy than what comes with a $150 kit.
I ordered an A8 and I get it this Sunday. Can you give me some more detail on the 4 things you suggest upgrading?
I looked at flashing the Marlin but do I need any extra cabling to perform the flash?
Do either of these fill the prereqs for the upgrades you mention? I ordered them as they came in a package deal with the printer.
https://www.amazon.com/gp/product/B00ME5YAPK/ref=ppx_yo_dt_b_asin_title_o02_s00?ie=UTF8&psc=1
https://www.amazon.com/gp/product/B01HEQVQAK/ref=ppx_yo_dt_b_asin_title_o02_s01?ie=UTF8&psc=1
Which power supply should I order? Did I forget to mention anything? I am trying to make sure I buy all of the stuff so I am ready to build on Sunday. I am gonna get a Raspberry Pi 3 for Octoprint as I only currently have a zero W and a Pi 4 available for use.
Why do that when Amazon Prime has it?
https://www.amazon.com/gp/product/B01HEQVQAK
This is the one I use on my Monoprice i3.
no problem! it was the first Mod I did on mine after reading that the bed heat connection is the issue with all the burnups.
good write up on the fix
https://3dprinterwiki.info/heatbed-terminal-burning-fix-with-mosfet-board/
here is the one I got for my maker select v2.1
https://www.amazon.com/d/3D-Printer-Controllers/BIQU-Power-Module-Expansion-Printer/B01HEQVQAK/ref=sr_1_3?ie=UTF8&amp;qid=1549832603&amp;sr=8-3&amp;keywords=maker+select+mosfet
might need longer wire, i did, just grabbed some at Lowes
I've tried clips with glass. The problem is your printhead and/or cooling fan will hit the clips unless you're really careful. I recommend the silicone thermal pads.
http://3dprinterwiki.info/wiki/wanhao-duplicator-i3/duplicator-i3-basic-mods/adding-a-glass-bed/
I've also tried hairspray on glass, and gluestick on glass, and painter's tape on glass. To hell with all of those, it's always either not sticky enough, or too sticky. Get yourself a sheet of PEI to put on your glass. It's soooooo much better than anything else. Perfect adhesion while printing, then your part just pops off easily when it's done.
Thermal glass $12: https://www.amazon.com/Signstek-Printer-Heated-Tempered-Borosilicate/dp/B00QQ5Q3BI
PEI + adhesive $17: https://www.amazon.com/Gizmo-Dorks-Printing-Surface-Adhesive/dp/B01KGDTPQK
Setup took maybe 20 minutes or so total. Assembling takes about 10, then about another 10 to get the bed leveled. Assembly is literally just 6 bolts you screw in. The bed leveling is a bit of a pain but not difficult. Directions say to use a piece of paper during leveling, but I found it more accurate to use a feeler gauge instead if you have one handy, if not the paper will work.
I tried the painters tape and had some success but still kept detaching from the base about 1/2 the time. I did not try glue or hairspray. While researching lots of people mentioned the PEI sheet so I figured I'd gamble on it. I have printed 7 or 8 things with it and only had 1 that didn't stick and that was probably my fault because I did not remember to wipe it down with rubbing alcohol. This is the one I got: https://www.amazon.com/Gizmo-Dorks-Printing-Surface-Adhesive/dp/B01KGDTPQK/ref=sr_1_2?ie=UTF8&amp;qid=1484765745&amp;sr=8-2&amp;keywords=pei
My suggestion is try it with the stock surface and/or the painters tape and see what kind of luck you have. If you have issues with sticking, then buy the PEI sheet.
https://www.amazon.com/Gizmo-Dorks-Printing-Surface-Adhesive/dp/B01KGDTPQK/ref=sr_1_1?ie=UTF8&amp;qid=1484800825&amp;sr=8-1&amp;keywords=pei+sheet
was it this material?
Gizmo Dorks PEI Sheet, 8" x 8" 3D Printing Build Surface with 3M 468MP Adhesive Tape https://www.amazon.com/dp/B01KGDTPQK/ref=cm_sw_r_cp_apa_WB3qybRCVC0HD
To increase your chances, make sure you use some quality PLA. The difference is in the chemistry and the quality control. I'm getting some great results with MatterHackers PLA. Pro grade, I think it's called.
Oh haha sorry.[ Gizmo dorks] (https://www.amazon.com/gp/aw/d/B01KGDTPQK/ref=sxts1?ie=UTF8&amp;qid=1483410646&amp;sr=1&amp;pi=AC_SX236_SY340_FMwebp_QL65)
https://www.amazon.com/gp/aw/d/B01KGDTPQK/
Look into purchasing a PEI (Polythermide) sheet to put onto your printing surface. I did so and it works incredible!
Just make sure that you take your time while applying it to reduce the amount of air bubbles. I picked up this kit from amazon: https://www.amazon.com/gp/product/B01KGDTPQK/ref=oh_aui_detailpage_o04_s00?ie=UTF8&amp;psc=1
Edit: It takes virtually no maintenance, and everything sticks to it incredibly well. I also forgot to mention that I have only tested it with ABS, but I hear PLA works well too. I have also heard that PETG sticks better than ABS or PLA.
Edit 2: I also should mention that I was able to stick it directly to the aluminum bed. Make sure to clean it really well if you do plan on taking this route.
I've been using a sheet of PEI that works like a charm. The one i got was from amazon, something like this would work https://www.amazon.com/Gizmo-Dorks-Printer-Surface-Adhesive/dp/B074XLD5QH/ref=pd_sim_328_3?_encoding=UTF8&amp;psc=1&amp;refRID=PPGSHY9T4C0YC14V4FVS
It even comes with the adhesive.
It's multiples of 0.04, but it won't have a huge impact.
Regarding hair spray/glue stick etc... a PEI sheet will save you a lot of effort. You put it on top of the glass and then print directly on it, no need to do anything. Edit: and yes, as /u/PuterPro says, get your bed flat.
Mine worked great without having to scuff it at all. I just heat the bed to 60°, when the print is done and the bed cools down the print pops right off. Here is the link to the one I bought.
Gizmo Dorks PEI Sheet 12" x 12" (305mm x 305mm) 1mm Thick 3D Printer Build Surface with 3M 468MP Adhesive, Made in The USA https://www.amazon.com/dp/B074XLD5QH/ref=cm_sw_r_cp_apa_i_PVGzCb0HBTC1P
Printed using a FolgerTech FT-5 R2, with Gizmo Dorks PEI build surface. Filament is just basic hatchbox PLA.
get one of these, night and day difference: https://www.amazon.com/Gizmo-Dorks-Printer-Surface-Adhesive/dp/B074XLD5QH
The pei sheet I got from amazon (https://smile.amazon.com/gp/aw/d/B074XLD5QH/ref=ppx_yo_mob_b_track_package_o0_img?ie=UTF8&amp;psc=1) didn’t have the adhesive pre-applied, it was just smooth on both sides with a thin film over it for protection, and a 3m double sided tape was included in the package. If yours has adhesive already on it, I’m not sure about the temp limit on the film, but suspect you’re right that it isn’t very high.
I had been thinking about just clipping it on before it arrived, but it was thin and flexible enough that I’m pretty sure it would get pulled up slightly by larger prints. I had considered just buying a 1cm thick sheet from McMaster Carr or somewhere rather than one being marketed for 3D printing, I think you could definitely clip that since it would be rigid, but I was concerned if it didn’t show up perfectly flat I wouldn’t be able to do anything about it.
I watched a few videos before putting it on, and it was actually easier than I expected. Even though it has some flex to it, it’s ridged enough that there wasn’t really any issues with bubbles under the pei sheet itself. The adhesive bubbled a little when I put it on the glass, but it wasn’t very hard to either work them out, or in a few cases just poke them with an xacto. The hardest part was actually removing the plastic from the top of the adhesive without peeling the whole thing off the glass, but once done the pei went on nicely. If you’ve seen them mounted before, it’s normal for it to look kind of mottled with some visible pockets of air, but still be flat with no significant bubbles. I checked for flatness and it was good. I will take a picture later and update this so you can see what I mean.
I’m jealous of your 2 backups, I have been afraid to print anything but PLA and be unable to get it off. I ended up with the pei because I kept destroying various stick on surfaces by squishing the first layer of PETG too much and ending up with it welded on.
I did my modified side panel on glass.
https://www.amazon.com/dp/B075XJ5ZP1/ref=cm_sw_r_cp_awdb_t1_4wpGAbJ1YRB7F
Specifically fits the bed for the mpsmv2.
Hey! I got the same printer and was using ABS for my first couple prints. Couple things--First the built in items on the SD card are sliced for PLA printing, so you need to up the temps on the extruder and bed--I had success just upping it to 240/80. This got it to stick, but I had to get my z positioning (the thumb wheels on the corners) just right. Also I absolutely needed a raft for anything to really stick.
If you're slicing your own items in Cura, the default filament size is 2.8mm and you're probably using 1.75mm filament.
Unfortunately on any prints longer than an hour the ABS would start to curl off the bed--I chalked that up to the somewhat breezy room I have my printer set up in currently.
tl;dr Make sure your bed/z is leveled precisely so that a piece of standard printer paper can slide underneath the nozzle in each corner with resistance. Try upping your temps and checking your slicer settings as well.
/u/Redditull mentioned a glass bed. I picked one up on amazon, this fits the bed pretty nicely (just lays between the corner screws)--you do need to raise your z-stop, there's a metal lever contraption screwed into one of the sides of your printer's frame that you need to unscrew and raise. I also attached a PEI sheet to this and I used thermal pads to attach all this to the bed. This all improves adhesion greatly, I've mostly been using PLA after the difficulties I had but I would imagine ABS would stick just fine as well.
Borosilicate Glass
PEI Sheet
Thermal Sheet
Glass will make the bed flat but not level. You still have to do that part. It will be much easier to level and require less frequent adjustments though. There are pre-cut pieces of borosilicate for the mini
something like this? seems inexpensive enough to give it a try. extr
Some other things I'd recommend
TL-Smoothers https://smile.amazon.com/gp/product/B071WG3SZQ/ref=ppx_yo_dt_b_asin_title_o01_s01?ie=UTF8&psc=1
I know you already upgraded the extruder assembly but this duel geared version is nice: https://smile.amazon.com/gp/product/B07SY745CF/ref=ppx_yo_dt_b_asin_title_o01_s01?ie=UTF8&psc=1
PEI Bed surface (has to date been the best upgrade): https://smile.amazon.com/gp/product/B07GSJSDWR/ref=ppx_yo_dt_b_asin_title_o09_s00?ie=UTF8&psc=1
and if you don't have a glass: https://smile.amazon.com/Creality-Ender-Glass-Upgraded-235x235x4mm/dp/B07RD6D2ZQ/ref=sr_1_5?keywords=creality+glass&qid=1571456745&sr=8-5
I'd recommend applying the pei in the smooth side of the glass that way you can flip it over to have the textured side if you want.