(Part 2) Best automotive lighting parts & accessories according to redditors
We found 1,625 Reddit comments discussing the best automotive lighting parts & accessories. We ranked the 800 resulting products by number of redditors who mentioned them. Here are the products ranked 21-40. You can also go back to the previous section.


About $30.
Here's what you do for an ideal dashcam installation:
POWER CABLE OPTION A (quick and sloppy)
POWER CABLE OPTION B (looks like it came that way from the factory)
Https://www.amazon.com/dp/B000COBK8A?ref=yo_pop_ma_swf
There's your roadrunner meep meep delete
All factory (street) bikes come with horns. It's required to be street legal.
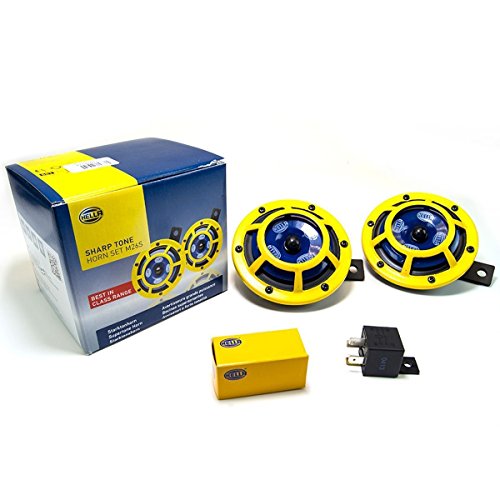
That said, most of the factory ones are pretty anemic. I usually replace mine with aftermarket ones. My favorite replacement for disc-style horns are Hella Supertones. They're silly loud, and if you mount both of them they're tuned to a dissonant interval so that they're extra annoying. They *really* get people's attention. You can get them with red, yellow, or black covers, and they even come in a kit with a relay so you can wire them in properly.
This is all DIY. Snagged these LED bolts off Amazon and just tapped into the wiring for the existing cargo light. Ran everything along the cabling into the hatch, drilled a pair of 7/16" holes for the lights, and hooked everything up.
EDIT: link formatting
Without tools, the best you can really do is look for oiliness on the pipe. When you find a joint that feels oily (look for dark colours on the pipe, usually covered in very fine dust. Once you rub the dusty area with your fingers you'll feel the oiliness), spray/pour a small amount of washing up liquid over it and look for bubbles. If there's any refrigerant left in the system, you'll usually see bubbles appear (or over a longer period, foam). Of course if the gas has all escaped already - and we're only talking a couple of hundred grams here - then you won't see any bubbles.
Most domestic gear has no access fitting at all so even locating the leak can be difficult if there's no visual indication. You need to get pressure in there so you can leak test - this means adding a bullet piercing valve (like this).
Then you need to put something in via your bullet piercing valve to raise the system pressure. It's best to use dry nitrogen to leak test to save wasting refrigerant, but since you most likely don't have that on hand you could buy yourself some refrigerant (most likely R134a) and pressurise with that. That's a big no-no here (both disposable cylinders and dumping gas to atmosphere by charging a system with a known leak) but I'm guessing your in the US, and those sorts of laws seem remarkably lax so go for gold. It's not like you'll be ruining MY ozone layer too, right? ;)
You also need to regulate the pressure going in to the system. This is where you need gauges. Connect the yellow line to your bottle, connect the blue line loosely to your bullet piercing valve, purge from cylinder to piercing valve by opening the cylinder tap + gauges tap, and releasing some pressure via the loose fitting, then tighten the fitting and close your gauges tap. Open the bullet piercing valve. Open the gauges tap slowly and give it ~50psi of system pressure.
Then you can go for gold with your soap, or you can lash out and grab yourself some "proper" leak detection fluid (like this), or better yet an electronic leak detector (like this one).
Once you've found your leak, you want to release your nitrogen (or reclaim your refrigerant using a reclaim plant and a spare cylinder), then repair it using an oxy/acetalyne set, or since it's only tiny pipework you can get away with a MAPP gas set.
If it's a copper->copper joint, you're laughing - polish the pipework up with emery cloth, heat the pipe until it's just this side of glowing red, and feed the joint with brown tip silver solder.
If it's a copper->steel joint, then it's a bit more of a pain. You need blue tip silver solder and flux. Clean your joint with the emery cloth, give it a nice coating of flux on every surface you need solder to stick to, then heat it up until it's a fair way short of glowing red. Feed the blue tip solder in and STOP. Unlike brown tip (15% silver) you can't just keep feeding blue tip (45% silver) as it ruins the weld.
Now, since you put on a bullet piercing valve and they leak like a sieve in the long term, we need to replace that with a schrader access valve. Since it's most likely going to be in a straight through piece of pipe, you can save time and grab yourself a pre made access valve in 1/4" pipe. Cut away the hole left by the bullet piercing valve, polish the copper and cut the pipework with a ~10mm gap using a tube cutter. Then slip your access fitting assembly in there, and follow the copper->copper joint procedure.
Of course, now that we've done all that you need to change the liquid line filter drier too. I'd recommend a 1/4" solder in core drier in place of the original copper spun drier because... well, copper spun driers are terrible. Follow the pipe cutting procedure from the piercing valve instructions and the soldering instructions from the copper->copper joint instructions and that's done too. Remember - always try and mount the drier so it's outlet is LOWER than its inlet. This turns the drier into a small liquid receiver and helps ensure a good liquid seal over the capillary tube. Speaking of capillary tubes, if it was inserted straight into the original copper spun drier CUT the capillary, don't try and unsweat it. The chances of blocking it up are about 82.5634% (approximately) when you unsweat capillarys. You're much better off chopping it with a set of capillary tube cutters and ensuring a good clean capillary. The ~30mm of wasted capillary will affect performance, but almost certainly not to any sort of measurable degree.
Then give the system a good evacuation using a vacuum pump and ensure it reaches a good vacuum (sub-500 micron) with a digital vacuum gauge.
Then using a set of electronic scales, charge your freshly evacuated system (remembering to purge!) to the charge recommended by the manufacturer.
Voila! You have just fixed your chest freezer.
..... Alternatively, pay someone to do it for you and/or recycle the components and buy yourself a new one.
From my Google doc:
Hella Supertones are pretty popular in the Subaru scene. They’re fairly easy to mount behind the grille in most cars. Personally, I like the sound of the new Sharptones a little bit more. But there’s endless options out there. Just find some tone that you like. Most electronic horns are gonna wire up the same
What are you trying to simulate? RC helicopters can run at a wide variety of rotor speeds depending on blade geometry and performance goals. High performance 3D flight will often see head speeds of 3000-4000 RPM on platforms as large as 600 size. If you're going for efficiency you can get asymmetrical blades and run much lower head speed (~1000 RPM or even lower has been done). Any speed between those two is a realistic speed, so the choice of what speed to use is for you to decide depending on what makes sense in the context of your application.
This is true for collective-pitch helicopters. If you're talking specifically about fixed pitch helicopters then head speed is directly tied to lift, in which case it still doesn't do a lot of good to choose a particular head speed because the chosen head speed will vary based on the lift required at any given time.
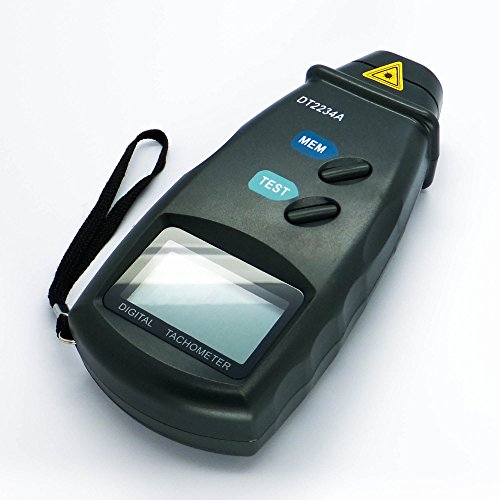
You don't need a strobe though, and tachs aren't that expensive.
I put a Stubby on the day after I bought the car and I've had zero issues with GPS, AM/FM, or Satellite.
I live in mid-Missouri, so I've seen a mixture of small city, urban, and rural areas since the install.
Edit: Link to the antenna I purchased.
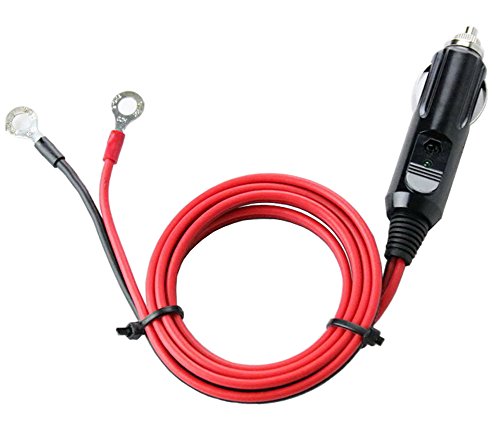
These are 12v, so you just need to make sure the cigarette lighter in your car can handle the power. So for example most late model hondas have the main/front cigarette lighter rated at 180w (the rating is screen printed right on it) which is more than enough power for an IH like these. I run one of my homebrews on the cigarette lighter in my car - just by plugging a 15A (180w) fused cigarette lighter connector (https://www.amazon.com/dp/B01HGO2OIS/ref=cm_sw_r_tw_dp_U_x_8RkADbX5XY409) into the back of the unit (obviously you have to put the correct sized DC power connector for your IH at the other end).
Subwoofer, Amp, 8 gauge cable kit, trim removal set, Fuse taps, and T-Taps
As for a guide, I just used other guides online and pieced them together. Really should have made a well-documented one when I did it, but I installed mine 6 months ago. Already forgot certain things. Just remember to look up the speaker wire colors for the back speakers before you tap into them and know that putting the power cord through your firewall from your battery is going to be a total bitch :)
Also just to clarify, the fuse taps are for the remote wire going into the amp. I tapped the sunroof fuse as it shuts on/off with the ignition (I don't have a sunroof, but it shouldn't matter if you do or not). Also also, that black cable going into my amp on the left side is a bass knob that came with the amp. That's wired all the way up into my glove box, so it can be adjusted easily if it becomes too much. The wires with kit and everything are long enough that you shouldn't need anything else, and everything tucks away in the door seem guides so nothing is showing at all.
Get something like this: https://www.amazon.com/Carviya-Cigarette-Lighter-Inverter-Electric/dp/B01HGO2OIS/ref=mp_s_a_1_3?keywords=12v+plug&qid=1564598312&s=gateway&sprefix=12v+olug&sr=8-3
Really helpful for testing stuff before installing it.
https://www.amazon.com/HELLA-007424801-Twin-Trumpet-Bracket/dp/B000COBK8A/ref=br_lf_m_7nz4yx2hyshh6uk_ttl?_encoding=UTF8&s=automotive
I wired one of these on my Mazda to replace the buzzer horn and it works great.
Here are some that I ordered from:
JST Performance - Cobb Accessport, Custom Tune, Turbosmart blow off valve, NGK 1 step colder spark plugs
James Barone Racing - Weighted short shift plate, Aluminum shift cable bracket bushings, Symposer delete, Green Air Filter (because they sell the gray one)
Depo Racing - 3.5" intercooler, catless downpipe, intercooler pipe kit
Boomba Racing - shifter base bushings, short shift lever
Tire Rack, Discount Tire Direct - wheels and tires. Both offer great deals but I go with Tire Rack because they include an amazing road hazard warranty for free with every tire you buy.
Tasca Parts - OEM Ford parts. Some good options: RS airbox lid, RS Shifter, RS engine cover, RS intake pipes
Amazon - ZL1 Rock Guards (tiny but very effective mud flaps), CravenSpeed stubby antenna, 3D (Mugen) style Window rain visors, Philips H11 Xtreme Vision headlight bulbs (same color as stock but 100% brighter), Stainless T-clamps for your intercooler, Motul Multi DCTF transmission fluid, and TONS of Meguiars car care products.
Walmart - best price for Mobil 1 5w-30 full synthetic engine oil, often have coupons for it too.
You can. I replaced the OE horns on my corvette with new AC Delco horns which didn't sound any louder. I replaced those with hella twin trumpet horns which were much louder than the replacements. Required me to crimp on spade terminals, but that took maybe 30 seconds a side.
https://www.amazon.com/dp/B000COBK8A?ref=yo_pop_ma_swf
https://www.amazon.com/dp/B01CQK4DZO/ref=cm_sw_r_cp_apa_yXz7BbYF2BVN6
I've had it for about a year. It takes a little calibration to get it to output the correct speed and rpm, but works well after it's set up. I bought it because my car didn't have an engine temp gauge, just idiot lights that turn on when you're already overheating.
the main reason for a tire rotation is mostly due to the tread of the rear tires going out faster than the front ones (not by much) so rotate them to even out the tread wear on your tires.
On mine (3) I have found around 6-7K milage my tread wear is about 1/32 difference (7/32 front and 8/32 rear) this depends on driving habit, road conditions etc.
I always suggest a 2/32 in.+ In difference before rotating so you won't be either doing it yourself so much or taking the car in to have them do it every 6,250 miles.
One of these tread depth gauges are the cheapest and easiest way to measure your tires tread depth (minus the penny method), doesn't have to specifically be this one but it's an easy one to show.
I'd say at least have one on hand in the glove box and if you are ever curious if you need a tire rotation (outside of an up coming 2 year service visit where they can rotate for you with the maintenance plan) you won't pay it of pocket for (in my opinion) unnecessary tire rotation.
Hella 200mm Rectangular E Code H4 Halogen Replacement Headlight Kit with 100/80W H4 Bulbs https://www.amazon.com/dp/B000FLTAE6/ref=cm_sw_r_cp_apa_nk2tybG699D1P
H4 100w Ceramic Fused PnP Heavy Duty Automotive Wiring Harness Headlight Foglight Booster Relay 12v https://www.amazon.com/dp/B00BMN30HY/ref=cm_sw_r_cp_apa_bl2tybWQNP2HX
Install the relay harness then just use the bulbs and housings and forget that kits wiring. With those bulbs you absolutely need the harness first or you will burn out wiring.
And it's really border-line emergency at that point. 2/32 is the minimum by law. It's not going to work so great if wet or snowy. Tires should be replaced around 4/32, before they degrade too much in slippery conditions.
I recommend getting a depth gauge to throw in your glovebox. Under $4 on amazon.
I got it here off amazon
I use this LED light:
https://www.amazon.com/gp/product/B00WVJR0D8/ref=ppx_yo_dt_b_asin_title_o04_s01?ie=UTF8&psc=1
It works very well and it’s super bright. If you do change out your bulb, switch the two corner running lights to LED as well. I used these:
https://www.amazon.com/gp/product/B00JRE38EA/ref=ppx_yo_dt_b_asin_title_o04_s01?ie=UTF8&psc=1
Installation was a breeze. You can find install videos on YouTube.
I drilled holes to flush mount these LED bolts and ran the wires in the open cavity behind the liner:
https://www.amazon.com/dp/B01ADHUXGU/ref=cm_sw_r_cp_apa_ViLEyb6HW4P21
On those LED bolts I wired male connectors from this pack to meet the female ends run to an inline fuse on the hot and ground, all terminated into a waterproof switch I flush mounted by the driver's side cubby. Waterproofed these connections to ensure no issues with wiring:
https://www.amazon.com/dp/B00PZVDPTM/ref=cm_sw_r_cp_apa_2nLEybMNKGGTM
Is an amazon link good?
Jtech 10x 194 168 2825 T10 5 SMD White LED Car Lights Bulb https://www.amazon.com/dp/B00877SL2M/ref=cm_sw_r_other_apa_2vsJxbERGGHGA
I have been debating buying one of these for my router table. I was hoping someone could tell me if there is a way to connect some kind of tachometer to the motor to display RPM.
edit: Nevermind. Apparently they make this thing
I can answer the dashcam wiring for you. Best way that I have found is to use a fuse tap like this.
http://www.amazon.com/Qiorange--circuit-Adapter-Blade-Holder/dp/B015GYN38A/ref=sr_1_2?ie=UTF8&qid=1464329991&sr=8-2&keywords=fuse+tap
You will also need the appropriate fuse for that particular dashcam. And you will need a 12V to 5V converter for the dashcam. Like this.
http://www.amazon.com/Dash-Camera-Vehicle-Hard-Wire/dp/B00MH4ZVHO/ref=sr_1_1?ie=UTF8&qid=1464330070&sr=8-1&keywords=dash+cam+wire
PS: Best part about this one is that you can install an inline fuse, which is much easier to find an appropriate rated fuse than it is with the automotive fuses.
Tachometers are overrated. If you need to 'calibrate' a variable speed knob, pickup one of these;
https://www.amazon.com/Digital-Photo-Laser-Tachometer-Contact/dp/B001N4QY66/ref=sr_1_4?ie=UTF8&qid=1523578148&sr=8-4&keywords=tachometer&dpID=511BEAxqKFL&preST=_SX300_QL70_&dpSrc=srch
Yes here!
https://www.amazon.com/dp/B01ADHUXGU/ref=cm_sw_r_cp_apa_JTsVAbDFS5GC0
Yup, that'll work.
Benefit of replacing the cigarette lighter is you'll have the negative and positive, fused, cables right there. Super easy
With the one you linked, you'll need to wire to a 12v source and add a fuse. You'll have to find your accessory wire to tap into, so it's not powered with the key off. (unless you want 12v to it at all times, I charge my phone in my car while I'm in work, so it's nice to have that feature)
I still think going with the cigarette lighter port is the best bet.
You could always keep this in the glove box just in case
ARECORD USB A Male to 12V Car Cigarette Lighter Socket Female Converter (Max Output 12V 0.8A) https://www.amazon.com/dp/B01J67JIOQ/ref=cm_sw_r_cp_apa_i_Z0jGDb11AYXP0
These work pretty well in my stock housings. I have (h4 version ) installed in three bikes. OPT7 Motorcycle LED Headlight Kit w/ Arc-Beam Bulb - H4 9003 - 6000K Cool White - 40w 3,500Lm CREE - 2 Yr Warranty https://www.amazon.com/dp/B00WVJR0D8/ref=cm_sw_r_cp_tai_2GGhzb9DW1R3Z
The instructions are real not clear, but the bulb separates with a twist from the mounting plate. Install the metal part, then your headlight bulb boot then insert the bulb assembly and twist to lock.
Make sure the bulb is positioned correctly with the leds pointing perfectly horizontal with the housing, otherwise you'll get a weird pattern high on one side - low on the other.
You would have to make a cable that goes from a cigarette lighter plug to the molex connectors used on that board. A molex pigtail is provided with the board, and you could combine it with this to make a power cable.
All you need to get that distance is a properly mounted 102 inch steel whip with a heavy duty spring, the mount should be drilled directly into the body of the vehicle and as close to the center as possible. The closer you get to the corners the more directional your range will become (I.e. back left corner of the vehicle will send the signal further off the direction the front right is pointed) this can be a good thing for vehicles falling behind the caravan. Get the antenna as high as possible the lower and closer to the body the less output you will have you want everything you can get for this range. Any other antenna won’t provide you the results your looking for; period, point, blank. That’s the first most important step. Get a clamp down if it’s too tall.
Next use proper coax RG213 it is lossless and 50ohms this is the perfect coax for CB radio; same stuff used by military. This is also important for this range. RG 58 will have loss and could be the difference in a mile or two.
You will also need an amplifier. Just a KL203P will provide you the power to reach 10 miles it will pump out 100 watts. They are very clean using a mosfit and don’t bleed over on other channels and cheap. Also, be sure to get an amp with a preamp this boost your receive to pull fading signals in it will help insure you get the 10 mile range.
If you have done the above steps you can now buy just about any CB you want they all put out 4 watts. However, you can get them peaked and tuned to match your amp for a little extra distance a local shop can do this or online shop like Bells. However, it’s not mandatory with the above amp and you’ll still get 10 miles.
If your installing yourself you’ll need an SWR/Watt meter to ensure proper working condition and you don’t burn up your equipment. Although, you can always have a local cb shop set it up for you and install.
Lastly, you’ll need to stay on off channels when operating so if you start hearing skip or DX turn to another channel that’s quieter. Stay off 6, 11, 19, 26, 28, and 38 these are frequently used and your transmission will be hampered by that. SSB will allow even further transmissions but be sure you amp has SSB capability KL203P does. Also, keep in mind that SSB requires each radio operator to tune in the one being received this is why it fell out of favor case driving and tuning is a pain in the ass. If each vehicle has a passenger this would not be an issue though.
This setup will get you 10 miles city, county, woods, mountains, and 20 on a flat plane. Anyone who says otherwise don’t know what they are talking about. Caravans are popular among over the road truckers who use this method. Also, keep in mind that rear vehicle only needs to reach the middle vehicle as they can relay the message to the front vehicle or vice versa.
I’d get the Uniden 980 SSB as they are matched for the KL203P stock out of the box. Many people run these without the peak and tune with awesome success.
https://www.wearecb.com/102-inch-cb-whip-antenna.html?gclid=Cj0KCQiA8_PfBRC3ARIsAOzJ2urlUI2xj35bZDuIbDSgTzuloWdl1YsfzPv9gfzua0izr2xQp4lJmnUaArQMEALw_wcB
https://rover.ebay.com/rover/0/0/0?mpre=https%3A%2F%2Fwww.ebay.com%2Fulk%2Fitm%2F112016328205
https://rover.ebay.com/rover/0/0/0?mpre=https%3A%2F%2Fwww.ebay.com%2Fulk%2Fitm%2F173658227769
https://www.amazon.com/dp/B004ULN610/ref=cm_sw_r_cp_api_ISC.Bb398FYA4
https://www.amazon.com/dp/B007B5ZAES/ref=cm_sw_r_cp_api_EUC.BbR4V1S61
> I'm looking more for what, if anything, is needed in the wiring behind the socket.
You need an Automotive Receptacle, and an Inline Fuse (2A is plenty) to protect it.
> But I'm wondering if there is some other interference on that battery and the wiring that I'm going to need to address.
What else do you have hooked up on the Leisure Battery and how do you charge it?
-------
Automotive Socket:
https://www.amazon.com/Attwood-Marine-12-Volt-Power-Outlet/dp/B003EET3XY/
(IIRC 12V and 24V use the same physical socket, though you might want to look for a 24V specific one if you don't want to risk it)
------
Inline Fuse (Actual Fuse Not Included):
https://www.amazon.com/Scosche-0400ATCFH16-5-Fuse-Holder-Gauge/dp/B008CVPE8C
As for swapping the headlight bulb out I’ve used these and the beam is just the same as the halogen it replaced just whiter and a longer throw. OPT7 Fluxbeam LED Headlight Single Bulb for Motorcycle - H4 9003-6000K Cool White - 40w 3,500Lm CREE - 2 Yr Warranty https://www.amazon.com/dp/B00WVJR0D8/ref=cm_sw_r_cp_tai_LnCMBbYDWH4TC
I’ve had no issues with people flashing me or any other issues. Two things are important. 1. This bulb comes apart to install it, this is not immediately evident, but a close inspection will show the bulb at two parts. The “holding ring - like the H4 has ) twists and comes off the the bulb assembly toward the front. You install this first, then your rubber protective boot and then the light assembly goes in and turns to lock. Now item 2. Is the only issue and fault with the bulb. When you insert and 1/2 turn, you can go beyond having the bulb exactly vertical in the assembly which will skew your lighting all out of spec, it will glare and be a non uniform pattern. The fix. Mark the fan assembly with a vertical line perpendicular to the actual LED chips. Now you know where vertical is and can install the assembly into the boot and the holder. Mine was about 5 degrees off if I just pushed in and turned till it stopper. I put mine vertical and then put a 1/4 dot of silicone between the holder and the bulb. Keeps it from moving, light is perfect. These bulbs have a fan assembly, it’s completely waterproof and I’ve submerged my DS in a few creeks with no failure of the light the fan just stays running under water till you turn off the ignition.
The other option is to just plug in a power strip if you don't need permanent installed outlets. If you are going to permanently install the outlets the wiring should be SJO cable to circuit breaker, circuit breaker to all outlets.
https://rvpartsexpress.com/product/20-amp-gfci-stand-alone-circuit-breaker/
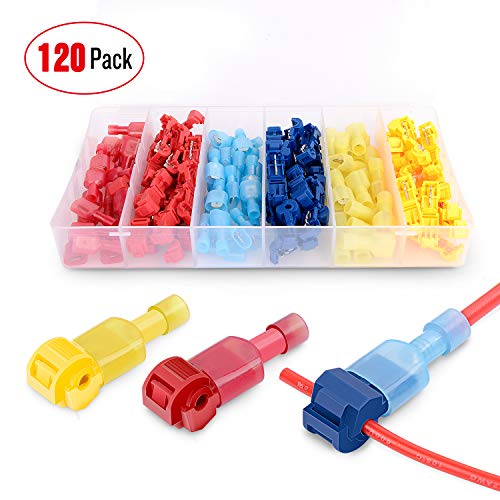
7.https://www.amazon.com/Nilight-Terminals-Self-stripping-Insulated-Disconnects/dp/B07CP987BN/
T-taps and some spade connectors would be the easiest way, otherwise it'll be a lot of cutting and soldering. If you go with t taps you can mix the colors of the connectors. It'll likely be a yellow tap on the 12 gauge trunk line, and the LED positive will get a red spade connector to plug into the yellow tap. The spades themselves are all the same size, so use the right color connector for each individual wire.
Other comments: the wires coming from the charge controller to batteries only needs to support 40 amps. They can be 8 gauge and fused at 40 amps, not 150. Your wire from battery to fuse block can be 8 gauge as well. I only see 25 amps of accessories in the block, and you'll likely never run all of them at once. So an 8 gauge supply and ground line with a 40 or 50 amp inline fuse will give you plenty of room to add more accessories later while being safe.
Edit: make sure you buy twisted strand copper wiring and not aluminum clad or solid core. Best spot for the thicker wiring is car audio stores or search amazon for stereo amp installation kits. If you go to home Depot for 0 gauge wire it'll be rigid and hard to work with, the car stereo wiring is super flexible.
Edit 2: you may want to consider adding a battery management system after the isolator. They make many variations, some that include the isolator function as well. Some allow you to program a maximum current for charging the lifepo4, which will make it easier to judge wire size for that run. The big benefit though is that a standard car alternator will only charge lithium batteries about 75% because it's regulated to about 14.2 volts. That's what the lead acid battery expects for charging. The lithium needs 14.7 or more to charge fully. So adding the bms will allow the lithiums to fully charge while driving, otherwise you'll have to rely on the solar for the last 25% of the charge. Just make sure to program the charge controller for lithium batteries.
Its pretty easy to do yourself. I have a 2003 yukon xl and I did the installation myself. Yours should be the same as mine, I assume you have onstar and bose as well. If I were you I would get this headunit and this adapter. It looks difficult, but its really quite easy to install. It also keeps all your factory steering wheel controls and onstar. A little spendy, but there is nothing cooler than changing the song on Spotify with the steering wheel controls on your ten year old vehicle.
Thanks, I think so too. Really happy with how it turned out. Was able to get the blinker mod done today as well.
Here you go!
http://www.amazon.com/dp/B00877SL2M/ref=pe_385040_128020140_TE_3p_dp_1
I went with these. I've been satisfied with the results, very bright and even. I've had no problems and I haven't had any go out, even the ones in my license plate light and I've has those for pry almost a year
I got a pack of [these] (https://www.amazon.com/dp/B015GYN38A/ref=cm_sw_r_other_awd_76MPwb4TCY4GW) so not to compromise existing circuits. Worked great for my A118C
I've heard those called Vampire taps before. It doesn't seem right to call this a "brute force" mod. It's quite simple, elegant, and non-destructive.
EDIT
I guess vampire tap just refers to the old 10BaseT networking thing. Found these "T-taps" on amazon:
https://www.amazon.com/Nilight-Terminals-Self-stripping-Insulated-Disconnects/dp/B07CP987BN
The tach can still be off. Laser tachs are pretty cheap.
What RPM are you looking to idle at? 700?
I have a blackvue DR590-2CH with a "power consumption avg. 290mA (3.48W at 12V)". The camera comes with a cigarette lighter plug. I'd like to use the Model 3 USB outlet (5V/2A) instead. Also, this post.
Do you think this converter will do the job? My basic concern is knowing enough to be dangerous and breaking something expensive or setting something on fire.
SECTION | CONTENT
:--|:--
Title | How to Properly Recharge Your AC System
Description | Recharge your AC system properly. I go though all of the steps on how to safely recharge your air conditioning system with refrigerant. First you need to evacuate the system, then pull a vacuum, and then add the correct amount of refrigerant based on weight. Manifold gauge set: http://amzn.to/29fZqu1 AC vacuum pump http://amzn.to/29nr6xS Refrigerant (with no oil or sealers): http://amzn.to/1WMjvuS Refrigerant Can Tap: http://amzn.to/20vQFxc Scale to weigh Refrigerant: http://amzn.to/1TrEQbs Ho...
Length | 0:13:09
****
^(I am a bot, this is an auto-generated reply | )^Info ^| ^Feedback ^| ^(Reply STOP to opt out permanently)
I installed this one on my beater truck. Looks to be available for under $100. Also there's a youtube video on how to install it. Just wire it into one of the backup lights (I used a T-Tap) and it will only come on when you put it in reverse.
Links to everything I used for my installation:
https://www.amazon.com/gp/product/B01G8HUTCW/ref=ppx_yo_dt_b_asin_title_o00__o00_s00?ie=UTF8&psc=1
https://www.amazon.com/gp/product/B00HNMLQAG/ref=ppx_yo_dt_b_asin_title_o01__o00_s00?ie=UTF8&psc=1
https://www.amazon.com/gp/product/B076F1WXRC/ref=ppx_yo_dt_b_asin_title_o01__o00_s00?ie=UTF8&psc=1
It's from Octane Lighting:
LINK
For reference, I have around 14,000 miles on my 18" Michelin MXM4 tires that came with the car (and around 7,000 on separate winter tires). When I checked the tread last they were all between 5/32nds and 6/32nds. I don't usually drive too aggressively but EVs are notorious for wearing out tires quicker due to the instant torque. Remember that the factory tires have a treadwear warranty that will get you a discount on your next set.
Also, it's cheap and easy to check your own tread depths using a tool like this that you can find in the automotive section of Walmart or in an auto parts store www.amazon.com/gp/product/B01F5N55B0
That's really awesome that you say that I bought h4 stuff on Amazon and I'm gearing up to install.
Anyone have any experience? Is this a good setup? Tough to install?
HELLA 003427291 Vision Plus 190x132mm High/Low Beam 12V Halogen Conversion Headlamp
H4 100w Ceramic Fused PnP Heavy Duty Automotive Wiring Harness Headlight Foglight Booster Relay 12v
HELLA H4 12V 100/80W Halogen High Wattage Bulb Off Road Use
The link I posted has all the information of what I bought and links to the product.
Anyway,
https://www.amazon.com/AutoLover®-Windshield-Display-Fatigue-Consumption/dp/B01CQK4DZO/ref=sr_1_1?ie=UTF8&qid=1523574421&sr=8-1&keywords=130734901
and with a OBD2 Y-Cable.
the autopal housings are great and take H4 bulbs. super easy refit, although you should also do a relay harness if you are going to overpower them because all the power goes through the headlight switch in the stock config.
harness
housing
bulbs
Note that if you have fogs the highbeam cutoff circuit might malfunction if you install a relay harness. Some info here
TL;DR: Any h6054 housing will fit. Do a harness swap too.
Edit: the Autopal and some other housing brands are available with ECODE or DOT glass lenses, for LHD or RHD.
DOT means there is not as sharp a cutoff. This is used in the US because overhead road signs are not illuminated as they are in the EU. As another poster said, once you have the housing in with it's little stamp you pretty much have carte blanche for the bulbs
Your first diagnostic should be to check the high/low pressure to make sure the compressor is compressing something.
Get one of these (or similar): http://www.amazon.com/Mountain-8205-R-134a-Manifold-Couplers/dp/B000JFHNG0
A good book for learning about how the A/C (and everything else) works is this: http://www.amazon.com/Automotive-Technology-4th-James-Halderman/dp/0132542617 ($110) No, it's not cheap-- but if it saves you even one mechanic visit, it will pay for itself.
The service manual for your Civic will have specifics of the pressures you want to see, but the short version is you want to ensure that the base pressure is roughly equal to the vapor pressure of the refrigerant at the ambient temperature. On the gauge set I have this is conveniently included on the gauge itself. The low and the high port should read the same pressure when you start. If not, perhaps the engine hasn't been sitting long enough after having the AC on?
If the pressure is lower than the normal vapor pressure of the refrigerant (less than the 60-80psi range depending on temperature) then STOP. Do not add more refrigerant. You have air in the system which needs to be sucked out with a vacuum pump before you proceed. You probably want a pro to handle that for you and there are likely some other components to be replaced as well.
This guy has great writeup of the recharging process:
http://blarg.introspect.net/cars/7
And to think i was going to get this, that shark fin is totally interesting now.
I mean if you can find a Pontiac dealership then maybe. Otherwise most audio shops don't bother repairing factory radios, unless you find someone that specializes in it. It's like trying to repair a car that was in a heavy front end collision, you just write it off and declare it totalled not attempt to repair it. I've had customers come and say a dealership wanted $1k+ to repair their radio whereas a brand new aftermarket deck installed, with more features, only came out to <$300.
But yeah, see if a friend knows radios or go to your local shop and get an estimate. Here's the parts for your own research:
Dash kit, 99-2003
Antenna adaptor, 40-GM10
Harness, PAC RP5-GM11
Definitely, you just need to convert the 12v into a trickle charge. There are many ways to do this, some more efficient than others. There might be a AA charger that runs off of 12v, might have a cig lighter input and be in automotive sections. Let me look on Amazon and stuff.
&#x200B;
https://www.amazon.com/Universal-Battery-Charger-Rechargeable-Batteries/dp/B07BFWHD7G/ref=sr_1_5?keywords=12v+AA+charger&qid=1565030427&s=gateway&sr=8-5
&#x200B;
more edit: here, all this should be whatever you're looking for-
https://www.amazon.com/ARECORD-Cigarette-Lighter-Socket-Converter/dp/B01J67JIOQ/ref=sr_1_1?keywords=cigarette+lighter+socket+to+usb&qid=1565030691&s=gateway&sr=8-1
&#x200B;
https://www.amazon.com/Chanzon-Cigarette-Terminal-Accessory-Inflator/dp/B07CQMQL9L/ref=sr_1_7?keywords=cigarette+lighter+socket+to+wire&qid=1565030768&s=gateway&sr=8-7
Forgot to mention...
A good SWR meter is always advisable. Never trust the radios built in SWR meter.
SWR is short for, Standing Wave Ratio. It's basically a measurement of resistance from your radio thru the cable and thru the antenna. You adjust your antenna by either lengthening it, or "trimming" it down. The Solarcon A-99 antenna has tuning rings to make this process easier.
Here is a good link that explains more on this;
https://www.rightchannelradios.com/blogs/installation-guides/18428275-understanding-swr
Also here is my meter and jumper cable;
Astatic PDC1 100 Watt SWR Meter https://www.amazon.com/dp/B004ULN610/ref=cm_sw_r_cp_apa_i_dvYqDbTM72D6M
RG58A/U COAX CABLE 3 foot Jumper for CB / Ham Radio - Workman CX-3-PL-PL -Made in the USA https://www.amazon.com/dp/B005IDVKR6/ref=cm_sw_r_cp_apa_i_uvYqDb81KE2D4
Typically no since there might be a 'spot' in the plastic molding of the fuse block, but if there are no metal contacts underneath, short of taking the whole fuse block out and modding it, you can't get there from here.
Most fuse blocks are setup to have a power 'bus' which connects the input side of the fuses to switched and/or constant battery power, but I've never seen a way to add a bus that's not there.
There are many 'add-a-tap' products that let you piggyback off another fused circuit. Ideally choose a less-critical circuit like your radio power circuit to hack into.
https://www.amazon.com/Qiorange-circuit-Adapter-Blade-Holder/dp/B015GYN38A?ref_=fsclp_pl_dp_2
Stick to the brand names and you'll be fine. My last few sets were Goodyear Nordics - which are fairly inexpensive and they work great.
You can check out tirerack.com to compare tires. I tend to stick away from tires that have a specific left and right side tread. Other than that, check how many miles they are rated for and the user reviews.
Get a tread depth reader for a few bucks and take the time to check each tire for even wear across the tire. The Goodyear Nordics are 13/32" brand new. It's a good way to gauge the % of life left. For inspection purposes, the tires much be 2/32" minimum, which is way too little for winter.
Update:
The system was empty. Added a little bit of UV oil and a can of refrigerant to diagnose the issue. AC turned on almost instantly, low side pressure around 30 psi by the end of the can; manifold gauges rock.
Plan is to run the AC for just a week or so to avoid long-term issues, just long enough to find the issue.
Hopefully we'll find the leak. If so, we'll buy the parts to replace.
In any event, we'll also get the accumulator and an o-ring set, pay for evac, replace the parts, pull vacuum, and charge it up properly.
Gotta get a vacuum too. Still confused whether the vacuum needs the r134a adapter - the adapter is illegal to ship to california for some reason; the vacuum in question (link) says it's made specifically for r134a but half the people say you need an adapter and half say you don't. (I got the manifold gauges I linked before - this one (link).
the only other thing I see that you should consider getting is a swr meter
http://www.amazon.com/Astatic-PDC1-100-Watt-Meter/dp/B004ULN610/
when your dealing with low watts system like a CB matching your antenna to the CB can make a major difference on your transmit and receive, as much as a few miles.
The bypass harness was for behind the stereo. Almost an "adapter" so to speak as well as a bypass. This is what I bought and what is now attached behind the stereo to the corresponding wires:
PAC RP5-GM11 Radio Replacement Interface With Built-In OnStar Retention/Steering Wheel Control Retention/Navigation Outputs for Select GM Class II Vehicles https://www.amazon.com/dp/B00DHUA9VA/ref=cm_sw_r_cp_api_i_LAdoDb36VCBBW
Very good point bringing up the relay harness. The stock wiring is crap. This upgrade is as important as the e codes themselves. Even what I'm running (55/60 bulbs) the difference is massive. But I upgraded the wiring long before I did the headlights. Bought mine years ago still going strong
https://www.amazon.com/Ceramic-Automotive-Harness-Headlight-Foglight/dp/B00BMN30HY/ref=pd_sbs_236_1?_encoding=UTF8&amp;pd_rd_i=B00BMN30HY&amp;pd_rd_r=AMFGSTM0NEFJBJ5FY5BG&amp;pd_rd_w=FP7E4&amp;pd_rd_wg=lmaEX&amp;psc=1&amp;refRID=AMFGSTM0NEFJBJ5FY5BG
This is what I have
https://www.amazon.com/Astatic-PDC1-100-Watt-Meter/dp/B004ULN610/ref=mp_s_a_1_8?keywords=ham+swr+meter&amp;qid=1568150950&amp;s=gateway&amp;sprefix=Ham+swr&amp;sr=8-8
https://www.amazon.ca/dp/B01CQK4DZO/ref=cm_sw_r_cp_apa_i_PKrDDb1HXPB0Q
$60ish on Amazon
Unless you're really looking to dig in and learn and aren't afraid of spending $300+ in tools you'll be better off to just drop it by an auto a/c specialty shop to have it diagnosed and repaired. Most commonly the system has developed a leak which has to be identified and repaired then the system has to be vacuumed down and recharged by weight.
cool, so would this do the trick -
https://www.amazon.com/Scosche-0400ATCFH16-5-Fuse-Holder-Gauge/dp/B008CVPE8C/ref=sr_1_1?ie=UTF8&amp;qid=1493947984&amp;sr=8-1&amp;keywords=16+gauge+fuse
They are hella horn sharptones. I bought them as an inexpensive mod that I thought might would look good. But living in Texas, with large highway and hugs trucks, a louder horn definitely comes in handy on small cars.
Edit: Hella 922.000-731 Sharptone Horn Kit https://www.amazon.com/dp/B00R3O0Y0M/ref=cm_sw_r_cp_apa_sD4.yb1NX31YP
Thanks! Would I use this to connect to the outlet? https://www.amazon.com/dp/B01HGO2OIS
Thanks, so I just need to buy two identical Mini fuse taps?
like this kit? https://www.amazon.ca/DIGITEN-Assorted-Inline-circuit-Adapter/dp/B01G8HUTCW/ref=sr_1_5?ie=UTF8&qid=1549426538&sr=8-5&keywords=mini+fuse+tap OR https://www.amazon.ca/Qiorange-circuit-Adapter-Blade-Holder/dp/B01J9GTL6O/ref=sr_1_1_sspa?ie=UTF8&qid=1549426538&sr=8-1-spons&keywords=mini+fuse+tap&psc=1
Through the remote monitoring device: https://www.amazon.com/Digital-Photo-Laser-Tachometer-Contact/dp/B001N4QY66/ref=mp_s_a_1_1?ie=UTF8&amp;qid=1549557310&amp;sr=8-1-spons&amp;pi=AC_SX236_SY340_FMwebp_QL65&amp;keywords=laser+tachometer&amp;psc=1
I got mine from Octane, 1 for our jeep and 1 for our 76 motorhome. H4 100w Ceramic Fused PnP Heavy Duty Automotive Wiring Harness Headlight Foglight Booster Relay 12v https://www.amazon.com/dp/B00BMN30HY/ref=cm_sw_r_other_awd_voo4wbV1EG5FJ
I put a set of these on my leaf in the factory horn location, and I'm very happy with them.
ive got the avic 5000nex from pioneer in mine, its got nav and bluetooth and a backup cam but that shit doesnt come with it. you just gotta get the head unit and aftermarket a/c control thingy
a/c thingy headunit holder: https://www.amazon.com/Metra-99-7803G-Installation-Display-Vehicles/dp/B00AHGFT94
head unit: https://www.crutchfield.com/p_1305201NEX/Pioneer-AVIC-5201NEX.html?origitemno=1305000NEX
Accessory wire is the 12v+ that gets current when you put your car key in the ignition and turn it (or, if you have wireless keys, just when ever the radio can play, but not the engine) (accessory has 12v+ with the engine running)
Basically, if you can turn your radio on, the accessory wire has current.
You want to use this wire, because the lights will turn off automatically when you get out the car.
You can tap into the wire using a t-tap like this
Nilight 120 Pcs/60 Pairs Quick Splice Wire Terminals T-Tap Self-stripping with Nylon Fully Insulated Male Quick Disconnects Kit, 2 Years Warranty https://www.amazon.com/dp/B07CP987BN/ref=cm_sw_r_cp_apa_i_DXa2Cb03G4FAR
https://www.amazon.com/AUTOLOVER-Windshield-Display-Fatigue-Consumption/dp/B01CQK4DZO
I actually just put these on my sportster last night: OPT7 Motorcycle LED Headlight Kit w/ Arc-Beam (https://www.amazon.com/dp/B00WVJR0D8/ref=cm_sw_r_other_awd_6SH3wb4PP998B)
The difference is astounding. The fitment can be a little tricky but I was able to fit everything in the original housing.
Also thinking about adding a light bar underneath from (http://trackerdie.myshopify.com/products/7in-36-watt-led-light-bar) but that'll be a little later.
Adapter for USB to female 12v cigarette lighter.
https://www.amazon.com/dp/B01J67JIOQ/ref=cm_sw_r_cp_apa_eAp9ybMD0SJ91
Do you know what wiper motor you have? Or what year and model car it came from? From that we can get the amperage.
Voltage doesn't matter-- everything is 12 volts (DC).
Amperage does matter, but I'm guessing your wiper motor uses around 1A. The relay of the remote I linked to earlier has a rating of 5A, so you might put a 5A fuse in there. If there's a short, it will definitely go above 5A and blow the fuse (which is what you want). Here's an example of a fuse holder that would work, but there a million options.
Since you're using a 5A fuse, you could use 16 or 18 AWG wire (rated for 7 and 10A).
So far I've been talking about the circuit for the motor that passes through the relay. For the receiver's power, you could use another 5A fuse with the same wire just to be consistent, though it really is only using milli-amps.
So basically, we size the protection (the 5A fuse) above the normal operating current (1A?), and then everything else is sized to be higher than the protection (5A+).
Finally, you'll wonder how you're supposed to connect the wires together. The best option is to solder the wires together and put heat shrink around the joint. If you can't handle that, they sell crimp wire splices for that. You can buy a real crimper or just use pliers.
The Uniden 520 is a great choice for a basic radio. I've been using one for years with excellent results. It's really hard to beat for the size/money.
Consider the K30 magnet mount antenna for an alternative in that size.
I've used both it and the Little Wil and found the K30 to perform noticeably better. It's also less expensive:
http://www.amazon.com/K40-K-30-Stainless-Magnet-Antenna/dp/B000H2W270/ref=sr_1_2?ie=UTF8&amp;qid=1417900765&amp;sr=8-2&amp;keywords=K30
The other commenter that suggested getting an SWR meter is also correct. These antennas all require some degree of adjustment for optimal performance. Just a basic meter will work fine.
http://www.amazon.com/Astatic-PDC1-100-Watt-Meter/dp/B004ULN610/ref=sr_1_1?ie=UTF8&amp;qid=1417900872&amp;sr=8-1&amp;keywords=SWR+meter
And the jumper:
http://www.amazon.com/Procomm-Coaxial-Cable-Jumper-Connectors/dp/B003DRJ738/ref=pd_bxgy_auto_text_y
The meter and jumper is something you'll very rarely need (just when moving the setup to a different vehicle, for the most part) so if you husband has a friend into CB or HAM operation, he may be able to borrow one for a few minutes rather than buying.
Finally, you'll need some way to power the radio. The easiest way is with a lighter plug:
http://www.amazon.com/Roadpro-Fused-Replacement-Cigarette-Lighter/dp/B0016LG0CY/ref=sr_1_1?ie=UTF8&amp;qid=1417901045&amp;sr=8-1&amp;keywords=lighter+plug
Just cut the connectors off the ends of the wires and splice it with the ones on the radio.
Alternatively, you can connect to the fuse box with an Add-A-Circuit. These come in different sizes depending on the fuses in your car. You can get one of these for less than $10 at any auto parts store.
Something like this? not exactly plug and play since you gotta wire stuff up, though...
Huh.. I did the opposite and put this one on my car.
https://www.amazon.com/dp/B07CP987BN/ref=cm_sw_r_cp_apa_i_SzyZDbW15NCS6
Are these the correct ones? I just want to make sure before I buy. I might look on eBay to see if I can just get a couple since I don't need so much lol
https://www.amazon.com/GODESON-88702-Smart-Color-Coded/dp/B01F5N55B0/ref=pd_sbs_263_t_2/137-8617068-0944230?_encoding=UTF8&pd_rd_i=B01F5N55B0&pd_rd_r=a036bac7-2c6f-44e1-ba76-7d40b8a30394&pd_rd_w=Kn0A9&pd_rd_wg=VVTGw&pf_rd_p=5cfcfe89-300f-47d2-b1ad-a4e27203a02a&pf_rd_r=2ATS0B6FGE716G022FK6&psc=1&refRID=2ATS0B6FGE716G022FK6
&#x200B;
You can usually pick on of these up at an auto parts store for a few bucks.
Generally speaking, around 4 or 5/32 you've got a dry-weather-only tire, and they're legally bald at 2/32
I don't know how much you consider "stupid expensive" but I got something like this, and I'm sure if you look at ebay they're even cheaper than this one.
https://www.amazon.com/Digital-Photo-Laser-Tachometer-Contact/dp/B001N4QY66
junkyard, or replace the stereo and use the HVAC dash kit like this...a little more expensive but keeps stock location of your radio. Also buy it through crutchfield youll get it at a reduced price with your stereo purchase.
https://www.amazon.com/Metra-99-7803G-Installation-Display-Vehicles/dp/B00AHGFT94
Buy a set of these, replace your dome lights, trunk light, glovebox light. It makes the car so much brighter compared to normal bulbs and uses way less power. You just get a little glow from residual through the relay and they might flash when dimming.
If you don't want to put the radio where the storage pocket is you can use this kit, though it is pricey. http://www.amazon.com/Metra-99-7803G-Installation-Display-Vehicles/dp/B00AHGFT94
It is certainly possible to add bluetooth without replacing the stereo but your sound quality will remain the same. A new headunit will generally increase your sound quality but you could just add an amplifier to your current radio to get better sound. It's really whatever you prefer.
To me that's just variations of meep-meep.
This is more the honk-honk I want.
https://www.amazon.com/dp/B000COBK8A/?coliid=I2D6UOPR27V56O&amp;colid=1P18OHMCNZYH0&amp;psc=0&amp;ref_=lv_ov_lig_dp_it
Does that price include the parts? The dash kit for your car will cost you ~$250 at a brick and mortar shop. At my shop if charge $100 in labor.
Edit: Metra 99-7803G Single/Double DIN Installation Kit with Display for Select 2003-07 Honda Accord Vehicles (Grey) https://www.amazon.com/dp/B00AHGFT94/ref=cm_sw_r_awd_dmIxwbDT7XGCB
A lot of people will tell you to do the penny trick, but I hate it. Coins wear and that is not an accurate measurement for something like tires, which are a safety device. A tire depth gauge like this is less than 5 bucks and will always give you accurate results. Buy one for each car and one for the house so you always have one around. I would replace around 4-5/32nds myself as I see you already did.
Here is the battery pack. The pack should put out 5v 3amps per USB unless I've misread, however this product and ones like it tend to convert 5v power from USB to 0.8amp max output at 12v DC, but the fan should require 1.2amp of 12v DC to run on low.
Edit: I located some testing on a similar product in a review that might be helpful:
This seems to do fairly well though I'm unclear what they think their ratings are. I connected this to a 60-watt 5V Anker 6-port USB power strip (which I have verified is better than 5% tolerance 5V at 2.8A on a single port) and began to take measurements.
Max power without total shutting down:
Input 5.08V at 1.9A
Output 10.01V at 818mA
---- Or slightly closer to 12V ----
Input 5.08V at 1.86A
Output 11.33V at 708mA
Max power stable long-term:
Input 5.03V at 1.86A
Output 11.62V at 675mA
Duration - 20 minutes stable, immediately following max-power test
This suggests that this 12V adapter will reasonably provide continuous output at 12V around 670mA with the capability to have higher surge-current but at the cost of dropping more voltage. I was very pleased with how cool it ran - only slightly warm to the touch (113F on the plastic case as measured on IR thermometer). In the event of an overload it does seem to fail gracefully and "shut down" the converter (outputting about 4.5V until reset) on severe overload then "resets" if it is unplugged for a couple minutes.
That chime may not be coming from the stereo itself, there are adapters for the stereo that add this functionality. I recently installed an ilx-107 in my car and left out the chime module from the adapter as it was obnoxiously loud.
Adapter like this.
Nope. USB only.
Edit: which brings up a point I didn’t think about....
Must be an adapter.
ARECORD USB A Male to 12V Car Cigarette Lighter Socket Female Converter (Max Output 12V 0.8A) https://www.amazon.com/dp/B01J67JIOQ/ref=cm_sw_r_cp_api_i_Xn9QCbE2H2WK2
http://www.amazon.com/gp/aw/d/B00AHGFT94/ref=pd_aw_sim_e_1?refRID=0AZRRC7R5CWMSSTB9VXX
http://www.amazon.com/Metra-70-7864-DZ-Climate-Controls-Control/dp/B000K4YO94
You should always tune the antenna. You will need a SWR meter to make the adustments.
I keep this one in my Jeep for when I hit something and need to check tuning:
http://www.amazon.com/Astatic-PDC1-100-Watt-Meter/dp/B004ULN610/ref=sr_1_6?ie=UTF8&amp;qid=1425314724&amp;sr=8-6&amp;keywords=swr%2Fpower+meter
It will get the job done.
https://www.amazon.com/dp/B00877SL2M/ref=cm_sw_r_awd_6zPbvb0N633Y7
Are these the ones?
This is so amazing. It's crazy to think how old that movie is, and how well it holds up. Things like these vehicles date it more than the production of the movie. Truly a masterpiece.
Just out of curiosity, if you are going to drive this full time what will you do with the factory dash? Are you going to try to set gagues into the fiberglass dash in front of the wheel? Or mount them on the A pillar? Being a 93 it won't have the OBD II port for a Heads Up Display, which is a shame because that screams 90s fancy Ford (I had a 88 Mercury Sable with the digital dash that was the shit).
The only other wiring is connecting both fog lights together and passing the fire wall. The wire has the two connectors for the lights, 2 grounds, and comes together to connect with the fog light line by the the reservoir.
I'd take some pictures, but I needed to put the bumper back on..
The eBay kit came with another set of wires but that was just an extension in case the fog light line was too far away. So the only other wiring is the harness in the pictures.
Would you like more detailed picture of that?
I know the green plug is for the button and I'm assuming black for ground.
The little black box things with the two red wires does have a 15 amp fuse in it.
It was just confusing me that the two red wires had connectors on them.
What is the proper way for finding wires with the correct Volts and Amps?
In order to avoid the splicing, could i use something like this?
I used these https://www.amazon.com/gp/product/B01ADHUXGU/ref=ppx_yo_dt_b_search_asin_title?ie=UTF8&th=1
Many other people have as well. Some people put them in the plastic circle tabs in the ceiling over the trunk. But to do that you have to drill a hole in the sheet metal of the ceiling. I didn't want to do that, so I popped off both D-pillar covers and drilled holes in those. Worked great. They are high enough up so they don't get covered unless the trunk is 100% packed.
I soldered them into the switch for the stock trunk light. That way the automatically turn on and off when opening and closing the trunk.
Links to some of the things I purchased and am happy with:
Weller WES51 Analog Soldering Station
Hakko FX-901/P Cordless Soldering Iron
NOCO GC018 12V Adapter Plug Socket with Eyelet Terminal
Carviya 12V 24V Heavy Duty 16 AWG 15A 20A Male Plug Cigarette Lighter Adapter
Metra 99-7803G Amazon link I had to cut out the center plastic support to clear room for it but nothing too extreme.
RioRand Dual USB 12v to 5v 3a transformer; Scosche 16ga fuse holder with two right angle usb cables from startech.com
I got the Boomba kit. Personally, I think its worth the $150 not only because of the materials but also the R&D that went into the design. Though I'm curious how your DIY kit goes, let me know!
One thing I will say is to look into getting a stubby antenna when you do the riser otherwise the stock antenna will hit the spoiler when you lift your hatch. I got this one from Amazon for $25 and so far its held up really well.
sure.. you can.. if you don't want a working camera..
You're going down the right path.. you'll need a hardwire kit like that and a fuse tap like this
The hardwire kit I used after research and recommendations from this subreddit
Just today I did my hardwire for my A119S off the front passenger fusebox with the 2 exact items I linked.. I found a fuse that was ignition on/off and spent about 5 minutes doing the work.. spent about 3 times as long routing the cable in a nice fashion around the a-pillar and window...
While I totally agree the down side is that OPs vehicle requires a wire harnes that cost almost $100. The nice side is that it does everything.
For some one who's just looking for aux input the pac/isimple style units can work for less.
I have no idea where to find that information, but I own one of these http://amzn.com/B001N4QY66 and I would use that and a power drill creatively to compare the ratio. Probably remove the tach and speedo and use the drill to spin the tach/speedo and compare an actual measurement of the drill with the measurement on the speedo/tach. I used my power drill to test out my tach when I had to disassemble and clean it to get it to work when I first bought my bike.
That's fine provided you're adding the fuse properly. Do NOT use this style. You should be using this style instead. Ensure the fuse amperage you add never exceeds factory and doesn't exceed the current carrying capacity of the wire gauge you run. That power pack doesn't pull much juice. Under 10A with music. Don't forget a proper ground too.