Best beer brewing equipment according to redditors
We found 1,553 Reddit comments discussing the best beer brewing equipment. We ranked the 599 resulting products by number of redditors who mentioned them. Here are the top 20.
We found 1,553 Reddit comments discussing the best beer brewing equipment. We ranked the 599 resulting products by number of redditors who mentioned them. Here are the top 20.


That is a bottle capper. It is used in homebrewing.
The working man's strap lock.
If you want the best general resource, How to Brew by John Palmer is the standard. Honestly, if you just want to see if it's for you or not, get a one-gallon kit and follow the directions. It might not give you the best beer on your first try, but it'll give you a pretty good idea of what it takes.
Don't buy a kit! They sell you all kinds of shit you won't use when there are better options for similar money.
Get a brewing bucket as if you don't have a bottler then this will make your life so much better.
Get 2 carboys (glass is best but better bottles will work too). Check Craigslist for these...you can get some awesome deals.
Get 1 Refractomoeter instead of a hydrometer because they use WAY less of your must to calculate and they aren't mega fragile like hydrometers are.
You will want an auto siphon
You will want a carboy brush that fits on a cordless drill because cleaning a carboy without one fucking sucks (and for 18 bucks this is a no brainer).
You will need sanitizer. I personally like Iodophor because it's super cheap, it doesn't really foam up and it lasts forever. I bought one of THESE bottles like 2 years ago and it is about half full even though I brew between 50-100 gallons a year.
I always advocate people start with beer bottles rather than wine bottles. The reason for this has less to do with the bottles and more to do with equipment. The Ferrari Bottle Capper is 14 dollars while a good floor corker for wine bottles will set you back 60 bucks. In addition, it's cheaper to bottle in 20 ounce beer bottles with caps rather than in wine bottles with good corks. Use of a double lever corker for wine bottles should be considered a war crime...seriously...unless you're a masochist who loves dumping wine everywhere and having to clean it afterwards...then just avoid them...they are absolutely awful.
If you go the wine bottle route then NEVER use agglomerated or colmated corks (the ones made from tiny pieces of cork glued together) as they fall apart and will leave chunks in your bottles. In addition they don't age well, so you are much more likely to lose your brew to spoilage. I like synthetic Nomacorc but you can also buy very good quality solid natural corks as well.
Good oxygen absorbing bottle caps on the other hand are mega cheap. Again...this isn't about one being better than the other, so you can use either one.
For wine bottles, I REALLY like the ones with screw tops because they make it nice and easy to cap your bottles once opened. But for all of your bottles buy these locally...shipping will double or triple the cost of these vs buying locally. I get them for 15 bucks a case a few miles from my house...they're almost 30 a case on Amazon or close to that from Midwest or from Ohio (shipping is like 11-15 dollars a case.)
For beer bottles...I prefer clear, but they'll be tough to find locally so I often end up with brown ones. Again...buy these locally not online due to shipping costs. Your local brewing supply stores buy these pallets at a time so even Amazon can't compete with the lack of shipping costs.
You would like to know about a bottle wand.
It has a spring loaded stop. You press it against the bottom of the bottle - the bottle fills all the way to the rim - stop pressing and remove the bottle wand - perfect fill level every time - when you stop pressing on the wand, it stops releasing mead/beer/wine/etc.
Looks very nice but I think you could have saved yourself a lot of work and easier cleaning by simply going with one of these: http://www.amazon.com/Bazooka-Kettle-Screen-brew-kettle/dp/B003ISY2DC
I would stay away from using commercial air compressors and pesticide sprayers.
Just buy a Cornelius keg (they're about 50 bucks) and get a mobile keg charger like this. You can then connect a 1/4 vinyl line and then get a ball lock or pin lock disconnect (depends on the type of corny keg you buy) and then attach a picnic tap at the end. If you want it to spray just buy a bottle filling wand or a racking cane and shove it into the outlet of the picnic tap.
http://www.midwestsupplies.com/platinum-pro-beer-brewing-starter-kit.html
or
http://www.amazon.com/dp/B0179ZH89Y?psc=1
The amazon costs more because it comes with an autosiphon, which you should definitely have
Both kits come with everything required to brew 5 gallons (40 to 50 bottles) of beer. Just need to buy bottles and you are good to go. It is the holiday season so odds are you may be able to find them even cheaper
Check out /r/Homebrewing and just start saving. Even 2 dollars a day with you and a friend and you could be rolling in a couple months.
edit: also start saving glass bottles that require a bottle opener. Those are reusable.
edit2: Things you'll need. Feel free to find similar products.
cooler with spigot
valve(I'm not sure of the size on that igloo)
bazooka screen
bottles(make sure they're brown)
caps
capper
some sort of gas stove. say a propane stove, a turkey fryer, or a kitchen stove.
a large pot
starsan
I'm probably forgetting things.
Holy crap, i didnt even think of those as a washer. Ive got like 200 of them. And theyre super cheap online. Woooooo, sorbo alternative!
Grolsch Bottle Replacement Washers (Pack of 100) https://www.amazon.com/dp/B004NXUJ06/ref=cm_sw_r_cp_apa_RO5lzb59739Q4
i got a pair of kegs during AIH's sale as well and i'm also new to kegging.
On your first question, here's what I'm doing:
and of course the two 5 gallon ball lock kegs from AIH.
>Have you made any liquor based drinks?
Screwdrivers are pretty good. Vodka and cranberry carbonated is pretty good as well. Margaritas you would think would be really good, but not so much. The sweeter the starting liquid the better it tastes carbonated, as carbonic acid is pretty bitter by itself. (carbonic acid is co2 dissolved in waters technical name, fun fact: The Ph value of our blood is what our bodies use to determine how much we need to breath. It is made slightly more acidic the more co2 is present.)
As far as supplies go, you need at a minimum,the stuff below. You can always get a bigger tank or longer/better hoses etc. But this is quite literally exactly what I have, and I only fill my tank up every 6-8 months (sooner if I make some dry ice with it.)
If you buy everything from amazon it will run you about $150, my local beverage distributor, in Atlanta suburbs, had most of this stuff a fair bit cheaper, so you may want to check with them first (I got burned by not checking).
Honestly, this was one of the best $100 or so I have ever spent. We buy those Mio squirt drinks when they go on sale, its like paying $0.08 for a 2 liter of Diet Faygo, plus all of the SodaStream flavors work as intended, you can get those from target for like 5 bucks and they make gallons of Soda. Plus all of the fruit stuff, and quixotic beverages just for fun.
Usage:
Make consistently good beer without temp control....not really.
Get this: it is very affordable, it is very easy to maintain the temps using the methods they say (5 degree cooling for each 2 liter of ice). It folds up so when you are not fermenting it can be out of site, it doesn't take a lot of extra space. It really has helped my brewing improve. One other thing is, its a safety measure agianst ruining anything in the apartment because of a blow off. Unless the blow off happens to happen when you open the bag anything would be contained inside the bag. The bag is water tight as stated and I have tested that out.
https://www.amazon.com/gp/product/B008EKD7CQ/ref=oh_aui_detailpage_o06_s00?ie=UTF8&psc=1
Cool gift idea!
I'd say, first and foremost, that you aren't going to be able to kit out your boyfriend for homebrewing. There are too many styles for different types of equipment, and it gets very expensive... But a basic kit is good enough to brew just about anything, and it gives him the option to buy new items piece-by-piece as he outgrows the starter ones.
If you want to give him a good start in the hobby, get him 3 things:
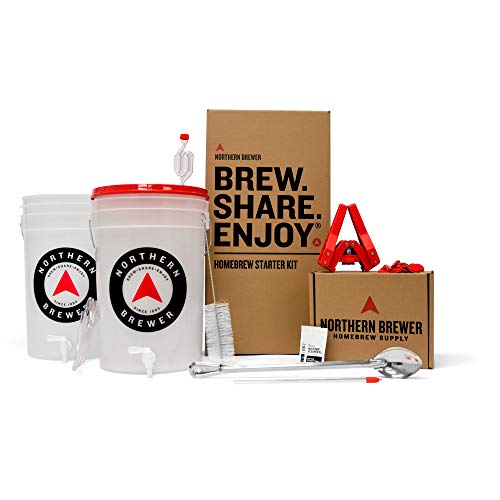
For a starter kit, it looks something like one of these: https://www.amazon.com/Share-Enjoy-Homebrew-Brewing-Starter/dp/B0179ZH89Y/ref=sr_1_3
You get a plastic bucket to ferment the beer, cleaning chemicals, hydrometer, bottles, bottle capper, siphon, etc. This should be perfectly adequate for him to brew beer dozens of times before he might want to start tweaking his equipment. The best part is you can replace individual parts of the kit any time you want - it makes it a very flexible upgrade path.
For a starter book, it's How to Brew all the way. I'm pretty sure everyone in here owns a copy.
For a starter kit, you can pick kits off Amazon. You should know there's 3 major types of beer recipe:
So, for all of these things, I gave Amazon links, but you don't have to buy them online at all. I'd strongly recommend looking up local homebrewing stores and just walking in. Most of my local shops are cheaper than shopping online, the staff are fun to talk to (because they really care about brewing), and it's nice to be able to examine some of the things before you buy them.
Whether you shop locally of online, everything I listed above should come in at less than $150.
My wife drinks 3-4 bottles of carbonated water every day. We used to buy Pelligrino at Costco, at $14/case, or around $60/mo. That was 3 years ago. This thing paid for itself a long, long time ago for me.
On top of that, I purchased a 5 pound tank from Amazon, and an adapter which hooks the tank up to the SodaStream. The tank costs $23 to refill, but has far more capacity than the little bottles the SS comes with. I have to refill it about once every two months.
Links:
https://co2doctor.com/freedomoonespec.htm
http://www.amazon.com/CO2-Tank-Aluminum-Cylinder-Valve/dp/B0085282UK/ref=sr_1_fkmr0_1?ie=UTF8&qid=1393961834&sr=8-1-fkmr0&keywords=7ln+co2+tank
Note: You can get a tank and swap it at some local shops, but where I live I can't find anyone who does that, so I had to buy the new tank.
This is a pretty good standard kit.
I bought a bunch of 16oz. glass swing-top bottles from a retail place called Chef's Emporium. I put pourer tops on them when in use and seal them with the swing top when it's time to put them in the fridge.
They're all over Amazon. Like this: Swing Top Grolsch Glass Bottles 16oz - CLEAR - For Brewing Kombucha Kefir Beer (6 Set) Bonus Gaskets https://www.amazon.com/dp/B01LB1862A/ref=cm_sw_r_cp_api_pG0Rzb1GQ3PJY
How about this: http://www.amazon.com/Genuine-Innovations-G5040-Charger-Black/dp/B000NV9CE6
No regulator, but it is technically C02. And you can keep the little refills in the cooler to chill them and bring as many as you want.
Obviously carb your keg at home with this solution. It would just be a way to expel the beer.
Or buy a CO2 inflator like this to initially pressure it.
http://www.amazon.com/Genuine-Innovations-G5040-Charger-Black/dp/B000NV9CE6
Fermtech Mini Auto-Siphon https://www.amazon.com/dp/B0064ODL1G/ref=cm_sw_r_cp_api_O18IBbH9HNE3C
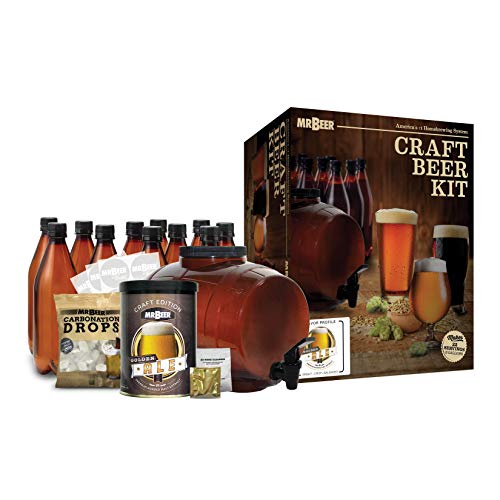
https://www.amazon.com/Mr-Beer-Premium-Gold-Homebrewing/dp/B001BCFUBU/
You should get this. Itd be cheaper than the stuff you pay for especially in the long run. Just a little bit of work to get a little over a liter of beer a day and if you get as many kits as what you would spend in a month you should be able to get enough kits for making a new batch of beer every week. With a little extra over the long run you could probably cut your cost by half if you try hard enough.
In the USA it looks like the cost of the equivalent of 10 liters would be about 10-25USD. It's probably going to be twice as much in australia looking at the costs of the components and how much is priced there. But the cost of 10 liters is anywhere from half to three quarters the cost of 9 liters.
https://www.walmart.com/ip/Corona-Extra-Mexican-Import-Beer-24-pk-12-fl-oz-Bottles-4-6-ABV/10984551
Just searching up the first set and the instore price is usually lower.
Freebie: You know how homebrewers (beer/moonshine) in America use copper tubing for heat transfer? They need to cool the beer down quickly.
That shit sells for $60 on amazon Guess how much it costs in China? $15. How much retail? Last time I was in the States... almost $100. What's the difference with a Global 500 company in Ningbo and a small extruder in Montana? MOQ. MOQ is like $10,000. Shipping to LA is $1900. Tariffs and VAT? NONE (HTSUS, anyone?). Amazon fulfillment is like $100/month (if you put ALL of your stock in their warehouse) and $2/product for shipping. Throw it on eBay and you got a stew going. Call 600 niche retail stores in America and get an order of 40 of these at $30 and you're going places.
If you're an English teacher, look out for shit like this. I sell something tangentially related to this product, and there is money to be made with that community. /r/entrepreneur
OR (8 US cents each) http://www.amazon.com/Brewcraft-Grolsch-Bottle-Replacement-Washers/dp/B004NXUJ06
Not sure if you have found these yet. They are about $1.60 a piece... The best way to overcome the fewer bottles is to brew more beer =)
http://www.amazon.com/CASE-OF-12-Bottles-AMBER/dp/B005CIFIDO/ref=pd_sim_indust_1
I keep posting this in the keezer builds for people who are about to build, here is the list of what I did with costs and where I bought things:
Here, while not basic, but a list that might help. This is a 4 keg setup. Some items are not exactly needed, for example hose clamps, MFL push to connect (you could just get barb ones), but helpful for disconnecting/cleaning. You can save a lot on faucets - my 4 costed me $280 total all in. You could also get a cheaper freezer.
I got a regulator with 2 possible pressures so I can have carbonation pressure plus serving pressure at the same time - also not a requirement.
Name|Price|Quantity|Total|URL
:--|--:|:-:|--:|:--
Inkbird Itc-308 Digital Temperature Controller Outlet Thermostat 2-stage 1100w w/ Sensor|$35 |1|35|https://www.amazon.com/gp/product/B011296704
Intertap Self Closing Faucet Spring|$1.99 |4|7.96|https://www.morebeer.com/products/intertap-closing-faucet-spring.html
Intertap Stainless Steel Faucet Shank|$32.99 |4|131.96|https://www.morebeer.com/products/intertap-stainless-steel-faucet-shank-4.html
Duda Energy HPpvc025-100ft 100' x 1/4"" ID High Pressure Braided Clear Flexible PVC Tubing|$28.50 |1|28.5|https://www.amazon.com/gp/product/B00LX6LS7E
Brewer's Edge UX-CAOO-IQIT Keg Lube 1 oz.|$5.98 |1|5.98|https://www.amazon.com/gp/product/B0064OK99S
Hilitchi 60 Piece Adjustable 8-38mm Range Stainless Steel Worm Gear Hose Clamps Assortment Kit|$12.99 |1|12.99|https://www.amazon.com/gp/product/B01IOE4RQQ
Taprite T752HP Two Product Dual Pressure Kegerator CO2 Regulator|$89 |1|89|https://www.amazon.com/gp/product/B0060NOX40
KegWorks Beer Tap Faucet Handle Black|$4.30 |4|17.2|https://www.amazon.com/gp/product/B000VI753Q
Intertap Forward Sealing Beer Faucet (Stainless Steel)|$31.54 |4|126.16|https://www.amazon.com/gp/product/B01NAGS3ST
4 Way Co2 Manifold|$42.99 |1|42.99|http://www.farmhousebrewingsupply.com/4-way-co2-manifold/
Accuflex Bev-Seal Ultra (3/16) 50'|$15.99 |1|15.99|http://www.farmhousebrewingsupply.com/accuflex-bev-seal-ultra-3-16-50/
Pin Lock Disconnect- 1/4 MFL Gas Side|$5.99 |4|23.96|http://www.farmhousebrewingsupply.com/pin-lock-disconnect-1-4-mfl-gas-side/
Pin Lock Disconnect- 1/4 MFL Liquid Side|$5.99 |4|23.96|http://www.farmhousebrewingsupply.com/pin-lock-disconnect-1-4-mfl-liquid-side/
1/4" MFL Push To Connect|$3.79 |4|15.16|http://www.farmhousebrewingsupply.com/1-4-mfl-push-to-connect/
5/16 x 5/8 BSPP (Shank Connector) Push To Connect|$5.99 |4|23.96|http://www.farmhousebrewingsupply.com/5-16-x-5-8-bspp-shank-connector-push-to-connect/
Igloo 7.1 cu ft Chest Freezer Black|$219.99 |1|219.99|https://www.walmart.com/ip/Igloo-7-1-cu-ft-Chest-Freezer-Black/31136433
Set of Four 5 Gallon Pin Lock Kegs Used|$28.90 |4|115.6|http://www.homebrewing.org/Set-of-Four-5-Gallon-Pin-Lock-Kegs-Used_p_3179.html
20 CO2 tank|$60|1|60|craigslist
2 in. x 8 in. x 10 ft. #2 and Better Prime Douglas Fir Board|$9.86|1|9.86|http://www.homedepot.com/p/2-in-x-8-in-x-10-ft-2-and-Better-Prime-Douglas-Fir-Board-604364/206182008
ZMAX 7 in. 16-Gauge Galvanized Reinforcing L-Angle|$3.27|4|13.08|http://www.homedepot.com/p/Simpson-Strong-Tie-ZMAX-7-in-16-Gauge-Galvanized-Reinforcing-L-Angle-L70Z/100375233
||||1019.36|
You would also need a wrench if you don't have one yet to unscrew the posts on the keg.
If you're interested in cider, here's an easy method that doesn't use the kit.
Sweet ciders add another couple steps, but I can go into that too if you'd like. Once you depreciate the cost of the gear over several batches, it's quite cheap compared to commercial cider.
reposting again...
As I've posted before, a nice alternative to the swamp cooler method is the Cool Brewing Cooler. It works the same way as a swamp cooler, if not better, but you don't have to deal with a giant vat of water.
These are the bottles I use for second fermentation.
This is the heating pad I use. It's pricey but you have complete control over the exact temperature you want and if it's a hobby you plan on continuing, it's well worth it.
Many people start with extract brewing and that's a great way to get your foot in the door and figure out if you want to continue.
I'm gonna recycle a reply I left on a similar post recently, I think it was a good, quick summary/overview of what you'll want to learn about and consider.
You have a couple of options to gear up. One option would be to pick up a brewing kit. I made a pic to explain what each item is in the beer kit. This is not an endorsement of that specific kit or brand, solely for educational purposes. With a kit, you get everything you need to start brewing and it's all brand new. The linked kit doesn't include bottles. You could find that kit or other kits at a local homebrew store and talk to people there who can help you on your brewing journey. The linked kit is by no means your only option - there are lots of kits out there. Whatever brand you consider, make sure it has the same components as the one I linked. You will need all that stuff.
You can also check Craigslist. People leave the hobby on occasion and put all their gear up on Craigslist for a fraction of the price new. I got everything in that brewing kit above, plus bottles, for $25 on Craigslist from a guy in my area who had been brewing with his buddy, and when his buddy moved away he just didn't feel like going solo.
Just a warning, if you're really into beer, this hobby is super addictive. I started Sept 2018 with the stuff I got off Craigslist brewing extracts in an aluminum pot on my stove and bottling -- and there is nothing wrong with doing this! You can make great beer from extracts. But I wanted to explore other styles and have more control over recipes. Dec 2018 I switched to all-grain (not using extracts). I now brew outside with a fancy brew kettle on a propane burner using all-grain recipes and then use kegs instead of bottling (yeah, we built a keezer). I love this hobby and there is really nothing as satisfying as drinking beer I made, sharing it with friends and family.
If you do decide to give brewing a shot, I have one final piece of advice. Beer is a lot more flexible than people give it credit for. Even mistakes made during the process can be overcome. Giving the yeast more time to work or aging a beer can reverse or lessen the impact of a mistake. When something seems to be off, this is the advice we always give: Relax, Don't Worry, Have a Home Brew (RDWHAHB). It's practically scripture 'round here.
Good luck and cheers!
A CO2 pressure gauge isn't very useful. It shows about the same pressure all the time, until you are SUPER low, and then it drops fast. As another poster said, there could be temperature variants too.
Unless it is critical that you never run out of gas, I would skip the gauge, and just refill when you are out.
Lastly note that you can track CO2 use by the weight of the cylinder. Weigh it when it is full, then again every month or two, and you will get an idea of how fast you are going through it.
Oh, edit to add: consider ditching the Soda Stream entirely. Get a real CO2 regulator, and use a "carbonation cap" on a 1L or 2L bottle. Using soda bottles is going to be way cheaper than using SodaStream bottles, and you can carb larger volumes.
Buy this and you can use your keg CO2 lines to carb it up in a soda bottle. You just gotta drink it relatively quickly or it'll show signs of oxidation soon: https://www.amazon.com/gp/aw/d/B01039C0Z0/ref=mp_s_a_1_8?ie=UTF8&qid=1505856195&sr=8-8&pi=AC_SX236_SY340_QL65&keywords=carbonation+cap&dpPl=1&dpID=410qbFqxN3L&ref=plSrch
Do you ever plan on doing 5 gallon batches? If you have the space it will be more cost effective to just go for a full size keging system. Mini kegs are going to cost you roughly what a new 5 gallon keg will.
That said if it's only a one-off thing you could use some 2 liter bottles and get yourself a co2 tank and regulator and a carbonation cap and force carb that way, it won't be on "tap" but it will be force carbonated.. and you can keep it carbonated if you leave the cap on and top off the bottle with co2 each time you pour from it.
If you have nothing then you'll need a regulator I have this one: (taprite t742hp primary double gauge co2 regulator, brass https://www.amazon.com/dp/B002UZUJ22/ref=cm_sw_r_cp_apa_i_auBCDbBPZ3V0H)
A co2 tank, something like this: (5lb co2 tank- new aluminum cylinder with cga320 valve https://www.amazon.com/dp/B00HQQ3WWE/ref=cm_sw_r_cp_apa_i_BvBCDbXPB33KP)
Some 5/16 tubing l, and a ball lock gas disconnect like this (5/16" gas line assembly - ball lock https://www.amazon.com/dp/B0064OI77Y/ref=cm_sw_r_cp_apa_i_6wBCDbSWZWMNY)
And a carbonation cap like this : (stainless carbonation cap counter pressure bottle filling with 5/16" barb,co2 coupling to carbonate soda beer fruit juice water https://www.amazon.com/dp/B01K4GGYT0/ref=cm_sw_r_cp_apa_i_BxBCDbK0V3J35)
I also have this regulator for my mobile mini keg set-up: Ultimate CO2 Regulator works with 5 types of CO2 tanks (0-50psi) https://www.amazon.com/dp/B071J9FKVD/ref=cm_sw_r_cp_apa_i_nABCDbQWF87S3
It works great and I use it with a soda stream co2 tank which are a little pricey for how much co2 you get but they're convenient and available everywhere. This makes a nice compact system since you don't have the big regulator and big co2 tank.
That's the kit I started with in September. The beer turned out great, even though I forgot to aerate it before pitching the yeast. I think it was around 4% ABV. The kit has everything you need to get started and you can upgrade from there. The bottle filler sucked, so I would recommend a spring tip one like this. Since then, I have upgraded to a bigger kettle and purchased a glass carboy.
Side note: Northern Brewer was recently acquired by InBev, and /r/homebrewing is not happy about it. I've started ordering from www.love2brew.com instead.
One thing you might consider is 2.5 gallon kegs. If you have some room to spare in your regular fridge, you could fit one of these in there and possibly get a small co2 tank or just use a keg charger like this:
http://www.amazon.com/Genuine-Innovations-Cornelius-Keg-Charger/dp/B000NV9CE6
Point being, if you put your mind to it, you COULD start kegging now. You'll never look back once you do.
Happy brewing!
6.5gal plastic fermentor - $17.88 (Don't bother with glass fermentors!)
6.5gal Bottling Bucket - $18.81
Hydrometer - $12.99
3 3-piece airlocks - $5.00 - trust me, they'll break.
stopper not needed with plastic fermentor
Bottle filler - $5.09
10 ft 3/8th inch tubing - $10.99
Auto siphon - $8.76
don't need a bottle brush with plastic fermentor
144 bottle caps - $5.78
Use any pure sugar for priming - just calculate it right. I use cane sugar without issue.
Wing bottle capper - $15.48
Dial thermometer not really needed if you're slapping on an adhesive one, but definitely get this for a hot liquor tun if you're doing that.
Wine thief - $11.20
I never used a funnel or fermentor brush - you can use anything to clean but I suggest Oxyclean rinses
32oz Star San - $20.70
Adhesive Thermometer - $4.84
Total Cost: $137.52. Not ridiculous savings BUT you get 32oz of star san instead of 4oz of io-star which will last you years and sanitizer is expensive. You get a plastic fermentor instead of glass which is so much easier to clean and keep light out. Glass carboys are good for aging and aging is good for wine or special beers. Focus on simple ales that don't require it first.
The real savings come when you do all grain and make your own equipment. You can save $137 alone if you buy a big stainless steel pot and slap on a dial thermometer with a ball valve.
A good option if you have Amazon prime: https://www.amazon.com/dp/B003UCCLG6
Not sure what your setup is, but I found having an immersion wort chiller in my starting brew days was incredibly efficient and time-saving (I did full 5 gal boils). These start ~$50 on Amazon, but you can buy coiled copper piping (the most expensive part) at any hardware store, bend yourself and use some inexpensive plastic tubing (make sure it’s heat resistant to handle the initial wort temp), some clamps and a faucet adapter. Cools wort remarkably fast and if you keep it clean and sterile (like all brew equipment), it will last as long as you brew beer.
Immersion wort chiller
There’s a few other quality of life equipment upgrades I’m sure you’ll find out along the way as you brew, but I felt this was well worth the money for the time and hassle it saved me.
Mead is super easy and rather cheap compared to other types of brewing. If you have a local homebrewing store they can help you get started and will have everything you need, most major cities have one and I find that the people are almost always very helpful.
The first thing is to decide volume, then if you want to boil or not, and then recipe (which includes batch strength). I prefer to boil my mead to help dissolve the honey and make sure its good and sanitized, but thats not entirely necessary
So Optional Equipment (if you boil)
1 Big Boil Pot - This needs to be big enough to do however much you want as a batch. If you get a 5 gallon pot, this is good enough for 2-3 gallon mead as well as if you got into Extract Beer Brewing. If you buy a 10 gallon boil pot (usually $120 or so) its big enough for 5 gallon All grain beer batches, as well as 5-8 gallon mead batches
2 Burner - If you are doing smaller batches your stove can handle it, if you move up to big batches or beer batches it helps to have a propane burner and propane tank.
Non optional Equipment:
1 Fermentation/Secondary Vessel - There are two options here. The cheaper route is the 8 gallon buckets with a lid and an airlock. A rubber mallet also really helps to get it on the first time (trust me here). They are about $20. The second option which I'd recommend is one of the Speidel fermenters, they are a bit more expensive at $50-$60 but have a nice spigot for siphoning and are super nice. You also need an aging vessel as you need to let it sit for 5-6 months before bottling. For this I recommend a PET carboy or a smaller Speidel Fermenter
If you are doing 5gallon, get the 8g Speidel or equivilant sized bucket. Get a plastic carboy or the smaller speidel fermenter for aging
The downside to not doing the Speidel fermenters is then you need a bottling bucket and a siphon pump to get the mead out of the bucket, I like the speidel fermenters because I can just transfer to it and use it to bottle with.
Bottle Filler and 3' rough of Hose - This is for bottling
Bottles - I prefer the nice flip top ones but they are usually around $30 for only 12 of them. The other option is to buy some bottle caps, and clean
Iodophor / Star San - Cleaner, just google them. You need this to clean all your equipment as well as your fermenters
There are some minor other things, such as a Big spoon for stirring, having a thermometer is a good idea... maybe other things but I think I covered most of it
Recipe: (The recipe itself)
Normal recipes are around 3 pounds of honey per gallon of water, so you need to get 15lbs of honey if you do 5 gallons. More honey will up the alcohol, less honey will lower it
A vial or two of yeast. I like to pitch two of them just to make sure it starts. I use Sweet Mead Yeast
Yeast Nutrient - Mead doesnt have some of the nutrients beer does, so a bit of this added per the instructions gets the yeast going
Optional - Flavoring. I tried out strawberry this time, totally optional but just google it and you can find it. Usually it comes in a tiny bottle
Instructions
First you dissolve honey into water. If you are doing a 5 gallon batch, use 5.5 gallons of water. If you are going to boil, nows a good time. During this process, Add the yeast nutrient. Put the mixture into your fermenter vessel. Cool it down to room temperature (important)
Its fairly important to ferment at 68-70 degrees for at least the first week or two (yeast stuff), so if you don't have central heating/cooling that could be an issue you have to tackle from another angle. At this point, pitch the yeast and seal it up and let them do their job
Wait about a month for it to ferment (the airlock will go bloop bloop a lot). Sanitize the hose and secondary/aging vessel, this vessel should be close to your actual volume so there isn't head room. Then transfer to the secondary, pop the airlock on it and let it age for usually 3-6 months, depending on your patience. At that point, transfer it back to a different vessel (to get it off the trub) and during this process add any flavoring (if any). Finally, siphon into bottles using that little spring bottle filler attached to the hose, and cap it
That was a bit long winded but I was trying to be thorough. if you have any questions feel free to PM me!
This one will work
https://smile.amazon.com/Fermtech-Mini-Auto-Siphon-3-8-inch/dp/B0064ODL1G/ref=sr_1_3?ie=UTF8&qid=1494300266&sr=8-3&keywords=auto+siphon
When I brew in bulk, I do like the beer homebrew folk do and use an auto-siphon with a bottle filler attachment. The siphon goes into the bucket, held just above the bottom to avoid the dead yeast, and stays far enough below the surface to (mostly) avoid the yeast strands, everything staying still and not mixed around. When a strand does sneak through, it gets caught in the bottle filler tip and can be easily wiggled out if problematic. It makes filling bottles extremely clean and simple. But unless you're brewing 3+ gallons in a single container, it's probably not worth the effort and I end up just using strainer + funnel.
I've made some slight modifications to this, mostly to make it easier to follow. I've also included steps that should be quite obvious to someone who's done any homebrewing before, but I wish someone had told me when I first started.
I'd link to the original, for the sake of attribution, but the user who posted this deleted their account not long after I wrote everything down.
This will produce a sweet fruit-mead (or melomel). WARNING this will be far more alcoholic than it tastes, and should not be consumed if you've recently taken antibiotics, or suffered gastric distress, as the yeast culture will still be alive, and will happily colonize your intestines if your gut microbiome is too fucked up.
Equipment: Most of this stuff will be a good deal cheaper at your local homebrew store, but I've included amazon links (also to the yeast).
At least 2 (3 is better, for reasons we'll get to) 1-gallon jugs (I don't recommend scaling this up), glass preferred. Add an extra jug for each additional batch. This one includes a drilled stopper and airlock
Drilled stoppers (or carboy bungs) and airlocks, non-drilled rubber stoppers.
An autosiphon and food-safe tubing.
Food-safe sanitizing solution (I recommend StarSan).
An electric kettle with temperature selector is useful, but not needed.
If you want to bottle it rather than just keeping a jug in your fridge:
Empty beer or wine bottles (just save your empties), capping or corking equipment, caps or corks, and a bottling wand.
Ingredients:
2.5 lbs (1130g) honey, clover recommended.
A cup (approximately 250ml) or so of fruit (I recommend blackberries, and I strongly recommend against cherries, other recipes have worked for me, but this yields a very medical flavor with cherries).
1 packet Lalvin EC-1118 yeast (a champagne yeast notable for its hardiness, its ability to out-compete other microorganisms, and its high alcohol tolerance).
Optional: potassium sorbate (to reduce yeast activity when our ferment is done), pectic enzyme (aka pectinase - for aesthetic purposes). Both are also available in bulk.
Process:
Day 1:
Mix sanitizing solution with clean water at specified proportions in one of your jugs, filling the jug most of the way. Stopper it, shake it. Remove stopper, set it down wet-side-up (to keep it sterile), pour the fluid to another jug. There will be foam left behind, this is fine, don't bother to rinse it or anything. At low concentrations this stuff is totally fine to drink, and won't ruin your fermentation or flavor.
Add honey to jug, all of it.
If you have a kettle, and your jug is glass, heat water to around 160F (71 Celsius), pour a volume into your jug roughly equal to the amount of honey present. Fix sterile stopper to jug. Shake until honey and water are thoroughly combined. The heat will make it FAR easier to dissolve the honey. Set aside for an hour or so while it cools. Add clean water 'til mostly full, leaving some room for fruit and headspace.
If you're missing a kettle, or using a plastic jug, this is gonna be a little harder. Fill most of the way with clean water (I recommend using a filter) leaving some room for fruit and headspace. Fix sterile stopper, shake 'til honey and water are thoroughly combined. This will take a while, and you will need to shake VERY vigorously.
At this point, you should have a jug mostly-full of combined honey and water. To this, add fruit (inspecting thoroughly for mold, don't want to add that). Then dump in a single packet of the Lalvin EC-1118 yeast, don't bother rehydrating it first or anything, it'll be fine going straight in. Add pectic enzyme if you have it (this does nothing to the flavor, it just makes the end product less cloudy). Stopper it up, shake it again. This jug now contains your "must" (pre-ferment mead).
Pour some sterilizing fluid in a bowl, put a carboy bung/drilled stopper in the bowl, with an airlock. Ensure full immersion. Let sit for a minute. Replace stopper with your bung/drilled stopper, affix airlock. Fill airlock with clean water, sanitizing fluid, or vodka. Rinse the stopper, fix it to your jug of sanitizing fluid.
Place must-jug in a dark place, I recommend a cabinet or closet.
Days 2-7:
Retrieve jug, give it a little jostle. Nothing so vigorous as to get your mead into the airlock, but enough to upset it. This is to release CO2 buildup, and to keep any part of the fruit from drying out. The foaming from the CO2 release may be very vigorous. Do this over a towel for your first batch. If the foam gets into your airlock, clean your airlock and reaffix it. Perform this jostling procedure at least once per day, more is better.
Day 8:
Final jostling, I recommend doing this in the morning.
Day 9:
let it sit, we want the sediment to settle.
Day 10: Time to get it off the sediment
Shake sterilizing fluid jug. Affix tubing to siphon. Put the siphon in the sterilizing fluid, shake the jug a little just to get the whole siphon wet. Siphon fluid into either a third container or a large bowl. This is all to sterilize both the inside and outside of your siphoning system.
Remove siphon from jug. Give it a couple pumps to empty it of any remaining fluid. Place siphon in your mead jug, leaving the end of the tubing in sterilizing fluid while you do this.
Take the jug that you just siphoned the sterilizing fluid from. Dump what fluid remains in it. Place the end of the tubing in this jug, then siphon the mead into it. Make no attempt to get the last bit of mead into your fresh container, it's mostly dead yeast and decomposing fruit.
Add potassium sorbate if you have it, stopper the jug, place it in your fridge.
Clean the jug you started in. Clean your siphon and tubing.
Day 11:
Let it sit
Day 12 or later: time to transfer again, or bottle it.
If you no longer have a jug full of sterilizing fluid, make one.
Repeat the earlier steps to sterilize the siphoning system, with a bottling wand attached to the end of the tubing if you want to bottle.
Sterilize your bottles or a clean jug, either with fluid or heat.
Siphon mead either into your bottles or jug. Stopper/cap/cork when done.
Put your jug/bottles in the fridge.
The yeast culture is still alive, and will continue to ferment. The fridge, and optional potassium sorbate, will merely slow this down. I recommend drinking any bottles within two months, to avoid a risk of bursting bottles. The mead should already be tasty at this point, but usually tastes much better after a couple more weeks.
EDIT: Fixed the formatting up a bit.
Ha. :)
I was thinking more about one of these: http://www.amazon.com/Spring-Loaded-Beer-Bottle-Filler/dp/B000E66A4U.
It seals when you no longer press down, keeping beer in the line.
If you want to be the best friend ever, listen up. A standard keg pump uses ambient air to pressurize the keg, which means the keg will go bad after a very short time. If you get a portable co2 system, it will cost a bit more, but I believe you will be considered the best friend ever. Here goes...
First you need the appropriate tap, which you have indicated is the S-type. You'll then need to get an MFL connector for gas hookup. While there, buy a party faucet with beer nut. You then buy the keg charger and mini CO2 cartridges (similar to those used in a pellet gun). I'll leave it to you to find Canadian sources for these products, but this is what you'd need.
The book How to Brew it's a great place to start doing some research. It's like the home brewer's Bible. There are also a lot of free resources online like discussion boards and how-to guides.
When you're ready to purchase a kit, [Northern Brewer] (http://www.northernbrewer.com/) and Midwest Supplies are both great retailers. I would recommend signing up for their mailing lists as they will often have starter kits on sale.
I would recommend staying away from the cheaper Mr. Beer kits. It can be a cheaper, easier option but it's like the easy-bake oven version of homebrewing. You'll make beer, sure, but you won't learn as much using these kits and there's little room for customization/upgrading if you decide to get more into it.
On Black Friday, both retailers that I mentioned always have starter kits on sale. I've gotten brewing equipment and 2 recipe kits for less than $100. That's enough to make roughly 100 bottles of beer for less than $1/bottle. You don't have to buy bottles, just save used ones, (no screw-offs) rinse them out, and you'll be able to fill and re-cap them.
Finally, when brewing, sanitize everything. The quickest way to ruin a batch of beer is improper sanitation.
Cheers.
I brewed my first batch this weekend! I used the Mr. Beer brewing system for simplicity and because I want to make small batches (2 gallon) with the least mess possible. (We've all gotta start somewhere!)
I've read that the included beers aren't much to speak about, but I wanted to get the process down. I look forward to using this subreddit for help as I work my way up to better and more complicated brews!
Hello world.
When I don't know what to get someone, I usually go over to mysubscriptionaddiction.com and find a nice monthly subscription box they'd like. There are monthly beer clubs, to fancy foods, and the infamous dollar shave club.
As for something on amazon, me and my boyfriend loved the Mr. Beer Kit. Me and my gal friend each got our boyfriends one of these for Christmas, and we all took a day out to brew beer together. The best part is making custom, inside joke labels with these clear label wraps and then sharing them with friends. Health/Mana Potion and Molotov Cocktail labels are always good for game night.
If beer isn't your thing, there's a wine version and a [cider version](http://amzn.com/B00I5R7MR4
). And if you're living sober, then I'm an ass and enjoy your anniversary! Congratulations. :)
To add to what /u/Sintered_Monkey has said, a kit to start can be a pretty good idea, though honestly, you could skip extract altogether^1. I got into the hobby with a 1 gallon all-grain kit from Brooklyn Brew Shop. They're $40 and include everything you need to get started brewing, so long as you have a couple of 8 quart or larger pots and a strainer (you can get by with 2 pots, but 3 can make it a bit easier; alternatively, brew-in-a-bag, or BIAB, could allow you to do this with just a single pot and is honestly easier). You'd also need one of these to cap your bottles. I'd recommend this route because it allows you to jump into the hobby pretty thoroughly; even a basic BIAB all-grain setup is doing all of the fundamental steps of beer-making that the pros use, and any gear upgrades beyond that (and you will end up having gear upgrades, because there are lots of fun toys in this hobby) are just to further refine your process. If you end up not liking it, you're out not even a hundred bucks. If you do enjoy it or just want more info, come join us at /r/homebrewing!
^1 (One of the first steps in brewing is extracting sugars from grains; this resulting liquid is called wort. With all-grain brewing, you do this extraction step yourself; with extract, you're basically buying concentrated wort—more expensive on an ingredient basis, you have less control over the final product, but your equipment costs are less.)
I think the reason champagne uses different corks than wine is due to the carbonation. The champagne type are more secure I imagine due to higher pressure inside. The issue with mason jar lids is that in canning, the contents are at a negative pressure and actually pulls the seals tighter. If you put carbonation in the jar then you have positive pressure pushing the seal apart and therefore the CO2 tends to escape. I would try small plastic bottles or someone here was going to try beer bottles with caps. You can get caps and a crimper and reuse old bottles. Not sure how it will work, the jury is out ;-)
$17 with prime shipping: http://www.amazon.com/Ferrari-Red-Baron-Bottle-Capper/dp/B001D6KGTK/
I used one of these back when I made my own soda. Capping them goes remarkably quickly. (Not great if you need any sort of pressure release, of course.)
Mine was super easy to build and has served me for about 4+ years now.
The cooler requires no modification. Simply remove the plastic spigot, and install the new ball valve.
The bazooka screen is a bit longer than the diameter of the cooler. Simply bend the end up slightly and it should fit. The new nipple on the ball valve fits 1/2" ID hoses.
Brew days go pretty smoothly, haven't had a stuck mash yet. Filters well as long as you vorlauf and set the grain bed. My efficiency is around 75% currently, using the Batch sparge method.
My setup is something like this:
Homebrew shops generally carry the tanks, and can fill them for you. You're probably looking at $120-$150 initial cost, but your cost per carbonation is pretty close zero: just the cost to refill the tank.
With this setup, you carbonate directly in plastic soda bottles. I generally use seltzer bottles, since they don't have any residual flavors in them, and they're designed to hold the pressure.
Transfer whatever you want to carbonate into a plastic bottle (about 3/4 full). Get it as cold as possible: for sodas, that's as close to 32-F as you can get; for cocktails, it's maybe 20 to 25-F. Squeeze the excess air out, screw on the carbonator cap, attach the gas hose, and shake the hell out of the bottle. Release the pressure (carefully; some mixtures can foam a lot), and repeat once or twice if you want really strong carbonation. For water, I usually carbonate around 35 psi. For cocktails, closer to 45 psi.
To bottle cocktails or sodas once they're carbonated, you can use 187ml champagne bottles and an inexpensive bottle capper. Your local homebrew shop probably carries both.
https://www.amazon.ca/Grolsch-Bottle-Replacement-Washers-Pack/dp/B004NXUJ06?SubscriptionId=AKIAILSHYYTFIVPWUY6Q&tag=duc12-20&linkCode=xm2&camp=2025&creative=165953&creativeASIN=B004NXUJ06
Way cheaper. Although, you probably don’t need 100 of them. 🤷♂️
http://www.amazon.com/gp/aw/d/B004NXUJ06/ref=mp_s_a_1_1?qid=1397145827&sr=8-1&pi=SY200_QL40
Yes, but also it's pretty easy to fold the strap into the case too cos the grolsh rings are flat
I've done it for the last 2 years. Really good. The link above is way more than you'll need, I'm still on my first pair!
I live in San Francisco and our best local brewcraft store is SF Brewcraft, http://www.sanfranciscobrewcraft.com/. The guys there are super knowledgable. They have several beginner kits, all 5 gallon. There are 3 different options of 2 plastic fermenters, 1 plastic and 1 glass, and 2 glass. I'd suggest going with this one: http://www.sanfranciscobrewcraft.com/product_p/eq101.htm
I got the plastic/glass combo a while back and that was how I got started. You can tell them which kind of beer you want and they'll make recipe recommendations and include everything you need for it.
There are smaller kits on Amazon and other places like MoreBeer if you don't want to go with a full 5 gallon setup.
5 gallon batches is about the biggest you can do on a normal stove top in a kitchen. Any bigger and you can't get enough heat to bring that much water to boil. If you don't have a lot of space in your kitchen, that might also be a reason to go with a smaller kit.
So the kit I recommended is great to get started. In reality, it comes with two plastic fermenter buckets but you only need one for beer these days. The instructions will indicate a traditional two-step fermentation process, but you'll have 2 which is great if you decide to do double batches.
You've GOT to have a pot. If you're doing 5 gallon batches, you need at least a 6 gallon pot with a lid. If you're doing smaller 1-2 gallon batches, you can use a smaller pot. A regular pot is fine, but spending a little more on a kettle that has a thermometer and ball valve is hugely helpful.
Ok but back to specific recommendations since that's what you need:
5 gallon batch recommendations
1-2 gallon batch recommendations
I haven't tried these kits, but they seem to fully be what you need.
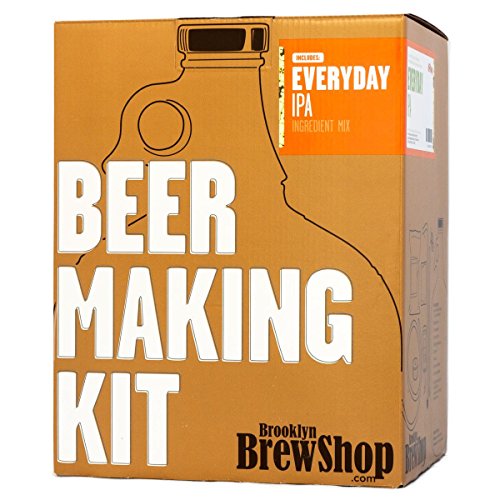
http://www.amazon.com/Brooklyn-Brew-Beer-Making-Everyday/dp/B005G20IIG/ref=sr_1_6?ie=UTF8&qid=1415488462&sr=8-6&keywords=homebrew+kit
http://www.amazon.com/Mini-Monster-Bookshelf-Brewery-Amber/dp/B00AKIUIEU/ref=sr_1_10?s=kitchen&ie=UTF8&qid=1415488614&sr=1-10&keywords=homebrew+kit
You will need bottles:
http://www.amazon.com/12oz-Amber-long-neck-bottles/dp/B003X4BO64/ref=sr_1_2?ie=UTF8&qid=1415488782&sr=8-2&keywords=beer+bottles
5 gallons of beer will fill about 48 bottles. Get 2 boxes of bottles. 1-2 gallons, get 1 box.
You will need bottle caps. If you buy from the kit I recommended from SF Brewcraft, caps are included. But if you don't, make sure you get them or that they come in your kit. http://www.amazon.com/Silver-Colored-Polished-Bottle-approximately/dp/B002W2E99C/ref=sr_1_9?ie=UTF8&qid=1415489000&sr=8-9&keywords=colored+bottle+caps
Hope this helps.
Gonna copy and paste one of my previous replies to a similar question last year. Hopefully that helps a bit.
Your question about ballpark cost is a bit "how long is a piece of string..?". It totally depends on your choices. Mine ended up costing me around $1k all up, but I'm in Australia and everything is bloody expensive over here.
------
Recently built a keezer myself so I can offer a bit of advice. I think the main reason most people shy away from kits is they tend to bundle cheap and nasty parts. Here's a list of parts you'll need and my insights to go with them:
I'm super happy with my system, the 650ss are awesome and let me use less than a metre of beer line. I also shelled out a little extra for a ball lock gas post and bulkhead to replace the gas-in barb on my gas manifold. That combined with another quick disconnect just lets me easily remove the gas bottle from the freezer and gas another keg for storage or something. Hope that helps a bit, feel free to ask any more questions.
So, you want to think about how many kegs you want in service at any one time. As others have mentioned, second-hand and sales are the shit. But there's something to be said for shiny and new.
A quick note in case you're not familiar with regulators. If you are, skip this. Basically when you get a tank of gas, it's holding a shitload PSI worth of gas. Whether or not the gas is in a liquid or gas state varies, but is largely irrelevant for this treatise. If you straight open that valve, it comes out at the highest speed that the nozzle on the tank will allow. So you screw on a gas regulator. The one that you attach to a tank is a primary/secondary combo. The Primary Regulator gauge is the left part of the regulator. It shows how much gas is in your tank. Co2 turns to liquid under pressure, so don't worry too much about what that gauge READS, just know that the internal mechanisms of the primary portion of the regulator are dropping 500-800PSI down to 0-100PSI or so. The second part of your regulator is the top gauge, which shows your Secondary PSI, or the output PSI, if you will. Depending on the sensitivity of the gauge and internal mechanisms, it can max out anywhere from 40-100. The screw on the front is how you adjust what PSI is coming out of that barb post at the bottom. This is the number you care most about. I only go into this much depth because when I first started kegging, I really didn't have a good grasp on these distinctions
If you plan on building a Keezer with space for 6 kegs, but only want to serve 3 at a time, I would get a single primary regulator with a secondary out and run that to an array of 6 Secondaries. That way you can carbonate and serve at variable pressures/volumes. However, even if you build that from scratch from used/new parts, it's still a pricey proposition.
Or, you could use that single regulator above and run the secondary to a 6 way manifold. The downside is each keg would receive equal pressure and therefore all carbonation in the kegs would be the same.
You could also mix and match for a more even approach: get a regulator like this and run the two outputs to two different 3-way manifold so 3 kegs could be X PSI and 3 kegs could be Y PSI. Meaning 3 kegs would be carbing and serving at 1 pressure, and 3 kegs would be carbing and serving at another.
Correct, the pressure applied to one keg, will be applied to both without regulators on each line. You'll have to disconnect the second keg to force carbonate. This would make a great Christmas present.........
Cool add-ons to the Brooklyn Brew Shop 1G kits (which I liked):
http://www.amazon.com/Beer-Wort-Wine-Refractometer-Scale/dp/B006GG0TDK/ref=sr_1_3?ie=UTF8&qid=1398314617&sr=8-3&keywords=refractometer+dual+scale
http://www.amazon.com/Fermtech-MINI-Mini-Auto-Siphon/dp/B0064ODL1G/ref=sr_1_1?ie=UTF8&qid=1398314371&sr=8-1&keywords=mini+auto+siphon
http://www.amazon.com/Brewcraft-Fermtech-Plastic-Bottle-Filler/dp/B0064OEE9O/ref=sr_1_2?ie=UTF8&qid=1398314427&sr=8-2&keywords=bottling+wand
Starsan you don't have to rinse off, and it really helps you to be confident in your sanitizing abilities.
http://www.amazon.com/Five-Star-FS_SS_16-San--16oz/dp/B00FA86OZ2/ref=sr_1_3?ie=UTF8&qid=1398314939&sr=8-3&keywords=star+san
http://www.amazon.com/Bottle-Capper-Red-Baron-Homebrew/dp/B000Q6ARMY/ref=sr_1_1?ie=UTF8&qid=1398315533&sr=8-1&keywords=bottle+capper
http://www.homebrewtalk.com/f39/fermentation-temperature-control-440670/
Anyway, enough. Don't overthink it. Those kits are so freaking easy to do, my first batch turned out pretty drinkable despite some temperature screw ups during mashing.
You can watch homebrewfinds.com for deals on any items I listed, and you can even better, get them from your local home brew shop.
Note, if you think you want to do bigger batches later, the mini auto-siphon and any tiny kettles are going to be a waste of money... the refractometer, starsan, capper, etc. will still be quite useful.
If it's a 1 gallon batch get the mini siphon:
https://www.amazon.com/Fermtech-Mini-Auto-Siphon-3-8-inch/dp/B0064ODL1G/ref=sr_1_2?ie=UTF8&qid=1498080342&sr=8-2&keywords=brew+siphon
if its 3-6 gallons get the big one:
https://www.amazon.com/Regular-Auto-Siphon-feet-Tubing/dp/B00AYHS7ZY/ref=sr_1_1?ie=UTF8&qid=1498080342&sr=8-1&keywords=brew+siphon
They all work fine.
> Please list ALL the basic equipment for pressurized CO2?
I use a CO2 fire extinguisher rather than a normal cylinder, but it's essentially the same.
Only real downside is the ongoing cost. Other thing to think about are balancing CO2 levels when the lights go off, but that's easy enough to accomplish with the timer plug.
Cost for me was about £100 all in, but I got lucky with some cheap CO2..
I have a DIY I built from googling for my 15g. It is a constant pain in the ass to get the mixtures right for given surface agitation and bioload. And then every time you want to make a change, you have to wait a day for the mixture to restart. And if you are using CO2 to lower pH, this causes wild pH swings. And, you can't turn it off at night.
Save yourself pain and buy a real setup:
http://www.amazon.com/gp/aw/d/B001DTNWF2?pc_redir=1407847266&robot_redir=1
http://www.amazon.com/gp/aw/d/B0058XWDFO/ref=pd_aw_sims_5?pi=SL500_SS115&simLd=1
http://www.amazon.com/gp/aw/d/B0085282UK/ref=pd_aw_sims_2?pi=SY115&simLd=1
http://www.amazon.com/gp/aw/d/B008UCOFJW/ref=pd_aw_sims_1?pi=SY115&simLd=1
$175 with prime.
EDIT: Jesus I totally forgot about the leaks. Constant leaks in the DIY system. I had several seals give after several weeks of use. So you are never safe. I think I currently have zip ties holding my overflow lines together.
https://www.amazon.com/Sankey-Ball-Quick-Disconnect-Conversion/dp/B00C30F75I
If wanted to use a Sanke to ball lock conversion kit (see link below) would I not need a liquid dip tube? I'm guessing that's all taken care of within the commercial Sanke keg.
https://www.amazon.com/Sankey-Ball-Quick-Disconnect-Conversion/dp/B00C30F75I
Amazon has them for pretty cheap.
https://www.amazon.com/Sankey-Ball-Quick-Disconnect-Conversion/dp/B00C30F75I
You could just use a plastic bottle and a carbonator cap.
you don't have to use a soda stream to make your own soda! I found a 5lb canister of CO2 on craigslist. It came with a regulator. Then I purchased one of these. It screws onto an empty 2 liter bottle. Squeeze all the air out of the 2 liter, put on the cap, turn on the regulator, shake vigorously, an you have soda water. Costs me about 10 cents a bottle.
Have a look at 1 gallon extract kits Buy a 1 gallon jug of wine (about $8) then dump out the wine or drink it and use that as your fermenter. You have a pot,spoon and save up some bottles or buy https://www.amazon.com/Chefs-Star-CASE-Bottles-CLEAR/dp/B011SGS8U8/ref=pd_lpo_vtph_328_bs_t_2?_encoding=UTF8&psc=1&refRID=THND89S8R7NBS9W8Y5SV.
Amazon has this for $100. It’s what I bought for my starter and still use almost all of the equipment.
Brew. Share. Enjoy. Homebrew 5 Gallon Beer Brewing Starter Kit with Block Party Amber Ale Beer Recipe Kit and Brew Kettle https://www.amazon.com/dp/B0179ZH89Y/ref=cm_sw_r_cp_api_jifeAbQX8JP6A
You definitely can, although it's much easier to start with a kit. Also keep in mind that used plastics (fermentation bucket, bottling tools) can sometimes house an infection if they weren't taken care of properly, so it's safer to buy those new. I got this kit and I still use most of the same equipment 1 year in...
Only thing you'll need here is a thermometer and some bottles.
Not so much a commercial product as putting together a DIY system. A 5lb CO2 tank (or larger if you like), a regulator valve (example), a ball lock disconnect (example), one or more carbonator caps (example), and some simple 5/16 ID tubing and hose clamps like you can pick up from any hardware store to hook it all together. There's tutorials online, and you can make them a bit fancier if you like, but that's the gist of it.
I wouldn't drill the lid for a thermowell and ball lock port. There are a combo action of items on Amazon you could get and utilize the bung hole that already exists.
Homebrew #7 Stopper Thermowell
Stainless Carbonation Cap Counter
Home Brew Ohio Solid Rubber
Drill a 1/4" hole in the undrilled stopper for the carb cap and you have a ball lock connector.
The bung with the thermowell works great on my anvil fermenters.
I recently switched from using recycled GT bottles to swing tops. It made a world of difference! Honestly, the carbonation increased by 50%.
These are the ones I bought off of Amazon...Swing Top Bottles
I got mine at my local brewery supply store! These seem similar.
Here is what I plan on getting for the 10 gallon. I also plan on buying a Finnex Planted+ II whenever it comes out.
CO2 Regulator- http://greenleafaquariums.com/products/gla-gro-co2-regulator.html
Fertilizer- http://greenleafaquariums.com/aquarium-fertilizers-supplements/pps-pro-fertilizer-package.html
CO2 indicator solution- http://greenleafaquariums.com/products/cal-aqua-double-check-indicator-solution.html
Drop Checker- http://www.amazon.com/dp/B00J594UVM/ref=wl_it_dp_o_pC_S_ttl?_encoding=UTF8&colid=1XASUQHYFCLHB&coliid=I3NWGM7JZJRTSD
CO2 Tank- http://www.amazon.com/dp/B0085282UK/ref=wl_it_dp_o_pC_nS_ttl?_encoding=UTF8&colid=1XASUQHYFCLHB&coliid=I2XE9EO3Z2DAGA&psc=1
Subtrate- http://www.amazon.com/dp/B0002DH0QM/ref=wl_it_dp_o_pC_nS_ttl?_encoding=UTF8&colid=1XASUQHYFCLHB&coliid=I10PPPB3TWL6ZG
Picknick tap, the cheapest co2 regulator and bottle you can find and a 5 gallon ball lock keg. Eventually you will want them cold too, and then you can build a keggerator.
https://www.amazon.com/PERA-ball-lock-assembly-making/dp/B079MF7RMP
https://www.amazon.com/Gallon-Home-Brew-Keg-Stainless/dp/B01HKZUQIs
https://www.amazon.com/Brewin-Gauge-Draft-Dispensing-Regulator/dp/B013J44ILA
https://www.amazon.com/Luxfer-CO2-5LB-LUXZebra-Aluminum-CGA320-Brushed/dp/B0085282UK
There is a shopping list, I am sure you can find cheaper on craigslist/the internet with some patience.
I just bought a 3 gallon used pinlock soda keg, with all the fixings (dual regulator, picnic tap, o rings.etc) for $150 from Adventures in Homebrewing. Went on amazing.com and got a 5# co2 canister for $66. Just need to fill it up at a local air soft store and I'm good to go for a little over $200.
Still leaves me 2 gallons to bottle, or I could just brew in 3 gallon batches.
FWIW, I ended up buying a tank on Amazon for $64, and then immediately swapping it out for a full tank for $20 at a welding supply store in the Bronx (http://www.awisco.com/). Even with cab fare there and back, it still beats the $150 for a refill and empty tank that website recommended.
You can use a fermentation cooler bag and ice packs.
This isn’t fool proof but does the trick for me at room temperature. I cool using some ice packs it comes with.
Home Brewing Fermentation Cooler - Beer Brewing Temperature Control, Keg Cooler, Fermentation Brewing Bag. The Original - Cool Brewing Fermentation Cooler. https://www.amazon.com/dp/B008EKD7CQ/ref=cm_sw_r_cp_api_i_Zy9RDb3E513D0
I am an all grain brewer that lives in a 550 sq. ft. apartment with my girlfriend (including a 50 sq. ft. balcony area). I brew 5 gallon batches, and created by own cooler mash tun using the following link:
http://www.popularmechanics.com/home/how-to/g1580/how-to-build-your-own-home-brewing-mash-tun/
It's a 5 gallon cooler that I got at Home Depot. All of the other parts can be sourced at your local hardware store.
In addition to the cooler mash tun I have the following:
I list all of that to show the type/quantity of things I am able to store. My girlfriend loves the hobby and participates on brew day (yay me!) so that's a bonus, but I don't think the stuff above is truly prohibitive in terms of storing. I have a section of my standard 2x5 ft closet for the large equipment, and I store a lot of the minerals and water chemistry stuff in my bottling bucket when not in use. Cleaned bottles are stored in the 12 packs they originally came in, stored in a little nook above my kitchen cabinets. The mash tun doesn't take up much square footage, being one of those cylindrical coolers, and I keep that outside (no doubt a benefit of the place I live).
I boil on a pretty standard, probably low-end electric stove. Takes a little longer to get things going, but I do get to a rolling boil. I cool the wort in my sink, which I fill with a party-size bag of ice. I also have a few pounds of hops portioned and stored in the freezer.
I hope that helps ease any concerns about apartment brewing.
tl;dr Apartment brewing is incredibly doable, even for someone like me who does all grain 5 gallon batches in a shared 550 sq. ft. apartment.
[Edit: additional info]
Not op but I was only able to bring it down a few degrees using this method. Ended up getting one of these for about $50. It brings it down by up to about 15 degrees depending on how many frozen water bottles you use. It's also pretty easy to dial in a desired temp within a few degrees.
I use a Fermentation Cooler that I put 2 half gallon frozen jugs in each morning.
The best way to do this (in my opinion) is to buy the normal sanke tap thing (https://www.amazon.com/dp/B002UZUSIM/) and get a snake to ball lock adapter (https://www.amazon.com/dp/B00C30F75I/)
You essentially take off two parts of the sanke tap thing, and replace them with the kit. This allows you to tap a sanke keg, then attach it to your system as if it was a ball lock keg. So normally you’d have two ball lock kegs, and sometimes you’d hook up this to the connections and tap a sanke keg with it.
Depending on your line type, removing the ball lock quick disconnects from the setup can be a massive PITA, this is very simple, almost an instant change over.
Btw those were just the first product results on Google, I’m not recommending those necessarily. Just an example.
Since I drink commercial beer from the kegerator when I haven't had time to brew I had the need to use both. I got sankey to ball lock adapters. I also got a 90° elbow for the beer line, so it wouldn't kink against the top of the fridge with the adapters on.
I took the lines off the sankey, put the ball lock quick disconnects on the hoses, and that's it. Works well. I can take a pic of the huge hunk of metal on top of my commercial keg if you would like.
A quick Google search provided me this. Seems easy enough. I'm sure there are cheaper prices out there if you do a little more searching than I did. All hail the almighty Amazon. Cheers!
I put these adapters on my sankey fitting, i keep all of my fittings ball lock and then if i have a sanke keg i just use the adapter.
https://www.amazon.com/Sankey-Ball-Quick-Disconnect-Conversion/dp/B00C30F75I
My LHBS is where I first heard about them, but amazon has them as well as a few other places.
http://www.amazon.com/Sankey-Ball-Quick-Disconnect-Conversion/dp/B00C30F75I
Cut the hose for the sanke connector and add on a threaded connector end to the gas line. Do the same to the liquid line going up the tap tower. Get the threaded connectors, not barbed. You would then get either pin lock or ball lock gas/liquid connectors and screw then onto the hoses and then connect to the keg. If you ever want to put a regular keg in there, get one of these so you can use ball lock connectors with a regular keg:
http://www.amazon.com/Sankey-Ball-Quick-Disconnect-Conversion/dp/B00C30F75I
There are a couple conversion kits. This one adapts the sanke tap to have ball lock connects. https://www.amazon.com/Foxx-4048Sankey-Quick-Disconnect-Conversion/dp/B00C30F75I
This kit swaps the sanke barb fittings for the flare fittings found on nicer ball lock connectors so you can easily swap lines over.
https://www.homebrewing.org/Kegerator-Homebrew-Conversion-Kit_p_720.html
edited links to not be a mess.
Sankey to Ball Lock Quick Disconnect Conversion Kit https://www.amazon.com/dp/B00C30F75I/ref=cm_sw_r_cp_apa_DNxTzb11NFBW2
Or just put these on a Sankey tap.
Haven't tried this but it might do the trick:
Ball lock adapters on the shank. Ball lock disconnects with hose barbs on the beer line.
https://www.amazon.com/gp/aw/d/B00C30F75I/ref=mp_s_a_1_1?ie=UTF8&qid=1486097663&sr=8-1&pi=AC_SX236_SY340_QL65&keywords=ball+lock+sankey+adapter&dpPl=1&dpID=41jBW4GS4IL&ref=plSrch
https://www.amazon.com/gp/aw/d/B002VLD7QU/ref=mp_s_a_1_1?ie=UTF8&qid=1486099355&sr=8-1&pi=AC_SX236_SY340_QL65&keywords=ball+lock+disconnect&dpPl=1&dpID=41w9JDJx6jL&ref=plSrch
They come in pairs and you only need the beer lines, but I suppose you can figure out a way to QD that gas manifold too if you were eager.
ha, loud and clear! I'm on call now, so you lucked out!
I wish I could give you some definitive advice, but without seeing what he's got, I can't comment with authority. He's probably got standard sanke couplers and I've not seen a good solution there. If you live close, I'd pay him a visit and see what you're dealing with. It's probably going to come down to you just making up some new lines to mate with your corny.
We're getting ready for our Strausstoberfest this weekend and over the summer I reconfigured all of my kegging lines to use 1/4 MFL's for an easier change out than barbed fittings. I may have a last minute surprise myself, as a friend has offered to bring a 1/6 barrel to the party, but it will be sanke. Fortunately, I already have a sanke connector and these from Amazon:
https://www.amazon.com/gp/product/B00C30F75I
If there is anything I can help with, let me know!
Live and learn I suppose. Once you use your equipment enough you will be able to start dialing in your volumes. Now you know for this style of beer that you don't need as much bottling volume. I usually have a little bit left over that I'll fill a plastic bottle with then carb using a carb cap. It's nice to have a little sample of it carbonated
Congrats on the wedding! I would assume the culprit is not capping the bottles right away. Unlike traditional bottling that has bottle re-fermentation happening to carbonate the beers, beer guns rely on the carbonation already in solution from the keg, so if those were left out a good portion of that CO2 may come out of solution. As far as salvation goes, I would say either enjoy your cask NEIPA and Saison, or use a PET bottle cap carbonator when you're ready to drink to carbonate up. I bring my beers to my homebrew club like this and I think it would be the best way to get both a carbonated beer as well as avoid oxidation as much as possible, with the caveat that you would have to pour from bottle to bottle, cap and carbonate when you're ready to drink one of those beers. You could do a couple at a time (if you have multiple caps) and just drink the beers within 24hrs of the transfer. If you did go this route, you could even use one cap, leave the cap on while the CO2 dissolves into solution, then swap for a standard PET cap and move the carbonator cap to the next bottle.
https://www.amazon.com/Carbonation-Carbacap-Coupling-Carbonate-Fruit/dp/B01039C0Z0
I’ve read here; I think one of the Brülosophy guys, about using a soda bottle with a carb cap to sort of inject the gelatin solution into the keg via the gas in port.
Here’s a plan I’ve been thinking about:
Potential downsides: even a warm solution might quick-chill on contact with cold metal of gas post and cause a gum-up of gelatin?
Edit: there are various kinds of carbonation caps. If using the one with a barbed part, then connect a line of tube to that and hold upright when sending gelatin in. If using the kind without the barb, hold the soda bottle upside down.
Visual Example of barbed:
https://www.beveragefactory.com/draftbeer/couplers/kmcbcp-carbonation-cap.html?catargetid=320012430000341477&cadevice=m&gclid=EAIaIQobChMI2MiP96363QIVUZF-Ch3HewZrEAQYAiABEgI7KvD_BwE
Visual Examples of ones without:
https://www.homebrewing.org/Carbonation-Cap-Stainless-Steel_p_3061.html?utm_source=google&utm_medium=shopping&gclid=EAIaIQobChMI4-7qraz63QIVmKDsCh3m-wsaEAQYAiABEgK5jfD_BwE
https://www.amazon.com/Carbonation-Carbacap-Coupling-Carbonate-Fruit/dp/B01039C0Z0
Edit 2: rewording
Very simple and easy to use.
Goes like this:
At the links above, pretty much everything is shown in the Amazon "frequently bought together" listing down the page.
All you do is fill the 2-liter bottle with cold water, squeeze it (to create some room to expand) and put the cap on while squeezing it.
Click it to the coupler, turn the gas on, and shake the 2-liter bottle for a minute to mix the co2 into the water (or juice, or wine, or beer).
Done!
Put in fridge. Make some more!
First time you set it up, play with the regulator setting to get the level of carbonation you prefer, and after that you don't have to mess with it again. Also, cold water carbonates easier.
This is what I've been using. Weird, though, because it sounds like what you recommended.
These have worked well for me: https://www.amazon.com/dp/B011SGS8U8/ref=cm_sw_r_cp_apa_ZGtEAbFW4725R
I also found something similar at IKEA that would work just as well
Kits are the best way to learn the basics, cleaning/sterilise importance and fermenting process. Find other beer kits like the IPA linked below at $44 - 5 gallon.
Equipment wise (kit below comes with a block party amber?) the USA doesn't do a pressure barrel like the uk though I did find that norcal do a solution(see links below)
The total cost below is sub-$200 for your first 5 gallon/40pints and will provide you all the tools you need to produce multiple batches in future. This equipment can also be use to make wine and cider. You can also rack your beer to plastic 2ltr or 3ltr pop/soda bottle to age and to easily chill in the fridge.
https://www.amazon.com/Share-Enjoy-Homebrew-Brewing-Starter/dp/B0179ZH89Y/ref=sr_1_1?ie=UTF8&qid=1503185459&sr=8-1&keywords=homebrew+kit
http://www.norcalbrewingsolutions.com/store/Fermenter-Spiedel-30-Liter-7.9-Gallon-Plastic.html
http://www.norcalbrewingsolutions.com/store/Speidel-Ball-Lock-Gas-In-with-Pressure-Relief-Valve.html
https://www.amazon.com/HomeBrewing-Brewing-Recipe-Citra-Session/dp/B00WIGZJQO/ref=sr_1_1_a_it?ie=UTF8&qid=1503185696&sr=8-1&keywords=ipa+brewing+kit+5+gallon
Once you are confident then you can progress on to the more advanced brewing. Not something to jump straight into. The disheartening experience of your first bad/spoilt batch shouldn't put you off, some can even be saved!
Good luck in your brewing. (Personally I found wine a much more forgiving experience when learning to home brew)
Most people start with a gear-kit similar to this: http://www.amazon.com/gp/product/B0179ZH89Y?keywords=northern%20brewer&qid=1449409004&ref_=sr_1_1&sr=8-1
Other thing you need is Starsan, it's a no-rinse sanitizer, you COULD use bleach, but you need at least 5 minutes contact time with bleach, and then you have to rinse the equipment which could introduce new bacteria. (http://www.amazon.com/gp/product/B0064O7YFA?keywords=star%20san&qid=1449409431&ref_=sr_1_1&sr=8-1)
Then you need to check out your LBHS for ingredient kits/ recipes.
I use a short piece of tube from a drilled stopper to the barb on $10 ball lock soda bottle carb cap:
https://smile.amazon.com/Ferroday-Stainless-Carbonation-Pressure-Carbonate/dp/B01K4GGYT0
If you are willing to look worse but have a much better solution than filling growlers from the keg, use plastic soda bottles (or seltzer bottles, same thing), and get one of these.
https://www.amazon.com/gp/product/B01K4GGYT0/ref=ppx_yo_dt_b_search_asin_title?ie=UTF8&psc=1
You can connect the gas and liquid line to it. First crunch the bottle, then fill with CO2. Remove the gas connect, then connect to the keg
using a liquid to tube to another liquid connect (also good for doing keg to keg transfers/blends), and then gently unscrew. As a bit of pressure is released, the liquid will fill the bottle.
You can do a counter pressure fill, which means you lose very little CO2, and get very little O2 exposure.
Non-homebrewers think plastic bottles look a little sketchy. Homebrewers appreciate the simplicity/technical advantages/well carbonated beer.
Can anyone recommend a particular carbonation cap? I'll be grabbing 1-3 of these for nearly continuous use. I'm hoping that I can still use my kegs for aging/storing the beer, then filling a bottle up and put 1-3 of them in the fridge and ditching my kegerator for a few years.
Amazon! They came with the bottles.
https://www.amazon.com/dp/B01LB1862A?ref=ppx_pop_mob_ap_share
Swing Top Glass Bottles - Flip Top Brewing Bottles For Kombucha, Kefir, Beer - Clear Color - 16oz Size - Set of 6 - Leak Proof Easy Caps, Bonus Gaskets, Chalkboard Labels and Pen - Fast Clean Design https://www.amazon.com/dp/B01LB1862A/ref=cm_sw_r_cp_apa_i_P6dxDb9CYMEXP
So I’m a newbie (and had some explosion issues) but here goes with what I did!
1.) I did 2F for 5 days at room temperature. Longer than the 2 days people sometimes recommend, because I had tried one bottle after 3 days and it was too sweet. (I also bottled 1F at sweeter than I would drink because I wanted to ensure carbonation.)
2.) I used chunks of strawberry, minced ginger, and lime juice. (Also made one with pineapple purée but that exploded!) ((Also made raspberry-lime not featured with mashed raspberry and that worked the best out of the three flavors.))
3.) About 1/4 cup fruit per 16 oz kombucha bottle. (For the featured Strawberry-Lime-Ginger: 1/4 cup finely chopped strawberry, 1 tsp minced ginger, 2 tsp lime juice.)
4.) These https://www.amazon.com/Swing-Top-Glass-Bottles-Chalkboard/dp/B01LB1862A?ref_=fsclp_pl_dp_1
Going forward thing I’m going to try different are:
-Juice over plant matter like someone suggested (except raspberry which worked great!)
-And I’m going to try to use herbs and perhaps chia seeds in one batch!
Happy Brewing!
Amazon!
Swing Top Glass Bottles - Flip Top Brewing Bottles For Kombucha, Kefir, Beer - Clear Color - 16oz Size - Set of 6 - Leak Proof Easy Caps, Bonus Gaskets, Chalkboard Labels and Pen - Fast Clean Design https://www.amazon.com/dp/B01LB1862A/ref=cm_sw_r_cp_api_i_4J.MDbCKXHADR
Your recipe sounds like it'll turn out well if all goes according to plan! You may want to add some sweetness back if it ferments dry, but you've got several weeks to figure that out and read the Wiki to get all caught up on the method and terminology to things like back sweetening and nutrient addition schedules. I admire that you're being industrious with your fermentation equipment, I wasn't brave enough to start fermenting with whatever I had on hand with my first batch.
If you think you'll stick with it, here's the equipment I used for my first batch. I highly recommend looking into it if you think you'll do another batch! (I apologize if you aren't in the US, Amazon is my go-to)
All-in-all, this is just about my current setup excluding yeast, yeast nutrients, and extra carboys and airlocks. The list above comes out to about $127.45 USD before tax, which really isn't too bad considering one gallon should yield just shy of 5 standard wine bottles! Most commercial meads I've seen ranges from $15-$25 with some exceptions (There's a winery near me called Oliver Winery that makes a mead called Camelot Mead that sells for about $8 per bottle. Very good for such a cheap mead, you can probably find it at Total Wine & More if you have one nearby).
​
Sorry for such a long comment! Best of luck in your mead-making adventure!
Edit: If you have a local homebrew store, I would opt for that rather than Amazon. Prices may not be as cheap but you won't have to wait for shipping, you'll be able to support a local business, and employees at homebrew stores are usually really helpful and they can recommend recipes and give you pointers. Nothing beats face-to-face interaction!
Sorry I tend to do my brewing calculations in imperial (Murican) but.. what I shoot for is a ratio of roughly (usually just a tad under) 1 oz/1 gallon when using dextrose.
For a 5 gallon batch I usually use 4-5 oz in most beers/ciders of medium-higher carbonation. Perhaps shoot for the lower side of that spectrum if you think you may have any residual sugars. If a cider is a bit undercarbed in the end it's not so big of an issue in my opinion.
So to convert converting to metric that would put you at about 13g/liter of what I use maximum if I'm not mistaken. 10-12 g/l should be more than plenty.
> Are there any major differences between top to top siphoning between fermenters, and tap to bottle? (Presuming 10 minutes to let the priming solution diffuse.) We would minimise splash and thus oxygenation in both cases.
Sorry not sure what you're referring to with your process. Maybe you could explain a little better what you're looking to do.
Here are the general beginner steps most people use for bottle carbonating:
I usually heat it until just before a boil or cut it right as I see a boil. As it cools I start getting everything setup.
Usually the dextrose mix cools relatively quickly especially as the cold bucket acts as a heat sink. It's best to not rack the cider right onto the boiling hot mixture.
A good tip is keeping the tubing just below the surface of the cider in the bottling bucket as it fills so I'm not splashing and introducing larger amounts of oxygen.
Sorry for the wall of text haha. That's a quick little rundown, hopefully it helps! If you have any questions feel free to ask!
I ordered one of these: http://www.amazon.com/Spring-Loaded-Beer-Bottle-Filler/dp/B000E66A4U after my first batch.
Also started with the NB kit.
This wand is great. Sometimes I get a very slow drip from it but unless you're gonna wait several minutes between bottles it isn't an issue. Even if you let it drip for five minutes you'd lose less than half a bottle.
$5 on prime, if that's your thing https://www.amazon.com/Spring-Loaded-Beer-Bottle-Filler/dp/B000E66A4U
I use this. Works great.
https://www.amazon.com/Spring-Loaded-Beer-Bottle-Filler/dp/B000E66A4U/ref=sr_1_1?ie=UTF8&qid=1539095622&sr=8-1&keywords=bottling+wand
It is fairly easy to get large equipment like vessels and burners locally in India but it's the little stuff that makes your brew day/bottling day easier like the bottle fillers and auto siphons which are kind of difficult/expensive to get hold off. Depending on which city you are in hops, malts and yeast can be easy to source especially if you have any brewpubs around. The selection of hops is again very limited so like like /u/chino_brews suggested you could get bulk hops from YCH. Dry brewing yeast is available (Fermentis, Lallemand) but it is mostly sold in 500g bricks so I would recommend picking up some 11g packets as well. You should definitely pick up a large 16/32 oz bottle of StarSan and a tub of PBW or something similar for cleaning and sanitizing. I would also pick up a hand held bottle capper, a racking cane, a couple of airlocks and a spigot for bottling. Almost everything else can be improvised or jugaad if you're a little handy :)
You want one of these https://www.amazon.com/gp/aw/d/B072C2YYHR/ref=mp_s_a_1_2?ie=UTF8&qid=1509601569&sr=8-2-spons&pi=AC_SX236_SY340_FMwebp_QL65&keywords=Bucket+spigot+beer&psc=1
And these https://www.amazon.com/gp/aw/d/B000E66A4U/ref=mp_s_a_1_3?ie=UTF8&qid=1509601632&sr=8-3&pi=AC_SX236_SY340_FMwebp_QL65&keywords=Bottle+filler+beer&dpPl=1&dpID=11RVezcyCFL&ref=plSrch
The filler goes on the spigot, you slide the bottle onto it until the bottom pushes up the black bit of plastic and it fills the bottle.
Open your dishwasher (assuming you have one) and put the bucket on the counter above and you have the perfect drop catcher.
This cut my fill time and mess down a huge amount.
If you're into DIY, you might be able to do something with these:
Carbonate
Cap
you can probably find a CO2 bike inflator from Walmart or something that might be cheaper and easier than marbles, but if you're in a pinch, i guess marbles could to it. They also have argon inert gas in a aerosol that you can buy for like $10.
Or you can get some 2 L bottles, one or more carbonator caps, and a ball lock fitting and air hose. You can hook those up to your tank's regulator and carbonate all the bottles you want.
You can also get a CO2 Charger and a ball lock fitting if you don't want to buy the big tank up front, but the running costs are a lot higher.
Either way, you can use your equipment to carbonate the water and use sodastream (or any other) syrup... or make and carbonate your own drinks.
you need something like this
50$ isn't too bad of a budget! There have been times when I was extremely financially strapped that I had 50$ to spend on ALL of my christmas gifts together (talking parents, sibling, bf, in-laws, aunts, uncle, bff) - and everyone liked what they got. Just don't worry about the price tag, go for the value! :)
One thing that popped to my mind when you mentioned that he's into eating and drinking (ice cold water in 100°+), is a beer brewing kit.
Here's one with great reviews for $29. And [here's another one for $50.] (https://www.amazon.com/Mr-Beer-Premium-Homebrewing-Making/dp/B001BCFUBU)
I'd take the cheaper one, given the reviews. It will make for a great memory (aka value) and you could add something smaller with it (e.g. voucher groceries for a BBQ/Burger/Steak night, to be used once the beer is ready).
If you think he's not going to like that, let me know, and I'll try to think of something else! :)
Oh my Zazzle! Thanks for the contest! <3
Now that he's graduated... maybe time for a new hobby, like homebrewery? Congrats to him, by the way!
I'd love some artwork... a bit overwhelmed by the bazillion choices, but so far, I love this!
ungrinch!
What about something like a Home Brewing Craft Beer Kit? Sounds like something fun you'd both enjoy doing together!
As for contest worthy... Ummmm, I assembled my own Halloween costume (late, I know, but I wasn't active on RAoA until recently! :( ) this year and am pretty proud of how it turned out/how all the pieces came together. n_n
Hey there! I'm a beer-lover myself . . . and I've been enjoying homebrewing, which is very rewarding!
If you're interested in a more formal approach to beer tasting, you may want to add _Tasting Beer_ to your wishlist! I just finished reading it myself. It goes into much greater depth than I'll ever really experience, but it gives you a deep perspective on what the most serious beer-geeks and beer-snobs are doing when they take a sip, and it has seriously improved my own appreciation of the ancient beverage.
Also, if you're genuinely interested in homebrewing, in addition to the relatively affordable Mr. Beer (I haven't brewed with it, but I've tasted several people's results with it, and they've been consistently good) you may want to watch for the Groupon deal from Midwest Supplies. It's inactive now, but they do seem to keep bringing it back, and it's a very good deal for getting starting homebrew equipment.
Finally, I saw your discussion with AllOfTimeAndSpace about IPAs, and although I see it's not your favorite style, I thought I might recommend an IPA I tried recently that I thought was spectacularly good: Lawson's Double Sunshine IPA. I imagine it's hard to get outside of Vermont (though I'd be thrilled if I'm wrong, since I don't live there and just had it during a vacation), but it is one of the most delicious beers I've ever tried!
There's definitely more snobbery among wine lovers, but beer is easily as complex, varied, and interesting! Good beer goes great with all sorts of good food, and it's just as rewarding. Glad you're finding so much pleasure in it!
---
Haha! I see (having now actually looked at your wish list) that you have my two suggestions on it already. Good show!
To get you started
A bottle capper.
Swing top bottles
I'm guessing you had the Red Barron. There's others out there, but the market is mostly RB or bench. There are smaller bench cappers out there that might work, but I've also fully invested in swing top bottles because I was so angry my wing capper broke.
Wow, I must be lucky. I have one of these, and used it to bottle two 5 gallon batches to far in recycled bottles (mostly Guinness, Magic Hat, Sam Adams, Samuel Smith), and haven't broken a bottle, and haven't had a leaky cap. It isn't the fastest thing, but it does the job.
edit:
Here is the Amazon product page with reviews.
http://www.amazon.com/Ferrari-Red-Baron-Bottle-Capper/dp/B001D6KGTK?ie=UTF8&amp;psc=1&amp;redirect=true&amp;ref_=oh_aui_search_detailpage
Does anyone know if the standard red bottle capper like this one can be used or modified to work on 29mm champagne bottles with crown seals?
It is a huge pain and if you have a bottle capper like that one get a second one, they can break. I went with the 16 OZ. EZ cap beer bottles.
You might want to then go more long-term and get him some bottling tools. Depending on how he wants to bottle, or what kind of mead he's making, a wine corker, a case of empties, and handful of corks might be something nice for down the road. Especially if he has something already aging in a carboy.
If it's supposed to be sparkling then you might want to stick with the relative ease of a bottle capper and some campaign bottles. TIL that in North America at least most sparkling wine bottles actually take regular ol' beer caps - which is incredible to learn. Martinelli's apple cider is the only place I've ever seen it done, but I guess it's common. If he doesn't have a regular bottle capper, or has something that isn't as easy on the bottle as one of these then maybe a capper and caps would be good.
Hope this helps!
Thanks for the input. Is this the one you have?
Oh yes, and it is quite simple to get the stuff together without buying a kit. Do you have a local home brew store?
This subreddit's wiki which includes a beginner section: https://www.reddit.com/r/Homebrewing/wiki/index
There are several videos on youtube that have good instructions.
Here is a basic list of gear to brew beer in a bag. You can get all of this stuff on amazon if you don't have it already. This is not the best list, but it works.
http://homebrewmanual.com/home-brewing-equipment/
Some of the stuff you won't likely have at home:
Beer recipes: http://beerrecipes.org/
To get grains from amazon, type in the grain type and it will provide you options. If you don't have the ability to mill it yourself, you can order it crushed. Its not ideal, but if you don't have a homebrew store near you and don't have your own mill....it will work. You will have to measure out the correct amounts for each grain that you add on your own from the bulk that you ordered. If you want to brew with extracts, you can also order those on amazon as well.
You can order hops on amazon the same way as grains or extracts.
I'm building a new brewing system, and today I built a 10 gallon cooler mashtun using all SS fittings. Having learned from past experiences, I came up with this build, which is just about the simplest way to make a mashtun.
What you'll need:
10 gallon Igloo cooler $41
Bayou Classic 1/2" SS Bulkhead $30
1/2" MTP Bazooka Screen $9
1/2" Male hose barb $8 (you can probably find one of these cheaper at your LHBS, I had one lying around)
Tools: Teflon tape, and a crescent wrench.
Total Cost: $88
I can vouch for the quality of HomeBrewStuff's products. Their pots are very solid. You can also add the bazooka screen to mash in it as well.
This is all I use in my igloo, and it works great:
http://www.amazon.com/Bazooka-Screen-brew-kettle-mash/dp/B003ISY2DC/ref=sr_1_1?ie=UTF8&amp;qid=1406924473&amp;sr=8-1&amp;keywords=bazooka+screen
I batch sparge. I bought this cooler: http://www.walmart.com/ip/Coleman-70-Quart-Xtreme-Cooler/4807332 and a screen like this: http://www.amazon.com/Bazooka-Screen-brew-kettle-mash/dp/B003ISY2DC
The cooler was on sale and cost me $25. (Looks like they might not be selling it anymore). The screen was about $20. They've lasted me a long time and I can do enormous batches (10 gal batches up to OG 1.080 or so without sugar or extract additions, or any strength 5 gal batches). Efficiency sits around 70%.
For batch sparging, the equipment doesn't seem to matter too much. If you don't grind too fine and are careful with your grain composition (not too much wheat) you won't have sticking problems, and there's no point in being fancy with the manifold since it's a batch sparge.
I am not (yet) qualified to speak on fly sparging. I'm trying to figure out a setup for it but it will take a bit more planning.
What is you plan for a mash tun? I went with a 10g Home Depot cooler and something like this: https://www.amazon.com/Quick-Weldless-Stainless-Bulkhead-Nipple/dp/B00JHMRH2Q
This is the cooler: https://www.homedepot.com/p/Rubbermaid-40-qt-Orange-Water-Cooler-FG1610HDORAN/202260809
You’ll also need a screen or false bottom. I think the screen is a ver economical option https://www.amazon.com/Stainless-Steel-Bazooka-Screen-Fitting/dp/B003ISY2DC
Alright! So the sparge arm is this connected to this.
I only had to modify the mash tun a little. I had to put a hole in for the thermocouple probe (bigger hole on the outer wall) and a hole in the lid for the sparge arm. Other than that, i just put my bazooka and associated fittings through the existing spigot hole.
As for capping, yes, plain old hand capper. Hopefully I'll be doing more kegging though and won't be required to do so many bottles.
I failed to mention, you'd want to fit the cooler with either a bazooka tube like this http://www.amazon.com/Bazooka-Kettle-Screen-brew-kettle/dp/B003ISY2DC or a false bottom like this http://www.instructables.com/id/Build-an-awesome-Mash-Tun-Less-than-60-Bucks-False/ I've heard the bazooka tubes can clog so I personally went with the false bottom. It would also be prudent to fit a ball valve on the outside of the cooler to attach a hose for draining into your boil kettle.
Stand by:
Ball Valve
False Bottom
10 gallon cooler
False Bottom - Valve adapter
Please shop around. I have no doubt you could get some of this stuff for cheaper. I was restricted in that my only form of currency was Amazon gift cards. Especially the adapter could be built / constructed for much cheaper than I paid.
Additionally, instead of the false bottom / adapter, one could simply employ a Bazooka Screen instead of a false bottom, I have just read that false bottoms are more effective and less prone to problems.
DISCLAIMER - Always do your own research and make sure the parts that you are buying are all compatible and properly sized, etc. etc.
Having said that, the parts I listed above are exactly what I ordered and all fit together perfectly, I just needed to go out and buy a female coupler (to attach the valve to the hose from the false bottom) and a washer (per the included instructions with the valve, which had a additional washer for my configuration).
Using two steel kettles like that sounds very expensive. How about an upright cooler with a false bottom? There are kits for converting Igloo-brand coolers in this way, like this.
That being said, if your efficiency is bad with a rectangular plastic cooler and braided hose, I'm not entirely sure that your efficiency will be much better with a different style of MLT. I did find that replacing my braided SS hose with a bazooka screen made things a bit easier since it doesn't get crushed in the grain like my SS braid did.
I have this - http://www.amazon.com/Bazooka-Screen-brew-kettle-mash/dp/B003ISY2DC/ref=sr_1_1?ie=UTF8&amp;qid=1380734556&amp;sr=8-1&amp;keywords=hop+bazooca
I had to fold in the end a little to fit in a 10 gallon cooler conversion. Usually get 80% efficiency with batch sparging and have only had one stuck sparge.
I'm not sure what you consider pricey as hell, but I have this one, available for $45. If you are doing extract with partial boils, I might just do an ice bath in the sink. That's what I used to do. If you are doing all-grain and/or full boils, I'd save up the $45.
Anybody think buying this wort chiller for $50 is a good deal? 20' of the same tubing at Home Depot is $27 before tax, and I have a $50 Amazon gift card.
Very cool, looks good! There's definitely a satisfaction that comes with building something with your own hands.
If anyone needs a good cheap chiller, I recommend this one. 25' for $51.50. It becomes an even better deal if happen to need anything else from the same seller. I tacked on an auto siphon, some air locks, and some yeast and the shipping only went up slightly.
You might be able to, If you went with a pin lock keg they are cheaper. Only problem with the mini fridge is that you may have to modify the fridge to get the C02 lines into the fridge, unless the tank, regulator, and keg can fit in there. I use this regulator https://www.amazon.com/Kegco-KC-LH-542-Premium-Regulator/dp/B003WX772G/ref=sr_1_1?ie=UTF8&amp;qid=1491405625&amp;sr=8-1&amp;keywords=c02+regulator with the dual output. This one is a little cheaper. You will need lines I suggest 5/16th for air and 3/16th for serving. 5 feet each should get you in a good situation for kegs. See if you can find a C02 tank on say craigslist or an old one. I swapped a really old tank at Airgas that was no longer fillable for a decently new one.
You would probably also want a picnic tap for your setup.
I picked up both my 9 gallon kettles (one with dual ports) for <$100 bucks shipped on black friday 2 years ago. I have seen other stuff go on sale for pretty cheap. If you can hold out, it might be worth waiting.
As for your regulator. I picked up this dual gauge regulator last week. It appears to be working well. For less than 50 bucks shipped (I have prime) it worked out well. However I don't know about longevity. It looks to be a much better build quality than my last one that went out because of what looked like old age.
You can also buy the washers by themselves...
http://www.amazon.com/Grolsch-Bottle-Replacement-Washers-Pack/dp/B004NXUJ06/ref=sr_1_2?ie=UTF8&amp;qid=1462308922&amp;sr=8-2&amp;keywords=grolsch
Those beer washers work very good, amazon prime for $5 gets you 100 of them.
Edit: it's $8 for 100
[ LINk ] ( https://www.amazon.com/dp/B004NXUJ06/ref=cm_sw_r_cp_api_F0bmzbEQQ71QS )
$14 and free shipping for 100 gaskets on Amazon. http://www.amazon.com/Brewcraft-Grolsch-Bottle-Replacement-Washers/dp/B004NXUJ06
http://www.amazon.com/gp/aw/d/B004NXUJ06?pc_redir=1398414039&amp;robot_redir=1
Pack of 100
You can just buy the washers, Amazon has them for $10 here
I recommend bottles that are rounded. I've had a couple bottles explode in the past, but they were the type pictured, the ones with corners. I think those create weak points, perhaps? My kombucha is extrememly bubbly, but it never breaks the rounded bottles!
http://www.amazon.com/CASE-12-Beer-Bottles-AMBER/dp/B005CIFIDO?ie=UTF8&amp;psc=1&amp;redirect=true&amp;ref_=oh_aui_search_detailpage
Most of the online retailers carry them. For example. Northern Brewer has them for $29.99/dozen (amber, 16 oz.) Amazon has them too.
Is there some other facet of this search that I'm not getting?
Amazon has grolsch type bottles for homebrewing.
This is an example. If you search "homebrewing bottles" you should find several different types.
http://www.amazon.com/CASE-12-Beer-Bottles-AMBER/dp/B005CIFIDO/ref=sr_1_7?ie=UTF8&amp;qid=1449637437&amp;sr=8-7&amp;keywords=homebrewing+bottles
If there is a homebrewing supply store near you they probably have them as well.
I have a set of fastracks and a set of [these bottles] (http://www.amazon.com/CASE-OF-12-Bottles-AMBER/dp/B005CIFIDO) and they work resonably well together. Every now and then one of the caps gets in the way, otherwise they fit well and are 10 times easier for storage than a bottle tree.
I use amber bottles, like this one.
Amber beer bottles, like this one, or amber wine bottles, like this one, also work great and might look a little nicer but are harder to label.
You can probably find these bottles cheaper on non-amazon websites too, just do a google search for "amber bottles" and look around. They come in different shapes and sizes too.
In terms of equipment, I started all grain right from the start, thanks to this kit: https://www.amazon.com/Brooklyn-Brew-Shop-Making-Everyday/dp/B005G20IIG/ref=sr_1_1?ie=UTF8&amp;qid=1485457723&amp;sr=8-1&amp;keywords=brooklyn+brew+shop
No need to buy this kit, you seem to already have most things contained in the kit. My point is that you can read the kit's content description and also other pieces of equipment not contained in the kit. You could compare with what you have now, and convince yourself you already [almost?] have all you need.
The only thing I see you don't have and might need are: strainer, funnel & thermomether.
Moreover, notice in the link to the kit above, only 1 carboy is provided: you can brew great beer without the need of "racking" to secondary; simply leave it in primary (for the same time as you normaly would with both 1st + 2nd fermenters...). Though having a 2nd carboy is cool and you can brew bigger volumes or even 2 batches in parallel.
Hope this clarifies/inspires you :-)
Happy brewing
PS: here are the instructions that come with the kit: http://brooklynbrewshop.com/directions/Brooklyn_Brew_Shop_Everyday_IPA_Instructions_.pdf
Make a beer
Open the beer!
I hope you find him something really great!
It's not, but I'd also suggest the Brooklyn Brew Shop 1 gallon kits: http://www.amazon.com/Brooklyn-Brew-Beer-Making-Everyday/dp/B005G20IIG/
This beer making kit is awesome for a science loving beer drinker. The science behind making beer is awesome, and it's a pretty neat hobby to get into. This kit is a bit more deluxe.
Molecular gastronomy is also pretty awesome. Who wouldn't love combining chemistry and food? Here is a deluxe kit.
If he likes games, The Art of Science is a big hit.
This smart phone adapter can connect to microscopes and telescopes to make a viewing screen. These are super useful if he uses either of these pieces of equipment.
https://www.amazon.com/Brooklyn-Brew-Shop-Making-Everyday/dp/B005G20IIG/ref=sr_1_4?ie=UTF8&amp;qid=1480176808&amp;sr=8-4&amp;keywords=1+gallon+beer++kit
https://www.amazon.com/Black-Shift3-piece-Craft-Beer/dp/B00RKD0OYM/ref=sr_1_15?ie=UTF8&amp;qid=1480176808&amp;sr=8-15&amp;keywords=1+gallon+beer++kit
These are the two kits i was given for christmas as few years ago and other than the bottles have everything the 75 dollar set has.
i started with a brooklyn brew shop kit (https://www.amazon.com/gp/aw/d/B005G20IIG/ref=mp_s_a_1_2?ie=UTF8&amp;qid=1495951927&amp;sr=8-2&amp;pi=AC_SX236_SY340_QL65&amp;keywords=brooklyn+brew+shop&amp;dpPl=1&amp;dpID=410e6JNicAL&amp;ref=plSrch) only thing you need in addition are 2 1.5gal pots and some kind of sieve. worked well for me, brewed about 7 batches that way nd they were okay to very good.
I had great results with a starter kit from Brooklyn Brew Shop. It's a fun time and you learn a lot about the process plus they have more beers available to brew on your own. Then you move on to getting the grain and hops yourself.
No you do not want those. You want these. http://www.midwestsupplies.com/5-16-barbed-shutoff-valve.html
the 4 way should already come with them. You need a way to turn the CO2 on and off as well as preventing any beer from back flowing into your gas lines. These will accomplish that
I currently have this one. http://www.amazon.com/Taprite-Product-Pressure-Kegerator-Regulator/dp/B0060NOX40
That is a good price for the 4 way
If he is using a dual regulator couldn't he have each manifold connected to the separate nosels? like this one?
Absolutely!
Almost everything came from Amazon, it was a little more in some cases... but you cant beat their support. If something is broken its replaced immediately and I wanted that reassurance.
Here is a list of the important stuff:
Nitro Regulator: https://www.amazon.com/gp/product/B07DY9SBMB/ref=oh_aui_detailpage_o09_s01?ie=UTF8&psc=1
CO2 Regulator (dual tap):https://www.amazon.com/gp/product/B0060NOX40/ref=oh_aui_detailpage_o08_s00?ie=UTF8&psc=1
Stout Faucet: https://www.amazon.com/gp/product/B000BO1KFY/ref=oh_aui_detailpage_o08_s00?ie=UTF8&psc=1
Shank for the stout faucet (beer faucets came with shanks): https://www.amazon.com/gp/product/B00829HN7E/ref=oh_aui_detailpage_o09_s02?ie=UTF8&psc=1
Beer Faucets: https://www.amazon.com/gp/product/B01D6MSELA/ref=oh_aui_detailpage_o08_s00?ie=UTF8&psc=1
Thermostat: https://www.amazon.com/gp/product/B0152LYY0I/ref=oh_aui_detailpage_o09_s00?ie=UTF8&psc=1
Drip tray: https://www.amazon.com/gp/product/B002NQIROA/ref=oh_aui_detailpage_o04_s00?ie=UTF8&psc=1
This was the nitro tank (probably the best deal IMO), its a nitro coffee place but it holds beer gas fine :) - I had to use this specific one because of the space it had to fit into, I wanted everything to be self contained in my build: https://beveragelements.com/beverage_elements_shop/cold-brew-nitro-coffee/cold-brew-coffee-nitro-coffee-cylinders/23-cu-ft-nitrogen-cylinder-nitro-coffee/?gclid=Cj0KCQjwlqLdBRCKARIsAPxTGaVyfeABi5S7mFR-ByXCWkDGRbyimzJ52J-2TXkyxDyYABYQxXios2oaAiDuEALw_wcB
&#x200B;
Obviously this thin wasn't cheap, but 3 tap kegerators aren't cheap either and this one does nitro! It was a decent investment spread over about 2 months of the build so that eased the pain on the wallet.
&#x200B;
Thanks! Good question. I definitely spent more than was necessary trying to figure everything out but the most expensive item was the king carousel. I was able to get it for on sale for about $45 brand new Amazon prime. Here it is but when I found it, it was on sale http://www.amazon.com/gp/product/B0055OWLFI/ref=oh_aui_detailpage_o03_s03?ie=UTF8&amp;psc=1.
Fridge I scored for free.
I'd say for the rod extension, coupler, bolts, screws, caulk, fasteners and glue was about $30. Used these to keep the front door closed with the seal they work great! http://www.amazon.com/gp/product/B00N2H50XA/ref=oh_aui_detailpage_o05_s00?ie=UTF8&amp;psc=1
The wood was one 8' board 8" x 1" I got at Home Depot and they trimmed to my specs, about $10.
The cost of stain and chalk paint 8 oz cans ~$6 each x 3 (primer for chalk) = ~$20.
I had all the keg lines already I just adapted them from old picnic taps.
Elbow shanks I got for 13.99 a piece plus shipping from Adventures In Homebrew with shipping $36.98 (46.98 actually now that i look back had a $10 credit). http://www.homebrewing.org/Chrome-Plated-Elbow-Shank_p_1187.html
Regulator off Amazon for $114.13 with Prime. http://www.amazon.com/gp/product/B0060NOX40/ref=oh_aui_detailpage_o00_s00?ie=UTF8&amp;psc=1
$29.90 for both chrome faucets off amazon free shipping http://www.amazon.com/gp/product/B00370AT2Y/ref=oh_aui_detailpage_o00_s00?ie=UTF8&amp;psc=1
Quick Connect I used for the top tap area $6 http://www.amazon.com/gp/product/B0000DD23N/ref=oh_aui_detailpage_o01_s00?ie=UTF8&amp;psc=1
So I guess when all is said and done 292.01.
But if you have the regulator and other bits laying around it could be around $177.88.
Kinda pricey but I guess I had to use that x-mas bonus somewhere!
Oh - and the thing takes about 6 pounds of nuts and dried fruit to fill. That gets pricey but gum balls sell for pretty cheap in bulk from here http://www.gumballmachinefactory.com/gumballscandy.html
Fermtech Mini Auto-Siphon https://www.amazon.com/dp/B0064ODL1G/ref=cm_sw_r_cp_apa_i_pmjzDbV80QZA9
This will fit a 1 gallon growler jug. Haven't seen anything smaller. That looks to be bigger than a gallon so check measurements to make sure it can reach bottom.
Relax, don't worry, you made alcohol! isn't it neat?
get yourself something like this, it will help a ton. (your local homebrew supply store is probably cheaper)
1st question: 2 weeks is fine. If you want to wait another week or two that's fine too.
2nd question: see the auto-siphon above. use it to siphon all of the liquid above the yeast cake that's settled on the bottom.
3rd question: For our purposes, I like to think of gravity as a measure of sugar content. Since yeast eat sugars and poop CO^2 + alchohol, the gravity will drop during fermentation. This allows us to measure our alcohol content.
Has anyone ever used one of the cheap red cappers? I'm on a budget, so I went with this. I'm planning on reusing Samuel Adams bottles from a variety pack I bought. I've got a Brooklyn Brewshop kit (afternoon wheat), a mini siphon {here}, and strainer, but no bottling bucket (I was told I can use a pot and siphon for just a gallon). Also got caps. Anything else I really need to get? I'm looking to start the process next week.
I'm assuming this is from Brooklyn Brew Shop (I started the same way, have the same carboy :P ). That's pretty normal, it will settle!
What I did for my second kit from them was a cold crash. Stuck it in my fridge for 5 days and then bottled. I was warned this may kill the yeast/make bottle conditioning impossible but it turned out just fine. I can't say it will always work, but for me it did.
My first batch was super carbonated (possibly just too much sugar. Be careful! Small batches mean small miscalculations can make huge differences).
Also, be very careful when siphoning, the yeast can kick up very easily, especially if you don't cold crash. You will want some yeast for bottle conditioning, but the suspended yeast should be enough. If you can, buy a mini auto siphon. Makes siphoning way easier. I won't go back to just a racking cane. Also a clip if you can, or just a steady hand :)
I have a Balcones barrel as well, bought from the same place. I ended up having to buy a siphon with a smaller diameter that barely fit in the top opening. This one worked: https://www.amazon.com/gp/product/B0064ODL1G/ref=oh_aui_search_detailpage?ie=UTF8&amp;psc=1
Use the auto siphon that came from the homebrewing kit - it's absolutely worth it. Bonus points if you have a bottle filler attached to the other end of the hose.
That's actually not bad but as mentioned below, a decent pot will go a long way. I bought a 30quart turkey fryer and put in a ball valve and that's been one of the best upgrades I've made. I have a fermentor now, but I got some free 6+ gallon food grade icing buckets from my grocery's bakery. Spigots, air locks, and bottling wands are $6 on Amazon. Tubing can be found pretty cheap online or at LHBS/hardware store.
Kettle - $25
Ball Valve - $22
Bazooka Screen - $9
Buckets - Free
Spigot - $6
Airlocks - $7
BIAB Bag - $5
Bottling Wand - $5
Capper with Caps - $18
Various Tubing - $15
This doesn't include your first beer kit, but you can pull off an all grain BIAB as long as you've got fire. My second favorite piece I own is my mash tun which is just a 10 gallon cooler with a bazooka screen and ball valve. I don't bottle anymore, but I feel like if I were to do it again that's all I would need to start. Oh, and a thermometer and some StarSan.
Yes, ideally you would attach a syphon tube to a bottling wand like this and use that to fill your bottles.
I recently got one of these, no foam from pouring into bottles
Spring Loaded Beer Bottle Filler https://www.amazon.com/dp/B000E66A4U/ref=cm_sw_r_cp_apip_DNWb6NyYyNjOT
http://www.amazon.com/Learn-To-Brew-Auto-Siphon-3/dp/B000E60JF6/ref=sr_1_1?ie=UTF8&amp;qid=1377796614&amp;sr=8-1&amp;keywords=autosiphon
http://www.amazon.com/Spring-Loaded-Beer-Bottle-Filler/dp/B000E66A4U/ref=sr_1_6?ie=UTF8&amp;qid=1377796614&amp;sr=8-6&amp;keywords=autosiphon
For less than $20 you won't have to deal with this in the future.
http://www.amazon.co.uk/Brew-Your-British-Real-Camra/dp/1852492589 is excellent - gives clear simple advice, as well as having a good selection of British ales, milds, porters and stouts - if that's your thing.
http://www.amazon.co.uk/Sacred-Herbal-Healing-Beers-Fermentation/dp/0937381667/ref=sr_1_1?s=books&amp;ie=UTF8&amp;qid=1368899642&amp;sr=1-1&amp;keywords=sacred+herbal+beers is also a really interesting book - an anthropological of the history and mythology of brewing, complete with recipes! A lot of the recipes are a bit simple, or sugar-based, but it (like Radical Brewing) is a really good source of inspiration and historical knowledge.
Advice? Get a bottling wand and a vinator and bottle draining rack and shave tons of time off your bottling day.
I would strongly caution against a 35 quart pot. The Bayou Classic 44 quart (11 gallon) pot is only a little more, and it's of dimensions more ameniable to brewing (tall, rather than squat). If you plan to migrate to BiaB, the version with the basket is quite useful; you'll be able to fire your heat source without worrying about scorching the bag.
For ingredients, I would recommend looking around for a LHBS (local homebrew shop). You'll likely not save much money ordering those online, due to their weight/cost ratio, and a LHBS is often the centre of your local community of homebrewers.
With regard to literature, my bible is John Palmer's How To Brew. You can also read the first edition online, but much has been learnt since that was published and the latest edition has current best practices.
That equipment kit is decent, but there are a lot of things in it you'll probably wish you hadn't bought.
You will want:
just bought this one for father's day, haven't used it: https://www.amazon.com/dp/B000NV9CE6/ref=psdc_979840011_t3_B01IFXQAYS
Could keg condition, get 1 gas in and 1 beer out disconnect, some hose and clamps, one of these, and some co2 cartridges. Ice down the bottom of the upright keg in a spare cooler or bucket.
Just be careful with the keg charger. The first time i used mine i way over pressurized and got cups of head.
I did last night it was easier than pie. Brought my carbonated keg over, put it on ice set up the picnic tap & used this. Then just remove & take home to put on your tap. Fresh draught beer at your friends. What's so hard about that?
Have to agree with everyone on here, a charger is the easiest way to go. Also they are small and relatively inexpensive.
http://www.amazon.com/Genuine-Innovations-G5040-Charger-Black/dp/B000NV9CE6
I do the same thing, only I keep the spring assembly in the bottle filler in place. You can keep the cobra tap open the whole time, and push down to release the beer. I spill less this way.
I also MacGyvered up a hand held co2 charger to purge the bottles, as I fear the oxygen goblins.
Beer making kit It will take a little investment of time at first, but will become beneficial later.
Beer making kit ?
I can patiently wait for almost anything, but not if I am in traffic. Anyhow, because I can wait for things, I figure making my own beer would be awesome. This kit should help immensely.
Good luck and stay safe.
Edit: a word
I making my stepdad some spicy chili and getting him a six pack of beer. Also got him a brew kit and a nice book. I dunno if this helps
Yeah there are tons of other ones. Was just the first one I found. There is This one but it is like 50 bucks and wasn't sure if you would want to spend that much on it.
So reading through the comments, you don't want to give up on beer. Fair enough, we've all got a poison, right? I'd suggest home-brewing. Because the kit is at first, quite expensive - I got a kit that included a keg, sterilisation pills, tubes/equipment and a beer kit for about £70. It's everything you need to start home-brewing. So the upfront cost is expensive. Then I found I could brew roughly 40 pints of beer from a single £12-£15 beer kit. So instead of $2 for 500ml can, you're having $0.65 per 568ml. Plus the satisfaction you made it yourself, and of course you can change up the recipe (different sugars used etc) every batch.
If you can put a few dollars aside from your beer fund for the next few months, buy a kit and have a great time brewing. You can also use old beer bottles to bottle the new beer!
Just found this beer making kit on Amazon for $52.99, less than your monthly beer fund. Worth a shot!
Beer kits like this are quite commonplace here, but I'm not sure if they are sold in sg. I know someone who brews his own beer all the time, and he's not rich, so it must not be expensive. haha
Or This setJK it's sold out. My bad. But email them!you can do the same with beer
What about a homebrew kit? Or does he have that already?
http://www.amazon.com/Mr-Beer-Premium-Edition-Brewing/dp/B001BCFUBU
OP never said anything along those lines, so how about being less of a dick, hmmm?
and you can't buy whole beer, but you can buy a homebrew kit
$20-$50 Mr. BEER! Who doesn't want to try their hand at it?
$10-$20 Stanley Camping Cook Set Being able to cook on the go is nice!
$5-$10 Mimosa Pudica Touch Sensitive plant that pretends to die when touched, HOW COOL IS THAT?!
$0-$5 Rose Kissed Jasmine Tea You need to be able to unwind with something after playing with all the new toys, right?
This
&
This
Just take the extra from the ten dollar contest prize if I'm chosen :)
If you're worried about wasting a significant investment, get one of the cheaper kits at Amazon, seems like a good way to test the water/beer.
beer, technology and science all in one kit!
Thank you for your response.
How do you feel the linked kit compares to the following kit from amazon? http://www.amazon.com/gp/product/B001BCFUBU/ref=ox_sc_act_title_1?ie=UTF8&amp;psc=1&amp;smid=ATVPDKIKX0DER
If you did this a lot maybe one of these would be better:
https://www.amazon.com/Ferrari-1170-Baron-Bottle-Capper/dp/B001D6KGTK
Just crimp the cap on.
Anchor Hocking Heritage Hill Glass Beverage Dispenser with Spigot, 2 Gallon https://www.amazon.com/dp/B00BWC0E42/ref=cm_sw_r_cp_api_f4uhAbF8X8STT
1 X Organic Kombucha Scoby - Live Culture by Scoby Kombucha https://www.amazon.com/dp/B009ZW8RP4/ref=cm_sw_r_cp_api_.5uhAb83TMN5D
Unbleached Cheesecloth 9 Sq ft 100% Cotton Reusable-Great Filter or Strainer for Cheese/Kombucha scoby/Glass jar/Wine making https://www.amazon.com/dp/B01M612PJU/ref=cm_sw_r_cp_api_j7uhAbFHCHX7S
Adhesive Temperature Strip https://www.amazon.com/dp/B0079JZLP4/ref=cm_sw_r_cp_api_i9uhAbJBGF75D
Red Baron Bottle Capper https://www.amazon.com/dp/B001D6KGTK/ref=cm_sw_r_cp_api_xbvhAbFY4CJN3
Beer Bottle Crown Caps - Oxygen Absorbing for Homebrew (Gold) https://www.amazon.com/dp/B00ZSEH8VW/ref=cm_sw_r_cp_api_YcvhAbCE0836F
Bottles Free: Just start saving old beer bottles (not the twist on style bottle) submerge them in hot water for 5 min, labels peel right off.
Sanitizer: White Vinegar, I prefer Star san.
Prince of Peace Tea, Black, 100 Count https://www.amazon.com/dp/B00AP70BKC/ref=cm_sw_r_cp_api_divhAbY9D73AP
With these products, you will be good to go and your volume is 2 gallons, so by the time your upgrading after your first batch. For me a 1 gallon container never cut it. With the capper you don’t have to worry about giving your friends a bottle of your Kombucha and never seeing your $4 swing cap bottle again. Just save old beer bottles or ask your friends for them.
To answer your question, the temps you listed are to low. For all brewing temperatures are very important. You want to keep your fermentation in the 70s. Here’s how you fix the problem without keeping your home heater on 24/7.
Round Kombucha Heater Kit for Continuous Brew Crocks & Dispensers. 10" Brewing & Fermentation Heat Mat, Works with any Ceramic, Glass, Stone or Porcelain Containers (10"-120VAC 7-Watts) https://www.amazon.com/dp/B072S6XBQJ/ref=cm_sw_r_cp_api_1tvhAb04PYXBK
Enjoy... In the long run you will spend less by starting off with the right equipment.
It's actually for putting bottle caps on, not removing them.
I've never heard of a wooden capper can you link me a picture? The cheapeast option is something like this but bench capper works way better imo.
You need something like this:
https://www.amazon.com/Ferrari-1170-Baron-Bottle-Capper/dp/B001D6KGTK
And a bag of caps. They are single use.
What I do is bottle at least one bottle of Kombucha in a plastic 20 oz soda bottle, and the rest in glass. Once the soda bottle is very firm to the squeeze, I put them all in the fridge.
If you have a homebrew shop near you, you can buy a bottle capper for like $20 and recap, or tighten the caps. Hell, you could probably just bring your bottles there and they'll let you recap it for free. Or if you know someone who homebrews, or if there's a brewery near you that caps their beer, etc.
The most common caper is called the "Red Baron Bottle Capper." Here's what it looks like:
https://www.amazon.com/Ferrari-1170-Baron-Bottle-Capper/dp/B001D6KGTK
I use this -- a bench capper would be nice if I lived in a big enough place that I were willing to semi-permanently dedicate table space to it, but that particular item works just fine for me for now.
I've been using the standard red bottle capper, but the thing is really kind of junk (I have two actually). It's always slipping, sometimes takes a few tries to get it right, technique needs to be spot on etc.
I am using (what appears to be )https://www.amazon.com/gp/product/B00TFVXUC0//ref=as_li_ss_tl?creativeASIN=B00TFVXUC0&imprToken=tPx24TDfjZE4TvrGDKk5Rg&slotNum=4&ie=UTF8&linkCode=w61&tag=villaegbakery-20&linkId=9e883a23a0cbb04c0ca1726a5999b954 Looks like the exact same one here https://www.amazon.com/gp/product/B001D6KGTK//ref=as_li_ss_tl?creativeASIN=B001D6KGTK&imprToken=tPx24TDfjZE4TvrGDKk5Rg&slotNum=1&ie=UTF8&linkCode=w61&tag=villaegbakery-20&linkId=137e7f2db4bc77fc4b1a6d281597aa42
Any recommendations for a better capper that doesn't suck?
I started with the bazooka screen linked below. I have brewed 12 batches with it and have no intention of "upgrading" to a false bottom. Make sure you select the one that is sold by Arbor Fabricating. For some reason it is only $.50 plus $4.99 shipping right now and it is really well made. I actually just bought a backup when I saw how cheap they are. :)
https://www.amazon.com/dp/B003ISY2DC
I use one too, with similar efficiency. I don't really want higher than mid-70s because that's what recipes are generally built for. Here's one on Amazon for about the same as what it would cost to build a SS braid filter: http://www.amazon.com/Bazooka-Screen-brew-kettle-mash/dp/B003ISY2DC
Plus, it's 1/2" MPT already, so it should thread directly into the bulkhead you attach for your ball valve. Easy peasy.
One thing is that for the 10gal Igloo cooler the 12" are slightly too long. I just bent the last 1-1 1/2" back on itself.
That's the biggest problem with using the braided stainless steel hose as a false bottom; it has zero structural integrity. I'd recommend buying at least a kettle screen to replace it, though it seems like you've already found a work-around.
This link doesn't work for me for some reason (maybe it's from your mobile?) so here's another link
Looks like the last piece of the puzzle is the mash tun - you need to convert a large cooler (10 gallons is a good size). If you have one with a drinking spout, you can unscrew the spout and install a ball valve. The inside end of the ball valve then attaches to something you use for lautering (filtering the wort out of the mash).
Ball valves are maybe $5 at Lowe's/Home Despot. You need some PTFE tape to seal the threads, and maybe a neoprene washer or two (although you can probably steal those from the existing spout you unscrewed from the cooler).
For filtration, you have a couple options --
I also recommend a thermometer, but honestly I think putting one into the cooler is pointless. Get a digital insta-read version like the thermapen, worth every penny of $100, and you can use it in the mash, on the wort, and while cooking. With a hand-held unit you can take temperature readings at different locations in the mash, and the thermapen probe is about 8 inches long.
Not sure what your kettle setup it's like but you could consider a bazooka filter. https://www.amazon.com/Stainless-Steel-Bazooka-Screen-Fitting/dp/B003ISY2DC. They have them at most Homebrew shops.
I added a Kettle Valve to each of the kettles. I am building a sparge arm out of CPVC that easily connects to the HLT valve. Plan on just connecting a piece of sanitized hose to the valve on the boil tank as needed for moving into fermentation buckets. I also have the screen on the boil tank for helping to remove leftover boil/hop sediment (hopefully this won't plug).
http://www.amazon.com/gp/aw/d/B003ISY2DC?pc_redir=1409004119&amp;robot_redir=1
So I finally put my mash tun together last weekend. I hit a few small snags that I should have seen ahead of time based on reviews of the spigot I bought!
Items
Total Cost: $76
Time to assemble: 15 minutes +- 5 minutes for testing the seal
Main suggestion - get either a false bottom or one of the short bazooka screens. The long bazooka screen is a pain to work with -- it barely fits in the cooler. I also heard there are spigots you can buy that come with a female connector so you wouldn't have to buy the coupling.
Take a close look at the instructions for the spigot - it spells out how to put it together correctly but the diagram was super confusing to me for some reason.
My primary frustration was that none of my local hardware stores had the coupling so I had to get and wait for it from Amazon. Lame!
That's beautiful! And it could double as a huge wort chiller :D
Just found my notes:
Do you have a wort chiller? http://www.amazon.com/Homebrew-Immersion-Wort-Chiller-Copper/dp/B003UCCLG6
You could also make or buy a flight glass set.
Here is the desktop version of your link
Some people don't chill at all, and just leave it overnight to get to room temp. You don't want to put a lid on before it drops to 160ish due to DMS still coming out, but you want to have a lid on by 140 to reduce wild yeast.
Personally I like my IC. And you can get it fairly cheap like here. It's only a 25' one, but that's what I use and can drop 10 gallons of wort to 80 degrees in half an hour (faster in winter, slower in summer).
For temp control, use a cooler. This is the cooler I use. It is perfect to hold any fermenter I've seen. Fill with 65f water. Put your fermenter in the cooler. Add frozen 16-oz soda bottles to keep water temps at around 65f. Monitor your fermenter temps (using the stick-on fermometer ... just be sure the fermometer isn't under water!). I've found adding 1 frozen bottle in the morning and 1 in the evening keeps temps exactly where I need them..
If your fermenter has a spigot in the bottom - place the fermenter inside a contractor trash bag (the super thick durable kind) before placing in the water. You don't want to risk infection by having the spigot exposed to the water.
For BIAB and All-Grain ... #1 - BIAB is all-grain. It is just easier. The ingredients are the same. The end result is the same (Beer!). The complexity, cost, and time are different. So, I'll just list out a 2-vessel BIAB-in-a-cooler hybrid system.
Total - $255 shipped to your door.
This setup will be a setup that you can use for all types of Ales. You can even do low-temp ales that ferment at 50-55f by adding more ice/colder water to the cooler. Don't think it would be efficient enough for lagering.
Process:
EDIT - you will need an extra 5-gallon pot to heat sparge water.. forgot that. They can be found anywhere for about $20. As always - check craigslist to save even more $$$$. This is the cheapest and most efficient setup I've been able to put together. If you really want to get fancy - then you can add a stainless steel fermenter from Chapman Brewing Equipment for an extra $99. The fermenter is well worth it!
EDIT 2: As always SANITIZE everything at all stages. Also - with all-grain, you'll eventually want to get into water chemistry. Read up on that. AND a good kitchen scale is needed for measuring out hop additions (and later water chemistry adjustments). Kitchen scales can be had cheap. You'll want one that is accurate and can be calibrated.
Yea I feel ya. I'm getting this co2 tank with this regulator
I wanted to get the 5lb cause it will last a long time and is only like $15 to refill at the welding supply near me. I hopefully won't have to upgrade until I get my 250g tank and ill be getting a 20lb for that one.
If he were to buy a TWO product dual regulator like the one you link to, then the answer is yes. His pricing indicated that he was only looking at a single product dual regulator like this: http://www.amazon.com/Kegco-Premium-Series-Gauge-Regulator/dp/B003WX772G/ref=sr_1_3?ie=UTF8&amp;qid=1407323203&amp;sr=8-3&amp;keywords=dual+pressure+regulator
Ah yeah good catch - will need to pick a different regulator and remove that bubble counter.
Hows this one look?
http://www.amazon.com/Kegco-Premium-Series-Gauge-Regulator/dp/B003WX772G/ref=sr_1_4?ie=UTF8&amp;qid=1421537185&amp;sr=8-4&amp;keywords=c02+regulator
Says for beer specifically but I'm guessing that doesn't matter
Get a 5lb CO2 tank, a regulator, ball lock valve and a Carbonator and make your own fizzy water. It's delicious.
Try amazon, this one says they can ship to finland. Shipping would be ~30 bucks though. Might buy the whole assembly in that case.
Ball Lock and hose
Coupler and valve assembly
As for getting the tank filled, I would go to your nearest bar or restaurant that uses co2 for their soda/beer and just see who their vendor is.
Am I missing anything? Or better reccomendations?
Tank
Regulator
Diffuser
Wow thank you!
http://www.amazon.com/gp/product/B003WX772G?psc=1&amp;redirect=true&amp;ref_=oh_aui_search_detailpage
Clearly states how to even add onto it in the question section.
https://www.amazon.com/Grolsch-Bottle-Replacement-Washers-Pack/dp/B004NXUJ06/ref=pd_sbs_79_1?_encoding=UTF8&amp;pd_rd_i=B004NXUJ06&amp;pd_rd_r=AY1NG5P021DCM7448X9N&amp;pd_rd_w=S18uq&amp;pd_rd_wg=DFktd&amp;psc=1&amp;refRID=AY1NG5P021DCM7448X9N
Cheapest straplocks
Brian May even uses them: http://i.imgur.com/r42kJne.jpg and you can get them on Amazon: https://www.amazon.com/Grolsch-Bottle-Replacement-Washers-Pack/dp/B004NXUJ06.
So, an alternative to kegging if you aren't ready for the expense is the buy those flip top brown bottles like these.
I have those, as well as a keg (which I only use for special occasions/parties right now as I don't have a kegerator) - the flip top bottles remove a lot of the hassle involved in bottling as you don't need to cap them. They are also larger than standard 12 oz bottles, so it takes less time.
Mason jars are made to withstand vacuum, not internal pressure. so you're more likely to have an explosion with those than a bottle made to have internal pressure. The Grolsh style beer bottles work great. I also like using 1/2 gallon growlers (get the ploy caps).
If you intend to have a sparkling product, you can try flip-top bottles. I have a bunch that originally held beer that I've successfully used for bottling carbonated things.
As others have said, champagne yeast doesn't guarantee a sparkling end product.
This?
http://www.northernbrewer.com/shop/brewing/beer-equipment-starter-kits/essential-brewing-starter-kit.html
$79.99 and includes everything you need minus bottles and a kettle. It even comes with an ingredient kit as well.
If you wanted to start off all-grain and 1-gallon, you can get the Brooklyn kit:
http://www.amazon.com/Brooklyn-Brew-Beer-Making-Everyday/dp/B005G20IIG
If you want DIY, other people will have better suggestions. I prefer to make things as simple as possible on myself!
http://www.amazon.com/Brooklyn-Brew-Beer-Making-Everyday/dp/B005G20IIG/ref=sr_1_1?s=home-garden&amp;ie=UTF8&amp;qid=1405695980&amp;sr=1-1&amp;keywords=1+gallon+brew+kit
This is what got me started...
Brother-in-law; it covers Seahawks and long hours driving.
Uncle: this is a little over your spending limit, but I've yet to find someone who likes beer that didn't see the appeal of making their own.
http://www.amazon.com/Brooklyn-Brew-Beer-Making-Everyday/dp/B005G20IIG
Here's a direct link to avoid OPs shopten spam.
Taprite T752HP Two Product Dual Pressure Kegerator CO2 Regulator https://www.amazon.com/dp/B0060NOX40/ref=cm_sw_r_cp_api_Wh0FAb87R778N
88 bucks. This is the one I have. Works great.
I'm looking to purchase the parts for a 2 tap sankey kegerator and wanted some feedback on before I go ahead and order. everything is through amazon because I have a large amazon gift card.
I already have 2 intertap flow control faucets
coupler-kegco KTS97D-W x2
beer line assembly x2
10 feet of gas line
20# luxfer co2 tank
taprite dual regulator
intertap shanks x2
I'm hoping to pick up a used chest freezer on craigslist. Anything I'm missing? Anything I should change?
That makes sense. I see one on Amazon for $89, so I know what the price range I'd be looking at is. I figured it was that easy, but I wanted confirmation before I leapt before I looked.
[Used Kegging Equipment - ID and Setup]
Relevant
Tangent
Thanks!
Very good than. Now you can just piece the rest togethers. For the Regulators, I'd recommend the Taprite T752HP. These regulators are awesome, super accurate and the knobs lock. 20-30' of 3/16" of Bev Line. Buy your gas in and liquid out keg fittings, some hose clamps and cobra taps. You should be able to get all that and a tank for not much more than $200 if you already have the kegs. Faucets will run you $40-50 a piece for a decent faucet and shank.
A word of warning about Taprite: I would definitely recommend testing everything in a quiet room before actually hooking up any hoses/disconnects/etc... just the regulator and a CO2 tank.
I purchased a new 4-way secondary regulator last year. Lost most of the first 20# tank... I didn't notice that one of the gauges was audibly leaking from the pressure relief valve for quite a while, because I didn't hear it over the fan I use to circulate air in the keezer. It wasn't until turning it up to 40PSI to burst carb a keg that I noticed it.
Went back and forth with customer service for a while trying various things. I finally disassembled the valve and found an o-ring that was obviously bad (visibly rough on one side, like it was stamped from a damaged sheet), so definitely not a shipping problem. The gauges all had QC stickers on them, but this had clearly not been tested very well... once I took it out of the keezer I could hear the leak as low as < 5PSI. It then took about a month before I had a replacement o-ring in hand.
Around the same time I also purchased a 2-way primary which showed up with a non-working high pressure gauge. This one though, I don't know for sure wasn't damaged in shipping.
I've had other Taprite regulators for years with no problems, so not sure if this is just bad luck or if something has changed.
EDIT: I should probably point out though that I would still purchase from taprite because while it was overall annoying, customer service was responsive, directed me to finding the problem, and shipped me a part to fix it. I would definitely be more thorough with my own testing though.
My regulator is this -https://www.amazon.com/gp/product/B0060NOX40/ It says it doesn't need a washer. I've closed the gas line valves and it sat fine.
So I’m not sure where I pulled this recipe from, it was probably inspired from another webpage but with my own twist and I’m still changing it as I go. So I originally tried 150g peeled ginger in a ninja single serve blender, filled to max line with water which was ~310ml and blended to hell. Then I put in pot, heated to ~65°C (150°F) and added 53g turbinado sugar (~4Tbsp) and 43g (~3 Tbsp) table sugar. I stirred for a few minutes to dissolve, covered and let sit about 30 min. Then I strained out the ginger muck, topped up with cold water to the 1L mark and chilled in fridge to room temp. Once it’s about room temp I put in the GBP grains to prevent any thermal shock. I also only use bottled (preferably Poland spring) water. Now the most recent batch was roughly quadruple of that but not topped up to 4L, instead closer to 3.5L making it a bit more concentrated. I let mine ferment fully dry and then force carbonate in a tiny 1.75 gal keg. If you wanna do swing tops I have one conditioning now with 3g of sugar added to the ~400ml that was in the bottle (I got them on amazon I think they’re 16oz bottles and this one was slightly under filled) I actually used 6ml from my cocktail simple syrup (1:1) and just put it in the bottle the other day.
Edit: sorry I wrote my recipes in real units and have to convert because... well Murica
Second edit: don’t forget to feed the grains! Even if you’re not gonna make another batch to drink, make a small 1L batch and give it a few hours on a vented container (I like using mason jars with these https://www.amazon.com/dp/B01H7G1NF0?ref=ppx_pop_mob_ap_share )
before putting in the fridge! Once in fridge their metabolic rate will come to a crawl and they’ll be in a solution of food and won’t starve (not for a good long while at least)
Third edit! Lol: the 5”? OXO strainer is ideal for harvesting grains and I also use one of these https://www.amazon.com/dp/B0064ODL1G?ref=ppx_pop_mob_ap_share to remove the bulk of the gingerbeer into another container before harvesting the grains out. It leaves all the muck leftover at the bottom and out of finished product. Also, most recent batch was neglected while heating and hit a boil so I’ll let you know how that changed it. I made one batch with fresh squeezed blackberry juice pressed and filtered as not to contaminate the grains and while it was wonderful it was a PITA. I plan to repeat but with some sacrificial amount of grains so I can just add mashed blackberry and let the culture extract the bulk of flavor then toss those grains with the vegetative waste at the bottom
There's the Mini Auto Siphon, made purposely for 1-2 gallon jugs.
In my experience the quality of your cold brew is also highly dependent on your filtering system. I use the Hario mizudashi because it has a very fine filter and produces extremely clean cold brew. I prefer the cold brew from the Mizudashi even with lower quality beans to simply submerging coffee in water and filtering it later. I use a 10:1 ratio in the Mizudashi and I like drinking it at that strength. 4:1 is meant to be diluted by half, so keep that in mind.
If you're making cold brew by simply submerging it in water and filtering it later, I'd recommend putting the coffee in something like this and seeing if you like it better. However it's still possible to make good cold brew without doing this, just make sure you leave all the sludge at the bottom and filter out the good stuff. A siphon like this which is commonly used for home brewing beer could be the perfect tool.
EDIT: as far as beans go, try making cold brew with the cheapest possible option if you have a low budget. Some grocery store coffee will work just fine as long as it's made well. Cold brew is perhaps the most forgiving method of coffee brewing.
Chill it in your... dorm fridge or an ice bath. That will encourage yeast and other trub to drop out. Then you can use a racking cane and tubing or something like this to transfer it to bottles. If those are no goes, you can do a careful "still pour" - slowly pour it trying to leave trub behind. PET soda bottles will do the trick for bottles.
I have a 5 lb [co2 tank](Zebra DNA Luxfer L6X Aluminum CO2 Tanks with CGA320 on/off Valve 5 LB, Brushed https://www.amazon.com/dp/B0085282UK/ref=cm_sw_r_cp_api_IxrIybWJW0EKA) it came empty, but I found a local place that fills my tank and gives it back instead of taking the empty and giving you an already filled one. I personally didn't want to do DIY because it's way more work where this you just fill it, attach your regulator with tubing and have your diffuser in the water. Pretty quick and easy setup. Highly recommend co2.
It came out to about $325. I opted for the led on the solenoid. Also, having the atomizer on the outside of the tank will be nice. This is the CO2 tank I went with.
Just kinda brainstorming here, I think I know my options but maybe somebody has some suggestions. I have a tiny crowded apartment, can't get a freezer/mini fridge. It stays pretty warm, like 75 ish. I keep my fermenters in our closet, which i shut the vent to and keep the door closed, but I'm not sure how much that helps. I'm planning on mainly doing 1-2g brews, and i was considering either doing a swamp cooler set up, which i don't really wanna do just cause itd look bad, or getting this which i don't really do because it's kinda expensive and i could probably only fit one of my small batch fermenters in it. There's gotta be some other kinda way to efficiently cool down a tiny 1g fermenter!
Good to know, I saw a few websites that had calculators for that but just went with what the recipe called for. A refractometer is absolutely my next purchase, and a fermenter bag like this which I've heard great things about. Wish I had the space for a chest freezer to convert in my home. ( http://www.amazon.com/Cool-Brewing-LLC-5B-YTCW-X9LG-Fermentation/dp/B008EKD7CQ)
I can fit my 6.5 gal carboy into my kettle (its short and wide) with room for a bag or two of ice.
Frozen water bottles are great if you have a container that will hold them. I use one of these now, its soft and folds up nicely: https://www.amazon.com/Home-Brewing-Fermentation-Cooler-Temperature/dp/B008EKD7CQ
When its occupied and its real hot, I've been using Voss Kevik, which has been delicious even fermenting at 90-100 deg. https://www.theyeastbay.com/brewers-yeast-products/sigmunds-voss-kveik
Do you have a porch or patio? I have been way happier since I ditched the stove in my small apartment and moved to a banjo burner on my patio. I also bought a short hose and adapter to screw it into my kitchen sink. So I can run water out to the patio for cooling and cleanup. (It isn't food grade so I don't use it for water used in the brew) Way nicer to be able to just hose everything out when done as well as hose away any spills or boil overs ect.
Even if you don't have a patio or porch, some sort of courtyard or BBQ area in your complex might work if you have access to a hose spigot.
I also don't have room for a temp controlled fermentation chamber but one of these fermentation cooler bags has worked really well for me and it collapses down to store away.
http://www.amazon.com/Cool-Brewing-LLC-Fermentation-Cooler/dp/B008EKD7CQ
> The lady friend isn't too thrilled about having a bonus fridge in the living room though.
Yeeeeeeah, I'm running into that as well lol. I picked up one of these a couple weeks ago, which should be more than sufficient along with some frozen water bottles. I'm hoping to start a new batch this weekend, we'll see how it works!
Here you go, fam. Frozen 2 liters cycled once a day or less keeps temp down significantly. I keep my house 66°f-68°f and was able to hold carboy temp at 60°f in peak fermentation with 2 frozen 2 liters cycled once a day for the first 3 days. After that just 1 sufficed.
I use a gaint carboy sized cooler bag found here. It can fold up pretty small or slide under your bed when not in use so you aren't commiting to bulky fridge or something similar. Putting a frozen 2 liter in there will easily bring you down to around 65 degrees.
https://www.amazon.com/Sankey-Ball-Quick-Disconnect-Conversion/dp/B00C30F75I
Thanks, yes it is a Sanjay keg. Is it one of these I need along with the regular co2 set-up?
https://www.amazon.co.uk/Sankey-Ball-Quick-Disconnect-Conversion/dp/B00C30F75I
http://www.amazon.com/Sankey-Ball-Quick-Disconnect-Conversion/dp/B00C30F75I
So I can hook up sankey kegs to my ball lock disconnect system. Works great
Easy! You can build the exact same thing, but you'll have to slightly modify your Sanke keg coupler with something like these. Basically, you put those ball lock conversion couplers onto your Sanke coupler and add ball lock disconnects to your existing gas/liquid lines. Now your system will work with the device in the hbt thread, and you'll be able to tab ball lock kegs too!
Thanks! Are these the products you're talking about?
https://www.amazon.com/dp/B01N2QZJND/ref=asc_df_B01N2QZJND5365060/?tag=hyprod-20&amp;creative=395033&amp;creativeASIN=B01N2QZJND&amp;linkCode=df0&amp;hvadid=198078807540&amp;hvpos=1o1&amp;hvnetw=g&amp;hvrand=12368553783614370258&amp;hvpone=&amp;hvptwo=&amp;hvqmt=&amp;hvdev=c&amp;hvdvcmdl=&amp;hvlocint=&amp;hvlocphy=9016563&amp;hvtargid=pla-349513331250
https://www.amazon.com/Foxx-4048Sankey-Quick-Disconnect-Conversion/dp/B00C30F75I/ref=sr_1_1?ie=UTF8&amp;qid=1518202987&amp;sr=8-1&amp;keywords=ball+lock+to+sankey&amp;dpID=41jBW4GS4IL&amp;preST=_SX342_QL70_&amp;dpSrc=srch
Will this be all I need?
I used this and these and just use ball lock quick disconnects on all tubing -- works great.
You'll want to do some research on the height you have and the height you'll need. You know the height if the 1/6 keg, how much room do you have for the line connections? Any sanke to ball lock conversion kit would add extra height.
This kit would work if you have enough clearance but it would easily add 4-6 inches to your keg height.
https://www.amazon.ca/Sankey-Ball-Quick-Disconnect-Conversion/dp/B00C30F75I
I'd like to find something that I could pop the ball-lock connector right on, currently I just use a keg filled with sanitizer.
Something like this but works for both gas and liquid disconnects
http://www.amazon.com/Carbonation-Carbacap-Coupling-Carbonate-Fruit/dp/B01039C0Z0
Dudebro. You need one (some?) of these:
http://www.amazon.com/Carbonation-Carbacap-Coupling-Carbonate-Fruit/dp/B01039C0Z0
I'm assuming that if you have a keg, you have a kegerator, and therefore have a CO² tank at the ready. As long as you have proper regulation and a ball lock connector, you're in business.
The way these things work: first, get a plastic bottle--20 oz, 2 liter, whatever. If you're going to serve within a couple of hours, I usually just clean/rinse. If you're going to keep it several days, everything needs to soak in sanitizer. Fill the bottle with however much beer you want to take, but make sure to leave at least some headroom. Take the bottle to the sink, screw the cap on tightly, depress the pin with a screwdriver or your thumbnail or something, and squeeze all of the foam out until you're squeezing beer out. Release the pin while being careful not to let the bottle suck any air back in. Then you just plug your CO² to the cap, the bottle pressurizes, you're in business. I tend to find hitting it with about 20psi works well--you want to be higher than serving pressure.
I can't tell you how much easier and expedient it is to use these carb caps instead of traditional bottling.
http://www.amazon.com/Carbonation-Carbacap-Coupling-Carbonate-Fruit/dp/B01039C0Z0
Or this
see if you can purchase one of these:
https://www.amazon.com/Carbonation-Carbacap-Coupling-Carbonate-Fruit/dp/B01039C0Z0/ref=pd_sim_328_6?ie=UTF8&amp;dpID=41PaQkKulFL&amp;dpSrc=sims&amp;preST=_AC_UL160_SR160%2C160_&amp;psc=1&amp;refRID=FSRQ012AAS1W8W5868W4
I use a standard CO2 tank, a Taprite pressure regulator marketed for use with beer kegs, and a couple carbonator caps. It's like a soda stream, but with standard interconnects and refills so cheap they might as well be free (I've been using a 20lb tank for 2 years, haven't needed to refill it once)
White Russians, duh!
Seriously tho, you might consider getting a carbonator cap so you can run thru a few smaller batches before you go all in. I've successfully carbonated stuff like mead, sake, and white whine using this cap and a standard soda bottle. I carbonate at 50 psi or so, which is close to club soda levels of carbonation. 30-40 gives you smaller bubbles like San Pelligrino.
I like the idea of a fizzy Hemingway Daiquiri, myself.
Just an FYI, you could cut out the sodastream alltogether with one of these:
https://www.amazon.com/Carbonation-Carbacap-Coupling-Carbonate-Fruit/dp/B01039C0Z0
Just pop it on a bottle and attach your CO2 line using the same ball lock that you use to attach it to a keg. I watched my LHB use it to carbonate a 1 liter bottle of water in about 30 seconds.
I bought these and they've worked out well so far. I've only used the for 3 batches. No explosions and my strawberry second ferment was on the verge of being too carbonated.
https://www.amazon.com/Chefs-Star-CASE-Bottles-CLEAR/dp/B011SGS8U8/ref=pd_sim_sbs_79_1?ie=UTF8&amp;dpID=51vunCRbh9L&amp;dpSrc=sims&amp;preST=_AC_UL160_SR160%2C160_&amp;refRID=ZYCKXHCPJPRABD169RBJ
Thanks for the advice, I'll definitely try soda bottles. I've also seen easy cap bottles: https://www.amazon.com/Chefs-Star-CASE-Bottles-CLEAR/dp/B011SGS8U8/ref=sr_1_1_sspa?ie=UTF8&amp;qid=1523023099&amp;sr=8-1-spons&amp;keywords=easy+cap+beer+bottles&amp;psc=1
I'd like to try these in the future, if these work how I think they're supposed to, it would save me the cost/hassle/space of keeping caps and a capper. Do you know of any downsides to this kind of bottle?
Thanks for your detailed reply! By the way, what do you consider a "carbonation safe bottle"? My first inclination was to use the flip-top style that I use for beer like these. Would these be appropriate for carbonating and storing for a month or two?
For the 2F I am using the glass swing top bottles that I've purchased from amazon.
https://www.amazon.com/Chefs-Star-CASE-Bottles-CLEAR/dp/B011SGS8U8/ref=sr_1_6?ie=UTF8&amp;qid=1487950546&amp;sr=8-6&amp;keywords=glass+swing+top+bottles
Thanks everybody, sounds easier than I thought. Can you please look at these products and let me know if I'm missing anything
Glass jar
https://www.amazon.com/1-gallon-USDA-Fermentation-Glass-Jar/dp/B006ZRBGSC/ref=sr_1_3_m?s=home-garden&amp;ie=UTF8&amp;qid=1481986875&amp;sr=1-3&amp;keywords=gallon+glass+jar
Scoby
https://www.amazon.com/Poseymom-Kombucha-Scoby-Cup-Starter/dp/B00J3U9RMK/ref=sr_1_4_a_it?ie=UTF8&amp;qid=1481988107&amp;sr=8-4&amp;keywords=kombucha+scoby
Some bottles for transport https://www.amazon.com/Chefs-Star-CASE-Bottles-CLEAR/dp/B011SGS8U8/ref=pd_sim_79_5?_encoding=UTF8&amp;psc=1&amp;refRID=8GX2CTXPKCQN47F3H629
Is it really this easy, I've brewed beer before and the materials and process were significantly more difficult. Anything I'm missing?
Recipes on the internet! It's basically whiskey and heavy cream. It's not terribly hard to make aside from making sure the cream doesn't curdle and isn't time consuming at all. Just Google "bailey's recipe" and you'll get a ton of versions, all pretty similar. No suggestions on which one as I haven't made it in years, but I just picked one at random from Google. Just don't listen to the ones that say you need eggs, it's unnecessary (and gross) IMO.
Too little too late, but you can make huge batches, get [inexpensive but nice looking glass bottles](Chef's Star CASE OF 6 - 16 oz. EASY CAP Beer Bottles - CLEAR https://www.amazon.com/dp/B011SGS8U8/ref=cm_sw_r_cp_api_KrVyybC36C3R0) off Amazon, and gift them for a cheap and easy but crowd pleasing present.
These are the bottles - found them on Amazon
I bought a kit initially just to get past any worry that I would miss something....it got me started anyways. If I would do it over I would just buy a gallon glass jar (wide mouth), some black tea, a starter scoby with liquid, some sugar, a flexy funnel (for bottling), and some flip top bottles. The kit added about 15 extra bucks to the cost if I had bought everything by itself. I also bought a few large glass pyrex jars for scoby hotels and/or to hold the scoby if I don't re-make a fresh batch that day. I also bought fresh cutting boards, saucepan and wooden spoons so I can keep that separate and really clean away from any other cooking I do.
Kit: https://www.amazon.com/gp/product/B00LW7OR4A/ref=oh_aui_detailpage_o05_s02?ie=UTF8&amp;psc=1
Bottles: https://www.amazon.com/gp/product/B011SGS8U8/ref=oh_aui_detailpage_o00_s00?ie=UTF8&amp;psc=1
For the cover I have been using a coffee filter with a rubber band and it's been working super.
I've had no issue with mold or worrisome stuff happening to my kombucha. Each time it works perfectly and forms a nice healthy pellicle/scoby for the next batch. I think a few things you can do to make sure it doesn't 'go bad' is to remember to get all liquids to room temperature before dumping it in, don't use metal on it, wash your hands well before touching, don't use antibacterial cleaning products near it, and clean utensils with white vinegar before using. That being said, it appears to be sort of hard to kill it so it's a pretty beginner-friendly hobby.
I have seen this beginners brewing kit on Amazon UK with everything I need for a good price the problem is this, it says that the 5 gallon boil pot is the equivalent of 18.5 litres BUT if you type into Google how many litres in 5 gallons it comes back with 23 litres my question is which is right?
I don't want to buy this to make a 23 litre batch of beer & later find out that the boil pot is too small to do so.
Here's the product in question if any of you wonderful people can help.
www.amazon.co.uk/dp/B0179ZH89Y/ref=cm_sw_r_cp_api_LUYIAbN52MW3R
I'm looking for a good beginner's homebrew kit for my SO. Does [this one] (https://www.amazon.com/dp/B0179ZH89Y/ref=cm_sw_r_cp_apa_VZGaAbJEF3ETW) look good for a total noob? I know I will need to buy bottles, caps, and a thermometer separately.
I'd like to give him something that isn't too expensive just in case he doesn't like homebrewing, but also something that can be reused if he does end up enjoying it.
Thanks in advance for any advice!
I home brew, though my equipment's still in boxes as we've only been living here in our house for about 4 months. I usually brew hefeweizens because the wife loves them.
It's very easy to get into and there are great kits for first timers available online. I believe there are a few brewing shops around here (still new to the area so have to research)
I highly recommend a kit like this
https://www.amazon.com/dp/B0179ZH89Y/ref=cm_sw_r_cp_api_0kGFzbE9CWAYS
You will end up replacing a lot of it over time but this and a beer kit will get you up and running easily without missing some needed equipment, introduce you to brewing, and provide everything to make more beer if you like it.
Once you've gone through a brew with a kit like this, you'll be able to more confidently walk into a home brew store and purchase things you need. Plus you get beer! (About 50 bottles) have fun! Remember you're just boiling stuff, so no need to panic!
I think the kits are good, the first one doesn't have a kettle, but has a thermometer. I don't think the second one has a thermometer but has a kettle, which is pretty important and can set you back around $30-50.
I got this Northern Brewer one from Amazon, but it's pretty similar to the second one you linked.
I want to buy this kit from Northernbrewer, it's only $99.99. Is it a good deal? Please advise :)
https://www.amazon.com/dp/B0179ZH89Y?psc=1
I've been using this Northern Brewer kit for years: https://www.amazon.com/dp/B0179ZH89Y/ref=cm_sw_r_cp_apa_i_IOVdBbVZ3TRG5
Only grip is it doesn't come with a hydrometer, buy one of those.
Long story short: Is my yeast dead?
I started my first brew on Saturday, using the recipe and ingredients that came with the Northern Brewer kit (this one).
It's been about 4 days now, and there's been exactly zero activity in the airlock. I checked around a bit, and it looks like that can happen when fermenting in a bucket.
However, I got out my laser thermometer today and its reading a temperature of 63.5-64 F on the bucket. The surrounding walls are at 64. So, I pried the lid off and took the picture in the link up top about 20 minutes ago, and it doesn't look like what I expected to see (based on google image results).
tl;dr: Not sure my yeast is actually doing anything. Is it possible its dead? If so, any way to rescue this?
EDIT: I pitched the yeast at 74 F, so I don't think I cooked it to death.
This kit has everything you need to start out.
http://www.amazon.com/gp/aw/d/B0179ZH89Y/ref=mp_s_a_1_3?qid=1464722380&amp;sr=8-3&amp;pi=SY200_QL40&amp;keywords=brewing+kit&amp;dpPl=1&amp;dpID=51diP37JBsL&amp;ref=plSrch
I just performed my first home brew today. I purchased the Northern Brewer starter kit, this one here:
https://www.amazon.com/gp/product/B0179ZH89Y/ref=oh_aui_detailpage_o01_s00?ie=UTF8&amp;psc=1
Just finished the amber ale that it came with. I was following this video:
https://www.youtube.com/watch?v=5jtCgQOB85E
When I transferred the wort to the carboy (I bought a 6 gallon carboy) it doesn't look like I left behind the sludge like it showed in the video. It looks like the sludge is at the bottom of the carboy. Will this be a problem?
In the video it shows to mix the wort with the water before adding yeast and I totally forgot to mix it around.. Wondering if that will be an issue?
Also I put the yeast in before I moved the carboy and I think it might have mixed it in a little so it's not all laying on the top, will this be OK? Thanks.
Cool. For about $10 you can get a carbonation cap. It will carb up a water bottle in about 30 seconds. I know my son can't wait for it to carbonate up, so we use this for a few small taste tests.
https://www.amazon.com/Ferroday-Stainless-Carbonation-Pressure-Carbonate/dp/B01K4GGYT0/ref=sr_1_3?ie=UTF8&amp;qid=1518870801&amp;sr=8-3&amp;keywords=carbonation+cap&amp;dpID=413n%252Bhm4z9L&amp;preST=_SY300_QL70_&amp;dpSrc=srch
Hey, this might not be what you're looking for, but it's a pretty good solution, and cheaper than a keg.
Ferroday Stainless Carbonation Cap Counter Pressure Bottle Filling With 5/16" Barb,CO2 Coupling To Carbonate Soda Beer Fruit Juice Water https://www.amazon.com/dp/B01K4GGYT0/ref=cm_sw_r_cp_apa_LS8fzbCZGKM80
My favorite is option 3.
With these you can even bottle from a warm keg to check how carbonation is going or how well a beer is aging. It's also nice for transporting beer. Instead of using a growler that will oxidize easily, just purge a 1 or 2L bottle and counter-pressure fill it. Only big drawback is you can't use them for competition beer.
\> want siphonless
Buy this kit: https://www.morebeer.com/products/sterile-siphon-starter-smooth-neck-carboys.html
Get a CO2 tank, and a gas-to-barb adapter and use that rather than blowing
Place carboy higher than target destination (e.g. on two milk crates), so you don't need to pressurize the container (much) to move the liquid, only enough to prime the siphon line
Now you're pressure-started gravity racking. No more dealing with autosiphons. No oxidation because you're filling the void with CO2. Bonus points if you flush the target container as well/go into a purged keg.
I really dislike spigots on plastic or glass fermenters.
Listen to this guy OP, he's the only one that actually answered your question. Those canning jars can't take too much pressure and are not usually perfectly cylindrical, this puts even more pressure on the corners.
They would probably work if you did a short 2F but then you'd have the same problem as you did with the growler, not enough carbonation, plus the added risk of a glassy, liquidy mess.
I'd just order a pack or dedicated swingtop bottles from amazon. If you wanted you buy a couple of 4-packs or Grolsh lager for the same price, and get the added bonus of 2 exta bottles and all of that delicious beery goodness.
https://www.amazon.com/Swing-Top-Glass-Bottles-Chalkboard/dp/B01LB1862A/ref=mp_s_a_1_3?keywords=kombucha+bottles&amp;qid=1567886502&amp;s=gateway&amp;sr=8-3
Swing Top Glass Bottles - Flip Top Brewing Bottles For Kombucha, Kefir, Beer - Clear Color - 16oz Size - Set of 6 - Leak Proof Easy Caps, Bonus Gaskets, Chalkboard Labels and Pen - Fast Clean Design https://www.amazon.com/dp/B01LB1862A/ref=cm_sw_r_cp_api_i_d6N7Cb4D5PVHC
Isn't this a brewing bottle though? The bottle cap is supposed to go off before the bottle explodes. You can check this as example.
Had similar problems early on. Went from 7 day 1F to 10 day solved that for me. I also keep my house in the high 70's-low 80's which i know some people find unbearable (comfortable temp for me).
Also I don't add sugar to 2F, but usually just let them sit for 4 days before refrigerating (though i might go back to 3 since my latest batches have had too much carbonation).
Finally, i started to use these bottles instead and they're honestly amazing. Best seal of the 3 brands I've bought and I'll be sticking with them.
Don't do your 2F in plastic bottles! The plastic will leech into your brew, leaving a nasty after-taste. Instead, try reusing kombucha bottles you buy in-store, they're rated to hold carbonation and won't leech anything into your brew.
I'd recommend buying some swing-top bottles if you're planning on brewing into the future - they make a big difference!
>True, but distill liquor in your own home and see what happens.
http://amzn.com/B001BCFUBU
I sue Amazon for selling an illegal product?
Start with a Mr. Beer kit. Do 3-4 batches, if you like it, then get yourself set up for LME brewing. If you do 5-6 batches of that and still want to brew, then look into all-grain.
These Brooklyn Brew Shop brew in a bag kits got me into brewing. http://www.amazon.com/dp/B005G20IIG. The things you need that it doesn't come with: strainer, funnel, pot, bottles, bottle capper. You could get him some basic equipment and some of those kits.
Or the classic
http://www.amazon.com/CO2-Tank-Aluminum-Cylinder-Valve/dp/B0085282UK