Best brewing & fermentation fermenters according to redditors
We found 205 Reddit comments discussing the best brewing & fermentation fermenters. We ranked the 67 resulting products by number of redditors who mentioned them. Here are the top 20.
We found 205 Reddit comments discussing the best brewing & fermentation fermenters. We ranked the 67 resulting products by number of redditors who mentioned them. Here are the top 20.


Start with a small batch just to make sure you like it. Chop up the habaneros, and put them in a quart-size mason jar. If you want to add other things like garlic, onions or the like, feel free. Or just straight habaneros. Now, make a brine - take 975 grams of distilled water and 25 grams of kosher or pickling salt (don't use iodized salt) and mix it together until the salt dissolves. Pour this brine over the peppers, leaving about 2"/4 cm space at the top of the jar. You should have plenty of brine left over, so pour some into a ziploc bag and seal the bag. Put this bag in the jar on top of the peppers, so that it holds the peppers submerged under the brine - you don't want any pieces of pepper floating at the surface, so make sure everything's submerged. Cap the jar (it's a lot easier if you get some lids like this or this), and set somewhere warm (around 70-80F). Within 24-48 hours you'll start to see bubbles and fizzing - fermentation is underway. It usually goes anywhere from a few days to a couple weeks. If you don't have those airlock lids, you'll need to burp the jars a few times a day - just crack them open a little bit to release the pressure. After 2 weeks or so, they should be done. You can then smoke them - take them out of the brine, and pop them into a smoker. Cold or hot smoke - dealer's choice. Fruit wood is best - peach if you can get it, apple otherwise. Smoke them for a few hours, then pop them in your cabinet to dehydrate all the way down and blitz them up into your powder.
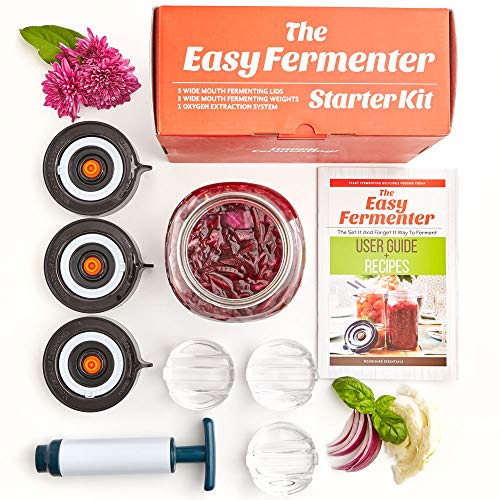
dude, just pick up a three pack of these:
https://www.amazon.com/Easy-Fermenter-Wide-Mouth-Lid/dp/B01DJVVORE
so worth it.
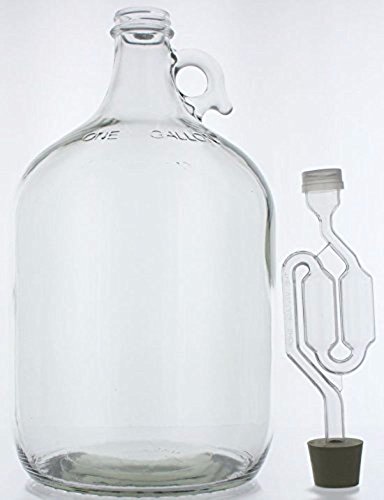
I'm a complete noob when it comes to making mead (or any booze). Google it and you'll find a lot of expert advice. Basically I just got a carboy from Amazon ($15 for a gallon one), and also ordered some rose hips and ale yeast because I couldn't find that stuff in the grocery store. Then it was:
Boil some water, dissolve 40oz or so of honey in it. Add some flavor stuff (box of blackberries, cinnamon stick, 2 tbsp rose hips, tsp of cloves) let it cool, add a packet of ale yeast, put it in the carboy, fill it almost all the way, and come back in two weeks. Strain it, drink it.
I'm sure the Internet will give you better advice, but that worked fine for me.
Here's the carboy I got:
https://www.amazon.com/Home-Brew-Ohio-Fermenter-Stopper/dp/B014T3LHFA/ref=sr_1_4?keywords=carboy&qid=1571874288&sr=8-4
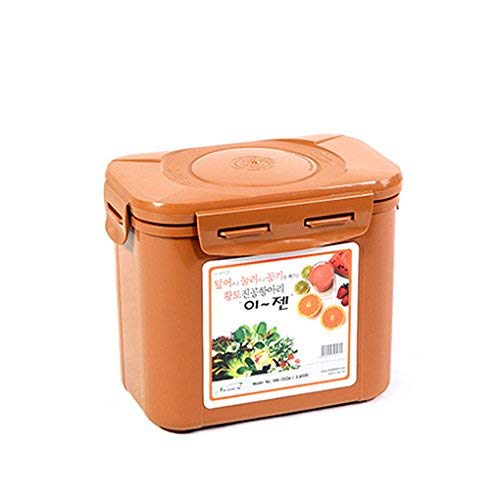
https://www.amazon.com/jen-Kimchi-Container-Probiotic-Fermentation/dp/B00SWBJJQ0
For the lazy
Fermentation crock like you make kraut or kimchi in.
If you want to make 1 gallon batches, which I recommend for beginners, buy a two gallon bucket. You want the extra space because your batch size will really be 1.25 gallons so you can top off your secondary. When you mix the mead for the first 4 days to add oxygen and degas CO2, it will foam a bunch and you dont want a mess. After you mix the mead, add nutrients. To learn more about nutrients, google "advanced nutrients in meadmaking"
part 2/2
One of the things you have to do is decide where you want to draw the line for your own personal definition of the word "raw". A commonly-accepted definition of following a raw diet is that at least 75% of your food is either raw or is cooked at temperatures below 104F to 118F. Some people go 100% with no heating at all. This is really important to figure out because you have to decide how stringent you want to be. For example, "raw almonds" aren't actual raw, because current laws require pasteurization of all almonds in the United States - so no almonds, no almond butter, no almond milk, etc. if you are truly 100% raw. Two additional things to consider are dehydration & pasteurization:
Fourth, I'd recommend picking up the Thrive Diet book by triathlete Brendan Brazier. This book contains many raw vegan recipes. These are high-energy recipes as well, as the book is oriented towards athletic performance.
Fifth, you may want to look into growing & fermenting your own foods. A few starter ideas:
Sixth, it's worth building up an inventory of great ingredients & recipes. A few starter ideas:
>I just threw out a bag of chips and decided it would be my last time ever buying anything like that. I don't want to buy anything processed again (after I eat up these remaining veggie dogs).
Food & health isn't so much of a destination, as a journey - learning what works best for your body, finding new ingredients, recipes, and tools, etc. Defining what path you want to take is important because that's what guides your day to day eating decisions, and also results in how good you feel, energy-wise. People generally go vegan for two reasons:
What often happens, in reality, is that people buy highly-processed fake meats (burgers, dogs, etc.), snack foods (potato chips, etc.), and junk food (dairy-free ice cream, candy, etc.) & then wonder why they don't feel good. Only you know how your body feels, so you have to figure out what works for you, which means trying new things, defining what your diet entails, learning about macros, and so on.
I've tried a variety of dietary approaches over the years (keto, paleo, low-carb, vegetarian, vegan, raw vegan, fruitarian, etc.), all with pretty good results. One of the biggest things I've discovered is that having a meal-prep system in place is critical to success, unless you have a lot of energy, free time, and a strong love of preparing food. I like to work in the kitchen...when I'm in the mood. The rest of the time, I need to feed my body my macros so that I feel good, look good, and am healthy, and really, I just need to fill the void when I get hungry & want something tasty.
So hopefully this gets you started in the right direction...there's an infinite amount of resources out there on the Internet, from raw vegan cheesecakes to walnut taco "meat". It also helps tremendously to eat according to your macros, and to figure out your eating schedule, which enables you to figure out a meal plan every week, instead of just winging it on a daily basis & struggling with being consistent & having consistent energy as a result.
https://www.amazon.com/VEVOR-Stainless-Fermenter-Brewing-Equipment/dp/B07MXGSK5C
this is incredible over-priced, or am I missing something? I use essential the same set-up and it cost a little under $20.
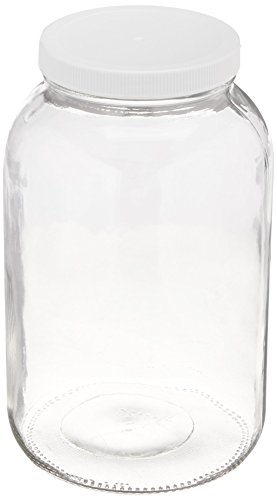
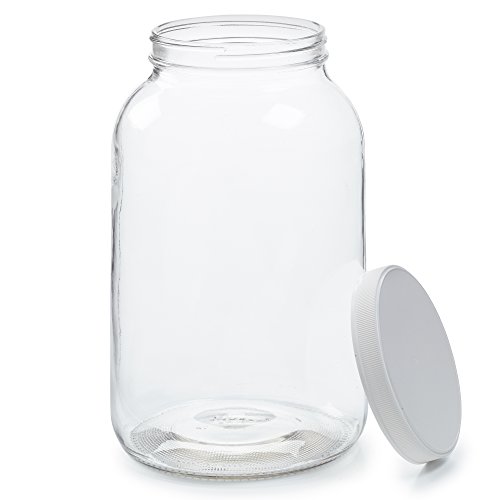
https://www.amazon.com/1-gallon-USDA-Fermentation-Glass-Jar/dp/B006ZRBGSC/ref=sr_1_3?ie=UTF8&qid=1491232715&sr=8-3&keywords=gallon+jar
https://www.amazon.com/Pro-Quality-Nut-Milk-Bag/dp/B00KLT6X9W/ref=sr_1_3?s=kitchen&ie=UTF8&qid=1491232680&sr=1-3-spons&keywords=nut+milk+bag&psc=1
I use a 1 tbsp - quart water mix. I also like wide mouth 1/2 ball jars but have moved up to 5 gallon containers. These lids also made life much easier. You can open your jar up and test the ferment and use a pump to remove the oxygen from it when you close it back up. I have no affiliation to this company btw. https://www.amazon.com/dp/B0719PCL7Y/ref=cm_sw_r_cp_apa_jwQRzbJCKRSZW
I try to keep it really simple so I don't screw it up:
-Boil a pot with all of your jars, weights (if using -- I do), and silicone rings to sanitize and set on dry paper towels, only handling with tongs, once sanitized
-Quarter and core your cabbage, then slice to desired thickness.
-Wash and drain ribbons (I use a salad spinner for this)
-Place in large bowl or whatever and toss thoroughly with 1 tablespoon of salt per head of cabbage and let sit for about 15 minutes.
-Place cabbage in jars, pressing down as you go so it is as compact as possible.
-Pour liquid from the bowl over the cabbage. It needs to be completely submerged. If your cabbage did not give off enough liquid, supplement with additional brine (I've seen different ratios, but I dissolve 1 tablespoon salt per cup of water and use what I need, after the solution has cooled)
-Seal your jars (here are the lids I used). If you're using mason jars, DO NOT USE THE REGULAR LIDS. The CO2 that fermentation creates will bust them in dramatic fashion.
-Set in a cool, dry space and leave them the hell alone. I give mine about 6 weeks in my 65* basement. If it's warmer it may be ready sooner, or you like it a bit more tart, give it some extra time.
That's pretty much it.
​
With the issue you have, my guess would be contact with oxygen, or some sort of contamination. I really can't recommend the lids enough. They take pretty much all of the guesswork out of it.
Good luck!
6.5gal plastic fermentor - $17.88 (Don't bother with glass fermentors!)
6.5gal Bottling Bucket - $18.81
Hydrometer - $12.99
3 3-piece airlocks - $5.00 - trust me, they'll break.
stopper not needed with plastic fermentor
Bottle filler - $5.09
10 ft 3/8th inch tubing - $10.99
Auto siphon - $8.76
don't need a bottle brush with plastic fermentor
144 bottle caps - $5.78
Use any pure sugar for priming - just calculate it right. I use cane sugar without issue.
Wing bottle capper - $15.48
Dial thermometer not really needed if you're slapping on an adhesive one, but definitely get this for a hot liquor tun if you're doing that.
Wine thief - $11.20
I never used a funnel or fermentor brush - you can use anything to clean but I suggest Oxyclean rinses
32oz Star San - $20.70
Adhesive Thermometer - $4.84
Total Cost: $137.52. Not ridiculous savings BUT you get 32oz of star san instead of 4oz of io-star which will last you years and sanitizer is expensive. You get a plastic fermentor instead of glass which is so much easier to clean and keep light out. Glass carboys are good for aging and aging is good for wine or special beers. Focus on simple ales that don't require it first.
The real savings come when you do all grain and make your own equipment. You can save $137 alone if you buy a big stainless steel pot and slap on a dial thermometer with a ball valve.
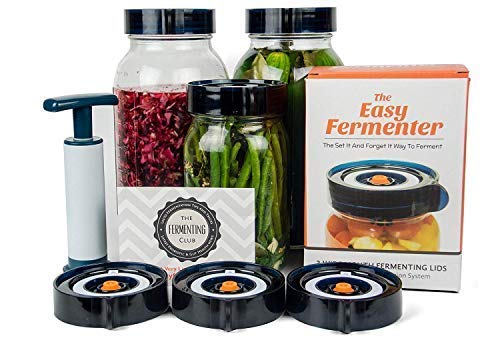
If you are having problems with it getting moldy (and depending on the ferment, aren't comfortable with removing the mold from an otherwise good ferment) then you probably need something like this: https://www.amazon.com/Easy-Fermenter-Wide-Mouth-Lid/dp/B01DJVVORE
I would suggest going with a salty brine ferment to cut done on the mold, with or without whey. You can use a plastic bag filled with water to keep what you are fermenting under the brine.
No worries of safety for the rust, but I'd definitely recommend a food grade ceramic fermentation crock for future ferments. They're not super expensive, they will literally last your lifetime (as long as you don't drop it). This is the one I use, has a built in water airlock (just keep it topped up every few days), its thick and heavy and opaque to prevent light damage. They also make a 10liter version for larger ferments! Good luck!
I got this own from amazon with weights: Easy Fermenter Wide Mouth Lid Kit... https://www.amazon.com/dp/B0789QYV52?ref=ppx_pop_mob_ap_share
Have you tried making your own fermented foods? My husband makes kimchi and other ferments in mason jars with these lids. It's really easy--just wash and cut up veggies and put them in the jars with whatever else the recipe calls for (salt water, usually), pop the lids on, and let them sit for a month. I've never done kombucha, but I hear it's pretty easy as well.
Yeah, I agree. Ceradyn is a great option, thanks for bringing it up. For reference, they are available on Amazon:
http://www.amazon.com/Katadyn-Drip-Ceradyn-Water-Filter/dp/B0007U010W/
Actually the Gravidyn is a tiny bit cheaper - this is the one I have:
http://www.amazon.com/Katadyn-Drip-Gravidyn-Water-Filter/dp/B0007U011G/
For anyone who's wondering, yes, the two systems are identical except for the filters that come with. You can put Ceradyn filters in the Gravidyn setup, and vice versa.
The filters are quite delicate, though, and prone to cracking and breakage. You need to inspect them carefully for hairline fractures when you get them. For example, one of the ones in my Gravidyn was broken on arrival. I convinced Amazon to send me a spare one (rather than having to send the whole system back). Also, when I was moving stuff around in one of my storage closets in the garage, I accidentally dropped one of the spare Gravidyn filters on the concrete floor. It was inside its protective cardboard box, but it still broke. I was heartbroken - such a waste of money from a moment's clumsiness. Make sure to treat these things with kid gloves!
For completeness, here are the spare filters - Gravidyn:
http://www.amazon.com/Katadyn-20720-Gravidyn-Replacement-Element/dp/B0007U011Q/
And Ceradyn:
http://www.amazon.com/Katadyn-Ceradyn-Replacement-Filter-Element/dp/B0007U0116/
Hope it's ok posting links like this... I have no stake, not connected with the company at all etc.
The Monolithic filters are also interesting, and they claim to remove arsenic and lead as well. I would be concerned with arsenic in the surface water around here, though it might only be something that is in ground water (i.e. from wells etc). Anyway, these are very simple and cheap too, you can make a bucket filter around one of these little things and have a basic system. I don't know how much formal testing they have had, but they seem to be used a lot in 3rd world countries.
http://www.monolithic.org/water-filters
http://www.monolithicmarketplace.com/collections/frontpage/products/just-water-ceramic-drip-filter
As I said earlier, if I ever have to use the creek water, then I intend for the Monolithic to be the first stage, then treat with calcium hypochlorite (pool shock - 78% TurboShock from Poolife is the best I've found), then treat again with the Katadyn to remove the chlorine and just do another round of filtering in general. I figure I should be covering my bases with this.
http://www.amazon.com/POOLIFE-Poolife-TurboShock-1-lb/dp/B0017SSFU6
And also in case anybody's interested: To treat water with calcium hypochlorite, first make a bleach solution (NOT FOR DRINKING!) by adding a heaped teaspoon to 2 gallons of water. Then you can treat drinking water with this by using 1:100 ratio (i.e. for every 1 part bleach solution, 100 parts water). This should make it obvious that the calcium hypochlorite is pretty concentrated stuff - you shouldn't be trying to treat drinking water directly. First make the solution, then use that to treat the water. For reference, the 1:100 ratio translates into roughly 2.5-3 tablespoons of solution per gallon of drinking water, or 3/4-1 cup to every 5 gallons of water (if you're treating by the bucket). I give a range since it might be easier to measure 3 tablespoons and 1 cup rather than fractions like 2.5 and 3/4, and I think it's probably true that a little over treatment won't do any harm, especially if you are filtering it out anyway. Let the water stand for at least half an hour when treating, the longer the better. Contact time is important for killing the viruses etc.
Also, the pool shock is hard to store safely, since it produces chlorine. Anything metal will get corroded over time. The best method I have found is to use the mason jars with the metal canning lids (the ones that come in two parts). The 1 lb packs of TurboShock fit nicely in a 1/2 gallon jar. I know the lid is metal, but it has a plastic coating on the inside, and those lids are the best sealing I have found. I can put three jars inside a plastic 5 gallon bucket that has been sealed with a Gamma spintop lid. Then I can check on them every few months, and I'll know immediately if the jars have been leaking inside the bucket, because you'll be hit with the chlorine as soon as you open the bucket. I figure if the metal lids start rusting, then I'll just see what their safe lifetime is, and treat them as consumable items. A box of lids is only a few bucks, so replacing them every six months or year or whatever is no big deal. I also wrap the jars inside the bucket in bubble wrap, just so they won't break against each other if things are thrown around during an earthquake. With 3 lbs of the calcium hypochlorite, I'm ready to disinfect a LOT of pond water! Maybe also useful as bartering material in the event of a long term service outage, you never know.
Oh, and one last thing - I got a set of long handled measuring spoons, so that I will be able to reach inside the jars to get the pool shock out without having to tip them up or whatever, risking getting this toxic substance on my skin or in my eyes (big nope).
http://www.amazon.com/ChefLand-Set-Sizes-Stainless-Ingredients/dp/B00AEUR6K8
I know metal isn't good with calcium hypochlorite, but I'm not storing them with the stuff and their contact time will be minimal, and I'll be washing them after each use. I just figure it's useful to try to consider the practicalities of how you will use stuff in reality... also, I'll probably not make 2 gallons, but rather only 1 gallon at a time, which will mean a heaped 1/2 teaspoon of pool shock. And how to store the bleach solution? I found some nice 1 gallon jars with plastic lids for that:
http://www.amazon.com/1-gallon-USDA-Fermentation-Glass-Jar/dp/B006ZRBGSC
The solution should be good for a couple of weeks, I think, if stored in a cool dark place. I guess you could also use it to treat your bucket toilet, so maybe you won't waste much.
Sorry, as you can tell I have thought way too much about this stuff. :P
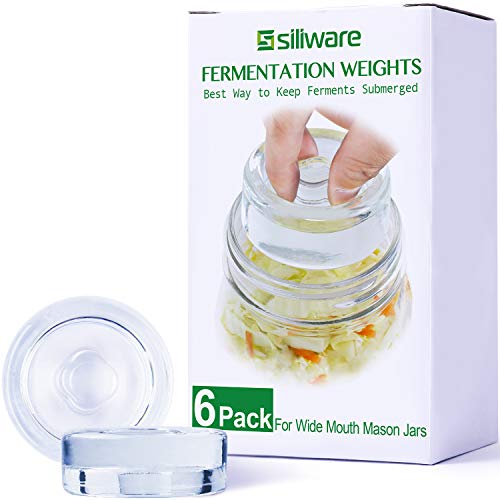
From reading your other posts, it sounds like you do this fairly often. I would recommend getting some fermentation weights. I have these.
I also recommend getting some self burping lids like these. All in all, you're talking about under $30.
I would recommend starting with a jar like this;
https://www.amazon.com/1-gallon-USDA-Fermentation-Glass-Jar/dp/B006ZRBGSC/ref=sr_1_8?ie=UTF8&qid=1524584912&sr=8-8&keywords=kombucha+1+gallon+jar
You won't need the top; however, it's nice to store for later use of the jar.
Add to that a standard coffee filter and an elastic to keep it on the jar.
It has a 1 gallon volume so you can follow the subreddits suggestion for a master recipe;
https://www.reddit.com/r/Kombucha/comments/5b1ztm/reddit_master_kombucha_recipe/
If it tends to be cold where you are < 75 F ambient temperature you may want to consider also snagging one of these;
https://www.amazon.com/VIVOSUN-Waterproof-Hydroponic-Fermentation-Germination/dp/B073PTZCJ4/ref=sr_1_4?ie=UTF8&amp;qid=1524584986&amp;sr=8-4&amp;keywords=kombucha+heater
If you are sourcing something used, please be sure to know what was in it before and clean it appropriately and then rinse it to insure no antibacterial or other cleaner residues reside, which could hinder the yeast and or bacteria from thriving.
Many folks prefer to have more surface area for the pelical to grow and find that it speeds up the over all process along with having appropriate temperatures.
Good luck!
As was already stated, definitely use glass as plastic and metal will both have adverse effects on your brew. The only thing I have to add is a recommendation for one to buy. Good luck!
https://www.amazon.com/dp/B01DJVVORE
I have 3 extra wide airlocks that I bought for a family member and they never used. You are welcome to them fellow kimchi maker. Let me know if they would fit those jars. I would recommend the wide mouth weights as well or a rock in a 5% salt zip lock bag to weigh it down.
https://www.amazon.com/Easy-Fermenter-Wide-Mouth-Lid/dp/B01DJVVORE
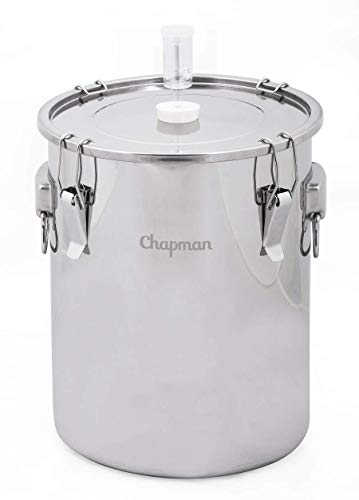
If your looking into upgrading to stainless to avoid plastic I would suggest a Chapman stainless bucket fermenter. They don't have all the bells and whistles of an SS brewtech bucket, but the price is more forgiving.
Amazon link
Whatever type you choose,
just don't install them like this.Edit: it's been fixed now, the 3 piece airlock was shoved in the lid upside down.
How big are your batches?
6.5 is fine for 5 gallons
2 gallon bucket for 1 gallon batches
7.8 gallon bucket for 6 gallon batches
Yeah they're called air locks, there's a few different types to choose from but standard ones look like this!
https://www.amazon.com/dp/B075LRMRDQ/ref=cm_sw_r_cp_apa_i_3i8RDbD24QD3T
Here you go
Easy Fermenter Wide Mouth Lid Kit: Simplified Fermenting In Jars Not Crock Pots! M... https://www.amazon.com/dp/B01DJVVORE/ref=cm_sw_r_sms_c_api_i_8PWODb005SZB5
I use these. I fill them with vodka instead of water.
https://www.amazon.com/dp/B075LRMRDQ/ref=cm_sw_r_other_apa_i_e5BXDbTNQK6V9
This is one of the more popular commercial setups.
https://toddycafe.com/toddy-cold-brew-system
I prefer a coffee sock and a gallon glass jar. 12 oz. of coffee on the counter for 12 hours and you are good to go.
https://www.amazon.com/CoffeeSock-ColdBrew-Filter-Certified-Reusable/dp/B015WTS0RS/ref=sxin_3_ac_d_pm?ac_md=2-0-VW5kZXIgJDE1-ac_d_pm&keywords=coffee+sock&pd_rd_i=B015WTS0RS&pd_rd_r=45644cf3-98f2-4160-8b80-661607b5eb18&pd_rd_w=0lsUO&pd_rd_wg=upwNC&pf_rd_p=24d053a8-30a1-4822-a2ff-4d1ab2b984fc&pf_rd_r=35C6GYY1NGEMM77M5AQ6&psc=1&qid=1574886893&s=home-garden
https://www.amazon.com/Empty-Gallon-Airtight-Leakproof-Plastic/dp/B075JR6H11/ref=sr_1_8?keywords=one+gallon+glass+jar&qid=1574886910&sr=8-8
I grow sprouts and also countertop small batch lactoferment with these.
For sprouts I use this. There is no bad smell (???), and if there was, it would mean the sprouts were bad.
https://www.amazon.com/gp/product/B00JG77G8M/ref=oh_aui_detailpage_o06_s00?ie=UTF8&amp;psc=1
Just finished my first sauerkraut batch in the TSM crock, it turned out great :)
Also a newbie, waiting for all my equipment to arrive from Amazon... But I picked up this 2 gallon bucket:
https://www.amazon.com/dp/B0064O8WWE/ref=cm_sw_r_cp_apa_BssFybCMY4GHZ
I do it 5 gallon batches so 5 gallon cheap store apple juice, 2 lbs of corn sugar, 2-3 lbs of peeled shredded ginger, and [champagne yeast] (https://www.amazon.com/gp/product/B00434CB74/ref=od_aui_detailpages01?ie=UTF8&amp;psc=1). Put it all in a Fermenter bucket with an airlock. Wait two weeks and bottle it/put it in a keg.
It's an S type airlock. You can find them at any homebrew store for less than a buck. I drilled a half inch hole in the center of the lid and attached a rubber grommet to create the seal.
It's a lot cheaper than buying the pre-made airlock lids.
I don't have any experience with them, but it looks like it is the same type as this one on Amazon. Sounds like the biggest complaint is the lid not sealing well.
Considering ditching my glass carboys in favor of this stainless bucket. Any thoughts?
Chapman 7 gallon Stainless Steel Fermenter
Edit: I do 5 gallon batches
I’ve been using a basic salt water brine on a mister of peppers garlic and onion. Found a pretty cheap fermentation kit for mason jars and working with that. Not doing very long ferments or anything but getting decent results. It’s really pretty easy. Hardest part is getting everything sanitized and that’s not even difficult. I use a small kitchen scale to make my bribes. (I.E. 1000g of water and 30g of salt = 3% brine) I then weigh all the ingredients individually that I put in it and record those numbers so I have the basics of the recipe and keep that so I can recreate it later if it like it.
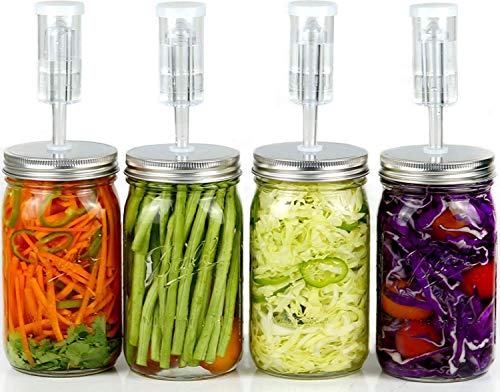
Fermentation Kit for Wide Mouth... https://www.amazon.com/dp/B07BFV9622?ref=ppx_pop_mob_ap_share
Looks really nice!!! I make kimchi on a regular basis, always in a big crock with weights. I just bought a set of these so I feel more comfortable doing small batches in jars. I like mine to ferment for about a month or so for more sourness.
There are also special containers made for stuff like kimchi that help hide the smell. Obviously only during storage and nothing can be done when you're eating it haha.
They work great so far. Here is the link do yourself and get some weights as well.
Easy Fermenter Wide Mouth Lid Kit: Simplified Fermenting In Jars Not Crock Pots! Make Sauerkraut, Kimchi, Pickles Or Any Fermented Probiotic Foods. 3 Lids(jars not incld), Extractor Pump & Recipes https://www.amazon.com/dp/B01DJVVORE/ref=cm_sw_r_cp_apa_i_x4epDbEKK7H0Y
4-Pack of Fermentation Glass Weights with Easy Grip Handle for Wide Mouth Mason Jar https://www.amazon.com/dp/B076V66FZ4/ref=cm_sw_r_cp_apa_i_T6epDbKRM0CDH
I just use a madolin cutter on some cabbage, sprinkled with salt, twisted and mashed, and repeated until all my cabbage was salted and in my pot. Then I covered with water and put a plate on top to keep it submerged. They actually sell some nice stone vessels to use for this with weights that fit them perfectly. https://www.amazon.com/dp/B00JG77G8M You can also get weights that are meant to fit mason jars perfectly.
Or, you could have one that's sure to be food grade delivered in 2 days with handy charts on it.
https://www.amazon.com/Fermentation-Kit-Wide-Mouth-Jars/dp/B075LRMRDQ/ref=sr_1_7?crid=FETONNKDKEEN&keywords=fermenting+lids&qid=1568432270&s=home-garden&sprefix=fermen%2Cgarden%2C1028&sr=1-7
Large mouth mason jars, with these lids.
https://www.amazon.ca/dp/B01DJVVORE/ref=cm_sw_r_other_apa_i_tfnGDbWQYR98Q
This isn't super useful for a "right now" solution, but in the future, you could make your own fermented foods using this and a mason jar.
kimchi fermentation lid
You can also look for fermentation crocks and there are mason jar lids fitted with air locks
https://www.amazon.com/Easy-Fermenter-Wide-Mouth-Lid/dp/B01DJVVORE
They look like these. I have them, they're great.
The equipment everyone is suggesting is a good idea. I'd also at least use wine yeast instead of bread yeast (it's not that expensive).
Honestly, though, I'd suggest buying something like this one gallon fermenter or this wide mouth fermenter. They both come with an airlock cost you less than $10 and they will make this process a lot easier.
If you want something super cheap, but not quite so disgusting, I suggest you start with Skeeter Pee. You can cut all the proportions down by 1/5. I always make mine with this champagne yeast instead of a yeast slurry. I just mix the yeast in a clean jelly jar with some apple juice, cover with foil, and wait until it starts to get bubbly. You can omit the tanin. I always blend up some frozen strawberries and throw that in there too (they probably have enough nutrition that you can also omit the yeast nutrient and yeast energizer if you start the yeast in apple juice). You can also use just the Potassium sorbate and leave out the Potassium metabisulfite and if you don't mind a cloudy drink, you can eliminate the Sparkloid as well (although I like how crystal clear it makes mine and that it takes out any of the seeds, strawberry pulp, yeast, etc.)
If you make all those alterations you can probably make a 1 gallon batch of delicious hard strawberry lemonade for less than $5 in ingredients and less than $10 in materials--it'll taste much better than the recipe you had and won't cost you much more either.
I use the same size gallon jars, but without air locks. I always use a few whole cabbage leaves to try to seal the little bits below. Of course you should try to push everything down really well before you put the whole leaves in, then fits them in and keep pushing again to get the liquid above it. Then I use some glass weights like this. They are really made to fit wide mouth quart mason jars but any weight is good to help get the brine up. I find that if they are within the straight part of the jar (below where it starts to taper in) i can get 3 of them in a triangular shape which does a pretty good job of getting the brine up.
I use these: Easy Fermenter Wide Mouth Lid Kit: Simplified Fermenting In Jars Not Crock Pots! Make Sauerkraut, Kimchi, Pickles Or Any Fermented Probiotic Foods. 3 Lids, Extractor Pump & Recipe eBook - Mold Free https://www.amazon.com/dp/B01DJVVORE/ref=cm_sw_r_cp_apa_SEeTBb8MQ12Y9
I've had great experiences with them.
To piggy back on u/stormbeforedawn's comment.
This is the equipment I used that I've had good luck with so far. It's what he recommended, I'm just providing links to the specific product I used.
Used would be fine for now. I've been looking at these glass big mouth carboys for a while now I just can't bring myself to pay the price. I'm sure I'lll get to it eventually:
https://www.amazon.com/Big-Mouth-Bubbler-Fermentor-Universal/dp/B00W3PYBMS/ref=sr_1_2_sspa?gclid=CjwKCAjwwtTmBRBqEiwA-b6c_3cuQPu7B8YXwu0Cf1RttF8Fws04bj1wEda7sh0ngyJRmI9yrIE3vRoC10IQAvD_BwE&hvadid=174232965350&hvdev=c&hvlocphy=9001869&hvnetw=g&hvpos=1t1&hvqmt=e&hvrand=2199293582037460939&hvtargid=kwd-57435854080&hydadcr=24658_9648989&keywords=big+mouth+bubbler&qid=1557514370&s=gateway&sr=8-2-spons&psc=1
Assuming you're asking about the lids. I bought a set of the Easy Fermenter Lids from Nourished Essentials.
https://www.amazon.com/dp/B01DJVVORE
I've been fermenting for a while now, these lids are great and turn most jars into fermenting containers.
I have always used home brew buckets they are 6.5 gallons, have gallon markings, and made from food grade plastic. Usually only around $20 at a local homebrew store. Here is an amazon link. https://www.amazon.com/dp/B0064O8X5K/ref=cm_sw_r_cp_apa_j-iiybTG2K9X4
Looks good! How far along is this and do you have an amazon link to the lids?
Edit: here's the link but they seem to be out of stock https://www.amazon.com/Easy-Fermenter-Wide-Mouth-Lid/dp/B01DJVVORE
Wide mouth mason jars with these on top
Easy Fermenter Wide Mouth Lid Kit: Simplified Fermenting in Jars Not Crock Pots! Make Sauerkraut, Kimchi, Pickles Or Any Fermented Probiotic Foods. 3 Lids, Extractor Pump & Recipe eBook - Mold Free https://www.amazon.ca/dp/B01DJVVORE/ref=cm_sw_r_cp_api_i_0ITXDbA6WMKFD
Regular brewers bucket. https://www.amazon.com/6-5-Gallon-plastic-fermenter-lid/dp/B0064O8X5K/ref=sr_1_1?s=home-garden&amp;ie=UTF8&amp;qid=1521752930&amp;sr=1-1&amp;keywords=brewers+bucket
I can get them for less at my local, but for illustration purposes there is a link.
https://smile.amazon.com/dp/B01DJVVORE/ref=cm_sw_em_r_mt_dp_U_bmx1DbPF79GQ3
If you're gonna stick with glass get a large mouth fermenter like this
https://www.amazon.com/Big-Mouth-Bubbler®-Gallon-Fermentor/dp/B00W3PYBMS
Or get PET, and use a non-abrasive sponge for cleaning. I have seen too many pictures and videos of glass carboys breaking so I only use PET now. Glass is much heavier as well. I haven't had issues with plastic at all.
This is what I use for 1F:
https://www.amazon.com/gp/product/B006ZRBGSC/ref=oh_aui_detailpage_o03_s00?ie=UTF8&amp;psc=1
This is what I use for 2F:
https://www.amazon.com/gp/product/B01CUJQTPI/ref=oh_aui_detailpage_o03_s00?ie=UTF8&amp;psc=1
When I bottle for 2F, I pour all of the kombucha into a different bowl and clean out the 1 gallon jar after each brew so the yeast doesn't gather on the bottom. I am on my 5th batch, everything has been great so far.
You need these.
Just ordered them on Amazon! Just regular Mason jars. These are the lids: https://www.amazon.com/gp/aw/d/B07921Y1CY?psc=1&amp;ref=ppx_pop_mob_b_asin_title
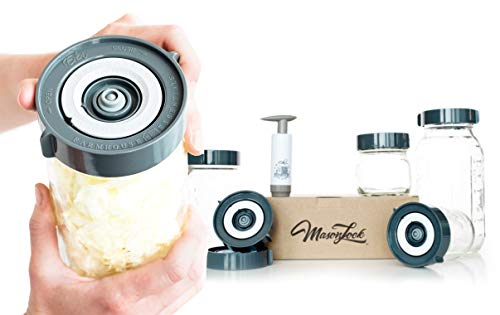
I bought one of these kits not long ago and honestly, it's day and night. It's 100% set it and forget it.
&#x200B;
I know there are other options that are cheaper, but I can't vouch for how good they are because I haven't tried those.
&#x200B;
https://www.amazon.com/gp/product/B0789QYV52
Try these weights: https://www.amazon.com/gp/product/B07CXJ92CG/ref=ppx_yo_dt_b_asin_title_o01_s00?ie=UTF8&psc=1 Make sure you buy wide mouth weights and wide mouth ball jars... I found ball jars delievered WAY cheaper through target and walmart vs amazon.
Try these lids: https://www.amazon.com/gp/product/B07921Y1CY/ref=ppx_yo_dt_b_asin_title_o01_s01?ie=UTF8&psc=1 These worked great as well.
I stuffed my 32oz jars way too full, and each jar yielded 2.5 5oz hot sauce bottles. Next time I will use 64oz jars...
And yes, also suggest getting a small digital scale to make sure your brines are right... that way you can be sure it stays shelf stable and edible for a lot longer.
Go with the coots recipe, it's what I'm using. With all the top dressing and other additions I'm sure it's drifted pretty far off that original mix though. I'm finishing up the 4th round but I did till/remix with more pumice and biochar after the 2nd round.
I am currently using 1 maxi with 4 distribution drippers in each 15g pot. Only thing I add to my res is agsil (silica) and some BTi to combat fungus gnats. I started with 2 maxis and no distro drippers at first but I'm really liking the 4 different drips. With just the 2 maxis the sides where there were no drippers got a little to dry for my liking. I've never had a run away dripper but plan for it just in case. My system is gravity powered so they could theoretically empty the res but that's a 13 gallon trashcan so it would never exceed that much water.
Not sure on the compost, I've only used homemade thermal compost and homemade ewc and the worms are fed the BAS craft blend so it should be nutrient rich.
I don't really do aact as much anymore...I just never really saw a huge difference and the brewing is annoying. Fermenting is awesome though, get some half gallon jars and fermenting lids. Exploding a glass jar of fermented stuff isn't awesome lol.
300w in a 3x3 is 33 watts per sq foot. That should give you pretty great results. There are 3 voltages of those new Vero 29s so that will pretty much just depend on how you want to drive them, how many watts per chip you want, etc. I'm guessing the HLG-320H-C drivers would work well but I haven't actually looked at the datasheets recently.
Kinda all over the place but hopefully that helps. Too many dabs! Just got some rosin plates and went a little too hard "testing"
What's a simple, intro ~6.5 gal fermentation bucket?
edit: This one keeps coming up, but so many reviews complain about the lid not sealing air tight. But then others say to not worry about that too much because it's just letting gas escape anyway without letting anything in.
Ah yeah here ya go.
Easy Fermenter Wide Mouth Lid Kit: Simplified Fermenting In Jars Not Crock Pots! Make Sauerkraut, Kimchi, Pickles Or Any Fermented Probiotic Foods. 3 Lids(jars not incld), Extractor Pump & Recipes https://www.amazon.com/dp/B01DJVVORE/ref=cm_sw_r_cp_apa_i_KA3jDbFHA0H7T
I just ordered one of these for $85 shipped. https://www.amazon.com/Chapman-Gallon-Stainless-Fermenter-Portless/dp/B01HIZF4SW/ref=pd_lutyp_simh_1_2?ie=UTF8&amp;dpID=41zBI3z1arL&amp;dpSrc=sims&amp;preST=_SL500_SR101%2C160_&amp;psc=1&amp;refRID=9SRV8ZGFM55V56D6WPH5
Wait, so you buy mason jars SEPARATELY and use special fermentation lids, correct? What about this kit thingy? Fermentation Kit for Wide Mouth Mason Jars, 4 Glass Weights+ 4 Lids+1 Pump+ 6 Ferment Record Labels+ Recipe Book
by SOLIGT
Learn more: https://smile.amazon.com/dp/B07BFV9622/ref=cm_sw_em_r_mt_dp_U_DQSyDb4ZA1N24
Do I need a special lid AND glass weights?
This is the set the lids and weights came from. First impressions: I really like them! They fit perfectly on wide-mouth Ball jars and the syringe seemed to get pretty much all of the air out. Just make sure you line up the threading because the first time I tried to put the lid on, it was crooked and very hard to get back off to fix.
Besides that, I’m basically remaking a sauce I made last year. But this time, I actually have a scale and was able to accurately measure my salt. When I made 4 different hot sauces last year, I had one that went bad, so I made sure to disinfect all of my equipment by soaking them in a bleach solution for about 10 minutes before starting. Hopefully between that, the airlocks, and the more accurate measurements with the salt will prevent any weirdness from happening.
Side note: the color that hibiscus gives the brine is absolutely beautiful and I love it so much.
Recipe:
-13 halved and seeded habaneros
-6 halved habaneros
-1 yellow bell pepper
-1 orange bell pepper
-4 guavas
-1 prickly pear
-2 inches of ginger, peeled
-8 small garlic cloves
-1 tsp. celery seeds
-2 tsp. coriander seeds
-4 hibiscus flowers
-5% brine with pickling salt by total weight (worked out to 39g for one jar and 40g for the other)
Fermenting for at least 2 weeks and then blending with brine and a small amount of white distilled vinegar for flavor and shelf stability. May also add a little xanthum gum to keep it from separating.
http://www.amazon.com/1-gallon-Glass-Jar-fermenting-Kombucha/dp/B006ZRBGSC/ref=sr_1_2?ie=UTF8&amp;qid=1397529260&amp;sr=8-2&amp;keywords=gallon+glass+jar
http://www.amazon.com/1-gallon-USDA-Fermentation-Glass-Jar/dp/B006ZRBGSC/ref=sr_1_2?ie=UTF8&amp;qid=1463408919&amp;sr=8-2&amp;keywords=gallon+glass+jar
These look PERFECT. Wide mouth, plastic lid, cheap, glass. What do you guys think?
You can get plastic lids for the ball jars. They also make half-gallon ball jars. You can get gallon sized glass jars as well
Amazon has them
I get fondant buckets from time to time, and I'll add the generic grommet and air lock to the lid. The best way to get the smell out is to scrub it good in hot soapy water, then rinse, then fill it with hot water and baking soda to absorb the remaining scent. It's usually not completely gone, but it's never been an issue for the things I've fermented.
>Well, that depends. You say water. Do you mean a brine?
I meant brine. I take two cabbages, shred them in a food processor, put the shredded cabbage in oblong glass dishes, measure out two tablespoons of sea salt and massage that into the cabbage for 5 minutes, leave the cabbage in the glass dish for 1 hour, and then pack it into half-gallon mason jars. Once these jars are filled to the top (noob mistake I keep making), I use a sauerkraut pounder to squish as much brine out as possible. Afterwards, I add an additional 1 tsp of salt and put glass weights on the cabbage before putting on the lids. If at this point there's not enough brine to submerge the cabbage, I add a little bit of bottled water until it is submerged.
>Why are you adding extra liquid at the start instead of just 2% salt by cabbage weight?
I do this under two scenarios:
0. I pack the jars full of cabbage and pound out as much brine as possible but there's still not enough brine to keep the cabbage submerged
0. Sometimes I don't have enough cabbage to fill up a half-gallon mason jar so I add bottled water until it reaches near the top of the jar
>Do you have a weight in the jar (I assume not based on your question, but maybe you do)
Yes, I use the glass weights that came with the fermentation kit
Empty 1 Gallon Glass Jar w/Airtight Leakproof Plastic Lid - Wide Mouth Easy to Clean - BPA Free & Dishwasher Safe - USDA Certified - Kombucha Tea, Kefir, Canning, Sun Tea, Fermentation, Food Storage https://www.amazon.com/dp/B075JR6H11/ref=cm_sw_r_cp_api_i_.MVGDbF2XQ6Y6
I have 7 and 14 gallon Chapman fermenters and really like them... especially the newer models at this price point! https://www.amazon.com/Chapman-Gallon-Stainless-Fermenter-Portless/dp/B01HIZF4SW?ref_=mw_olp_product_details
Fermentation Kit for Wide Mouth... https://www.amazon.com/dp/B075LRMRDQ?ref=ppx_pop_mob_ap_share
I used this PLUS weights because I'm an extra idiot.
https://www.amazon.com/Fermentation-Kit-Wide-Mouth-Jars/dp/B075LRMRDQ/ref=pd_lpo_sbs_79_t_1?_encoding=UTF8&psc=1&refRID=N8RJ66PS6EDXG3YSSNZJ
I'm assuming it's airtight. I barely opened it over 2 weeks.
A glass weight would be best.
weights
Those are the ones I use and they work great. I’ve never done it with the bag. Just doesn’t seem sanitary and more likely to ruin your ferment.
I’d start with a small Batch so you don’t throw a lot away. You’ll learn from any mistakes and it won’t cost you a lot. Use 1 quart jar. Put your vegetables in there. Then mix 2 cups of water with one tablespoon of salt. Mix well and then pour into quart jar with the weight.
I learned from the video below. His simple technique works with pretty much any vegetable.
Craig’s kitchen
Yeah either get plastic lids and manually burp whatever you're fermenting or get lids with airlocks that let air out but no air in.
These are the ones I bought when I started and while they're nice it's kinda overkill, if you can find anything plastic that has an airlock for cheaper I'd go with that.
After a quick search I found these and they look okay.
As a quick note, if you plan to make anything that smells strong, I'd advise against the ones I bought; they have rubber parts. I made kimchi using one of the lids and now it's my kimchi lid, because the rubber parts smell like an open jar of kimchi from meters away even after excessive washing and boiling in water for several minutes.
The first one says it will ferment, but because you use only vinegar you might not see much activity. Just follow instructions.
The second should get decent activity, and based off the recipe it looks like you might be able to use a one gallon container. ( I'm only estimating because I suck with metric)
Try this-
https://www.homedepot.com/p/Leaktite-2-gal-Bucket-2GL-WHITE-PAIL/202264039
or this-
https://www.amazon.com/1-gallon-USDA-Fermentation-Glass-Jar/dp/B006ZRBGSC
This is all based off you being in America, and with that in mind- you can usually find flip top/latch top jars at stores like tj max or Marshalls for about 5$. Good luck and have fun. If you have any trouble just ask.
Glad to share, we've had a lot of fun with it! For canning, this site has some really good general info and basic recipes. Lately I use this book more, but she does not use pectin, I still do. Her process often involves extra steps with separating solids from liquid and cooking down the liquid - I don't do that, too much time and mess.
For fermenting, I went to a workshop to learn the basics. I'm really liking it because of how flexible and easy it is - no water baths and sterilizing, recipes aren't really needed. This site has a good guide for brine strength, but I approximate how much salt, and it's been fine. A basic sauerkraut, you slice up a head of cabbage, reserving the pieces of the core. Sprinkle about 3 tablespoons of Celtic sea salt or Himalayan pink salt (or some kind of salt with no additives) and massage it in for a few minutes. Sprinkle on some caraway seeds and mix in. Then pack it into a quart size, clean, ball jar. Pack it down firmly as you fill it, I use my fist, but you can get a sauerkraut packer - a wooden instrument to pack down krauts. Add all the liquid it has released too. Leave about 1-1.5 inches of head space, place the cabbage core and put a lid on it. The cabbage core is in lieu of other kinds of weight, basically you need the veg to stay under the liquid throughout. The cabbage should release enough liquid to cover it, but if not, add brine (3 tablespoons salt per quart) to cover. Then just let the good bacteria go to work for a few weeks, making sure to burp your jar every day at the beginning, then less frequently. In our first batch this year we forgot the first day after, and then the next day when we released the pressure it sprayed all over like a shaken can of soda. Because I am lazy, I got these lids that prevent the need for that step, but I still had one overflow because my cabbage released more water than I expected.
That is a basic recipe, but you can put in whatever you want, and just make sure it has enough brine. We made one with julienned beets, kohlrabi, onion, and carrot with some pickling spices. I did another with cabbage, greens, beets, onion and kohlrabi with mustard seed and oregano. These folks who ran the workshop I went to list their products here and there are some really good ideas for what combinations you might try. Have fun with it!
For larger brews of kombucha it gets tough depending on what you prefer to brew in. Some also get very heavy as you go up in gallons. I've been looking into this for a while and it's not a simple decision. You have to decide what way you want to go with your brewing when you get to the point of wanting a higher yield.
The choices you have are brewing grade plastics, brewing grade stainless steel, ceramic, glass, and wood.
Wooden barrels are going to be the one of the most expensive and the hardest to purchase. It costs about 175 dollars for a 5 gallon vinegar/kombucha barrel. Note this is a special barrel and is different from wine barrels in construction. 20 Liter Oak Kombucha Barrel
Stainless is going to be the other more expensive one but costs will vary. Though it seems to be a lot easier to get a large capacity stainless fermenter versus the bigger barrels. These are commonplace from pretty much any brewing equipment seller. 14 Gallon Stainless Steel Fermenter
Glass and Ceramic are rarer in gallon sizes larger than 5-10. I have hear tell of specially made glass/ceramic large containers but they would not be cheap. The largest easily accessible glass container I've found is the 6.5 gallon big mouth bubbler carboy. The largest ceramic container I've found is a 10 gallon preserving crock.
Plastic will be hands down the cheapest and lightest way to go for larger brews. 6.5 Gallon plastic fermenter with lid and Drum Tap
Basically if you go with anything outside of plastic you will be paying from 75-175 for 5+ gallons in a single container. My 1st choice has been to try out the Big Mouth Bubbler and see how I like that but my second is to get into brewing in barrels but that just my choice.
https://www.amazon.com/TSM-Products-31060-Fermentation-Harvest/dp/B00JG77G8M
&#x200B;
https://www.amazon.com/Gardeners-Supply-Company-5-Gallon-Stoneware/dp/B002P4RISG
I would look into e-jens for an alternative. Come in different shapes and sizes plus it seems easier to clean
https://www.amazon.com/Sauerkraut-Container-Probiotic-Fermentation-Earthenware/dp/B00SWBJJQ0
Wide mouth mason jars + fermentation weight + fermentation lid
I personally love these lids but they are pricey and the other ones work fine.
Yes I use ball mason jars and dishwasher before each use. As for the lids I’m using these - https://www.amazon.com/dp/B075LRMRDQ/ref=cm_sw_r_cp_api_i_.Wk5CbB9JYDT6
This should make over carbonation impossible!
Obviously you want some carbonation for Komubucha, so this might not work for that. But for kimchi saurkraut etc it is great!
Easy Fermenter Wide Mouth Lid Kit: Simplified Fermenting In Jars Not Crock Pots! Make Sauerkraut, Kimchi, Pickles Or Any Fermented Probiotic Foods. 3 Lids(jars not incld), Extractor Pump & Recipes https://www.amazon.com/dp/B01DJVVORE/ref=cm_sw_r_cp_apa_i_SdIzCb490E139
Probably something like this . I've been eyeing these for a while myself.
Been noticing in a good number of Kimchi videos that Koreans seem to
use these and I'm wondering how well they hold up over time.
I use these...
https://www.amazon.com/Gallon-Plastic-Fermenter-drilled-lid/dp/B0064O8WWE/ref=mp_s_a_1_2?crid=3BOCV43TCMST7&amp;keywords=2+gallon+fermenting+bucket&amp;qid=1551151619&amp;s=gateway&amp;sprefix=2+gallon+ferm&amp;sr=8-2
You are welcome! I found quite a few others that will probably work just as well and shave off a few bucks too!
$12.99
6 pack $15.99
I use mason jars and attach those air lock lids people use for fermenting things. They let co2 out so the coffee can degas and you can just use the pump to suck out the air. It’s not as slick as the atoms containers but it’s a money saver... if you’re curious
It's done in a couple of different ways -
Some people just loosen the lid to let some of the gas escape, but you always run the risk of letting air in (could cause mold), but it really depends on how long a jar lasts you haha.
For intentional ferments, many folks use lids like this for the process with fermentation weights:
https://www.amazon.com/Fermentation-Kit-Wide-Mouth-Jars/dp/B075LRMRDQ/ref=sr_1_5?keywords=fermentation+lid&amp;qid=1571407118&amp;sr=8-5
Has anyone fermented with something like this?
&#x200B;
https://smile.amazon.com/Easy-Fermenter-Wide-Mouth-Lid/dp/B01DJVVORE/ref=sr_1_1_sspa?keywords=ferment&qid=1570111451&s=home-garden&sr=1-1-spons&psc=1&spLa=ZW5jcnlwdGVkUXVhbGlmaWVyPUFESzVOTjE2UEwwMU0mZW5jcnlwdGVkSWQ9QTA2MDYzNTIyOFZTOUhYUUlNVjlIJmVuY3J5cHRlZEFkSWQ9QTA1MTU0OTQxRk84WUNFSTlRWkk4JndpZGdldE5hbWU9c3BfYXRmJmFjdGlvbj1jbGlja1JlZGlyZWN0JmRvTm90TG9nQ2xpY2s9dHJ1ZQ==
TLDR: The "Full kit" looks like it has the basics. As others have said, you might want a food-grade plastic bucket for primary fermentation, and you'll need bottles/containers to store the end product in.
If it were a "complete" kit I'd probably put one together which included One step sanitizer to sanitize equipment,a plastic fermentation bucket, and an auto-syphon to make racking (i.e., transferring the liquid from container to container) easier.
If it's something you're interested in pursuing further, there's plenty more you could consider picking up. A bottle filler for the auto syphon, a filtration kit to help clarify wine/mead, fining products, you might want to look into picking up more things like yeast energizer and yeast nutrient (which it sounds like this kit comes with some) and sulfate/sorbate (to stabilize the mead before back-sweetening) etc.
There are lots of recipes and lots of help available, so read up and feel free to ask questions and have a lot of fun experimenting and trying new things :)
Was looking at them last month. Not cheap to buy or ship here to the UK unfortunately :(
https://www.amazon.com/dp/B01DJVVORE/ref=cm_sw_r_sms_c_api_i_8PWODb005SZB5
Like this?
Air locks
This is what I used:
Fermentation Kit for Wide Mouth Jars - 4 Airlocks, 8 Silicone Grommets, 4 Stainless Steel Wide mouth Mason Jar Fermenting Lids with Silicone Rings (4 Set, Jars Not Included) https://www.amazon.com/dp/B075LRMRDQ/ref=cm_sw_r_cp_api_i_.rnVDb1DB18WK
Don't forget the easiest and cheapest pump there is! You can easily find this in local restaurant supply shops.
1 Gallon Pitcher
You can easily siphon it too, just more to sanitize post boil.
Also, get some of these!
Or these!
use a 15.5 sanke keg. take the spear out, use a carboy cap to seal,take the larger cap off and put in an airlock. sanke's can be found for around $20-40 depending on the condition of them. now you have a SS fermentor
if you want SS mfg, look at the chapman fermentors. https://www.amazon.com/Chapman-Gallon-Stainless-Fermenter-Portless/dp/B01HIZF4SW
Thanks! What about a large 1 gal jar? https://www.amazon.com/Empty-Gallon-Airtight-Leakproof-Plastic/dp/B075JR6H11
Thanks everybody, sounds easier than I thought. Can you please look at these products and let me know if I'm missing anything
Glass jar
https://www.amazon.com/1-gallon-USDA-Fermentation-Glass-Jar/dp/B006ZRBGSC/ref=sr_1_3_m?s=home-garden&amp;ie=UTF8&amp;qid=1481986875&amp;sr=1-3&amp;keywords=gallon+glass+jar
Scoby
https://www.amazon.com/Poseymom-Kombucha-Scoby-Cup-Starter/dp/B00J3U9RMK/ref=sr_1_4_a_it?ie=UTF8&amp;qid=1481988107&amp;sr=8-4&amp;keywords=kombucha+scoby
Some bottles for transport https://www.amazon.com/Chefs-Star-CASE-Bottles-CLEAR/dp/B011SGS8U8/ref=pd_sim_79_5?_encoding=UTF8&amp;psc=1&amp;refRID=8GX2CTXPKCQN47F3H629
Is it really this easy, I've brewed beer before and the materials and process were significantly more difficult. Anything I'm missing?
Of course they sell them on amazon https://www.amazon.com/dp/B075LRMRDQ/ref=cm_sw_r_cp_api_i_DJ5QDb1BYWFSM
Which fermenting bucket do y'all like? I bought this one, but it came with a hole drilled in the bottom like it was a bottling bucket. I returned it for a replacement... which came with the exact same thing.
2 gallon bucket with drilled lid, $16.17. This will be perfect for what you're describing. http://www.amazon.com/Gallon-Plastic-Fermenter-drilled-lid/dp/B0064O8WWE/ref=sr_1_2?ie=UTF8&amp;qid=1426011617&amp;sr=8-2&amp;keywords=2+gallon+bucket
Dunno if I've ever seen 1.5 gallon, but 2 gallon would be good for a 1 gallon melomel recipe.
Edit: New formatting...
Like /u/officeboy I use mason jars ranging from 6 ozs all the way up to 64 oz depending on the need. They're very handy.
If I need to do something larger, I use a one gallon glass jar from amazon. Cheap and works the same as the mason jars.
If I need to get above a 1 gallon starter, I just end up using a 3 gallon carboy just like a normal brew.
I normally scrape off the surface stuff and give the food a taste. I bought some pickling stones from Amazon and they work very well holding everything under the brine (if using Mason jars) mine are for wide mouth.
http://www.amazon.com/gp/aw/d/B00V41EZNC/ref=mp_s_a_1_1?qid=1464484798&amp;amp;sr=8-1&amp;amp;pi=SL75_QL70&amp;amp;keywords=Pickling+pebble
Also you can get airlocks for the jars. These ones are simple to use!
http://www.amazon.com/gp/aw/d/B01726CJ9Y/ref=mp_s_a_1_2?qid=1464485203&amp;amp;sr=8-2&amp;amp;pi=SL75_QL70&amp;amp;keywords=pickle+pipe
I've never had any good experiences with those silicone airlocks, I find this style to work a lot better. Also, it's best to base your salt off of the total weight of ingredients, especially something like beans where you can pack them in tight and have a high vegetable:water ratio.
Never seen anyone put an airlock on their kraut before. The standard thing if you're making it in a jar is to close the lid tightly and just burp it once a day and take a taste, then refrigerate it when it's at your preferred level of sourness. Fermenting it in a sealed container helps it to absorb more CO2, which gives it a crisper texture.
Another good way to do it is to ferment in an e-jen kimchi container. Works great for all sorts of pickles.
Amazon link here.
Also bought these to go with it.
My wife bought me the book Fiery Ferments and now I can put it to use.
This kit also has an $8 off coupon.
$10 off this one.
I got this one recently, pretty cheap for stainless steel. Only downside is no conical base, but at that price, I can't complain.
I bought this... and this
It ended up following around in the middle the first time and formed a second on the top so now I have two.
These are the grommets and these are the lids, and it looks like you can just buy the whole thing already assembled.
These bags are expensive and you can't sample the goods without using up a new bag. Get a glass jar and a burping lid. Example: https://www.amazon.com/Easy-Fermenter-Wide-Mouth-Lid/dp/B01DJVVORE/ref=sr_1_2?keywords=fermenting&amp;qid=1551063658&amp;s=gateway&amp;sr=8-2