(Part 2) Best car amplifier installation products according to redditors
We found 1,207 Reddit comments discussing the best car amplifier installation products. We ranked the 198 resulting products by number of redditors who mentioned them. Here are the products ranked 21-40. You can also go back to the previous section.


An overengineered car stereo fuse holder like this one
https://www.amazon.com/InstallGear-Gauge-Line-Fuse-Holder/dp/B01CT4ZJHS
I use these at work in marine environments:
http://www.amazon.com/3M-Heat-Shrink-Connector-Piece/dp/B008HMHJDO
Over that I apply more heat shrink. Holds up pretty well.
In my experience, there are two schools of thought on wiring in accessories. The first and most common approach is to tap into the vehicle's existing wiring to power all your stuff off the main battery. This is a terrible thing to do, though, especially with modern vehicles as they can be very sensitive to voltage drops and changes. Plus, it introduces the potential for countless gremlins that will ruin a trip, and may cause your vehicle to not function.
​
The second and better school of thought is to design a secondary electrical system from scratch, that is connected only once to the main vehicle and that is at the battery OR the alternator (Battery is easier and way more common). The second way gives you a lot more freedom to build your system, because it all comes down to math. First, start with your power source -- how are you going to power your stuff?
​
If you are going to do a second battery, then that's your answer. Find a place to put it that is near the chassis (as in, keep the weight low) and make sure you can secure it so it does not become a projectile. Connect it to your main battery using a DC to DC Charger (CTEK is good, Redarc is great and priced to match, Renogy is good but cheaper and not as widely tested). Then, install a fuse block near the second battery and run your accessories to that. If you want to run everything off the main battery, then instead of finding a place to install a second battery, just do the Fuse Block.
​
The Fuse Block then becomes what you wire everything extra to -- literally everything that didn't come with the car should go through this fuse block. It's only connected to the main battery by two wires. By starting with this principle, if there are any problems at all with your accessories, your vehicle should still run without any electrical gremlins causing your rig to sit down, and if you need to totally isolate the system, 5 minutes to disconnect those two wires is all it takes.
​
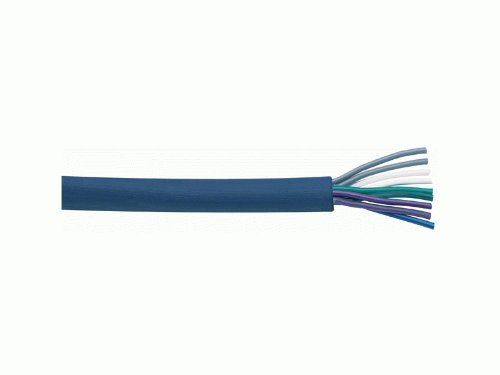
As far as the accessories themselves, the rest then becomes pretty easy -- figure out the energy required to run the accessory (quality manufacturers will supply this info), figure out where you are going to physically install the accessory, and how long the run of wire will be to power it. Select a wire that will be appropriate for the current, and you are good to go.. If you have many accessories in one place -- lets say you want to have a dash panel with 4 switches in it -- then I recommend getting multi-strand cables, like this:
​
https://www.amazon.ca/Metra-MC918-20-20-Feet-Nine-Conductor-Multi-Use/dp/B004H1KAMQ/ref=sr_1_2?keywords=vehicle+wiring+multi+conductor&qid=1563898763&s=gateway&sr=8-2
​
This allows you to route one "Master" Cable to your switch block rather than running 10 individual wires. Obviously you'll need to buy the right gauge wire for your application.
​
A few other pointers:
​
​
We are hoping to use the ARB Linx system in our new rig to limit the number of wires we have to run. It's a fairly new option though so not a lot of people are familiar with it -- it might be worth a look though as it could save you some work.
I think most people here recommend KnuKonceptz because it's inexpensive and true to gauge. You can buy some extra wire by the foot for the Big 3. By the way that's some great equipment.
This is the drone that I have built:
Been slowly building my first quad over the past month or so. Just when I have time. I bought a cheap carbon fiber kit off amazon. I will list everything I have bought so far.
Fly Sky FS-i6 Transmitter https://www.amazon.com/gp/product/B00VE3PZ3Y/ref=oh_aui_detailpage_o04_s01?ie=UTF8&psc=1
Fly Sky FSia6b RX (need this to run PPM instead of PWM): https://www.amazon.com/gp/product/B00VE3Q3XU/ref=oh_aui_detailpage_o02_s00?ie=UTF8&psc=1
LHI quad Kit with ESC's, Motors and Flight Controller: https://www.amazon.com/gp/product/B010FMGUS8/ref=oh_aui_detailpage_o04_s00?ie=UTF8&psc=1
Now the above kit comes with a CC3D flight controller, after some research, I decided that I would use a Naze32 rev6 board instead. I purchased that from Hobby king, I will list all hobbyking purchases after amazon.
Nylon hex nuts, screws and stand offs:
https://www.amazon.com/gp/product/B01EPLH08Y/ref=oh_aui_detailpage_o03_s00?ie=UTF8&psc=1
XT60 connectors: https://www.amazon.com/gp/product/B01E9HM7NC/ref=oh_aui_detailpage_o03_s00?ie=UTF8&psc=1
Lipo Voltage Checker: https://www.amazon.com/gp/product/B01E7UXVL8/ref=oh_aui_detailpage_o03_s00?ie=UTF8&psc=1
Battery / GoPro straps: https://www.amazon.com/gp/product/B01F7MEDW6/ref=oh_aui_detailpage_o01_s00?ie=UTF8&psc=1 PS: good velcro isnt enough!
Tri-blade Props. Buy a couple of these!:https://www.amazon.com/gp/product/B01CHDNRRK/ref=oh_aui_detailpage_o00_s00?ie=UTF8&psc=1
Extra arms....JUST IN CASE! https://www.amazon.com/LHI-Carbon-thick-250mm-Quadcopter/dp/B01715HGNU/ref=sr_1_1?ie=UTF8&qid=1472346179&sr=8-1&keywords=LHI+arms
These are all the hobby king stuff that I bought:
Naze 32 FC ACRO: http://www.hobbyking.com/hobbyking/store/__96841__AfroFlight_Naze32_Rev6_Flight_Controller_Acro_.html
1300 mah 3s 45-90c lipos: http://www.hobbyking.com/hobbyking/store/__18207__Turnigy_nano_tech_1300mAh_3S_45_90C_Lipo_Pack.html
Besides a lipo charger, the above will get you flying! Below is everything needed for the FPV aspect! I used to run RC cars so luckily I had a lipo charger from those days
Camera and transmitter from ebay: http://www.ebay.com/itm/262061528376?_trksid=p2057872.m2749.l2649&ssPageName=STRK%3AMEBIDX%3AIT
Clover antennas from ebay: http://www.ebay.com/itm/272297376391?_trksid=p2057872.m2749.l2649&ssPageName=STRK%3AMEBIDX%3AIT
Quanum Cyclops FPV Goggles from hobbyking: http://www.hobbyking.com/hobbyking/store/__104150__Quanum_Cyclops_FPV_Goggle_w_Integrated_Monitor_and_Receiver_AR_Warehouse_.html
Now this is prolly the most basic, beginners fpv setup that you can buy... Its perfect for learning and crashing lol. I have about 3 flights with mine so far, about 4 batteries. Buy props lol, lots of props. Already had to change 1 arm too.
Infinity Reference 5 channel amp - $239.99
[4 AWG amp kit] (https://www.amazon.com/Rockville-RWK4CU-Copper-Complete-Installation/dp/B019Z3RCG2/ref=sr_1_6?ie=UTF8&qid=1550159767&sr=8-6&keywords=4+awg+amp+kit) - $49.95
9 wire - $24.95
Additional RCAs - $19.99
4 channel LOC - $23.34 - You need this because you're keeping your factory radio
RCA splitter - $7.45 - To get the 4 channel LOC to 6 channels for the amp's input. There's maybe other ways you could do this, but this is what I would do because it'd be the simplest to swap the radio in the future.
Infinity Reference 6.5" for the doors - $56.95/pair x 2 = $113.90
Infinity Reference 3.5" for the dash - $48.70
= $528.37 + Installation which will easily run between $200 - $350
If you'd like to spend a bit more you might ask about sound dampening on the doors. Or you might save the extra and put it towards replacing the radio in the future.
You don't need to slip over the connector, the heat shrink is already on the butt splice. You crimp then heat and it shrinks down and seals everything. There's a coating of glue the melts and oozes out. But you need to make sure you have a good crimp too, cheap ones will break or cut the heat shrink when you crimp. The glue also helps hold the wires in place. If you shrink it down without crimping, you'll still need to apply some force to rip the wires out.
https://www.amazon.com/3M-Heat-Shrink-Connector-Piece/dp/B008HMHJDO
Alternatively, invest in some Heat Shrink Butt Splices
Much less messy and far sturdier than twisting and wrapping with electrical tape. You just insert each end of the wire, crimp, and hit it with some heat to seal it. This way is weatherproof, electrical tape isn't.
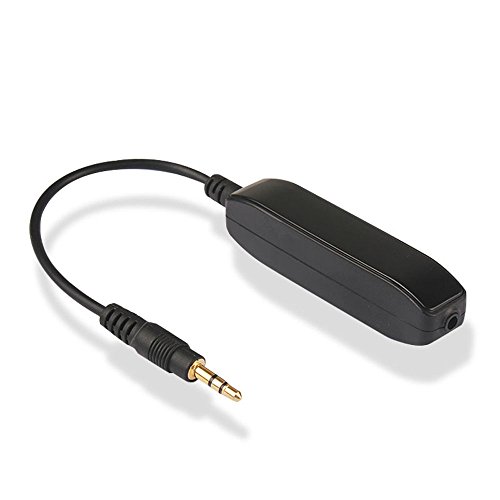
There are a couple of things going on. First it sounds like you have speaker level signal out of home mini connected to line level input of amp. Second thing is probably ground loop noise.
To reduce speaker level signal to match line level amp input, add resistors to make a voltage divider similar to this video.
https://www.engadget.com/2017/12/11/mod-gives-googles-home-mini-speaker-its-missing-line-out-jack/
To reduce ground loop noise, try a ground loop isolator balaun such as this.
Noise Filter Ground Loop Isolator Eliminate Car Electrical Noise with permalloy core Transformers 3.5mm Audio Cable Black https://www.amazon.com/dp/B01N7QSOO8/ref=cm_sw_r_cp_apa_i_CYEODb1HB5TMB
Analog is the cheapest, fastest, and easiest.
Get a 3.5mm to RCA (stereo) Y adapter in the length you need:
https://www.amazon.com/Cable-iXCC-Shielded-Gold-Plated-Stereo/dp/B019D048XC/
Problem is, you may get buzzing from poor grounding, in which case you'll need to "lift" (isolate) the ground loop -
Plug something like this in-line, after the Y adapter, before the stereo AUX RCA inputs -
https://www.amazon.com/InstallGear-Ground-Isolator-Noise-Filter/dp/B077Y5DLBB/
or a newer type (plug this into the computer first, then that Y adapter):
https://www.amazon.com/REIIE-Ground-Isolator-Bluetooth-System/dp/B01JUOWB2Q/
Here's some that ship via Amazon Prime: https://www.amazon.com/dp/B01E9HM7NC/ref=pd_lpo_sbs_dp_ss_3?pf_rd_p=1944687442&pf_rd_s=lpo-top-stripe-1&pf_rd_t=201&pf_rd_i=B005FAPYXS&pf_rd_m=ATVPDKIKX0DER&pf_rd_r=QGZ6F6JXSQ8DRTGM8ADM
It's extremely easy to DIY. I'd strongly recommend visiting YouTube. Most customization shops will likely do it, but AFAIK it's not that common of a task due to how simple it really is to do. There's videos for pretty much any popular car model.
A screw driver, some zip ties and maybe a knife or pair of wire strippers is all you'll likely need to do it right.
In case anyone is curious here's what's involved:
That's really it. All that is a detailed way of saying "thread the wire around your windshield to the fuse box then bolt the neutral to bare metal and put the positive in your fuse box tapping a non-critical fuse that's only energized when the car is on."
You can make that existing wiring work for a 4 or 5 channel amp. You would just need to run the outputs back up to the radio harness or to each door. This makes it easy: https://www.amazon.com/dp/B004H1KAMQ/ref=cm_sw_r_cp_apa_i_uP6rDb766M3Y5
https://www.amazon.com/dp/B07N8KKR6X/ref=cm_sw_r_cp_apa_i_VS6rDbY2JVNC1
I just used this for a budget build recently. It would work with your speaker choices. At a 400$ budget you could do it and the 4 speakers and the speed wire. It will be loud. But you'll want to add a sub to it at some point for the low end that youll be missing
We made an enclosure out of foamcore boards and duct tape...they get chewed eventually, sure...but it worked better than this:
http://www.amazon.com/Marshall-Small-Pet-Deluxe-Play/dp/B0013TT2SS/ref=sr_1_1?s=pet-supplies&ie=UTF8&qid=1322368051&sr=1-1
Also, I got wire covers for everything like this:
http://www.amazon.com/American-Terminal-SL500-100-2-Inch-Tubing/dp/B0017686ZC/ref=sr_1_6?ie=UTF8&qid=1322368115&sr=8-6
For EVERYTHING...keeps the chewing down and keeps them from getting peed on. Also, every rat loves a buddy....
Perhaps wire loom? You should be able to buy it for a LOT less at your local Home Depot, Menards, Lowes, or auto parts store.
These connectors are the best type to use, especially if it's exposed to weather. I even tape or shrink wrap over these sometimes but it's not necessary.
If I have time and the project is appropriate or I can't spare extra bulk in a wiring harness, I'll skip covered connectors and use solder with bare metal connectors and shrink wrap.
I think you should keep your car and repair it. The $1000 is much cheaper than a new car, and the Corolla will last you many more years.
Could you not repair it, and try something like a 12v fan?
Like this:
https://www.amazon.com/AboveTEK-12V-Electric-Car-Fan/dp/B010CESJTC
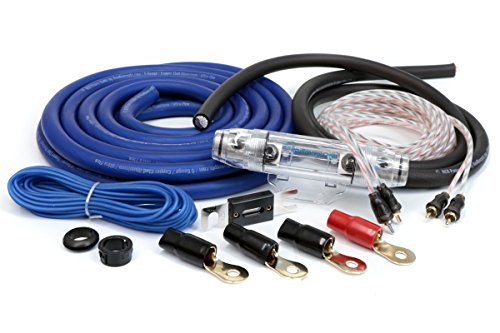
What I'd do, and have done is run this into these Power distrobution block w/ fuse, and ground distribution block. Then you can just get a few feet of 4 gauge red/black for your amps.
Subs are easy to install, just find a route from the battery back to where the subs reside. Older cars generally make this easier. The most common way is to just go:
Battery -> route through firewall (trickiest part) -> route under carpet/trim/seats to back -> hook up to amp
what you will need:
Subs
Amp
Easy: buy a kit
Less Easy : go to lowes/menards/Ho E Depot and buy wire, connectors n' shit, plus order RCA cables n' other shit.
steps:
used to havehas a good AMP to SUB wiring diagram thingy.Edit: If you have any questions I will certainly try to help if you ask, but as always I am not a lawyer and the above post is not intended as legal advice in your country of origin.
Im gonna hook you up with two different set ups that will more than meet your goals: Either one will use this wiring kit. First 2 Soundqubed HDS212 subs and make sure you get dual 2 ohm voice coils. And get this box thats right around $400 for subs and a proper box. Or you could go with sundown E12s with this box for a little more$. for either setup a CAB 1600.1 for $200.
No matter which setup you pick you will be under the $800 you have budgeted.
It sounds like you did a bunch of research and you're totally ready for this bun!
Just a couple of specific ideas to add on to what the other commenters have suggested. This stuff is great for covering wires. If you find that the carefresh doesn't absorb odor as well, you can try a pelleted litter (I use oxbow eco-straw since it's safe for them to eat)
Congrats on your new bun!
You need:
1.) XLR connector like this: https://www.amazon.com/gp/product/B00067JJ8Q/
2.) Some long enough wire, for example: https://www.amazon.com/gp/product/B00UR0N370/
3.) One XT60 connector: https://www.amazon.com/gp/product/B01E9HM7NC/
4.) Some sort of quick disconnect plug, example: https://www.amazon.com/gp/product/B006ZOIJ0S/ (this is so that it can easily disconnect if you crash without damaging the cable)
Then just solder those parts together and you're ready to go.
PS: This case is optional but it perfectly fits 2 carvepower battery cases and the solar charger device + cable: https://www.amazon.com/gp/product/B01N6N3J8D/
It's something to clean up the sound if it's from power problems. There's lots of them out there, and they're pretty cheap.
Though gambling on that vs. getting a headphone extender for your known working back port may not be the best plan.
These are a godsend when working with laptops and other mains-powered portable devices (like phones, iPods/MP3 players etc plugged into noisy chargers) - I keep about 6 in my stage audio cabling kit.
Ground loop isolation transformers. Example on Amazon:
http://www.amazon.com/Radio-Shack-270-054-Ground-Loop-Isolator/dp/B002YGM5D8/ref=sr_1_14?ie=UTF8&qid=1411741856&sr=8-14&keywords=ground+loop+isolator
I have some these under my desk and behind my monitors that i run cables through
I had the exact same issue with my monitors and it turned out to be a ground loop problem. Bought myself one of these and it completely fixed the issue.
Just read through your post again and a few more things came to mind:
All Deepminds have balanced outputs - make sure you are using a proper 3-conductor (TRS->XLR) cable to connect to your UMC
Check your gain-staging. you want to make sure your source signal is nice and high so you aren't raising the noise floor by amplifying it at your interface so your deepmind ought to be turned up quite high and your UMC should not have the gains cranked if possible. Even if you have some bus noise, proper gain staging can sometimes reduce it to the point where you can barely perceive it.
You mention that the noise changes with keyboard action which is a sure-fire indication it's bus noise from your computer. Try connecting your UMC to different usb ports to see if there is a difference. On my setup the high speed (blue) usb ports seem to be isolated better than the others.
Make sure your phantom power (+48v) on the UMC is turned off)
Check the USB cable that you are using to connect your UMC to the computer: some cables have a ferrite core, otherwise know as a ferrite bead or "choke" that looks like a little cylinder on the cable: https://en.wikipedia.org/wiki/Ferrite_bead This is meant to keep high frequency noise from messing up the USB signal and it shouldn't effect any of the frequencies that are in the audible range but just in case it's encouraging the ground to go one way or the other try a cable both with and without to see if it helps.
The MicroHD will most likely solve the problem but so will these for a lower price:
https://www.amazon.com/InstallGear-Ground-Isolator-Noise-Filter/dp/B077Y5DLBB/ref=sr_1_6?crid=KUPCV1LLYM77
https://www.ebay.com/itm/HKATOPS-3-5mm-RCA-Ground-Loop-Isolator-AudioStereo-Hum-Noise-Filter-Audio-W27/202731548848
*note that when using these you will no longer have a balanced signal so keep your cable runs short, and you will have to get RCA->TRS adaptors to connect it between your synth and your interface.
Transformer isolators take an unbalanced signal in one side and induce the same signal into the output without any physical connection between the wires - so you immediately get rid of any DC bias and the system has to find a different route to ground (usually through the chassis or the ground pin on your power supply as it was intended)
If, down the line, you want to get a real swiss-army-knife isolator box I suggest:
https://www.ebay.com/itm/Mackie-MDB-2P-Stereo-Passive-Direct-Box-DI-Box/392059765174
...or something similar. A good passive DI will let you attenuate the signal and lift the ground so you can use them to solve a lot of different issues.
This is the cure bruh: https://www.amazon.com/dp/B010CESJTC/ref=cm_sw_r_apa_kmGCxbA0VTMAK
Buy a new coil wiring harness. They're notorious for failing. I bought some plastic wiring tubing (like this) at the local WMart and wrapped it in electrical tape before installing the new one (Hyundai Accent, but basically the same car). You can buy OEM parts on EBay direct from Korea fairly cheap.
Does anyone know anything about fixing RF Interference with a Ferrite RF Choke? My Vive has had tracking problems until 7:45, and I've tried everything except this. I'm not sure what I need though. I've seem some recommend this, which I would prefer since it's cheap, however this popular post recommended using 4 others, plus a second link box and cable, which would be $125+.
Would the cheaper choke work? Would I need multiple? How many loops of wire would I need to put through it? The radio tower I believe is messing with me is about 1000 feet away or so. Don't know the frequency it's at, all I know is when it lowers its frequency at sundown(7:45) my Vive works.
Sorry to confuse you!
Anyway,we find one link for you reference,it is not our store,we can not sure if it can solve your problem or not!please note!
https://www.amazon.com/dp/B00XDACVOM/ref=sxr_pa_click_within_right_2?pf_rd_m=ATVPDKIKX0DER&pf_rd_p=2957865822&pf_rd_r=1GWQS0HRW2C6BE6QY3S0&pd_rd_wg=OUqEh&pf_rd_s=desktop-rhs-carousels&pf_rd_t=301&pd_rd_w=8Iuo7&pf_rd_i=radio+filter&pd_rd_r=RKD1QV4ZXF5QEPQAA791&psc=1
You can get a cheaper alternative on Amazon. This is what I bought -- 100 ft for $14. I feel like that spiral cable wrap isn't the most protective. :X
You need a ground loop isolator likely because when charging the speaker(s) there’s a ac/dc conversion happening. Check this out. It has helped others with same problem. https://www.amazon.com/AUKEY-Ground-Isolator-Systems-Included/dp/B01L1NP7YI. Some say this ones better https://www.amazon.com/Isolator-Audiophile-Frequency-Without-Distortion/dp/B01N10AQ76/ref=mp_s_a_1_3?crid=3RV5RXTNPJ09E&keywords=krypt+ground+loop+isolator&qid=1555458843&s=gateway&sprefix=krypt+g&sr=8-3&utm_source=share&utm_medium=ios_app
The crutchfield guy may have been trying to sell you a LOC that corrects the bass roll off some cars experience. I myself bought an LC2i converter for that reason, but you may not need it. It looks like that amp accepts speaker level inputs so you may be able to skip the LOC altogether and just tap into your rear speakers. Up to you though the LOC is so cheap you may as well use it. If you notice the bass is decreasing as you increase volume you might look into buying a more expensive LOC that fixes the signal. I would try out the bass package as is first before I did that though.
You will need RCA cables to run from the LOC to the amp. Amazon has some for like 8 bucks. For the amp wiring kit, I got one for 20 dollars on Amazon.
InstallGear 4 Gauge Complete Amp Kit Amplifier Installation Wiring Wire https://www.amazon.com/dp/B01N1SS2ZA/ref=cm_sw_r_cp_apa_i_L1q8Ab9TTW5NK
This is 4 gauge wire which is more than enough for your amp. If you prefer 8 gauge you can find a similarly priced set on Amazon. Everything else looks fine. Any reason you went with the MTX?
https://www.amazon.com/Monoprice-107118-1-Inch-10-Feet-Flexible/dp/B001114AO4
I bought these to cover up my cords. They've worked well so far.
Yup!
https://www.amazon.com/gp/aw/d/B010CESJTC/ref=yo_ii_img?ie=UTF8&psc=1
Thanks man after following ur advice, I found that the trailing edge did not give any voltage feedback but the side closest to the battery did give feedback. Running a continuity test I further found out the fuse failed. Whats interesting is that the fuse looks intact from just looking at it. The fuse is a AGU 80 amp 5AG80A
Saying that I have found two problems with my installation that were the likely causes of my issues. 1)I had left the rubber inside the terminal of one end on the fuse holder. There is now a black singe mark inside the terminal. 2) The fuse is a AGU 80 amp fuse, after doing some research I have found that the recommended fuse for 4 gauge wire is 125 Amps. I have went out and bought a new inline fuse holder with a ANL 150 amp fuse.
Thanks for the advice.
To add to what paxtana said, if you plan on riding in wet conditions I'd recommend using some waterproof heat shrink connectors like these. In my experience, the silicone covers that come preinstalled on those connectors don't really hold up long term in wet conditions and can sometimes vibrate loose to expose the metal they're supposed to protect. I've personally used these on all of my builds and have never had them fail.
They are all over Amazon and work surprisingly well. I was skeptical at first, but as long as you make a decent mechanical connection with the wires first they work great.
Thank you for the more detailed information. A lot of the explanations that say what to do are always AFTER it's failed, not before. And since I don't know a lot about electrical or boards in general it's all Greek to me.
Before I go breaking my board:
https://www.dropbox.com/s/y6d8at28o7njnjf/2016-09-12%2007.53.17.jpg?dl=0
The issue is with the connector to the left of the one labeled "Power" in my picture above. I need to break the green plastic connector (directly connected to the board) and leave the pins. Then Solder these pins to the posts sticking out the bottom of the XT60 female connectors. Something like: https://www.amazon.com/Finware-Female-Bullet-Connectors-Battery/dp/B01E9HM7NC/ref=sr_1_6?ie=UTF8&qid=1484342494&sr=8-6&keywords=XT60+connector
Then solder the wires to the pins of the male XT60 connector, plug, set it and forget it. Correct?
I can't imagine there being a lot of room from the board to the XT60 connector pins. That's going to be rough for a novice solderer like me. Pre-tinning the pins on the female side will be VERY necessary.
I'll show you my setup to see if it will work for you.
Dashcam - https://www.amazon.com/V1-Dashboard-Recorder-G-Sensor-Recording/dp/B00X528FNE/ref=sr_1_4?s=car&ie=UTF8&qid=1484000259&sr=1-4&keywords=dash+cam
add-a-fuse connected to an always hot fuse under the passenger side - https://www.amazon.com/HitCar-Vehicle-Circuit-Profile-Holder/dp/B00U61OO50/ref=sr_1_1?s=car&ie=UTF8&qid=1484000314&sr=1-1&keywords=add+a+fuse
12 volt to 5 volt adapter cable https://www.amazon.com/WheelWitness-Hardwire-Installation-Dashboard-Charger/dp/B00TGQ1Y3Q/ref=sr_1_3?s=car&ie=UTF8&qid=1484000362&sr=1-3&keywords=12+volt+to+5+volt+adapter
Run that to the dashcam, add a 64GB microSD and record at 720p.
You should get around 6 hours of footage before it erases the older one. You can spend a little more to get a dashcam that will support 128gb SD cards and get 12-14 hours out of it.
If you connect it to an always hot 12v fuse, you should have no problem keeping the dashcam running 24/7.
Note: In Texas, temp near the windshield can exceed 110 degrees so make you get a capacitor based dashcam if you live somewehre that gets really hot or really cold
Try this or get different cables to use this, because that works fine for me.
I too have read the horror stories of excessively destructive rabbits. I've yet to really encounter one, however. Supervision and some thoughtful prevention seems to go a long way, along with providing an outlet for their natural behaviors.
One of our bunnies did nibble on my laptop adapter, but really, that's my own damn fault for not supervising the situation more closely. (I'd fallen asleep on the couch watching netflix.) Most of our other cords that they have access to have been run through split loom tubing.
The supervision aspect is easily the most important part- figure out what sort of naughty tendencies your rabbit has and prevent them from being able to act on those tendencies. Use taste deterrent sprays to keep them from chewing on inappropriate things and give them things that they CAN chew on. If they're digging at the carpet, give them somewhere appropriate to dig, etc. It's a little bit like having a perpetual puppy- make wrong decisions difficult/uncomfortable and make the right decision rewarding.
I am assuming that the reason you want to hardwire the dashcam is because your cigarette lighter is live all the time, even when the ignition is off. If that is the only reason, you do not have to hardwire it, you can purchase a switched lighter adapter and keep the dashcam plugged in all the time and turn off the switch on the adapter when you leave the car.
I am just saying that because you have not indicated that you are interested in hardwiring because you want to use the dashcam in parking mode, and because you have said that you have no experience in car electronics.
However, if you want to go ahead with the hardwiring, I urge you to watch some videos on YouTube demonstrating how to hardwire. Here's one, e.g. https://www.youtube.com/watch?v=3I9FZL8btqc
As to the fuse to use in your car, I see that you have 3 fuses that are spare. You can use any one of those provided that it only becomes live when the car ignition is turned on. The only way you will know that is by testing it with a circuit tester.
So, along with the circuit tester you will need to buy a 'add a fuse' such as this https://www.amazon.com/HitCar-Vehicle-Circuit-Profile-Holder/dp/B00U61OO50/ref=sr_1_9?ie=UTF8&qid=1468810452&sr=8-9&keywords=Add+a+fuse
Make sure that the blades of the fuse are the same as what is in your car.
Be very careful when working in the fuse box that you don't short circuit anything. It could be bad news.
Yes, it will work. Get a good ground loop isolator that won't affect sound too much.
After some searching I found Lanzar HTG237 1,000-Watt 2-Channel on amazon. With that amp an 8awg kit will work.
What kind of car are you putting it into?
Line Output Convertor + 2 Channel amp + amp kit
or if you wanted something more name brand something like THIS Cheap stuff still, but better than the dual crap
All you need is one of these. You don't have to remove any cable. It goes between your current cables and your receiver.
Or one of these. - Same thing, different store.
I personally use this one, but it requires you to also buy some of these adapters.
All of these solutions are the same thing, but through different stores.
I have, here's my install: http://www.focusfanatics.com/forum/8943153-post48.html
My add-a-fuse: http://www.amazon.com/HitCar-Vehicle-Circuit-Profile-Holder/dp/B00U61OO50
Do you recommend a DI Box over a ground-loop isolator? From my understanding, they'll both do the same function in different manners. Feel free to correct me.
http://www.amazon.com/Stinger-SGN20-Ground-Loop-Isolator/dp/B002ZRQ3PW/
Also: Another strange problem I'm having is that whenever I play videos (even on mute), a weird (oscillating?) noise comes out of the speakers for a bit. It eventually disappears, but I'd like to avoid it.
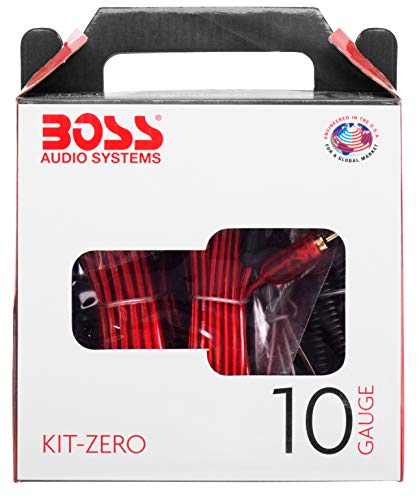
if it helps i have this 4 guage currently running to the sub: https://www.amazon.com/InstallGear-Complete-Amplifier-Installation-Wiring/dp/B01N1SS2ZA/ and have this 10 guage: https://www.amazon.com/InstallGear-Gauge-Black-Power-Ground/dp/B01NBE1YQ4 . wiring plan is something like this: https://i.imgur.com/SKKeeVB.png
or even something as simple as some wire tubing would clean it up:
https://smile.amazon.com/Monoprice-107118-1-Inch-10-Feet-Flexible/dp/B001114AO4?sa-no-redirect=1
You can stop that. I think Mix 31 is the type of bead you need to block CB. Basically you loop the cables through something like this a bunch of times, like this, close to the speaker.
Just get some Split wire loom that cars use to hide the wires. Lots of different sizes, fairly cheap and easy to use. Kitten can chew on it without harming the wires hiding inside. As an added bonus cats tend to hate the taste.
Tap a fuse - 1st fuse protects your vehicle, 2nd fuse slot protects your dash cam - allows you to tap into the fuse, and power your dash cam.
Update 2: I have found the cause of the problem and what was needed to fix. I will post below what i found so if anyone else gets this, they can fix it.
https://www.youtube.com/watch?v=wnN31snqR9o
Everything needed to fix this in this video. It was a grounding problem caused by a crappy PC. This little box eliminated all static noises, and has actually increased audio quality. With this i also bought a 2x1/4" jack to RCA cable, as that is the type of input my monitors take, all equipment used listed here: (UK Amazon)
Ground Loop Isolator: https://www.amazon.co.uk/AV-Link-Ground-Loop-Isolator/dp/B000NVWB9O/ref=sr_1_1?ie=UTF8&qid=1522861082&sr=8-1&keywords=ground+loop&dpID=413Ja6ofpeL&preST=_SX300_QL70_&dpSrc=srch
2x1/4" Jack to RCA: https://www.amazon.co.uk/dp/B006H0E4YA/ref=psdc_407727031_t2_B004EBKV1Y
(Amazon.com products):
Ground Loop Isolator: https://www.amazon.com/InstallGear-Ground-Isolator-Noise-Filter/dp/B077Y5DLBB/ref=sr_1_2?ie=UTF8&qid=1522861210&sr=8-2&keywords=ground+loop+isolator
2x1/4" Jack to RCA: https://www.amazon.com/dp/B000068O19/ref=psdc_3236443011_t1_B004NCYVY2
Check google maps. Solution were those https://www.amazon.com/RF-Choke-31500-Ferrite-Material/dp/B00XDACVOM/ref=sr_1_8?s=industrial&ie=UTF8&qid=1461671439&sr=1-8&keywords=rf+choke
Thanks for showing the math behind it, definitely shows how falsely they have advertised it
With the welding cable, i have found this after a quick Google search
http://www.r-techwelding.co.uk/70mm-welding-cable/
They offer 50mm, 35mm etc but 70mm is the biggest. Is that worth it?
What about this? https://www.amazon.co.uk/KnuKonceptz-Gauge-Amplifier-Wiring-Installation/dp/B004YWC4FY/ref=sr_1_27?ie=UTF8&qid=1495667068&sr=8-27&keywords=amp+wiring+kit
It says CCA but I have no idea what that means in terms of performance
They do offer a long grounding wire for the "big 3" upgrade as xxYYZxx said, if that's worth it
That looks like it'll fix the problem! Wondering if it's just a basic Isolator Transformer, or if it has some additional stuff (filtering/processing) to handle other noises. Was considering getting something like this: https://www.amazon.com/dp/B002YGM5D8/ref=cm_sw_r_cp_apa_3gGgzb4TBWVH7 which looks to be just the basic isolator.
Looks like I have some options to try now, thanks!
If true the OP can work around it by installing an input transformer between the source and the headphone amplifier. This will break the unwanted ground short.
edit- like (this one)
Kript Noise Filter Ground Loop... https://www.amazon.com/dp/B01N7QSOO8?ref=ppx_pop_mob_ap_share
Fans?
Will do! I want to make sure im doing this right, I would take the RCA outputs and ford head and feed those into the amp, and then use this wire to connect the amp output to the cars factory wiring to feed the 4 cabin speakers?
https://www.amazon.com/Metra-MC918-20-20-Feet-Nine-Conductor-Multi-Use/dp/B004H1KAMQ/ref=sr_1_3?ie=UTF8&qid=1542597755&sr=8-3&keywords=9+wire+speaker+wire
Or should I wire the 4 speaker outputs from the ford head into the amp, and then have it amplified, and feed the output of the amp back into the speaker side of the harness?
Thanks. It didnt seem right that it was doing that. These are what I ordered I've used them many times before with no issue. The heater heats up super fast compared to the old one. Like atleast twice as fast which is nice but has me wondering.
You need a line out converter if you still have the factory head unit.
You are limited if you are wanting to buy thru amazon.
https://www.amazon.com/Rockford-Fosgate-Amplifier-Install-Interconnect/dp/B001AV5ZHQ/ref=sr_1_4?keywords=8%2Bawg%2Bwiring%2Bkit&qid=1559096898&s=gateway&sr=8-4&th=1
As he said ground loop isolator. Or a power conditioner. Power conditioners are a lot more though. They are usually used with high end stereo equipment and instruments like guitars.
I had bad static with line out to aux in on the mix amp gen 4 and this solved it.
https://www.amazon.com/Isolator-Audiophile-Frequency-Without-Distortion/dp/B01N10AQ76/ref=sr_1_6?crid=23OWCEXOMDQ3Q&keywords=ground+loop+isolator&qid=1557551859&s=gateway&sprefix=ground+l%2Caps%2C156&sr=8-6
But i had planned to need it. I may even get one for stream out.
I was thinking of making my old holder with wood as the plastic ones seem to melt for some people. I've never had that happen. I was looking at install gear ones already. Would it be better to get one that needs terminal ring or just the screw in type? This is the one I was considering https://www.amazon.com/InstallGear-Gauge-Line-Fuse-Holder/dp/B01CT4ZJHS/ref=mp_s_a_1_4?ie=UTF8&qid=1549041992&sr=8-4&pi=AC_SX236_SY340_FMwebp_QL65&keywords=anl+fuse+holder
Yep i think that’s what i’m going to get. Was recommended a ground loop isolator
(https://www.amazon.com/dp/B077Y5DLBB/ref=cm_sw_r_cp_awdb_t1_5HazCbG8DWADK)
If that fails i found this - https://www.amazon.co.uk/dp/B01BYIP4IE/ref=cm_sw_r_cp_api_i_lKazCbDZ83MYT
Do you think that could solve the issues as that has two balanced TRS outputs.
Just a lot to spend on something that might not solve my problem
I tried connecting it to the the same outlet as the other station with an extension cord and it still occured. I suppose it must be interference then. Any idea if this'll help?
https://www.amazon.com/RF-Choke-31500-Ferrite-Material/dp/B00XDACVOM/ref=sr_1_8?s=industrial&ie=UTF8&qid=1461671439&sr=1-8&keywords=rf+choke
No splicing the factory harness... but it does require splicing into two of the wires that connect to the button. The connectors snap over two of the wires to the button (unless I can find a connector that matches the button connector).
Power comes via an add-a-fuse connector, the ground connection works on any screw / connection to the vehicle body, and the button wires are tapped via snap on T-Tap connectors.
An additional benefit is that only changes the startup state - the button still works to turn it on \ off if there's ever a situation where you wanted it on.
What kind of noise are you getting? If it's a 50/60Hz hum using an isolation transformer on it's output would reduce it significantly https://www.amazon.com/Isolator-Eliminate-Electrical-permalloy-transformers/dp/B01N7QSOO8/ref=sr_1_6?ie=UTF8&qid=1491227544&sr=8-6&keywords=3.5mm+transformer
Alternatives are to run a long cable, optical or 3.5mm analogue from the PC to the sound bar directly.
By the way I found the kit I bought.. Comparing it to what you've told me, it sucks lol.
https://www.amazon.com/dp/B0002VM8RU/ref=cm_sw_r_em_apa_KzrbzbR453S2T
I think I will go with this because it has what I need and is cheapest do you think it is okay?
https://www.amazon.com/Finware-Female-Bullet-Connectors-Battery/dp/B01E9HM7NC/ref=sr_1_6?ie=UTF8&qid=1480295788&sr=8-6&keywords=XT60+connector
This is what you're talking about, right? Get a multiple pack, always good to have excess!
Or a 12 volt fan, like this or this.
You can absolutely connect all this to the factory head unit. The Pioneer amplifier that I linked to you can accept speaker wire inputs. No need for RCAs or line output converters at all. It's the white square 8-pin plug on the end of the amp. You'll clip each factory speaker wire in two, connect the side coming from the head unit to the white square 8-pin plug on the amp, then connect the output of the amp to the other side of the factory speaker wire going to each speaker. I'd recommend some 9-wire to help you with this. Easily connect all the head unit outputs to that, run to the rear in one small jacket, and into the amplifier.
I would actually get these: (Real 18AWG 43x2pcs Strands) 10 Pairs DC Power Pigtail Cable 12V 5A Male & Female + 10 Pairs DC Power Jack Plug Adapter Connector for CCTV Home Security Surveillance by MILAPEAK (2.1mm x 5.5mm) https://www.amazon.com/dp/B07CWQPPTW/ref=cm_sw_r_cp_api_i_LmT0Db7G21FSE
I like them better because there are less exposed wires and they are higher quality for pretty much the same price.
To connect a single wire to two things, you split the wire. Take a higher gauge stranded wire, strip it a fair amount (a couple inches) then take half the conductors and twist them together, same with the other half. Use heat shrink so now you’ve got one wire that splits into two wires. Solder additional lengths of wire to your split ends if you need the individual split sections to be longer.
Protip: use these to make soldering wires together dead simple. Kuject 120PCS Solder Seal Wire... https://www.amazon.com/dp/B073RMRCC3?ref=ppx_pop_mob_ap_share
Buy yourself a heat gun if you think you’ll do this more than ~5 times, it makes soldering wires together a 30 second task, very easy.
Will this work?
I did this mod yesterday on my Monoprice Maker Select V2.1
I bought this: https://www.amazon.com/gp/product/B01E9HM7NC/ref=oh_aui_detailpage_o03_s00?ie=UTF8&psc=1
Disassembled printer
Used needle-nose pliers to pull the entire connector (while still plugged in) directly away from the board. It takes a little wiggling but the green and orange parts of the plug should eventually work their way off the metal posts still attached to one-another. (note, no heat was required to do this)
Solder on the female end of the plug to the board in it's place. Solder wires to the male plug.
Repeat (power & hotbed connectors)
Total of 8 solder locations.
Done in about 30 minutes with very minimal soldering skills and minimal disassembly.
Edit: Also worth noting that the listing for X60 connectors I linked came with red and black heat shrink tubing.
Just to close the loop, I fixed this with a ground loop isolater
https://www.amazon.com/gp/product/B01N7QSOO8
I wanted to give an update.
(http://www.bestbuy.com/site/kicker-cs65-6-1-2-coaxial-speakers-with-polypropylene-woofer-cones-pair-black/7708042.p?skuId=7708042)
I'll be running the stock radio so I'm assuming everything installation related should be pretty self explanatory.
Am I missing anything?
I just purchased this wiring kit - Rockford Fosgate 8 AWG Amplifier Install Kit with Interconnect
Am I totally screwed with the amp I have or will I get by for awhile? I thoroughly believed in all the reviews I read on Amazon; the Boss equipment was recommended with the MTX subs and the reviews said they worked fine together.
cable manager
I stand it vertically without the stand and it's very stable. Only 3 cables connected (power, LAN, HDMI) and all wrapped into single tube via cable manager. Use proper color tube to merge into your desk color.
When I first got my cat she did the same thing. I ordered this tubing to go around our wires. It’s relatively cheap and you get a large amount. She never bothers anything that I’ve wrapped this around.
https://www.amazon.com/gp/aw/d/B0017686ZC?psc=1&ref=yo_pop_mb_pd_title
Is this the buzzing noise everyone is talking about on the JBL MKii305p speakers? https://imgur.com/VSoTcre
Will this ground loop noise isolator possibly fix this buzzing issue on my speakers? https://www.amazon.com/gp/product/B01N10AQ76/ref=ppx_yo_dt_b_asin_title_o00_s00?ie=UTF8&psc=1
https://www.crutchfield.com/p_113DDX374B/Kenwood-DDX374BT.html?tp=20217&omnews=14403470
https://www.amazon.com/gp/product/B00XLXHVVE/ref=oh_aui_search_detailpage?ie=UTF8&psc=1
https://www.amazon.com/gp/product/B004H1KAMQ/ref=oh_aui_detailpage_o01_s00?ie=UTF8&psc=1
A DAC powered by the USB directly won't help with the noise. You'll either need to run a Toslink connection into your DAC, use a line filter/isolator, or a better DAC that's self powered.
I was running into the same noise issue with my old USB powered DAC and ended up with this line filter before I got my Bifrost: https://www.amazon.com/gp/product/B01N10AQ76/ref=oh_aui_search_detailpage?ie=UTF8&psc=1
With my Bifrost, I have 0 noise as it's self powered and has noise filters going on inside of it. Just be aware that isolators remove some frequency along with the noise, but the one I linked completely solved my dirty USB noise problem.
Not unless your only gonna be running 500w rms... That's just preference, you can run a little more power through 8ga but I wouldn't. You'll want 1/0ga wire for a proper amp for those subs. Hell, that AT amp wants a 180A inline fuse. The Knukonceptz KCA 1/0ga kit would be fine since it can handle up to 250A. It's like $70 after shipping. Doesn't include RCA's or anything, but you already have that stuff in.
Try to pick up something like this. Good luck!
Ok so ill be ordering this one.
Could water have potentially gotten to the fuse and cause it to blow? I saw slightly exposed wire where the fuse connects to the wire via allen key that is now covered with electrical tape.
While people might snub their nose at cheap speakers I have 2 pair of these in my crew cab and they sound just as good over the road noise as speakers that cost twice as much.
https://www.crutchfield.com/p_575R1675X2/Rockford-Fosgate-R1675X2.html
I rented a versa for a while when working 400 miles from home and driving back and forth on the weekends. They are not the quietest cars so those subtle nuances people spend extra on can get lost in the "ambiance". Thing I loved about that car is I could set the cruise on 95 and still get 33 mpg, which is triple what I would get driving 80 in my truck.
As far as subs go keep an eye on your local CL or Facebook marketplace for anything in JL Audio's W3 line. I'm going to go pick up a second 12w3v3-4 in a couple days for a bill. You have time to sit and wait until you find a good deal so just keep your eyes peeled.
NVX makes great amps for under $200, if you can't find a monoblock used before your head unit comes out (you should be able to pick a suitable one up using those same resources for $100).
As far as amp wiring kits you're not going to be pulling enough amperage pushing a 250-500w rms subwoofer to necessitate a 4ga ofc wiring kit. 8ga ofc or 4ga CCA will be fine.
https://www.amazon.com/gp/aw/d/B01N1SS2ZA?psc=1&ref=ppx_pop_mob_b_asin_title
$80 for factory replacement speakers
$20 for wiring kit
$100 for sub
$100 for amp
$500 for head unit