Best ceiling light fixtures according to redditors
We found 681 Reddit comments discussing the best ceiling light fixtures. We ranked the 338 resulting products by number of redditors who mentioned them. Here are the top 20.
We found 681 Reddit comments discussing the best ceiling light fixtures. We ranked the 338 resulting products by number of redditors who mentioned them. Here are the top 20.


I use these lights! I recently changed them from some red + blue lights cause I got tired of the pink color, and I couldn't be happier with them! I have four of them screwed under each shelf!
I second this - this would fix like all of my problems.... potentially
Edit:
Went through OP's history...
https://m2.ikea.com/ca/en/p/fjaelkinge-shelving-unit-white-60221683/
https://www.amazon.com/gp/product/B01HBT3BVM/ref=oh_aui_detailpage_o00_s00?ie=UTF8&psc=1
From this post:
https://www.reddit.com/r/succulents/comments/a76try/my_succulent_shelf_is_finally_complete_12_led/
I use these and they work great.
I just have them zip tied to metal shelving. They're cheap, lightweight, don't get hot and are LED so less electricity useage.
I have 2 sets that I use for my entire set up, 2 per shelf.
I plan on using them to start my seeds indoors here shortly but they've worked great for my succulents, some even bloomed. People say you have to have the colored lights but you definitely don't.
I just have mine on a timer so I literally don't have to worry about a thing. I'll definitely have to pay more attention once I get my veg seedlings started, at least for water.
I've been using these HitLights LED strip for over a year, no complaints 9/10 for this price.
old setup with the LED's from last year
current setup still same kit
Edit: You might also want to pick up a strip-to-strip connector for $7 like this one so it looks cleaner along the corners but it's not necessary considering the LEDs will be hidden anyways.
For anyone interested
My lights: https://www.amazon.com/dp/B01HBT3BVM/ref=cm_sw_r_cp_apa_i_CdHKDbPDRD0JF
My shelf: https://www.homedepot.com/p/HDX-48-in-W-x-72-in-H-x-18-in-D-Decorative-Wire-Chrome-Heavy-Duty-Shelving-Unit-HD18481302PS-1/203846551?MERCH=REC-_-rv_mobileweb_rr-_-NA-_-203846551-_-N
I also needed an outlet timer since the lights don't have one https://www.amazon.com/dp/B00MVFF59S/ref=cm_sw_r_cp_apa_i_FmHKDbGVVCMWT
Planning on buying this light setup for 4 shelves with succulents and cacti and houseplants underneath them. What do you guys think?
Edit: itll be near a west facing window, but i really would mainly like them to survive through the winter.
$14 Discraft Weekender Bag
$24 12V Rechargable Battery Pack
$15 UV LED Strip
$4 Menu cover
$6 Power splitter
$5 Power Plugs
Total = $68
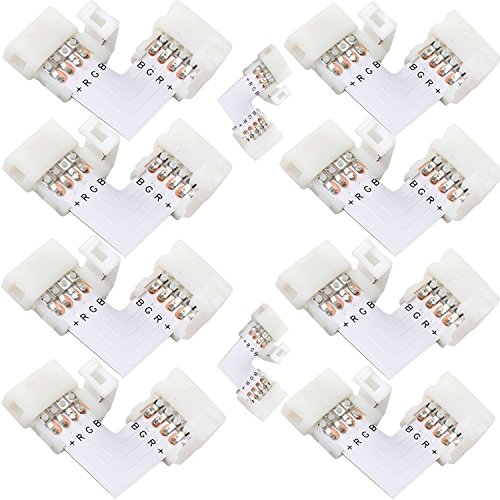
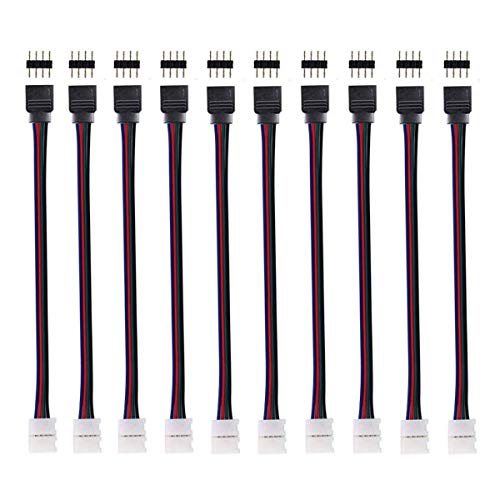
For anybody that want's to do this but are scared to solder,or just want things easier. They sell connectors for these light strips that get rid of having to solder completely.
http://www.amazon.com/dp/B00977FHG4/ref=wl_it_dp_o_pC_nS_ttl?_encoding=UTF8&colid=3A3W1Z0CUSK9T&coliid=I26ROOAIL77ZA4
I got these recently and I’m pretty happy with them! I have 3 on my shelf with my more light hungry succs. 2 on one shelf with my less light hungry, and 1 on my prop shelf. I got them because in my sunniest spot they were still etiolating. New growth is all compact now, and even a little sunstress and some blooms! The lights are about 6-10in above my plants..
These are probably too long for that shelf tho. I know Barrina has 2ft lights like this that are actually made for plants but I’m not sure if the specs are right for succs. My lights stick out past my shelf so it’s not the prettiest but it’s functional. From my understanding the cheap clip plant lights from amazon don’t really do much of anything.
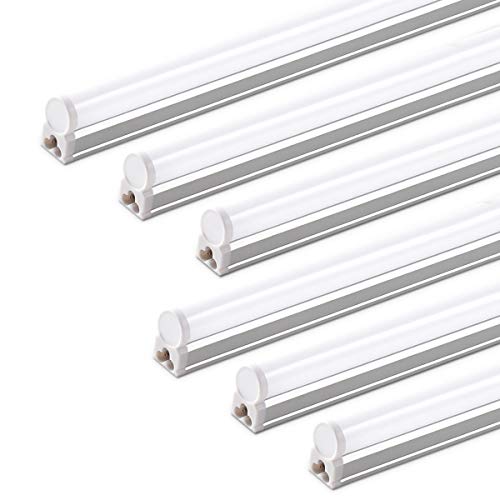
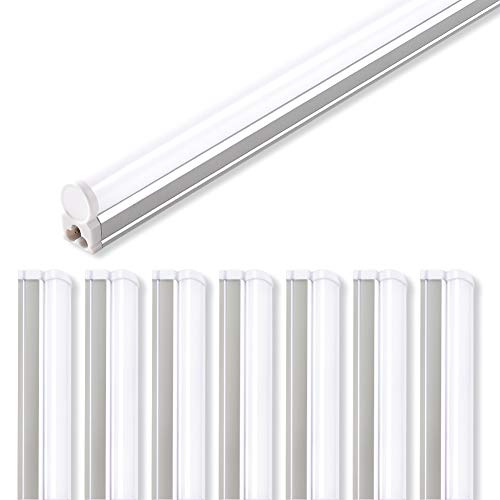
(Pack of 6) Barrina LED T5 Integrated Single Fixture, 4FT, 2200lm, 6500K (Super Bright White), 20W, Utility Shop Light, Ceiling and Under Cabinet Light, Corded electric with built-in ON/OFF switch https://www.amazon.com/dp/B01HBT3BVM/ref=cm_sw_r_cp_api_i_ghNFDbAW91XJR
In my opinion, if you paid $3K for that little workbench and additions, you've lost your mind.
What do you have there really? A whole 8 sq.ft. of work space if you clear everything off? How can you sit back and be ok with that for $3K? My workbench is probably more than twice that length at 9' and deeper as well. It's made of birch hardwood with steel legs and if given some moderate care will outlive me. I probably have about $700 in that workbench. I'm all pegboarded out as well. You got a monitor up but in spending $3K you still don't have anything hooked up to it?? And what are you going to spend on a Mac mini, another $800? I snagged an aging gaming PC off of Craigslist for $120 which will handle YouTube and whatever other garage shit I throw at it quite easily. Snagged a 1080 ultrawide monitor on there for super cheap as well and mounted it on a VESA swivel mount. Your lighting is truly terrible. You have one light bar going across the top? Even in the video thumbnail you can see all the shadows being cast in that dimly lit area. Do yourself a favor and grab some of these. They'll make your garage as bright as the surface of the Sun and you'll never think about lighting again.
Pasting a comment i made a few months ago. open source version using fastled and an unofficial build of prismatek
>https://www.amazon.com/gp/product/B011BD2B5Q/ref=oh_aui_detailpage_o05_s02?ie=UTF8&psc=1
>https://www.amazon.com/gp/product/B00NLAMS9C/ref=oh_aui_detailpage_o00_s00?ie=UTF8&psc=1
>https://www.amazon.com/gp/product/B00TT2QM5W/ref=oh_aui_detailpage_o05_s00?ie=UTF8&psc=1
>https://www.amazon.com/gp/product/B01FSGGJLY/ref=oh_aui_detailpage_o02_s00?ie=UTF8&psc=1
>measured and cut led strips, connected them via the corner connectors. the end of the led strip comes with a power plug and a 4pin connector (looks similar to a PWM fan connector) connect that with the rainbow wires to a programmed arduino.
>https://www.amazon.com/gp/product/B01EAF4YNE/ref=oh_aui_detailpage_o05_s01?ie=UTF8&psc=1
>power supply i used. it was more expensive to get it via amazon, but those are the parts i used to make a solder-free setup. you could order same or similar parts and get it real cheap from china.
>https://youtu.be/NIIXmleTbP0 video of it in action :)
If you could find some way to diffuse the lighting a bit I think itd take it to the next level. Because how bright the picture makes it seem, I can't tell if its just a standard adhesive LED strip or what
But something like this would soften the lighting and give you clean straight lines
The area looks very cool though
I use these 4 per shelf, 3 shelves (I also have some cacti that were not included in my family photo that live in my cabinet). They are not "grow lamps" per se but they meet the specs needed for growth. This is the cabinet I house my lights in. The lights dont get very hot so I just point a little fan at it during the day. Hopefully that gets you started :)
OK. Let's make that the focal point of the room.
1.Above the bar only, maybe a few feet out. Remove the drop ceiling. Leave it for the rest of the room, if you like. Once you pull the ceiling, paint the structure above in flat black, to make it kind of disappear. You want the headroom to make it stand out from the rest of the basement.
2.For lighting, use micro spot lights on the bar itself. Something like this would really make a statement:
https://www.amazon.com/Tech-Lighting-800CBL5PN-Accent-Nickel/dp/B002N2W90M?ie=UTF8&*Version*=1&*entries*=0
3.People need a foot rail to feel relaxed. You can buy or make one for not too much money.
4.Behind the bar you need a focal point. I am assuming that you'd have a TV somewhere else, so that is out. But what if you built four shelves, two one each side, with a space in the middle. Then find a place that makes neon signs, and create a special, one-of-a-kind sign for your bar. I am a Don Henley fan, so my retreat is called "The Sunset Grill". See if you can come up with something unique.
5.Every bar needs tunes. I propose that you do not put a bookshelf system behind the bar. I suggest that you start looking at Ebay, CraigsList, 2nd hand stores. What you want is an old jukebox. It would be better is it didn't work. What you want is the shell. Then you could outfit it with Blutooth, Pandora, streaming media off your home network.
Hope this gives you something to think about. You are really lucky. This is going to be a blast to build.
Not to mention a $120,000 chandelier
Got everything from amazon.
LEDs: https://www.amazon.com/gp/product/B008GYTVSY/ref=oh_aui_detailpage_o02_s00?ie=UTF8&psc=1
Driver: https://www.amazon.com/gp/product/B00VM28NWW/ref=oh_aui_detailpage_o02_s02?ie=UTF8&psc=1
Dimmer: https://www.amazon.com/gp/product/B00JQ437YM/ref=oh_aui_detailpage_o02_s01?ie=UTF8&psc=1
Connectors: https://www.amazon.com/gp/product/B0062RBR84/ref=oh_aui_detailpage_o01_s00?ie=UTF8&psc=1
Ordered a driver two-pack incase I came up with a use for the extra LEDs.
It is pretty easy to use, it has adhesive backing so it sticks. You can cut it to the length you need. I used These to connect the different strips that I cut. I also got some of This to extend the connectors.
I'll link the full order:
I am
not 100%happy with the light strip I got.They are super sensitive to the power draw and flickers time to time(maybe it's the power adapter =/). Though, it's cheap and does its job pretty well![EDIT] correcting the led power connect as opinted out by /u/BishoujoReview
[EDIT] flickering was due to an old extension cord. I plugged the power adapter directly to the wall outlet and that solved the problem.
Not op but 99% sure it’s these: https://www.amazon.com/dp/B01HBT3BVM/. I have a set of the same ones.
These guys? https://www.amazon.com/Barrina-Integrated-Fixture-Utility-Electric/dp/B07DNPL2VC/ref=sr_1_3?keywords=Barrina%2BLED%2BT5&qid=1554527148&s=gateway&sr=8-3&th=1
How long have you been using them? You're plants seem to have very nice color.
Century Indoor 24-Hour Mechanical Outlet Timer, 3 Prong, 2-Pack https://www.amazon.com/dp/B01LPSGBZS?ref=yo_pop_ma_swf
(Pack of 6) Barrina LED T5 Integrated Single Fixture, 4FT, 2200lm, 6500K (Super Bright White), 20W, Utility Shop Light, Ceiling and Under Cabinet Light, Corded electric with built-in ON/OFF switch https://www.amazon.com/dp/B01HBT3BVM?ref=yo_pop_ma_swf
Hgrope 5W LED Grow Light Desk Lamp Clamp Flexible Neck for Hydroponic and Indoor Plants https://www.amazon.com/dp/B07CVKWZH3/ref=cm_sw_r_cp_api_i_7ZEaBbZSW8ASJ
this last one isn't the exact red/blue lights i have but it looks better than mine hahaha
You can use bluetooth to turn them off.
I use these because the Vive Pre base stations didn't have bluetooth: https://www.amazon.com/gp/product/B01CWNMB86/
ac adaptor
right angle connectors
LED strips
It’s these.
(Pack of 6) Barrina LED T5 Integrated Single Fixture, 4FT, 2200lm, 6500K (Super Bright White), 20W, Utility Shop Light, Ceiling and Under Cabinet Light, Corded Electric with Built-in ON/Off Switch https://www.amazon.com/dp/B01HBT3BVM/ref=cm_sw_r_cp_api_fQ19BbK7VS958
That's a great big space, you're very fortunate.
Also:
(Pack of 6) Barrina LED T5 Integrated Single Fixture, 4FT, 2200lm, 6500K (Super Bright White), 20W, Utility Shop Light, Ceiling and Under Cabinet Light, Corded electric with built-in ON/OFF switch https://www.amazon.com/dp/B01HBT3BVM/ref=cm_sw_r_cp_apa_i_M2cYDbSKZY7WG
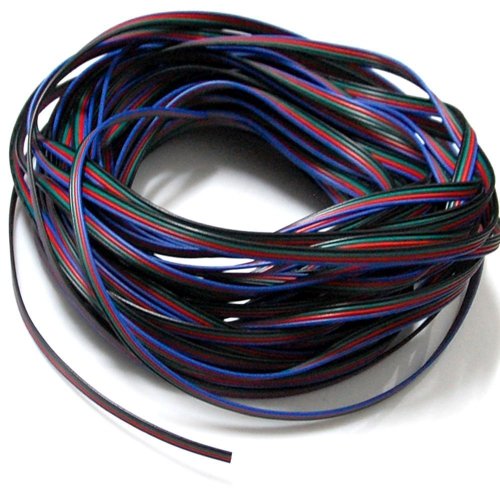
So we bought some RGB led's from amazon, auto wire, a switch and [extension wire] (http://www.amazon.com/Color-Extension-Cable-Line-Strip/dp/B00DPQMKBS/ref=sr_1_1?ie=UTF8&qid=1416110978&sr=8-1&keywords=rgb+extension+wire)
Tap into the 12v cig plug(or any 12 volt that turns off with your car) and run it to the power side of the controller box. Then cut the led's to length and use the double sided tape that comes with it to hold it in place out of sight. Solder the extension wire between the driver and passenger side footwells and to the back. The front was easy, however the backseat was harder.
We had to take the seats out in the back to run the wire under the carpet to keep it hidden. Then there's a 1/4" gap where we put the lights. It is on the bottom, where the seat fabric meets the metal frame of the seat.
To run it to the bed, we had to take the plastic storage behind the seat to find a rubber grommet that is on the driver's side behind the seatbelt about 6-9" from the floor. Its a 1/2" rubber grommet that just plugs a hole and has no other purpose. then run the wire beneath the bed.
We took the railing on the sides of the bed(4 torx bolts per side) and then popped off the plastic that sits on top of the bed sides. Using 3M 20lb double sided tape, we attached the LED's to the bottom side of the rails that were removed. Then the wires were run through the holes that hold that plastic top piece in place. Those holes give access to the inner fender wells where the wire was securely zip tied and run to the other side of the bed and the same process was done.
We later found out that the lights in the bed cannot be in their fade mode while the truck was in motion, so we had to run a separate switch to the bed section so it could be turned off independent of the interior lighting.
If you have any specific questions, feel free to PM me and ill call my buddy to take more pictures for you! It was his new truck that we did it to, not my personal car.
Not tape, but usually if you want to diffuse an LED strip and have the installation look pretty you would use a plastic or aluminum channel with a diffusion cover. Something like this. On-the-cheap you could put the strip in acrylic square tube and then sand or sandblast the outside to frost it.
You can also use white fabric or vellum - remember that the farther you put the diffusion the better blending you'll get.
i bought these for my garage, bright enough for me
https://www.amazon.com/Barrina-Integrated-Fixture-Utility-Electric/dp/B01HBT3BVM/ref=sr_1_6?keywords=led+garage&qid=1568855153&s=gateway&sr=8-6
I'm going to do some copy/paste from Wikipedia for this.
​
>Direct sunlight has a luminous efficacy of about 93 lumens per watt of radiant flux. Multiplying the figure of 1050 watts per square metre by 93 lumens per watt indicates that bright sunlight provides an illuminance of approximately 98 000 lux (lumens per square meter)
​
The important number here is that 98000 lumens per square meter.
​
So lets take a LED light from Amazon that makes 2200 lumens each. https://www.amazon.com/dp/B07DNPL2VC/ref=cm_sw_em_r_mt_dp_U_Me4WCbEJ31RRE
​
To get the same amount of light as the sun in a square meter you'd need 45 (98000/2200) of these LED lights. This is over simplified since LED light doesn't exactly mimic the sun but you get the idea.
​
These lights from Amazon are about an inch wide and for arguments sake a meter long (actually a little longer). A meter is 39 inches long so you couldn't even fit 45 of these in a row to mimic the sun.
​
(Note to self I need more lights in my indoor greenhouse.)
​
Edit for more maths: So lets say you have 20 of these LED lights in a square meter (seams reasonable to me versus staking them side-by-side). You have 44000 lumens per square meter. A little bit less then half of the sun. So you'd need to have them on twice as long as "full sun" duration. 8 hours of full sun becomes 16 hours of LED light.
​
(This is ridiculously oversimplified, point being you need a lot of lights shining a long time to mimic the light output of the sun.)
https://www.amazon.com/gp/product/B004C2SB6W/
I did something like that for my Lego shelf. Used some LED strips and a motion sensor module to keep it all automatic. I had no idea what I was doing and bought a bunch of stuff I didn't need, but...
And if you're comfortable soldering, that's pretty much all you need to get something up and running. But I wanted to make it all modular so I could take it apart and set it back up without too much hassle. So I ended up buying adapters and coaxial power cable things:
I'm pretty sure I did it as inefficiently and cost ineffective as possible because I have severe amazon impulse control issues and just buy shit to get started on fun projects. I'm sure with a little more research/guidance you could do it a little cheaper. But I'm happy with my setup for now.
and here's a picture of the shelf. The shelf is terrible, and it's all a wreck because I'm in the middle of moving, but it shows the brightness pretty well. Oh and I have about a 1/4 roll of LEDs left, so I'd guess 2 or 3 rolls would take care of your shelf.
This, and this
LEDs: http://www.amazon.com/gp/product/B00KCHRKD6/ref=oh_aui_detailpage_o03_s00?ie=UTF8&psc=1
the power supply is really bad for most reviews. I'd suggest getting a laptop charger with multiple connectors, unless someone else knows a better way.
links: http://www.amazon.com/gp/product/B00977FHG4/ref=oh_aui_detailpage_o03_s00?ie=UTF8&psc=1
i bought these LED strip lights, which can be cut down to whatever length, and this power supply. i also bought some extra wire and connectors so i could run one long strip of LED lights through all four enclosures. worked around the adhesive issue by hot gluing the fuck out of them. i scratched up a line about two inches away from the front wall, to create some texture for the hot glue to grab, and allowed some extra glue to sort of wrap around the strip and prevent the strip from being peeled away from the glue.
Just run extension cords behind the wall or within the cabinets. That way stove heat won't be a problem. If you want to save money just buy bulk wire. But if you connect more than 16ft of lights in a single circuit, then you needed an amplifier which needs to be plugged into an extra power supply otherwise the lights near the ends of the circuit will be dimmer and also off color. Color correctness comes from adequate power.
Here are the components I got:
RGB LED Strip Lights Kit,BEILAI RGB LED Light Strip Waterproof SMD 5050 DC 12V Flexible Neon Tape 16.4 Ft (5M) 300leds with 44key Controller for Christmas Kitchen Party Indoor and Outdoor decoration https://www.amazon.com/dp/B01KSPR5GS/ref=cm_sw_r_cp_api_p6mWBbZ9XWQ7N
EvZ 22AWG 4pin LED Electric Wire 22 Gauge 33ft 10m Conductor Extension Cable Line Cord for RGB LED Strip 5050 3528 https://www.amazon.com/dp/B00DPQMKBS/ref=cm_sw_r_cp_api_r7mWBbSQEZB0T
EvZ 10PCS LED 5050 RGB Strip... https://www.amazon.com/dp/B01CMLLKHG?ref=yo_pop_ma_swf
12V DC Battery Pack, 6000 mAh... https://www.amazon.com/dp/B00U2PVX36?ref=yo_pop_ma_swf
And a bunch of male/female connectors - but I can’t find the link. Also make power connectors for the power bank.
Soldering was a pain because the led leads are so close together. Used a knitting ring in the hoodie opening to keep it stiff and hot glued the whole contraption onto some black sweats. No time this year but I want to play with Tron type costumes next year.
like these https://www.amazon.com/Connector-JACKYLED-Non-waterproof-Splitter-conductor/dp/B011BD2B5Q/ref=pd_bxgy_60_img_2?_encoding=UTF8&pd_rd_i=B011BD2B5Q&pd_rd_r=5ae782b3-ee0c-11e8-b5ba-5dfed4e35b83&pd_rd_w=P4U5P&pd_rd_wg=QOlxe&pf_rd_i=desktop-dp-sims&pf_rd_m=ATVPDKIKX0DER&pf_rd_p=6725dbd6-9917-451d-beba-16af7874e407&pf_rd_r=R7YXNJXKSHVCZZ9VS9BZ&pf_rd_s=desktop-dp-sims&pf_rd_t=40701&psc=1&refRID=R7YXNJXKSHVCZZ9VS9BZ
Same, but mine don't have an extension so you have to be tall enough to reach them, but here's a link for anyone interested.
https://smile.amazon.com/gp/product/B01CWNMB86
Go with some cheap LED strips. These should do the job https://www.amazon.com/dp/B01HBT3BVM
amazon has a 6 pack of 48 inch led shop lights for 40 bucks. best investment ever
​
891 reviews 4.5 stars I got a perfect set. put 4 in the shop. one over my kitchen sink and one in the laundry room.
​
yes the connecting wires are a little short . but it comes with 6 power cords and switches..
https://www.amazon.com/Barrina-Integrated-Fixture-Utility-electric/dp/B01HBT3BVM/ref=pd_lpo_vtph_60_bs_lp_t_1?_encoding=UTF8&psc=1&refRID=5W1BPBMPEGBEQ9304H79
https://www.amazon.com/Barrina-Integrated-Fixture-Utility-Electric/dp/B01HBT3BVM/ref=sr_1_2?keywords=Barina+led&qid=1554859667&s=gateway&sr=8-2
1 pack of six, lights up the entire 3 car garage well. Super easy to install and inexpensive.
I got these are they are great. Easy install and lights up my garage nicely. Only issue is that one came in with a dent in the plastic housing of the light. It didn't cause any issues though. There are plenty of other posts about these lights on here as well.
Barrina LED T5
Did the same here, wired my garage up with 2 boxes of these bad boys. They're very bright and very daylight though VERY cheaply constructed due to the price point.
I've got the UFOs: https://www.amazon.com/dp/B071SGN885?ref=yo_pop_ma_swf
And also the LED T5s: https://www.amazon.com/dp/B076FQ15R6/ref=cm_sw_r_other_apa_bYeRBbKYA0RCM
It seems to be working well so far, I've got lots of flowers and some stress coloring coming back. Nothing is stretching so far either.
Waaaaaaay overpriced!
These below are fantastic. Pack of 8, 4’ T5 6500k 2300lm 20w fixtures. I use tons of these in a commercial grow setup.
https://www.amazon.com/dp/B076FQ15R6/ref=cm_sw_r_cp_api_i_2tIQDbBFSHXJZ
I just purchased these lights 2 weeks ago...my lettuce and herbs are happy. I'm using 4 per shelf. 2-3 inches above the plants.
https://smile.amazon.com/gp/product/B076FQ15R6/ref=ox_sc_sfl_title_20?ie=UTF8&psc=1&smid=A1KZKP85O3COJ
for peppers you may want to use the 4000k lights or a mix of the two. There is more red spectrum in the 4000k lights which is more ideal for fruiting plants. Blue spectrum is great for leafy growth
Do not hesitate and buy these lights or something similar. Best decision I’ve made for my plants this summer. I saw this on fat_plants_only instagram. She has a whole highlight on her lighting set up and it works. My plants are finally compact and have their stress colors. I think the key is to make sure it’s white LED and 6500K. This is what my set up looks like now. I have my lights on 12 hours a day and in about two weeks I noticed a difference in my plants.
https://www.amazon.com/gp/product/B07DNPL2VC/ref=ppx_yo_dt_b_asin_title_o02_s00?ie=UTF8&psc=1
​
Well worth the $60 IMO. Tubes are light weight, connect easily enough to the little mounting brackets, came with enough end-to-end connectors, male-to-male wires, and male-to-plug switched wires that I didn't need to buy any additional connection pieces or anything. Only minor complaints were that I had to pre-drill the holes in the joists for the mounting clips (should've expected it, I'm just really lazy) and that the screws themselves aren't terribly hard to strip if you're not paying attention.
Track lighting. Usually they're placed on the roof. Similar to these.
I don't think you have a problem. When I had more money to spend, I spent almost all of my money on Amazon because they just have everything I needed, great service and I've sold my soul to them anyway since I use prime.
15k on Amazon is totally fine. I mean - if you had bought an overpriced chandelier, you could have spent almost 100k on one single Amazon product. And even if you don't buy expensive decorations on Amazon, if you use AmazonFresh or Pantry, spending most of your money on Amazon isn't that unusual.
I just found this one for a 100K chandelier.
yeah, you'll just need a connector like this:
http://www.amazon.com/HitLights-Angle-Light-Connector-SMD3528/dp/B0062RBR84/ref=sr_1_4?ie=UTF8&qid=1421782254&sr=8-4&keywords=led+strip+connector
So every year I like to "build" something to make the campsite a little more hospitable/more glamping like. Last year I used three of these in series at the tops of our two EZ-Ups. I then wired them up to one of the car batteries with a switch in between it and the lights. Worked like a charm. The switch sat on top of the front wheel driver's side tire, so it was somewhat concealed while being right at the entrance to our campsite. The amount of light off of three of those was also pretty impressive. Our entire 14 person (4 cars) campsite was super bright at night. The LEDs don't draw much power (obviously don't leave them on all night) so a morning run of the engine (which we did everyday to charge phones and whatnot) kept the battery from dying.
You can cut and use a connector.
https://www.amazon.com/Solderless-Light-Strip-Connector-Extension/dp/B006VZKSNC
This is the one I've been using: http://www.amazon.com/gp/product/B0040FJ27S/
There may be better and worse ones out there; honestly I don't remember how I chose that. But I have three of them and they've worked well for me.
So far I haven't run into any problems. When/if you splice the strips, obviously make sure you keep the wires in order. They sell pre-made connectors and splitters, but I didn't really use any of those. I did buy some of these connectors: http://www.amazon.com/gp/product/B006VZKSNC but all I ended up using them for was the raw wire (I cut the ends off an soldered them directly to the strips).
In the Arduino-controlled setup, I re-used the power supply that came with the strip, and just fed it through the mosfets linked above. I discareded the remote and the little controller box (well, I filed them away for potential later use).
In my application I found that the adhesive on the back of the strips didn't work very well, so I ended up taping it up with gaffer tape. That works well for me because the strip is in a recessed area you can't see unless you crane your neck to look for it. But if the strips were somewhere more visible, I'd need to look for a more elegant mounting solution.
OP Delivers and sorry for the delay. Thanks to /u/maxwellsearcy for reminding me!
Now, cut the plugs off one side of the lights and off the power supply. Match the wires up on the Dresden ballast with RGB+ on the LEDs. Carefully strip away the outer shielding on the power supply cord and then strip the tiny wires on the inside of the power supply wire. Put those into the power screw points on the Dresden. Plug it in and test. It should come on a solid color.
Now that you have it working, go into your Hue app and scan for new lights. You will see 2 lights pop up for every Dresden ballast you configure. Once it's done scanning, click them in the app and make sure they flash. One of them will NOT flash and you can safely delete that one.
That's it!
Here's what I would get as a budget option. The products posted are just examples, not necessarily something I would recommend. Just what I came across with a quick search on Amazon. I did something similar in my bedroom by dropping strips into crown molding that I put up about 6" below the ceiling.
LED strip lights, this will let you make 2 lines of them on top of the beam. Lay them out and test them before you tape them down, you may find that you need to mount them on something to give them a little angle to get full coverage. Your just going to have to experiment.
Jumper cables. These will let you cross the bumps in the beam without the lights sticking up and looking ugly, and then turn around to power the 2nd line. Get enough to make all the jumps you need, the turn and a couple extra.
Finally ditch the cotroller they come with. Those IR remotes are all crap and don't work very well. You have to end up standing in just the right spot with the controller pointed just right to make changes. Next I tried a wifi option with an app to control the lights. It worked ok, and being able to set them to turn on and off at certain times was nice. The problem was that it was slow, I found myself not turning them on very often because it would take a minute or two to open the app, wait for it to find the lights and then turn them on and change colors. I ended up with a remote similar to this one that was RF with a color wheel. It's not as precise as the wifi app and doesn't have lots of nifty features, but it's simple and easy.
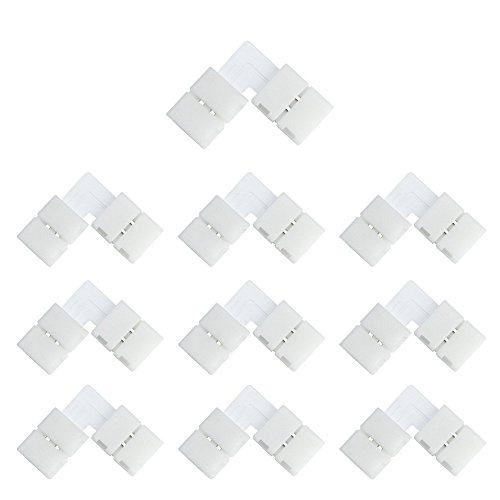
Plain RGB strip? Just grab these jumpers or these corner connectors and cut the strip on the marks. Clip in the strip and bam, done.
Soldering: The led strip lights can be cut and and you can solder on some wire to make easy corners. I have a strip with whites in it so this is the wiring I ordered with mine. You would want wire for RGB strips (4 line) if you don't have and RGBW strip.
The strips usually ends with a cable and a 4pins male connector. But you also need to buy an adapter (look at my first comment ;) ) because also the motherboard got a 4pins male connector. So you need a female to female 4 pins cable. And if you plan to use the strip that you just cutted, than you need this kind of adapters:
https://www.amazon.com/WOWLED-10PCS-Female-Connector-Strip/dp/B01A0B8O24/ref=sr_1_3?ie=UTF8&qid=1505487537&sr=8-3&keywords=4+pin+cable+led+male
Also I suggest you to buy these connectors since it's pretty difficult sometimes to attach the strip on angles, with these you can just cut the strip in two pieces and connect it with the adapter:
https://www.amazon.com/Zitrades-10PCS-Connector-Conductor-Jumper/dp/B00977FHG4/ref=sr_1_4?ie=UTF8&qid=1505487310&sr=8-4&keywords=led+strip+connector
EDIT: Regarding rainbow effect, that is what I was talking about. The whole led strip will change color continuously but always one color at once.
Another idea. Need to have the lights far from the power source? Use this cable with these connectors. A slight bit of soldering (use heat shrink tubing around the solder joints) and you're in the game!
I used this LED strip
The strip is 16 feet long, so i measured out a rectangle for the top of my case, and the front length of the case. I then cut the strip into sections so i could run the cable how i wanted.
I used these adapters to connect each of the sections i made
For the connection from the front left cable to the front right cable, i spliced one of the connectors with some white spare cable i bought, and ran it across the bottom of the case (seen in one of the pictures. Then i mounted everything with 3M mounting tape, which is highly recommended. Let me know if you have other questions, as I made some mistakes which cost me some length of LEDs but was overall not too hard.
I was running this at 2.5 amps without a heat sink but it will take much more if you have a fan or heat sink. 18 gauge wire will do fine with some headroom (1mm if metric). 20 gauge wire would normally be fine but low voltage wire can come in a connected pair so they are derated. For example, this 20 AWG wire pair is being derated to 3.2 amps by the manufactuer although the current-wire size charts would normally show this wire to be fine. That wire would be fine for 30-35 watts on this LED and the same wire I used on my testing.
Buy this 18 AWG wire:
https://www.amazon.com/BNTECHGO-Silicone-Flexible-Strands-Stranded/dp/B01AQOI36M/ref=pd_lpo_sbs_60_t_0?_encoding=UTF8&psc=1&refRID=YPDAJMHZ4QMNAVG1TRSJ
Keep in mind that this is a constant voltage setup that you're likely doing. 12.6 volts and 12.8 volts can have a significant difference on current levels and how hot this COB gets so you want to actually measure the current level. Different COBs can have different voltage drops and COB temperature also plays a role in voltage drop and thus current levels in a constant voltage setup.
Hey OP, instead of keeping the info in chat I'll post here so others might be able to use it.
I'm assuming you have no experience splicing wires, soldering, or using heat shrink tubing, so I found some quick connect things you should be able to use.
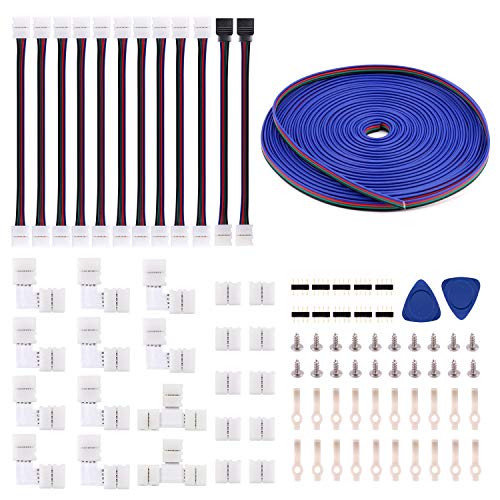
So, the parts I have here are the LED Strip (marked as 'sections' since you will be cutting it), the L Connectors, the 'Wire Harnesses', the Adapters, and the Wire itself.
I drew up a small diagram here with explanation.
​
If you, or someone you know would be able to do the stuff mentioned above, this could have a lot less parts by doing aware with the adapters and wire harnesses and just soldering the wire between LED strips.
(Maybe there is a local Makerspace near you that could assist)
​
Also, instead of the LED strip method, I've seen people with LED bars the run the length of the shelf, and have wires to connect up to another bar. Something like this. (search" LED under cabinet lighting")
If the above diagram seems too difficult, or you're not able to get anyone to assist, then this would be a super easy option for you.
​
This is my next project...
https://github.com/steve228uk/homebridge-magichome
SUPERNIGHT WIFI Wireless LED Smart Controller Working with Android and IOS System Mobile Phone Free App for 16.4ft 300 LEDs RGB LED Light Strips https://www.amazon.com/dp/B01JS0KEBW/ref=cm_sw_r_cp_api_XJn-ybKJ9WEBS
Alightings 4pin LED Connector Connect Wire to Strip, Applicable for 10 mm 5050 RGB Waterproof LED Strip Lights, 22 - 20 AWG Cable Without Stripping the Wires https://www.amazon.com/dp/B01I8CDF58/ref=cm_sw_r_cp_api_jKn-ybEXT5PVQ
EvZ 4 Color 10m RGB Extension Cable Line for LED Strip RGB 5050 3528 Cord 4pin https://www.amazon.com/dp/B00DPQMKBS/ref=cm_sw_r_cp_api_yKn-ybSYT4318
EPBOWPT 12V 5A Power Supply AC Adapter for 5050 3528 RGB LED Strip Light Low Voltage Device https://www.amazon.com/dp/B01KT20TNG/ref=cm_sw_r_cp_api_OKn-ybWC82QCH
SUPERNIGHT (TM) 16.4FT 5M SMD 5050 Waterproof 300LEDs RGB Color Changing Flexible LED Strip Light https://www.amazon.com/dp/B00DTOAWZ2/ref=cm_sw_r_cp_api_4Kn-ybSM88NFB
Soldering is a good skill to have and basic soldering irons are very inexpensive. Try it!
Your other option is to buy longer wire and use strip to wire connectors on both ends of the wire.
First, leds strips are made the cheapest way possible so there is a good chance that some of them will be damaged right out of the package. With that said, measure the length you need and buy double that just to be sure.
Length doesn't dictate the brightness of the leds, (which are wired in series) the power source will. Typically the 12v ac adapter that gets provided for these led strip packs just isn't enough to keep the leds at 12v due to voltage droop. To fix this, just get a better quality power supply. Even trying for a slightly higher voltage, and adding a resistor between the source and the lights.
For light diffusion, try this:https://www.amazon.com/U-Shape-Aluminum-recessed-installation-Mounting/dp/B00F9Q602M
Although, if the light will be viewed indirectly, you probably wont need it.
I used these when I did LED strips under my cabinets. Theres corner ones too https://www.amazon.com/gp/product/B00F9Q602M/ref=oh_aui_search_detailpage?ie=UTF8&psc=1
I used this light strip from Amazon. I'm really happy with them. Installation was a breeze. I bought a splitter and L-shape connectors to make things easier.
I bought these: https://www.amazon.com/gp/product/B06XDLMYMQ/ref=oh_aui_detailpage_o04_s00?ie=UTF8&psc=1
They make the controllers very heavy. After taking both the protective shell and skin off the controllers it felt like the controllers had no weight to them at all. I took them off because I was having tracking issues and because I'm not doing anything but development right now. Most likely the tracking issues are my own fault - my setup isn't the best and I haven't taken the time to improve it.
I am 6'5" or so. I hit my ceiling when playing games, so the shell is great for protecting my controllers. I'd recommend them for problem games but not for full time use.
Edit: Not on topic but this is the best accessory I've bought. Two switches to turn the lighthouses off. https://www.amazon.com/gp/product/B01CWNMB86/ref=oh_aui_detailpage_o04_s00?ie=UTF8&psc=1
I've put these up. They're bright af:
(Pack of 6) Barrina LED T5 Integrated Single Fixture, 4FT, 2200lm, 6500K (Super Bright White), 20W, Utility Shop Light, Ceiling and Under Cabinet Light, Corded electric with built-in ON/OFF switch https://www.amazon.com/dp/B01HBT3BVM/
These are the lights I have in the picture :)
Looks great!
I bought these for my garage and it was the best investment ever!Especially in the winter. Suuuuper easy to install and lots of installing options, either strung together or individually.
(Pack of 6) Barrina LED T5... https://www.amazon.com/dp/B01HBT3BVM?ref=ppx_pop_mob_ap_share
If you only grow greens then I always recommend these (Pack of 6) Barrina LED T5 Integrated Single Fixture, 4FT, 2200lm, 6500K (Super Bright White), 20W, Utility Shop Light, Ceiling and Under Cabinet Light, Corded Electric with Built-in ON/Off Switch https://www.amazon.com/dp/B01HBT3BVM/ref=cm_sw_r_cp_apa_EDN6BbD2J5E4T
They're affordable and provide a lot of light, they work great for leafy stuffs
Yep.
I run them for 16 hours. Things were struggling for a bit (that could have been a combo of things) but when I added mylar to the front things took off. I just started another rack with a "nursery" space where the lights are much closer. Those are growing about twice as fast as the original one.
https://www.amazon.com/Barrina-Integrated-Fixture-Utility-Electric/dp/B01HBT3BVM/ref=sr_1_3?crid=35RVOJTLYQCAN&keywords=barinna+led+t5&qid=1559125327&s=gateway&sprefix=barinna%2Caps%2C175&sr=8-3
Based on another Reddit users recommendation, I have a 6-pack of these on the way for the shelf/tower I’m building for growing greens.
lights
> Actual blueprint
Great, you make my plans look like something an orangutan would wipe its ass with...
I must tell you there is no guarantee 5000k will work better, in fact I get the easily tightest growth from 4000k LED. 6500K fluoro made for wide plants but not nearly as tight, it demanded more real estate with wider leaves + longer stalks to spread them out.
Fluoro and LED are different of course, fluoros have wide spectrum always and LED is divided into almost pure RGB spectrum (like lasers)
I'm telling you, the plant under MH 250 watt at 5500 kelving gave me good fast growth compared to the LED (only using ~35%of the LED strip output tho) but fewer nodes! Much more air in that plant.
MH is its own technology, with its own spectrum, but it seems the color of the light source has an overall say in plant BUILD more than growth SPEED and I've seen it in every single plant I've grown, they all seem to respond the same within their species capabilities.
4000k LEDs got a lot tighter nodes and darker colors. It's in week 8 flower and STILL NOT YELLOWING, my bigger plants with more soil look starved for nitrogen in comparison.
5000k+ can work if you have few plants and want the few, atlas sized leaves, if you want more species and individuals the 4000K is going to keep it thin and shorter and tighter spaced plants. 3000K works but I wouldn't look at anything but the most efficient lights in your case (which in most LED cases is 4k)
of course hard to guarantee I don't really know shit, but something of this sort.
Quantom boards with 60 degrees would be a problem no?
The arduino stuff is over my head so can't calculate for that, But know what I would want to do, Have LEDs around the frame and back light the leaves, maybe less efficient for some plants, may look better in warm white, who knows. A ring of low intensity back light would be cool.
So many factors, my head hurts, your ideas seem sound however.
My old strips are kind of like these, but less efficient and more expensive (and can still grow serious dope)
https://www.amazon.com/Barrina-Integrated-Fixture-Utility-Electric/dp/B01HBT3BVM
Maybe try 5000k, but make it a third priority, I'd invest in efficiency, lower price and the known tight build of ~4000k LEDs first and foremost
But take into account I have not browsed all specs and prices on QB and COB options and my selection is very limited out of EU.
Good luck with that build tho I'm loving it. I had a shit ton of plants not long ago but ran into health issues and now building back up to a comfortable, low maintenance indoor environment.
OP here. At someone’s suggestion on this subreddit, I bought these lights on Amazon: https://www.amazon.com/dp/B01HBT3BVM?ref=ppx_pop_mob_ap_share. I put all six of them a few inches above my Echeveria and keep them on for 12 hours each day. I know from past experience that Echeveria Afterglow will IMMEDIATELY flatten out if it doesn’t get enough sun, and I bet if I put it outside tomorrow it would tighten back up. So that must mean my grow lights aren’t strong enough, right?? I can’t keep them outside because I live in Phoenix, Arizona, where our 120 degree weather will kill them. I’m just trying to get them through the summer by bringing them inside. Does someone have stronger grow lights they can recommend? Price is not really an issue for me.
Does anyone have thoughts or experience with these grow lights?
What are your preferred lights for the best price for a larger collection?
https://www.amazon.com/Barrina-Integrated-Fixture-Utility-Electric/dp/B01HBT3BVM/ref=mp_s_a_1_6?keywords=6500k+led+light&qid=1571371822&sr=8-6
I have a very large collection that I’ve accumulated most of over the last few months and need to buy many of this type of grow light or a few large ones. I’m not sure if I’m going to do a table(s) or shelf setup or a combo of both. Any and all thoughts and advice welcomed and appreciated.
For an inexpensive and easy to install solution, check these out: https://smile.amazon.com/gp/product/B01HBT3BVM/
A 6-pack for ~$50 is pretty darn cheap. They put out a good bit of light and will really light up a basement workshop very well.
https://www.amazon.com/gp/product/B01HBT3BVM/ref=oh_aui_detailpage_o08_s00?ie=UTF8&psc=1 bought these and LOVE em.
https://www.amazon.com/gp/product/B01HBT3BVM/
There you go! I would really like to have attached it to the house, but I will be building a carport that will attach to those stairs in the future. There is a drain to some sort of basin. I poured 5 gallons of water down it without issue before proceeding to tear down the cover.
I do have them just to give a few things in the window a little extra push. But, you would be better off spending just a little more and getting these t5's... https://www.amazon.com/gp/product/B01HBT3BVM/ref=ppx_yo_dt_b_asin_title_o00_s00?ie=UTF8&th=1
I am also a neophyte, but have made several diy grow lights recently. Take everything I write with giant grains of salt.
You can buy a CXB3590 (3500 K, 36VDC) for $38 from digikey. An LED holder from newark ( http://www.newark.com/ideal/50-2303cr/led-holder-cree-cxa35-cob-array/dp/39X0077 ) runs about $3. You can buy a 900mA driver for it off amazon for $11 ( https://www.amazon.com/dp/B01MSANIYC ). You can buy a household AC box and a light switch for about $5 from home depot. Scrounge a PC AC cable, some wire for the DC side, some solder. Dig through old electronics for a good heat sink, a fan. Ask some computer folks for thermal paste.
That would bring you close to $50.
From that you can make a 30W led light, I think get over 5000 lumens, and it'd probably be pretty good quality, and not terribly dangerous.
For the AC side, do everything in the electrical box, and make sure it's grounded. Random stuff happens, don't let it happen to you. Electrical shock sucks, but poorly done AC wiring stuff could get hot, start a fire, so putting it in a box is a must. And it's really nice to have a the AC switch. You could simplify, leave out the switch, and use wire nuts, but it's still absolutely necessary to do that in a box and ground that box.
On the DC side, I used these barrel connectors ( https://www.amzn.com//B06Y4YXRMC ) with the wiring to the LED. It's also nice. EDIT: I don't know what these connectors are rated for, but they seemed pretty sturdy.
Sorry, again, I have some electronics background, but I'm new to lighting, so it's foolish of me to even comment.
I guess what im looking for is something like this:
https://www.lotusledlights.com/recessed-lighting/j-box-mounted
but one that will work with Hue.
or even something as slim as this would work:
http://www.usa.lighting.philips.com/products/product-highlights/slimsurface-led-downlight
​
but neither of those works with hue. Im not restricting myself to only Philips, if there are other brands out there as long as its compatible with the Hue Hub I would think it'd be ok.
​
Closest thing with Hue I could find is this
https://www.amazon.com/Philips-801480-Flushmount-Compatible-Assistant/dp/B0718XQ49D/ref=sr_1_4?s=lamps-light&ie=UTF8&qid=1536096331&sr=1-4&keywords=hue
but if im going to go that thick i might as well just get a normal ceiling light that accepts normal sized . bulbs
>It was a bit of a crude process and I wish I had the tools to do it more effectively but basically what I did was take a high density RGB LED light strip and connect it to a four pin strap connector (link below). I then took out the white led and reflector from the inside of the card and replaced the whole reflector with the light strip. Next I took the GTX logo out of the card and sanded off the green outer coat on the lettering and placed it back inside, I put a few pieces of printer paper between the lights and the logo to help with light dissipation and routed the cable out through a small hole next to the IO shield on the front of the card. sorry that this isn't the best step by step guide on how to do it (I honestly got into it without a clue what I was doing) but hopefully this helps just a little bit with your process. Thanks for asking!
>
>https://www.amazon.com/iCreating-Connector-Conductor-Controller-Solderless/dp/B074G48LWQ/ref=sr\_1\_5?keywords=rgb+strip+connector&qid=1550632831&s=gateway&sr=8-5
​
Light is fine but $70 for one is very expensive. Check Amazon, you can get 8 (20W) for that price: (Pack of 8) LED T5 Integrated Single Fixture 4FT,20W,2200lm,6500K (Super Bright White),Utility led Shop Light, LED Ceiling light and Under Cabinet Light, Corded electric with built-in ON/OFF switch https://www.amazon.com/dp/B076FQ15R6/ref=cm_sw_r_cp_apa_i_xoKQDbBF6P1HG
I got a set of 6 LED bars online for like $55 and they work great. You need something between 5000k to 6500k ideally(thats the color)
Here is some sets of 2, 6, and 8
2
https://www.amazon.com/B2ocled-Linkable-Integrated-equivalent-Single-Ended/dp/B01JFPB0JU/ref=sr_1_fkmr1_4?s=lawn-garden&ie=UTF8&qid=1526527440&sr=8-4-fkmr1&keywords=2ft%2Bbarrina%2BLED&th=1
6
https://www.amazon.com/GRG-Integrated-Linkable-Fluorescent-Replacement/dp/B079BD5CG7/ref=sr_1_5?s=hi&ie=UTF8&qid=1526529507&sr=1-5&keywords=2ft+6500K+LED
8
https://www.amazon.com/dp/B076FQ15R6/ref=cm_sw_r_cp_api_i_2tIQDbBFSHXJZ
They are just about all cuttable - you just need a connector.
Try this one : https://smile.amazon.com/dp/B078VBVVMW
With this : https://smile.amazon.com/dp/B01HRMPDC8
Don't waste your money with Phillips Hue strip lightning. There are generic brands that connect directly to a Google Home or Alexa device, assuming you have one... You get way more length and they are much more vibrant. I have had mine for over a year with no issues.
The lights https://www.amazon.com/dp/B076RNNH1F/ref=cm_sw_r_cp_apa_MlWKBbB03197B
The connectors I bought https://www.amazon.com/dp/B078VBVVMW/ref=cm_sw_r_cp_apa_.oWKBbS9RAMP4
For smaller jobs there are smaller sets of connectors...
I have a growlight, this 300W one, set up like this (sorry it's sideways) and it does pretty amazing! Depending on how big a collection you're thinking of accumulating there's a lot bigger bulbs that are like 4 ft long and can work in shelves. There's another redditer around here who uses these, 3 to a shelf, and has an amazing set up. There's lots of other lights, too. This is just what I've got in my bookmarks at the moment!
This is actually a project I just did this weekend. I originally only had the two shelves in front of the window with red/blue LEDs. It is a south facing window; it's just getting to the end of the day in the picture. I set up the other shelves on the opposite wall for plants that (I believe) only need low light, and cuttings.
I did not like the red/blue LEDs because they caused immediate eye fatigue, and with this also being the spare room my kids use for toys ("the play room"), I didn't want them to have any long-term effects from the lights. I don't know if it's possible, but even being in the room with the red/blues for 5 minutes was pretty bad. I got these lights because they're daylight lights, and any lights are better than no lights at all. These are the lights I bought.
Edit: I'd also like to add one thing about humidity trays. I haven't ever seen much documentation about it or discussion, so I have just been using cookie sheets filled with my bonsai soil mix (100% inorganic). It seems to work? lol
Inside is likely a transformer. This appears to be for low-voltage cable lighting like this. Why it's there I can't guess.
https://www.amazon.com/800CBL5PN-Electronic-Surface-Lighting-Halogen/dp/B002N2W90M
If you're looking for something different take a look at these low voltage cable lights.
I installed them in my kitchen and they never fail to get compliments.
Whew, that was quite the task. Thanks for the contest!!!
all constant voltage LED strips are customizable in length. All you need to do is cut across the cut points (usually marked)
As long as you have the correct power supply (12V or 24V) that shouldn’t matter.
These connectors make it a bit easier when connecting strips together, although I’m not sure if they come in longer lengths. Just make sure they’re the right width.
HitLights LED Light Strip Connector, 8mm Single Color 3528-6 Inch Any Angle Strip to Strip, 4 Pack https://www.amazon.com/dp/B0062RBR84/ref=cm_sw_r_cp_api_i_nLfrDb5BWSWBD
ETA: let me know if you need help :)
If you don't want to mess with soldering the LED strips in the future, there are premade LED connectors available in just about every size and shape and for almost every style of strip. They're also decently cheap.
Also, USB outlets, while expensive, are well worth it.
Absolutely beautiful table!
I guess that depends on your soldering skills. If you solder than you can follow this guide. If not then you can get a set of these to connect all the pieces together.
Overall I spent about $126 because I used a lot of material that I already had (baseboard, paint, romex).
Materials Used:
Leftover 7/16" OSB sheathing cut to size
(2) Closetmaid Cubeicals
Existing baseboard
1" x 12" pine board
Shelf hardware
Paint
Painter's Putty
Caulk
Primed Quarter Round
LED light strip
12v Power Supply
(2) LED PCB connectors
Magnetic Door Switch
(2) Old Work Boxes
Romex Cable
Outlet
Outlet Cover
The LED strips are cut-to-length at specified locations (usually indicated by scissor icons).
You can either go with an adapter or do it yourself method. If you want to use an adapter or premade connector you can use something like: 90 Degree Connector or RGB Connector. If you want to look for other products just lookup something like "RGB LED Strip Connector."
If you want to go the DIY path to route around curves or sharp 90-degree bends, you will need to cut the strips and solder them together. You'd want to use small wire, so if you maybe have a spare ethernet cord, you could use the wires found within to use as connectors.
Any reason you didnt just use connectors like this?
This is the adapter I used. It’ll work for any single color LED strip. You’d need a different type if you’re doing a RGB strip (multi-color strip).
LE 2 Pin Connector Kit, 8mm DC Adapter Cable, Power Connectors for Single Color LED Strip Light, Pack of 2
https://www.amazon.com/dp/B0085ZX8EM/ref=cm_sw_r_cp_api_i_e7i2Cb2ZBD1FG
You might want this too but they are easy to solder regardless.
I don't think there's a buying guide, unfortunately
I'm going to use this Power Supply with this Adapter for this LED String along with this RGB Controller
I think I may heed your advice and get some RGB ones.
As for your comment on soldering, I am a little nervous about that. At least at my newbie status with all of this. Do any of these do the same thing?
EvZ 4 Color 10m RGB Extension Cable Line for LED Strip RGB 5050 3528 Cord 4pin
Zitrades 10PCS LED 5050 RGB Strip Light Connector 4 Conductor 10 mm Wide Strip to Strip Jumper
4PCS 2M 6.56ft 4 Color RGB Extension Cable LED Strip Connector Extension Cable Cord Wire 4 Pin LED Connector for SMD 5050 3528 2835 RGB LED Light Strip ( 4 PCS )
http://www.amazon.com/Zitrades-10PCS-Connector-Conductor-Jumper/dp/B00977FHG4/ref=sr_1_4?ie=UTF8&qid=1436291634&sr=8-4&keywords=light+strip+connector
These look like "dumb" led strips (no onboard electronics). You either need to solder the ends or use one of the solderless connectors. These are for making nice corners: https://www.amazon.com/Connector-JACKYLED-Non-waterproof-Splitter-conductor/dp/B011BD2B5Q/ref=pd_sim_86_24?_encoding=UTF8&pd_rd_i=B011BD2B5Q&pd_rd_r=YBEV9BRYYGQ25YR29T5C&pd_rd_w=NsgMN&pd_rd_wg=gO6Fc&psc=1&refRID=YBEV9BRYYGQ25YR29T5C and these can be used to join strips https://www.amazon.com/Zitrades-10PCS-Connector-Conductor-Jumper/dp/B00977FHG4/ref=pd_sim_86_28?_encoding=UTF8&pd_rd_i=B00977FHG4&pd_rd_r=YBEV9BRYYGQ25YR29T5C&pd_rd_w=NsgMN&pd_rd_wg=gO6Fc&psc=1&refRID=YBEV9BRYYGQ25YR29T5C
The one's you linked should work. I'd highly suggest connecting each monitor's strip in parallel as well to reduce issues with how much current the strips draw and avoid having some of the LEDs dimmer (the ones at the far end of the strip)
Basically you just connect them to a 12V power supply and a controller. You can cut the strips to whatever lengths you need and wire them in series. This guide has a lot more information. The ones that I used are the brighter 5050 RGB LEDs.
If you don't want to mess with ordering the parts separately you can find kits like this one. Also, if you want to cut strips and not have to mess with soldering them together you can get straight connectors like these or connectors like these for any right angles that you need to make.
Awesome product, thanks for letting me know it exists.
If you scroll along the "Customers who bought this product also bought" bar on that page you'll find These connectors and they lead on to loads of different options.
Lights: https://www.amazon.com/gp/product/B01BY7GMEK/ref=oh_aui_detailpage_o01_s01?ie=UTF8&psc=1
Extension connectors: https://www.amazon.com/gp/product/B00977FHG4/ref=oh_aui_detailpage_o01_s01?ie=UTF8&psc=1
I ordered this LED strip light kit from Amazon:
https://smile.amazon.com/gp/product/B016CDCM54/ref=oh_aui_detailpage_o02_s00?ie=UTF8&psc=1
I also ordered these connectors:
https://smile.amazon.com/gp/product/B00977FHG4/ref=oh_aui_detailpage_o02_s00?ie=UTF8&psc=1
The kit comes with 16' of lights, and you can cut them to the length you need and use the connectors to bind them for working around corners or covering large spaces. Taking into account the space in my marquee that's lost to the speakers, 16' was just enough, but the inverter that comes with the kit can drive more, so you could order an additional strip by itself on the cheap to expand if needed.
Bought them from Amazon for less than $20. Also bought extra RGB wires that connect the cut stripes behind the shelves. Plus Silicon Clips incase the tape wears off.
Closer Image of Right shelf
When things settle down for me too, maybe :) money's tight but eventually if theyre still there when i can, i will.
We also bought the connector clips (so it can bend around corners and stuff), extra wire (for extra length), and connector ends (for the extra wire).
The whole thing is super easy and quick to put up! As a warning, the peel and stick backing isn't good at all, so i would recommend buying stuff to help it stay. We used sticky tack since it doesn't hurt the surface so we can take it off if we need to. We left it on a long time (6 hours) and it barely heated up at all. Just about as warm as a starbucks coffee cup. As long as it's not on all the time it shouldnt heat up at all
No problem.
I was also looking at an alternative solution from another reddit post which would use the following items:
If this makes sense then it would look something like this?
LED strip --> strip connector --> 10m extension cable (through ceiling) --> strip connector --> LED strip for cabinets on other side of wall
Found a very informative video of the ballast + LED strips + hue bridge: https://www.youtube.com/watch?v=VNfa9X5Sq1Q
That's already $93 + tax so if it makes more sense to just get a refurb hue strip kits and synchronize them to the same room (Kitchen) then I guess I will go with another set of hue strip kits.
Then you would want this
EvZ 4 Color 10m RGB Extension Cable Line for LED Strip RGB 5050 3528 Cord 4pin https://www.amazon.com/dp/B00DPQMKBS/ref=cm_sw_r_other_awd_p4-NwbH302Q8D
Soldering was simple for mine, it may be a slight headache for the multiple wire, but will look good. I have about 8 feet of wire along with the 16 feet of lights and there isn't an issue, i believe my power supply is 3A. I think i recall someone said they had 4 of them on a 3A supply without any issues. I would advise a drop of hot glue at the soldered ends to keep the weight of the wire pulling everything down.
I think it's a combination of different photography and possibly different LED spacing and diffusion.
If you want a nice smooth light, get the highest-density strip you can, and put some sort of diffuser on it. These are purpose-made but anything that makes the light go through some kind of frosted effect will do the same thing. You could even put them inside clear tube and spray it with glass frosting paint.
Correct. The Arduino can only output a few mA (see its specification), so you need to use transistors (eg MOSFETs) - probably one for every channel (R/G/B).
I recommend you work in stages:
If you give us more details about what exactly you're planning to do we may be able to give you more concrete answers, but your post is very vague.
Also, consider how you want to install the LED strips. Usually indirect lighting works best, but this means you can't just stick them on the wall/ceiling, but have to recess them behind something (e.g. a TV, on top of cupboards) so that you're never looking at the strip directly, but it's illuminating a wall/ceiling instead. Keep in mind that the strips can produce a moderate amount of heat - I recommend you look into metal U-shaped channels (example) to act as heat sinks.
Cool. How did you bend it around the corners? As a trial run, I tried a shorter trip around a wall mounted tv and it was a pain to get it to bend at the corners. Then saw a forum post about how they sell these 4-pin right-angle connectors that let you join strips after you cut them. According to some youtube videos I've seen, the strips seem easy to cut. There is a dotted-line every few inches. Then once you cut them, you insert it into the connectors and the pins will touch the copper dots where the strip was cut. Of course, I haven't done this yet. Just based on what I've seen. I guess, I'll soon find out :)
I just pick a random manufacturer that has decent rating on Amazon, but this the one I bought: econoLED 12V Flexible SMD 5050 RGB LED Strip Lights, LED Tape, Multi-colors, 300 LEDs, Non-waterproof, Light Strips, Color Changing, Pack of 16.4ft/5m Strips https://www.amazon.com/dp/B006LW2NJM/ref=cm_sw_r_cp_apa_iVSazb46NR2QD
Some right angle connectors if u need it:
10X L shape 4 Pins Connector JACKYLED 10mm Non-waterproof Quick Splitter Right Angle Corner Connector 12V 72W Clip for 5050/3528 SMD RGB 4 conductor LED Strip Lights Strip to Strip (22Pcs Clips) https://www.amazon.com/dp/B011BD2B5Q/ref=cm_sw_r_cp_apa_BWSazb8PFRMJN
Totally could. I personally have used these for inside my case and under my case. They work with my asus strix x370-f gaming mobo that has the 4-pin rgb header
solderless connectors for corners and extensions for gaps that didn’t need lights and where the corners wouldn’t work.
Well the 3M arsenal of stickyness does include post it notes so there are varied stickystrenghts. I thought about the corner kinks so I bought corner attachments that keep it flat. Since the back of my TV is so smooth, no matter what happens, they still fall off from the weight of gravity. Velcro doesnt work, the only saving grace is Duct Tape. Not fancy but definitely unseen.
Agreed! 100% I'll be testing THESE after arrival later today.
Sucks that I had to, but got tired of fumbling to plug in when on my head, so ordered this, should do the trick without having to mod an expensive piece of kit: https://www.amazon.com/dp/B01CWNMB86
https://www.amazon.com/gp/aw/d/B01CWNMB86/ref=yo_ii_img?ie=UTF8&psc=1
Sounds like a similar situation to mine. I've been using separate seated (in my small computer room) and room-scale (in the lounge, next room) since the beginning. However, I don't use any extra base stations, instead using some [quick release plates] (https://amzn.com/B000JLK5PU), [DC switches] (https://amzn.com/B01CWNMB86), and extra DC adapters. Changing positions is just a matter of turning it off and unlocking at the original position, relocking and turning on at the new position, then going through Steam's room setup. The process is relatively quick, although going back to room-scale takes a little longer (it would be great if Steam added a way to 'save' profiles).
Ok so I was thinking of using the LED strip, then use the T-shape connector and the L-shape connector to connect all the strip together. The T-shape connector will be connect with a cord as well like in the diagram I drew. But I’m a noob and I don’t know if this is possible to make, and what kind of cord or wire should I use in this case? Anyone have any idea or guidance here to help me out?
https://www.amazon.com/Barrina-Integrated-Fixture-Utility-Electric/dp/B01HBT3BVM/ref=pd_bxgy_60_img_2/138-2966327-8717767?_encoding=UTF8&pd_rd_i=B01HBT3BVM&pd_rd_r=3a6ef682-6a34-41cc-afb6-a6bbfa9d96f4&pd_rd_w=HpnFN&pd_rd_wg=5gsXi&pf_rd_p=a2006322-0bc0-4db9-a08e-d168c18ce6f0&pf_rd_r=GKE7RCTCWJEH4PXXHFAQ&psc=1&refRID=GKE7RCTCWJEH4PXXHFAQ
The link you provided has a color wiring connection example.
You could try something along the lines of these lights.
Since they are a plug in not "permant fixture" you shouldn't even need to worry about a permit. I use these in my garage and they're quite good for the price.
Looking at getting some lights for my garage (single overhead light and an Ikea light =/= good times) and was thinking about these. If anyone has any comments about these lights in particular or other budget friendly solutions, that would be great!
https://www.amazon.com/gp/product/B01HBT3BVM/ref=oh_aui_detailpage_o03_s01?ie=UTF8&psc=1
https://www.amazon.com/GE-54178-Socket-Adapter-Outlets/dp/B000TU1W9Y/ref=sr_1_8?ie=UTF8&qid=1500931612&sr=8-8&keywords=outlet+socket
I used these. 4 linked together in a two car garage. extremely easy to install and very light/low profile
EDIT: When I bought them they were $60 for a 6 pack
I put $50 worth of LED stick lights in the basement workshop. Oh my god it is so nice to be able to see what I'm doing. When I move, I will unscrew about 8 small screws from the drywall, fill the holes and be on my way!
The lights I'm looking at are 2200 lumen each. I will try to fit 16 bulbs total. These are the ones.
https://www.amazon.com/Barrina-Integrated-Fixture-Utility-Electric/dp/B01HBT3BVM/ref=mp_s_a_1_4?ie=UTF8&qid=1542908042&sr=8-4&pi=AC_SX236_SY340_QL65&keywords=led+light+fixture&dpPl=1&dpID=41CSVksDnPL&ref=plSrch
I'm not sure if I'm allowed to post such a basic question, so I'll ask here.
​
What kind of grow lights should I get? I'm about to purchase a 5-tier shelf to hold all of my succulents for winter, but I'm new to this and have never used grow lights before. Browsing through this sub I've found these two are mentioned a lot? Here's one and here's another. Which one should I get? Should I put all the lights up top and let them shine down or should I put one on each shelf?
Here you go boss. I think this also confirms they are the same set OP has haha. They are very cost effective. I run four per shelf in my garden but I will note that I've run into the occasional plant that I need more light for. Three season lettuce comes to mind (they didn't develop any color until I moved them outside) though that may be a light temperature thing... I still need to test that.
https://www.amazon.com/Barrina-Integrated-Fixture-Utility-Electric/dp/B01HBT3BVM
This calendar has worked well for me. We use a couple hundred square feet in our backyard for growing veggies, and tend to start most of them indoors like people in this thread have mentioned.
A [cheap set of LEDs] (https://www.amazon.com/gp/product/B01HBT3BVM/ref=ppx_yo_dt_b_search_asin_title?ie=UTF8&psc=1) (you can buy fancy full-spectrum plant LEDs if you really want, but these are just for getting them growing prior to putting them outside) and a [heat mat] (https://www.amazon.com/certified-Seedfactor-Waterproof-Germination-Hydroponic/dp/B074753J5V/ref=sr_1_4?keywords=seed+mat&qid=1557274811&s=gateway&sr=8-4) from Amazon or a local nursery will go a long way in making sure you're ready to go with plants year round.
If you get some plants going indoors, you can replace your tomatoes and peppers with some cold-weather crops (Brussels sprouts, broccoli, cauliflower, spinach, etc.).
Currently using [3 of these guys] (https://www.amazon.com/dp/B01HBT3BVM/ref=cm_sw_r_cp_apa_zbnXBb08TPT7Z) in a DIY bench. They're 6500k and have been working out really well for my plants. My ficus seedlings seemed to be getting too much light so I've also made a shade cloth with cheap netting fabric.
Downside is they're 48" long. But the pack brings 6 for $40. Each bulb is only 20W. Running 3 for 12hrs/day will only cost me ~$3. Highly recommended.
Someone just mentioned these here earlier. I don’t currently use grow lights, but I think I’ll be looking at those if/when I do...
Instead of using pull chains I would recommend switching over to linkable LED lights. These are relatively inexpensive and are basically plug and play so little electrical knowledge is needed unless you want to hardwire them to a switch. Typical 3-5 year warranty means you should be covered for a while.
https://www.amazon.com/Barrina-Integrated-Fixture-Utility-Electric/dp/B01HBT3BVM
I am getting so down on my collection. I bought these Barrina lights and thought I would be good. Got a 4 foot stand from Home Depot, a bunch of new echeveria, and was super excited for my new setup. And despite it, they’re still stretching. They stop once they get about an inch 1/2 away from the light. I’m so disappointed, but am afraid I can’t afford a light that won’t have them seeking the light. My stretched out echeverias just make me sad to look at now. :( Any suggestions?
https://www.amazon.com/gp/product/B01HBT3BVM/ref=oh_aui_detailpage_o08_s00?ie=UTF8&psc=1
These are $50, super bright. Like so bright. All you need for a 1 space or even a 2 space garage. For the price get 2 and have all the nice low power usage bright ass led lighting you ever need.
I have these in my garage and they have been great. A few of my friends saw them and had to have them as well. I've had zero issues.
Agreed. This looks like the plugs for some 4ft long LED overhead lights I recently bought.
https://www.amazon.com/gp/product/B01HBT3BVM/ref=oh_aui_search_detailpage?ie=UTF8&psc=1
I use these and they work well for me! https://www.amazon.com/gp/aw/d/B01HBT3BVM?psc=1&ref=ppx_pop_mob_b_asin_title
I got the 5,000 lumen LED fixture from Harbor Freight for $20 and its stellar! Though I did find what looks to be the identical light in a 6 pack on Amazon for $45. I'll be ordering that for my next shop!
https://www.amazon.com/gp/aw/d/B01HBT3BVM/ref=ox_sc_act_image_1?smid=A1V31LM9AH9FRH&psc=1
I've got 4 of these over my 300L and the two extra are in my garage over part of my aquaponic system:
https://www.amazon.com/gp/aw/d/B01HBT3BVM/ref=ox_sc_saved_image_3?smid=A1V31LM9AH9FRH&psc=1
As for the floodlights on my other tanks, I can't find the exact ones I've bought anymore and they're a lot more powerful than you'd want, but there are plenty of 20W 6500k LED floods on Amazon. Most are around 2200 lumen each, and come in 2-packs which would be a pretty perfect amount for yours. If you scan over the reviews, you can often find other people using them over planted tanks with great results.
I just bought a shelving rack like this one and these lights, but now I'm trying to make sure I set everything up properly and have questions x_x
Thanks for any help! :)
I use these lights and they work good so far and are good price. i hung 2 per row to cover edge to edge.
https://www.amazon.com/gp/product/B01HBT3BVM/ref=ppx_yo_dt_b_asin_title_o03_s00?ie=UTF8&psc=1
Well, the only thing I can add is that my LEDs aren't plant specific either. This is what I bought from Amazon and haven't had any issues as far as seed starting goes.
https://www.amazon.com/gp/aw/d/B01HBT3BVM?psc=1&ref=ppx_pop_mob_b_asin_title
Maybe if you look at the specs it will help.
Thanks :)
You could write sequences easily enough, and in fact it would be relatively trivial to fire them off spontaneously with simple pushbuttons as input to your microcontroller. When I put that costume together, I wore a little custom switchboard like a watch that had the arduino installed on it along with a series of pushbuttons and rocker switches to turn things on and off.
Syncing to music directly might be tough - certainly doable, but it may just be easier to have buttons which perform preprogrammed actions. There are a lot of ways things could go awry when trying to line up audio with circuits. For professional shows it's better to have an engineer or two (on further viewing, it looks like they had 3 guys manning this in the show) on the sidelines controlling all that stuff, but if it's just you a simpler and more adaptable route might be to program 8 or so actions, wire buttons from the arduino to your fingertips to fire them off, and rely on your own timing and coordination to get things really moving. Just a suggestion to avoid overcomplicating things, and using such a technique also allows you to be a bit more adaptable (say, for example, if you want to use the surrounding music like at a club as opposed to needing your own).
Also /u/Tinkrr2 is right about the voltage requirements varying by brand - make sure you look into that. Finally, if you're looking to make this into a semi-permanent hobby then it helps to have an adjustable power supply handy. A beefy battery, a sizable power supply, a few barrel jacks, some Dupont connectors, and most importantly an adjustable buck converter will take you very far. I wouldn't worry too much about any of this now, but if you decide you like tinkering with electronics (especially LEDs, which have moderate power requirements) that would be a terrific start.
I'll try to remember to take some pictures tonight but here's the basics:
Parts:
So what you're going to do is cut the connector off of the fan. Strip the wires back. Some fans have three or four wires. Mine had three. What you're looking for is the positive and negative wires which are most likely red and black. Strip the insulation on these wires to expose the bare copper. It sometimes helps to expose enough to fold the copper and double it up to make it easier to screw on the connector. Feed the red wire (positive) into the + side of one of the female connectors. Screw it down and do the same for the other side. Now just connect it to the power supply and you're done!
Yes, you should just make sure that the charger is rated for the current you'll draw. There are plenty of options for using the barrel connector. I keep a bunch of these guys around to power things. What kind of laptop uses a 5V charger?
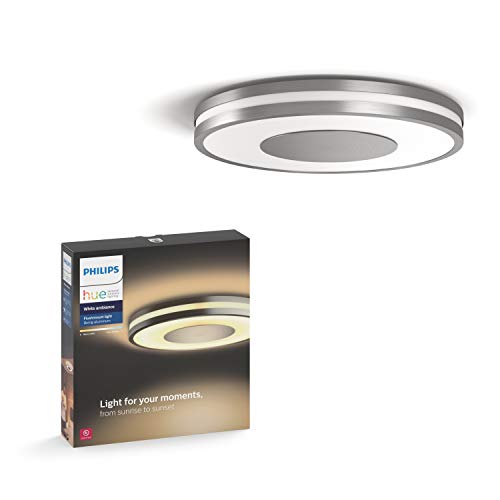
So, we’re going to replace the two ceiling fixtures anyways because the current ones are ugly. Would something like this maybe be more convenient than messing with the bulbs? https://www.amazon.com/Philips-Hue-Flushmount-Compatible-Assistant/dp/B0718XQ49D
What voltage power do you use in Japan, 220v or 110v?
I think the Hue Being Ceiling lights are available in either. Heres an Amazon US listing for a 110v:
https://www.amazon.com/Philips-Ambiance-Flushmount-Amazon-Aluminum/dp/B0718XQ49D/ref=pd_sim_60_5?_encoding=UTF8&pd_rd_i=B0718XQ49D&pd_rd_r=5GZP7P4DG6A56R6M3VGD&pd_rd_w=vNBHQ&pd_rd_wg=xh9jk&psc=1&refRID=5GZP7P4DG6A56R6M3VGD
And heres Amazon UK with a 220v version:
https://www.amazon.co.uk/dp/B01L99H7YC?aaxitk=e5R-VZJp-wtvfikARE6q7g&th=1
Then for connection just, for example, cut the plug end and a foot or so of cord and use that to connect to the power terminals on the fixture and then plug it in.
So one thing to note is you should have good plan to solder, unless you plan on using that last link, but those are way too big. These wires are like 26 gauge. Also when you cut silicon it makes it not water proof, so may need some like silicon or something to seal each end.
Could use something like this:
https://www.amazon.com/iCreating-Connector-Conductor-Controller-Solderless/dp/B074G48LWQ/ref=sr_1_4?ie=UTF8&qid=1539742033&sr=8-4&keywords=led+strip+to+wire+connector+3+pin&dpID=51kzc4nBvjL&preST=_SY300_QL70_&dpSrc=srch
or this
https://www.amazon.com/Alightings-Connector-Waterproof-Lights-Connection/dp/B06XHCFMB5/ref=sr_1_3?ie=UTF8&qid=1539742033&sr=8-3&keywords=led+strip+to+wire+connector+3+pin&dpID=511V-NwYvlL&preST=_SY300_QL70_&dpSrc=srch
Just look for 3 pin wire to strip connector or something like that.
The phanteks header is the standard 5050 led header it looks like. Pretty sure the LEDs you want have these, but if not....
You'll need something like this
iCreating 10PCS LED 5050 RGB Strip Light Connector 4 Pin Conductor 10 mm Wide Strip to Controller Jumper Solderless Clamp On Pigtail Adapter for 5050 Color Changing Flexible LED Strip light https://www.amazon.com/dp/B074G48LWQ/ref=cm_sw_r_cp_apa_SDtNAbSPZJK9Q
There are lots of options for this. I personally did my own mod where I used a Corsair Lighting Node Pro and use software to control it: https://www.youtube.com/watch?v=kgMd2CcUkBQ
The 12v Analog RGB strips would be the easiest in terms of controlling as you can buy bulk RGB strips and solder less connectors like these to control your lighting: https://www.amazon.com/iCreating-Connector-Conductor-Controller-Solderless/dp/B074G48LWQ/ref=sr_1_1_sspa?keywords=solderless+rgb+strip&qid=1571675396&sr=8-1-spons&psc=1&spLa=ZW5jcnlwdGVkUXVhbGlmaWVyPUEzU1lSR1o3VDk2S0VOJmVuY3J5cHRlZElkPUEwNTEyNzg1M1I1R0NaNVFBUkVRNiZlbmNyeXB0ZWRBZElkPUEwNDI4MDU3Mkg1NE82WjVBM1RUTSZ3aWRnZXROYW1lPXNwX2F0ZiZhY3Rpb249Y2xpY2tSZWRpcmVjdCZkb05vdExvZ0NsaWNrPXRydWU=
The 5v Addressable is a little more work as there are different standards that companies use for connectors. Though if you are comfortable with a solder iron and crimping connectors, then that is an option: https://www.youtube.com/watch?v=6Dl9yd_Nxqk
If I'm understanding this correctly, you just need a 4-pin adapter of some sort like this? https://www.amazon.com/gp/aw/d/B074G48LWQ/ref=mp_s_a_1_3?ie=UTF8&qid=1524049728&sr=8-3&pi=AC_SX236_SY340_FMwebp_QL65&keywords=led+4+pin+connectors&dpPl=1&dpID=51g6jpIbo%2BL&ref=plSrch
LEDs. Cut them to size, string multiple strands together with some jumpers. I wrapped all my connections with weatherproof electrical tape.
Not really there's a "second" cable that deals with RGB only, not the power to the fan.
they are the round pinned cable here: https://www.amazon.com/dp/B075FKL6C1/
the arrow on the cable points to PIN 1 on the motherboard.
On the motherboard they are the white connectors if you look at the 1st picture here: https://www.amazon.com/dp/B07FVYKFXF
It's Labeled RGB Header1, (Bottom left corner) and it looks like you only have the one connection point, so you'll need a splitter to extend to each fan that has it.
12V G R B and next to it is ADDR_LED1
So your motherboard can have addressable RGB and Synchronized RGB fans.
There are some splitters on amazon
4 Pins black rgb LED Splitter Cable LED Strip Connector 8 Way Splitter Y Splitter for One to Eight RGB 5050 3528 LED Light Strips with,1m rgb wire,10x male to male 4pin plugs
https://www.amazon.com/dp/B075FKL6C1/ref=cm_sw_r_cp_tai_HHkzCbTTTX5QP
So the motherboard supports 4pin rgb (12V). You can get a 4pin splitter to have multiple fans to 1 header. I have 8 connected to 1 header running no problem. You will then download Mystic Light from MSI website and enjoy. Link below..
https://www.amazon.com/gp/product/B075FKL6C1/ref=ppx_yo_dt_b_asin_title_o09_s00?ie=UTF8&psc=1
Yes!
https://www.amazon.com/gp/aw/d/B076FQ15R6?psc=1&ref=ppx_pop_mob_b_asin_title
I have a mix of lights for a number of plants, I have been impressed with these t8 4ft LEDs if you don't mind manually wiring them or buying a separate fixture for them. I just screw the tombstones to the bottom of my shelf and ziptied the other end. Like so.
https://imgur.com/a/9itKz
https://www.amazon.com/gp/product/B01DJT1CQY/ref=oh_aui_search_detailpage?ie=UTF8&th=1
I have some of these and they are a great alternative if you don't want to wire anything. I have only had them a month or so but my Neps they are over seem happy.
https://www.amazon.com/gp/product/B076FQ15R6/ref=oh_aui_detailpage_o07_s00?ie=UTF8&psc=1
Thanks.
I'm going with this 12v 4-pin light strip with these splitters and to keep it clean, some extension and right-angle options.
(Pack of 8) Barrina LED T5... https://www.amazon.com/dp/B07DNPL2VC?ref=ppx_pop_mob_ap_share here is the link to the lights that I bought
I am late in the game for grow lights. I have read just about every thread on grow lights and I just want to make sure that this setup will be okay.
I’m thinking of buying 4 of these (2 on each shelf) fixtures: Shop Fixture
And these T5 HO bulbs: Vivosun Bulbs
Would this work for my 2 metal shelves?
Or .... go with these and put 4 on each shelf? Barrina T5 LEDs
Skip the wood frame and buy 3M sticky backed LED strips.
Also: 10X L shape 4 Pins Connector JACKYLED 10mm Non-waterproof Quick Splitter Right Angle Corner Connector 12V 72W Clip for 3528/5050 SMD RGB 4 conductor LED Strip Lights Strip to Strip (22Pcs Clips) https://www.amazon.com/dp/B011BD2B5Q/ref=cm_sw_r_cp_apa_i_d0t9AbE9153VY
Nice work overall!
https://www.amazon.com/gp/aw/d/B011BD2B5Q/ref=pd_aw_sbs_86_1?ie=UTF8&psc=1&refRID=FDQFPECZ028FXK6RJSE6&dpPl=1&dpID=71bKtJdyONL