Best collated hardware fasteners according to redditors
We found 41 Reddit comments discussing the best collated hardware fasteners. We ranked the 27 resulting products by number of redditors who mentioned them. Here are the top 20.
We found 41 Reddit comments discussing the best collated hardware fasteners. We ranked the 27 resulting products by number of redditors who mentioned them. Here are the top 20.


![Rapid 13/8 Staples R13 and R23 and R33 8mm shank length [Pack of 5000]](https://m.media-amazon.com/images/I/414xvgssEvL.jpg)
It is for shooting nails into cement
http://www.amazon.com/Simpson-Strong-P22AC4-Caliber-Yellow/dp/B001I3L6AQ/ref=pd_cp_hi_1
As others have noted, you need something for the knocker to strike on. In a pinch, you can get some kind of pretty brass drawer knob. You probably don't want to have the knob bolt go all the way through the door, so drill a hole and use a threaded insert and just use a threaded rod rather than a bolt.
Get a hammer drill and a masonry bit. Pre drill the holes and hammer these little plastic anchors in.
https://www.amazon.com/TruePower-Red-Anchor-25-pack/dp/B074Q16VYW
Then screw into the anchors. They hold really well in older brick. If you have newer brick look into “tapcons” same idea just without the plastic piece. The special screws are hammer drilled into the brick.
Picture Frame Pliers
https://www.amazon.com/PICTURE-FRAME-PLIERS-PEACHTREE-WOODWORKING/dp/B00153LKU0/
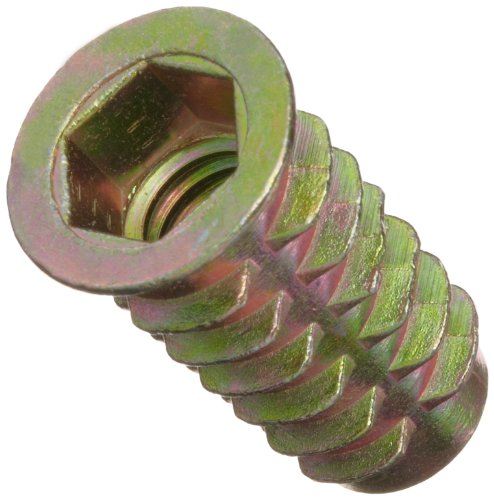
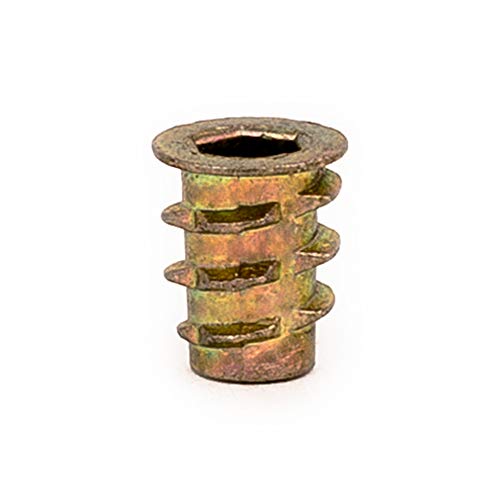
It's a threaded wood insert screw. Something like these.
E-Z Lok Threaded Insert, Zinc, Hex-Flanged, 5/16"-18 Internal Threads, 25mm Length (Pack of 25) https://www.amazon.com/dp/B002WC8TV6/ref=cm_sw_r_cp_apa_i_HGuEDbNCDTXEB
40pcs 1/4"-20 Furniture Screw in Nut Threaded Insert Nutsert for Wood Furniture Connector 15mm Length https://www.amazon.com/dp/B07Q6HKK45/ref=cm_sw_r_cp_apa_i_dHuEDbBKV3F74
The ones you have in those legs are screwed in with an Allen wrench.
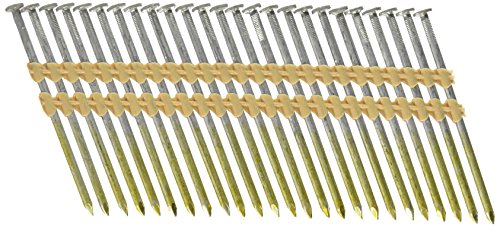
We don't use .113s for sheathing. Get .131s or .148s depending on the plans. Any decent lumberyard should have them.
edit: for example, http://www.dunnlumber.com/Store/ProductDetail.aspx?pg=1620&pl1=2436&pid=15547
https://www.amazon.com/Smooth-Brite-Strip-Degree-JobPak/dp/B073ZLL33X
Evidently Senco is into the plastic fasteners now - https://www.amazon.com/SENCO-M006105-Plastic-Composite-Finish/dp/B073XCZDDH
In hindsight I should have left more room between the mortise and the side of the legs. If they split, then I will make a wood "patch" larger than the mortise itself to glue over that side, but hopefully it'll be fine. I didn't get a good picture or write about it, but the M&T joints also have a bolt going through the leg which attaches to a threaded insert in the runner. In addition to holding the runner in, hopefully this will minimize pressure against the side of the mortise.
Start figuring out a clamping solution. The kit doesn't come with anything to hold your work in place. In my experience the double sided tape is awful. If/when the tape fails you'll break a lot of parts on your machine.
I'd recommend setting up your waste board with these inserts and buy a bunch of these clamps
In my opinion, 90% of the standing desks are pretty much identical. They're all sourcing no-name, Chinese made legs and electronics (the legs are literally all over Alibaba). Even the tops are likely sourced from a handful of the same companies.
I bought legs from Automonous.ai and handmade a top (I'm into woodworking so it was a fun project for me). The legs looks like nearly everything that every other standing desk company is offering.
If you're half-way mechanically inclined: buy the legs from wherever you can find a good price. Go down to ikea and buy one of their tops. Screw the legs to the top.
The only thing you'll need to watch is making sure you don't strip the screw from the wood. I, personally, put in some threaded inserts to reduce the chances of rip out. Something like this: https://www.amazon.com/E-Z-Threaded-Hex-Flanged-Internal-Threads/dp/B002KT43MU/ref=pd_sbs_328_2?_encoding=UTF8&pd_rd_i=B002KT43MU&pd_rd_r=STWHEH78NZ223Y0N8MPY&pd_rd_w=5TO6r&pd_rd_wg=1zLyj&psc=1&refRID=STWHEH78NZ223Y0N8MPY
I ordered this as a filler. Its helped with a few random builds.
https://www.amazon.com/gp/product/B017QDHIW6/ref=oh_aui_search_detailpage?ie=UTF8&psc=1
Basswood and Butternut are easiest for carving. I'm also going to try to carve a tap handle as a Xmas present. The basswood isn't the most beautiful wood as far as natural color and grain, but if you stain or paint it, it will look good.
I got this to carve on, since it is already almost the right size.
and these to use for the threaded insert
I also got one of these carving knives, although you could do the same thing with any knife. They are just ergonomic and have a nice small blade for detail work.
I'm going to attempt to carve a big "M" with a hop sitting on the top for my Brother-in-law.
Hope this helps! Good luck!
OSB is good when it's not exposed to water. The OSB-based siding is more resistant to moisture than the type used for roof and floor decking. I would use 7/16" OSB for the roof decking, check local craigslist ads to find it cheaper than the big box stores. For the flooring, I would use straight 3/4" plywood, what used to be called CDX but now is called something different. If you find a deal on OSB floor underlayment that's too good to pass up, I would paint the underside before installing it and you'll need to surface it with something to keep it from splintering up as you move stuff across it. Glued-down roll vinyl flooring would work well for that, and it can often be found fairly cheap as remnants and such. OSB floor decking is normally at least 3/4" thick with tongue and groove long edges, and it has different internal and surface strand orientation to make it stronger in the long direction specifically to use as floor underlayment.
As for tools, you'll need a nail gun and a small compressor. This is a decent nailer: http://www.hfqpdb.com/best_coupon/21+DEG+ANGLE+FULL+HEAD+FRAMING+AIR+NAILER
Note, it's 21 degrees, nailers come in different degrees, and it's important to get 21 degree nails to go with it. I like these nails: https://www.amazon.com/Hitachi-20163S-Framing-Galvanized-Collation/dp/B004TSSC72 They are hot dipped galvanized which will hold up much better than zinc plated. These are 3-1/2" long, giving plenty of grip area for the shank. You can also get some some shorter ones for the siding and roof decking if you want, but I wouldn't go shorter than 2". Be sure to get a bottle of air tool oil and use a few drops every day before you start nailing.
A good tape measure is important. A framing square is good for smaller items, but you'll need to use the 3-4-5 method and cross-corner measurement methods to square up the floor structure before attaching the plywood decking. The 3-4-5 method is based on the fact that in a right triangle with the short sides measuring 3 on one side and four on the other, will measure 5 on the hypotenuse, the distance between the ends of the other two sides. It's a ratio, so any multiplier will work. For instance, if you measure 6' on one side and eight feet on the other, the diagonal distance between the two ends of the sides will be 10' apart if the two sides are perfectly square. The cross-corner method is to measure the length across opposite corners, and if they're the same then the rectangle is square. If one diagonal is longer than the other, then it's not square and you need to shift things around to make it square.
For the level, on something that big, you can look up how to build an Egyptian level using a bucket of water and some tubing, or it may be easier to rent a level laser.
A screw gun will be helpful, especially if you're using metal roofing and/or siding. If you are using sinewave tin, a.k.a. corrugated tin, make sure you install the screws with the rubber washer in the high part of the tin, not the low part, otherwise you'll be getting lots of leaks. If you're doing shingles, a chalk line will be extremely valuable to snap the shingle lines.
For cutting the plywood, lay it on top of some 2x4s to keep the saw blade from hitting the ground, and use a straight edge to guide the cut. Do a test cut, just barely a nibble, to measure exactly how far from each edge of the circular saw the edge of the cut is, and write that down on a piece of masking tape on the saw. Use that measurement to calculate where to put the straight edge before cutting. Here's a straight edge saw guide: https://www.harborfreight.com/50-inch-clamp-and-cut-edge-guide-66581.html Be sure to take a 20% off coupon for that one. Remember, at HF you can use as many coupons as you want, but it's one coupon per item and one 20% coupon per day, though it's really just one 20% coupon per visit. Don't forget take a freebie coupon.
Ok, thanks for the tip!
Edit: Wonder if this pack will have those
Mini Skater 23 Size Nickel Plating Tiny Eyeglass Screws Sunglass Spectacles Watch Repair Replace Micro Parts Assortment kit,1650PCS https://www.amazon.com/dp/B07DCJ9L3Y/ref=cm_sw_r_cp_apa_i_xUj7CbJ2WFNMH
Amazon link.
https://www.amazon.com/Rapid-Staples-shank-length-Pack/dp/B000I6M2O8
Hex drive threaded insert:
https://www.amazon.ca/gp/product/B002KT43MU/ref=s9_acsd_top_hd_bw_bCvuKgN_c_x_w?pf_rd_m=A1IM4EOPHS76S7&pf_rd_s=merchandised-search-11&pf_rd_r=1J9NGMDV17VNYSRTXD0J&pf_rd_t=101&pf_rd_p=14a4ac83-e830-5b74-a48f-8a1412c67169&pf_rd_i=11849271011
Connector bolt:
https://www.homedepot.ca/product/paulin-1-4-20x1-5-8-joint-connector-bolt/1000155731
​
Make sure whichever ones you get have matching threads
I suggest these instead. Winston Moy makes some good points about using these in the added video.
https://www.amazon.com/gp/product/B002KT43MU/ref=oh_aui_detailpage_o06_s00?ie=UTF8&psc=1
https://www.youtube.com/watch?v=kcdAnUnX59s
I'm not sure if there are other manufacturers or not, but E-Z lock makes those - here on amazon. Those looks like their inserts for "soft wood" whereas they have knife thread inserts for hardwood. Reviews seem to indicate that the softwood ones do well in hardwood anyway and are about 1/4 of the price.
You might have a bit of a struggle finding them on Amazon -- particularly at a reasonable price. Their size & shape isn't very shipping-friendly. I had to pick mine up in person at Home Depot.
Also, if you aren't doing so already, you might consider using threaded inserts so you can remove/replace the retainers as needed. On my marquee, I used these inserts with these screws. I actually used the threaded inserts all over the place on my cab, I liked them so much.
Is your carpet getting wet somehow?
Not sure why water is a concern - unless some fool ran drywall screws through sheetmetal to mount the amp.
Rivnuts in the floor, stainless screws through the PVC to mount the PVC to the floor, and E-Z locks with machine screws to mount the amp to the PVC.
I have boxes of those casters you linked to. So basically you just want to put regular wooden legs on it right? It is actually quite an easy task. What couch has those on there, just curious?
The Caster fits into an insert in the wood. First you must remove that insert/grommet. Then screw in one of these inserts using an allen wrench. Chose 5/16th or 1/4 according to the leg you pick out. Slightly oversize the hole...carefully. You can just wiggle a bit around if you want. https://www.amazon.com/Z-Threaded-Hex-Flush-Internal-Threads/dp/B002713X8G/ref=sr_1_4?keywords=5%2F16+insert&qid=1556762868&s=gateway&sr=8-4 When you screw these in do it in the same method of using a tap/die set. They are easy to bend. Do a back/forth motion. If it gets tight pull out entirely, enlarge hole. Grab a new one if you feel like you bent it. If your whole wasnt large enough its easy to bend those. If you screw up use one of those easy out screw stripped out removal tools. I buy the cheapy ones like this but other inserts don't have the issues of easily bending.
Your main bolt sizes in furniture are 5/16 & 1/4 inch ... and their metric counter parts (#6 or #8) . You will be using one of those. Probably American 5/16th when you buy legs. Just stain them some kind of black/brown.... that gos with anything.
If your hole is too large for some reason. Glue in a dowel with the holes diameter/depth(your starting over from scratch). Let dry. Then create the appropriate size hole with a drill starting in the center of the dowel.
Quest complete, collect XP.
I've been working on this table project for a little while now, and now just need to fasten the legs to the table tops. One issue that that these raw oak slabs were never planed more than the rough cut from the tree, so their fairly uneven, and even bow a little (don't think it shows in the pictures, though). For that reason, I need a way to level the legs so that the tables don't rock once their finished. Shimming the plates with washers should be easy enough to get the table level, but I'll need machined threads to run the fasteners into and out of (and then into and out of again) so that they'll still hold once it's all said and done. I've looked at a few different options for this problem, but aren't convinced any of them are ideal. T-nuts would work, but I think they might pull out since they won't be held in from the top of the table surface (not interested in that industrial look). These threaded inserts and these similar ones would seem to do the trick, but the reviews raise questions about the strength of the material in dealing with hardwood, as well as problems with the material stripping while trying to place them. Anyone have any suggestions/advice?
TLDR: Looking for fastener solutions to affix table legs to the underside of an oak slab that will allow adjusting to level the table.
Yes, GRK RSS screws are the best for this!
https://www.amazon.com/GRK-ICC-ESR-2442-HandyPak-Structural-Package/dp/B001SFMM2U
If i was forced to pick something right now i would look at these: http://www.amazon.com/GRK-RSS10318-5-ProPak-8-Inch-Structural/dp/B001PCXHK2http://www.grkfasteners.com/Portals/0/documents/sellSheets/rss.pdfBased on the data sheet, you would have a tough time failing one of these fasteners. The only concern would be the strength of the plywood at the fastener, which would have to do with the specific plywood you picked and the area in contact with the screw head.ignore what i said, just follow this guide. it seems solid. https://www.reddit.com/r/HomeImprovement/comments/492uaj/im_building_a_climbing_wall_and_ceiling_traverse/d0opul9
How convienent, I was in the market for a mouse.
But I decided to spend a couple more bucks because it's still cheaper than nails and i didn't hear any massive backlash from the internet.
Do you want to do it minimally? I'm assuming the cable you bought is similar to/or is the Monoprice HDMI fiber cable. Are you securing it to dry wall?
You could look at some really narrow crown staples.
https://www.amazon.com/Bostitch-SB97-1GLS-20-Gauge-Staple-Galvanized/dp/B000IKNWN4
Or this
https://www.amazon.com/Cable-Matters-200-Pack-Nail--Clips/dp/B00Y362HSA/ref=sr_1_4?ie=UTF8&qid=1474387599&sr=8-4&keywords=wire+tack