Best compressed air filtration products according to redditors
We found 23 Reddit comments discussing the best compressed air filtration products. We ranked the 14 resulting products by number of redditors who mentioned them. Here are the top 20.
We found 23 Reddit comments discussing the best compressed air filtration products. We ranked the 14 resulting products by number of redditors who mentioned them. Here are the top 20.


Without tools, the best you can really do is look for oiliness on the pipe. When you find a joint that feels oily (look for dark colours on the pipe, usually covered in very fine dust. Once you rub the dusty area with your fingers you'll feel the oiliness), spray/pour a small amount of washing up liquid over it and look for bubbles. If there's any refrigerant left in the system, you'll usually see bubbles appear (or over a longer period, foam). Of course if the gas has all escaped already - and we're only talking a couple of hundred grams here - then you won't see any bubbles.
Most domestic gear has no access fitting at all so even locating the leak can be difficult if there's no visual indication. You need to get pressure in there so you can leak test - this means adding a bullet piercing valve (like this).
Then you need to put something in via your bullet piercing valve to raise the system pressure. It's best to use dry nitrogen to leak test to save wasting refrigerant, but since you most likely don't have that on hand you could buy yourself some refrigerant (most likely R134a) and pressurise with that. That's a big no-no here (both disposable cylinders and dumping gas to atmosphere by charging a system with a known leak) but I'm guessing your in the US, and those sorts of laws seem remarkably lax so go for gold. It's not like you'll be ruining MY ozone layer too, right? ;)
You also need to regulate the pressure going in to the system. This is where you need gauges. Connect the yellow line to your bottle, connect the blue line loosely to your bullet piercing valve, purge from cylinder to piercing valve by opening the cylinder tap + gauges tap, and releasing some pressure via the loose fitting, then tighten the fitting and close your gauges tap. Open the bullet piercing valve. Open the gauges tap slowly and give it ~50psi of system pressure.
Then you can go for gold with your soap, or you can lash out and grab yourself some "proper" leak detection fluid (like this), or better yet an electronic leak detector (like this one).
Once you've found your leak, you want to release your nitrogen (or reclaim your refrigerant using a reclaim plant and a spare cylinder), then repair it using an oxy/acetalyne set, or since it's only tiny pipework you can get away with a MAPP gas set.
If it's a copper->copper joint, you're laughing - polish the pipework up with emery cloth, heat the pipe until it's just this side of glowing red, and feed the joint with brown tip silver solder.
If it's a copper->steel joint, then it's a bit more of a pain. You need blue tip silver solder and flux. Clean your joint with the emery cloth, give it a nice coating of flux on every surface you need solder to stick to, then heat it up until it's a fair way short of glowing red. Feed the blue tip solder in and STOP. Unlike brown tip (15% silver) you can't just keep feeding blue tip (45% silver) as it ruins the weld.
Now, since you put on a bullet piercing valve and they leak like a sieve in the long term, we need to replace that with a schrader access valve. Since it's most likely going to be in a straight through piece of pipe, you can save time and grab yourself a pre made access valve in 1/4" pipe. Cut away the hole left by the bullet piercing valve, polish the copper and cut the pipework with a ~10mm gap using a tube cutter. Then slip your access fitting assembly in there, and follow the copper->copper joint procedure.
Of course, now that we've done all that you need to change the liquid line filter drier too. I'd recommend a 1/4" solder in core drier in place of the original copper spun drier because... well, copper spun driers are terrible. Follow the pipe cutting procedure from the piercing valve instructions and the soldering instructions from the copper->copper joint instructions and that's done too. Remember - always try and mount the drier so it's outlet is LOWER than its inlet. This turns the drier into a small liquid receiver and helps ensure a good liquid seal over the capillary tube. Speaking of capillary tubes, if it was inserted straight into the original copper spun drier CUT the capillary, don't try and unsweat it. The chances of blocking it up are about 82.5634% (approximately) when you unsweat capillarys. You're much better off chopping it with a set of capillary tube cutters and ensuring a good clean capillary. The ~30mm of wasted capillary will affect performance, but almost certainly not to any sort of measurable degree.
Then give the system a good evacuation using a vacuum pump and ensure it reaches a good vacuum (sub-500 micron) with a digital vacuum gauge.
Then using a set of electronic scales, charge your freshly evacuated system (remembering to purge!) to the charge recommended by the manufacturer.
Voila! You have just fixed your chest freezer.
..... Alternatively, pay someone to do it for you and/or recycle the components and buy yourself a new one.
Easier to just move more air. Even if you chill it, you're not going to get a huge temp delta (compared to ambient vs combustion temperatures). That is, if ambient is 30C and combustion is at 1000C, if you chill the air to 0*C you're only incurring an additional 3% to heat the air to combustion temp. It may be worth relocating your intake to make sure the intake air isn't heated by the forge though.
IMO, just get a big-ass centrifugal fan like they use to dry animals. Something like this.
Backyard metal casting has tons of great resources.
In three years you never googled it?
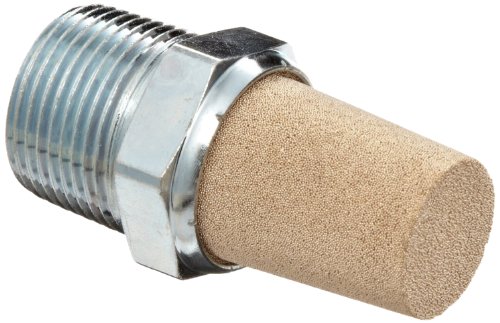
https://www.amazon.com/Arrow-F309-02F5-Pneumatic-Filter-Npt/dp/B0115G7LSQ
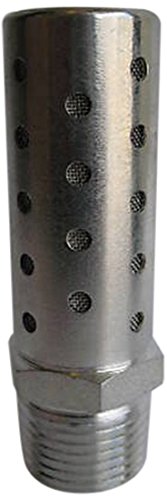
MettleAir SHF-N04-1PK Pneumatic High Flow Silencer, Stainless Steel, 1/2" NPT https://www.amazon.com/dp/B007IUBXFG/ref=cm_sw_r_cp_apa_lUxkzb8E9WH8C
Install one of these on your blow off with a threaded tri clamp fitting. Works great.
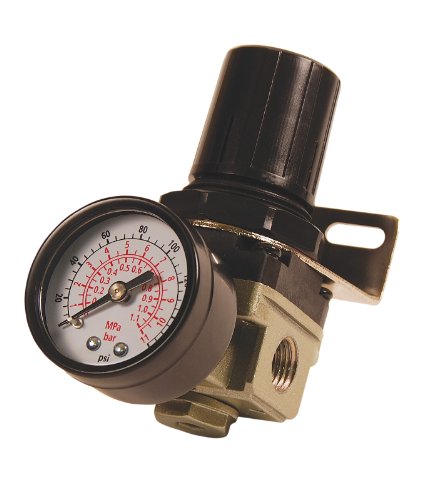
Yeah its on there super tight. I suppose I could try that. The regulator in question is
https://www.amazon.com/Technologies-0781-9410-G250-60-510LP-Regulator-Connection/dp/B00BZEZ7RQ/ref=pd_sim_328_2?_encoding=UTF8&pd_rd_i=B00BZEZ7RQ&pd_rd_r=BDF06WP827M2T0XJ21R7&pd_rd_w=0FQIy&pd_rd_wg=bhj6U&psc=1&refRID=BDF06WP827M2T0XJ21R7
Variac speed controller
https://www.amazon.com/PHC-Enterprise-Variac-Variable-Transformer/dp/B006NGI8VS
a duct silencer/muffler
https://www.amazon.com/VenTech-VT-FS-6-Muffler-Silencer/dp/B00HWILBSS/
insulated duct and google how to insulate/wrap a inline fan for cannabis
That's a lot of money for a fan. You could always get a cheaper fan that moves more cfm and simply get a fan silencer. You would still save money at that rate and spend the rest on an enclosed hood or cool tube to help with temperature control.
Overall you're good.
Fan Silencer (out of stock at the moment, but cheaper): http://www.amazon.com/VenTech-VT-FS-6-Muffler-Silencer/dp/B00HWILBSS/ref=sr_1_3?ie=UTF8&qid=1450225496&sr=8-3&keywords=fan+silencer
Fan silencer (more expensive, but in stock): http://www.amazon.com/Phresh-701200-Silencer-4-Inch-12-Inch/dp/B007ZU5YQS/ref=sr_1_6?ie=UTF8&qid=1450225496&sr=8-6&keywords=fan+silencer
Hood Upgrade: http://www.amazon.com/Apollo-Horticulture-GLRLS24-Hydroponic-Reflector/dp/B00BMVK8HG/ref=sr_1_1?ie=UTF8&qid=1450225652&sr=8-1&keywords=air+cooled+hood
Fan and Carbon Scrubber Replacements: http://www.amazon.com/VenTech-VT-IF6-CF6-B-Controller/dp/B0051HDECS/ref=sr_1_1?ie=UTF8&qid=1450225799&sr=8-1&keywords=ventech+vt+if6
If you're going to be flowering in the tent, I would recommend lightproofing it, as well. Use only the ports in your tent for intake and cut some carbon filters to size. http://www.amazon.com/Carbon-Pre-Filter-38002-Activated-Sheets/dp/B00LXIWNT4/ref=sr_1_1?ie=UTF8&qid=1450225982&sr=8-1&keywords=carbon+filter+sheet
Your tent is a little expensive, too. If that's the one you have your heart set on, go for it. As an alternative, I suggest http://www.amazon.com/MILLIARD-Reflective-Hydroponic-Mylar-Window/dp/B00ETBDX14/ref=sr_1_1?ie=UTF8&qid=1450226158&sr=8-1&keywords=milliard+grow+tent
You will want a fan or two of some kind to circulate air inside the tent. 6 Inch clip fans are popular. I use a pair of 4 inch clip fans and a tower fan.
Make sure to look into a DIY Ona Bucket for smells. During flower it will stink up your room when you open the tent. Just turn the Ona bucket on a little before that and you're good. If you're really paranoid about smell, you can also get an inline carbon scrubber. They're pretty expensive and probably not necessary unless you pick some especially fragrant strains. http://www.amazon.com/Phresh-500-Inline-Filter-6-Inch/dp/B00CJIMUH2/ref=sr_1_1?ie=UTF8&qid=1450226390&sr=8-1&keywords=phresh+inline
That's my $.02, anyway. There are much more experienced growers here.
Alright, The wood, nuts, bolts, screw, L brackets, plastic, plexi-glass, wire, air compressor, duct work reducer (to create funnel), and pail can all be bought at a hardware store outlet. (I had most of those all on hand)
Everything else
Pneumatic cylinder -crusher 25$
loading cylinder 30$
Solenoids 20$
6mm quick connect fittings 15$ you may need to order a converter or adapter to fit the crushing cylinder. I think its 1/4" fittings, so you could order those too but be sure to check
6mm Pneumatic hose 12$
6mm T splitter 6$
Air Pressure Regulator 10$ use to regulate the air to the loading piston as it runs at a lower psi/ can be slowed down some as well.
Shut off valve 6$
Quick connect to airline 6$ What you need may be different. Depending on your set up.
Arduino Uno 15$
12V Power supply 7$
12V to 9V 6$
158$ + construction materials that shouldn't cost more than 50$
Note: Some of this may be found else where for cheaper, but at least you know what you are looking for. Also I rounded everything up.
Let me know if this helps at all.
Edit: Its also helpful to have someone who can weld, so that cost has to be factored in as well. I traded work for work.
I'd also add that you should get an inline gauge that can set the PSI, that way you KNOW that the PSI is consistent at that part of the hose.
This is the one I plan on buying, sounds like it might fix your issue, i'd also get another 5 feet of hose to go from that to your gun.
Good luck!
I'll go in order from the CO2 tank down the line:
Grab one of these and never have to worry about moisture.
Is shop air available? As far as I know, there's very little water in shop air. I'd try putting a small regulator like this on the outside of the box, with a small bulkhead (Say 4mm or 5mm) going through the wall. Regulate the downstream pressure to provide air flow, and a check bulkhead/check-valve on the box elsewhere to provide means of escape but prevent anything from coming in?
Just spitballing here.
Is this one ok pressure gauge i saw cheaper but i don’t know what is the good one so i pick this
The most important things are a tank and the ability to fill the tank to a PSI above a minimum of 80 or so. A tank makes it so the compressor doesn't have to run constantly, and creates a buffer so the air pulses of the compressor aren't transmitted to the brush where they can cause dotted rather than smooth lines. You want the compressor to be able to put out a higher PSI because you want the tank to hold enough so you can spray for longer at pressures of 60 PSI or below for longer intervals before the compressor has to refill the tank.
For model painting, most of your spraying will be best done at 20-30 PSI. Higher PSIs like 60 tend to be either for cleaning, or stuff like textile paints (i.e. T-shirt artists). The little "fishtank" compressors like the Ninja Jet can only deliver a max PSI of around 15 or so, which is on the very bottom edge of what most brushes can work with. PSIs of 15 and below are mainly used for tiny close-in detail work with highly thinned paint, and going that low works better with brushes that are designed specifically for detail, rather than "jack of all trades" workhorses.
Different brushes require different CFM (cubic feet per minute- a measurement of air volume rather than pressure), and little "fishtank" compressors are bare minimum here as well, so there will be many brushes where they'll make the brush spray poorly because they physically can't provide enough air to keep up at any pressure. A good target CFM rating for a tankless compressor is 1.5.
A tanked compressor can technically get away with less CFM, since it's not supplying the brush directly, but unless you want to have to stop painting whenever the compressor has to top up the tank, you want the compressor to have enough CFM to supply the brush WHILE also filling the tank, which means check your brush manual/documentation for its CFM, and look for a compressor that is specced over that by at least 1/2. The higher the CFM, the faster the tank will fill. Unfortunately I could not find specs for the Patriot that list CFM, but 1.5 is probably still a good start for a tanked compressor.
"Master" and other such Chinese import brand compressors are popular because people think they're cheap, but for very little extra a brand like California Air Tools will get you better QC, support, reliability, and specs. Chinese airbrushes are comparatively cheap, but the compressors aren't really, so there's not much reason to get the Chinese ones IMO.
Avoid regular hardware-style compressors unless you're painting in a very noise-tolerant environment, as even the "quiet" ones are LOUD AF. Seriously: when the descriptions/reviews say "super quiet" they mean by construction site standards, not household appliance standards.
As to fittings: if you live in a particularly dry climate (like Arizona, say), you can get away with not using a moisture trap, but even there it's good practice to have one just in case. If your climate is any more variable or humid than that, you will want a moisture trap. You can just get one from the local hardware store though: it doesn't have to be a special type. Always place the trap last in the air supply/fitting chain before the airbrush hose, so: compressor-> tank-> regulator-> moisture trap-> airbrush hose-> airbrush. Or if using a bench block as described below: compressor-> tank-> regulator-> connecting hose-> bench block regulator-> moisture trap-> airbrush hose-> airbrush.
In the US, compressors usually have 1/4 NPT fittings. In Metric countries, 1/4 BSP. These fittings are cross-compatible enough that you can use them together with teflon tape.
For hobby and fine art airbrushing, I HIGHLY recommend a lightweight hose like this over braided hoses. Braided hoses are for industrial-type settings like auto painting shops, where hoses need to be extra hard wearing.
BTW, when painting, loop the hose once around your forearm so if you accidentally drop the brush, the hose acts as a lanyard preventing the brush from hitting the floor. I feel like I'm constantly hearing horror stories about people damaging their brush by dropping it when preventing this is so easy.
A tanked compressor with come with a regulator. These are perfectly usable, but imprecise. It's not strictly necessary, but I do highly recommend using the built-in regulator as a step-down regulator, and getting a 0-30 or 0-60 PSI regulator to chain after it. I use one of these on my setup, and it makes adjusting airflow much better.
If you plan on locating your compressor directly on or under your "workbench" surface, that's all you need. If the compressor is going to be outside immediate/easy reach, it can be good to mount your regulator and moisture trap on a separate "bench block" so you can put it on/under your bench within easy reach. This is what I had to do with my setup (I mounted the regulator and moisture trap on a scavenged heavy steel bookend). In that case, you'll want/need a hose like this to go between the compressor and the regulator/filter block.
There are "extras" you can get like a quick-connectors and MAC valves, but I don't personally recommend them. If you're only using the compressor for your airbrush, you don't need quick connectors on the compressor side of the hose, and IMO quick connectors on the brush side don't actually save you time/energy as it only takes 2 seconds to unscrew a brush from the hose. If your regulator is in easy reach, a MAC valve similarly does not save you any time/effort. Both of these also add lots of bulk to the brush stem, which is undesirable if your instinct is to hold/use the brush like a pen instead of a gun. There are mini-filters that go between the hose and the brush, but I generally don't recommend them for the same reason: too much added bulk on the brush stem: it's better to to add to your main filters if you need better filter performance.
I don't have a Badger Patriot, but my understanding is that it's a good brush. I have two Badger SOTAR models, and if they're any indicator, I'd expect spray performance to be comparable to IWATA, but fit & finish to be more raw and "industrial" outside of the nozzle and needle, so a little fussier to keep clean. It should be much better and more reliable than a 20$ "Master" or "Point Zero" or whatnot.
The threads in the head assembly can be a little "gritty" on Badger brushes OOB. If that's the case, I recommend lapping them with something like Flitz to ensure a good seal. Basically just put a tiny dab of compound on the male threads, then screw them in and out about 20 times to polish off the burrs that are causing the gritty/sticky feeling. Make sure to clean the residue off thoroughly before spraying again.
For maintenance, get a roll of lint-free shop paper towels, a couple packs of interdental brushes from the local dollar store, a box of q-tips, and a box of round wood toothpicks. Use paper towels and q-tips wetted with solvent/thinner to clean the cup and needle, the interdental brushes to clean the passageways/tubes in the body, and use a wood toothpick whittled to a needle taper and soaked in thinner to clean the inside of the nozzle (don't use metal tools to clean the nozzle, as they might scratch it or flare the tip). Occasionally you'll need to inspect the needle tip or nozzle for gunk or damage, so you'll want a high-X pocket magnifier similar to this. Also a stick of wax-based lip balm to help the threads in the head assembly maintain a good air seal (apply a tiny amount to the male threads before reassembly after cleaning).
Get or make a spray-out pot. They're easy to DIY out of a margarine tub or soda/juice bottle, so although nice, it's not strictly necessary to buy one.
Get or make an airbrush stand/holder. This is not for storing the brush, but rather for having a way to set the brush down while in-in use without spilling the paint cup. Again: these are easy to DIY, so you don't have to splash cash on one unless you really feel like it.
Hope that helps!
DUDE, If your going to use a compressor, you MUST have an inline water filter like this
You need a pressure regulator. https://www.amazon.com/Bostitch-BTFP72326-Regulator-4-Inch-Thread/dp/B00HXD2V36/ref=mp_s_a_1_7?keywords=pressure+regulator&qid=1572565174&sr=8-7
Pressure is related to flow. So what happens to the gas in the tube is what will determine the actual pressure.
like this one?
Would this work? http://www.amazon.com/ARKSEN%C2%A9-Compressor-Filter-Regulator-Water/dp/B00CWKTAV6 . I would also get a radiator or two for the heat dissipation.
> discounted rate
Lol, half the time the products stated MSRP is ridiculous to the point that they aren't viable; case in point. $1100 for a fan? It's literally this with an attachment. Where the extra $1000 in engineering comes from is beyond me. Maybe the Raspberry Pi module to provide power cycling or controls for a bluetooth device? It's still insane.
Also note that the kick starter I linked actually delivers a product now. The campaign valued it at $1159 but they sell it for $759.
The whole thing is connected to a vacuum pump..
I have some videos that I need to upload somewhere (good anonymous alternative to youtube?).I have no idea what my CFM of my pump is but it pulls through quite literally anything.And another set of random photos from cooking that night while engineering
New ideas are I need one of these mesh filters. Perhaps 2. They draw pretty hard. These are impossible to do by your self however they may be of use in the 'power assist' mode with the vacuum pump. Definitely need one on the outlet of the first jar to keep depris from the next.
Also think I need to have buffer jars hooked up backwards. The one closest to the vacuum pump empty hooked up to a jar full of water. That way when it sucks through 1 full jar you know that all air in all of the jars has been 'smoked' through. Given enough equipment you could pack 1 massive 1g bowl hook it up to 28 mason jars in series. (You'd have to play around with sizing). And then everyone in the room can carry around a jar full of 'vaporized' 1 gram. Put a straw in it and just inhale in as much or as little time as you want.
Also need to figure out where to get a glass downspout locally to use that instead of the pipe.