Best craft cutting tools according to redditors
We found 313 Reddit comments discussing the best craft cutting tools. We ranked the 174 resulting products by number of redditors who mentioned them. Here are the top 20.
We found 313 Reddit comments discussing the best craft cutting tools. We ranked the 174 resulting products by number of redditors who mentioned them. Here are the top 20.


I could've got karma for these scissors? Damn. I didn't think they were that special, they're like less than $10 at hobby lobby.
Amazon link
Edit 2: The guide is available here
-----------
I made these token mini's as an alternative to buying miniatures. They're significantly cheaper and can be made in 0.5", 1", 2", 3" sizes and cost very little (1" and 2" shown).
If enough people are interested, I'd be happy to create a DIY post or video.
Edit: I created a MS Word template (link) for 1", 2", 3", and 4" tokens for anyone that doesn't want to wait until I post my guide.
I use wooden circles as the base - they're available on Amazon in 1", 2" and 3" sizes; /u/ScoutManDan suggested MDF discs.
The tops are epoxy stickers - they're also available on Amazon in various sizes.
When it comes to assembly, this is the order I use:
I got you
Hello.
A lot of things can go badly wrong with even basic bondage. For that reason, I really don't recommend learning it by trying it for yourself. The best way to learn bondage is to have it taught to you in person.
The good news is, bondage people are very open and usually offer workshops in any big city. If you go to one, expect to walk into a room full of people who you are in no way sexually attracted to, including some that are slightly sexually repulsive to you. But stay anyway. Keep your clothes on. Listen and learn.
In addition to safety, a workshop will teach you a few really fun knots, tell you the best kinds of rope and where to buy it, how to clean things afterwards, and all sorts of other useful tips.
If you ignore that advice-- which is really the best advice-- here are a few things to watch out for. It's three tips that will prevent you from injuring somebody.
With respect to number one, beginners should not use rope on hands or wrists. Go to Mr. S. (reputable shop) and get a set of nice basic padded wrist restraints. They have tie-points on the outside of the restraint. A lot of beginners seem to think that restraints are for the hard-core people. But the reality is just the opposite: restraints are there for beginners to not fuck up.
With respect to number two, never leave anyone tied up alone. Always be prepared with a set of EMT scissors. Note that these are sharp enough to cut rope, but the points are blunted so you can stick them between the rope and skin (eg: neck) without cutting. It's to get somebody out of rope if they pass out or if your knots go wrong and start to self-tighten.
Always have an escape plan: for example, never clip a wrist restraint to a metal chain: tie it with rope instead so you can cut it if the sub passes out suddenly.
Don't leave arms tied elevated for a long period in an early session. It causes a lot of stress to the body. Try it for ten minutes the first time, and if that goes well, try it for 20 minutes.
Start slow. Try something briefly. see how the sub feels the next day. Try it again longer/harder if it works. Know what a safeword is. Don't jump right into rape play. Don't jump right into gags.
That's sorta the first 10 minutes of a bondage talk. But really, go to one and get it for real.
Amazon link for anyone not wanting to support Hobby Lobby - or just hermit-y like myself and like not leaving the house: https://www.amazon.com/Rainbow-Embroidery-Scissors-Sew-Tasty/dp/B07G2TG468/ref=sr_1_5?ie=UTF8&qid=1538286426&sr=8-5&keywords=unicorn+scissors&dpID=41g2IuM-AbL&preST=_SY300_QL70_&dpSrc=srch
Glass cutter tool.
Ok. Did some reading.
I'm not going to sugar coat this because well, I don't believe in that.
Welcome to the dark side. We have goldfish crackers. (BTW my roommate was an aide for 20 years and said that they are convenient because if they are attacking you, you can throw them at them and it will distract them for a while.) Invest in goldfish crackers and fruit loops. They make good rewards.
Buy this book. I really wish someone had recommended me that book before I stepped into an autism classroom. I reread it now every once in a while and still learn new things.
Start here. Go through the rest of her blog. Subscribe to it. She runs an excellent easy to understand blog.
Visuals are insanely important. Subscribe to LessonPix. Your school may have Board Maker, but I find it very difficult to use. Plus, LessonPix is online based so you can create something at home and then access it at school or vice versa. It is like $36 a year, which is insanely cheap. For my visuals, I usually put a picture with the word on the bottom.
You will need velcro. Do not buy it from a store. This is a wholesale place online. They have the cheapest velcro out there. I buy coins so I don't have to cut it, it makes it a lot easier. If you are going to cut velcro, get titanium scissors. They will not gum up when cutting velcro. Have a system with your velcro so you don't have random patterns of velcro. I usually do soft on a surface and rough on anything that travels.
You are going to need a personal laminator. My binding has the cheapest 5 mil laminating sheets out there. Use 5 mil for anything that travels and if its going to stay on a wall, use 3 mil. 3 mil or 1 mil (what the school laminating machine uses) tears easily and doesn't last. Once you create something, you don't want to lose it. Most any laminator will do. I like the Fellowes brand. This is a very good one. That my binding website has some awesome deals on laminators. Whatever you get, just make sure it doesn't need a carrier sleeve to laminate because those are annoying. Just make sure that if you from 5 mil to 3 mil you switch the laminator over to 3 mil and let it cool or there will be a burning smell. To save time I bought one of these. Just makes cutting faster.
Don't overspend on stuff for the classroom. Look at oriental trading post. You can find a lot of stuff there. Sign up for the newsletter and wait from a free shipping coupon, don't pay for shipping.
Get yourself a couple pairs of these. I like the 18 inch ones. Make sure your tetnus shot is up to date.
You probably need to brush up on your evidence based practices for autism too.
I know this is a lot of information. But these are all things I wish people would have told me before I started teaching this level of autism kiddos. I went into it blind. I've had to put all this together through reading, training, and observation. Its easier just to be front loaded with the information.
My first year teaching, I was put in a K-1 mod/severe autism class (your setting 3). It was the first autism specific class at the school. Nobody gave me any support. I had no idea what I was doing. I had very little formal training on autism specific teaching. It was like being sucked into a vortex in deep water with nobody around to help me. I didn't even know where to go for information. That's why I try to help people and be completely honest. I'm not trying to overwhelm you.
If you need help and support, let me know. My MA.Ed is in Special Ed with a specialty in Autism Spectrum Disorder. I am teaching a class similar to yours at an elementary school level next year. I'm really good at dealing with behaviors and data too.
:) Yueton Vintage European Style Plum Blossom Needlework Embroidery Scissors (Copper) https://www.amazon.com/dp/B01DG5JVA0/ref=cm_sw_r_cp_apip_4vOu6LA8IifYU
This reminds me, I need to go figure out what scissors they gave me at work because as a lefty it's one that works fantastic, and that's probably one of the worst things you have to deal with as a lefty. More than half the scissors on the planet are totally useless for left-handed people. Especially the ones in grade school that would just crease paper if you used them in your left hand.
edit: Someone actually linked them lower in the comments. These are beautiful.
https://smile.amazon.com/Westcott-Titanium-Scissors-Straight-Handle-13901/dp/B000P0LNRE
Just get this, $23 and you're set.
https://www.amazon.com/gp/aw/d/B01EG6TP9A/ref=mp_s_a_1_1/167-5726856-9481462?ie=UTF8&qid=1478979249&sr=8-1&pi=AC_SX236_SY340_QL65&keywords=bottle+cutter&dpPl=1&dpID=4115CJ0rkYL&ref=plSrch
http://www.amazon.com/Kai-5210-8-inch-Dressmaking-Shears/dp/B004MN72VG
Kai brand shears, affordable and really really good. Source: Spent four years in textile industry, used nothing but these.
Not OP, but the easiest way to cut glass bottles like this is with a glass bottle cutter like this or this.
I've been cutting bottles like this to make wine bottle candles for my centerpieces and my favors!
I'm surprised no one has mentioned Knotty Boys yet, they have a lot of good tutorials.
Also: If you are going to try rope bondage, please have EMT shears on hand. You can get them for $4 on Amazon. These are designed to cut material off of a person without harming their skin; it is not safe to use regular scissors or a knife to cut rope off of someone in an emergency.
Now I usually cut with electric tile cutter and sand on DIY flat lap, but for someone looking to only do straight cuts and not make the glasses for sale I'd say go with one of the jigs available and then just do the hot-cold water routine, a candle or a jet butane torch over the score line.
Alternatively, you can also make a jig yourself, it's not that hard and will probably save around $30.
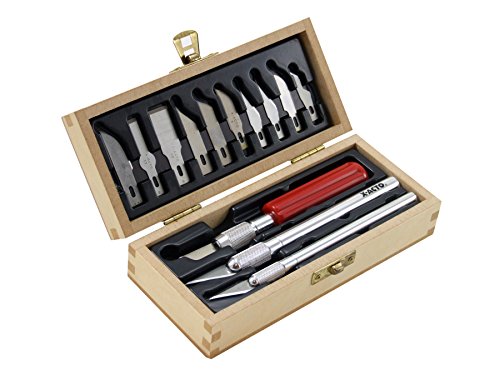
Thanks! I have a bunch of large thick sheets of styrofoam and a good selection of small Xacto knives (http://www.amazon.com/Xacto-X5282-Basic-Knife-Set/dp/B00004Z2UB).
I can't give any tips other than just make sure you plan ahead. In my case I went for a very damaged and abandoned look, so any cutting mistakes would only make it better.
Near the end my dad made an electric styrofoam cutter for me (Basically a wire in between a coping saw with a current going through it). This made cutting thin bits significantly easier and faster, but most of what you see here has been done with the knifes.
I also advice to go with ISO 90 type Styrofoam, as this is much more compressed and will likely look a lot better. I used ISO 60 Styrofoam here, as I could not find 90.
Just take your time, be patient, and it will all work out!
I see you're being recommended a lot of multitool options, but I've had a folding pair myself for 15 years (same kind my seamstress mom used) and they've yet to fail me... Slip-n-Snip
If you want that shit to break on impact you need to score the bottle with a glass cutter. You know, one of these
https://www.amazon.com/gp/product/B00004YNNP/ref=s9_acsd_top_hd_bw_bs6zh_c_x_5_w/139-0216923-7062946?pf_rd_m=ATVPDKIKX0DER&pf_rd_s=merchandised-search-3&pf_rd_r=G2E4P4WMY1G0PS1X2ZSY&pf_rd_t=101&pf_rd_p=daa158e8-1d34-51d0-b958-18647c7872e9&pf_rd_i=12896601
Ok, #1 that is the coolest idea on the planet! There is no better money you could spend on a gift for a sewer. Especially one without decent scissors. (or shears or cutters or whatever).
I use Gingher and Kai. Both are great but Kai is definitely easier on the hands. I've got 67 year old hands that are in good shape but not in 30 year old shape.
These Kai Shears are the ones I use (and love) every day. They aren't as expensive as you want to spend so might I suggest adding these embroidery scissors? They are so very handy and the larger finger holes make it much easier for old hands to get them working efficiently.
Seriously, this is just the nicest idea.
I used this glass cutter to etch the glass, then broke it off by dipping the bottles in hot and cold water (back and forth for a few minutes), then sanded the tops for a while.
My advice is if you do it make more then your target number because some break uneven. I made six to get four and just ditched the two worst ones. Ill probably just make those “duds” into candles.
How are you cutting them? I've cut thousands of wine, champagne, and liquor bottles. I use this cutter and diamond sanding pads, and I get beautiful smooth edges with minimal effort. I don't use the candle provided with the cutting kit. I use a hot water from a kettle and cold tap water to stress the score.
Not saying you have to do it this way, just letting you know that there is a way to get the edges cleaner.
35 feet is honestly long for rope stuff, even for people who do a lot of rope stuff.
Most ropes come in 30 feet pieces and are doubled over to create more surface are, for a total of 15 feet of working length.
Many people prefer even shorter lengths, in the 23 foot range, again doubled over for more like 11 feet of working length.
Some rope packages come with 5 lengths of 30 and 2 lengths of 15. The lengths of 30 are used for complex ties, while the 15 are used for smaller ties or finishing longer ones where you need just a little more rope.
The 15 foot lengths are again doubled over for a very manageable length of 7.5 feet.
You could cut it into 3 pieces. Two 10 foot lengths and one length of 15. Knot the ends off, or use tape if you do not intend on washing it. This would give you enough for say-
Very helpful video for learning rope.
Another helpful rope tutorial.
Have you got safety shears?
Took me around 20 minutes to setup including the glass cutting!
Great video showcasing the whole process: https://www.youtube.com/watch?v=oLD2chHhsXI&t=396s
Ikea LOTS mirror https://www.ikea.com/ca/en/catalog/products/39151700/
Tools I used for this project (Canada/non-affiliated)
We wanted to do candles in wine bottles for our centerpiece but our venue won't let us do uncovered flames. As a workaround we decided to go with something like this where the candles are inside the bottle.
Of course this meant cutting the bottoms off of nearly 100 bottles, which meant
exploiting our friends for free laborhours of work delabling, washing, scoring, and cutting the bottles.The whole process was pretty smooth, but pretty labor intensive. The scorer worked like a charm but it takes a bit of practice to get a straight score. Still we did lose about 12 bottles but we had plenty of extras as we've been begging our friends and families for all their discarded wine bottles for the last year.
If this is something you're interested in for your wedding here are the tools we used:
https://www.amazon.com/AGPtek-Bottle-Machine-Cutting-Bottles/dp/B0155WMTGU/ref=sr_1_3?ie=UTF8&qid=1475268871&sr=8-3&keywords=bottle+cutter
https://www.amazon.com/Bottle-Cutter-Genround-Machine-Cutting/dp/B01EG6TP9A/ref=sr_1_4?ie=UTF8&qid=1475268871&sr=8-4&keywords=bottle+cutter
The one in the second link works slightly better but they were both decent. Basically all you have to do is score the bottle ONCE around in a straight line, then dunk it in hot near boiling water then ice water back and forth. After a dunk or two it splits right along the line.
When I started doing bondage, I got a bunch of thick (1/4 inch) cotton clothesline from the hardware store, cut it into 15ft and 30ft lengths, and tied a tight overhand knot at the ends. Rope is always easy to explain away, particularly when it's "normal" rope and not the nice bondage-specific stuff. If you find that you really like tying, you can always buy better rope, and then you have convenient lengths of clothesline for other things.
15ft is enough for tying wrists together in a two-column tie, and you can use that same simple tie to tie together anything that has two 'columns', like two ankles, an arm to a waist, two sides of a bent leg, and so on.
If you want to, say, tie wrists and ankles to the bedposts, what you want is a one-column tie, which is just a secure and comfortable way to secure one 'column' of the body to something else.
If you want to get more into bondage, 30ft is enough to tie a basic chest harness, which you can use to tie other things to, as a convenient 'handle' for your partner, or just to give them more of a feeling of confining rope. A common chest harness is a box tie, or a takate kote, which is basically a chest harness that binds the hands and arms instead of letting them stay loose.
If you want something other than rope, I'd recommend something thicker like scarves rather than strips of fabric. You can pick up scarves at basically any women's accessories section of a department store. Fabric tends to knot tightly, so thicker fabric is a bit better, and it's good to keep something around to help work the knot out (like a knitting needle to stick into the knot) or something to cut the fabric (like a pair of safety shears or a knife you're comfortable using close to skin). Actually, keeping those things around is important when you're tying with rope, too.
With these, I've made all my headphones wireless. Only $7.98 at the moment.
Being in the US, I don't know any local businesses in your area. I've always found glass shops to be extremely helpful. For the ones that are full -- ask them about other places to take classes. They'll even give you informal pointers if you ask.
I started many years ago without taking a single class. Today, there's probably tons of stuff on the internet, so it may not be necessary.
You'll need a glass cutter. I prefer the pistol grip type, but some people use this kind.
Then you'll need glass. If you can't get any near you, you can buy it online (don't know how much shipping is). Some glass is much easier to cut than other. Ask the salesman if you don't know.
I would get started by learning to cut glass. I'm sure there's a youtube video out there. Here's a page to get you started.
Then there's a lot of materials to buy: glass grinder, copper foil, soldering iron, solder, flux. And a lot of things to know, only a small percentage of which I do. Google is your friend.
You need some new scissors. Recommended.
I used a starter set of carving chisels [like these] (http://www.amazon.com/Starter-Set-of-5-Tools/dp/B001UYQPNG/ref=sr_1_cc_3?s=aps&ie=UTF8&qid=1411898341&sr=1-3-catcorr&keywords=starter+carving+chisel+blades) but not those exact ones, and then this [Xacto carving set] (http://www.amazon.com/Xacto-X5175-Deluxe-Woodcarving-Set/dp/B00004Z2UD) when I got to the finer details.
If he is a big warhammer collector and painter then it may not be a good idea to get him a random model as he may already have it or dislike that particular model. I'd suggest that you consider putting several smaller things in a box for him.
Here are some alternatives to an individual model that he may enjoy:
-Primers and paints (you can buy the GW brand paints, but I'd recommend Vallejo). A mix of metal paints (copper, brass, gold, silver, steel) would be a nice gift. And every painter always needs black so that would be a nice thing to add on.
-Paint brushes. A few very fine brushes would be helpful. Look for sizes 0, 5/0 and 10/0.
-If you know that he airbrushes you could buy him a bottle of 70 isp alcohol to add to any grouping of things you give him.
-Warhammer books are always a nice gift. If you can tell us if he collects Warhammer 40K (scifi) or Warhammer (medieval aesthetic) we can recommend books.
-Something like this would be a nice gift for him if he puts together a lot of models: http://www.amazon.com/Xacto-X5282-Basic-Knife-Set/dp/B00004Z2UB/ref=sr_1_2?ie=UTF8&qid=1415106833&sr=8-2&keywords=xacto
-A warhammer themed t shirt (you can find them on etsy and ebay).
I have these to travel with. Slip-N-Snip The Original Folding Safety Scissors (1, 13 IN) https://www.amazon.com/dp/B005J091G0/ref=cm_sw_r_cp_apa_i_bVCNDbM6HN77K they fold and unfold very easily, but don't accidentally come loose.
[Or OP used a circular glass cutter.........] (http://www.amazon.com/Ephrems-Original-Bottle-Cutter-Kit/dp/B007PK12GY/ref=sr_1_1?s=arts-crafts&ie=UTF8&qid=1382379202&sr=1-1)
Hmmmmm. If you have enough of the purple, I think you might want to do it again, but this time with a pair of super sharp "nippers." I have a pair of Fiskars https://smile.amazon.com/Fiskars-190500-RazorEdge-Micro-Tip-Action/dp/B00UY11IFG/ref=sr_1_17?ie=UTF8&qid=1541026478&sr=8-17&keywords=fiskars+scissors and I absolutely love them. The spring action means your hands don't get tired because they open themselves up. They are really sharp and pointy and let you get right in there on all the little fussy parts.
Looking at your crown area again, you might not have to start all over; just get the nippers and clean everything up and see what you think. However, the fray check might still be super visible (and it usually stays pretty stiff) so you might want to practice using the nippers on this piece and then make another one?
Xacto carving kit
Xacto X5175 Deluxe Woodcarving Set https://www.amazon.com/dp/B00004Z2UD/ref=cm_sw_r_cp_api_i_XDX2Cb61AZ2TC
Titanium scissors like these aren't actually titanium but steel with a thin surface coating of a titanium compound (probably titanium nitride).
Titanium metal scissors would go blunt very fast compared to a steel pair.
I tried making my own cutter and the results weren't always good. The string method was worse (though I didn't give it much of a chance.)
I bought something almost exactly like this
https://www.amazon.com/Glass-Bottle-Cutter-Genround-Machine/dp/B01EG6TP9A
and I can usually get about 9/10 bottles cut with no flaws. Maybe worth the money?
Also: I tend to use a bucket of cooler faucet water for the higher thermal difference (instead of just room temperature), and I never tap it, I just alternate boiling water (I'm pretty generous with it all around the cut), and you can hear it fracture when it hits the cooler water. If you hear that once or twice, you can usually just gently tug the two pieces apart.
Instead of using sheet protectors, get a roll of 3 millimeter mylar/duralar. I got the idea from 3mil_mylar, he does some good stuff. Over all, the stuff is cheaper than buying sheet protectors, and allow for much bigger stencils. I got mine from a seller on amazon here. It also works great with a heat based stencil cutter. As for adhering the stencil to the shirt, just use spray adhesive on the back of the stencil, wait for it to get dry and tacky, and then put the stencil on the shirt and cover your edges. Adhesive spray directly on the shirt will get icky and may not come off.
Slip-n-Snip folding scissors. They're amazing: https://www.amazon.com/Slip-N-Snip-Original-Folding-Safety-Scissors/dp/B005J091G0
I would not recommend the citadel tools. They are quite expensive compared to other brands. I would recommend something like this. The mold line remover I think is unnecessary. You can just as easily remove mold lines using the back edge of a hobby knife blade. the file set might be nice to have, but again, there are cheaper options.
Unless you're really committed to spending your money at that one store or whatever, I recommend checking hobby lobby (or whatever your local equivalent is) for tools and equipment. Don't buy cheap, but don't buy expensive, either. haha.
I've never owned a pair of these so I can't speak to the quality, but the reviews look positive and their cheap enough to try out (IMHO). However, I'm not sure how heavy duty a scissor your looking for. These might be worth looking into.
Here
Found a chrome pair as well.
Here is a video of them. (not much of a video).
Edit: Came across these as well.
Edit 2: Just found these, they are made by kershaw which is always nice, and they sound a lot like what you were describing in the OP. Video here. Seems they come in black as well.
I Cut the bottom off of 50+ wine bottles for wedding table decorations. The best method we came up with was using a glass cutting tool here
We tried a blow torch to heat the cut and it dip it into an ice bath. It was ok. What worked best was low boiling water and an ice bath. Place the bottle in up to the cut and then dip into water. Gave a nice clean break. The cut doesn't need to be deep at all. The shallow cuts broke better because we didn't put as many micro cracks into the glass.
The most mundane thing I could think of
product review: I was a little nervous with two 8 inchers to fill my hands but I was pleasantly surprised by how they fit right in. They did their job and they did it well. I was very pleased and will share them with my friends and neighbors when they need to get the job done!
Kotobuki Traditional Japanese Thread Scissors, Black Finish with Short Blade https://www.amazon.com/dp/B00WXIRPU0/ref=cm_sw_r_cp_api_AbGVzbK0KGNSH
What i got for those interested
Sorry forgot to reply to this!
I got mine at Michael's but here is an equivalent link:
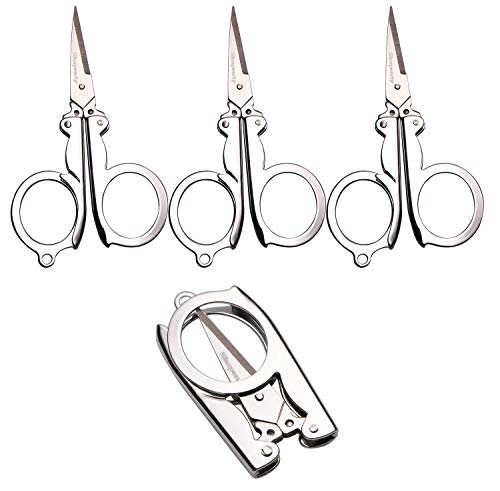
Shapenty Stainless Steel Folding Portable Travel Scissors Cutter Foldable Paper String Craft Shred Scissors, 4 Pack https://www.amazon.com/dp/B07448MFHZ/ref=cm_sw_r_other_apa_i_sRhWDbKYRY5AW
This is easier - http://www.amazon.com/Ephrems-Original-Bottle-Cutter-Kit/dp/B007PK12GY/ref=sr_1_3?ie=UTF8&qid=1376621587&sr=8-3&keywords=ephrem%27s+deluxe+bottle+cutter
I store materials and tools for a given project in a mesh zipper pouch. This includes needles, scissors, a seam ripper, a needle minder, and a needle threader.
To store needles, I bought magnetic sheets with adhesive backing and placed them in ArtBin slimline cases. (ArtBin has a slimline case with the magnet already in it but it was larger than I prefer). I have enough so that I can have a case per pouch.
I bought a 4 pack of folding scissors from Amazon so I could have a pair per pouch.
Rolling Scissors
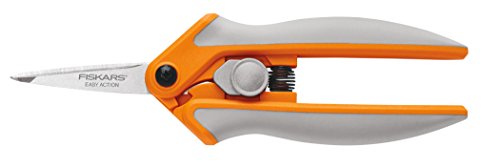
For snips, I have a pair of Coilmaster's and a pair of Harbor Freight $3 specials, which work really well. Scissors, I use a pair of Fiskars micro tip shears,and they have been the best I have tried so far. Fiskars 190500 RazorEdge Micro-Tip Easy Action Shears, 5 Inch, Orange and Gray https://www.amazon.com/dp/B00UY11IFG/ref=cm_sw_r_cp_taa_ufXWDbGNSXMJQ
Is something like this what you're talking about?
Good Job! Remember there are no rules in quilting except have fun. I like your fabric choices. And if that's your first block, you're a natural.
I read another comment about mistakes; no one will notice them unless you point them out. Also, in Japanese art, there is a thing called wabi-sabi which is sometimes brought about by an "intentional mistake" to demonstrate that the art was made by a human hand. Something too rigid in it's lines can be cold and unfeeling. (wabi-sabi can also be about finding the beauty in naturally aged and worn objects.) Beauty is in the worn spots and imperfect lines.
PS, if you're looking for really sharp scissors ever, KAI, they make different scissors for cutting fabric or nipping threads. These are great if you ever get into doing a hawaiian quilt where you cut through 8 layers of fabric for the design.
http://www.amazon.com/Kai-5210-8-inch-Dressmaking-Shears/dp/B004MN72VG/ref=sr_1_1?s=arts-crafts&ie=UTF8&qid=1373484941&sr=1-1&keywords=kai+scissors
You sound like my girlfriend. More sleep is lost to crafting than anything else. She also does a lot of stuff with wine/liquor bottles. This bottle cutting tool is awesome and there's all kinds of neat things to make. She primarily makes the self watering planters and luminaries (cuts the bottom off and sits it on top of a votive candle). Although some of the stuff she makes requires more expensive power tools. She has an ETSY store called Mino'aka Studios. You may be able to get a couple of ideas from there.
We love the idea of craft trading as well. If you're interested you should reach out to her on ETSY. She knows about my redditing "problem" so just mention we talked on here. I'm more into woodworking, but she's the crafting genius. I'm sure she'd love to talk to you about that.
That's funny, we have a lot of Nov/Dec birthdays as well...including mine. I can sympathize. The crafting really ramps up once the weather cools off and with the holidays approaching.
I bet now you don't feel so bad about rambling, huh? I tend to go on and on as well.
My only gripe so far is that I usually trace my stencils with a fine tip pen but the ink would smear on this stuff. However, the ink holds if I use a sharpie. I've been told that you can buy duralar that has a matte finish and works better to draw on. I also just ordered a stencil cutting tool which is recommended for Duralar, so hopefully it works well because I have some heavy detail designs I want to cut out but I really don't want to deal with the hours of cutting involved.
I highly recommend you order yourself one of these. You can find some tutorials on the net as well. Check out the tutorials from Esoteric Order of Gamers here. Some good tips there.
This needs to be higher up. While no doubt anyone can get good cut with a hobby knife or box cutter after some practice, getting the right tool is the best way to ensure even a novice gets nice clean cuts. FoamWerks tools are the Rolls Royce of foam cutting, but even a simple tool like this $8 xacto board cutter will greatly improve your cuts and will allow you to make easy tongue and groove joints. Here's a video tutorial on how to use the board cutter.
Yeah, it totally makes sense to me now, especially now that I'm looking at your photos more closely. I had the same experience, 100%. My opinion is that if the missing color on the backs is not repaired before installation, you will always see it. How could you not?
Your installers are saying "that's how it is" because they're not being careful enough.
If you have any extra pieces of tile, you can try cutting new pieces yourself to see how it goes. Score the tile from the front using a glass tile cutter like this: https://www.amazon.com/dp/B075W8WZYY
Then place a thin piece of wire on a flat surface and place the tile on top of that, front side up. Make sure that the wire and the scored line are in alignment. Then press down on the tile and it should easily snap along that line.
I had a lot of extra tiles so I did it many many times, probably successful 25% of the time.
If that doesn't work, see if there's a place who can cut the tile for you with a water jet. I had good luck with that for the pieces that I couldn't snap.
Cutting glass is easier than you'd think. If you find a frame at a garage sale or something with decent glass that is bigger, chances are good you can cut the glass yourself! I just did the same thing today!
I used this:
https://www.amazon.com/dp/B00004YNNP/ref=twister_B01HKUG03S?_encoding=UTF8&psc=1
Ooh, Star Wars sounds like a good place to look for easy patterns!
I'm a guy myself, and not all that self-conscious about it, so it may not count, but my own favorite scissors are these ones ... it's a very common design, I think, the link is just the top hit I got from google.
>Headbands and bandanas are amazing if you want to look like a basketball player or Axl Rose.
Cool? That's your opinion, just like my opinion is that a top-knot makes you look silly. I'll take both of those over the latter.
>Also, you said dozens of different ways. I only see 7 things linked here with a few duplicates.
Lmao. That's what you want to nitpick about? The goal is keeping hair out of your eyes, not fancy hairstyles:
http://f.tqn.com/y/menshair/1/S/2/1/-/-/bald5.jpg
https://www.amazon.com/Sexy-Hair-Control-Maniac-Shine/dp/B00GYGKQTY/ref=sr_1_2_a_it?ie=UTF8&qid=1499281267&sr=8-2&keywords=hair+control
https://www.amazon.com/xtava-Pinup-Hair-Clips-Professional/dp/B01LXCL45M/ref=sr_1_11_s_it?s=beauty&ie=UTF8&qid=1499281288&sr=1-11&keywords=hair+clips
https://www.amazon.com/Soft-Style-Butterfly-Clamps-Assorted/dp/B000X20Y4C/ref=sr_1_8_s_it?s=beauty&ie=UTF8&qid=1499281288&sr=1-8&keywords=hair+clips
https://www.amazon.com/Toboggan-Timeless-Clothing-Accessories-Top/dp/B01LZ27V22/ref=sr_1_1?ie=UTF8&qid=1499281462&sr=8-1&keywords=beanie
https://www.amazon.com/VIKINGS-Chieftain-Safety-Swedish-Platinum/dp/B011L8WJIA/ref=sr_1_4_s_it?s=beauty&ie=UTF8&qid=1499281551&sr=1-4&keywords=razor
https://www.amazon.com/Westcott-Titanium-Scissors-Straight-Handle-13901/dp/B000P0LNRE/ref=sr_1_3?ie=UTF8&qid=1499281558&sr=8-3&keywords=scissors
Get a pair of these: https://www.amazon.com/dp/B004NG8V9E/
If you end up using neckties you absolutely positively need a pair.
They're cheaper, safer, and better than anything you may have hanging around already.
FYI: I sent you lots of amazon links as I am not sure where you live or if you have access to craft stores such as Hobby Lobby or Joann Fabrics. I know for certain that I have seen most of these items cheaper at the store than what I could find online.
I hope that all of this helps. Good luck on the shopping. I know that whatever you end up getting her she will love.
Cutting glass is easy. The tool to do it is here GLASS CUTTER or you can get them at Lowe's or Home Depot in the paint department for about the same price.
Better yet, Lowe's will cut the glass for you for free and if the cut is wrong, they will redo it at no cost. It is about a third the cost of having a glass shop do the job.
Home Depot no longer cuts glass.
As far as putting a notch in the wood, use a "Dado Blade" on a table saw, this is exactly what these blades are designed to do.
I've been playing it for about 5 years now? I really do love the game and I know i'll be playing it for a long time to come. Even if I didn't, I would still love to take on the project, just for the sake of getting into woodworking.
I was looking at this kit on amazon, I thought I would be able to very carefully use a chisel on most of the board, but I'm just not sure. It does say it comes with routers, but I don't see if they specify the size.
http://www.amazon.com/Xacto-X5175-Deluxe-Woodcarving-Set/dp/B00004Z2UD/ref=sr_1_1?s=hi&ie=UTF8&qid=1407618296&sr=1-1&keywords=woodworking+kit
Would you mind linking me to a router and template? I was googling around earlier and could not really figure out if i was looking at the right thing.
This is so nice of you, thank you for hosting this contest.
I'm all about repurposing. This wine bottle cutter would be a much safer way to repurpose my wine bottles!
Town Drunk
Thanks again!
I had a pair of these confiscated when I traveled last month.
Good for you.
Please learn to play safe. Do not hesitate to say that something bothers you (mentally or physically)
I did my wife's hands up too tight (oops!) and she immediately mentioned the tingling in her fingers. Do not wait to say something is too tight, too rough, etc.
I got this rope (200ft) and it's very soft and doesn't tangle.
http://www.amazon.com/gp/product/B004432CHI/ref=oh_details_o07_s00_i00?ie=UTF8&psc=1
Also, make sure you have a set of sheers like this:
http://www.amazon.com/gp/product/B004NG8V9E/ref=oh_details_o05_s00_i00?ie=UTF8&psc=1
I used and Xacto foam core knife I bought off Amazon.
It was $19.99. I'm sure any hobby knife would work but people recommended this one in a foam core thread so I bit. I'm pretty happy with it, very smooth cuts. But I've never tried cutting foam core with anything else.
https://www.amazon.ca/gp/product/B000HGK840/ref=oh_aui_detailpage_o02_s00?ie=UTF8&psc=1
here ya go
https://www.amazon.com/dp/B00004YNNP/ref=cm_sw_r_cp_apis_1519001525672
https://www.amazon.com/gp/aw/d/B00004Z2UB?psc=1&ref=yo_pop_mb_pd_title&th=1
On a serious note, it's really easy to cut glass. If you can find some glass of the right tint in a thrift store, it's cheap to get. Then go home, buy one of these, then go at it to your heart's content and save money.
Really, you shouldn't be paying to have glass shipped to you, nor for others to cut it. It's quick easy and cheap.
So depending on the type of carving you want to do. Like this is a good knife for spoons like wood spoons or salad tongs. http://www.amazon.com/gp/aw/d/B00343VCCK/ref=mp_s_a_1_14?qid=1420451007&sr=8-14&pi=AC_SX110_SY165_QL70
some of these no matter what. I wish idid when I started. So many wasted bandages. http://www.amazon.com/gp/aw/d/B0002IY0IS/ref=mp_s_a_1_17?qid=1420451150&sr=8-17&pi=AC_SY200_QL40
The exacto set. http://www.amazon.com/gp/aw/d/B00004Z2UD/ref=mp_s_a_1_5?qid=1420451349&sr=8-5&pi=AC_SX110_SY165_QL70 is a good starting set. Eventually if you like carving you might upgrade to something like this. I have this kit. http://www.amazon.com/gp/aw/d/B0020LOY7C/ref=mp_s_a_1_28?qid=1420451227&sr=8-28&pi=AC_SX110_SY165_QL70
It may be the crafter in me, but a really cute pair of small scissors would be both appropriate and useful...
You could also make label for a grooming product of choice calling it "Tied and True (lip balm, moisturizer, etc..)"
The local Home Despot is the best place to get started.
You want the kind or rope without a core like
twisted nylon
There are some good resources online for how to do ties. Start with twisted monk
And buy a set of EMT shears
Important in case of emergency either physical or mental.
Very important, it's ok to tap out and stop right in the middle, by either side. Set up a safe word.
After that spend a bunch of time talking about it. What you both liked, didn't like, want to try..
How did you get your bottles cut so clean? I tried the Kinkajou cutter and the this one but I can't get consistent results. Any tips?
Hobby Lobby! However they're also on amazon and also on this site
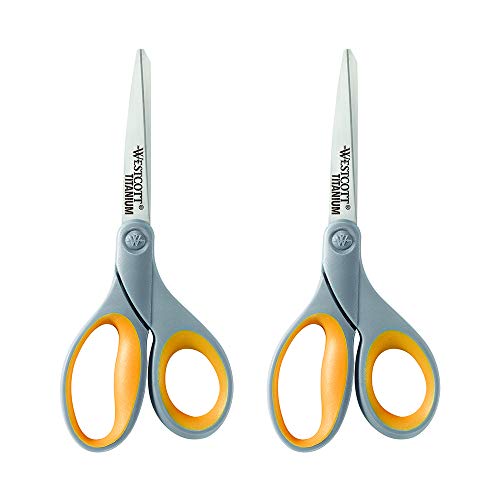
I can see where you'd think that, but they're actually grey with an orange interior. Mostly grey.
https://www.amazon.com/Westcott-Titanium-Scissors-Straight-Handle-13901/dp/B000P0LNRE
10/10 scissors 100%
You could probably conceal the tiki-ness somehow. Get one of these $22 bottle cutting tools.
Take a dark glass wine bottle. Cut the bottom off. Stick the Tiki torch through the bottle so that the upside-down bottle conceals the torch. You might have to cut the neck end of the wine bottle off in order to make that end big enough to fit the torch through.
Then figure out a way to hold the bottle in place. Maybe tie a short stick crossways below the bottle so the bottle can't slide down.
stealth scissors
or just plain old folding scissors
Bring the tube to any place that does glass work, like windows and glass tables and what not and ask them to cut it, or buy cheap bottle cutter and cut it yourself
​
https://www.amazon.com/Glass-Bottle-Cutter-Genround-Machine/dp/B01EG6TP9A
one of these
Very nice.
I am currently working on some foamcore storage for TI3 as well. Basing mine off of a post on BGG from a guy using chitboard/cardstock.
To aid in 45 degree cuts, take a peek at this: Amazon linky
Thank you for the link. I do like how you cut the box size down. Very well executed.
on a side note, you might take a look at a Hobby Lobby if you have one near you. Usually, the foamboard is beside the framing section (at least at the 4 in my city they are, I assume they use a similar floor plan at each store) Well, there are some vertical storage bins that contain thick matboard, mostly used for framing. At my locations they have large sheets of 3mm foamboard (about HALF the size of the traditional foamboard) which is REALLY nice to work with.
I'll admit, two problems are they only come in LARGE boards (which I usually cut down when I get home for storage and so it doesn't warp) and that I have only seen it in white with white core.
I am a fan of the black/black core myself, but am learning to like this thin/white FB as it allows me a little more room when it comes to designing inserts. (as sometimes that 2mm difference is HUGE)
I've never heard them called surgical scissors but I've always called them tramua sheers, and they're quite cheap
Even cheaper option
Rolling scissors
https://www.amazon.com/OLO-Rolling-Scissors-Better-Way/dp/B076HTBFFZ
I have 2 pairs of these and they are incredible. Wustof would be a great product as well.
Kai 5210 8-inch Dressmaking Shears (N5210) https://www.amazon.com/dp/B004MN72VG/ref=cm_sw_r_cp_api_i_LXqnDbF71REDC
Just a modern version of this
I found what looks to be the exact same design
Yueton Vintage European Style Plum Blossom Needlework Embroidery Scissors (Copper) https://www.amazon.com/dp/B01DG5JVA0/ref=cm_sw_r_cp_apa_i_XJ5.AbSFJHNJD