Best craft supplies & materials according to redditors
We found 3,900 Reddit comments discussing the best craft supplies & materials. We ranked the 2,016 resulting products by number of redditors who mentioned them. Here are the top 20.
We found 3,900 Reddit comments discussing the best craft supplies & materials. We ranked the 2,016 resulting products by number of redditors who mentioned them. Here are the top 20.


A bit expensive for my taste, but then again if you're really mad you might just splurge on this outrageous prank prop and irresponsibly take away part of your carefully made budget.
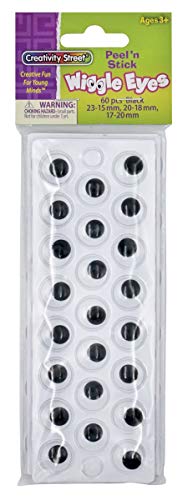
for the record, they do make self-adhesive googly eyes haha, then you don't need the double sided tape! we keep a stash at my work for general fun and merriment lol.
https://www.amazon.com/Creativity-Street-Wiggle-Multi-Pack-AC3437-02/dp/B000F8V66O
100 sheets of gold leaf measuring 1.7" by 1.7", totalling 289 square inches, cost $12.55, with free two-day shipping. I'm sure actual artists can get better deals on bulk quantities. Gold leaf isn't actually all that expensive since it's only like an atom thick.
No way in hell. There's bamboozling there. real gold leaf sheets that size cost WAY less than 5k... you can't tell me the paint and labor is "THAT" special. https://www.amazon.com/Gold-Leaf-Sheets-1000-Real/dp/B00VALQQ60
I'll just leave this here. OP must do the rest.
Creativity Street Peel and Stick Wiggle Eyes Multi-Pack, 60 -Piece Pack (AC3437-02) https://www.amazon.com/dp/B000F8V66O/ref=cm_sw_r_cp_tai_MifTzbJ90T4CR
Gold foil isn’t really that expensive, it’s so thin there’s really not that much gold weight wise
https://www.amazon.com/Gold-Leaf-Sheets-1000-Real/dp/B00VALQQ60
Here's an image of a print-and-play (cardstock, laminated, corner-cut) I did. I used one of my Kadomaru Pro cutters. Great device! (It's not heavy duty like that other link, but I did try something heavier duty and messed up a few cards as they didn't cut right. That's just the one brand, though, not the one someone else linked to here.)
I never knew I needed this until today. Amazon link for convenience:
Fake Outlet Stickers ($8.99 for 12 @ Amazon)
Yep.
Clever died when you used a Hermes belt to try your first punch! Next time spend a few bucks on this
https://www.amazon.com/dp/B000NK5VY2/ref=cm_sw_r_awd_bBrcvb0R6XYTE
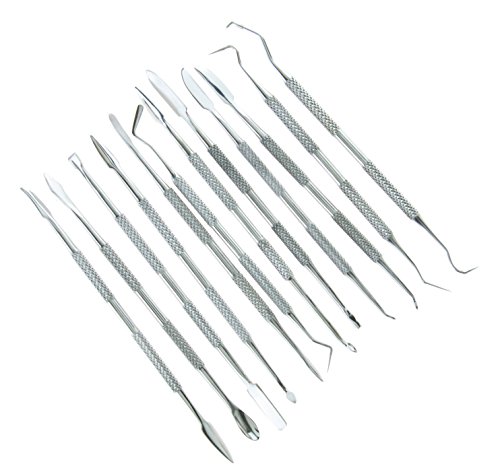
They're actually just wax carving tools and, IMO, this is a much better set.
2,500 googly eyes.
I built it so long ago that I don't remember the exact parts, but it was pretty simple.
They key thing I did was use hard boiled egg holders to hold the touch controllers. Basically you drop the bottom of your touch controller into this holder, then wrap your hand around the egg holder itself. Holding both the controller in the holder, and the holder itself.
The PVC parts are just 1' PVC pipe with a pair of PVC 90 degree elbows. You'll need something to cut the PVC pipe, a hacksaw works well, I used a dremel, or you can pickup a pipe cutter while you're on amazon
I also used one small piece of 3/4 inch PVC pipe wrapped in duct tape to hold the AR-15 stock onto the end. This is a luxury, but as someone who shoots real guns a lot, having a real gun stock on the end of it really makes a difference to your cheek weld.. So if you want dat real AR feel, you can pickup an AR stock right here.. All you need is the plastic stock, the tube and all the other stuff isn't required. I just warpped the 3/4 inch PVC pip in tape until it fit VERY snuggly into one of the 1" PVC elbows. I left it about 6" long, so that the rreal AR-15 stock would slide over it. I used a bunch fo tape around the 3/4" PVC pipe until the AR-15 stock very snuggly.
You will also need some 5 minute epoxy, and I used some instamorph. I used the epoxy to glue the egg holders onto the PVC pipe, and then wrapped the bases in electrical tape. Make sure you scuff up the PVC pipe before putting the epoxy on. I used a knife to scratch it up, and then some snad paper to really rough it up. This helps the epoxy hold.
I wrapped the base of my touch controllers in plastic wrap, then I heated up the instamorph and placed a bunch of it in the egg holder. Then I pushed the touch controller into the egg holder, so that the instamorph took the shape of the touch controller. DO NOT use epoxy for this.
After that, all you need to do is cut your PVC pipe to length and put the 90 degree elbows on there. The AR 15 stock is optional, not required.
I also recommend a sling, so that you can pop your hands in and out of your stock as need be. When your done with the stock, it'll just hold on the sling. And old cheapy rifle sling will work.
If you want to be REALLY evil, buy these the next time you fly and put a few of them up around the airport.
Better yet, if you're flying with one or more other people, give each person a few of them and have a contest to see whose stickers (the ones that each person places) can trick the most people.
Congratulations! You've earned one of these!
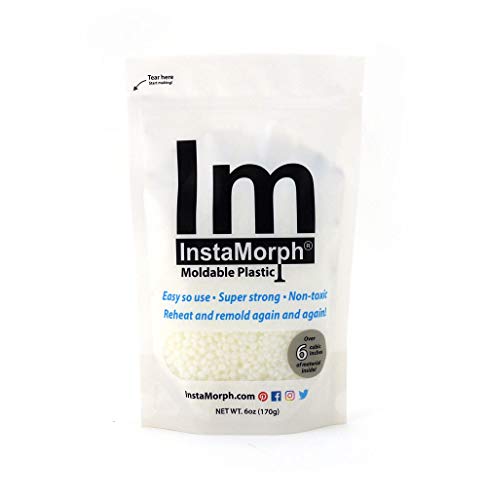
this stuff is the same thing in pellet form http://www.amazon.com/InstaMorph-Moldable-Plastic-6-oz/dp/B004MFLU4Y/ref=sr_1_2?ie=UTF8&qid=1463054497&sr=8-2&keywords=mold+plastic
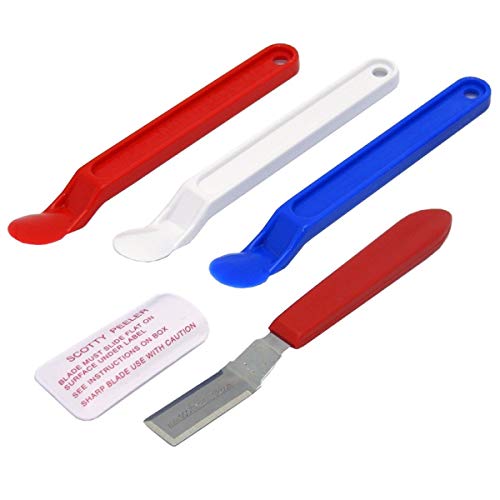
Get yourself some Scotty Peelers. The plastic ones are pretty safe for surfaces.
https://www.amazon.com/dp/B0068QIQVA/ref=cm_sw_r_cp_api_i_aHDzDb2262KP9
These work pretty well too, and your money might go farther
https://www.amazon.com/Plastic-Scrapers-Replacement-Stickers-Application/dp/B07K1RKLR4
These are awesome for getting in there and getting things clean. highly recommend them.
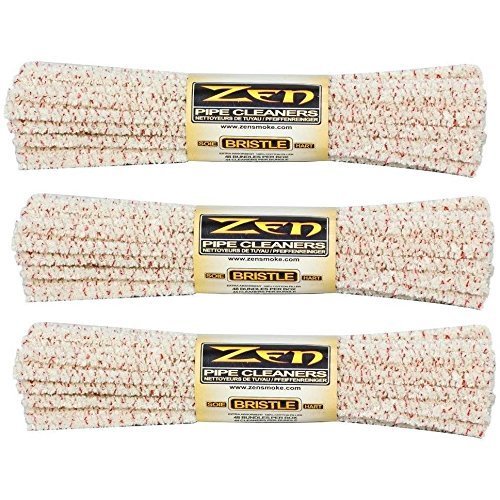
http://www.amazon.com/Bundles-Pipe-Cleaners-Hard-Bristle/dp/B000W5R6UA
These changed my life
DEWALT DWST08130 ToughSystem Suitcase https://www.amazon.com/dp/B01M3SP97Z/ref=cm_sw_r_cp_api_i_R3B0DbVARKYQT
I used a scrap of kaizen foam from another project. But any foam will do. Closed cell foam will age better and not absorb water.
Fastcap Kaizen Foam 57mm (2-1/4") Black https://www.amazon.com/dp/B007J2JJYK/ref=cm_sw_r_cp_api_i_TaC0Db2YE2QW8
Look up Zen pipe cleaners on Amazon
https://www.amazon.com/Zen-Bundles-Cleaners-Bristle-Count/dp/B000W5R6UA
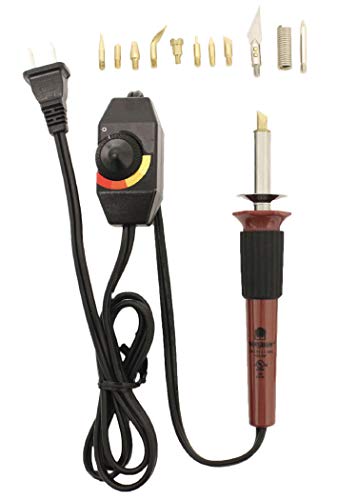
There are 'wood burners' like this: https://www.amazon.com/Walnut-Hollow-Versa-Temp-Temperature-Woodburning/dp/B005P1TRAS
That you use like a marker to burn wood. They're basically a soldering iron with a fat tip.
They are clay/wax sculpting tools
http://www.amazon.com/SE-DD312-12-Piece-Stainless-Carvers/dp/B000SVRSRY/ref=sr_1_6?ie=UTF8&qid=1418578480&sr=8-6&keywords=clay+sculpting+tools&pebp=1418578503800
You can buy a cheap rotary punch and do it. It's really easy to use.
Woodburner - I got it for Christmas but here it is on sale now for $28 and it comes with assorted attachments. The carbon paper is less than $10 for 10 sheets, too.
Not much. There's barely any gold there. Small sheets like that are about $12 for 100
As with many such luxury items, it's all for show, and there's no real value in there.
https://www.amazon.com/Fake-Outlet-Stickers-Prank-Electrical/dp/B06XR4SD1V
A) I have an awl in my craft kit that I usually use. B) If you have a hammer and nail, you can also use that; put something underneath that won't get damaged. C) They do sell actual leather hole punches for pretty cheap.
Better tool than the one shown in his video, comes with variable temperature knob and flat end and other tips.
http://www.amazon.com/Walnut-Hollow-Versa-Temp-Temperature-Woodburning/dp/B005P1TRAS
Would suggest adding this bits kit to give more hot end shape versatility.
http://www.amazon.com/gp/aw/d/B0024JMIPA/ref=pd_aw_fbt_21_img_3?ie=UTF8&refRID=139FHWPPGW5KYRDHVAQA#immersive-view_1456844011167
Uncaging
Marking the holes
Making the holes
Apoxie Sculpt 1 Lb. White https://www.amazon.com/dp/B0013UDWXI/ref=cm_sw_r_cp_apip_6KnEdOHgdEvSU
Looks like a wood burner tool with some sort of letter attachments (like these maybe). I've never used the letter attachments myself but wood burners are cheap to pick up, pretty easy to get the hang of, and loads of fun. You could burn the letters with the regular attachment too but I guess if you don't have the best handwriting or if the wood you're using is tough to burn evenly then the letters make things simple.
Edit: Really cool project OP. Nicely done and a great idea.
It's like one of these.
Here's a collar I made for my dog. Its more legible on lighter colors, my dog'S collar and leash are just plain veg tan.
I used Tenacious Tape on a down jacket and its held up great.
http://www.amazon.com/Gear-Aid-Tenacious-Fabric-Repair/dp/B005BLQTEE
Adding to all this:
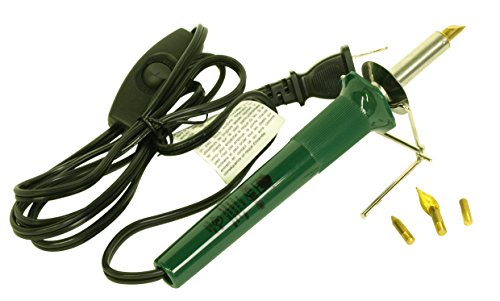
Get a soldering iron that allows you to control the temperature. That made all the difference in the world to my own soldering abilities.
This is the one I've been using lately. Only costs approximately $20USD shipped, and does have a temp dial. Now the placement of the temperature dial is a problem for some people, because it's on the cord close to the iron itself. I have never had an issue of the dial pulling the iron off the table, but am really careful to avoid that scenario in the first place.
Practice safety with regards to any hot tools like soldering irons: turn em off when done, don't leave em unattended until they cool down, and ALWAYS unplug em when not in use. Never depend on an "on/OFF switch on anything in your shop/work space. Always unplug, making sure the cord (and everything else) is safely away from both the hot part of the iron and keep all things from the edge of the table itself.
The helping hands clamping devices on the market today have much smaller bases. I have 2 and the one with the magnifying lens is made useless because of the small footprint of the base. A regular helping hands would probably suffice. I bought a cheap lamp that has a built in magnifying lens which does the job for me.
Hi there. If you're looking for a craft, woodburning can be a lot of fun!
I'd recommend picking up a basic woodburning tool at your local craft store or online and give it a try. Most come with some instructions/ideas and a variety of different tips to use. A popular one (which I enjoyed using) is the Versa Tool by Walnut Hollow, since it's inexpensive and you can adjust the temperature. They make an even cheaper one-temp model but if you want to practice shading and such the temperature control is really nice for a few extra bucks.
Other than that, you really just need some wood and you're ready to get started! The craft store will likely have wooden plaques and shapes as well, usually pine or basswood which are easy to burn. But if you just want to practice, any wood will do. I get scraps from local carpenters or lumber yards; driftwood can be fun too. Just be careful you aren't burning wood that's been coated or chemically treated, as you'll breathe in some unhealthy fumes. Just regular smoke from burning can be a nuisance but usually more so when burning larger pieces/burning for long periods of time. So although it may not be necessary for a beginner, down the road I would recommend getting a fan if this becomes an issue.
As for stenciling, I personally use graphite paper to trace designs onto the wood (you'll also find this at the craft store). Carbon paper is a similar option but I find it a bit messier/hard to remove if I've made a mistake. All you do is draw or print off the image that you want to burn. Then you lay the graphite paper (black side down) onto the wood, lay your image on top (I recommend taping to keep it in place), and lightly trace over it. Once you are finished and pull up the papers, the graphite will have transferred onto the wood where you traced and now you have your outline to burn over.
I hope that made sense! I find seeing a visual can often help, so some Youtube tutorials may be a good place to start to learn the basics. There are tons of resources online, and quite a few books on how to do different techniques/use different tips if that's more your style. Or just find some old scrap wood and experiment.
Have fun!
Let it cure a bit for hard edge sculpting. Use an old razor to slice off little equal chunks. It's pretty sticky and will ruin a nice blade. Cut off very small amounts at once until you get a handle on your skills, think a few grains of rice. When you pas the sculpt time, just smash the blobs onto bases and make mud or sandstone. When it's to far gone, it will just fall off, so rocks can easily be glued back done. Balancing stickyness and hardness is really key.
Go out and grab a huge pile of dental tools for cheap. The little paddle and shovle kind, not the wire picks. I own several real deal sculpting knifes but I go back to that one dental tool I like the best. Amazon has lots, but they are really common.
A good first project is layered sandstone for bases and other base elements to get a feel for moving it around. Then try out gap filling then furtrim and chain mail.
It's a little blurry, but it looks like you need to mesh the greenstuff onto the cloak a little better. It looks like there is a gap between the two?
Having the gap on the shoulders is fine, since it is sitting on top of them, but you want it to blend into the cloak itself, since it is supposed to be part of it.
Do you have a sculpting tool? They help a lot when dealing with greenstuff, especially for keeping your fingerprints off of it.
This is what I use;
https://www.amazon.com/gp/product/B000SVRSRY/ref=oh_aui_detailpage_o05_s00?ie=UTF8&psc=1
I run this instead of a Dremel brand tool. I have had a couple Dremels die on me over the years, so I tried this one and it has lasted 4 years so far! I also got a lot of my bits from harbor freight. I use the cuttoff wheels (ALWAYS WEAR FACE PROTECTION WITH THESE), Sanding Drums, and grinding stones the most. Use the cutoff for cutting out large swaths of material, sanding drums for tighter areas, and grinding stones to debur and smooth it all out. Most work that needs a dremel can be done with hand tools for better control. Coping saw, files, and flush cutters can go a long way. A lot of the "pros" don't use Dremels because they can jump out of control and hit a part of the blaster you planned on leaving stock and leaving a huge gash.
As for soldering Irons, I've heard wonderful things about this model, but cheaper models will work fine. TBH, I'd grab something in the $10 range and see if he sticks with the hobby. Maybe for christmas you can get him a nicer one if he's still going at it. I use a super duper old school Weller soldering station, so really anything will work. The issue you'll get with the cheaper soldering irons is the tips will tend to not last long and the heating element might crap out after a few months. Don't go cheaper than $10 here as some of them are meant for wood engraving, not soldering and wont get hot enough to melt solder. Any size solder is fine. I personally use lead/tin solder and just avoid breathing fumes as well as wash my hands when I'm done modding. Lead solder is MUCH easier to work with and requires less heat. Look for "Rosin Core solder" as it's easier to work with as it has flux in the center of the solder.
Good flush cutters, hobby knife, wire strippers, heatshrink, wire, loctite, etc are all valuable modding supplies. We sell some on our shop (shameless plug). I would recommend for plastic to plastic bonds he use Devcon Plastic Welder (make sure it contains Methyl Methacrylate as this acts as a solvent weld to bond the plastics together chemically instead of a weak adhesive grip like putty). Putty should be used as a filler material. I use two different putties. Free form Air for large amounts of gap fill, it is 6 times less dense than normal putty so it wont make the blaster weight 8 pounds when done. It is VERY easy to sand, but sometimes requires a thin layer of bondo over top of it to leave a perfect finish. I also use Apoxie Sculpt which is a direct replacement for normal putty for gap filling purposes. It's MUCH easier to sand than JB Weld putty, and leaves a nice smooth finish when sanded down.
Speaking of sandpaper, get various grades of sandpaper from 100 down to 600 grit (I go as far as 1000 if I want a gloss sheen on something).
Other than all of that, the tools I have on my bench that I would hate to mod without now are: Helping hands (for soldering), various different sizes of needle nose pliers, numerous sizes of small to medium screwdrivers, silicone lubricant, hot glue (for securing wires inside the shell), Electric Screwdriver, and various tweezers.
I might have some work in progress pics but my approach is usually like this.
I spend some time using GIS looking at other people's ideas for a conversion. I start making a shopping list. With both of the models in this thread you have lots of parts from Skaven Hellpit Abomination, and Soul Grinder.
From there I poke around on ebay for a few days/weeks until I get all the bits I'm looking for. I try be careful of vendors that want to charge shipping for every bit, or I can order $7 worth of bits and pay $21 in shipping. Be patient.
The maggot head on the soul grinder was from ... I forget.. but it's like a big walking maggot head guy made by some other vendor than gamestop.
My shopping list included barrels (for pus), possessed limbs, and green stuff. Greenstuff isn't cheap so I often will use something else if I have to fill in large gaps
Miliput is about 1/2 the price of Greenstuff but there are tradeoffs It's more like something you would use to make a ceramic out of. It practically melts when you get water on it, but you need it wet. Not great for details, but perfect if you just need to fill in a big gap.
For those big gap areas (a space of more than 1" needs to get filled in) what I do sometimes is wad up some aluminum foil. Stuff that in the hole. Then I cover it with the Miliput. This gives the model the structure I needed. Once that is there, I can just use the greenstuff for the cosmetic work, not the structural part.
Things usually start off looking really bad. You just have bits jammed all up together, but you keep adding a little more filler in here, and there, and it starts coming together. Once you get the primer on (fyi Miliput takes a few more coats to cover). it starts to take shape.
Buy this for all your Pops that don't stand. We have over 900 Pops, and this is the best thing to use that we've tried.
r/https://www.amazon.com/InstaMorph-Moldable-Plastic-6-oz/dp/B004MFLU4Y/ref=sr_1_2?ie=UTF8&qid=1536279608&sr=8-2&keywords=instamold
Tenacious Tape.
https://www.amazon.com/Gear-Aid-Tenacious-Fabric-Repair/dp/B005BLQTEE
This stuff is just shy of magic. I repaired a tear on my snowshoes and 3 trips later its still holding.
Put a piece of tenacious tape on both sides going 1" past the tear. It will hold forever.
A strop is only for honing (the final step to achieving a razor-sharp edge), while a whetstone could be used for anything from shaping the initial bevel to honing, depending on the grit.
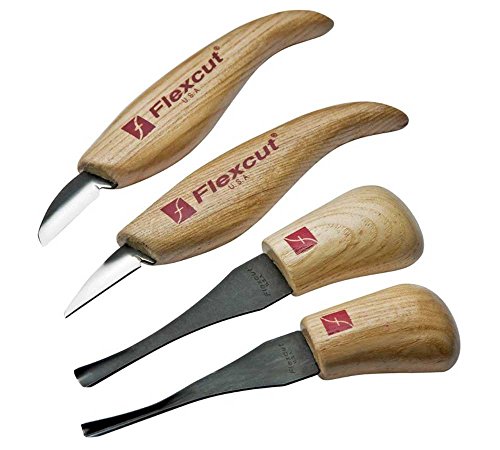
If you do buy some Flexcut knives, which I highly recommend, you will probably only need a strop if you properly maintain them. In fact, they recommend you never use a whetstone and only opt for a Powerstrop if you neglect them for too long.
Many sites will recommend you buy tools one by one so you can get what you need, but as another beginner, I was extremely happy I purchased the Flexcut Deluxe Set. It was probably one more knife and one more palm tool than I needed, but it helped me understand what was out there and how to use them. A good, cheaper alternative might be this set.
No matter what you buy, one of the most important things to do from both a safety and usability (and enjoyment!) factor is to keep your tools as sharp as possible. That way it requires less force to move the tool through the wood, which is a common injury mechanism, and it makes it easier to create fun things. For the weird angles with V and gouge tools, I use another Flexcut invention. It works okay, but you can get the same results with folded sandpaper or other methods. I also bought a fullsize knife strop because it really does make a difference and you can get some with a lot more surface area. I haven't needed to buy a whetstone yet.
Also, I've since supplemented my starter set with Dockyard tools, which also come very sharp and keep their edge well. So far I've only used their micro tools, but I understand they have decent sets as well.
Speaking from unfortunate experience, you should definitely pick up a pair of kevlar gloves. I had a pretty serious hand injury (partially severed tendon) because I was just doing some touchups and wasn't using my gloves and got a bit sloppy. It only takes one single wrong stroke, and I had gotten complacent since I'd been so careful in the past. The gloves let me be more reckless and have definitely saved me from cuts, although they wouldn't protect against a stabbing cut. Thumb guards are also popular, but I don't actually like them very much. The gloves are nice because you can get a great grip on the tools.
When you have a knife or a set, you'll need some wood to practice on. I found ebay to be a great resource...just search for "basswood" and pick a few different sizes. 2x2x6 seems to be a good starting point to me. Make sure it is kiln-dried as well. Here is a good assortment that is pretty cheap. Butternut is another good choice, but for a beginner, I'd stick with basswood from personal experience.
Finally, if you are wanting a good book to introduce you to the subject, I'd recommend the Complete Book of Woodcarving. I've bought a number of books on the subject, but it is definitely the best if you are only buying one and need an overview to the entire craft. Old Time Whittling is only 30 pages, but gave some great examples and was very useful to me as well.
https://www.amazon.com/Watch-them-wiggle-Black-PIECES/dp/B0074MHV7W
I think we should all pitch in and send these, gift-wrapped, to the OP's command who took away precious morale.
Kaizen foam.
kaizen Foam
Not sure how the OP cut it, but I just used a very long exacto blade.
I just used this stuff:
https://www.amazon.com/gp/product/B00BXYWXY8/ref=oh_aui_detailpage_o02_s00?ie=UTF8&psc=1
to reassemble a Time Steel that I replaced the battery in. Worked great. It's probably not water proof anymore, but with two layers of it, it's probably at least splash resistant.
I peeled the previous double stick material off (it's actually pretty easy with just fingernails alone) and then placed one layer on the plastic gasket, and one layer on the underside of the screen. Getting the screen reconnected was a little tricky and required the use of a long thin metal tool, you might be okay with just a flathead screwdriver.
Knitpicks https://www.amazon.com/Knit-Picks-Yarn-Ball-Winder/dp/B00O3GHFA0/ref=mp_s_a_1_1?ie=UTF8&qid=1549167430&sr=8-1-spons&pi=AC_SX236_SY340_FMwebp_QL65&keywords=knitpicks+yarn+winder&psc=1#
Gold leaf is pretty cheap stuff. A nice sentimental gift, but no notable monetary value.
Anything with gold leaf on it is just capitalizing on the perceived worth of gold to massively inflate the price they charge. And yes, gold is very expensive, but gold leaf isn't. Gold leaf is so incredibly thin that you could coat a whole burger with it for less than $5.
Saffron is expensive but the amount you'd actually use is a few bucks at most.
Same with the rest of the ingredients. The Kobe beef (why would you even use Kobe just to grind it up when you can use regular beef and throw in some extra fat, but whatever).
That burger costs maybe $200 to make at most, most of which is just the wasteful use of Kobe beef. That burger could probably be replicated for under $100 with Wagyu subbed for the Kobe.
https://www.amazon.com/Fake-Outlet-Stickers-Prank-Electrical/dp/B06XR4SD1V
I've got some ideas. What exactly do you need a laminator for? And are you in a decent sized city?
The Pixma Pro-100 handles cardstock perfectly. It's not going to be the most amazing print quality on most cardstocks. You need special inkjet paper which tends to be expensive. But I find it is more than adequate for my purposes using regular cardstock. I got mine on sale + a big mail in rebate that came with a Visa cash card. Overall I paid about $130 for it which is pretty good imo. I print on both sides of some real thick cardstock and then just cut them out with the paper cutter I'm going to link below. The other good thing about the printer is it handles larger paper sizes. I have 13x19 inkjet paper that it takes and the prints come out incredibly good. And that's a pretty decent size for printing the stuff I'm going to attach to chipboard.
(If you go the Pixma route, I suggest looking at some bulk inks. It has reduced my costs significantly)
I use this for a paper cutter. Works fine. You might do well to find a way to shine a light from underneath the swing arm to line up cuts but it's plenty good enough without it.
I use this corner rounder. I've done thousands of cards with it. Still good. I think if I had to buy it again though I'd look for something that was more like a traditional hole punch in using your whole hand. The one I linked gets your fingers sore after a while.
The reason I asked about where you live is because if you live in a good sized city, you may have access to fab labs. My public library has one with a laser cutter. It makes making tokens a breeze. And because it's at the library for me, it's freeeeeeee. Print on some label paper. Slap the fronts and backs onto a sheet of chipboard. Stick it in the laser cutter and voila, perfect tokens. They'll come out slightly singed but overall they're great.
How much are you going to print and play?
If it's not a lot, I would say just skip the printer. It's $130 at its cheapest and that's not even counting the cost of replacing the ink. If you're only going to print a few games and they're not that intense, just go to a local printshop and use their high quality business laser printers. They print super sharp into label paper and card stocks. Print the fronts on one, the backs on the other, stick em together, cut it out with the paper cutter. It's a bit of work but the finished product looks great.
It’s actually sold by Knit Picks through Amazon, just FYI, but good to know anyway!. Knit Picks Yarn Ball Winder https://www.amazon.com/dp/B00O3GHFA0/ref=cm_sw_r_cp_api_i_75X3Cb6KH6JBT
Loud whistle - https://www.amazon.com/gp/product/B00FOJRF64/
Heavy duty velcro - https://www.amazon.com/gp/product/B001O6T2ZS
Sugru throttle nub - https://www.amazon.com/dp/B01BFE0KNQ/
I liked the recent post with the bicycle bell mod, really anything to enhance safety, especially in NYC, where jaywalkers cross roads diagonally with their heads buried in their phones and then proceed to do the "evade me" shimmy when they finally see you coming.
I use it sparingly, 120 dB is on the human pain threshold for hearing, so it's quite jarring. A quick toot toot tends to resolve most antsy situations, but a nice sustained hard whistle can even help you be heard from inside yellow cabs.
The Yi cameras are really very good for the money. The Yi Lite gets great reviews and it's cheap, and you can use all the standard GoPro mounts, so you can use some Sugru to custom implant a GoPro mount on the face of your helmet. You can also use your general 3M tape to stick the mounts on nicely as well.
I wanted to give a heads up for those looking to save money with DIY foams. I went through 3 orders of Comply tips over a 3-4 month span. They would literally tear up due to the excess earwax after 2-3 weeks of use(even with the earwax proof version). I got fed up and ordered these
I've been using these DIY tips for a long time and its been amazing.
Puncher
http://www.amazon.com/gp/product/B000NK5VY2/
Tips
http://www.amazon.com/gp/product/B0013A0C0Y
http://www.instructables.com/id/DIY-Noise-Isolating-Earbud-Tips/
I've gone through about 8 pairs of DIY foam tips with my Triplefi v10 and still have tons of spare foam tips left.
https://www.amazon.com/dp/B000SVRSRY/ref=cm_sw_r_cp_apa_wbCYAbCYNG33G
Thanks for all the replies! So let make sure I'm getting this info correct, it's fine to dab with Stainless Steel? I would not be endangering my health by dabbing with these? http://www.amazon.com/SE-DD312-12-Piece-Stainless-Carvers/dp/B000SVRSRY/ref=acc_glance_sg_ai_ps_t_2
Couple of helpful accessories that people always mention on this subreddit include:
I think you are likely right. I've never seen this happen before myself though. Try different pipe cleaners maybe? I use these: https://www.amazon.com/Zen-Bundles-Cleaners-Bristle-Count/dp/B000W5R6UA/
Bro, I had a 99 Maxima with those exact same keys... both copies of the key broke the same way. I just got some moldable plastic like Instamorph and bridged the gap on the key. Sucks though... you drop those keys once and boom.
Honestly, the biggest thing is having the right tools. My friend is a circuit board engineer and he let me use his workshop which saved me days. From a technical perspective, nothing here is too difficult -- the tricky parts are in the details, like wiring up the original power switch and reset switch to work with the Raspi global input/output and somehow wiring up the LED light, but these things aren't really necessary for it to function, just added flair. Apart from that, you literally just throw the img file onto a micro sd card, put that on a raspi, mount the board to something and you're pretty much done.
That said, I did discover that this stuff is effing awesome.
Yeah, it is. Flexcut makes great equipment, I've got a fair number of their tools myself. Personally, I'd spend a bit more and get this set, which will really open your options up and make it easier to create:
http://www.amazon.com/Beginner-Palm-and-Knife-Set/dp/B005EG033Y
The flexcut tools are so well made you only need a strop to keep them honed if you take care of them...no need for a sharpening stone(s).
my best advice, as a semi-novice myself in wood burning:
i'd start with a cheaper wood burning tool. can find one at wal mart, home depot, craft store... it'll look like a soldering iron. get one with a few interchangeable tips, maybe one with a heat regulator if you're so inclined to spend the extra money. they can get complex and expensive, so depending on your involvement in the hobby it can get expensive, but you'll definitely see a difference in the heat consistency in the more expensive tools. but for a beginner, something like this is perfect to figure it out: http://www.amazon.com/Walnut-Hollow-Creative-Versa-Temp-Temperature/dp/B005P1TRAS
I got this set as a gift, but after doing three projects and burning my fingers on the handle I'd recommend buying a tool like this where you can actually adjust the temperature. For more information and inspiration I'd recommend checking out /r/pyrography and good luck getting started.
OK you've inspired me. Just bought these http://www.amazon.com/Peel-Stick-Wiggle-Eye-Sheets/dp/B000F8V66O/ref=sr_1_6?ie=UTF8&qid=1368210896&sr=8-6&keywords=googly+eyes
Also, you might want to invest in a belt hole punch. They're about $8-10 on amazon, and its way easier than trying to use a drill to make an emergency hole in a belt at 6 am. Ask me how I know.
Using something like this is a lot cheaper than buying new belts. Works great.
Wax Carving Tools are one of the best investments I've made.
As well as one of these or these, depending on the vape you use.
Seconding the Kemper recommendation.
These are cheap and cheerful too, depending on the scale you're working at. https://www.amazon.com/SE-DD312-12-Piece-Stainless-Carvers/dp/B000SVRSRY/
Should be less than $15 at places like Michaels. Especially with coupons.
Also this: https://www.amazon.com/dp/B000VRTG8Y/
Grab some Zen Pipe Cleaners
&
Grab a bottle of Propylene Glycol (lube for the mouthpiece)
https://www.amazon.com/Milliput-Superfine-2-Part-Hardening-Putty/dp/B002CNEWAM
Plastic glue is an evil set out to frustrate new people to the hobby. Initially enticing, incredibly limited, long term damaging, and overall a waste of money. Beware. Always only use super glue.
There, now we're done with that.
It's not plastic, it's resin.
Best practice is to lightly rub it with soap and water and wait for it to completely dry.
Take a xacto and file to it to even out connecting faces. It can often be warped as well. If so, google methods to reshape warped resin. It's been a while for myself.
Use super glue only to glue it.
Then use super glue to clue it together.
Buy this.
Fill the gaps. Sand as necessary.
I've been thinking of making one for myself...
Tin
Moldable Plastic
https://youtu.be/v7Np50hwSBg?t=1m28s
Mirror
i had a patient that made his own denture that ive wrote about before. it was a nightmare. he had nonrestorable dentition and needed full mouth edentulation and denure fabrication. he couldnt afford it and disappeared for months. then on a friday at 430 he showed up as an emergency on my schedule. he used these beads that he bought off amazon that they make hollywood masks out of and stuff. i guess you heat it up to make it moldable? so he heated it in his oven and then shoved it in his mouth. it bonded to all of his tissue and remaining teeth. he had it in his mouth for 3 days before he had the courage to admit he needed help. i had to try t oget him numb under it (which was crazy difficult) and section it surgically. when it finally became removable, it brought teeth and tissue with it. he needed bone and tissue grafts, residual root tip exts, and a denture made afterward. all and all it ended up being way more expensive than if he would have just had regular ext and dentures made. this was maybe 5 years ago. i had taken a ton of pictures for liablity reasons at the time. but since then ive moved across the country and opened my own practices, so im pretty positive i dont have the pics anymore
edit: im pretty sure he used a material similar to this https://www.amazon.com/InstaMorph-Moldable-Plastic-6-oz/dp/B004MFLU4Y/ref=cm_cr_arp_d_product_top?ie=UTF8 ... it was definitely all white and looked more like a mouthguard than a denture
InstaMorph is pretty much the same thing except it doesn't expire and is less expensive. (I haven't actually used either one, so I could be wrong...)
I always suggest flexcut for beginners for two reasons, they are fairly inexpensive, and they are sharp and hold an edge well. (I would not suggest using them on anything harder than mahogany or perhaps oak)
If you find you like woodcarving, then I suggest move on to more traditional (And fairly expensive tools like Pfeil, Ashely iles, Two cherries, Auriou, Henry Taylor, Robert Sorby etc)
They do have a small set similar to what you're looking for,
https://www.amazon.com/Beginner-Palm-and-Knife-Set/dp/B005EG033Y/ref=sr_1_4?ie=UTF8&qid=1483717685&sr=8-4&keywords=flexcut+set
As for wood, basswood is good for beginners, also butternut. I personally hate basswood and prefer to carve woods with a janka hardness of 1000 and up. That's just me though and many folks love basswood, I just find it too soft for my style of carving.
Cleaning, I just pick up the larger shavings and vacuum the rest.
Some resources,
http://www.wood-database.com/
Database on wood with detailed info on each species.
https://www.toolsforworkingwood.com/store/index.php
Very good supplier of woodworking/carving tools, I use them often and they are usually very prompt in shipping.
http://www.constantines.com/
I order from these guys every so often, usually 12x12x2 mahogany blocks.
http://www.japanwoodworker.com/
Another supplier of tools, they also have wood.
http://www.bellforestproducts.com/
Wood supplier, excellent stock of more exotic lumber, I tend to browse the "Hand pick your board" section often.
Also, ebay is a nice place to find carving wood.
Unfortunately, most cheap sets aren't worth buying. A nice combo set, which has the two most common types of blades and the two most common types of "gouges" can be had for around $55. This, IMHO, is a great starter kit.
Do you think he'd be more interested in carving figures, like whittling, or relief carving, which is like creating scenes on flat panels?
I really like Flex cut knives and gouges. They are a little bit of money but they will last you a life time.
Depending on what you want to do I have found 2 sets This one that is only knives and then This which has a combination of knives and gouges.
Personally if I were you I would go for the second one because it will give you a wider range of things that you can carve.
Well, considering another user just posted that Walnut Hollow Versa Tools are frickin dirt cheap on Amazon right now, I'd get one of those asap. Here's the link. I've used mine for the last 3 1/2 years and it's the only tool you'll ever need if you learn how to use it. This entire piece was done with my Versa Tool
Lightly sketch out the outline of the design you want to burn. Then turn the burner on and just trace the pencil lines. You'll need to just get in there and practice, nothing I tell you will make much sense until you get some hands on experience. Don't wet anything, you use the burner to draw the same way you'd use a pencil.
This is the one to get, Walnut Hollow Creative Versa Tool with Versa-Temp Variable Temperature Control & 11 Woodburning Points (Tips) https://www.amazon.com/dp/B005P1TRAS/ref=cm_sw_r_cp_apa_i_kIZSDbJ6TJ852
this is the exact one
Yeah please don't do this, it's awful enough to work retail as it is. Want to have some fun, then buy some of these and place them on things to give them ridiculous faces. It doesn't torture underpaid people working on thanksgiving and it's actually quite a bit funnier:
http://www.amazon.com/Watch-them-wiggle-Black-PIECES/dp/B0074MHV7W/ref=sr_1_1?ie=UTF8&qid=1416598670&sr=8-1&keywords=googly+eyes
Thoughts and prayers for your cancelled eyeball Swunty.
But don't sweatstain it and look on the bright side... for the low cost of $5 you can now give your face a much needed upgrade!
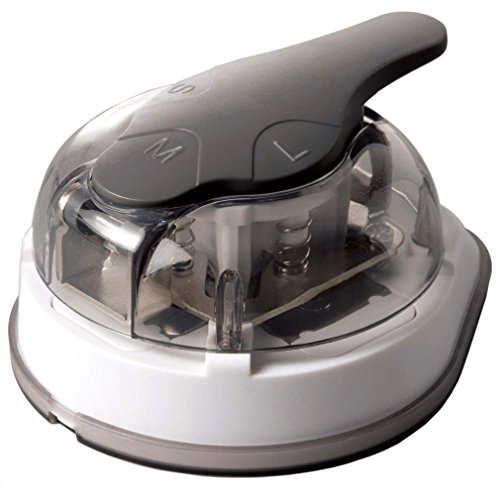
How did you make the corners super round?
I'd really like that. My current cards are sharp and pointy.
Aha! Found out.
https://www.amazon.com/Sunstar-Kadomaru-Corner-Cutter-S4765036/dp/B0076FJ7SS
Which opening did you cut with?
For the 2.5mm one:
https://smile.amazon.com/gp/product/B00G08PEXO/ref=ppx_yo_dt_b_asin_title_o01_s00?ie=UTF8&psc=1
For the 3mm one:
https://smile.amazon.com/gp/product/B0076FJ7SS/ref=ppx_yo_dt_b_asin_title_o03_s00?ie=UTF8&psc=1
2.5mm is closer to American corners. 3mm is closer to Japanese corners.
Printing: 9€
Punching tool: 8€
576 cuts, 576x pressing the puncher amazon link
300g/sqm paper.
You might want to replace that pluck foam with some - https://www.amazon.com/Fastcap-Kaizen-Foam-57mm-Black/dp/B007J2JJYK
Got rid of mine as fast as i could, since it's open cell and will attract moisture and also tends to react with oils
They should sell googly eyes in their shop to stick to the front of the Rift.
https://www.amazon.com/dp/B0074MHV7W/ref=cm_sw_r_cp_awd_yuTKwbW664SEN
Not to mention that you are providing entertainment to your whole family! Start charging admission! Don't forget the Googly Eyes! :D
Edit: added link
http://www.amazon.com/gp/product/B0076FJ7SS/
You can buy them here. You have to buy them in packs of 50 for like $70. I believe they're priced that way because they own a patent for the matte finish laminate and they are "industrial" grade. It works amazingly well with thicker mecahnical pencil lead (0.9mm or thicker). It almost looks like you're writing with a marker, and then completely erases with no trace.
They sent me a free sample of them, so I did a couple for AQ, too:
I bought a corner cutter to clean the corners up. Works very well, too. I got that from Amazon here: https://www.amazon.com/gp/product/B0076FJ7SS/ref=oh_aui_detailpage_o01_s00?ie=UTF8&psc=1
an option if you can't find anything and are a little handy is buying something similar to this packing foam and cutting a rough seat shape and attaching it to both sides and putting in a box and it will keep anything fairly safe
super 77 for foam to foam and double sided tape to hold foam to the box. That way the foam can be replaced when you fuck it up.
whats it for, both of the foams you linked are open cell. Im a big fan of kaizen foam if the foam is going to contact anything metal or electronic.
https://www.amazon.com/Fastcap-Kaizen-Foam-57mm-Black/dp/B007J2JJYK/
This is what you're looking for.
http://www.amazon.com/Fastcap-Kaizen-Foam-57mm-Black/dp/B007J2JJYK/ref=sr_1_1?ie=UTF8&qid=1414720138&sr=8-1
I'd recommend you buy the case you like and buy some Kaizen foam. Don't look for a case that comes with foam as it'll severely limit your options.
Been wanting to do this....planning on using this:
https://www.amazon.com/Fastcap-Kaizen-Foam-57mm-Black/product-reviews/B007J2JJYK
Great Job!
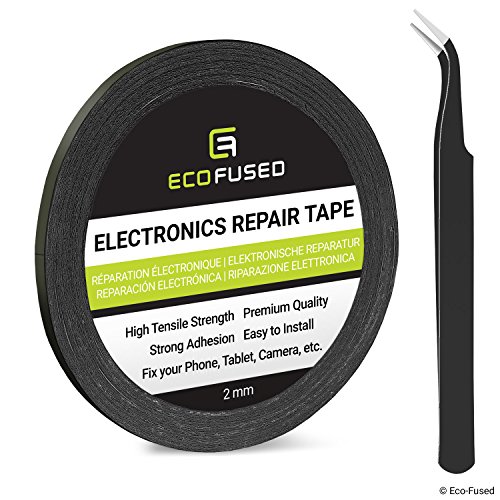
You could probably use some of this stuff.
Eco-Fused Adhesive Sticker Tape for Use in Cell Phone Repair - 2mm Double Sided Tape - also including 1 Pair of Tweezers / Microfiber Cleaning Cloth https://www.amazon.com/dp/B00BXYWXY8/ref=cm_sw_r_cp_apa_WNmJAbWCEV019
Maybe this tape
https://www.amazon.com/Eco-Fused-Adhesive-Sticker-Phone-Repair/dp/B00BXYWXY8/ref=sr_1_4?ie=UTF8&qid=1549321426&sr=8-4&keywords=Electronics+adhesive
Or maybe this adhesive?
https://www.amazon.com/Clear-Electronic-Grade-Silicone-Squeeze/dp/B07MKBBQTC/ref=sr_1_3?ie=UTF8&qid=1549321426&sr=8-3&keywords=Electronics+adhesive
I'm not an expert on this, just trying to help and maybe give you an idea.
I just got 3m double sided tape...Works fantastic. My original one and replacement both fell out. Not hard to fix.
It's a sticker.
Peel and Stick Googly Eyes
Tried my best to measure with a ruler at work, here's what I found:
[EDIT]
Cheap leather hole punch tool if anyone ends up needing to use it, it works well: https://www.amazon.com/dp/B000NK5VY2/ref=cm_sw_r_awd_Hfhiub0RM4ZS5
Or get a leather punch that costs 9$
https://www.amazon.com/SE-7924LP-Heavy-Duty-Leather-Punch/dp/B000NK5VY2
These and these. Oh and This. I also recommend getting a pasta machine or something like it. Heres one by sculpey.
I'm using some metal sculpting tools, Here's the set I'm using, a lot of sculpting comes down to experience and practice, life-drawing lessons always helped but besides that I've picked up some tips and tricks here and there. note some of these tips only relate to Sculpting with Super sculpy.
For the love of god make a sturdy armature
Thin pieces of sculpy can be cooked in boiling water anything below 8mm for about 15 minutes
when sculpting the eyes/eyelids It's much easier to use solid eyes. I usually roll 2 balls, throw them in some boiling water and then once they've hardened jam them into the eye sockets. It's much more forgiving when the you're trying to tuck in the eyelids around the eyeball and it doesn't give way to your tool
You can use lighter fluid to smooth out Sculpy, get a small sturdy paint brush and dipping it into lighter fluid you can use it to manipulate the Sculpy to get some nice flowing lines and soft edges.
thats the most I can think of off the top of my head.
SE DD312 12-Piece Stainless Steel Wax Carvers Set https://www.amazon.com/dp/B000SVRSRY/ref=cm_sw_r_cp_apa_i_GAPFDbPW0RSP7
Apoxie Sculpt 1 lb. White, 2 Part Modeling Compound (A & B) https://www.amazon.com/dp/B0013UDWXI/ref=cm_sw_r_cp_apa_i_9APFDb4BZREHF
Sand Detailer Finishing Kit, Finer Grits, 24 piece https://www.amazon.com/dp/B0039ZCQAK/ref=cm_sw_r_cp_apa_i_BCPFDbBV5SSGW
SERONLINE 24pcs Ball Stylus Dotting Tools, Polymer Modeling Clay Sculpting Tools Set Rock Painting Kit for Sculpture Pottery https://www.amazon.com/dp/B0776SN7Y5/ref=cm_sw_r_cp_apa_i_JDPFDbTH56VM0
Monster Clay Premium Grade Modeling Clay (5lb) https://www.amazon.com/dp/B0722NKKYF/ref=cm_sw_r_cp_apa_i_dEPFDb1WPY7K2
Special thanks to u/Morgan-3D and u/Lps2 for the STLS! I modified the Poseidon/Mod holder to fit my Joytech infinite....had an error when printing and it ended up being a perfect fit for the reverse banger and grommet. Coil holder and second Poseidon stand are awesome, thanks again to everyone here for providing so many tips. Happy Sunday y'all!
Details:
Joytech Espion Infinite & Sai TAF (Awesome Mod, but no Arctic Fox compatibility. The TCR mode is great so I don't feel like I'm missing out too much; I have a backup VooPoo I'll get around to flashing soon).
Usually running Triple Black Ceramic, TCR 366 / 27 Watts / 360 - 430 / Locked @ 0.29 with the Reverse Banger on a halfway decent rig. I get very solid clouds and throaty strong rips all day. I have some ti & quartz buckets to try but I'm so happy with the Triple Black I haven't got around to it yet.
Favorite items are obviously the 3D Prints and Reverse Banger. Loving this wax Carver kit (you can't beat this price anywhere) : SE DD312 12-Piece Stainless Steel Wax Carvers Set https://www.amazon.com/dp/B000SVRSRY/ref=cm_sw_r_cp_apa_i_CMOQCb61J6RYC
Also, this ultrasonic cleaner and portable case with ice packs is a must for me (all recommendations from waxpen & r/saionara):
Ultrasonic: Yesker Professional Ultrasonic Jewelry Cleaner with Digital Timer for Eyeglasses, Rings, Coins https://www.amazon.com/dp/B001DKDAVW/ref=cm_sw_r_cp_apa_i_zNOQCbYCNV3EB
goldwheat Portable Insulin Cooler Bag Diabetic Organizer Medical Travel Cooler Pack + 2 Ice Pack https://www.amazon.com/dp/B01E3MS782/ref=cm_sw_r_cp_apa_i_7NOQCb3RB56GX
Never would have got this dialed in without these subs & HVT! I am barely even using flower anymore.
Personally I would go with a decent quartz banger. Those glass nails, like the one that comes with your piece, are prone to break - but it is still very usable.
With the piece you linked, you'll need a 14mm female. Here is a very basic article on glass joint sizes and male/female genders - edit: looking for a better reference.
The general rule of thumb for male and female joints is if it inserts INTO a glass joint it is a male - Think penis. If it slides OVER a glass joint it is a female - Think vagina.
For example, the glass dome (and the bowl) on the piece you linked is a female joint because it slides over the male joint (not pictured) on the downstem.
While Ti nails are perfectly fine, I prefer quartz. I think the flavor is better, but this is just my opinion. There are a lot of options out there for nails, try them out and find what suits your tastes.
You can get along just fine with a banger by itself but, to get the most out of it you should learn how to use a carb cap. There is a learning curve with everything but through trial and error you'll eventually get to MLG360no-dome globfather status in no time.
As far as domed vs domeless, the piece you linked comes with a glass dome, which you would need if you used just a regular nail insert such as the glass one that comes with your piece. Here is an example of a domeless Ti nail, and here is one similar to yours with a dome and Ti nail insert.
Notice how the domeless nail has a an opening, or channel, in the middle for the vapor to flow through as you inhale. You don't need a dome to capture the vapor with a domeless nail. This is really the difference between the two types as the standard nail insert is basically a solid dish with no airways on the surface.
There are many styles of domeless nails but hopefully this will give you a general idea about the differences between the two.
I should add that with a domeless nail, you won't need a dome, but you will want to learn how to use a carb cap. Also, as /u/snobord mentioned, the carb caps are going to be different depending on what type of nail you decide to use. If they don't match up or properly restrict airflow, the caps will not work as intended. So be sure to do your research before deciding to pull the trigger.
You'll also need a dabber or dab tool to apply your concentrates to your nail. Personally, I use a Ti dabber with a ball point tip because it makes it easier for me to collect my rosin after I press it. There are a lot of options for dabbers as well and really I think it comes down to personal preference.
edit:
>/u/snobord
>The type of your concentrate is going to affect the kind of dabber you want to use. The ball point wouldn't be ideal for crumble, for example. I personally bought a stainless steel wax carver set from Amazon so I'd have all the bases covered.
Finally, you're going to need some sort of storage container for your concentrates like a wax wallet or something similar. A quick google search should point you in the right direction.
edit:
>/u/snobord
>As for the silicone containers, bought 10ish (don't remember exactly) of them last year, used them one or twice and basically haven't touched them since. The main reason is I pick up from dispensaries and it comes prepackaged in half/one gram packs and the process of transferring it over isn't even worth the effort. This is definitely a matter of opinion though so my point is just that op should try it out before buying a bunch.
Several edits later: If I missed the mark on anything let me know. Op, hopefully if I wasn't able to answer your questions someone more experienced can chime in and get you on the right path.
Good luck, and happy dabbing!
it's this
i bought it at michaels but much cheaper on amazon
I use this and another one. Sadly I lost all the tips recently and I'm working with just one. Don't loose them, they come in handy when you get better.
It's kind of like a pen with a steel (?) tip that's interchangeable depending on what you're doing. I would suggest getting wood from a craft store (Michael's), heating up the woodburner and trying things out. It can take a lot of patience at first to even do lines. Experiment with how long to hold it on the wood to make a line.
Oh, also if the wood isn't pre-sanded, make sure to get some sand paper and sand it down. At least that's what my grandma always told me to do, so it's now habit. :o
I also trace lightly in pencil what I'm going to do before I actually go and burn something. If you're not a very good artist you can always tape something to the wood and press on the paper and trace. It won't leave a pencil/pen mark, but it will leave an indent you can see and go over with the wood burner.
Afterwards stain it and leave it out to dry for a few hours.
Have a lot of fun and experiment. It's such a fun hobby!
Like the idea. If you have $10, get one of these: Woodburner Really easy to do detailed burns. Just make sure to burn before staining!
A woodburning iron? Any craft store should have them (Michael's, AC Moore), or just buy one on Amazon. Often them come in boxed sets (with some kind of booklet and a bunch of scrap wood) designed for kids.
Zen Bundles Zen Pipe Cleaners Hard Bristle, 132 Count https://www.amazon.com/dp/B000W5R6UA/ref=cm_sw_r_cp_api_qNObAbWP8147Y
Get these. This pack has lasted me almost a year. I hardly ever use the brush that came with my Pax.
I block the mouth end with an old cut-up q-tip after removing the mouthpiece. Sometimes I'll scrape a bit of goo right away on the top with a dry q-tip but I do the finishing steps near the end by spraying a tiny amount of 99% iso on a qtip and rub away.
I dab the inside of the oven with 70% iso and I start scraping with a knife.
I finish off the oven with a green scouring pad that I cut to 1 cm/2 and dip it in iso and I use a precision screwdriver and I rub it in the oven.
Then I remove the old q tip and use those plastic lined pipe cleaners and dip it in iso and go to town on the vapor chamber.
I also wipe off the flat mouthpiece first with a towel to remove most of the goo and then I use cold water, an old toothbrush and dawn dish soap to clean it since you should avoid using iso on rubber if possible.
To clean the screen I just burn off the stuff with my torch lighter and it's like new.
Sometime I'll scrape some crap off my half pack oven lid with a knife if it gets too bad, then I clean it with iso and a qtip.
At the end I make sure to thoroughly wipe everything with 99% iso as to not inhale small scouring pad particulates that might have been left behind.
I have a tip to help with maintenance, if you're using the original screens, use a pair of pliers and bend the sides a little bit so it's easier to remove. On that note I remove the screen after each use and wipe the pax oven/screen with a dry q-tip, I use a bamboo skewer to help pry it off (by pushing on the side of the screen) and I can use it as a tool to scrape some abv that's stuck in the oven.
I have a Pax 3, a Mighty and a Dynavap M 2017 and yet my go-to is the pax3. If you treat it right, it's amazing.
Apologies for the text wall!
Often times the white acrylic pearled stems are very difficult to get back to perfect when the airway has been poorly maintained (not sure on your color). Best approach I have found with these is to completely submerge it and soak the stem in a mixture of white distilled vinegar and baking soda. You want the solution to bubble and fizz during the majority of the soak (so use a good amount of baking soda in the bottom of your container and a lot of patience filling it). I will usually place the stem tennon side down. Make sure you have cleared the airway as much as you can. You will want to see bubbles coming out through the lip as it soaks. You can soak for 1hr to overnight (this soak won't hurt anything)
Follow up the soak with passes of a bristle nylon brush (https://www.amazon.com/dp/B0115SLLLM/ref=cm_sw_r_cp_apa_aVXdzb72RVG6S) and hard bristle pipe cleaners if still being stubborn (https://www.amazon.com/dp/B000W5R6UA/ref=cm_sw_r_cp_apa_DWXdzbXF8T8WV) Pass multiple soft pipe cleaners dipped in the flat sodium bicarbonate solution, followed by dry ones. Aaaand REPEAT as many time as needed haha. It usually works pretty well for me.
You can also use the flat sodium bicarbonate mixture to clean the outside of the bowl and inside the shank to remove some smell! Vinegar and water is often recommended for cleaning hard wood floors that have been freshly stained as it won't remove stain and sanitizes. The extra dissolved baking soda can help with smell as well :)
These are only 5 bucks and they work great.
Is the screen or the pipe itself getting clogged. For the pipe I recommend the pipe cleaners that have metal bristles mixed in with the soft ones as well. As far as the screen I've found that if you make sure to hit the bowl and empty the ash and scrape the screen the second you are done, before the resin and ash can harden it helps keep it clean. Don't leave half smoked bowls. If it is attached and won't clean well it may be worth cutting out and leaving just enough around the edge to hold another screen in place, and just replace that one when it gets clogged.
Edit these are the pipe cleaners i'm talking about
these are really great for cleaning any smoking device, I have a bunch https://www.amazon.com/Bundles-Zen-Pipe-Cleaners-Bristle/dp/B000W5R6UA/ref=sr_1_1?ie=UTF8&qid=1478012971&sr=8-1&keywords=zen+pipe+cleaners
Not for this price, they don't :)
And my local shop doesn't, actually. At least, they never do when I've shopped there, but they're much more porn oriented, the smoking accessories are relegated to a corner and most of it is way overpriced glass pieces. I wish there was a proper smoke shop like some of the ones I've seen online around here.
This is what I use for my customs.
Example
It's really sturdy & you can even get long/thin/sharp details without worrying about them breaking off.
Look up some tutorials & be sure to play around with it.
Haven't used it but a lot of people say "Green Stuff" is good too.
Just whatever you do, stay away from any air/bake dry clays I've yet to see any custom using those turn out decent.
Ok good because I’d recommend this stuff. It’s very easy to work with and fill holes. A little tip is to wet your fingers down after it’s pretty much in place and smooth it out. It takes awhile to set up but after that a little sanding and paint away.
Along with the already great suggestions by OrangeKrate76, check out Apoxie Sculpt.
It dries/cures slower so it gives you more working time to work with molding, so less sanding to do in the long run. But I'm not sure the structural and weight difference versus 2 part epoxy.
It often depends on what your end goal is. Some sculpting putty is going to be a bit softer and rubbery as it cures, while others will be very hard.
I like Aves Apoxie Sculpt for most projects. It's very hard when it cures, but you can work a decent amount of detail into it if you sculpt it after it's been out a while, but before it totally cures.
I bought some moldable plastic & was surpised to discover most people are using it for false teeth. It is pretty cool stuff.
https://www.amazon.com/InstaMorph-Moldable-Plastic-6-oz/dp/B004MFLU4Y/ref=pd_sbs_328_1?_encoding=UTF8&pd_rd_i=B004MFLU4Y&pd_rd_r=db76cbd5-e0b8-11e8-a192-c9cc3f1dfa1a&pd_rd_w=2KTcR&pd_rd_wg=vAiBe&pf_rd_i=desktop-dp-sims&pf_rd_m=ATVPDKIKX0DER&pf_rd_p=7d5d9c3c-5e01-44ac-97fd-261afd40b865&pf_rd_r=B7Q79AJPSNNCZ33GAMR2&pf_rd_s=desktop-dp-sims&pf_rd_t=40701&psc=1&refRID=B7Q79AJPSNNCZ33GAMR2
Sugru or moldable plastic. Save what you don't use for another fix.
You could certainly patch it with nylon and some sewing skills, but I would probably use gear repair tape for something minor like that.
https://www.amazon.com/Gear-Aid-Tenacious-Fabric-Repair/dp/B005BLQTEE
Tenacious Tape is the industry standard for repairs in breathable fabric. Has worked well for me in the past, and unlike duct tape it is specifically made for use with technical fabrics.
Thank you!
I used this set:
amazon.com/Flexcut-Beginner-All-Purpose-Included-KN600/dp/B005EG033Y/ref=sr_1_1?keywords=flexcut&qid=1568304084&sr=8-1
I also have a micro V tool that I used.
Here is an entry-level knife set with two useful palm gouges
He would also need honing compound to keep them sharp. He'd need to find a strip of leather to glue onto a nice flat board to apply the compound to. You can buy just plain leather all over the place, like here.
I don't know too many people that carve with balsa, never tried it myself either. Most carvers in North America though use basswood or tupelo.
The other friend just stopped talking to me a couple weeks later for reasons unknown. It was a big bummer.
A couple months later, ex-gf contacted me out of the blue to get lunch. I was super excited at the prospect, so I went. She told me she was sorry for not keeping in touch as promised. Her previous breakups were always terrible, but she realized I actually meant it when I said I wanted to remain friends. We kept in touch for a few years and saw each other on occasion. It was nice.
Moral: If someone needs space, do your best to give it to them. It could turn around.
4. [Surprised Crono](http://www.videogamesprites.net/ChronoTrigger/Party/Crono/Crono%20-%20Shocked%20(Front%29.gif), [Lucca casting a spell](http://www.videogamesprites.net/ChronoTrigger/Party/Lucca/Lucca%20-%20Right%20Arm%20(Front%29.gif), emo Setzer - for perlers, of course!
Thanks for the contest!
---
The fact that you are even thinking of doing something like this for people you've never met, especially when it will cost you money that you don't have, is amazing. Never let anyone tell you that you're anything less than great. You've got a good head on your shoulders, and you should be proud of that.
https://www.amazon.com/Walnut-Hollow-Versa-Temp-Temperature-Woodburning/dp/B005P1TRAS
Here this is a good one to start with it has temperature control which is great (its currently on sale so bonus). The kit i started with didn't and its been a hassle.
I have a process down that I love (since I'm not artistically gifted at drawing or writing pretty). I neither free hand, nor draw it.
I use an inkjet printer and print the image, phrase, etc. onto wax paper (but it has to be mirrored horizontally). The inkjet printing on wax paper will not allow the ink to dry. You can then press the paper onto the wood (do some careful measuring and marking to ensure that you get it where you want it). Make sure you do it once and do it right without moving it (otherwise the ink will smear). Then you basically have a printed version of whatever you want to burn on the wood piece all drawn out for you. You can then trace over the ink with a wood burner (see link below for cheapo kit I have used for this method which works great). This saves me from having to be skilled/artistic, and I also find that the ink burns into the wood and helps enhance the blackness of the burn marks.
​
I spent about $150 a couple years ago for a cheap cheap inkjet printer, a ream or two of wax paper, and the wood burning kit and I have gotten a ton of mileage out of it.
​
Link for transferring printed item to wood
https://www.theartofdoingstuff.com/print-on-wood/
​
Cheapo wood burning kit I use
https://www.amazon.com/Walnut-Hollow-Versa-Temp-Temperature-Woodburning/dp/B005P1TRAS/ref=sr_1_7?keywords=wood+burning+kit&qid=1569870300&s=gateway&sr=8-7
I used these to burn the lettering:
Definitely want to sand the finish off the handle first - makes the burning easier. Also need to go slow with it since the curve won't allow you to get the entire letter burned in at once. Kinda have to roll it up and down.
Did the whole thing (including hammer) for about $50
This is the burner I'm currently using, but it's pricy. I started Woodburn initially using this,to see if I'd like it, but the thread for the tips melted with extended use. I invested in the fancy professional one when I felt certain I was going to keep this hobby going, but the first one I bought really worked well for practice and testing out the hobby!
A very cool invention! Bet this person has made some bank. :)
https://smile.amazon.com/Scotty-Peelers-Label-Sticker-Remover/dp/B0068QIQVA/ref=sr_1_1?ie=UTF8&qid=1484157229&sr=8-1&keywords=scotty+peeler
That, combined with a hair dryer, makes it so much easier to remove labels.
ETA: I found one of these, Used, on eBay and it's perfect. It's the small travel version with a folding handle and has Tourmaline crystals in it which help reduce static electricity. It's great for my hair, as well! :)
https://smile.amazon.com/BaBylissPRO-Tourmaline-Titanium-Travel-Dryer/dp/B003QKL5YQ/ref=sr_1_3_a_it?ie=UTF8&qid=1484157360&sr=8-3&keywords=babyliss+pro+tt
BRO
http://www.amazon.com/Scotty-Peeler-Label-Sticker-Removers/dp/B0068QIQVA/ref=sr_1_1?ie=UTF8&qid=1406151845&sr=8-1&keywords=scotty+peeler
Not so easy on a book but I buy and sell stuff that often has stickers. I use this sticker removal kit. The plastic scrapers are pretty handy. I actually sharpened the plastic edges with a nail file, works better. Usually I use citrus based cleaning wipes and goo gone as well but that would likely smear the ink on a book cover.
Yes!
https://www.amazon.com/dp/B01GPVFZHK/ref=cm_sw_r_cp_api_DL1BybCTR66N6
https://www.amazon.com/dp/B0074MHV7W/ref=cm_sw_r_cp_api_zM1BybYBHDSWT
One teacher here does these pop-quiz questions and the table that gets the most correct get 1 wiggle eye for each person in the table. Kids here eat them up (not literally, thankfully.)
I got you fam
Hi!
Some things about me...
And I love RAOA because gifting and being gifted gives me something to look forward to. Life can be a little rough sometimes. Other than that, watching everyone interact and be nice to each other gives me some nice fuzzy feelings.
http://www.amazon.com/dp/B000F8V66O/ref=wl_it_dp_o_pC_nS_ttl?_encoding=UTF8&colid=2AN2PXRX4RL99&coliid=I3CDARR7I9YJ7J&psc=1
I would really love these googly eyes.
It's more of a DIY
PM me you address and I'll send you one of these.
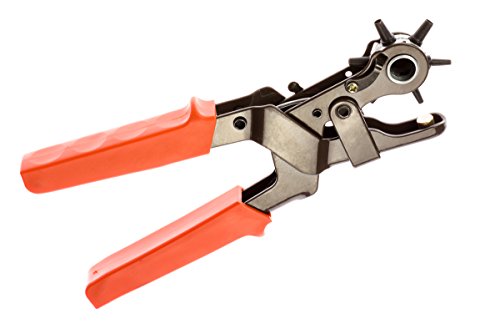
Hey bud... get one of these for the next time you want to punch a hole in your leather. Not expensive and makes a much cleaner cut for the leather!
Kind of looks like a leather punch to me.
The one I am linking to rotates, however.
http://www.amazon.com/SE-7924LP-Heavy-Duty-Leather-Punch/dp/B000NK5VY2
All you need is a hole punch and an eyelet setter. I use 3/16" eyelets which are a little on the smaller side but still fit most leather laces.
For belts, have you considered ordering custom-made ones such as from this site? Alternatively there are guides for making your own that can be found in /r/malefashionadvice and it seems to be pretty easy and cost-effective. I also love my leather hole punch, which I got for less than $10 on Amazon. Hope you find that helpful!
So, $8.82 for a wax carving set:
http://www.amazon.com/SE-DD312-12-Piece-Stainless-Carvers/dp/B000SVRSRY/ref=sr_1_1?ie=UTF8&qid=1370102302&sr=8-1&keywords=wax+carving+kit
I don't know what to tell you with specifics for Spain, but I can give you some general info that may or may not be helpful to you.
First off, there's this link in the sidebar. It'll give you a bunch of options.
Your hobby knife and mouldline remover will be the same thing. The handles all function the same way. However, I'd recommend picking up some kind of hobby knife set so you get a variety of blade shapes to try and multiple handles to use. #11 blades are the standard, and I prefer X-acto brand, but your mileage may vary. Some larger blade sizes won't fit into smaller handles. Buy in bulk to save money. You can remove mouldlines with the back of a blade, rather than a separate tool.
Any kind of cheap and well-reviewed wax tool / clay tool / dental tool set will work for scupting. Same deal with needle file sets. And with your pin vise. The drill bits will break (for any set), though, and bits can be problematic to replace if you're not sure of exact sizing.
I use Aves Apoxie Sculpt; the regular is a grey color. Tutorial hereSame two-part compound idea, but it will thin (and clean) with water before hardening and is a finer grain than green stuff (so it files/sands nicer (smoother). Very easy to manipulate & shape with wax shaping tools
4th tool from the left http://www.amazon.com/SE-DD312-12-Piece-Stainless-Carvers/dp/B000SVRSRY/ref=sr_1_16?ie=UTF8&qid=1415246554&sr=8-16&keywords=pottery+tools is my favorite for keeping seams down and keeping my fingers out of harms way!
These are the only craft related thing on my Amazon list. I'm a jeweler by trade and would use these in wax carving for models.
Lunar Supplies
Like these?
After trying just about every method of using concentrates, I find that my prefered method is a nectar collector, This one is a great starter kit. This guy makes awesome stands with a 3D printer and sells them super cheap. An enail is outrageously expensive and more for the party session style. Pens just don't get hot enough and it's not an on-the-go kind of set up. Get a professional grade butane torch like this one, and borocite dish like a mini-ramekin. Oh, I almost forgot, I would upgrade to a quartz tip as opposed to the titanium one it comes with. Sorry, I'm at work and keep remembering things to add- essentially, of all the methods, I prefer the nectar collector or honey straw method simply because it give the most control when hitting. Another handy thing to pick up is a set of wax sculpting tools
.
As far as my "recipe", I usually get diamonds or crystals and then top them off with some distillate sauce. This is mostly because I draw really hard and can't help it, so sauce prevents the crystals from shooting straight through the straw.
Overall, I hate to say it, but when learning how to use concentrates, just be flat out prepared for losses and accept the trial and error process. Eventually, you'll find your groove with it. I promise.
https://www.amazon.com/gp/product/B000SVRSRY/ref=oh_aui_detailpage_o00_s00?ie=UTF8&psc=1
Was actually $6.99 when I bought it, my bad. I guess the price went up on it :( but still, $8.95 for 12 of these aint that bad.
Welcome welcome
I would recommend a few things depending on what you're looking to do.
For helping smooth out the print I regularly use XTC-3D by smoothon- You basically coat your print with the epoxy and it dries smooth. You really need to put it on really thin or else you will lose the details of your print. Once its dried you can sand it further or paint.
https://www.youtube.com/watch?v=ZopV6He4cqE
I also regularly use a dremel to remove excess pieces or grind away parts I cant tear off.
I also picked up these needle files that are awsome for sanding down detailed areas.
http://www.harborfreight.com/needle-file-set-10-pc-69876.html
I also use sculpting tools to help remove stubborn support materials.
http://www.amazon.com/gp/product/B000SVRSRY?keywords=sculpting%20tools&qid=1451425886&ref_=sr_1_2&sr=8-2
Specifically the forth tool from the left
Other than that I just use sanding paper when needed.
Hope that helps and hope you are enjoying the witbox
Wax carvers like these.
http://amzn.com/B000SVRSRY
Oh, wow, that's beautiful. I've been looking at that one in my local store for a while.
Still on the little pen-type burner.
I really want to try my hands at woodburning! I have this tool on my crafts and hobbies wishlist. It can make some pretty cool stuff! LOOK AT THIS! I want! :D
/u/fatalis_vox duuuuuuuuuuuuude let's get creative in herre
https://www.amazon.com/Walnut-Hollow-Introduction-Intermediate-Woodburners/dp/B000VRTG8Y
This is the exact model, though we did get a small pack of various tips as well.
Wood is from Michael's. It's very cheap so get some and try it out!
I used a super basic tool by Walnut Hollow with the universal tip.
https://www.amazon.com/Walnut-Hollow-Introduction-Intermediate-Woodburners/dp/B000VRTG8Y/ref=sr_1_7?ie=UTF8&qid=1487731682&sr=8-7&keywords=wood+burning
I found this one on amazon for $12
https://www.amazon.com/dp/B000VRTG8Y/ref=cm_sw_r_other_apa_i_bggSDbNSYJDR7
One of those, beginner tool (sorry, dunno how to hyperlink).
I would suggest going to a cigar shop and picking up some. I have found a pack of 30 for $1. I have heard some people use a paperclip, but you might scratch the oven or vapor path.
https://www.amazon.com/Bundles-Zen-Pipe-Cleaners-Bristle/dp/B000W5R6UA
I use these and haven't had to buy any in months.
Usually wherever you buy your glass should have some. I use Zen Bristle Pipe Cleaners, my local shop has them for $1.50 for the 44 pack, which lasts a while (you can reuse them a couple times).
Instead of foam you could use bits of old sweater. Easier to felt into, and they have a nice weight to them. As for wire, I really like using actual pipe cleaners, not the craft kind. They have really hard bristles that catch the wool and make a great base. They’re not perfect for tiny details, cause they can be spiky, but they are quite strong.
Well, you could just mouth hit it with a lighter and not inhale it. You know, until you stop tasting burnt cotton. Then just blow out all the burnt stuff.
Also, if you REALLY wanna clean it out...
Your best bet for wood is probably going to be pipe cleaners. They were originally created for cleaning wooden and clay pipes. This with a light alcohol/water mix (probably 30alcohol/70water) and a nice drying overnight should have you in ship shape.
Hope this helps.
Your vapor path is probably clogged. Your unit is getting hot because it's either clogged and you can't remove the vapor and heat that's being produced, or, it's getting hot because you didnt pack it tight enough and the heater is being over worked.
https://www.amazon.com/Zen-Bundles-Cleaners-Bristle-Count/dp/B000W5R6UA
I use those to clean all my vapes. Remove the mouthpiece. Dip one in 90% iso and stick it through the vapor path holding the unit upside down. Any excess alcohol will drip down the pipe cleaner and get absorbed or drip to the floor. You dont want to risk alcohol getting underneath the silicone and getting into your electricals. The pipe cleaner will pop out the screen and you can scrub that down. Then run the pipe cleaner back and forth while twisting to get a good scrub in the vapor path. I usually have to use two pipe cleaners to get the vapor path clean. A clean pax is a happy pax.
I found these work great for this.
http://www.amazon.com/gp/product/B000W5R6UA/ref=oh_aui_detailpage_o00_s00?ie=UTF8&psc=1
http://www.amazon.com/gp/aw/d/B000W5R6UA/ref=mp_s_a_1_1?qid=1452984269&sr=8-1&pi=SY200_QL40&keywords=zen+bristle+pipe+cleaners&dpPl=1&dpID=41I0P5fM0nL&ref=plSrch
I found these for $4 with free shipping.
This.
I use this stuff called apoxie sculpt, it is great for that stuff. it mixes in two parts (like an epoxy) stays workable for about 2 hours, adheres to almost anything, is pretty cheap and hardens like the original plastic substance.
*oh, and it can be tooled once cured.
You could try polymer clay or a product called Apoxy Sculpt that I found on amazon. I've used this with great success.
Apoxy Sculpt
I've purposely bought a few damaged figures, but I'm very into customizing, so I tend to buy what I think I can fix.
If your absolutely going to buy the statue one way or the other and the damage isn't too severe I'd consider picking it up and saving the money.
I've never fixed a statue, but I'd assume it's a little easier than a fig since there's no moving parts.
If you got a picture of the damage I, or someone else more knowledgeable than me could give you some pointers on how to fix it.
Since it's Batman's cape, I'm assuming one of the end spikes broke off. If that's the case all you would need to do is buy some Apoxie Sculpt or similar epoxy, re-sculpt the damaged part, then try to match the paint with some black/blue acylics.
You say the damage isn't noticeable in certain poses so even if the fix isn't that pretty, from a distance it'll probably look fine.
Apoxie sculpt seems to be the standard for custom POP Vinyl figures.
http://www.amazon.com/Apoxie-Sculpt-1-Lb-White/dp/B0013UDWXI
Sounds good! I got mine on Amazon.
Apoxie Sculpt 1 Lb. White https://www.amazon.com/dp/B0013UDWXI/ref=cm_sw_r_cp_api_i_sm7-AbS384KVZ
This stuff.
This product has a pretty long working life, so you'll have time to mold it exactly as you want it while it hardens, without sanding it later. Maybe rub a little piece of smooth wood over it, or use a putty knife, after you apply it, for a good edge. Apoxie Sculpt 1 Lb. White. Good luck.
Should I use [this sort of putty stuff] (http://www.amazon.co.uk/Milliput-Superfine-White-Epoxy-Putty/dp/B002CNEWAM/ref=sr_1_5?ie=UTF8&qid=1410973369&sr=8-5&keywords=2+part+epoxy) or the liquidy type?
edit: just found this stuff... do you think it might work?
Welcome to the world of moldmaking. I've had moderate success using this method:
You'll need Instant Mold - a low temp plastic that hot water will make maleable.
And Milliput - a 2 part putty.
Put the Instant Mold in hot water, let it soften. Pull it out and press your base into it. Hold it under cold water so it 'hardens'. Peel out your base and you'll have a negative mold. Use the Putty to fill the negative mold, let it harden overnight and then pull out the hardened putty base. It'll probably need some cleanup around the edges but you're done.
I use Devcon Plastic Welder to bond parts, and Milliput Superfine White as additional structural support and filler and to blend the shells together.
Ain't this the same stuff?
https://www.amazon.ca/Green-Stuff-Kneadatite-sculpting-Painter/dp/B001AE5ZQO/ref=sr_1_2?ie=UTF8&qid=1498139132&sr=8-2&keywords=green+stuff
Amazon.ca is showing alternatives too...
https://www.amazon.ca/Milliput-Superfine-White-Epoxy-Putty/dp/B002CNEWAM/ref=sr_1_1?ie=UTF8&qid=1498139132&sr=8-1&keywords=green+stuff
Look for Canadian sculptor/mouldmaker people and/or propmakers working in Resin, and you'll find the right kind of stores I think :P
Fill with this stuff?
To add to the good info above: for KDM miniatures you are pretty much guaranteed to need to use putty/epoxy for the gaps on them if you want them to look good painted. Most of the big monsters will have some very noticeable gaps when put together, and it is fairly common on some of the armor kit survivors too (especially the unarmored kit mentioned above - serious issues with "ken doll" arm sockets).
For larger gaps, I prefer milliput superfine white. It is firm enough you can shape it (add water to help change consistency if needed).
https://www.amazon.com/Milliput-Superfine-2-Part-Hardening-Putty/dp/B002CNEWAM
For smaller hairline graps, I really like Vallejo Plastic Putty. It doesn't require pre mixing and is easier to work with if you just need to get it into a tiny gap. Usually apply it then wipe off with wet cloth.
https://www.amazon.com/gp/product/B000PHCNLC
Instamorph is also great stuff. You soften it in boiling water and it is workable like silly putty until it cools. Repeat as often as necessary to get it right.
I was working on something like this, but I kind of gave it up in favor of cooler projects... my ideas were:
OR
Another great material for repair is Instamorph:
InstaMorph - Moldable Plastic - 6 oz
http://www.amazon.com/dp/B004MFLU4Y/ref=cm_sw_r_an_am_ap_am_us?ie=UTF8
One Idea I have had for this was the usage of products like Gorilla plastic or InstaMorph to create an ergonamical Grip espacially designed for my Hand, like Tournament Guns are having it.
My go to would be modable plastic
​
https://www.amazon.com/InstaMorph-Moldable-Plastic-6-oz/dp/B004MFLU4Y/ref=pd_lpo_sbs_201_t_0?_encoding=UTF8&psc=1&refRID=FVJT0JSSW1NJFE23J74N
Thrift store or craigslist would probably be your best bets.
Depending on your school, you might be able to get some pieces on loan from a theater department?
For adding details on your costumes and accessories, maybe ask around and see if a school/library/local hackerspace can get you access to a 3d printer. If all else fails, a ten dollar bag of thermoplastic and some spare time can go a long way for making/modifying props and adding details at a super low budget.
As a side note, thermoplastic is also a lifesaver for building/repairing weird ass mounts, accessories, and holders for shit at the last minute.
One of my guys make tips out of a moldable plastic.
https://www.amazon.com/dp/B004MFLU4Y/ref=cm_sw_r_cp_awdb_2CqrybK72VEP9
Have you ever played around with this? https://www.amazon.com/gp/aw/d/B004MFLU4Y/ref=mp_s_a_1_1?ie=UTF8&qid=1495313333&sr=8-1-spons&pi=AC_SX236_SY340_FMwebp_QL65&keywords=instamorph+moldable+plastic&psc=1
It's a plastic that turns clear, sticks to itself and gets a texture similar to silly putty when you put it in 55 degree Celsius water. Once it cools, the plastic hardens and is actually pretty durable. I made a cone shape like a party hat and smashed it with a hammer a few times and it flexed but sprung back into shape immediately. The plastic is remoldable if you just heat it back up. You could mold it into any shape or thickness you want, and it is actually pretty strong.
Yea, I broke some off its fingers taking the supports off my prints of this model as well. And really your print looks as good as mine does. Maybe you could slow print speed down a little more, to like 1500 mm / min, and get the remaining fingers to look a little more round.
I use a product off Amazon called InstaMorph to mold replacement parts for stuff that I can't just glue back together.
I've used this stuff to repair holes in my socks although a bit overkill, it works great. It should be perfect for pants!
I'm a beginner who probably has more money than skill, but I would absolutely recommend a Flexcut set. This would be a great choice on a budget.
Most important thing is to make sure you keep the tools as sharp as possible. Flexcut makes a "variable" strop that works on a bunch of different tools and comes with polishing compound.
If you only want to buy a knife, Mora is a great alternative to Flexcut. A knife similar to the KN12 should be roughly the same cost-wise. You can make your own strop out of an old leather belt glued to some wood, so just do some research online for more info and then all you need to buy is some polishing compound.
Flexcut makes good carving tools at reasonable prices. This is a great starter set, IMHO.
Flexcut Beginner Palm & Knife Set, All-Purpose Cutting Knife and Detail Knife Included, with 2 Palm Tools (KN600) https://www.amazon.com/dp/B005EG033Y/ref=cm_sw_r_cp_apa_i_XORFDb8F3QMA6
$60 on Amazon . 2 knives and 2 gouges. they come sharp and are pretty easy to keep sharp (I bought that brand's slipstrop for sharpening).
Which would be easier to start with? I see the benefit of both. Do you have a rotary tool that you would recommend? I've browsed around and was thinking about the Dremel 4000 here but part of me wants to go the hand route....I can do that inside my house without pissing anyone off as much with a rotary. Any recommendations on knives and micros? What about there and here. I'd like to stay under or around $100.00 on my first go of tools. Thanks again
Heya! Thanks for stopping by.
It can be a bit tricky, depending on what materials and tools he has already.
If he wants more whittling-style knives, Amazon is also a place for this.
If he's the outdoorsy type, then any nice range pocket knife will work (as long as it looks / feels comfortable to hold!). The spirit of Whittling is in the doing, not so much in the materials used.
Other accessories that could go well could be safety gloves (no one wants to cut themselves !), A place for him to store wood, or even a bench perhaps.
Really, it's up to what he already has and his wants. Hope this helps!
This was the set I bought. If you have a Woodcraft near you, that's also a great place to start for buying individual tools and accessories.
Outside of the blades, I'd suggest a thumb guard, slipstrop (or back of an old leather belt), and sharpening compound.
Well, if you are looking for a wide variety of tools: i started with these
Though to start you would probably do fine with just a knife
or if you want to spend a little more you can't go wrong with drake
It's tough to recommend a knife as a starting point though. Obviously I don't want to say "You need to go out and spend a bunch of money, or you'll regret it" Because the truth is you would probably be fine with the knife sets you were looking at before.
I would say 1 good quality knife is better than 5 poor quality knives though. I have no personal experience with the sets you were looking at, but I have seen a few random posts where people have expressed that the sets they found at hobby lobby didn't hold their edges very well, which can be a frustrating experience.
At the same time, spending 10 dollars on a set of knives, might be all you need to decide if you are into the hobby or not and want to spend more money on it. It's tough. I would however go into that situation knowing that if you spend 10 dollars on a set of 5 knives, odds are good in a short amount of time if you decide you are into the hobby, you will feel their lack and want better knives.
Honestly... no. This handgun is as basic as it gets- you'll be able to strip it in 30 seconds. Just buy a bunch of ammo and get rolling. If you're into DIY projects, go ahead and get an [extra grip module] (http://www.selwayarmory.com/shop-by-category/firearms-parts/sig-sauer-parts-and-tools/sig-sauer-p250p320-grip-modules.html) and a wood burning kit. That way you can work on stippling. Practice on a PMAG or something first! You can look into the Apex flat trigger (link in my big comment) as well.
My husband uses rolls of this: http://www.dickblick.com/products/grafix-wrap-dura-lar-rolls/
I forgot to mention that he uses a burning tool with a fine tip to 'cut' the stencil. Like this one
I used this one:
http://www.amazon.com/Walnut-Hollow-Versa-Temp-Temperature-Woodburning/dp/B005P1TRAS?ie=UTF8&psc=1&redirect=true&ref_=oh_aui_detailpage_o02_s00
It worked well for my first project but I will likely be investing in a better tool for future projects.
I use this, and like it quite a bit. Walnut Hollow Creative Versa Tool with Versa-Temp Variable Temperature Control & 11 Woodburning Points (Tips) https://www.amazon.com/dp/B005P1TRAS/ref=cm_sw_r_cp_tai_vm11BbXHK4WMT
Thanks! I got this one off Amazon.
https://www.amazon.com/dp/B005P1TRAS/ref=cm_sw_r_cp_apap_pIoTAxt7fU2iu
What about some cool paint by numbers? Like a cool cow or maybe a neat tree.
I've recently attempted to take up wood burning and fried a couple of wooden spoons, may take some time to actually get the hang of it..or that could just be me....
wood burning
You use a special tool that's basically a soldering iron with special tips. I currently use one of these. The red comes from stain applied after the burning. And thanks :)
This is the exact burner that I use: https://www.amazon.com/Walnut-Hollow-Versa-Temp-Temperature-Woodburning/dp/B005P1TRAS
I just bought mine at a crafts store in the city I live in. However, pretty much all burners are the same, so you can definitely buy a cheaper one and it will probably work just fine. I used to have one that I got for $15, but I upgraded to this one for the temperature control abilities.
This is what I'll be getting. Similar to my old one.
Walnut Hollow Creative Versa Tool with Versa-Temp Temperature Control https://www.amazon.com/dp/B005P1TRAS/ref=cm_sw_r_awd_P5Ufvb1271FZZ
https://www.amazon.com/dp/B005P1TRAS/ref=cm_sw_r_awd_P5Ufvb1271FZZ
I used one of these.
This is the foam I used. 1 sheet is enough to do both those drawers fully without having to mess with piecing offcuts together. I know, it's pretty expensive for what it is, but once you get used to it there's no going back. It's like power windows or having the ice dispenser in the fridge door.
Optional but highly recommended is cutting the foam with a hot knife. I bought this one and it's decent.
The foam I used has a weird silicone- or wax-impregnated backing so no marker or pencil or pen I tried would write on it usefully, so I had to make all my marks on the backing with shallow exacto cuts, then cut through with the hot knife. It's important to remember that since you lay out the marks on the backing that everything will be mirrored left-to-right from the finished product. I took pictures so I'd be sure everything would be where I wanted it when I flipped back over.
You can get them pretty cheap. This is a pretty decent starter one with temperature control.
https://www.amazon.com/gp/product/B005P1TRAS/
Scotty Peelers are amazing! I bought some of them specifically for removing stickers from Gamestop cases after I bought them after I got tired of peeling them off by hand, having sticky residue left behind, then having my game cases stick together in the shelf.
Any small amount of residue left behind can easily be wiped away with Goo Gone and a washcloth.
Get a set of these Scotty Peelers. For sticky residue you can use rubbing alcohol or Goo Gone. I've also seen people suggest lighter fluid or hairspray, although I've not personally used either.
absolutely. For most, Goo Gone and a rag will work. For very stuck on ones, I have a Wagner heat gun that I will blast it for a few seconds and it will lift right off.
Scotty Peelers are also a very useful tool for removing stickers.
https://www.amazon.com/Scotty-Peeler-Label-Sticker-Removers/dp/B0068QIQVA
Scotty Peeler is the god at removing price stickers. You will also need to use blow dryer/heat gun to activate the glue, whilst removing the tag. Check youtube for more info.
If there is some glue leftover (usually the case for old old tag) then you can try using googone or similar products.
I know you already have it off, but wanted to share for anyone else removing stickers. Scotty peeler was a life changer for me and boat stickers, and now any stickers.
https://www.amazon.com/dp/B0068QIQVA/
Well, I guess that's my Amazon impulse purchase for the day ...
How about this video?
Or this one?
or a picture
Laugh You!
around $5 THINK OF THE POSSIBILITIES
Under 10 - I basically make all day to day decisions with this
http://www.amazon.com/Mattel-30188-Magic-8-Ball/dp/B00001ZWV7/ref=sr_1_1?ie=UTF8&qid=1409136677&sr=8-1&keywords=magic+8+ball
Under 5
http://www.amazon.com/Watch-them-wiggle-Black-PIECES/dp/B0074MHV7W/ref=sr_1_1?ie=UTF8&qid=1409136773&sr=8-1&keywords=craft+eyes
You will be amased at how many people you can make laugh by just sticking these everywhere and anywhere!
>She continued: ‘Some parents won’t leave the doll with their children at night because you are not allowed to have any eyes in the room.’
Guess I know what I am doing with these now!!!!
you can buy 2000 googley eyes.
https://www.amazon.com/Watch-them-wiggle-Black-PIECES/dp/B0074MHV7W
Scavenger hunts are too much fun! I should be working! RAWR! Thanks for the fun break =]
1.) Something that is grey. My name is makeup and I am grey! WL
2.) Something reminiscent of rain. This color is called "Naughty Nautical". Nautical = water, water = rain. =D?? WL
3.) Something food related that is unusual. Pretty sure most people don't have teeney shaped veggie cutters. WL
4.) Something on your list that is for someone other than yourself. Tell me who it's for and why. (Yes, pets count!) This is for my two parrots! My quaker especially loves dried papaya. I'm teaching her how to fly right now and have been using food as a reward, but we ran out of papaya a couple of weeks ago, and our local bird store has been out of stock for a long time. Turns out that Whole Foods doesn't carry dried papaya either. Rawr! WL
5.) A book I should read! I am an avid reader, so take your best shot and tell me why I need to read it! The Girl with the Dragon Tattoo. I had heard about this when the movie came out in English. I liked the movie and then moved on with my life. Come this spring, I found myself facing a LOT LOT LOT of driving by myself, so I started borrowing audiobooks from the library. I borrowed all three of these books and REALLY enjoyed them. It wasn't at all what I expected. They're murder mysteries with a lot of themes about violence against women. When I learned about the author, it became that much more interesting. The author wrote these books with the intention of making 10, but died after the third one. They found them after he died. The themes about sexual violence stem from a gang rape he witnessed as a teenager. He never forgave himself for not being able to help her, so he channeled all those emotions into his writing later in life. Anyway.....interesting stuff. Good books. I recommend them :)
6.) An item that is less than a dollar, including shipping... that is not jewelry, nail polish, and or hair related! Pfft.
7.) Something related to cats. I love cats! (keep this SFW, you know who you are...) If I was a cat, this would be my JAM!
8.) Something that is not useful, but so beautiful you must have it. Dresses are admittedly useful for avoiding public indecency charges, but not really useful beyond that. BUT LOOK AT THE RAINBOWS!!!!!!!!!!!!!!!!!!!!!!!!!!!!!! WL
9.) A movie everyone should watch at least once in their life. Why? Not on my wishlist (it's on American Netflix though!), but everyone should be aware of the impact of plastic on the environment and our bodies. Education is everything. Plus, there's a newborn baby at the end.
10.) Something that would be useful when the zombies attack. Explain. 1. Stab zombie in the skull. 2. ??? 3. Profit. The reviews rave that it's super sharp and doesn't stick so it probably wouldn't get stuck in their skull like other knives. WL
11.) Something that would have a profound impact on your life and help you to achieve your current goals. I don't know if I'd use the word profound, but it would sure help me out. A big passion of mine is learning to ID birds. I'm pretty good at most birds, but finding information on juveniles is VERY difficult sometimes. I've used this book before to help identify birds in hand, but I think the information regarding juvenile plumage would help me identify young birds from afar. It's even part of my job to identify birds! WL
12.) One of those pesky Add-On items. This is an Add-On item, but it's also a hair addon =P Not on my WL, but I'm losing my hair like crazy so I might have to look into these >.>
13.) The most expensive thing on your list. Your dream item. Why? This isn't the most expensive item on my list (that was #8), but it's the one that would help me the most! When I do field work, I tend to have a lot of gear on me at once, and the extra strain of binoculars around my neck tends to give me some really freaking sore muscles. A harness would be MUCH easier on my shoulders/neck/back. I start field work again in October, so I plan on buying it for myself by then anyway =] WL
14.) Something bigger than a bread box. EDIT A bread box is typically similar in size to a microwave. This is larger than the average bread box.
15.) Something smaller than a golf ball. I am smaller than a golf ball! WL
16.) Something that smells wonderful. This smells amazing!!! I'm infatuated with cinnamon, but had to stop using cinnamon Crest YEARS ago because I developed a bad reaction to it. This stuff is expensive, but the company is very environmentally responsible and I feel good giving my business to them. WL
17.) A (SFW) toy. This seems pretty SFW unless you're playing Cards Against Humanity. evil grin WL
18.) Something that would be helpful for going back to school. I used sticky notes all the time in school! WL
19.) Something related to your current obsession, whatever that may be. I've obsessed with birds since I was 11. I've been obsessed with rainbows forever. I'm currently obsessed with sushi. THIS IS ALL THREE! WL
20.) Something that is just so amazing and awe-inspiring that I simply must see it. Explain why it is so grand. Hear me out! This baby can keep ice for DAYS. Sitting out in the sun for hours on end? NO PROBLEM! YOU'LL HAVE ICE AT THE END OF THE DAY!! Seriously, Thermos needs to pay me for how much I rave about their stuff. My water bottle has still had ice in it after three days AND being refilled twice. No joke.
BONUS
This beauty was made in OR.
fear cuts deeper than swords. She is my favorite character by far :)
Boom and its prime so no shipping cost!
Are you also into print and play then?
Thanks for the link, I'll go for this one instead. https://www.amazon.co.uk/Sunstar-Kadomaru-Corner-S4765036-Japanese/dp/B0076FJ7SS/ref=cm_cr_arp_d_pdt_img_sims?ie=UTF8
hah yea. I got a corner punch just for this campaign. I print on cardstock so they have some thickness to them. All my HotAC printed cards are cut that way :)
Its time consuming, but looks really good.
[edit] Wow. I made a list in Excel of all the extra pilots and i totally missed Braylen :| feels bad. Glad you got it in your list tho haha.
[Kaizen foam] (https://www.amazon.com/Fastcap-Kaizen-Foam-57mm-Black/dp/B007J2JJYK) would work. You could use a hole saw or a razor to cut the diameter you need and you just peel off layers until you get the exact thickness you want. It's really easy to work with.
Amazon has full 2’x4’ sheets of Kaizen foam for $32.50, you’d just have to cut them to fit your PACKOUT. The link is for the 57mm (2-1/4”) foam, so may have to browse for the thinner ones if that’s what you need. Fastcap does sell their own adhesive to hold multiple layers together, but you could probably use something like 3M’s Super 77, which can be found at most craft/home improvement stores. Fastcap Kaizen Foam 57mm (2-1/4”) Black
Otherwise you can buy them pre-cut fromKaizeninserts.com for your particular box. Comes in different height/color options, just cost a bit more.
https://www.amazon.com/Fastcap-Kaizen-Foam-57mm-Black/dp/B007J2JJYK
I used this stuff. I'm not sure what thickness/size you need, but do a search for 'kaizen foam' on Amazon and it'll cough up the sizes/thicknesses available.
Yeah I tried that at first but wasnt very happy with the results, the pluck and pull type was really hard to just cut a form fitting shape, too soft, and I ended up ripping it even with a brand new exacto blade. This stuff cost a good bit, but it was totally worth it in regards to end quality of the entire case. It's still discounted a bit, though I did grab it when it was half off. If you go with this case, 2-¼" is exactly what you want.
Fastcap Kaizen Foam 57mm (2-1/4") Black https://www.amazon.com/dp/B007J2JJYK/ref=cm_sw_r_cp_apa_i_Cx.1DbFMXAC1J
I have a lot of leftover double-sided LCD screen tape, so I just used that. It comes off without any damage, fading, or residue after months of staying on the Joycon. I suspect you could probably use regular 3M double-sided tape without issue though.
I would go with a phone adhesive tape https://www.amazon.com/Eco-Fused-Adhesive-Sticker-Phone-Repair/dp/B00BXYWXY8 It's a quick fix until you get a replacement, or you could apply a wet glue (specific for phone) if you want to use it more. In my experience, the tape will be fine for a while.
It is better to use this stuff, http://www.amazon.com/Eco-Fused-Adhesive-Sticker-Phone-Repair/dp/B00BXYWXY8
That is what was used in the first place. Remove the tape, place new, and compress.
I see, maybe try this: Adhesive Sticker Tape for Use in Cell Phone Repair - 2mm Tape - als... http://www.amazon.com/dp/B00BXYWXY8/ref=cm_sw_r_udp_awd_72jfvb14M5AGV
You don't "need" to put an adhesive, but if you don't, you risk dust getting beneath your lens and stuck onto the screen, which obviously isn't ideal.
I put 3mm double sided sticky tape. I used this one from Amazon.
You might be able to find a smaller roll of tape, but you really don't want to go more than 7mm IMO. I chose 3mm because I use it for other projects. I just put two tape pieces like this along every edge of the screen:
||
And definitely no glue unless you want to risk a runny mess and never take off your lens again.
Honestly, though, I got a super inexpensive swift on amazon, and a KP winder. Best investment ever.
https://www.amazon.com/Cutehill-Umbrella-Operated-Knitting-Winding/dp/B00VGD39O4/ref=redir_mobile_desktop?_encoding=UTF8&psc=1&ref_=ppx_yo_mob_b_inactive_ship_o0_img
https://www.amazon.com/Knit-Picks-Yarn-Ball-Winder/dp/B00O3GHFA0/ref=sr_1_4?keywords=yarn+winder&qid=1573524391&s=arts-crafts&sr=1-4
So if you have prime, or know someone with it, for $30 you've got your setup
Thanks! I use the knitpicks ball winder. This one in particular! I do hold tension on my yarn while winding and I bent the metal holder to fit the large ball lol Knit Picks Yarn Ball Winder https://www.amazon.com/dp/B00O3GHFA0/ref=cm_sw_r_cp_apa_i_p.HPCb2F75KKG
Hi! Thanks! I use this It’s $19.99 on Amazon, very affordable. It’s nice to have the right tools.
Here's enough for around 200 TO-220 transistors
It's possible that it's real, gold leaf is extremely inexpensive.
Doesn't look too expensive honestly. $15 for 100 2" square sheets doesn't sound that bad.
Surprisingly not as expensive as you would think.
https://www.amazon.com/Gold-Leaf-Sheets-1000-Real/dp/B00VALQQ60
​
$.12 a sheet.
This is excessive and wasteful, but putting it on a burger and selling it for $100 or whatever is just duping gullible rich people. It's like (at most) $5 worth of gold on a $12 burger.
Gold foil sheets are actually not outrageously priced. Here's an example from Amazon 25 sheets for $43 bucks.
Gold gilded sheets are even less expensive, 100 for $13, not much more expensive than any other kind of fancy decorative supply.
You can polish the blade with mothers mag polish or somthing simular, and you can patch the handle with sugru
Sugru that shit back together! Cheaper than getting a new bong.
https://www.amazon.com/Sugru-Moldable-Glue-SBLK3-Black/dp/B01BFE0KNQ/ref=sr_1_3?ie=UTF8&qid=1473193684&sr=8-3&keywords=sugru
Shit is fucking magic, I had a similar thing happen to an ash catcher.
http://i.imgur.com/fSZDR9S.jpg
Works great.
Pic of the broken part? Used is definitely the best option, but could the broken part be put back on? Little super glue? Depending if there is a lever you can put some Sugru on it as a nice grip that won't cut your finger.
https://www.amazon.com/Sugru-Mouldable-Glue-Original-Formula/dp/B01BFE0KNQ/
https://www.amazon.com/dp/B06XR4SD1V/ref=cm_sw_r_cp_api_i_s-mACbEWVTS2Y
worth the 9 bucks
Mmm hmm.
https://www.amazon.com/Fake-Outlet-Stickers-Prank-Electrical/dp/B06XR4SD1V/
This would be my ultimate $5 and under item. Googly eye all the things!
The dog ate my homework!!
This is what I got, less than $6 for 500 eyes, with Amazon Prime: http://www.amazon.com/Watch-them-wiggle-Black-PIECES/dp/B0074MHV7W/ref=sr_1_1?ie=UTF8&qid=1376416990&sr=8-1&keywords=googly+eyes
Only downside is that they're not sticky-backed, so you'll need to buy some super glue. I got a bottle of super glue with a brush applicator, and it works great.
http://www.amazon.com/Watch-them-wiggle-Black-PIECES/dp/B0074MHV7W/ref=sr_1_1?ie=UTF8&qid=1427659148&sr=8-1&keywords=googly+eyes
DO IT
Any combo of this , this or this !
Who doesnt love googly eyes, feathers and pompoms?! Art and crafts stuffs!
Weight hmmm ... 7.9 lbs
https://www.amazon.com/Sunstar-Kadomaru-Corner-Cutter-S4765036/dp/B0076FJ7SS
Great for any thin player boards and player aids. Keeps the corners from gettings dinged up.
I work in architecture and have a pretty deep understanding of reprographics and what any decent print shop is capable of. I'm personally very excited to make what should be, in most cases, much nicer cards than what PP used in the past. I just checked the errata card PDF they released and you can get a 600dpi image for each card, have it printed on a nice linen or even plastic cardstock and use a corner punch so they have nice rounded corners and fit perfectly into some of the better sleeves available specifically for MTG/popular card game sizes.
I know the DIY/crafty aspect to miniature gaming hasn't historically extended much beyond painting/sculpting/terrain modeling, but why not give a nice set of cards the same treatment we give our beloved minis?
I use this one: https://www.amazon.com/Sunstar-Kadomaru-Corner-Cutter-S4765036/dp/B0076FJ7SS/ref=sr_1_4?ie=UTF8&qid=1537575611&sr=8-4&keywords=corner+rounder
​
It's nice, relatively inexpensive, and has three choices of round.
So, I make my own cards for things every once in a while, and I have this corner rounder. You could trim the sides, then re-cut the corners, and you'd never be able to tell the difference. :)
If you want an inexpensive laminator, I bought this one from amazon (http://amzn.to/2kxWSdz). It was around $22. It does one page at a time and seems to do a fine job. I only have experience with this one laminator, but for taking paper things and covering them with plastic it seems to work pretty well. It only comes with 5 pages of lamination material, so you will need to pick up a pack of the lamination pages. A pack of 100 of the "laminating pouches" cost around $12 on amazon. "Pouches" is kind of a misnomer. They open kind of like a clamshell (connected on one edge, the other three sides open). You slide whatever you want to laminate inside, then slide it through the machine. It was a little difficult getting the hang of laminating a bunch of small pieces on one sheet. The trick I used was to put a book in front of the laminator that was even with the level of the input slot, that way you could just gently slide the page forward without moving the little pieces around inside. My first few attempts were done just holding it by hand and feeding it in and I ended up having pieces move and overlap and get laminated overlapping each other.
I would also recommend a corner cutter (like this: http://amzn.to/2k64w1u). When I was cutting out laminated cards/pieces, I ended up with pointy corners. It wasn't a big deal, but being able to round out the corners makes things just feel better to handle.
The whole setup cost about $45 from amazon for laminator, 100 pages (of which I still have plenty left) and the corner cutter.
After buying a laminator, I ended up discovering all kinds of things that I didn't realize needed lamination. :)
A few days late here, so for all I know you've already purchased, but I have one called the "Sunstar Kadomaru Pro, Corner Cutter (#S4765036)" and I really love it. It does three different corner sizes, so you can experiment with an index card or something and see which angle works best. I got it from Amazon here:
https://smile.amazon.com/gp/product/B0076FJ7SS/ref=ppx_yo_dt_b_search_asin_title?ie=UTF8&psc=1
I've trimmed the borders off a number of decks, and this guy always makes my corners look great. (I wish the same could be said for my edges -- I'm still working on doing those cuts as evenly as I'd like...but hey, at least my corners always look good...)
Here's all the files you'll need.
For the paper, I just use standard 8.5x14" Legal paper. My printer has a duplexer, but it won't duplex legal, so I had to do a manual duplex (flipping the paper over by hand and printing everything again). The cover is 65lb Bristol Board and was manually duplexed as well.
My books have 10 pages in them, which is made by two sides of 5 sheets of paper. The pages print 2-up per page and they are cut down the middle long-ways, that way when you fold them in half, the score sheet appears on the front page and the notes page ends up on the back of the score sheet. 5 sheets of paper make two books. I have a paper cutter that can cut the full length of the legal sheet, but if you don't, you can simply use a straight edge and a razor blade, or if you have a regular paper cutter, you can just fold the pages in half on the short edge, then cut them in half on the long edge.
Once everything is stapled, I round the corners using a corner cutter. Here's a cheaper corner cutter, but it can't handle the whole book at once. I have both of those corner cutters, and the cheaper one comes in very handy for other projects I do.
In that link is both Trap and Skeet books. I have a doubles sheet, but I need to finish the cover. Once I get done with it, it'll be in that link as well.
I use a similar method.
I layout my cards in Gimp and print them on Polaroid photo paper that I get at the Dollar Tree. 8 sheets for a buck = 72 cards.
I cut them on with a Fiskar rotary cutter and usually sleeve them with a cut down 3x5 card as backing for a little extra stiffness in UltraPro sleeves. But, if it's something that I want to keep...
I use a Swingline laminator with Apache pouches and corner punch them with the Kadomaru Pro.
https://www.amazon.com/gp/product/B010PK3G96/
https://www.amazon.com/gp/product/B00FORXKOC/
https://www.amazon.com/gp/product/B0076FJ7SS/
The rotary cutter was a little under twenty bucks at Walmart. It was cheaper than Amazon when I bought it.
I bought sheets of Kaizan foam to line my cases. I found a specialty woodshop that sells it near me. You can also buy cases that have pluck foam inside. Pelican brand cases are the most popular but are expensive.
It’s this stuff: Fastcap Kaizen Foam 57mm (2-1/4") Black https://www.amazon.com/dp/B007J2JJYK?ref=yo_pop_ma_swf
I cut slots for them.
Saw this awhile back. Add some foam to it and you should be good to go :) a good budget option if you ask me.
If you're looking for something more customized, there's these custom sleeves that are affordable. There's also Modern Coup if you have the money and want something classier.
I didn't go overly compact, but I did buy a cheap hard shell carry on bag from amazon and some Kaizen foam. Tore out the innards of the carry on bag and cut out slots for headset, touch controllers cameras and even a slot for my 1080 for the times that I don't need to bring a computer, but the computer at the destination needs a better card.
It accompanied me on 6 flights so far.
Here's a link to an image of it before being completed. It lacks the Video card slot. I also added some command wire hooks on the top and bottom inside of the camera half and ran two bungie cords between them to hold the cameras down.
*Open cell foam is generally bad for long term storage
You would be fine if you used closed cell polyethylene foam, which you can pick up at places like McMaster Carr or Amazon.
you can find a big airsoft backpack and put a foam like this , cut it and you are surely safer than the strapped backpaks IMHO
I do a very similar set up for backpacking. Peakclip with body on front or on the top of my bag in a foam insert (when I know the conditions are just going to suck, like when I'm snow camping) I built using this (https://www.amazon.com/gp/product/B007J2JJYK/ref=ppx_yo_dt_b_asin_title_o08_s00?ie=UTF8&psc=1) and extra lenses get wrapped in a fleece or with my quilt.
​
For biking, can you strap it to your bike? Then I could see using a pelican case or something similar.
or buy double sided sticky tape. these are the kind they use in phone nowadays https://www.amazon.com/Eco-Fused-Adhesive-Sticker-Phone-Repair/dp/B00BXYWXY8/ref=sr_1_1?ie=UTF8&qid=1467497800&sr=8-1&keywords=cellphone+tape or go to a walmart/staples for these http://www.staples.com/Scotch-Double-Sided-Tape-with-Dispenser/product_SS940458
I won't lie... Cheap Amazon Prime accessible tape.
The two names are as follows;
2mm Clear Double Sided Strong Adhesive Acrylic Tape For Phone LCD Screen Repair https://www.amazon.com/dp/B019OQ4Z10?ref=yo_pop_ma_swf
Eco-Fused Adhesive Sticker Tape for Use in Cell Phone Repair - 2mm Tape - also including 1 Pair of Tweezers / Eco-Fused Microfiber Cleaning Cloth (black) https://www.amazon.com/dp/B00BXYWXY8?ref=yo_pop_ma_swf
I know they're cheap, but how much should I spend/what should I search for when I purchase? Computers are my hobby, but I work in kitchens and bake bread full time... Soooo, I'm pretty good with my hands. Application is not the issue here.
Thats what I was thinking. Do you think this would work? 2mm seems like its the perfect thickness, though it's double sided and I'd only use a single side.
Not quite, but here is something you could possibly go off of... :)
Adhesive: http://www.amazon.com/gp/product/B00BXYWXY8?psc=1&redirect=true&ref_=oh_aui_detailpage_o03_s00
And the bezel was 0050!
I asked for a set of pom pom makers, a yarn winder, a nice-looking yarn tote, a set of blocking mats, and some awesome crochet books!
I got one yesterday! This one:
https://www.amazon.com/Knit-Picks-Yarn-Ball-Winder/dp/B00O3GHFA0
It's working fine for me so far :) There are picture of the cakes in the reviews
I tried looking for the one I bought on amazon but it looks like they no longer sell it. But I did some searching and found two:
Knit Picks Yarn Ball Winder https://www.amazon.com/dp/B00O3GHFA0/ref=cm_sw_r_cp_api_2WO5BbZCAERFF
Stanwood Needlecraft Large Metal Yarn/Fiber/Wool/String Ball Winder, 10-Ounce https://www.amazon.com/dp/B0078T6KQY/ref=cm_sw_r_cp_api_5NO5BbBJGNRE5
The one complaint I have about mine (and I’m not sure there’s really a product that would do any better) is that sometimes when you’ve wound a big cake if you try to wind too much the whole thing will just fly off...so I wish it had some sort of cap that would keep it from doing that. But I mean as long as you slow down once it starts getting big it’s fine. I suppose it wouldn’t be too hard to come up with a quick fix at home, I just haven’t put any effort into that myself.
Good luck!!! 😀
Knit Picks Yarn Ball Winder https://www.amazon.com/dp/B00O3GHFA0?ref=ppx_pop_mob_ap_share
I've used this pretty frequently and it's amazing for the price. I've had no issues with it and I've done my whole collection of yarn with this.
I have this one and I love it, I found mine on ebay used for only 10 bucks. Just be careful not to go too ridiculously fast otherwise nice softer yarns can fly off. It works like a charm though.
https://www.amazon.com/Knit-Picks-Yarn-Ball-Winder/dp/B00O3GHFA0/ref=sr_1_1_sspa?keywords=yarn+winder&qid=1550710566&s=arts-crafts&sr=1-1-spons&psc=1
Is this the one?
https://www.amazon.com/Knit-Picks-Yarn-Ball-Winder/dp/B00O3GHFA0/ref=mp_s_a_1_1_sspa?keywords=knitpicks+yarn+winder&qid=1554558644&s=gateway&sr=8-1-spons&psc=1
This one -> https://www.amazon.com/gp/aw/d/B00O3GHFA0?psc=1&ref=yo_pop_mb_pd_title
Another quick question and I'm done for now: is it okay if I get gold leaf that isn't entirely real gold but a blend will it work? (I might be wrong but I've found some listing that says it is like 999/1000 real gold which I read as meaning 99% real gold, so I might be wrong).
Better way of putting it: will these be alright?
https://www.amazon.com/Hem-Dragons-Blood-Incense-Sticks/dp/B0016Z3BA4
https://www.amazon.com/Gold-Leaf-Sheets-1000-Real/dp/B00VALQQ60
Not enough gold in that room to be worth your time, it's all gold leaf This is actually very common in Japanese temples.
This is gold leaf. It's insanely thin, about 4-5 millionths of an inch according to Google. You can get 100 sheets of it for $12. I don't think it's quite as much of a splurge as you believe. It's pointless, but it's not something only the richest of the rich can do.
Just use silicone self-fusing tape:
https://www.amazon.com/gp/product/B00HWRO9MY/ref=oh_aui_detailpage_o05_s00?ie=UTF8&psc=1
or use liquid tape:
https://www.amazon.com/Gardner-Bender-LTW-400-Liquid-4-Ounce/dp/B002CC05EA/ref=pd_sim_328_21?ie=UTF8&dpID=413CdGG5uqL&dpSrc=sims&preST=_AC_UL160_SR82%2C160_&refRID=FY2E02TWCMGTEJPJYZ0K
or even Sugru (probably the best but most expensive option):
https://www.amazon.com/Sugru-Moldable-Glue-SBLK3-Black/dp/B01BFE0KNQ/ref=sr_1_1?s=hi&ie=UTF8&qid=1465690927&sr=1-1&keywords=sugru
So I got the idea off YouTube from a guy called MTB Alan. Super awesome video of him showing you step by step. Check it out.
https://youtu.be/SUtwXFQMA6w
$10:
Sugru Mouldable Glue - Black (3-Pack) https://www.amazon.com/dp/B01BFE0KNQ/ref=cm_sw_r_cp_api_i_5azoDb9ANG90W
$7:
Suptig Tripod Mount Adapter for Gopro https://www.amazon.com/dp/B071XVZKP1/ref=cm_sw_r_cp_api_i_0czoDbBPVN334
That’s it. IMO looks way better than zip ties, holds much better than zip ties. The Sugru is tested for 4lbs (roughly 2kg) and it feels solid as a rock. Took about 5 minutes to knead, 2 minutes to mold, and then let it sit for 48 hours. The pack says 24 will be plenty but since I used all 3 packs I decided to let it sit a little longer.
Hope it helps somebody! 🤙🏼🤙🏼
Not really, about $10 for a 3 pack or $20 for an 8 pack
https://www.amazon.com/Sugru-Mouldable-Glue-Original-Formula/dp/B01BFE0KNQ/
https://www.amazon.com/Sugru-Moldable-Glue-Original-Formula/dp/B00EU7DBNM/
The frayed wire is one of the standard use cases for this stuff.
A blob of Sugru might do the job https://www.amazon.co.uk/Sugru-Mouldable-Glue-Original-Formula/dp/B01BFE0KNQ
If you're after a cheap and dirty fix:
Got the idea from this video (which explains it a bit better): https://www.youtube.com/watch?v=qZ2LPpbiZXc
This stuff is ideal for applications like these.
SUGRU
GoPro Hero 5 is only $250. Grab some Sugru and attach to the chin of your helmet.
What about Sugru?
When mounting to curvy helmets, just get some of this and do this.
https://amzn.com/B01BFE0KNQ
Looks like a sticker someone would place at an airport.
https://smile.amazon.com/Fake-Outlet-Stickers-Prank-Electrical/dp/B06XR4SD1V
Like one of these?
https://www.youtube.com/watch?v=j8b7acamOdg
https://smile.amazon.com/Fake-Outlet-Stickers-Prank-Electrical/dp/B06XR4SD1V/
If anyone wants to do a job and run before the client tries to plug something in:
https://www.amazon.com/Fake-Outlet-Stickers-Prank-Electrical/dp/B06XR4SD1V
The first time I saw this was in a prank video 2-3 years ago. It wasn't in Houston though. Oh wow... this is getting serious
You can trust me, I have [peel and stick googly eyes] (http://www.amazon.com/Peel-Stick-Wiggle-Eye-Sheets/dp/B000F8V66O/ref=wl_it_dp_o_pd_nS_nC?ie=UTF8&colid=8MQV9QDIDXV3&coliid=I1OT8LWIY47VG4) on my wishlist. I'll use them for sticking to everything and making the world a sillier place.
Seriously, though. I've had these on my wishlist for a long time and my plan has been to put them on a few robots we have at my work (I'm a research scientist). I promise to post video of them in action if I win!
128
These are things I bought that work great.
First, the stands;
https://www.amazon.com/gp/product/B003PEUA30/ref=oh_aui_detailpage_o01_s00?ie=UTF8&psc=1
Then the adaptor;
https://www.amazon.com/gp/product/B00X5QO3B8/ref=oh_aui_detailpage_o01_s00?ie=UTF8&psc=1
And finally the finishing touch for the headpiece;
https://www.amazon.com/gp/product/B000F8V66O/ref=oh_aui_detailpage_o07_s00?ie=UTF8&psc=1
That's everything you need. But yeah, get them high up, pointing down a bit, and make sure on sturdy flooring so as you're jumping around they don't carry the vibration over and judder.
http://www.amazon.com/gp/aw/d/B000F8V66O?cache=faa4de1ec5dce58f3e533641d9b80480&pi=SY200_QL40&qid=1405642276&sr=8-3#ref=mp_s_a_1_3
http://www.amazon.com/gp/aw/d/B00H9BEC8E?cache=faa4de1ec5dce58f3e533641d9b80480&pi=SY200_QL40&qid=1405642331&sr=8-1#ref=mp_s_a_1_1
http://www.amazon.com/gp/aw/d/B001QTXKB0?cache=faa4de1ec5dce58f3e533641d9b80480&pi=SY200_QL40&qid=1405642475&sr=8-1#ref=mp_s_a_1_1
Get this tool:
http://www.amazon.com/Leather-Hole-Punch-Tool-Heavy/dp/B000NK5VY2/ref=sr_1_1?ie=UTF8&qid=1321287194&sr=8-1
$6.68 + FS w/ Prime.
http://www.amazon.com/SE-7924LP-Heavy-Duty-Leather-Punch/dp/B000NK5VY2
You can buy a leather puncher at Hobby Lobby for $20 ($10 if you use a coupon). Here is one for $7 off Amazon. One of the best purchases I've ever made!
Congrats! Soon you'll need a punch
I got one of these and have used it to make 6 new holes in my belt!
https://www.amazon.com/SE-7924LP-Heavy-Duty-Revolving-Leather/dp/B000NK5VY2
Nice work, really well done.
Here is an inexpensive punch I have used for years that works well: SE 7924LP Heavy-Duty Leather Hole Punch Tool, 2.0 - 4.5 mm https://www.amazon.com/dp/B000NK5VY2/ref=cm_sw_r_cp_apa_exDxybKCYTQBP
I would suggest this kind of device http://www.amazon.com/SE-7924LP-Heavy-Duty-Leather-Punch/dp/B000NK5VY2 better them knife cause it doesn't tear material as much so holes might stay (read not completely tear) longer.
You can then reinforce holes with this http://m.instructables.com/id/Reinforced-fabric-hole-Old-style-button-hole-or-ey/
Ideally you should use something like this.
http://www.amazon.com/SE-7924LP-Heavy-Duty-Leather-Punch/dp/B000NK5VY2
might have to make 2 holes side by side. if you Cut the rubber, it will continue to rip along that cut and tear. If you use a hole punch you are creating a round hole and it has no place to tear.
If you have a farm store or hardware store close by where you live they might have one on the shelf.
Even better solution
Get a leather hole punch for best results, they are cheap. I've cut down a couple belts. Then I just used a pair of good scissors to trim off the excess leather.
This is how you're supposed to do it -
http://www.amazon.com/Leather-Hole-Punch-Heavy-2-0mm/dp/B000NK5VY2/
With one of these
try this one
leather punch
I bought it about a month ago, did the job well on 4 different belt so far, super easy.
For the life of me I cannot locate that exact tool.
Here's some great ones though: SE DD312 12-Piece Stainless Steel Wax Carvers by SE http://www.amazon.com/dp/B000SVRSRY/ref=cm_sw_r_udp_awd_vAj1tb03SC6N4
I got it at a local Flea Market / Swap Meet
Pick up some dental picks/tools or clay working thingums. These for example.
They'll help with smoothing of green stuff and shaping without leaving fingerprints.
I use these: https://www.amazon.com/Hakko-CHP-170-Stand-off-Construction-21-Degree/dp/B017ODDPNO/ref=sr_1_3?ie=UTF8&qid=1499887364&sr=8-3&keywords=flush+cut+pliers
And these: https://www.amazon.com/SE-DD312-12-Piece-Stainless-Double-Sided/dp/B000SVRSRY/ref=sr_1_2?ie=UTF8&qid=1499887406&sr=8-2&keywords=wax+carving
Anything I missed?
I'm a noob but no one else has said anything:
Material:
For larger figures you'll probably want some sort of clay as opposed to epoxies like green stuff/ graystuff/ milliput. ( https://www.sculpey.com/super-sculpey/9-super-sculpey-firm ) super sculpy firm is the only polymer clay I've used (oven hardening). Unless anyone with more experience pops by I'd say just get some super sculpy and play around with it. Learn what you like about it or dont like, and branch out from there.
Tools:
https://www.amazon.com/SE-DD312-12-Piece-Stainless-Carvers/dp/B000SVRSRY/ref=mp_s_a_1_3?keywords=wax+carving+tools&qid=1573851649&sprefix=wax+car&sr=8-3
I think this is what I have, plenty of shapes and sizes for all your detailing needs. You may also want some files for after you bake the clay:
https://www.amazon.com/10-Piece-Diamond-Needle-Total-Length/dp/B07R3R9461/ref=mp_s_a_1_9?keywords=diamond+file&qid=1573851744&sr=8-9
These work well in my experience. As far as your armature question goes I'd definitely recommend arnatures, I'd just go on amazon and search "copper wire", obviously dont get anything insulated. I think I have 24 gauge wire and it's perfect for what I do on the ~25mm scale, so a thicker gauge may be beneficial to you.
Paints:
Make a thread at /r/minipainting it's a more active sub and has some really good painters.
Again, I'm no expert. The tools/ files I can vouch for, and the clay will be a good starting point if no one else pipes up. Good luck!
Also, I like the drawings!
Edit: I should say that if you're on a budget the files and tools are not required, you can get by with whatever you have around the house. Toothpicks, silverware, hobby knives, paperclips, safety pins, etc.
This is a good cheap set you can get from Amazon.
https://www.amazon.com/SE-DD312-12-Piece-Stainless-Double-Sided/dp/B000SVRSRY/ref=sr_1_6?ie=UTF8&qid=1483070428&sr=8-6&keywords=sculpting+tools
Also, the small sphere in this set helps.
https://www.amazon.com/COMI-Pottery-Ceramics-Sculpting-Modeling/dp/B01JED95XG/ref=sr_1_1?ie=UTF8&qid=1483070440&sr=8-1&keywords=sculpting+tools+round
I need doll-modding supplies!
Like clay or tools or acetone pens or embellishments or brushes.
With practice, I hope to be able to work with some very talented doll artists in my community, as well as crafting custom dolls for people over the Internet.
The ideal kit for resin scraping, in my opinion, can be found on Amazon.
http://www.amazon.com/gp/product/B000SVRSRY/ref=pd_lpo_k2_dp_sr_3?pf_rd_p=486539851&pf_rd_s=lpo-top-stripe-1&pf_rd_t=201&pf_rd_i=B003KE3ZFK&pf_rd_m=ATVPDKIKX0DER&pf_rd_r=0NYKVM69MZ4ANCM4RX26
Oh yeah, I bought this set of wax carving picks about a year ago and get tons of use out of all the tools: https://www.amazon.com/gp/product/B000SVRSRY/ref=oh_aui_search_detailpage?ie=UTF8&psc=1
 
Not many better deals for less than 10 bucks if you ask me. Not to mention buying the one's labelled for uses other than vaping/smoking are always a hell of a lot cheaper than the one's you get in a smoke shop.
Milliput and green stuff both work well for gap filling and smoothing over rough areas. Liquid green stuff is garbage. I find that milliput is more fragile than green stuff, so if you're putting it in areas that are likely to be touched a lot (or you're fabricating detail) I'd use green stuff. But I like it a little more for seam filling just because of how easy it is to sand and carve.
Get yourself a cheap set of tools and remember to smooth it over with watered tools/fingers.
If you are molding by hand I would suggest a set of carving tools.
https://www.amazon.com/gp/product/B000SVRSRY/ref=oh_aui_detailpage_o06_s01?ie=UTF8&psc=1
I follow this cap maker on Twitter and they did a killer BMO a while ago, you should definitely go for it: https://twitter.com/tinymakesthings/status/983197768431710210
What are you using for tools? I got this for 9 bucks: https://www.amazon.com/gp/product/B000SVRSRY/ref=oh_aui_search_asin_title?ie=UTF8&psc=1
Okay I bought everything needed except woodburner. Do you think this would get the job done? https://www.amazon.com/Walnut-Hollow-Introduction-Intermediate-Woodburners/dp/B000VRTG8Y/ref=lp_262717011_1_3?s=arts-crafts&ie=UTF8&qid=1524884937&sr=1-3
Any chance you could show me what your printed out and how you stenciled? Yeah I am copying you completely.
I'm only experienced with a basic kit, which has a few different tips. Basically, I use 3, a fine point, medium point and a thicker point to fill.
Something like this should work for what you described....
Walnut Hollow Creative Woodburner Introduction Value Pen for Beginners and Intermediate Woodburners https://www.amazon.com/dp/B000VRTG8Y/ref=cm_sw_r_cp_apa_i_tJZkDb8K213ZE
It's basically wood burning. You take a sanded piece of wood and then start drawing (burning) with this tool as if you would with paint. Takes some skill, yes, but the most basic of patterns are very easy to do. Then just apply varnish and let it dry.
No problem. You'll probably be cleaning lint etc mostly from it if you plan to carry it around. I tend to go a little overboard when I clean my guns, but I typically don't clean my rifles/shotguns all that frequently and will go between multiple thousands of rounds before I do.
When I clean my guns I use a mat like this to absorb oils etc and this to get all of the black carbon out of it. I use these to clean the bore/inside of the barrel. I use these and these for the hard to reach places that still have something building up on them.
When you're done cleaning everything, you'll want to make sure you put oil/grease on all the components that come in contact with other parts. Basically if it rolls oil it, if it slides grease it. I use this on the slide/rails where they contact each other and use this in most other places. Then I'll wipe down the exterior with this.
Really all you have to make sure you do is get most of the debris out of the gun, and make sure you have oil on surfaces that create friction or need some kind of rust preventative coating.
http://www.amazon.com/Bundles-Pipe-Cleaners-Hard-Bristle/dp/B000W5R6UA i use these a lot for my warez too
Pipe cleaners
I hope you feel better!
Smoke shops, craft stores, gun shops, Walmart, Amazon and such. Colorful and/or sparkly pipe cleaners are more for crafts and might cost more. Look for cheap fuzzy white pipe cleaners.
I'm still working through a huge pack of 12" pipe cleaners I bought years ago. Handy to have around. I cut them in half so I have twice as many.
Edit to add this link of some on Amazon and another link. These have stiff bristles and are made more for cleaning instead of crafts.
I always put everything away as soon as I've finished, that way I know I'm not going to bump into it, knock it to the floor, etc.
Cleaning on a weekly basis is a good habit to get into, the alcohol and salt is pretty cheap compared to the chemical solutions that are sold that do exactly the same thing and get it no cleaner in the end. Don't forget to clean the bowl and stem. Purchase bottle brushes for the purpose and clean those off after use every week. It will keep your bong looking like new and make sure every different strain smoked tastes as it should.
Also stop by the tobacconist to purchase pipe cleaners, the ones with metal filaments in them, they do an excellent job of keeping those stems clean.
This is what the pipe cleaners I'm talking about look like. I usually cut them in half 'cause they're too long as is.
http://www.amazon.com/Bundles-Zen-Pipe-Cleaners-Bristle/dp/B000W5R6UA/ref=sr_1_2?ie=UTF8&qid=1415465541&sr=8-2&keywords=pipe+cleaners
I cannot open the link, either, but I'be been a pipe smoker for most of my life and I'd call these pipe cleaners.
Anyhow, you don't need those to clean a razor. A toothbrush and dish soap are all you'll ever need for that. I usually just give my razors a gentle scrub with my nail brush when changing blades. No biggie.
I use these, local shop stocks them
http://www.amazon.com/Bundles-Zen-Pipe-Cleaners-Bristle/dp/B000W5R6UA
+1 to just ISO (99% OR 91% Isopropyl alcohol) and salt. Though I learned the hard way that if you're cleaning a grinder just use ISO. The salt makes it more difficult to reclaim the goods.
This process will take a couple/few hours but just let it sit in a bag, shake it around every so often, and of course one bag per item if it's glass. You don't want to lose a piece in the cleaning. Overnight is great too if you want. I strongly recommend pipe cleaners with hard bristles too.
I highly recommend zen pipe cleaners They're really cheap and work great.
yeah, I ended up using it twice. It still functions fine and temp is good, it's just it feels like the fuzziness is killing the drag and not allowing smoke to come out well
just for opinion, do you think this product is good for Pax?
http://www.amazon.com/Bundles-Zen-Pipe-Cleaners-Bristle/dp/B000W5R6UA
I use these
http://www.amazon.com/gp/aw/d/B000W5R6UA?vs=1
Sorry for shit formatting, I'm on mobile.
While I have no experience making prop guns, I have made prop swords using PVC fake-wood, which is very easy to cut and sand. I usually cut the general shape of the sword, then use a dremel to sand to a better shape. Once I am happy with the shape, I do detailing with Apoxie Sculpt, which becomes rock hard, but can make some very nice details.
However, I usually do a single piece construction, so more complex shapes like guns may need to be made separately and assembled. If you aren't happy with the detail on pepakura files, I would recommend trying to use Apoxie Sculpt to add the details once the model has been hardened.
Not sure if you want something entirely empty like OP's base, but I just finished a set of 12 Bones skeletons (there's probably a joke there). Anyway, I used some plain 1" round bases and Apoxie Sculpt to blend the hunk of plastic down smooth with the base. Some of them are propped up on rocks I sculpted if their existing base was too wide for the new base. They all came out looking pretty nice and it didn't take too much effort. I can grab some photos later if you like.
I'm also very new to this so do take this advice with a grain of salt, there are probably better solutions out there, but this worked for me.
I've had very good results with this stuff. Has a much longer sculpt time. Water soluble. Dries hard but with a stoney, chalky texture that makes it great for carving details if you need. Because it's water soluble, you can work it into the seams, then wipe off the excess with a cloth and get a perfect fill which doesn't need sanding.
Also, remember that you can always try stuff on scrap pieces. No need to guess how it will come out.
Stupid good for modeling and so strong that 24hrs after I mixed it I sometimes carve it with a dremel, amazing modeling clay.
Damn that sucks, is it a handle or does air actually have to travel thru it?
If it's just a handle I bet something like this would work
http://www.amazon.com/Apoxie-Sculpt-1-Lb-White/dp/B0013UDWXI/ref=pd_sim_201_12?ie=UTF8&dpID=41gn20MrtUL&dpSrc=sims&preST=_AC_UL160_SR160%2C160_&refRID=1EXNH8K3Z8F6KFXHQF54
No problem at all!
That top section is just spare insulated electrical wire I had floating about, with those grey blobs formed out of Apoxie Sculpt. If you're not familiar with it, it's two-part epoxy clay that will harden to a rock a short time after you combine the two parts, so you can mold it to whatever shape you like and set it fairly quickly. I just slapped it around the wire and hoped for the best, but another option that might look neater is if you find rubber tubing just large enough to slide over the wire in those sections.
For the anchoring, I'm going to MacGuyver this, mostly because I'm having a brain fart and can't think of a search term for what I actually want, so let's start from the bottom of the construction. Get your bucket lid that you'll be using for the base. Epoxy (or screw, if you're feeling adventurous) a light bulb socket to the center -- this will provide that wide, stable base that I failed at when I was building mine. Scoop out a hollow in your styrofoam round large enough to make it sit around that socket, and cut a hole over the socket part. Glue the styrofoam to the bucket lid once you're sure everything lines up properly. We'll be adding the dowel next, but we need to see how long that dowel needs to be.
Take your mannequin head, and flip it upside down. You should see the hole in the bottom of the neck for conventional use. That will not be nearly deep enough. I speak from experience. If you're using a plastic one, you might need to drill to get past the stoppage at the end, if you're using styrofoam a long knife or screwdriver and some patience should work. Get all the way up into the head if you can, but at the very least get a few more inches to work with. Now take your dowel, and push it in as far as it will go. Mark that point on it, that's one end of the depth. Do the same into the socket under the foam. Measure to those marks and add them together, that is the total length of your dowel, cut it to that size.
The most important part here is getting a solid connection from the dowel into the socket. Epoxy should be strong enough, but whatever you use, make sure that the dowel is not moving, it will only end in tears. Once that's solid, cut a hole in the bottom of your (already colored) bucket and slide it down the dowel, attach to the foam round with epoxy. Volia. You have a solid anchor that's long enough to actually hold the head up. That should be able to handle bobbling around, if rotation becomes an issue and you don't expect to take the head back out, you can glue the head to the bottom of the bucket, but if removal might be needed, velcro should do the trick.
I hope that was clear enough!
Edit: Oh I'm a dumbass, you were probably asking about the part behind the wire at the top. That's actually part of the bucket I used and just painted to match, I went digging and found my old order for it. Not sure if that one in particular is still available, but as long as you have that little lip area where the lid connects, you should be fine.
Sweet. Keep us up to date on the ammo counter! Get this, stuff works great =)
It was originally the little plastic monster that came with the Alisa Ilyinichna Omela Nendoroid
I used an exacto knife to shave all the plastic parts off to make the right body shape, then took apoxy sculpt clay to make the body texture and spikes, then I sprayed Tamiya Grey Primer on top, then painted it black/white/red with Tamiya acrylic paints.
I hope this helps.
there's two types of putty, basic putty for filling in tiny holes, gaps or panel lines. and the other is epoxy sculpting putty. this is the stuff for bigger jobs like adding custom details or redefining "parts". tamiya sells some and so do other brands, i personally use this
More bang for your buck (compared to green stuff) with this epoxy sculpt
I mix up a little bit and press the magnets into it on the underside of the base. Keep these containers in a plastic bag for longterm storage tho.
Aves is a "apoxy" clay. It air drys so you don't have to bake anything. It's not an epoxy it's an apoxy. Not sure if apoxy is a real word though.
In 2011 I did a scary pumpkin head mask... I got a foam pumpkin at Michael's, carved a face in it, and made an opening at the bottom so I could wear it. I fastened a brimless baseball cap inside so it would fit securely. Then I put a piece of clear plastic inside the eyes at an angle, and mounted LED eyes inside the top of the mask, pointing down. Because of the plastic reflector, from the front the LED eyes looked like they were deep inside the mask. (same technique as the Terminator mask in this video)
This year I plan to revisit the concept, but with better carving. I will use some Apoxie to give the pumpkin some thickness near where it's carved. I'll put a closet push-light inside the forehead and run a wire out of the head so I can switch it on when I want, and I'll wear this mask directly on my face.
I'm planning to cut the mask into a face part and a jaw part, and fasten both parts to a morphsuit face stocking so the mask mouth moves with mine. It should be pretty unsettling.
Ah, thanks again! Here's the apoxie I bought: https://www.amazon.com/gp/aw/d/B0013UDWXI?psc=1&ref=yo_pop_mb_pd_title
The feet are indeed terrible, and so are the backs of the legs. The upside is that those parts are hollow because they're going to be seen the least, so you don't have to make it perfect. I gave up on making it perfect at least, too much work.
I use Milliput Superfine for most of it. It's suitable for large fillings. I then use some tamiya basic putty over any little cracks left over, that's the gray stuff, since it shrinks and is more suited for small fillings and since it's just easier.
I'm assembling Skitarii from Warhammer 40k atm, and I'm really struggling with liquid greenstuff. It's total crap.
While glueing I pressed the edges together and it looked nice. There even came a bit melted plastic out of the line, so I sanded it down but there is still a very small visible gap.
The thing is, it is really distracting because it goes across the cloak of the mini... Would Milliput work to get a smooth surface?
​
https://www.amazon.de/Milliput-Epoxy-Putty-superfein-weiß/dp/B002CNEWAM/ref=sr_1_1?s=toys&ie=UTF8&qid=1537424527&sr=1-1&keywords=miliput
is this the right one?
I'm going to be buying one of two different epoxy fillers.
https://www.amazon.co.uk/Milliput-Epoxy-Putty-Superfine-White/dp/B002CNEWAM/ref=sr_1_1?ie=UTF8&qid=1480860814&sr=8-1&keywords=white+epoxy
or
https://www.amazon.co.uk/gp/product/B004NB3OMS/ref=ox_sc_act_title_3?ie=UTF8&psc=1&smid=A3P5ROKL5A1OLE
I've been reccomended the second one but the issue is that it means I'll have to paint it since it's a browny tan colour cure. Therefore might end up buying the white Milliput instead.
This is Milliput Superfine White, http://www.amazon.ca/dp/B002CNEWAM
Milliput is pretty good at this.
https://www.amazon.com/Milliput-Superfine-2-Part-Hardening-Putty/dp/B002CNEWAM/ref=sr_1_2?ie=UTF8&qid=1527463101&sr=8-2&keywords=milliput
You can make it effectively solid, which will make it a lot more comfortable on your skin, especially if you want to wear for a while. Look for a product called instamorph. It's basically just little plastic beads that melt when put in hot water.
Melt a bunch of it and roll it into a cylinder about the diameter of a pencil. This way you can easily remelt it if necessary. Also put your ring in hot water so that it warms up a bit. Once both are good and hot, work the instamorph liberally into the groove; you want to have it spilling a little out of the groove. Be sure to push plastic into any air gaps.
Do one side, then melt more plastic and do the other side. Then put the whole thing in cold water for a while to cool.
All that's left now is to sand away the excess plastic and then polish it smooth. Start with a coarse grit, like 60 or 80, and get it pretty close to the shape you want. Then just use finer and finer grits to do your successive shaping and smoothing. A pack of different fine grits like this should be pretty good for what you need.
A few other thoughts:
I did this modification to my ring and it was like a whole different product. I couldn't go more than a day or so before my skin got pressed into the groove and became really tender. Now with a little lotion I don't have any problems down there from the ring.
Use InstaMorph. It's a moldable plastic that I've used as fake fangs. You soak it in hot water, let the plastic become a little clear then scoop it out, and begin to mold it. Once cooled off, it will turn a solid white. If you don't like the shape, you can easily drop it back into the hot water and repeat the process. I used my coffee maker (without the coffee) to make a pot of hot water and it worked fine w/ that temperature.
You could modify your mouse with something like ShapeLock or Instamorph. It's a plastic called polycaprolactone which you can soften in near-boiling water and hand-mold into anything you want. When it cools, it turns into a hard, sturdy, paintable plastic.
I had considered doing a plaster mold of my feet, then filling it with something like this thermoplastic so I'd have 3D models of my feet. Then just sending that off to manufacturers and asking if they'd see what size would fit those feet the best.
Never got around to it, though. Plus, I'm pretty sure everybody would think I'm really, really weird (not that they don't already).
This item may not seem very fun but it's used to make something super fun and awesome! My family and I go all out on halloween and decorate our house so it looks awesome! The final touches of course are our costumes. This year I'm planning on making a full mouth piece of pointy teeth. I already have the material to make the teeth itself but I need this to make the mouth piece so they stay in my mouth. It basically makes dentures haha they will look sort of like these. Oh and it's $9.99 :) Sunday Funday
This stuff is awesome for this exact use InstaMorph - Moldable Plastic - 6 oz https://www.amazon.com/dp/B004MFLU4Y/ref=cm_sw_r_sms_apa_i_MknVDb38RJJWA
Molding plastic is your friend.
I had similar problems with my cage. I got a jar of InstaMorph and made a little cover for the back of the bar. Works perfectly. I also used the slightly bigger ring and threaded it through a piece of Food Grade Vinyl Tubing which both reduces the diameter, but more importantly, makes it non-skin, without being to grippy. If that makes sense.
As this is just the chamber portion, I recommend getting a good chunk of a thermoplastic like (InstaMorph https://www.amazon.com/dp/B004MFLU4Y/ref=cm_sw_r_cp_apa_96RKzbBT7Z845)
Or you could maybe use a modelling clay. I would go with a cook gold colour or something, and then wrap a design around it, partially for strength, and partially for looks.
I bought 3 different ones this one actually shoots darts, so its mechanism is pretty sturdy. The one I used was [This] (https://smile.amazon.com/gp/product/B005SICR6O/ref=oh_aui_detailpage_o09_s00?ie=UTF8&psc=1) cheapie. It has a working mechanism, but I didn't need it to function, so I only used the hammer, frizzen, backplate, and trigger guard, then modified them with thin, homemade Worbla. (To make metal-smooth Worbla, mix [Instamorph] (https://smile.amazon.com/InstaMorph-Moldable-Plastic-6-oz/dp/B004MFLU4Y/ref=sr_1_2?ie=UTF8&qid=1504898165&sr=8-2&keywords=instamorph+pellets) with a small amount of ordinary flour. Put it in a glass pan and heat it in an oven until the plastic gets soft, then carefully mix them together and knead until evenly combined. It's smoother than real Worbla, which uses wood fibers as a filler, and a LOT cheaper!)
You could make a custom extension using a moldable thermoplastic like instamorph. You soften the plastic with a hair dryer or by submerging it in boiling water and then you can form it into whatever shape you like.
Just be sure it's up to code, as other people in this thread have mentioned.
Get some water-moldable plastic like this stuff:
https://www.amazon.com/InstaMorph-Moldable-Plastic-6-oz/dp/B004MFLU4Y/ref=mp_s_a_1_6?keywords=Hot+water+plastic+mold&qid=1554581119&s=gateway&sr=8-6
Mold some face bases, and pour a resin of your choice in. You can cut up the bases to form larger shapes or sections to glue onto big bases. The results look pretty good with a little green stuff and paint
Nice! I did the whole thing at 250%, and yes, the ribs were terrible. I ended up using a spray lacquer in several coats on them, and they were still fragile... I also used some of this with the black color pellets to match my Black PLA, to reinforce some areas like the knees and the neck joint where it connects to the head.
How does it compare to Tenacious Tape? https://www.amazon.com/Gear-Aid-Tenacious-Fabric-Repair/dp/B005BLQTEE
The problem is the water. They aren't meant to be filled with water. Otherwise, you would use something like this https://www.amazon.com/Gear-Aid-Tenacious-Repair-Fabric/dp/B005BLQTEE
Tenacious Tape may work well for this repair.
Also, do you find that your heels are slipping when you run? There has to be a reason for the premature material failure...
I was recommended this stuff https://www.amazon.co.uk/McNett-Tenacious-Tape-Fabric-Repair/dp/B005BLQTEE/ref=pd_lpo_200_bs_tr_t_2?_encoding=UTF8&refRID=JE4Y4RXE3TRKTR73BV46 by Mark from IR -- apparently it's pretty bomber.
This may be an easy fix for you.
https://www.amazon.com/Gear-Aid-Tenacious-Fabric-Repair/dp/B005BLQTEE/ref=pd_lpo_200_bs_t_2?_encoding=UTF8&refRID=WD6WP7TXEVH39VR0D4WA
The knife set
The wood
The strop
Okay, thanks. Would this be a good starter set you think? Then if I enjoy it enough and get some more cash pick up some of the north forge ones eventually.
Yeah, it is. I bought it based on a recommendation. Luckily I had cut resistant gloves so I could get a grip on part of the blade and get more accurate cuts. But if you look at my first project, they didn't really require and details. It was just getting the feel of working with the wood.
Here is what I purchased. I prefer the fixed blades as opposed to the ones where you can switch them out. I haven't had a single issue with the knife quality. Both of the gouges work well for me. One is a 70 degree cut and the other is curved.
I've got this one
Great job! I do this as well but I only trace stuff I find online or create on my own. What tools do you use?
I own this:
https://www.amazon.com/Walnut-Hollow-Versa-Temp-Temperature-Woodburning/dp/B005P1TRAS/ref=sr_1_2?ie=UTF8&qid=1469129344&sr=8-2&keywords=wood+burning+kit
In my experience, I find basswood the easiest to work on. I am still very new to this so any advice/links would be greatly appreciated. I have done approximately 6-7 pieces.
I'm assuming you're using one of the cheaper green pens with the three tips. There's another, more robust hobby pen from the same company that comes with a circle-shaped tip to it, that's about the size you're asking. The burns won't be crazy fast, but if you do it right they'll come out as nice black polka dots.
This is the pen I'm talking about
If that doesn't work for you, you should look into getting a more expensive setup or a blowtorch that you can heat that circular tip with more quickly.
I'm a big fan of Pyrography or Wood Burning Art and the amazing art it makes. You should look some up if you have the time. If not just comment and I'll post some links of some cool stuff. You need this puppy to put the art onto the wood. I find the entire process very relaxing. Hope you may considering venturing into this awesome art form.
Oh and...... Stillneverwrong is so groovy
Thank you! I definitely think you should give it a shot. From what I see so far on this subreddit, I use a different tool than most. https://www.amazon.com/Walnut-Hollow-Versa-Temp-Temperature-Woodburning/dp/B005P1TRAS/ref=sr_1_3?ie=UTF8&qid=1466045184&sr=8-3&keywords=wood+burning , but I really like it.
I'd say that I'm somewhat artistically inclined, but in that I like to be creative. I wouldn't say I can freehand well, aside from stick figures. I use carbon paper to help me transfer images.
The tricky part is more in your steady hand and eye for shading than in your artistic ability, I think! I mainly use three tips: one that looks like a pencil, one that's a tinier pencil tip, and one that looks like a leaf (I use that one for the shading and the others for outlining). That's it!
I've been doing this for maybe a year now, and still learning techniques. Give it a shot!
Glad you figured something out, there are these as well:
https://www.amazon.com/dp/B005P1TRAS/ref=cm_sw_r_sms_awd_rnXfxb9BQNTF9
https://www.amazon.com/dp/B00MJW08JK/ref=cm_sw_r_sms_awd_4nXfxbPS230AX
Walnut Hollow Creative Versa Tool... https://www.amazon.com/dp/B005P1TRAS?ref=ppx_pop_mob_ap_share
Actually this one looks like the kit I have -- http://www.amazon.com/Walnut-Hollow-Creative-Versa-Temp-Temperature/dp/B005P1TRAS/ref=sr_1_1?ie=UTF8&qid=1413925846&sr=8-1&keywords=leather+burning+kit
...and it's a bit cheaper, anyway. And I completely know what you mean about tooling and neighbors! That was a problem until I finally got out of an apartment....
No problem!!!
Capital letters:
Walnut Hollow Hotstamps Uppercase Alphabet Branding and Personalization Set for Wood and other Surfaces https://www.amazon.com/dp/B0019N4VSO/ref=cm_sw_r_cp_apip_qZ3nYNo4V4dhs
Lower case letters:
Walnut Hollow Mini Hot Stamps Lowercase Alphabet Branding & Personalization Set for Wood, Leather & Other Surfaces https://www.amazon.com/dp/B01KTBQU3A/ref=cm_sw_r_cp_apip_kDRK8wBD2b4RL
Wood burner:
Walnut Hollow Creative Versa Tool with Versa-Temp Variable Temperature Control and 11 Woodburning Points https://www.amazon.com/dp/B005P1TRAS/ref=cm_sw_r_cp_apip_l5txnwxGFubDB
A pretty ok wood burner is about $28 on Amazon
Here’s the one we have
I've been using a woodburning tool which is an adjustable temp soldering iron type of deal with multiple nozzle attachments when I want to heat smooth any PLA, works great if a little awkward to hold due to the heat shield. I mostly use it for the exacto blade attachment since it slices PLA like the proverbial hot knife through butter and couldn't be happier with that aspect of it and would be kind of lost without it.
​
I picked mine up at a Michael's in the wood crafting section, if you're in the US go there or amazon something like this https://www.amazon.com/Walnut-Hollow-Versa-Temp-Temperature-Woodburning/dp/B005P1TRAS/ref=sr_1_2_sspa?keywords=wood+burning+tool&qid=1559074816&s=gateway&sr=8-2-spell-spons&psc=1 as I think that's my exact model.
​
I also do heat welding/smoothing with a 3Doodler 3dpen with the nozzle removed and a pin vise drill bit embedded in the hot end to conduct heat to a fine pointy tip for super fine detail. About the only use I have for that 3d pen since it's incompatible with my typical filament diameter and I won't buy their proprietary overpriced filament on principle lol. But the little attachement modification I made to it is too useful to return the device so I keep it.
​
This isn't a perfect solution, neither of these are and are going going to be useful in certain circumstances but you can royally mess up your prints with heat smoothing, especially when you're not mindful and the heat shield melts off a giant chunk of your piece. Not to mention toasting the hell out of your fingers from time to time. Anyway it's useful but not a magic bullet. Best way I've got to smooth prints is using filler primer, filling compound and sanding and I stick to the heat tools for cutting and welding these days, but I did try for awhile to perfect this, just not ideal for my needs. Useful tool to have though for this hobby, like I said couldn't do without the exacto attachment it's worth it just for that!
alright just getting an idea of what you used, I was using soldering iron first then got
https://www.amazon.com/Walnut-Hollow-Versa-Temp-Temperature-Woodburning/dp/B005P1TRAS/ref=pd_lpo_21_bs_t_2?_encoding=UTF8&psc=1&refRID=GRGCG1F455C6GW8D7XXJ
and my stippling went from what you got there to PRO looking overnight the variable temp is the way to go. I also did alot of prep maybe too much but i used just sandpaper (120>300>600) grits to get it super smooth, then stipped with a fine or med point. Not telling you that it looks like crap I just want you to know that the wood burner can take it alot farther than the iron ever will without any more practice involved.
Link to Heat Gun: https://www.amazon.com/dp/B005P1TRAS/ref=cm_sw_r_cp_tai_BAHLybZMSVPMZ
Build list:
Zev Dragonfly Slide
Trijicon RMR 06 Type 2
Zev Glock 19 Dimpled Bronze Match Barrel
AmeriGlo GL-429 Suppressor Sights
TTI Spring Kit
SSVi Tyr Trigger
Glock OEM Minus Connector
​
Tools used:
Wood Burner
Dremel Micro Max 8050
Dremel Bit 108 Engraving Cutter
Dremel Polishing Kit
Sand Paper Assortment
Flitz Polish
You could always make shadowed socket holders out of Kaizen foam and place the sockets exactly where you want them. You can use a hot knife, long thin razor knife and/or a hole saw kit to make cut-outs for your sockets.
A wood burning kit like THIS works great on the foam for making finger grip holes and for cleaning up the bottoms of shadowed spots that are less than the thickness of the foam.
FastCap's long nose permanent markers are great for marking out the patterns of your sockets or other tools for you to cut on.
​
Just my two cents.
This is the pen that I used to make this. I taught myself by just messing around on a blank piece of wood and it wasn't too difficult, but I'm sure you could find some good videos on YouTube if you just search "Pyrography".
I use this dial controlled “pyro pen” or wood burning tool for various cleanup tasks, especially removing supports from small bits on figures. The included “x-acto” blade works great. This specific model will dial down pretty low though I’ve never actually measured the temperature.
Walnut Hollow Creative Versa Tool with Versa-Temp Variable Temperature Control & 11 Woodburning Points (Tips) https://www.amazon.com/dp/B005P1TRAS/ref=cm_sw_r_cp_tai_7SkWCbW11FD6E
I bought a 25 dollar wood burning kit off Amazon. Here is the one I used. I really liked it because it had its own temperature control, and a whole lot of different tips you could use to make patterns or thin lines.
I have been using this model https://www.amazon.com/Walnut-Hollow-Versa-Temp-Temperature-Woodburning/dp/B005P1TRAS
> My grandfather was an amazing woodworker, and my skills are limited, but years ago before he died, we worked on a few pieces and I really took to the woodburning. For my birthday that year he bought me a little woodburning kit (cost about $20). About 9 months ago my wife told me to clean out the shed and I found it and thought, "why not." I've been hooked ever since.
It only takes about $20 to get started (http://www.amazon.com/Walnut-Hollow-Creative-Versa-Temp-Temperature/dp/B005P1TRAS/ref=sr_1_1?ie=UTF8&qid=1451521659&sr=8-1&keywords=woodburner)
I picked up the Creative Versa-Tool kit for $29.99 at a local store. It's currently $26.31 at amazon.
Thanks! One thing that I realized while doing this project is that it will require you to a) learn how to draw, or b) find some creative way to sketch a pattern onto the wood for you to trace. I ended up free hand sketching the design on a piece of paper (while looking at a wiki image), overlaying it onto the wood, taking a pocket-knife and poking holes through the paper/onto the wood at the corners of the shapes, playing connect the dots with the resulting holes, and then traced over with the wood burner. However, I'm pretty sure there are easier methods, this is just what was in hands reach.
If you ever get the urge to refinish it, the beeswax can be removed fairly easily, and a good wood burner can be bought pretty cheap.
If it were me, I'd spend $20 or so on a small U-Gouge and use it to cut out the lines you scored originally. Because that gouge is 1.5mm, you should also be able to straighten up any slightly-crooked lines by choosing a good starting point for your cut. Since it's a log, I would use a small paintbrush to brush hot water onto each line a minute or so before you start your cut to soften it a bit. With the gouge I mentioned you shouldn't have to re-sharpen, but you'd need to strop it frequently during the process.
After cutting the lines, use the chisel tip (or a round tip 1mm or smaller) of the wood burner to re-trace the lines to get that nice, dark look to them. The kit also comes with a big, blunt, round tip that is perfect for re-making the dots once you've finished with the lines.
That would hold up better and wouldn't fade in the sun. Of course, that all assumes the wood itself is still in good condition, which it might not be.
Anyway, it's a pretty easy and cheap weekend project you could do to restore that awesome board to have a nice look and playable quality. Wish I had some stumps around here....
Thank you, just a regular wood burning kit. My wife free-handed it with a pencil first and then traced her lines.
No burnt fingers
http://www.amazon.com/Scotty-Peeler-Label-Sticker-Removers/dp/B0068QIQVA/ref=sr_1_1?ie=UTF8&qid=1405034470&sr=8-1&keywords=scotty+peeler
I'd try these, they work well for this type of thing.
https://www.amazon.com/Scotty-Peelers-Label-Sticker-Remover/dp/B0068QIQVA/ref=sr_1_1?ie=UTF8&qid=1495114588&sr=8-1&keywords=scotty+peeler
I use scotty peelers I had laying around. They were made to remove store price stickers. They have a thin sharp edge that really gets under the print. https://www.amazon.com/Scotty-Peelers-Label-Sticker-Remover/dp/B0068QIQVA/ref=sr_1_2?ie=UTF8&qid=1491591135&sr=8-2&keywords=sticker+remover
I have obtained similar items when buying iphones and video game consoles. I can't recommend these particular ones, but the cords I have come in handy. First one is for the several different apple products, 2nd link is for ps2/ps3, wii and xbox 360. The particular one I have has an adapter for some older nintendo consoles.
https://www.amazon.com/Charger-Universal-Charging-Lighting-Samsung/dp/B01AK5AYIM/ref=sr_1_2?ie=UTF8&qid=1487358894&sr=8-2&keywords=multi+apple+cord
https://www.amazon.com/MADCATZ-MOV06155V-Universal-Component-Cable-1-8m/dp/B000IAPGIS/ref=sr_1_2?ie=UTF8&qid=1487358985&sr=8-2&keywords=universal+video+game+cord
This things pretty handy. Is it the device that's broken or are my batteries dead:
https://www.amazon.com/Amprobe-BAT-200-Battery-Tester/dp/B005G7SBY4/ref=sr_1_1?ie=UTF8&qid=1487359100&sr=8-1-spons&keywords=battery+tester&psc=1
scotty peeler
goo gone
barkeepers friend
magnifiying glass with light good for looking at little markings or tiny text
upc scanner
Bring headphones (I listened to audio books). Make sure each team member has their regular department, and have a sign off so u know who did what and that it was finished without hunting them down. Plan your path through the department. With the paper tags u have to tear learn the order and tear them b4 u go out so u have a stack and dont have to tear as you go. When putting out tags do one type at a time, i.e. I started with peg hook tags - square tags - rectangle - etc. This is so u aren't switching between piles or searching. Other than all that just learn to go into zombie mode and it will fly by. You can try a tool like the "Scotty Peeler" if your having issues getting the tags off. I normally put the peg labels on lightly so they peel easy and for things that I know change every week I put a little hanging over so I can tear and go (some leaders dont like this). (back to keeping to your assigned departments) (https://www.amazon.com/dp/B0068QIQVA/ref=cm_sw_r_cp_apa_jiqUBb33F55WF)
I hate that as well, for me if I rush it I end up messing it up so I go slow with good results. If you can get a perfect can and or catch lid out of a roll just use that one. There is also stuff like this https://www.amazon.com/Scotty-Peelers-Label-Sticker-Remover/dp/B0068QIQVA
https://www.amazon.com/Watch-them-wiggle-Black-PIECES/dp/B0074MHV7W
https://www.amazon.com/Watch-them-wiggle-Black-PIECES/dp/B0074MHV7W/ref=sr_1_3?ie=UTF8&qid=1484153008&sr=8-3&keywords=googly+eyes
I want to be the guy who makes one of these videos whilst carrying a spare pair of "googly eyes" to stick on the can.
"There you go little fella!"
She's gonna smack you
I would have said she won't hit you but you put that in there for some reason and obviously you know your girlfriend!
I kinda need these googly eyes for my family, too much fun
This item would be totally rad, man. My daughter would have tons of fun putting googley eyes on all the things!
Nice. My smoke shop tends to pull 7-10 dollar bullshit.
Yup, I'm a fan of my dentist pick. Another good deal, though not currently in stock:
http://www.amazon.com/SE-DD312-12-Piece-Stainless-Carvers/dp/B000SVRSRY/ref=sr_1_1?ie=UTF8&qid=1382473690&sr=8-1&keywords=dabbers
Gore-Tex should work, I used one on a pair on snowboarding pants about 8 years ago and the patch is still holding strong through 5 or 6 washings. I don't see why it wouldn't work on a sleeping pad. I actually carry one in my repair kit out on the trail for a sleeping pad or rain jacket/pants haven't used it yet on those items but I know it worked damn well on my pants.
EDIT: Hmm, I think the gore-tex I linked and the Tenacious Tape are the same thing just under different names?
They look the same and both are made by gear aid, the gore-tex package says "Tenacious Tape". Now I'm curious, might have to do some tests.
Thanks dude! And, yeah that's an awesome design, I think it'd make a cool deck too.
I'll let you in on a secret that took me forever to figure out: the best way to make masking / stencils is to get yourself some transparency sheets, like the kind used for overhead projectors in school, and then take a marker and draw what you want to spray through (best way to make stencils). Then take a 'wood burning kit' (which is just a low-heat soldering gun pretty much) and use it to "trace" your lines on the transparancy sheet, do it light and quick and it'll cut the parts out that you want - afterwards you'll be left with a mask or stencil that's much stronger than paper, easy to clean, and the wood engraver allows you to make more detailed and smoother cuts than if you were masking with tape, or cutting out of cardboard or card stock.
When you finish your painting, you'll want to give it a light coat of clear spray finish, and when that dries hit it with a coact of actual clear coat - I use minwax - that''s 'satin' (which is their way of saying 'matte') listed there but I prefer mine to be gloss. It's important that you hit it with the spray finish first, because it'll seal the paint, and the minwax may cause it to run if you don't. I use a lot of markers in my paintings and minwax will absolutely make them bleed and run if I don't seal them first.
You also want to seal it because the acrylic will easily chip off the deck
Like I said, also be aware that painting on a deck is A LOT different than painting on canvas, the deck will cause the acrylic to paint much faster than canvas so you lose that 'wet period' you normally have to blend paint.
Good luck, post a picture when you finish it! And feel free to drop me a line if you have any other questions.
Amazonn
Amazon again! ( cheaper i think)
https://www.amazon.com/Fake-Outlet-Stickers-Prank-Electrical/dp/B06XR4SD1V
I just replaced my screen 2 days ago.
http://www.amazon.com/gp/product/B00LF6IVC2?psc=1&redirect=true&ref_=oh_aui_detailpage_o02_s00
and
http://www.amazon.com/gp/product/B00BXYWXY8?psc=1&redirect=true&ref_=oh_aui_detailpage_o02_s00
You will also need superglue.
https://www.amazon.com/dp/B000VRTG8Y/ref=cm_sw_r_cp_awdb_t1_m.RzCbEG2RY9F