(Part 2) Best craft supplies & materials according to redditors
We found 3,900 Reddit comments discussing the best craft supplies & materials. We ranked the 2,016 resulting products by number of redditors who mentioned them. Here are the products ranked 21-40. You can also go back to the previous section.


DECORA 3" Giant Wiggle Googly Eyes with Self Adhesive Set of 4 https://www.amazon.com/dp/B0177WIJ3I/ref=cm_sw_r_cp_api_vHUQAbR48H0NQ
I got you
Hello.
A lot of things can go badly wrong with even basic bondage. For that reason, I really don't recommend learning it by trying it for yourself. The best way to learn bondage is to have it taught to you in person.
The good news is, bondage people are very open and usually offer workshops in any big city. If you go to one, expect to walk into a room full of people who you are in no way sexually attracted to, including some that are slightly sexually repulsive to you. But stay anyway. Keep your clothes on. Listen and learn.
In addition to safety, a workshop will teach you a few really fun knots, tell you the best kinds of rope and where to buy it, how to clean things afterwards, and all sorts of other useful tips.
If you ignore that advice-- which is really the best advice-- here are a few things to watch out for. It's three tips that will prevent you from injuring somebody.
With respect to number one, beginners should not use rope on hands or wrists. Go to Mr. S. (reputable shop) and get a set of nice basic padded wrist restraints. They have tie-points on the outside of the restraint. A lot of beginners seem to think that restraints are for the hard-core people. But the reality is just the opposite: restraints are there for beginners to not fuck up.
With respect to number two, never leave anyone tied up alone. Always be prepared with a set of EMT scissors. Note that these are sharp enough to cut rope, but the points are blunted so you can stick them between the rope and skin (eg: neck) without cutting. It's to get somebody out of rope if they pass out or if your knots go wrong and start to self-tighten.
Always have an escape plan: for example, never clip a wrist restraint to a metal chain: tie it with rope instead so you can cut it if the sub passes out suddenly.
Don't leave arms tied elevated for a long period in an early session. It causes a lot of stress to the body. Try it for ten minutes the first time, and if that goes well, try it for 20 minutes.
Start slow. Try something briefly. see how the sub feels the next day. Try it again longer/harder if it works. Know what a safeword is. Don't jump right into rape play. Don't jump right into gags.
That's sorta the first 10 minutes of a bondage talk. But really, go to one and get it for real.
most definitely possible. you can either use an EF-E mount adapter like metabones or sigma, OR my preferred method to get the best quality (requires some DIY), is to get a set of these, lightly and i do mean LIGHTLY taper out the mount to the right shape of the lens mount. Tapping the end of the tool with one of these, for stubborn spots. Don't worry if you slip a bit and hit the sensor. Anything that shows up in your images, you can crop out in post.
Clean it up and polish it down with this. Best stuff in the business.
​
You'll be 🔪🔪☠KILLING IT 🔪🔪☠ in the photography game afterwards. All you pics will be 🔥🔥LIT🧯🧯!
Honestly, I'd say ditch the kit and DIY it.
First, you want some alginate. This is what you will make the mold out of. A kit is going to give you enough for one try and this is where most people have problems (if it sets up too fast you are screwed). The 1-lb bag on Amazon is enough for four or five molds.
Second, you need body-safe silicone. I'd try either this or this. The 20A is going to be softer than the 30a. The two pints that you get from Smooth-on is enough for 3 or 4 replicas. You can also buy just the silicone from Clone A Willy. They claim that is body-safe and you'd get enough silicone for one dildo.
Third, you'd want to get something to make a tube out of to create the mold. A plastic water bottle like a 1L smart water bottle would work fine.
Fourth, you may want a vibrator to insert into the silicone before it cures (if you want a vibrator instead of a dildo). The one that comes in a kit is pretty bad. A Tango would be pretty awesome.
Finally, a good cock ring is indispensable when it comes to keeping your FWB hard through the molding process.
If you are set on a kit, the Clone A Willy kit works OK. The biggest issue I had was that it comes with a big, piece o' junk vibrator to insert into the silicone. If you didn't use the vibrator there wasn't enough silicone to get the job done. When you did insert the vibrator it was almost impossible to keep it from getting to close to an edge, creating a weak spot in the toy. After about three or four uses a small tear developed and it was no longer safe to use. If you do go for the kit, I'd highly recommend that you ditch the vibrator that comes with it and replace it with a Tango. Better vibrations and the thinner profile would work a lot better in this application.
Machining the chocolate directly is going to involve a lot of complexity.
For starters, you'll have to make your whole machine food safe. That means it will need to be sanitizable and your cutting bits will have to not leave any hazardous chemicals or metals behind.
Beyond this, you now face the challenge that chocolate has an extremely low melting point and is therefore likely to melt rather than cut. When I've seen people machine chocolate its typically done in a freezer for this reason.
A simpler solution might be to machine something like jewlers wax into a positive of what you want your chocolate to look like. Then cast the wax in a food-safe silicone.
Once you have that the silicone mold should be able to safely cast the chocolate, and should be reusable to boot.
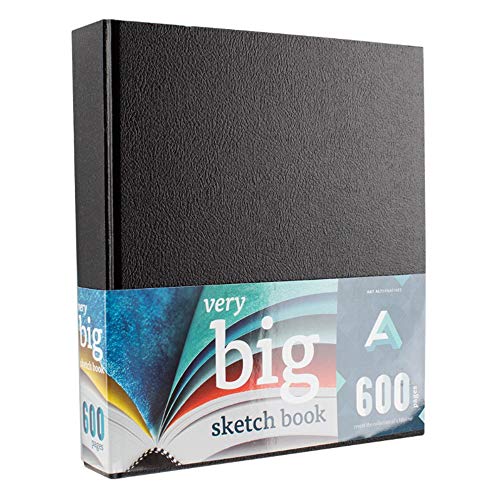
I have this Very Big Sketchbook as my Book. I hot glued in scrapbook paper from michaels, those are like .87 cents. And I print off all my work (spells pictures rituals) because I’m not sitting here writing everything down when I’ve already made my documents look nice.
I like this method because I can tear the paper out and the scrapbook background may be damaged a little, but I can always glue something back over it and tada like new. Also, I’m the only one whose ever gonna see it so I do what I want.
Edit: I LOVED watching charmed and always wanted a Book as thick as theirs so I really love this sketchbook and it was only $27.
I just posted another comment so you'd see a notification.
Here's the list! Hope it's not too long. All the tools listed are the ones I bought. If I have other suggestions, I've listed them as well. I've also listed details on the functions of the tools, and why they're superior to some other alternatives. If you look for the same amount of tools in one of those "kits," they would set you back roughly 200-400, depending on where you bought it from. The tools in these kits are usually quite inferiorly made as well. This list is a result of about a week long search and perusal. Tandy is a well known and easily accessible aggregation of tools, but they're overpriced for what they do and their quality is mediocre at best.
*Some of the eBay listings might have ended, but I'm sure you'll be able to find identical tools for the equivalent price or even cheaper.
For me the tools came out to a grand total of roughly $115. You can give or take $20 if you want to improvise your own tools, or switch them out. I'd say this setup works just fine for mid to smaller projects like what I made, or wallets, etc.
As for the leather, Springfield Leather sells some quality leather by the square foot, which is nice for first timers, as most tanneries only sell by the side, like what I had, which usually average around 21-28 square feet. Pretty big investment. Maverick Leather Company sells quality leathers as well as Horween "Seconds", like what I got for a very nice discount. These seconds are full sides with minor defects in the leather, but unless you're making huge bags it's easy to cut around the brand marks/scars etc, and your leather will look spotless. I got a full side of Horween Essex for roughly $130, and I'm guessing if I bought the same straight for Horween it would have run me in the ballpark of $300 or so. Since my laptop case only used about 7-8% of my leather, I used about $10 worth of leather. Quite a bargain if you ask me. If you're looking to do many projects like I am, I'd advise you to invest in a nice Horween side. Can't beat it for value and price.
All told, the laptop case itself cost about $11-12 worth of materials** (leather, fabric, thread, glue) and took the better part of 2 days to complete. Granted, much of that time was spent just sitting and thinking as most of it was improvisation, as you can see by my horrible sketch.
As far as my "learning" went, it was literally just Google. Some youtube videos help, and I glanced through some forums, but overall, as I've often found in woodworking too, nothing beats hand-on experience.
Well, hope this helped you guys out and answered some questions. I know I definitely would have appreciated a specialized list like this when I was starting out.
Amazon of course
Same problems as many of the posts. Ran out of silicone. Though now they do have a larger vibrator to take up more volume for the larger girth guys. I still would get the extra silicone from them just in case.
I would also suggest getting some extra alginate. I messed up the first mold. The extra alginate I got was much better than the stuff provided by clone-a-willy. It changes color when it is ready. http://www.amazon.com/gp/product/B007PULSRM?psc=1&redirect=true&ref_=oh_aui_detailpage_o03_s00
Sling is just thick cotton grosgrain ribbon, QD Attatchments can be found all over the place, and so can the strap adjustment buckle, all for super cheap.
>The stitching on the strap is a little difficult, but other than that...
Nah man, not at all. The real item obviously uses a machine, however you can achieve similar results with some scrap leather (Buy "Vegetable Tanned" leather for crafting, takes dye well and is very strong, you may even find a "Belt Blank" kit already cut into a nice neat strap) and some "leather lacing chisels" also known as Pricking Irons. Simply lay out where you want your stitch-box, double your leather over, line up the fork, smack it with a hammer (into a wooden backstop), and there you have it, nice evenly spaced stitchable holes. From there, you just dye the leather however you prefer (Leather Dye works great, but in a pinch, wood stain works fine and double-brewed coffee can work too), finish the edge with a little bees wax and an edge slicker and hand sew it together with some Waxed Thread and some robust Leathercraft Needles. (I might even lay down a layer of contact adhesive between the leather-strap-leather sandwich for additional hold while sewing). Just take your time and be patient with layout and cutting and it would make for a great afternoon project. For a tutorial on stitching leather neatly, check this out and this edge slicking tutorial. Bonus; you can dye the leather and buy whatever color grosgrain and hardware you want to match or contrast to your heart's content.
Ok. Did some reading.
I'm not going to sugar coat this because well, I don't believe in that.
Welcome to the dark side. We have goldfish crackers. (BTW my roommate was an aide for 20 years and said that they are convenient because if they are attacking you, you can throw them at them and it will distract them for a while.) Invest in goldfish crackers and fruit loops. They make good rewards.
Buy this book. I really wish someone had recommended me that book before I stepped into an autism classroom. I reread it now every once in a while and still learn new things.
Start here. Go through the rest of her blog. Subscribe to it. She runs an excellent easy to understand blog.
Visuals are insanely important. Subscribe to LessonPix. Your school may have Board Maker, but I find it very difficult to use. Plus, LessonPix is online based so you can create something at home and then access it at school or vice versa. It is like $36 a year, which is insanely cheap. For my visuals, I usually put a picture with the word on the bottom.
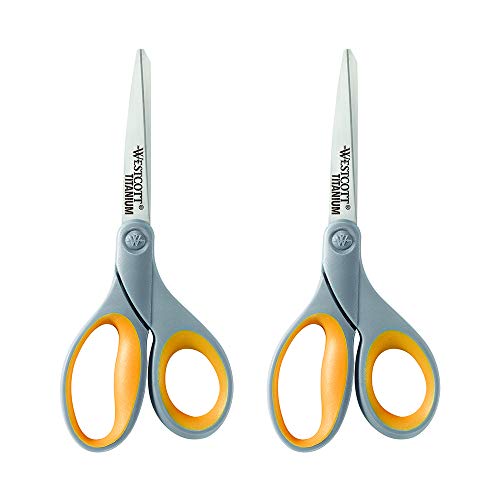
You will need velcro. Do not buy it from a store. This is a wholesale place online. They have the cheapest velcro out there. I buy coins so I don't have to cut it, it makes it a lot easier. If you are going to cut velcro, get titanium scissors. They will not gum up when cutting velcro. Have a system with your velcro so you don't have random patterns of velcro. I usually do soft on a surface and rough on anything that travels.
You are going to need a personal laminator. My binding has the cheapest 5 mil laminating sheets out there. Use 5 mil for anything that travels and if its going to stay on a wall, use 3 mil. 3 mil or 1 mil (what the school laminating machine uses) tears easily and doesn't last. Once you create something, you don't want to lose it. Most any laminator will do. I like the Fellowes brand. This is a very good one. That my binding website has some awesome deals on laminators. Whatever you get, just make sure it doesn't need a carrier sleeve to laminate because those are annoying. Just make sure that if you from 5 mil to 3 mil you switch the laminator over to 3 mil and let it cool or there will be a burning smell. To save time I bought one of these. Just makes cutting faster.
Don't overspend on stuff for the classroom. Look at oriental trading post. You can find a lot of stuff there. Sign up for the newsletter and wait from a free shipping coupon, don't pay for shipping.
Get yourself a couple pairs of these. I like the 18 inch ones. Make sure your tetnus shot is up to date.
You probably need to brush up on your evidence based practices for autism too.
I know this is a lot of information. But these are all things I wish people would have told me before I started teaching this level of autism kiddos. I went into it blind. I've had to put all this together through reading, training, and observation. Its easier just to be front loaded with the information.
My first year teaching, I was put in a K-1 mod/severe autism class (your setting 3). It was the first autism specific class at the school. Nobody gave me any support. I had no idea what I was doing. I had very little formal training on autism specific teaching. It was like being sucked into a vortex in deep water with nobody around to help me. I didn't even know where to go for information. That's why I try to help people and be completely honest. I'm not trying to overwhelm you.
If you need help and support, let me know. My MA.Ed is in Special Ed with a specialty in Autism Spectrum Disorder. I am teaching a class similar to yours at an elementary school level next year. I'm really good at dealing with behaviors and data too.
I like using alginate. Solidifies cold, can do all sorts of fine detail, and is super soft so it's easy to get out of.
FYI, I've had this one for more than a year, and it's held up like a champ. I got it for $15. It's now $10.
This is a great idea!
To make it even easier:
1 inch Felt Pads
I inch printable labels
1 inch wooden disks
No cutting required.
They sell precut mini mirrors if you have a square shape, but I couldn't find any in the size I needed.
I bought these: https://www.amazon.com/gp/aw/d/B01BU99K6E/ref=yo_ii_img?ie=UTF8&psc=1
They work pretty well as long as you apply it perfectly flat. Otherwise you get sort of a fun house mirror effect.
This reminds me, I need to go figure out what scissors they gave me at work because as a lefty it's one that works fantastic, and that's probably one of the worst things you have to deal with as a lefty. More than half the scissors on the planet are totally useless for left-handed people. Especially the ones in grade school that would just crease paper if you used them in your left hand.
edit: Someone actually linked them lower in the comments. These are beautiful.
https://smile.amazon.com/Westcott-Titanium-Scissors-Straight-Handle-13901/dp/B000P0LNRE
How To Start Your Own Dildo Making Business
Tube - (Amazon)
Temporary Molds - (Amazon)
Long-term Molds - (Amazon) https://www.smooth-on.com/products/dragon-skin-10-nv/
Rubber To Fill Mold - (Amazon) https://www.smooth-on.com/products/dragon-skin-30/
Color (optional) - https://shop.smooth-on.com/silc-pig
Amazon
Just get this, $23 and you're set.
https://www.amazon.com/gp/aw/d/B01EG6TP9A/ref=mp_s_a_1_1/167-5726856-9481462?ie=UTF8&qid=1478979249&sr=8-1&pi=AC_SX236_SY340_QL65&keywords=bottle+cutter&dpPl=1&dpID=4115CJ0rkYL&ref=plSrch
Take the glass out and use the sticker mirrors. You could also apply right over top if you want it done faster:
https://www.amazon.com/Flexible-Mirror-Sheets-Cuttable-Plastic/dp/B01BU99K6E/
Maybe a hardware store, or any sort of craft store. They are on Amazon too, but it’s for a pack of 50. There is even a comment about DnD in the reviews. lol
https://www.amazon.com/dp/B01CSV14JE/ref=cm_sw_r_cp_api_m5HKBbGA9YAEM
Not OP, but the easiest way to cut glass bottles like this is with a glass bottle cutter like this or this.
I've been cutting bottles like this to make wine bottle candles for my centerpieces and my favors!
$22 Amazon stainless whiskey stone ice cube tray plus $29 2 part room temp cure silicone that doesn't need to be cooked?
https://www.amazon.ca/Dernord-Stainless-Whiskey-Chilling-Reusable/dp/B077XC5DYN
https://www.amazon.ca/Smooth-Smooth-Cast-Liquid-Plastic-Compound/dp/B004BN7G0E
Silicone don't stick to anything and will release surprisingly easy. If you're having trouble a tiny little bit of dish soap and water on the mold before hand will fix the problem.
I do the same thing with wood tokens.
https://www.amazon.com/gp/aw/d/B01CSV14JE/ref=mp_s_a_1_1?ie=UTF8&qid=1506542121&sr=8-1&pi=AC_SX236_SY340_FMwebp_QL65&keywords=wood+tokens&dpPl=1&dpID=51mEHnSvQXL&ref=plSrch
And
1 inch stickers
https://www.amazon.com/gp/aw/d/B01DE56YXO/ref=mp_s_a_1_2?ie=UTF8&qid=1506542189&sr=8-2&pi=AC_SX236_SY340_FMwebp_QL65&keywords=1+inch+circle+stickers&dpPl=1&dpID=51o3QxXG4jL&ref=plSrch
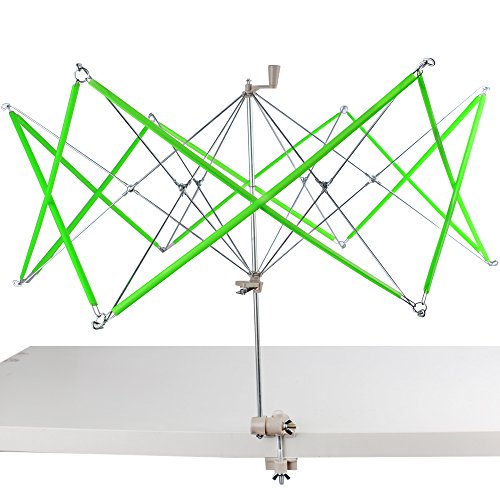
Yarn Swift. There's two kinds: an Umbrella swift, and an Amish swift. The ubmrella swift has a mechanism that "opens up" like an umbrella, and holds your hank in a loop. They usually attach to a surface like a countertop or tabletop. The Amish swift doesn't attach to a counter or table, but rests upon it, and has little "arms" that holds your hank in an open loop. You stick your hank on the swift, then cut the ties (don't cut the ties before it's on the swift, that's asking for trouble), then use a ball winder or your hands to form your ball/cake/whatever.
As long as you cut the ties AFTER the yarn is on the swift, you should have a relatively easy time. Though, that assumes that the dyer/manufacturer of the hank didn't screw it up when dyeing and or tying the hank. But if the dyer/manufacturer screwed up, there's not much you can do about that, swift or no swift.
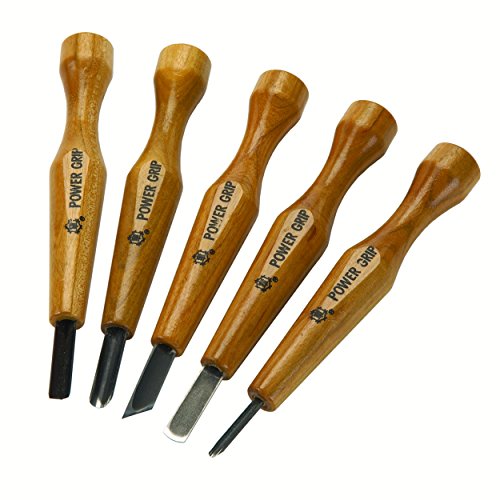
I really like powergrip. You can buy a set of them on amazon. Here's the five piece set.
OHhhhhh there are a ton of things you could get your friend. Price is going to be the biggest thing.
Low end
Quality sketch books
http://www.amazon.com/Art-Alternatives-Sketches-Making-Hardcover/dp/B0025TZ30G/ref=pd_sim_201_64?ie=UTF8&dpID=41P-a-zm7QL&dpSrc=sims&preST=_AC_UL160_SR160%2C160_&refRID=0F10SP8YX71YXCMRXJG9
Micron Pens (LOVE THESE)
http://www.amazon.com/Sakura-30062-6-Piece-Pigma-Micron/dp/B0008G8G8Y/ref=pd_bxgy_201_img_3?ie=UTF8&refRID=0F10SP8YX71YXCMRXJG9
Mid-Range
Nice drafting table for illustrations
http://www.amazon.com/gp/product/B004N7AXF8/ref=s9_top_hd_bw_bFfK7_g196_i4?pf_rd_m=ATVPDKIKX0DER&pf_rd_s=merchandised-search-3&pf_rd_r=1RZ31XD1YQWR6679ZWZ7&pf_rd_t=101&pf_rd_p=e2586643-3e21-5a6c-aba3-4d8d6e8d97c8&pf_rd_i=3733771
Nice tracing table
http://www.amazon.com/Artograph-12-Inch-17-Inch-Light-Pad/dp/B003QMAUSQ/ref=sr_1_8?s=arts-crafts&ie=UTF8&qid=1463621722&sr=1-8&keywords=led+light+table&refinements=p_36%3A2638329011
Amazon gift cards for reference material. We look at a lot of stuff.
High end (sorry for the big jump in price just a suggestion)
Wacom tablet. This thing is sexy!!! I would love to have one of these myself.
http://www.wacom.com/en-us/products/pen-displays/cintiq-22-hd-touch
I'm going to throw this one in there anyways even though it's by far the most expensive thing here, but still. 27-inch iMac with Retina 5K display if you choose to go this way, I'm willing to help give you some specs that would help your friend out so they will be happy to be doing this forever and ever!
There are so many other options you could go with and if you choose to, your welcome to bounce ideas off me. The more special your piece I feel as though the more inspired your friend will be to be something big. I know I would!!
Good luck!!!
I'm surprised no one has mentioned Knotty Boys yet, they have a lot of good tutorials.
Also: If you are going to try rope bondage, please have EMT shears on hand. You can get them for $4 on Amazon. These are designed to cut material off of a person without harming their skin; it is not safe to use regular scissors or a knife to cut rope off of someone in an emergency.
How are you cutting them? I've cut thousands of wine, champagne, and liquor bottles. I use this cutter and diamond sanding pads, and I get beautiful smooth edges with minimal effort. I don't use the candle provided with the cutting kit. I use a hot water from a kettle and cold tap water to stress the score.
Not saying you have to do it this way, just letting you know that there is a way to get the edges cleaner.
We wanted to do candles in wine bottles for our centerpiece but our venue won't let us do uncovered flames. As a workaround we decided to go with something like this where the candles are inside the bottle.
Of course this meant cutting the bottoms off of nearly 100 bottles, which meant
exploiting our friends for free laborhours of work delabling, washing, scoring, and cutting the bottles.The whole process was pretty smooth, but pretty labor intensive. The scorer worked like a charm but it takes a bit of practice to get a straight score. Still we did lose about 12 bottles but we had plenty of extras as we've been begging our friends and families for all their discarded wine bottles for the last year.
If this is something you're interested in for your wedding here are the tools we used:
https://www.amazon.com/AGPtek-Bottle-Machine-Cutting-Bottles/dp/B0155WMTGU/ref=sr_1_3?ie=UTF8&qid=1475268871&sr=8-3&keywords=bottle+cutter
https://www.amazon.com/Bottle-Cutter-Genround-Machine-Cutting/dp/B01EG6TP9A/ref=sr_1_4?ie=UTF8&qid=1475268871&sr=8-4&keywords=bottle+cutter
The one in the second link works slightly better but they were both decent. Basically all you have to do is score the bottle ONCE around in a straight line, then dunk it in hot near boiling water then ice water back and forth. After a dunk or two it splits right along the line.
I used this glass cutter to etch the glass, then broke it off by dipping the bottles in hot and cold water (back and forth for a few minutes), then sanded the tops for a while.
My advice is if you do it make more then your target number because some break uneven. I made six to get four and just ditched the two worst ones. Ill probably just make those “duds” into candles.
Use a wing divider to draw your stitch line.
Leather Wing Divider KangTeer 5.5 inch Leathers DIY Tool Adjustable Craft Edge Creaser Rotating Leathercraft Tool https://www.amazon.com/dp/B07CK2569L/ref=cm_sw_r_cp_apa_.gN1Bb9T67MEM
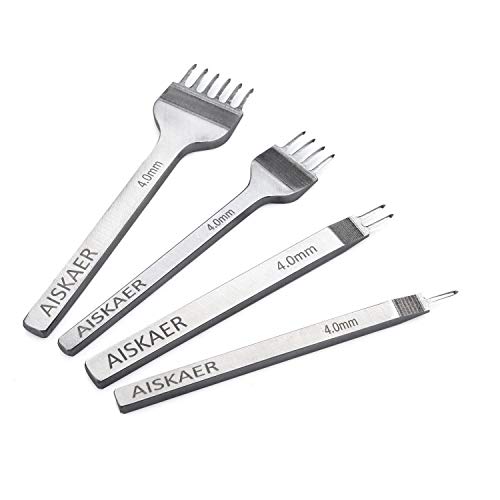
Then, use a diamond chisel to punch your holes.
Aiskaer White Steel 4mm 1/2/4/6 Prong DIY Diamond Lacing Stitching Chisel Set Leather Craft Kits (4mm) https://www.amazon.com/dp/B014549SNG/ref=cm_sw_r_cp_apa_uiN1Bb2NAQ60Z
I use both of these products and have zero issues getting clean stitching.
Now I usually cut with electric tile cutter and sand on DIY flat lap, but for someone looking to only do straight cuts and not make the glasses for sale I'd say go with one of the jigs available and then just do the hot-cold water routine, a candle or a jet butane torch over the score line.
Alternatively, you can also make a jig yourself, it's not that hard and will probably save around $30.
Do you mean something like these? Because that seems like an awesome idea! https://www.amazon.com/Self-adhesive-Clear-Rubber-Feet-Bumpons/dp/B001JASGH4
You have some great tips too, thanks.
35 feet is honestly long for rope stuff, even for people who do a lot of rope stuff.
Most ropes come in 30 feet pieces and are doubled over to create more surface are, for a total of 15 feet of working length.
Many people prefer even shorter lengths, in the 23 foot range, again doubled over for more like 11 feet of working length.
Some rope packages come with 5 lengths of 30 and 2 lengths of 15. The lengths of 30 are used for complex ties, while the 15 are used for smaller ties or finishing longer ones where you need just a little more rope.
The 15 foot lengths are again doubled over for a very manageable length of 7.5 feet.
You could cut it into 3 pieces. Two 10 foot lengths and one length of 15. Knot the ends off, or use tape if you do not intend on washing it. This would give you enough for say-
Very helpful video for learning rope.
Another helpful rope tutorial.
Have you got safety shears?
like this
They're called Bumpons - Here is a pack of 100 for $7.75
SECTION | CONTENT
:--|:--
Title | How To Make LEGO Gummy Candy!
Description | This simple recipe is great to do with the kids, and lets you pump out massive amounts of custom gummies, that are snack-able, and stackable as well! [✓] Lego Ice Molds: http://amzn.to/2cBCIRa [✓] SmoothSil Silicone: http://amzn.to/21k9Eex [✓] Karo Corn Syrup: http://amzn.to/2ctti67 [✓] Knox Gelatin: http://amzn.to/2chOEUL [✓] Blue Jell-O: http://amzn.to/2chPEYR Endcard Links: Batarang: https://goo.gl/ggrtBr Clothespin Gun: https://goo.gl/ZNMN6L Ninja Balls: http://bit.ly/SquishyNinjaBalls So...
Length | 0:06:19
****
^(I am a bot, this is an auto-generated reply | )^Info ^| ^Feedback ^| ^(Reply STOP to opt out permanently)
You can go out to any place that sells lumber, home depot, lowes, or just a hardware store. Birch plywood is a good start, but it splinters a lot when cutting it. I would recommend MDF board, it cuts easy and is great for beginners. After that youll just need a set of woodcutting tools, I would suggest getting this set, since its cheap and still pretty good. Use a sharpie to draw/plan out your image and make sure youre cutting out the negative spots, the parts that you want to keep white. You'll also need ink, you can get speedball (its cheap), a brayer, and a wooden spoon to burnish the image on to paper. As far as paper goes, I would suggest using mulberry at first, its thin so you can see what you are doing during the burnishing process.
So the steps as follows:
With these, I've made all my headphones wireless. Only $7.98 at the moment.
When I started doing bondage, I got a bunch of thick (1/4 inch) cotton clothesline from the hardware store, cut it into 15ft and 30ft lengths, and tied a tight overhand knot at the ends. Rope is always easy to explain away, particularly when it's "normal" rope and not the nice bondage-specific stuff. If you find that you really like tying, you can always buy better rope, and then you have convenient lengths of clothesline for other things.
15ft is enough for tying wrists together in a two-column tie, and you can use that same simple tie to tie together anything that has two 'columns', like two ankles, an arm to a waist, two sides of a bent leg, and so on.
If you want to, say, tie wrists and ankles to the bedposts, what you want is a one-column tie, which is just a secure and comfortable way to secure one 'column' of the body to something else.
If you want to get more into bondage, 30ft is enough to tie a basic chest harness, which you can use to tie other things to, as a convenient 'handle' for your partner, or just to give them more of a feeling of confining rope. A common chest harness is a box tie, or a takate kote, which is basically a chest harness that binds the hands and arms instead of letting them stay loose.
If you want something other than rope, I'd recommend something thicker like scarves rather than strips of fabric. You can pick up scarves at basically any women's accessories section of a department store. Fabric tends to knot tightly, so thicker fabric is a bit better, and it's good to keep something around to help work the knot out (like a knitting needle to stick into the knot) or something to cut the fabric (like a pair of safety shears or a knife you're comfortable using close to skin). Actually, keeping those things around is important when you're tying with rope, too.
How about wood carving?
amazing work, would love to see the final full pic.
I feel like the build may have been easier if you used pricking irons rather than a hand sewing punch, it helps to keep even spacing and you can make a bunch of holes in one go. https://smile.amazon.com/CrazyEve-Leathercraft-Leather-Stitching-Perforate/dp/B00T17OULI/ref=sr_1_1?ie=UTF8&qid=1468779215&sr=8-1&keywords=pricking+iron
again, great work
Absolutely. I would recommend a few tools to get started - a cheap set of stitching chisels to get you started (these poke the holes for the needles to go in and out of), a cheap wing divider to scribe a straight stitching line, some waxed thread I linked Ritza Tiger 25 in 0.6mm because it's pretty much all I use, there are cheaper options, but this thread is wonderful to work with. Most of the other thread on amazon is going to be thicker and look too chunky with a 4mm iron IMO. Lastly, some needles. I use and like these. Then just look up a few youtube videos on saddle stitching. You'll have it down in no time. It's really not super difficult, there are a few tricks to making it look nice.
I tried making my own cutter and the results weren't always good. The string method was worse (though I didn't give it much of a chance.)
I bought something almost exactly like this
https://www.amazon.com/Glass-Bottle-Cutter-Genround-Machine/dp/B01EG6TP9A
and I can usually get about 9/10 bottles cut with no flaws. Maybe worth the money?
Also: I tend to use a bucket of cooler faucet water for the higher thermal difference (instead of just room temperature), and I never tap it, I just alternate boiling water (I'm pretty generous with it all around the cut), and you can hear it fracture when it hits the cooler water. If you hear that once or twice, you can usually just gently tug the two pieces apart.
You can use paste wax, I also use parafin for planes, Gulf Wax, used for candles but easier to use for this purpose. This is what I use, but its cheaper in grocery stores.
https://www.amazon.com/Paraffin-Household-Gulf-Wax-Pack/dp/B00D8N3NT6
This isn't a journal but might still work, really big sketchbook I've been eyeballing.
The most mundane thing I could think of
product review: I was a little nervous with two 8 inchers to fill my hands but I was pleasantly surprised by how they fit right in. They did their job and they did it well. I was very pleased and will share them with my friends and neighbors when they need to get the job done!
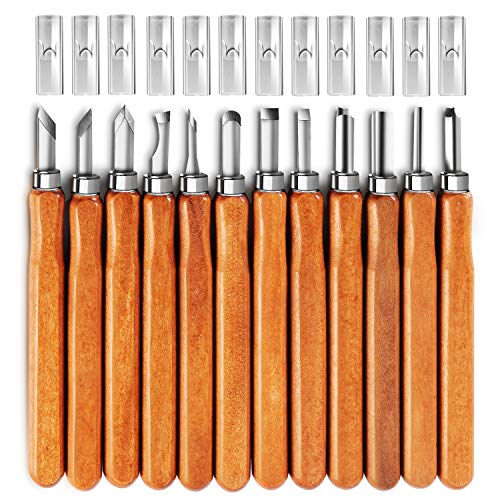
I haven’t been carving for long myself, but I recommend investing in a Mora Woodcarving 120 knife. Good for small jobs and is a really handy knife in general. Plus you can take it camping for random carving fun.
Next, maybe some cheap wood carving chisels. Link is here for a $15 set. They won’t be nearly as good as the expensive ones, but it’ll save you money if it’s something you want to just give woodcarving a go without a major investment. If you don’t like it, no biggie.
Worst thing I see with any hobby is people buying a bunch of expensive stuff they don’t end up using. The best thing i see is when hobbyists buy themselves a really good tool as a reward for sticking with it. Nothing makes you appreciate good equipment than making do with substandard stuff for a while :)
This piece was carved onto a bit of dry twig I found in the nearby park. I use old sun-bleached driftwood too, as it’s super soft. The best, and cheapest way to figure out the different properties of wood is to try out deadfall from local trees. That is until progressing to proper blocks of wood. I’m not there yet at all.
I’m sure some carving maestros will be able to make all sorts of better suggestions but this setup has worked for me so far.
Would love to see pics of any pieces you make, feel free to share!
Oh, and don’t forget: cut away from yourself. And keep a stack of bandaids handy ;)
Titanium scissors like these aren't actually titanium but steel with a thin surface coating of a titanium compound (probably titanium nitride).
Titanium metal scissors would go blunt very fast compared to a steel pair.
We have tried it and thought it was okay, but I would personally recommend buying some alginate and Dragon Skin silicone.
 
For about the same price we got a much better toy--and have materials left over for more cloning fun. Dragon Skin is a professional grade silicone that is pretty widely used by both the movie and sex toy industry. You can choose the hardness/softness you want (we went with the 10A as that was what most forums suggested). It can be bought from Smooth-On directly or on amazon, ebay, etc. As for the alginate, we went with this mostly for the price and convenience, but it worked great.
 
Anything that won't leak (and is large enough to accomodate your anatomy, of course) should work as a container for the mould. We went with a QT cup (cheap and easy), but you can also simply cut the top off of a plastic bottle. Apparently, legos work surprisingly well and are a popular choice, but those little fuckers are too expensive IMO.
 
This redditor explains the process we followed pretty well and Youtube is full of helpful videos on how to do lifecasting. We actually ended up purchasing some plaster to make the positive mould that could be reused. (Side perk: a plaster mould of a cock sitting the bookshelf also makes for a hilarious conversation piece).
 
I realize this route sounds much more involved, but we honestly felt that it was much easier and more cost effective. The clone-a-willy kits seem too finnicky and leave little room for error. Having one shot to get it right can take the fun out of it and makes it hard to, er...stay hard (crucial to the process). Getting some wiggle room and ending up with a much higher quality end product was well worth the extra $10 (at least for us). Either way, I wish you the best of luck!
As /u/wenbobular said, you probably want food grade silicone. There are a few ways to go about making such a thing. If you're trying to make something like a jello mold, I'd invert the print and fill it with the silicone. If you want a press mold then the silicone would need to just be a thin coating on your plastic. That's going to be hard to achieve while keeping a sharp enough edge to cut your dough. Good luck!
[Or OP used a circular glass cutter.........] (http://www.amazon.com/Ephrems-Original-Bottle-Cutter-Kit/dp/B007PK12GY/ref=sr_1_1?s=arts-crafts&ie=UTF8&qid=1382379202&sr=1-1)
Get some wooden disc's from Amazon or a craft store.
https://www.amazon.com/dp/B01CSV14JE/ref=cm_sw_r_cp_apa_i_p-XVDbR27GSP7
Also get a circle punch of the same size: https://www.amazon.com/dp/B013NESBKK/ref=cm_sw_r_cp_apa_i_vaYVDbEGWXAV3
You can either print out artwork on cardstock or even use common pokemon cards to punch out the art.
Take a tiny bit of Elmer's glue, wood glue or some sticky tack, and glue the art to the wooden discs. Boom. High-quality tokens.
This is a trick used in the Roleplaying community to make tokens for their characters and NPCs without breaking the bank. ~15 dollar investment gets you like 100 tokens.
I reccomend between 1 inch and 1 1/2 inch for the size. Depends on your purposes.
Have fun!
I got these on my wishlist at the moment. I just don't know if I want the 2" or 3" eyes because I haven't measured yet.
Googly Eyes! Why? Because googly eyes make everything better!
100 googly eyes
Googly eyes
For tools (for example, to make a wallet), you would need... anything missing?
Wooden slicker for burnishing (http://www.amazon.com/gp/product/B0048FM2OU?psc=1&redirect=true&ref_=ox_sc_sfl_title_27&smid=A3NY6IRPSQ8J63)
self-healing mat (http://www.amazon.com/gp/product/B0006SDOFO?keywords=self%20healing%20mat&qid=1449180954&ref_=sr_1_8&sr=8-8)
Cement (http://www.amazon.com/Barge-Cement-Rubber-Leather-Glass/dp/B002JL2ZHE/ref=sr_1_2?ie=UTF8&qid=1449180993&sr=8-2&keywords=leather+contact+cement)
Edge dye (http://www.amazon.com/Tandy-Leather-Eco-flo-Professional-Dressing/dp/B00LKMAJQW/ref=sr_1_13?ie=UTF8&qid=1449181034&sr=8-13&keywords=leather+edge+dye)
Sand paper
grover for making stitch grooves (http://www.amazon.com/gp/product/B00OHAHICM?keywords=leather%20edge%20beveler&psc=1&qid=1449180851&ref_=sr_1_1&sr=8-1-spons)
beveler (http://www.amazon.com/gp/product/B00430GAS4?psc=1&redirect=true&ref_=ox_sc_sfl_title_30&smid=ATVPDKIKX0DER)
awl/chisel for making stitch holes (http://www.amazon.com/gp/product/B00CBRVKOK?psc=1&redirect=true&ref_=ox_sc_sfl_title_31&smid=A1EX7LU0M6LM21 http://www.amazon.com/gp/product/B0036LNXEA?psc=1&redirect=true&ref_=ox_sc_sfl_title_29&smid=A2UDNPGKURPVSY)
needles for stitching and thread (http://www.amazon.com/gp/product/B00114RBSI?psc=1&redirect=true&ref_=ox_sc_sfl_title_26&smid=ATVPDKIKX0DER)
Anything else?
A ball winder and swift is the best investment I’ve made! Especially now that I buy lots of hanks. Here is the ball winder I have and here is the swift I use.
You can watch any YouTube video for instructions, but a very important tip. Never cut the ties before you put the hank on the swift!! Good luck!
I tried it before they introduced the larger vibrator insert. I actually ran out of of silicone so it shredded the length by an inch. Seeing you are the same girth as me and also longer I suggest the larger kit. I also messed up the first time with their alginate so I had to by some separate from their kit. I got a bit quicker setting and also color change alginate so you know when it is ready to place yourself.
My take is that it is an awkward process so be prepared to mess up the first time. It also really helps to do with with a partner. Not only can they help mix and prep but also give you visual and physical stimulation to keep you ready to mold.
Color change alginate: https://www.amazon.com/gp/product/B007PULSRM/ref=oh_aui_detailpage_o03_s00?ie=UTF8&psc=1
Maybe try mixing in some paraffin wax next time. I use it when i make buckeyes. It helps the chocolate not be so soft and melty.
I agree with /u/redsnappa127 . The materials that make up the clone willy kit are standard life-casting materials. Search for molding alginate on amazon. You can get a pound of alginate for $15 http://amzn.com/B007PULSRM or you get get 4lbs from Smooth-on which is the company that professional body casters use for $32: http://amzn.com/B000QCM27Q or from smooth-on: http://www.smooth-on.com/Life-Casting-Alja-/c3_1185/index.html?catdepth=1
Then you need a platinum cured silicone which is the more expensive part $38: http://amzn.com/B00EOA25X2 or www.smooth-on.com/Silicone-Rubber-an/c2_1115_1131/index.html?catdepth=1
SmoothSil 940 is platinum cured and food safe so it should be safe to make into a dildo.
You just need a molding container and that would be easy to make out of an old water bottle, the 1L smart water bottles would be good as they are decently sized and smooth sided.
This mainly because I used up every sketchbook I had from October 2015 to October of last year for my self imposed yearlong Inktober.
I'm not sure if it's the same knife set your talking about, but this set came up once and whoever bought it said it was junk. I'd always be leary if the exact same knife set was pictures under different brand names like this one is.
If you're on Facebook, join some carving groups and lurk. The ones that come up most frequently in the group I'm in are Mora or Morakniv, Opinel, and several smaller knife makers. There are others, but Moras always come up.
What are you interested in carving specifically?
E: Check out spoon carving, Greenwood working and sloyd on Facebook. Lots of equipment talk, projects, and inspiration. A lot of the members are in Europe/Eurasia and they are extremely gifted people.
yep often a set will come with a 1/2/4/6 set up you can often get a 10 as well. it's nice because the spacing is standardized for each set.
I'm using these round ones I ordered on Amazon: http://www.amazon.com/dp/B001JASGH4/
Just added one on each nut that holds the plates together.
The company is called Oh Boy Artifacts and they’re not currently making any products. I found one similar here but I think it might be bigger than yours
Why not just save yourself time and energy and change the design. That's what they did to make it work. I would make the legs from 4x4 (which is really 3.5 x 3.5) and the horizontals pieces from 2 x 4 (again, realy 2.5 x 3.5) Everything will match up and it will look just fine. Or just use 2x for all of it. That's the best part about seeing a design you like. Just make it work for the tools and materials you have at your disposal.
Also, another suggestion would be to add rubber tabs or felt tabs to the top of the wood for the glass to rest on. Otherwise, that glass could easily slide around. I'd go with something like this to keep the glass protected from the wood and in place: http://www.amazon.com/Self-adhesive-Clear-Rubber-Feet-Bumpons/dp/B001JASGH4
I just jumped on this topic yesterday. I am not repairing toys I am trying to make custom feet for Combiner Wars toys. I have a Perfect Effect set, and I have the original (horrible) small feet. I want to use the hinge of the original one, make a custom shape using DAS clay, sculpt the foot, use it to make a mold and cast plastic feet for my combiners. It will probably become lot of work for a poor result, but I am going to give it a try. :)
I read a lot about products and it seems that Smooth On offers good result.
http://www.amazon.com/Smooth--Silicone-Making-Rubber-Inc/dp/B004BNF3TK/ref=sr_1_1?s=arts-crafts&ie=UTF8&qid=1462795907&sr=1-1&keywords=smooth+on
http://www.amazon.com/Smooth--Smooth-Cast-Liquid-Plastic-Compound/dp/B004BN7G0E/ref=sr_1_2?s=arts-crafts&ie=UTF8&qid=1462795907&sr=1-2&keywords=smooth+on
I forgot about the epic adventure part until I had already drawn and uploaded the images, so if you could just imagine the two drawings together, maybe swimming in a fish tank full of outer space, or riding on the backs of eagles, that would be great. Heh.
Anitaxjffdskjarizard and 186394.
I will probably end up photoshopping these pictures onto an eagle once I get back from work. Or the fish tank thing. Because that sounds really neat.
Edit: I also forgot to link an art thingie from Amazon. Look at me go today! I have to do it when I get home from work though, 'cause I have to leave, like, this minute.
Edit again: Okay, art thingie. Wasn't sure if it had to be art supplies, or a piece of art to display, so I'll link one of each type of thing just to cover the bases.
Big ass damn sketchbook. The price is listed at $28, but there are offers for $19, which I dunno if that still qualifies. If it's null, just, like.. yell at me or something.
This is art. Stare at the art. You should now feel mentally reinvigorated. If you suspect staring at art has not provided the required intellectual sustenance, reflect briefly on this classical music.
Edit again again: Here you both are in a fish tank full of space.
I got a small 16$ set from amazon ( Electop 31 Pcs Leather Sewing... https://www.amazon.com/dp/B07998XNQK?ref=ppx_pop_mob_ap_share )
A small all metal diamond punch set ( Aiskaer White Steel 4mm 1/2/4/6... https://www.amazon.com/dp/B014549SNG?ref=ppx_pop_mob_ap_share )
And a really nice, cheap, knife ( BANYOUR Leather Knife Cutting... https://www.amazon.com/dp/B07LD4PC2D?ref=ppx_pop_mob_ap_share )
They worked for what I needed, especially as a beginner!
Great idea. Will really help those riding behind you understand why your not moving over. Thank you for being considerate to others!!!
As an idea to help you see behind you. You might be able to get a small flexible plastic mirror that you can attach to the brim of your helmet. If oriented the correct way, you should be able to make out if someone is behind you. In a catch, it is very unlikely to cause a secondary issue. Something like this: https://www.amazon.ca/Flexible-Mirror-Sheets-Cuttable-Plastic/dp/B01BU99K6E
May I suggest these?
If you have a problem with your foot sliding forward, you can make your own.
Simply take this Molding Compound and take out your laces and pull the tongue of your skates all the way back. Roll up some of this and put it in the end of your skate. Slide your foot in the skate and allow the mold to harden. Take your foot out and remove the molding. Cut off any excess you don’t need. Take some super glue and glue the molding where it makes contact with the inside of the skate. Install the molding back into the skate and allow the glue to dry. This will give you a perfect fitting toe and will stop any sliding forward you may have.
For the wax? I use paraffin hot wax: https://www.amazon.com/Paraffin-Household-Gulf-Wax-Pack/dp/B00D8N3NT6/ref=sr_1_4?keywords=paraffin+wax&qid=1558722691&s=gateway&sr=8-4-spell
alternatively, there's some cheap yarn swifts on amazon - I bought this one https://www.amazon.com/Cutehill-Umbrella-Operated-Knitting-Winding/dp/B00VGD39O4/ref=sr_1_2?ie=UTF8&qid=1539610044&sr=8-2&keywords=yarn+swift . Its definitely not the greatest swift in the world but it does the job surprisingly well
No, you can't melt silicon. First it can handle ridiculous temperatures, second you'd just get a goopy mess.
You need something like this
I like this, or they have adhesive ones.https://www.amazon.com/Flexible-Mirror-Sheets-Cuttable-Plastic/dp/B01BU99K6E/ref=pd_sim_201_3?_encoding=UTF8&psc=1&refRID=7D9S28ZGY7YBZN1P0CPA
>Headbands and bandanas are amazing if you want to look like a basketball player or Axl Rose.
Cool? That's your opinion, just like my opinion is that a top-knot makes you look silly. I'll take both of those over the latter.
>Also, you said dozens of different ways. I only see 7 things linked here with a few duplicates.
Lmao. That's what you want to nitpick about? The goal is keeping hair out of your eyes, not fancy hairstyles:
http://f.tqn.com/y/menshair/1/S/2/1/-/-/bald5.jpg
https://www.amazon.com/Sexy-Hair-Control-Maniac-Shine/dp/B00GYGKQTY/ref=sr_1_2_a_it?ie=UTF8&qid=1499281267&sr=8-2&keywords=hair+control
https://www.amazon.com/xtava-Pinup-Hair-Clips-Professional/dp/B01LXCL45M/ref=sr_1_11_s_it?s=beauty&ie=UTF8&qid=1499281288&sr=1-11&keywords=hair+clips
https://www.amazon.com/Soft-Style-Butterfly-Clamps-Assorted/dp/B000X20Y4C/ref=sr_1_8_s_it?s=beauty&ie=UTF8&qid=1499281288&sr=1-8&keywords=hair+clips
https://www.amazon.com/Toboggan-Timeless-Clothing-Accessories-Top/dp/B01LZ27V22/ref=sr_1_1?ie=UTF8&qid=1499281462&sr=8-1&keywords=beanie
https://www.amazon.com/VIKINGS-Chieftain-Safety-Swedish-Platinum/dp/B011L8WJIA/ref=sr_1_4_s_it?s=beauty&ie=UTF8&qid=1499281551&sr=1-4&keywords=razor
https://www.amazon.com/Westcott-Titanium-Scissors-Straight-Handle-13901/dp/B000P0LNRE/ref=sr_1_3?ie=UTF8&qid=1499281558&sr=8-3&keywords=scissors
Get a pair of these: https://www.amazon.com/dp/B004NG8V9E/
If you end up using neckties you absolutely positively need a pair.
They're cheaper, safer, and better than anything you may have hanging around already.
ah good catch. Do you have a preferred brand of food safe silicon molding? I found this guy but that's it
Here's an easy fix I've used on my HHKB that solved all my problems with it slipping around:
apply these rubber feet on the bottoms of your HHKB. You might be able to find cheaper ones at a hardware store.
I'm looking into these, but they are 8-9 stitches per inch. I'm doing 6-7 stitches per inch, so that might be too much for me. I'm searching ebay for other options.
I'll just leave this here: http://www.amazon.com/dp/B004G59EDE/
edit: also, this: http://www.ebay.com/itm/700pcs-mixed-wiggly-googly-eyes-with-self-adhesive-DIY-Scrapbooking-crafts-/321052725676
Honestly, though, I got a super inexpensive swift on amazon, and a KP winder. Best investment ever.
https://www.amazon.com/Cutehill-Umbrella-Operated-Knitting-Winding/dp/B00VGD39O4/ref=redir_mobile_desktop?_encoding=UTF8&psc=1&ref_=ppx_yo_mob_b_inactive_ship_o0_img
https://www.amazon.com/Knit-Picks-Yarn-Ball-Winder/dp/B00O3GHFA0/ref=sr_1_4?keywords=yarn+winder&qid=1573524391&s=arts-crafts&sr=1-4
So if you have prime, or know someone with it, for $30 you've got your setup
It looks like this stuff, or something very similar. (Ignore the part where it shows it being poured white on the package. It's actually clear until it hardens.)
Sorry I was unable to find a mold like that, the closest thing was a D20 icecube mold but even that is out of stock.
I did however find thisA kit to make your own
Here is a video on how to do it. You can also make a 1 part mold but that wont last nearly as long. and will look less nice. If you follow the edges of the dodecahedron for the mold haves you will have a near perfect result.
https://www.amazon.com/Axe-Sickle-100-pcs-unfinished-limitations/dp/B01CSV14JE/ref=sr_1_3?ie=UTF8&qid=1503692960&sr=8-3&keywords=wood+discs bought mine here
You sound like my girlfriend. More sleep is lost to crafting than anything else. She also does a lot of stuff with wine/liquor bottles. This bottle cutting tool is awesome and there's all kinds of neat things to make. She primarily makes the self watering planters and luminaries (cuts the bottom off and sits it on top of a votive candle). Although some of the stuff she makes requires more expensive power tools. She has an ETSY store called Mino'aka Studios. You may be able to get a couple of ideas from there.
We love the idea of craft trading as well. If you're interested you should reach out to her on ETSY. She knows about my redditing "problem" so just mention we talked on here. I'm more into woodworking, but she's the crafting genius. I'm sure she'd love to talk to you about that.
That's funny, we have a lot of Nov/Dec birthdays as well...including mine. I can sympathize. The crafting really ramps up once the weather cools off and with the holidays approaching.
I bet now you don't feel so bad about rambling, huh? I tend to go on and on as well.
This is easier - http://www.amazon.com/Ephrems-Original-Bottle-Cutter-Kit/dp/B007PK12GY/ref=sr_1_3?ie=UTF8&qid=1376621587&sr=8-3&keywords=ephrem%27s+deluxe+bottle+cutter
это basswood (я так понимаю липа).
это фактически моя первая "серьезная" работа по дереву (легко убедиться, нагуглив "резьба по дереву домовой" и сравнив:) ), так что я наверняка что-то делала неоптимально. много времени ушло чтобы срезать лишние куски с бруса и получить примерные очертания, т.к. срезаешь ножичком по чуть-чуть. А сама резьба и детализация заняли ну часов 6 может. Сверху лак.
​
из инструментов у меня обычный набор для начинающих, вот такой. Хотя реально там 3-4 разных ножа использовалось.
Non-mobile: paraffin wax
^That's ^why ^I'm ^here, ^I ^don't ^judge ^you. ^PM ^/u/xl0 ^if ^I'm ^causing ^any ^trouble. ^WUT?
This is what Smooth On makes for that. It's suggested you pull a vacuum so I haven't tried it yet.
https://www.amazon.com/gp/product/B00EOA25X2/ref=ox_sc_saved_title_10?smid=A14PXI2GJIO87&psc=1
A swift is only necessary if you are winding hanks of yarn. I would be afraid the yarn would tangle without a swift if winding a hank. There's a relatively inexpensive swift on Amazon here: Umbrella Swift I have it and while no, it isn't as visually attractive as the nice wooden ones, it works very well and stores easily.
It was actually quite simple. I bought this: https://www.amazon.com/gp/product/B01BU99K6E/ref=oh_aui_detailpage_o02_s00?ie=UTF8&psc=1
​
And then I made a triangle and taped it inside the machine bottom to allow for it to stay off the drip tray. I then cut another piece and laid it on top of the triangle. I will take some pictures and another video today. I was able to clean it up a bit and make it more clean by taking off an additional layer of the protective plastic. :)
​
Overall, very pleased with the results. Now if I could just hit the cup :)
One of the better purchases I've made was round wooden tokens. I've bought two sizes, 1.5" and 1". These get used all the time for monster tokens, NPC tokens, to mark important map items, etc. Whatever we want to write on them. I also made a bunch of spell tokens so my younger players could track their spell usage easier. This has been a huge improvement.
Thanks! http://www.amazon.com/gp/product/B001T8IEO6/ref=oh_aui_detailpage_o01_s00?ie=UTF8&psc=1
I bought those after a trial run with a set of 12 for $12. I found that I really only use 1-2 of the gouges anyway. The steel in this set ($33 for 5) is much higher quality than the steel in the $15 range. Eventually I'll save up and get a much better set, but if I keep these sharp they'll last me awhile I think.
I got these needles: https://www.amazon.com/gp/product/B001687P3U/ref=oh_aui_detailpage_o00_s00?ie=UTF8&psc=1
and these punches: https://www.amazon.com/gp/product/B00T17OULI/ref=oh_aui_detailpage_o01_s00?ie=UTF8&psc=1
http://www.amazon.com/gp/product/B0025TZ30G/ref=pd_lpo_sbs_dp_ss_1?pf_rd_p=1944687722&pf_rd_s=lpo-top-stripe-1&pf_rd_t=201&pf_rd_i=B000FWCQ78&pf_rd_m=ATVPDKIKX0DER&pf_rd_r=0YAA9ZE1DMG7NCNCCYJJ
http://www.amazon.com/gp/product/B00CBRVKOK/ref=s9_simh_gw_p201_d0_i2?pf_rd_m=ATVPDKIKX0DER&pf_rd_s=desktop-1&pf_rd_r=1PVZED59D6F03DF8X880&pf_rd_t=36701&pf_rd_p=1970559082&pf_rd_i=desktop
I think this might work better if you're interested in trying.
Here is the mobile version of your link
I use a wooden disc like this for monster tokens and put letters on them so I can easily remember them in the fights. Not as much heft as a metal washer but works the same way and you can glue pictures to them for custom PCs/NPCs.
Paraffin Household Gulf Wax (Pack of 1) https://www.amazon.com/dp/B00D8N3NT6/ref=cm_sw_r_cp_api_7R8FAbAC6SF09
These are the ones I use. They are PERFECT. Just barely clear the base so it dont rock. Got the link from a past reddit thread.
Stitch Chisels 4mm
Wax thread
Saddle stitch
Hello!
I'm going to guess 8.8 lbs :) And this is my item!!!! Googly eyes are the best! (/r/eyebombing)
1: Truck Nutz for my Atlas
2: A Run DMC style gold rope, with Mercedes emblem, for my Hunchie.
3: Curb feelers
4: Mohawks
5: Stick on eyes http://www.amazon.com/Creative-Charles-Leonard-Assorted-64530/dp/B004G59EDE
6: A "I Brake for Nobody" bumper sticker
That makes sense. I was looking into this. I would like to find something a little easier though. That low melting point plastic seems like a good idea as well.
If your lino tools are getting worn out and/or you just want to upgrade, these are excellent and well-priced carving tools. I use them for woodblock carving.
Nice! It is all about starting slow and steady with a little bit of a hodgepodge of things for students to try. At our space we started seeing how much our students were not interested in electronics/robotics/high-tech stuff and were leaning towards design, art, and fabrication. So then we started investing resources and people in that direction. My absolute favorite thing we did was buy a MASSIVE sketchbook that became the community sketchbook for anyone to just draw, paint, or whatever they wanted in it. Filled it up in a little over a year and it is totally amazing.
Are you allowed to decorate that? Needs googly eyes! Also, she has a beautiful smile!
Whatever you do, glue google eyes on your Roomba if you get one like this
But seriously, here is a link to the Roomba I love and here is a link to the google eyes!
I've never heard them called surgical scissors but I've always called them tramua sheers, and they're quite cheap
Looks pretty good. Always come in at least 3/16 of an inch from edge for stitching. Get yourself a stitching groover too. It cuts a groove in the leather both to help heep stitches straight, and so your thread doesn't sit proud if the leather. Especially for an item that will be in and out of your pocket. Get a set of diamond stitching chisels too to help you with spacing, and clean up your stitches. https://www.amazon.com/dp/B014549SNG/ref=cm_sw_r_cp_apa_i_1.CJDb1VV85PN
Other than that. I would personally do this with a thicker veg tan leather, obviously you have what you have. But thicker veg tan allows you to better finish the edges of the leather and use an edge coat to both make it pop, and to protect the edge of the leather which is what will surely start to wear first on this item. You dun good, though, just need to practice!
https://www.amazon.com/Art-Alternatives-Hardcover-Sketchbook-Giant-Sketchbook-600/dp/B0025TZ30G/ref=sr_1_7?ie=UTF8&qid=1536696244&sr=8-7&keywords=sketchbook+hard
Well, you could make a resin or clay mold and fill it up with plastic/metal (as in, use resin or clay w/old key to make a mold, filling it up with this stuff). Or you could use a 3D printer. But it's probably too much trouble.
Has anyone tried to use silicone rubber to fix this? Would probably require someone making a mold from an intact Pebble 2 out of Sugru or a 3D printer then pouring the silicone rubber material into the mold. The only thing is that I'm not sure how you could 'glue' the new buttons onto the side of the watch. Here's the link to the silicone material: https://smile.amazon.com/dp/B00EOA25X2/
I'm looking for adhesive silicone strips - basically continuous versions of these (https://www.amazon.com/Self-adhesive-Clear-Rubber-Feet-Bumpons/dp/B001JASGH4). Ideally corner orientated pieces too. 3~5mm width, anything wider would probaly look weird.
I need them as 'surround feet' for a box.
TIA for any pointers
Any self-respecting Go user has a pair of these on the front. Without them, you’ll look ridiculous.
It's all good they have them for $6.49!
I used Smooth-On Smooth-Cast 300 and 305, it's great stuff but the cost really adds up: https://www.amazon.com/dp/B004BN7G0E/ref=cm_sw_r_cp_dp_T2_lLMuzbE6RRXQF
VELCRO Brand - Sticky Back - 5/8" Coins, 75 Sets - Clear https://www.amazon.com/dp/B001ASD850/ref=cm_sw_r_cp_apap_k8TPBquZeKOKP
Axe Sickle 1 inches (50-pcs / 100-pcs / 200-pcs) Natural Schima superba unfinished round wood,These round wood coins The limitations are endless!(50-p https://www.amazon.com/dp/B01CSV14JE/ref=cm_sw_r_cp_apap_YA9H1Csn8ANJA
I was thinking about using something like this (flexible mirror sheet). Super easy to work with, no sharp edges and you can roll it up into a tube if you wanted to.
one of these
Bring the tube to any place that does glass work, like windows and glass tables and what not and ask them to cut it, or buy cheap bottle cutter and cut it yourself
​
https://www.amazon.com/Glass-Bottle-Cutter-Genround-Machine/dp/B01EG6TP9A
I can see where you'd think that, but they're actually grey with an orange interior. Mostly grey.
https://www.amazon.com/Westcott-Titanium-Scissors-Straight-Handle-13901/dp/B000P0LNRE
10/10 scissors 100%
Oh and I'm getting these
http://www.amazon.com/Sketches-Making-Giant-Hardcover-Sketch/dp/B0025TZ30G/ref=sr_1_2?s=arts-crafts&ie=UTF8&qid=1418088587&sr=1-2
http://www.amazon.com/Sakura-Pigma-Sensei-Manga-Drawing/dp/B001463RWW/ref=sr_1_6?s=arts-crafts&ie=UTF8&qid=1418088761&sr=1-6
Thankfully my birthday is this saturday and christmas is coming up too, so I should get enough money to buy all of these.
By hand. I bought these chisels http://www.amazon.com/Vktech-Stainless-Steel1-Diamond-Leather/dp/B00CBRVKOK
Sounds like dull and or low-quality cutting tools. A sharp tool is a safe tool.
It really shouldn't require much force even with traditional "hard" linoleum. They also make various grades of much softer lino blocks.
One of my best upgrades when doing lino was ditching those cheap big box store Speedball cutting tools. Those things aren't even properly beveled to begin with and they dull super quick. I picked up this affordable set which isn't even like "pro-grade" or anything but good lord those things came literally shaving sharp, hold an edge quite well, and, because they were properly ground from the factory, they're pretty easy to sharpen when dull. The comparison of just that simple upgrade is like carving with a hot knife in butter compared to my Speedball which was like trying to carve wood with a screwdriver.
This is so nice of you, thank you for hosting this contest.
I'm all about repurposing. This wine bottle cutter would be a much safer way to repurpose my wine bottles!
Town Drunk
Thanks again!
You could probably conceal the tiki-ness somehow. Get one of these $22 bottle cutting tools.
Take a dark glass wine bottle. Cut the bottom off. Stick the Tiki torch through the bottle so that the upside-down bottle conceals the torch. You might have to cut the neck end of the wine bottle off in order to make that end big enough to fit the torch through.
Then figure out a way to hold the bottle in place. Maybe tie a short stick crossways below the bottle so the bottle can't slide down.
https://www.amazon.com/Gimars-Carbon-Steel-Carving-Tools/dp/B01FGZIVD6/ref=zg_bs_8090896011_1?_encoding=UTF8&psc=1&refRID=WM76TCS0NX15BPYE7770
I get these, but there are better ones! Namely anything with 3M on them.
Even cheaper option
You can trust me, I have googly eyes on my wishlist. I'll use it for the greater good and lolz of human kind.
Gulf wax
Paraffin Household Gulf Wax (Pack... https://www.amazon.com/dp/B00D8N3NT6?ref=ppx_pop_mob_ap_share
And paraffin oil
Behlen Paraffin Oil, 1 Pint https://www.amazon.com/dp/B004O246M8?ref=ppx_pop_mob_ap_share
Rice cooker
Elite Cuisine ERC-003 Rice Cooker... https://www.amazon.com/dp/B000B2UADE?ref=ppx_pop_mob_ap_share
These are the three items to start the whole process. Mix the waxes as Ozzie describes. Also, as he says, the amount of wax you have to work with is enough for a very long time so initially, sure it costs more than a bottle of regular chain lube but over time it’s definitely a big money saver. It did take me a minute to find the right paraffin oil for the best price, but that was the one. Make sure to strip the chain really well first. Best bet would be to just start with a new chain, strip that, and then wax it.
Ideally you need something like this: http://www.essdee.co/products.aspx?cat=sets
But ordinary knife or "wood carving kit" like this: https://www.amazon.com/Gimars-12-Set-SK5-Vegetables/dp/B01FGZIVD6/ref=zg_bs_8090896011_1?_encoding=UTF8&psc=1&refRID=NMAH7T3D173073ENXREP would be ok.
Some tools will need sharpening, but most of what I've used, even cheap ones, were "make one wrong move and cut your finger" sharp from the box.
Depends what quality you want. If you just want to start with something basic and easy:
OOMOO 30 Silicone Mold Making Rubber
Smooth-Cast 300 Liquid Plastic Compound
Sargent Art Plastilina Modeling Clay, 2-Pound, White (for making 2 part molds)
Legos or $-Store tupperware for mold walls. About $50-60. It's not super high quality, but it does work.
For you or anyone else that may be considering trying it, first buy extra mold making powder. We used this, Its cheap and changed colors when it was ready. We tossed out the tube after the first try and filled a bowl with mold goo instead, which was way easier to stick his dick in. Use a cock ring to stay hard and use slightly cooler water to make the mold set up quicker. Its going to be messy so I recommend doing it in a bathroom but the mold peels off easily so don't worry about ruining the floor or any tools. Its a fun thing to do together C; I got the glow in the dark viberator. Its actually a pretty nice toy. I got mine from adamandeve.com which always has huge deals like free shipping and 50% off with a quick google search.
I started with this then got one of these for removing larger chunks.
*note the irwin one comes with a factory edge meaning it will need to be sharpened...so you'll need one of these and this to get that baby super sharp. then run it over the flat part of this and you'll be in like Flynn.
Also the flexcut slip strop if used every 20 minutes of carving (with any tool) will keep the edges super sharp for longer, meaning you dont have to go to the harsh stone right away. Also, note, when using the stone, to soak for at least 20 minutes before using. There are plenty of great youtube videos out there teaching proper sharpening technique for all sorts of tools with Water stones.
I'd also suggest a wooden mallet and a larger heavier one, or I just use a rubber mallet. Also while you're at it, grab a coping saw to remove large areas of unwanted wood. Make sure you have a vice to hold your wood or some sort of block device.
I'm still waiting on my carving knives from Here. They have a back order of 6-8 weeks! I got a straight (sloyd) knife and a hook knife for spoon carving and such.
So far that's where I'm at. Hope that helps.
"for rubber, small pumpkin, Soap, Vegetables and more "
Gotcha. Does it stretch or move a lot when you cut it?
Yeah that’s not the best way to mark stitching lines so I recommend a wing divider. This will be cost effective and will help tremendously with your stitching.
I bought these two when I started and still use them.
https://www.amazon.com/dp/B0779R5FCJ/ref=cm_sw_r_sms_c_api_i_A727AbF4N33A3
https://www.amazon.com/dp/B014549SNG/ref=cm_sw_r_sms_c_api_i_a827AbKEF359B
They work great for me and will eventually upgrade to some quality tools like KS.
I've got Googly Eyes on my wishlist because when you've had a shitty day nothing cheers you up like seeing something with googly eyes.
Its hefty for sure. Traveling with this thing is going to be challenging although the 75 lbs (110 gsm) is the paper weight not the shipping weight.
Looks like amazon.uk has an option Big Book
Hope that Helps!
I used cheap stitching chisels from amazon (https://www.amazon.com/gp/product/B00T17OULI/ref=oh_aui_search_detailpage?ie=UTF8&psc=1) to punch the holes preassembly. Then glued everything and stitched it up. I don't have a small diamond awl but that would definitely make things a lot easier. I put a bunch of needles through the corner holes to keep them lined up but they naturally fell out of line (because of the outside curve vs the inside curve) so I had to back stitch one side to realign them.
Thanks so much for the response!
Hmmm maybe that's it. What do you mean by casting? Also, I wonder if my needle is too large. I find that to really get it through the holes, I need to push an awl through and the original diamond shape is somewhat lost. As far as ensuring the slant, I think I'm doing this correctly. It's hard to tell from this picture as the stitches rest in a stitching groove, but they had a slight slant, and the backend definitely looked ~ok~ (though a bit messy like you see in the picture as far as looking a bit "twisted")
I agree about the thread gauge too-- maybe it's too thick.
Thread
Needles
Punches
In order of purchase, here's where I started:
BeaverCraft Carving knife
Strop
Detail knives
Flexcut Cutting knife
Flexcut Detail knife
Mora 106 carving knife (upgrade from the beavercraft)
This is my first attempt at any sheath and wet forming. That is the reason I decided to test it out first with a scrap piece. I liked the minimalist idea and this is what I came up with. I also tested my new diamond chisels and I love them but if the stitches look a little off it's because I just eyeballed the whole project. I used 5-6 oz veg, .7 mil Kevlar thread, and finished it with olive oil then tried my burnishing wax as a water repellent by melting some over the whole thing with a hair dryer then rubbing it in while hot. I like the look of it. As for the burnishing wax I used equal parts bee and paraffin wax. I tried it on a really rough edge and used nothing but the wax and I think it works great. Any comments or suggestions would appreciated. Here are the chisels I used. It makes 8 stitches per inch.
I put these rubber feet next to where the little plastic bumps on the bottom towards the back of the keyboard are: https://www.amazon.com/gp/aw/d/B001JASGH4/ref=mp_s_a_1_3?qid=1465585240&sr=8-3&pi=SX200_QL40&dpPl=1&dpID=21KThbUYKEL&ref=plSrch
Fixed it immediately. You can also put them over the screw holes, but I prefer to leave those open for easy access to the innards.
I own them.
Check here
Here is the mobile version of your link
I just bought these (arrive today so no report, free shipping through 11/9) trying to upgrade/add on to this which was great to start (super sharp on arrival) with but lacks a bigger gouge.
Good for you.
Please learn to play safe. Do not hesitate to say that something bothers you (mentally or physically)
I did my wife's hands up too tight (oops!) and she immediately mentioned the tingling in her fingers. Do not wait to say something is too tight, too rough, etc.
I got this rope (200ft) and it's very soft and doesn't tangle.
http://www.amazon.com/gp/product/B004432CHI/ref=oh_details_o07_s00_i00?ie=UTF8&psc=1
Also, make sure you have a set of sheers like this:
http://www.amazon.com/gp/product/B004NG8V9E/ref=oh_details_o05_s00_i00?ie=UTF8&psc=1
Does this look like a good start?
He already has a knife but this looks to cover some of his other needs.
I started in November last year after getting some wood carving gifts for my birthday. I had never even attempted it before, but I've now found a life long passion hobby. Below are the links to all of the things I was given for my birthday. It's not fancy at all, but it's also enough of a good investment that you can tell if carving is for you without breaking the bank. In all it's around $30. Also, https://bit.ly/2JPID0Z. This article has information on understanding wood grain, something that is insanely important to making the right cuts. The important thing I've found is when you are making your cut, make them small and shallow. Even if you're looking to remove a lot of wood. You will end up digging in too deep and ripping an irrecoverable chunk out of your block if you're too heavy handed with it. Just go with the flow and take your time. But, most important of all...post everything you make here. This community is so friendly, honest and helpful you only stand to improve by sharing your progress!
https://amzn.to/2JS2DjC - Wood Carving tools
https://amzn.to/2qAG364 - Basswood mixed size bag
https://amzn.to/2H7TPYY - 20 minute Whittling Projects book.
P.S Good luck if you do take it up! Go create!
here ya go
This is just my second wallet, heavily inspired by /u/sgircys (thanks for the awesome tutorial). The leather is 2-3 oz Oak Leaf from Tandy. I've given it a couple of coats of neatsfoot oil and left it in the sun for a day. The tread is 0.8 mm black tiger thread. Chisels are these cheap ones from amazon. I've used the 6 prong one to do all of the holes in the wallet.
Another side question, if I want to get a dye would you guys recommend the oil based ones or water based?
I use these to actually punch the holes on thinner leather: https://www.amazon.com/gp/product/B00T17OULI/
For projects, you can do slightly larger bags, dop kits, etc if you go for a fabric lining, duck cloth or canvas would add good reinforcement.
I like Oom-Moo 30 and SmoothCast or CastingClear for starters. That is if you are going for repeatable results.
You could also simply start with some plaster of paris or algaenate from your local art supply for single casts.
Good luck and post pics of your experience!
That's the stuff I use! I ended up going with the original version with wall clips rather than the Open Lock version. Then, we used a mold-making kit to mass-produce them out of plastic. I haven't painted them all yet, but for the ones I have I sprayed the standard gray primer and then dry-brushed with a lighter gray to get a really easy, cool look.
Here's the current state of affairs: https://imgur.com/a/ZAmYH
The local Home Despot is the best place to get started.
You want the kind or rope without a core like
twisted nylon
There are some good resources online for how to do ties. Start with twisted monk
And buy a set of EMT shears
Important in case of emergency either physical or mental.
Very important, it's ok to tap out and stop right in the middle, by either side. Set up a safe word.
After that spend a bunch of time talking about it. What you both liked, didn't like, want to try..
It looks good! If you have ~$20 to spend you can get a groover ( https://www.amazon.com/gp/aw/d/B074YD8DXY/ref=mp_s_a_1_5?ie=UTF8&qid=1506701984&sr=8-5&pi=AC_SX236_SY340_FMwebp_QL65&keywords=leather+working+tools&dpPl=1&dpID=51qIiFoZwYL&ref=plSrch ) and stitching prongs? I'm not sure of the technical term ( www.amazon.com/gp/aw/d/B00T17OULI/ref=mp_s_a_1_1?ie=UTF8&qid=1506702124&sr=8-1-spons&pi=AC_SX236_SY340_FMwebp_QL65&keywords=leather+stitching+punch&psc=1 )
I have the Knit Picks winder, which works wonders for me.
Recently got a swift and it's not the most amazing thing but it was $16 which is right in my price range! Here is the Amazon link.
I got this swift because another reddit user commented that they got it and it's worked for them for three years. Obviously because it's plastic and thin metal you need to be careful when using it and store it safely, but it fits right back in the box and I love it so far.
I always put yarn like that on this to wind it into a ball:
https://www.amazon.com/gp/aw/d/B00VGD39O4/ref=mp_s_a_1_5?ie=UTF8&qid=1526908602&sr=8-5&pi=AC_SX236_SY340_QL65&keywords=yarn+winder&dpPl=1&dpID=5171tQEelnL&ref=plSrch
hard eye-roll yes, duh, I didn't say it wasn't a wax. 🙄 I just said it isn't pink in its natural state, which it isn't. If it's pink it's dyed
paraffin wax is more of a whitish gray
But good on ya for ignoring the facts