(Part 3) Best crafts & sewing arts according to redditors
We found 14,171 Reddit comments discussing the best crafts & sewing arts. We ranked the 7,592 resulting products by number of redditors who mentioned them. Here are the products ranked 41-60. You can also go back to the previous section.


100 sheets of gold leaf measuring 1.7" by 1.7", totalling 289 square inches, cost $12.55, with free two-day shipping. I'm sure actual artists can get better deals on bulk quantities. Gold leaf isn't actually all that expensive since it's only like an atom thick.
No way in hell. There's bamboozling there. real gold leaf sheets that size cost WAY less than 5k... you can't tell me the paint and labor is "THAT" special. https://www.amazon.com/Gold-Leaf-Sheets-1000-Real/dp/B00VALQQ60
Shit isn't rated that well though https://www.amazon.com/Stuart-Semple-mattest-flattest-acrylic/dp/B0758GKKGZ/ref=sr_1_5?ie=UTF8&qid=1527617129&sr=8-5&keywords=BLACK+2.0
Almost everybody is saying it's not drying all that black. The pictures show clearly visible edges. Doesn't look great.
Here's something very similar.
BLACK 2.0 - The world’s mattest, flattest, black art material by Stuart Semple
Gold foil isn’t really that expensive, it’s so thin there’s really not that much gold weight wise
https://www.amazon.com/Gold-Leaf-Sheets-1000-Real/dp/B00VALQQ60
lol I think the same thing every time I see those. It looks like someone ctrl-v'd a generic anime face on the head without bothering to resize it proportionally.
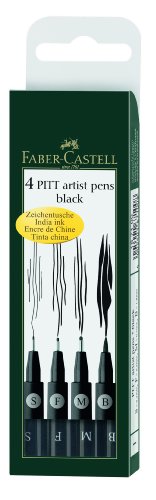
Faber-Castell makes really nice pens though. I use this set.
I'm uh, I'm really concerned that "customers that viewed this item also viewed" something called the "Fat Old Fred" after I clicked on that 55 gallon drum of "Passion Lubes" Natural Water-Based Lubricant. The horror that is Fat Old Fred, with his gaping hole of a mouth above his "Bob... Bob had bitch-tits" bitch-tits, just staring back at me with his permanently closed eyes and what appear to be his removable nose and mouth area.
I just know I'm worried about the kind of search suggestions I'm gonna get in the future. Also, in grand Amazon fashion, the most helpful two reviews for the "Fat Old Fred" are here:
> "The handy carrying case is also quite useful for carrying other dismembered obese human torsos.
> Just in case you were curious."
And..
> "I'm really happy with my Fat Old Fred, Black. Though if I'm being up-front, I have to deduct 1 star for it not being quite black. It's actually closer to the color of wet terra cotta. Anyway, I was thrilled upon the arrival of my Fat Old Fred, Black, and immediately began to explore the various uses for a silicon sculpt of a kind-of-old-looking obese torso. My first idea was to cover him in paint and use a trebuchet to launch him at a giant canvas (after all, we all know art is really a process not a product amirite?) but I achieved unsatisfactory results as I seemed to only get face+tits+belly prints. After an hour or so the wall of my warehouse loft wound up looking like a giant had dipped their balls in paint and slapped them all over my wall. Not a good look, unfortunately.
> My backup plan was to pimp him out to the crackheads who have an encampment in the storm drain under my warehouse, and so far I'm happy to say I've already recouped my costs in crack rocks and crusty dollar bills. A-, 8/10 would buy again."
http://i.imgur.com/cT9xoIl.jpg
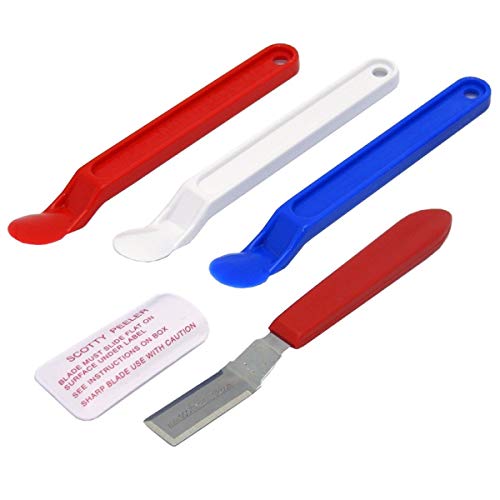
Get yourself some Scotty Peelers. The plastic ones are pretty safe for surfaces.
https://www.amazon.com/dp/B0068QIQVA/ref=cm_sw_r_cp_api_i_aHDzDb2262KP9
These work pretty well too, and your money might go farther
https://www.amazon.com/Plastic-Scrapers-Replacement-Stickers-Application/dp/B07K1RKLR4
I take my ring off to shower and sleep, but my ring is definitely pretty darn loose when I'm cold. It spins around and can fall off if I really try to shake it off, or if it gets caught on something...like a pocket. I think the best option is to get a ring size adjuster that can be easily removed and put back on for days when it's a little looser. My ring size is already pretty small so I don't want to bring it down any further.
I used a wire wheel brush on my wired drill (a kit like this: http://www.harborfreight.com/wire-wheelcup-brush-set-6-pc-60475.html)
Then just wiped them down well before painting. For the paint: https://www.rustoleum.com/product-catalog/consumer-brands/painters-touch-ultra-cover-2x/matte
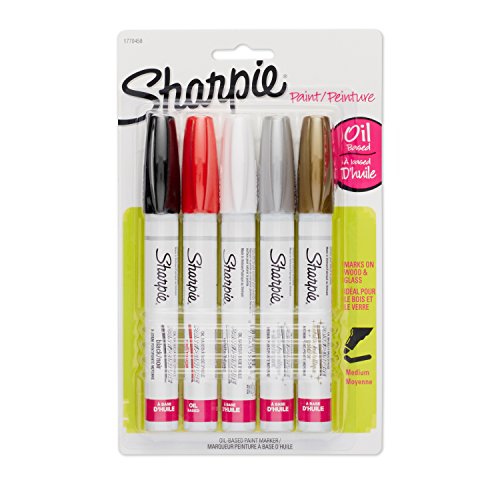
Then I used the Sharpie Oil Paint Pens for the lettering (http://www.amazon.com/Sharpie-Oil-Based-Assorted-Metallics-1770458/dp/B003YDYO1Q). Depending on the size of the lettering, you might need different sizes.
Not much. There's barely any gold there. Small sheets like that are about $12 for 100
As with many such luxury items, it's all for show, and there's no real value in there.
I use the Lihit Lab Compact. Its a cheap case and small enough to fit in my jean pocket. I hold 3 pencils, 4 pens, 2 highlighters, spare lead, and a eraser in mine with some room to spare for some slimmer items like sticky notes or something while still being able to fit in my pocket.
One thing I love about it is the materials its made of. The clips on my pencils tend to be a bit on the strong side and with all the other cases i tried the clips snagged when pulling them out or putting them in. With this case I never really had that problem and can pull them out without issues and for most of my pens/pencils I can simply push it back in without having to lift the clip out.
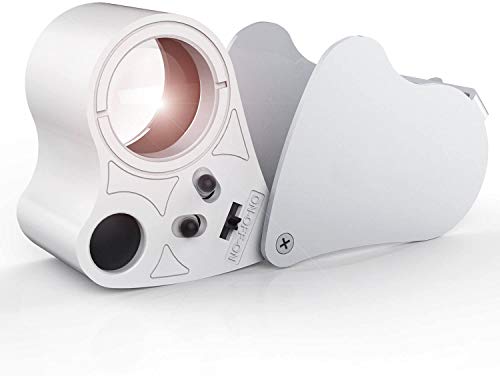
A jeweler's loupe works just fine, too. I utilize this one from Amazon and cross-reference cards of the same color/set to check for fakes.
Nice, I bought the Notebook for my upcoming trip to Canada (Journaling and such).
The case is the Lihit Lab Smart Fit. It fits 3-4 pens on each side, though I only keep my fountain pens on the padded side and use the other side (with the net) for storing a mechanical pencil, a text-marker and a ruler.
It's a nice case for everyday-use and it's also water resistant I think.
https://www.amazon.com/gp/product/B0026HC9F4
I have no idea what this would be used for
https://www.youtube.com/watch?v=etY_v7A3P2k
​
Please, for your sanity, watch this video. It gives multiple tests that will help you better distinguish between real and fake cards.
​
https://www.amazon.com/gp/product/B00K0BGNNC/ref=ppx_yo_dt_b_asin_title_o02__o00_s00?ie=UTF8&psc=1
​
Buy this or an equivalent. For ~$10 you'll save yourself a lot of grief and heartache.
These were Faber Castell Pitt pens, 4 pack from Amazon (https://www.amazon.com/dp/B000TKEZDO/ref=cm_sw_r_cp_apa_i_LuF7AbF24XN09)
I might have some work in progress pics but my approach is usually like this.
I spend some time using GIS looking at other people's ideas for a conversion. I start making a shopping list. With both of the models in this thread you have lots of parts from Skaven Hellpit Abomination, and Soul Grinder.
From there I poke around on ebay for a few days/weeks until I get all the bits I'm looking for. I try be careful of vendors that want to charge shipping for every bit, or I can order $7 worth of bits and pay $21 in shipping. Be patient.
The maggot head on the soul grinder was from ... I forget.. but it's like a big walking maggot head guy made by some other vendor than gamestop.
My shopping list included barrels (for pus), possessed limbs, and green stuff. Greenstuff isn't cheap so I often will use something else if I have to fill in large gaps
Miliput is about 1/2 the price of Greenstuff but there are tradeoffs It's more like something you would use to make a ceramic out of. It practically melts when you get water on it, but you need it wet. Not great for details, but perfect if you just need to fill in a big gap.
For those big gap areas (a space of more than 1" needs to get filled in) what I do sometimes is wad up some aluminum foil. Stuff that in the hole. Then I cover it with the Miliput. This gives the model the structure I needed. Once that is there, I can just use the greenstuff for the cosmetic work, not the structural part.
Things usually start off looking really bad. You just have bits jammed all up together, but you keep adding a little more filler in here, and there, and it starts coming together. Once you get the primer on (fyi Miliput takes a few more coats to cover). it starts to take shape.
I highly recommend oil based paint pens over permanent markers. Thy take a little longer to dry but look 100x better and won't fade (sharpie can fade over a long time). They are easy to find at local craft stores (I got mine at Michaels if you have that close). These are the ones I've used.
Sharpie Oil-Based Paint Markers, Medium Point, Assorted Colors, 5-Count
https://www.amazon.com/dp/B003YDYO1Q/ref=cm_sw_r_cp_api_EnWgzbCKPF1QG
Picture for reference. The bottom row of horror pops are all paint pen. Most of the others are Sharpie (before I knew about paint pens)
https://imgur.com/a/dglSz
Great, now Amazon is recommending some really weird shit for me.
I just used this stuff:
https://www.amazon.com/gp/product/B00BXYWXY8/ref=oh_aui_detailpage_o02_s00?ie=UTF8&psc=1
to reassemble a Time Steel that I replaced the battery in. Worked great. It's probably not water proof anymore, but with two layers of it, it's probably at least splash resistant.
I peeled the previous double stick material off (it's actually pretty easy with just fingernails alone) and then placed one layer on the plastic gasket, and one layer on the underside of the screen. Getting the screen reconnected was a little tricky and required the use of a long thin metal tool, you might be okay with just a flathead screwdriver.
Knitpicks https://www.amazon.com/Knit-Picks-Yarn-Ball-Winder/dp/B00O3GHFA0/ref=mp_s_a_1_1?ie=UTF8&qid=1549167430&sr=8-1-spons&pi=AC_SX236_SY340_FMwebp_QL65&keywords=knitpicks+yarn+winder&psc=1#
my ring size changes a lot depending on the weather/temperature. i sized it for summer, so it would never be too small. in colder weather, i use ringuards to keep my rings snug. they get gross over time, but i don't mind buying a new pack once a year.
edit to add: i did have sizing beads put on the engagement ring, but i hated them. they were frequently uncomfortable for me in cold weather, and i found them unbearable in warm weather, so i had them removed after a few months.
This or this can help with your ring until your weight stabilizes and you can get it resized. :)
Gold leaf is pretty cheap stuff. A nice sentimental gift, but no notable monetary value.
Anything with gold leaf on it is just capitalizing on the perceived worth of gold to massively inflate the price they charge. And yes, gold is very expensive, but gold leaf isn't. Gold leaf is so incredibly thin that you could coat a whole burger with it for less than $5.
Saffron is expensive but the amount you'd actually use is a few bucks at most.
Same with the rest of the ingredients. The Kobe beef (why would you even use Kobe just to grind it up when you can use regular beef and throw in some extra fat, but whatever).
That burger costs maybe $200 to make at most, most of which is just the wasteful use of Kobe beef. That burger could probably be replicated for under $100 with Wagyu subbed for the Kobe.
Like this? I guess I didn't even know that was an option. I can make my weights look 10x cooler now, thanks.
> I mean, why else is there "20 pounds of ass" sitting on one of our shelves, next to a torso.
https://www.amazon.com/Fuck-Silly-Bubble-Butt-RD173/dp/B01CGZJGT2?th=1
It doesn't quite look realistic anyway, even with the skin colour...
but then I guess it would look even less realistic without the skin tone?
Also, completely unrelated, but equally hilarious :
https://www.amazon.com/dp/B004JOB9Z8/
Great review :
>The handy carrying case is also quite useful for carrying other dismembered obese human torsos.
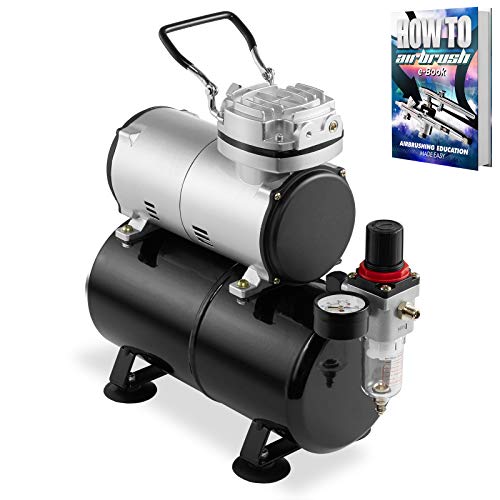
Welcome to the subreddit! I think I can answer a couple of your questions about paint. Some people swear by doing it outside when the weather is nice, especially in the cooler months, where humidity and dust aren't as prevalent. I personally paint indoors. I picked up a paint booth from Amazon for under 80 bucks and it works great! I just vent the fumes outside through a partially opened window with the vent the booth comes with.
Paint booth from Amazon
As for preparing the body. I've always been told to wash and dry the parts involved first with soap and water, then allow to dry completely. You can accelerate this with a dust free cloth or hair dryer, pick your poison. Then sand the body with a 600 grit grade of sandpaper, rinse again, and wet sand (body and paper are wet with 1000-1200 grit) Once that's done, you're ready for priming. Model builders who are way better at this than me typically recommend 1-2 coats of primer, the color depends on the body color. So for bright colors, use a white primer. For darker colors, use a grey primer. After you've primed a couple times, its time to take the body and sand it again, with 1200 grit. Get it all smooth, then shoot the color. First three coats are mist coats, sprayed 10-12 inches from the model, very light coats. After that comes 2 or 3 wet coats, sprayed closer to the model, careful not to overpaint or you'll get dripping or pooling in some spots.
There are lots of forums for modelers, including this one. The mods here put together a painting FAQ you can see on the right side of this page. I like your truck! Looks great! I hope some of these answers help.
I use these for samples and I couldn't be happier. I have 3 mostly full already and I'm filling a 4th for my sister. You can fit most labels on the lid or the bottom.
It’s actually sold by Knit Picks through Amazon, just FYI, but good to know anyway!. Knit Picks Yarn Ball Winder https://www.amazon.com/dp/B00O3GHFA0/ref=cm_sw_r_cp_api_i_75X3Cb6KH6JBT
https://www.amazon.com/RinGuard-Ring-Size-Adjuster-Sizes/dp/B00PI0T25Q This (or other products like it) might help. :)
I'd wait to have them soldered.
Maybe get a temporary ring size adjuster and then have your ring re-sized and have them soldered after the wedding.
Loud whistle - https://www.amazon.com/gp/product/B00FOJRF64/
Heavy duty velcro - https://www.amazon.com/gp/product/B001O6T2ZS
Sugru throttle nub - https://www.amazon.com/dp/B01BFE0KNQ/
I liked the recent post with the bicycle bell mod, really anything to enhance safety, especially in NYC, where jaywalkers cross roads diagonally with their heads buried in their phones and then proceed to do the "evade me" shimmy when they finally see you coming.
I use it sparingly, 120 dB is on the human pain threshold for hearing, so it's quite jarring. A quick toot toot tends to resolve most antsy situations, but a nice sustained hard whistle can even help you be heard from inside yellow cabs.
The Yi cameras are really very good for the money. The Yi Lite gets great reviews and it's cheap, and you can use all the standard GoPro mounts, so you can use some Sugru to custom implant a GoPro mount on the face of your helmet. You can also use your general 3M tape to stick the mounts on nicely as well.
You make me wonder... Has anyone put Black 2.0 on terrain yet?
Behold
https://www.reddit.com/r/Sneakers/comments/6eqshj/boost_whitening_mystery_grey/
post of what it looks like after
I would assume it looks fine long term because the oil would soak into the boost and keep it white until it got dirty again (vs. painting over it that would chip off), use a white oil sharpier - I think this is the right one. https://www.amazon.com/Sharpie-Paint-MParker-White-35568/dp/B0026HC9F4
/u/Ouranox /u/brokeandfamous would be great if you guys gave advice because I haven't personally done this yet.
Btw, you can use a hot air dryer to uncrease your NMD blocks as well, if you haven't seen that post yet :)
This one ?
https://www.amazon.com/dp/B0026HC9F4/ref=asc_df_B0026HC9F45009361/?tag=hyprod-20&creative=395033&creativeASIN=B0026HC9F4&linkCode=df0&hvadid=167130062341&hvpos=1o2&hvnetw=g&hvrand=7910342813992266338&hvpone=&hvptwo=&hvqmt=&hvdev=m&hvdvcmdl=&hvlocint=&hvlocphy=9004333&hvtargid=pla-312324517103
https://www.amazon.com/Milliput-Superfine-2-Part-Hardening-Putty/dp/B002CNEWAM
Plastic glue is an evil set out to frustrate new people to the hobby. Initially enticing, incredibly limited, long term damaging, and overall a waste of money. Beware. Always only use super glue.
There, now we're done with that.
It's not plastic, it's resin.
Best practice is to lightly rub it with soap and water and wait for it to completely dry.
Take a xacto and file to it to even out connecting faces. It can often be warped as well. If so, google methods to reshape warped resin. It's been a while for myself.
Use super glue only to glue it.
Then use super glue to clue it together.
Buy this.
Fill the gaps. Sand as necessary.
eww. it feels kinda gross that this link is already purple for me... it's because I fell into this amazon rabbit hole the other day from another /r/ofcoursethatsathing post (circumcision trainer). From there I clicked on "Fat Old Fred, Black" and the lube (and some gimp masks) was listed under also-viewed from there.
Amazon carries all three sizes:
https://www.amazon.com/Molotow-Liquid-Chrome-Marker-1Mm/dp/B01E7EFSVU
Also, Blick has it for less:
https://www.dickblick.com/products/molotow-liquid-chrome-marker/
Do you have a proper jeweler's loupe? As far as I know, most fake don't even pass the light test let alone pass the loupe check on the green dot on the back of the card.
EDIT: Good, inexpensive loupe: https://www.amazon.com/gp/product/B078N34WZR
I really like these artist pens have some in black and some in grey. Feels more authoritative then pencil and you can get a nice sense of tone with the greys.
If you don't want to mess around with ink, I'd recommend the Faber-Castell Pitt Artist Pens. http://amzn.com/B000TKEZDO
https://www.amazon.com/Sharpie-Paint-MParker-White-35568/dp/B0026HC9F4
I used one of these. It took about 15 minutes per wheel to put on two coats. Because the tires were brand new, I did not have to clean them off or anything. I have already taken it through a car wash and the lettering stayed on fine.
http://www.amazon.com/Sharpie-Paint-Marker-Point-White/dp/B0026HC9F4
sharpie makes oil based paint pens..
http://www.amazon.com/Sharpie-1770458-Oil-Based-Medium-Assorted/dp/B003YDYO1Q/
Customers who viewed this item also viewed Fat Old Fred.
Customer who viewed that also viewed this weird as shit thing.
https://www.amazon.com/Nasco-Fat-Old-Fred-Black/dp/B004JOB9Z8/ref=pd_sbs_121_3?_encoding=UTF8&psc=1&refRID=972QP906FX8R49C70EPT
I recently bought a setup about a month ago so if you are in the US, I'd recommend the following:
I have the compressor, the hose, and the booth and they've worked great for me so far. Honestly, you save on shipping vs. the Master Brand and mine came preassembled with the regulator installed. The Master Brand ones are notorious for having regulators that you screw in and they end up tilted to the side. In fact I think people in this sub have pointed this flaw out (there's a better link with pictures, I just can't find it). Items were shipped promptly and got here in one piece. You also get the discounts if you buy a certain amount from them.
I actually have an Iwata NEO that I got from Amazon for about $40ish. I'm still on the fence as to whether or not I like airbrushing or not. Honestly, I wish I had gotten the PointZero brush just as a cheap intro dual-action brush.
I think someone on this subreddit once pointed out that an airbrush is like a regular brush, just powered by air. They weren't kidding. It takes time to master. If you have the money to spend on a fancy >$100 airbrush like the Krome, then less of your time will be spent trying to master the idiosyncrasies of your brush. But it doesn't change the fact that it takes practice to be able to lay down really smooth, thin coats consistently.
I don't know how busy you are as a student, but it can be time consuming to set everything up, test your spray conditions, mix your paints, actually paint, and then clean everything up. If you find you like the process, then you can invest in a better brush in the future and keep your old one for laying down primer or base coating.
But there's nothing wrong with OOB snap builds if you find that's your thing.
edit: for link formatting mistakes, and also to say that I'm not very experienced yet, so take my advice with a grain of salt.
edit 2: My other regret is not considering compressed CO2. I live near a welding supply shop and a restaurant supply shop that both sell compressed CO2 cylinders. A 10 lb tank with high pressure regulator would have been around $120 and then some for converters or extra regulators. People on the fine scale forums claim that a 10 lb tank could last months for airbrushing and it's only $17 to refill at either shop. Would have been perfect too for carbonating beverages for homebrew purposes. Just another option to consider. Definitely do not buy the Badger compressed air cans. They don't last long enough.
Maybe! De-bagging makes things a lot less messy for me, at least. I (and others around here) use Darice bead jars, which are fairly affordable and store nicely. Bonus: the little round labels that Shiro includes with sample baggies fit almost perfectly on the top or bottom of the linked jars.
Hmm, I bought my jars from Amazon. And son of a b, I bought them for $12 and now they are $6.93!
Now, they are a bit taller than the normal eyeshadow jars you'll get from companies, but they are cheap haha.
A very cool invention! Bet this person has made some bank. :)
https://smile.amazon.com/Scotty-Peelers-Label-Sticker-Remover/dp/B0068QIQVA/ref=sr_1_1?ie=UTF8&qid=1484157229&sr=8-1&keywords=scotty+peeler
That, combined with a hair dryer, makes it so much easier to remove labels.
ETA: I found one of these, Used, on eBay and it's perfect. It's the small travel version with a folding handle and has Tourmaline crystals in it which help reduce static electricity. It's great for my hair, as well! :)
https://smile.amazon.com/BaBylissPRO-Tourmaline-Titanium-Travel-Dryer/dp/B003QKL5YQ/ref=sr_1_3_a_it?ie=UTF8&qid=1484157360&sr=8-3&keywords=babyliss+pro+tt
BRO
http://www.amazon.com/Scotty-Peeler-Label-Sticker-Removers/dp/B0068QIQVA/ref=sr_1_1?ie=UTF8&qid=1406151845&sr=8-1&keywords=scotty+peeler
Not so easy on a book but I buy and sell stuff that often has stickers. I use this sticker removal kit. The plastic scrapers are pretty handy. I actually sharpened the plastic edges with a nail file, works better. Usually I use citrus based cleaning wipes and goo gone as well but that would likely smear the ink on a book cover.
You could probably use some of this stuff.
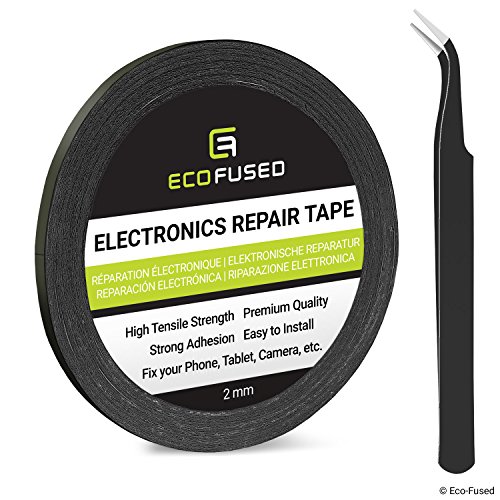
Eco-Fused Adhesive Sticker Tape for Use in Cell Phone Repair - 2mm Double Sided Tape - also including 1 Pair of Tweezers / Microfiber Cleaning Cloth https://www.amazon.com/dp/B00BXYWXY8/ref=cm_sw_r_cp_apa_WNmJAbWCEV019
Maybe this tape
https://www.amazon.com/Eco-Fused-Adhesive-Sticker-Phone-Repair/dp/B00BXYWXY8/ref=sr_1_4?ie=UTF8&qid=1549321426&sr=8-4&keywords=Electronics+adhesive
Or maybe this adhesive?
https://www.amazon.com/Clear-Electronic-Grade-Silicone-Squeeze/dp/B07MKBBQTC/ref=sr_1_3?ie=UTF8&qid=1549321426&sr=8-3&keywords=Electronics+adhesive
I'm not an expert on this, just trying to help and maybe give you an idea.
I just got 3m double sided tape...Works fantastic. My original one and replacement both fell out. Not hard to fix.
Most of them come in a 30x and 60x combo for like $8 on amazon.
This is the one I have
Beemoon Jewelry Magnifier, 30 X 60X Illuminated Jewelry Loupe for Gems Jewelry Rocks Stamps Coins Watches Antiques Models Photos https://www.amazon.com/dp/B00K0BGNNC/ref=cm_sw_r_cp_apa_i_y-VRCbC1F1RKM
Nutes: https://www.amazon.com/gp/aw/d/B006XTQGLO?psc=1&ref=yo_pop_mb_pd_t2
Few packages of these to hang lights and filter:
https://www.amazon.com/gp/aw/d/B010DD743O?psc=1&ref=yo_pop_mb_pd_t2
Extension cords
Plenty of options
Lights
https://www.amazon.com/gp/aw/d/B01B4GQ6MO?psc=1&ref=yo_pop_mb_pd_t2
Fabric pots:
https://www.amazon.com/gp/aw/d/B00TF9E6XE?psc=1&ref=yo_pop_mb_pd_t2
Air control
https://www.amazon.com/gp/aw/d/B01H1R0K68?psc=1&ref=yo_pop_mb_pd_t2
Fans
https://www.amazon.com/gp/aw/d/B001R1RXUG/ref=yo_ii_img?ie=UTF8&psc=1
Outlet timer:
https://www.amazon.com/gp/aw/d/B06XC7GTCN/ref=yo_ii_img?ie=UTF8&psc=1
Tent https://www.amazon.com/gp/aw/d/B01731MNJE/ref=yo_ii_img?ie=UTF8&psc=1
Carbon filter
https://www.amazon.com/gp/aw/d/B01CJ5D4AG/ref=yo_ii_img?ie=UTF8&psc=1
4 inch duct
Can find anywhere
Jewelers loop (super important)
https://www.amazon.com/gp/aw/d/B00K0BGNNC?psc=1&ref=yo_pop_mb_pd_t2
To dry your buds
https://www.amazon.com/gp/aw/d/B01GXHQIKO?psc=1&ref=yo_pop_mb_pd_t2
Surge protectors and ext cords
Find anywhere
Inline fans
https://www.amazon.com/gp/aw/d/B01M7S46YZ?psc=1&ref=yo_pop_mb_pd_t2
Soil probe
https://www.amazon.com/gp/aw/d/B017GQ9VVY/ref=yo_ii_img?ie=UTF8&psc=1
A few other things I got locally from grow shops. Quality seeds are important. Greenpointseeds.com is always having bomb sales, ship from Colorado, and are top quality. Soil from local grow shops but can also buy from online. I went cheaper on light, but I wouldn't do that again. Get good quality lights.
thanks, it’s the Lihit Lab Compact Pencil Case
https://www.amazon.com/LIHIT-Compact-Pencil-Repellent-A7687-24/dp/B01BD0GPKO/ref=sr_1_5?crid=2QGHJFWJYBTCZ&keywords=lihit+lab+pen+case&qid=1572845472&sprefix=lihit+la%2Caps%2C190&sr=8-5
If you're in the states, get yourself a Molotow Liquid Chrome marker.
Molotow Amazon Link For Reference.
Molotow ONE4ALL Acrylic Paint Pump Marker, 1mm, Liquid Chrome, 1 Each (703.101) https://www.amazon.com/dp/B01E7EFSVU/ref=cm_sw_r_cp_api_GxA0AbTVJ739B
https://www.amazon.com/BLACK-2-0-mattest-flattest-material/dp/B0758GKKGZ
$19 for a bottle on Amazon. It's dark, but it's no Vantablack.
What kind of scope?
For a Newtonian, you can get those kinds of concrete forming tubes from places like Lowes and the Home Despot. They're just heavy cardboard, and last pretty well, but I'd definitely recommend painting it with something that will provide protection. Painting it flat black inside and/or flocking it is a good idea too. (I found a paint online, Black 2.0, which claims to be the flattest black paint available to the general public, except if your name happens to be Anish Kapoor). I bought some and it is pretty damn black. I ended up not using it to paint the inside of my scope, but I might use it on my 80mm refractor. Not cheap, but really, really black. Not Vanta Black level black, but as closes as you can buy.
Couple to 3 weeks
https://www.growweedeasy.com/harvest#trichome-method
Check this out at Amazon.com
JARLINK 30X 60X Illuminated Jewelers Eye Loupe Magnifier, Foldable Jewelry Magnifier with Bright LED Light for Gems, Jewelry, Coins, Stamps, etc https://www.amazon.com/dp/B078N34WZR/ref=cm_sw_r_other_apa_i_5YxWCb03A89GS
It is hard for me to tell from this picture. But I can see your plant is very healthy at this late stage, so you have little to lose by erring on the side of waiting another week or more. Of course I agree with those who said to use the trichomes as your guide as soon as you are able.
This little guy works really well and is only $8.99:
https://www.amazon.com/gp/product/B078N34WZR/ref=ppx_yo_dt_b_asin_title_o01_s00?ie=UTF8&psc=1
Was the one you bought by any chance this set? If it's that set, or one that looks like it, then all of the bigger markers are mainly for detail painting. The smaller one is intended for panel lining, but I'd suggest at least getting a black lining marker too, since gray is too light for many colors.
If I plan on painting the kit, I cut every pieces out so that I can paint them all at once. However, I organize pieces into sections - L/R legs, L/R arms and so on. When I paint, each section goes on their on tray to prevent confusion. I have been building long enough that, even if I mix the parts together, I should be able to find what I need.
I try not to mix PG parts though. That's like finding that one piece you need in a pile of Lego.
-----
>cheap clippers to cut from the runner and then to try and cut closer to the part.
That's the cause of your problem. You should be using a sharp nipper and cut further away to the piece, then shave it down with a very sharp hobby knife or, if the gate is thin enough, cut against the piece with your nipper.
------
It is possible to polish the part with sanding only, however, it will take a lot of time and quite a bit of sand papers. Here is how I often hide my sanding
For the major borders I used a Medium .7mm and for the stairs and fine details, as well as the crosshatched border a Small .3mm
I use Faber-Castell artist pens. Go through them fairly fast but they give me awesome lines. I just wish the Medium .7mm was actually a .8mm hhahaaha
Here is a link: http://www.amazon.com/Pitt-Artist-Pens-Wallet-Styles/dp/B000TKEZDO
http://www.amazon.co.uk/Faber-Castell-Artist-Wallet-Black-Sizes/dp/B000TKEZDO/ref=sr_1_2?ie=UTF8&qid=1376688255&sr=8-2&keywords=faber-castell+pens
The "B" pen :L
Actual pen says - Faber-Castell PITT artist pen, Black 199***
https://www.amazon.com/Sharpie-Paint-MParker-White-35568/dp/B0026HC9F4
Ok thanks I'll look into that.
Something like this
http://www.amazon.com/Sharpie-Paint-Marker-White-SN35568/dp/B0026HC9F4
??
i've got some all white NMD's and i've tried so hard to clean them. Washing machine, hand washing, jason markk, etc. Nothing works. they are still yellowing. never getting all white shoes again
What I did find is using an oil based white sharpie on the boost is MAGIC. (https://www.amazon.com/Sharpie-Paint-MParker-White-35568/dp/B0026HC9F4) the boost looks brand new after a coat of it
Should I use [this sort of putty stuff] (http://www.amazon.co.uk/Milliput-Superfine-White-Epoxy-Putty/dp/B002CNEWAM/ref=sr_1_5?ie=UTF8&qid=1410973369&sr=8-5&keywords=2+part+epoxy) or the liquidy type?
edit: just found this stuff... do you think it might work?
Welcome to the world of moldmaking. I've had moderate success using this method:
You'll need Instant Mold - a low temp plastic that hot water will make maleable.
And Milliput - a 2 part putty.
Put the Instant Mold in hot water, let it soften. Pull it out and press your base into it. Hold it under cold water so it 'hardens'. Peel out your base and you'll have a negative mold. Use the Putty to fill the negative mold, let it harden overnight and then pull out the hardened putty base. It'll probably need some cleanup around the edges but you're done.
I use Devcon Plastic Welder to bond parts, and Milliput Superfine White as additional structural support and filler and to blend the shells together.
Ain't this the same stuff?
https://www.amazon.ca/Green-Stuff-Kneadatite-sculpting-Painter/dp/B001AE5ZQO/ref=sr_1_2?ie=UTF8&qid=1498139132&sr=8-2&keywords=green+stuff
Amazon.ca is showing alternatives too...
https://www.amazon.ca/Milliput-Superfine-White-Epoxy-Putty/dp/B002CNEWAM/ref=sr_1_1?ie=UTF8&qid=1498139132&sr=8-1&keywords=green+stuff
Look for Canadian sculptor/mouldmaker people and/or propmakers working in Resin, and you'll find the right kind of stores I think :P
Fill with this stuff?
To add to the good info above: for KDM miniatures you are pretty much guaranteed to need to use putty/epoxy for the gaps on them if you want them to look good painted. Most of the big monsters will have some very noticeable gaps when put together, and it is fairly common on some of the armor kit survivors too (especially the unarmored kit mentioned above - serious issues with "ken doll" arm sockets).
For larger gaps, I prefer milliput superfine white. It is firm enough you can shape it (add water to help change consistency if needed).
https://www.amazon.com/Milliput-Superfine-2-Part-Hardening-Putty/dp/B002CNEWAM
For smaller hairline graps, I really like Vallejo Plastic Putty. It doesn't require pre mixing and is easier to work with if you just need to get it into a tiny gap. Usually apply it then wipe off with wet cloth.
https://www.amazon.com/gp/product/B000PHCNLC
Keep up
Sharpie paint pen.
https://www.amazon.com/Sharpie-Oil-Based-Markers-Assorted-5-Count/dp/B003YDYO1Q/ref=sr_1_4?s=arts-crafts&ie=UTF8&qid=1497493379&sr=1-4&keywords=paint+pens
Those are the same ones I use. Alot of the celebrities comment on his much nicer they look when they sign
I have a $10 limit for my secret Santa at work and I found a set of wine glasses (4 of them) at a local thrift store for $1.50. I was stoked! I saw this thing on Pinterest about using paint pens on wine glasses so I went to Michaels with a 50% off coupon (they have one almost every week if you sign up for their emails) and bought these markers for about $6. I haven't tried it yet, and you have to bake the glass, but I imagine you can do it with any kind of glassware and would probably only need one set of markers to cover everyone? Thrift stores are also a great place to find vases for this type of project :)
Thank you! I painted it with a white oil-based sharpie - Link (But I got a single one from wal-mart for something like $2.50
This was all done free hand, I didn't plan anything out or sketch beforehand/etc. You can tell when you look fairly close that there are some drips and unintended splotches that I just worked into the design. I knew that if I planned it out beforehand I'd over-think everything and I would never actually paint it!
Damn, lol how about Fat Old Fred then?
Λολ. Θα πάρω και το recommended προιόν από κάτω.
I see your.... Whatever it is and raise you Fat Old Fred http://www.amazon.com/Life-Form-LF03749U-Fred-Black/dp/B004JOB9Z8/ref=pd_sim_sbs_indust_2
Airbrush Booth - You really shouldn't breath in the fumes. If you are painting indoors, you should use something like this to capture and filter the overspray/fumes. This is in addition to wearing a mask. You will see people in youtube tutorials not wearing masks and not using a booth - it's really bad practice if you care about your brain cells. I like the one below, but the fan is louder than the compressor.
80$ on Amazon https://www.amazon.com/Master-Airbrush®-Portable-Airbrush-Painting/dp/B00BMUH8L6?ie=UTF8&ref_=pe_385040_128020140_TE_3p_dp_1
$20- Paint mask/respirator - See notes above. I use one designed for spray painting.
https://www.amazon.com/3M-07192-Paint-Spray-Medium/dp/B0002STR22/ref=sr_1_1?ie=UTF8&qid=1469825823&sr=8-1&keywords=Spray+paint+mask
Airbrush - I recommend starting cheap until you get a hang of it. It's easy to damage parts. It's been a while since I've researched, so I apologize for having forgotten the terms. You want an airbrush that is fed from a cup on top (gravity fed?), a trigger to control the air separately from the paint (maybe called dual action?), and needles .2 to .5mm. This airbrush came with a quick connect (to snap on and off of the compressor hose), which is a big convenience. They are cheap if you need to buy separately.
$30 https://www.amazon.com/PointZero-Precision-Airbrush-Valve-Crenelated/dp/B004KNDQMM?ie=UTF8&ref_=pe_385040_128020140_TE_3p_dp_1
$10Airbrush cleaner fluid and brushes - to flush the airbrush and clean it after use.
$10- Airbrush cleaning pot - You spray cleaner and excess paint into this.
https://www.amazon.com/gp/product/B005H46T0O/ref=od_aui_detailpages01?ie=UTF8&psc=1
90$ - Compressor with Tank - The separate tank is key, it will maintain constant pressure very well and provide good steady flow. This one is pretty quiet as compressors go, but still noisy enough that you need to work behind a closed door.
https://www.amazon.com/PointZero-Portable-Airbrush-Compressor-Oil-less/dp/B004KNDQCM?ie=UTF8&ref_=pe_385040_128020140_TE_3p_dp_2
$10 - Airbrush hose- https://www.amazon.com/PointZero-Airbrush-Braided-Air-Hose/dp/B004KNAH7E?ie=UTF8&ref_=pe_385040_128020140_TE_3p_dp_5
All in, it cost me $250 before paint.
I have this one as a second compressor and have had no issues. I have a larger noisy one from Home Depot I use in the garage or outdoors but for indoor use the one I linked sits under my work table.
If you are in the US I would recommend the badger airbrushs I have had great luck with mine.
I think the one I have is:
https://www.amazon.com/Badger-Air-Brush-R1V-Renegade-Velocity/dp/B0013NBQLA/ref=sr_1_13?ie=UTF8&qid=1526884557&sr=8-13&keywords=Badger+airbrush
Get a gravity feed airbrush, they require lower psi to work and are just easier.
For a compressor get one with a tank it will give a nice consistent air flow. Something like this is a decent starter compressor:
https://www.amazon.com/PointZero-HP-Airbrush-Compressor-Portable/dp/B004KNDQCM/ref=sr_1_12_sspa?ie=UTF8&qid=1526884681&sr=8-12-spons&keywords=Badger+airbrush&psc=1
I'm pretty new to airbrushing but I recently got this airbrush and I found it suits my needs. I wanted a compressor that had a tank so I had steady airflow, a regulator, and a water trap and this unit has all three for a reasonable price. At first I went to hobby lobby too but I found all their compressors were pretty expensive even after the discount. So, I don't have any recommendations from the list but the point zero compressor is solid for the price.
You don't need anything heavy duty for airbrushing, but get one with a tank for sure.
I use this one: http://www.amazon.com/gp/product/B004KNDQCM but it seems to no longer be available. It's quiet enough that I can close a door and barely hear it from the other room. Cost around $80, so target a price in that area.
From what I've read the expensive 'name brand' ones don't seem to be worth the extra price and you should just be prepared to replace the compressor every few years.
Here's my Airbrush History
That's pretty much it from my personal experience... If you have any questions let me know and I'll try to answer it for you.
Best part is the total for my Airbrush/Compressor Combo's I both bought under $100.
COPY PASTED FROM MY RESPONSE ELSEWHERE
I use this http://www.amazon.com/Best-Choice-Products%C2%AE-Airbrush-Extractory/dp/B004ZH7RSM/ref=sr_1_2?ie=UTF8&qid=1420160560&sr=8-2&keywords=spray+booth when airbrushing. Works well for what you pay for it, suction is good and the filter catches most particles. Make sure you get a spare filter or two, they get clogged pretty fast.
Thanks! I've looked at a few spray booths, specifically this one. Any recommendations?
So I have decided on getting a spray booth.
Does this one look alright?
https://www.amazon.com/gp/aw/d/B004ZH7RSM/ref=mp_s_a_1_5?ie=UTF8&qid=1481355048&sr=8-5&pi=AC_SX236_SY340_QL65&keywords=spray+booth&dpPl=1&dpID=51DA5SIaCrL&ref=plSrch
I use these bead storage containers - I think a lot of people here use the same ones! There's also one with 30 jars. I usually get mine on Amazon, but you can get them at Michaels or other craft stores too.
Chiming in because I'm a loudmouth: I can't compare old sample sizes to new, because I just received my first order, but I felt my samples were pretty generous. For only $1, there's enough there for multiple applications of each product. They shadows are so pigmented and cover/blend so easily, you can get away with using the tiniest little amount. I bet I could get at LEAST ten uses out of each sample - at the very least. Probably more! I got little plastic jars from Amazon because I didn't want to screw around with the baggies, and then I just emptied the baggies into the jars. The circular label stickers from the bags fit pretty neatly on the jar lids, and the sample fills about 1/3 of the jar.
I have this container that's designed for holding small beads, works great to keeping parts contained, and secured if needed. Similar to this
Yknow, I almost got you some Performance Colors pressed shadows in the exchange, but I couldn't decide what colors to get you.
As far as storage, I found this at my local Micheals. There's also a 30 pc version for a couple bucks cheaper.
If you like Jasmine, sixteen92's Hellebore is so good. You might like Ex Tenebris Lux too.
And if you need brushes, BH Cosmetics is running a good sale right now.
Scotty Peelers are amazing! I bought some of them specifically for removing stickers from Gamestop cases after I bought them after I got tired of peeling them off by hand, having sticky residue left behind, then having my game cases stick together in the shelf.
Any small amount of residue left behind can easily be wiped away with Goo Gone and a washcloth.
Get a set of these Scotty Peelers. For sticky residue you can use rubbing alcohol or Goo Gone. I've also seen people suggest lighter fluid or hairspray, although I've not personally used either.
absolutely. For most, Goo Gone and a rag will work. For very stuck on ones, I have a Wagner heat gun that I will blast it for a few seconds and it will lift right off.
Scotty Peelers are also a very useful tool for removing stickers.
https://www.amazon.com/Scotty-Peeler-Label-Sticker-Removers/dp/B0068QIQVA
Scotty Peeler is the god at removing price stickers. You will also need to use blow dryer/heat gun to activate the glue, whilst removing the tag. Check youtube for more info.
If there is some glue leftover (usually the case for old old tag) then you can try using googone or similar products.
I know you already have it off, but wanted to share for anyone else removing stickers. Scotty peeler was a life changer for me and boat stickers, and now any stickers.
https://www.amazon.com/dp/B0068QIQVA/
I have a lot of leftover double-sided LCD screen tape, so I just used that. It comes off without any damage, fading, or residue after months of staying on the Joycon. I suspect you could probably use regular 3M double-sided tape without issue though.
I would go with a phone adhesive tape https://www.amazon.com/Eco-Fused-Adhesive-Sticker-Phone-Repair/dp/B00BXYWXY8 It's a quick fix until you get a replacement, or you could apply a wet glue (specific for phone) if you want to use it more. In my experience, the tape will be fine for a while.
It is better to use this stuff, http://www.amazon.com/Eco-Fused-Adhesive-Sticker-Phone-Repair/dp/B00BXYWXY8
That is what was used in the first place. Remove the tape, place new, and compress.
I see, maybe try this: Adhesive Sticker Tape for Use in Cell Phone Repair - 2mm Tape - als... http://www.amazon.com/dp/B00BXYWXY8/ref=cm_sw_r_udp_awd_72jfvb14M5AGV
You don't "need" to put an adhesive, but if you don't, you risk dust getting beneath your lens and stuck onto the screen, which obviously isn't ideal.
I put 3mm double sided sticky tape. I used this one from Amazon.
You might be able to find a smaller roll of tape, but you really don't want to go more than 7mm IMO. I chose 3mm because I use it for other projects. I just put two tape pieces like this along every edge of the screen:
||
And definitely no glue unless you want to risk a runny mess and never take off your lens again.
It's hard to tell through a picture since we don't know the strain..If you know the strain, look it up and see what it generally flowers for.
To be certain of when your plant is finishing, I highly suggest getting a Jewelers Loupe, Kinda like a magnifying glass, will allow you to see the trichomes go from clear to cloudy to amber.
https://www.amazon.com/Illuminated-Jewelers-Magnifier-Magnifying-Lighting/dp/B00K0BGNNC/ref=sr_1_3?s=arts-crafts&ie=UTF8&qid=1510069533&sr=1-3&keywords=jewelers+loupe+100x
When i was in the market for one, and not willing to spend a shit ton on it, most forums/people told me to got for this
Like Supremecowboy said, perhaps some nutrient issues, and probably a couple weeks left (2 at most, based on pic, but we need more info).
Got a nice fade going on with the leaves, but the buds look as if they have stalled - they tend to get fatter/taller during flower, but this could be related to the strain itself.
Hard to tell with this kind of picture. One glaring "issue" is that we see no trichs/crystals on the base of the leaves close to the bud..
What're the specs? Days flowering, nutes, light, etc
The only way to tell if she's ready is by looking closely (get a loupe ) at the trichs.
Looks tasty no matter what, tho!
This one. To take these photos, i align the 30x with my camera lens and use one of these chip clip things to hold it in place
FWIW, I bought this one below and it works pretty well - it has a LED that really helps illuminate the trichs. I tried one that clips onto the phone lens but couldnt' get a good pic and returned it.
https://www.amazon.com/gp/product/B00K0BGNNC/ref=oh_aui_search_detailpage?ie=UTF8&psc=1
I bought one of the USB ones with a stand that does photos and videos and I think it's worthless for trying to look at the live plant. Trying to hold the camera still, the plant still, adjust the focus and look at your laptop screen and capture a photo... a lot to do at once. Plus the photos are potato quality.
I got this loupe and it works great.
http://www.amazon.com/gp/product/B00K0BGNNC?psc=1&redirect=true&ref_=oh_aui_detailpage_o01_s00
Honestly, though, I got a super inexpensive swift on amazon, and a KP winder. Best investment ever.
https://www.amazon.com/Cutehill-Umbrella-Operated-Knitting-Winding/dp/B00VGD39O4/ref=redir_mobile_desktop?_encoding=UTF8&psc=1&ref_=ppx_yo_mob_b_inactive_ship_o0_img
https://www.amazon.com/Knit-Picks-Yarn-Ball-Winder/dp/B00O3GHFA0/ref=sr_1_4?keywords=yarn+winder&qid=1573524391&s=arts-crafts&sr=1-4
So if you have prime, or know someone with it, for $30 you've got your setup
Thanks! I use the knitpicks ball winder. This one in particular! I do hold tension on my yarn while winding and I bent the metal holder to fit the large ball lol Knit Picks Yarn Ball Winder https://www.amazon.com/dp/B00O3GHFA0/ref=cm_sw_r_cp_apa_i_p.HPCb2F75KKG
Hi! Thanks! I use this It’s $19.99 on Amazon, very affordable. It’s nice to have the right tools.
I lost weight and now my ring is too big, but I don't want to resize it until I'm sure that my finger is staying the same size it is. I bought this temporary ring resizer on Amazon and it's awesome. It's just a tiny PVC tube cut into a spiral that you twist onto the ring. Can't fall off, rotates easily so you can put the ring on easily, and it's not visible from the outside of my hand. It comes with a few sizes too so you can get the fit exactly right. If the "wait for the wedding band to hold it in place" solution is your favorite option, this might be a good temporary solution.
I can take a picture of my hand if you want to see how it looks, just let me know!
Forget about your worries and your strifes - politics is such a pain. You want to be involved but the negativity and futility gets to you after a while. Ugh...
I really need these ring sizers. I've lost some weight and two of the rings I wear all the time no longer fit! Booo... Anyway, here's some sage advice from Rick.
My ex had this problem for different health reasons but the result was the same. She used https://www.amazon.com/RinGuard-Ring-Size-Adjuster-Sizes/dp/B00PI0T25Q these ring size adjusters and then got the rings in the sizes that fit her when her fingers were swollen. Hope that helps OP
waiting to go to an expert to have it resized, I've seen some transparent rubber thinghies to make it narrower on he inside, look them up on amazon, for example:
https://www.amazon.com/RinGuard-Adjuster-Jewelry-Polishing-Cloth/dp/B00PI0T25Q
an alternative is a nail polish like substance that dries and becomes rubber after you paint it on the inside to shrink the hole
I just bought these- RinGuard Ring Size Adjuster (Set of 3 Sizes) https://www.amazon.com/dp/B00PI0T25Q/ref=cm_sw_r_cp_apa_rjVuyb994MP6R
It's just cut plastic tubing but it works, I just wrapped one around my wedding and engagement ring and it holds them together as well so it feels even more secure.
Here's enough for around 200 TO-220 transistors
It's possible that it's real, gold leaf is extremely inexpensive.
Doesn't look too expensive honestly. $15 for 100 2" square sheets doesn't sound that bad.
Surprisingly not as expensive as you would think.
https://www.amazon.com/Gold-Leaf-Sheets-1000-Real/dp/B00VALQQ60
​
$.12 a sheet.
This is excessive and wasteful, but putting it on a burger and selling it for $100 or whatever is just duping gullible rich people. It's like (at most) $5 worth of gold on a $12 burger.
Gold foil sheets are actually not outrageously priced. Here's an example from Amazon 25 sheets for $43 bucks.
Gold gilded sheets are even less expensive, 100 for $13, not much more expensive than any other kind of fancy decorative supply.
How about this?
https://www.amazon.com/LIHIT-Compact-Pencil-Repellent-A7687-24/dp/B01BD0GPKO/ref=pd_sbs_229_7?_encoding=UTF8&pd_rd_i=B01BD0GPKO&pd_rd_r=50e00fb8-36c1-11e9-80dc-db96b6b7be1a&pd_rd_w=IcGEs&pd_rd_wg=sX9cO&pf_rd_p=588939de-d3f8-42f1-a3d8-d556eae5797d&pf_rd_r=CH3727G4YSSBNMR8Y315&psc=1&refRID=CH3727G4YSSBNMR8Y315
I have one. I store 5 sketch pens in it, and 3-4 fountain pens as well.
Amazon link: LIHIT LAB. Compact Pen Case (Pencil Case), Water & Stain Repellent, Black, 3.5" x 6.5'' (A7687-24) https://www.amazon.com/dp/B01BD0GPKO/ref=cm_sw_r_cp_apa_i_mTjTDb0290ZR2
If you are still looking, I have this one right here that i use for school: https://www.amazon.com/gp/product/B01BD0GPKO/ref=ppx_yo_dt_b_asin_title_o02_s00?ie=UTF8&psc=1
Its a great case that i throw in my backpack with all my pens lol. I have 3 fountain pens on one side, and 2 mechanical pencils plus 2 erasers on the other. Heres a link to what mine looks like: https://imgur.com/oYv6BbU
EDIT: Sorry i posted this before seeing that you were looking for something with separate spaces for pens.
You can polish the blade with mothers mag polish or somthing simular, and you can patch the handle with sugru
Sugru that shit back together! Cheaper than getting a new bong.
https://www.amazon.com/Sugru-Moldable-Glue-SBLK3-Black/dp/B01BFE0KNQ/ref=sr_1_3?ie=UTF8&qid=1473193684&sr=8-3&keywords=sugru
Shit is fucking magic, I had a similar thing happen to an ash catcher.
http://i.imgur.com/fSZDR9S.jpg
Works great.
Pic of the broken part? Used is definitely the best option, but could the broken part be put back on? Little super glue? Depending if there is a lever you can put some Sugru on it as a nice grip that won't cut your finger.
https://www.amazon.com/Sugru-Mouldable-Glue-Original-Formula/dp/B01BFE0KNQ/
Sure, here it is on amazon:
Moloto Liquid Chrome
https://www.amazon.com/dp/B01E7EFSVU/ref=cm_sw_r_cp_awdb_t1_pve4BbEQ8EQP4
Looks like they have different size tips, I was able to get the 1mm one at hobby shops near me
Used a Molotow marker
https://www.amazon.com/Molotow-Liquid-Chrome-Marker-1Mm/dp/B01E7EFSVU
model masters flat black.
also if you wanted to try a chrome look these are pretty good: https://www.amazon.com/gp/product/B01E7EFSVU/
I got mine through Amazon.
https://www.amazon.com/gp/aw/d/B01E7EFSVU/ref=mp_s_a_1_3?ie=UTF8&qid=1481870577&sr=8-3&pi=SX200_QL40&keywords=molotow+liquid+chrome&dpPl=1&dpID=414sZoEl3EL&ref=plSrch
If Amazon isn't an option for you, try going to Molotow.com to see if they can get you a link to a local supplier. I'm in Oregon and even ordering it through Amazon, it ended up coming from the U.K., so it took several weeks to get here.
[Neighborhood of $28] (https://www.amazon.com/BLACK-2-0-mattest-flattest-material/dp/B0758GKKGZ). Considering that's over 6oz, it's pretty reasonable compared to, say, GW paints.
Black 2.0 is on Amazon.
https://www.amazon.com/Stuart-Semple-mattest-flattest-acrylic/dp/B0758GKKGZ
maybe rethink your black. It's not Vanta black , but the fun disclosures and agreements made me believe it's something close. I'd take pictures but even my most non potato cameras can't capture it without a light box but here's an article
Also if you can purchase this for nine bucks.
https://www.amazon.com/JARLINK-Illuminated-Jewelers-Magnifier-Foldable/dp/B078N34WZR
This will tell you for sure if you have a mite problem.
I was looking at the photo more and Some of the white specs look like you dropped some kind of white dust or something on them so in the picture I can have no way of telling whether this is mites or not but if you purchase this microscope and look on under the leaves you will see them
Purchase a jeweler's loupe.
Use it to look at the individual trichomes (crystals) on the buds. They will initially be glassy clear and will look like small mushrooms. Then will begin to turn cloudy/milky as the buds mature. Then amber. When about 30-40% of the trichomes are amber, she's ready. This will give you the most potent buds and the most accurate expression of the plant.
Looking great though!
From Amazon: https://www.amazon.com/dp/B078N34WZR/ref=cm_sw_r_cp_apap_taOSjJI7Urjft
This picture was taken with the 30x magnification lens on the loupe with a Pixel 3. More importantly, my OtterBox Commuter case was still on, which provides a small gap between the lens and the loupe, which takes clearer pictures.
So Pixel 3 in the case, and the lens held directly to the case, if that makes sense. Hope this helps!
I just bought this one today that a fellow redditor from this sub recommended me
I'd suggest picking up one of these for $10:
https://www.amazon.com/JARLINK-Illuminated-Jewelers-Magnifier-Foldable/dp/B078N34WZR
But if you are at all serious about edge performance I would highly recommend stepping up to a USB microscope. I've got this one and I am very happy with it:
https://www.amazon.com/dp/B00XNYXQHE
but I'd be willing to bet this one is going to be more than good enough at half the price:https://www.amazon.com/Jiusion-Magnification-Endoscope-Microscope-Compatible/dp/B06WD843ZMAnd for reference here, you'll need to step up to the $150 price point to get anything appreciably better. I have yet to see any reports of anything in the $40 - $150 price range that is any better than what you can get at the $40 price point.
In my opinion, once you've spent $100 on sharpening kit you'll get far more value from one of these cheap USB microscopes than anything else you can buy.
I got a two pack on amazon for under $10.
JARLINK 30X 60X Illuminated Jewelers Eye Loupe Magnifier, Foldable Jewelry Magnifier with Bright LED Light for Gems, Jewelry, Coins, Stamps, etc https://www.amazon.com/dp/B078N34WZR/ref=cm_sw_r_cp_api_i_TqlKDbP81PPA4
I bought this loupe and use my phone’s camera:
https://www.amazon.com/dp/B078N34WZR/ref=cm_sw_r_cp_api_i_7hFRDbT12N633
Here's the basic set that is associated to the classic Gundam colors. There are many more sets that you can buy if you are willing to search around for them.
Thanks! I use some paint pens! GSI Creos Gundam Marker Basic Set (6 Markers) https://www.amazon.com/dp/B0009AFN0S/ref=cm_sw_r_cp_api_i_9qmsDbBKTQP2B
Those are the ones I use. Take some getting used to. So practice on some junk castings first 😆😂
So i just got back from Asia and got a haul of HG and one RG and MG. I'm just getting back into Gunpla after a 10~year hiatus, and want to take a step up in to beginner level painting/panel lining/etc instead of just straight builds.
Some 1/144s I got that I want to start working on:
HGBF X-1 FullCloth (the one Lucas used in BFT)
V2 AB
HG Wing0
HGBF Wing Honoo? (Its a red.... Wing gundam?)
HD X Divider
I dont know the first thing about painting, and have watched some tutorials here and on youtube.
Gundam Marker basic set
Gundam Marker Metallic
Thanks in advance for the random questions.
Might this be something like you were talking about?
https://www.amazon.com/GSI-Creos-Gundam-Marker-Markers/dp/B0009AFN0S
Cut with these
Sand with this
Fill in stressed plastic with these
A general pack like this, is a good starting point. If at some point you need a color outside of that set, try searching for an apporpriate color through hobbywave, or robot4less.
http://www.amazon.com/GSI-Creos-Gundam-Marker-Markers/dp/B0009AFN0S/ref=cm_lmf_tit_6
You can also use one of these for panel lining:
http://www.amazon.com/Gundam-GM01-Black-Fine-Line/dp/B0027ORJ10/ref=pd_sim_t_4
Hey everyone!
I'm as new as it gets. So, I made a shopping list after doing some research on everything that I think I need to start. I'll place the links to all the items in the lines below. Everything is on Amazon because... well why not?
Gundam
Glue
Marker
Tweezers
Knife
Cutters
Mat
More Markers!
*Krylon Matte Finish
Am I missing anything?
This is what I got. They shake like paint pens do, so I figured they were the same.
Thank you.
What is the purpose of the yellow, red and blue pens if you are just going to use the grey, black and brown ones?
So this was my first gunpla! I got impatient waiting for my gundam markers to come in (which are taking forever!) so i decided to try my hand at lining and using the decals. I wanted to put one i cared a little less about before i put together my SD Freedom Gundam. I was thinking about doing Freedom with some orange instead of blue (maybe), but wasn't sure how to do a metallic-ish orange without an airbrush :P
Thank you, which markers should I pick up? these?
http://www.amazon.com/gp/product/B0009AFN0S/ref=ox_sc_act_title_4?ie=UTF8&psc=1&smid=A9Q1SRRTDFE7O
I bought the set of gundam markers in the link below. However, when I tried to apply the gray, the gray looked darker than the gray from the runner. I smeared it to give it a feather effect but it was still too dark to be the same color. Am I suppose to let it dry first and then it would be the same shade of gray?
Also, this shade of gray of course only works of the darker one. What color is the one from the legs? Can't be th white one.... can it?
Lastly, is there a marker for epyon's color scheme if I want to continue with this method for epyon?
http://www.amazon.com/gp/product/B0009AFN0S/ref=oh_aui_detailpage_o04_s01?ie=UTF8&psc=1
For fineliners, I would highly recommend Faber-Castell Pitt Artist Pens, in the thinnest tip size. But if you're going to get these, I HIGHLY recommend buying the pack with all 4 tip sizes and picking the one you like best, since a lot of people have different preferences. All the sizes will come in handy at some point for bullet journalling. They're about $10 on Amazon for the 4 pack.
If you're a student and you're planning on using your bujo to write down HW and/or you also wanna be a bit more cost efficient, I recommend gel pens. It gets really annoying to have to switch between a fineliner for writing HW and stuff in my journal and using a pen to take notes or do something for class (which is why I use a fineliner in the summer and a gel pen during the school year LOL). I recommend the Pentel Energel Gel Pen, in the 0.3 mm size. They dry super quick, so they're great to use for highlighting or if you're a leftie. And they look just as nice as a fineliner on your standard journal paper. Also great for taking notes in school because of the quick drying time. To save money, what I do is use an existing pen body I have (I have a zebra sarasa pen body) and just replace the existing ink with Pentel Energel refills. A pack of 12 refills is $11 on Amazon. I bought the refill pack a year and a half ago and still have 5 refills left. Or if you want the actual pen itself, it's $7 for a pack of 3.
Hope this helped!
CROCODILE DUNDEE!!!!! :D Now that's a knife!
Dude. Big Trouble In Little China on the big screen is awesomesauce. Resevoir Dogs is another good one of mine.
Baby Bunnies. Precious. Baby. Bunnies. Cuteness. Precious. Darlings. Sweethearts!
Pens to draw bunnies!
<3 <3 <3 <3 <3BUNNAHZZZZZ<3 <3 <3 <3 <3
cheesecake all day everyday
My favourite dessert are profiteroles mmmmmmmmmmm.
Item under $15
Draw stuff! That's what I did when my internet was out for a whole week.
Tomorrow, 9AM.
Linky
Faber-Castell Pitt Artist Pens
They go easily over acrylic paint and make really smooth lines. Lots of painters who do black outlines use them because they are more exact. I use the "brush" one and the others are good for smaller projects or watercolors. I would not recommend using anything other than the brush-tip one for paintings because the tips are too hard and much gouge the paint or ruin your pen tip.
Heres a link to the pens. I bought it off of amazon. I use the superfine size normally. Faber-Castell PITT Artists' Pen Set Black. https://www.amazon.ca/dp/B000TKEZDO/ref=cm_sw_r_sms_apa_DN1czb14KM9FM
A decent sketch pad is just better than any notebook or printer paper you probably have lying around.
My favorite pens are these
This particular pack of 4 has different tip sizes. I can use all 4 of them on one good piece. Not use them up, just use each one of them.
If you want to up your game, you can use any kind of graphite pencil (even a regular #2) and some tortillons for shading. It took me a while to brave shading but it was a game changer when I took the leap.
I just pinterest for "Zentangle Patterns" and stick them all on a board and go for it. You'll build off of them and use borders. Where you find empty space, you can just search your board for something that compliments or contrasts and fits your space.
I'm real proud of the ones I've done and get a lot of compliments. I guess it means a lot because I literally can't draw a car or a dog.
Oil pens
The best thing for painting the boost is the sharpie oil markers
https://www.amazon.com/Sharpie-Paint-MParker-White-35568/dp/B0026HC9F4
Amazon.com: Sharpie Oil Paint MParker Bold White (35568 ...
they do make one:
http://www.amazon.com/Sharpie-Paint-Marker-White-SN35568/dp/B0026HC9F4
If I remember correctly, people were using a white sharpie. Use the search bar.
Edit: http://www.amazon.com/Sharpie-Paint-Marker-White-SN35568/dp/B0026HC9F4
The feet are indeed terrible, and so are the backs of the legs. The upside is that those parts are hollow because they're going to be seen the least, so you don't have to make it perfect. I gave up on making it perfect at least, too much work.
I use Milliput Superfine for most of it. It's suitable for large fillings. I then use some tamiya basic putty over any little cracks left over, that's the gray stuff, since it shrinks and is more suited for small fillings and since it's just easier.
I'm assembling Skitarii from Warhammer 40k atm, and I'm really struggling with liquid greenstuff. It's total crap.
While glueing I pressed the edges together and it looked nice. There even came a bit melted plastic out of the line, so I sanded it down but there is still a very small visible gap.
The thing is, it is really distracting because it goes across the cloak of the mini... Would Milliput work to get a smooth surface?
&#x200B;
https://www.amazon.de/Milliput-Epoxy-Putty-superfein-weiß/dp/B002CNEWAM/ref=sr_1_1?s=toys&ie=UTF8&qid=1537424527&sr=1-1&keywords=miliput
is this the right one?
I'm going to be buying one of two different epoxy fillers.
https://www.amazon.co.uk/Milliput-Epoxy-Putty-Superfine-White/dp/B002CNEWAM/ref=sr_1_1?ie=UTF8&amp;qid=1480860814&amp;sr=8-1&amp;keywords=white+epoxy
or
https://www.amazon.co.uk/gp/product/B004NB3OMS/ref=ox_sc_act_title_3?ie=UTF8&amp;psc=1&amp;smid=A3P5ROKL5A1OLE
I've been reccomended the second one but the issue is that it means I'll have to paint it since it's a browny tan colour cure. Therefore might end up buying the white Milliput instead.
This is Milliput Superfine White, http://www.amazon.ca/dp/B002CNEWAM
Milliput is pretty good at this.
https://www.amazon.com/Milliput-Superfine-2-Part-Hardening-Putty/dp/B002CNEWAM/ref=sr_1_2?ie=UTF8&amp;qid=1527463101&amp;sr=8-2&amp;keywords=milliput
use these. you can re-apply after crashes to keep looking fresh
I've heard oil markers work really well
like these:
https://www.amazon.com/Sharpie-Oil-Based-Markers-Assorted-Metallic/dp/B003YDYO1Q/ref=ice_ac_b_dpb?s=office-products&amp;ie=UTF8&amp;qid=1526382073&amp;sr=1-1&amp;keywords=sharpie+paint+pen
https://www.amazon.com/Nasco-Fat-Old-Fred-Black/dp/B004JOB9Z8/ref=pd_sbs_121_5?_encoding=UTF8&amp;psc=1&amp;refRID=D5ZRJS30VP37S4PZDENY
Your order has been added to your cart
https://www.amazon.com/Nasco-Fat-Old-Fred-Black/dp/B004JOB9Z8
u know how satisfied u will nbe if uy clicj on one foi rthese linkish
https://www.amazon.com/Uncle-Jims-Worm-Farm-Composting/dp/B000Q5S7RM/ref=sr_1_1?ie=UTF8&amp;qid=1491257886&amp;sr=8-1&amp;keywords=worms
https://www.amazon.com/Dummy-Display-Phone-Model-Non-working/dp/B01MTVDPOQ/ref=sr_1_1?ie=UTF8&amp;qid=1491257901&amp;sr=8-1&amp;keywords=fake+iphone
https://www.amazon.com/Nasco-Fetus-13-Weeks/dp/B004JOD3G6/ref=sr_1_1?ie=UTF8&amp;qid=1491257919&amp;sr=8-1&amp;keywords=fetus
https://www.amazon.com/Nasco-Fat-Old-Fred-Black/dp/B004JOB9Z8/ref=pd_sbs_328_4?_encoding=UTF8&amp;pd_rd_i=B004JOB9Z8&amp;pd_rd_r=80Y6TG8QQ7R4GMA6TJEH&amp;pd_rd_w=SAtuy&amp;pd_rd_wg=dARaX&amp;psc=1&amp;refRID=80Y6TG8QQ7R4GMA6TJEH
https://www.amazon.com/RCA-RCT6103W46H-10-inch-Android-Keyboard/dp/B013LAHT40/ref=sr_1_1?ie=UTF8&amp;qid=1491257959&amp;sr=8-1-spons&amp;keywords=rca+tablet&amp;psc=1
https://www.amazon.com/Whitelabel-Bluetooth-Dongle-Compatible-BlueSoleil/dp/B00E86EFY4/ref=sr_1_25?ie=UTF8&amp;qid=1491257981&amp;sr=8-25&amp;keywords=bluetooth+dongle
https://www.amazon.com/FunKo-FUN5545-Shrek/dp/B00WMMTUNW/ref=sr_1_13?ie=UTF8&amp;qid=1491258011&amp;sr=8-13&amp;keywords=shrek
[thasnk gpeopel fmor all yur support
Even better. Fat Old Fred
https://www.amazon.com/gp/aw/d/B004JOB9Z8/ref=pd_aw_sim_sbs_236_1?ie=UTF8&amp;psc=1&amp;refRID=P38HWHG1YGYGVNP01ZW5&amp;dpPl=1&amp;dpID=51s7hCHnqQL
https://www.amazon.com/PointZero-Portable-Airbrush-Compressor-Oil-less/dp/B004KNDQCM/
Compressor reliability does seem to be a crapshoot. I have a paasche cheapie ~100 bucks i bought 4 years ago that is still alive and kicking with intermittent use.
My advice would be to try out a cheaper one first. The one I linked comes with an airtank too. I just don't think 2.6x the cost is justified for compressor internals.
That's a full sized compressor, but same theory :-).
You need an airbrushing one. Have a look at these:
https://www.amazon.com/PointZero-HP-Airbrush-Compressor-Portable/dp/B004KNDQCM/ref=sr_1_3_sspa?s=arts-crafts&amp;ie=UTF8&amp;qid=1521943135&amp;sr=1-3-spons&amp;keywords=airbrush+compressor&amp;psc=1
https://www.amazon.com/Badger-Air-Brush-Co-TC910-Compressor/dp/B005UH7CVI/ref=sr_1_21?s=arts-crafts&amp;ie=UTF8&amp;qid=1521943135&amp;sr=1-21&amp;keywords=airbrush+compressor
Not sure where you are located, but try art or model supply shops, search for "airbrush compressor". They should go for around $100-200. You only need 1/5 to 1/4 HP as you only need to reach up to 30 psi (most spraying would be 18-25 psi).
I bought this compressor along with a Iwata Neo airbrush and a 6' hose. Came out to around 150$ total.
That compressor's like a 3rd the cost of some other compressors with the same features. And while it's only been a month, I haven't had a single issue with it.
[has done me well so far] (https://www.amazon.com/PointZero-HP-Airbrush-Compressor-Portable/dp/B004KNDQCM/ref=mp_s_a_1_2_sspa?crid=1OPK6CK3N0BZL&amp;keywords=pointzero+airbrush&amp;qid=1555382635&amp;s=gateway&amp;sprefix=pointzer&amp;sr=8-2-spons&amp;psc=1)
Also Looking at this one https://www.amazon.com/gp/product/B004KNDQCM/ref=ox_sc_act_title_5?smid=A3KUYHN7HI5ZSF&amp;psc=1
Someone posted a great set of videos by a guy who is a real "no-nonsense" airbrusher. His thought is that you use lacquer thinner (basic cheap stuff from a hardware store) to clean EVERYTHING. Even acrylics. Going with that approach I don't think it really matters.
I mostly spray acrylics and the Allclad stuff (which is Lacquer), but have used some enamels without any issues. Just thin it with actual proper thinner, and don't waste the good thinner on cleaning the thing.
Not sure about the Paasche, but the Iwata's are similar quality wise I think, and they all have seals that can handle any of the solvents, so the brush itself won't have an issue with any of the paints.
With any "kit" I think you are making tradeoffs. I would spend the money on a good brush, double action (whatever your preference for brand). I have found the .3mm needle size (some are .35) to be the most versatile. Iwata HP-C can be had for $150 or so. I am sure Paasche has a similar one.
For compressor I have been very happy with this one which was pretty inexpensive:
https://www.amazon.com/gp/product/B004KNDQCM/ref=oh_aui_detailpage_o06_s00?ie=UTF8&amp;psc=1
I am sure you can get a better one, and with any of these "knock-offs" there are some risks as quality control may not be as consistent with the brand name ones. Compressor will have a much smaller impact on your quality of life than the airbrush itself. If you eventually got tired of the lower volume tank and too much running, or wanted something fancier or quieter, or if it ends up crapping out after a coulle of years you can trade up. As long as it holds pressure, and has a reasonable regulator and water trap, the compressor itself won't give you any problems until it dies. A cheap airbrush, on the other hande, will be miserable and frustrating every time you use it. Or worse, will be fine up until the point that it spits out a gob of stuff in the middle of an almost perfect paint job (speaking for a friend of course ;-) )
I haven't used one, but a No-Spill Paint Cup may help.
Spraying indoors is usually a bad plan. If you really want to, you can buy a spray booth or build one.
I can't say the product is terribly durable but mine is still going two years later, crack a window and point the hose outside
Folds up nicely if you are in a small space, put a sheet of cardboard down under it overspray tends to sneak thru the seams where it folds sometimes
https://www.amazon.com/Airbrush-Spray-Extractor-Crafts-Figurines/dp/B004ZH7RSM
Open a window, it should be fine. If you are really concerned you should get a spray booth. Example.
I got this.
Considering going into airbrushing but not sure if I should build a DIY booth or buy a portable one. I just wanted to hear some experiences with either and was wondering how often I would need to replace filters/how difficult is it to replace the filters on a portable booth (including finding new parts + installing said parts)
PS. I was interested in this booth
https://www.amazon.com/Airbrush-Spray-Booth-Paint-Extractory/dp/B004ZH7RSM
Non-mobile: this is the one I bought
^That's ^why ^I'm ^here, ^I ^don't ^judge ^you. ^PM ^/u/xl0 ^if ^I'm ^causing ^any ^trouble. ^WUT?
I just picked up a spray booth from Amazon surprisingly cheap and does a good job at not letting the strong smell permeate the space. this is the one I bought
Thank you!
I keep all of my loose shadows in a bead container, seen on Amazon here. I sort all of my shadows based on color, and stack them in an order that doesn't change. So I roll a die to pick which box of smaller containers, then again to see which column to pick, then again to see how far down the row I should go. If I pick a shadow that I've used before (since the purpose is to use the shadows that I don't use) then I roll again.
I recommend buying eyeshadow samples - in my experience, Shiro's samples are actually quite generous. You can store your shadows in bead containers like this: Darice Bead Storage on Amazon or you can buy 5g or 3g jars (from a variety of vendors including Amazon, TKB trading, Coastal Scents, etc).
There is a bit of a learning curve with loose powders, but overall you can use them similarly to pressed shadows.
Also, the Fyrinnae customer service issue has since been resolved (the person creating problems has been fired and the owner has joined this subreddit and is awesome) - you may compile your wishlist as you please :)
I'm purchasing some jars to store them in now that I'm done hauling for a while.
I'm torn between using the [Darice 1.5" Diameter x .75" Tall]
(http://www.amazon.com/Darice-2025-251-Clear-Container-Storage/dp/B002DPINS6/ref=sr_1_1?ie=UTF8&amp;qid=1406499805&amp;sr=8-1&amp;keywords=bead+storage&amp;dpPl=1) and the Darice .75" Diameter x .1" Tall. While I want them to be the same 5 gram jars that Shiro and HW use, so they're all around the same height, but it's so much cheaper to buy the large pack with Amazon Prime.
Yep! I bought this and it fits my eyeshadow sample baggies perfectly :)
The Shiro labels go on almost exactly (I suggest putting them on the bottom so you can see colors from above), and I put Aromaleigh labels on the side.
If conformity with other indie jars is not an issue, you could consider bead jars. I have the Darice 30 bead jar (I love the clear case it comes in) which is about 1.5" high and .75-1" wide. They have many other sizes, like this one. If you have a JoAnn's or Micheal's nearby, they often have 40-75% off of retail items coupon you can print out on their website that are shared between the two stores.
I also have a bunch of unused bead jars from the 30 jar set you could have for free + shipping if you don't care about the clear rectangle case.
Someone here recommended these and they are perfect! I take the label off the baggie and put it on the lid or the side of the little jar. They are screw top, not snap, but so far I am loving it! plus the jars come out so you can rearrange, etc.
No burnt fingers
http://www.amazon.com/Scotty-Peeler-Label-Sticker-Removers/dp/B0068QIQVA/ref=sr_1_1?ie=UTF8&amp;qid=1405034470&amp;sr=8-1&amp;keywords=scotty+peeler
I'd try these, they work well for this type of thing.
https://www.amazon.com/Scotty-Peelers-Label-Sticker-Remover/dp/B0068QIQVA/ref=sr_1_1?ie=UTF8&amp;qid=1495114588&amp;sr=8-1&amp;keywords=scotty+peeler
I use scotty peelers I had laying around. They were made to remove store price stickers. They have a thin sharp edge that really gets under the print. https://www.amazon.com/Scotty-Peelers-Label-Sticker-Remover/dp/B0068QIQVA/ref=sr_1_2?ie=UTF8&amp;qid=1491591135&amp;sr=8-2&amp;keywords=sticker+remover
I have obtained similar items when buying iphones and video game consoles. I can't recommend these particular ones, but the cords I have come in handy. First one is for the several different apple products, 2nd link is for ps2/ps3, wii and xbox 360. The particular one I have has an adapter for some older nintendo consoles.
https://www.amazon.com/Charger-Universal-Charging-Lighting-Samsung/dp/B01AK5AYIM/ref=sr_1_2?ie=UTF8&amp;qid=1487358894&amp;sr=8-2&amp;keywords=multi+apple+cord
https://www.amazon.com/MADCATZ-MOV06155V-Universal-Component-Cable-1-8m/dp/B000IAPGIS/ref=sr_1_2?ie=UTF8&amp;qid=1487358985&amp;sr=8-2&amp;keywords=universal+video+game+cord
This things pretty handy. Is it the device that's broken or are my batteries dead:
https://www.amazon.com/Amprobe-BAT-200-Battery-Tester/dp/B005G7SBY4/ref=sr_1_1?ie=UTF8&amp;qid=1487359100&amp;sr=8-1-spons&amp;keywords=battery+tester&amp;psc=1
scotty peeler
goo gone
barkeepers friend
magnifiying glass with light good for looking at little markings or tiny text
upc scanner
Bring headphones (I listened to audio books). Make sure each team member has their regular department, and have a sign off so u know who did what and that it was finished without hunting them down. Plan your path through the department. With the paper tags u have to tear learn the order and tear them b4 u go out so u have a stack and dont have to tear as you go. When putting out tags do one type at a time, i.e. I started with peg hook tags - square tags - rectangle - etc. This is so u aren't switching between piles or searching. Other than all that just learn to go into zombie mode and it will fly by. You can try a tool like the "Scotty Peeler" if your having issues getting the tags off. I normally put the peg labels on lightly so they peel easy and for things that I know change every week I put a little hanging over so I can tear and go (some leaders dont like this). (back to keeping to your assigned departments) (https://www.amazon.com/dp/B0068QIQVA/ref=cm_sw_r_cp_apa_jiqUBb33F55WF)
I hate that as well, for me if I rush it I end up messing it up so I go slow with good results. If you can get a perfect can and or catch lid out of a roll just use that one. There is also stuff like this https://www.amazon.com/Scotty-Peelers-Label-Sticker-Remover/dp/B0068QIQVA
or buy double sided sticky tape. these are the kind they use in phone nowadays https://www.amazon.com/Eco-Fused-Adhesive-Sticker-Phone-Repair/dp/B00BXYWXY8/ref=sr_1_1?ie=UTF8&amp;qid=1467497800&amp;sr=8-1&amp;keywords=cellphone+tape or go to a walmart/staples for these http://www.staples.com/Scotch-Double-Sided-Tape-with-Dispenser/product_SS940458
I won't lie... Cheap Amazon Prime accessible tape.
The two names are as follows;
2mm Clear Double Sided Strong Adhesive Acrylic Tape For Phone LCD Screen Repair https://www.amazon.com/dp/B019OQ4Z10?ref=yo_pop_ma_swf
Eco-Fused Adhesive Sticker Tape for Use in Cell Phone Repair - 2mm Tape - also including 1 Pair of Tweezers / Eco-Fused Microfiber Cleaning Cloth (black) https://www.amazon.com/dp/B00BXYWXY8?ref=yo_pop_ma_swf
I know they're cheap, but how much should I spend/what should I search for when I purchase? Computers are my hobby, but I work in kitchens and bake bread full time... Soooo, I'm pretty good with my hands. Application is not the issue here.
Thats what I was thinking. Do you think this would work? 2mm seems like its the perfect thickness, though it's double sided and I'd only use a single side.
Not quite, but here is something you could possibly go off of... :)
Adhesive: http://www.amazon.com/gp/product/B00BXYWXY8?psc=1&amp;redirect=true&amp;ref_=oh_aui_detailpage_o03_s00
And the bezel was 0050!
I've had this one for about two years and it works fine. It's just a cheap Chinese loupe that probably doesn't magnify anywhere near the extent that it claims, but it does what I need.
I use a jeweler's loupe for magnification, specifically I bought this one:
https://smile.amazon.com/DBPOWER-Illuminated-Jewelers-Magnifier-Magnifying/dp/B00K0BGNNC/ref=sr_1_5?ie=UTF8&amp;qid=1486750468&amp;sr=8-5&amp;keywords=jewelers+loop
I just put my phone camera lens on the eyepiece to take pictures, and it works pretty well. The one I linked to is nice as well since it comes with LED lights to high illuminate it, which can be really useful considering how close you have to get.
amazon has a great selection of loupes
https://www.amazon.com/gp/product/B00K0BGNNC/ref=oh_aui_search_asin_title?ie=UTF8&psc=1
This one has a stronger 60x magnification. I use this to confirm the laser inscription on my diamond as well as to really look at small details on the diamond
You could answer so many of your own questions by picking up a loupe and having a look
See heads? Good job. Don't see heads? Bad job, go back and try again.
I asked for a set of pom pom makers, a yarn winder, a nice-looking yarn tote, a set of blocking mats, and some awesome crochet books!
I got one yesterday! This one:
https://www.amazon.com/Knit-Picks-Yarn-Ball-Winder/dp/B00O3GHFA0
It's working fine for me so far :) There are picture of the cakes in the reviews
I tried looking for the one I bought on amazon but it looks like they no longer sell it. But I did some searching and found two:
Knit Picks Yarn Ball Winder https://www.amazon.com/dp/B00O3GHFA0/ref=cm_sw_r_cp_api_2WO5BbZCAERFF
Stanwood Needlecraft Large Metal Yarn/Fiber/Wool/String Ball Winder, 10-Ounce https://www.amazon.com/dp/B0078T6KQY/ref=cm_sw_r_cp_api_5NO5BbBJGNRE5
The one complaint I have about mine (and I’m not sure there’s really a product that would do any better) is that sometimes when you’ve wound a big cake if you try to wind too much the whole thing will just fly off...so I wish it had some sort of cap that would keep it from doing that. But I mean as long as you slow down once it starts getting big it’s fine. I suppose it wouldn’t be too hard to come up with a quick fix at home, I just haven’t put any effort into that myself.
Good luck!!! 😀
Knit Picks Yarn Ball Winder https://www.amazon.com/dp/B00O3GHFA0?ref=ppx_pop_mob_ap_share
I've used this pretty frequently and it's amazing for the price. I've had no issues with it and I've done my whole collection of yarn with this.
I have this one and I love it, I found mine on ebay used for only 10 bucks. Just be careful not to go too ridiculously fast otherwise nice softer yarns can fly off. It works like a charm though.
https://www.amazon.com/Knit-Picks-Yarn-Ball-Winder/dp/B00O3GHFA0/ref=sr_1_1_sspa?keywords=yarn+winder&amp;qid=1550710566&amp;s=arts-crafts&amp;sr=1-1-spons&amp;psc=1
Is this the one?
https://www.amazon.com/Knit-Picks-Yarn-Ball-Winder/dp/B00O3GHFA0/ref=mp_s_a_1_1_sspa?keywords=knitpicks+yarn+winder&amp;qid=1554558644&amp;s=gateway&amp;sr=8-1-spons&amp;psc=1
This one -> https://www.amazon.com/gp/aw/d/B00O3GHFA0?psc=1&amp;ref=yo_pop_mb_pd_title
Something like this?
Mine is super loose (spinning) in the winter, and when I'm hot it's a struggle to take off.
One suggestion I got was to look for small plastic "clips" that loop around the bottom of the rig and works to increase the size a little on the days it's super loose. Some jewellers have them, sometimes you can (apparently) find them at department stores!
Like this: https://www.google.ca/url?sa=t&amp;source=web&amp;rct=j&amp;url=http://www.amazon.com/RinGuard-Ring-Size-Adjuster-Sizes/dp/B00PI0T25Q&amp;ved=0ahUKEwiH892G3bfKAhVL9WMKHQYFDygQFgghMAI&amp;usg=AFQjCNHMiDAvxwBRh7W0B9z3zllPsDyM2A&amp;sig2=gW6qfDx5ELv3EeDZMjowmA
I bought these and they worked fantastic. After that got too lose, I ended up getting a cheaper second wedding ring, simpler band, in my new size, and got the old one resized since I have unlimited resizing with my warrenty, and the new ring also comes with unlimited resizing.
Another quick question and I'm done for now: is it okay if I get gold leaf that isn't entirely real gold but a blend will it work? (I might be wrong but I've found some listing that says it is like 999/1000 real gold which I read as meaning 99% real gold, so I might be wrong).
Better way of putting it: will these be alright?
https://www.amazon.com/Hem-Dragons-Blood-Incense-Sticks/dp/B0016Z3BA4
https://www.amazon.com/Gold-Leaf-Sheets-1000-Real/dp/B00VALQQ60
Not enough gold in that room to be worth your time, it's all gold leaf This is actually very common in Japanese temples.
This is gold leaf. It's insanely thin, about 4-5 millionths of an inch according to Google. You can get 100 sheets of it for $12. I don't think it's quite as much of a splurge as you believe. It's pointless, but it's not something only the richest of the rich can do.
I have the vagabond 3 pen case https://www.franklin-christoph.com/vagabond-notebook-covers.html inside of one of these https://www.amazon.com/LIHIT-Compact-Pencil-Repellent-A7687-24/dp/B01BD0GPKO/
LIHIT LAB. Compact Pen Case (Pencil Case), Water & Stain Repellent, Black, 3.5" x 6.5'' (A7687-24) https://www.amazon.com/dp/B01BD0GPKO/ref=cm_sw_r_cp_api_9op1BbM5B5XSC
Might be a bit too big, but I really like this case by Lihit Lab
Lihit lab case pretty nice https://www.amazon.com/LIHIT-Compact-Pencil-Repellent-A7687-24/dp/B01BD0GPKO/ref=sr_1_3?keywords=lihit+lab+case&qid=1573780771&s=office-products&sr=1-3
Lihit Lab Smart Fit
Just use silicone self-fusing tape:
https://www.amazon.com/gp/product/B00HWRO9MY/ref=oh_aui_detailpage_o05_s00?ie=UTF8&amp;psc=1
or use liquid tape:
https://www.amazon.com/Gardner-Bender-LTW-400-Liquid-4-Ounce/dp/B002CC05EA/ref=pd_sim_328_21?ie=UTF8&amp;dpID=413CdGG5uqL&amp;dpSrc=sims&amp;preST=_AC_UL160_SR82%2C160_&amp;refRID=FY2E02TWCMGTEJPJYZ0K
or even Sugru (probably the best but most expensive option):
https://www.amazon.com/Sugru-Moldable-Glue-SBLK3-Black/dp/B01BFE0KNQ/ref=sr_1_1?s=hi&amp;ie=UTF8&amp;qid=1465690927&amp;sr=1-1&amp;keywords=sugru
So I got the idea off YouTube from a guy called MTB Alan. Super awesome video of him showing you step by step. Check it out.
https://youtu.be/SUtwXFQMA6w
$10:
Sugru Mouldable Glue - Black (3-Pack) https://www.amazon.com/dp/B01BFE0KNQ/ref=cm_sw_r_cp_api_i_5azoDb9ANG90W
$7:
Suptig Tripod Mount Adapter for Gopro https://www.amazon.com/dp/B071XVZKP1/ref=cm_sw_r_cp_api_i_0czoDbBPVN334
That’s it. IMO looks way better than zip ties, holds much better than zip ties. The Sugru is tested for 4lbs (roughly 2kg) and it feels solid as a rock. Took about 5 minutes to knead, 2 minutes to mold, and then let it sit for 48 hours. The pack says 24 will be plenty but since I used all 3 packs I decided to let it sit a little longer.
Hope it helps somebody! 🤙🏼🤙🏼
Not really, about $10 for a 3 pack or $20 for an 8 pack
https://www.amazon.com/Sugru-Mouldable-Glue-Original-Formula/dp/B01BFE0KNQ/
https://www.amazon.com/Sugru-Moldable-Glue-Original-Formula/dp/B00EU7DBNM/
The frayed wire is one of the standard use cases for this stuff.
A blob of Sugru might do the job https://www.amazon.co.uk/Sugru-Mouldable-Glue-Original-Formula/dp/B01BFE0KNQ
If you're after a cheap and dirty fix:
Got the idea from this video (which explains it a bit better): https://www.youtube.com/watch?v=qZ2LPpbiZXc
This stuff is ideal for applications like these.
SUGRU
GoPro Hero 5 is only $250. Grab some Sugru and attach to the chin of your helmet.
What about Sugru?
When mounting to curvy helmets, just get some of this and do this.
https://amzn.com/B01BFE0KNQ
This is what I used! Applies a chrome looking effect to the plastic
Molotow Liquid Chrome Marker 1Mm https://www.amazon.com/dp/B01E7EFSVU/ref=cm_sw_r_cp_apip_mlgEtASVTj7qJ
Cool, thanks for the reply. When I do chrome work I just used a silver sharpie but your work looks much, much nicer.
Edit: Found it on Amazon for those others that may be interested
I can only afford one right now, which size would you recommend?
https://www.amazon.ca/Molotow-ONE4ALL-Acrylic-Marker-703-101/dp/B01E7EFSVU/ref=sr_1_1?crid=ES5LM22C2ZRE
Looks awesome. It looks like you got some of the rivets, but a nice little tool I've recently found is this little pen. It's been super helpful and really makes the small details pop.
Should of bought a Molotow pen.
Yeah, that's the right one. Sorry I said chrome earlier-- i had read either on RWI or RG where someone was trying this one..
https://www.amazon.com/gp/product/B01E7EFSVU/ref=ox_sc_sfl_title_2?ie=UTF8&amp;psc=1&amp;smid=A79CLRHOQ3NF4
but metallic silver is the safe bet.
doot
Black 2.0 is not "sick as hell" at all. It's just matte black paint. Don't make my mistake and buy into the manufactured social media hype. I had a use in mind for it (blackening the inside of a telescope tube) and it did worse than the factory coating when I did a test splotch. I also recommend looking at the 2.9 out of 5 star Amazon reviews with more pictures if one test isn't enough.
https://i.imgur.com/OW2yOIp.jpg
It should be noted that Semple also released his own version called “Vantablack 2.0” not quite as black but still very very black.
https://www.amazon.com/Stuart-Semple-mattest-flattest-acrylic/dp/B0758GKKGZ
If you're wanting to do it go with https://www.amazon.com/Stuart-Semple-mattest-flattest-acrylic/dp/B0758GKKGZ
It's apparently not as black.
https://www.amazon.com/Stuart-Semple-mattest-flattest-acrylic/product-reviews/B0758GKKGZ/ref=cm_cr_dp_d_show_all_btm?ie=UTF8&amp;reviewerType=all_reviews
I’m using this loupe
JARLINK 30X 60X Illuminated Jewelers Eye Loupe Magnifier, Foldable Jewelry Magnifier with Bright LED Light for Gems, Jewelry, Coins, Stamps, etc https://www.amazon.com/dp/B078N34WZR/ref=cm_sw_r_cp_api_i_a9GIDbYZTHBZE
I'd get a jeweler's loupe over a microscope, I've tried both and vastly preferred the loupe. The microscope (at least the one I tried) was really finicky to get properly in focus, with the loupe you just whip it out and you're ready to go with little to no adjustment.
Here's the loupe I use:
[Jarlink 30X 60X Illuminated Jewelers Eye Loupe Magnifier, Foldable Jewelry Magnifier with Bright LED Light for Gems, Jewelry, Coins, Stamps, etc] (https://www.amazon.com/dp/B078N34WZR/ref=cm_sw_r_cp_apa_eLzMBbB47M9SY)
Edit: as a bonus, it's way easier to take pictures through the loupe than the microscope.
Like this?
JARLINK 30X 60X Illuminated Jewelers Eye Loupe Magnifier, Foldable Jewelry Magnifier with Bright LED Light for Gems, Jewelry, Coins, Stamps, etc https://www.amazon.com/dp/B078N34WZR/ref=cm_sw_r_cp_apa_i_OG5JDbP0GQC6W
Don't let your dreams be dreams. About $20 on Amazon.
I just replaced my screen 2 days ago.
http://www.amazon.com/gp/product/B00LF6IVC2?psc=1&amp;redirect=true&amp;ref_=oh_aui_detailpage_o02_s00
and
http://www.amazon.com/gp/product/B00BXYWXY8?psc=1&amp;redirect=true&amp;ref_=oh_aui_detailpage_o02_s00
You will also need superglue.