Best food service equipment & supplies according to redditors
We found 450 Reddit comments discussing the best food service equipment & supplies. We ranked the 220 resulting products by number of redditors who mentioned them. Here are the top 20.
We found 450 Reddit comments discussing the best food service equipment & supplies. We ranked the 220 resulting products by number of redditors who mentioned them. Here are the top 20.


![Plastic Condiment Cups with Attached Leak Resistant Lid, Bpa Free, [100 Pack ] Clear Portion Container for Condiments, Samples, Dressings, Pills, Balms, Jello Shots | 2 oz](https://m.media-amazon.com/images/I/41844C9q-vL.jpg)

> a better way to do it—short of cutting a device-shaped-hole in the lid—is to use Ping-Pong balls.
Cutting a device-shaped-hole in a lid is actually quite easy for some kinds of lids.
Ping pong balls are cheap but so are these lids and the containers that go with them.
Brisket is a challenge. I have gotten the hang of it pretty good, after several tries. I do mine like they do in Texas, because, well I live in Texas.
Don't cut your brisket up in smaller pieces, its not going to turn out correctly, ever. It's really meant to be cooked all together.
Step 1: Trim
I square off the brisket flat - the flat typically has really uneven edges huge chunks of hard fat and other stuff that won't cook down. So the goal with the flat is to get all the sides of the meat even thickness and to reduce, but not completely remove the fat cap.
For the Brisket Point, I want to build bark on meat so I'm aggressive with the trim. The point is heavily marbled, so we don't need to maintain as much exterior fat here.
Step 2: Season
Salt and pepper all over. That's it.
Smoking for long hours is going to pretty much hide any flavors you put on the brisket anyway, so just S&P for me. But here you can try things out and get creative. Unless you are trying to do Texas style, which is S&P.
Step 3: The cook
I have an electric pellet grill. It uses little wood pellets to heat and smoke. I set this to 275F (135C) and put my brisket on and close the lid. Now I walk away. I do nothing except make sure the fuel is good for 6 hours. This first 6 hours is where you get the bark.
After 6 hours have passed - I open the lid for the first time. I'm checking the bark here. if its light go another hour. if its where I want it it's time to wrap. Some people wrap in foil - I disagree with this.
I use butcher paper: https://www.amazon.com/Pink-Butcher-Kraft-Paper-Roll/dp/B06XCCQ9K4
The butcher paper protects the bark, it breathes unlike foil, and you want it to breath.
At this stage I'm 6 or 6.5 hours in now. This is the first time I'm putting a probe in. I expect to be 155F - 165F (68C-74C)
Brisket is wrapped back on the smoker, and probed. I'm watching fuel and just watching the brisket come up to temp.
At 200F (93C) I'm using my probe to test the brisket in various places. The probe should go right through meat with little to no resistance. Remember I'm still wrapped so I'm poking through the paper as well. (just don't go all the way through and let the juices out of the bottom.) the brisket is probably going to be "done" Between 205F and 210F (93C-98C) But the poke test is more important than the actual temp - just dont go over 210F(98C)
Now I pull it off and wrap it in a towel. I put it in a cooler until the temp drops down to about 160F (71C) Perfect serving temp.
​
Hope at least some of this is helpful!
That looks delicious! Here are some reusable 2 oz containers that have been total game changers for my SO and I as far as the meal prep world. Also, if you are on a fun kick they make great reusable Jell-O shot containers. It might help ya save a few bucks in the long run.
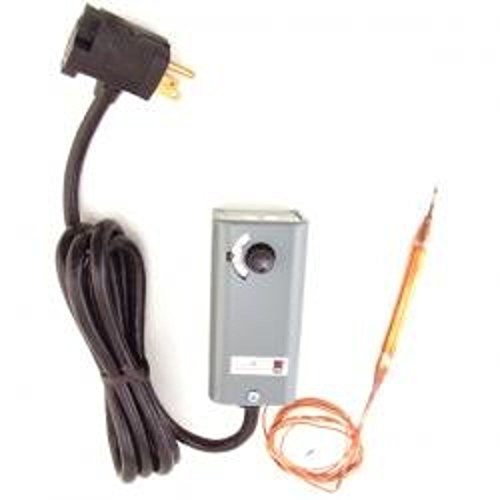
It doesn't take much to convert one either. Just an independent temperature controller like this: http://www.amazon.com/Johnson-Controls-A19AAT-2C-Temperature-Controller/dp/B0002EAL58/ref=sr_1_2?s=home-garden&ie=UTF8&qid=1372450611&sr=1-2
Looks like it's just a flat (not a full packer with the point)
I would consider getting a real nice slicing knife. I've got the victorinox one that is so sharp it scares me a bit, but is the good for slicing brisket
https://www.amazon.com/Victorinox-Swiss-Army-Cutlery-Slicing/dp/B0000CFDB9
Usually people wrap with Pink Butcher paper not Foil with brisket
https://www.amazon.com/Pink-Kraft-Butcher-Paper-Roll/dp/B07K4BRR4N
Aaron Franklin talks about it here:
https://www.youtube.com/watch?v=pGZ39yYxeBk&t=82s
This is far better stuff than that waxed stuff. It's what we all use over here. It is backed with polyethylene so it doesn't bleed through any cracks that form, and removes cleanly. Over here we can get it at Walmart, but I get mine in the hunting section of the sporting goods store. you can get it at Amazon UK.
Freezer Paper
Edit: Thanks, Bot!, Thanks, Coffee!
Ok, this is probably going to get a little long but I'm going to take care of you here so strap in. I make sandwiches like this and take them to work. People at work are always telling me how awesome my sandwiches look, asking where I got it, and expressing disbelief that they are vegetarian while saying "you made that?". So, first I'm going to tell you how to make it and then I'm going to tell you how to wrap it because this shit doesn't fit in your average ziploc.
The bread in the picture is what my grocery store calls "Brick Oven Pane Tuscan" but get what you think looks awesome. Bread is the foundation of any amazing sandwich so don't be stingy. Then, from top to bottom, it's whole grain mustard, swiss cheese, veggie salami, veggie turkey, tomato, baby spinach, and mayonnaise. Now, the picture that I linked you to was from a while ago. I've made some changes to my standard sandwich. I now oven roast grape tomatoes and add those to it along with some black olive slices. I've also swapped out the baby spinach for some field greens with herbs. Also, a coworker started collecting condiment packets at his desk in a bowl to trick people (people assume it's candy at first) and it's sort of become a thing so I don't put the mayo and mustard on my sandwiches anymore. I just use his packets at work. This reduces any potential for sogginess.
Ok, now for how to package it. First, get some freezer paper which is like parchment paper but one side is plastic. Some people call it butcher paper. Wrap it like it's a big piece of meat except you only need to do it once. Once it's all wrapped up you can drop it in a gallon size ziploc freezer bag. This is just in case the tomatoes are too juicy and the freezer paper can't hold it in. I reuse mine for weeks so they last forever.
And there you go. Once you are done you'll have an amazing sandwich that people will think is professionally made and will nourish you through your afternoon and into the evening. Be sure to make this sandwich your own. Put what you want into it. Use this as a guideline. Check out my food tumblr for other sandwich ideas. Ask questions if you want.
Cheers!
Reusable Cup Carrier/Cup Caddy (2 Pack)
https://www.amazon.com/dp/B0754ZNJJH/ref=cm_sw_r_cp_api_i_CQyTCb1YCREZC
You'll want a better bike lock — cable locks are notoriously easy to cut through and won't protect your bike. I'd invest in a high quality Kryptonite or Abus U-lock if possible.
I also like using a thermal backpack to carry orders. Something like this (coupled with a foam insert that acts as a drink holder):
https://www.amazon.com/dp/B01EGZBNFA/ref=cm_sw_r_sms_awdb_t1_pLcYCbC9N6Y5V
And +1 on the extra phone battery.
I'm not OP but I make a brisket about twice a month for my family. Here are my steps, done on a Rec Tec Bull 700.
http://www.amazon.com/Peach-Butcher-Paper-Durable-Carry/dp/B00NC5S6OM
Now you have access to butcher paper. Paper bags are not food grade so you can't have any idea of what you're using is safe or not.
https://www.amazon.com/Pink-Butcher-Paper-Roll-Unbleached/dp/B06XCCQ9K4/ref=sr_1_3?ie=UTF8&qid=1492617873&sr=8-3&keywords=butcher+paper
I had the same issue, but it turns out that you can find anything on amazon nowadays.
Yea I didnt think butcher paper would be worth it until I tried it. It is pretty awesome, link to what I bought.
https://smile.amazon.com/gp/product/B00NC5S6OM/ref=oh_aui_search_detailpage?ie=UTF8&psc=1
Your bark does look pretty fantastic.
Nice. You are going to love it. If you are only ever doing 1 or 2 steaks a bigger pot should work out fine for your sous vide. I needed to cook up to 6 steaks at once and opted for a [cambro-like container] (http://www.amazon.com/Rubbermaid-Commercial-FG631200CLR-Space-Saving-Container/dp/B000R8JOUC?ie=UTF8&psc=1&redirect=true&ref_=oh_aui_detailpage_o03_s00) and [lid] (http://www.amazon.com/Rubbermaid-Commercial-FG652300WHT-Lid-SSC/dp/B000VAUFD6?ie=UTF8&psc=1&redirect=true&ref_=oh_aui_detailpage_o03_s00)
That helps whenever I want/need to use my Anova. Some people use a cooler and I understand that line of thinking, especially if you are using it for long periods of time as it is more energy efficient. I just could not find a cooler that I would have been able to attach the Anova to so I went the route that I did.
Yaaas girl! Cut your design out on freezer paper I found it easier to mirror the image and put the paper shiny side up on the cutting mat, then iron it onto your fabric.. shiny side goes down and it'll melt the plastic on the paper so it sticks right to the shirt. Use a foam brush and dab your fabric dye/paint on (any will do, I picked up whatever they had at Michaels) and that's it.. once it dries you peel off the freezer paper and you should have nice clean lines. I washed mine right away and it looks exactly the same as store bought screen printed graphic tees.
And if my rambling is too hard to follow YouTube has a vast variety of tutorials if you just search for cricut freezer paper 😀
DD bag is crap. I bought that one from amazon and I'm pretty satisfied!
Commercial Quality Food Delivery Bag 21.5" x12.5" x11" Extra Strength Zipper and Thick Insulation https://www.amazon.com/dp/B0741BQV7G/ref=cm_sw_r_cp_apa_i_wTWACbHS6BAD8
If this what your referring to?
https://www.amazon.com/dp/B07RPBP22R
There are many many options for housing a salamander. Nobody knows has a better internet presence for keeping them then the folks at caudata.org as mentioned by u/ye_ol_chuckaboo below. They have a helpful forum where you can get info advice and answers to questions. they also have care-sheets. So i suggest you spend soem time looking there.
Some simple ideas would start with something like:
go get a 40 gallon aquarium or larger. or 3 - 4 foot plastic storage box or like this
whatever you use it will need a lid to keep things out and the salamander inside but it must allow air to pass through
the main thing here is that it doesnt need to be more than 15 inches tall but should have as much surface area (footprint) as possible. A good minimum is about 4 - 4.5 square feet. or anything at or above the "40 gallon size " on the standard US tank sizes chart here
buy some organic untreated (chemical free, fertilizer free) topsoil from a garden store.
plan to use at least 6 - 8 inches of soil at the bottom
​
order several cork bark hides like this logs or half logs will be good to partially bury and to keep on the surface so the animal can choose a hide.
​
get a *large* smooth sided glass ceramic water bowl like this or like this
​
use only smooth objects stones, smooth glass ceramic, plastic. no gravel no sharp rocks no sharp wood.
Moss and plants can help add humidity and attractiveness.
a water mister bottle is helpful to have around
​
feel free to ask any specific questions
Experimenting.
Pink Butcher Kraft Paper Roll - 18 " x 175' (2100") Peach Wrapping Paper for Beef Briskets - USA Made - All Natural FDA Approved Food Grade BBQ Meat Smoking Paper - Unbleached Unwaxed Uncoated Sheet https://www.amazon.com/dp/B06XCCQ9K4/ref=cm_sw_r_cp_api_i_.qduDbS6AXYYW
Pink Butcher Paper Kraft Roll 18"... https://www.amazon.com/dp/B00NC5S6OM?ref=ppx_pop_mob_ap_share
If you commonly get pizza orders (or even like taking once home yourself now and then, too) I'd recommend picking up a pizza bag like this one on Amazon I've had it for several months and it's quite nice.
Long pizza deliveries are kinda common (when you get them) as quite frequently you're running to customers outside that pizza place's regular delivery area, though some places just don't bother with their own drivers at all anymore.
this stuff: https://www.amazon.com/Peach-Butcher-Paper-Durable-Carry/dp/B00ZYDRI8K?th=1
This is what I use:
Pink/Peach Butcher Paper Roll 18" X 150' in Durable Carry Tube https://www.amazon.com/dp/B00NC5S6OM/ref=cm_sw_r_cp_apa_kO4uxbDWZ2209
THIS is the paper I use. I've had good luck with it.
Here's what I use: http://www.amazon.com/Peach-Butcher-Paper-Durable-Carry/dp/B00ZYDRI8K/ref=sr_1_2?ie=UTF8&qid=1462468577&sr=8-2&keywords=pink+butcher+paper
I like the 24" wide better than the 18" and 150' will last awhile.
It's all good, I actually found exactly what I was looking for , just wish it was cheaper 😭. I better get tipped more for it lol.
I also purchased from amazon [this](Pink Butcher Kraft Paper Roll - 18 " x 175' (2100") Peach Wrapping Paper for Beef Briskets - USA Made - All Natural FDA Approved Food Grade BBQ Meat Smoking Paper - Unbleached Unwaxed Uncoated Sheet https://www.amazon.com/dp/B06XCCQ9K4/ref=cm_sw_r_cp_apa_AOeFAbB16G7MW)
It is awesome and a normal amount.
What's the wineador model? if it's got a compressor instead of being thermoelectric you are going to need one of these or something similar.
But yeah what model is it?
I picked up a half size & full size bag. They are quite well insulated
https://www.amazon.com/Commercial-Delivery-Half-Size-Strength-Insulation/dp/B07FC2749Q/ref=mp_s_a_1_10_sspa?keywords=catering+bags+insulated&qid=1559064824&s=gateway&sprefix=catering+b&sr=8-10-spons&psc=1
https://www.amazon.com/Commercial-Delivery-Half-Size-Strength-Insulation/dp/B0741BQV7G/ref=mp_s_a_1_10_sspa?keywords=catering%2Bbags%2Binsulated&qid=1559064824&s=gateway&sprefix=catering%2Bb&sr=8-10-spons&psc=1&th=1
This right here is good info if you've never heard of it before. This is the stuff I buy. https://www.amazon.com/dp/B00ZYDRI8K/ref=cm_sw_r_cp_apa_acqAzb6H9HPH4
Try a local butcher's shop. They often don't have clear freezer paper, but brown unbleached freezer paper. It took a lot of work to find somewhere that actually has freezer paper out here in BC. Also, Amazon looks like it sells it in Canada, but it is expansive as balls
Here’s one: Pink Butcher Kraft Paper Roll - 18 ” x 175’ (2100”) Peach Wrapping Paper for Beef ... https://www.amazon.com/dp/B06XCCQ9K4/ref=cm_sw_r_sms_c_api_i_-BJUCb484WQX0
I’ve never used it but it gets good reviews
My time to shine! I have helped build two kegerators. The first one uses a small chest freezer and holds up to four 5-gallon kegs. We use this one for our homebrews at the house, and simply open the lid to use a cheap picnic tap to dispense the beer.
The second kegerator was a bigger undertaking. This one uses a massive chest freezer (capable of holding 4 full-size kegs and a slim keg simultaneously) and the same type of Temperature Regulator. The main difference is that instead of opening the lid to retrieve beer, we have beer lines leading to a tap wall and chalkboard. How does one get the lines out of the airtight appliance? We had heard a ^(cosmically?) funny story of some chump trying to drill through a wall of his freezer; he pierced a coil and ruined the whole thing.. We wanted to avoid something like that. Although there are no coils in the lid of the freezer, we decided on the method that follows:
Remove the lid from the appliance entirely. Make a rectangular frame of 2x4s the exact size of the top of your chest freezer. Use caulk to get a tight seal on your joints. Drill holes for your beer lines through the wood, rather than through the appliance, and put the freezer lid back on top of your wooden frame. The weight of the lid, in combination with the rubber grommet, should keep your fridge operating efficiently. If you have problems with cool air leaking out, try using big velcro strips to hold the lid on tighter. It seems pretty efficient to me, since one only needs to open the unit to replace a keg.
Best of luck! Pictures when I have them
edit: to have multiple kegs at once off the same Co2 tank requires a "splitter" to divert the gas from 1 to any number of kegs
I have one of these digital controllers which does exactly what you're looking for. I'm super happy with it.
If you're thinking cheaper, there's an analog version as well.
I think a good place to start would be with the Freezer Paper. I had a difficult time finding it, but the Reynolds paper worked really well for me.
Another user here of the 3 gallon/ (12 quart) rubbermaid container and lid. I cut a very small hole in the lid for my anova to fit into and it hardly loses any water even on >24 hr cooks. Plus the lid is flexible enough to just lift one or two corners and position bags. you can also use it to keep a zip top bag in place instead of clips or vacuum bags.
http://smile.amazon.com/gp/product/B000R8JOUC?psc=1&redirect=true&ref_=oh_aui_detailpage_o03_s00
http://smile.amazon.com/gp/product/B000VAUFD6?psc=1&redirect=true&ref_=oh_aui_detailpage_o03_s00
I also use this ikea pot lid organizer to help separate bags or weigh down food that just keeps wanting to float. It is pretty nice because you can turn it around and remove pegs to customize the shape for what you are cooking.
http://smile.amazon.com/gp/product/B00TJTWR04?psc=1&redirect=true&ref_=oh_aui_detailpage_o05_s00
Something else that is nice to use is a pair of tongs with silicone tips so that they don't rip your bags but still grip your food for removal or changing the placement of food, because you don't want to stick your hands in hot water!
http://smile.amazon.com/Vivree-Kitchen-Tongs-Set-Stainless/dp/B00XGXGP3Y/ref=pd_sim_79_3?ie=UTF8&dpID=41nuul3KFhL&dpSrc=sims&preST=_AC_UL160_SR160%2C160_&refRID=0TK46SWSYA8WEN7S6YPR
It looks like you're trying to format a word into a link. Try this instead:
> [Freezer Paper](https://www.amazon.co.uk/Reynolds-Freezer-Paper-Plastic-Coated/dp/B00EME5KZ0/ref=sr_1_1?ie=UTF8&qid=1501581704&sr=8-1&keywords=freezer+paper)
Result: Freezer Paper
***
^^Please ^^note: ^^Edits ^^won't ^^appear ^^visible ^^if ^^made ^^soon ^^after ^^posting. ^^| ^^I'm ^^a ^^bot, ^^beep ^^boop ^^| ^^Contact ^^me ^^| ^^Opt-out ^^|
Thanks. I have greatly enjoyed learning the process at home. Even some of the early disappointments were enjoyable to some degree. I would strongly recommend starting with simple ones like cream cheese and goat cheese to get an idea for the process. Plus they don't require real aging so there is immediate gratification.
My cheese cave is just a tiny little mini-fridge I got for free from a friend. I use one of these to regulate the temp. You simply plug the fridge/freezer into it and based on your settings, it controls the power to the fridge. For humidity, just a glass of water in there is the best I can do.
I put together my own curing chamber after falling into the rabbit hole of this subreddit. In total it cost me about $175.
Materials:
Temp Controller
Humidity Controller This humidity controller is much cheaper than other options I saw, you will have to wire it yourself, but it works great!
Ultrasonic Humidifier, I got one for $35 on Amazon.
Humidity Monitor
I simply browsed Craigslist for a suitable full size fridge, and managed to get one for $40. This is the one I got
Let me know if you have any questions Id be happy to help!
Thanks :) I'm so happy with how it turned out.
Yeah I used freezer paper, this exactly http://www.amazon.co.uk/gp/product/B00EME5KZ0/ref=oh_aui_detailpage_o06_s00?ie=UTF8&psc=1 I'm in the UK so can't get it in supermarkets! As for not getting the edges to curl up I guess I just had the iron on it for a while. I did also have the cut out stencil underneath a heavy cookbook for a while too try make it all flat before I ironed it on the t-shirt.
https://www.amazon.com/Condiment-Resistant-Container-Condiments-Dressings/dp/B01LZKC89T
You can probably find smaller packs or a better price. They work great. Bit of food in each one, every other day written on each one. (minimal feeding to keep toxins down since you don't want to ask a sitter to do water changes)
HIDE THE REST OF THE FOOD
I like to take any bulk meat and break it down into meal sized portions, then freeze each portion separately. For example if I buy 8 pounds of ground beef, I'll use 1lb right away and then break the rest of it up into 7 1lb portions and freeze each separately. If I buy a pack of 12 chicken breasts, I prepare one right away, and wrap the other 11 individually. That way you never have to defrost then refreeze the meat, which is really damaging to the meat.
When freezing meat, the best method is to wrap it in freezer paper then place it inside a plastic bag. Make sure to always write the contents and the date you froze them on the bag. That way you won't end up with a pound of hamburger hiding in your fridge for five years.
Another sweet tip- Get a small chest freezer off Craigslist and convert it to a refrigerator with a Johnson controls regulator https://www.amazon.com/Johnson-Controls-A19AAT-2C-Temperature-Controller/dp/B0002EAL58/ref=mp_s_a_1_2?keywords=johnson+kegerator&qid=1566823193&s=gateway&sr=8-2 . They use about 1/10th the power, are bigger and super cheap. I did this in my rig and love it. I put it right under the counter and cut the counter to flip up.I only have 150 watts of solar and 200AH of battery and can run the refrigerator non stop and charge the batteries. The capacity is also much larger.
Yah here u go
Drink holders BevBag 4R Cubed Drink Carrier... https://www.amazon.com/dp/B07K8SJHV3?ref=ppx_pop_mob_ap_share
Catering bags Insulated Food Delivery Bag... https://www.amazon.com/dp/B07Q3SWLRR?ref=ppx_pop_mob_ap_share
Pizza bags cherrboll Insulated Pizza... https://www.amazon.com/dp/B07KXP8WC9?ref=ppx_pop_mob_ap_share
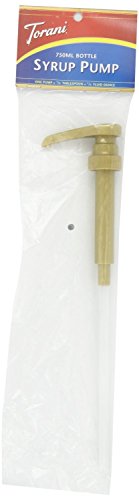
I use my soda stream to make carbonated water, and then pump soda syrup into my glass to make a drink. I can have something different each time if I want. This is the cola syrup I use. I also have cherry and vanilla syrup so I can have a cherry cola or vanilla cola if I want it. Soda stream syrups are gross, especially if you don't care for artificial sweeteners. Monin syrups I order online, but Torani I can buy from Smart and Final for $5 a bottle. You can buy pumps to fit the Torani and Monin syrup bottles, which make dispensing the syrup super easy. I usually use 4-6 pumps of syrup per glass.
My item!
Best gif ever.
I bought mine from Amazon since I couldn't find it in the grocery store. It's like normal paper on one side and kind of waxy on the other side. The waxy side fuses with the shirt and the paper side is really easy to draw on.
cowpox ツ
these are the ones uber gives out theyre actually pretty good and i use a large USPS fixed rate mail box (fits perfectly) for compartments
http://www.amazon.com/PACKIR-Insulated-delivery-backpack-by18-inch/dp/B01EGZBNFA?ie=UTF8&refRID=JFKZNZJYQ3CNX5BCDWRW&ref_=pd_ybh_a_11
EDIT: im also not a traditional messenger and i take my electric bike on the train a lot
Alright, That was a quick message off my phone.
Freezer - Sams Club - $199 - I bought at our local SAM's. I just put my kegs in there and use picnic tabs, I am working on setting up a wood collar to add taps.
Power/Temp Control - I bought this off amazon because it was cheeper than locally. There is also a digital version (costs more) I didn't see any reason to go with it.
CO2 tank, regulator, hoses, ETC: bad teacher brewing on South Airport, they also have the temp control. I would recommend a 20LB tank if you can fit it and afford it. 5lbs are nice, they are easy to move but you will get the most "bang for your buck" our of a 20lb when doing refills and the time it will last.
Filling your CO2 tank - Northern Fire and safety is going to be the best. They are reasonable and WAY cheaper than Air Gas.
I hope this gives you a good starting point. I can provide some more advice.
Slippery fabric is hard to cut well. One method to control it is to use freezer paper. You lightly iron (just a touch) to the wrong side of the fabric, trace the pattern (or you can trace it on beforehand) and cut. I've found that with bigger pieces it's not necessary to cover the entire piece of fabric with freezer paper; it's the cutting lines that matter, so if there are some gaps in the middle it's all right. Remove the freezer paper right after cutting. If you're going to cut out more pieces, the free freezer paper patterns can be reused.
Microserrated shears also work extremely well if you're willing to buy a pair.
The method with the thread that you used to turn the loops was fine. You can also use a loop turner with a hook or a set of sticks like this. I prefer that the latter.
I've read your replies to comments and recommend this. I'm in a tiny apartment too! just drill holes on the sides/top.
I also have a lot of nitro waste and obvs no easy access to carbon since I don't clip my own lawn but I've been using paper bags from groceries, toilet paper/paper towel rolls, and going around my neighborhood with my daughter and picking up dead leaves/twigs to dump in for carbon
If you decide to add other apps I like to use Favor's bag for other deliveries. Larger, can stretch, the material looks better and best of all, it has a shoulder strap as well and that makes deliveries so much easier.
If you don't want to work Favor, that's also understandable. I found some bags on Amazon:
I honestly don't know why it's so damn hard to find a bag sold commercially with a shoulder strap. I guess you could buy another bag and if you have some sowing skills add a strap yourself. Would anyone else be interested in something like this? Shoot, maybe I should start up my own business, selling gear for DD or other drivers that they won't sell :)
Edit: I found a $23 22 inch carrier for pizzas! Beeeeeeet! As for shoulder straps just buy a replacement one and DIY it like I mentioned :)
My orders are never all over the place when I keep them in my bag. it's probably the bag I use. As I stated in my post, this is my first complaint. However it's not my first experience.
I'm not sure what PM is. I do believe it's unprofessional to bring the food to the customer outside of an insulated bag. Bags really do keep food warm. I use this bag. https://www.amazon.com/dp/B0741BQV7G/ref=cm_sw_r_cp_apa_J1jSBb16WGFH8 It keeps my food in place, no spillage, keeps it really warm, and customers can often smell the food when I open it. Once the food is in the bag there should be zero reason to open it until it gets to the customer. I have a pizza bag for pizzas.
You're right about being respectful though. I simply disagree about not bringing the bag. Maybe it's because I managed pizza places in college.
Freezer paper is sold in grocery and craft stores. The pattern is traced to the matte side and the shiny side is lightly ironed to the wrong side of the fabric. Silk is best cut in a single layer. Charmeuse has a shiny and matte side.
PK-76F: Doubledeck Insulated Pizza/Food Delivery Backpack Bag, 16"x 15"x 18", With a Cup Holder. A Waterproof, Collapsible Food Take-Out Box For Catering, Restaurant, Delivery Drivers, 76Liters(Black) https://www.amazon.com/dp/B07GFS77BP/ref=cm_sw_r_cp_apa_i_H8X2Cb5C2AW42
Here you go
Get it from amazon
http://www.amazon.ca/Reynolds-391-75Sqft-Freezer-Paper/dp/B000BZYCNK/ref=sr_1_1?ie=UTF8&qid=1421879637&sr=8-1&keywords=freezer+paper
Amazon is probably your best resource.
https://www.amazon.com/Pink-Kraft-Butcher-Paper-Roll/dp/B07K4BRR4N/ref=sr_1_1_sspa?keywords=pink+butcher+paper&qid=1573827893&sr=8-1-spons&psc=1&spLa=ZW5jcnlwdGVkUXVhbGlmaWVyPUExS083TTVFTFdKVVBIJmVuY3J5cHRlZElkPUEwODU2MjAxMklTTjJJTkJXUEg0TyZlbmNyeXB0ZWRBZElkPUEwMDY2MjY1MlVKNks2OFBERjNWOSZ3aWRnZXROYW1lPXNwX2F0ZiZhY3Rpb249Y2xpY2tSZWRpcmVjdCZkb05vdExvZ0NsaWNrPXRydWU=
175 feet will last you a long time. Probably 50 or 60 smokes.
Would this work for temp control?
Johnson Controls A19AAT-2C Freezer Temperature Controller https://www.amazon.com/dp/B0002EAL58/ref=cm_sw_r_cp_awd_1j1FwbY9VRKHE
Thermopop
This bacon cure with the recipe tied to a mason jar filled with the cure.
Head lamp
Clam Shell Tongs
Roll of Heavy Duty Foil
Roll of Pink Paper
Spool of Butchers Twine
Polder wired probe thermometer
Instead of a basket throw everything on a decent sheet tray.
after reading through this thread, a couple people referenced the Johnson control units.
seems fairly simple to regulate the fridges temp this way.
Buy a cheap used chest freezer for cheap off of craigslist (many for sale usually): ~$50-100
Buy a temperature controller off of Amazon: $49
http://www.amazon.com/Johnson-Controls-A19AAT-2C-Temperature-Controller/dp/B0002EAL58
Throw in the probe, set the temperature, plug them in, and then fill with beer when you notice it working. Problem solved, possibly under $100.
My father did almost the same thing except he was attempting to make a keg fridge out of a stand up freezer and tried drilling holes in the side. Brand new unit that wasn't even plugged in yet was toast. You have all the important parts to make a new one. You should be able to pick up a chest freezer for a reasonable amount of money such as http://www.samsclub.com/sams/ge-chest-freezer-5-cu-ft/124989.ip and then you can buy something like this http://www.amazon.com/Johnson-Controls-A19AAT-2C-Temperature-Controller/dp/B0002EAL58 and set the temp to whatever you want This is going to be by far your cheapest solution if you remember to drill your holes in the lid and nowhere else (coolant lines don't run in the lid.) I have the same freezer and I can tell you it will fit 3 of those 5 gal pop kegs that it sounds like you're using. plus space for your CO2 source as long as the bottle isn't too big. Doing this setup might be a bit more energy efficient as well seeing you're using an external control on a better pump that gets cooler faster and has just as good if not better insulating than normal fridge style keggerators...
this was super easy to make. Buy a regular black t-shirt, a spray bottle with 50/50 water bleach mix and freezer paper.
http://www.amazon.com/Reynolds-391-Freezer-Paper/dp/B000BZYCNK
you should be able to find this at your local grocery store next to the other baking items.
Here is a great video on how to do this yourself.
http://www.youtube.com/watch?v=Zn43W40q330
here is the stencil i used
http://i.imgur.com/S4chd.jpg
i did a reverse spray for this, because otherwise it would look like Conan with a mustache. So I cut out the hair and mustache and ironed those pieces to the shirt so the bleach goes around them and they stay black.
This is a very easy stencil and easy hobby, I have made 20+ bleachshirts for friends as gifts. The best part is they are original and the person getting them is always happy to get an original shirt.
Yes, this one.
i decided on the Johnson because the wire is thin enough I don't have to drill and can just place it under the lid.
You'll see the copper wire in the top-right corner. Also next to it is a thermostat to make sure it's actually hitting my temperature which right now is 62F.
The glass of water is to place the probe into once the water gets to temp that way I'm not getting false readings from the side or the air and I know what the liquid temperature is to get a better reading of what the beer is actually at.
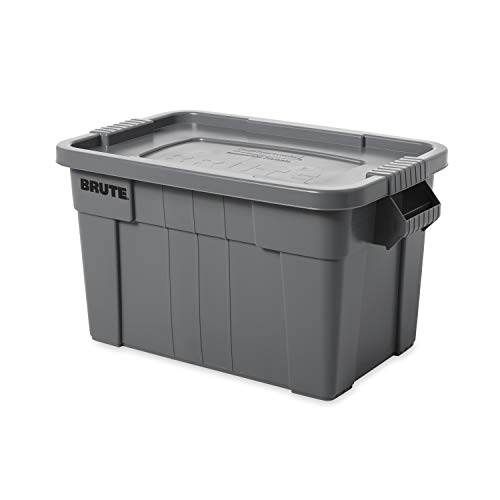
I have 14 of these totes full of worms. They are expensive but sturdy and they stack with about 5 inches of space between each other due to the handles which is perfect for worming.
https://www.amazon.com/Rubbermaid-Commercial-BRUTE-20-Gallon-FG9S3100GRAY/dp/B001B1C4G0
You can find Freezer Paper on Amazon!
As for how long you left the bleach on: I don't take NEARLY that much time! I spritz a pretty moderate amount of 50/50 on, let it soak for maybe 5-10 seconds, dab it off, and repeat. Do that for like three or four times, and it should work a lot better. When you're done, dunk it in water.
The bleedthrough, I guarantee you, is being worsened by the fact that you left it on for 30 minutes.
For meats, I use freezer paper. I've never had any problems with it. Just get tape that will hold up in the freezer and mark the package with a sharpie so you know what's in it and when you put it in the freezer.
Design and design considerations:
Heating/Cooling:
Active Aqua Chiller, 1/4 HP - Note in the temp graph below the blunting of the green curve as the red (ambient temp) went high. I have the dual stage temp controller set to kick on the cooling plug at 68, and this starts the second water pump that pumps through the cooler. The cooler is set for 69 currently so when the temp reaches 70, cooling kicks in. I am continuing to fiddle with this setting.
Nutrients:
Plant photos:
Plants received dry bare root with no green growth from starkbros.
Temp graph:
This is with the La Crosse wifi temp probe (https://www.amazon.com/Crosse-Technology-926-25106-Wgb-Wireless-Monitor/dp/B06ZYJ5L5B/ref=cm_cr_arp_d_product_top?ie=UTF8) so I can check remotely. Red line is ambient temp, green line is water temp.
Water changes:
https://www.amazon.com/dp/B00NC5S6OM/ref=cm_sw_r_cp_api_i_A3H7AbEYKVTZT
http://www.amazon.co.uk/Reynolds-Freezer-Paper-Plastic-Coated/dp/B00EME5KZ0/ref=sr_1_1?ie=UTF8&qid=1427828218&sr=8-1&tag=steal-20&keywords=freezer+paper
What kind of container are you looking at that's $40? A 12 qt container and lid is half that price.
https://smile.amazon.com/gp/product/B000R8JOUC/ref=oh_aui_detailpage_o01_s00?ie=UTF8&th=1
https://smile.amazon.com/gp/product/B000VAUFD6/ref=oh_aui_detailpage_o01_s00?ie=UTF8&psc=1
I use This as my temperature controller, and it works really well. I keep a digital probe in there as well, so I can zero in on the actual temp.
this is what i use, doesn't have a wax side
https://smile.amazon.com/gp/product/B00NC5S6OM/ref=ppx_yo_dt_b_asin_title_o06_s00?ie=UTF8&psc=1
Good idea man. You can buy external control boxes and run that thing at your desired temp. Not sure if that works for your set up, but...FYI.
Freezer control
I would be careful with trying to fill up that sterlite container all the way either as a grow bed or as a water reservoir. On our first attempt at aquaponics, we used a cheaper, thinner container and it busted out the side.
We bought a "brute" from Rubbermaid and it works well as a grow bed for our small aquaponics system.
We bought this in the 20 gallon size:
https://www.amazon.com/gp/aw/d/B001B1C4G0/ref=mp_s_a_1_2?ie=UTF8&qid=1502282096&sr=8-2&pi=AC_SX236_SY340_FMwebp_QL65&keywords=brute+rubbermaid&dpPl=1&dpID=41uT2oDRwFL&ref=plSrch
This is what I bought:
https://www.amazon.com/gp/product/B06XCCQ9K4/
Try looking into a plastic tub, here's a good one which fits a 10 gallon tank absolutely perfectly.
You need to be very careful about who finds out you have a gecko though. I had fish my freshman year and people would always come in to look at them, which was fine because they were allowed in the dorms. However, other students decided to get banned pets like hamsters, and because word spread quickly, they were found out and had to get rid of the pet. That is a bigger concern than school officials or RAs walking into your room to discover the geck themselves, since they won't do it often. If you're not certain that you can keep it very secret, I wouldn't advise bringing it.
Honestly I think you're better off with a fridge, for the amount of time and money it would take to build an "icebox" like the Son of Fermentation.
You can get external temperature controllers that don't require any wiring at all, like this one.
check out these https://www.amazon.com/Hydrofarm-Active-Aqua-Chiller-10/dp/B008HV7VKG?th=1 Might be what you want, might not be.
https://www.amazon.com/Peach-Butcher-Paper-Durable-Carry/dp/B00NC5S6OM/ref=sr_1_2?ie=UTF8&qid=1469705877&sr=8-2&keywords=butcher+paper
Effectively, all you have to do is add a thermostatically controlled switch to control the compressor. Some have recommended products like this (though I don't have personal experience with it). You plug the unit into your wall, freezer into the unit, put the thermocouple in the freezer and set the thermometer.
I posted this to you on a thread from two days ago then I saw this post.
The chiller is probably going to be the most expensive part of your setup. We started with a Max Chill 1/13 HP for a 20 gallon long tank. It worked fine for us.
We weren't prepared for breakdowns though and when our central air died in August the chillers ran constantly until they overloaded. It turned out to have fuses but that chiller wasn't enough for the larger size tank we wanted and so we replaced them.
Our current chillers are ActiveAqua ASCH50-25 1/4HP. They are much larger but they handle our now 40 gallon in Florida with no problem. In hindsight I would have bought my chiller for the largest tank size I expected to have rather than purchase twice.
Advice. Be ready for adapting for whatever tubing diameter the chiller uses. Ours both provide fittings for 2 sizes. Assuming you have an external filter, you will have to run tubing between them and might need an adapter. The max chill had fittings we used with 1/2 inch interior diameter tubing. The ActiveAqua has fittings for 1/2 inch or 3/4 inch. We still use adapters because our filter uses 5/8 inch tubing.
[EXACTO!!] (http://www.amazon.com/Reynolds-Aluminum-391-Freezer-Paper/dp/B000BZYCNK/ref=wl_it_dp_o_pC_nS_nC?ie=UTF8&colid=MZFHWYFCZUHR&coliid=I2DYR9D8MD5323)
Boomerang!!
Might want to look into a chest freezer and getting a thermostat to keep the temperature in the 60-70 degree range for brewing.
A quick google search shows this thermostat as an example of what I'm talking about.
Does having an external controller along the lines of this, where it cuts AC power to the fridge/freezer, significantly effect power efficiency? Or shorten the compressor life/etc.?
Is there a better solution to that part?
I'm pretty sure you can use this to turn that "Keezer" into a radically dominant kegerator.
This is the best looking one I've found, but it doesn't list the dimensions; also a little pricey
Edit: It does show the dimensions in one of the pictures
https://www.amazon.com/Reusable-Carrier-Delivery-Removable-Dividers/dp/B07RPBP22R/ref=sr_1_64?keywords=insulated+cup+carrier&qid=1564646683&s=gateway&sr=8-64
Try wrapping in pink butcher paper next time... you'll get better bark.
https://www.amazon.com/Peach-Butcher-Paper-Durable-Carry/dp/B00ZYDRI8K
This lid works for the 8QT and up I believe http://www.amazon.com/Rubbermaid-Commercial-FG652300WHT-Lid-SSC/dp/B000VAUFD6/ref=sr_1_2?ie=UTF8&qid=1405516119&sr=8-2&keywords=rubbermaid+carb-x+lid
This is what I have been looking into. Hope that helps, and maybe some others can give input.
https://www.amazon.com/dp/B07GFS77BP?ref=ppx_pop_mob_ap_share
But that bag works better as a backpack, doesn’t have hooks to strap it down better to a bike. It comes with a drink holder, that works fair but you still get a little spillage if you drive like I do.
I recently just purchased the postmates backpack and that comes with metal hooks, which really makes the tie down to the bike more secured, also comes with a crappy little drink holder.
It was surprisingly cheap. You can buy the necessary converter online or at any brew shop. They should run you about $60. Just search convert freezer to fridge on Amazon etc.
Basically, you plug in your freezer and the controller cuts it on and off to keep it at a fridge temp rather than freeze. Genius.
From there, I took the lid off and built a frame out of 2x4's that I glued to the chest. I used the frame to drill my holes for the taps, hoses, etc. and then re-mounted the lid's hinges to the 2x4's.
My overall cost to set up a two keg system was about $500 for kegs, taps, tanks, etc.
If you are serious and want to do it, just shoot me a message and I'm happy to help.
https://www.amazon.com/Johnson-Controls-A19AAT-2C-Temperature-Controller/dp/B0002EAL58/ref=sr_1_1?ie=UTF8&qid=1523290700&sr=8-1&keywords=convert+freezer+to+fridge
Here's a good link on Amazon... https://www.amazon.com/dp/B00NC5S6OM
This is coffee land, where we like coffee more than we like artificial flavorings. Those flavored beans are a kind of herpes for coffee gear, with flavors that never quite leave the machine.
But if you are into that sort of thing, you can get him some syrup and a pump and let him tweak his coffee to his heart's content in the cup.
i use this bag i bought from target
https://www.target.com/p/clevermade-snapbasket-50-can-soft-sided-collapsible-cooler-heather-charcoal-black/-/A-52936168?ref=tgt_adv_XS000000&AFID=google_pla_df&fndsrc=tgtao&CPNG=PLA_Patio%2BGarden%2BShopping_Local&adgroup=SC_Patio%2BGarden&LID=700000001170770pgs&network=g&device=c&location=9026908&gclid=Cj0KCQjw5MLrBRClARIsAPG0WGyPtiVs6neIgDm0_Hh5ZEiB971Arfri_aaUoL1DHfAHpuCDgV-msIoaApV4EALw_wcB&gclsrc=aw.ds
i also use this bag for drinks which i sometimes leave in that bag-https://www.amazon.com/BevBag-Shoulder-Reusable-BevTray-4-Cups/dp/B07K8SJHV3/ref=sr_1_9?keywords=beverage+bag+delivery&qid=1567713221&s=gateway&sr=8-9
​
the first one i mention is big enough to put large bags in which is perfect and wide enough.
Have you tried pink butcher paper? Foil contains any fat and water that is released by the meat, which essentially causes it to braise. Butcher paper becomes saturated and "sweats" so the meats slowly roasts. I've found that using foil for butts makes the light meat dry and the dark meat mushy.
I have something similar to this in my quiver of delivery bags that I mainly use, but it's not quite the same.
https://www.amazon.com/Earthwise-Insulated-Collapsible-Waterproof-Reinforced/dp/B06ZZGX3KQ/ref=mp_s_a_1_16?ie=UTF8&qid=1539230376&sr=8-16&pi=AC_SX236_SY340_FMwebp_QL65&keywords=insulated+grocery+bag
I use it for envelopes for logistics and for grocery bags for PN and WF. For restaurants I make sure it's flat on the passenger floor and use one of my Pizza bags to build a nest so the food doesn't tip over while driving.
There is this awesome bag for PM that is compartmentalized that I want for Christmas but it's 80 bucks and Postmates logos all over it. It would be great if you had a hatch, but if not you would have to even out a seat to prevent food from shifting to one side. I think it's meant to be saddled to a rack on a motorcycle tho.
An imgur link will suffice. As for the backpack they currently offer here in NYC, i've seen Postmates couriers with something in the fashion of this except the ones exclusively for postmates have a design on it and are probably built better, at least they seem like they are from observation. The Caviar backpack is a bit bigger at L:20 1/2 W:15 H:18 roughly.
PK-66V: Pizza Delivery Bag, Food Delivery Bag, 12 inch Pizza Backpack, Insulated Food Bag, Thermal Delivery Bag, Pizza Delivery Backpack, Keep Hot, Top Loading, Velcro Closure, 16" L x 12" W x 18" H https://www.amazon.com/dp/B01EGZBNFA/ref=cm_sw_r_cp_api_qfztzbARQCYAC
Here’s a link to butcher paper on amazon:
Pink Butcher Kraft Paper Roll - 18" x 175' (2100") Peach Wrapping Paper for Beef Briskets - USA Made - All Natural FDA Approved Food Grade BBQ Meat Smoking Paper - Unbleached Unwaxed Uncoated Sheet https://www.amazon.com/dp/B06XCCQ9K4/ref=cm_sw_r_cp_api_i_ASO6CbVN16XSP
https://www.amazon.com/Pink-Butcher-Kraft-Paper-Roll/dp/B06XCCQ9K4/ref=sr_1_2_sspa?ie=UTF8&qid=1550191685&sr=8-2-spons&keywords=butcher+paper&psc=1
If you want to cellar but don't have a cellar, consider doing what I did:
-get a cheap chest freezer from craigslist
-get one of these
http://www.amazon.com/Johnson-Controls-A19AAT-2C-Temperature-Controller/dp/B0002EAL58/ref=sr_1_3?ie=UTF8&qid=1417031293&sr=8-3&keywords=thermostat+regulator+johnson
(you can control the temp of the freezer pretty well. mine fluctuates between 50-55 degrees)
Finally, and this is not necessary (but I love it), get a raspberry pi , analog thermometer and a breadboard. I have mine tweet me the temperature inside every hour and email me if the temp goes above or below pre set thresholds.
I'm not sure that's it, Freezer Paper is only waxed on one side, I'm not sure greaseproof paper is waxed in the same way. I don't think we have a UK equivalent (but I'm hoping I'm wrong).
I honestly can't imagine greaseproof baking paper sticking when ironed.
However, amazon UK and hobbycraft sell freezer paper, so we can still get it!
http://www.amazon.co.uk/Reynolds-Freezer-Paper-Plastic-Coated/dp/B00EME5KZ0
Thanks OP, you've opened up a whole new world for me by crossposting this.
I use this paper and it works great. amazon link
Bit pricey but I say it’s worth the investment if you’re going to be doing this a lot. Also despite what the reviews say it does come with a cup holder and divider to separate cold/hot foods, fits up to 15 inch pizza.
https://www.amazon.com/dp/B07GFS77BP/ref=cm_sw_r_cp_api_i_I3nMDbYWWWRQK
Not really, no formula. In fact, once you perfect a method it only works for that bean. Buy a different bean, dial it in. Cold brew is one of the more forgiving methods.
I recommend setting up a bunch at once, with various methods in tiny containers (think like those sauce containers with plastic lids) record each method and length of time, temperature it sat at, etc. Then taste them all and see which you liked best
https://www.amazon.com/dp/B01LZKC89T
You can get an iron for around $10. Freezer Paper is around $8. Your shirts will come out much better using the proper tools. Good luck!
This Bag is pretty good but you can get "knock offs" or cheaper versions of this same style bag on like Alibaba/china sites. But here's a link to it on amazon. https://www.amazon.com/dp/B01EGZBNFA/ref=cm_sw_r_cp_api_qfztzbARQCYAC#
The Brute line has food grade commercial totes. Have you seen em?
https://www.amazon.com/dp/B001B1C4G0
I use a 1/4 horsepower watercooler.
Active Aqua Chiller, 1/4 HP https://www.amazon.com/dp/B008HV7VKG/ref=cm_sw_r_other_apa_TroZzb0JC63T8
I did some searching and bluvoy the company most recommended dash bag by reddit has this drink bag similar. It costs 30 bucks.
Reusable Drink Carrier for Delivery and Food Delivery Bag | Drink Holder Works as a Travel Coffee Carrier to Go, Drink Caddy Bag, Cup Carrier Tote and Drink Carrier with Handle and Removable Dividers https://www.amazon.com/dp/B07RPBP22R/ref=cm_sw_r_cp_api_i_FOoLDb3G2Y0XG
Try it: https://www.amazon.com/Pink-Kraft-Butcher-Paper-Roll/dp/B07K4BRR4N/ref=mp_s_a_1_3?keywords=pink+butcher+paper+for+smoking+meat&qid=1571499880&sprefix=pink+but&sr=8-3
They literally have this on Amazon. GH is just slapping their logo on it.
https://www.amazon.com/Outdoor-Sport-Reusable-Carrier-Caddy/dp/B0754ZNJJH/ref=zg_bs_5016479011_14?_encoding=UTF8&psc=1&refRID=PWE0WYA1Y1XTNXC8V04F
Link for UK/EU
Link for USA
Should be what you're looking for and it works very well, not too much either
Here you go:
http://www.amazon.com/dp/B0002EAL58?tag=wrightfood-20&camp=14573&creative=327641&linkCode=as1&creativeASIN=B0002EAL58&adid=10456JWVX52RVYXDN1MK&
I use this for my meat curing fridge. Works perfectly.
Nice! How are you regulating the temperature though? I would have thought you would need something like [this temperature controller] (http://www.amazon.com/Johnson-Controls-A19AAT-2C-Temperature-Controller/dp/B0002EAL58/ref=sr_1_2?ie=UTF8&qid=1381762647&sr=8-2&keywords=johnson+temperature+controller) or do you just want your beer that cold?
I usually decline/unassign orders with alot of drinks. Just out of annoyance/lazyness.
​
If you want to deal with them, you could invest in a good drink carrier. Something like this would probably work well.
I've not tried parchment paper before, so I don't know. I've used wax paper once which was a terrible mistake, and since then I've ONLY used freezer paper. You can get it through Amazon Canada here. I don't know how much cash you have, or how expense this is vs USD, but this will make you a goodly number of shirts (depending on big of a design you use. I've done 4 shirts so far, and I easily have enough paper for 7-10 more remaining.
My local homebrewing store had one in stock that I used to make my freezer a keezer. It doesn't have a temp limit on it (some of the ones I have seen can only do certain ranges).
I don't know if you could convert a freezer for that purpose though, because freezers are designed to blow out that cold air out and I don't know if that would shock your yeast or not.
Anyway, this is the unit I have
I think a PID would work well. I picked up one of these (sorry for the eBay link, I can't find an actual online store). It monitors temperature and humidity, but I haven't tried it yet. It comes with a sensor and has the proper relays built in, so it should Just Work™. I'd like to hook it up to a regular size fridge, but I don't have room in my apartment for a full size fridge dedicated to curing. :(
My freezer controller works in a pinch, but I'm not sure how good it is a regulating the temperature.
I have this guy: https://smile.amazon.com/gp/product/B0002EAL58/ref=oh_aui_search_detailpage?ie=UTF8&psc=1
Works perfectly. Shuts the power off when my fridge reaches 65 degrees.
This is the lid I bought for that exact container.
https://www.amazon.com/gp/product/B000VAUFD6/ref=oh_aui_search_detailpage?ie=UTF8&psc=1
I find it stupid to pay for the pre-made lid as it literally took me 60 seconds to trace the Anova mount onto the lid and then cut said lid with pocket knife. But hey it ain't my money.
I've found a fair amount of people that have done it with chest freezers but mostly they used http://www.amazon.com/gp/product/B0002EAL58?ie=UTF8&tag=selfsufficientlife-20&linkCode=as2&camp=1789&creative=390957&creativeASIN=B0002EAL58
I'm not sure if an upright freezer is fundamentally different. In where the coils go and if that would cause the short cycling to be more of an issue. This is just stuff that I've picked up from researching this and don't really know how much is complete bs and how much is legit which is why I posted here in the hopes of someone saying you aren't crazy that makes sense
Pink butcher paper
I have two of these http://www.amazon.com/gp/product/B0002EAL58/ref=oh_aui_detailpage_o02_s00?ie=UTF8&psc=1 and although they work well in the summer and spring they are not going to work well in the winter. Apparently you cannot even buy these black boxes. Wish I would have known.
https://www.amazon.com/gp/product/B01EKKJOCU/ref=ppx_yo_dt_b_asin_title_o03__o00_s00?ie=UTF8&psc=1
Well worth the $22 price. Deluxe, heavy duty, holds two large pies, has a flap with Velcro and can be held underneath with strap to open. Plain black, can use with any delivery app.
Haha yeah, I bought a huge Rubbermaid container on Amazon along with it's accompanying lid.. I found a cardboard box that fit the container perfectly, put a trivet in it, then double-wrapped another cardboard box around the first box to insulate it. Ofc I cut out a little hole for the Anova WiFi and use a towel to cover up the other space. Pics attached :)
#1 and #2
I use this 20 gallon rubbermaid brute filled up about 3/4 full with my RO water and I have no bowing whatsoever. So if you are looking for a quality tub I would definitely recommend it.
Also you can get something like this to control the temperature https://www.amazon.com/gp/aw/d/B0002EAL58/
I'm pretty sure this is the one (not hone at the moment [burglars: please don't burgle me]): http://www.amazon.com/gp/aw/d/B0002EAL58
For my Anova PC I use the Rubbermaid 3 gallon space saver: http://www.amazon.com/gp/product/B000R8JOUC?psc=1&redirect=true&ref_=oh_aui_detailpage_o07_s00 and the lid which is soft enough to cut with a knife: http://www.amazon.com/gp/product/B000VAUFD6?psc=1&redirect=true&ref_=oh_aui_detailpage_o07_s00 I may eventually get a larger unit but for now this is what I have. I also ordered the Sousvide Supreme rack but have not received it yet.
Amazon
https://www.amazon.com/gp/product/B06XCCQ9K4/ref=ppx_yo_dt_b_search_asin_title?ie=UTF8&psc=1
Sure thing!
https://smile.amazon.com/gp/aw/d/B01EKKJOCU?psc=1&ref=ppx_pop_mob_b_asin_title
https://smile.amazon.com/gp/aw/d/B07FFC91JZ?psc=1&ref=ppx_pop_mob_b_asin_title
I keep my old DD bag flat in the pizza bag in case I need a hot bag while out with pizzas.
http://www.amazon.com/gp/product/B0002EAL58/ref=oh_aui_detailpage_o03_s00?ie=UTF8&psc=1
Got it in today, will see how it goes. Has plenty of excellent reviews.
Earthwise Insulated Food Delivery Grocery Bag Carrier (Set of 2) Collapsible Extra Large Waterproof Reusable Shopping Tote Zipper Top Lid for Hot or Cold Food Reinforced Bottom Panel https://www.amazon.com/dp/B06ZZGX3KQ/ref=cm_sw_r_cp_apa_i_037GDbVY6YYVT
New Star Foodservice 50073 Insulated Pizza Delivery Bag, 18" by 18" by 5", Red https://www.amazon.com/dp/B009LOZHW2/ref=cm_sw_r_cp_apa_i_T47GDbBMTR5YB
These bags have paid for themselves many times over