Best hobbies according to redditors
We found 6,915 Reddit comments discussing the best hobbies. We ranked the 3,169 resulting products by number of redditors who mentioned them. Here are the top 20.
We found 6,915 Reddit comments discussing the best hobbies. We ranked the 3,169 resulting products by number of redditors who mentioned them. Here are the top 20.
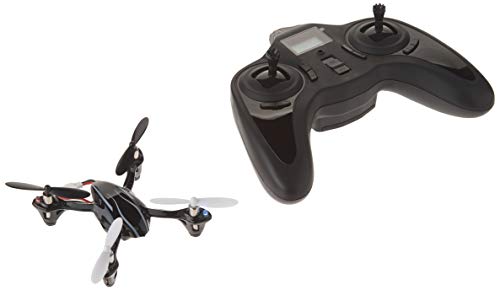


Remote control heli. All metal construction, 3 channel with gyroscope. Literally 10000x better than any air hogs crap.
http://www.amazon.com/Syma-S107-S107G-Helicopter-Colors/dp/8499000606/ref=sr_1_1?ie=UTF8&qid=1314579634&sr=8-1
Come visit /r/Multicopter I would suggest that he not start with a DJI Phantom. It creates some bad habits that would be hard to brake later if he wanted to move to a different platform. You can get a RTF (Ready To Fly) quad for less than $50 that i'm sure he would have a blast with.
Unlimited Fun @ $19.75
Ideas I've had or seen in the thread thus far:
It's the Syma S107. Here's a Link
there's several colors, all under $30, and they're awesome! I got one for Christmas too.
I have a full size quad that I built. I also have a hubsan.
I highly recommend getting the hubsan to practice with. it's cheap, easy to repair, and does a good job training flight skills.
one with camera ($30):
https://www.amazon.com/Hubsan-Channel-2-4GHz-Copter-Camera/dp/B00EXBDWZC/ref=sr_1_1?ie=UTF8&qid=1468503824&sr=8-1&keywords=hubsan
Without camera ($30):
https://www.amazon.com/Hubsan-H107L-Channel-2-4GHz-Quadcopter/dp/B00IZC6C8E/ref=sr_1_2?ie=UTF8&qid=1468503862&sr=8-2&keywords=hubsan
FPV ($110):
https://www.amazon.com/Hubsan-Quadcopter-FPV-Camera-Toy/dp/B00GSNWB5K/ref=sr_1_4?ie=UTF8&qid=1468503862&sr=8-4&keywords=hubsan
On a side note, I am floored at how cheap the fpv and camera models are.
Those RC helicopters are the best!
http://amzn.com/8499000606
Build Pics
Setup details:Monitor: Acer KG271USpeakers: Logitech z506KB: Tecware Phantom w 3rd party keycapsMouse: Razer Mamba Elite & Razer scarab mousepadCase: SM550
Build Details:
MB: Asus ROG Strix B450-i gaming
CPU: R7 3700x
CPU cooler: Cryorig C7G + NF-A9x14
Ram: Corsair Vengeance RGB 3200Mhz CL16
PSU: Corsair SF750 Plat
GPU: EVGA RTX 2080 Gaming XC
Additional Case Fans: 2x Be Quiet! Silent Wings 3 Pwm
Notes:
Questions:
Will Sliger cases sell their internal 20pin to USB A and USB C header separately?(SOLVED)Overall pretty happy with the build quality and how the theme turned out. Black/gray with orange highlights :) Eagerly waiting the NF-A12x25 and NF-A9x14 chromax fans!!! (If we DO get them lol)
(edit: added more info)(edit 2: added responses and findings)
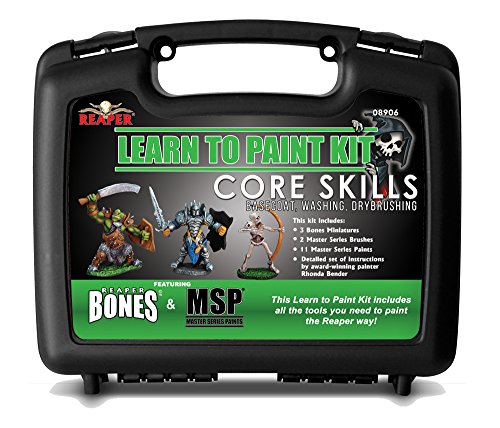
The Reaper: Learn to Paint kit is prolly the best place to start. Comes with a couple minis to practice on as well.
I personally started w/ P3 (Still favor them over others) But I got a Vallejo master kit in trade, so I'll be using those for some time. They're ok, a bit runny at times, but they just need to be shaken more.
Hubsan x4 mini quadcopter. Super fun, amazing stability and as much range as you could want for something this size. It also takes a licking and bounces back. When it doesn't, it's pretty easy to fix. A great gateway model for the whole "drone" hobby. There's also a version with a camera to take movies, and an FPV model. For under $40 it's a great deal if you're are at all interested in the hobby.
http://www.amazon.com/Hubsan-H107L-Mini-RTF-Quadcopter/dp/B00IZC6C8E/ref=sr_1_1?s=toys-and-games&ie=UTF8&qid=undefined&sr=1-1&keywords=hubsan+x4
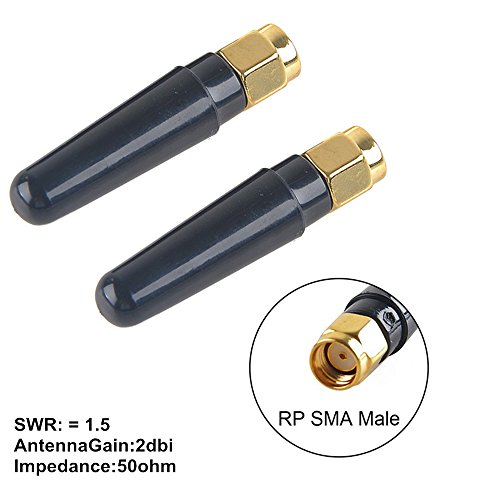
I use these wifi antennas. No real numbers to back them up but they seem to work and stay out of the way https://www.amazon.com/dp/B071LMRK36?ref=ppx_pop_mob_ap_share
Two RC helicopters.
I wish they were this cheap when I was 6.
Did you know Amazon will donate a portion of every purchase if you shop by going to smile.amazon.com instead? Over $50,000,000 has been raised for charity - all you need to do is change the URL!
Here are your smile-ified links:
these
---
^^i'm ^^a ^^friendly bot
I've plugged it before and I'll plug it again - Reaper's Learn to Paint kit is probably the most budget-friendly way to dive into mini painting. It comes with a set of paints, some brushes, three minis to practice on, and a handbook that introduces you to painting techniques that get progressively more complex on each mini. Plus, it's easy to add paints to the kit's storage case if you end up enjoying the hobby.
If you go that route, I also recommend adding a bottle of red paint and a few better brushes, because the kit doesn't come with any shades of red and the two included brushes are just average. Otherwise, it's got everything you need to get started and the practice minis are a godsend (I didn't want to touch my Gloomhaven minis until I had a couple less important ones under my belt).
Edit: Just saw that the kit is a little pricier on Amazon CA. If you can find the kit on another site or at a local game store for under $45 USD or so I would still recommend it, otherwise it's worth hitting up the minipainting sub and seeing what other options they recommend for beginners.
First off WELCOME TO THE TIME/MONEY BLACKHOLE !!
As a fellow Tau player I just have to correct something, they arent robots. Theres little fish face alien fuckers in those suits.
Yes they are fantastically awesome !
If you hit your local shop on weekends you will very likely find people who will be incredibly nice to you and will be very happy to help you learn to paint. This is usually a great bunch of fanboys and we love talking to newbies :) My son will talk for hours on how awesome orks are and his buddie will tell me how amazing Chaos is. I play Tau, Space Marines, Eldar & Necrons. oh i'm 47 so the habit will last your lifetime.
As for what equipment, I suggest an exacto knife for removing tiny bits of plastic. A task light with a magnifying glass is awesome. A good set of brushes & an Army painter kit. Links are below. Paint scheme... dude they are all awesome. What do YOU want ? Dont go crazy at first. start simple, 3 colors and basic bases. As you get better you can add details. Please post photos of your progress and never be afraid to ask questions
For the greater good !
Light - https://www.amazon.com/Spectrum-Daylight-Magnifier-3-Diopter-VS01222B/dp/B00DJG9DFA/ref=sr_1_2?ie=UTF8&qid=1493865330&sr=8-2&keywords=task+light+magnifier
Paint - https://www.amazon.com/Army-Painter-Warpaints-Mega-Paint/dp/B01MTXRUUT/ref=sr_1_1?ie=UTF8&qid=1493865371&sr=8-1&keywords=army+painter+set
Brushes - https://www.amazon.com/gp/product/B01M7UFLP5/ref=oh_aui_search_detailpage?ie=UTF8&psc=1
Hubsan x4
99.9% of the time the only way to be good at a thing for a while is to suck out loud at a thing for a bit. :)
Hey OP, this is where I started: the Reaper Bones Core Skills set.
It has 3 figures, 2 brushes, about a dozen paints, and a booklet that gives you instructions and tips on how to get acquainted with the hobby. It's only $30, doesn't take a ton of space, and has pretty decent paints (brushes are like bare minimum to work, but that works because you're just getting started).
There's another kit called Layer Up! that comes with new brushes, paints, and figures, and teaches some more advanced techniques as well, so the "next step" is there waiting for you whenever you want to branch out.
I'd also grab maybe a wine cork, thread/yarn spool, or something that fits nice in your hand, plus some cheapo poster tack to help you hold a figure. The Reaper figures are supposed to be made in such a way that they don't require primer, but I still wash the minis with dish soap and a toothbrush and prime them anyway (I like Vallejo primers).
The best advice I can probably give is be patient not just with the work you do, but with yourself as well. The idea of the hobby is to have fun, create stuff, and enjoy the process/output. It doesn't have to look perfect your first go, nor should it. Give yourself the opportunity to improve and keep it relaxed.
If you've got any other questions on starting out or anything, feel free to hit me up.
That's what they tend to cost. I've recently been buying Vallejo acrylics because they're cheaper and they seem to do the job just as well (for my purposes anyway).
Here are a couple of options on Amazon that are a much better value than single pot Citadel purchases.
https://www.amazon.com/Vallejo-Basic-Colors-Paint-17ml/dp/B009162PWU
https://www.amazon.com/Army-Painter-Miniature-Painting-Warpaints/dp/B01MTXRUUT/ref=sr_1_1_sspa?s=toys-and-games&ie=UTF8&qid=1510174105&sr=1-1-spons&keywords=citadel+paint&psc=1&smid=AU2FNATHSFHNB
Plus, I actually like the squeeze bottles more than the pots because I don't have to dedicate a brush to getting paint out and I also tend to use less from the squeeze bottles.
Here are some Bloodbowl minis I painted using Vallejo paint.
https://imgur.com/a/svAco
It's a little bit of an extra expense up front, but just this past week I bought this kit from Amazon:
http://www.amazon.com/gp/aw/d/B00NTMC49G/ref=mp_s_a_1_2?qid=1451310598&sr=8-2&pi=SX200_QL40&keywords=reaper+bones+miniatures&dpPl=1&dpID=51DZMCGMRCL&ref=plSrch
It came with 9-10 bottles of paint, 2 brushes, 3 miniatures, and a great guide/tutorial for getting started. It gives very good step by step instructions with details on all the various painting techniques for the first miniature, then recommended paints and techniques for the other two in the box. Worked really well for me for an introduction!
Now the next step is to work up the courage to apply those techniques to Mice and Mystics and Sentinel Tactics...
>Hey guys noob here trying to get into the hobby. I've just been adding up some prices and it's getting ridiculous... am I doing something wrong or is this the entry fee we're talking about? Here is my math.
>
>TOTAL
>$29 - Chaos Black Spray
>$11 - Agrax Earthshade
>$6 - Lamenters Yellow
>$6 - Flash Gitz Yellow
>$6 - Yriel Yellow
>$6 - Ardcoat
>$11 - Agrellan Earth (x3)
>SUBTOTAL $97
>
>$6 - Kantor Blue
>$11 - Coelia Greenshade
>$6 - Lothern Blue
>$6 - Sotek Green
>$6 - Temple Guard Blue
>$6 - Ushabti Bone
>$6 - Screaming Skull
>$6 - Balthasar Gold
>$6 - Gehenna's Gold
>$6 - Khorne Red
>$11 - Carroburg Crimson
>$6 - Wazdakka Red
>SUBTOTAL $82
>
>Paints $179
>Start Collecting! Seraphon $140
>Essential Citadel Brush Selection $87
>Mouldline Remover $19
>TOTAL: $425
>
>^ This paint is for bases and Saurus Warriors only, haven't even calculated the cost of paints for the Cold One Knights and the Carnosaur yet because it was already getting out of control and this is supposed to be my intro into the hobby...
It hurts my pocket book to see people pay $11 for black primer and clear coat when you can buy the same quality of spray for ~$3-4 each.
And $6 for single colors is ridiculous. But then I don't use GW paints. I prefer army painter shade washes, and Vallejo model color or game color for regular colors. I use Rustoleum black, grey, and white primer and always have great experiences with it as long as you follow the use instructions (like don't spray when too hot or too cold or rainy). And I thought my Testors Dull clear coat was expensive at ~$8.
[Vallejo basic model color] (https://www.amazon.com/dp/B009162PWU/ref=cm_sw_r_cp_apa_7xLcAbSVVT1V1) 16 basic colors for $42, which is a ton better than $6 per color.
Army Painter Quickshades 11 washes for $27.50
And if you like army painter paints which they are great paints there is the starter set: Mega Paint Set by Army Painter 50 paints includingbasic colors, shade washes, and a few metallics for $90.
Don't buy into GW's propaganda, their regular paints aren't any better than other common brands like Army Painter and Vallejo, and they are a fraction of the price, usually about half the cost.
Personally I used to use exclusively GW paints and wish someone would have told me this stuff early, I would have saved a lot of money. When I started using other products I realized I didn't even like the GW method for most things. Base paints are too thick, and layer paints are the exact same as army painter or model color paints. Then you get things like acrylic medium, airbrush medium, and glaze medium which you can buy in big bottles from other companies, like Golden, which is the same gunk that GW sells for $6 per pot that you can buy from Liquitex or Golden 8 oz bottlrs for ~$10-$15.
If you're worried about getting studio colors without using GW paints then the community has you covered with the paint conversion chart.
Save yourself some money if you're worried about cost and don't overpay for GW materials when it's the same stuff across the board.
Cut your teeth on something like this before you start throwing money at big/expensive stuff.
Album Link
This is the Velka 3 v1.1 in Grey
---
This is my very first SFFPC build. I am coming a Fractal Design Nano S. This Velka 3 is Tiny! I did some small amount of basic modding to make it look like I wanted it. I replaced the 16mm Anti-Vandal switch that came with it for one that has an led for power. I wrapped the psu cables in an automotive cloth wiring harness tape so you couldn't see the bright psu cables from the original. I taped over the Velkase Fans to hide the colors of the stickers and cables as well. I also used the small quadcopter antennas.
---
Specs:
| Part | Price | Purchased at |
|:-----------|------------:|:------------:|
| Ryzen 5 1600| $65| hardwareswap
| MSI B450I Gaming Plus AC | $130| Amazon
| 8GB x 2 Crucial Ballistix Sport 3000MHz | $66| Amazon
| EVGA GeForce GTX 1060 SC 6GB | $110| hardwareswap
| FSP 400w Flex ATX PSU | $90| Amazon
| Reeven Vanxie 34mm Tall | $20| Newegg
| Samsung EVO 970 250GB| ($70 otherwise)| Previous Build
| Velka 3 Grey| $80| Velkase
| 2 x VF-8010-PWM 80mm x 10mm| $20| Velkase
| Velkase-LiHeat 300mm Riser | $40| Velkase
---
Notes
Replacement Power Switch
CPU Cooler
Case Fans
Velka 3 Sidenotes
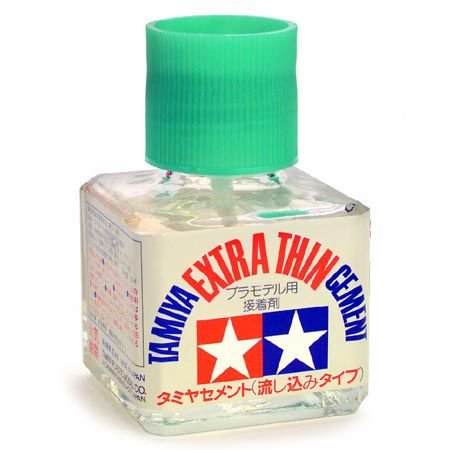
Tamiya make a good Willys Jeep - the more recent version is item # 35219. Amazon link. Get him some Tamiya extra thin cement, an x-acto knife, and consider a starter set of model paints. For brush painting I suggest Vallejo Model Color paints - basic colors for the jeep would be something like black, white, olive drab green and a brown.
I suspect that it is a SYMA!
Can anybody verify?
E: I'm like, 97.2% sure it is.
A toy heliocoptor. I got this one for Christmas, its alot of fun. http://www.amazon.com/gp/aw/d/8499000606/ref=mp_s_a_1?qid=1325344441&sr=8-1
http://www.amazon.com/gp/aw/d/8499000606/ref=mp_s_a_1_1?qid=1376159623&sr=8-1&pi=AC_SX110_SY190
They are surprisingly durable and easy to fly. I've slammed that thing into the walls and ceiling dozens of times so far and it still flies great.
I used to buy Loctite. It's pretty decent for what it is, but I don't really like those fancy 'squeeze' bottles, so I started looking around for a different brand to buy from.
This is what I buy now and it works very well. Good value, too. It's usually around $6, not $8, which is the highest I've ever seen it. Sometimes it drops down to $3/$4.
http://smile.amazon.com/gp/product/B0000DD1QQ?psc=1&redirect=true&ref_=oh_aui_detailpage_o06_s00
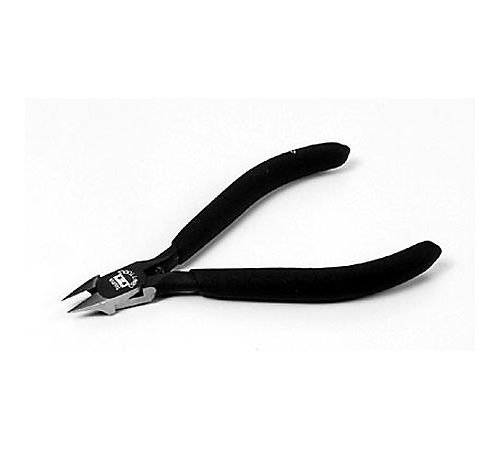
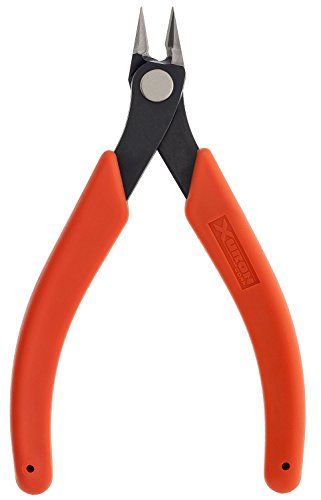
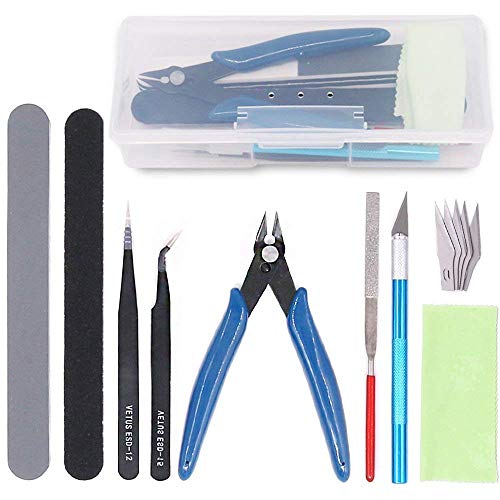
BUY THE BEST SIDE CUTTERS YOU CAN AFFORD
Better results (less plastic strain), less need to use a hobby knife/cut yourself, and faster build time are all benefits of having good side cutters
I've repeated this about 20x but I'll say it again. The Tamiya 74035 sharp pointed side cutters are worth every penny. If you ever watch Gunpla pro modellers videos from Japan, these are the cutters everyone uses
http://www.amazon.com/Tamiya-74035-Sharp-Pointed-Cutter/dp/B000J47Z4G
YES!
Buy this. It will change your life.
https://www.amazon.com/Reaper-Miniatures-08906-Learn-Paint/dp/B00NTMC49G/ref=sr_1_3?ie=UTF8&qid=1536982838&sr=8-3&keywords=reaper+bones+starter+set
If you are starting completely from scratch, I would recommend something like the Reaper Bones starter kit because the value is excellent, it comes with a tutorial booklet, and you have a container for keeping together your supplies (which is a problem, especially as you progress in the hobby).
11 paints alone will cost you 30 bucks, and you also get two brushes, three minis, and the case. There are (slightly) cheaper ways to start but I don't think any that are as easy. Plus many of the cheaper ways to get paint or brushes means using even worse quality components which for a new painter is difficult. I have painted very nice minis in dollar store craft paint, but I also have an art degree and know exactly what to add to the paint to make crappy paint behave the way I want it to.
So that's my suggestion. Get a starter kit from reaper (or another company if you find something you like) and paint the included minis. If that floats your boat, build from there.
Your friendly local game store may have the kits even cheaper. Does hurt to call and ask.
Yeah but it's gotta be affordable, and not fake. I've tried searching for available graphene batteries or systems and so far there isn't really anything you can buy that seems not sketchy. I'm also not impressed by any of the stats that come with some of the less sketchy ones i/e actually rated and not just fake reviews. Until that "graphene" battery has specifications that dictate it's significantly better than anything else I won't buy it. They are always claiming graphene is crazy amazing with super storage and fast charge times but when it has barely more than standard battery storage I get a bit skeptical. I found one which says it's a graphene battery but it's only 14v 1.3 Ah and it weighs 176 grams. While numerous other standard type batteries like this one have the same exact specs but actually weigh less at 155 grams. Which makes no sense considering the supposed capabilities of graphene and perks for using it. Which leads me to believe that it being advertised as graphene is a bit of a stretch towards and outright lie.
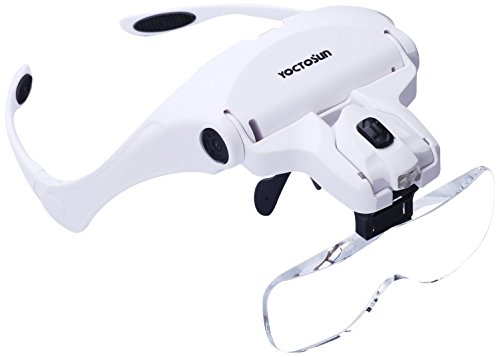
Ooh! I got these recently and they've helped SO MUCH! The light goes right where you need it, and you can direct it slightly up or down, too. I also never realized how helpful magnification is until getting these. My stitches are so much more even!
Here's a Psylock I did recently. I used the Ms. Marvel body, which I think it's the same as Capt. Marvel. The open hand and head I got from a Mariah Hill from the TRU Shield 3-Pack.
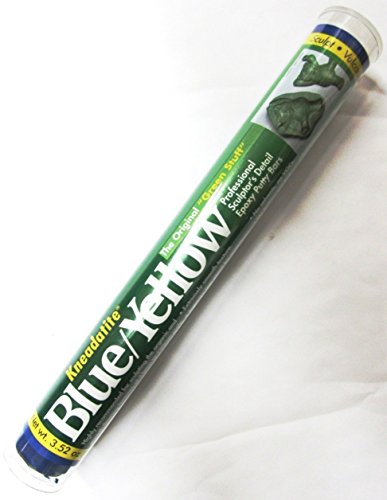
I used Green Stuff for the hair, it hardens to a plastic like toughness but still retains a little flex, so I like using it for hair.
Sword I just got from Casting Cave I think, and painted purple. ClayorNotCustoms also sells a clear purple sword.
Sand down all the joints as best you can, anywhere where plastic rubs plastic. You can prime the figure, then work all the joints and see where problem areas are.
For energy effects I'd try hot glue before melting plastic. Wrap your figure's fist in aluminum foil, then cover it in hot glue in whatever shape you want (like a psychic knife), let it cool. Then take it, and the foil off and your hardened glue shape should pop back over the fist. Water down some purple paint real good and paint it and it should keep it's transparency.
If you have any more questions go ahead and ask.
I'm a full-throated advocate of never buying anything that GW rebrands (clippers, greenstuff, brushes, primer, etc.)
For the cost of a small GW ribbon of greenstuff, you can buy more kneadatite (the manufacturer!) than you'll ever use. Unless, of course, you're a sculptor.
I love supporting my FLGS, but Amazon has a log of it for $13:
Green Stuff Sculpting Putty
MG RX-78 Origin ticks most of those boxes. It's a modern kit of the oldest gundam. (despite the Amazon photos, the kit is in full color. Next to no paint needed)
Not terribly expensive, not overly complicated, iconic, articulate, etc. Good kit to get back into the hobby with.
If you want to just blow him away, Sazabi Ver Ka always works.
Do you care if it has a camera?
$39.19 Hubsan X4 H107L without Camera
$51.45 Hubsan X4 H107C with Camera for recording video to memory card
$171.99 Hubsan X4 H107D with FPV Camera that streams live video to the transmitter's screen
Get [this] (http://www.amazon.com/Hubsan-H107L-Channel-2-4GHz-Quadcopter/dp/B00IZC6C8E) one! And several sets of propellers. And get your company to buy it for you as training.
Trust me, you WILL crash many times. If they can afford the big copter, they can afford this too. Give yourself a month to learn on the little one and you will save many hundreds of dollars in repair.
Edit: Just read you're at a water park, so DEFINITELY get the smaller model before flying the big one. Unless a $1400 loss is acceptable.
I am a beginner in fpv flying who just got a maiden flight of my x220 today and here are my thoughts.
tldr; x220 is too dangerous to recommend to a first time flyer so get a Hubsan X4 or similar quad to practice with since it's way cheaper.
This was the first ever drone I bought and is what I started with (Jun 2015). It was way harder than I thought it'd be but I eventually got a feel for it and got a Hubsan X4 (Nov 2015) after researching for a first "real quad". It was a huge step in difficulty but after a year I am very comfortable in the Expert flying mode. I can full throttle it into the corner of my wall and quickly pull back, operate it with the front facing any direction, orbits, yaw spins, etc.
The x220 was a completely different level. During my short flight I had to focus on just hovering and could only move it in the direction I was facing and this was only in angle mode which is basically auto leveling afaik. Regular mode I could just hover. Remember too that this is all LoS and not FPV. I got a pair of FatSharks setup but am not near comfortable enough to use them in flight.
This thing is a beast and super dangerous so I would not recommend it to someone who has never flown a quad before. I'm not sure how good sims are for learning but I would look into a Hubsan X4 to learn with since its relatively cheap and has that expert mode to work up to. You can also fly it indoors during the winter and outdoors when its nice out.
It's a Syma S107G, they're dirt cheap, great fun too.
Airfix and Revell Germany both make starter sets.
This set of larger planes might also be a good choice if the idea is to go for a "bigger" present.
These packages include paint, glue, and a paintbrush. Honestly, the paint isn't great. But as a first time lark, (1) he's likely going to build an imperfect model, (2) he'll probably still have fun doing it.
For further information as to basic toolkits and commonly asked questions, see the FAQ and stickied posts.
https://www.reddit.com/r/modelmakers/wiki/index
Short version: craft knife like an X-acto knife, glue, paintbrush, maybe a sanding stick or two (manicure boards of various grits would work for this), tweezers.
Also, I would recommend this as glue:
https://www.amazon.com/Tamiya-87038-Extra-Thin-Cement/dp/B000BMYWYC
It's designed to flow into the joints of plastic parts and essentially weld them together. It works much better than the tube glues that will be included in those sets.
As for the kinds of results one might be able to expect if one takes time and is careful:
https://www.reddit.com/r/modelmakers/comments/6uqtiv/english_electric_lightning_172_airfix_starter_set/
Speak with u/pukit about it as well, that's his model using nothing more than what's included in the box of one of the starter kits I linked.
It's a good first dip.
Hope that helps.
You could also buy some Tamiya glue. That way if any other plastic items of yours breaks, you can fix it.
https://www.amazon.com/gp/product/B071LMRK36
I build Gunpla, non-Bandi plamo, GW plastic, and FW resin. Simply put, Bandai's offerings, both in Gunpla and plamo, have Forgeworld details (without the occasional Forgeworld warping or bad pulls), Dark Vengeance (snapfit) assembly, largely precolored parts, poseability, and sane pricing.
I mean, really. this kit and this one both cost the same amount of money (in the US, $85). But one kit is 2 runners of gray plastic, and produces a static model (unless you magnetize, in which case it'll be mostly static). The other kit is 31 runners of parts in color, with poseability. Oh, and Bandai can offer it at this price, and still pay royalties to Sunrise.
1/144 are even less money, and you can choose between HG (focused on external detail) and RG (internal and external detail) kits.
A quad copter like this:
Hubsan H107L X4 Mini RTF RC Quadcopter
Wait till you get one of these
$500 is a tight budget. $500 can get you "something that flies" and "something that's FPV." At the $500 level, you're talking 4-12 minutes.
Wind handling comes from "being fast" and "having a decent flight controller". Naze32, Flip32, KK2 2.1, NAZA, etc.. are all good flight controlers.
The big question is, what are you trying to do? Just "get in and have fun?" Well, in that case I'd probally point you at something like a the Proto or Hubsan ready to fly FPV quads, and a second, non FPV quad for bashing around. Buy two of the same brand, and a half a dozen batteries, and a good charger.
Quadcopters break. And they break, a lot. The bigger they are, the more they break. If you oops, you've lost a prop. If you oops hard, you've broken an airframe, bent a motor shaft, popped a battery... something like that.
If you're determined to fly something larger, you're going to eat the budget quickly.
So "the nerobro way"
Hubsan 104d FPV: $150
http://www.amazon.com/Hubsan-H107D-FPV-Mini-Quadcopter/dp/B00GSNWB5K/ref=sr_1_1?ie=UTF8&qid=1422240063&sr=8-1&keywords=hubsan+x4+fpv
Hubsan 104 crash pack: $20
http://www.amazon.com/Hubsan-H107D-Quadcopter-Crash-shown/dp/B00FZ9BDMU/ref=sr_1_2?ie=UTF8&qid=1422240063&sr=8-2&keywords=hubsan+x4+fpv
Hubsan 107 (non fpv): $54
http://www.amazon.com/Hubsan-H107L-Channel-2-4GHz-Quadcopter/dp/B00IZC6C8E/ref=sr_1_1?ie=UTF8&qid=1422240139&sr=8-1&keywords=hubsan+107
4x battery charger: $7
http://www.amazon.com/ThinkMax%C2%AE-X4-Battery-Charger-Hubsan/dp/B00LGWQ4FG/ref=sr_1_13?ie=UTF8&qid=1422240139&sr=8-13&keywords=hubsan+107
That'll get you something to learn with, and something to fly FPV with for less than $350. And you will NOT be bored. :-) And if you really screw up, you'll have spare parts. Consider adding a few more batteries.
If you are looking for a good beginner quad copter that you can easily learn to fly then you should go for the Hubsan X4 or the Blade Nano QX
The charge time really isn't all that bad. It'll charge back up in 10-15 minutes. I really thought it'd bother me but I'm totally okay with it. This is the perfect starter copter to learn how to fly these things.
If it's really a deal breaker and you're okay with spending more, one of the cheapest way you're going to get significantly improved flight time would probably be a Hubsan X4, a 5 pack of batteries, a simple charger, and a prop guard for about $70 before tax.
I'd call that step 2 in the hobby though and would absolutely recommend the Cheerson CX-10 as step 1.
Not sure why you would spend a week looking, Amazon Prime FTW
Not a Board Game, but you can buy the reaper kit on amazon that comes with everything you need including a few minis to practice on.
Reaper Miniatures 08906 Learn To Paint Bones Kit https://www.amazon.com/dp/B00NTMC49G/ref=cm_sw_r_cp_api_Bc9CybJAZXE9K
Also, if you just want a basic set of paints for a decent price and a brush and such, this kit is solid.
the reaper bones kickstarter V is coming in a few days, oct 1 I believe, it was supposed to be 2 weeks ago but got delayed a tad.
this is THE big discounted bundle all the dm's are waiting for, the bones kickstarters are BUCKETS of the damn things, tonnes of mediocre minis with a dnd fantasy focus, for like $1 a mini. You'll never get through em all.
BUT it will take MONTHS to arrive (IIRC it took 12 for reaper bones IV? somebody who got it can confirm).
In the meantime board-games are your best bet, keep an eye on ebay and such.
Go into a games workshop on an off-time (the late night big events aren't gunna be great) and they'll take you through the whole process with a free mini. And then try to flog you all their stuff
The reaper learn to paint kit for $34us has everything you need, 2 brushes, 11(?) paints and 3 minis, as well as a guide. All that's mising is the final layer of varnish to protect your precious first paintjob. https://www.amazon.com/Reaper-Miniatures-08906-Learn-Paint/dp/B00NTMC49G/ref=sr_1_1?keywords=reaper+learn+to+paint&qid=1569113608&s=gateway&sr=8-1
if you can afford it my vote goes to the mega paintset 2017 serval shades of the msot used colors, a brush, different metallics and washes and some kind of intro sheet how to drybrush and wash etc. you know basic beginner stuff. also it´s the biggest discount you get per bottle unless you get the complete pack which was limited and had all paints they ever produced!
advice because this is a little more work with this brand: shake the bottle like a maniac, if you think your arm starts to hurt and it´s enough, shake some more. also get mixers for the paint, dependign on materials if you use metal balls tey will rust inside the paint so i advice getting glass balls ~6mm and drop two in each paint
A Syma S107 RC Helicopter. <30 bucks, and friggin awesome. I've been playing with mine for weeks.
If you wanna give money to Reddit, use the link, (and/or read comments), in qgyh2's post
Get one of these !
Only $20, they are completely stable and maneuverable in any direction. I've dropped it from over 30 feet and ran them into walls and it still flies like a champ. With blinky lights too! Not sure what else you could want in a heli.
Use good glue like the kind that comes with a precision applicator or a liquid glue for joining shell halves or panels. Watch a few youtube videos on gluing.
Do not use the crappy tube glue.
Malifaux minis are pretty darn close to KD in terms of complexity. I really don't think you are going to find anything cheap, but you could probably buy, assemble, and ebay the minis you build (and anything is cheaper than fucking up a KD model). You'll lose a few bucks, but a well assembled mini is worth almost as much as one on the sprue.
I am new to assembly as well, but after about 20 models I don't even sweat it. Everyone on this sub swears by Tamiya liquid cement -- but I think this applicator is 100x better than the brush for most cases:
https://www.amazon.com/gp/product/B0006N6ODS/ref=oh_aui_search_detailpage?ie=UTF8&amp;psc=1
Basically... take your time, clean up every little piece as it comes off the sprue, dry fit a few times to make sure. It's not that hard, it just takes patience. Sometimes I will sand+dry fit a piece a dozen times before it finally fits perfectly. One thing that I didn't realize for a long time is these things aren't perfect -- sometimes a piece just doesn't fit and its up to you to fix it. A couple of the hands on the Phoenix, for example, were real bastards for me. A really great trick I learned randomly on youtube -- you can use the plastic cement as a kind of seam filler by putting slightly more glue than necessary, so it just barely squeezes out the side. Then cut/sand any excess.
I also recommend grabbing a cheap seam scraper and a very nice sprue cutter (the clippers at home depot are not made for plastic). Also maybe some tools for pinning -- for example, I had a resin base that I wanted to put my antelope on, so he had to be pinned to it rather than glued.
If you are going to paint your models, there's a few more things you should get -- a putty you like, some clay shapers, and some way to do some light sanding.
Invest in some good side cutters and some sanding sticks. . Don’t stress if you make mistakes, just do your best to finish the model. You’ll learn a lot just by getting it finished as best you can. Then try another kit.
Frosting - any white marks on models after post-curing are usually due to residual IPA or water left on the print. If you make sure they are completely dry before putting them under the UV lights you will get rid of most of this (I use an airbrush or compressed air can to help speed things along.
For fixing divots etc you can try to remove most supports before post curing as the resin will be softer and less likely to fracture (leading to divots). Otherwise you have to look to tips from plastic modellers and use putty and glue to fill and then sand. The tools you use are also important - proper modelling sprue cutters (side cutter and tweezer types) put less stresses on the resin and lead to cleaner cuts. Final clean up can be done carefully with a sharp new blade in an xacto knife (a magnifier of some sort helps). 99% of the time I remove supports after the IPA washes and before post-curing (use gloves!). Tamiya Sprue Cutter & Sprue tweezers
The shininess when you do not wash in IPA is the extra resin on the model hardening to a smooth finish. When you wash it off the layers and 'pixels' in the model are more apparent and your get the matt finish. I have not experimented much with this but you can try adding a clear coat over your model at the end of the process to restore some clarity.
Paints: Most GW paints are fantastic, there are a few exceptions here and there, but you can easily supplement your GW paints with alternatives from Vallejo, Army Painter and P3. This usually comes down to personal taste for most people.
http://www.thewarstore.com/vallejo-game-color-paint.html
http://privateerpress.com/formula-p3/paints
https://www.thearmypainter.com/
Brushes: GW brushes are a joke, they're the same price as really nice brushes like the Windsor Newton series. If you're going to spend $15-$20(US) on a single brush, get something nice not the GW crap.
Hobby Tools: GW's hobby tools are fine. It's hard to mess up simple metal tools. That being said, they're also 3-4x what they should cost. A trip to your local hardware store should net you the same or better products for about 1/4 of what GW wants to charge!
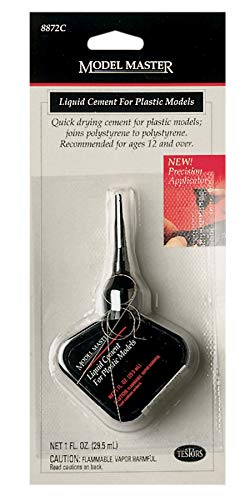
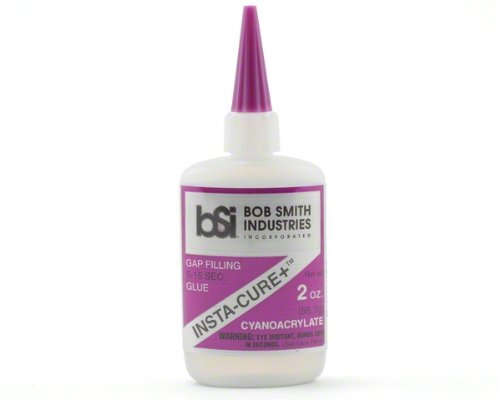
Glue: I hate GW glues personally. I've never had a good experience with them. For plastic assembly I prefer Model Masters and for Super glue I prefer the Bob Smith Industries gap filler medium.
http://www.bsi-inc.com/hobby/insta_cure_plus.html. I would be shocked if you can't find this in any number of hobby/craft stores. Worst case scenario, you can get it from Amazon with a couple of days wait time.
https://www.amazon.com/Liquid-Cement-Plastics-1-oz/dp/B0006N6ODS. Best plastic glue around, the metal applicator tip allows for extremely precise application of glue.
Primer: Everyone has different opinions on primer. If you're just getting back into the game I suggest going with GW primer. It rarely has issues and although extremely pricy, it gives an excellent base coat. That being said, any dollar store matte primer will do the trick.
**Once you're back into things, I highly suggest you look at an airbrush. The miniatures world has changed a LOT in the last 20 years, and now airbrushes are cheap and many paints are already formulated for use with them!
nonononono dont use super glue! What you need is cement glue, I use and recommend Tamiya. I've never used super glue on plastic models so Im not sure what will happen, but play it safe and use the stuff that was designed for these models.
Edit: look to see if there are any hobby stores near you, they most likely can give you advice, and most likely would stock the correct paints and glues
here's my airfix Hurricane mkII that was my first serious build, It's old and I lost the canopy, but I still like it :) Model making can be very fun, those are some nice kits, enjoy them
tamiya glue is pretty good with a nice applicator if you want to be more careful when gluing your models, https://www.amazon.co.uk/Tamiya-87038-Extra-Thin-Cement/dp/B000BMYWYC/ref=sr_1_1?crid=2N0SJ6OUA4GVT&keywords=tamiya+glue&qid=1566379040&s=gateway&sprefix=tamiya+g%2Caps%2C137&sr=8-1
MEK is SUPER dangerous to use. if the fumes get in your eyes, you go blind. get it on your skin and it can cause all sorts of other issues like nervous system complications. its seriously that dangerous. https://www.ccohs.ca/oshanswers/chemicals/chem_profiles/mek.html
it works well for welding abs plastic as it works on the molecular level to bond the pieces together. has use in 3d printing and such, but other than that, i wouldnt use it for modeling.
i suggest not using it due to the dangers in both use and storage (it needs a stable temp).
just pay for the real stuff
http://www.eplastics.com/styrene-glue one alternative.
https://www.amazon.com/Tamiya-87038-Extra-Thin-Cement/dp/B000BMYWYC/ref=sr_1_5?ie=UTF8&amp;qid=1491598947&amp;sr=8-5&amp;keywords=styrene+glue its cheap enough to not worry about the price. its not like you plan on wel
A favorite of mine and a lot of people on this sub is Tamiya Extra Thin Cement: https://www.amazon.com/Tamiya-87038-Extra-Thin-Cement/dp/B000BMYWYC/ref=sr_1_1?ie=UTF8&amp;qid=1478116000&amp;sr=8-1&amp;keywords=tamiya+extra+thin+cement
This stuff is great for small parts, it has a very small applicator brush built in. The regular Tamiya Cement is also good stuff, it just has a bigger brush and is much thicker. The regular cement is more for larger pieces.
The 3 things you need are:
That's pretty much it. If you want to dive in really deep I have a massive post that lists other tools and touches on a lot of customization that people have done. But none of that's mandatory, you can very easily forge ahead with just the 3 tools I linked above.
I'm assuming you're talking about maintaining a speedcube.
Pop out an edge, once in a while (every few hundred solves, maybe) clean out the cube dust that accumulates. Use a wet cloth (or a tissue, if you're lazy)
Re-lube (try traxxas 50k for lube. It'll last you for years) with a few drops of lube. Put a drop on the edge, and a drop on the base of a corner. If you're up for it, unscrew and lube the core (a small drop on each of the screws/springs), but you don't really NEED this.
If you want to lube it use this guide:
http://youtu.be/s4paID_54lQ
Best (for the price) lube:
http://www.amazon.com/gp/aw/d/B000BOLVFI/ref=mp_s_a_1?qid=1367526514&amp;sr=8-1&amp;pi=SL75
Also do a bunch of solves, then try and take out the torpedoes and see if you like that feeling better (I do but some don't)!
Now go play! :)
Shows a comparison, using the same piece, of the cheap Amazon Platos and the God Hand. I have the Tamiya's that are clearly inspired by the God Hand, wondering if its worth the upgrade.
My nippers:https://www.amazon.com/Tamiya-Sharp-Pointed-Side-Cutter/dp/B000J47Z4G
Anyone seen or used the one sided nippers?
Things I've learned starting out:
Wash the miniatures. I found the easiest way was those little ziploc plastic containers. Warm dishsoapy water in them, throw a few minis in, scrub them with an old toothbrush, rinse them off and toss them into a second ziploc container filled with plain water. Then drain and refill that a few times to get all the soap out. Be careful you don't dump them down a drain.
Take them out of the warm fresh water and put em onto a plate with a paper towel or something to dry. I like to organize them into which model belongs to what at this point.
I invested on a sprue cutter and it has been WONDERFUL for me to remove pesky mold lines and the bigger tags sticking out of models. Also an xacto knife helps.
I got some cheap needle files from Harbor Freight and they've helped get the flash lines flush without any weirdness.
After your stuffs all pretty and moldline free I tend to toss it into a sonic cleaner because I work at a lab. It might be placebo but the industrial strength badass one at work seems to get clean and I mean... why not? But you can do the water and rinse again. Or even just do it once, after the mold line removal. (Side note: sonic cleaners are PRETTY RADICAL for removing paint from miniatures with some simple green. I love it. Saves me a lot of scrubbing.)
Anyway once its dry I personally use this glue and some stuff called green stuff to fill in gaps. Heres a tut showing the basic idea
Once they're assembled I use some good ol elmer's white glue on the bases and dip em in sand and shake them off. Tutorial that shows that
Then prime your stuff. Tons of tutorials about it and tons of everyone saying which is their favorite primer, spray or brush on, different types of primer, different brands. Some stand by Army Painter or Citadel. I've had good results with Rustoleum Ultra Cover 2x White primer. I've recently picked up some TAMIYA WHITE which I hear good things about. Trying them on some Morats tomorrow.
Lots of other good info has been posted too! I also just started probably, shit, 6 months ago, so this is stuff I've had to pick up and learn as I go.
Welcome to the hobby, friend! Here's a few useful tidbits of info for you.
None of the Gundam kits from the last 20 or so years need glue. That's a standard feature across pretty much every Gundam model kit. So in that regard, feel free to pick any design you like. Not all kits are created equally, but a quick search across this subreddit will help you figure out if the kit you're looking at happens to be hot garbage (and there are a few that are).
To more directly answer your question, the starter set uses an older model of the classic RX-78-02 Gundam. The Revive version is a much, much better model. You can find it here on Amazon.
A panel lining pen (or pens) are not required, but certainly make for a better final product. They're pretty cheap on their own, and generally you'll want at least grey and black, and possibly also brown. Alternatively, you can get a pack of all 3. You'll also want so basic q-tips/cotton swabs to clean up your panel looking.
You're also going to need some nippers. Nippers come in a range of types, qualities, and styles. The best nippers are single sided (that is, one side is a blade and the other is flat). These, the infamous Godhands are hands down the best nippers on the market. They're expensive as shit, but worth every penny. If you're on a medium budget, Tamiya's nippers are the next best option. There are cheaper nippers out there, but they're gonna come with significantly inferior results. That said, a lot of that can be addressed with...
A good hobby knife. You'll be just fine with a simple, cheap X-Acto knife, but there is (in my opinion) a better option. My personal favorite, the Tamiya Design Knife. It's got a slightly smaller blade, which will let you get into tighter spaces with it. It also comes with a metric crapton of replacement blades. You'll want to replace the blade every couple kits, but there's a bunch of them in there. There same container that holds the replacement blades even has a second chamber to dispose of your old blades into.
Finally, you may want some fine pointed (possibly angled) tweezers for decal application. Finger oils can screw up the adhesive on the stickers. You can pass on this starting off most likely, but you'll want to get some eventually.
TL;DR, the starter pack isn't the best option. If you're after the granddaddy Gundam, get the Revive. Otherwise, pick your favorite design. The newer the kit, the better, generally speaking. Look at the copyright date on the box cover to see. Bottom left corner.
You're going to need nippers, which can get pricey, but the cost is worth it. Start with a mediocre pair, and upgrade to the Godhands once you're committed to the hobby. You'll need a knife, too. You can cheap out on this one, but there are better options IMO.
Optionally, get tweezers, panel lining pens, and cotton swabs.
Edit: other good starter kits
HG Barbatos is a great kit. The build process for IBO models is a bit different than other gunpla, though, as they have a quasi-inner frame.
HG 00 Gundam is another great starter. It's also the first kit I ever panel lined, and it was a great starter for that.
If you're wanting a Zaku, the HG The Origin Zaku II Type C is probably the best Zaku kit released to date in 1/144 scale.
Finally, I'd feel bad for not suggesting my all time favorite HG build. It was just a fun, fun kit to make and to pose. The HG 1.5 Gundam. It's got some really cool gimmicks and, unique colors, and an awesome design.
If you want to learn how to fly drones, start with one that doesn't have FPV. This way you'll know how to fly it if your monitor goes out.
I recently got the "UDI U818A". It's a great learner, easy to fly and takes crashes well. It's around 16 inches diagonally, so a little big for indoors. That's never stopped me though. You can get one on Amazon for around $50 usd.
A smaller option is the "Hubsan X4". I haven't flown this particular quad, but I'm probably going to order one this week. It has great reviews, and is only about 6 inches across diagonally. Great for indoors. Again, Amazon has them for around
$50$30 usd.I suggest starting with one of these. Get good, then move up to something more expensive with FPV.
Edit: Links and such
UDI U818A $49.23 + Free Shipping
Hubsan X4 H107L (no camera) $33.95
Hubsan X4 H107C (camera) $29.99 + Free Shipping
Do some digging and look for deals. You may be able to find cheaper prices. I got my U818A for $28 + Free Shipping on a Lightning Deal.
Im sure its fine, but its super overpriced. Effectively looks like a syma x1 with a fancy, heavy frame over it.
Get the syma x1 for $35 or the hubsan x4: http://www.amazon.com/Hubsan-H107L-Mini-RTF-Quadcopter/dp/B00IZC6C8E/
I think the CrazyFlie is one of the worst options, honestly. It's expensive and requires a computer and gamepad. It might be a good option if you're into computer based control, but if you just want to fly around then there are a few others you could go with. I haven't seen many kits at this size but there are a lot of prebuilt/ready to fly options:
These were $40 at Radio Shack. Get one from there or your local hobby shop, practice with it until you get good, then head back to your local hobby shop, walk up to the guy at the counter and say "I have $160 and I've been practicing with a Hubsan. What's a good model I can upgrade to?"
Win.
Great! But seriously before you build your QAV, go buy a cheap "beater" quadcopter that you can learn to fly on. Fpv is hard and will be even harder if you begin not knowing how to fly at all. Go buy what everyone recommends: the Hubsand X4. When you can crash on your first flight it'll be with a 40 dollar quad instead of a $300+ build.
Hubsan X4 (H107L) 4 Channel 2.4GHz RC Quadcopter, Black https://www.amazon.com/dp/B00IZC6C8E/ref=cm_sw_r_other_awd_PBRQwbYK710HY
There are 4 models, the h107c has two versions
H107L - no camera
H107C - two versions - vga and HD/720p
H107D - fpv version with display on remote
there are also hubsan-specific add-on goggles for the H107D that plug into the remote
I assume you don't have an electrical engineering background and just want something you can buy?
Note: Below is not guaranteed to be perfects/correct, just some cursory research for you because I was in the mood.
Parrot AR Drone 2.0 uses a 2000mAh 11.1v (3S) LiPo.
It looks like the Power Pot outputs 5V to USB and there are usb LiPo chargers, but they look like they're all only for 3.7v (1S) cells.
I don't know what kind of "solar batteries" you have. If the solar bits can output at 11-18V, you could combine it with something like this to charge the LiPo. If not, you can also purchase and bring a panel with you that can output at that range.
Battery is 22.2Watt-hours.
Looking at Kathmandu, you get ~5.37kWh/m²/day. With the 14W version of the linked panel, assuming 50% charge efficiency on a bright and sunny day pointed right at the sun, you'd get ~37Wh/day. Assuming it's spread across 12 hours of daylight evenly and you track the sun (alright this is a bit of a BS assumption, but insolation values are usually a little low so we'll hope it evens out) you'd be able to charge a battery in about 7.2 hours. Shell out for the 28W version and you'd be able to do it in ~3.6 hours.
The charger and panel linked aren't necessarily the best or best value, just the first 2 I found. Don't hold me to my calculations, they could be completely wrong but can give you a rough idea.
Another consideration, depending on the length of your trip. If you get the 28W version and the charger linked, you're spending about $200 and you can get maybe 2 fully charged flights/day. It looks like spare batteries can be had for ~$20 and LiPos self-discharge at <5%/month. You could buy 10 at the same price and not have to worry about charging.
If you go with this approach, buy and test it out early.
Something like this?
https://www.amazon.com/gp/product/B071LMRK36/
https://www.amazon.com/gp/product/B071LMRK36/ref=ppx_yo_dt_b_asin_title_o03_s00?ie=UTF8&psc=1
If you plan on taking up the hobby and want paints to build on, I would pick up the Reaper learn to paint set . Comes with 2 brushes and 11 paints to get you started. Plus 3 minis to use in campaign. There’s a reason there are so many pictures of that skeleton mini on the sub. It’s a great starting point.
I recommend starting out with a beginner box. The Reaper Beginner Box has all the paints, washes, and brushes you'll need to get started. It also comes with an instructional booklet and some models to practice on, so you can work on the basic skills.
Keep in mind that minipainting is a cheap hobby... but WH40k is not. If you're just interested in the painting aspect, or you're on a very tight budget, you may want to look at some different games. Warhammer can get very expensive very quickly.
I got my Reaper learn to paint kit today. I have zero experience with painting but it was way easier than I expected.
Reaper makes Learn to Paint kits. I've used them to reinforce some of what I've learned at local painting meetups and I've liked them. I ended up grabbing a large Army Painter paint set and then had a wet palette and a Winsor & Newton brush recommended to me from a Zombicide painting group. They also pointed me to a head-mounted light/magnifying glass and some brush soap.
That link covers how you build armies to some degree. There are rules for what can go in. Each faction has both allowed units and units of various tiers of alliance. The link also covers army bonuses and alliances. To get the real details, you'll need either Armies of Lord of the Rings or Armies of the Hobbit. There's also a new Gondor at War book that I believe has some additional army information in it, but I haven't picked it up yet.
They have a lot of battle reports out there. If you have an hour, https://www.youtube.com/watch?v=3eUQ9zT4Dd0 is a "how to play video." A shorter video (28 minutes) is https://www.youtube.com/watch?v=jkgHoUIK4l4 which is a few years old, but much of the play sequence is the same. GBHL (Great British Hobbit League, can search GBHL on youtube) and STF both discuss things.
Best of luck and welcome to the community!
Depends on what you mean by "best" and "beginner" ...
Are you looking for the best in bang for the $$ as someone beginning in the hobby?
Best as in "easy" for a beginner to use?
OR best as in the best quality paints/colors regardless of price or difficulty?
--------------
Here's a quick rundown:
-----
Suggested starting kits:
Don't forget spray primers first.
A great place to start is the mini painting starter sets by Reaper:
https://www.amazon.com/Reaper-Miniatures-08906-Learn-Paint/dp/B00NTMC49G
https://www.amazon.com/dp/B01N458GBK/
They're not too expensive, and they are a great intro to mini painting. They also come with pieces to practice techniques on, and a lot of paints to work with as well. I'd get those, and maybe some brushes.
I also would recommend a wet palette to keep paints wet between painting sessions, magnifying glasses to help see, and a mini holder.
I also got these brushes, which seem to be working well for me, and have a mix of useful ones.
The starter paint sets Reaper puts out are solid. Comes with 3 minis and teaches you the basics with step by step instructions for each mini. Coupling that with some yt videos on how to use a good wash you can learn quickly. I was surprised how good some of mine look after just doing a few. I expected to be terrible but there's a lot of good stuff out there to help.
While this is generally considered good advice given here for a true "no experience" beginner you can get away with cheaper brushes.
IMO these brushes work great and are an excellent value at 4 bucks. And you will get a variety of useful sizes. (If you look for them in store they now have black handles, not blue)
http://www.walmart.com/ip/Plaid-10-Piece-Detail-Round-Brush-Set/22086220
(And yes I know this isn't an amazon purchase like OP wanted but its a great value)
Its probably better to pick up primer and sealer locally too. You could probably get both at Walmart.. I use Krylon COVERMAXX Acrylic Crystal Clear Flat sealer. But I like to use Duplicolor Sandable Primer so I get that at the automotive store.
IMO I would not buy a palette either. It's really easy to make a wet palette out of things from the dollar store or from around the house that will serve you better then an artists palette.
https://www.youtube.com/watch?v=96mjmqWTPfM
Reapers MSP and Citadel paints are not well represented on Amazon.. but Vallejo and Army Painter paints are..
Reaper does have their Learn to Paint kit on Amazon:
http://www.amazon.com/Bones-Miniatures-Learn-Paint-Reaper/dp/B00NTMC49G/ref=cm_cr_pr_product_top?ie=UTF8
If your not sure that mini painting is going to be your thing you may just want to start with (diluted) craft paint anyways... but purpose made miniature paint really does have its advantages.
Sorry I know I haven't been much help on what to buy on Amazon but hopefully this will give you an idea on what to avoid
https://www.amazon.com/Reaper-Miniatures-08906-Learn-Paint/dp/B00NTMC49G
Reaper kit comes with 2 brushes, a decent selection of paints, and some really good instructions for painting the included minis. Downside is you might want to pick up some additional paints as the ones included are tailored to the included minis (no human fleshtone, etc).
https://www.amazon.com/Army-Painter-Wargame-Starter-Paint/dp/B007SQ3C18/
Basic but fairly standard set of paints, includes an ink for shading, and cheap enough to buy a few decent brushes along with it (the one it comes with is rather low quality, but considering the price it's not that bad of a negative point)
You can start with one of the learn to paint kits.
They include instructions, paints, brushes, even a few miniatures to practice on. I linked the Core Skills set, there are a couple of other kits on Amazon as well for learning more advanced techniques.
Buy cheap and buy twice. Save your money and get good stuff. The extra money you'll spend will be less in the long run when you factor in having to upgrade all of your current equipment when you start getting serious and realizing you shouldn't have gone cheap.
I was in the same boat as you. I only had roughly $700 to spend, and for me, that's a lot of money. I picked out most of the components you did and read reviews, watched videos, and did nothing but learn, learn, learn. After dozens of hours researching and learning new things, what I found is that if I wanted a drone that a) Flew good and b) was fast and c) was responsive - I was going to have to spend more and go quality. The adage "Buy cheap and buy twice" rings true in life and holds doubly true in this hobby. In the end, I decided to go the quality route. I ended up spending ~$475 on my quad and picking up a second job to pay for the TX and goggles. It's ultimately up to you, but if you want to freestyle, go fast, and end up racing. I would strongly recommend not going frugal in regards to your quad. It's what the vast majority of people told me not to do and, even though I spent way more, I'm glad I listened and built a top quality high end quad that's going to last.
My Build:
RotorRiot Alien 5' Frame
KISS FC & KISS ESCs
EMAX 2205 2300KV (aka Red Bottoms)
TBS Unify Pro HV
HS1177 camera
ImmersionRC Spironet Antennas
HQ 5x4x3 Props
Taranis X9D Transmitter and matching X4R Receiver
I'm in the USA, so these are more North America-centric, but I'm fairly certain you can find equivalents in Europe or Australia.
If you want to learn techniques before buying expensive minis, but a pack of cheap army men or dinosaurs:
https://www.dollartree.com/kids-military-action-figurines-50ct-packages/279838
https://www.dollartree.com/plastic-dinosaur-figurines-7-in/252377
In the store, these are $1.00 USD. great for learning to paint, and disposable if you mess up.
Primer: Painters Touch 2x - good primer, way less expensive than Citadel. Home Depot Link
Brushes: Painting, especially learning to paint will be rough on brushes. Cheap brushes that aren't garbage will work for you, I suggest these: Walmart Link
Paint: Don't use craft paints. They are super cheap, don't thin well, are well pigmented and are generally crap for actual mini painting. Vallejo has a starter kit that's great: Amazon Link
Army Painter has a very basic starter kit, I'm a fan of their range as well, Amazon Link
$3 USD will get you a ton of minis to learn on
$5 USD for primer
$4 USD for brushes
$30-50 USD for paints
Get a cheap hobby knife or x-acto knife and for less than $75 you're in a hobby that will keep you entertained for life.
If you really don't want to start on non-hobby minis, $10-25 USD will get you an EZ Build pack. Games Workshop Link
You may even want to just drop the $40 and get the basic starter for Warhammer AoS - LINK or WH40k - LINK. Each has 4 Easy Build packs in it, so basically, buy 3, get one free, plus you get the basic rules of the game as well.
Hope this helps.
Army painter is likely your best bet, and they have a relatively large kit (link below) and you're not going to get better than $2 per pot. Really as far as I know, the big names are really what you're looking at, and probably expect to pay between $2.50 and $5 a color. You can by other brands, but miniature paint is made for miniatures, and will turn out better than a store bought acrylic at michaels. P3, Vallejo, Citadel, Army painter, those are you big names.
https://www.amazon.com/Miniature-Painting-Wargamer-Regiment-Miniatures/dp/B01MTXRUUT/ref=sr_1_1_sspa?ie=UTF8&amp;qid=1517982587&amp;sr=8-1-spons&amp;keywords=army+painter&amp;psc=1&amp;smid=AU2FNATHSFHNB
There's an updated version of that set with a few more paints that would look good for BB. https://www.amazon.com/Army-Painter-Warpaints-Mega-Paint/dp/B01MTXRUUT/ref=sr_1_1?ie=UTF8&amp;qid=1488210258&amp;sr=8-1&amp;keywords=army+painter+set+iii
The Army Painter Miniature Painting Kit with Bonus Wargamer Regiment Miniature Paint Brush - Acrylic Model Paint Set with 50 Bottles of Non Toxic Model Paints - Mega Paint Set 3 https://www.amazon.com/dp/B01MTXRUUT/ref=cm_sw_r_cp_api_i_A9jWCbSM25CCW
Is a great set that I purchased when I got into 40k. It has a great selection of colors and washes so you’ll have everything you need to get started. Plus with all the options the set will grow with you as a painter. As you get more comfortable you can use what’s in there to expand into adding more advanced shades and highlights. As long as you remember to “thin your paints” it should last you awhile. If you want to get the most out of these or any paints I’d also recommend looking up how to make a wet pallet. It’s easy and makes a little paint go along way. Hope this helps.
Maximum bang for buck would be an Army Painter Mega Set. You can achieve basically anything with this selection. For varnish/mediums skip Amazon, just use the half-off daily coupon for a bottle of artist's medium/varnish (Liquitex, Golden, W&N, whatever) at Michael's/AC Moore/Hobby Lobby/whatever is local to you.
Some things that I would recommend having to start out: Warhammer 40k rule book, Codex for your army, D6 dice(other dice would be useful too as wound/victory point trackers). The Citadel Colour app is a good (free) app to get for deciding what paint to get to paint your army. It also has some good tutorials on how to paint miniatures (which you can also find on youtube). As for assembling your minis, if you search on Amazon you'll find everything you need, just search for miniature assembly kits https://www.amazon.com/Rustark-Gundam-Building-Repairing-Fixing/dp/B071LB1T5D/ref=sr_1_3?crid=3H7CRDBPOZZJ3&keywords=miniature+assembly+kit&qid=1567860206&s=gateway&sprefix=miniature+asse%2Caps%2C171&sr=8-3 < I use this one. You'll also need plastic glue for all your plastic needs and super glue for Resin-cast miniatures. A good glue for plastic would be Testors non-toxic plastic cement. For Resin super glue Loctite is usually a good brand. For brushes, cheaper brushes you can buy in bulk for like 5$ or something are fine to use. Just do some googling for the sizes you'd need. For Priming your models (which you have to do to get the paint to stick to them) do some googling, you can go with spray paint or you can hand paint (I hand paint or use an airbrush using Vallejo primer). It's also worth mentioning that with both paints and miniatures, you can get a good percent of them from third party retailers, either at your local gaming store that carries them, or online (I recommend MiniatureMarket.com or Gamenerdz.com ) for a reduced price.
Side cutter nippers.
https://www.gunpla101.com/review-god-hand-ultimate-nipper/
There's a range...
https://www.amazon.com/gp/product/B001TMZ7QA
Probably Green Stuff.
https://www.amazon.com/Green-Stuff-Yellow-Epoxy-Putty/dp/B002MB61RQ
As far as I know, Reaper Miniatures.
Also, he uses "Green Stuff" Epoxy Putty to sculpt additions to miniatures.
I bought one of these a few weeks ago and it's so much fun. Great gift. I'm ordering one for my boyfriend this week.
I noticed that you didn't add the sticker on the waist. I would recommend adding it with a toothpick and smoothing it out with a cotton swab. Also, invest in a set of Gundam Markers for panel lining.
&#x200B;
You can find those here.
&#x200B;
Otherwise, great job on the modeling!
I highly suggest picking up something small and cheap that you can mess around with and learn the mechanics of multi flight while you figure everything else out. I personally like the Hubsan x4 and they also have one with a camera on it for a little extra. I should have started with the Hubsan (or other microquad) because I crashed my first build terribly which set me back several months of repair.
For your first bigger multi you could look into the Cinetanks if you're interested in zipping around (link is only to a frame, but they have suggested parts in the right sidebar). I've heard good things about the DJI Flamewheels.
What I've been doing as I get ready for my next multi is to look at the build logs section of the sub wiki. Gives me a good idea of what I'd like and what other people have done too. I also suggest checking the two forums on the sidebar (multi and rcg) The guys at Multirotor pretty much held my hand and walked me through my first build, which I'm really grateful for.
Good luck! And welcome. :D
Well before you get to a 500 sized multirotor, Might I suggest something smaller and less spinning blades of death?
such as:
http://www.amazon.com/Hubsan-H107L-Channel-2-4GHz-Quadcopter/dp/B00IZC6C8E
Once you get comfortable then you should move up...but if you are new, and don't know to much, you WILL wreck it.
First of all, I would never attach your cell phone to a helicopter (I doubt many--if any, could even hold it). They make cheap cameras that are made to attach to the bottom of RC helicopters. Go that route :)
Now I just sort've got into this hobby. I know very little but I can give you some advice.
There are 3 types of RC Helicopters:
-Coaxial = two sets of rotor blades (not including tail rotor) EASIEST AND CHEAPEST
-Fixed Pitch = single rotor with fixed blade pitch EASIER AND CHEAPER
-Collective Pitch = single rotor with controllable blade pitch HARDEST AND MOST EXPENSIVE
Those are also listed from easiest to hardest to fly. You can learn to fly a coaxial in like 20-30 minutes if that. Coaxial heli's will easily hover with little to no controller input as the gyro/accelerometer does all the work and dual rotors are inherently stable. A good first coaxial could be the Syma S107 @ $27. Feel free to skip to a fixed pitch heli if you are daring but with the Syma S107 being less than $30 you should still get it.
Fixed pitch heli's are an entirely different animal as I've recently learned. They are much less stable than a coaxial helicopter but not uncontrollable if you are patient and careful. The physics behind a FP heli is much different than a Coax. These heli's are also more powerful (usually) so be very gentle otherwise you'll be replacing parts even more so than you will normally. YOU WILL NEED TO BUY REPLACEMENT PARTS. YOU WILL CRASH. Keep in mind though, it's not completely terrifying :). Don't be afraid to learn. I love and recommend getting a Blade 120 SR @ $160-180. I just got one and I love it. It's so fun. It's so appealing to fly a single rotor heli because it's more realistic and challenging.
Finally, you have Collective Pitch helicopters. These are what the "pros" use. The rotor blades have a variable pitch that allows for very intense and tricky maneuvers. These are sometimes called 3D helicopters because (if you are skilled enough) can fly them upside down or any direction in between while zipping through the air. I don't know too much about them because I'm still learning to fly a fixed pitch heli. Do NOT start with one of these helicopters. The Blade 450 3D @ $470 is a common example of a Collective Pitch 3D helicopter. As you can see they are quite expensive.
Helicopter Cameras: EXAMPLE
TL;DR: Start with a coaxial (Syma S107) to learn. Then move up to a fixed pitch helicopter (Blade 120 SR). Buy lots of replacement parts/training gear/flight sim (optional). Get used to crashing. Don't fly too high at first. Have fun!
If you're a beginner, get the S107g. It's something like 85% off and I love every bit of it. It's very small and light, so you can only fly it inside, but still tons of fun. The rotors look a bit flimsy, but I've been smashing this thing into every wall in my house daily for the past three weeks and it's still doing pretty good.
Take it slow, then. Spend a lot of time looking at it really closely and absorbing the detail. Listen to sad music while you build (I usually do). Consider how nice it is that there are actually things in the world that fit together and make sense (and since this is a kit from Revell Germany it's probably quite good, and the directions should be easy to follow and sensibly written). Get some liquid model cement like this: http://www.amazon.com/Liquid-Cement-For-Plastics-1-15oz/dp/B0006N6ODS ...and some acrylic model paints from a hobby shop or online (Vallejo paints are quite nice, and acrylics clean up with water and won't stink out your room) and maybe a spraycan of some kind of gloss coat-- Testor's makes a decent glosscoat lacquer, and there are others out there too. Test fit before gluing. Use tiny amounts of glue, applied with a toothpick or something similar. Don't use model cement on the clear parts, though-- use good ol' Elmer's Glue (I think-- check our wiki to be sure) and if the clear parts are a little iffy, dip them in Future floor polish ("Pledge with Future Shine"-- it's like a magical model-building liquid). If you mess this one up, there are other kits out there, and you can learn from this one so the next one will be better.
We have a wiki with a lot of general info that may answer other questions, or just ask: http://www.reddit.com/r/modelmakers/wiki/index
The easiest way to remove paint or plating from parts before gluing is to scrape the spot with an X-Acto #11 razor knife. Be patient and take your time, you can get all the paint off.
Second, when you use your Testor's cement, apply it with a toothpick, and use less than you think you'll need. Amazing that it won't hold two painted parts together, but if you get it on paint it'll take that right off. :)
You can use CA (superglue) as well. I use Testor's Model Master cement (love the applicator) for most plastic-to-plastic, and CA for plastic to metal or rubber, as well as for when I need a faster drying time or if I just can't scrape off the finish.
Finally, you have to leave it be while it cures. Model cement works by melting the styrene. Cover the surface of one part with glue, attach the other part, wipe away any excess that squeezes out, then clamp it or wrap it with a rubber band and don't touch it for at least 5-10 minutes. Moving the parts during curing will ruin the bond.
This shit, right here.
And specifically that one. The metal applicator is fantastic, as it is easy to clean (seriously, why would you use a fat plastic need for plastic cement applications?) and being a thin needle allows you to apply it in hard to reach nooks and crannies.
Tamiya extra thin plastic cement my dude. Will literally weld the plastic back together, better than superglue for fixing clean breaks.
Tamiya 87038 Extra Thin Cement Glue Fine Tip 40ml https://www.amazon.com/dp/B000BMYWYC/ref=cm_sw_r_cp_api_Sc5Fzb0CHHSS1
This stuff right here.
Just use it in a well ventilated area and don't apply it to parts you've' painted cause it'll eat that paint like it wasn't there.
I tried a few different ones and had the most success with this for the model assembly and then any super glue gel for the model to the base.
If you can buy this Traxxas 50k from amazon
If you only want to buy one tube of lube, buy 50k. It's the same as weight 5 on SCS but you get more for the price.
If your just trying to find a lubricant for your speed cube. I think your better off with [traxxas 50k] (http://www.amazon.ca/Traxxas-5137-Differential-Oil-Weight/dp/B000BOLVFI). Traxxas is good and plus its 10$.
If your settle on getting silicone spray. I heard you should get CRC silcone spray.
https://www.amazon.com/dp/B071LMRK36?ref=ppx_pop_mob_ap_share
These have worked well from me, and are pretty small
https://www.amazon.com/gp/product/B071LMRK36/
I use these. They are tiny but work well, my router is on the floor above me and I've never had a problem with these
These are the ones I use on my Gigabyte Aorus B450i mobo - 2pcs 2.4G 5.8G FPV TX Antenna RPSMA Male Dipole Whip FPV Antenna for FPV Multicopter Racing Drone Quadcopter https://www.amazon.com/dp/B071LMRK36/ref=cm_sw_r_cp_api_i_4a5ODb60E28V4
Works very well
I used these:
Makerfire 2pcs 2.4G 5.8G FPV TX Antenna RP-SMA Male Dipole Whip FPV Antenna for FPV Multicopter Racing Drone Quadcopter https://www.amazon.com/dp/B071LMRK36/ref=cm_sw_r_cp_api_i_7E-8AbSHNSN3C
Way better than the standard ASRock one on my Z370 Fatal1ty and much smaller, too. Don’t ask me how that’s possible. 😂
5GHz is especially good with these. Ask me tomorrow and I’ll check what my link speeds are, if it’ll help. FWIW, I’m behind a 6’ tall mirror and two interior walls, plus a hallway. In total, maybe ~25 feet away from a Synology RT-2600ac with both bands active on a 100Mbps Spectrum package.
I ended up buying these tiny antennas from Amazon. Performance has been the same as the stock antenna so far, but my PC is in the same room as my router so signal strength isn't really a problem for me. Aesthetically, they are perfect in that they are so tiny as to be basically hidden amongst the cables plugged in the back.
Been painting a few years and lurking here forever, here's my advice:
> Mixing Brush: I am told that you should not mix paint with your primary brushes. Where can I buy a cheap brush for mixing, and anything special I need?
If I'm already using a "larger" brush (1 or higher) I'll mix with my good brushes and just be mindful of how far up the ferrule I am or use the back of the brush. If I'm using a detail brush I'll use a super cheap synthetic 2 or 3. Look on amazon or at a local art chain (Michaels) for cheap student grade packs of round brushes. You'll end up using these for terrain, PVA glue, and all sorts of other things.
> More Brushes: My kit came with a 2 flat and 0 round. What other brushes will I need, and what in your opinion is a good brand to buy? Any set that covers all the basics? Although I am new to painting, I'd like something that will last me and be quality. They sell SoHo brushes in my local store, which look like they are great quality. Any users here?
This topic can get pretty involved. Brushes have a lifespan so if you're new to the hobby I wouldn't recommend dropping money on higher end Kolinsky brushes like W&N Series 7 or daVinci Maestro. For a new painter I recommend Winsor & Newton's University series and Army Painter's Wargamer brushes. The W&N University brushes are higher than average student quality acrylic brushes that can be abused. They're great for basecoating with thicker mixes. The Wargamer brushes are a cheap intro into real sable hair so you can get started at layering with thinned paints.
> Primers: This is a big ? for me --- Spray primers, basic black white and grey? Which ones, what brand, etc... Really unsure what is recommended here, as in a store there are so many, but hoping /r/minipainting can help as we are all painting the same stuff. Would love some specific product recommendations here.
For the most part, you have three options: spray cans, brush-on, and airbrush. I can't really recommend spray primers - they require ventilation, have trouble with humidity, and can only be sprayed at one consistency. Many of the hobby spray cans advertised for basing your minis aren't actual primers. Brush-on primers are the most economical but run the risk of losing detail on the mini if applied heavily. Airbrushing is my preferred method using either Mr. Hobby's Mr. Surfacer 1500 thinned with Mr. Color Leveling Thinner for highly detailed minis, or Vallejo Primer for tabletop quality minis. Vallejo Primer's are acrylic and polyurethane so they're more protective but can sometimes take away detail.
> Finish: I saw a few videos where they spray some 'protective' finish on a product, I believe there are matte finishes as well as gloss finishes? Can I get any 'matte/gloss finish' product, or are there certain ones for miniatures?
Same three options as priming. If your minis are going to be handled often, I recommend a glossy coat then a matte coat. Glossy varnishes are stronger than matte varnishes, so this combo will give you the most protection. You are more likely to lose some detail this way. If your minis are for display only you can skip the varnish and just be careful. Dried acrylics are basically thin plastic so they have some durability on their own. Brand-wise I airbrush using Liquitex Professional gloss and matte varnishes, thinned with Vallejo airbrush thinner and a drop or two of Vallejo flow-improver. Vallejo varnishes are also good but Liquitex offers the best bang for your buck.
> Mini Holders: I found this product which looks amazing, but is not available until late 2017 since the Kickstarter has ended. Are there any similar products that someone could recommend, or should I just go with something very simple? Would love to hear some ideas.
I use an old Citadel paint pot and white poster tack to stick to the bottom of the base. If you want to paint individual parts, heat the tip of a needle/pin with a lighter, press it gently into the glue joint of the mini (the hole will be hidden later), then press the other side of the needle into a wine cork or similar.
> Brush Care: I got a "masters" paste from a store that I was told to rinse and swirl my brushes in after painting. Any other tips or is this okay?
Master's is the best option, just make sure you follow the directions and use warm water for best results. You can also get a small bottle of W&N Brusher Cleaner and Restorer to have on reserve if you accidentally let paint dry on one of your better brushes. If it's a cheap or synthetic brush you can clean it with original Windex (WITHOUT Ammonia-D) or Vallejo airbrush cleaner, followed by a wash with Master's.
> Carving/Scraping tools: I know some minis need to be cut from a sheet and some have mold lines that need to be cleaned. How is this done and what tools are needed?
Get a decent pair of sprue cutters - I recommend these. You should be able to find these for $10 at a local hobby store. For plastic minis you should be fine with just an X-acto or similar knife for getting rid of mold lines - just run the blade mostly perpendicular to the line and "shave" it gently.
> Storage Box: For all the little things that come along with painting, what do you use/recommend to store everything in?
A coffee mug works fine as a brush holder. You can try a hardware store for all sorts of containers if you're traveling with paints. Otherwise desk space and some imagination (spice racks) or money (official paint stand) are all you need.
> Paint Agitators: I was told to get some steel balls and put them in every paint bottle I have. It's okay to leave them in there. Would these work, or any concerns?
Please do not use steel ball bearings. You can attempt to buy "marine grade" ball bearings but unless it's reputable and expensive they are still likely going to rust and ruin your paint. I use hematite beads for necklaces for my paints. 4mm for dropper bottles and 6mm for pots. You can get them cheaper at Michaels w/ a coupon and they're inert so they won't stain your paints.
> Flow Improver: Thoughts? I was told to mix this into my washes. How much should I add, one drop? Is this product okay, or is this only for airbrushing?
Flow improver is generally used for airbrushing to extend the drying time and prevent clogs. Fluid retarder in the form of actual art supply from W&N or Liquitex, Vallejo's Glaze Medium, or Games Workshop's Lahmian Medium are what you're looking for. These can all be used to turn a normal paint into a wash (heavy dilution), or can be used to extend drying time for wet blending (light dilution). I can't give you exact ratios as each paint company, each color, and the age of your paints will dictate that. Trial and error is the only method here.
One thing that hasn't been mentioned yet is a wet palette. It will save you a lot of headache when learning to wet blend and will let you save mixed paints for many days. You can get one for cheap and use either the papers that come with it or kitchen parchment paper. Both will yield different results so play around with both. Be sure to use distilled water or you're likely to get some funk from mold after a couple days.
This is what I use for my customs.
Example
It's really sturdy & you can even get long/thin/sharp details without worrying about them breaking off.
Look up some tutorials & be sure to play around with it.
Haven't used it but a lot of people say "Green Stuff" is good too.
Just whatever you do, stay away from any air/bake dry clays I've yet to see any custom using those turn out decent.
First of all anything I say here are not absolutes and do have substitutes. Each painter has their own way of doing things. This is just my take.
Prepare Your Mini for Painting
Before you do any paint first you need to sand/trim, assemble, fill gaps, and prime your miniature. When you sand/trim your mini you are removing mold lines and areas that don't mesh well with the minis surface, your trying to get everything even. You can use an exacto-knife and files for this. Once you have all the pieces so that they fit together well next you need to assemble your mini. Take the time to dry fit everything before gluing to make sure it all fits together. The type of glue you use depends on what the mini is made of and preference. For plastic, I tend to use super glue 90% of the time since plasti-weld (a chemical that melts the plastic together) doesnt seem to make the joint any stronger, though I could be using the wrong type. You can also pin the mini joints together for added strength. After your mini is assemble now we need to fill those gaps that can ruin a great paint job, I see it all the time and it makes me sad. There are many different types of putty that you can use but I go for green stuff. I mix 1:1, yellow to blue, and using a damp toothpick I wet my hands and smoosh it into gaps until it seems filled. This can be hard to tell sometimes since you cant get a sense of depth. If you want to make sure I will usually brush on some Gesso and check to see if it even. Finally we can prime our miniature. This is required or acrylic paint wont stick to the plastic. Application can be done via airbrush, rattle can, or brush. Since I haven't done much with a brush, but FYI you can use the Gesso above also for priming, and I cant assume everybody has an airbrush I will talk about the cheaper option, rattle can or spray paint. There are many available like those made for miniatures (though I don't think they have a real difference), and brands like Rustoleum and Krylon. Make sure you get a can that is for just priming and not the "prime and paint" type and is for indoor/outdoor use, sometimes the outdoor only stuff can be a bit thick. The brand doesn't matter as much as when and how you apply it. Humidity and temperature are Very important when priming a miniature, if it is to hot and dry the paint will crack and to humid you can get dripping and that terrible fuzzy look. Make sure you read and FOLLOW the directions on the can. When applying the paint do wide sweeps across the miniature with a constant spray. Keep the sprays short and the motion consistent.
Painting
Now you are at the fun part. Again, there are different mediums to paint in, oil, acrylic, pigment. Acrylic is a good place to start. The brand of paint you use is really up to you. You can go to a hobby or art store to get these paints. Don't get the paints that are to cheap the results are not good. Blick is a good store to visit because mini painting is an art that uses artistic mediums. That is what Blick is all about and you will get a wide range of brands there, you don't have to use the mini makers brands. Brushes are very important and if you get the cheapest kind you'll find that they tend to fray and leave little bits of bristles on your mini. For starters stick with the mid range synthetic ones and take care of them, theyll last awhile if you do. Make sure you wash them in your water pot (just a jar of water) often so that the paint doesn't dry on them and clean them every so often. So when you sit done with your brush and begin make sure you thin your paints or they will end up thick and goopy. You can thin with distilled water or you can use an acrylic medium. There are many special mediums but the most useful ones are matte and glaze medium and are used for different painting techniques. Always give your paint time to dry before applying more or youll mess up the prior coat and things will look rough.
Sealing
After you are done painting and have let your mini dry for a few days its now time to seal and protect it by giving it a few coats of finish. This will keep scratches away from your wonderful paint job. Application and selecting is similar to picking a primer but there are 2 options, gloss and matte. Think about what type of finish you want. Most go for matte and some use a mix but few do only a gloss finish.
Stripping
So you messed up. What now? Well you can strip the paint off and try again but you got to be careful here because this process can make the mini brittle. A common used item is Simple Green. Though it does a good job on the acrylic paint it will not remove the primer very easily. To do that I have found Super Clean to work best. But do note, only soak a mini 10 minutes at a time sink Super Clean works by sucking the moisture out of the paint, and the mini. So do a 10 minutes soak, then take a toothbrush and try to brush off the paint, then return to the solution and repeat.
Just shorten the link next time - just use [ ] ( )
Try green stuff:
http://www.amazon.com/Green-Stuff-Yellow-Epoxy-Putty/dp/B002MB61RQ
It's literally called Green Stuff!
get this one. its a great little electric heli that uses dual rotors to keep it stabilized and it can fly for like 5-8 minutes. it can also take a lot of abuse and crash from 20 ft and not break
That thing looks awesome. How did it fly? My first "multirotor" was this micro heli that I got it from Amazon in 2012 when they were first starting to put gyros in the micros. The little guy still flies really great too. Since I've watched quadcopter tech advance so quickly I wonder how much better the helis have become since 2012. I haven't heard anything about them in recent years. I'll have to look into them and see if they've gotten into FPV now.
I ended up going with this guy! https://www.amazon.com/gp/product/B00EOEBG2Y/ref=oh_aui_detailpage_o01_s00?ie=UTF8&amp;psc=1
Assuming you will start with panel lining on bare plastic first.
----
Here comes the controversial part, people say that the Acent will eat through your plastic and make it brittle - which is not wrong but not always right. Yes, it will ruin the plastics if you shower them in the accent and enamel. All you need is a little touch and the ink runs. To clean up, damp a cotton swap with enamel thinner and rub right off. Very easy. Very little headache.
----
There are other self-thin solutions that some people use, but I find the options above the be the most efficient ones.
By Zaku Revive, did you mean one of the Origin kits or the Gouf Revive? Because I don't believe they have released a Zaku Revive yet. As for what to build next, pretty much any modern HG kit is going to be easy to assemble, but the Revive kits are some of the best out there. Unfortunately, there is no Guntank Revive, but the Guncannon Revive is a great kit, and the Zeon side has the Gouf Revive and Gyan Revive so far.
As for panel lining, you just need some lining markers or pens (I suggest these). All you need to do is use them to fill in the panel lines on the kit and maybe some of the other recesses (you can look at photos of the kit with panel lines in the instruction manual for guidance) and then use some Q-tips to wipe off the excess.
They are transparent stickers and dry transfer decals. for panel lining i used these gundam markers. they're pretty neat.
The 3-pack of markers for bold lines:
https://www.amazon.com/GSI-Creos-Gundam-Marker-Value/dp/B00HY93GHY/ref=sxts_sxwds-bia?crid=3GTR0RXGUXX4H&keywords=gundam+marker+set&pd_rd_i=B00HY93GHY&pd_rd_r=3b3b062e-d90d-495a-8e52-176ed31b8ba1&pd_rd_w=RRUZa&pd_rd_wg=sdCxW&pf_rd_p=a5491838-6a74-484e-8787-eb44c8f3b7ff&pf_rd_r=9A24ZX8C18EJZBXABCXP&psc=1&qid=1571687311&sprefix=gundam+marker%2Caps%2C152
Tamiya ink works differently, it will spread down the lines: (Comes in a variety of colors)
https://www.amazon.com/TAMIYA-87131-Panel-Accent-Plastic/dp/B01HDJ7BR0/ref=sr_1_1?keywords=tamiya+ink&qid=1571687349&s=toys-and-games&sr=1-1
&#x200B;
And I like to use this for fine details, it is thinner than the Gundam markers:
https://www.amazon.com/gp/product/B002UCSNQY/ref=ppx_yo_dt_b_search_asin_title?ie=UTF8&psc=1
&#x200B;
These I use for cleaning, the middle grit will take off ink, then the fine will buff the marks:
https://www.amazon.com/gp/product/B00R34AE66/ref=ppx_yo_dt_b_search_asin_title?ie=UTF8&psc=1
&#x200B;
Hope this is helpful, good luck!
I have found that the easiest (and cheapest) way to up your model kit game is to panel line them. It makes the color separation pop way more, and helps define the proportions of a kit much better. A three pack of the panel linking markers are on Amazon for 5-7$ usa (link below). I recommend using the gray marker for white parts, brown for red orange gold and yellow parts, and black for blue gray and silver parts. The markers last a very long tine as well.
Another way is to buy some sanding sticks (10$ roughly for a 4 pack) and work on carefully removing nub marks. It will really improve the final presentation on the finished model. Start with a lower grit stick to remove the nub, and then increase the grit to polish away the scratches. If done correctly (I'm still working on this too) it will look like the nub was never there.
I Hope this helps, from one modeler to another.
Panel lining markers:
GSI Creos Gundam Marker Value Set -GM01&02&03- (Black, Gray, Brown) https://www.amazon.com/dp/B00HY93GHY/ref=cm_sw_r_cp_apa_i_xt-2DbKF7CZZR
Sanding sticks:
Squadron Products Value Pack Sanding Stick https://www.amazon.com/dp/B000CDR5K8/ref=cm_sw_r_cp_apa_i_AC-2Db3ZFSJ3K
Edit: also the panel lining will help the paint job pop. In addition I'd saw use multiple coats from the gundam makers if possible.
Your best bet is it start with something like this then when you get comfortable flying, you can build a FPV 250 for ~ $600-$1000.
Assuming you saw one on the set for some film stuff, I assume you're interested in a more AP-style rig like a DJI product. Most of the people here are more interested in a DIY "racing/freestyle" FPV miniquad, a smaller, mostly carbon fibre build that's intended to be fast, responsive, and an immersive flying experience. So, your first decision is whether you're after a more casual photography rig or a quicker, racing quad.
In either case, most of the other comments seem to say "buy something small and cheap and start learning", and I'll second that advice. Most of us here fly "FPV", wearing goggles that show us what a small camera on board broadcast. Before you can do that though, you need to learn the basics of flight, ideally "line of sight", without the goggles.
The Hubsan gets recommended a lot (H107L) because it was one of the best, cheap quads out there. They're $32 on Amazon and are a good starting point. Make sure to grab some extra propellers and a couple more batteries, flight time is about 5 minute of casual hovering.
For a little less though, I cannot recommend the Eachine H8 Mini enough. It's smaller, a little more responsive, and just as durable. Once you're more familiar with the basics of flight, too, you can try out "rate" (manual, no auto-leveling) mode with this one too for about $10 and some time flashing firmware.
From there, once you get used to the basics of control, you can start adding in cameras and goggles and practicing FPV. Eventually, you can work your way up to a larger miniquad.
And always feel free to ask more questions if you have them!
</rant>
You can definitley do this with a mid size quad and gopro/small point and shoot. I personally don't like the wide angle of the gopro. I mainly use mine for mapping and find the wide angle causes excessive warping/distortion. One thing to consider would be a Canon point and shoot. They are pretty cheap and can run CHDK which lets you do a lot of cool things like remote triggering, running scripts, saving raw files etc...That is what I currently use and it works well.
As for the quad choice the phantom is a pretty basic platform that will do what you want. I haven't flown one, but my understanding is they are pretty easy in stabilize mode. I haven't personally flown this either but I have a kit that is running a similar flight controller/software and I really like it. It has a bit more functionality than a phantom, but will probably take a bit more effort to set up as well.
Either way I would suggest getting a small toy quad to learn first. The Hubsan is great learner. It is much better to crash one of these than an expensive phantom/camera set up. Plus you can fly this inside as well. Also check out /r/Multicopter. There is a lot of good info there.
This is what I have, and what many people in this sub will tell you to get.
http://www.amazon.com/Hubsan-H107L-Mini-RTF-Quadcopter/dp/B00IZC6C8E
You would be safe also getting the crash pack:
http://www.amazon.com/Hubsan-H107-Quadcopter-Crash-Pack/dp/B00D3LTTU0
Very small very fun and very easy to learn nn. I've had mine for over a year now and I still fly it every couple days.
may i recommend you and your friends pool 45 dollars and have the time of your lives with a hubsan x4 H107L
These are neat novelty, but personally i think getting him a hubson x4 would be better, its not a fixed wing, but there super fun and a great intro rc quad copter. http://www.amazon.com/Hubsan-H107L-Channel-2-4GHz-Quadcopter/dp/B00IZC6C8E
I was going to get this one www.amazon.com/Hubsan-H107L-Channel-2-4GHz-Quadcopter/dp/B00IZC6C8E/ref=sr_1_1?ie=UTF8&qid=1420393850&sr=8-1&keywords=hubsan+x4 I don't think I really need a camera. is there a way I could add one later if i wanted to. Should i get this crash pack www.amazon.com/Hubsan-H107L-Quadcopter-Crash-Pack/dp/B00FZ1P3LK/ref=sr_1_3?ie=UTF8&qid=1420393850&sr=8-3&keywords=hubsan+x4 or should i just get more batteries?
Get a cheap small quadcopter to practice / crash / practice. Learning to fly well is the best way to prevent damage to your phantom. Also, learn to fly well in atti mode (no GPS help)
http://www.amazon.com/gp/aw/d/B00IZC6C8E/ref=mp_s_a_1_1?qid=1417370608&amp;sr=8-1
http://www.amazon.com/gp/aw/d/B00D3IN11Q/ref=mp_s_a_1_fkmr0_1?qid=1417370779&amp;sr=8-1-fkmr0&amp;pi=AC_SX110_SY165_QL70
Some people feel that the propeller protectors ( http://www.amazon.com/gp/aw/d/B00BS4KUCK/ref=mp_s_a_1_1?qid=1417371068&amp;sr=8-1&amp;pi=AC_SY200_QL40 ) can cause vortex ring state and could cause a crash. ( DJI Phantom 2 - Prop Guards explained. - Also T…: http://youtu.be/4LcnVgbxdiI ) I personally fly with out them. It saves weight and makes you fly more cautiously.
***Download and read this 50 page manual!... Read it twice!! Everything you need to know about the Phantom2 V+
https://www.dropbox.com/s/bi24lrdja4ler29/DJI%20Phantom%20Vision%20Summary%20Guide.pdf?dl=0
Watch phantom crash YouTube videos and figure out why they crashed, learn from it.
I use a SkyRC iMax B6AC v2
One advantage over the accucell 6 charger is that you can plug directly into an AC outlet without an adapter. It's a bit more pricey, however.
iMAX B6AC V2
No cords needed.
I recommend this kit. Gives you everything you need including instructions. Models are very detailed and are good practice for 40k.
Are you looking for an actual game in the end, or just something to paint and play with? If the latter, check out a couple of these
Don't buy the kit from Reaper
The Reaper Learn to Paint Kit is a good start. https://www.amazon.com/Reaper-Miniatures-08906-Learn-Paint/dp/B00NTMC49G/ref=asc_df_B00NTMC49G/?tag=hyprod-20&linkCode=df0&hvadid=198106869250&hvpos=1o1&hvnetw=g&hvrand=4162754609749801597&hvpone=&hvptwo=&hvqmt=&hvdev=c&hvdvcmdl=&hvlocint=&hvlocphy=9067609&hvtargid=pla-379995415869&psc=1
Reaper Miniatures 08906 Learn To Paint Bones Kit https://www.amazon.com/dp/B00NTMC49G/ref=cm_sw_r_cp_apa_f3K-zbQR2X1P9
I still have non... except painting minis for some reason.
people have confused my drawings with my 3 year olds. (he asks me to draw a horse in his coloring book and then later someone says 'thats not bad for a 3 year old')
Reaper sells a painting tutorial kit, different levels that include minis, instructions, paints and brushes and i got good at it, so look into them if you had fun! (amazon link, much different than the ones i got years ago)
p.s. Is your enchanter named Tim?
Damn it, I look like a dirty liar now. They run about $30. https://www.amazon.com/Reaper-Miniatures-08906-Learn-Paint/dp/B00NTMC49G
I bought mine at their booth at PAX, I think they were having a special. Either way it's a good kit! Sorry to mislead!
If you search ebay for "dark vengeance space Marines" you can find brand new squads for about half the price of retail ($13-15)
Good advice already here, especially /r/minipainting. What really got me going when I started last year was the first Reaper Learn to Paint kit. Comes with paints, brushes and step by step instructions to paint the three included minis. I ended up ordering duplicates of the minis and went through each with my three kids (13-18). All of them actually turned out really well. It worked at least well enough that we realized, we can actually learn this to some level. You can find plenty of info elsewhere obviously, but I appreciated how this dumbed it down enough for us. Plus, you have some basic paints to hang onto going forward.
Reaper's Learn to Paint Kit is pretty popular.
This is what I bought when I got started. It is a pretty good starter and comes with 3 minis. Not terrible depending on your budget only $30
https://www.amazon.com/Reaper-Miniatures-08906-Learn-Paint/dp/B00NTMC49G/ref=sr_1_1?ie=UTF8&amp;qid=1487900672&amp;sr=8-1&amp;keywords=reaper+learn+to+paint+kit
Nothin to it but to do it! Seriously, there is so much pride that comes from playing a game with minis that you painted. Even a poor paint job is usually better than NO paint. I'd recommend buying one of the "learn to paint" kits from Reaper or the like. It's pretty cheap to get started and find out if it is for you.
I really like this kit.
The brushes are decent.
The paint selection is nice, although there is no red and the yellow is kinda meh. So you'll want to buy those two colors individually.
The best part for beginners, in my opinion, is that it includes 3 minis and a guidebook for how to paint them.
If you need help beyond that, YouTube is filled with tips, tutorials, etc. I like The Miniac and Tabletop Minions personally.
Check out the official "WHAT SHOULD I BUY!" guide.
This is a good starter kit.
Does he use miniatures in his games? You could pick him up a random booster pack of D&D minis- new monsters to use can be inspiration for encounters.
EDIT: This would most likely be on budget and these are new figures! Came out in late July.
https://www.miniaturemarket.com/wzk72871-pack.html
If he plays 5e there are new books coming out still- you could look at what he has or order something upcoming for him to lean his campaign toward.
EDIT: Make sure you check his shelf/bin if you don't want to get something he has already!
https://www.amazon.com/s/ref=nb_sb_noss_2?url=search-alias%3Daps&amp;field-keywords=5e+books
Maybe he is a fan of fantasy books/movies? You might have some luck picking something he would like- that could bleed through for inspiration.
Also, tabletop players always enjoy a new set of dice, if they are a shiny new color or something.
I suggest these!
https://www.amazon.com/Wiz-Dice-Pack-Random-Polyhedral/dp/B01KN7REWQ/ref=sr_1_fkmr1_1?ie=UTF8&amp;qid=1502128441&amp;sr=8-1-fkmr1&amp;keywords=alchemical+oddities+dice
EDIT:
This is kind of a stretch probably- but consider steering him toward something like https://www.kickstarter.com/projects/1513061270/reaper-miniatures-bones-4-mr-bones-epic-adventure/comments which can be a near endless source of materials/resources.
You could try picking up one of the starter sets to see if he would like painting!
https://www.amazon.com/Reaper-Miniatures-08906-Learn-Paint/dp/B00NTMC49G/ref=sr_1_2?s=toys-and-games&amp;ie=UTF8&amp;qid=1502128215&amp;sr=1-2&amp;keywords=reaper+bones+paints
https://www.amazon.com/Layer-Bones-Miniatures-Learn-Reaper/dp/B01N458GBK/ref=sr_1_1?s=toys-and-games&amp;ie=UTF8&amp;qid=1502128232&amp;sr=1-1&amp;keywords=reaper+bones+paints
This Reaper Bones "Learn to Paint" kit actually comes with 3 practice minis, as well as brushes, paints, and getting started guide:
https://www.amazon.com/Reaper-Miniatures-08906-Learn-Paint/dp/B00NTMC49G
That way, you don't worry about messing up your game-related minis.
If you already have brushes & paints, then maybe see if you can find some random cheap minis to practice with.
To get started, I recommend getting these two kits to practice.
Reaper Getting Started
Reaper Layers Kit
Whatever miniatures you use, make sure you wash them in warm water and Dove dishwashing liquid.
Those miniatures above DO NOT need primer, but for practice, get some Vallejo, Game Workshop or Army Painter Primer. Whatever you can find locally. Get a gray primer.
Practice on these miniatures. If you do not like them you can try painting them again.
If you want some more practice miniatures find whatever is on clearance at Miniature Market or CoolStuffInc or the unpainted D&D line.
How to start all over again, just soak your painted miniatures in simple green overnight. The next day use some elbow grease, old tooth brush, rinse in clean water and let dry. You are good to give them a second try.
Thank you. I will say that it definitely helps to practice a lot and have good materials. Learning how to highlight a face is a must and there are a ton of videos and tutorials about that. I recommend a good set of brushes (about 2-3 different sizes), I use thePsycho by Army painter and I have used it for the last 2 years for those fine details. I am also beginning to use a wet palette which helps create layers, I usually do about 3-4 different shades. Finally, using a set of magnifying lenses helps a lot. I can give more details, but those are the biggest tips I can give.
Try r/minipainting
I’ve used YOCTOSUN Head Mount Magnifier... https://www.amazon.com/dp/B01H8808H6?ref=ppx_pop_mob_ap_share for awhile
I recommend the Army Painter Wargames Starter Paint Set. It has all the basic colors you need anyway plus an excellent metallic and a very nice wash. There's also a brush included that's not complete rubbish. Later you can add more colors to your collection as you need them.
This Army Painter starter set is your best bet. It has Black, White, 3 primary colors, green, a flesh tone, a good brown, steel metallic(you can add colors to it of you want the metal to look a different color), and Strong tone wash(actually my favorite wash, period). Even comes with an okay detail brush.
If you want purple and orange. You can pick up any brand you want and it'll work just fine with these paints. Citadel is usually the easiest to find if you have gaming shop nearby. Or if you have a hobby lobby, they sell Vallejo model paints. They're good. Other brands that come to mind. Reaper, P3, Secret Weapon, and Scale 75. All good.
So all you'd need to get is a primer of your choice. And a decent brush, here's a decent brush set. And probably want to get a good matte varnish. Most people recommend Testors dull coat. But if you want brush on. Vallejo matte varnish is a good alternative. All in all you could easily be under $50.
Miniac's video on how to take care of your brushes
If you’re planning on painting becoming something you do, I think the best value is this set of 50 paints for $94: https://www.amazon.com/Miniature-Painting-Bonus-Wargamer-Regiment/dp/B01MTXRUUT . The paint quality is similar to GW’s paints but you get a LOT more for your money (the dropper bottles hold almost twice as much paint as a GW paint pot, and cost about 1/3 as much). And it’s half the price of Vallejo’s mega paint set.
For a cheaper option, https://www.amazon.com/Miniatures-Highlighting-Miniature-Army-Painter/dp/B01MTXRU2L is less than $30, but you only get 10 paints. But again, a better deal than GW’s paints - GW has a deal for $40 for 11 small paint pots versus $28 for 10 larger dropper bottles from army painter.
But if you can afford to get the 50 paint set from Army Painter, I’d spring for that - the paints cover a wide variety of colors and options (including washes and metallics) and will last you for years.
If you’re looking to get a lot of quality paints quickly at a good price, I cannot recommend Army Painter’s Mega Bundle enough.
https://www.amazon.com/Miniature-Painting-Wargamer-Regiment-Miniatures/dp/B01MTXRUUT
you can do a lot with very few paints. until last week i used only paints from this set: https://www.amazon.com/dp/B007SQ3C18/ref=dp_cerb_2
but now i've indulged a bit and got this one: https://www.amazon.com/Miniature-Painting-Bonus-Wargamer-Regiment/dp/B01MTXRUUT/ref=pd_day0_hl_21_1?_encoding=UTF8&amp;pd_rd_i=B01MTXRUUT&amp;pd_rd_r=d61c3069-2acb-11e9-b05b-55823f4364c8&amp;pd_rd_w=FkZNS&amp;pd_rd_wg=VymzG&amp;pf_rd_p=ad07871c-e646-4161-82c7-5ed0d4c85b07&amp;pf_rd_r=MZSV80GDBD3S4TVVGN2K&amp;psc=1&amp;refRID=MZSV80GDBD3S4TVVGN2K
A few things are going sideways here.
&#x200B;
First of all, you don't need every paint. You just don't. Even if you want all the colors, there are other paint companies, I'll link a few. Everyone has their own opinons, of course, on the quality of the various paints. These still range from 1-200 dollars for the paints, but still, a far cry less then you must be paying GW.
&#x200B;
https://www.amazon.com/Miniature-Painting-Bonus-Wargamer-Regiment/dp/B01MTXRUUT?ref_=bl_dp_s_web_7513501011
&#x200B;
https://www.amazon.com/Reaper-Master-Bones-Paint-Complete/dp/B01NAEA1YC/ref=sr_1_5?ie=UTF8&qid=1540331060&sr=8-5&keywords=reaper+paint+set&dpID=51wdGAzIDyL&preST=_SX300_QL70_&dpSrc=srch
&#x200B;
https://www.amazon.com/Vallejo-Game-Color-Basic-Paint/dp/B009LH0YTA/ref=sr_1_8?ie=UTF8&qid=1540331110&sr=8-8&keywords=reaper+paint+set
&#x200B;
In addition, you can get all the brushes you'll need, in good quality, here
https://www.amazon.com/dp/B00HC8H4EI/ref=sxts_kp_tr_2?pf_rd_m=ATVPDKIKX0DER&pf_rd_p=8778bc68-27e7-403f-8460-de48b6e788fb&pd_rd_wg=hHPTk&pf_rd_r=0GT4KSMPYRA7JT2FMDYE&pf_rd_s=desktop-sx-top-slot&pf_rd_t=301&pd_rd_i=B00HC8H4EI&pd_rd_w=fbRI0&pf_rd_i=army+painter+brush+set&pd_rd_r=52c35bd8-add2-476d-9143-b6dcc068755e&ie=UTF8&qid=1540331250&sr=2
&#x200B;
If you go for the Army Painter large Paint set, the Army Painter Brush Set, and get Dark Imperium for around 135.00 on Ebay or Amazon, you are looking at 270.00. You can find pretty much every tool that Citadel sells much cheaper elsewhere in the off brand. I don't even use a scraper for example, I use files and cheap craft knife.
Welcome to the hobby and this great game!
As for beginner painting resources, I highly recommend Mike Meeple's "Painting Poorly" series:
https://mikemeeple.blogspot.com/p/blog-page_16.html
He does a great job of breaking down the steps and his guides are very easy to follow. As an added bonus, he focuses on painting using less expensive materials and showing that you can get quality results without needing to spend a ton of money on paints, brushes, etc.
As for "best starting paint set" - there are a lot of different answers depending on the specific of your situation. For example, what colors do you plan on using? Do you already have brushes, or do you need brushes? Some paint sets include brushes (although they usually aren't very high quality).
When I first started, I was gifted this set from The Army Painter:
https://www.amazon.com/Miniature-Painting-Bonus-Wargamer-Regiment/dp/B01MTXRUUT
I've been very happy with it. But I've used maybe half of the paints in the set, so that's probably overkill.
It really depends on your goals, and how much you're comfortable spending. You can certainly make a ton of progress without nearly as much investment as that set.
The biggest beginner mistake I would caution against is not thinning your paints. If you use paints straight from the pot, it will be very thick and you'll end up obscuring a lot of the finer details on your models. So thin your paints (I just use water, but there are specialty thinning mediums that some people like to use). And take your time! Try to enjoy the process. Not everyone enjoys painting their models, but I find that it's a great way to relax at the end of the day. Don't put too much pressure on yourself to make your models look perfect. Take a slow, and as you practice you'll become more confident and you'll be able to paint more models more quickly.
Disclaimer - I am by no means an "expert" painter. But hopefully my comment is helpful.
Side note - I recommend joining the "A Song of Ice and Fire: Tabletop Wargamers" Discord server. There are a lot of really helpful people on there who are great at answering rules questions, giving painting tips, and discussing game tactics.
Thanks! I was overwhelmed too, so I started by watching some videos on YouTube and whatnot. I ended up getting this set:
https://www.amazon.com/gp/product/B01MTXRUUT/
&#x200B;
This feels like pretty good value to me, and has a ton of colors to pick from. It also has premade washes for shading, metallic paint, and blood/dirt effect paint so it has worked super well for Gloomhaven stuff.
Thanks for the advice! I'm planning on getting this set in particular. https://www.amazon.com/Rustark-Gundam-Building-Repairing-Fixing/dp/B071LB1T5D/ref=sr_1_3?keywords=gunpla+clippers&qid=1568147591&s=toys-and-games&sr=1-3
$20, Sima 107
http://www.amazon.com/Syma-S107-S107G-Helicopter-Colors/dp/8499000606/ref=sr_1_1?ie=UTF8&amp;qid=1371512528&amp;sr=8-1&amp;keywords=sima+107
I have a yellow one.
For kids ages 8-12. Get them something remote controlled if they're boys. Just about every Christmas season JCPenny's sets out little remote helicopters for about $20. They're actually not bad for the price since I have about 3 just for myself. But my cousins went crazy over them last year. If you can't find them in store, amazon.com and a bunch of other sites carry the Syma S107 for about $22.00. Great starter copter. Stay away from Air Hogs.
Little girls are harder for me. My only two female cousins, sister are easy; they basically tell me everything they want and where I need to go get it. And my sister does all the shopping for my mom and grandmother; I just hand over the money.
The one female (well male and female) I bought for on my own this year was my sisters best friend (my sister from a different mister) just got married this year. I took photos from her wedding, went to shutterfly and had a coffee table book made of pictures from their wedding. Basically a more professional looking scrap book. However, unless they're into photography, kids that age probably would not appreciate that.
As far as your female interest...you're on your own. You know her, I don't.
Came here to post this! They are tons of fun. Each of the grad students in my lab owns a set, and we have combined them to make some really sweet huge stuff!
We also have two of these in the lab:
Syma S107 Remote Control Helicopter. They're a TON of fun.
remote chopper
RC cars are fun to play with. I got an RC18 a while back and it is a blast to bash around. If you want, you can get really into upgrading / modifying them. I kept mine stock, to avoid dumping too much money into it!
Edit: If you want something cheaper, this helicopter is pretty rad.
I'm working on a 3D game engine for controlling electronics.
Just finished a filming session driving my robot around with this screen.
Working on a lot of shader stuff and working on a new screen for controlling model helicopters with touch screens.
Do yourself a favor, and buy Bob Smith brand super glue. More glue for less money. Also, they sell "un-cure", in the case you glue yourself to your ... self.
> Am definitely thinking contrast paints are the way to go for starters. Do they come in inclusive sets?
&#x200B;
Depends on if you remember how to paint, really. It's another way to do things. No sets, AFAIK, but they are intended to replace base, shade and layer paints with one paint, so they're overall either cheaper or better value for money, if you didn't do highlights before contrast paints.
&#x200B;
Supplies:
--Razor knife
&#x200B;
--Cut mat
&#x200B;
--plastic glue
&#x200B;
--*thick* superglue
&#x200B;
--Spray primer of choice
&#x200B;
--cheap arts & craft store brushes
&#x200B;
--sticky tac
&#x200B;
--gatorade caps
I did not need to pin him. In fact I've not found the need to pin any of the models because of the glue I use.
https://www.amazon.com/gp/product/B0006N6ODS/ref=oh_aui_detailpage_o07_s00?ie=UTF8&amp;psc=1
That stuff emulsifies the plastic a little to create a nice bond, of course be careful with it, but it works great. The harder you press and hold the parts together until it starts to set up the better it fills in seems too. The applicator tip is very helpful for these tiny miniatures as well.
For the SA use masking tape to hold the disk in place if need be, but if you hold him in place for about 5 min it starts to set up enough to hold the base in place then you can turn him upside down so all his weight is off the leg and let him set up for for a day. Usually this stuff sets really fast, the only things that require more time to set are real "load-bearing" spots like the leg here or the left hand of the Dragon God.
Reminder: this glue essentially melts plastic, but as long as you don't bath your minis in it will not harm your model. It only emulsifies the surface it is applied to. It will not eat your model like acid or something.
Tamiya Extra Thin Cement works perfectly for KDM. The cement actually melts the plastic together for a tight fit. It comes with a fine tip brush applicator which gives you great control. Added bonus is you can’t glue things to your fingers, and it gives you 10-30 seconds to reposition the pieces.
Definitely dry fit all pieces before gluing to make sure they go together properly. Have fun!
Tamiya extra thin cement
Sorry had the wrong wording its Tamiya Fine Primer
I guess i was thinking about (and still screwed up) the name of their glue i use
Try liquid cement for plastic. It fuses the plastic together instead of just gluing them together. Tamiya Cement is what most people recommend, however depending on if you have a hobby shop nearby you can get cheaper brands like Testors.
Just apply to both pieces you want to fix, hold them for 30 or more seconds, and it should be good! However, you should really let it cure for a day or more to really prevent breakage. It's not 100% fixed, but way better than just super glue.
My best guess would be to use a thinner for that type of glue, if one is available. If one isn't, you might need to just gently flick and peel them off or softly sand them down. Wish I could give a better answer :(
Also, I'd recommend making the jump to cement glue as it creates very small seams that can be sanded down to near invisible levels with some patience and a delicate hand. Though if the model kit is of a good quality, you probably wouldn't need to. Tamiya example on Amazon. An example of a model maker using that type of glue. He also gives great tips throughout his videos, if you find yourself a fan of his.
I recommend you pick yourself up a bottle of this to help deal with the sheer off. Apply a coating to the sheered off end, hold it together for awhile, and then leave it be so it can cure properly. It should weld the two pieces together, but with the location of the break, you do run the risk of losing some flexibility in the arm.
I suggest that you use a plastic cement to glue in the parts. That's why I do with accidents like this. Plastic Cement is pretty solid as an adhesive too. Here's what I suggest that you get: https://www.amazon.com/Tamiya-87038-Extra-Thin-Cement/dp/B000BMYWYC
i did something similar with a p bandai kit i got a while ago. was a lot more rigit than i was expecting and i broke a piece off.
I found out about a brand of plastic cement.
https://www.amazon.com/gp/product/B000BMYWYC/ref=oh_aui_detailpage_o04_s00?ie=UTF8&amp;psc=1
it is a solvent that partially dissolves the plastic. put it on and line it up right with where it broke and apply pressure. then let it sit for about a day, then it will be practically like new. seen people use stuff like this to fix seamlines too though that takes a bit of sanding.
I'd recommend Traxxas 50k You can usually get it for pretty cheap at a local Hobby RC store or here on amazon
If you don't wanna buy the Traxxas 50k at a hobby store you can get a 2oz bottle (60cc) for about $7 which is cheap.
https://www.amazon.com/Traxxas-5137-Differential-Oil-Weight/dp/B000BOLVFI
Since you have all the different "weights" I can tell you will need to test them to see which one matches your style, then after that naturally you will be narrowed down to a few lubricants maybe even 2-3, as you will see what fits or doesn't. Traxxas lubricants are cheap and the standard bottle is 60cc for about $7 on Amazon and $5 to a online hobby store I use. However cubicle lubricants are still useful but if you need a wallet friendly alternative then Traxxas is the way to go. However I always recommend a bottle of 50k around you it's pretty much universal. Alot of people just lube the core of their cube with 50k, lube 4x4's with 50k (when you break it in it feels amazing), and 2x2's.
30k, and 50k and some thin weights is all you ever honestly need and since your getting Lubicle Speedy, you won't need 10k, but yea. Goodluck
That's my 2 cents.
Traxxas 50k is one of the most common differential oils that is used on cubes. Lubix is a differential oil with a huge markup. You don't need much lube at all to get one properly lubed. CBC did a video on how to lube a cube, it's a Zhanchi but you can apply the same thing to all cubes.
No, this is what many people use for cubes. It works great and it is a lot less expensive than other lubes. It is meant for plastic parts on RC cars, so it is completely silicone based. This weight is not reasonable for cubes, so many people use 50k weight. You can get some here.
Edit: Also, the 500k is going to be extremely viscous, don't use it for cubes. This person is doing it for fun, not to improve their cube.
Both can be great cubes. What is your preference? The Shuang Ren is a much dryer, faster feeling cube, while the AoLong is a smooth, clicky feeling puzzle. Performance wise, the AoLong is a better cube, but a Shuang Ren is better for people who prefer a cube that feels slightly more stable.
Oh, and for lube, Traxxas 50k weight Differential oil. Buy a syringe like this one and use it to apply the lube. Hope I helped!
Edit: You may want to visit this page to consider other possible options. There's a world of cubes out there.
I personally only use Traxxas 50k, I got a medium sized bottle a couple years ago, and haven't even used half of it. Really good, makes cubes smooth, and was great on my GTS2M
https://www.amazon.com/Traxxas-5137-Differential-Oil-Weight/dp/B000BOLVFI/ref=sr_1_1?ie=UTF8&amp;qid=1504210494&amp;sr=8-1&amp;keywords=traxxas+50k
These are quite...meh, better than wire cutters and normal side cutters, but not as good as good side cutters. That's because these are meant for children, who usually don't have high allowances, and don't do much besides cut straight off the runner. The godhand nippers that everyone uses and refer to universally as "Godhands" is the Ultimate Nipper 5.0.
Other good nippers include the Gundam Planet Nippers and Tamiya Sharp Pointed Side Cutters.
This might be what you are looking for
-EDIT- HUGE data dump here, sorry about that! I like Gundam stuff, what can I say?
In my experience, Tamiya makes good stuff in general.
I'm a big fan of markers for use in touch-up work and for panel lining.
The "Gundam" branded panel liner markers can make a huge difference on some kits, but honestly it depends on the surface detail on the kit. Basically, panel lining helps emphasize surface detail and make it stand out more when the model is viewed from a distance. IMO panel lined models are usually way nicer looking than straight OOB.
IMO this is a good starter pack, as the "Real Touch" markers are all double sided, giving you more options for application.
Sharpie and other brands have fine tipped metallic markers, and those can make a HUGE difference. I'm a big fan of covering any exposed frame parts with a metallic color, like gunmetal or silver, and then do highlights / color separation in gold.
The other immediate purchase you will want to make is a good side cutter tool (if you do not already have one). Using an Xacto / hobby knife works, and using wire cutters or other tools that aren't made for modeling work will get the job done, but will leave you with jacked up plastic anyplace you make cuts. This usually gives you crappy looking nub marks that can really make the model look cheap. You can fix that with sanding, but it's MUCH easier to clean up a nub if you barely make any marks to begin with. A "side-cutter" is the tool you want. They look a lot like other kinds of scissor-style cutter tools, but only one of the two sides is sharp. The idea with a side-cutter is the dull side reinforces the piece you're cutting through, holding it in place and giving you a smoother cut with less stretching. The plastic turning white is actually it being stretched as it's cut.
Once I heard about side-cutters I got myself some GodHand ones. Those are like $60 so not what I'd recommend a beginner buy unless you're made of money. I think these Tamiya side-cutters are OK? Others on this sub will probably have better suggestions on this topic ;)
I've become a fan of sanding sponges recently. I definitely would recommend checking your hobby shop's selection of sanding implements to see what they have in the way of sanding sticks, sponges, and other abrasives. IMO you'll want like 500 grit, 1000 grit, and 2000 grit versions of whatever you get, and you'll want to use each of those in ascending order. Higher number = finer sanding surface. The rough bits are smaller and closer together, so you will get a smoother surface. I do 500 to get rid of the big remnants of a nub, then up it to 1000 once it's pretty smooth, and then 2000 when I'm just about done and just want to get a good finish. I use the coarser stuff first because it's way faster at removing plastic. You could JUST use 2000, but it would take forever...
The fundamentals of getting the parts off the runners as nicely as possible, and then getting them as clean as you can before assembly are IMO the key to doing good models. I'd recommend getting solid at this stuff with a few kits you don't need to paint before you graduate to also doing painting, it's a whole other set of stuff to learn ;)
I got a question for you.
How much do you want to spend on cutters?
Some notable brands for cutters are (listed from price ascending) Xuron($10-$20), Tamiya($25-$30), Gundam Planet($35), and then Godhand($55-$??). (There might be others, but I have found these to be the most popular.)
Right now I have Gundam Planet nippers. They are the best nippers I have had so far, but I have only owned one other pair so dont take my word to heart. What ever you do don't go for a $5 pair not worth it at all. I did that and I spent more time fixing the mistakes those clippers did to my model.
Personal opinion get a pair of Tamiya Sharp Pointed Side Cutters or Gundam Planet Nippers. Here is a [comparison] (https://panzercraft.com/articles/2016-01-31-tamiya-side-cutters-vs-gundam-planet-nippers/) between the two. In all honesty though I have no been able to replicate that slow cut with my GP nippers. Another point is I have been able to get pretty close if you scratch the white part with your finger nail it almost looks like the slow cut photo.
P.S. Really though all of your clean up with the nubs is going to be with sand paper and a razor blade of some sort. I just ordered myself a OLFA Rubber Grip Utility Knife, but you can also get a OLFA Cushion Grip Knife if you want one of them.
You should check out this remote-controlled helicopter for about $20. I just got one to give away, felt compelled to test it out and it is awesome!
They're all over Amazon, this is the first link: http://www.amazon.com/Syma-S107-S107G-Helicopter-Colors/dp/8499000606 . And for the record, this and all small coax helis will not lift ANY weight. Maybe a penny or 2 tied underneath (at the center of gravity).
A Mini RC helicopter. Best $20 ever spent.
Fun Toy that's not expensive. I have one and it's ridiculously fun: http://www.amazon.com/Syma-S107-S107G-Helicopter-Colors/dp/8499000606/ref=sr_1_1?s=toys-and-games&amp;ie=UTF8&amp;qid=1321847149&amp;sr=1-1
Other Gifts: In thinking back on gifts I've really enjoyed from my dad, I would say books that he really loved and got for me. Even though I didn't read some of them until years later, I eventually was so glad I got them and we've talked about them on numerous occasions. One that comes to mind was Asimov's Foundation.
But also, helicopter. Fun!
I have this and it's big brother. I did manage to break a blade on the larger one but I found replacements for about $12. The little has more flexible blades so it doesn't seem like they'll break as easily, also it seems to handle better. It's actually much easy to fly / control than the bigger.
http://www.amazon.com/Syma-S107-S107G-Helicopter-Colors/dp/8499000606/ref=sr_1_1?ie=UTF8&amp;qid=1311232674&amp;sr=8-1
The s107 is persistently cheap on amazon
The price actually went up to $25+ around christmas time but it sits at under $22 the rest of the year from what I've seen.
Yep, pretty standard for that type of helicopter.
https://www.amazon.com/Syma-S107-S107G-Helicopter-Colors/dp/8499000606
I bought myself an RC helicopter for Christmas this year. I'm 29.
I was shopping online when I stumbled across one for ~$20. It got pretty bad reviews, but I found one on amazon that had great reviews, was good for indoors, and was only ~$35.
Was initially going to get it for a roommate, but decided to get them more practical gifts. I still wanted to play with that helicopter though, so I added it on as a gift to myself. Arrived yesterday, but I'm waiting until Saturday to open it. =D
http://www.amazon.com/Syma-S107-Gyroscope-Controlled-Helicopter/dp/8499000606
http://www.amazon.com/Syma-S107-S107G-Helicopter-Colors/dp/8499000606
So much fun... So little cost...
The models are metal, so regular plastic model cement won't work. I recommend a good gap filling CA glue. Any hobby shop would carry it, and it's available on Amazon.
http://www.amazon.com/dp/B0000DD1QQ/ref=cm_sw_r_tw_s_awdm_V0tLxbFCMCDQP
I just made some food serving trays and had to do a little research on this. I ended up using cyanoacrylate (super glue). I have read they use it for dentistry and emergency sutures, so it's pretty inert after it dries. I usually pack the crack or hole with sawdust and drip the glue into it until it is soaked in. It dries pretty quickly and is rock hard.
Yup have fun! If you got a revell kit which requires gluing, I recommend using Tamiya cement instead of the supplied model cement. I found the supplied stuff tends to add thickness to connections, which will push apart seam lines. What you want to do with this stuff, if there's peg holes, apply a tiny bit in the hole then snap together. Run the thin brush with the tamiya cement along the seam line, this solution will soften and literally weld the plastic together. Apply pressure on both sides to really push together the seam. Some excess material will goo out, this is a sign that the melding is working and the pressure is pushing the 2 together. However dont over pressure to the point where things buck. Let sit and cure, preferably let sit for 12 hr+ (I'm impatient so sometimes I tackle it around the 4-6 hr mark). The plastic will solidify again and here you treat like the nubs, use a blade to carve off the excess and sand away the seam line. This is what modelers do to remove ugly gaps and large seam lines, a bit technical and requires practice, but necessary for certain kits.
If you're hasty and impatient like me and want to avoid waiting/don't care too much about seam lines, use CA glue Which is just fancy speak for super glue. This stuff dries thin and is VERY fast. The purple cap dries in 5-15s, there is a blue cap that dries in 1-3s. Use sparingly, and make sure the part doesnt need to come apart again, as they never will.
Ah yeah, the hasegawa Su-33 is pretty high end, plus expensive. would definitely practice before tackling it. I personally like the reverse swept plane from ace combat more, though I dont know much about the series
Maybe try this brand too: https://www.amazon.com/Insta-cure-filling-Bob-Smith-Ind/dp/B0000DD1QQ
It cures fast and the tube I have has lasted a long time. I have used some department store bands and had trouble. Never used gorilla, though.
https://www.amazon.com/Liquid-Cement-Plastics-1-oz/dp/B0006N6ODS
I use this and swear by it.
https://www.amazon.com/Liquid-Cement-Plastics-1-oz/dp/B0006N6ODS If you're doing a lot of plastic model stuff, treat yourself to one of these. It lets you shift around the piece to set it in place but has a nice sticky hold and after a couple of hours will actually melt the plastics together making them have a solid one piece bond.
If you're using Testors, go with their Model Master line. This one in particular. The cement comes out a long steel tube about the size of a pin, so the flow is much easier to control. These come with two rods to clear any blockages as well.
What happened?
Also, I highly recommend upgrading to this - Better Plastic Cement
I'm a big fan of the Testors ModelMasters variety: http://www.amazon.com/Liquid-Cement-For-Plastics-1-15oz/dp/B0006N6ODS
The "ModelMasters" part is significant because it has a small metal applicator that is very clog resistant.
There are other brands that other people really like as well that have the metal applicator needle, but I can't remember what they are, off-hand.
FYI: You will want to use Plastic Cement for these hard plastic models. It will give superior results when compared to super glue.
I recommend looking for something like this: https://www.amazon.com/Liquid-Cement-Plastics-1-oz/dp/B0006N6ODS
The Model Masters (an offshoot of Testors, so a well-known brand) has a very nice this applique needle to apply very small amounts to precise locations. It'll keep you from ruining your new expensive figures! The game can be played without them. Take your time assembling, fixing, sanding, etc.
KD was my first time assembling minis. I definitely had some trepidation over the whole thing, but really it's not bad.
Now, I admit, I had some guidance from a coworker, but I'll pass all that guidance onto you right now. All you need are the following three items:
Basically, the key once you have these tools is to take your time. Consult a guide like vibrantlantern.com, which another poster mentioned, and which was an invaluable resource to me.
A mini takes me anywhere from an hour (really complex monster), to 20 minutes, generally. They can go much faster once you get the system down, but I like taking time to figure out exactly what the mini should look like (for the armor kits).
Throw on some music, or Netflix (or whatever helps you pass the time without distracting you too much), maybe grab a beer, and make an evening of it.
It's also worth noting that all you need to start playing is the White Lion, and the four Starting Survivors. These all come on a single sprue, and are really quite simple to assemble given the above directions and tools. That will get you through several hours of gameplay just by itself, and then from there you can move on to creating other monsters and survivors as you need or want them.
Hope this helps!
Do you perhaps know how GW's current plastic glue works? I've used the really old one that came with a brush (like tamiya's glues), that one melted the plastic slightly in which case 'removing it' doesn't do anything since it's already destroyed detail. In this case you may need to resculpt the detail yourself.
Also don't use any glue debonder/remover, they are acetone based...and acetone will eat plastic.
Your best bet may be isopropyl alcohol at 99% diluted with water. Though even this can melt plastic but is far less reactive then any other remover like acetone/turps/spirits. Trythis at your own risk really. Sorry can't really be much help. In the future you may want to try something like this, it's thin but easier to manipulate since it has a brush.
Just get some of this
There are a few different ways to fill seamlines, with my preference being Tamiya Thin Plastic Cement. Filling seams should only be done if you want to paint, as you get to paint over the filled seam. As for masking, any small measuring tool is helpful. In addition, good Masking Tape can also help.
> I'll be getting a pg unicorn
I don't think there is one yet... Do you mean Master Grade?
I'm not sure on the rubber cement. I use Tamiya Plastic Cement. For markers, I suggest the fine tip gundam markers. These are cool because if you make a mistake, you can wipe it off before it dries. Your strategy looks good. Are you going to be doing nub removal? I use a x-acto knife and very high grit sandpaper to get rid of nubs. You also might want to pick up the Tamiya Basic Tool Set for removing the pieces off runners. As far as changes to kits over the past 10 years, I've noticed that HG and MG kits have gotten a lot better. There's a lot more detail in them now than there was before. Also, a new line of gunpla has come out called Real Grade. These aim to take the quality and articulation of a Master Grade kit, and put it in 1/144 scale. They look fantastic, and have a inner frame that you build.
I like Tamiya cement. I use the extra thin variety most often. It comes with a brush on the lid which I find much easier than trying to squirt the correct amount in the correct place, or trying to scoop it up with a toothpick or whatnot.
https://www.amazon.com/Tamiya-87038-Extra-Thin-Cement/dp/B000BMYWYC
As for the chemistry, really any brand will dissolve GW plastic and meld pieces together, it's just a question of what consistency you like working with better.
To make sure your bikers don't get "stuck" you need to have their legs positioned perfectly or they splay out or pinch into the jetbike seat.
There's a line on their ass that runs across both legs that I've always used to ensure fit. What I do is use a thin plastic glue like the brush on Tamiya, brush it into the leg hole and the part of the joint where it connects, then press the legs on. After that I let it set for maybe about 10s and then I put the biker on a jetbike and adjust the legs a little before the glue sets completely hard.
This allows me to ensure two things. First, that each biker stays on their bike without magnets or anything. And second, that and both of the bikers feet contact the foot rests and both their hands contact the handlebars (I use the same technique for arms).
Would this be a good choice? I was reading up on vibrantlantern.com and they recommended the citadel clippers and GW thin glue. However, this was the closest thing I could find on amazon. Alsow what about these clippers?
you'll probably getting a lot of this for the many loose parts of that kit.
I just built my RG Zeta and you couldn't be more right about parts falling off cause of a light breeze. I glued the skirts, vets, and even the chest frame to the gray part that moves the chest up and down just to make it bearable. If you can find it, I'd recommend getting this glue here cause it won't melt the plastic to where it's obvious.
Plastic Cement is what you should use with models.
Standard glues use the glue to gold the parts together, whereas plastic cement melts the parts together
This is what you’re looking for!
https://www.amazon.ca/Tamiya-87038-Extra-Thin-Cement/dp/B000BMYWYC
Super glue or plastic cement is recommended I think.
Tamiya Plastic cement is supposed to be good:
http://www.amazon.com/Tamiya-87038-Extra-Thin-Cement/dp/B000BMYWYC
Here's some info specific to bones:
http://forum.reapermini.com/index.php?/topic/48668-bones-preparation-glues-putties-mould-lines-etc/
Great panel lining work! I'm jealous! It's interesting to see that you opted not to use some of the stickers (like around the toes). Good use of dynamic posing as well.
Very few (if at all any) nubs, but the one on the top of the cannon sticks out to me. Have you considered using thin cement to "melt" the plastic and bond it all together? It works wonders without needing to get messy like you do with putty.
In case you need some, Tamiya makes them: http://www.amazon.com/Tamiya-87038-Extra-Thin-Cement/dp/B000BMYWYC
It sounds like a great idea. So to start off with, do you know what really interests him? Like Tanks or planes or ships, military, civilian, what sort of era (like ww1/ww2/coldwar etc). Tanks is a bit of a wide pool!
In general, Tamiya is often a very good place to start. The kits are pretty easy to put together, they fit really well, look nice when done, have clear instructions and not too many parts. For tanks I would say a 1:35 scale tank is probably the best bet, tanks come in really 4 scales, 1:16 (absolutely monstorously huge), 1:35 (pretty much the standard scale, around 15 cm long or so), 1:40 or 50 something (used for war gaming stuff) and 1:72 teeny tiny tanks. Of the tanks I've built recently, the Tamiya amx-13 1:35 was pretty nice.
Kit aside, you'll be wanting to get him some tools (if he doesnt have any). As far basics I would say; 1) A pot of plastic glue, I recommend the tamiya extra thing (this stuff), a pair of cutters for getting parts off the sprue (I really like the pointy nose ones like this, a pair of tweezers (if he has some lying around they'll do to start with), something to sand pieces with (some use sandpaper, I use sanding sponges, some use sanding sticks), a couple of brushes (small detail and wide flat are what I use the most) and once you've decided on a kit maybe a pots of paint. On the paint front, again I would just default to tamiya acryllic 17ml pots to start with (and buy him some thinner, those paints are like treacle).
As another option, there are some really nice kits by bandai which dont really need any glue and dont have to be painted (look better with both in my opionion) but they are fundamentally click together. Their starwars line of kits are especially great in my view if thats something he likes.
If you have a local modelstore I would go talk to them. Places like hobbycraft carry models but they arent particularly helpful in my expience. If you dont have a hobbystore near you, then the websides I dfefault to are emodels.co.uk (very nice to navigate website, a little expensive), hannants (god awful website design, but they stock basically everything under the sun), wonderlandmodels.co.uk (somewhere inbetween, I have had some poor service from them but most people seem fine), amazon (be very careful with prices, there arent many model supplies on there and the stuff that is seems to get uppriced by bots to silly levels) and ebay (if you find something you really want its often on there for a good 20% cheaper than elsewhere, especially older cheaper kits).
Armor kits come with the original game purchase- yes.
I'd recommend this glue:
http://www.amazon.com/gp/product/B000BMYWYC?psc=1&amp;redirect=true&amp;ref_=oh_aui_detailpage_o06_s00
Anyone that has built minis for a while loves Tamiya. It's FAR superior to most super glues.
Your best bet is to order it online. It does depend on what lube you want, if you want the professional lube, get it from SCS or Cubicle, but if you just want some simple lube, get some Traxxas on Amazon. https://www.amazon.com/Traxxas-5137-Differential-Oil-Weight/dp/B000BOLVFI/ref=sr_1_5?keywords=silicone+lube+traxxas&qid=1563613705&s=gateway&sr=8-5
https://www.amazon.co.uk/Traxxas-TRA5137-Differential-Oil-Weight-x/dp/B000BOLVFI/ref=sr_1_1?ie=UTF8&amp;qid=1495038082&amp;sr=8-1&amp;keywords=traxxas+50k is this the same 50k used with cubes? Just that differential oil sounds weird to me.
Firstly, I'd consider getting the GAN 356 X because money isn't a problem, as you said. Of course, if you have a reason for getting the 354 M (such as small hands), go ahead, but if you do not, then you should get the GAN 356 X.
Moreover, I simply do not believe that getting Cosmic or Supernova or whatever The Cubicle offers is ever worth it unless you do not have the time to set up the cube yourself. My reasoning is that all lube setups are temporary, and the lube will eventually dry out. With all of the money that you spend for someone else to set up your cube, you could easily buy lube for yourself that'll last you much, much longer. For example, check out this Traxxas 50K offer on Amazon: https://www.amazon.com/Traxxas-5137-Differential-Oil-Weight/dp/B000BOLVFI
50K is widely used as both a core lube and a piece lube (although, it's not that good of a piece lube imo), and this huge bottle costs less than $10. Adding this lube into your cube is extremely trivial as well, so I see no reason to let other people set up your cube, especially because it costs so much.
If you want a good piece lube, I'd recommend Angstrom Gravitas and Angstrom Dignitas ($10 as a bundle) from The Cubicle. Gravitas is a super long-lasting lube, and the combination of these two lubes in my Valk 3 M is the best lube setup I've ever tried on it.
TL;DR There is no need to pay so much for someone else to set up your cube (lube is temporary anyway) when you can just buy a whole bunch of lube and set up your cube yourself for however long you'll use it for.
https://www.amazon.co.uk/Traxxas-5137-Oil-Differential-Weight/dp/B000BOLVFI/ref=sr_1_1?ie=UTF8&amp;qid=1538679658&amp;sr=8-1
If you don't have traxxas 50k, get that first just due to the versatility of it, being able to use 50k on both the core and sparingly on the pieces. You can get it over on amazon here.
If you still do have more budget, I would recommend lubes specifically for the pieces. Stuff such as TheCubicle's Silk, DNM-37, and Lubicle One, or Cosmic lube from SpeedcubeShop will do as well. These lubes are less viscous than 50k and are great for being used on the pieces.
50K differential oil is the lube of choice for the core. You may want to acquire a syringe as it is very easy to over lube without one. If you intend to lube the pieces you will need lighter lube, around 30K.
I did tons of research today and I found from many many YouTube videos, Traxxis 50k is the best. It's cheap, and there is a lot of lube inside the tube. It works great for all cubes. I actually bought a tube for myself today. Here's the link. [Traxxas 50k Lube](Traxxas 5137 Differential Oil, 50K Weight https://www.amazon.com/dp/B000BOLVFI/ref=cm_sw_r_cp_api_j.ItybSA4VN9D)
I hope this helps!
You're getting 5cc for $3.89.
A bottle of Traxxas, which is largely the same stuff, at 50cc (or 10x as much) for $7.99 or less in some places.
You're paying 77 cents per cc, whereas Traxxas is 16 cents per cc.
taking it apart and cleaning the pieces with a cloth might help if there's any dust/dirt buildup slowing your cube down
otherwise i recommend buying something like lubicle speedy to lube your cube with, i personally use traxxas 50k but some people don't like the feel it leaves on larger cubes compared to a thinner lube like lubicle speedy
Got my traxxas 50 early :D
Still breaking in my yuxin little magic since people reccomend not to lube until it's well broken in, so rn using my good ol' qiyi warrior that got lubed up. It's turning pretty darn well now (was kinda gummy before idk why, didnt lube it before), but how long does lube last?
I got this btw
if that changes anything (like different types of traxxas 50k? idk)
I'm a fan of the traxxas 50k (but I might try 30k) I've used it probably 30 or 40 times and only used about 1/3 of it so it will last you forever. It's longer lasting than silicone sprays so there is more consistency over time.
It also seems to spread itself throughout the cube better, so you don't really need to disassemble, spray, then reassemble to get an even coat.
Also, many of the silcone sprays can damage the plastics, slightly melting or eroding the surface. Some even say on the packaging they are not safe for use on plastic.
Clippers,
i reccomend
http://www.amazon.com/Tamiya-74035-Sharp-Pointed-Cutter/dp/B000J47Z4G/ref=sr_1_1?s=toys-and-games&amp;ie=UTF8&amp;qid=1404390673&amp;sr=1-1&amp;keywords=tamiya+cutter
Hobby Knife
Sandpaper with different levels of grit/Nail file also works.
Once you get your first MG you will never look back, they are amazing.
I would recommend the MG Red Astray, my favourite kit and its so unique looking.
Happy bday!
I predict that you'll come out positive by $417
Here is an [item from my list] (http://www.amazon.com/dp/B000J47Z4G/ref=wl_it_dp_o_pC_S_ttl?_encoding=UTF8&amp;colid=37P03X5GM5QWW&amp;coliid=I1PV451LGGZM7P) that you can use your winnings to get!
There is a list of recommended tools in the wiki section. I used tamiya sharp pointed side cutter this one: https://www.amazon.com/Tamiya-Sharp-Pointed-Side-Cutter/dp/B000J47Z4G until i switched to Godhands last month.
If you really wanted to learn the ins and outs of modeling gunpla, or any model really, something like the tamiya nippers are great. They're good enough to get clean cuts, but you'd still need to sand and cut off that last bit of the nub with a hobby knife to get really good and clean results, which can take time and if you're not careful with sanding you could get soften edges. This is all part of learning modelling, it can be tedious but this is all part of the hobby.
Getting a pair of godhands, I don't have to sand or use my hobby knife as often as I used to. When I do have to sand it's usually just to smooth out a very tiny nub, probably because the nipper blade wasn't flat enough on the piece. The nippers just cut so smooth and well (at least for now while the blades are still sharp), it's basically cut the time I need to get my pieces out of the runners by half and I make less mistakes (no cutting too deep with the hobby knife, no over-sanding). But godhands when just starting out, you do miss out on learning and mastering certain techniques, if that's not something you think is important I'd say go with the godhands if you have the budget for it.
Hope this helps!
Certainly.
Tamiya side cutters: http://www.amazon.com/dp/B000J47Z4G/ref=sr_ph?ie=UTF8&amp;qid=1454130412&amp;sr=1&amp;keywords=tamiya+side+cutter
Gundam Planet Nippers: http://www.amazon.com/Gundam-Planet-Premium-Nipper-Plastic/dp/B012TMXDAU/ref=sr_1_1?s=toys-and-games&amp;ie=UTF8&amp;qid=1454130468&amp;sr=1-1&amp;keywords=gundam+planet+nipper
Ouch, I would recommend using nippers that are designed for modelling like [Tamiya's sharp pointed nippers] (https://www.amazon.com/Tamiya-Sharp-Pointed-Side-Cutter/dp/B000J47Z4G/ref=sr_1_2?ie=UTF8&amp;qid=1525891853) or God hand nippers if you have the cash. Standard side cutters tend to pinch and tear instead of cutting and with the brittle nature of resin they can take chunks out like that. I also recommend cutting 1-2mm away from the model itself and then sanding down the left over nubs after full curing.
Yeah. And I just check Amazon, of course they have one pair left for $30 the day after I ordered them from GP. Uggghh..http://www.amazon.com/gp/aw/d/B000J47Z4G/ref=mp_s_a_1_1?qid=1458056910&amp;sr=8-1&amp;pi=SX200_QL40&amp;keywords=gundam+planet
I have been waiting a while as well. I have been using these and would say if the ultimate nippers are the best, these come in at a close second. http://www.amazon.com/gp/aw/d/B000J47Z4G/ref=mp_s_a_1_1?qid=1414256218&amp;sr=8-1&amp;pi=SX200_QL40
He said good price guys lol. If you're coming from nail clippers and just want a cheap, but legit set of nippers look on Amazon for xuron like these. They are the ones I have. But if you really want cheap ones xuron make cheaper ones as low as like $10 but they might not have a spring open or cut perfect.
I use the xuron ones for initial removal from the sprue, then some Gundam planet nippers for the close cut. But if you're just getting started don't worry about them. I will say though that for the price, the Gundam planet nippers are amazing. But don't feel like you have to save up and skip out on an HG or 2 to get these amazing nippers. But if you're flush and want the best, they're what I'd recommend.
I first use a really good "sprue cutter" like this one from Amazon https://www.amazon.com/Xuron-2175ET-Professional-Sprue-Cutter/dp/B001TMZ7QA/ref=sr_1_3?crid=25ZM1ZKGISST3&keywords=sprue+cutters+for+plastic+models&qid=1558789186&s=gateway&sprefix=Sprue%2Caps%2C196&sr=8-3 Then I use el cheapo Harbor Freight files and fine sandpaper like others have mentioned. This is your first one? Nice job! Bet it will clean up nicely :)
All good advice you've received so far.
I'd also get some sprue cutters (also called flush cutters) - they are like wire cutters except one side of the blades is flat so you can cut near to the part and leave little or no attachment point. If there is one, file it off as /u/warlock27 suggests.
You can usually find cheap ones online or in a hobby shop, here's some on Amazon so you know what I'm referring to:
https://www.amazon.com/Xuron-2175ET-Professional-Sprue-Cutter/dp/B001TMZ7QA/ref=sr_1_1?ie=UTF8&amp;qid=1478566221&amp;sr=8-1&amp;keywords=sprue+cutter
(sorry for the long link)
Otherwise a hobby knife is good for part removal too, and cleaning up any parts.
It will snap together fine, I've built a couple of similar models and am surprised how well they fit and click together. But can't hurt to get some plastic cement - Tamiya Extra Thin is usually the top recommendation.
Plus may be an idea to get some small needle-nosed pliers and tweezers for handling small parts - again either from a hobby shop or most electronics, craft or hardware stores will have something (or chemist/drugstore for tweezers).
http://www.amazon.com/Tamiya-74016-Basic-Tool-Set/dp/B000BMYWXI/
This is the only basic tool set I know of.
That said, I would recommend getting a nice spruce cutter:
http://www.amazon.com/Xuron-2175ET-Professional-Sprue-Cutter/dp/B001TMZ7QA/
X-acto knifes are essential, such as the #2 large blade which is probably the most essential tool you will need.
http://www.amazon.com/X-ACTO-Knife-Cap-Silver-X3602/dp/B000V1QV7O/
Other miscellaneous tools you should get: Q-tips, fine and regular for cleaning tools, weathering with pigments, etc. Fine-tipped tweezers are also very useful. I recommend using Tamiya's extra thin cement, as well as regular cyanoadhesives for painted parts on your model. You will also definitely want some sanding tools, I recommend going to the Dollar Tree or w/e and getting a bunch of medium and fine nail filing sticks. They are cheap and work excellent on models. Tamiya also makes a line of very fine grit sandpaper (1,000, 1,500, 2,000, 2500, etc.) that can make a nice polished surface, as well as sand down thick paint.
If going the spray can route, I'd also recommend one of black paint, as the Redstone, Saturn Ib, and Saturn V all have large chunks of black.
Sprue cutters would also be a good investment, too.
https://www.amazon.com/Green-Stuff-Yellow-Epoxy-Putty/dp/B002MB61RQ
Welcome! Glad to hear you are interested in Malifaux and welcome to the hobby! As another user mentioned check out the "Pullmyfiger" wiki on tactics and how to play. Also take a look at r/minipainting on tips and tricks for painting and inspiration! So since you are brand spanking new and have a lot of questions I'll try to cover all I can. As for my background Malifaux is the only mini game I have ever played and when I first started I was new to the hobby as well.
Lets start with minis and gameplay. Glance over pullmyfinger to check out tactics and looks of models. See who you enjoy. When I first started I picked Resurrectionists because I really enjoyed the thought of having undead minions doing my bidding. Think about what type of tactics you want to play with. Do you want to shoot people from behind cover? Do you want to summon monsters? Do you want to be in an enemies face with melee? Do you enjoy trickery and movement based shenanigans? Each faction is balanced faction to faction and each one harbors a wide variety of gameplay. Some have their specialties, but each faction can do just about anything. For example say you like to summon. Ressurs are king of summons yet other masters can summon as well, like Ramos in the Arcanists (electrical creations and spiders), Leviticus in the Outcasts (undead techno horrors), and Somer Teeth Jones in the Gremlins. There are others but you get the idea. Pick a faction you think is cool or looks cool. Depending on what faction you go with depends on which master is good for beginners. Some of the beginner friendly masters for each faction are
{Faction}:{Masters};{Role in order of masters}
Guild: Lady Justice, Perdita, Sonnia; Melee, Ranged, Magic
Ressurs :Seamus, McMourning, Nicodem; Movement/range, Melee/poison, Summoning (expensive start up cost though)
Arcanists: Rasputina, Kaeris, Ramos; Ice Magic, Fire magic, Electric/summons
Neverborn (slightly more advanced): Lillith, Jacob Lynch; Melee, Card Manipulation
Outcasts: Victoria's, Von Schill; Melee, Ranged
Ten Thunders: Misaki, Jacob Lynch; Hit and run tactics, Card Manip.
Gremlins: not enough knowledge to comment :/ Sorry
To let you know I used to have two masters in each crew other than gremlins, until I sold off many of them to focus on three factions instead of all of them.
These masters listed themselves are pretty straightforward but may have advanced interactions with their crew that you will learn in time and with reading and lots of play and practice. This also just lists what the master does. Like Lady Justice herself is melee but the rest of the crew is versatile with melee or ranged attacks and interactions. The box sets always compliment the master well especially for the beginner crews. In all honesty though pick a faction and master you think is cool. The rest will come with time.
Next lets talk about construction and supplies
Each set of Minis comes in a padded cardboard box on a sprue like this.
This is a link to the instructions Wyrd has wonderfully provided. You can look up individual box sets instruction sheets to decide for yourself how complicated a project may be. Its hard to put a difficulty on construction of the minis because they all use small parts.
Each box set comes with the models on a sprue, simple round bases and character/upgrade cards for each model in the box.
The basic tools you will need are
Hobby Knife/Exacto Knife
Needle nose pliers
Miniature Plastic glue/welder
Gorilla Glue
Green Stuff
Table or work surface
These supplies are for construction only. The cement plastic glue stuff is very sensitive. Literally a drop is all you need to permanently fuse two parts together. It actually melts the plastic ever so slightly into each other. Do not get excess on fingers and use carefully. Do not smash the parts together. This is why I like the kind with a fine point applicator like the one I linked. Always do a dry test fit first when constructing even with instructions it can be difficult to see how they parts go together. The Gorilla glue and green stuff is what I use for basing. Needle nose pliers and knife to cut things out and help hold them. Basing can be as simple or as complicated as needed. Sometime I use a very thin layer of green stuff and paint to simulate earth. Sometime I go get tiny tiny pebble off the side of the road to make rock formations. I once bought clock parts off ebay and got scrap from a plumber friend and I glued them into some green stuff to make a techno junkyard. Get creative.
Next once your model is constructed and based now it is time to paint! You will need
Brushes of varying size and type
Primer either spray primer or paint on primer
Paint and washes
Water containers
Pallet, Wet or dry. I prefer a wet pallet
Light
Start off by priming your minis by either spraying with a spray primer or a paint on primer. I like spray primer because it is fast BUT it is more finicky. It can ruin a mini if you are not careful. Don't spray too close, don't spray in high humidity. Use nice even coats. Two to three thin coats is much better than one very thick coat. Wait for each coat to dry before doing the next. It doesn't take long if you use thin even coats. Then go ahead and paint!
I am always trying to do miniatures and save money. I cannot break the bank right now BUT one thing I do not skimp on is quality brushes. As long as you keep them clean a great brush will last you ages. Invest in some decent ones and they will treat you well. Miniature paint is not always required and can get very expensive. I actually got most of my acrylic paint from Wal-Mart. The paint from there though is very thick! You want to water it down to be like skim milk. Again many thin layers are better than 1 thick one. If the paint slicks right off the model it is too thin. The other kind of specific paint to pick up is called a wash. It can be put on in large amounts and will dry dark in crevices but not on raised parts of the model. It gets great shadows and detail. Anyways I know it is a lot of information for just starting out but shoot me a reply or a Pm and I would be glad to answer more questions or concerns!
Thanks!
Sure thing!
I started by mashing some aluminum foil into the general shape that I wanted it to be, and then hot glued that to a 40mm base. I then reinforced the foil with more hot glue with lengthwise bands of hot glue.
Once cooled, I covered the structure in a layer of Apoxie Sculpt, (AS) which essentially resulted in a smooth "tentacle" upon which I could add details.
My next step was sculpting the chitin plates along the back of the structure with AS. I started with the smallest one near the tip, and working one plate at a time, giving each one adequate time to set, worked my way to the largest one at the base. After each plate had set, I used heavy grit sandpaper to touch up the final shape and add some texture to them (think fingernail ridges), and these scraper tools to add the deeper cracks. This is an area where AS is superior to Green Stuff(GS); it cures rock-hard, so it can be filed, tapped, sanded, and drilled with very good results.
From this point on in the project, I used (roughly) 50/50 mix of GS and AS.
I then used a dremel tool with a tiny carving head to carve out space under the edge of each plate and sculpted in the connective tissue there. Looking back, I wish I'd left more of a "ledge" on the plates, so that that connective tissue was more recessed. Live and learn.
Next step was planning out the rest of the structure. I knew I wanted the inside of the tower to be 1) composed of different sections, 2) complex in texture, 3) "Squishier" than the outside, and 4) functional in appearance. I used pencil to draw sections on the model until it was broken up in a way that I liked, and then I planned a few of the details. (I settled on the vertebrae-like structures as a way to separate the sections, the defiler-like texture near the tip, and decided that I wanted structures at the base that looked like they were "rooted" into the ground--I didn't want it to look like it just sat on the surface.
I sculpted the vertebrae next, using this wonderful tutorial by Mr. Pink, one of my sculpting heroes. The defiler texture was added next, using a "Hydra tool"--a rounded off nail set into a handle. Just poke the tool in at an angle where you want a hole to be--I wish I'd done a better job of organizing the holes into a pattern of some sort.
the long lateral sections came next. I put putty down, and then used a large ball burnisher to make the large depression, a smaller ball burnisher to make a smaller depression in the middle of the large one, and a tiny ball burnisher to make the ring of tiny depressions around that second, medium sized depression. Once I had all of those in place, I went back to the medium burnisher for the depressions on the surface, between the large depressions. I can't think of a better way to describe this right now, but I can attempt to clarify if you like.
the tubes at the base were next. Fat cylinders of putty were rolled out and the ribs were sculpted with the back of the narrow scraper I used on the chitin plates. After they'd set, I blended them into the rest of the structure with the putty around it. the tiny spine structure was made similarly to the larger ones, and the concentric circles were made by making a hole, putting a ball of putty into it, and then turning the hole into a doughnut with a hydra tool, and then repeating.
The tiny spikes were shaped, and allowed to cure, and then glued to the model and blended in with texture and stuff.
If you want more general advice, I'll cut/paste an old comment below, or if you want further clarification or whatnot, let me know!
Happy sculpting!
Sorry, I could have given you a link.
Here are a couple of examples of green stuff:
https://www.games-workshop.com/en-FI/Green-Stuff
https://www.amazon.com/Green-Stuff-Yellow-Epoxy-Putty/dp/B002MB61RQ
&#x200B;
At least with the first type, you mix two different clays together and they harden over time. That means you can form them just as you'd like in the meantime, while it's soft. Hope that answers your question :)
Green Stuff
Exactly this. They sell in a different package where the two epoxies are connected and it doesn't last as long. With these, keep each color in it's own Ziploc bag and it will last forever.
I'm using normal framing wire. It cost $3 for a million feet of it.
Yep that stuff exactly but that's the packaging you'd want to stay away from. The middle where it touches has to be cut away. Look for tubes like this:
https://www.amazon.com/Green-Stuff-Yellow-Epoxy-Putty/dp/B002MB61RQ/ref=pd_sim_21_4?_encoding=UTF8&amp;psc=1&amp;refRID=3VXACGJZ4E2YY0XY4JVB
Or two separate tubes.
With a 4x4 base you're probably looking for something that's 12"+ tall. I think you'll have more luck modeling that yourself than purchasing anything available. I think you'll have better luck buying this and this and testing your artistic ability.
Edit: These might make a nice touch: Melissa & Doug Rainbow Crystals Bead Set
For very large pieces it can get pricey, but it is amazing for detail. http://www.amazon.com/Green-Stuff-Yellow-Epoxy-Putty/dp/B002MB61RQ/ref=sr_1_1?ie=UTF8&amp;qid=1425485701&amp;sr=8-1&amp;keywords=green+stuff
Oil/grease the male connector(s). Buy some green stuff: two part epoxy, yellow and blue, mix em to make green, mold them around the male connector. Remove gently and let dry. Will become as strong as PVC.
http://www.amazon.com/Syma-S107-S107G-Helicopter-Yellow/dp/B004A8ZRB0/ref=sr_1_1?ie=UTF8&amp;qid=1323554972&amp;sr=8-1
The most fun i've had for $27 in a really long time
Remote control helicopter.
This
Halloween Hijinxery
Gotta love a tiny remote control helicopter!
Mini RC Helicopter!
http://www.amazon.com/Syma-S107-S107G-Helicopter-Yellow/dp/B004A8ZRB0/ref=lp_166591011_1_1?s=toys-and-games&amp;ie=UTF8&amp;qid=1389380950&amp;sr=1-1
So Much fun for so little money.
http://www.amazon.com/Syma-S107-S107G-Helicopter-Yellow/dp/B004A8ZRB0/ref=sr_1_2?s=toys-and-games&amp;ie=UTF8&amp;qid=1346261592&amp;sr=1-2
MG Sazabi is a beast of a kit, and it's just barely under $100 on Amazon at the moment.
Any version of the Unicorn Gundam is a good pick, though I'm not sure on Prime availability.
HG Kshatriya with Prime is ~$60.
Maybe a variation on the Sinanju? Stein, Ver. Ka, or Animation Color
It's currently at $90 on Amazon.
As for the Gatling Guns, those are a third party add on. Made by Playwright
The Sazabi on my shelf is the MG Sazabi Ver. Ka
That would probably be the Sazabi Ver. Ka bestie.
Though I hear the ZZ Ver. Ka which recently came out gives it a good run for its money.
Here is a cool site to look at detailed reviews at majority of most kits out there bestie (click on the MG, RG, so on at the top). It’s in Korean, but they shows tons of pictures to give you an idea of the kit, and you can always translate the page to see what is said if needed.
Let me know if you have any other questions (Gundam or Gunpla) bestie I’ll answer them for you.
I just watched 00 a few weeks ago and Virtue/Nadleeh is my favorite design from that series. Kit looks great, I've been tempted to get one myself but I have 3 MGs on the slow boat from Japan that will take me a bit to build. To take your kit to another level, look into panel lining. I bought this set and it's suuuuper easy and makes kits look incredible, especially on a kit that's mostly one color like this (the legs of Nadleeh especially).
On a side note, I don't remember Nadleeh having this shield/rifle combo in the anime, any idea if this was from the one mission where they sent it out as Nadleeh instead of Virtue?
Gundam model kits are, well, model kits, of mechs from some anime’s. They look very unique, check out r/gunpla for more. These specific markers are simple to use: just run them into the lines and done! I got this set, which I would recommend: https://www.amazon.com/Gundam-Marker-Value-TAIYO-Corporation/dp/B00HY93GHY/ref=sr_1_2?ie=UTF8&amp;qid=1535925628&amp;sr=8-2&amp;keywords=gundam+panel+line+marker&amp;dpID=41KeV7gp0LL&amp;preST=_SX300_QL70_&amp;dpSrc=srch
Use gray for white, cream, etc. colors (I only used black here as a test); brown for red, yellow, green, etc.; and black for gray, brown, the rest.
Edit: they work well for tanks and terrain especially, where you don’t want to use a lot of wash but still want to have shadows. For them, I use a mix of this marker on the less deep shadows, and a bigger one on the deeper ones. Example: https://imgur.com/a/CycO1Wk the specific thick marker is the black one in this set: https://www.amazon.com/GSI-Creos-Gundam-Marker-Markers/dp/B0009AFN4Y/ref=sr_1_3?s=toys-and-games&amp;ie=UTF8&amp;qid=1535926026&amp;sr=1-3&amp;keywords=gundam+panel+line+marker+set&amp;dpID=51ay1SKBe8L&amp;preST=_SY300_QL70_&amp;dpSrc=srch I’m sure you can find one of these individually too, I’m just too lazy to find it right now.
Hahaha. No problem
(Hobby Link Japan Marker Black)
https://hlj.com/gundam-marker-black-fine-tip-for-panel-lines-gnzgm01
(Hobby Link Japan marker Grey)
https://hlj.com/gundam-marker-gray-fine-tip-for-panel-lines-gnzgm02
(Amazon set of 3) https://www.amazon.com/GSI-Creos-Gundam-Marker-Value/dp/B00HY93GHY/ref=mp_s_a_1_2?keywords=panel+line&amp;qid=1569935250&amp;sr=8-2
(Amazon Tamiya Panel Wash Black)
https://www.amazon.com/TAMIYA-87131-Panel-Accent-Plastic/dp/B01HDJ7BR0/ref=mp_s_a_1_4?keywords=panel+line&amp;qid=1569935250&amp;sr=8-4
(Amazon Tamiya Panel Wash Grey)
https://www.amazon.com/Panel-Line-Accent-Color-Light/dp/B07CMSBDCB/ref=mp_s_a_1_8?keywords=panel+line&amp;qid=1569935250&amp;sr=8-8
I put links from Hobby link Japan because thats what people here recommend using, bit I also put Amazon because it might be easier for you. Unfortunately I couldn't find the wash on Hobby link. Happy Building 😁
Great job first time out! I remember this kit fondly and can’t believe you found one. Everything u/levrin said is correct. If you are looking to continue, at the very least I recommend going out and purchasing an exacting knife/side cutters/ a set of paneling markers/and tweezers for decals.
Again. Great first outing and welcome to the hobby!
side cutters
paneling markers
tweezers
knife
Hope this helps
Nope just lining markers. This is the set I used, I used the black the most since its mostly a red suit.
&#x200B;
https://www.amazon.com/gp/product/B00HY93GHY/ref=oh_aui_detailpage_o07_s00?ie=UTF8&psc=1
Here's the link. https://www.amazon.com/gp/aw/d/B00HY93GHY/ref=mp_s_a_1_2?ie=UTF8&amp;qid=1526919703&amp;sr=8-2&amp;pi=AC_SX236_SY340_FMwebp_QL65&amp;keywords=gundam+marker&amp;dpPl=1&amp;dpID=41KeV7gp0LL&amp;ref=plSrch
Honestly, at that price point, you're best off going with the Hubsan x4 H107L
Here's an amazon link if u want:
Hubsan X4 (H107L) 4 Channel 2.4GHz RC Quadcopter, Black https://www.amazon.com/dp/B00IZC6C8E/ref=cm_sw_r_cp_apa_hVuFybV3D6TR6
Order one of these first and learn to fly it, or something similar. The controls are the same and you can practice indoors. Also, if you destroy this you are out $40, instead of the full price.
Not exactly the answer you may have been looking for, but I figured I would contribute...I bought something like that from Amazon a while back.
https://www.amazon.com/Hubsan-H107L-Channel-2-4GHz-Quadcopter/dp/B00IZC6C8E/ref=sr_1_3?ie=UTF8&amp;qid=1474758367&amp;sr=8-3&amp;keywords=hubsan+quadcopter
That's the model I bought, and extra batteries/chargers/parts have been easy to find online and even at hobby specialty shops. This one doesn't have a camera, but there are models that do. Super fun toy, tbh. Pretty sharp learning curve, even on the "beginner" mode that smooths out the flying. Highly encourage getting a propeller guard thing to slap on it especially if you fly indoors.
Start by getting a line-of-sight drone and see if you like it first.
hubsan x4 (comes with a controller)
batteries
charger
prop guards+props
$55 to see if you like it.
When you break that, try repairing it. If you don't like that, then the hobby may not be for you.
As long as it isn't too windy the Hubsan X4 mini quadcopter is a lot of fun.
Buy a Hubsan x4 to practice on before getting a real drone. Even if it's for a week or two. https://www.amazon.com/Hubsan-H107L-Channel-2-4GHz-Quadcopter/dp/B00IZC6C8E/ref=sr_1_cc_1?s=aps&amp;ie=UTF8&amp;qid=1493237581&amp;sr=1-1-catcorr&amp;keywords=hubsan+x4
I'm a noob. I just bought this and it should be here tomorrow. You can get one with FPV already set up. I think that one is ~$130. This one's $40. I got a sim app for my computer called Heli-X to learn how to fly it (360 controller compatible). The question is can you fly one? Check out the app t's free.
It's also US Only, and readily available elsewhere for the same price..
Cameraless Model on Amazon
These little guys are tanks. Fly over grass, get plenty of spare props and you are all set on a very affordable budget.
https://www.amazon.com/Hubsan-H107L-Channel-2-4GHz-Quadcopter/dp/B00IZC6C8E/ref=sr_1_5?ie=UTF8&amp;qid=1539549955&amp;sr=8-5&amp;keywords=Hubsan+X4
Yup it's the hubsan X4 Amazon link that someone here recommended as a great starter that won't break on the first crash. And at 30 bucks I picked up two so I had spare parts for when I eventually destroyed it (which I did)
So much fun!
You should consider a small one first. Like a [hubsan x4 from amazon.](
http://www.amazon.com/Hubsan-H107L-Mini-RTF-Quadcopter/dp/B00IZC6C8E/ref=sr_1_1?ie=UTF8&amp;qid=1417075365&amp;sr=8-1&amp;keywords=hubsan+x4)
But if you don't mind the pricetag, and want to jump into it. You get ARF kits for 3-400usd. Then you need another 1-200usd in fpv gear. And 4-500 for radio/receiver, flightcontroller and batteries/charger.
In short, you should consider a pricetag around 800-1000usd to get starting. Maybe up to 1500-2000 depending on what you need to buy extra and if you want the "new" HD fpv goggles and so on.
I would suggest buying a cheap nano quad, like the Hubsan x4 or the Syma x11 first: fly, crash, learn, THEN look at building a 250. Plus then you have something you can fly around inside when the weather is bad
http://www.amazon.com/Hubsan-H107L-Mini-RTF-Quadcopter/dp/B00IZC6C8E/ref=sr_1_1?ie=UTF8&amp;qid=1417727353&amp;sr=8-1&amp;keywords=hubsan+x4
You can use a site like camelcamelcamel.com to keep track of the price. I paid $30 and $35 (lost the first one) when I ordered mine.
Hubsan X4, it's cheap and comes with everything you need to fly it
Hubsan H107L
$46 on Amazon (up ~$5 for the holidays). Grab a crash pack and prop guards.
I'm sure the crash protection on that is just a plastic blade guard. It looks like a Hubsan H107 clone but personally, I would go for this http://www.amazon.com/Hubsan-H107L-Channel-2-4GHz-Quadcopter/dp/B00IZC6C8E/ref=sr_1_1?s=toys-and-games&amp;ie=UTF8&amp;qid=1418505430&amp;sr=1-1&amp;keywords=hubsan+x4
From everything I've read here, the Hubsan X4 series are great. There are new ones coming out at some point in the future, however the current versions are great, and cheap as well.
http://www.amazon.com/Hubsan-H107L-Channel-2-4GHz-Quadcopter/dp/B00IZC6C8E
Strange that it lists the rather spendy fpv version of the Hubsan instead of the cheaper (and still very good, especially for a beginner) base model: http://www.amazon.com/Hubsan-H107L-Channel-2-4GHz-Quadcopter/dp/B00IZC6C8E
https://www.amazon.com/Hubsan-H107L-Channel-2-4GHz-Quadcopter/dp/B00IZC6C8E
They're not super powerful, but still a lot of fun. You don't want a ton of power on your first done, anyway.
It's easy to fly, with readily available replacement parts.
Exactly right. This is the one I started with (this option doesn't have a camera and is $35, I got the one that's 40 I think with the cam)
Hubsan X4 (H107L) 4 Channel 2.4GHz RC Quadcopter, Black https://www.amazon.com/dp/B00IZC6C8E/
And you can see all parts to fix it are super cheap as well. The controls are the same as the more expensive ones. These are not anywhere as fancy, so you really need to learn to fly them. The more expensive ones have lots of functions to keep it steady and such. But it's very easy to get disoriented when it's high up and you can't see which way is forward. Bad news if there's obstacles nearby and you don't know how to control it. It's also why so many of them have been making headlines lately. Idiots get them without learning to use them first, and then they drop and hurt people.
The hubsan x4 was my first quad. I learned so much on it. And they are cheaper than ever now. If you are new to flying and just got or are thinking about getting a spark or even a more expensive drone, I HIGHLY recommend grabbing an x4 and learning the ins and outs of quad control on something that won't break your heart when you break it. We all scrapped our knees when learning to walk. Learning to fly is no different.
Hubsan X4 (H107L) 4 Channel 2.4GHz RC Quadcopter, Black https://www.amazon.com/dp/B00IZC6C8E/ref=cm_sw_r_cp_apa_i_.jg6AbAFEV9W0
Go on amazon and buy all this in my opinion to get into Quadcopter flying:
The actual Quad
Things you will need
I got this one, the Hubsan X4. It's showing it for $40 right now but I think I only paid $35 for mine at the time. They make the same one with a camera installed but I didn't see the point of that since the whole idea was to only use it for practicing.
It really wasn't hard to get the hang of. I started indoors with it and crashed it several times. It was fun but taking it out to the soccer fields and zipping it all over the place is what made me understand people's obsession with multicopters. The worst that has happened outdoors is twice I've taken my eye off it when it had gotten so far away it was just a tiny black speck in the sky. Both times I panicked, cut the throttle to let it fall and searched for it. Luckily it suffered no damage either of those times.
I will say you should definitely invest in some extra props and extra batteries. You can find all that pretty cheap online too. Even with all that added on you're still talking about less than $100.
Oh, and completely un-GoPro-related: these things are extremely fun to fly at night. With the LEDs on it's easier to see and looks like a UFO buzzing about.
Sorry i replied to you a few days back but i was on mobile and it ended up being posted as a reply to the main thread!
Hubsan X4 H107L : http://www.amazon.com/gp/aw/d/B00IZC6C8E
OMG, right?! I've gone through three of them already... I destroyed the blades to this one yesterday after only two days on the job. ---> http://www.amazon.com/gp/product/B00IZC6C8E/ref=oh_aui_detailpage_o05_s00?ie=UTF8&amp;psc=1 -- it was a little cheaper when I got it, really like it, but it's super hard to control in the house...
I got the L. It was around $50. Actually, lemme grab the link.
http://www.amazon.com/gp/product/B00IZC6C8E/ref=oh_aui_detailpage_o01_s00?ie=UTF8&amp;psc=1
Are you sitting me. I coulda got one with a camera for $10 more!?!?!
Here is about what I spent: http://i.imgur.com/ZU2hzQr.png
Edit: Table format
Link|Part|Model|Price
:-:|:-:|:-:|--:
link | Frame | Lumenier QAV-R 5 | $107.75
link | Motors | EMAX RS2205 2300KV | $76.99
link | ESCs | Littlebee 20A PRO | $49.99
link | Flight Controller | MotoLab Cyclone F3 | $40.69
link | Radio Tx | FrSky Taranis X9D Plus | $211.37
link | Radio Rx | Frsky XSR | $26.74
link | Headset | Fatshark Attitude V3 | $331.99
link | FPV Tx | ImmersionRC 600MW 5.8 | $48.98
link | FPV Antennas | Aomway | $15.00
link | FPV Camera | Foxeer XAT600M | $48.88
link | HD Camera | Yi | $100.00
link | Charger | SkyRC iMax B6AC V2 | $49.97
There may be a part or two missing. The links may or may not still be good, this is from ~4 months ago. Take out the headset, HD camera, and other FPV stuff and the cost drops by $545. These are also all high-end parts.
Edit2: Some Youtube subs
https://www.youtube.com/channel/UCahqHsTaADV8MMmj2D5i1Vw
https://www.youtube.com/channel/UCemG3VoNCmjP8ucHR2YY7hw
https://www.youtube.com/channel/UCoS1VkZ9DKNKiz23vtiUFsg
https://www.youtube.com/channel/UC9zTuyWffK9ckEz1216noAw
https://www.youtube.com/channel/UC3ioIOr3tH6Yz8qzr418R-g
https://www.youtube.com/user/EngineerX
https://www.youtube.com/channel/UCX3eufnI7A2I7IkKHZn8KSQ
https://www.youtube.com/channel/UCp1vASX-fg959vRc1xowqpw
>Next question is controllers and goggles.
If you're not on a tight budget, the best things to get would be the FatShark Dominator V3's (goggles), and the FrSky Taranis X9D Plus (transmitter). You'll find it hard to find someone to argue against either of those.
Aside from that, for the receiver get a FrSky D4R-ii, and run it in PPM mode. For batteries, I used 1300mah 3s at first, and moved to 1300mah 4s once I wanted to take the training wheels off.
Edit: I also got a D4R-ii mount and a GoPro mount. You will break the D4R-ii mount eventually, so I recommend getting 2. The last thing you would need (if you don't have) is a LiPo charger, and maybe a parallel charging board if you want to charge all of your batteries at once.
Once you have all of that + your Vortex, you are ready to go.
I use an [imax b6] (http://www.skyrc.com/index.php?route=product/product&amp;product_id=217) with a parralel charging board. / Amazon link
This particular charger has a heavy counterfeit presence online though so it's important to make sure it's a genuine SkyRC charger if you decide to go down that road. Avoid ebay and the likes. The Amazon link above is the real deal for reference.
In the true spirit of the hobby, you should dump some cash in these. But really:
LiPo charger - $48 - Genuine SKYRC iMAX B6AC V2 Dual Power (6Amps, 50Watts): LiPo, LiHV, LiIon, LiFe, NiCd, NiMH, Pb Lead Acid AC/DC Professional RC Balancing Battery Charger & Discharger (Version 2) w/ Micro USB Port, Temperature Port, 2S-6S JST-XH Balance Ports https://www.amazon.com/dp/B00ND7J38C/ref=cm_sw_r_cp_api_htDxybG82Q702
2 batteries - $29 ea - Gens ace LiPo Battery Pack 5000mAh 50C 2S 7.4V HardCase 21 with Deans T Plug for RC Car Boat Truck Roar Approved https://www.amazon.com/dp/B00WOAWHUK/ref=cm_sw_r_cp_api_1tDxybYW7ARFP
2 brushless combos - $43 ea. - GoolRC 3650 3100KV/4P Sensorless Brushless Motor with 60A Brushless ESC&#xFF08;Electric Speed Controller&#xFF09;for 1/10 RC Car Truck https://www.amazon.com/dp/B01CCRZD1Y/ref=cm_sw_r_cp_api_LuDxybH8WPFP6
2 2.4ghz tx rx bundles - $38 ea - FLYSKY RC 3 CH Transmitter TX FS-GT3B For CAR Boat 2.4Ghz 2.4g w/ Receiver https://www.amazon.com/dp/B00HNJNXVY/ref=cm_sw_r_cp_api_LwDxybYGHVVE8
So at $280 they would both be fully up to date with lower end electronics. The sky is the limit.
i had a knock off fail that had an internal power supply, just wouldn't turn on after a week of use(clone of: https://www.amazon.co.uk/Genuine-SKYRC-Power-6Amps-50Watts/dp/B00ND7J38C)
fan can also get noisy over time - oiling it helps
Whichever one you get make sure it comes with a build in power supply. I overlooked that when I bought mine and now I'm stuck with having an extra brick laying around just to give power to the lipo charger. I mean it's so inconvinient, I'm surprised non power supply models are even a thing.
Here is my suggestion:
https://www.amazon.com/Genuine-SKYRC-Power-6Amps-50Watts/dp/B00ND7J38C
As far as MaH vs 2s, 3s, etc. MaH will give you longer run times. All things being equal a 5000 MaH will last 25% longer than a 4000 MaH.
The difference between 2s and 3s is that 3s will have 50% more voltage because it uses 3 lipo cells instead of 2 cells. This will make your car go faster. The tradeoff is that 3s batteries are more expensive and as you're going faster, you're going to be more likely to break parts on the truck.
I'd recommend the SKYRC iMAX B6AC V2. It's also 6 amps but will do storage charge and it has a USB port if you want to hook it up to your computer. For about the same money, it has some better features. Just make sure it has the battery connector you need or else get an adapter for a few bucks.
Batteries I don't have a good recommendation. You'll need to get the dimensions of the battery tray and find something that fits or just find out what other Slash owners use and buy that. (Hobbyking has a really nice battery finder based on dimensions but I know you only want to use Amazon.)
What do you think about the iMax B6?
http://www.amazon.com/gp/product/B00ND7J38C?psc=1&amp;redirect=true&amp;ref_=ox_sc_act_title_1&amp;smid=A1S8P6QXTTYCQC
Imax for about 40$ can charge and do everything you could ever want a charger to do for any battery. Do not even attempt to use your other charger. A 23minute video I made for lipos for /r/airsoft
Link for charger with the power supply 53$ worth every penny. I have over 20 different chargers myself. I can find you what you need let me know your budget. I will link more.
This charger and this power supply ~35$ best choice. Power supply is external and tou have to buy it seperate but the same thing as the first and cheaper. Pm me with questions I will point you in the right direction so hard you won't stray off. This is the shit I know the most. This is my jam. Lol
If you want to start painting minis, check out r/minipainting for some resources and inspiration.
I started by watching youtube videos to see how the techniques were used and I picked up the Learn to Paint kits from Reaper Miniatures. #1 and #2 are currently available on Amazon for about $30 each. They come with 11 paints each, a couple brushes, and 3 minis each to get you started, plus a guide to paint the included minis.
Once you've practiced on a couple minis, I'd also recommend picking up a "flesh wash" if you'll be painting light-skinned characters. It makes the shading on light skin much easier. You might also want to get a black and brown wash for shading just because those are the most commonly used ones and it'll make your life easier. (A "wash" is a thin, watery paint that's used to make the crevices of the mini darker, like they're in shadow.)
Total startup cost if you get both paint kits and a bottle each of flesh, black, and brown washes: about $70. Additional bottles of paint will run you $3-4 each, and more Reaper Bones minis (the most economical but still well-detailed minis I've found) are around $2-4 for medium sized minis.
I use ones that are used for drones. My gigabyte z390 mini itx has the the connectors close too. 2pcs 2.4G 5.8G FPV TX Antenna... https://www.amazon.com/dp/B071LMRK36?ref=ppx_pop_mob_ap_share
No problem with antennas at all. I mostly use Ethernet so wasn’t concerned about the look. Good luck.
https://www.amazon.com/gp/product/B071LMRK36/ref=oh_aui_search_asin_title?ie=UTF8&amp;psc=1
I'd highly recommend this kit if you can buy it:
https://www.amazon.com/dp/B00NTMC49G/ref=cm_sw_r_cp_api_KDOgAbJ2VC8V6
It's a kit that comes with paint, 3 minis, a couple brushes, and some instructions.
My wife and I had never painted minis before, and we bought this and have been painting like mad since. It teaches some really great basic techniques and gives you the basics of what you need to get started. Then, it's just all about practice. Take your time painting, learn as you go, and you'll get better and better!
Also, using double sided tape on an old pill bottle is a great way to manipulate your mini while painting it!
Anyone looking to learn should try the Reaper learn to paint kits.
They'll teach you a ton, and are really fun. I'm just finishing up the second set and really proud of all of the minis I've done.
A lot of people start learning to paint with the Reaper kit It also includes a few generic minis to learn on.
For me, I started with the three Zombicide paint sets. They've given me a lot of utility and variety of colors and shaders. To this day I still use them (along with other Army Painter and Citidel paints that I've added) even if I'm not painting zombies.
For D&D, I mostly dig into the Reaper catalogue as they cover just about everything. Games Workshop models are expensive and the newer models are scaled.
Reaper Minis has a line of minis called Bones. They're cheaper plastic versions of their metal/resin minis, and you're looking at around $3 for each humanoid.
More expensive than the tubes, but you get exactly the mini you're looking for.
https://www.reapermini.com/miniatures/figurefinder+plastic/latest/page1
You may want to start with a kit like this:
https://www.amazon.com/Reaper-Miniatures-08906-Learn-Paint/dp/B00NTMC49G
Three minis, brushes, paint, and a case.
I like to prime my bones minis with a brush on primer. They advertise that you don't need to do this.
Wizkids also has pre-primed minis. They usually come in a two pack for $7-$8. I'm not a fan of these, though. The scale/proportions aim towards more realistic-ish, but at this scale, I don't like how it looks.
For someone starting to paint, avoid metal and resin miniatures. They have a lot of prep work before they'll be paintable.
Thanks! I was looking at this set from Vallejo and this set from Reaper. I hear that 1/2 of the paints in the Reaper set are bad or hard to work with though. Although it does come with 3 minis.
These are the ones I got but both were cheaper at the time.
Vallejo color pack was right at $41.
Reaper Bone Set was like $30.
edit: had the prices swapped.
Hey there! I got into painting based on the board games I was picking up that came with plastic miniatures. This was a good starting place as the figures aren't super detailed and adding any paint to them seemed to make them better than standard board game pieces.
If the art side if things is more of the draw then I would suggest checking out a starter kit. There are a few "starter kits" out there that are good because they give you the basic necessities to jump into painting without spending tons of money.
I saw a couple good looking kits on Amazon. Here is a DND specific one:
The Army Painter Dungeons and Dragons Official Paint Line Adventurer's Paint Set https://www.amazon.com/dp/B07DWMTNDJ/ref=cm_sw_r_cp_apa_i_-QBDDbAFWJSHE
Or here is a generic fantasy one:
Reaper Miniatures 08906 Learn To Paint Bones Kit https://www.amazon.com/dp/B00NTMC49G/ref=cm_sw_r_cp_apa_i_z1BDDbC1DSWE1
I think I'd recommend the second one as it comes with a couple different figures and seems like it's ready to go right out of the box.
One cool thing about painting miniatures is that it is as complicated or as simple as you'd like. There are some great tutorial videos on YouTube to teach the basics. I learned from Sorastros painting tutorials. He does a good job of showing you the basics to get a decent looking figure and then gives you extra steps if you are extremely detailed or want to go to the next level.
As others have mentioned you can get sets of figures to paint from reapers miniatures website. Or if there is a board game out there with a theme your son likes, it may be a good place to start as most games come with 15-30 miniatures with different sizes. Including bigger monsters which can be really fun to paint. Plus you then have a fun game in which to use your art project.
Mice and mystics is a fun family cooperative game with tiny anthropomorphic mice fighting fantasy battles similar to the redwall books. I painted the figures from those and had a great time with the painting and the game.
Some other good ones are Descent 2nd edition and Starwars Imperial assault. Both come with great miniatures but are a little complex on rules and need one player to be the big bad overlord playing against the heroes.
There is also a series of dungeons and dragons board games that are cooperative and come with lots of miniatures. The quality of these isn't very high but those were my first figures.
If you want to go "whole hog" you could purchase one of the "Warhammer age of sigmar" starter boxes. These miniatures are extremely detailed and actually require you to assemble them from several pieces. They don't come with paint inused but there are entire paint kits to go along with them. Some folks really enjoy putting the GW models together, then priming and painting them. These aren't cheap so it might be best to start elsewhere but you get a lot of figures in the box. I will warn you the theme is fairly dark. Lots of blood and skulls.
Best of luck and I hope you guys enjoy!
If you're in a tight budget, it's best to go to Micheals and take advantage of their coupons. Depending on the store, some will take multiple coupons at once and use their competitors' coupons but be sure to check/read their restrictions. And check out your local game workshop and ask if they do deals. Sometimes, they can give you a discount.
For the brushes, there is only one size everyone uses and that's size 1. The best brush brands you can use are Artists Loft and Royal & Langnickel. Keep in mind that when you go to the store, be sure to read what the brushes are for. There are three types: watercolor, oils, and acrylics. Get the acrylic brushes! Those are your best friends when you paint minis. Also, watch out for specialty brushes. Those have animal hairs that are used for specific paint styles and are high maintenance to keep clean. You can learn about those special brushes here and learn the different types of brushes here.
The paints you are using are really watered down so the results will be quite messy and unpleasant to look at but you can make neat textures with them so keep them. The best paints to use are Winsor & Newton (acrylic & oils), Artist Loft (acrylic & oils), Golden (acrylic & oils), Citadel (acrylic), and/or Vallejo (acrylic). Read the labels of your paints before purchasing! People these days do not put the paint back so they are often mixed up. So, for the time being, to make things easier for you is to try out Reaper Miniatures or Army Painter. These brands have good starter kits when you are in a strict budget.
The only thing I would have done differently if I were a beginner would be the research. Before I buy anything, I research which materials are best suited for my projects, look into stores on what kind of discounts I can get from them, list what interests me, and compare prices. It's a pain to do but it's worth the money. The best advice I can give you as a long-time painter is to experiment and practice. The more you do, the more you learn. Even though it may take forever to finish, the experience you went through will help you figure out which technique is worth doing. Remember, you are the painter, do what's easier for you! Sometimes, you don't need pricy things to make your projects look good. It's all in technique and patience.
I got the Reaper Learn to Paint set, which also includes a couple of brushes and 3 minis.
https://www.amazon.com/dp/B00NTMC49G/ref=cm_sw_r_cp_taa_HDaSBbYD4K1WX
I definitely recommend getting one of the many miniatures boardgames out now (if you tell me what kind of minis you are looking for, I can recommend a few).
For paint, you don't have to start with miniatures paints, but it might be easier if you do. There are learn to paint kits that have a brush, some basic paint colors, and even a couple minis to get you started. Most of the major paint brands have some kind of kit like that (Vallejo, Games Workshop, Reaper).
Also, check out /r/minipainting.
I just started with the Reaper Learn to Paint Kit, really easy way to get started in my opinion! Link: https://www.amazon.com/Reaper-Miniatures-08906-Learn-Paint/dp/B00NTMC49G/ref=mp_s_a_1_1?adgrpid=55819558237&amp;gclid=CjwKCAjw8qjnBRA-EiwAaNvhwGXY4C_lJTX3hS4XeCG7J0O2VCjfVcWgoE8t_97gi7gGVUtJJ7tNXxoC_sEQAvD_BwE&amp;hvadid=274729776910&amp;hvdev=m&amp;hvlocphy=9018839&amp;hvnetw=g&amp;hvpos=1t1&amp;hvqmt=e&amp;hvrand=11012796542518246449&amp;hvtargid=kwd-340426098194&amp;hydadcr=26684_9635742&amp;keywords=reaper+learn+to+paint&amp;qid=1558914259&amp;s=gateway&amp;sr=8-1
My bet is it's the one in this Reaper Learn to Pain Kit
It's listed as coming with: "Core Skills includes everything you need to start painting, including 11 Bottles of MSP Core Colors, MSP HD, and MSP Bones Paints (9030-Leather Brown, 9037-Pure Black, 9429-Dragon White, 9452-Blade Steel, 9054-Polished Silver, 9433-Mountain Stone, 9200-Harvest Brown, 9413-Naga Green, 9432-Desert Sand, 9408-Candlelight Yellow, 29815-Dragon Blue)"
So I'd guess Naga Green. (Though a commenter says there may be substitutions in the kit.)
https://www.amazon.com/Reaper-Miniatures-08906-Learn-Paint/dp/B00NTMC49G
Got it for Christmas, was pretty easy to follow!
This is my first thought. I think this might be good?
What do you think?
Here you are mate
I had zero experience and got a lot out of the Reaper Learn to Paint kit Amazon link. It comes with very good printed instructions.
It doesn't have red or
yellowa fleshtone though. Just a thing to keep in mind.e: derp fix
If you’re talking about the Reaper Learn to Paint kits they’re pretty awesome. I didn’t find out about them until I had already been painting a while too, but some friends and coworkers have picked them up and seem to love them.
For those that haven’t heard of them, with each set you get a few minis, a brush, some paints and a guide to walk you through some basic techniques that’ll get you painting at least tabletop quality.
I would highly recommend you try this Learn to Pain Kit and maybe follow up with this second one if you enjoyed it. I really helped me a lot to grasp some basic concepts when painting.
I usually paint reaper minis, but for him you could honestly just get a bag of green army men and prime them grey, then move on to more intricate minis (and expensive) minis when he learns the basics (and doesn't lose patience.)
As for paints, a normal acrylic set should work out, you could also look into a paint kit. I would honestly recommend the Reaper Bones Learn-to-Paint Kit as it was my first, comes with a decent selection of colors that don't require thinning for regular painting, as well as a couple brushes and 3 minis.
Hope this helps! :)
Yes I did post to Facebook.
Like any hobby you can spend a little or spend a lot. I always recommend this starter kit to new painters https://www.amazon.com/Reaper-Miniatures-08906-Learn-Paint/dp/B00NTMC49G it gives you everything you need to get started, even some minis to practice on.
Ok. Gonna throw out a couple of suggestions to get you started.
First get a starter paint set.
You can get them from the local hobby shops
A few of them come with the basic supplies you need to get started.
The following ones come with a small set of paints, a brush and a miniature to paint. Often they also come with step by step instructions or online videos to watch
Dungeons and Dragons Official Paint Line Adventurer's Paint Set https://www.amazon.com/dp/B07DWMTNDJ/ref=cm_sw_r_cp_api_i_kTC0Db25P03XH
Dungeons and Dragons Official Paint Line Monsters Paint Set https://www.amazon.com/dp/B07DWL5JZZ/ref=cm_sw_r_cp_api_i_VVC0Db4FCQTAM
Reaper Miniatures 08906 Learn To Paint Bones Kit https://www.amazon.com/dp/B00NTMC49G/ref=cm_sw_r_cp_api_i_vWC0DbVBYBCNP
Reaper Miniatures Master Series Paints #09970 Starter Set for Mini Figures https://www.amazon.com/dp/B07664WJ3H/ref=cm_sw_r_cp_api_i_RXC0DbPXRB07Z
The Army Painter Kings of War Undead Miniatures Paint Set - Highly Pigmented Acrylic Model Paint Set - 10 Miniature Paints in 18ml Dropper Bottles https://www.amazon.com/dp/B01MRYAY5R/ref=cm_sw_r_cp_api_i_FYC0Db3QD8HJT
The above links are only there to show you what to look for.
Citadel also has a great range of paints but they are generally more expensive and don’t come with brushes or models to paint
Please. Buy local and support our FLGS (Friendly Local Game Stores) They are the reason why so many people are into these hobby’s.
Take a little while and find a couple of Nolzurs or Reaper miniatures you like to paint. They are inexpensive and will be great pieces to start with.
However if your gonna look online Miniature Market currently is having their Black Friday sale
https://www.miniaturemarket.com/searchresults?q=black+friday+sale#/?_=1&amp;sort.ga_unique_purchases=desc&amp;page=1&amp;filter.product_tag=Black%20Friday&amp;filter.manufacturer=Army%20Painter
What ever route you’re choose let us know what you did and show us your completed work. There are a lot of super helpful people here
Yep, just amazon it. Get the green one first, then the blue if you want more
Reaper Miniatures 08906 Learn To Paint Bones Kit https://www.amazon.com/dp/B00NTMC49G/ref=cm_sw_r_cp_apa_i_QG2QDbVC4XT3A
The Reaper kit here
https://www.amazon.com/Reaper-Miniatures-08906-Learn-Paint/dp/B00NTMC49G
Is from what im aware of, the best mini painting starter set you can get, price effective too.
Not from Canada, so I can't help you on the ordering stuff, but you can always check local brick and mortar gaming shops. If you find one that sells miniatures etc. not only can you buy your stuff there, they are probably also happy to help give you recommendations / stuff to practice with if they can gain you as a customer.
Oh and I would start with a starter set, not a mega set \^\^
(something like this but not completely overpricesed...)
I figured this had been answered before, just wasn't sure where to look. Thanks for the response!
Would this kit be a good place to start? I'm hoping to have it by Friday because I've got all weekend free. So I want to order something today.
I would advise against re-buying the black edition. It is nicer, but the quality is still a bit lacking. For the figures, I know people have gone to using the old micro machine models. I'm not sure how available they are/how bad shipping would be to Portugal.
For painting, I highly recommend getting this kit from Reaper. The instructions are easy to follow and it comes with everything needed to get started. Once you've painted the three included figures I would look into ordering the colors you want to use. Generally speaking, you would need to:
I'd skip doing highlights for that many figures, and I wouldn't bother sealing them either. I'd also paint one figure of each type first, then do batch runs in series (prime everything, base coat everything, wash everything..)
Hopefully this can get you started improving your set. :)
Sure, here's the airbrush- https://www.amazon.com/gp/product/B00GYHVDBS/ref=oh_aui_search_detailpage?ie=UTF8&amp;psc=1
and reaper paint set- https://www.amazon.com/gp/product/B00NTMC49G/ref=oh_aui_search_detailpage?ie=UTF8&amp;psc=1
Nah you want a minimum 50C constant, 50C burst is too low.
https://smile.amazon.com/1300mAh-Battery-Airplane-Skylark-Nighthawk/dp/B013I9T0T6/
or
https://smile.amazon.com/1300mAh-Battery-Nemesis-Skylark-Nighthawk/dp/B01N9H2I19/
https://www.amazon.ca/Tattu-Battery-1300mAh-14-8V-Airplane/dp/B013I9T0T6
Would recommend these.
something like theses if you have the money
Well that mostly depends on budget. I got this Eachine Wizard x220 a few days ago, but I got the bind & fly version since I already have a radio. This thing is GREAT, my main quad I built about a month ago needs to be tuned and I didn't have time to today so I flew this instead for all of my flights and it is SHARP. The RTF version (the one I linked) comes with everything you need to fly but you'd also need goggles like FatSharks if you're willing to spend a lot on goggles or Eachine VR007's if you want something cheaper to start out on FPV with. I started with the Eachine's and they work fine, but after awhile the size will start to get annoying with no DVR and some other bells and whistles FatSharks have (I just got FatSharks a couple days ago and they're great!). And of course you would need a camera. The first GoPro session does 1080p60fps and it's only $200 so you'd be under $500. I'm not 100% sure this comes with a battery too though so you'd want a few extra 4S 1300mAh batteries and a charger for them (lot's of different options here so these are the batteries I use and here is the charger I use ). Just make sure you get batteries with an "XT60" connector and your charger has an XT60 charging cable. Here's a great video made by a fellow r/Multicopter user on how to safely charge LiPo batteries. They are no joke!
Anyway this is a GREAT quad to start with, the only downside to it IMO is that it uses the "FlySky" radio transmitter and receiver which is not that great. I started out with a different version of the one this has and my first quad lost signal and smashed face first into concrete from over 50 feet up. Luckily most components on these are tough as nails so it's a cheap fix, I just had to replace a GoPro lens (GET LENS PROTECTORS!) and a couple small parts. Anyway, I believe the radio in this one is a newer version that has had way less problems than mine, so if you get it maybe just range test low and over grass or something before going crazy?
If you want to watch a review of this quad, here's a great review made by u/uavfutures (same guy that did the LiPo video), who convinced me to buy it and I wasn't disappointed.
One more thing...have you ever flown a quad before or flown FPV? If not you may want to pick up a Blade Inductrix FPV and some goggles to get the basic idea down before you spend money on something you don't know how to fly. If you have any more questions let me know!
Some really popular LiPos that a lot of the pilots use are:
Tattu 4S 1300mAh 75C
Lumenier 4S 1300mAh 60C
Thunder Power Adrenaline 1300mAh 4S 80C
I was looking for a 4S with a high discharge rating, ordered 6 of these this morning. Tattu LiPo Battery Pack 1300mAh 75C 4S
Op posted link as new comment instead of replying, here's what they said;
"https://www.tindie.com/products/Abacomtech/ezpick-manual-pick-and-place-machine/
https://www.amazon.com/dp/B01H8808H6/ref=cm_sw_r_cp_apa_i_FNJvCb5F2HY8J (there are many other relabeled and variations of this particular one)."
https://www.tindie.com/products/Abacomtech/ezpick-manual-pick-and-place-machine/
https://www.amazon.com/dp/B01H8808H6/ref=cm_sw_r_cp_apa_i_FNJvCb5F2HY8J (there are many other relabeled and variations of this particular one).
I’ve been very happy with these.
Edit: just be careful when swapping to the headband as the plastic clip broke when I did it. Nothing a little duct tape couldn’t fix though! Doesn’t matter if you’re wearing glasses with the headband.
I’m also over 40 here and my eyesight just tanked as well. I recommend this instead of a mounted magnifying lens.
YOCTOSUN Head Mount Magnifier... https://www.amazon.com/dp/B01H8808H6?ref=ppx_pop_mob_ap_share
Comes with several lenses of increasing magnifying strength and doesn’t get in the way of handling things. They look goofy but I’m well behind caring at this point.
I have this headlamp and I love it.
https://smile.amazon.com/gp/product/B01H8808H6/ref=oh_aui_search_detailpage?ie=UTF8&amp;psc=1
I used the Pathfinder Battles Deep Cuts Female Dwarf Summoner mini because it was the only female dwarf at my FLGS and it was inexpensive. I will say if you've never bought this brand/type, the detail shown in the picture online is far above and beyond the actual mini, and I assume the pic is a computer render. This may already be obvious to y'all, I dunno!
Anyway, I sliced her hands/spell effects off at the wrist with a utility knife and sculpted new hands from Apoxie Sculpt, leaving a hole through one fist to fit the axe I sculpted. I also added a beard, because I love lady dwarfs with beards, and trimmed a little off her head as well so it could fit the dragon skull I sculpted too. Wasn't sure what to put in her other hand but ended up cutting off a generic monster head from one of many cheap baddie minis I had, just so she'd look extra badass, I suppose. (I think I should not have used generic super glue to attach the monster head though, as it left a white film and ended up falling off anyway.) I also trimmed a little away of the base so she could sit on her new mount, a huge polar bear (for the Mammoth Rider Pathfinder prestige class).
I painted everything with this super basic starter set of Army Painter paints. I intended the colors to be pretty neutral and natural, because the character makes a lot of her own gear from animal hides, bones, etc. Didn't really know what I was doing, so tips are appreciated, but be gentle :) I used almost the cheapest mini and paints I could find because I was afraid I would be terrible and end up wasting money on a hobby that I would suck at. It turned out better than I expected though, and inspired me to want to paint my Heroforge mini too. Any suggestion for the next (not too expensive) tool/paint/whatever I should get?
For example, I'm building Orks and got:
Kings of War Dwarfs: https://www.amazon.com/Warpaints-Kings-War-Dwarfs-Paint/dp/B01MRYAE2C
Kings of War Greenskins: https://www.amazon.com/Army-Painter-Kings-Greenskins-Paint/dp/B01LYRD27V
Starter Kit: https://www.amazon.com/Miniatures-Highlighting-Miniature-Army-Painter/dp/B01MTXRU2L
&#x200B;
Which got me all the metallics, 3 washes, a variety of good Ork paints, and a brush for less than the Mega set.
&#x200B;
The only basic supplies you will need are paint brushes and acrylic model paints. A starter set like this for you would be perfect, if you're in Taiwan you can probably find something local for much cheaper.
https://www.amazon.com/Miniatures-Highlighting-Miniature-Army-Painter/dp/B01MTXRU2L/ref=sr_1_4?ie=UTF8&amp;qid=1525546731&amp;sr=8-4&amp;keywords=army+painter
If you want more videos on how to get started, the basics are covered very well in my opinion by Games Workshop videos. They sell models for a science fiction miniatures game but the ideas of painting models are universal and this will really help you!
Basic painting of a military vehicle:
https://www.youtube.com/watch?v=Ig_gKQAgBKY
Another basic military vehicle tutorial:
https://www.youtube.com/watch?v=74p9eGwRAog
Adding weathering and battle damage:
https://www.youtube.com/watch?v=gyuPxJG5kFc
And the great thing about acrylic hobby paints is that they can be easily removed from the model, so if you don't like what you did you can remove it all and start again fresh!
http://www.instructables.com/id/Take-Paint-Off-of-Models/
> For example, this box set contains almost all the colors you will ever need (other than specific ones). https://www.amazon.com/Miniature-Painting-Bonus-Wargamer-Regiment/dp/B01MTXRUUT/ref=sr_1_4?s=toys-and-games&amp;ie=UTF8&amp;qid=1524496671&amp;sr=1-4&amp;keywords=army+painter
These paints are great. I bought the same set and the dropper bottles are perfect for painting with a wet palette. I've grown to hate the GW paint pots. You can also use test tube holders to organize them at your painting station.
For example, this box set contains almost all the colors you will ever need (other than specific ones). https://www.amazon.com/Miniature-Painting-Bonus-Wargamer-Regiment/dp/B01MTXRUUT/ref=sr_1_4?s=toys-and-games&amp;ie=UTF8&amp;qid=1524496671&amp;sr=1-4&amp;keywords=army+painter
Obvious colors for these models - army green for the green armor, necrotic flesh for highlighting the armor, skeleton bone probably for the pants (may need to add a little brown depending on the color you like), and one of the flesh tones for the skin. They primarily used the dark tone (black) wash on the basically the entire model, I think we could do better. Recommend, flesh wash for skin, dark tone for weapon and armor crevices, and soft tone (brown) for the paints. Khaki pants and black detailing is just too much contrast for my taste.
Side note, Army painter's paint brushes are decent but there are other options. I recommend the Virtuoso paint brush set, that will give you every kind of brush you would need. https://www.amazon.com/gp/product/B01M3PSN8T/ref=oh_aui_detailpage_o07_s00?ie=UTF8&amp;psc=1
The Army Painter Miniature Painting Kit with Bonus Wargamer Regiment Miniature Paint Brush - Acrylic Model Paint Set with 50 Bottles of Non Toxic Model Paints - Mega Paint Set 3 https://www.amazon.com/dp/B01MTXRUUT/ref=cm_sw_r_cp_apa_i_-mEwCb9WT1C4E
I also used a few citadel paints
I use gw paints, mainly because I just always have, and I'm used to them, but if you wanna use some better quality, most people recommend vallejo or army painter. You can get a pretty good start with a variety of colors for army painter on Amazon for a pretty good price.
https://www.amazon.ca/dp/B01MTXRUUT/ref=cm_sw_r_cp_apa_B706BbA6TT14G
And I know you didn't, but I use their brushes, this set is a good starting point.
https://www.amazon.ca/dp/B00HC8H4EI/ref=cm_sw_r_cp_apa_F806BbW819S9Q
Well, depending on the level of newbness the following might be helpful:
Use Tamiya Extra Thin Plastic Cement (green cap) instead of super glue for the grey plastic stuff. It won't work on Resin though. Buy it at a Hobbytown USA or off Amazon.
Use wire cutters to remove stuff from the sprues, don't twist. Even a cheap $4 pair of Hakko cutters works fine. I use a small Gerber pocket knife to scrape off mold lines.
Don't get caught caught up into magnetizing stuff. Just glue it and be done. Nobody is going to care if you say a Carnosaur counts as a Troglodon for a game, or if your Saurus Knights are not really using the lances they are modeled with.
Apparently massive amounts of Skinks are a good investment for current Seraphon. I'd not buy more than 2 boxes while waiting for a new battletome though.
If you REALLY screw up a model, you can fix it with green stuff 99% of the time.
Army Painter sells a 50 paint set that I fully endorse. Drip bottles that won't dry out quickly like GW paints.
Ebay is a good resource. You'll have to click worldwide on the left.
Sometimes you can get stuff you can't find on Amazon at your local independent hobbystores or official GW stores that keep old stock, like unsold copies of Carrion Empire. One example, Chaos Lord on foot is a website exclusive, but you can have it shipped to a store for free instead of $10 to your home. You have to place the order in person with the store staff for that specific shop to get credit for the sale though.
I am currently using a box set I got off of Amazon: https://www.amazon.com/Army-Painter-Miniature-Painting-Wargamer/dp/B01MTXRUUT?ref_=ast_bbp_dp
Good luck finding a group!
Emerald Tavern and Dragon's Lair both carry a couple of lines of paint (I'd personally avoid Games Workshop paints, they're overpriced and the pots will help your paint dry out).
King's Hobby has a great selection of paints from companies you won't find elsewhere in town.
If you're just starting, brushes from craft stores or great.
A great way to get all the paints you'd need to really get started is the Army Painter Set, which has 50 paints, a guide, and a brush to get started with:
https://www.amazon.com/Miniature-Painting-Bonus-Wargamer-Regiment/dp/B01MTXRUUT/ref=sr_1_3?keywords=army+painter+set&amp;qid=1554409358&amp;s=gateway&amp;sr=8-3
I recently bought one of these sets. they're pretty good and fairly cheap compared to buying idividually. the brush it comes with is great for large areas but i wouldnt try doing any detail with it. you do have to shake the bottles like crazy though.
https://www.amazon.com/Rustark-Gundam-Building-Repairing-Fixing/dp/B071LB1T5D/ref=sr_1_3?keywords=gunpla+starter+set&link_code=qs&qid=1564181072&s=gateway&sourceid=Mozilla-search&sr=8-3
Here it is.
Nippers, tweezers (for small parts or stickers), files, x-acto knife. All ya need in the box.
And you can use fine point sharpies for panel lines, or Gundam markers. A set of 2 is like, $3.
I'm pretty new with Gunpla and I'm planning on getting some more kits soon, and I was wondering if this little bundle of tools would be a good investment.
https://www.amazon.com/Rustark-Gundam-Building-Repairing-Fixing/dp/B071LB1T5D/ref=mp_s_a_1_3?ie=UTF8&amp;qid=1537979135&amp;sr=8-3&amp;pi=AC_SX236_SY340_FMwebp_QL65&amp;keywords=model+kit+nippers&amp;dpPl=1&amp;dpID=51KtR2rfa9L&amp;ref=plSrch
I don't have any of these tools and I don't have much money to spend on them. This is the first time I've seen this pop up on Amazon, so I figured I should ask here before I did anything else.
I got a set similar to this https://www.amazon.com/Rustark-Gundam-Building-Repairing-Fixing/dp/B071LB1T5D/ref=sr_1_2?crid=1NVWGU1Y2TD3K&keywords=sprue+cutter&qid=1571361112&sprefix=sprue+cutter%2Caps%2C338&sr=8-2
It has a sprue cutter and emery boards to sand down. If you take your time clipping you won't need to do much sanding with the emery boards. But you'll definitely need to file/sand down some edges to get pieces to fit more flush and to make the end result cleaner and not have little bits of plastic sticking out of seams. Hope you enjoy the build process!
You should really give it a shot! It's not that hard once you get into it, and it feels really good once you get your first model finished.
I have zero artistic talent, but started out with the Reaper Bones Learn to Paint Kit, and that worked out pretty well. You could also check out the G&S series Painter's Guild for tips as well.
Reaper starter set. Includes 3 minis so you don't wreck your Gloomhaven ones.
https://www.amazon.com/Reaper-Miniatures-08906-Learn-Paint/dp/B00NTMC49G/ref=asc_df_B00NTMC49G/?tag=hyprod-20&linkCode=df0&hvadid=198106869250&hvpos=1o1&hvnetw=g&hvrand=8376958937611519793&hvpone=&hvptwo=&hvqmt=&hvdev=c&hvdvcmdl=&hvlocint=&hvlocphy=9003454&hvtargid=pla-379995415869&psc=1
This is how I started https://www.amazon.ca/Learn-To-Paint-Bones-Kit/dp/B00NTMC49G/ref=sr_1_1?keywords=Reaper&qid=1566844721&s=toys&sr=1-1
I know its not D&D branded but it teaches some good fundamentals. also, https://www.reddit.com/r/minipainting/comments/39ui1s/rminipaintings_official_what_should_i_buy_guide/
Reaper has a Learn to Paint kit which may interest you. For brushes I just use cheap $2 brushes from my local hobby store, theyre imitation sable (which means fake hair, so not expensive) in sizes from 2 down to 000.
I would also strongly recommend looking into wet palettes if you get started- you can home make one insanely easy using some wet tissue and baking paper to keep paints from drying out.
I’m an amateur as well. I bought this and a nice set of brushes but really just YouTube video. I’m lucky to have a friend who is really talented at painting minis so he has given me a lot of pointers
Yeah! The base kit is [Reaper Miniatures Learn to Paint Kit](reaper miniatures 08906 learn to paint bones kit https://www.amazon.com/dp/B00NTMC49G/ref=cm_sw_r_cp_apa_yT80AbMDASHDX)
Gives you 2 brushes, paint, figures and instructions on painting.
Then you do the [layer up kit](layer up bones miniatures learn to paint kit reaper miniatures https://www.amazon.com/dp/B01N458GBK/ref=cm_sw_r_cp_apa_uR80Ab5SGKD34)
Its the Reaper Starter Set
Link to the kit on amazon:
Reaper Miniatures 08906 Learn To... https://www.amazon.com/dp/B00NTMC49G?ref=ppx_pop_mob_ap_share
I used this in combination with youtube videos when i started up. It was very helpful to follow the guide and use the exact paints on the exact miniatures so i could SEE the difference it was making.
Are you following any tutorials? I'm new to mini painting myself and may i suggest something? Reaper Miniatures Learn To Paint Bones Kit is what i bought and what i'm learning from. I think it might be worth trying out.
Here's my first mini, i'm working on the second one from the kit now : The Orc.
https://www.amazon.com/dp/B01MTXRU2L/ref=cm_sw_r_cp_apa_i_2jnBCb8EV962A
https://www.amazon.com/dp/B00NTMC49G/ref=cm_sw_r_cp_apa_i_rmnBCbM62FJ8M <--- I started with this one
Game Color Intro Set (16) https://www.amazon.com/dp/B000PHCTRK/ref=cm_sw_r_cp_apa_i_XnnBCbKRMBSGA <----a little bit pricey, but gives you more paints so....
As I stated, I got the reaper set to start with a few months ago and then just started buying citadel paints as I needed them to fluff up what I didnt have and I still mix my own colors for parchment and skulls, since I dont need that much of it.
Personally, I like citadel paints. I find they thin easily and flow nicely, and the colors are the official colors for the models. But I hate the pots they come in, so I bought empty 15 ml vials to pour them into.
If you can find a sculpt that fits with your character's description somewhat, that would be a good place to start. Hero Forge is kind of expensive to make mistakes on a first-time paint job (upwards of $20 USD). You can pick up a Reaperbones or Wizkids Nolzur's Unpainted packet for a couple of bucks (~$3-$4 USD) and those are much more affordable to make mistakes on.
As some other people have said, there are real, significant differences between craft acrylic paint and acrylic paint that's been specifically designed for painting miniatures. Higher pigment density, smaller particle size, etc. Reaper makes a nice learn to paint kit that has everything you'd need to get started, including a few of their Bones series minis. Might be worth checking it out. I've heard some of the colors don't always match what the description states though
Unfortunately I can't attest to how much it would cost for delivery outside of the US so that might suck
Pick up a reaper bones starter kit. They come with instructions and explain the starter techniques well. It also won't cost you a ton and you won't be super invested if the hobby turns out to not be for you. I got the kit yesterday and I haven't been able to put my brush down. Link for the kit: https://www.amazon.com/Reaper-Miniatures-08906-Learn-Paint/dp/B00NTMC49G
I'd go with the Reaper Bones Learn-to-Paint kit. It comes with brushes, 3 Bones miniatures, and paints as well as an instruction book to start teaching you the basics of of getting your paint on the figure, washing, and highlighting. If you like that kit they have a second kit that will teach you to layer.
I don't know if this will fit the citadel pots, but at less than half the cost it may be worth a shot. Plus you get some paints and some miniatures in a foam insert with a nice small hard case.
Edit: forgot to add the link to what I was talking about... https://www.amazon.com/dp/B00NTMC49G/ref=cm_sw_r_cp_apa_yj4-BbM2QFARM
Army painter starter set or reaper learn to paint those are both solid starter sets that are an excellent quality with a printed how to. Army painter comes with washes and reaper comes with practice minis and a case. I cant recommend anything more than these two. Between the two go with what ever one is cheaper on amazon that day, or who ever you decide to buy from
I bought one of the Reaper learn to paint sets (link below). I never painted the minis that came with it, but know people who have. The colors work well for beginners. Thee is a decent mix and a full spectrum. Supplement that with a few other reaper bottles and you have a good start collection of paints for like $50.
From there, I kept on buying one or two bottles at a time and now own a bunch of paints. I stopped for a whole but starting painting again just last night! It's fun and relaxing. My Saturday shift at my local game store is coming to a close in the next month, so with more time I hope to paint some more coming up!
https://www.amazon.com/Reaper-Miniatures-08906-Learn-Paint/dp/B00NTMC49G
I've also never painted before, can you recommend a good...starting place? Beginning kit, tutorial you found helpful? I've looked into kits like this one.
I've also considered getting into painting, and this might help me with that as well.
I was interested in just painting up a few of my plastic miniatures for fun, and to make them a bit more interesting.
Got this as a starter kit, even comes with a few minis to paint so you can practice before you get started on the ones you care about: https://www.amazon.com/Reaper-Miniatures-08906-Learn-Paint/dp/B00NTMC49G
I immediately bought a couple of extra colours, but it seemed like a pretty cost effective way to get started, and it comes with some instructions around technique, using the included miniatures as examples.
reaper starter kit.
If you buy from reaper (more than on amazon) then for every $40 spent free shipping and a free mini (changes monthly)
https://www.amazon.com/Reaper-Miniatures-08906-Learn-Paint/dp/B00NTMC49G
Being a noob to painting prints, this is what I plan to do as a start. I'm printing a lot of miniatures and terrain for table top RPG's. However, it depends what you want to print and paint I suppose. I've been known to use a rattle can with basic success.
https://www.amazon.com/dp/B00NTMC49G/?coliid=I2XLJWT8929NO3&colid=AFMF9PQZP81Y&psc=1&ref_=lv_ov_lig_dp_it
They look 10 times better than most of mine.. that are still on the sprue and in a box.
Also as far as paint goes. Find a local game shop if you can and see if they have a beginner set. I know Reaper has one that comes with a few minatures. GW also had something at one point. Also Army Painter had one that went with Zombicide.
Edit: links
Reaper Miniatures 08906 Learn To Paint Bones Kit https://www.amazon.com/dp/B00NTMC49G/ref=cm_sw_r_cp_apa_jQQJzbKXD9NDN
Games Workshop. Some of them have minis and some do not. If you do choose one without they have some great start collecting boxes.
https://www.games-workshop.com/en-US/searchResults?N=1088720681+3815114983
Army painter Zombicide sets
https://shop.thearmypainter.com/products.php?ProductGroupId=17
https://www.amazon.com/Reaper-Miniatures-08906-Learn-Paint/dp/B00NTMC49G/ref=sr_1_1?ie=UTF8&amp;qid=1483116351&amp;sr=8-1&amp;keywords=Reaper+learn+to+paint
For 35 bucks you get everything he will need in his very own kit.
You might be able to go cheaper at like 25 bucks buying Apple barrel and some cheapo brushes and a few cheap models but might as well spend the extra 10 and get paint that is intended for the hobby and a nice little carry case.
Thank you.
Here's the one I bought:
https://www.amazon.com/gp/product/B00NTMC49G/ref=oh_aui_detailpage_o04_s00?ie=UTF8&amp;psc=1
Yeah that's the one I believe! There is another kit with near the exact name that I was thinking of but they appear to be basically the same thing:
https://www.amazon.com/gp/aw/d/B00NTMC49G/ref=mp_s_a_1_2?ie=UTF8&amp;qid=1520570884&amp;sr=8-2&amp;pi=AC_SX236_SY340_FMwebp_QL65&amp;keywords=reaper+learn+to+paint+kit&amp;dpPl=1&amp;dpID=51TeFEhhzgL&amp;ref=plSrch
Responding to your comments mostly... sorry for the wall of broken up text..
Attaching a gopro is more about the thrust of the quad than the strength of the carbon fiber. I would guess you could attach one to either build.
They will both likely be "overpowered" for you, but yea you'll grow into it.
I would argue the Racerstar ESCs are also more reliable than the Eachines.
If that's the matek with the OSD that shows your battery voltage, it's a great PDB (around $13 right now I think).
Haven't used an F4 board yet, but recently upgraded to the SP racing f3 and I sure do like it.
Props are cheap anyways and you'll be buying more at some point.
The Monster FPV cam should work great for you, there's a $25 clone of the HS1177 on banggood that would also work well.
Your vTx looks good. Make sure your antenna match the vtx port (sma or rp-sma) and check whether you need male or female.
YES get the 65C batteries. Though that rating isn't held to a standard for marketing them, you'll want some nice high-C, 4S batteries. I suggest both these Tattu 4S 1300mah batteries on amazon for around $25 (the price changes), and those infinity graphene 4s batteries on banggood (though it looks like maybe they took them off their site?). Get a few batteries, you're not going to want to have to charge every 5 min of flight you get.
I hear great things about the IMAX B6 charger here, but I personally use this Charsoon Antimatter 250W charger and love it. I grabbed a nice balance/parallel board for it and can charge 4 batteries in about 45 minutes. Just get one that people haven't had many problems with, and learn to safely charge lipos. Otherwise, there's a fire risk.
I have both the EV800s and the VR D2s. Got them for the same price (~$50) and like the VR D2s a bit better. But really, the EV800s are great. Again, make sure you get the correct antenna upgrades.
If you'll want to be flying a lot right away, maybe try to get 4 batteries. Otherwise I'd start with 2 if that's all you can afford, and get more later.
I would replace the VTX you chose for the tx526 as you can change it's output power and it isn't as massive as the ts832 (you will most likely run into problems mounting it in the martian 220).
Like another commenter said, you should buy bigger motors, maybe rs2205s I can vouch that the rs2205s are practically indestructible and run very very smooth.
You should get 4s batteries, I use tattu 4s 1300mah 75c batteries on my martian 220 with rs2205s motors and just this week I got a shipment of cnhl Lipos.
You should get VR-D2 Pros goggles, they are much better bang for buck, diversity+dvr for 90$.
Man, you don’t fly much RC do you. https://www.amazon.com/dp/B013I9T0T6/ref=cm_sw_r_cp_api_7BnUBbJP8FSQT RC lipo packs are literally multiple pouch cells glued together, leads soldered to the end tabs. Definitely no circuits of any kind, and no hard case.
Ive flown well over a thousand hours of RC, built quite a large number of fixed wing and multirotor UAVs for fun, and I’ve worked on multiple large electric aircraft in my career. I am speaking from experience.
The bottom line is that SUAS / manned aircraft collisions are going to do a substantial amount of damage, as this study and others that test ingestion into turbofans (for example) demonstrate. But it’s silly to think of SUAS batteries as a bomb that will inevitably go off and start a fire. It’s possible, just like Jet-A fires are possible, under the right circumstances.
I would recommend wraith32 escs if you're going to spend that much money. They support a higher dshot and are rated for more amps.
https://www.fpvmodel.com/wraith32-32bit-35a-blheli_32-esc-dshot1200_g1271.html
You should get a Pagoda-2, it's designed to work with a case which protects the axial ratio of the antenna.
https://www.banggood.com/5_8-GHz-Pagoda-Omnidirectional-FPV-Flat-Panel-Antenna-LHCPRHCP-SMA-Male-p-1159835.html?rmmds=search
And lastly those batteries are good but they're cheaper on amazon
https://www.amazon.com/Tattu-Battery-1300mAh-14-8V-Airplane/dp/B013I9T0T6
> I ended up with a bunch of 550mah 3S batteries: can I use them to tinker with this build?
I suspect you would get a minute of lackluster performance from those batteries on a 5" quad. However, those are great bats for a 2" build. So save them.
> Battery options once I'm 100% ready to fly?
Amazon sells Tattu and Infinity Graphene 1300 mAh 4S batteries that would work well with your rig. Ensure you get a high C rating (60+).
> Prop options?
Those DAL props are great. Other options are the HQ 5x4.3x3 props.
> Extra wires?
I have never needed to buy extra wires. You'll collect plenty from parts you buy.
> I feel much more comfortable dealing with this kind of merchant.
There are other reputable merchants with US stock at competitive prices. Examples are heli-nation.com, getfpv.com, racedayquads.com, etc. The amazon/ebay merchants are mostly just buying from the overseas guys and upping the price. But I understand the sentiment.
As far as checking your build. You'll probably need to buy an XT60 connector and wire to solder to the FC/PDB (Like these). You'll need need some battery straps (Like these). You'll need a vtx antenna (rec: Foxeer).
Do you have a battery charger?
Do you have FPV goggles?
You're spot on for the propeller measurements. One thing to keep in mind is almost everyone runs 5" props, so you'll have a lot more options if you build based around that. The only benefit you can find from 6" is if are intentionally trying to do efficient flying for more time, otherwise you won't really see much of a difference.
The additional benefit of smaller props is that you can go a bit smaller on your build, which means less force across the frame when you land and less breaking. I find that 4mm arms are the sweet spot for durability, 3mm is just a little bit low for anything above 150mm. Removable arms are even better while learning, so you don't have to replace the entire frame if one breaks.
I have normal Prime, but not sure if the stuff that shows as Prime eligible for me is the same as the one-day eligible stuff for you. That being said, if I had to build a drone from Amazon right now, I'd go with:
Frame 1 or 2 (actually have this one from a previous build)
ESCs (I prefer separate ESCs rather than 4-in-1 or all-in-1 in case anything breaks)
Flight controller
PDB
Props 1 or 2 depending on what your motors can handle, should be able to do either based on that kv and measurement
Receiver (assuming you get the QX7)
Video transmitter
Camera
Batteries
Charger
Balance board for charging multiple batteries
Left out motors since it sounds like you have some in mind. This kind of build will have plenty of power, probably hover at around 30% throttle if I had to guess, so just keep that in mind. You can tone it down manually by getting some less aggressive propellers, in the flight controller max throttle, or on your transmitter max throttle, but I recommend just getting used to it. Also mess around in simulators, there weren't any when I started out and I would have probably saved a few hundred in parts if they were (though parts back then were like 8x the cost they are today).
I live in Canada also :P
That's still cheaper though, I'll keep that in mind for next time. Thanks.
https://www.amazon.ca/Tattu-Battery-1300mAh-14-8V-Airplane/dp/B013I9T0T6/ref=sr_1_1?ie=UTF8&amp;qid=1505498334&amp;sr=8-1&amp;keywords=tattu
1300mAh 75C and 1550 mAh 75C. This is my first build and my FC is about a month out so I couldn't tell you how they fly, but the reviews are decent and they're an okay price, even with the Amazon Tax.
I have these. They're pretty nice but way too heavy for the small little nose piece. I have to take breaks from them. I think I'm just going to a regular old magnifying glass and light on a stand for my desk.
I bought one from amazon that was prettys wide and it still didnt work.
Give this a try! It works for me:)
https://www.amazon.com/dp/B01H8808H6/ref=cm_sw_r_other_apa_Guuvzb7QXP4D4
Hehe I’m still relatively new too. And I too make polymer clay things, the tiny stuff really does hurt your eyes. I bought one of these things as it helps for the tiny stuffs: head mount magnifier
I believe this is the one:
https://www.amazon.com/Yoctosun-Magnifier-Professional-Jewelers-Interchangeable/dp/B01H8808H6/ref=pd_lpo_vtph_328_bs_t_1?_encoding=UTF8&amp;psc=1&amp;refRID=TCHXY0SG58VH85TADDJT
I use these. I frickin' live in them when doing electronics. They fit over my glasses, and work really well straight out of the box.
https://smile.amazon.com/gp/product/B01H8808H6/ref=oh_aui_search_detailpage?ie=UTF8&amp;psc=1
they're ok, but they don't offer much magnification and the led is finicky. there's a makerspace by me with a microscope and it makes me really want my own for small smds, but i think you can get down to 0805s at least without needing that, and i dont need to go smaller than that yet
I use https://www.amazon.com/gp/product/B01H8808H6/ref=oh_aui_detailpage_o07_s00?ie=UTF8&amp;psc=1
Yeah, I wasted so much paint on my partchment paper pallet prior to buying the wet pallet. I dunno what I was doing... I was planning on making one out of tupperware, but couldnt find a sponge at Michaels, so just bought it instead.
I actually purchased a jewelers headset that I love, https://www.amazon.com/gp/product/B01H8808H6/ref=oh_aui_search_detailpage?ie=UTF8&amp;psc=1
It has a light and interchangeable lenses from 1x to 3.5x
If you're not into painting - the first bundle is fine if you're willing to put the money into it, the other bundles are too much for a beginner IMO
Something like:
https://www.amazon.com/Miniatures-Highlighting-Miniature-Army-Painter/dp/B01MTXRU2L/ref=sr_1_4?ie=UTF8&amp;qid=1518146756&amp;sr=8-4&amp;keywords=army+painter+kit
Is a cheaper entry point - look for something in the same category as this, the primary colours + a few extras, a shade and a standard sized paint brush
This way you can try out painting and if you enjoy it, you can add to it from there, while not investing as heavily as the suggested bundles in the link are asking
Another option ~
https://www.amazon.com/Games-Workshop-60-22-Base-Paint/dp/B00KOCXDT4/ref=sr_1_2?ie=UTF8&amp;qid=1518147023&amp;sr=8-2&amp;keywords=citadel+paint+kit
Any paints from Army painter/Citadel/Vallejo are great places to start, just get whatever's got the best deal on at the time.
Only other suggestion would be to get a spray undercoat such as
https://www.amazon.com/Army-Painter-CP3001-Base-Primer/dp/B005WH3LVG/ref=sr_1_1?ie=UTF8&amp;qid=1518147186&amp;sr=8-1&amp;keywords=miniature+undercoat+spray
Undercoat sprays make painting a mini MUCH easier and MUCH quicker, however, if you are only painting the bases and not any detail on the mini, you can get away with no undercoat spray
(You can get cheaper sprays but I find when you're new, picking one model paint brand and sticking to it to start with makes things easier to manage)
I've just grabbed links from Amazon, but you can find these products all over the place
Can't argue with the price. If you're looking to upgrade a little bit, this might be a nice next tier for you. https://www.amazon.com/Army-Painter-Miniatures-Highlighting-Miniature/dp/B01MTXRU2L/ref=sr_1_7?keywords=army+painter&amp;qid=1565736973&amp;s=gateway&amp;sr=8-7
and these paint handles are so nice https://www.amazon.com/Games-Workshop-Warhammer-Citadel-Painting/dp/B077DMTJ2V/ref=sr_1_2?keywords=citadel%2Bpaint%2Bhandle&amp;qid=1565737114&amp;s=gateway&amp;sr=8-2&amp;th=1
I’ve used cheap paints and they range in usability. The folk art paints at Walmart are not too bad as long as your willing to do 3 or 4 coats. Those ones you’ve got there look like the ultra cheap stuff which I couldn’t even to get to show up on the models.
My recommendation is just buy the good paint, your spending 60+ usd on models. I just buy a few paints at a time as I need them. Go buy 3 colors you want for your army and go from there. Those cheap paints are just going to frustrate you.
Edit: go with something like this
You recommend something like this set?
https://www.amazon.com/Miniatures-Highlighting-Miniature-Army-Painter/dp/B01MTXRU2L/ref=sr_1_3?ie=UTF8&amp;qid=1525713641&amp;sr=8-3&amp;keywords=army+painter+starter+set
Your advice was welcomed. I ordered this kit...
https://www.amazon.com/gp/product/B01MTXRU2L/ref=ppx_yo_dt_b_asin_title_o01_s01?ie=UTF8&psc=1
...along with some primer, brushes, palette, and a head mounted light with magnifier. I'm sure I'll need more paints and washes, but figured I'll see what I can do with that kit before trying to get more so I can see exactly what I need and why. And yes, I plan to watch a lot of Youtube stuff. It's so handy for learning. Thank you. I'll try to remember to post a picture after I complete my first one.
I just started painting too and opted for this set: https://www.amazon.co.uk/gp/product/B01MTXRU2L
Biggest issue so far is that the red is super watery so takes a lot of layering to get any pigment on to the model. No idea if this is typically an issue for reds or if its this brand.
Will these have everything I need? https://www.amazon.com/gp/aw/d/B01MTXRU2L/ref=ox_sc_act_image_1?smid=AU2FNATHSFHNB&amp;psc=1
If you have $100, this will have you covered for a while. Also, this is pretty basic but might do you. You would just need to pick up a wash.
Thanks! So I use citadel spray on white primer, and then I have the army painter paint set that I couldn't recommend enough
https://www.amazon.com/Army-Painter-Miniature-Painting-Wargamer/dp/B01MTXRUUT/ref=mp_s_a_1_3?adgrpid=54742839303&amp;gclid=CjwKCAjwkenqBRBgEiwA-bZVtnMSLzgS5Nhec703D93n9XCBfZcWdlkHiu4aqhzNr9cuITI3yLnPnxoCmewQAvD_BwE&amp;hvadid=274701151352&amp;hvdev=m&amp;hvlocphy=9009970&amp;hvnetw=g&amp;hvpos=1t1&amp;hvqmt=e&amp;hvrand=12190172592698759649&amp;hvtargid=kwd-302312447411&amp;hydadcr=26678_9635621&amp;keywords=army+painter+mega+paint+set&amp;qid=1566224483&amp;s=gateway&amp;sr=8-3
Once you get past assembly (the advice here already is great!), you'll want to look at paints. Do yourself a favor and get a good primer (around $15, I use Army Painter flat black primer), and then 3 brushes (kolinsky sable is the best, but regular sable works fine too). Get a size 0, 1, and 2. Do not get super cheap brushes, but you don't need way out expensive brushes either. $8-12 a brush should be your target.
Then you've got to choose paints, and this will boil down to personal preference. Vallejo makes great paints, as does P3 and Army Painter. I'm not wild about Games Workshop's paints.
This is a great value, if you decide you like their paints.
Any brand recommendations?
Found this brand on amazon, are they reasonable? https://www.amazon.de/dp/B01MTXRUUT/ref=cm_sw_r_cp_apa_aF0CAb1NRA68T
Also the link you give sells the set for 189 dollars. I've got it for much much less on Amazon (in France) : 95 € (105 dollars) :
https://www.amazon.fr/Army-Painter-Peinture-Miniature-Warpaints/dp/B01MTXRUUT/ref=sr_1_3?__mk_fr_FR=%C3%85M%C3%85%C5%BD%C3%95%C3%91&keywords=army+painter&qid=1568376715&sr=8-3
I started with the army painter set on Amazon. Was like $80 but came with 50 colors some washes and a few metallic paints. They are fairly easy to use because they come in dropper bottles and are pretty thin on their own. I'll try to find the Amazon link if possible.
https://www.amazon.com/Miniature-Painting-Bonus-Wargamer-Regiment/dp/B01MTXRUUT/ref=mp_s_a_1_2?ie=UTF8&amp;qid=1550464178&amp;sr=8-2-spons&amp;pi=AC_SX236_SY340_FMwebp_QL65&amp;keywords=army+painter&amp;psc=1&amp;smid=AU
A little more expensive then I thought but is good bang for your buck. It is less then $2 per paint. That is very cheap for the quality and amount you get.
Probably not what you mean, but if you buy the 50-pack it comes to less than $2/bottle
The Army Painter Miniature Painting Kit with Bonus Wargamer Regiment Miniature Paint Brush - Acrylic Model Paint Set with 50 Bottles of Non Toxic Model Paints - Mega Paint Set 3 https://www.amazon.com/dp/B01MTXRUUT/ref=cm_sw_r_cp_api_i_vGxACbVGZFHTC
I have that kit on my wishlist! https://www.amazon.com/Miniature-Painting-Bonus-Wargamer-Regiment/dp/B01MTXRUUT?pd_rd_wg=QF5Rt&amp;pd_rd_r=7a84c3db-6700-457e-8491-a869aacf9454&amp;pd_rd_w=xlczg&amp;ref_=pd_gw_wish&amp;pf_rd_r=56ZBVAA7D63S6X3AWP8Y&amp;pf_rd_p=51143653-d574-5e14-a08c-77ccfb46e5ba. I may just opt to buy them as I need, but what kind of painting do you do?
I'll post it here, so others can see.
Paint: Miniature Painting Kit with Bonus... https://www.amazon.com/dp/B01MTXRUUT?ref=yo_pop_ma_swf
Brushes: MyArtscape Detail Paint Brush Set -... https://www.amazon.com/dp/B010QLOJ3G?ref=yo_pop_ma_swf
Printer: Monoprice Mini Delta 3D Printer With... https://www.amazon.com/dp/B07CJQ3D6L?ref=yo_pop_ma_swf
This is pretty good value if you really want to cover all your bases colour wise, then pick up some brushes and a can of primer.
I would however suggest going slow so you don't end up with a bunch of paints you don't need, I started with this, a little pot of citadel primer and those 4 brushes because it had all the colours I needed at the time. Now I just buy colours when I need them - normally a dark base and lighter same colour for highlighting. You don't really need $100 of paints when you can just buy what you need. Put whatever is left over towards an airbrush and compressor even if you only use it to prime.
I only have 14 colours, 3 shades, 1 environment, 2 mediums, a varnish and 2 primers and I use them all but never really feel like I am missing colours so don't waste money on 50 paints when half that will do.
are you talking about this? https://www.amazon.com/Miniature-Painting-Bonus-Wargamer-Regiment/dp/B01MTXRUUT/ref=sr_1_4?s=toys-and-games&amp;ie=UTF8&amp;qid=1526122414&amp;sr=1-4&amp;keywords=army+painter
Which brand should I use
The army painter https://www.amazon.com/gp/aw/d/B01MTXRUUT/ref=mp_s_a_1_1?ie=UTF8&amp;qid=1511569196&amp;sr=8-1-spons&amp;pi=AC_SX236_SY340_QL65&amp;keywords=vallejo+paint&amp;psc=1
Or Vallejo game paints https://www.amazon.com/gp/aw/d/B009LH0YTA/ref=mp_s_a_1_1?ie=UTF8&amp;qid=1511568873&amp;sr=8-1&amp;pi=AC_SX236_SY340_QL65&amp;keywords=vallejo+game+color+paint+set&amp;dpPl=1&amp;dpID=41tGFD4Os0L&amp;ref=plSrch
Army Painter is a separate brand from Vallejo. They make a wide variety of colors (they have their own range), not just limited to the colors you mentioned here.
Perhaps /u/mrgraverisen meant something like this https://www.amazon.com/gp/aw/d/B01MTXRUUT/ref=mp_s_a_1_1?ie=UTF8&amp;qid=1500230839&amp;sr=8-1&amp;pi=AC_SX236_SY340_FMwebp_QL65&amp;keywords=army+painter+mega+paint+set
I believe I have finally decided on my first Gunpla, the HG Age II Magnum and want to make sure the items I have added to my Amazon cart are ideal or not for a beginner/future use for HG and MG kits. The list is as follows:
I know that this sub has a list of tools and tutorials, but because I'm trying to budget, I was thinking no more than $100 would be ideal for me to start with. Since I'm beginning with HG models, I don't think I need a full set of Gundam markers, but if it's needed/required/highly suggested, I might pick them up as well.
So I have read and seen that top coating and panel lining are essential for MG models to make them pop. Are they just as essential for HG model kits? Looking at pictures of the Age II Magnum I'm planning on getting from Amazon, it doesn't seem to have a lot of indents for panel lining. Of course, I could be wrong and be blind as a bat. If I don't do any sort of panel lining, is it still a good idea to add a top coat regardless?
Also, how soon can one get into MG kits? I was originally going to jump straight into either the MG GM Sniper II or the RX-78-2 Ver 3.0 but after doing some research over the past few days, I've decided I'll be doing a few HG's to begin with as I haven't built model kits since I was like 7 or 8 with my dad. I'm thinking after the Age II Magnum, I was thinking about getting either the HG Double O Diver or the HG 00 Shia Qan[T]. Maybe after I complete the 3 HG's I've listed, is it possible to jump to the the GM Sniper II?
TL;DR:
You can search depending on your budget. This and this is a $20 set.
Something like this is good to start with. If you like the hobby, you can always get better, more expensive tools from there: https://www.amazon.com/Rustark-Gundam-Building-Repairing-Fixing/dp/B071LB1T5D/ref=sr_1_20?ie=UTF8&amp;qid=1541540564&amp;sr=8-20&amp;keywords=hobby+tool+set
get something like this, with the drills maybe in your local measurements.
then a set of files like this or a complete set like that. than this strange substance.
consider this in case he gets funny. some collection of magnets like those. prices vary drasticly, again go for local measurement system. he will probably need 1x1mm, 2x1mm, 3x2mm. just check if the drills you got and the magnets fit size wise and the magnets have to be neodynium.
&#x200B;
i am not very familar with skaven so i cant give much advice on models but i assume this one will make him happy. it qualifizes for "anything really cool", can be used to build different things he might like and you can use the stuff mentioned above to fill out the rest of the budget if you like.
&#x200B;
this overrated book vendor in the links was just used as example of product and quality and prizes of products will vary drastically. with this stuff you cant make too much wrong with going cheap.
somebody from your country might offer you a good vendor. i cant really suggest specific products since they maybe are not availlable where you are from.
&#x200B;
my most sincere condolences that you lost your partner to plastic crack :(
Getting back into the hobby, I'd recommend a kit off amazon: https://www.amazon.com/Rustark-Gundam-Building-Repairing-Fixing/dp/B071LB1T5D/ref=sr_1_4?s=toys-and-games&amp;ie=UTF8&amp;qid=1550287251&amp;sr=1-4&amp;keywords=model+kit
this has served me well
A pin vise and a range of bit sizes is always nice. Lots of kits require you to drill holes in pieces, and not having a pin vise is an issue.
I personally have 6 or 7 tweezers, ranging from flat head to needlepoint to 90*. Probably don't need that many, but having both straight and curved are a good option.
Nail sanding sticks from the beauty section of most stores is good. A set of files is also nice for hard to reach areas and curved pieces.
This is potentially a good starter set. It lacks a pin vise though, although you can easily find one on Amazon as well. I recommend a 0.3 - 1.5 mm range of bits if possible. I also don't know your budget, so this could be too expensive.
Amazon. There are kits that are sold with side cutters, files, nail polishers. Just about anything you could need for a build. https://www.amazon.com/Findfly-Gundam-Building-Repairing-Fixing/dp/B071LB1T5D/ref=sr_1_1?ie=UTF8&qid=1527227248&sr=8-1&keywords=gunpla+tool+kit
Here is the desktop version of your link
You need a sprue trimmer my friend.
http://www.amazon.com/Xuron-2175ET-Professional-Sprue-Cutter/dp/B001TMZ7QA
For the same money almost you can get one that's meant to cut sprues. I don't have a pair yet myself but I've heard good things.
https://www.amazon.com/Xuron-2175ET-Professional-Sprue-Cutter/dp/B001TMZ7QA/ref=sr_1_cc_1?s=aps&amp;ie=UTF8&amp;qid=1527554871&amp;sr=1-1-catcorr&amp;keywords=sprue+cutter
https://www.amazon.com/gp/product/B001TMZ7QA I think you can use pretty much anything for the first cut, just be careful that you're not stressing the plastic below as you cut. Before I got the Xurons I used wirecutters (the Xurons are a big step up). But I'd say that first cut is usually thicker plastic (and there's more tension, don't know if that is relevant), so it's going to wear your nippers more. If you're asking whether GP or Tamiya work well for both cuts, I can't speak to that, but I think any tool you use for both is going to wear faster. In that case maybe be prepared to sharpen your nippers (I just sharpened my Xurons after ~9mos and I notice a difference).
Back again with another question.
I'm still working on my second gunpla, and I feel like I'm spending an exorbitant amount of time sanding, and I'm wondering if I'm cutting the nubs too long. I have to spend a moment with 400 grit sandpaper just to get them down to a manageable size.
I've tried to cut down a bit closer to the gates while still leaving the part undamaged, but my cutters often will slip down as I cut and sometimes will mar the plastic. [These] (https://smile.amazon.com/gp/product/B001TMZ7QA/ref=oh_aui_detailpage_o01_s01?ie=UTF8&amp;psc=1) are the ones I'm using, I'm not sure if its a technique error or the cutters.
[Here] (https://i.imgur.com/XD2RAqc.jpg) are couple examples of parts that I cut out. Any thoughts on if I need better cutters (I hope not!) or if there is some element of technique I'm doing improperly.
Its somewhat frustrating me because as I sand down the nubs sometimes one of the others on the part will get bumped by me somehow and due to the size of the nub and the leverage on the plastic it will snap off and leave a really bad mark just as if I snapped it off the runner.
I use the Xurion 2175et. They make really clean cuts with minimal effort. Easily the best clippers I've ever used.
green stuff
You can order it off of amazon or ebay, like at this link here:
http://www.amazon.com/Green-Stuff-Yellow-Epoxy-Putty/dp/B002MB61RQ/ref=sr_1_1?ie=UTF8&amp;qid=1465180253&amp;sr=8-1&amp;keywords=green+stuff
It's also often called "Two part epoxy putty"
This link leads to a gap filler made specifically for this issue! You mix the yellow and blue to make the green ckay-like substance that fills in any gap!
https://www.amazon.com/Green-Stuff-Yellow-Epoxy-Putty/dp/B002MB61RQ/ref=mp_s_a_1_1_sspa?adgrpid=58824589151&amp;hvadid=274732491114&amp;hvdev=m&amp;hvlocphy=9015551&amp;hvnetw=g&amp;hvpos=1t1&amp;hvqmt=e&amp;hvrand=10939296767922561980&amp;hvtargid=kwd-299414241990&amp;hydadcr=28696_10176914&amp;keywords=green+stuff&amp;qid=1567476058&amp;s=gateway&amp;sr=8-1-spons&amp;psc=1&amp;smid=A3D3WXKRRQPHZM&amp;spLa=ZW5jcnlwdGVkUXVhbGlmaWVyPUFSTU0wMURGVVA4RkomZW5jcnlwdGVkSWQ9QTAxNTg5NjkyMFRVM0dIVjlRVEZRJmVuY3J5cHRlZEFkSWQ9QTAyNzk2NzEyMzRQUEhBN0UyUkNKJndpZGdldE5hbWU9c3BfcGhvbmVfc2VhcmNoX2F0ZiZhY3Rpb249Y2xpY2tSZWRpcmVjdCZkb05vdExvZ0NsaWNrPXRydWU=
I buy Kneadatite green stuff recommended from r/minipainting.
It's $13 for a tube that's at least 3x larger than GW green stuff. Added benefit is that the Blue and Yellow are in separate packages, so it never goes bad.
Amazon Link
green stuff https://www.amazon.com/Green-Stuff-Yellow-Epoxy-Putty/dp/B002MB61RQ
https://www.amazon.com/Green-Stuff-Yellow-Epoxy-Putty/dp/B002MB61RQ this or something similar. I usually buy at local shops because some of them have it cheaper than online does though.
I have been using 1" plastic squares that I got on Amazon. I'd seen a few Kickstarters for stampers to put a pattern onto bases. I figured I could make my own.
I used the Clay to make my positive. I made one of a cobblestone and another of bricks. They are much larger than the size of the base so that I can use any portion to create the impression.
I then used this low melting point plastic. Soften it up and then press it into the clay pattern. Now I have a negative that I can use over and over.
I then got some Green Stuff. Put it on my 1" square base and then gently press into my negative image. Now I have a positive and I can let that setup and glue/pin my mini to the base.
http://www.amazon.com/Green-Stuff-Yellow-Epoxy-Putty/dp/B002MB61RQ
Its a 2 part moldable "plastic"
You mix equal parts, mold it into shape, and when it dries it can be painted and to a lesser extent, sanded.
Personally, and this is just conjecture because I haven't started painting my miibos yet, but I'd just do what I do for miniatures. Get some acrylics, thin them to the consistency of skim milk, put on a ton of coats. With regard to sculpting hit up a hobby shop and ask for "Green Stuff."
http://www.amazon.com/Green-Stuff-Yellow-Epoxy-Putty/dp/B002MB61RQ
http://www.bananaking.net/cento/workshop/conv_green.htm
Don't use polymer clay. It melts plastics and I wouldn't want to test it on these. I believe they're vinyls but I don't know how it interacts.
If you're shy on painting head on over to /r/minipainting and soak up some knowledge. The features on the amiibos are larger but the techniques should carry over.
use a scalpel and side-cutting pliers to carefully cut the base out of the mini leaving just a small piece around the feet.
Get some blank bases and use green stuff to create your 3d cobblestone texture. The exceeding plastic under the feet will help to keep the mini steady and will be completely covered by the green stuff.
I don't have any "methods," since I've never tried to sculpt individual feathers (just a feature "texture" on wings). But I'd suggest using green stuff or a similar two-part epoxy putty, if you weren't already. It holds detail amazingly well and dries almost as hard as plastic, while being much less brittle than modeling clay. Something that protrudes off the edge of a model (like, I'm guessing, your feathers) could still get snapped off, but during normal play, or even if you drop the model from a reasonable height like a game table, it should be totally fine. I'm not a sculptor by any means, but that's the best material I know to recommend.
But as for a "way to sculpt or apply feathers" once you have the green stuff, I'm not sure, and it would depend on how big you want the feathers to be. I can attach some pictures of a project I'm working on to give you ideas, if you want, but I haven't yet added any free-standing feathers. They're molded directly onto the wings of the model, so I don't have to worry about them breaking off.
a very thick and very tacky idea is green stuff
http://www.amazon.com/Green-Stuff-Yellow-Epoxy-Putty/dp/B002MB61RQ
mix the blue and yellow and make green clay that sticks to plastic
TURN THAT FROWN UPSIDEDOWN, FRIEND! D: ---> :D
I think this rc heli would cheer you up! :3
My boyfriend really wanted this for his birthday, but I lost my job and I couldn't afford it. Yes, he is a child at heart. He's really 25, and he said he would take a "derp" photo.
edit: um... he's 26 now, hence the birthday. woops.
http://www.amazon.com/Syma-S107-S107G-Helicopter-Yellow/dp/B004A8ZRB0/ref=sr_1_1?s=toys-and-games&amp;ie=UTF8&amp;qid=1324983043&amp;sr=1-1
marked down from over $100
This.
Everything else on my list has some purpose or use... this... well I just thought "I want a helicopter!"
$20 RC mini helicopter!
My brother got one and its pretty cool flying around with precise control
Syma S107/S107G R/C Helicopter
One of the coolest things I've bought in the past long time, and it's only $20.00.
http://www.amazon.com/Syma-S107-S107G-Helicopter-Yellow/dp/B004A8ZRB0/ref=sr_1_2?s=toys-and-games&amp;ie=UTF8&amp;qid=1342975319&amp;sr=1-2
The PG looks to be the Strike Freedom
Second from left is the Sazabi Ver. Ka
Far right is one of the Unicorns, maybe Full Armor? Not sure about far left or second from right.
I can relate to that. I've never really had a SAL package go missing or get damaged, but its worth the peace of mind to go for the more expensive options on more valuable purchases.
I actually purchased my Sazabi Ver Ka locally (even though it was 60$ more expensive) because I was mortified that the box would get dinged up due to its sheer size, so I wanted it to travel as small a distance as possible.
Sorry, I meant to say MG (Master Grade):
Bandai Hobby MG Sazabi Version Ka Model Kit (1/100 Scale) https://www.amazon.com/dp/B00EOEBG2Y/ref=cm_sw_r_cp_apa_i_-GOPDbSXK9MWN
Bandai Hobby MG Sazabi Version Ka Model Kit (1/100 Scale) https://www.amazon.com/dp/B00EOEBG2Y/ref=cm_sw_r_cp_apa_AM1NAb889NPRG
Update: its now almost $90
As a few others have mentioned, the MG Sazabi Ver. Ka is the companion kit to the Nu Ver. Ka. Right now it is $85 on amazon, which is $15 above your price range. However, $85 is a great price for the kit considering the lowest price it has been on amazon was $74. As a side note, I have to say the Sazabi Ver Ka is one of the best kits I have ever built.
Another option is the Hi-Nu Ver. Ka. It is an alternate version of the Nu Gundam (the one that you linked). From what I understand, the Hi-Nu is an amazing kit, and is currently $73 on amazon.
Keeping in the same set of kits, you can get several SD kits. They are smaller cuter versions of the full kits and are much cheaper and easier to build. Plus getting three of them will cost about $40. Here are the links:
Nu Gundam SD
Sazabi SD
Hi-Nu Gundam SD
I hope this helped. If you can find out more about which series they like, we can offer more suggestions.
I think these might be more of a challenge. Hope the links work. http://www.amazon.com/Bandai-Hobby-Sazabi-Version-Model/dp/B00EOEBG2Y/ref=sr_1_1?ie=UTF8&amp;qid=1449005374&amp;sr=8-1&amp;keywords=sazabi+ver+ka http://www.amazon.com/Bandai-Unicorn-Gundam-Ver-Ka-Master/dp/B005QKF860/ref=sr_1_9?ie=UTF8&amp;qid=1449005374&amp;sr=8-9&amp;keywords=sazabi+ver+ka http://www.amazon.com/Bandai-Hobby-Sengoku-Astray-Gundam/dp/B00HD4ILWK/ref=sr_1_2?ie=UTF8&amp;qid=1449005701&amp;sr=8-2&amp;keywords=Sengoku+Astray+Gundamhttp://www.amazon.com/Bandai-Hobby-Gundam-Model-Astray/dp/B0042VJ018/ref=sr_1_12?ie=UTF8&amp;qid=1449005374&amp;sr=8-12&amp;keywords=sazabi+ver+ka
Well, the only things you really need to build a kit are a pair of hobby clippers and motivation. Everything else is optional, depending on how much effort you wanna put into making your model look as best as possible(hell, I used nail clippers of all things with my first gunpla because I didn't want to invest in tools before actually building one for myself and knowing if this was a hobby I wanted to pursue or not).
For this one I actually got a modeling toolkit, some Gundam markers for panel lining and a small cutting mat through amazon(although you might be able to find them at local hobby stores as well). I can't really speak for other tools, but these ones worked pretty well for me. If you're worried about costs you can always start with just some basic tools and slowly build your toolbox up from there as you build more models. Hopefully you have as much fun with your first gunpla as I had with mine!
P.S. Remember I'm also a newbie so take all of this with a grain of salt
Gundam Marker Value Set -GM01&amp;amp;amp;amp;02&amp;amp;amp;amp;03- (Black, Gray, Brown) https://www.amazon.com/dp/B00HY93GHY/ref=cm_sw_r_cp_api_y0ZqxbBYCHNCM
Three pack of the two pens you have to $9 with Amazon Prime vs the ~$11 for just the grey and black. Saves a buck or two with an extra pen.
Using these for my first build, easy for panel lining. Just have some Q-tips ready for removing excess ink that you don't want, and some IPA for redos.
I bought the same mat and I have no issues with it!
EDIT: I also have the same cutters, works great for me. For the Xacto knife, just want to point out that that one does NOT come with a cap (I made the same issue). There is a version with a cap, then you can just add an extra blade set. Make sure you get the right blade size. That there is a #1.
EDIT2: I got the same sandpaper too lol. I wish I had gotten files since I didn't have something hard to attach the sandpaper too. But that's my preference. Well I don't mean I would want files specifically, but holding a flimsy piece of sand paper to sand hasn't been fun. I need to get some sort of small block to tape it too or something.
Hey guys! Just found this sub, but I've been wanting to get into this hobby for a while. Planning on going with this one to get my feet wet.
Before I buy it, I'm also planning on getting these markers and these wash's (both from the wiki). Can someone show me to a video tutorial that explains exactly how to use them please? I've got no idea what the wash's are for...
I might also pick up this scriber to try and do some battle damage, but I can't find any tutorials on that? I'd also need some paint...
Is there anything else that I'm missing? I've already got decent angle cutters and an Xacto knife.
Thanks!
U. Just found the tutorials link that covers lining, but I could still use some info on adding battle damage!
I think something like this with the three basic colors is pretty good to start with, they'll probably last several kits until you want to start experimenting with paints.
I used gundam panel lining markers. Brown for the reds and gray for everything else. I ran over all my lines with some alcohol on a qtip to makes them less heavy.
Hey everyone!
I'm as new as it gets. So, I made a shopping list after doing some research on everything that I think I need to start. I'll place the links to all the items in the lines below. Everything is on Amazon because... well why not?
Gundam
Glue
Marker
Tweezers
Knife
Cutters
Mat
More Markers!
*Krylon Matte Finish
Am I missing anything?
The gear I used for this, plus the kit itself, I all got from Amazon.
A Basic Modelling Tools Kit and the Gundam Marker Value Set.
I agree that in terms of "cost per hour" gunpla isn't that bad at all. As for why I've dropped so much, I've got a friend who is deployed to Korea right now. He's only going to be out there 6 more months, so I asked him to send me a bunch of stuff- 11 kits totaling $270. So yeah, that hurt the wallet, but it means I'll be able to focus on buying supplies like paint and tools for a while!
I just got my panel markers actually. Ordered off Amazon and didn't notice that they were an item that was shipped from Japan. The set only cost $6 for gray, black and brown, but it took 6weeks.
Newtypehq has them at $3 each, but if you are in the states shipping is quick.
https://newtypehq.com/products/gundam-marker-liner-type?variant=14993675681841
If you're ok waiting, here's the link for the seller I bought from.
https://www.amazon.com/gp/aw/d/B00HY93GHY/ref=ya_aw_od_pi?ie=UTF8&amp;psc=1
For beginners the HG RX 78-2 Revive is a great kit for starting. Few stickers, and nice part color separation. It's 1/144 scale, so just take your time to avoid breaking any parts.
$10 USD - amzn.com/B00WW4F8YA
You can also get some panel lining Gundam Markers to help highlight vents, details, parts of interests, etc. The RX 78-2 is a good kit to also practice panel lining.
$9 USD - amzn.com/B00HY93GHY
As for tools, something like this should get you by for now since you're just starting the hobby. Has everything you need to get building.
$17 USD - amzn.com/B01GHA6C7G
If you plan on doing a lot of kits in the future, I'd just invest in some Gundam Markers. They're $10 for a set of black, gray and brown. Or if you just want black and gray, they're only $7.50.
Pfft, I wouldn't recommend building one right off the bat anyways. That's a lot of fiscal and emotional investment for something that's gonna crash and burn in the first couple months anyways. There's a bunch of cheap, wonderful, learner 'toy' grade ones out there to whet a curiosity.
Good luck with your degree. I wouldn't know where to start with that, mine was in Computer Science.
correct me if im wrong but the hubsan x4 is only like 30 bucks...can this go high and shit and is it fast? how is this one compared to OPs video? I can only imagine what the 1500 dollar drones can do....
They're called mini quadcopter, I think.
$30.00. Tons of fun to fly, a great cheap introduction, and a great way to learn the basics. There's a learning curve, you're going to crash, so why not use something easily replaceable.
Just to be sure because i live in germany.
Do these look like the right parts?
https://www.amazon.de/Hubsan-H107L-Radiosteuerung-Quadrocopter-Spielzeug/dp/B00IZC6C8E/ref=sr_1_1?ie=UTF8&amp;qid=1465071284&amp;sr=8-1&amp;keywords=hubsan+x4
https://www.amazon.de/Hubsan-Quadcopter-Flugzeug-Helikopter-8-5x20mm/dp/B00TIDNBEC/ref=sr_1_fkmr0_2?ie=UTF8&amp;qid=1465071245&amp;sr=8-2-fkmr0&amp;keywords=Tera+4+Pcs+Quadcopter+Spare+Parts+3.7V+Motor+7x20mm+for+Hubsan+X4+H107L+Quadcopter
https://www.amazon.de/Haibei-Propeller-Rotorbl%C3%A4tter-Quadcopter-Ersatzteile/dp/B014PASS40/ref=sr_1_1?ie=UTF8&amp;qid=1465071422&amp;sr=8-1&amp;keywords=walkera+ladybird+props
https://www.amazon.de/Keenstone-LiPo-Akku-4-Kanal-QuadCopter-Super-CP/dp/B01DK7N2OK/ref=sr_1_fkmr0_1?ie=UTF8&amp;qid=1465071191&amp;sr=8-1-fkmr0&amp;keywords=5pcs+Tenergy+3.7V+380mAh+LiPO+Battery+for+Hubsan
And thank you for the help.
> That said, the X4 is still better. If you've found it for less than $30, get it! Get it and give me the link!
X4 (H107C) : https://www.amazon.com/Hubsan-Channel-2-4GHz-Copter-Camera/dp/B00EXBDWZC/ref=sr_1_5?s=toys-and-games&amp;ie=UTF8&amp;qid=1468986489&amp;sr=1-5&amp;keywords=hubsan+x4
x4 (H107L) : https://www.amazon.com/Hubsan-H107L-Channel-2-4GHz-Quadcopter/dp/B00IZC6C8E/ref=sr_1_4?s=toys-and-games&amp;ie=UTF8&amp;qid=1468986489&amp;sr=1-4&amp;keywords=hubsan+x4
Do yourself a favor and master this before diving into building a quadcopter. The hubsan is the best mini quad for the money hands down. Do not bother with the cheerson cx-10, it has unreliable signal in my experience even at very close range among other cons.
I have a hard time believing you'll be able to squeeze a custom build with transmission to your phone out of $300 even if you have a radio controller already.
My advice is maybe a phantom 2 or 3 for ~$500. It will route video straight to the DJI app in your phone. A custom quadcopter is going to be a bit more tricky to get onto your phone and you're more likely to be sending it into FPV goggles.
If you don't go the DJI route you will have to buy an RC controller/vrx/battery charger/figure out a way to view the video feed/etc. The cost can really get out of hand. I bought an Immersion RC Vortex after outgrowing the hubsan and after all the basics I needed I had spent well over $1000.
All in all, until you have 2x/3x as much of a budget go with the hubsan. Good luck!
Thanks, yeah they probably look too similar to justify spending ~$40. I'm going to use that money to buy this then haha.
Hah, it does sound like it :)
I just know how much kids love these things, and how easy they are to break.
EDIT: err, I mean - http://www.amazon.com/Hubsan-H107L-Mini-RTF-Quadcopter/dp/B00IZC6C8E/ref=sr_1_1?ie=UTF8&amp;qid=1410873331&amp;sr=8-1&amp;keywords=hubsan+x4
They are WAY stronger than you would expect. Propellers often get bent / break in crashes, but they are like $1 each so its no big deal. If you fly over grass I think its nearly impossible to break frames.
A micro drone like this is a good way to get started.
/r/Multicopter
I think it's expensive for everyone...lol. And for $40, why not?
Is this the one? http://www.amazon.com/dp/B00IZC6C8E/ref=wl_it_dp_o_pC_nS_ttl?_encoding=UTF8&amp;colid=3QAIPXUUVWZPZ&amp;coliid=I3C0HKYELURX1K&amp;psc=1
Please, do yourself a favor and DO NOT start with a 450. You will break something or someone. Drop $40 on the Hubsan X4 http://www.amazon.com/Hubsan-H107L-Mini-RTF-Quadcopter/dp/B00IZC6C8E/ref=sr_1_1?ie=UTF8&amp;qid=1416879681&amp;sr=8-1&amp;keywords=hubsan+x4 as a trainer, it'll teach you everything you need to know about how to fly. Beyond that, the F450 is great.
Late reply, but here are my thoughts on this.
Basically any RC helicopter can be easily controlled via arduino. The trick is either taking apart the included controller as you suggested and simply wiring the connections to the sticks to a breadboard or something. The sticks are basically just potentiometers.
The other way you could do it would be to find an RF shield or something so the arduino can just output on the correct frequency. I haven't been into RC as a serious hobby for a while (I'm talking like almost 20 years, since I was a teenager, so things have probably changed a lot), but I remember being able to go out and buy various crystals at my hobby shop so that you could easily swap what frequencies the controllers/receivers worked on. This was important at events where there might be 10 people all flying at the same time (just pop out your crystals if someone else is on that frequency and replace it with a different one). I'm sure there must be an RF transmitter arduino shield out there that works on this principle. Maybe start researching how people control robots, like the ones that play soccer and stuff.
As far as recommendations go, would you be interested in a quadcopter? The Hubsan X4 is a WICKED fun tiny quadcopter. It's fast, easy to control, etc, etc. It even has swappable batteries so you don't have to wait 20 minutes after every 5 minute flight to go again. Heck, I'd recommend you get one of those for your friend even if it can't be connected to arduino just because it's super fun LOL.
Good luck!
EDIT: BTW - when I said that the X4 is "easy to control" that is, of course, relative. It will require practice. Your friend will probably need to get familiar with flying anything you buy manually before trying to control it via programming, so what I mean is that it's a great quadcopter to learn on. It's durable, replacement parts are cheap (definitely get 3-4 extra sets of blades, a crash repair kit, extra batteries, and blade guards if you can find them), and most of all it's so fun and the learning curve so gentle that your friend will not lose interest or get frustrated. An added bonus is that it's also fairly basic (no fancy built in electronics) so it's definitely hackable with the right skills.
Woah man, that's kind of pricey for a Hubsan X4.
You can get virtually the same thing sans camera for much less:
http://www.amazon.com/Hubsan-H107L-Mini-RTF-Quadcopter/dp/B00IZC6C8E/ref=sr_1_sc_1?ie=UTF8&amp;qid=1415335149&amp;sr=8-1-spell&amp;keywords=hubsam
If you want the camera:
http://www.amazon.com/Hubsan-H107C-2-4G-Quadcopter-Camera/dp/B00EXBDWZC/ref=sr_1_sc_3?ie=UTF8&amp;qid=1415335149&amp;sr=8-3-spell&amp;keywords=hubsam
And if you want it in all in one FPV:
http://www.amazon.com/Hubsan-H107D-FPV-Mini-Quadcopter/dp/B00GSNWB5K/ref=sr_1_sc_2?ie=UTF8&amp;qid=1415335149&amp;sr=8-2-spell&amp;keywords=hubsam
Also, consider a 2.4ghz hack for your AR drone:
http://www.rcgroups.com/forums/showthread.php?t=1420951
Thanks for the answers!
Part 1:
After thinking about Hubsan x4 vs Syma x1 carefully and researching on google, I still decided to go with Hubsan X4, mainly because I will probably have to be flying indoors since it's going to start snowing here pretty soon. :(
I will also buy the propeller guard. What I am curious about is, seeing as the flight time is only a little over 5 minutes, what extra batteries should I get for it and what charger? Would these do?
Part2:
Oh, that was my bad. A week or so ago, we were thinking about getting a hexacopter with a gopro and later upgrading it to be able to lift dslr devices, hence the second dslr gimbal. But seeing as gopro4 has some pretty good quality, we probably won't need to be lifting dslrs any time soon. Is the gimbal we get with f550 kit any good? Also, the f550 kit says we need to get a controler, but I have no idea which one.
The FPV you recommended is this one, right?
We would probably need to get an aditional controler with LCD screen, right?
This is also a great learning quad . After a little over a month of draining the 3 batteries I have for it almost everyday, I feel like I have a good grasp on the basics of flying. I'm planning my first build now.
The hubsan is definitely worth the money.
No worries! I actually have the Syma x1, the Hubsan x4, and the Nano QX so I've had plenty of first hand experience on all 3 of the super popular ones.
The specific Syma x1 I have is this:
http://www.amazon.com/gp/product/B00906PKQ4/ref=oh_aui_detailpage_o01_s01?ie=UTF8&amp;psc=1
Its the cheapest of the 3 and has the longest flight time. However this means it has the longest charge time (about 90 minutes for around 20+ minutes of flight)
The Nano will fly for around 10+ minutes and charges in around 35 minutes.
The Hubsan takes around 45 minutes to charge and flies for about 6~7 minutes depending on if you have the guard attached.
Of the 3 the Syma is the easiest to fly, and the best for a total beginner to learn on. However the Syma does not have blade guards, but the blades themselves are very sturdy (in about 50 flights and many crashes from various heights onto various surfaces I have yet to break a single propeller)
The Nano is my favorite hands down, best bang for your buck if you can afford the $70~100 price range. However due to its incredible agility it would be rather hard to learn on and would crash a lot. I've had all 3 for months and I still can't fly the Nano in agility mode indoors. Seriously, that sucker can move. The Hubsan is kinda a happy medium between the Syma and Nano in nearly every aspect. Personally its my least favorite of the 3, but it is still a very solid beginner copter. The Hubsan isn't bad by any means, its just that the other two are better in my opinion. The Hubsan is the heaviest of the 3 despite it being the smallest. Also the Hubsan has the shortest flight time, but a longer charge time than the Nano.
Also, very important - if you get a Hubsan DO NOT GET THE CAMERA upgraded version. The camera is really bad, it doesn't come with a micro SD card, any video playback will include the lovely sound of the motors (they are very loud in flight) as performed by the world's worst microphone at max volume, and the camera is always on (even with no card inserted) so it drains the battery faster than the non camera version. (not to mention the added weight)
If I had some spare cash I would definitely buy a second Nano, they are that awesome once you know how to fly. I would also probably buy another Syma because the quality for the cost is fantastic. Honestly I would buy a second Syma x1 instead of an extra battery for the first one. Its like $10~15 for an extra battery kit, I personally would rather just have 2 copters for 30 bucks instead of just one with an extra battery. (you can cannibalize one if the other breaks, plus that gives you 2 chargers, 2 controllers, 2 batteries, and a total of 16 propellers to use. Not to mention a total of 8 motors and 2 flight boards) So if you plan on crashing a lot just spring for a second one instead of a repair kit.
I know everything I said about the Hubsan seems negative, but its still a very good starter copter at a very reasonable price. Having used one as much as I have, I would absolutely buy it again (minus the damn camera) if I ever had a reason to. That being said I should warn you, my Hubsan - and possibly all Hubsans, are out for blood and are face seeking. I've gotten some fairly bad cuts and bruises from mine. Do yourself a favor and just keep away from the flip button until you have either a lot of room / experience, or some sort of bullet proof shield to hide behind.
If you have any other questions about copters or learning to fly I would be more than happy to try and answer them. I know that finding specific information about this stuff can be kinda hard or confusing at times.
Here are links to the other two quads I talked about:
Hubsan x4 - http://www.amazon.com/Hubsan-H107L-Mini-RTF-Quadcopter/dp/B00IZC6C8E/ref=pd_sim_sbs_t_1?ie=UTF8&amp;refRID=197PJ9NDQ5JDVB73REBF
Nano QX - http://www.amazon.com/gp/product/B00CYHZN8G/ref=oh_aui_detailpage_o00_s01?ie=UTF8&amp;psc=1
Hubsan X4
Orrrr with a camera for $13 more here
This guy is a micro, but incredibly tough and a great starter/learner. Get extra props or the prop guards.
Well what are ya waiting for? Join the fun!
http://www.amazon.com/Hubsan-H107L-Mini-RTF-Quadcopter/dp/B00IZC6C8E this guy is good and will carry the camera. http://www.amazon.com/Parrot-AR-Drone-Quadricopter-Controlled-Android/dp/B007HZLLOK this is better if you can afford it. either of them will be shaky unless you add a stabilizer.
Thank you! Any opinion on the Hubsan H107L?
Nice! I'd recommend getting a toy size quad to practice on, it will save you some cash in the long run. The Hubsan X4 has treated me well.
I'm not sure if there's a consumer grade quad out there that will be able to do that. Your best chance to keep things cheap (low cost, not low quality) and efficient is a custom build. From the components I have off the top of my head, I'm fairly sure you can do it for $1000 (with FPV equipment, including receiver , except for the screen/goggles). With some careful thought and a little optimizing, you could probably get it down. What's going to end up costing the most will be the high efficiency motors, and the high power batteries.
If you want to start flying quads, here's the same advice you'd get anywhere else on this subreddit, put down about $50 on a Hubsan X4. It'll take the crashes while you're learning so a more expensive quad doesn't have to. It's pretty durable so you won't have to worry about breaking it either.
How about $42 bucks:
http://www.amazon.com/Hubsan-H107L-Channel-2-4GHz-Quadcopter/dp/B00IZC6C8E/ref=sr_1_1?s=toys-and-games&amp;ie=UTF8&amp;qid=1420789989&amp;sr=1-1&amp;keywords=hubsan+x4
Quadcopter!!! http://www.amazon.com/Hubsan-H107L-Channel-2-4GHz-Quadcopter/dp/B00IZC6C8E/ref=sr_1_1?rps=1&amp;ie=UTF8&amp;qid=1421690873&amp;sr=8-1&amp;keywords=hubsan+x4&amp;pebp=1421690875734&amp;peasin=B00IZC6C8E you can get alot off stuff for these guys, for 100 you can get a case extra batteries and more!!!
Absolute best thing you can buy for that price is a hubsan IMO. They are almost bullet proof, parts are dirt cheap, readily available and they fly amazingly.
--107c+ which is at the top of your range but is quite nice--
[--or the 107L which is on the bottom of your range, no camera--] (http://www.amazon.com/Hubsan-H107L-Channel-2-4GHz-Quadcopter/dp/B00IZC6C8E/ref=sr_1_4?s=toys-and-games&amp;ie=UTF8&amp;qid=1451252092&amp;sr=1-4&amp;keywords=hubsan+x4)
Both fly Awesome and you can buy batteries and multichargers for them to have nearly endless fly time, for extremely cheap. I have drones ranging from a chroma 4k (1200$) to the 107L (50 $). Of all the drones, i think the Hubsans gives the most enjoyment for the money, they fly great and are super durable. Its a totally care free and chill experience, knowing they are so cheap and easy to fix you can enjoy they capabilities guilt free.They can fly extremely fast out doors, are powerful, do flips at speed, banks corners well, and have a good yaw rate. They are quite the little machine.
> only the ridiculous high end custom commercial filming drone could draw blood
You sound like you have not flown even a medium sized "toy" quad if you think this.
Even the mini ones will scratch you good, a 250 sized quad will fuck your shit up if it hits you and an amateur filming more so.
Hubsan X4 H107L $32
http://www.amazon.com/Hubsan-H107L-Channel-2-4GHz-Quadcopter/dp/B00IZC6C8E/ref=sr_1_4?s=toys-and-games&amp;ie=UTF8&amp;qid=1449195469&amp;sr=1-4&amp;keywords=hubsan+x4
You should start with a Syma x5c-1 or a hubsan x4 to start out with. They are about $50 and you will want to crash those when you are starting out. Crashing your 250 will get expensive quick. After you get about a month or so of stick time, then start looking into your 250 build. If you want, hubsan also makes an fpv version which is super fun to fly, but its around $100. Let me know if you have questions!
Syma
Hubsan
FPV Hubsan
Is the Mini version more than enough for me to start out?
http://www.amazon.ca/Hubsan-X4-Mini-RTF-Quadcopter/dp/B00IZC6C8E
I'll probably pick up spare batteries as well. Does the mini come with the prop-guard as well?
Thanks!!
Damn the one on banggood was for the drone only! I'm going to order on amazon.
So I tried to get into droning years ago, but the LOS drone I got, I couldn't really get it to hover without moving at a good clip of speed, It was very discouraging. I watched E-max videos and it seems like maybe this drone you are mentioning is alot better. Below is the first attempt drone I had (which after a bunch of crashes I couldn't get to hover at all).
https://www.amazon.com/gp/product/B00IZC6C8E/ref=ppx_yo_dt_b_asin_title_o04_s00?ie=UTF8&amp;psc=1
This is just my opinion but I would recommend buying the [husband X4] (http://www.amazon.com/gp/product/B00IZC6C8E/ref=as_li_tl?ie=UTF8&amp;camp=1789&amp;creative=390957&amp;creativeASIN=B00IZC6C8E&amp;linkCode=as2&amp;tag=phreakenterp-20&amp;linkId=OQXRQ5RIBJ3C2N3U)
It's cheap and easy to learn on. But on whether to build or not. Building is:
Just my 2 cents.
I've got this Hubsan X4 and it's a fun toy drone
New? The hubsan micro should be the first thing purchased. Practice as you assemble.
Ok. I found this one. I'm assuming it's the one with the yaw control on the throttle?
Agreed. I think it's a good idea to learn to fly on something cheap. I started with the Hubsan H107L X4 Mini RTF RC Quadcopter. I bought the quadcopter, a crash pack, a prop guard, and some extra batteries for about $100.
Yep, and they fly great.
Hubsan X4 or Blade Nano QX are the two I can suggest (have both). Started with the X4 but eventually purchased a hobby grade transmitter and a Nano to bind with it.
WLToys and Syma make some other popular options, many of these at $50 or less (especially if you don't mind a wait and shipping from China).
If you want Prime though, here is the X4 page and here's the Blade QX BNF.
Have fun!
As I'm nearing the finishing stages of my build (woo!), it has occurred to me that, even though I ordered a couple of 1500mAh 3s batteries, and I already have a Genuine SKYRC iMAX B6AC V2 Dual Power (6Amps, 50Watts), I need something to go in between the two!
I've been charging my 1s Whoop-class batteries with a parallel charging board on Amazon, but it's just for 1s.
Amazon tells me that people who bought the Genuine SKYRC iMAX B6AC V2 Dual Power (6Amps, 50Watts) above, also bought this: BW® 2-6S Lipo XT60-Plug Parallel Balanced Charging Plate Charging Board for Imax B6 / B6AC / B8
It's not clear to me how that plugs into the SKYRC iMAX B6AC V2. It looks like the only way to plug into it is male-type banana clips.
What else do I need? What do you recommend?
I'd like to be able to parallel charge 1-4 (or more) 1300-1500mAh 3s, or 4s batteries.
The quanums v2's can run on 2s lipos, so any cheap 2s lipo in the 500mah+ should do the trick. These nano-techs 850mah 2s works well and gives decent power time.
For charging, I personally like the Turnigy Reaktor it can do 10A, plus this 12v power supply and a parallel charging board, you can quickly charge 4 or 5 lipos at once. In the future if you plan to get another Reaktor charger, you can hook it up to the same power supply. I have 3 Reaktors hooked up to my power supply.
On a cheaper end, this B6AC can do 6A and doesn't require a separate power supply.
This is what my setup looks like.
Haha, nice to teach someone ;)
You have it the wrong way around. This is how it's supposed to look. And if you unsolder the wires, you also save some space, which is pretty nice on small builds. And it looks nicer.
The nice plastic wrapping is probably some kind of heatshrink tubing. Want to heatshrink your own stuff? Get this. You just heat it up with a lighter and it shrinks to half the size. There is no problem if you take the plastic off and leave it without it, but it's more likely to short on something, a bit less water resistant (in case a drop of water lands on it), and it doesn't look as professional ;)
If you want to solder the motors directly to the ESCs (which I recommend, as it's lighter and looks neater), you can heatshrink them with this heatshrink afterwards.
The balance charger connects to the balance plug and (usually) the main plug on the battery. There are some cheap, low-power chargers that only use the balance plug. The balance plug has thinner wires, so it can't handle a high current like the main plug (which also uses a connector that handles higher current). On batteries the size of your battery, the wires will be almost the same size, but on bigger batteries the main wires are usually quite a bit thicker. The higher-power chargers use the main plug for charging/discharging (several amps) and the balance plug for balancing (usually under 2A). You should charge your batteries at around 1C, which is 1A in your case, so you don't really need a higher power charger unless you want to be able to charge several batteries at once or plan on getting something that needs bigger batteries in the future. Also, most of the lower-power chargers only have a fixed current and can't discharge the batteries or show other useful information. Most of the higher-end ones can show you the current charging current, voltage, time since starting, mAh recharged etc, and can also discharge your batteries to around 40% which is the level it's best to store batteries at.
The LiPo alarm plugs into the balance port in order to be able to measure every cell individually. This means you can't over-discharge any cell (for example if one of them is faulty and discharges faster than the others). You unplug it when you're done flying, and connect the balance charger to the same connector when you're charging.
When you want to buy a balance charger, you have a lot of different options, depending on whether you want a really cheap charger (something like this), an OK all-around charger (like this one), a charger that can charge 4 different batteries at once (like this one), or a charger that can charge 40 of the batteries you're using in parallel at once (this one). Also note that some of them only have a DC input, so you need an external power supply for them. You can for example make one out of a server power supply, or you can just buy a ready to use one.
Also, do you have a LiPo charger? If not you can check out the iMax B6AC V2 which is probably the best bang for the buck. Watch a youtube video or two and you will be good to go.
If you need help picking out batteries or any other accessories just post in this sub and ask.
If anyone wants a link to this charger it's called the: B6AC Smart Charger
https://www.amazon.com/gp/aw/d/B00ND7J38C/ref=mp_s_a_1_8?ie=UTF8&amp;qid=1473099837&amp;sr=8-8&amp;pi=AC_SX236_SY340_FMwebp_QL65&amp;keywords=lipo+charger&amp;dpPl=1&amp;dpID=51GvA3h-MNL&amp;ref=plSrch
Be sure to do a bit of homework on the batteries.
If your batteries are 1300mah charge at 1.3 amps. If they are 1500mah charge at 1.5 etc..
Use a voltage alarm on your quad or put a buzzer on the flight controller.
https://www.amazon.com/gp/aw/d/B003Y6E6IE/ref=mp_s_a_1_1?ie=UTF8&amp;qid=1473100031&amp;sr=8-1&amp;pi=SX200_QL40&amp;keywords=voltage+alarm&amp;dpPl=1&amp;dpID=411iqbcCz9L&amp;ref=plSrch
Once the alarm goes off land, since over draining can damage the batteries.
Once youre done flying for the day use your charger to place the batteries in storage mode. Keeping them charged more than a couple days can damage them. Just charge them the day before flying, and if you end up not using them decharge them on the charger back down to storage mode.
What is the recommended balance charger that I can plug 4 into at once and just let it do its thing? I'm lookin at This one
https://www.amazon.com/gp/product/B00ND7J38C/ref=oh_aui_search_detailpage?ie=UTF8&amp;psc=1
I love this charger. Charges everything I need. If it doesn't I just make my own connector.
Hey Time-killing, thank you for the advice. I have one more question if you don't mind. I think I'm going to get started by going with the basic Reaper Learn to paint Bones kit to get my feet wet and see how that feels.
You recommended some Space Marines earlier to practice on and while I think that's a cool idea, I'm more into fantasy stuff. Can you recommend anything like that but more on the fantasy side?
Edit: Maybe something like this? Black Ark Corsairs? These minis have armor, weapons and different material types. Is that what you were going for with your original example?
Bonus question from someone who can't stop sweating the details: Do you think the Reaper paints would be "wasted" on those GW minis? Should I try to acquire some Vallejo and Citadel paints to make the most out of painting GW minis?
And I hope you're having a happy new year as well. :D
I honestly just bought this and started by following the written instructions: https://www.amazon.com/Reaper-Miniatures-08906-Learn-Paint/dp/B00NTMC49G
After I painted the minis, I just went to my FLGS and grabbed a handful of cheap minis to practice on and a few paint brushes from Michaels. The basic techniques you learn from that book are like 80% of painting a mini. The rest comes with experience and playing around with techniques, colors, layers, etc
Also, I am the least artistic person and I feel mine arent terrible.
Edit: As for the issue with time, whenever I want to watch a show, I setup my stuff and paint while I watch. It passes the time and I get two things done at once. I would recommend no distractions for the first minis you paint though to get a feel for how it works.
https://www.amazon.com/Acrylic-Paint-Set-Quality-MyArtscape/dp/B01K4C5PBC/ref=sr_1_22_sspa?s=arts-crafts&amp;ie=UTF8&amp;qid=1519670333&amp;sr=1-22-spons&amp;keywords=acrylic+paint+set&amp;psc=1 - Regular
https://www.amazon.com/Reaper-Miniatures-08906-Learn-Paint/dp/B00NTMC49G/ref=sr_1_2?ie=UTF8&amp;qid=1519668466&amp;sr=8-2&amp;keywords=P3+Paint+sets - Mini
Edit - The mini one was just an example, I wasn't looking at that one particularly.
a remote control helicopter from Amazon for $18.
(http://www.amazon.com/Syma-S107-S107G-Helicopter-Colors/dp/8499000606/ref=sr_1_1?ie=UTF8&amp;qid=1321131163&amp;sr=8-1)
oh dear god yes. I bought this for a buddy's bachelor party (he and all of the other guys went to RPI). It was great success.
One of these
http://www.amazon.com/Syma-S107-S107G-Helicopter-Colors/dp/8499000606/ref=sr_1_1?s=toys-and-games&amp;ie=UTF8&amp;qid=1323797187&amp;sr=1-1
They are cheap, and are utterly mesmerizing to many people. Now, the price I am seeing is $19.99,but the price for you may be different, depending on amazon.
Word of warning however: if you charge from the controller, make sure you have good quality batteries. If not, they will leak trying to charge the chopper.
This RC Helicopter
19.50 shipped, the greatest toy ever. Charges via USB and has a built in gyroscope. It is also indestructible, I crash it into anything and everything but it is also maneuverable enough that within my first hour of flight it got it to perch on top of an iMac. I showed my dad and he immediately bought 5 and gave them to his buddies, everyone can fly it and love it.
Syma S107/S107G R/C Helicopter
Syma 107's are incredibly durable and easy to fly.
http://www.amazon.com/Syma-S107-S107G-Helicopter-Colors/dp/8499000606
Super cheap too, but it does look like a "regular looking helicopter".
If you're really alone for the whole night, and work in a big openspace office, check out these things. They're hella fun. Side note, I won't say whenever I did or did not fly RC helicopters in my corporate offices.
Beside that, learning to code is fun, and quite rewarding.
I'm 45 and got one of these for my 12 yo son. Lets just say he hasn't spent much time with it. BTW, this things is WAAAY better than those air-hogs crap helicopters.
http://www.amazon.com/Syma-S107-Gyroscope-Controlled-Helicopter/dp/8499000606/ref=sr_1_1?ie=UTF8&amp;qid=1293342181&amp;sr=8-1
This is the exact one i bought, Its a sturdy little guy too.
This post made me realize how much I've always wanted an RC copter. I just ordered one on Amazon. Can. Not. Wait!
http://www.amazon.com/Syma-S107-Gyroscope-Controlled-Helicopter/dp/8499000606/ref=sr_1_1?s=toys-and-games&amp;ie=UTF8&amp;qid=1293349448&amp;sr=1-1
I'm 30and my mom got me the Syma s107 this Christmas. My dad is in his 50s. He got one too.
These things are awesome! Surprisingly easy to fly.
i got this, i researched helicopters for about a minute, and this was the best
http://www.amazon.com/Syma-S107-Gyroscope-Controlled-Helicopter/dp/8499000606/ref=wl_it_dp_o?ie=UTF8&amp;coliid=IP99X04CA4PL6&amp;colid=3T02BRXWTLCPO
Might as well order one of those bugasalt. I'm sure you can put this to good use.. An RC helicopter is always a lot of fun. Try it during your work break. It makes the day go better.. I swear!
It seems you have an interest in programming stuff, so you can't go wrong with a RaspberryPi. And who doesn't want a LEGO TRex!!!!!!
Aaand crap... I just read Needs to be able to ship to Australia.
I'm guessing pick one in this case...
It wasn't a post, per se, but a featured ad for this guy.
A remote controlled helicopter. Good ones are relatively cheap and they are endlessly fun.
Here's a good one, but cheaper on Amazon
I might suggest an indoor vehicle. I personally have these:
http://www.amazon.com/Syma-S107-S107G-Helicopter-Colors/dp/8499000606/ref=sr_1_1?ie=UTF8&amp;qid=1369769242&amp;sr=8-1&amp;keywords=syma+s107g
http://www.amazon.com/Maisto-Lamborghini-Mucilage-Colors-Vary/dp/B003PBPHBS/ref=sr_1_8?ie=UTF8&amp;qid=1369769256&amp;sr=8-8&amp;keywords=maisto+rc
Great fun if you just wanna screw around inside :)
The only problem with 3ch helis is they have the controls reversed on the transmitter, so you'll end up learning the wrong way. If you're never planning on upgrading to "real" helis (4ch fixed pitch with swashplate, 6ch collective pitch with swashplate) then this won't be an issue and you can just buy the cheap ones and have fun. If this is the case I suggest something like a syma s107
If you want to learn the real control scheme (mode 2) then you can start with an easy double horse 9116 that will auto-balance when you let go of the control stick (thanks to the weighted flybar) which makes it a good beginner heli.
http://www.amazon.com/gp/aw/d/8499000606
Here is a cheaper link sold by another store, fulfilled by amazon.
LINK
Basically, it is capable of doing more things than other similarly priced helicopters. It is trickier to fly, but that's because it is doing less of the flying for you.
On something like the S107 (or other coaxial helicopters), if you stop giving it any inputs, it'll level itself out and just kind of sit there. The V911 (and other single rotor helicopters) will do less of that for you, so you have to learn more control. It'll help prepare you better for flying larger helicopters and (IMO anyways) will keep your interest longer because there's more you can do with it.
I personally went from the S107 to a Blade MSR-X, but the blade is probably more than you're willing to spend ($90). If this is your absolute first helicopter, the S107 (http://amzn.com/8499000606 for example) may not be a bad idea - it's less than $20 and will let you start learning how to deal with orientation.
The glue I'm using is a gap-filling cyanoacrylate, specifically this: https://www.amazon.com/Insta-cure-filling-Bob-Smith-Ind/dp/B0000DD1QQ
What I've been doing is applying it to the cracked areas, and smoothing it down. Once that's dried, I've applied more, and smoothed that. Repeating until the crack is filled, and I will sand that after. I have a pretty solid array of fine grit sandpapers, as well as a pretty extensive array of dremel bits. I think some fine grit buffs will help me with these cracks as well as some other rough spots I was hoping to smooth over. Hoping it goes well. I'm actually having some success re-texturing the hair where it cracked by using the same metal bristle tool on the glue as it dries. Gonna need to soak this tool in some acetone when I'm done, though.
This is the glue I love, I also use insta-set which is a spray that will make the glue dry in seconds so you can keep working on the same part without stopping for a bit, great stuff.
This is the only glue.
https://www.amazon.com/Insta-cure-filling-Bob-Smith-Ind/dp/B0000DD1QQ
There is nothing better. It will definitely fix any X-Wing model. You can glue your car back together with it.
Hot glue and foam core are wonderful together, other than having to do a little clean up with the little hot glue strings.
However, IF you are using superglue for anything, please don't buy those little dinky bottles. Try Insta-cure, it's the exact same stuff, comes in multiple thicknesses, and costs the same for a 1 oz bottle as you would spend for one of those tiny tubes. I don't know that I've ever used a bottle fully up, they tend to dry out and harden over a year or two. Most model railroad and hobby stores will carry it, or just buy it online.
id reccomend this glue, i use it for models of any game. i used it on putting together many many points of directorate and other armies.
https://www.amazon.com/Insta-cure-filling-Bob-Smith-Ind/dp/B0000DD1QQ
pinning is ok, espeically with models that are large and have flat connection points like these, although ive never had to pin a firestorm model. they are quite light with the white resin they use.
the thin flakes or other resin flash id just scrape off with a knife. just make sure its clean and give it a good prime.
have fun!
I use Insta-cure+ with some of my models:
https://www.amazon.com/Insta-cure-filling-Bob-Smith-Ind/dp/B0000DD1QQ
Insta-cure+ actually melts the plastic and fuses the two ends together. So you need to be very careful with how you use it.
Edit: Yes the 5-15 seconds to bond on the bottle is accurate. They also make a 1-3 second version... which usually ends with my thumb and index finger fused together.
It will be plenty strong for you to leave it be to cure or work on another part. I use Insta-Cure+ very strong bong within a minute. They have some that cures slower or faster as well. Full strength cure in 2hrs for this one.
This works for plastic and resin models really well.
You could try hobby epoxy. Idk about how the heat generated from it will affect the headphones, or if it even will, but the epoxy I use is significantly stronger than hot glue.
(I crashed my RC plane and ripped the tail completely off and repaired it with epoxy. I crashed it again the next week, and the tail ripped off again, 1 inch away from where it had previously been ripped off. Pretty impressive imo.)
Edit: Here are 2 glues I'd recommend: Epoxy, Super Glue. Watch your fingers, this stuff WILL stick them to anything if you get some on them. (speaking from experience)
Go with a glue in a bottle, not a squeeze tube, and store in in your freezer. The superglues at the store can almost be considered single use, as they do not reseal cleanly.
I've had a bottle of this stuff for 4 years, still good as new every time i used it
https://www.amazon.com/Insta-cure-filling-Bob-Smith-Ind/dp/B0000DD1QQ/
https://www.amazon.com/Liquid-Cement-Plastics-1-oz/dp/B0006N6ODS
This stuff is what I use
I currently use the testors black bottle glue. It's a very thin product and is easily applied in small amounts through a very thin steel tube applicator tip. The red twin pack glue is a thick gel that is a bit more unwieldy to apply. It's been years since i've used the thick gel type and I recomend using the black bottle stuff. It's the type of glue that will melt the plastic and create a permanent bond.
Reading the packaging a little closer it looks like the black bottle now uses a plastic applicator tip. This model master version (still Testors) has the metal tip, which I like. https://www.amazon.com/dp/B0006N6ODS/ref=psdc_2236128011_t1_B00005CA7S
Games Workshop has a glue that is the same as the black bottle Testors/model master but the the GW bottle isn't as good and the applicator tube can pull out of the bottle on you if you're not careful.
From the world of Warhammer I learned about this stuff
Great glue for plastic. I don't know if it will work on the TI plastics but it essentially melts the piece and makes it stick back together. I would try this on that plastic and see.
Flush Cutters: https://www.amazon.com/gp/slredirect/picassoRedirect.html/ref=pa_sp_atf_aps_sr_pg1_1?ie=UTF8&adId=A07771002JJJMUPKY9LNZ&url=%2FIGAN-330-Electronic-Clippers-Powerful-Precision%2Fdp%2FB07RW8VTSX%2Fref%3Dsr_1_1_sspa%3Fkeywords%3DFlush%2Bcutters%26qid%3D1568614943%26s%3Dgateway%26sr%3D8-1-spons%26psc%3D1&qualifier=1568614943&id=3287567174581193&widgetName=sp_atf
Hobby Knife:
https://www.amazon.com/Hobby-Excel-Blades-Safety-American/dp/B0006O5JHE/ref=sr_1_5?keywords=Excel+hobby+knife&qid=1568614967&s=gateway&sr=8-5
Testor's Model Glue:
https://www.amazon.com/Liquid-Cement-Plastics-1-oz/dp/B0006N6ODS/ref=sr_1_9?keywords=PLastic+glue&qid=1568615017&s=gateway&sr=8-9
&#x200B;
As for paint, I usually buy off of Games Workshop's website. Any order over $60 gets free shipping in the US. Models depend on if I can get them at my local store, or Amazon first. Anything not available at those two I go to the GW website for. Have fun, and good luck.
Just my thoughts on gluing these models. I have built 4 of these HMM models (Shield Liger, Blade Liger Bang Ver. [Pic](https://i.imgur.com/VU5go5C.jpg](https://i.imgur.com/VU5go5C.jpg), Raven's Geno Saurer, and the PK Iron Kong.) I glue all, non-moving pieces, and the reason is because, when you don't do that, the models are VERY fragile. I built the first one (the Shield Liger) without glue, and kept having issues where parts would fall off while trying to pose. I eventually stripped it all down and rebuilt it with glue because of that. I like to pose these models because there is so much articulation to them, that posing them is a joy. Using glue basically makes them an action figure.
&#x200B;
This is the "glue" I use: Model Master - Liquid Cement for Plastic Models. This stuff basically fuses the plastic to plastic, so that's why glue is in parenthesis, so be VERY careful. I like that it has a needle like tube that allows you to use a very minimal amount, and 1 bottle lasts for many builds. Just my 2 cents from a guy who actively builds with glue.
I was able to assemble my entire core set plus 11/12 expansions with these items:
https://www.amazon.com/gp/product/B0006N6ODS/ref=oh_aui_detailpage_o05_s00?ie=UTF8&amp;psc=1
and
https://www.amazon.com/gp/product/B01D1JYXKO/ref=oh_aui_detailpage_o06_?ie=UTF8&amp;psc=1
The clippers are still going strong and the files work nicely. I have no mold lines or excess glue on my minis and I filled in some gaps with green stuff:
https://www.amazon.com/Green-Stuff-Strip-RPR-75006/dp/B001BR8AU8/ref=sr_1_10?ie=UTF8&amp;qid=1498688095&amp;sr=8-10&amp;keywords=Green+stuff
You can usually find it a bit cheaper. Hopefully, that helps!
well imo, Testor's Liquid Cement For Plastics is the best thing out there for assembling plastic models. Stuff only works on plastic so if you get it on your hands or anything else, you can wipe it off and it's fine. Also it gives you some time to adjust the model unlike super glue. http://www.amazon.com/Testor-Corp-Liquid-Cement-Plastics/dp/B0006N6ODS
You would have to be extremely careful, but you might be able to do it using this.
It has a very tiny, needle thin applicator that should allow you to avoid gluing the joint, but as I said you'll want to be REALLY careful. I think you're probably okay if you just handle it gently though, if you'd rather not take the risk.
I recommend Tamiya, basically the same effect as any other plastic cement, but the bottle has a little brush in the cap which I have found to be much more convenient for application. Specifically, the brush allows you to be much more precise and does not have the possibility of excess glue running down the model.
This would probably work wonders in removing those seam lines.
It's a cheap kit so thats the best kit to practice with a new technique.
https://www.amazon.ca/Tamiya-87038-Extra-Thin-Cement/dp/B000BMYWYC
Get this glue https://www.amazon.com/Tamiya-87038-Extra-Thin-Cement/dp/B000BMYWYC
It comes with a little brush on the cap to apply it, so it makes a thin layer, and it actually fuses the plastic together, so it makes the mini very durable.
Note that it will only work with plastic minis, for metal or resin you'll want superglue..
I think I'll get my hands on this
It's cheaper than MrCementS and also thin. Some lad on youtube did a review and they seem the same.
What glue did you use for her? I bought one and for some reason this glue isn't working at all for me.
https://www.amazon.com/Tamiya-87038-Extra-Thin-Cement/dp/B000BMYWYC/ref=sr_1_1?ie=UTF8&qid=1538196687&sr=8-1&keywords=tamiya+glue
&#x200B;
You could maybe try thin model cement ?
I don't know how it would work on that kind of plastic though
Do you have a recommendation for a specific brand? I've had troubling finding a glue that is recommended for rigid Polystyrene. Most of what I get points me in the direction of modeling cement like this https://www.amazon.ca/dp/B000BMYWYC/ref=ox_ya_os_product
If you need suggestions on Glue, I like using [Cyanoarcylate glue] (https://goo.gl/images/Y3VYYN). This will work on both plastic and metal miniatures. Most hobby stores will have this with a different store label. You don't need much to glue and it dries really quickly (10-15 seconds)
You could also try using a more advanced glue: Tamiya Extra thin cement. But be advised, this may slightly melt plastics, which is why it is great on large models. I did this with my troll and it worked really well. I wouldn't really use it on small figured if you are novice to miniature assembly. It tends to flow into spaces and basically melts plastic together nearly seamlessly... but take care with it. It dries rather slowly, so I will use a bit of the Cyan glue and then use the Tamiya glue elsewhere on the model. So the cyan will hold quickly which will then allow the Tamiya time to dry and meld the plastic.
I would recommend some snips for removing the miniatures from the plastic spues, a sharp hobby knife, and maybe some hobby files. The snips from Games workshop and the scraping tool are nice, but cost ALOT. You probably get away with just a hobby knife for like 8 bucks... but with as many miniatures you are assembling it is work considering your hands and fingers. =]
A hobby mat / cutting board could also be good to work on but not necessary.
Another option is Tamiya plastic glue; it's just as good. This is the stuff you're looking for: https://www.amazon.de/Tamiya-Extra-Thin-Plastikkleber-300087038/dp/B000BMYWYC/
It works by melting the plastic that it touches, so the two parts fuse together into a permanent bond. The best way to use it is to put a little bit on one or both of the surfaces you want to combine, wait a few seconds for it to start dissolving the plastic, then press them together.
It is great on translucent models because it dries perfectly clear.
I just got this stuff for my brother:
tools
glue
mold line scraper
I'd suggest getting some well reviewed mini brushes from Amazon as well. Make sure you clean them. Enjoy!
Here is an example of a "side cutter":
https://www.amazon.com/Integy-Hop-ups-Precision-Modelers-Plastic/dp/B00W4172V8/ref=sr_1_2?ie=UTF8&amp;qid=1505567090&amp;sr=8-2&amp;keywords=side+cutter
Liquid glue (random sales listing I chose, unsure if cheapest):
https://www.amazon.com/Tamiya-87038-Extra-Thin-Cement/dp/B000BMYWYC/ref=sr_1_2?ie=UTF8&amp;qid=1505567173&amp;sr=8-2&amp;keywords=tamiya+extra+thin+cement
Example of sanding sticks (prices will vary, more than one brand available probably):
https://www.amazon.com/Squadron-Products-Value-Sanding-Stick/dp/B000CDR5K8/ref=sr_1_4?ie=UTF8&amp;qid=1505567224&amp;sr=8-4&amp;keywords=sanding+stick
THIS: https://www.amazon.com/Tamiya-87038-Extra-Thin-Cement/dp/B000BMYWYC
Is the glue you will want to get, hands down. All the models are plastics, and there is no better plastic glue than the one I linked.
Assuming you are from the US: https://www.amazon.com/gp/offer-listing/B000BMYWYC/ref=dp_olp_new_mbc?ie=UTF8&amp;condition=new
also there were a couple parts that didn't sit fully flush after our initial gluing
we used tamiya extra thin cement and after letting it sit for a little bit we simply applied a little more glue to the offending crack (one instance was the arm holding the spear) then gently pushed it where it needed to be and held it for 20 seconds or so
I think when we get Allison I'll take pictures at different steps
Tamiya Extra Thin Cement† are my go to plastic glue:
I love the small brush in it for applying the glue I find it easier to control the "precision" tube (like on this) I also find that the tube get stopped with old glue and I don't think I have ever used all the glue in one because of that. But as I said the Tamiya glue do not have that problem.
The design of the glass bottle makes it almost impossible to tip over (I did that 2 times last time I tryed humbrol Liquid Poly)
I like the glue it self, but if you want "extra thin" or something a little thicker is a personal taste and what you are using it for. But extra thin are the standard for model kits and what we are doing is smaller (or same size) than that.
Edit: I forgot to say that if your flgs don't have it you local model kit/train store does, and in general it's a good place to look for hobby supplies.
†(The link are from this guide https://hobbymodelguide.com/best-glue-for-models/ that I like, so there probably a refual link in it)
But you live in the world of internet, and the internet has it: https://www.amazon.com/Traxxas-5137-Differential-Oil-Weight/dp/B000BOLVFI
Couple questions about lube
Seems the general consensus is to go with the:
https://www.amazon.com/Traxxas-5137-Differential-Oil-Weight/dp/B000BOLVFI/ref=mp_s_a_1_2?keywords=traxass+50k&amp;qid=1564327271&amp;s=gateway&amp;sprefix=traxass+50&amp;sr=8-2
Is there anything else you would recommend that would go hand and hand with this?
Is Traxass50k ok for internals and plastic?
Will I need some type of applicator, or will the built in bottle dispenser be sufficient?
Any help is appreciated, thanks guys
No. WD-40 is known to harm cubes. I'd suggest checking out any cubing store for specialized lubricant. Personally, I use Traxxas differential oil and I heard that it's basically the same as other lubes. Its pretty cheap, especially considering how much they give you.
You should try Rubik's Cube lube. It is rated by viscosity and weight 5 is pretty thick.
https://thecubicle.us/cubicle-silicone-lube-c-35_64.html
EDIT: Found a good cheap alternative too which has around the same viscosity of around weight 4 of above.
http://www.amazon.com/Traxxas-5137-Differential-Oil-Weight/dp/B000BOLVFI
Save yourself even more by getting this. Its basically the same as lubix but much much cheaper. You could also try 70K instead of 50k (the viscosity) for a more loose lubricant.
Traxxas 50k
Traxxas 50k is optimal for cubes IMO. Maru is light and doesn't last long or give as much of a buttery feel. It's good for short speed boosts, but I don't like it in the long run. 50k is pretty nice once broken in. It works for both the hardware and pieces
http://www.amazon.com/Traxxas-5137-Differential-Oil-Weight/dp/B000BOLVFI/ref=sr_1_1?ie=UTF8&amp;qid=1462239118&amp;sr=8-1&amp;keywords=traxxas+50k
As seen it is frequently bought together with cubes
Is this it?
&#x200B;
I am definitely going to get this if I can. Also, do I lube the exact way J perm does it in his How to Lube a Cube video?
This stuff?
it depends on the lube, if you want a durable lube then i suggest traxxas 50k -> https://www.amazon.com/Traxxas-5137-Differential-Oil-Weight/dp/B000BOLVFI
it's a huge bottle and is cheap and is often used in cubing :) it will last you a year or more
In that case, I guess you could just buy a single bottle of 50k which will cost you around ~$20, which will still help you with the spring noise, but it is also the same price of the set in the regular amazon, so if you can source some from there, then it could save you some money than buying from amazon.in (also people say traxxas lasts forever, which makes it a good investment)
&#x200B;
But if you're r e a l l y tight on budget, people say Gan Magic Lube is pretty nice and costs around ~$6 on thecubicle.com (idk about India prices), but won't really help with your spring problem.
Ah, thanks. One last question, would you happen to know how much lube is in this bottle? I can't find an amount anywhere, but I'd like to get a ballpark estimate of how long it'll last.
I live in Canada and it's $10 here. American it seems it's $7.
http://www.amazon.ca/Traxxas-5137-Differential-Oil-Weight/dp/B000BOLVFI/
http://www.amazon.com/Traxxas-5137-Differential-Oil-Weight/dp/B000BOLVFI
The most popular seems to be Traxxas 50k. It's pretty cheap; I'd give it a shot.
Traxxas 50k from RC hobby shops or online is a popular choice. Or Lubix (direct or from specialty cubing sites) to get a very similar substance in a nice application syringe with a cool sticker.
Crazy Bad Cuber lubing video. I seems like the main mistake people make is using too much lube which slows down your cube.
http://www.amazon.com/Traxxas-5137-Differential-Oil-Weight/dp/B000BOLVFI/ref=sr_1_1?ie=UTF8&amp;qid=1417888698&amp;sr=8-1&amp;keywords=traxxas+50k
If you haven't bought it yet, get this. Pretty much everyone uses or suggests it.
I believe Amazon beats SCS on price if you're in the US (I'm not).
Ideal is 30k - 50k wt not 30-50 wt
It will work but you need something much thicker. This is shock oil. You want differential oil which is just really thick shock oil. 900 CST = ~67 wt and ideal is 30k to 50k wt (apparently ~1250461 to ~2291130 cst (accidentally said wt instead of cst) ).
I think if you get this, it will either be like water and do nothing to the cube or basically be like maru lube that lasts longer which can be a good thing (maru lube makes cubes super fast but doesn't last very long).
https://www.amazon.com/Traxxas-5137-Differential-Oil-Weight/dp/B000BOLVFI
I'm a cuber so I wanted to make use of the spare lube that I have
Just get this One little dab (a little smaller than a pencil eraser) will do your entire 3x3, a bit more will do bigger cubes, it's confirmed safe for puzzles, and is pretty thick. If you use the right amount, you hardly know it's there, except your puzzle is a bit quicker and smoother.
I get that it's twice the price, but it's worth it, I think, to get something proven to work, than something that'll probably run like water (it's mostly Polyalphaolefin, which may degrade plastics, a cursory Google search tells me).
Yeah, from Amazon you can get it here:
http://www.amazon.co.uk/Traxxas-TRA5137-Differential-Oil-Weight/dp/B000BOLVFI/ref=sr_1_1?ie=UTF8&amp;qid=1427838040&amp;sr=8-1&amp;keywords=Traxxas+Lube
Replace .co.uk with .com if you want
Would this also work because I have it at home https://www.amazon.ca/gp/aw/d/B000BOLVFI/ref=mp_s_a_1_1?qid=1458503710&amp;sr=8-1&amp;pi=SL500_QL40&amp;keywords=Rubiks+cube+lube&amp;dpPl=1&amp;dpID=41oEMSxS9OL&amp;ref=plSrch
Just to play devil's advocate, you could justify the cost of the new tools if they are very well designed. The tools you've recommended are definitely good tools and I think any hobbyist would be happy with them, but that doesn't mean there isn't a reason to pay more. As an example, the side cutters you've linked are good cutters. But Tamiya does make a set of really nice side cutters that gunpla builders really like and recommend if you have the money that costs about $30:
Tamiya 74035 Sharp Pointed Side Cutter
I'm not as familiar with the other tools so I don't have any links for them, but if they have to quality to back them up there is a reason for the cost.
That being said, unless you to take the modelling side of this hobby super seriously, there is no reason to spend that much on tools unless cost really isn't an issue. And to add to that I'm skeptical that these tools are going to be any better that offerings that are already out there. Xuron makes a set of side cutters with similar features except that it has a plastic handle (which since I own a pair can say it's a really good handle) which is cheaper:
Xuron 2175ET Professional Sprue Cutter
TLDR: GW tools may be worth if the quality is there and you can afford them, but I doubt that this will be true.
http://www.amazon.com/dp/B000J47Z4G/ref=sr_ph_1?ie=UTF8&amp;qid=1463999409&amp;sr=sr-1&amp;keywords=tamiya
is different than
http://www.amazon.com/Gundam-Planet-Premium-Nipper-Plastic/dp/B012TMXDAU/ref=cm_cr_arp_d_product_top?ie=UTF8
?? didn't know
If I were to go back in time I would just not have bought it and bought a nicer version of each tool separately since I like to invest in the long run.
In my opinion, the xacto knife that comes with the kit isn't secure enough, ie it may wobble during precise cutting. I'd recommend just getting a hobby knife off Amazon or wherever.
The sidecutters do the job but they aren't great. If you don't cut close to the piece, it won't bruise the plastic, but I would still recommend in investing in a good sidecutter if you're really interested in modeling. I personally use the Tamiya Sidecutters. They're expensive but they cut through the runners like butter.
All in all, the Tamiya basic tool set isn't bad- it's a decent toolkit and you can still use it on any model and still achieve a great finish, but you'll just have to work a bit harder.
If you do get the kits just make sure you have the proper tools. You don't need glue but I'll recommend it.
Here at the 3 items I'll pick up if you were to get this kit.
Tamiya Model Glue
Sharp pointed side cutters
Sanding sticks are nice to have as well.
Tamiya Sharp Pointed Side Cutter https://www.amazon.com/dp/B000J47Z4G/ref=cm_sw_r_cp_apa_zDv9yb4FDB0CC
What's your budget then? They usually range from $30 to $60.
MG Unicorn
MG Sengoku Astray
If he hasn't built anything before, getting him a pair of cutters to go along with the model will help tremendously
Tamiya cutter
The cool thing about RGs and a lot of newer MGs is that the armor parts are specifically designed to hide the seams, so you don't have to worry so much about it. If you want an easier way to do your kits, invest a little money in a really good pair of side cutters, a good blade (I like to use 30 degree-angled blades, for better control). The old #11 X-Acto is too easy to slip and take off more plastic than you want (or part of your finger). Some fine-to-ultra-fine grit sandpaper is useful, too, but not necessary if your cutter and knife do a clean enough job, and you're careful about what you cut. I get my sandpaper at auto supply stores. You can get up to 2000-grit paper and it's a lot cheaper than buying specialty hobby sandpaper. Some fine point tweezers for decals and markings, a cutting pad, and maybe a panel liner or two, and you're good to go. An investment of less than the price of a good Master Grade should get you set up. If you invest a little in good tools, you'll find that the "work" part of the hobby goes a lot more smoothly.
Also: keep those old kits that you think you've messed up. Use them as paint hulks, practice cutting and panel lining on them, use them as victims in dioramas and battle displays; get inspiration from them! They're not mistakes, they're lessons. Oh, and remember that the pictures you see on the blogs and in the magazines are made by artists. Not everyone can draw, or play music, or write poetry, and not everyone can build $2000 garage kits and make them look like museum pieces. That's not the point. The point is that you enjoy it. If you aren't enjoying it, don't do it. But if you like it, practice, and you will get better and better, even if you don't become a Gunpla god(dess).
edit: splelgin
I just recently built my first kits as well, HGUC #40 Zaku II and HGUC #117 Gouf custom, and all I absolutely needed were nippers. Of course, I don't exactly go for perfection, at least not yet. But my nippers are some nice Tamiya ones that cut through the plastic like butter and let me get some really flush cuts from the start.
I haven't done any panel lining, and both of my kits look decent enough without it. I can definitely see where it would help the detail pop though.
I just picked up these sprue cutters: http://www.amazon.com/Xuron-2175ET-Professional-Sprue-Cutter/dp/B001TMZ7QA. So far they are great, and actually cut the plastic rather than break.
The mini's aren't too difficult to build, though I understand it can be overwhelming. There are official build guides (build.kingdomdeath.com). To get started on building you'll need 3 things:
You don't need those exact ones, those are just examples. The most difficult model was the Phoenix probably, but some, like the antelope, are only like 5 pieces.
Did you know the Xurons are Made in the USA? thats actually pretty cool, and in my book another excellent reason to buy.
I just got mine in today, and i noticed it has a lifetime warranty? Might be interesting to check out what that covers... never buy cutters again?
Edit: Found these also, which may be good for small parts on busy tree's http://www.amazon.com/Xuron-2175ET-Professional-Sprue-Cutter/dp/B001TMZ7QA/ref=sr_1_1?ie=UTF8&amp;qid=1372196644&amp;sr=8-1&amp;keywords=2175ET
I use Xuron -- they're awesome. First set lasted me through years and years of Warhammer minis, followed by gunpla. I just replaced that original set with their 2175ET which has a slight blade off-set to reduce strain on the plastic, thus reducing white stress marks. And they're cheap! Best option IMO.
You can use almost any Male RP-SMA antenna that claims to work with the frequencies that matter to you. This is usally means that it claims to work in the 2.4 and 5 GHz range.
The almost is due to the close proximity of the two connectors. They will not be able to accommodate antennas with larger connectors.
These small and cheap ones work, but might not give the full range.
For 55$ nope :D cheap short antennas exist for example. https://www.amazon.com/gp/aw/d/B071LMRK36?psc=1&amp;ref=ppx_pop_mob_b_asin_title
I know that's not what you were looking at but just fyi
I ordered this kit a couple months ago as a starter kit.
https://www.amazon.com/gp/product/B071LB1T5D
Should I be looking at a better cutter? Or is this one fine and it's just my technique that needs work? If it's my technique can you recommend a youtube video or anything that would help me improve?
Maybe these?
https://www.amazon.com/Makerfire-Antenna-RP-SMA-Multicopter-Quadcopter/dp/B071LMRK36/ref=mp_s_a_1_26?crid=1NHXRXHED4WBI&amp;keywords=drone+antenna&amp;qid=1550411329&amp;s=gateway&amp;sprefix=drone+ant&amp;sr=8-26
I use these, it's extremely small and it's extremely fast.
Pro tip, get these to replace the big shark fin antenna
https://www.amazon.com/dp/B071LMRK36/ref=cm_sw_r_cp_api_i_Nc7DDb39NFBVB
Love the scheme, you seem very gifted with painting, how did you get that orange?
&#x200B;
you should try to do something about those mold lines though. I recently bought this kit which really helped me with it as well as for other modeling stuff ( i am not affiliated with them)
You can get much cheaper stuff from other companies. That is at a jacked up price on that website.
http://www.amazon.com/Green-Stuff-Yellow-Epoxy-Putty/dp/B002MB61RQ
I don't know if I'm going to paint Amiibo like figures. I've painted stuff like that before. It has a different surface than normal wargaming figures, so you need to basecoat well(especially if you only want certain parts of the figure done, and not just spray the whole thing).
Once you get a good base you can probably be ok, but you'd need a good varnish or seal coat too.
http://www.amazon.com/Bandai-Hobby-Sazabi-Version-Model/dp/B00EOEBG2Y/ref=sr_1_1?ie=UTF8&amp;qid=1417304074&amp;sr=8-1&amp;keywords=sazabi+ver+ka
Here you go :D well it's not really a store but better than nothin :D
I bought black grey brown on a similar post for my wing zero custom. Black on dark like blue. Gray on whites. Brown on yellows.
https://www.amazon.com/dp/B00HY93GHY/ref=cm_sw_r_cp_apa_3N7PybMJYVF88
This: https://www.amazon.com/dp/B00IZC6C8E/ref=cm_sw_r_cp_apa_Kx3lybYSS9XG9
Awesome little quadcopter for what it is. About the size of your palm so you can fly it indoors or out, durable so you can crash a few times and not worry too much about breaking it, and cheap enough you won't have a heart attack if you do. You're gonna crash a lot learning to fly so don't go for anything crazy to begin with. Get a bunch of extra propellers and a pack of 5 extra batteries and he can fly for about an hour straight, and you're still only around $60. If you want to upgrade from this, there's another version of this same thing with a camera and screen for first person flying that comes in around $100
http://www.amazon.com/gp/product/8499000606 I saw this in the best 20 dollars you can spend thread yesterday. I am anxiously waiting its arrival.
No Amazon considers it an add on item and won't let me buy it alone. Has to be bought with something else making the order more than 25. That's why I was wondering if it matters what brand or if I could pick another one on there like Liquid Cement For Plastics 1 oz https://www.amazon.com/dp/B0006N6ODS/ref=cm_sw_r_cp_api_Bl5FzbVNY0BDB
?? Take it easy Killer, I'm not saying they don't exist, just that none I've ever had haven't had variable pitch. I had this, which is variable pitch and is 20 bucks. Calm it down.
I love these little Hubsan X4’s. I always buy the version without a camera and without the “altitude hold/flight stabilization” horseshit. The basic plain Jane 4”quad. One of the X4’s with a half dozen batteries (always upgrade battery, don’t buy stock lipos they suuuck) and you’ll have an absolute blast for $40. Also great for night flight with the leds.
https://www.amazon.com/Hubsan-H107L-Channel-2-4GHz-Quadcopter/dp/B00IZC6C8E/ref=mp_s_a_1_3?crid=3FQP7KZKRDLF7&amp;keywords=hubsan+x4&amp;qid=1554822023&amp;s=gateway&amp;sprefix=hubsan&amp;sr=8-3
no, its impossible to drop a few drops on a painting board, mix with water and other colors..check out what providers do ->
https://smile.amazon.com/dp/B009LH0YTA/ref=cm\_sw\_em\_r\_mt\_dp\_U\_xX-OCbJTMCEVR
https://smile.amazon.com/dp/B01MTXRUUT/ref=cm\_sw\_em\_r\_mt\_dp\_U\_cY-OCbKJNJB6C
what's this? i can use these to drop dot(s) of paint on a painting board and control the amount of paint being used...this, this is...heresy...contact the emperor! shocking i know..but alas there are better paint containers than these POS's.