(Part 2) Best household painting supplies & tools according to redditors
We found 988 Reddit comments discussing the best household painting supplies & tools. We ranked the 520 resulting products by number of redditors who mentioned them. Here are the products ranked 21-40. You can also go back to the previous section.


As an old house lover (and fellow old house owner), I'm begging you to please restore those windows! It can be done!
I'm making this response extra long and detailed since this question comes up from time to time. Hopefully it can be a resource for others.
But I say this as a guy who bought a real wreck of a house where the previous owner had let everything go. We needed to fix all 45 openings at once as part of a major rehab, and after 6 weeks of effort, about $3000 of experimentation (including taking a week off work and hiring two people to help me), I finally gave up and put in vinyl windows. It completely broke my heart, and my house is uglier because of it. But sometimes, an old window is just too far gone to save. But in that process I learned a lot and I'd like to share a few things.
OK, on to your questions.
General resources and tools I found useful:
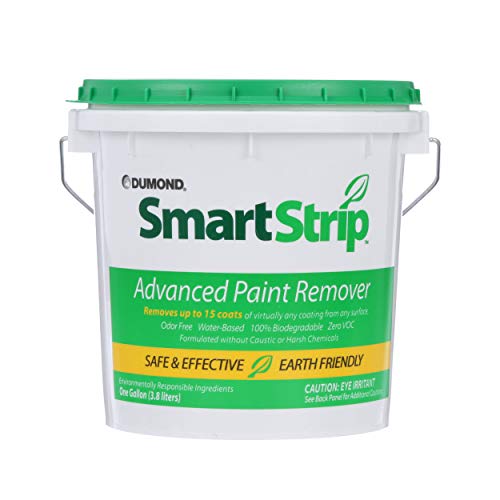
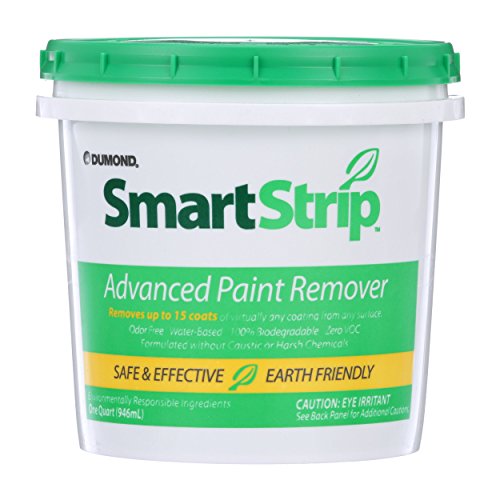
Hey! I actually just did this exact job in my house on the fireplace. Probably about 6-7 layers of paint for me. I did a ton of research and settled on smart strip (amazon link below) - there is also a pretty good YouTube video of someone doing outside brick. I put the paste on very thick and used the waxy paper to cover for 2 full days. When I came back to it with a heavy duty razor scraper, it came off pretty easily. I’d say I still spent 5min per brick on the later part of the process but absolutely love how the project came out.
album of pictures
Smart Strip by Peel Away - 1 Gallon Paint Remover https://www.amazon.com/dp/B001F0KO2S/ref=cm_sw_r_cp_api_5uC-Bb522HRW2
I got one similar but from Lowe’s so I could make sure was heavy duty. ORIENTOOLS Heavy Duty 4-inch Razor Blade Scraper with Long-Handle, Cleaning Glass Wall Scraper, Painting Stripping Tools,Tile Adhesive Removal https://www.amazon.com/dp/B075Z4B54H/ref=cm_sw_r_cp_api_3BC-Bb10Q4KND
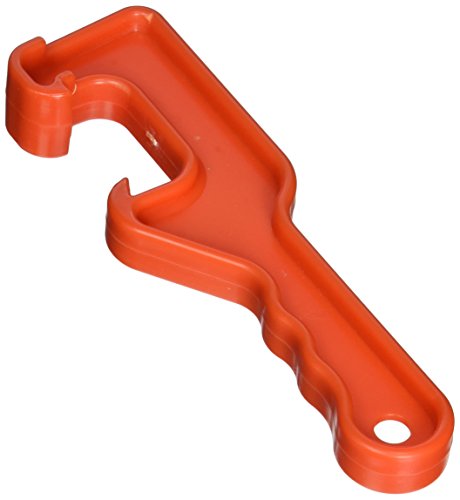
Helps you open the lid on 5 gallon plastic buckets. Here's a similar one.https://www.amazon.com/Linzer-5425-Plastic-5-Gallon-Opener/dp/B000KKPBFE/ref=sr_1_1?ie=UTF8&qid=1485806805&sr=8-1&keywords=5+gal+bucket+lid+opener
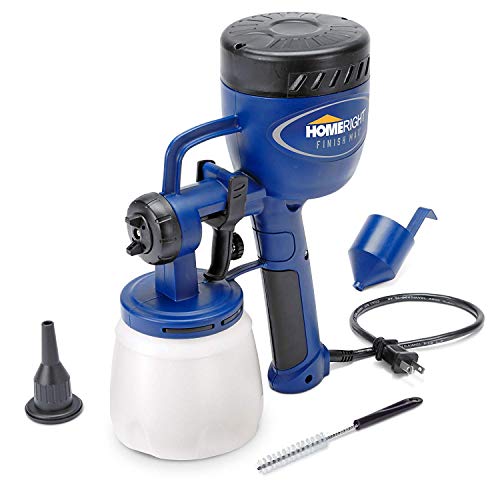
I fought with several sprayers, and kept paying more and more with no luck. Then bought this cheap piece o' crap to spray some stain on a fence (figure it'd be single us) - and it's amazing. Love using it, cheap, simple to use and clean. Most important, sprays great. https://www.amazon.com/HomeRight-C800766-C900076-Painting-Projects/dp/B003VKFDEO/ref=sr_1_2_sspa?keywords=paint+sprayer&qid=1572931296&sr=8-2-spons&psc=1&spLa=ZW5jcnlwdGVkUXVhbGlmaWVyPUExVDRTQjUwOEVEQU0wJmVuY3J5cHRlZElkPUEwMjUxNDUwMzI2M0tIQU4yME5ORSZlbmNyeXB0ZWRBZElkPUEwOTU3MTQ1MVVKTTlQNjNDOURQNyZ3aWRnZXROYW1lPXNwX2F0ZiZhY3Rpb249Y2xpY2tSZWRpcmVjdCZkb05vdExvZ0NsaWNrPXRydWU=
Just speed tape and kapton tape. Both are good at taping things. Kapton is more for electrical, aluminum for insulation. Considering this is just testing I'm sure the speed tape was used just because they have a bunch of it.
https://www.amazon.com/3M-Foil-Tape-3381-Silver/dp/B01GQQ6FOG/ref=sr_1_2?s=industrial&ie=UTF8&qid=1466724251&sr=1-2&keywords=speed+tape
https://www.amazon.com/ProTapes-Pro-Polyimide-Dielectric-Strength/dp/B00DVBLKZE/ref=sr_1_3?ie=UTF8&qid=1466724270&sr=8-3&keywords=kapton+tape
http://www.brainpickings.org/2013/07/31/ai-weiwei-cctv-camera-do-it/
thanks ai weiwei!
and for the lazy ones under us
http://www.amazon.com/Spray-Close-6001-Extender/dp/B0014HBQLA/
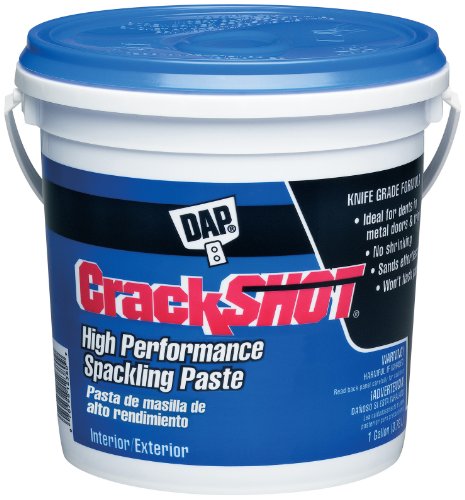
Get something like this, any brand will do - its all the same shit really. I did a real botched job in my last apartment and my landlord had no idea. Just smear it on, wait for it to dry and sand it down. Paint if necessary, but if you are lucky the eggy white tinge might match whatever you are patching.
Tip - you can write it as [item](URL) and it will come out like this - Cheap piece of crap. No more ugly URLs to look at.
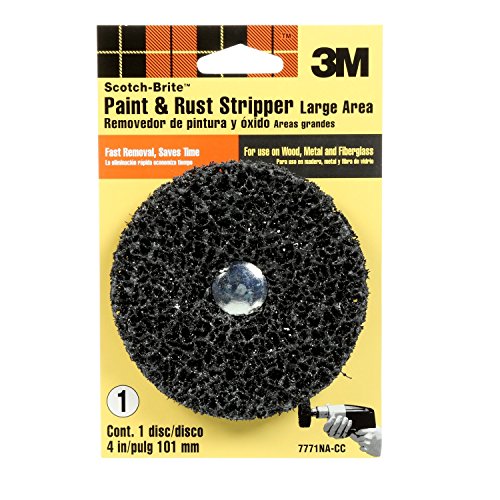
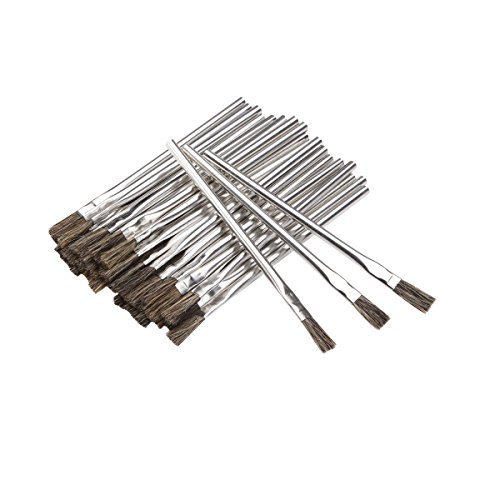
This thing: https://www.amazon.com/3M-Paint-Rust-Stripper-Brush/dp/B000BQT4UK/
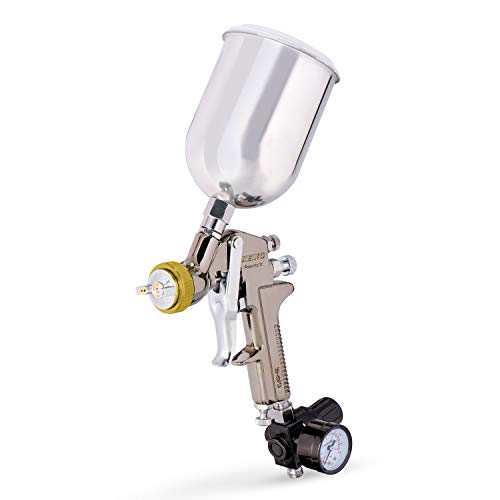
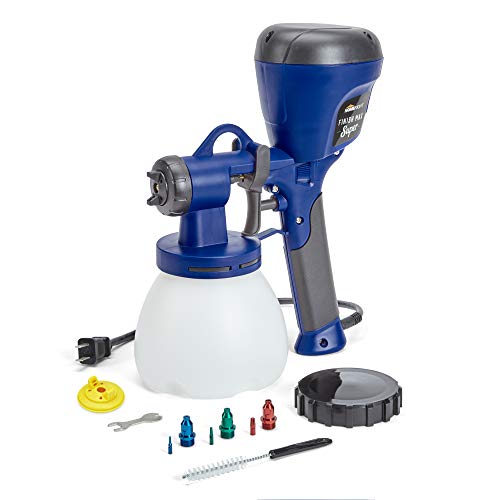
I primed it first did two coats and sanded in between coats then did two coats of paint. I used a spray gun. HomeRight C800971.A Super Finish... https://www.amazon.com/dp/B071X9FZ7R?ref=ppx_pop_mob_ap_share
Or you could buy one of these for half the price and use a 5 gallon bucket. Hell of a lot easier to clean than that thing is, and fewer moving (and plastic) parts to break
http://www.amazon.com/Shur-Line-06572L-Extension-4-Feet-9-Feet/dp/B00192AAC6/ref=sr_1_2?ie=UTF8&qid=1426301800&sr=8-2&keywords=extending+paint+roller
30 bucks or a shitty later leaning on the wall?
This stuff will change your life
That is what I used to remove the orange from my AS VAL
It's very simple. Get something like this and then this for the smaller stripe.
You could do it without a clear coat but the clear coat will make it more resistant to pealing/chipping/more permanent. If you do decide to do a clear coat it's not coming off unless you sand the clear coat and your paint off.
Most helmets/bikes come like this from the factory with their vinyl stickers etc placed on and then just clear coated over.
https://www.amazon.com/Linzer-5425-Plastic-5-Gallon-Opener/dp/B000KKPBFE/
Midwest Supplies also sells them.
My personal friendly letter to your husband:
https://www.amazon.com/Premier-Paint-Roller-69730-Plastic/dp/B000KKKXCU/ref=sr_1_2?ie=UTF8&qid=1487637049&sr=8-2&keywords=drop+cloth
https://www.amazon.com/HomeRight-C800766-Finish-Fine-Sprayer/dp/B003VKFDEO/ref=sr_1_1?ie=UTF8&qid=1487637070&sr=8-1&keywords=paint+sprayer
https://www.amazon.com/ScotchBlue-Painters-Multi-Use-1-41-Inch-60-Yard/dp/B00004Z4DI/ref=sr_1_1?ie=UTF8&qid=1487637095&sr=8-1&keywords=painter%27s+tapehttps://www.amazon.com/3M-8511PB1-Particulate-Respirator-10-Pack/dp/B0002YKBV2/ref=sr_1_5?ie=UTF8&qid=1487637121&sr=8-5&keywords=painter%27s+mask
https://www.amazon.com/Presa-Premium-Paint-Brushes-Piece/dp/B011ARI5IU/ref=sr_1_1?s=hi&ie=UTF8&qid=1487637193&sr=1-1&keywords=paintbrushes
https://www.amazon.com/285143-Rust-Oleum-Ultra-Interior-Chalked/dp/B010FEBFOA/ref=sr_1_1?ie=UTF8&qid=1487637303&sr=8-1&keywords=interior+paint
Or, you know. YELLOW PAGES for actual painters where she IS.
Edit:formatting.
https://www.amazon.com/Neiko-31215A-Gravity-Nozzle-Aluminum/dp/B000UVR458/ref=sr_1_1?ie=UTF8&qid=1494814233&sr=8-1
Paint can opener
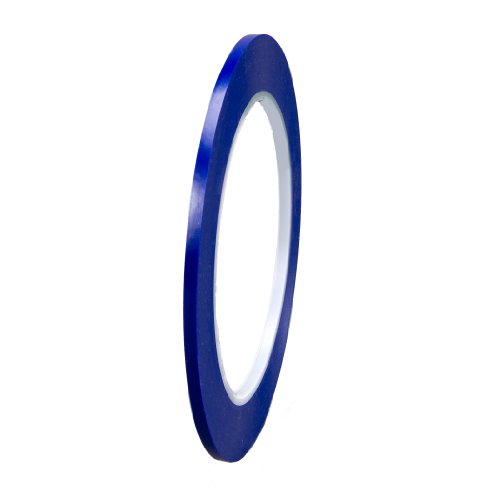
This stuff is the best for sharp crisp lines, i use it for automotive graphics as well as my models.
I find kapton tape to be super helpful in various situations, helping hold things in place, or mask pins off so I don't bridge things by accident. The main reason it's good compared to any other tapes for miscellaneous rework is it's high heat resistance. random example on Amazon
Sorry Reddit didn't show me any notifications, just came across this on my feed (mobile... ffs)
As the other reply says though, Amazon for the win! Got it on Amazon Canada, Just looked for the widest I could find
Scotch-Blue Painter's Tape, Multi-Surface, 2.83-Inch by 60-Yard https://www.amazon.ca/dp/B001EJMS4M/ref=cm_sw_r_cp_apa_-.fWAbJ8PXT9M
https://www.amazon.com/gp/aw/ol/B000ZZYQ6E/ref=olp_tab_all
5 dollars, shipping included. That's after 4 seconds of searching. I'm sure you can find a lower price with more time
Acid brushes dude. Cheap and disposable.
https://www.amazon.com/dp/B006ZBD95Q/ref=cm_sw_r_awd_.8pbvb0YY8D8Z
I went into my project with no experience but I read a bunch of info online and watched some videos. I’ve found I’m better at the paint stripping and my husband is better at the actual glazing.
I use a heat gun as well and usually put a large putty knife over the glass in the area I’m working then let it cool periodically. I try to be really careful so I can preserve the original glass.
Once I get the paint stripped I sand it down to bare wood then stain. I paint the exterior facing part of sash but use a water based finish on the inside. I also strip, stain and finish the interior trim. I’ve been pulling out the sash weights, adding new rope and putting them back together as well. To help with energy efficiency I’ve added bronze spring stripping to seal up some cracks. https://thecraftsmanblog.com/how-to-install-spring-bronze-weatherstripping/
The craftsman blog has a ton of awesome information all in one place but there is other info out there as well.
I’ve found the Hyde Contour tool to be incredibly helpful with the fine areas/detail work. You just lately scrape the paint off then use sand paper to gently smooth out the wood. It’s the best way I’ve found to get rid of the paint without losing the detail work. I believe that was also a recommendation from the craftsman blog.
Hyde Tools 10450 Contour Scraper with 6 Changeable Blades https://www.amazon.com/dp/B000W65L7E/ref=cm_sw_r_cp_api_i_fBfcBbANDB3D3
It’s a tedious project and I didn’t mean for it to escalate to this level. I’m now obsessed with my heat gun and have been removing paint from doors, trim, etc. Just slowly making my way through the house!
I picked this guy up last fall with these projects in mind and haven’t been disappointed.
https://www.amazon.com/Neiko-31215A-Gravity-Nozzle-Aluminum/dp/B000UVR458
As long as it’s not a brush it’s a big step up.
> shower head extenders
YES. Here ya go. Get some teflon tape and wrap the threads when you install it. Nobody likes a leaky shower.
I think this would suffice
Yes. It will look fine, esp with a clean / sharp paint line cut in where wall meets molding. I also wouldn't bother scraping out any old paint or caulk. Waste of time and would make zero diff. in finished job. Might also want to clean up and paint that bb heat sheet metal while your at it.
Where I'm coming from - 18 ys experience doing this kind of work.
I suppose, if you really want to put a ton more time in to this you could get a set of contour scrapers and scrape the top molding down but honestly that won't make a huge diff in finished project.
https://www.amazon.com/Hyde-Tools-10450-Contour-Changeable/dp/B000W65L7E
As /r/rudderusa said, just use mud / joint compound.
I picked up some of this: https://amzn.com/B000ZZYQ6E and it works great. Just apply, smooth it out, let it dry (8'ish hours to be 100% safe), then sand it down and you will be ready to prime and paint.
I carry smartstrip in my store works great and not as caustic to work with.
https://www.amazon.com/Smart-Strip-Peel-Away-Remover/dp/B001F0KO2S
Exactly what I was going to suggest. Get one of these http://www.amazon.com/Spray-Close-6001-Extender/dp/B0014HBQLA and the problem is solved for $20 in under 2 minutes.
I’ve found this set incredibly useful when scraping off paint which has been softened by stripper.
https://www.amazon.com/Hyde-Tools-Available-10450-Changeable/dp/B000W65L7E/
Would you recommend the preval aerosol cans over a regular paint gun like this?
You can take them apart by just drilling out the rivets, and I just use spray paint for the base color. You can use some kind of paint stripper (can grab some from your local hardware store or walmart, but something like this) to remove the paint that is on there if you want, but it's not completely necessary, just make sure you do light coats of spray paint so it sticks nicely.
For the details I use paint pens but you could probably use any paint with fine paint brushes.
Then i finish with a glossy enamel clear coat spray, and just be careful not to spray it on too thick or it can make the paint run or bubble up a bit.
Aside from just "how to do it" some tips:
Dead thread, but just for posterity's sake: I've started experimenting with these.
I think these can be utilized safely. I'm basing a build around a RapidLED aluminum enclosure. This allows me to earth ground anything I may bump in the tent. I've also bought inline fuse holders to limit the current on both legs (independently) of the AC (positioned as close to the main power cord as feasible.) Finally, a little kapton tape to cover the solder joints that can't be heat-shrinked (eg., right on the boards themselves, which are behind a the enclosure's plastic splash-shield to begin with.)
Just a little taste from today's initial testing, I think the 50 watt ICs may be a bit ambitious. I wired up three of them on my 20" enclosure, and even with the 92mm fan going (though in fairness, without thermal compound behind the boards) they were putting off a bit of smoke. Upon shutdown, none of the wires look melted, so I think the smoke must have been from the boards themselves. I'm not sure if this is some initial out-gassing, but I'm uncomfortable with it. I'm going to try again with some 20w & 30w ICs. The flicker that Big Clive talks about on his youtube channel wasn't very noticeable to my naked eye.
They're a great product. However, I use the regular 'ol lids because they're cheaper. Cheaper means I can get more of them. And if it's for long-term, I'm not going to need to open/close them very often at all. The gamma lids aren't necessarily any more air-tight than a regular lid. They're just easier to get on and off. Keep that in mind. How often do you need to remove the lids on your long-term storage buckets? Either way, I use one of these for that purpose, and it's a snap.
Out of curiosity, why are you considering storing the buckets under water? And, is the cistern used for drinking water?
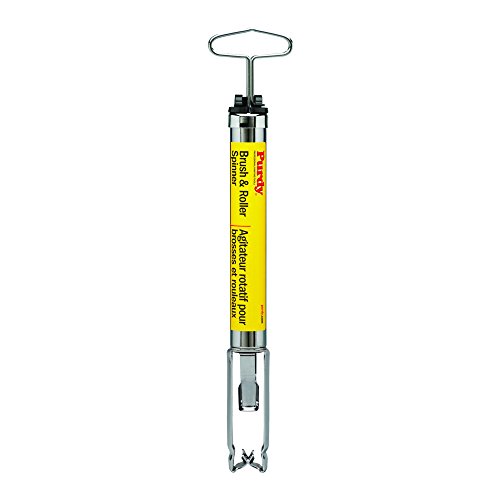
https://www.amazon.com/Purdy-140755200-Roller-Spinner-Cleaning/dp/B00F29A7Y8
this is the one I own, makes quick work of clean up.
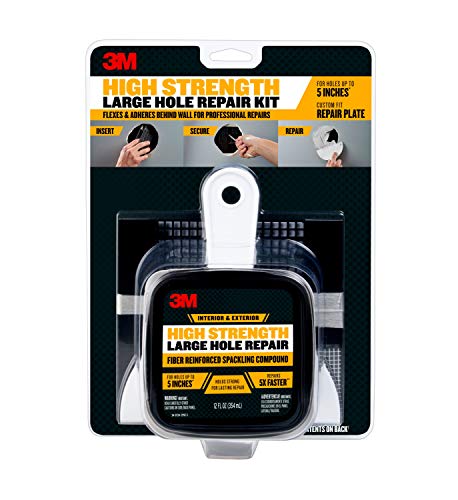
How big is it? If it's less than 5" or so, these kits work well and are pretty self explanatory. There are also instructional videos on youtube. If this is an apartment that you rent, there is limited value in fixing it too well.
That bit about the blotting is the important part. IPA just dissolves the flux. If you don't physically remove it, the IPA evaporates, and the flux is still on the board.
There is a specific tool, which consists of a handle and a blade, and below the blade there is a rig for connecting a plastic grocery bag to catch the stuff as you scrape it. Should be able to find it in the home depot paint department. Here, like this little chingadero
Invest in a good sander and a paint eater
They actually make just that very thing.
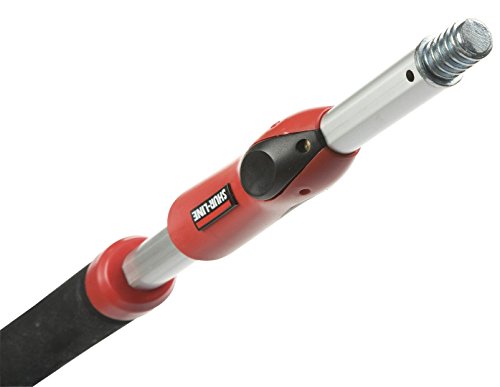
I have used this 4ft-9ft extendable painter's pole made by Shure Line as a light boom. It's very light and easy to operate. You can pick it up at any home improvement store for under $35. They make shorter ones, but I havent used them. You will also need an adapter for the threaded end to convert it to a standard 5/8" light mount. Kacey makes such an adapter and it's available at MPEX for less than $20. On to of that, a lightweight swivel adapter for your flash shoe and you're in business. It won't stand on its own, but I have used 2 straps to strap it to my leg like a splint, and I can walk around with it. Looks ridiculous, but the light is really nice.
Dude I'm with you I just found a used one of these https://www.amazon.com/Shur-Line-6572L-Adjustable-Extension-4-Feet/dp/B00192AAC6 I was planning on buying one for dumpster diving. Saved me money. I can't wait to get a truck so I can go scrapping and dumpster diving.
A spray extender could help in this sort of situation, if you wanted to keep a little distance between yourself and the spray to avoid getting it on yourself and standing in there with the fumes as well, you just screw it on the end of a pole.
Thank you much for this advice. I am reading him all these comments. I hadn't known about skin injection. That doesn't not sound good.
Hey, would skin injection be a problem with a sprayer like this? This isn't a high pressure sprayer right?
https://www.amazon.com/HomeRight-C800971-Painter-Painting-Projects/dp/B071X9FZ7R/ref=sr_1_1?crid=3LA8KMD06TAVN&keywords=homeright+super+finish+max+paint+sprayer&qid=1567987497&s=instant-video&sprefix=homeright+super+finish+max%2Cinstant-video%2C177&sr=8-1
I can't say anything about the Silent Paint Remover, but it basically looks like a gigantic heat gun. Heat guns are fantastic for removing paint from trim, especially with a profile/contour scraper set. As long as you're not stripping the entire side of a house, you should be able to get away with a cheaper hairdryer style heat gun that runs around $40.
Also, to add to what jacobcanflyy says, if you don't want to go for bondage tape, a good alternative is the PTFE, which is teflon tape, or plumbers tape. you can get it for insanely cheap at any hardware store.
pic reference. Don't get it from amazon though, they stiff you on the shipping.
https://www.amazon.com/3M-Paint-Rust-Stripper-Brush/dp/B000BQT4UK/ref=pd_lpo_vtph_469_bs_lp_img_1?_encoding=UTF8&psc=1&refRID=DNZWTQ39A3E22NJBSS9Z
This is pretty much it.
I just use a poster board taped to a wall (gaffers tape) stand the subject a couple feet in front of it. Use a single octabox/flash at roughly 45° as close to them as I can get it without being in frame. Adjust the light stand closer to 0° if the light looks too directional.
Here are some examples: http://m.imgur.com/gallery/iACh4
But since you need something more mobile from the sound of it maybe you could try doing something like mounting a smaller octabox to a painters pole or monopod? Then you have it ready to go. When you need to do a portrait hold it at 45° and shoot with the other hand. You could even skip the octabox and just hold the flash and point it. I've done that for wedding receptions where I can't bounce my flash, but want to avoid setting up stands. I don't know if direct flash will give you the look you want though.
My husband, son and I just moved into a temporary place while my hubby is in school and I HATE it. So, while we stock my house some stuff has to be done. It has the terrible wood paneling and old 70's green sink and bathtub. It's a cheap arrangement to help us save money to get a house after he finishes with his schoolin'. I NEED something to make it more cheerful in here. I plan to paint the walls, but I need primer and I heard this was good stuff. And if at all possible, this shit. Apparently the people who lived here before us had no clue what they were doing with ANYTHING so there's shit that needs fixin'.
Ugh, I appreciate your reply immensely but just fuck.
What kind of saw should I cut with if I go your route?
What does vee out mean?
I know you don't like kits, but how about this kit if I decide to cut out the dent? It uses a plastic piece instead of a square piece of drywall. If it's trash, which lightweight joint compound do you recommend?
You can get a home test kit. You make a cut through the layers to expose all layers. It'll tell you.
But don't eat it. I'm not so sure about heating it either. Lead vaporizes at 1100°. How hot is your heat gun?
I'd go with a good stripper.
Smart Strip by Peel Away® One Quart ‘Sample Size’ Paint Remover
https://www.amazon.com/dp/B001PCVKLK/ref=cm_sw_r_cp_apa_i_cVzcBbVBVB6Y9
I'd go with this remover, not sure about refinishing or repainting, never done metal before.. Good luck!
Dumond Chemicals, Inc. 3301 Smart Strip Advanced Paint Remover, 1 Gallon https://www.amazon.com/dp/B001F0KO2S
I would use this product and after the necessary time, remove it with a plastic scraper. You might need a gallon, depending on the size of the wall. That tile is beautifully well preserved.
Maybe just a brand thing. I'm using the Scotch Blue painters tape: https://www.amazon.ca/gp/product/B001EJMS4M/ref=ppx_yo_dt_b_asin_image_o03_s00?ie=UTF8&psc=1
I don't know if Id recommend it though. In my limited experience Its hard to get fine details in the first layer like holes or text to stick unless you rubbing alcohol the tape first, but when you do large surfaces stick too well and you'll have a hell of a time to get them off. I started using this glue stuff that came as a sample pack in a couple of my 3dprintingcanada.com orders but decided it wasn't worth the mess and hassle. Others have had success with hairspray so I'd give that a shot first.
I miss the stock flexible magnetic build tac that comes with the Ender 3 pro, so I ordered a replacement that I'm going to stick on top of the glass. My bed was so warped from factory that I could almost stick a dime in the middle under a straight edge. Hopefully with a magnetic build tac on top of the glass Ill have the best of both worlds. My temps will suffer and it will be a little heavy but I'm willing to experiment.
If it's too spongy, add a layer of polyimide film tape over the switch.
https://www.amazon.com/dp/B00DVBLKZE/ref=cm_sw_r_cp_awdb_t1_FbUtDbQMAS8T8
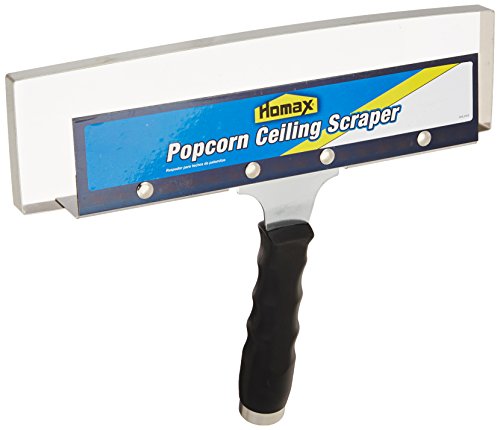
By bubbly, do you mean a popcorn ceiling? If they haven't been painted over, they're easy, if annoying, to remove yourself. We had to do our whole damn house. I have another tool to recommend for that! https://www.amazon.com/gp/product/B0002YSQSW
You'll still want to cover your furniture and electronics, but the bag you attach catches a whole lot of the mess and makes clean up a lot faster. Just spray the ceiling with water and then scrape it off.
Well, I ordered 3 small traschcans, a shower curtain, two types of plungers, a toilet brush, and some plumber's tape so I can install my showerhead
http://www.amazon.com/3M-Vinyl-Tape-471-PN6404/dp/B005EB72WY
It's on Amazon for 11 bucks. It's 2.83" x 60 yards.
https://www.amazon.com/ScotchBlue-Painters-Multi-Use-2-83-Inch-60-Yard/dp/B001EJMS4M/ref=sr_1_1?ie=UTF8&qid=1484372268&sr=8-1&keywords=wide+painters+tape
Thanks. I used the sander just on the rails and stiles. Because the sidelights were originally painted after they were installed there was no paint on the edges and a few coats everywhere else. This would have left a very visible paint line all the way around if I had just painted without sanding first. So I just sanded to blend in where there was paint and where there was none, as well as the loose paint that came up easily. I didn't need to use a heat gun because I was just going to repaint them, not take them all the way to bare wood.
Around the glass I hand-sanded any loose paint and heavy paint bumps. Since the closet is upstairs I didn't have to make it show quality because very few guests will see it.
The sander is a 5" random orbit Bosch ROS20VS. It's several years old, but works great. Never leaves swirl marks.
I've refinished several 100+ year old doors (with a century of paint on them) to bare wood for staining. It's a very tedious job and I hated using heavy solvents, like you. I did find some success using non-fume products like Peel Away. You brush it on and let it sit and it makes scraping off old paint a lot easier. You just have to follow the directions closely and make sure you get it all off (it's water soluble). However, it may still leave very old oil based layers. You may have to just sand, or scrape, those off.
But, the next product I will try for those projects is Smart Strip (https://www.amazon.com/Smart-Strip-Peel-Away-Remover/dp/B001F0KO2S). It's expensive, but seems to get good reviews.
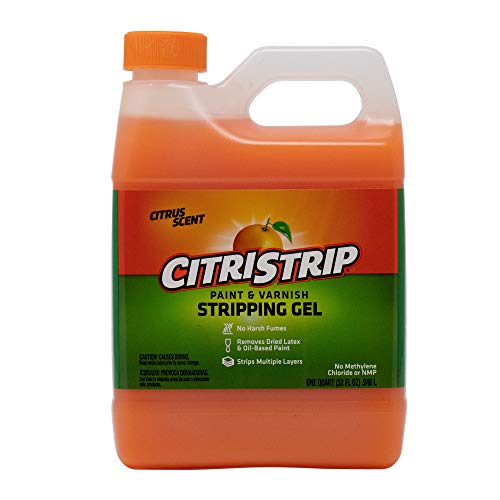
I removed it for the sake of the photograph. Haven’t bothered with removing the paint just yet. Bought some stripping gel last night at the hardware store and it’s worked well for me in the past.
I got this - is good?
I just got a neiko and with a sufficient compressor it seems to do great!
You need a specialized paint remover like Citristrip or Smart Strip. I used Smart Strip on painted wood in my garage and it worked great. Apply thickly with a paintbrush and scrape off with a metal scraper. You may have to refinish or repoly the floor.
https://www.amazon.com/Smart-Strip-Away-Sample-Remover/dp/B001PCVKLK/ref=sr_1_1?ie=UTF8&qid=1492362164&sr=8-1&keywords=smart+strip+paint+remover
This. And when I do intricate things, I use an acid brush.
You have one of these?
has a bag that catches most of the falling junk.
Spin them clean with one of these
Something like this would work: https://www.amazon.com/3M-Repair-Compound-Self-Adhesive-Sanding/dp/B06Y4682NF or https://www.amazon.com/3M-Patch-Primer-Self-Adhesive-Sanding/dp/B00IOQKUQG/
(Drywall repair kits can also be purchased at Lowes, Home Depot, etc.)
Do you have leftover paint for touch-up?
HomeRight Finish Max C800766, C900076 Paint Sprayer Power Painter, Home Paint Sprayer Tool for Spray Painting, HVLP Spray Gun for Painting Projects https://www.amazon.com/dp/B003VKFDEO/ref=cm_sw_r_cp_apa_Fy0ZBbNSZTMXA
I’ve used this spray gun from amazon to do a fence, a shed and a few art projects for Halloween. This thing is amazing. I am by no means a pro, but it did a perfect job, and it’s easy to use, low overspray and super easy to clean.
get one of these poles, adapt a tripod head (can use a $2 paint roller handle) and a remote trigger https://www.amazon.com/Shur-Line-6572L-Adjustable-Extension-4-Feet/dp/B00192AAC6/
If you are serious about clean brushes, this tool will do the job:
https://www.amazon.com/Purdy-140755200-Cleaning-Roller-Spinner/dp/B00F29A7Y8
It does a great job of stripping the paint off each of the bristles.
http://www.amazon.com/Ampro-A1441-PTFE-2-Inch-260-Inch/dp/B003YL4CJC/ref=sr_1_1?ie=UTF8&qid=1341637802&sr=8-1&keywords=ptfe+tape
Tape that small.
Our contractor quoted us $2400 to do two rooms. I bought a $20 tool, some plastic to put down and a water sprayer for $15. Soak the ceiling with water. When it starts to rain in the room, you have almost enough...keep spraying.
Wait about 15 minutes and then scrape. This is the tool you want. Plastic shopping bags clip to the bracket, so what you scrape goes into the shopping bag.
You have to use a stripping gel (like this one: https://www.amazon.com/Citristrip-QCSG801-Paint-Varnish-Stripping/dp/B07LF8T6PM/ref=sr_1_1?keywords=Citri-Strip&qid=1564881339&s=gateway&sr=8-1 ) to remove the protective coating. You should still sand them a bit after but stripping them first saves you a lot of effort.
https://youtu.be/gGLV7fd0-fQ
Takes about 4 hours. For the flat part of the pan I highly recommend using the drill press instead of a handheld drill because it tends to wobble like crazy.
If you do this I highly recommend wearing a painters mask because otherwise your mouth will taste like iron.
You should be able to find a paint stripper disk in a hardware store, something like this:
https://www.amazon.com/3M-Paint-Rust-Stripper-Brush/dp/B000BQT4UK
Buy 2 because they slowly chip away and getting 1 lodge pan smooth takes up about 1.5 of them. You'll need an adapter to attach to the drill and when the adapter starts touching the pan that's when you want to switch the pads out.
The whole idea is to make the cast iron smooth. The smoother the better and trust me unless you do this (or smooth it out some other way) your lodge pan will never be "nonstick".