(Part 2) Best industrial & scientific according to redditors
We found 29,159 Reddit comments discussing the best industrial & scientific. We ranked the 11,986 resulting products by number of redditors who mentioned them. Here are the products ranked 21-40. You can also go back to the previous section.


You could also get a meter that you can plug between the wall socket and the power plug of your computer for pretty cheap, like this one. It tells you exactly how much energy you consumed.
https://www.amazon.com/gp/product/B00U2H451G/ref=ppx_yo_dt_b_asin_image_o05_s00?ie=UTF8&psc=1
Go forth and spread chaos.
I got 4 of these from being a patron to a podcast called Hysteria 51, but they don't seem to be so hard to find
https://www.amazon.com/PHARMEX-1-78G-Permanent-Paper-RECTAL/dp/B00U2H451G
 
Thingiverse
 
Prusa Multi-Material!
We're having a LAN party so...I decided to cut up an existing heartstone model from thingiverse for multi-material.
I'll upload the model to thingiverse later today for my fellow nerds/geeks.
 
Images
 
Print time: 35hrs
Detail: .15mm
Filament:
Stone
Blue
 
The stone filament worked, surprisingly, great with the multi-material. Multi-material is insanely picky about filament quality so I'm pretty happy with the outcome. The first print I tried had some bleeding with the blue, so I increased the wipe tower a bit, which solved the issue.
After months of fighting with the MMU, I think I've finally got it tuned in...knocks on wood.
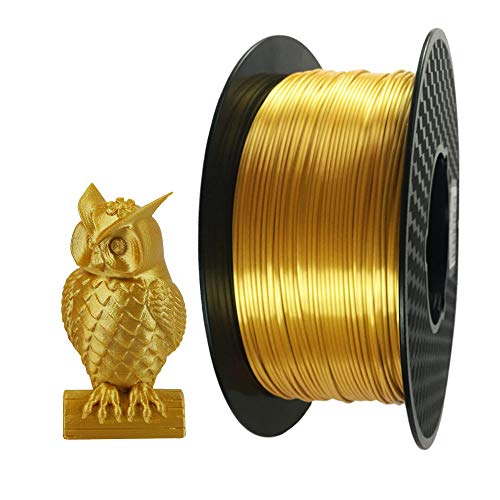
just a cheap generic gold silk pla
https://www.amazon.co.uk/gp/product/B06XRPYXP2/ref=ppx_yo_dt_b_asin_title_o04__o00_s00?ie=UTF8&psc=1
​
Get mechanical grade alcohol, 99%, get it in the pressurized spray can, and regular bottle. Disassemble the GPU and get any parts that got coolant on them out of the system.
Get a clean plastic container that can fit the parts you've gotten wet. Put the alcohol in there from the non pressurized n bottle. Place parts in bath of alcohol, use the pressurized alcohol and qtips to clean your parts. Once done, let dry for at least 48 hours in front of a fan.
I've recovered an entire x99 system this way. Good luck.
Edit
https://www.amazon.com/MG-Chemicals-Isopropyl-Alcohol-Cleaner/dp/B005DNQX3C/
Spray
https://www.amazon.com/dp/B005T8PL1Q
1000 for $8? Worth it.
for extra lulz.
What exactly are you asking?
The price of the filament is $32 for a spool of 1kg.
If you're asking how much it would cost for a company to print it for you, that would depend a lot on the company.
ZIRO 3D Printer Filament PLA... https://www.amazon.com/dp/B01IIAC2MW?ref=ppx_pop_mob_ap_share
True, Amazon has 1000 of them for $6. That specific company sells a lot of other labels for medical use too if you want some more variety in life.
https://www.amazon.com/PHARMEX-1-78G-Permanent-Paper-RECTAL/dp/B00U2H451G/ref=sr_1_1/131-6096589-0436132?ie=UTF8&qid=1527116544&sr=8-1&keywords=rectal+use+only+stickers
Or you could just have 1000 of them shipped to you for $9
Ninety-one percent may be a lot better than 70%, but I wouldn't call it ideal.
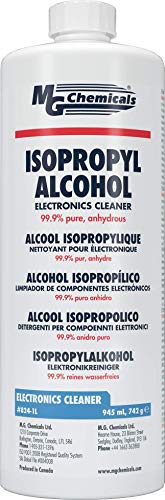
FWIW, I have a bottle of this 99.953%-pure anhydrous isopropyl alcohol, which is even better.
Get a long drill bit and drill through that wood. Get a wireless endoscope and put it down into the hole to see what's in there.
Edit: I would recommend against a paddle bit in case you hit a nail, it'll be ruined.
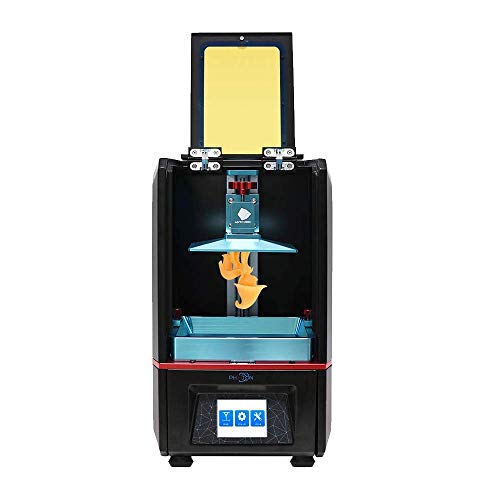
Not plastic. Resin, the Anycubic is a DLP printer, using a liquid resin and a UV display to print the layers. The quality is perfect as perfect as the model you load into the machine. no print lines, this model I only needed supports on the shoulder pads. Everything else was straight printed
Here are some links
Printer: https://www.amazon.com/ANYCUBIC-Assembled-Innovation-Off-line-Printing/dp/B078N2TSYS/ref=sr_1_1_sspa?keywords=anycubic+photon&qid=1554900126&s=gateway&sr=8-1-spons&psc=1
Resin: https://www.amazon.com/Anycubic-POT016-PRINTER-500Mll-500G-Grey-Bottle/dp/B079GR1L19/ref=sr_1_1_sspa?keywords=anycubic+photon+resin&qid=1554900236&s=gateway&sr=8-1-spons&psc=1
Nope, just used Golden filament
Silk Gold 3D Printer PLA Filament... https://www.amazon.com/dp/B06XRPYXP2?ref=ppx_pop_mob_ap_share
SILK PLA is amazing. it DOES have serious issues. the stuff is crazy strong but very very poorly sticks to itself (brittle layer adhesion) Print it hot 220c higher if the plastic behaves for you.
so thin parts? forget it. your not likely to get it off the bed without cracking it (use ultra base)
and even 3 perimeter 25% infill grid parts can "snap" if the nozzles catches an edge (broke my adalinda dragon a few times) and if you drop it it will break.
BUT the results are simply stunning.
Here are some links (gold is not in stock that I can find right now) these are direct non affiliate links. if you want to help me out goto todays3dprint.com and use any of the links their (and then these links) but you don't have to.
Silver (I have not tried this one but they all print the same)
https://www.amazon.com/Silk-Silver-Filament-Printing-Material/dp/B06XSBFB17
Copper
https://www.amazon.com/Silk-Copper-Filament-Printing-Material/dp/B0761PMW3X
if this one was prime I would be ordering one as it looks VERY nice.
These from 3d Solutech are dirt cheap and some of my favorites! I have printed with all of them except the lavendar. I have it just have not used it yet in a print.
They call them "ultra pla"
Yellow
https://www.amazon.com/3D-Solutech-Filament-Dimensional-Accuracy/dp/B01B5KACX8
sample print Drogon
https://www.youtube.com/watch?v=ImOW0N1LNSA
Blue (my favorite)
https://www.amazon.com/3D-Solutech-3DSUPLA175BLU
Sample Print Adalinda (75 hour print truly stunning)
https://www.youtube.com/watch?v=qZV0LTx-MlY&t
Green (out of stock right now)
https://www.amazon.com/3D-Solutech-3DSUPLA175GRN-Dimensional-Accuracy/dp/B01B5KPNUK
Sample Print. Aria Dragon (another truly stunning model)
https://www.youtube.com/watch?v=3g-5oyVsyRA
White
https://www.amazon.com/3D-Solutech-3DSUPLA175WHT-Dimensional-Accuracy/dp/B01B5KFRHO
Sample Print (Loubie Swan)
https://www.youtube.com/watch?v=DOavv-K-mYw
Red (really pink I have yet to find a true RED silk they all come out pink)
https://www.amazon.com/3D-Solutech-3DSUPLA175HPK-Dimensional-Accuracy/dp/B01B5LIL58
Sample Print (faceted Tree)
https://www.youtube.com/watch?v=ZbuFM0UUo2c&t=100s
Here is the GOLD I used (sample print squirrel)
https://www.youtube.com/watch?v=DOavv-K-mYw&t=420s
but its not available right now (not sure if it is coming back or not)
https://www.amazon.com/gp/product/B06XRPYXP2
again. its a PAIN IN THE ASS filament but damn are the results incredible. worth the suffering :-)
again the links are "clear" direct links. if you want to help me visit one of the links to amazon in my videos first which will help me out. or use the direct links here if not.
in general search for "ultra" or "silk" PLA.
Poly Alchemy ALSO makes some disgustingly gorgeous SILK PLA's !! check out Night Shade and Night Sky in particular to be truly awestruck with the beauty of these filaments
Here are some higher resolution images of some of these filaments
Poly Alchemy Night Shade (stunning and dark)
https://i.imgur.com/tyMb4Xn.jpg Another
https://i.imgur.com/fphprtA.jpg
Poly Alchemy Night Sky (I love this one)
https://i.imgur.com/BWv59dv.jpg Another
https://i.imgur.com/9zz93el.jpg
Poly Alchemy Bubble Gum
https://i.imgur.com/6WyaMIY.jpg
Elixr is NOT CHEAP $30 for 750 grams or something like that. (its around $50 a kilo)
in the US Printedsolid.com sells it.
3D Solutech Ultra Green
https://i.imgur.com/5n7nQZx.jpg
As you might be able to tell I REALLY like these plastics :-)
EDIT: HIGH RES ALBUM HERE - https://m.imgur.com/a/CxDxI7d
GIF here: https://giphy.com/gifs/3dprint-U5JfGDUzxcIf1UURwx
This was printed on my Ender 3 pro at .16 mm layer height.
The model is the T-Rex skull from MakerBot: https://www.thingiverse.com/thing:308335
The filament used is Silk Gold PLA from CC3D: https://www.amazon.com/dp/B06XRPYXP2/ref=cm_sw_r_cp_apa_i_QFsCDbK11H8N8
Some more details here :
These are just concept boards I'm making, nothing too serious. They're powered by Teensy 3.2s, have Kailh White Box switches (with temporary caps), and the sticks on the corners are 3DS XL (I believe) joysticks.
The purpose of the joysticks was to have some analog controls, and be able to change their functionality while in use. From mouse, to controller, to more niche functions like quick highlighting, or whatever else I can come up with. Suggestions would be appreciated!
The case isn't anything too special. It's "Marble" PLA, and it has a bunch of holes in it for the purpose of being able to switch wrist rests, or potentially hard mount them to a chair or something similar. The key caps aren't in any particular configuration. I just put on what I had to fit the profiles I wanted, so the outliers are basically random.
If you have any questions or suggestions, let me know! This is just a test / proof of concept, so I'd love to heard your ideas.
EDIT: Adding some more details.
I have one of these in my bag to prevent just such an occurrence. You don't realize how handy they are until you've used one and lost it.
Here you go
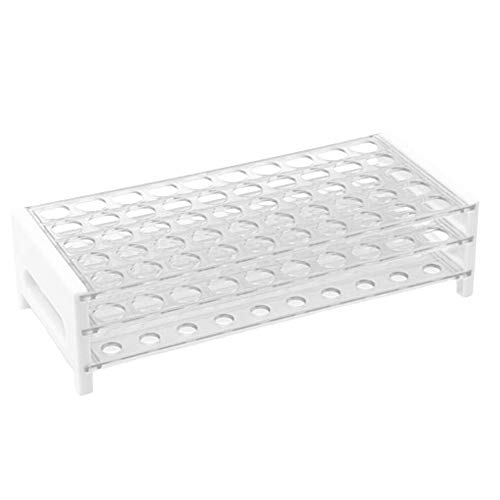
Karter Scientific 208U2 Plastic Test Tube Rack for 15/17 mm Tubes, Holds 50, Detachable https://www.amazon.com/dp/B005Z4QWIK/ref=cm_sw_r_cp_api_i_pWFDCbW4RRGJ5
$5.50 on Amazon and Prime eligible.
Get yourself a pH reader - this is the one I use. Otherwise, you need to stick to approved recipes.
https://smile.amazon.com/ZIRO-Printer-Filament-1-75mm-Marble/dp/B01IIAC2MW/
The picture has a label, Ziro... so it's Ziro Marble Filament. Bit of a misnomer though because it's actually more of a peppered plastic than it is marble. Looks cool though
https://www.amazon.com/PHARMEX-1-78G-Permanent-Paper-RECTAL/dp/B00U2H451G
There you are
Look up "scoping the change key hole" for more
https://books.google.com/books?id=rVFkBgAAQBAJ&lpg=PA57&dq=scoping%20the%20change%20key%20hole&pg=PA61#v=onepage&q=scoping%20the%20change%20key%20hole&f=false
The important information is on page 61 and 62.
I have done this. Took me 4 hours. Drill a small hole for a scope below where you think the bottom of the locking door ends with a couple inches to spare, maybe 5" below the top of the door. Preferably in an inconspicuous spot. Bend and insert the scope, angle up and hope the change key hole isn't covered by a plate. The follow the process in the above link to determine the combo, then use that combo to open the safe.
scope: https://www.amazon.com/dp/B01MYTHWK4/
Mine had a 2nd door below that needed a key. You could always pick that too if you have one. Or just cut the whole thing off.
It was this from amazon!
He found it without a Fluke: http://www.amazon.com/Fluke-1AC-A1-II-Volt-Alert-Non-Contact-Voltage/dp/B000EJ332O/ref=pd_cp_hi_2
Here's the short and dirty list:
That's the quick run down. It's a blast to do, and a helluva lot cheaper than buying at your local B&M! The up-front cost is a little steep, but for about $100 you can get to making some great juice.
I bought this one this past year.
https://www.amazon.com/gp/product/B01MYTHWK4/
Works good. You can take photos, videos with their app.
And in case you run out of battery mid-use, you can also use it while it is plugged in via USB charging.
The printer? It's this guy.
ANYCUBIC Photon https://www.amazon.com/dp/B078N2TSYS/ref=cm_sw_r_cp_apa_i_gpuKDbAPQE7PM
Turn off power at the circuit box. Test that the power is out on the outlet you're going to look at by plugging in a nightlight or something - it shouldn't turn on. Open up the outlet and look at the end of the wires connected to it. If they're silver they're probably aluminum, if they're copper they're probably copper.
Quick and easy, but not foolproof, as you're only looking at the one outlet. If your house has been remodeled it could have a mix.
​
edit: btw...if you own a house or condo you should probably just buy one of these. You put it in an outlet, or touch a wire (even a lamp cord or similar) and it'll glow/beep if there's electricity to it. Something like replacing an outlet or switch with the same kind is dead simple - although if often seems there's no way all those wires will fit back in the wall, they will. This makes it easier to avoid shocking yourself.
well i just got out in the kitchen and experimented. I took ingredients that i thought sounded good together but i took into consideration the pH of things. Thats where vinegar comes in. in order to be shelf stable it has to have a pH of 3.9 or below (as per FDA regulations).
A very simple hot sauce would be Peaches, yellow ghosts, fataliis, and pineapple with some cider vinegar and agave nectar. or you can go the savory route with fresh smoked ghost peppers, pears, white vinegar, garlic, and a touch of salt.
to find the pH you can either use litmus paper or a good pH pen like this
and check this out: http://thehotpepper.com/topic/29501-making-hot-sauce-101/
This is a good conformal coating I've used after cleaning of the board to protect the traces:
https://www.amazon.com/gp/product/B008O9YIV6/ref=ppx_yo_dt_b_asin_title_o01_s00?ie=UTF8&psc=1
https://smile.amazon.com/ZIRO-Printer-Filament-1-75mm-Marble/dp/B01IIAC2MW
https://www.amazon.com/dp/B00U2H451G/ref=cm_sw_r_cp_apa_d7cRBbF95XNBB the ones I bought
Yes, for pharmacy use
PHARMEX 1-78G Permanent Paper Label,"FOR RECTAL USE", 1 9/16" x 3/8", Blue (500 per Roll, 2 Rolls per Box) https://www.amazon.com/dp/B00U2H451G/ref=cm_sw_r_cp_api_i_6MJOCbGPZ9FQZ
https://www.amazon.com/PHARMEX-1-78G-Permanent-Paper-RECTAL/dp/B00U2H451G
So creating this took a bit of practice and patience. Basically, I built the 3d model from scratch using a software called fusion 360. Once I got the model built I used Simplify 3d to get the printing parameters set (layer hight, print speed, nozzle/bed temp etc...)
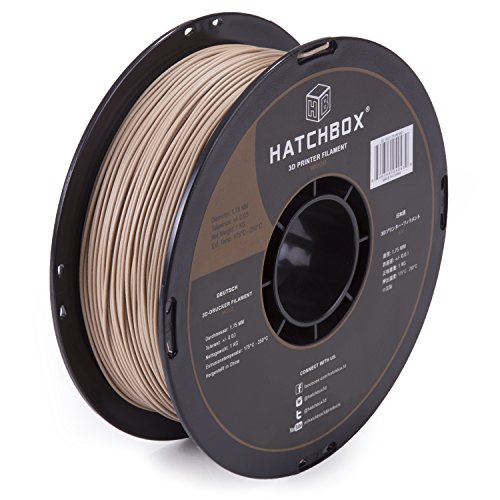
You then send that file directly to the printer for printing. I’m using a JG Aurora A5s which is a relatively cheap intro printer. I loaded it up with some wood PLA filament (amazon link for reference: HATCHBOX 3D Printer Filament, Dimensional Accuracy +/- 0.03mm, 1.75 mm, 1 kg Spool, Wood https://www.amazon.com/dp/B01092XXD4/ref=cm_sw_r_cp_api_i_3AulDbTCWTM9X).
I’m not sure exactly how this filament is made but it seems like a mixture of saw dust and plastic that functions almost exactly like the normal PLA plastic most 3d printers use.
Anyways, once the print is done. (This took about 4-5hrs) you can sand it down and polish out any imperfections the printer may have left. And also being wood, it will absorb any type of wood stain.
You can still see some layer lines but if I adjust the layer hight and put more effort into sanding, then those would be a lot less noticeable.
Hope this helps!
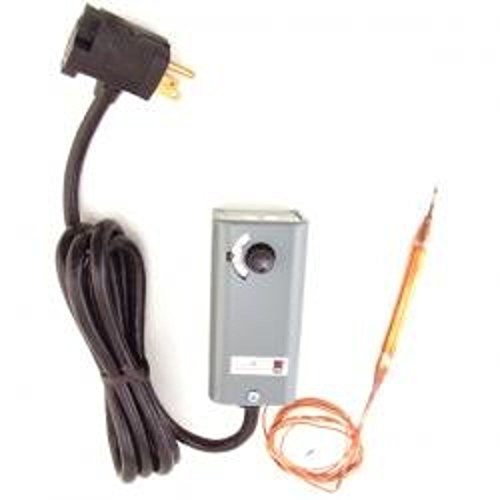
It doesn't take much to convert one either. Just an independent temperature controller like this: http://www.amazon.com/Johnson-Controls-A19AAT-2C-Temperature-Controller/dp/B0002EAL58/ref=sr_1_2?s=home-garden&ie=UTF8&qid=1372450611&sr=1-2
Good PSA
Here are some Links
Oakton PH2
Calibration Solution
Storage Solution
Get a good quality tester and keep it cleaned/calibrated and you will have it for a VERY long time :D
PS. I started out with a $20 PH pen and found out after some PH issues started up that it needed to be calibrated pretty much between each use. If I left it alone for a week it would be off by .3-.5 every time...
> Rubbing alcohol (99% if you can get it)
I'll just leave this here
Link to the thing: https://www.thingiverse.com/thing:2173745
Filament: https://www.amazon.com/Filament-Silk-Gold-Printing-Material/dp/B06XRPYXP2
If you haven't printed one yet you must! It's the best 3D model to use as your first print. Maybe the best 3D model ever! I know this because I'm the world's foremost expert on the Low-Poly Rose Twist Vase (<serious voice> <important-looking nod>) :D
BTW: I have no affiliation with that filament manufacturer. I do love that stuff though (gone through five spools of it now I think)! The silver is pretty good too.
This has been my alternative
Free one-day shipping with Prime, too.
https://smile.amazon.com/PHARMEX-1-78G-Permanent-Paper-RECTAL/dp/B00U2H451G?sa-no-redirect=1
I think you forgot the "For Rectal Use Only" label somewhere....
Buy these "FOR RECTAL USE ONLY" stickers on Amazon.
We had exactly this problem, and went through dozens of different "solutions" until we finally hit it.
The vent stack was clogged.
If you're not familiar with it, a vent stack is a pipe running up to your roof that lets the air out of your drain pipe ahead of the water trying to drain.
Get up on your roof, look for a pipe about 4" across that's just open to the sky. Drop a fiberoptic camera down the pipe to look for a clog. This is the one we used. Once you've found the clog, you can figure out the best way to clear it. We broke it up with fiberglass snap together poles, then put the garden hose down it on full blast.
To me it sounds like electrical portions are being leached into a neighboring unit or something like that.
Since your unit is so small, I'd take a look at the breaker box. Turn off power to everything you have, then flip the breakers to turn everything off. Turn on each thing individually to power only the areas you reside in. If there are any remaining after you have your whole unit powered, they may go to other rooms/units in a past renovation.
It may not turn anything up, but it'd be an interesting experiment to see what turns up.
Edit; If you want to try monitoring some of your things, like your pc, try getting one of these.
I just bought two spools and camelcamelcamel says that it's currently at its all time low price.
https://smile.amazon.com/gp/aw/d/B01092XXD4/ref=mp_s_a_1_1?ie=UTF8&amp;qid=1491709900&amp;sr=8-1&amp;pi=AC_SX236_SY340_QL65&amp;keywords=hatchbox+wood&amp;dpPl=1&amp;dpID=511IFoPtR4L&amp;ref=plSrch
ZIRO 3d Marble Filament https://www.amazon.com/ZIRO-Printer-Filament-1-75mm-Marble/dp/B01IIAC2MW/ref=sr_1_3?keywords=marble+filament&amp;qid=1563198549&amp;s=gateway&amp;sr=8-3
It’s ZIRO “Marble Color” PLA from Amazon! ($21.00)
Awesome Filament. Hides Layer Lines Incredibly Well.
It’s as smooth as normal PLA, just looks textured from the speckles.
This was printed at .2mm on my Ender 3. One of my Favorite Materials And Prints to date!
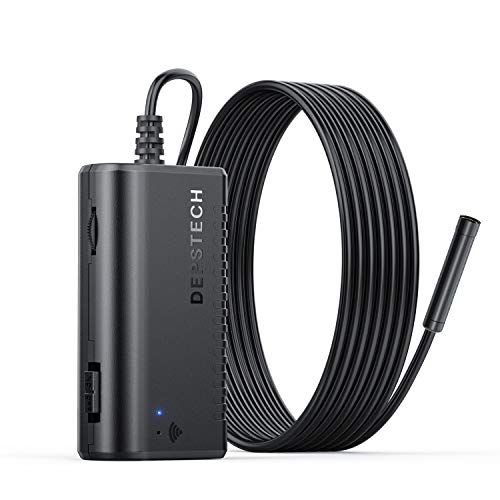
https://www.amazon.com/Depstech-Endoscope-Inspection-Megapixels-Smartphone/dp/B01MYTHWK4/ref=sr_1_3?s=industrial&ie=UTF8&qid=1542329677&sr=1-3&keywords=endoscope
&#x200B;
i bought one similar - stupid handy to have around. A non wifi flexible version is like $16 on amazon.
This is exactly what I would do to identify what fell in there. With a boroscope type camera, there isn't really a reason to tear down an otherwise good engine, you simply put this through the spark plug hole. The better systems have small magnetic tools you can use to pick things up. If they don't have one they should buy one as it will come in handy in the future.
What I've used at work: High End
What I use at home: Cheap Home Use
Use a pencil or something to confirm that it actually goes in.
If it does, something like this could save you a lot of effort to find out it is empty (or find out that it is full of cash and priceless art that you don't want to damage)
DEPSTECH Wireless Endoscope, IP67 Waterproof WiFi Borescope Inspection 2.0 Megapixels HD Snake Camera for Android and iOS Smartphone, iPhone, Samsung, Tablet -Black(11.5FT) https://smile.amazon.com/dp/B01MYTHWK4/ref=cm_sw_r_cp_apa_i_jl0RDb8YEV8VY
I've got two drones but depending on the space it might be impossible to get in there and see anything safely - maybe something like this would work better/easier?
https://www.amazon.com/gp/aw/d/B01MYTHWK4/ref=mp_s_a_1_2?ie=UTF8&amp;qid=1505512430&amp;sr=8-2&amp;pi=AC_SX236_SY340_QL65&amp;keywords=flexible+camera+scope&amp;dpPl=1&amp;dpID=41MF0hUWJXL&amp;ref=plSrch
In the comments from the link he said he used this gold filament:
https://www.amazon.com/Filament-Printing-Material-CC3D-Metallic/dp/B06XRPYXP2?th=1
Depends on what I'm looking for.
Pens For the cheapest deals on readily available imported pens, it's hard to beat Amazon (esp. with Prime Shipping). And of course, there's all the links in the sidebar. But rarer or more exclusive imports are apparently cheaper to acquire at Engeika. I've never used them, though I've heard great things.
Ink Samples The Goulet's have an incredible selection and a really clean website (now with a few bugs, but still aesthetically pleasing), but only 2ml samples. Both Brian Anderson and Todd Nussbaum do 3ml samples, and they also carry Sailor inks (a significant gap in Goulet's coverage). Todd, in particular, is shipping out of AZ, so he's a day or two faster for us impatient west-coasters. Anderson is shipping out of WI, so he's probably closer to you than either the Goulet's or Todd.
Paper Depends on how fancy you want it. My university's bookstore carries Rhodia, so I employ my tax-free discount there. But for really "luxury" papers (as pretentious as that sounds) you can't beat Paperforfountainpens.com. They repackage Japan's Tomoegawa "Tomoe River" paper into notebooks and A5 pads. But mostly I'm writing on the "absorbent-as-paper-towels" shit notepads my work has for free.
Nib tuning/cleaning supplies Almost exclusively at the Goulet's. They have a great selection, sure, but more than that, every single tuning product they sell they have a video teaching you how and when to use it. I did buy a sample tube holder from Amazon instead of the Goulet's, but that's because it holds 50 (to their 40) and I'm already starting into my third 50-tube holder.
Yeah, I was actually surprised at how good the color turned out. Here’s what I used:
Silk Gold 3D Printer PLA Filament 1.75 mm 1 KG (2.2 LBS) Spool 3D Printing Material CC3D Shine Silky Shiny PLA Metal Gold Like Metallic PLA Filament
https://www.amazon.com/dp/B06XRPYXP2/ref=cm_sw_r_cp_api_i_NAHPCbR59STKJ
First grow.
This took 2-3 months. Seems like I ran into a number of first-timer pitfalls along the way. Good learning experience though.
Can't wait. So god damn tired of shady, undependable hook ups.
Edit 2:
Photos of my setup.
Edit 1:
Some have asked about my setup. This is about everything. This is my first grow so take my suggestions with a cup of salt but this stuff has worked well for me.
Tent:
Zero complains. Very happy with this. It just fits perfectly into a closet (had to remove the hanger bar though).
http://www.amazon.com/gp/product/B004U6WCMY
Air
Carbon filter:
The inside of my tent stinks. I smell absolutely nothing outside. Don't get caught. Get a good carbon filter. Maybe not this one, but something.
http://www.amazon.com/gp/product/B004FVJK60
Inline fan:
I hand this outside the tent. No need to take up any space or add any heat inside the tent.
http://www.amazon.com/gp/product/B002JQ14F8
Variable xformer for fan control:
This allows me to control the noise and airflow. Every other fan controller made the fan buzz. This thing is quality built. I keep it around 50v.
http://www.amazon.com/gp/product/B006NGI8VS
Circulation fans:
http://www.amazon.com/gp/product/B004RTMD8C
DWC
Bucket top net pots:
http://www.amazon.com/gp/product/B0049XIIGC
Air pump:
http://www.amazon.com/gp/product/B002JPEVMC
Airline:
The black just prevents light from getting into my res.
http://www.amazon.com/gp/product/B001D4XTUU
Air stones:
http://www.amazon.com/gp/product/B0050HJ7Q6
Check valves:
You NEED these. Many airlines are thin enough that if the power goes out or a hose becomes disconnected, capillary action might permit water to back-flow into your electrical air pump and/or just flood your room. Don't take chances when a .50 cent valve will protect you. There are some horror stories in the aquarium hobby about this. Note, even if the air pump is higher than your res, capillary action can pull the water up through the air hose. This is the same principle that allows 100ft trees carry water from the roots to the canopy.
http://www.amazon.com/gp/product/B00977J508
Lighting
Lights:
Word of warning. Start off a good distance between the lights and your canopy. These product more light than you think and I have burned and cooked plants from keeping these too close. They don't product a ton of heat or anything. I think it's just too much light if they aren't a good foot or so away from the canopy. I assumed I could practically lay LEDs on top of my canopy. Not so.
http://www.amazon.com/gp/product/B00FGFLCXS
Adjustable ropes for lights:
Chains work, these are just faster/easier to adjust.
http://www.amazon.com/gp/product/B0098R0600
Tools
Temp/humidity sensors:
http://www.amazon.com/gp/product/B0013BKDO8
pH pen:
I used to do chemical reagent tests (I have tons of aquariums so I had it laying around). Never again. A pen is fucking awesome for dialing in pH every morning. Get one!
http://www.amazon.com/gp/product/B00EQISYQO
Pruning snips:
These are great. Sharp as fuck and solid.
http://www.amazon.com/gp/product/B00004SD76
Training wire:
What I use for my scrog screen and early training before the screen goes in. Also good for random shit that's temporary enough I don't want to waste a zip tie.
http://www.amazon.com/gp/product/B001EXJ652
Nutes/Water changes
Pond pump:
This is another must have! I've been using these for a while now to handle water changes in my aquariums. It's also awesome for mixing nutes before they go into your DWC. I drop one in a bucket without a hose attached and then just dump all my nutes and such in. The pump does all the mixing. Then I adjust the pH a little. Give the pump about 10-20 seconds to mix my pH up or down in and test again. I don't have to worry my pH adjustment isn't probably mixed yet. I makes the mixing process so easy and fast. I also use these to pump out my res once the scrog screen is in place.
http://www.amazon.com/gp/product/B006M6MSL0
Root protectant:
One of my early problems was with brown algae. This cleared it right up after a week.
http://www.amazon.com/gp/product/B00IGFH3FG
Syringes:
No guess work. I know exactly how many ml I'm adding.
http://www.amazon.com/gp/product/B000RB3CV6
Cal-mag:
http://www.amazon.com/gp/product/B000J2CUPW
pH control:
http://www.amazon.com/gp/product/B000BNKWZY
Nutes:
http://www.amazon.com/gp/product/B000COBT54
http://www.amazon.com/gp/product/B000CO7U02
You can also get a meter and show them. His estimate is good, but the wats would most likely be much lower. Without a GPU you probably hover around 80wats total system draw with peaks just over a 100.
https://www.amazon.com/P3-P4400-Electricity-Usage-Monitor/dp/B00009MDBU
https://www.amazon.com/d/Industrial-Power-Meters/TS-836A-Energy-Voltage-Electricity-Monitor/B00E945SJG
I'm noticing a trend involving multi-tailed foxes...
Very cool, but I have a question. Do you think the filament would still be sensitive enough to heat if it was coated in epoxy such as this stuff to give it a nicer, more "sculpture"-like finish? It'd be fun to have something like this, but I typically do everything I can to obscure print lines on display pieces. Can't prime or paint this though, obviously.
Oh maaan, well Shambs was actually my first ever... everything. First rave, first festival, first trip, first time experiencing EDM. My friends took me under their wing (they have a tradition of spoiling a newbie every year) so I mostly followed them around. Dirtmonkey was memorable AF, I danced around and put for rectal use only stickers on everybody's totem that was there. Pigeon Hole's sunday night set was awesome (despite them being a fill-in). Boogie T was unreal, we just sat at the front of the Pagoda and let PK fuck us up haha. Neon Steve was super rad cause I got to go on stage, BTSM was one of the few artists I was familiar with PRIOR to shams, and honestly I discovered Rezz and fell in love with her! I'm lowkey bummed I missed Dimond Saints and Whipped Cream tho. Overall, 12/10 experience. Changed my life. I will absolutely be there next time with much much much more appreciation for the artists now that I'm more familiar with them and loving the music.
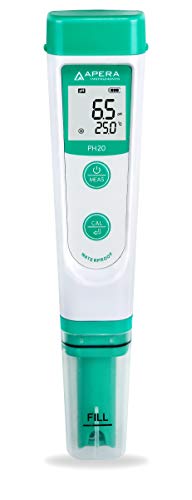
Apera Instruments AI209 PH20 Value Waterproof pH Pocket Tester, ±0.1 pH Accuracy, 0-14.0 pH Range, Complete Kit https://www.amazon.com/dp/B01ENFOHN8/ref=cm_sw_r_cp_apa_B.ftzbRZX6JX1
Edit: Time to transplant, they look big enough and the solo cups have shallow soil to begin with.
Edit2: looks like you have more perlite than soil, I would do a light n feeding after transplant.
Metal Squin Mesh Fabric, very complicated manufacturing process
https://www.amazon.com/Pukido-50x42cm-Metallic-Sequined-Decoration/dp/B07MM4X41H/ref=sr_1_25?keywords=Creativesugar&amp;qid=1562090301&amp;s=gateway&amp;sr=8-25
There are several people on this sub 3D printing on to fabric. Something similar to this might be possible, 1 mm by 1 mm by 0.5mm cubes separated by 0.2mm, using gold 3D printing filament on the underlying cloth.
https://www.amazon.com/Filament-Silk-Gold-Printing-Material/dp/B06XRPYXP2
It's probably fine but considering it's electricity I'd stick with the tried and true. Any electrician in the US will tell you Fluke is the gold standard.
Edit- apparently "less than 20 dollars" is no longer true.
https://www.amazon.com/Fluke-1LAC-Voltage-Detector-1000V/dp/B000EJ332O/ref=sr_1_9?keywords=klein%2Bnon%2Bcontact&qid=1566832341&s=gateway&sr=8-9&th=1
I experienced a similar situation. I was using the drops-based pH testing system and didn't have to use a whole lot of pH up to get a good color out of the tester. When I switched to a digital pH meter I noticed that much more pH up was needed to attain the proper pH range.
Eventually that pH meter drifted so far down the scale that even calibration wouldn't bring it back. I ended up buying a different digital pH meter that has a digital calibration system and it's perfect. It reads much, much more accurately than the other two systems, especially if I calibrate with three pH points: 4.0, 7.0, and 10.0.
Carbon scrubber
measuring glass/syringe
If you're doing hydro there are other nutrients I might recommend getting.
I know a lot of pH pens have bad reviews, this is probably the best one I've seen for the money, no idea if yours is good:
https://www.amazon.com/gp/product/B004G8PWAU/ref=ox_sc_act_title_11?ie=UTF8&amp;psc=1&amp;smid=ATVPDKIKX0DER
Also if you're not necessarily set on LEDs you can get an equivalent/better, MH/HPS light.
If you do go for a better light for the same/less price you could also go with a larger tent. This one isn't very much more but it can support a larger light, and it has some real decent reviews. https://www.amazon.com/dp/B00H9NGP8C/ref=ord_cart_shr?_encoding=UTF8&amp;psc=1&amp;smid=ATVPDKIKX0DER
I would go with a 4'x4' tent at the very least; the one you've linked is too small for a 1000W lamp. I'm doing 4x3x7 right now with 1000W and it's really not easy to keep it cool, I'll often hit 88-90F even with AC in the room. A little bit larger space and it would be much more comfortable.
What are your plans for a growing medium? This might be more important than anything else you're buying! There are also a million options between soil, coco, and the various hydro setups like DWC, ebb and flow, etc. I've had good results with coco coir. You might be best off starting with a decent soil like the Fox Farms lines - pH is much easier to manage in soil.
Speaking of, you also want a good pH meter, and pH up and down. Just get the General Hydroponics pH test kit - it's cheap and you'll have enough to fix pH for your entire grow. For a meter, I recommend this Oakton unit. You'll also want some pH calibration/storage fluid to maintain it properly.
Using Amazon and Medlabsupply for ease (two stop shop). I havent found much better prices (maybe a few cents..) in my homebrew career. My setup is a bit more expensive than whats listed lol.
Equipment
Consumables
Sterilization - dry heat stove method
It's pretty easy to clean this.
ESD circuit board brushes: http://www.amazon.com/Plastic-Handle-Circuit-Static-Brushes/dp/B00BM38YPW
99.95% Alcohol: http://www.amazon.com/MG-Chemicals-Isopropyl-Alcohol-Cleaner/dp/B005DNQX3C/
Distilled Water can be used as well, just give it a few days to dry out.
Dip the brushes in the alcohol, don't just add the alcohol to the board, you'll end up using too much.
Make sure to wait an hour or so to guarantee that its all evaporated.
If you do it like that, I can see your math. However, if you do it like this:
https://www.amazon.com/dp/B00WUPUYCC/ref=cm_sw_r_cp_apa_YptHxb7EHCH6V
https://www.amazon.com/dp/B005F5OJG6/ref=cm_sw_r_cp_apa_KqtHxbP3G3QW7
http://www.carolinaxtract.com/#!product/prd12/3738421821/120ml-sample-100mg-ml-nic-html
http://store.flavorah.com/All-Vaping-Flavors_c_8.html (Or Bull City or ECX or Gremlin, etc. - let's call it $50 in flavoring)
https://www.amazon.com/dp/B005UGBG20/ref=cm_sw_r_cp_apa_TxtHxbBFM078P
https://www.amazon.com/dp/B000B9V20W/ref=cm_sw_r_cp_apa_NBtHxb23GQ99V
You can make ~4L/4000ml of 3mg/ml for ~$150 or a little under $0.04/ml, so ~$4.50 per 120ml with supplies left over.
Maybe I'm mistaken in thinking ~$150 isn't large scale but I'm sure many people on here spend at least that much in a six month period (five 250ml of Blue Dot will run you $187).
Tips.
What you see in the photo will last the average cigar smoker 10+ years and cost you under $25.
Here are a couple of links:
http://www.amazon.com/Essential-Depot-PROPYLENE-GLYCOL-QUART-Propylene-Glycol/dp/B005F5OJG6/ref=sr_1_3?ie=UTF8&amp;qid=1404234989&amp;sr=8-3&amp;keywords=propylene+glycol
http://www.amazon.com/Water-absorbing-crystal-polymer-Insect/dp/B0051V22VS/ref=sr_1_4?ie=UTF8&amp;qid=1404235071&amp;sr=8-4&amp;keywords=soil+crystals
It's just food grade propylene glycol. I bought this big guy - 1qt (32oz) for $13 - and it'll last me for a lifetime.
On that starter kit you mentioned... It's fine, but it isn't the best route if you think you might stick with this.
First up, read up on mixing by weight. /u/Botboy141 has a fantastic write up on it. It ends up being cheaper and faster long term versus mixing with syringes. Take into account that you should use different syringes for each flavor and you'll have to clean them after use... The cleaning murders the time mixing and that kit doesn't have many syringes, so you'll be cleaning a lot.
A break down for you on mixing by weight... It isn't 100% I'd bet, but it should be close enough.
Scale: 16.99 http://www.amazon.com/gp/aw/d/B0012TEQMG - this is the one I have, but the auto shut off is a friggin annoyance. Pick up the one Botboy141 recommends for the extra 14 or so dollars. So let's go with 30
Pipettes: 10.00 for 500 1ml. http://www.amazon.com/gp/aw/d/B005CD2I50
10 for 200 3ml (you can probably find a better price) - http://www.amazon.com/gp/aw/d/B005IQTSE0
Dispensing bottles x2: 7.00 http://www.amazon.com/gp/aw/d/B00B5139AG
Pg: 13.00 http://www.amazon.com/gp/aw/d/B005F5OJG6
Vg: 13.00 http://www.amazon.com/gp/aw/d/B004C7MTLA
Nicotine: 100mg/120ml 19.00 http://www.nudenicotine.com/product/500ml-100mgml-100-pg-nicotine-base-for-mixing-only/ 50 30ml ldpe bottles: 11.00 http://www.amazon.com/gp/aw/d/B00F098JJA
$113, call it 130 with some shipping here and there.
Now add flavors, assuming you get 50 bucks of 8ml vials from wizard labs and you're running closer to 200. This will get you a good bunch of juice and the next time around you'll probably get 4oz bottles of your favorite flavors and maybe some more pg vg nic and possibly pipettes. It's worth the money, but syringes will be cheaper up start costs. You'd probably save about 70 bucks to start, but it'll cost you in frustration and time, which isn't worth the pain from all I remember with them.
Edit: I say wizard only because of the sample size of the vials... You can use bull city, tfa and lorann direct for 4oz and up on a bunch, or any other vendor really. But 50 in wizard with shipping will probably get you 25 or 30 vials.
Syringes will take away the scale and dispensing bottles and pipettes, so 60 bucks actually, and you'll add about 30 back in a bunch of 1ml, a few 3 or 5 and a couple of 10 for pg/vg and14ga blunt needles.
Hopefully that helps a bit. I can reformat it later on the computer if need be.
If it could be used everyone here would use one and save that money. I don't like spending $25 on a fan speed controller either but it needs to be done. The $20 one sucks by the way, it makes your fan hum, get the active air brand it runs quieter or if you really want the quietest get a variac. But that's more money and you're looking to spend less lol. I can help you spend more but not less.
I use these http://www.amazon.com/gp/product/B005Z4QWIK/
I have a speed controller like that, it makes the fan louder actually. This one is worth it if loud fans annoy you https://www.amazon.com/PHC-Enterprise-Variac-Variable-Transformer/dp/B006NGI8VS
3 plants is absolute max for 2x4 and 3 gal pots are prob enough for that. my 3 plants have filled my 2x4 halfway through flower, 2 is a better number if you want good light coverage, 2 plants with 5 gal pots
getya one of these:
http://www.amazon.com/Variac-Variable-Transformer-300va-Output/dp/B006NGI8VS
those cheap ones will make the fan hum. this makes it super quiet
This is what I have. There is no motor hum at any speed. The only thing to hear is the air that's being moved.
http://www.amazon.com/gp/product/B006NGI8VS
Looks like it's painted. If you zoom in you can see the engine intakes and the missile bay on the back are white. There is gold filament that looks pretty nice though.
https://www.amazon.com/Filament-Silk-Gold-Printing-Material/dp/B06XRPYXP2/ref=sr_1_3?keywords=gold+filament&amp;qid=1559185928&amp;s=gateway&amp;sr=8-3
Silk Gold 3D Printer PLA Filament... https://www.amazon.com/dp/B06XRPYXP2?ref=ppx_pop_mob_ap_share this stuff is pretty good but make sure you use it right or you will end up like me...
A few weeks ago, u/mrdead113 posted an amazing vase design, printed in a silk gold PLA: https://www.reddit.com/r/3Dprinting/comments/ane711/monochromatic_vase_in_gold_silk/
&#x200B;
It looked so good that I bought some silk gold PLA too (a different brand: https://www.amazon.ca/gp/product/B06XRPYXP2/) and printed the same vase design at 440mm tall on my MakerBot Z18.
&#x200B;
(Note: I don't recommend MakerBot devices, it's just the biggest printer I have)
Easy.
https://www.amazon.com/MG-Chemicals-Silicone-Modified-Conformal/dp/B008O9YIV6/
I use this on my new winter build. I basically do about 3 packs a day and then toss it in the rack to dry with the dishes and haven't had a problem. Chicago has a lot of snow right now and it's reversed props so it's always packed tight when I get home since they fling the snow at the flight controller.
https://www.amazon.com/MG-Chemicals-Silicone-Modified-Conformal/dp/B008O9YIV6/ref=pd_m_ba_rp_of_2?_encoding=UTF8&amp;psc=1&amp;refRID=C8DPHQ5N2VJN5QBZG0NX
It's normally like this after every flight. https://imgur.com/a/XMGUulZ
Please explain "you cleaned the bottom of the CPU?"
I sure hope you aren't talking about the center of the bottom! That part has many SMD's and should not be touched.
On what surface did you work on the CPU? Did you work on kitchen or wood/tile floor or on carpet?
I've never seen anyone kill a CPU by delidding, except on HEDT CPU's. That's because HEDT's have caps next to the die, by the IHS, and a delid that isn't using the correct kit can cause the IHS to slide over the caps and shear them off. Der8auer explicitly mentioned this in one of his videos. But that is clearly not a problem if all caps are intact.
Delidding a HEDT CPU is far far more risky than a regular consumer chip (e.g. 9900K, 8700K) even ones that are not soldered, all because of those caps.
What nail polish did you use ?? It is made clear that *ONLY* nitrocellulose based nail polish should be used. You can also use conformal coating. https://www.amazon.com/gp/product/B008O9YIV6/
How many coats of nail polish did you use? Usually its recommended to use about 3 coats, letting each coat dry before applying another one.
The laptop issue is surprising. I've probably applied LM on my MSI laptop about god, 30 times now? And it hasn't died yet. I even damaged one of the screwhole HS mounts (Don't ask). Laptop still works fine. How is it possible to break a laptop like this? Did any LM spill out anywhere? Did you check? Did you use a cutout foam dam as a complete spill barrier like I recommend for any direct die LM applications? (this includes delid direct die LGA (desktop), not just BGA)). https://www.amazon.com/gp/product/B002GKC2US/
Are you sure you didn't kill the CPUs by static shock or something? Killing a LGA *AND* BGA chip has me very suspicious about what you actually did.
Silicone conformal coating. You can cover everything with this stuff, fc, escs, vtx, reciever. Keep it out of buttons and connectors, this is where people use a brush and paint on corrosionx.
Did you have one of these?
PHARMEX 1-78G Permanent Paper Label,"FOR RECTAL USE", 1 9/16" x 3/8", Blue (500 per Roll, 2 Rolls per Box) https://www.amazon.com/dp/B00U2H451G/ref=cm_sw_r_cp_api_-6n8BbDZRF18W
If you need another purchase to get free shipping, try the Rectal use only sticker.
For some labeling fun that's more legal, may I suggest "For rectal use only" stickers?
They're smaller, so they're fun to put on screwdrivers, remotes, etc
I have the Micro Swiss on my Maker Select and I love it.
https://www.amazon.com/gp/product/B01E1HANLS/ref=oh_aui_detailpage_o03_s00?ie=UTF8&amp;psc=1
Apera Instruments AI209 PH20 Value Waterproof pH Pocket Tester, ±0.1 pH Accuracy, 0-14.0 pH Range, Complete Kit https://www.amazon.com/dp/B01ENFOHN8?ref=yo_pop_ma_swf
Marble PLA is just light gray PLA that has tiny bits of black PLA added to make it look like marble. I've used this one in the past with good results:
https://www.amazon.com/ZIRO-Printer-Filament-1-75mm-Marble/dp/B01IIAC2MW
Apparently Hatchbox Wood Fill has gone up in price...that was going to be my recommendation.
Otherwise:
Marble PLA
Glow in the Dark PLA
Bronze PLA
Ziro3d marble PLA.. not sure if it's abrasive on a regular brass nozzle, I used a hardened steel just in case https://www.amazon.com/gp/aw/d/B01IIAC2MW/ref=mp_s_a_1_1?ie=UTF8&amp;qid=1522342000&amp;sr=8-1&amp;pi=AC_SX236_SY340_FMwebp_QL65&amp;keywords=ziro+3d+1.75+filament&amp;dpPl=1&amp;dpID=51J8fcvBLhL&amp;ref=plSrch
I was going to suggest this if nobody else had. Also idk how bug the hole is, but there are also affordable endoscope cameras that you could stick in there to see if there are broken bits, cylinder damage etc.
Example: https://www.amazon.com/DEPSTECH-Waterproof-Inspection-Megapixels-Smartphone/dp/B01MYTHWK4/
idk anything about that particular one, was just the first one that came up in a search.
I'm sure I don't remember them all, but the last two cool/useful things were:
A bluetooth OBD-II reader. Diagnose check engine lights, look at various performance metrics, real time monitoring... pretty cool for 50 bucks.
A wireless borescope like this one. I bought it to help run some wires for a new thermostat, but I can see it being really useful in a lot of applications.
Specifically for waterproofing electronics https://www.amazon.com/MG-Chemicals-Silicone-Modified-Conformal/dp/B008O9YIV6/ref=sr_1_1?crid=3EC3ZDK61896K&keywords=silicone+conformal+coating+for+electronics&qid=1557150527&s=gateway&sprefix=silicone+conform%2Caps%2C178&sr=8-1
&#x200B;
While you're at it, pick up a UV pen light also, to check for missed spots.
http://www.amazon.com/gp/product/B008O9YIV6
I've got this on my Shrieker and I've been flying it daily in rain and mud and snow. My only complaint, and I think this will be true with any conformal coating, is that it wicks into micro-buttons and can cause them to stop working if you aren't careful.
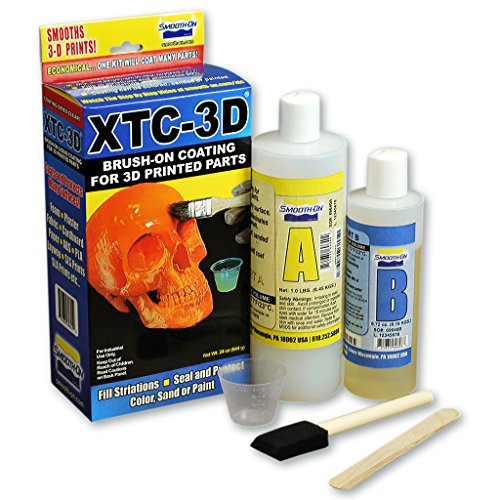
I would recommend saving yourself the effort and using something like [XTC-3D](https://www.amazon.com/Smooth-XTC-3D-Performance-Print-Coating/dp/B00PFXK4JY/ref=sr_1_3?ie=UTF8
) for smoothing out layer lines instead of sanding. PLA and PETG are painful to sand, and ABS is painful to print.
I've been experimenting with different things.
Plastruct Plastic Weld makes a pretty solid bond. The only time I've had trouble with it is lately while trying to bond sections of a sword blade that are 0.3" thick and 3" wide. The sections with the most stress on them can snap if I let it flex enough.
I used Gorilla Glue to glue together pieces that left gaps. It expands and fills, so that was handy. The bond seemed strong, so I'm going to try that on the blade pieces next.
I've also used Loctite gel control super glue and it worked fairly well, but I don't believe the bond is as strong as Plastic Weld.
As for finishing prints, my current method is to use XTC 3D to smooth the print. After that, I prime, sand, and paint using spray paints. I will probably get an airbrush soon to try for nicer looking paint jobs.
Amazon but apparently we bought them out of stock for now which I see as an awesome accomplishment
https://www.amazon.com/PHARMEX-1-78G-Permanent-Paper-RECTAL/dp/B00U2H451G/ref=mp_s_a_1_1_sspa?keywords=for+rectaluse+only+stickers&amp;qid=1557941530&amp;s=gateway&amp;sprefix=for+rectal&amp;sr=8-1-spons&amp;psc=1 is the link to it if you are interested
> I guess we just don’t dispense?
You start switching to these stickers.
Hatchbox wood PLA 1.75mm
Hey everyone!
Was curious if anyone can help me out with this.
It’s an Ender 3 Pro using the Hatchbox wood filament.
Anything small prints fine. Usually good for 2-3 hours no issues.
Anything 4+ hours I come back to a jammed extruded several inches above the print with nothing comes out.
Filament: HATCHBOX 3D Printer Filament,... https://www.amazon.com/dp/B01092XXD4?ref=ppx_pop_mob_ap_share
I recently printed one in this wood filament, which is stainable, and it looked pretty good plain, but fantastic once I stained it. If you have any layer lines, they tend to look like wood grain once you stain it.
https://www.amazon.com/gp/product/B01092XXD4/ref=oh_aui_detailpage_o00_s00?ie=UTF8&psc=1
That said, it seems to have left bits behind in the nozzle, so the white I switched to afterwards kept having little brown bits for a while.
I've really been considering this "marble" PLA, though, because I want to print up the same character as a double size figure and give him a kind of "statue" look.
https://www.amazon.com/AMOLEN-3D-Printer-Filament-Marble-Color-1-75mm-PLA-Filament-Sample-Silk-Bronze-Filament/dp/B072QZL854
Grey worked well, as u/Snownova said. Black, not so much. Any place where a support was hesitant to come off gets really visible when it's unpainted, and the characters are somehow shiny in a bad way.
Weird post to make an image, but go ahead and grab the first one.
Apera Instruments AI209 PH20 Value Waterproof pH Pocket Tester, ±0.1 pH Accuracy, 0-14.0 pH Range, Complete Kit
https://www.amazon.com/dp/B01ENFOHN8/ref=cm_sw_r_cp_api_i_u3h7CbEN27BGJ
I used this one, a few reviews mentioned having trouble with it jamming and such. I printed it hotter than normal (220c) which is maybe why I didn't have any problems.
I've actually had a ton of luck with this: Depstech Wireless Endoscope, WiFi Borescope Inspection 2.0 Megapixels HD Snake Camera for Android and iOS Smartphone, iPhone, Samsung, Tablet -Black(11.5FT) https://www.amazon.com/dp/B01MYTHWK4/ref=cm_sw_r_cp_apa_93X8BbMDFSYGB
It creates a wifi hotspot that you connect your phone or tablet to, and then through an app you can see the camera video. It's much cheaper than some of the Dewalt, Milwaukee, and similar items.
This is a model I found and printed for a friend with this new gold filament that I purchased it came out really well aside from the fact that I printed at .2 layers and not .1 or lower layers like I meant to.
Ganesh 3D scan found on #Thingiverse https://www.thingiverse.com/thing:2545113
Here is the filament I forgot to share it
3D Printer Filament PLA 1.75 mm Silk Gold 1 KG ( 2.2 LBS ) Spool 3D PLA Printing Material https://www.amazon.com/dp/B06XRPYXP2/ref=cm_sw_r_cp_apa_gsVIAbA6ZHJ43
Thingiverse Source: https://www.thingiverse.com/thing:3815748
Printed on an Ender 3 using Silk Gold PLA and placed on a box above an oil diffuser.
^^^^^^^^PHXtourPlz
I haven't tried it myself, but this Gold Silk PLA has gotten good reviews and I've seen people post some really beautiful prints made with it.
We're redoing electric in our house, and the only advice I can give is do not trust any labels unless you've tested it yourself twice. We made an updated wiring map of our house using walkie-talkies and a no-touch tester. There was no logic to the map whatsoever. Half the house turned out to be wired from one 12A breaker. One room had outlets attached to 5 different breakers. Double-taps and duct-taped wires everywhere... It's going to be a long project.
That's quite the range. I'd recommend getting one of these to get a more accurate reading.
Lol sure
https://www.amazon.com/gp/aw/d/B004C7MTLA/ref=mp_s_a_1_7_a_it?ie=UTF8&amp;qid=1505844760&amp;sr=8-7&amp;keywords=pg&amp;dpPl=1&amp;dpID=4162WNRg3oL&amp;ref=plSrch
https://www.amazon.com/gp/aw/d/B005F5OJG6/ref=pd_aw_fbt_121_2?ie=UTF8&amp;psc=1&amp;refRID=00QCF415KADTMNV835CS
Your choice of CBD
Here you go!
https://www.amazon.com/dp/B005Z4QWIK/ref=cm_sw_r_cp_api_7Hqtzb5A24BNF
No. I got the rack from amazon. https://www.amazon.com/gp/product/B005Z4QWIK/
Or if the thing is delicate or expensive (let's not over-volt that old unregulated tube power supply), use a variac.
> AFAIK most fans with speed regulators won't actually be much quieter on the lower setting as it just uses a variable resistor (a rheostat) to control the fan speed. Often they even have an extra buzzing noise. The only good way to alter a fan speed is to alter the AC voltage it receives. To do this you need a variac (variable AC), You can find them for 50 quid but you have to wire them up yourself.
I agree. My rig got much quieter with this variac https://www.amazon.com/PHC-Enterprise-Variac-Variable-Transformer/dp/B006NGI8VS
https://www.amazon.com/gp/aw/d/B078N2TSYS/ref=cm_cr_arp_mb_bdcrb_top?ie=UTF8&amp;th=1&amp;psc=1
Enjoy!
Yep, once you go blue...
Capricorn Bowden PTFE Tubing XS Series 1 Meter for 1.75mm Filament (Genuine Capricorn Premium Tubing) https://www.amazon.com/dp/B079P92HN9/ref=cm_sw_r_cp_api_i_RyguDbVRZAVKJ
I just saw some people print with CC3D Silk Gold that looked freakin amazing.
Best I’ve used so far is Amazon Basics Wood, but the CC3D Silk Metal series is on my to-do list.
Try Gold filament :)
example
This is the stuff I used.
Definitely one of my favorites!
3D Printer Filament PLA 1.75 mm Silk Gold 1 KG (2.2 LBS) Spool 3D PLA Printing Material Silky Shiny PLA https://www.amazon.com/dp/B06XRPYXP2/ref=cm_sw_r_cp_api_tL62BbK8MP47B
https://www.amazon.com/gp/aw/d/B06XRPYXP2?psc=1&amp;ref=ppx_pop_mob_b_asin_image
Here’s the product link.
I just got into this and purchased this 3D printer : ANYCUBIC Photon UV LCD
I absolutely love it. If you want I can message you some pictures of the few minis I've made once I get off work today! I tried the ender 3 printer but it took a bit too much to setup for me but I've heard it can do amazing things too for a lot cheaper.
Yes, still have it - I've run about 1.5L of resin through it, just bought another couple of litres and am starting to think about changing the original FEP sheet out.
My only real complaint is with levelling. It's a bit of a hassle, not because it's hard, per se, it's just that you need to be really precise (you're doing ultra thin layers, after all) and it's easy to get a liiiitle out of whack. Then again, it's pretty much a one-time thing, so it's a marginal complaint in the grand scheme of things. I found it helps to run a piece of paper in each corner to check that they feel pretty much the same; it's easy for one corner to be a little loose. Once I figured that out, I spent maybe 15 - 20 minutes levelling (hold plate down, tighten, check... nope, still not even; loosen, repeat) and haven't touched it since.
As for the S... I think the improved LED is probably the biggest upgrade, since it should reduce cure times and will hopefully produce slightly better prints across the whole platform. That said, I don't know that I'd spend the money to upgrade from my original unit - I've never had any issues with Z wobble and would rather see linear rails if to improve the kinematics anyway. I'd actually be tempted to keep an eye out for sales on the base Photon - Amazon has done a few flash sales lately (LOL, they're actually doing one now!) for $370 or so, and at that price, I don't think the S is worth the premium.
https://www.amazon.com/ANYCUBIC-Assembled-Innovation-Off-line-Printing/dp/B078N2TSYS
Extruder: get a microswiss hotend for it will be able to print flexible and other materials.
Parts cooling: Upgrade to the petsfang 5015 mod for better print cooling.
Auto bed leveling: Get the TH3D ezabl sensor for great bed leveling.
Other mods: motor dampers to reduce noise and vibration
To smoothers to smooth prints
Raspberry pi for octoprint
All metal extruder
Capricorn tubing
Hope I could help 😀
Links:
micro swiss hotend
petsfang part
ezabl sensor
motor dampers
tl smoothers
octoprint link
all metal extuder
capricorn tubing
Also this is what my petsfang with sensor looks like. https://i.imgur.com/sQahB69.jpg
I will give you my top 5.
1.The hard yellow springs $5 and you will have extras. These will help your bed stay level longer. I think I need to check mine once every.. 10 prints or so or every other week, maybe longer. https://www.amazon.com/dp/B013G5I4US/ref=cm_sw_r_cp_apa_i_vkE6Cb8SHNBVG
2.Glass bed. Lowes for $3 cut 2.5mm. Ender 3 bed known to be warped.
3.Pick up a Raspberry pi ~$50 and install octopi/ octoprint.. free, and a mini b to USB cable $5. Now you don't need the to fiddle with micro SD and can manage everything from PC. https://www.amazon.com/dp/B07BC6WH7V/ref=cm_sw_r_cp_apa_i_olE6Cb8J91Q1J
And
https://www.amazon.com/dp/B00P0GI68M/ref=cm_sw_r_cp_apa_i_umE6CbPGSR7T4
4.Raspberry pi cam $25 and longer cable $3 to go with your Raspberry pi octoprint. Now you can monitor prints while "away" .. aka relaxing in your lazy boy watching YouTube vids on how bad season 8 of GOT was. https://www.amazon.com/dp/B01ER2SKFS/ref=cm_sw_r_cp_apa_i_noE6CbXTHCPDS
And
https://www.amazon.com/dp/B00M4DAQH8/ref=cm_sw_r_cp_apa_i_ipE6Cb9RK6QNR
5.Bowden tube $11. Only if you plan on printing hotter then 240c. So petg, abs.. ECT ECT . https://www.amazon.com/dp/B079P92HN9/ref=cm_sw_r_cp_apa_i_KjE6CbDMX6SGE
Hope this helps.
>https://www.amazon.com/gp/product/B079P92HN9/ref=oh_aui_detailpage_o05_s00?ie=UTF8&psc=1
https://www.amazon.com/gp/product/B07F1K1LTC/ref=oh_aui_detailpage_o05_s00?ie=UTF8&psc=1 (a bit more than 20$ now sorry! lol)
You get enough from these two products to upgrade more than one printer as well, I love capricorn tubing, I wish it was just standard with every printer also just double checking that you're using 1.75mm filament I don't know the CR10 that well if that's an option that wont work with these products if you're using a larger filament. Good Luck!
There are several videos on youtube for first time ender 3 setup. Mostly they cover some detailed orientated techniques like...
Open the sensor and coat the board with this.
Edit: inserted hyperlink correctly
Silicone conformal coating is a good choice for where moisture is present, I don't see why not other than it being slightly more expensive. You could also try potting. I recommend this.
Conformal Coat will be durable and microwave safe
MG Chemicals Silicone Modified Conformal Coating, 55 ml Bottle with Brush Cap https://www.amazon.com/dp/B008O9YIV6/ref=cm_sw_r_cp_apa_i_szhYCbWY2KTKM
ESCs (and FC and RX) are coated in conformal compound, its like super thin layer of epoxy. See here: http://amzn.com/B008O9YIV6 Makes it mostly waterproof, in theory at least, not something I want to intentionally test.
And then between ESC and arm is thin piece of double sided foam: http://amzn.com/B007Y7EF4E
Even if it comes loose, there isn't much slack in the wires, so it can't actually move up more than a 1/8 inch or so so its not going to like get hit by a prop or something. I've done similar setup on 2 other quads and not had any issue.
In order to answer this correctly, you need a little more information. You'll need to buy/borrow a power meter and see what your average power consumption is. The 1000w max number really doesn't mean much.
https://www.amazon.com/d/Industrial-Power-Meters/TS-836A-Energy-Voltage-Electricity-Monitor/B00E945SJG
&#x200B;
Once you know how many amps or watts you draw, we can start sizing the system. How critical is it that this system be up and available 24/7? Are you trying to run a server that needs to have a 99.999% up time? Even with solar and batteries, there will be strings of cloudy days that may require you to stay plugged in, or if you can tie the alternator into the batteries, you'll have to run the engine or buy a generator to get you through bad weather days.
&#x200B;
Standard components:
Batteries - Either 12 Volt deep cycle, or pairs of 6 Volts golf cart batteries. Golf cart batteries tend to allow deeper discharge than the 12 Volt deep cycle, but come with lower overall capacity. Two 12 Volts will get you ~400 amp-hour rated capacity, four 6 volts will get you the same capacity, but generally last longer before needing to be replaced.
&#x200B;
120 volt Battery charger - can be a cheap pep-boys battery charger or a dedicated RV converter setup.
&#x200B;
Solar system - Number of panels will be determined once your average usage is known.
&#x200B;
Solar Charge Controller - size will be based on # of panels. Can be super cheap but not efficient, or expensive but efficient.
&#x200B;
Inverter - Takes your 12 Volt battery power and turns it into 120 volt AC to run your computer. You'll need a pure sine wave inverter if you're running electronics. Size will be based on average power consumption of the computer.
&#x200B;
Here's the numbers if you want to size to the full 2000 watt power draw:
&#x200B;
If you want to run the system off of the battery for 14 hours, you'll need the following:
2000 watts for 14 hours equals 28,000 watt-hours, or 28kwh.
The Tesla Power Wall has a capacity of 13.5 kwh, so two of those will get you close.
Battery: https://www.tesla.com/powerwall
I believe the new powerwalls come with built in inverters, so they should be able to output 120 volts directly. Weight = approx 600 lbs with wire and connections, they cost $7,800 each, so you're looking at just over 15k for your batteries. Other industrial sized batteries may be available slightly cheaper.
&#x200B;
Add as many solar panels as you can. You only get 4-7 equivalent hours a day of solar charging based on location:
https://www.nrel.gov/gis/assets/pdfs/solar_dni_2018_01.pdf
The Chevy Astro may be able to fit 4x100 watt panels on the roof. 400 watts for approx. 5 hours a day means you'll be able to charge the batteries about 2kwh per day minus any efficiently losses, so it would take 2 weeks to charge the batteries from dead to full on solar alone. You're basically buying yourself the full 28 kwh required capacity with the 4 solar panels and 2 power walls.
&#x200B;
If the batteries were just about dead when you plugged in at night and you wanted to recharge them while keeping the system running for 10 hours, you would need 2000 / 120 = 16.67 amps to run the computer, and 23.33 amps for 10 hours to charge the batteries. That's 2.8 kw for 10 hours to fully charge the battery, unfortunately, during grid charging, the powerwall charges at a max rate of 1.7 kw. That's 14.16 amps to charge the powerwalls. You would need to max out a 30 amp RV hookup site for a minimum of 16 hours to charge the batteries to last you one day.
&#x200B;
My suggestion, buy one of these, and carry enough gas to run it 24 hours a day.
https://www.amazon.com/Honda-EU3000iS-Starting-Portable-Inverter/dp/B0002XC0V2/
&#x200B;
EDIT: Final suggestion, rent a server and travel with a laptop that will allow you to remote in to the more powerful computer.
&#x200B;
&#x200B;
Yep, I use something like this: https://www.amazon.com/d/Industrial-Power-Meters/TS-836A-Energy-Voltage-Electricity-Monitor/B00E945SJG
There's all price ranges, but the principle is the same, you put it in-between your device and the wall socket, so all current goes through it, then it can show it on a screen. Some of them do real time calculations based on your local electricity prices.
Epoxy and lots of sanding.
I see them so often, that I wonder if it is inevitable with the process. Another approach would be to just smooth them out and paint it. This is a good material for smoothing a print: http://www.amazon.com/XTC-3D-High-Performance-Print-Coating/dp/B00PFXK4JY
Most people are telling you it can't be done, but the truth is there are food grade filaments and techniques for printing food safe parts. I don't recommend you do this, but at the same time I'm happy to provide the following information.
https://all3dp.com/food-safe-3d-printing-material-filament-plastic/
https://www.3dhubs.com/talk/thread/overview-food-safe-3d-printing-materials
Slightly related, I've emailed Smooth-On to confirm their XTC-3D is not food grade.
My best results have been prints in clear resin, but "transparent" PLA can be enhanced as well.
I bought the following:
https://www.amazon.com/gp/product/B00PFXK4JY
You mix it like epoxy, and lightly coat the outside. I use my hands (with gloves). It removes minor blemishes, and makes for a "smoother, shinier" part.
It is not for everyone; sometimes I prefer the "frosted" look on a part.
PRO TIP: Buy a box of thumb tacks. Put a bunch of them point up so your part can dry without sticking to anything.
You can get 1000 of 'em for about 10 bucks.
Hijacking your comment, my friend bought these on amazon and put them on all our shit at work. Fucking dick
https://www.amazon.com/PHARMEX-1-78G-Permanent-Paper-RECTAL/dp/B00U2H451G/
you're welcome.
|Maybe although i feel this is more fitting.
It's PLA with wood fibers that give it a wood like appearance. It's a bit messier to print with because it can gum up the hotend (in my experience) but it can look really nice.
Link
Thanks! It’s Hatchbox Wood PLA. I would’ve preferred a darker color but this was the only one in stock and I’m not a patient man...
https://www.amazon.com/dp/B01092XXD4/ref=cm_sw_r_cp_api_i_I0n0CbFH4KKNR
My own shoutouts:
Hatchbox Wood: https://www.amazon.com/gp/product/B01092XXD4/ref=ppx_yo_dt_b_search_asin_title?ie=UTF8&amp;psc=1
This sands easier than any classic plastic filament, after which you'd swear someone whittled the wood themselves. After stain, it's my very favorite thing to use. It's abominably stringy if you use anything smaller than 0.15mm layers, but that really doesn't matter since you're gonna sand it anyway.
Photos: https://imgur.com/a/wDIbPRq
CCTree Marble: https://www.amazon.com/gp/product/B07CVJJB9Y/ref=ppx_yo_dt_b_search_asin_title?ie=UTF8&amp;psc=1
This prints like butter, but I've been unable to stop it from stringing. It's easier to sand than other non-wood filaments I've tried though. I like the appearance, which seems to naturally hide subtle layer lines like the wood does.
Photos: https://imgur.com/a/R23qBsw
Special mention to Prusament: the very least stringing I've seen among the few filaments I've tried, but I don't buy it because it's expensive in the USA and because the fumes make my eyes hurt while doing squeaky noises in the extruder. Weird.
Photo: https://i.imgur.com/bNYNJYj.png
https://www.amazon.com/gp/product/B01MUAMRN7/ref=oh_aui_search_detailpage?ie=UTF8&amp;psc=1
upgraded carriage plate, should be one of the first things you do, the stock one is flimsy and prone to warping, making the print bed extremely hard to level reliably.
https://www.amazon.com/Micro-Hotend-SLOTTED-Cooling-Wanhao/dp/B01E1HANLS/ref=sr_1_fkmr3_1?ie=UTF8&amp;qid=1497736485&amp;sr=8-1-fkmr3&amp;keywords=i3+plus+all+metal+hotend
all metal hotend will enable you to print at much higher temp, and increase reliability of the print head. not strictly needed, but a great upgrade if you want to print abs, petg, or other higher temp filaments.
https://www.amazon.com/dp/B01HCVJ3K2/ref=sxr_rr_xsim_1?pf_rd_m=ATVPDKIKX0DER&amp;pf_rd_p=3008523062&amp;pd_rd_wg=sUxZ5&amp;pf_rd_r=W5Q7RV181EJYGTBW4YDJ&amp;pf_rd_s=desktop-rhs-carousels&amp;pf_rd_t=301&amp;pd_rd_i=B01HCVJ3K2&amp;pd_rd_w=ZPXZq&amp;pf_rd_i=tri+gorilla&amp;pd_rd_r=F2X8G4XDPCVTNXX6J560&amp;ie=UTF8&amp;qid=1497736655&amp;sr=1
heater bed mosfet upgrade. again, not strictly needed, but also useful for high temp filaments like abs, as you can run the heated bed at higher temps. also solves (small possibility, i3 plus supposedly fixed issue) of stock mosfet burning out and catching fire.
https://www.thingiverse.com/search?q=i3+plus+cooler&amp;sa=&amp;dwh=295945a7ab3d0cd
print a cooling fan shroud, i use the ciiicooler, the diiicooler is great as well. preferably in abs. BIG quality improvement, the stock fan is useless.
these are some of the ones i use, and there's a lot of other things you can do, extruder gear, improved bearings, too many to count really, just a matter of how far you want to go for incremental gains. the carriage plate and the cooling fan shroud are the only strictly necessary ones though.
oh and i made my own version of this z-brace, don't have the files anymore unfortunately, but this one is fine:
https://www.thingiverse.com/thing:1653631
that's also something you should do asap.
I would second the Microswiss. It will be my next nozzle after seeing all the recommendations both here on reddit and on the various other Wanhao/Maker boards. Find it here
I totally recommend the All-Metal extruder Hotend for the i3 as well, once I threw that on, my prints were beautiful.
https://www.amazon.com/gp/product/B01E1HANLS/
Meh... Def not worth the trouble imo.
This one is awesome. https://www.amazon.com/dp/B01ENFOHN8/ref=cm_sw_r_cp_apap_wRPEXgJRekaAc
If that's too expensive for your price range just do the strips or the drops. Waaaay more reliable.
Us or Canada? Cuz he linked Canadian amazon. Apera also has a really good cheaper model that i use.
Apera Instruments AI209 PH20 Value Waterproof pH Pocket Tester, ±0.1 pH Accuracy, 0-14.0 pH Range, Complete Kit https://www.amazon.com/dp/B01ENFOHN8/ref=cm_sw_r_cp_apa_i_OZpvCbD6G9EE5
I have an Apera pen and it works really well. I like it for sure.
I used to use the drops suck, and they suck. It's hard to get an accurate reading. The pen is great for accurate readings, but it takes up to 20 seconds to fix on the correct pH, which at times feels like forever.
This is the one I have: https://www.amazon.com/Apera-Instruments-AI209-Waterproof-Accuracy/dp/B01ENFOHN8/ref=sr_1_2?ie=UTF8&amp;qid=1499548253&amp;sr=8-2&amp;keywords=ph+pen
I have tried a few of the $15-$25 pens on amazon, they all seem very similar and very inaccurate. Eventually I got tired of it and opted to spend a bit more ($50ish) and picked up this meter:
Apera Instruments AI209 PH20 Value Waterproof pH Pocket Tester, ±0.1 pH Accuracy, 0-14.0 pH Range, Complete Kit https://www.amazon.com/dp/B01ENFOHN8/ref=cm_sw_r_cp_apip_NeCAe1dMSV4Nc
And have been extremely pleased with its performance. Quick and accurate readings for both pH and water temperature.
Get the Apera. DON'T GET THE BLUELAB.
> if you dont mind having to calibrate your ph pen every time you use it just get a cheap 10 dollar ph pen. I dont mean to imply that all of them need to be calibrated every single time but i am saying don't expect them to work perfectly.. i advise you just assume that you will need to be calibrating it very very often if you use it very very often so you dont set yourself up for disappointment.
>
> but If you want a solid ph pen get an apera ph pen (i have this one)
>
> I had a yellow ph pen that lasted me a couple months before it went to crap. then i went through two broken Bluelab ph Pens (they werent mine though they were used and handed down from a close friend). I always read about bluelab being the ph pen every one should have. that is bullshit imo. If you do your research you will see lots of stories with bluelabs going to crap, probably because they dried out... but stilll.... its very commmon...
>
> i HIGHLY recommend apera ph Pens. I got the 50 dollar version and it works perfectly just like a bluelab (in working condition) does. It has a one button auto calibration... and it can calibrate using three points if you want.. and its dead on accurate and reminds you when to calibrate and it tells you when the ph reading is stable.. and tells you the temperature of the solution.. Its nice for 50 dollars. Or you can dish out more and get the version that has a repplaceable probe. Keep in mind the replaceable probe is about 40 bucks so i ended up getting the 50-dollar pen thinking that if it ever goes to crap i might as well buy a nother one instead of just replacing the probe...
>
> apera ph pen is probably the only ph pen that averages 4.5 star reviews on amazon (140 reviews is a lot imo). When it comes to ph pens the reviews on amazon speak for themselves if you ask me
https://www.reddit.com/r/microgrowery/comments/6vdl6n/getting_into_dwc_hydroponics_bluelab_guardianpens/dlzpu78/
I wouldn't use the strips they are shit. Get a liquid ph tester kit at the very least, I use this ph meter it works like a charm don't waste money on a cheap ph meter either. You will regret it.
I've been wanting to try this 'marble' filament for a while,
Looks pretty cool.
https://www.amazon.com/ZIRO-Printer-Filament-1-75mm-Marble/dp/B01IIAC2MW/
It's just PLA but that doesn't make it less exciting.
Not too expensive either.
ZIRO 3D Printer Filament PLA 1.75mm... https://www.amazon.com/dp/B01IIAC2MW?ref=yo_pop_ma_swf
At first I didn't really like it. But it has grown on me.
This is using the Ziro marble filament.
It took about 10 hours.
Model of the original at the Minneapolis Art Institute
Some random brand on Amazon.
Try this, I just got some and it's working well.
https://www.amazon.com/gp/product/B01IIAC2MW/ref=ppx_yo_dt_b_asin_title_o00_s00?ie=UTF8&psc=1
I borrowed one of these from a buddy.
DEPSTECH Wireless Endoscope, WiFi Borescope Inspection 2.0 Megapixels HD Snake Camera for Android and iOS Smartphone, iPhone, Samsung, Tablet -Black(11.5FT) https://www.amazon.com/dp/B01MYTHWK4/ref=cm_sw_r_cp_api_i_j3LjDbGN7D7BB
Made a huge difference. I was able to start with small easy to patch holes while I was figuring out the route and made sure I wasn't going to put my hole saw through an electrical cable. Almost felt like cheating.
Just drill a small hole (easy to patch) in the wall and use an inspection camera to peek in and see. If worried about patching walls, pull off a piece of the trim and drill behind that. Then put the trim back and hide the hole.
Here are things from my wishlist (past and present)
Wera Screwdrivers
https://smile.amazon.com/dp/B0085NTQJK/
Oscillating blade set:
https://smile.amazon.com/dp/B0109SELWA/
Clamp multimeter:
https://smile.amazon.com/dp/B00NWGZ4XC/
Kreg Jig Jr.:
https://smile.amazon.com/dp/B000J43A7W/
Angled Long Nose Pliers:
https://smile.amazon.com/dp/B00N3VSS4S/
Groove Lock Pliers:
https://smile.amazon.com/dp/B000FK1R0W/
11 ft wifi endoscope:
https://smile.amazon.com/dp/B01MYTHWK4/
non contact voltage tester:
https://smile.amazon.com/dp/B001UAHZAM/
claw nail puller:
https://smile.amazon.com/dp/B0015YPJMY/
Workmate portable work bench:
https://smile.amazon.com/dp/B000077CQ0/
Cable snake fish tape:
https://smile.amazon.com/dp/B000BP7WBO/
9 Outlet metal power bar:
https://smile.amazon.com/dp/B00F8ZQY5M/
Spade drill bit set:
https://smile.amazon.com/dp/B00099E7WE/
36" bubble level:
https://smile.amazon.com/dp/B000UKMWMO/
You can order an ozone generator to sanitize your ductwork. I used them back when I worked as an auto detailer and ordered one for myself. Damn things are like magic. Family and neighbors are always wanting to borrow it. Hell, I run the thing in the kitchen after I fry stuff (empty house, of course). It's right up there with cheap borescope on my list of stuff that's handy to have, but many homeowners don't think of.
What's the wineador model? if it's got a compressor instead of being thermoelectric you are going to need one of these or something similar.
But yeah what model is it?
My time to shine! I have helped build two kegerators. The first one uses a small chest freezer and holds up to four 5-gallon kegs. We use this one for our homebrews at the house, and simply open the lid to use a cheap picnic tap to dispense the beer.
The second kegerator was a bigger undertaking. This one uses a massive chest freezer (capable of holding 4 full-size kegs and a slim keg simultaneously) and the same type of Temperature Regulator. The main difference is that instead of opening the lid to retrieve beer, we have beer lines leading to a tap wall and chalkboard. How does one get the lines out of the airtight appliance? We had heard a ^(cosmically?) funny story of some chump trying to drill through a wall of his freezer; he pierced a coil and ruined the whole thing.. We wanted to avoid something like that. Although there are no coils in the lid of the freezer, we decided on the method that follows:
Remove the lid from the appliance entirely. Make a rectangular frame of 2x4s the exact size of the top of your chest freezer. Use caulk to get a tight seal on your joints. Drill holes for your beer lines through the wood, rather than through the appliance, and put the freezer lid back on top of your wooden frame. The weight of the lid, in combination with the rubber grommet, should keep your fridge operating efficiently. If you have problems with cool air leaking out, try using big velcro strips to hold the lid on tighter. It seems pretty efficient to me, since one only needs to open the unit to replace a keg.
Best of luck! Pictures when I have them
edit: to have multiple kegs at once off the same Co2 tank requires a "splitter" to divert the gas from 1 to any number of kegs
I have one of these digital controllers which does exactly what you're looking for. I'm super happy with it.
If you're thinking cheaper, there's an analog version as well.
Thanks. I have greatly enjoyed learning the process at home. Even some of the early disappointments were enjoyable to some degree. I would strongly recommend starting with simple ones like cream cheese and goat cheese to get an idea for the process. Plus they don't require real aging so there is immediate gratification.
My cheese cave is just a tiny little mini-fridge I got for free from a friend. I use one of these to regulate the temp. You simply plug the fridge/freezer into it and based on your settings, it controls the power to the fridge. For humidity, just a glass of water in there is the best I can do.
I put together my own curing chamber after falling into the rabbit hole of this subreddit. In total it cost me about $175.
Materials:
Temp Controller
Humidity Controller This humidity controller is much cheaper than other options I saw, you will have to wire it yourself, but it works great!
Ultrasonic Humidifier, I got one for $35 on Amazon.
Humidity Monitor
I simply browsed Craigslist for a suitable full size fridge, and managed to get one for $40. This is the one I got
Let me know if you have any questions Id be happy to help!
\> voltage detector is showing current on the parts that are not lit.
&#x200B;
non-led christmas lights have a shunt that forms when the light's filament burns out, this is so if one bulb burnt out, the series continuity isn't broken and it doesn't take out the whole strand.
&#x200B;
some of the shunts don't form, and that's how those lightkeeper pros are supposed to 'heal' a bad string....by making a big pulse, enough to melt and form those shunts that didn't quite make it.
&#x200B;
http://www.ciphersbyritter.com/RADELECT/LITES/XMSLITES.HTM
&#x200B;
actually, usually that lightkeeper pro voltage detector is pretty crappy, I use this:
&#x200B;
https://www.amazon.com/gp/product/B000EJ332O
That's a big question but if you take it step by step you'll be able to make progress.
Firstly, do you know you're body fat percentage? By looking at your picture I'd guess maybe 12-17%. If you don't know the cheapest and easiest way to check is to use an accu measure caliper. Dirt cheap on Amazon.
https://www.amazon.com/AccuFitness-AM99-Accu-Measure-Body-Caliper/dp/B000QURRUK
Then, use the Katch-McArdle formula on this site:
https://www.muscleforlife.com/tdee-calculator/
Calculate your total daily energy expenditure, add 15-20% to account for bulking and gradually build up you intake by 100-200 kcal per week until you reach your new calorific intake.
Id imagine if you do the calcs you'll end up bulking somewhere between 2500-3000 kcal per day (careful though, if you're an endo/meso like me this may be too high hence the gradual increase).
Bulk up to 15% BF then cut down to 10%. Rinse and repeat!
Heavy, compound lifts, low reps (4-6 for three sets), 3-5 exercises per muscle group. Deadlift, squat, military press, bench press should form the basis of your training. Don't go crazy on the cardio while bulking.
Monitor weekly or daily and tweek accordingly. Ignore people (even me!), and find a system that works, but that's the general starting outline for bulking.
Muscle for life is the website companion to the book I mentioned. Gold mine of info. If this was too much of an info dump, sorry. Or if you knew it already, ignore me.
Check your bodyfat % with a $5 caliper to see where you are at.
If you are really about 16%, I would continue to cut down to ~12-13%, then bulk to 17%, repeat. 3-6 months in each phase, weight changing by about 1 lb per week. Set a basement weight, and each time you come back down to that weight see if you have a slightly lower body fat measurement - which would mean you built & retained more lean mass than you had last time at the same weight.
Basic Info | |
--------- | :---------: |
Gender | Male |
Age | 22 |
Height | 6'0" |
Weight | 167 lbs |
BMI | 22.6 |
BMI Categorization | Normal weight (18.5 - 24.99) |
Estimated Body Fat % | 16% |
Estimated Fat Free Mass | 140 lbs |
*Estimated Fat Mass | 27 lbs |
Estimated Goal Weight @ 20% BF | 175 lbs |
Estimated Goal Weight @ 15% BF | 165 lbs |
*Estimated Goal Weight @ 10% BF | 156 lbs |
Estimated Weight Change for 10% BF | 11 lbs |
Estimated Time @ 1 lb/Week | 2.75 months |
*Estimated Goal Date | 8/29/2016 |
BMR (Calorie burn per day at rest) | 1795 |
Exercise Frequency | 3x / week |
| BMR 1.375 |
TDEE (Calorie burn per day w/ exercise) | 2469 |
Estimates more accurate for untrained individuals. Use a caliper for actual values.
Macros - Male (3x / week) | Calories | Protein (.8g/lb) | Fat (.35g/lb) | Carb | Fiber | lbs / Week |
--------- | :---------: | :---------: | :---------: | :---------: | :---------: | :---------: |
Lose Weight / 20% Deficit | 1975 | 134g | 58g | 229g | 28g | -0.99 |
Lose Weight / 15% Deficit | 2098 | 134g | 58g | 260g | 29g | -0.74 |
Maintain Weight | 2469 | 134g | 58g | 352g | 35g | 0.00 |
Gain Weight / 5% Surplus | 2592 | 134g | 58g | 383g | 36g | 0.25 |
Gain Weight / 10% Surplus | 2716 | 134g | 58g | 414g | 38g | 0.49 |
Calipers are not so expensive.
https://www.berkeleywellness.com/healthy-eating/diet-weight-loss/article/body-fat-scales-step-right
The bf% on scale can be notoriously inaccurate, but there isn't really a way to get an accurate reading on this without going to a research facility and using their dexascan or water weighing machines.
Personally, I have a little caliper and do that as well as measurements. They are usually close enough to the same measurement for me.
I use this calculator: https://www.calculator.net/body-fat-calculator.html
I use these calipers: https://www.amazon.com/AccuFitness-AM99-Accu-Measure-Body-Caliper/dp/B000QURRUK
This helps when the scale hasn't changed.
I finally found and purchased these that have a 0-14 pH testing range, on Amazon. I think for increments smaller than 1 your best bet is to get a digital pH meter (something like this), but those can be pricey.
I've had one of these for almost two years with no problems: http://www.amazon.com/Oakton-EcoTestr-Waterproof-Tester-Range/dp/B004G8PWAU ... Try finding that, or similar on Amazon UK. I think, if my £>$ math is correct, it should be about £30-40
Although I need mine for my own hydroponic botanical needs, I can recommend the meter I use as a low-cost solution if nobody has one for you.
This is the one I use, and it's quite cheap at $15, but will still read just fine. Just get some calibration solution and check it a couple times between uses, until you are satisfied it is keeping calibration, then you can go longer without testing. I kept checking mine and it never lost calibration, so I've been pretty happy with it. It is not waterproof though, and after dropping mine in the reservoir I had to relearn how to read it due to to LCD cells lighting up when they shouldn't (so 5.8 read as 9.8 because the extra line on the 5 lit up.) After recalibrating, it was fine, just wonky to read, testing against drops and ph buffered nutrient solution (always sets itself to 5.8ph) showed it was calibrated fine. So just don't get it wet, and be careful not to break the probe putting the cap back on, as it's made of glass and the cap edge can crush it.
Another better quality one that I hope to get soon is this one, although it is more expensive at $50, it is also waterproof and just all around better quality.
OP delivers
http://www.amazon.com/dp/B005DNQX3C/ref=biss_dp_t_asn
https://www.amazon.ca/MG-Chemicals-99-9-Percent-Isopropyl-Alcohol/dp/B005DNQX3C
http://www.ebay.com/itm/99-ISOPROPYL-ALCOHOL-99-9-High-Purity-Gallon-packed-in-4-qts-/111336493723 <Cheap
99.9% Isopropyl Alcohol
Use 99% isopropyl alcohol (I use this stuff) to degrease the places on which you'll be putting the adhesive bits.
Personally, I spray down a cloth or paper towel with glass cleaner (Windex) then add a few sprays of alcohol and use that for most frame cleaning. Then for things which need to be grease-free I follow up with straight alcohol on a clean paper towel.
I use much stronger degreasers on metal-only parts, such as when cleaning the drivetrain parts when off of the bike. But for anywhere around plastics, alcohol is my go-to. It will not hurt the epoxy in carbon fiber.
(Always remember, carbon fiber is plastic.)
Going to have to fry those headphones.High concentration isopropyl alcoholHe's never gonna hear the end of this!
Okay, here's my answer. I go the oral route. I make a solution using propylene glycol (aka "PG").
My recipe for 4-ACO-DMT: .5g powder --> 4ml PG, combined in a small amber dropper bottle. Shake well until totally smooth. In my experience, 8 drops is a good starter dose. I just put the drops into a beverage and down it.
Obviously, you need a scale. You can get a decent one for under $20. One that is highly recommended the Gemini-20.
Yeah that's not too bad. Of course you can get 1000ml of concentrate for $45! We bought 120ml of concentrate from three sources (1, 2, 3) to compare and she didn't notice a big difference between them. They've all been in the freezer since and still taste fine 3 years later (actually one of them is completely gone and the other 2 are getting pretty low).
I just started with an online calculator and went from there; it's easy to get to whatever % you normally vape at.
I found out quickly that plastic syringes suck - they wear out and the eliquid melts the markings off. So I got a few glass syringes off of ebay (though really I've only ever needed one).
Initially I was super-careful with the nicotine concentrate as it can be fatal in really small doses, but after handling it a bit I realized it's actually very safe and easy to handle. Unless you squirt it in your eye or mouth you aren't going to have a problem - but you definitely need to keep it away from children and pets.
Then a few glass dropper bottles, PG and VG.
Whenever she's getting low she'll order a few different flavorants (usually from here) in 10ml bottles. I rarely mix flavors as it's simpler not to - just dump a full 10ml bottle into a dropper bottle, add 4-6ml of nicotine concentrate, then around 20ml each of PG/VG. Let it sit a week and it's ready to use.
For that $60 you're getting 120 ml you could get started.
$13 for VG
$11 for PG which is optional
Flavors here. Probably end up spending $15-$20. Less if you find a good recipe with a couple flavors
$18 for the higher end nic
Just need 2 1ml syringes with 14g needles and 1 5ml or 10ml syringe with a 14g needle, some bottles (which you can reuse glass bottles), and you're good to go.
First, watch this, then come back: How to make your own E-Liquid : Mixing by Weight - DIY Tutorial I hate youtube tutorials, and I still recommend this, so seriously, watch it.
Now, a warning. You can spend a tiny amount to start DIY, or you can just take the plunge and spend a good chunk, but be set for a while and the cost per ml drops even more.
So you'll need supplies. Other than nicotine and flavorings, Amazon works pretty well.
I put my PG and VG into some squeeze bottles I found at wal-mart for $0.97. Makes dispensing them super easy (just like in the video). You can also find them on Amazon for slightly more, but Walmart is on the way to work, so I just stopped there.
I put my flavors into dripper bottles, which I got from Heartland Vapes, but that only works if you want 100+. Free shipping is at $75, so I also threw flavors into my orders, since I'd need them anyway. Personally, I started with single flavor juices that I knew I'd like. I ordered a lot from MtBakerVapor, and most of their flavors are just single flavor FlavorWest (FW) stuff, so I grabbed them. I made those for a month, then I started buying more flavors (like my favorite, TFA Chai). Now I'm adding more flavors into my juices, judging on what I think would work well (it doesn't always). Start simple, then build on what you learn.
Buy some nicotine from your preferred vendor, if you want nicotine in your juice.
Then wait impatiently while USPS loses your package in San Diego, CA, during which you can download the calculator and experiment with it. The bottom calculator on the side bar is amazing. Now you're going, "Crap, I gotta weigh my liquids!". Well, not really. You can take the specific gravities off the manufacturer data sheets (sometimes there, sometimes right, don't trust the ones from FW), google them, or ask here and someone probably has them. Or, you can use the built-in weights for PG and VG, and then set your flavors to 1ml = 1g. It's close enough.
Most of all, remember to have fun.
Quick tip: Better not enough flavor than too much. Too much flavoring mutes the flavor, not enhances, and spearmint burns your lips when you add too much. You can always add more, you can't take away.
Keep the amount of sweetener low or zero and it will have the biggest impact on coil life. Low flavor will help in general, but some flavors hardly contribute to coil gunk at all, so it depends on which flavors you use. I haven't noticed any difference in the rate I change coils using 50/50 and 70/30, and I use both regularly in different setups.
BTW, it sounds like you are trying to decide between a finished nicotine base, 50/50 or 70/30 with maybe 6mg/ml nic added already, for example... Sorry if I misunderstand. That way does work but I do it the other way around, and mix my flavor base, then add nicotine to suit the order. If you buy VG, PG, and 100mg/ml nic each in its own bottle, you will have infinite flexibility with every bottle you make.
It's cheap too:
https://www.amazon.com/Glycerin-Vegetable-Kosher-USP-Quart/dp/B004C7MTLA/ref=sr_1_4_a_it?ie=UTF8&amp;qid=1506167220&amp;sr=8-4&amp;keywords=vegetable+glycerine
https://www.amazon.com/Propylene-Glycol-Quart-KOSHER-PURE/dp/B005F5OJG6/ref=sr_1_4?ie=UTF8&amp;qid=1506167242&amp;sr=8-4&amp;keywords=propylene+glycol
Scale 30
PG 13
VG 13+7Sh (Price is different from when I bought it, recommend difference source)
100 Pipettes 5
Lorann Sampler 15
Various bottle options, take your pick.
http://www.amazon.com/gp/product/B005F5OJG6/ref=ox_sc_sfl_title_2?ie=UTF8&amp;psc=1&amp;smid=A16NOSQ55ZAIJQ
This is what the lubricant is made out of.
Get a big thing of it.
these test tube holders also work really well for that.
I use one of these test tube holders,. It's just about full though, so either I'll need to get another or user up some ink.
Start small. It'll save you money, let you get your feet wet, and help you learn how to grow better, and then you can buy bigger.
My "starter package" is:
https://www.amazon.com/gp/product/B00SWGYYWO
https://www.amazon.com/gp/product/B01I4NY8KW
https://www.amazon.com/gp/product/B00F8ZQYHA
https://www.amazon.com/gp/product/B0098R0600
https://www.amazon.com/gp/product/B004Q2ER5C/
https://www.amazon.com/gp/product/B006NGI8VS
https://www.amazon.com/Smart-Pots-5-Gallon-Soft-Sided-Container/dp/B002JUOWB2
https://www.amazon.com/FoxFarm-FX14053-12-Quart-Organic-Potting/dp/B001I49Q98
https://www.lowes.com/pd/Garden-Treasures-15-31-in-Rust-Plastic-Plant-Saucer/50445000
https://www.amazon.com/gp/product/B004PS4B08
So for about $420 (heh), you can get your foot in the door and start growing. This is a nice setup too, you can probably save $100 by shopping around, buying used, or doing-it-yourself. I've left off a few odds and ends like dryer duct, Fiskers for trimming, weed fabric pins for low-stress training, pitcher for watering, Mason jars for storage, but you can likely find those or suitable replacements around the house without spending money.
I also have a Raspberry Pi 3 ($43) with Sense Hat ($37) and metal case ($15) in each of my grow tents to log temperature/humidity and other things. I'm interested in eventually using the GPIO functionality to water my plants too. Not critical, but definitely a nice thing to have, especially if you're the hacker type. If you go this route, you might look at raspiviv.com too.
https://www.amazon.com/gp/product/B01C6FFNY4
https://www.amazon.com/gp/product/B014HDG74S
https://www.amazon.com/gp/product/B0722L338Q
I'm glad I bought a good intro setup because I still use it now that I've upgraded. I now have a 3' x 3' GG Shorty tent with HLG 300 LED for flower, a 2' x 2.5' GG Shorty tent with two 400W Roleadro COB's for veg, and my "intro package" is now my germination/cloning tent (and drying tent too since several people suggested that too). Being able to have three tents (germination -> veg -> flower) working simultaneously is increasing my output quite sharply. I'm doing this to help a relative with cancer, so you may not need to go quite as crazy as I did.
You mentioned using 35+ gs (~1.25 oz) a month. You probably aren't going to be able to grow that much given the constraints of tent size and light wattage (plus being a first-time grower! You'll learn a lot!). So once you get used to it, you'll probably want to buy more stuff. Marijuana isn't addictive, but growing marijuana absolutely is.
Once you've got your hardware, the variable cost is seed (~$10), soil (~$5), nutrients (~$20), and electricity (~$30). From that, I'm going to estimate you can grow ~1.5 ozs (you can do more as you learn more though). So you're looking at ~$40/oz after you've made the initial hardware investment.
Hope this helps. Depression, cancer, and everything else can just go suck it.
Awesome controller. I've been thinking about getting this one. It looks very similar to yours. How was your experience with that vendor?
I have a speedster and it sucks donkey balls. As soon as you start turning it down, the fan starts a really annoying humming.
Does yours run smooth at lower speeds?
Variac speed controller
https://www.amazon.com/PHC-Enterprise-Variac-Variable-Transformer/dp/B006NGI8VS
a duct silencer/muffler
https://www.amazon.com/VenTech-VT-FS-6-Muffler-Silencer/dp/B00HWILBSS/
insulated duct and google how to insulate/wrap a inline fan for cannabis
Well you say that, but you just obliterated a resistor by hooking it up to the mains...in any case, I won't lecture you.
A dimmer could work yes. The reason they work without blowing up or dissipating tons of power is AC magic, and we can leave it at that. You could also use a variable transformer such as a variac.
When air is moving we dont think that there is an electric motor turning it but not getting the benefit of the air since we redirect it. A little noise to make sure there isnt a fire is a fine exchange. If it is too loud this way try moving it in the attic away from any walls.
This is the fan set up I use and once its mounted it stays quiet.
http://www.amazon.com/gp/product/B006Z1JLY4/ref=oh_aui_detailpage_o00_s00?ie=UTF8&amp;psc=1
http://www.amazon.com/gp/product/B006NGI8VS/ref=oh_aui_detailpage_o03_s00?ie=UTF8&amp;psc=1
The transformer made all of the difference. I keep it set at about 75% of maximum.
Another sweet tip- Get a small chest freezer off Craigslist and convert it to a refrigerator with a Johnson controls regulator https://www.amazon.com/Johnson-Controls-A19AAT-2C-Temperature-Controller/dp/B0002EAL58/ref=mp_s_a_1_2?keywords=johnson+kegerator&amp;qid=1566823193&amp;s=gateway&amp;sr=8-2 . They use about 1/10th the power, are bigger and super cheap. I did this in my rig and love it. I put it right under the counter and cut the counter to flip up.I only have 150 watts of solar and 200AH of battery and can run the refrigerator non stop and charge the batteries. The capacity is also much larger.
Alright, That was a quick message off my phone.
Freezer - Sams Club - $199 - I bought at our local SAM's. I just put my kegs in there and use picnic tabs, I am working on setting up a wood collar to add taps.
Power/Temp Control - I bought this off amazon because it was cheeper than locally. There is also a digital version (costs more) I didn't see any reason to go with it.
CO2 tank, regulator, hoses, ETC: bad teacher brewing on South Airport, they also have the temp control. I would recommend a 20LB tank if you can fit it and afford it. 5lbs are nice, they are easy to move but you will get the most "bang for your buck" our of a 20lb when doing refills and the time it will last.
Filling your CO2 tank - Northern Fire and safety is going to be the best. They are reasonable and WAY cheaper than Air Gas.
I hope this gives you a good starting point. I can provide some more advice.
Would this work for temp control?
Johnson Controls A19AAT-2C Freezer Temperature Controller https://www.amazon.com/dp/B0002EAL58/ref=cm_sw_r_cp_awd_1j1FwbY9VRKHE
after reading through this thread, a couple people referenced the Johnson control units.
seems fairly simple to regulate the fridges temp this way.
Buy a cheap used chest freezer for cheap off of craigslist (many for sale usually): ~$50-100
Buy a temperature controller off of Amazon: $49
http://www.amazon.com/Johnson-Controls-A19AAT-2C-Temperature-Controller/dp/B0002EAL58
Throw in the probe, set the temperature, plug them in, and then fill with beer when you notice it working. Problem solved, possibly under $100.
My father did almost the same thing except he was attempting to make a keg fridge out of a stand up freezer and tried drilling holes in the side. Brand new unit that wasn't even plugged in yet was toast. You have all the important parts to make a new one. You should be able to pick up a chest freezer for a reasonable amount of money such as http://www.samsclub.com/sams/ge-chest-freezer-5-cu-ft/124989.ip and then you can buy something like this http://www.amazon.com/Johnson-Controls-A19AAT-2C-Temperature-Controller/dp/B0002EAL58 and set the temp to whatever you want This is going to be by far your cheapest solution if you remember to drill your holes in the lid and nowhere else (coolant lines don't run in the lid.) I have the same freezer and I can tell you it will fit 3 of those 5 gal pop kegs that it sounds like you're using. plus space for your CO2 source as long as the bottle isn't too big. Doing this setup might be a bit more energy efficient as well seeing you're using an external control on a better pump that gets cooler faster and has just as good if not better insulating than normal fridge style keggerators...
Yes, this one.
i decided on the Johnson because the wire is thin enough I don't have to drill and can just place it under the lid.
You'll see the copper wire in the top-right corner. Also next to it is a thermostat to make sure it's actually hitting my temperature which right now is 62F.
The glass of water is to place the probe into once the water gets to temp that way I'm not getting false readings from the side or the air and I know what the liquid temperature is to get a better reading of what the beer is actually at.
I use This as my temperature controller, and it works really well. I keep a digital probe in there as well, so I can zero in on the actual temp.
Good idea man. You can buy external control boxes and run that thing at your desired temp. Not sure if that works for your set up, but...FYI.
Freezer control
Honestly I think you're better off with a fridge, for the amount of time and money it would take to build an "icebox" like the Son of Fermentation.
You can get external temperature controllers that don't require any wiring at all, like this one.
If you’re looking for a non contact voltage tester ( tick tracer) my personal favorite is the fluke.
Fluke 1AC-A1-II VoltAlert Non-Contact Voltage Tester https://www.amazon.com/dp/B000EJ332O/ref=cm_sw_r_cp_api_i_PMRkDb24ADV56
If you’re looking for a wiggy to check actual voltage I would recommend buying a volt meter. I currently use this one and love it.
Fluke T5600 Electrical Voltage, Continuity and Current Tester https://www.amazon.com/dp/B0006Z3GZU/ref=cm_sw_r_cp_api_i_rPRkDbNV768AZ
> I'd at least take it apart and use a multi-meter to see if the wires are hot.
I would NOT recommend using a multi-meter to see if the wires are hot. Get yourself one of these things. I consider them an absolute essential for any homeowner or DIY'er. It's a very easy, and relatively safe, way to test for a live cable.
> I would NOT recommend using a multi-meter to see if the wires are hot.
Why not? Also, you can use https://www.amazon.com/dp/B000EJ332O as the url, you don't have to add all that extra crap to it
For 80% of hardware work you just need a good, solid multi-tipped magnetic screwdriver and a pez dispenser full of excedrin.
Toss in a power supply tester like a Dr. Power II and you have nearly all hardware tools you need.
Just be aware that many software tools on Hirens are only licensed for personal use, using them for professional use would be a violation of license agreement.
If you're going to be checking networks, you're going to want a good fluke toner, and a fluke voltage tester so you don't kill yourself
You're also going to want a cat5 crimper that won't break
If you're troubleshooting big networks then pick up a fluke microscanner II, but only if it will save you several thousand bucks in effort.
I should also mention I like this one best because the Klein ones can be sensitive to bumping and give off false positives: Fluke 1AC-A1-II VoltAlert Non-Contact Voltage Tester https://www.amazon.com/dp/B000EJ332O/ref=cm_sw_r_cp_apa_i_5HP2Db6VTSXP3
It looks like you're trying to format a word into a link. Try this instead:
> [this](https://www.amazon.com/dp/B000EJ332O)
Result: this
Got it fixed? Downvote to delete.
***
^^Note: ^^Edits ^^appear ^^invisible ^^if ^^made ^^soon ^^after ^^posting. ^^| ^^I'm ^^a ^^bot, ^^beep ^^boop ^^| ^^Contact ^^me ^^| ^^Opt-out ^^| ^^Feedback
You can use one of these to test if the line in the wall is still live. Push it in the hole you made and it should light up. Then turn off breakers one by one until the light on the sensor turns off.
Non-contact voltage tester is what I'd use. I linked a Fluke, but you should be able to pick up something comparable for around the house usage for around $20.
I'd bet it's 120v, and if a doorbell doesn't sound inside the house when you press the button, it's probably disconnected.
If not, there's a wire shoved in the walls or ceiling somewhere that's going hot every time you press the button.
Good luck.
Hmm, that link should take you directly to a voltage tester. Here's another one off Amazon that appears to be getting good reviews: http://www.amazon.com/Fluke-1AC-A1-II-Volt-Alert-Non-Contact-Voltage/dp/B000EJ332O/ref=sr_1_1?ie=UTF8&amp;qid=1343538975&amp;sr=8-1&amp;keywords=voltage+tester
> classic Fluke
You mean this one?
Caliper. It's cheap and consistent. Read the directions carefully and then measure yourself a ton for practice. Keep practicing until your measurement comes up the same.
I use these calipers to measure my body fat. I do a 3 point measurement. It takes a few minutes, since I run through all of the measurements 4-5 times and use the average, but I measure weekly, so it's no big deal. I only have 4 weeks of data, but it is showing a slow, steady decline. Seems reasonably accurate to me, but who knows... Definitely cheap though.
Get a body fat caliper and a cloth measuring tape. Take measurements weekly. Body fat caliper comes with instructions but pick a few "problem areas" and "growth areas" for the measuring tape (upper thigh, waist, stomach, chest, biceps, calf). Weight is a terrible measure of health. What matters most is what percentage of your weight is unnecessary fat vs healthy bones, muscle, organs and necessary fat. Since it requires two to do the measurements, and you're married, do it after frisky times :)
Get yourself one of these lovely tools as well: http://www.amazon.com/AccuFitness-Accu-Measure-Body-Fat-Caliper/dp/B000QURRUK
> Also, what is a good body fat calculator?
It's difficult to accurately estimate body fat %, especially with an online calculator. DXA scans are the most accurate method, and can usually be found in universities or training centers. Body fat calipers are a much cheaper and more convenient method but aren't as accurate. The scales devices that measure electrical conductivity aren't accurate at all.
buy a pair of calipers from amazon and find out - they're under 10
There are two pH pens: One for soil, and one for water.
In my experiences and others, soil pH pens aren't the most accurate, so a liquid pH meter has done well measuring the pH of the water that is about to go in, and the pH of the water coming out the drain holes.
So if you were to water in soil with say 6.7 pH water/nutes, and it came out at 6.5, you'd know your soil was around 6.3 pH. This way, you can have one meter that's practical for two functions!
This would be one of the most recommened
This is the one I always see suggested
https://smile.amazon.com/Oakton-EcoTestr-Waterproof-Tester-Range/dp/B004G8PWAU
With a lab-style ph meter, like this one or this one. I use the oakton because it is temperature corrected, whereas other meters require you test a solution at a specific temperature for an accurate reading. You use them to test the runoff water when you water the plants. You measure the PH of the water you put into the pot, and see how much it changes when it comes out, which will give you an idea about the PH level of your soil. For instance, if I measured my water to be 7.0 going in, and found it to be 5.8 coming out, I would know my soil is at least 5.8 on the ph scale or lower. However, I find that just measuring the PH of what I put in, the runoff doesn't matter so much, if the soil is properly prepared. I would go on, but I'll stop myself here for the sake a brevity; there's plenty to learn if you seek the information.
Having said that, I will say there are some soil probe type meters that work well, but you have to calibrate it, and care for and store the electrode properly, which can get difficult because the electrodes are often very long and don't have a cap/case to hold storage solution. Though, it does require you mix water with your soil for the electrode to get a proper reading, so really testing the runoff is the same as (properly) using a soil probe, but the lab meters will be more accurate, easier to use, calibrate, store, and care for properly.
edit: oh yeah, PH indicator drops can also be used, but they are not nearly as accurate or reliable, and can sometimes be difficult to read since your runoff solution will not be perfectly clear.
If you continue to plan on doing dwc grows your need a PH meter get this one.
http://www.amazon.com/Oakton-EcoTestr-Waterproof-Tester-Range/dp/B004G8PWAU/ref=sr_1_2?ie=UTF8&amp;qid=1372348082&amp;sr=8-2&amp;keywords=ph+meter
If the leaves that are turning brown are touching the soil, I would consider that the reason. If not, possibly a ph issue? I would definitely invest in an accurate meter regardless. I use this and haven't had any issues, but most people will recommend the Oakton
I've used this one that was $50 for over a year and it has been reliable. I got it because it is comparable in quality to the BlueLab ones (which some people like here) without being $80. Their are ones for cheaper like this one, but they should be avoided like the plague because they lose calibration almost immediately. With the one I showed above, I've only had to calibrate it once every 2 grows while the other one would lose its calibration after a few weeks.
Oakton 2
I started off with one of the yellow cheap models, dropped it from 2 feet above ground and it immediately died. The Oakton is leaps and bounds more accurate, faster, and waterproof if you accidentally drop it in your res.
EDIT: The cap on the Oakton is perfect for keeping a little storage solution on the tip, which keeps it accurate for longer and will extend the lifetime of the device.
http://www.amazon.com/General-Hydroponics-GH1514-Control-Kit/dp/B000BNKWZY
Kit comes with test indicator. Although with a 50gal tank, you might want a bigger quantity than the 8fl.oz bottles there. Getting a digital pH tester will save some time as well.
I love this one http://www.amazon.com/gp/product/B004G8PWAU/ref=oh_aui_detailpage_o04_s00?ie=UTF8&amp;psc=1
What about this one?
http://www.amazon.com/gp/aw/d/B004G8PWAU/ref=mp_s_a_1_1?qid=1373158088&amp;sr=1-1&amp;pi=SL75
I think you should get one of these http://amzn.com/B004G8PWAU
You'll need 7.0 and 4.01 solution too which would put you over your 50 a bit unfortunately.
Just dont get the cheap milwaukee pens, they are awful
ph drops are pretty cheap for a general idea otherwise
What you want is anhydrous isopropyl
Let them know exactly what happend and seek an RMA if possible as others suggest.
If no RMA is provided, you should clean that socket using high purity isopropyl alcohol. You can normally get it at a pharmacy in "medical grade". Or you can buy electronics grade in aerosol can or liquid to thoroughly rinse out and flush the socket.
I use 99.9% isopropyl alcohol (electronics cleaner). Works great,
MG Chemicals 824-1L 99.9% Isopropyl Alcohol Liquid Cleaner, Clear , 945 mL (1 US Quart) https://www.amazon.com/dp/B005DNQX3C/ref=cm_sw_r_cp_api_jIFPAb1ZECD8F
Use isopropyl alcohol to clean the whole the inside. It's safe for Electronics and will make it look like new. I would use a krylon paint on the rusty screws after removing the rust.
MG Chemicals 824-1L 99.9% Isopropyl Alcohol Liquid Cleaner, Clear , 945 mL (1 US Quart) https://www.amazon.com/dp/B005DNQX3C/ref=cm_sw_r_cp_apa_i_xyE1DbQ5BGQWF
You can get it easy on Amazon, there are hundreds of brands to chose from.
This is what I use, since it contains no water and is 99.9%. use gloves though, it will dry the crap out of skin.
https://www.amazon.com/MG-Chemicals-Isopropyl-Alcohol-Cleaner/dp/B005DNQX3C/ref=sr_1_9?ie=UTF8&amp;qid=1504808917&amp;sr=8-9&amp;keywords=99+isopropyl+alcohol
Not sure what solder you used, but that looks like flux. Isopropyl alcohol (like this) should work fine as a cleaner.
Essential Depot PG
Essential Deport VG
I have been getting my PG and VG from Amazon. Its cheap and if you have prime it gets there super fast.
I use the essential depot VG, and PG. I get them quarts at a time for like 11-13 bucks apiece and that shit lasts a long time. You will go through more VG than PG usually.
I used to get my nicotine from wizard labs but I recently started using nude nicotine, I recommend it. In the DIY sub youll see a shit ton of vendors and a bunch of brands people swear by. Thats the part that can be overwhelming.
you can get bottles so many fucking places, if you just want a few amazon will do you right, wizard labs has em. Lately I have been just getting them from fasttech cause they are decent bottles (plastic) and they are cheap as fuck. when searching for bottles a good tip to have is 1/2oz bottles are 15mls and 1oz bottles are 30mls,
https://www.onestopdiyshop.com/ is a pretty awesome place.
http://wholesale.heartlandvapes.com/ is nice too.
For just starting you dont need much, PG, VG, NIc, Bottles, Flavors, Get a couple of 1ml and 3ml Syringes, and some 14g needle tips for VG based shit, and 18G tips for PG based shit.
My mixes are mostly VG, so I get my nicotine in VG Carrier base. I think I have pretty much covered most beginner info. I hope you decide to check it out its pretty rewarding and fucking fun.
Come hang out, Lurk about or whatever
I forgot you will also want to use a ejuice calculator, I use the POTV ejuice calculator on my phone it works well and its free. Its in the Android and iOs store. Peace!
Nicotine quality varies so sick with a reputable source like nude nicotine. Pg and vg are about the same but I'd still get it from a reputable source. This seems to be the cheapest and is good quality.
Glycerin Vegetable Kosher USP 43 oz https://www.amazon.com/dp/B004C7MTLA/ref=cm_sw_r_awd_2tYJub1T9F4VY
Essential Depot Propylene Glycol 1 Quart Essential Depot http://www.amazon.com/dp/B005F5OJG6/ref=cm_sw_r_udp_awd_quYJub0G6VXPH
Hey dude! I purchased a starter kit when I started making E-juice, and while it was helpful I quickly realized that I could of gotten more for less had I known what I needed. It is a lot cheaper to just buy the products individually since you will also be getting a larger amount too. Here are some links and in my opinion this is the cheapest way for someone to start DIY:
VG- https://www.amazon.com/Glycerin-Vegetable-Kosher-USP-Quart/dp/B004C7MTLA/ref=sr_1_2_a_it?ie=UTF8&amp;qid=1480546689&amp;sr=8-2&amp;keywords=vegetable+glycerine
PG- https://www.amazon.com/Essential-Depot-Propylene-Glycol-Quart/dp/B005F5OJG6/ref=sr_1_3?ie=UTF8&amp;qid=1480546865&amp;sr=8-3&amp;keywords=propylene+glycol
Gloves- https://www.amazon.com/Liberty-Glove-Industrial-Disposable-Thickness/dp/B01MZZ0FHO/ref=sr_1_2?ie=UTF8&amp;qid=1480546913&amp;sr=8-2&amp;keywords=nitrile+gloves
Syringes- https://www.amazon.com/10-Pack-Refilling-E-Liquids-Applicator/dp/B01HFTYINS/ref=sr_1_6?ie=UTF8&amp;qid=1480546884&amp;sr=8-6&amp;keywords=blunt+tip+syringe
Nicotine- https://www.nudenicotine.com/products-page/unflavored-nicotine-base/
And as for bottles it is all up to you I personally buy mine from http://wholesale.heartlandvapes.com/eliquid-bottles/plastic-eliquid-bottles.html
*Lastly all you need is flavorings, I think it would be best for you to search around and find what you like, I personally prefer http://gremlindiy.com/ and http://www.bullcityflavors.com/ . Hope this helped!
Here is PG and VG, but I'm not sure how to check shipping rates to you.
You could also try using /r/juiceswap if you need someone to re-ship it to save on costs.
Are you looking for unflavored nic juice or just straight VG or PG?
For unflavored nic juice, Wizard Labs has some pretty good pricing when they actually have it in stock (they also carry literally tons of flavors).
As for straight VG or PG (for DIY flavor mixing) Essential Depot on Amazon has Kosher grade VG and PG.
I recommend this and these
It’s a set of vials and syringes. I would recommend getting a vial holder as well. That way, you have all the vials in one places and are not as likely to spill. The vials are nice because you can test small batch mixtures. Label the tops of the vials and keep a notebook. Rhodia is good or something else that can show off sheen. This way, you can more down the vial designation, the proportions, the inks used and what the resulting color looks like.
Another thing you would want to learn about is color therapy because a cool yellow mixed with a warm blue will give you a different green than a warm yellow mixed with a cool blue. Rot dye has a great mixing chart that is a wonderful resource for color mixing.
Beyond that, different inks interact and react in sometimes unexpected ways when mixed, which is another reason to have small vials to see what the reactions are and if the ink start to separate or do something else unusual.
Mine is this one from Goulet, but once I got more than 40 vials I took it apart and laid the two layers side by side across a box (9.5" wide) I had handy. There are also racks like this one on amazon.
Get one from amazon, it'll be cheaper!
ETA: link $6 bucks!
Looks like this test tube holder from amazon:
http://www.amazon.com/Karter-Scientific-208U2-Plastic-Detachable/dp/B005Z4QWIK/ref=sr_1_3?ie=UTF8&amp;qid=1452305718&amp;sr=8-3&amp;keywords=test+tube+holder
I just have them floating in a drawer right now also, but a guy I work with uses this test tube rack and it works exceedingly well. I'll be picking one up soon, or one like it.
I get mine from Amazon, but I also use a lot of tubes. Instead of inking up my pens from bottles, I only use sample vials (or something like a TWSBi inkwell for my larger pens). It's a great way to avoid contamination of your ink. We live in a pretty moldy area, so I"m always concerned about fuzz on the pens syndrome.
Note: there are other types of tubes that are on eBay, but these cryotubes are by far the best. The other clear ones can't have 5ml unless you fill it to the brim, making a mess of things. These tubes are exactly like the ones sold on Goulet pens, only it has blue lids instead of clear.
https://www.amazon.com/gp/product/B074QKMF2G/ref=oh_aui_detailpage_o09_s00?ie=UTF8&amp;psc=1
If you'd like a rack for your sample vials, here's a link to the one that I purchased. It is identical to hte ones sold on Goulet.
https://www.amazon.com/gp/product/B005Z4QWIK/ref=oh_aui_detailpage_o07_s02?ie=UTF8&amp;psc=1
You can buy them from Goulet pens, they have a 40 vials one.
I found this 50 vial holder, which is the same thing but bigger capacity. It works perfectly. (mine is almost full... I think I went overboard with it).
http://m.ebay.com/itm/281880651830?_mwBanner=1
100 for $9 vs 10 for $3 (+ $4 shipping) at Goulet. Comes out to 9 cents a piece vs 71 cents (with shipping) at Goulet. But remember they are literally on the slow boat from China from eBay!
You may also like this holder: https://smile.amazon.com/gp/aw/d/B005Z4QWIK/ref=mp_s_a_1_1?ie=UTF8&amp;qid=1496098817&amp;sr=8-1&amp;pi=AC_SX236_SY340_FMwebp_QL65&amp;keywords=sample+vial+holder&amp;dpPl=1&amp;dpID=41dcT%2B82SsL&amp;ref=plSrch
It is less than half the cost on Amazon
Both of these products are identical to what Goulet sells.
BTW I LOVE GOULET and do most of my purchasing from them! Always like to support the local community :)
A few of these will make life easier for you.
This unit is pretty similar to the Goulet model, except it holds 50 samples instead of 40 and is only $6: http://www.amazon.com/gp/product/B005Z4QWIK/ref=oh_aui_detailpage_o08_s00?ie=UTF8&amp;psc=1
http://www.amazon.com/gp/product/B005Z4QWIK?psc=1&amp;redirect=true&amp;ref_=oh_aui_detailpage_o05_s00
I use a vial rack from amazon it was around 5.99 and holds 50 vials.
ETA link and state price is now $6.09
I also bought some tiny round stickers. I put one on top of each sample vial and put a little ink on the sticker. Makes it easier to find a certain color.
Get a variac or step-transformer based fan speed controller, use with a voltage controllable fan like a ruck.
No extra sound, no increased wear.
Something like This.
Anything less will probably still cause the humming and the fan damage.
This one
I think you're right. Would this model be compatible with my 120V, 1000W bulb? What would happen if I went up to 130V on the variac?
I soldered my ergodox PCBs with my hakko set to 650 F (about 340-350 C). Just don't keep the iron on the switch solder posts any longer than necessary. Basically, if you don't have a perfect joint in 3 seconds, you did something wrong. The traces are small enough on keyboard PCBs that you probably don't even need that high of a temp, but I think it helped to make nice shiny joints when using lead-free solder.
The same temps worked with a separate de-soldering pump that I have that is similar to this one. I haven't used the integrated kind that you linked to before. Over 400C, you are risking burning up small traces and delicate components, but you are probably okay if you work fast. If you really wanted to control temp on that cheap desoldering iron, you could plug it in through a variable transformer.
Soldering components to a huge, thick PCB ground plane on my tesla coil kit, on the other hand... that was more of a challenge. I dialed it up to 750F (400C), and should have been using extra flux.
Personally I got a 301 and wish I would have gotten a 304... wish I would have made my ET a probe and not a dial gauge. I run it with artisan, but it’s nice knowing if something happens with the comp you can still roast if you want to. I also feel like there is a little lag in the computer so I glance at the thermometer from time to time.
I got an extra motor without the case as a backup ($20)
And https://www.amazon.com/gp/aw/d/B00XKDEVIQ?psc=1&amp;ref=ppx_pop_mob_b_asin_title
Works like a charm
I went to 3 hardware stores before I realized there are inside and outside threads on the regulator to the propane tank... so you’re good there, I’m just dumb I guess
Lastly I highly recommend getting one of these
https://www.amazon.com/gp/aw/d/B006NGI8VS?psc=1&amp;ref=ppx_pop_mob_b_asin_title
Happy roasting :)
https://www.amazon.com/dp/B06XRPYXP2/
Here's a link for Amazon (not affiliate) to the stuff I got:
Silk Gold 3D Printer PLA Filament 1.75 mm 1 KG (2.2 LBS) Spool 3D Printing Material CC3D Shine Silky Shiny PLA Metal Gold Like Metallic PLA Filament https://www.amazon.com/dp/B06XRPYXP2/ref=cm_sw_r_cp_apa_i_eCTQCbJT0C24S
Printed a Sleeping Beauty's crown for my wife.
3D Printer Filament PLA 1.75 mm... https://www.amazon.com/dp/B06XRPYXP2?ref=ppx_pop_mob_ap_share
It is this: https://www.amazon.com/gp/product/B06XRPYXP2/ref=ppx_yo_dt_b_asin_title_o03_s00?ie=UTF8&amp;psc=1
This is the gold PLA I used:
https://www.amazon.com/gp/product/B06XRPYXP2
ANYCUBIC Photon lightning deal in Canada
https://www.amazon.ca/dp/B078N2TSYS/ref=cm_sw_r_cp_api_i_vvJlDbHNJPGSP
If the main use will be miniatures, I think the Photon is the way to go. It is currently $320 on Amazon, which is a great price. I make miniature figures and bits and have had the chance to compare my photon prints to stuff from mid-range filament printers, and no one has denied that the resin prints look way better on small scale stuff.
&#x200B;
I was worried about the talk about the bad smell, messy processing, etc....but I started with the photon and never looked back. Smell has been a non-issue in my experience and the post-processing isn't problematic or messy after a bit of practice.
The one I got is the Anycubic Photon which from what I could figure is the cheapest functional one that doesn't have reliability issues like leakage (and trust me, the last thing you ever want is the resin leaking, the stuff is horrible if it ever gets anywhere it shouldn't be).
Unlike an FDM you also have to think about ventilation. I printed a 4-inch duct adapter for the printer and got a cheap inline duct fan just so I could vent all the fumes outside. But for what it's worth it has been a lot easier to maintain and get started than any FDM printer I've used, at the cost of more hassle with post-processing and cleaning.
The stats on that machine aren't anything better than what other manufacturers offer. My suggestion? Get either the Anycubic Photon or the Moai.
https://www.amazon.com/ANYCUBIC-Assembled-Innovation-Off-line-Printing/dp/B078N2TSYS
$450 off Amazon with the instant coupon.
or
https://www.matterhackers.com/store/l/peopoly-moai-laser-sla-3d-printer-fully-assembled/sk/M2513KLL
They sell a fully assembled version or the unassembled version MUCH cheaper.
Both of these systems have a large and active community. Both can use a wide variety of resins as well. The Moai has a bigger build plate and should mechanically last longer. Both will require you to replace the FEP film in the Vat. Which I managed to buy two square feet of it from McMaster Carr for $30 shipped. Both will print to the level of detail you need. The print files on the Moai are Gcode and therefore can use open source slucing software, the photon will have to be sliced in their program but prepping can be done elsewhere. The Moai will be slower to print because it uses a laser/galvo vs the Photon's LCD DLP.
I own two machines one of which is a Photon. I plan on purchasing the Moai 200 when it comes out this month as well. If there is anything else I can answer for you just ask!
If you want to print things that small and detailed, you’re going to want to go with a DLP or SLA printer. They use liquid resins instead of a thermoplastic. Something like an Anycubic Photon, a Sparkmaker FHD, a PrusaSL1 (if your willing to wait a few months), or if you have a bigger budget, a Form 2.
Become your own source. Cut out the middle man. Destroy Unicron. Kill the Grand Poobah. Eliminate even the toughest stain.
The Ender 3 is $250. The Anycubic Photon is out there for $450 if you want higher quality for more trouble and messier process.
Welcome to the hobby. I like to use Hatchbox PLA. Your gonna want to check out r/PrintedMinis r/3Dprinting and I like 3D Printed Tabletop.
I started with the Anycubic Photon. Aside from being fairly cheap, I found it pretty easy to use. I have, however, noticed a tendency for it to unlevel far more often then it claims. I level it every 2-3 prints, but the process only takes a couple minutes.
I also found this video enlightening and it inspired me to be sure I got a little bit of extra equipment.
Anycubic Photon down to $339.49 CAD on Amazon Canada
And $439.99 for the S.
And I just pulled the trigger on one!
It's back at $299 ($339 with a $40 coupon) if you hurry.
https://www.amazon.com/gp/product/B078N2TSYS/ref=ox_sc_saved_title_1?smid=A1A5FQE7R5RISB&amp;psc=1
https://www.amazon.com/gp/product/B078N2TSYS/ref=ox_sc_sfl_title_3?ie=UTF8&amp;psc=1&amp;smid=A1A5FQE7R5RISB
This is the first one I got and cost is all relative, for me the 500USD I paid was cheap for what it did. Build one warhammer army and break even on cost. However yes some of them are very expensive.
I'm pretty new to this too, I bought my Ender 3 Pro around the same time as you. Quiet printing is pretty high on my list as well as being able to print high-temp exotic filaments in the long term while maintaining reliability.
First upgrades I purchased were stiffer bed springs so I would be less likely to throw the bed out of level while removing prints or working around the printer and Capricorn XS tube since it has a more consistent internal diameter, fits closer to the filament, and can work with slightly higher temps. I also picked up a pack of bowden couplers recently as I noticed the end nearest the extruder is sliding past the coupler jaws on de/retraction; don't worry about that unless it's an issue for you. That's about $30 alone since I don't have a supply shop locally and have to order those parts in bulk. I had a Pi 3B laying around unused and flashed Octoprint onto it. Highly recommended. I have a replacement Noctua hotend fan, buck converters, and 5015 blower on order to quiet the fan noise; about $32. Just replaced the Meanwell psu fan with a 60x25mm Noctua I had lying around (Note: there may be better options in the 92-120mm range to replace part of the PSU housing, but that's what I had laying around). Next upgrade coming is the SKR Mini E3 with TMC 2209 drivers ($28) to eliminate almost all of the stepper noise. Also looking into a replacement for the control board fan and some vibration isolating feet for the frame. As far as higher temp printing I haven't made a lot of progress aside from buying a titanium all-metal heat brake ($11) winch I have yet to install or inspect, and looking into enclosure and electronics relocation avenues.
Either way the mods I purchased came in at around $100 US which should quiet the printer and help with reliability. Also looking into picking up a good M3-M4 bolt kit if any exist in the US.
Here are some links to the things I picked up and will, which may be helpful if you're in the US. Mostly from Amazon.
Type | Name | Link | Price
---|---|----|----
Reliability | 8mm x 20mm yellow springs | Link | $6.98
Reliability | Capricorn XS Tubing | Link | $11.49
Reliability | PC4-M6 / PC4-M10 Pneumatic Bowden Fittings | Link | $11.99
Silence | Noctua 40mm x 10mm 3-pin fan | Link | $13.95
Silence/Various | LM2596 Adjustable Buck Converters | Link | $10.95
Silence | 24v 5015 Radial Ball Bearing Fans | Link | $7.19
Silence/Various | SKR Mini E3 w/ TMC 2209 drivers | Link | $28.81
High Temp | Titanium All-Metal Heat Brake | Link | $11.52
TOTAL: $102.88 US + Tax
Parts already purchased/ bought with printer
Type | Name | Link | Price
---|---|----|----
Reliability/High Temp | OEM Ender 3 Glass Bed | Link | $20
Reliability | Feeler Guage Set | Link | $5
Reliability | 608zz Bearings, using with this(My Remix), this, and this, though I like this design a bit better | Link | $5.98
QoL Improvement | Raspberry Pi 3B w/ Octoprint | Link | $34.46
Silence | Noctua 60mm x 25mm 3-pin fan, goes with this mod | Link | $14.95
TOTAL: $80.39 US + Tax
Future planned upgrades
are you using an all-metal hotend?
Heat creep was really bad on my CR-10 when I switched to a microswiss all-metal. Initially I fixed it by reducing my retraction distance and increasing my retraction speed, but on longer prints it still ended up being too much of a problem and I switched to a new heatbrake that allowed the bowden tube to go all the way down to the nozzle and used Capricorn bowden tube to avoid deformation.
I'm getting much cleaner prints now and zero jamming. I think this heatbrake works with the original CR-10 heatsink
Most of these are less about upgrading, and more about fixing possible issues. But all of these are great to have and extremely cheap.
As others have said the glass bed and yellow bed springs are great, just be aware the amazon listing on there I used was shipped from china and took almost a month to show up. So pay attention to the shipping times.
The couplers the E3 comes with are straight up garbage. If they are not causing problems yet... they will. These are way better and give you plenty of extras if you ever need them:
https://smile.amazon.com/Ivelink-PC4-M10-Straight-Pneumatic-Extruder/dp/B073TTWWN1/ref=sr_1_7?keywords=ender+3+coupler&qid=1558892247&s=gateway&sr=8-7
&#x200B;
The PTFE tube it comes with is also not great, any replacement one is usually better, and like others said with Capricorn you can print higher temps, but they also are manufactured to tighter tolerances and have less slack in your system. As to if this is a noticeable difference, it's arguable, but upgrading has fixed problems for some people.
https://smile.amazon.com/Capricorn-Bowden-Tubing-1-75mm-filament/dp/B079P92HN9/ref=sr_1_3?keywords=capricorn+tubing&qid=1558892351&s=gateway&sr=8-3
&#x200B;
Even more important than the tubing it self is the cutter you use, if you buy different tubing, make sure you get a good cutter so the ends don't get pinched. This can cause drag that causes underextrusion.
https://smile.amazon.com/Capricorn-Bowden-Tubing-Cutter-M-Bowden-Cutter/dp/B07N11H963/ref=sr_1_8?keywords=capricorn+tubing&qid=1558892424&s=gateway&sr=8-8
&#x200B;
The plastic extruder on the E3 is know to wear out after a few months for some. A filament guide will help but a better aluminum extruder should fix it for good. They are cheap and easy to install:
https://smile.amazon.com/HICTOP-Upgraded-Replacement-Aluminum-Extruder/dp/B0761PGLZ4/ref=sr_1_1_sspa?keywords=ender+3+extruder&qid=1558892498&s=gateway&sr=8-1-spons&psc=1
&#x200B;
Once you want to go deeper down the hole, the two big mods that you will be happy with are A auto bed leveler and quieter stepper motors. There are guides for both of these on youtube and they are much more complicated and a bit more expensive but give amazing results.
&#x200B;
A BLTouch goes for about $80 with the extension cable so you don't have to cut wires. It will make it so you save an offset and basically rarely have to level your bed again and the machine will account for most of it. There is another type of leveler I think it's called EZABL or something like that, but I liked the BLTouch option better so I never did the research on it.
If you want to do more upgrades like a touch screen, filament rounout sensor, and etc. you need a different main board. Most people upgrade to the MKS Gen L. They are about $25 bucks but require you to also buy new stepper motor drivers, which i'll touch on next. The board has more memory and slots for upgrades that the stock board does not. It does require a lot more setup and printing a new housing for the board. Again there are great youtube videos, just search for 'Ender 3 MKS Gen L'
&#x200B;
If you think the Ender 3 is loud and would like it to be WAY quieter you can install better stepper motor drivers. The TMC 2208 driver will make the movement almost silent. you will still hear the fans, but the movement sound will completely gone. To install them you will need to either use the above mentioned board (as the stock board has the drivers integrated) or if you want an easier way you can order the Ender 3 Silent Ver 1.4 board:
https://www.creality3donline.com/creality3d-new-upgrade-silent-114-mainboard-for-ender-3-pro-ender-5-customized-und-non-standard-matching_p0147.html
This won't give you the upgradabiliity of the MKS board, but is a direct drop in replacement that gives you the silent steppers.
&#x200B;
Welcome to family, and I hope some of that was helpful
You can get the extruder here with a halfway decent tube. That includes a tube but it isn't as good as the capricorn tube, which you can get here. I ended up getting the extruder with the not-as-good tube, and have been running that. I have a capricorn tube on standby in case I need it but so far haven't, so maybe the tube included with that extruder is good enough, but I may also just be lucky.
&#x200B;
There's no instructions included with that kit, so you'll want to follow along with something online. Here's a video from the same channel I linked to earlier that should help.
I actually replaced my whole extrusion path.
First, I found that the spring in the stock extruder assembly would fatigue resulting in under extrusion and jams. The BMG is a little pricey but worth it IMO. Comes with pretty good instructions.
Second, I switched to a Micro-swiss all metal hot-end. I probably didn't need to do this - given I almost never print high-temp materials but did it anyway.
Last, cheapest, and not least, Capricorn Tubing. Do not underestimate the difference this can make.
If you're up to the challenge, I highly recommend a BLTouch. It completely solved my first layer woes (warped bed on my CR-10s).
Second - some Amazon links for the upgrade pieces I mention:
Springs - https://smile.amazon.com/gp/product/B07SDDHYN4/ref=ppx_yo_dt_b_search_asin_title?ie=UTF8&amp;psc=1
Bowden Tube - https://smile.amazon.com/gp/product/B079P92HN9/ref=ppx_yo_dt_b_asin_title_o00_s01?ie=UTF8&amp;psc=1
Couplings - https://smile.amazon.com/Dorhea-Straight-Pneumatic-Fittings-Accessories/dp/B07NSRCH2W/ref=sr_1_15?keywords=3d+printer+fitting&amp;qid=1574436375&amp;sr=8-15
Extruder - https://smile.amazon.com/gp/product/B079JZ374W/ref=ppx_yo_dt_b_asin_title_o00_s02?ie=UTF8&amp;psc=1
PEI Sheet - https://smile.amazon.com/gp/product/B07GSJSDWR/ref=ppx_yo_dt_b_asin_title_o00_s02?ie=UTF8&amp;psc=1
Stepper Motor Dampeners - https://smile.amazon.com/gp/product/B07C7FRLNX/ref=ppx_yo_dt_b_asin_title_o00_s02?ie=UTF8&amp;psc=1
Bootloader Flashing Kit - https://smile.amazon.com/Gulfcoast-Robotics-Bootloader-Flashing-Duplicator/dp/B07S5BBLKM/ref=sr_1_3?keywords=arduino+uno+ender+3+kit&amp;qid=1574436535&amp;s=industrial&amp;sr=1-3
Note that I didn't buy this flashing kit, but this one seems to have everything you need to get a bootloader onboard the Ender. What happens is you go through a bunch of steps to attach this so the printer and then put a bootloader onto the Ender 3 board. You only have to do that one time, then you can update the firmware as often as you want - typically via a USB cable. I have Octoprint installed, so I can flash my firmware on my basement printers from my upstairs computer using wifi. Super easy and handy.
Two things I would I highly recommend is to get a new extruder assembly and a new Bowden tube. I've had similar issues and they went away as soon as I changed these parts out.
Upgrade 3D Printer Parts MK8 Extruder Aluminum Alloy Block Bowden Extruder 1.75mm Filament for Creality 3D Ender 3,CR-7,CR-8, CR-10, CR-10S, CR-10 S4, and CR-10 S5 https://www.amazon.com/dp/B07B96QMN2/ref=cm_sw_r_sms_apa_i_6tWTDb1JYN38X
Capricorn Bowden PTFE Tubing XS Series 1 Meter for 1.75mm Filament (Genuine Capricorn Premium Tubing) https://www.amazon.com/dp/B079P92HN9/ref=cm_sw_r_sms_apa_i_vvWTDbKY7ZVTY
These or any other should work
Nozzles
PTFE. This is the cadillac option. Cheaper tubing is very cheap, like $5 for 5 feet or something.
I didn't mention these as I haven't installed them, but stepper dampeners. Please see the stickied thread on /r/ender3 about these, if you want to order them!
The springs I ordered. Note: I couldn't quite replace the one where the wires attach to the bed. I didn't play around too much, I just left that one on there. The other three have held solid, and the next time I'm adjusting my bed, I'll try to put that one on there as well.
Hope that helps!
Edit: Reddit markdown not liking my links, I'll try to fix them
I got my Ender 3 Pro about a month ago, performed some upgrades and ran into a few problems, but with some weird caveates.
I'm trying to print multiple miniatures on a single print, but seem to be getting a lot of oozing or stringing issues, but when I test with retraction tests, the test comes out perfect with identical settings. Additionally, when googling around, I couldn't find anything except for potentially a nozzle clog or potentially hydrated filament (possible, I'll test this later)
&#x200B;
I've tested a few other prints as well, a benchy and a testcube, they print fine. Really curious about what's going on. Do I need to spread the prints out more, use different settings, or is it more of a mechanical issue?
&#x200B;
I'd appreciate any help you guys have to recommend!
&#x200B;
So, lets get down to it:
Printer: Creality Ender 3 Pro
Surface: Creality Glass surface
Upgrades: Aluminum extruder upgrade
Capricorn Tubing
New bed springs
In addition to these, I've tightened the X and Y bolts on the runners to reduce wobble -- there's no more wobble, maybe they're too tight? I don't think so, I've had good prints with these settings, but not with a few things.
Settings:
Basically the same as the "normal" settings for the Ender 3 on Cura 4.0.0
But in addition: (And what I think may be important is bolded)
adhesion_type = raft
layer_height = 0.12
support_tree_enable = True
support_type = buildplate
brim_outside_only = False
fill_outline_gaps = True
infill_pattern = cubic
infill_sparse_density = 25
material_final_print_temperature = 180
material_initial_print_temperature = 180
material_print_temperature = 185
optimize_wall_printing_order = True
raft_margin = 10
retraction_amount = 7.5
retraction_speed = 20
speed_print = 30
support_angle = 40
support_conical_enabled = True
support_infill_rate = 50
support_interface_enable = True
support_pattern = lines
** NOTE ** Standard supports are turned off, I'm using the tree supports
support_tree_collision_resolution = 0.15
travel_avoid_supports = True
travel_compensate_overlapping_walls_enabled = False
wall_thickness = 1.2
*may* not be your issue but you will need to recalibrate your estep is you swapped the hob gear (extruder gear) as they are different diameters than the stock one.
&#x200B;
Total side note for anybody who wants to clean up their links: Anything after the ? is erroneous data for anybody else clicking the link unless it has multiple options to select. This works for most websites, including ebay.
&#x200B;
Example:
https://www.amazon.com/gp/aw/d/B079P92HN9**?psc=1&ref=ppx_pop_mob_b_asin_title**
https://www.amazon.com/gp/aw/d/B079P92HN9 <-- Really only what is needed.
I was just doing some test prints to get the bed re-leveled and this fitting decided it didn't want to live any more.
Time to order some new parts, I guess.
That's fair man. THat's how I feel too. Not many people skate in teh rain, but I live in the bay and that's just not an option. Oh... if you're going off-brand I'd recommend that you coat all of your componenets with conformal coating. It's an electronics waterproofing product. Here is a linkl:
https://www.amazon.com/MG-Chemicals-Silicone-Modified-Conformal/dp/B008O9YIV6/ref=sr_1_1?crid=2KILXXHLES5D1&amp;keywords=waterproofing+for+electronics&amp;qid=1564775250&amp;s=gateway&amp;sprefix=waterproofing+for+ele%2Caps%2C176&amp;sr=8-1
A lame humor response I suppose....never mind. I was only suggesting this nice servo as the ultimate pipe hitter. "Fucking around" means to me buying only a slightly better servo than you currently have now while hoping that it will be enough. Then you get it and you wish that you had not wasted time and effort on it. Then you get a slightly better one again in the hopes of the same thing...so on and so forth. My attempt at a humorous reply was to quit fucking around with all that shit and get this "mean as hell" servo and be "done fucking around"
^
Does your BEC output 8.4 volts? If not, you won't be getting the most out of the KD1. It stands up to reason that you should not run a 7.4 volt servo on 8.4 volts if you want it last.
^
Now "spec shopping" can be problematic. People have been doing this forever with most all kinds of merchandise. Its Marketing. The problem here is determining a common metric among brands and lines within brands. Does a reliable metric among all servos exist? ?? Who says .08s/60 degrees and 347oz-in is even accurate? Are those readings for the whole arch? Will the servo be able to hit 347oz-in while 2/3s of the way into a rotation? Does it get hot and does the torque go down with rising heat? Perhaps the equipment used to make those measurements is off a bit to inflate the "specs"? I have so many questions here?? Marketing shenanigans have been going on as long as markets have existed. I like my KD1s because they work well for me. They have no equal in my opinion. I'm too old to jack around with marketing nonsense.
^
I have been playing with RC since 1986 and my "fucking around" days are long gone. Say I wanna build an RC model, I now only purchase enthusiast level products. The servo I mentioned is such a device. It is not cheap, but is anything high end cheap? Do you need a top end servo for your vehicle, probably not. Would you want one? Who wouldn't? Can you afford it? ??
^
My KD1s have amazing holding power. They absolutely stay where they're told through the arch. Its CPU is extremely capable and the coding for this servo is second to none. Now, its algorithms are optimized for heli cyclic duty, but this actually seems to me to translate to surface steering use very well.
^
I've never owned a Savox servo so I can not attest to their quality. As far as the Xpert being waterproof, I cannot say. It is a heli servo and flying a heli in the rain isn't likely a good idea. It also isn't advertised as waterproof. I've gotten my xpert servos wet ripping up dew covered grass and no issues so far ?? You can purchase a bottle of silicone conformal coating I waterproof circuit boards with this stuff all the time. Would it work on a servo? ??
^
Being concerned about this waterproof issue, an advertised as a "car" servo with claims of waterproof might be in order here. Brushless is indeed the new hotness in servos these days. Most higher end servos nowadays are "digital" too.
^
Perhaps instead of "spec shopping" utilize the gifts of modern technology and see what others have done. Don't reinvent the wheel here. As I'm sure you already know, online videos can be pretty nice for seeing what's out there. Better yet find a local RC club or track. Speak to the people there and ask what they have.
^
I used to ride the brand loyalty wagon all around. I was huge into Asian RC radios and servos. I never had a bad Hitec, Futaba, Airtronics, KO Propo or JR servo. I still have vehicles with those servos in them right now.
Clear nail polish may work, though this is specifically made to protect electronics and is only $12.
Don't worry about heat. Conformal coating isn't going to insulate anything so much it over-heats. Unless you put on like 20 coats of the stuff maybe.
By the way, you should probably use silicone conformal coating instead of acrylic. It's a little more durable, and not quite as nasty to work on. Personally I prefer the liquid over aerosol. It's much easier to make sure you get everything coated well, and the fumes aren't quite as bad.
Thats great to hear! It must've still had moisture under the chips causing a short but now had time to fully dry out.
Get this stuff https://www.amazon.com/MG-Chemicals-Silicone-Modified-Conformal/dp/B008O9YIV6/ its modified with a UV dye so you can see where its been applied. You can get a UV led Flashlight for cheap to ensure havent missed a spot.
You can coat everything, even soldering pads. if you ever need to solder anything to the board, the coating just steams away just be sure to reapply the coating in that area afterwards.
The bottle arrived the other day and I took my tinyhawk freestyle apart and desoldered the VTX (same board as the tinyhawk) to fully coat it then also added a larger capacitor. https://i.imgur.com/wYo9Laz.jpg . I did two coats then one more once everything was soldered and plugged in. I'm confident that this thing could survive a dunk in a pond now.
Here is a link to it on amazon. Would be happy to send an affiliate link if you like :)
https://www.amazon.com/MG-Chemicals-Silicone-Modified-Conformal/dp/B008O9YIV6/
Seriously though, this stuff works well for me. I can fly and crash into snow with confidence. :)
I've used this stuff on drones, for flying in the rain (and crashing in wet grass). It's pretty good.
Compra uma merda destas e vai percorrendo as tomadas da tua casa todas até encontrares o que é responsável pelo consumo elevado. Se não é a pelas tomadas é pelas lâmpadas. Algo aí está a gastar um exagero de energia desnecessariamente.
https://www.amazon.com/dp/B00E945SJG/ref=cm_sw_r_cp_apa_i_d79GDbEETPCEW
Pretty cheap, very useful. It's going to be hard for you to just anecdotally measure. And your property manager is more likely to listen if you send in a problem stating "the fridge is averaging X kwh a day, which is Y kwh over what the manufacturer says is it's normal operating time"
Most hardware stores should have them. Or even Amazon. The kill a watt is a popular brand.
You should use something like this https://www.amazon.com/TS-836A-Energy-Voltage-Electricity-Monitor/dp/B00E945SJG
Then you plugit in to the wall, and plug your rig to the power meter, then you can see how much watt your rig is using
An Arduino Uno is an ATMega328p with header pins attached and a USB programmer.
If you don't know what you're doing, you really shouldn't be messing with mains power.
Here's a commercial power meter.
Here's a project where someone uses that for the purpose you've described.
Okay let's use logic here, every part of the computer has been swapped or changed so we can eliminate the components from the equation.
3 things are left.
Try with a different set of peripherals, clean instal using different keyboard, mouse and monitor.
&#x200B;
Check the voltage that your outlet outputs into your PSU, I know these units are meant to regulate voltage and this should not be an issue but if it's too important of a variations, even for split seconds, it can damage/render unusable certain components.
&#x200B;
Make sure you plug everything properly, motherboard 24pins are hard to plug in, make sure it's all the way in there.
Standoffs behind motherboard? Proper power cables to graphics card? PSU strong enough to drive all components?
Any overheating component ^(try) HWMonitor?
&#x200B;
Maybe formatting isn't getting rid of a ferocious virus created by the lord of pain in the ass himself.
&#x200B;
So many things can be at cause here, hope this helps, never stop trying you magnificent warrior, those 3 years weren't for nothing!
&#x200B;
EDIT : My girlfriend mentioned : internet connection. try clean install offline and see if it only happens when online maybe ?
I would almost guarantee it's power related. Especially if you are mining Ethash etc. You will be amazed how different algos draw power. Ethash burns almost 30% more power on the same GPU as Crytponight. Get two of these outlet watt meters $14 each https://www.amazon.com/dp/B00E945SJG/ref=sspa_dk_detail_4?psc=1&amp;pd_rd_i=B00E945SJG&amp;pd_rd_wg=QooCB&amp;pd_rd_r=MM75D80Z5KP5PVS680GJ&amp;pd_rd_w=pV3wH the best money you will spend. Put on each powersupply, remember that you really don't want to run more than 75% of the stated power. If you have 1000W don't pull more than 750-800 max and that is if you are using a top quality power supply. Make sure the power is spread equally, you may need to mix the power to the cards to balance out the power.
my biggest advice - try picking up an appliance power meter and running it on different applicances (especially TVs and washer/dryer) for a day at a time, this will tell you a lot about which appliances are using the most power and will almost certainly pay for itself when you can be more mindful of the biggest users. My suspicion is the electric dryer, especially if it's on the older side.
Both of these devices will let you monitor how much energy your whole house is using, but the big thing about the Neurio device is it can supposedly detect which device is causing the spike in usage. As I understand from reviews it's a work in progress - it doesn't magically work out of the box, but you need to train it against your devices.
Non of these are going to magically help you save energy, I think you'd be better off just trying to figure out yourself what is using so much power (and put the money towards buying more energy efficient devices if you need to). If you want to measure how much power a device is using over a day, something like this will do (and even calculate the cost): https://www.amazon.com/gp/aw/d/B00E945SJG
Your usage works out to be an average of 5kW which seems quite high (US average is about 1/10 of that) but without more details who knows. How big is your house? How many people live there? Do you have electric heating? AC on most of the year? A pool?
sanding helps, but you need this
https://www.amazon.com/XTC-3D-High-Performance-Print-Coating/dp/B00PFXK4JY
This is the coating. It is liquid epoxy and can be very messy if you don't plan it out. https://www.amazon.com/XTC-3D-High-Performance-Print-Coating/dp/B00PFXK4JY/ref=sr_1_3?ie=UTF8&amp;qid=1511381617&amp;sr=8-3&amp;keywords=3d+print+finishing
This is the one I think he is printing - https://www.thingiverse.com/thing:404028
You could potentially do an acetone wash.
I use Smooth-On XTC-3D, but it might not be right for your application. It can add some thickness to parts, which in the case of Sledgefire shells might make them unusable.
Official Site
Amazon
Nice! I'm sure that'll look awesome. I suggest using bondo to fill cracks and divits and XTC-3D or a similar epoxy to cover the entire piece to smooth it out.
I can't say this is what the "best" method is, just what has worked for me in the past:
My biggest gripe with 3D printing was that the ridges were always present. This process makes it so the ridges are non-existent and easier to paint!
Edit: I should mention I've mostly worked with large scale cosplay props. This process might not work for everything, like you probably don't need to put epoxy on small stuff.
This is what you need to make it look 100% better http://www.amazon.com/XTC-3D-High-Performance-Print-Coating/dp/B00PFXK4JY/ref=sr_1_2?ie=UTF8&amp;qid=1451974721&amp;sr=8-2&amp;keywords=Xtc+3d
Not much really. The benefit of buying the mk2s is that you really don't need to modify or swap anything.
Here are a few things you might want in my opinion:
Looks good. I've been wanting to print up a car too.
You should look into XTC-3D.
I used this on my 3D printed upper/battery compartment
https://www.amazon.com/gp/product/B00PFXK4JY/ref=oh_aui_search_detailpage?ie=UTF8&amp;psc=1
It worked great! Took a couple hours to sand after but then just primered it and thats it.
http://imgur.com/a/yMRjP
You can order this stuff off Amazon and it's specifically made for 3d prints. The ones I've done have a mirror finish, and you can tint it directly to make candy automotive style finishes. Or you can prime it and paint it.
https://www.amazon.com/gp/aw/d/B00PFXK4JY/ref=mp_s_a_1_2?ie=UTF8&amp;qid=1525533010&amp;sr=8-2&amp;pi=AC_SX236_SY340_FMwebp_QL65&amp;keywords=xtc-3d&amp;dpPl=1&amp;dpID=51jOz30NOXL&amp;ref=plSrch
a défaut je te propose des stickers for rectal use only
Amazon sells them for under 10$ but they are temp out of stock it looks like
For rectal use only.
https://www.amazon.com/PHARMEX-1-78G-Permanent-Paper-RECTAL/dp/B00U2H451G
I've also had quite a lot of fun with these
I'm buying these and so should all of you.
I think you should purchase these and give them out.
It shows decent shipping for me, says id get it in a bit over a week. Its 5$ more than amazon as seller though https://www.amazon.com/HATCHBOX-3D-WOOD-1KG1-75-Filament-Dimensional/dp/B01092XXD4/ref=s9_simh_gw_g328_i2_r?_encoding=UTF8&amp;fpl=fresh&amp;pf_rd_m=ATVPDKIKX0DER&amp;pf_rd_s=&amp;pf_rd_r=9D8V700W3MJKX2N6FQEN&amp;pf_rd_t=36701&amp;pf_rd_p=a6aaf593-1ba4-4f4e-bdcc-0febe090b8ed&amp;pf_rd_i=desktop&amp;th=1
All three crests were printed on a stock ender three with Hatchbox Wood pla. The pla I used sands and stain just like wood so it was the perfect choice for these crests.
For the Gryffindor and Raven claw crests, I used regular dark wood stain. The Slytherin crest is what the prints look lime without staining. I plan on on painting the Slytherin one as I dont think the stained look fits the house. Links to everything I used can be found below.
Link to filament
Gryffindor Crest
Raven Claw Crest
Hufflepuff Crest
Slytherin Crest
Weird. If you click other sellers on Amazon it does show Amazon as a seller with Prime.
I've only used https://www.amazon.com/gp/product/B01092XXD4/ref=ppx_yo_dt_b_asin_title_o09_s00?ie=UTF8&amp;psc=1 but had some great results.
Here's some of my wood pla projects. The first two images are sanded and stained, the final is fresh off the printer with some fuckups I was troubleshooting. https://imgur.com/a/DdEEXzZ
I used a red mahogany stain
here is the filament https://www.amazon.com/gp/product/B01092XXD4/ref=oh_aui_detailpage_o02_s00?ie=UTF8&amp;psc=1
I'm expecting my printer tomorrow (Maker Select v2 - couldn't wait for mini v2 and reading mixed thoughts put me off) going to try printing this with a wood PLA. (https://www.amazon.com/gp/product/B01092XXD4) Really excited to see how it turns out. Have to wait until Tues for the filament, but that'll give me some time to acquaint myself with this beast. Thanks for inspiring me.
It's available on the US amazon $34...
https://www.amazon.com/gp/aw/d/B01092XXD4/ref=mp_s_a_1_1?ie=UTF8&amp;qid=1492206271&amp;sr=8-1&amp;pi=AC_SX236_SY340_QL65&amp;keywords=hatchbox+wood+pla&amp;dpPl=1&amp;dpID=511IFoPtR4L&amp;ref=plSrch
I have the same printer. While everyone is correct in saying you can handle the higher temps, you need to be careful because of the PTFE hotend it comes with stock. The PTFE tubing in the hotend starts to get mushy around 245 and printing too long at this temperature will eventually result in a clog. I upgraded mine to the Micro Swiss All Metal Hotend and never looked back. Higher, more consistent print temps as well as better looking prints overall!
Alternate Amazon Link
I went with the MicroSwiss upgrade. Was quite painless to do. Just be sure to start your base retraction to .5 and tweak from there. The Cura given with the MP Select has its retraction set to 7mm from the start so you may want to look into adjusting it now before you clog again.
Amazon has the same one if you don't want to mess with the 'bay.
My MS is out of commission right now due to a motherboard issue - but that's not something that's common occurence with these machines. That aside - I love my MS, it's a damn good printer for the price and works really well. Plus it's on the cheaper side of things and can be upgraded pretty easily. I would suggest getting this printer, and a glass sheet for a bed upgrade. The buildtak stuff they put on it is fine for a little bit, but the glass just produces better results in my experience. And if you want to at a later point in time, a MK10 all metal hotend nozzle upgrade (with cooling block) is also a fairly cheap and easy buy/install. Just the core machine though, no mods - is really good and easy to install and calibrate. Totally would buy another one if I could right now.
Glass bed
Nozzle upgrade
That link looks like a Bowden extruder setup where the stepper motor is further upstream from where the plastic is melted/extruded.
I have a MS+ also, the recommended replacement for that part is the MicroSwiss all metal hotend.
Here is the block:
Micro Swiss All Metal Hotend with SLOTTED Cooling Block for Wanhao i3 https://www.amazon.com/dp/B01E1HANLS/ref=cm_sw_r_cp_tai_EPg0BbVAAANA1
Extruder plate:
Micro Swiss CNC Machined Aluminum Extruder Plate for Wanhao i3 https://www.amazon.com/dp/B06XMRFKRZ/ref=cm_sw_r_cp_tai_uQg0Bb6WV1GXG
Lever:
CNC Machined Lever for Wanhao i3 extruder https://www.amazon.com/dp/B01FWHH4DQ/ref=cm_sw_r_cp_tai_WQg0Bb10AFP5T
Important thing to remember: Nothing is -ever- mandatory unless it's a major safety issue. The closest thing to that on that printer is the mosfet. I believe your original message implies you replaced the buildtak, so the Mosfet upgrade would be a very good idea unless you plan to change out the control board entirely.
Everything else is Optional and Quality of Life/Print stuff. ^.^
The following are examples on Amazon. Other folks and posts may have better advice on where/what to get.
Y Carriage plate
https://www.amazon.com/dp/B01MUAMRN7/ (This is the part under the heated bed)
MicroSwiss all metal hotend (From other person's post):
https://www.amazon.com/dp/B01E1HANLS/
Linear bearings would be LM8LUU for the Y rods. If you have the plastic bearing holders, it's easy. If you have the aluminum block bearing holders, you'll have to find somebody else to source info on the circlips and how to not become sad with them.
You can print things just fine without any of these upgrades, so don't worry about the long print (unless you run out of filament).
A new controller board can do extra stuff and is required (Highly recommended, since you "can" make the probe work on the Melzi board, but poorly and at the cost of other things) for Z-Probe use, dual extruder, and with the heated bed on that printer, can remove the need for a separate MOSFET. It opens the path for other upgrades, can improve print quality to a degree in some cases, and can drive you absolutely nuts trying to set it up.
The inexpensive Quality of Life I'd recommend are thumbwheels with nylock nuts (hard to turn, but keep your level for a long time); corner-bracket spring cups (printed); and glass print bed. Two sets of printed things and about $12 at worst for the glass.
The bearing upgrade (If you can do it without fighting circlips) helps reduce Y-axis stutter and vibration. That upgrade brought my print quality up hugely. $25 or so if you get a lot of spares or higher quality ones.
The Y platform helps you with leveling and staying level.
The lack enclosure has some printed parts, $20-40 worth of Ikea furniture, and up to $50 worth of siding depending on your ability to cut glass and plexiglass.
So many things you CAN do. None that you MUST do. Some that you SHOULD do. And everything else is Just For Fun.
FYI, The Monoprice Maker select V2 is a rebranded Wanhao Duplicator i3 V2.1, and its also known as the Coccoon Create in other countries. If you see any of those names, thats your printer.
Your printer doesnt use an E3D V6 hotend, it uses a MK10 hotend.
You can use a V6, but you'll have to print a bracket for it, will probably require some firmware changes with requires flashing a bootloader with an arduino, and may require some additional hardware.
Normally its recommended to just heat up your hotend and carefully pull that plastic off with tweezers, but as your heating cartridge is damaged, that leaves you with two options-
I never used it, but this one from Gulfcoast Robotics looks well made as well. this is your whole setup minus a heating cartridge. A whole all metal hotend with nozzle and thermistor for $45 is a deal. They've even got installation instructions linked in the description. Side note- i assume it takes a 1/4in 6.35mm cartridge like the original but you might want to double check with them. You can never go wrong with well-manufactured American components.
Either way you'll need a new heater cartridge (and probably thermistor). Heres a link to a replacement cartridge. Heres a link to a store full of wanhao parts.
This printer uses an unusual sized heater cartridge- 1/4in, AKA 6.35mm.
Most (E3D) cartridges are 6mm.
Dont get a 6mm cartridge, get a 6.3-6.35mm cartridge. (A 6mm will be too loose and thats one of the reasons that the Anet A8 is such a fire hazard, the heater cartridge can fall out)
Good luck!
Nozzles are all generally brass. Those should be expected to be replaced from time to time. They are relatively cheap. The Microswiss upgrade is more than just a nozzle. It replaces the stock hotend with all metal. In your stock hotend is a PTFE tube that can cause jams, will deform if heated too high, and prevents you from using certain materials. The microswiss is a relatively inexpensive and easy way to fix this.
I recommend the block too: https://www.amazon.com/Micro-Hotend-SLOTTED-Cooling-Wanhao/dp/B01E1HANLS/ref=sr_1_1?ie=UTF8&amp;qid=1503589251&amp;sr=8-1&amp;keywords=microswiss
However you can save a little money:
https://www.amazon.com/Hotend-Nozzle-WANHAO-FlashForge-Builder/dp/B01C3HEQZC/ref=sr_1_3?ie=UTF8&amp;qid=1503589251&amp;sr=8-3&amp;keywords=microswiss
Yes, it's that z brace mod. Make sure you use the version with the adjustment nuts at the top AND bottom.
Here's the hot end.
I also recommend the 120mm fan mod to shut those noisy fans up, a glass bed because the leveling of the bed it comes with is horrible, an upgraded spool holder, and some lock nuts for the bed. (At a minimum.)
I bought this and it's helped with cloggs I used to get a lot.
https://www.amazon.com/gp/aw/d/B01E1HANLS/ref=mp_s_a_1_fkmr1_1?ie=UTF8&amp;qid=1493012482&amp;sr=8-1-fkmr1&amp;pi=AC_SX236_SY340_FMwebp_QL65&amp;keywords=Wanhao+duplicator+i3+cooling+block
Seconding everything people have said here and want to add the following.
A glass bed with 10mil PEI from CS Hyde will do wonders for bed leveling.
Upgrade your Y plate as soon as possible, the stock one warps over enough time making bed leveling nearly impossible.
All metal hotend such as the micro swiss is amazing, no more clogged PTFE tubing, easier to clean if it does.
Z brace is a must, also print a fan cooler like the Diicooler on thingiverse. Replace the stock part cooling fan with a nice radial fan, plenty on amazon, make sure its 12v. This helps prints come out cleaner.
Yours should come with thumbwheels, if not, print some, bed leveling is easier with it.
Print some spring cups as well, keeps the springs straight and not bending when leveling the bed.
DO THE MOSFET MOD TO MAKE IT SAFE!
Watch this vid and do his printed mods https://www.youtube.com/watch?v=Tpcm4XEbP1Q&amp;t=752s&amp;list=PLyIdpN_zILcknsQzSZSiWhQ685NxkWsvD&amp;index=2
Also, stay far far FAR away from Shaxon filament! It broke my hotend, check my post history to see the red glob of death I dealt with. I have had very good luck with eSun PLA.
Links for bought parts:
Fans: [here (https://www.amazon.com/gp/product/B00MJU6JR2/ref=oh_aui_detailpage_o02_s00?ie=UTF8&amp;psc=1)]
Glass plate: [Here (https://www.amazon.com/gp/product/B07B2YLWF9/ref=oh_aui_detailpage_o03_s00?ie=UTF8&amp;psc=1)]
Hotend: [Here(https://www.amazon.com/gp/product/B01E1HANLS/ref=oh_aui_detailpage_o05_s00?ie=UTF8&amp;psc=1)]
Y plate: [Here (https://www.amazon.com/gp/product/B07B251KBS/ref=oh_aui_detailpage_o01_s00?ie=UTF8&amp;psc=1)]
MOSFET: [here(https://www.amazon.com/gp/product/B01HEQVQAK/ref=oh_aui_detailpage_o02_s00?ie=UTF8&amp;psc=1)] and wires [here(https://www.amazon.com/gp/product/B017U6PGLO/ref=oh_aui_detailpage_o02_s00?ie=UTF8&amp;psc=1)]
The meter is a matter of preference. I would shop based on how it's calibrated...some use 6.86 and 4.01 solutions but meters that calibrate at 7 & 4 may be more expensive but those solutions are cheaper. I have had probes break too so don't go crazy on price. I like this one because of the case it comes with along with the calibrating fluid. I would also get some sort of dropper it will help to adjust your ph. If it is just clean water a single drop of ph down will lower the oh by several points. Aim for 5.5-6.5
Draining and replacing the water won't solve your issue right away. As long as the plant stays alive and growing it should be fine. If you can remove the plant out of the bucket and run some water over it for a few minutes and replace the water it would probably help.
Edit: found a photo of my tomato last year. This thing got like 8ft tall.
http://imgur.com/a/cpSRuql
The only way I know of accurately testing pH in the soil is by testing the run-off from your waterings with an electronic meter.
First off, in order to use a pH meter, you must calibrate it every. single. time. Or at least once a week. They're notorious for drifting even when stored correctly. You will need 4.0 and 7.0 calibration solutions, they're sold as powder or in liquid form. You should also have probe cleaning and probe storage solution. Contact lens solution (not hydrogen peroxide stuff) can work as probe cleaning solution in this context, as it works well on organics in a gentle way.
Unfortunately the $10 specials aren't really that great, and you won't get really repeatable results until you hit about the $35-$50 price point. At this price point they should start to have replaceable probes. e.g.: this or this . I'm pretty sure /u/chino_brews knows the specific generic design name of the 2nd one I linked, lots of different vendors have a house brand white box version of it. Fisher Scientific design that went off patent, can't remember the number.
Spring for a pH meter. This one comes with a full calibrations and testing kit for about $80. Here's the same one, without the extras for about $45.
I got this Apera Instruments pH pen style meter. It was about 0.2 out of calibration after ~2 months of use, it takes about 30 - 45 seconds for the pH to stop slowly changing... really annoying. It's fairly reliable but slow. Overall I'm fairly happy with it as a new grower, definitely meets my needs.
Just received this ph meter today:
https://www.amazon.com/dp/B01ENFOHN8/ref=cm_sw_r_cp_api_-iXpzb0Y5RXN0
Was really easy to calibrate and not too expensive imo. Will update with any issues, but so far it's perfect for my needs.
Apera Instruments makes very very good ph pens. I’ve had mine for many months and I’ve calibrated it 2 times. I didn’t even need to calibrate it the 2nd time. I just wanted to see if it was off after a couple months, but it was still good! It’s still correctly calibrated right now, which has been another couple months since I did it last
I know some people use the cheap 15-20$ Orange and yellow ones amazon has with some pretty good results. I would personally spend a tad bit more and get one from Apera if you can.
Here’s the one I have: Apera ph20
I apologize for not linking. That was poor Reddit etiquette.
Apera Instruments AI209 PH20... https://www.amazon.com/dp/B01ENFOHN8?ref=ppx_pop_mob_ap_share
Professional TDS ppm Conductivity... https://www.amazon.com/dp/B01FPG89CE?ref=ppx_pop_mob_ap_share
> Use Environment: RH 95%, 0-50℃(32~122℉ )
Listed right in the item description.
For what it's worth, I picked up this one and it's been great.
Bok choi has been the easiest thing for me to grow by far so there's definitely something off in your system.
Having a pH pen and an EC pen is pretty much critical to diagnosing nutrient solution problems. This is the pH meter I have, which is kind of mid-tier but comes with calibration solution. Also pick up some storage solution as it will reduce how often you have to recalibrate the pen vs keeping it dry. EC meter you can go cheap on, I use this one and get good results.
i had the yellow one threw it away and got this https://www.amazon.com/gp/product/B01ENFOHN8/ref=s9_acsd_topr_hd_bw_bQc7kp_c_x_w?pf_rd_m=ATVPDKIKX0DER&pf_rd_s=merchandised-search-3&pf_rd_r=YEXJEDDCYN7YESJAB4XY&pf_rd_t=101&pf_rd_p=c8d54159-ecd9-53c4-bc0e-a00d14b99e74&pf_rd_i=393271011 it comes with 4ph and 7ph solution so you can calibrate it when ever too
Supposedly the probe I use has ATC. I've tested the same sample at mash temp vs 60 degrees and got the exact same reading. YMMV
This is what I have:
https://www.amazon.com/gp/aw/d/B01ENFOHN8/ref=mp_s_a_1_4?ie=UTF8&amp;qid=1525700380&amp;sr=8-4&amp;pi=AC_SX236_SY340_FMwebp_QL65&amp;keywords=ph+meters
It’s actually marble! Looks great and hides some small imperfections
ZIRO 3D Printer Filament PLA 1.75mm Marble Color 1KG(2.2lbs) - White https://www.amazon.com/dp/B01IIAC2MW/ref=cm_sw_r_cp_api_i_Y05iDbDAKXX8T
I use this one
ZIRO 3D https://www.amazon.com/dp/B01IIAC2MW/ref=cm_sw_r_cp_apa_i_85VDDbFFE022X
I'm a connoisseur of purple.
Other than that, I enjoy Ziro Marble and Proto-Pasta Teal.
If it's the one that's been being used for other posts, Ziro marble PLA https://www.amazon.com/ZIRO-Printer-Filament-1-75mm-Marble/dp/B01IIAC2MW
I've been using the snap-in version for a couple of weeks now, and have no problem at all. This is the plastic I used. It may be a little rougher than average, which could help.
https://www.amazon.com/gp/product/B01IIAC2MW
This reminds me of the borescopes on Amazon for iPhones or tablets that could probably do the same thing with a modified Laryngoscope to hold the wire.
Depstech Wireless Endoscope, WiFi Borescope Inspection Camera 2.0 Megapixels HD Snake Camera for Android and IOS Smartphone, iPhone, Samsung, Tablet - Black(11.5FT) https://www.amazon.com/dp/B01MYTHWK4/ref=cm_sw_r_cp_api_na01AbWNKMD9E
Rather than take the seat out, have you considered purchasing a borescope? Especially if you know where the sticker should be. They aren't much money and then you'll have a borescope for later.
Something like this...
https://www.amazon.com/Depstech-Endoscope-Inspection-Megapixels-Smartphone/dp/B01MYTHWK4/
It's kinda like this one, but the newer updated one from Depstech.
https://www.amazon.com/dp/B01MYTHWK4/ref=cm_sw_r_cp_apa_i_NOX4Cb8BDMV4S
It shows for $35.99 and the updated one is $60 but my dad had a code from the company that we got it for $35 for the newer one. I thought it was a dead bird at first too
So something like this, with a pair of needle-nose pliers could help. Use the camera to push it to where the pliers can get to it.
&#x200B;
Good luck!
or this (sfw)
Depending on the angles a long flex bit can be good. Along with a hook on the end of one of these
DEPSTECH Wireless Endoscope, IP67 Waterproof WiFi Borescope Inspection 2.0 Megapixels HD Snake Camera for Android and iOS Smartphone, iPhone, Samsung, Tablet -Black(11.5FT) https://www.amazon.com/dp/B01MYTHWK4/ref=cm_sw_r_fm_apa_i_AuG0DbZS54RS3
Otherwise you are looking at cutting and patching sheetrock
Yes its on Amazon for $36.99
https://www.amazon.com/Endoscope-Depstech-Inspection-Megapixels-Smartphone/dp/B01MYTHWK4
Also, there's no way to know for sure but try to watch a video on youtube on how to properly source an engine from a junk yard. You might look for one with accident damage versus one that looks normal because it implies that it was running at the time of the accident, versus scrapped for mechanical issues.
&#x200B;
You might be able to do a compression test if you find a way to somehow bring your battery and the junkyard allows you to do connect to the starter somehow. At least pull the plugs and take a look.
&#x200B;
You won't be able to check the fluids at the junkyard to know if there was oil mixing with coolant so.. if you can manage to get a compression test done somehow that'll be the way to go.
&#x200B;
I bought this wireless snake camera thing for $30 on amazon which connects to your phone and it's got a light at the end. You might be able to use this to check inside of the cylinder head and look for any damage.
https://smile.amazon.com/gp/product/B01MYTHWK4/ref=oh_aui_search_detailpage?ie=UTF8&psc=1
&#x200B;
I use it to find TDC when doing a leakdown test when a screwdriver won't fit
I wanted to try this but dat manufacturing lead time doe
MG Chemicals Silicon Modified Conformal Coating.
I was able to see where I had coated and where I missed with this UV Flashlight.
conformal coat EVERYTHING you can (https://www.amazon.com/MG-Chemicals-Silicone-Modified-Conformal/dp/B008O9YIV6). use 'sensor-safe' silicone gasket maker everywhere. It's actually more than just damage, I got water in my HK Swamp Dawg airboat RX and it went full throttle, rather than failsafe. I was holding it, having just gotten it out of the water, draining it. I almost bit me.
also, consider a cheap gyro, really helps with wind, turning and super fun drifting.
As others have mentioned, get rid of that tape. You should be using a conformal coating like this stuff... https://www.amazon.com/dp/B008O9YIV6/ref=cm_sw_r_cp_api_J5dKBbSFHY21N
I'd second the conformal coating, seems to work well for me. this is the stuff I used http://www.amazon.com/MG-Chemicals-Silicone-Conformal-Coating/dp/B008O9YIV6/ref=pd_sim_328_1?ie=UTF8&amp;dpID=41dzbpa8jyL&amp;dpSrc=sims&amp;preST=_AC_UL160_SR118%2C160_&amp;refRID=01C6ET92JK608J6A6AWW
What country is that? If you are in the US Amazon has what you are looking for.
> So for the most part you only have issues if the pcb gets wet.
That's what conformal coating is for.
I'm not sure why it's so hard to find the little bottles on Amazon now.
Acrylic
Urethane
Silicone
I have the acrylic because the silicone kind costs about twice as much. The urethane might make a harder protective shell though I'm not sure. And you can solder through it so don't worry about trying to remove it.
I remember watching a YouTube video where someone covered their electronics in this stuff and flew it in a bathtub. Plus it doesn't add any bulk to the drone like liquid tape. But that being said I haven't tried it myself yet.
I dont get it?
https://www.amazon.com/gp/product/B008O9YIV6
is $13 is that out of your price range?
The nice thing about actual conformal coating is that you can solder through the coating or remove it if needed. Had grate luck with it so-fare.
They sell https://www.amazon.com/MG-Chemicals-Silicone-Conformal-Coating/dp/B008O9YGQI its about $5 more though, it is an Aerosol. Never used it before though.
This is what you want
https://www.amazon.com/MG-Chemicals-Silicone-Modified-Conformal/dp/B008O9YIV6/
This is more specialized than nail polish.
https://www.amazon.com/dp/B008O9YIV6/ref=nav_timeline_asin?_encoding=UTF8&amp;psc=1
Dry drone is a popular product out there but, it's price to size ratio is crazy. I also have come across Silicone Conformal coating like this:
https://www.amazon.com/gp/product/B008O9YIV6/ref=oh_aui_detailpage_o07_s00?ie=UTF8&amp;psc=1
Base model Blade 15 2018 with 1060
For best thermals:
Thermal pads and liquid metal
as well as this conformal coating to prevent the liquid metal from allowing conduction to happen.
in ThrottleStop
for performance
and for Battery
Then if you want to get even better thermals
this cooling pad giving me these idle temps and these temps in Assassins Creed Odyssey after 3 hours of play Connected to my Core X Chroma.
With 32gb of RAM and 4tb of storage between the 2tb sata and the 2tb nvme drives it's my work computer with A couple VMs running and lots of chrome tabs and my main PC when i'm home plugged into the core.
if you don't like the Razer logo on the back you can get a dbrand skin on it with no logo cutout
Don't use liquid electrical tape. It can't handle the temps and will just be goo under the HS. Use MG Chemicals 422B Silicone Modified Conformal Coating instead found here: https://www.amazon.com/gp/product/B008O9YIV6/ref=ppx_yo_dt_b_search_asin_title?ie=UTF8&psc=1
http://www.amazon.com/gp/product/B008O9YIV6?psc=1&amp;redirect=true&amp;ref_=oh_aui_detailpage_o01_s00
that's it
https://www.amazon.com/gp/product/B008O9YIV6/ref=ppx_yo_dt_b_search_asin_title?ie=UTF8&amp;psc=1
It's for waterproofing electronics.
You should try silicon conformal coating. It really works I killed an esc going through puddles and than heard about the stuff from the fpv community and I am able to almost submerge my esc and bms.
https://www.amazon.com/gp/product/B008O9YIV6/ref=ppx_yo_dt_b_asin_title_o07_s00?ie=UTF8&psc=1
Honestly, i just use a Kill-a-wattVery similar to the one in the link.
Since the things you have plugged in don't generally change a whole lot, you could use something like a [plug in energy meter] (https://www.amazon.com/TS-836A-Energy-Voltage-Electricity-Monitor/dp/B00E945SJG/) to measure those sorts of devices and a [clamp on amp meter] (https://www.amazon.com/Klein-Tools-CL200-Clamp-Temperature/dp/B003LDFVBG/) to measure the ones that don't. It is obviously not real time, but it'd be quite a bit cheaper than monitoring every circuit in real time. Once you know how much power your large appliances use, it isn't going to change. ;)
60 watt bulbs hardly touch the electric bill. Anything with motors is what kills your power bills.
https://www.amazon.com/dp/B00E945SJG/ref=cm_sw_r_cp_apa_1WTKxbEMKP24B
http://www.amazon.com/TS-836A-Energy-Voltage-Electricity-Monitor/dp/B00E945SJG/ref=sr_1_2?ie=UTF8&amp;qid=1463748772&amp;sr=8-2&amp;keywords=power+monitor
I can say it's either a driver problem or a hardware problem - I know it sounds vague, but without taking a 1st hand look I can only speculate
doesn't help that you have 2 cards in your system by different manufacturers; you also say you noticed GPU % usage fluctuations
---
can you get your hands on a power measuring unit gizmo?
I have a feeling that you might hit the limit on that PSU; I haven't yet found power specs for 290, but 2x 290X will draw 750W in full load at the wall
edit: according to this Guru 3D article, they recommend a 800W PSU as minimum
> AMD Radeon R9 290 Crossfire - On your average system the cards require you to have a 800 Watt power supply unit as minimum.
Everyone else commmented on the obvious toxic situation you are in. I am just gonna try to help you with a way to quatify how much electricity you are using.
https://www.amazon.com/TS-836A-Energy-Voltage-Electricity-Monitor/dp/B00E945SJG
plug this in, and then plug in what you want to measure. You can do some easy math and figure how much electricity anything uses and do some basic math to calculate how much that cost if you have an electric bill laying around.
I use outlet meter like this
https://www.amazon.com/TS-836A-Energy-Voltage-Electricity-Monitor/dp/B00E945SJG
that is most precise way to measure power, software solutions are not reliable
The voltage in Norway is 240v. I used a plug-in electricity meter (or plug load meter) to read the wattage & ampere.
I'll update when the server is up and running.
If you're averaging 2kW/h you might just need to find the source of that. Maybe get one of these guys and troubleshoot?
I bought a few of these power meters from AliExpress at about $12 each, but it took a while to get here.
&#x200B;
You can't. You can rig up something and use an amp probe or buy a plug-in power meter but what you're asking for doesn't exist, at least not cheaply.
Some battery backups provide this built-in, otherwise you can get a plug that sits behind the battery backup in the elec socket and shows how much you are using. Like this here
If you have budget left, I know I can find benchmarks of this online. But please buy a kill-a-watt to check the wattage your PC will output. Preferably when stress testing both the CPU and GPU with furmark, intel burn test, OCCT. You might be surprised at how little this system pulls from the wall. I estimate between 450-500W depending on how high your overclocks are.
I suggest windforce cards a lot and I am slightly afraid to suggest a 650W PSU despite the fact that the benchmarks show that 2 GTX970s pull 439 watts when in full stress. Add a 111-140 for the CPU and like 5 for the HDD/SSD and you get to a roudhly 550W.
The kill-a-watt can also be used for other stuff! So not a terrible buy, handy tool to have.
You can use a device like this:
https://www.amazon.ca/Display-Energy-Voltage-Electricity-Monitor/dp/B00E945SJG
Test each device plugged in and see if anything is using a high amount of electricity.
> It's 40 more watts on an overclocked R9 390. Most overclocked GTX 970s will exceed 210 watts when overclocked. Your "30-40%" number is a gross hyperbole, as 40w is actually 19% out of 210w.
Ok so now you are using overclocked cards, your efficiency goes down the drain if you overclock past a certain point.
Let's compare the numbers for factory overclocks on average gaming power draw:
&nbsp;
https://www.techpowerup.com/reviews/MSI/GTX_970_Gaming/25.html
MSI GTX 970: 168W vs R9 290 in the same test: 239W -> 42.3%
&nbsp;
https://www.techpowerup.com/reviews/Sapphire/R9_390_Nitro/21.html
Here is an Sapphire R9 390 Nitro: 261W vs 168W for the MSI 970 -> 55.4%
&nbsp;
We could compare maximum power draw instead of average but that doesn't really help your case:
MSI 970 213W vs Sapphire 390 365W -> 71.4%
&nbsp;
Let's look at a slower clocked R9 390:
https://www.techpowerup.com/reviews/Powercolor/R9_390_PCS_Plus/28.html
Average gameing power draw 231W vs 168W for the MSI 970 -> 37.5%
So I would not call that hyperbole, I would call that me being generous with the numbers ;).
> One, it can vary based on the displays used (of which they do not disclose), resolution, refresh rate, ect. There is not nearly enough data to call this an issue and not even the review you linked itself goes as far as to call it that because there simply isn't enough data.
How about that data, I, me personally have 3 different monitors, 3 different resolutions.
I usually don't throw away all my monitors and replace all of them, I usually upgrade one at a time.
I bet a lot of people use their old monitor as a secondary when upgrading, so they measure this power draws scenario for a reason.
Anyways, in my case the Sapphire R9 390 drew almost 90W when "idle" my MSI 970 draws about 16W.
It's night and day difference in noise and heat output. That R9 pulls more idle than my i7 at max torture load.
&nbsp;
> This doesn't really prove anything. I've had loud GTX 970s and loud R9 390s. The only thing it proves is that some designs are better than others.
While I generally agree that this does not universally prove anything, keep in mind that all the 3 cards I tested have exceptional cooling solutions.
I run a silent PC that is almost inaudible if idle, and because I work 8 hours a day using this PC that's important to me personally. I choose those cards for a reason.
My case is not an ideal scenario for a high power card because the ventilation is limited (only 1 input fan on low RPM on idle + case is noise isolated does not have a lot of open air vents).
Still my scenario especially shows how much heat a card puts into a case because I like to keep the ventilation (noise) to a minimum.
https://www.techpowerup.com/reviews/Sapphire/R9_390_Nitro/22.html
The Sapphire Nitro is a fantastic R9 variant.
0db when "idle" like the MSI 970 (which is why the Sapphire 390 was my first choice and the first card I tested as an upgrade in my current system).
Unfortunately in my case the card never really is "idle" because of the 3 monitors.
Like I said before, the gaming noise wasn't bad at all. The extra noise this card produces in my scenario is mostly due to the excess heat my case fans have to get out of my case.
Again I wouldn't really mind the noise level during gaming, or the extra power draw in that situation.
What killed this particular card for me was the idle power draw with my 3 monitors.
&nbsp;
> Where are you even getting these numbers from? Every review I have seen has R9 390s at under 10w during idle.
I have something like this:
https://www.amazon.com/TS-836A-Energy-Voltage-Electricity-Monitor/dp/B00E945SJG
I measured my system power draw with my iGPU vs the power draw with the R9 390. Difference was almost 90w with all monitors attached.
This test has the R9 390 at 71 W idle with multiple monitors attached:
https://www.techpowerup.com/reviews/Sapphire/R9_390_Nitro/21.html
I gladly admit that my measurement might not be super accurate and something like +-5W inaccuracy of measurement is possible.
I only had two monitors attached to the iGPU because it only has two connectors ;).
If you want we can call it 70W at idle with multiple monitors.
&nbsp;
> Just going to point out that there are R9 390s with fans that don't turn on until 76c as well....
Yes and the Sapphire I tested is one of them. Sadly the card does not stay under 76 due to the power draw ;).
If I only had one monitor, or if they would fix the multi monitor issue,
the Sapphire 390 would be the better card compared e.g. with my 970.
If you don't mind the extra heat and electricity bill. (which is reasonable if you don't game that much or live where electricity is cheap).
&nbsp;
> No one here was arguing otherwise but there is only so many shits that can be given about power consumption. If I wanted to worry about power usage I would buy a Nintendo switch.
Well this whole thread started when I addressed the claim of "AMD sucks because they run hot!!!!!!!1!".
If you care about power draw depends on where you live. Where I live, with my usage scenario (at least 8 hours a day drawing ~70 extra watts).
The extra cost of running the Sapphire 390 is 146kWh per year or roughly 40€ a year.
Let's assume you use your card for at least 2-3 years so that's 80-120€ extra cost.
That was the extra cost of a 980 back when I was looking for a new card. The 390 would lose that duel.
I realize, that if you live in the US or somewhere with low energy cost, the difference is much lower. (The national average was 12.99 cents per kwh).
$20 per year or 40-80$ for a 3 year period. Now if you remove the extra monitors, of if you only use the PC for gaming this will be even lower.
I'm fine with you not caring about it. I do.
&nbsp;
> Low power consumption is nice, to a point. It stops becoming important when companies like Nvidia simply continue to cut down their die sizes to stave off performance improvements.
Whut? You cut down die size, because you can due to the 16nm process, to increase yield because that's how you make money. It's also more efficient :D.
Which is why Nvidia could improve perf/Watt immensely.
50% more efficient going from a 980Ti to a 1080Ti,
something like 70% more efficient going from a 970 to 1070,
up to 100% if you look the most favorable gains on the lower end.
On the other hand Vega 64 gives you barely more perf/Watt over a Fury X...
&nbsp;
I don't agree that they starve off performance improvements. At least not unreasonably so.
Again, die size means profit. The smaller you can go while still improving performance the better.
Now if only AMD could bring a competitive card in the higher end... that would force Nvidia to give up more of their profits by cutting price or increasing die sizes again to stay competitive.
Again I came from an AMD card and I wanted to buy one again but I had to go with the 970.
Looking at Vega right now I have to say I'm not impressed yet.
Ryzen is a different story though, let's hope they can counter Intels next Hexacore line. Maybe I can go full AMD again, on my next machine.
&nbsp;
My i7 3770 is starting to show its age, but only in some of my work tasks and the 970 is holding up surprisingly well at 1440p@60Hz during gaming.
I can probably wait for Zen 2, which should roughly come out around the same time as Volta and hopefully Navi is not too far away either.
Who knows, maybe by then AMD gets some support from the major deep learning frameworks, it looks like Vega would be a good card for that.
For ~12-15 bucks you can see how much stuff really uses.
Just buy something like this
When you say "safety fuse", is this something in your PC or something in your home?
If it's something in your home, you should get one of these to test what your computer is drawing from the wall: https://www.amazon.com/TS-836A-Energy-Voltage-Electricity-Monitor/dp/B00E945SJG
It's possible that your drawing too many amps from the wall.
You can get a watt meter that plugs into the outlet and you plug your PC into that and it will tell you real time how much your PC is drawing.
https://www.amazon.com/d/Industrial-Power-Meters/TS-836A-Energy-Voltage-Electricity-Monitor/B00E945SJG
Yes, I'm talking about watts in both situations. I have a meter similar to this one
https://www.amazon.com/d/Industrial-Power-Meters/TS-836A-Energy-Voltage-Electricity-Monitor/B00E945SJG
or you can use this: https://www.amazon.com/XTC-3D-High-Performance-Print-Coating/dp/B00PFXK4JY/ref=sr_1_1?ie=UTF8&amp;qid=1467164171&amp;sr=8-1&amp;keywords=xtc+3d
or this and then epoxy sealer: https://www.amazon.com/DELUXE-MATERIALS-DLXBD044-Perfect-Plastic/dp/B0076LAVFK/ref=sr_1_1?ie=UTF8&amp;qid=1467164177&amp;sr=8-1&amp;keywords=perfect+putty
This stuff
I was gonna start with my own variation on a sledgefire shell and also do tests with this https://www.amazon.com/Smooth-XTC-3D-Performance-Print-Coating/dp/B00PFXK4JY/ to see if it could produce better results than just sanding alone.
I've had good results with the standard .4 nozzle. As long as it prints clean, I've had more success putting effort into post-processing. This stuff does wonders for painting. I've printed minis on .5 and .6 nozzles with similar results in quality.
I'm going to try this out today.
It can be, though that looks rougher than any of mine. But there's a product called XTC-3D that automatically smooths the striations of 3d-printed objects by filling them in.
On a modern engine it would run rich due to the O2 sensors in the CAT telling the engine to pump more fuel and if terribly bad, throw faults when the CAT O2 sensors get too far outside of tolerance. Also any leaks could be entirely mitigated by coating the thing in XTC-3D:
https://www.amazon.com/XTC-3D-High-Performance-Print-Coating/dp/B00PFXK4JY
https://www.amazon.com/Smooth-XTC-3D-Performance-Print-Coating/dp/B00PFXK4JY
Its a self leveling resin used in certain forms of post processing.
Try This
Smooth-On XTC-3D High Performance 3D Print Coating - 24oz. Unit https://www.amazon.com/dp/B00PFXK4JY/ref=cm_sw_r_cp_apa_ztcRBbQYAWSST
You can use xtc-3d from smooth on to get a super nice smooth finish, that's what I did here
Are you familiar with this stuff for coating?
That looks pretty sick. Just FYI though, you can get rid of those print lines with something like this: 3d print goo
You should try XTC! Its fantastic at filling on 3d prints, 30 minute cure time. Only takes 1 careful coat for fine prints, or 2-3 regular coats for less detailed prints. You can sand it smooth with 400 grit
https://www.amazon.com/XTC-3D-High-Performance-Print-Coating/dp/B00PFXK4JY
Forgot about this for smoothing non-ABS prints: https://www.amazon.com/gp/product/B00PFXK4JY/
I'm not fantastic at 3d printing yet, but I highly recommend this. It's helped to get rid of the "layers" in a print without losing too much detail. You can get a TON out of a single bottle, so it's worth the price. https://smile.amazon.com/gp/product/B00PFXK4JY/ref=oh_aui_search_detailpage?ie=UTF8&amp;psc=1
https://www.amazon.com/PHARMEX-1-78G-Permanent-Paper-RECTAL/dp/B00U2H451G type stickers?
PHARMEX 1-78G Permanent Paper... https://www.amazon.com/dp/B00U2H451G?ref=yo_pop_ma_swf
Happy rectal sticking
https://www.amazon.com/dp/B00U2H451G/
&#x200B;
Awesome! Don't let your dreams be dreams.
You can buy rolls of them
Stickers for this sub
https://www.amazon.com/PHARMEX-1-78G-Permanent-Paper-RECTAL/dp/B00U2H451G/ref=asc_df_B00U2H451G/?tag=hyprod-20&amp;linkCode=df0&amp;hvadid=193156914694&amp;hvpos=1o2&amp;hvnetw=g&amp;hvrand=6974352704374866013&amp;hvpone=&amp;hvptwo=&amp;hvqmt=&amp;hvdev=m&amp;hvdvcmdl=&amp;hvlocint=&amp;hvlocphy=9013122&amp;hvtargid=pla-311801599591&amp;psc=1
https://www.amazon.com/gp/aw/d/B00U2H451G/ref=mp_s_a_1_1?ie=UTF8&amp;qid=1502722148&amp;sr=8-1&amp;pi=AC_SX236_SY340_FMwebp_QL65&amp;keywords=for+recital+use+only+stickers&amp;dpPl=1&amp;dpID=41LdjsqFhSL&amp;ref=plSrch
Metal, most likely no as I don't have any experience with it. (plus the price)
Wood, maybe. I have a good bit of woodworking knowledge, but not at this small of a scale. If I were to do it in wood, it may be just wood 3D printer filament
> How do you find printing in Wood?
>
> I've only done pure PLA so far. I want to try a PLA infused wood next.
You need wood filament. Apparently Hatchbox Wood PLA is not possible to find right now, why? I do not know.
Amazon link which is currently out of stock. I honestly do not have any knowledge and/or recommendation for another brand of wood filament so hopefully someone can chime in.
It's all one type of filament. You can have give it various looks with different types of stain.
https://www.amazon.com/HATCHBOX-3D-Filament-Dimensional-Accuracy/dp/B01092XXD4?crid=3QYW3EJW2UMOP&amp;keywords=hatchbox+wood&amp;qid=1536927700&amp;sprefix=hatchb&amp;sr=8-1&amp;ref=mp_s_a_1_1
Hatchbox and AMZ3D wood PLA from Amazon print just fine. AMZ3D filament comes from the same factory as Hatchbox. If you like one, you'll like the other. Also, AMZ3D has more blues and purples than Hatchbox (just in case you were interested).
A filament with some percentage of wood added to create different finishes as compared to other filaments.
HATCHBOX 1.75mm Wood 3D Printer Filament - 1kg Spool (2.2 lbs) - Dimensional Accuracy +/- 0.05mm
Basic Cura guide for simple problems-https://ultimaker.com/download/170/Cura_User-Manual_v1.0.pdf
Sli3r manuel (I know you are using cura but the advanced settings are adusting the same things and some of the different settings can get confusing this can explain each setting)-http://manual.slic3r.org/
Your machine has a max temp of 230C and I print my wood filament (http://www.amazon.com/HATCHBOX-1-75mm-3D-Printer-Filament/dp/B01092XXD4) at about 205-210C so you are good.
As for all the speeds you have to experiment to see what is right for your printer but I would start slow and work up. I agree 60mm/s is a good starting point. Use the suggested temps for the filamnet as a baseline and work from there. I believe the Maker Select is almost identical to the Wanhao Duplicator i3 so these articles might help you also-http://3dprinterbrain.info/pmwiki.php/DupI3/SlicerSettings
After you start printing use this to tune and troubleshoot, it is very good-https://www.simplify3d.com/support/print-quality-troubleshooting/
Above everything, you are going to fail some prints and you are probably going to troubleshoot, but when you have a problem just come back and we help you troubleshoot.
Thanks I'll try bumping up the temp a bit.
The color is a bit weird because of the lighting, but it's just this common filament: https://www.amazon.com/dp/B01092XXD4/ref=cm_sw_r_em_apa_i_kFv4Db1J16DN1
This is the wood filament I use when I print. I like this filament more than any other material. It prints so well. I've had cleaner prints with this stuff than any other material.
Easy solution- Wood Filament
Thanks for the interest everyone.
I used Hatchbox 3D Wood filament, printed with PLA settings, bed 60, extruder 210. The only problem I have is it's super stringy as the extruder moves from finish to start locations.
I'm going to finish this with sandpaper, this filament sands very nicely. Once it's sanded I'm going to assemble the boat pieces with wood glue, sand again then use wood stain to finish.
Think I'm going to print at least 5 of these and experiment with different wood stains and some colors. I don't have any serious plans to use them in water but I've heard this filament does float.
If I use some spray lacquer it might help but I'm guessing introducing the print to water probably wouldn't be the best for it's longevity.
If you look at the reviews in the below link you'll see some finished prints.
Link to filament - https://www.amazon.com/gp/product/B01092XXD4/ref=oh_aui_detailpage_o08_s00?ie=UTF8&amp;psc=1
It's [Hatchbox.] (http://www.amazon.com/gp/product/B01092XXD4?psc=1&amp;redirect=true&amp;ref_=oh_aui_detailpage_o02_s00) I'll try colorFab once this one runs out.
its abrasive so you will need a hardened nozzle. I just did the entire microswiss upgrade
I got this full setup from Amazon and I have been very happy with it. When I performed the swap I noticed that the heatsink facing side of my cooling block had a REALLY shitty surface on it. I think I was getting poor conduction to the heatsink and experiencing heat creep after a couple hours. The face on the slotted block is beautiful. No more heat creep.
OK good info! I can get loads of 3mm hardware easily so no worries there.
I found this hot end and cooling block in the related items: Micro Swiss All Metal Hotend with SLOTTED Cooling Block for Wanhao i3 https://www.amazon.com/dp/B01E1HANLS/ref=cm_sw_r_cp_apa_d.w0xb2R481VR is this good for the price? I'll look online but are there specific enclosure designs that work best?
Also found a laptop cooling fan that is supposed to fit, and borosilicate glass for the bed.
I'm going to start slow with PLA and see where my adventures take me but I might get a reel of ABS too, hopefully I can make RC car parts and stuff like that the some point.
Go ahead and grab the Micro Swiss All Metal Hotend with Slotted Cooling block. Like $50 on Amazon with Prime. An all-metal is necessary for printing PETG/ABS/anything above 230 really.
Also, the 3DPrinting nerd fairly recently uploaded a full tutorial on installing this thing if you're uncomfortable with the (well) written instruction.
Another user mentioned that they swapped in an E3D, but that is a) probably a bit overkill, and b) a huge hassle.
The nozzle on that printer is a MK10 nozzle. There's a bunch on Amazon.
https://www.amazon.com/s?k=mk10+nozzle&amp;sprefix=mk10&amp;ref=nb_sb_ss_i_0_4.
Unless you've been really abusive, it could just use a nice clean. I use a brass brush on mine. Just pre heat the hot end and scrub away. It'll be fairly clean when you're done.
But if you want to change the nozzle, you may want to go ahead and upgrade to an all metal setup with the Micro Swiss hot end. This comes with a new nozzle and some other stuff.
https://www.amazon.com/Micro-Hotend-SLOTTED-Cooling-Wanhao/dp/B01E1HANLS/ref=mp_s_a_1_1?keywords=micro+swiss+maker+select&amp;qid=1562131663&amp;s=gateway&amp;sprefix=microswiss+maker+&amp;sr=8-1
I personally have the Micro Swiss kit with their plated nozzle. After scrubbing it, it always looks good as new.
Im thinking of getting these, will they be compatible?
https://www.amazon.com/gp/product/B07KB1QJGJ/ref=ox_sc_act_title_2?smid=A39S0U3UP1U7UG&psc=1
https://www.amazon.com/gp/product/B01E1HANLS/ref=ox_sc_act_title_3?smid=A36KNDPALTN82Y&psc=1
https://www.amazon.com/6-35mm-Ceramic-Cartridge-Printer-Extruder/dp/B071K8Z9KF/ref=sr_1_1_sspa?ie=UTF8&qid=1549548097&sr=8-1-spons&keywords=wanhao+i3+heater+cartridge&psc=1
&#x200B;
Would this be better for number 3?
https://www.amazon.com/Micro-Hotend-SLOTTED-Cooling-Wanhao/dp/B01E1HANLS
Edit: also which hairspray do you use?
Set it up and use the existing hotend to print out a z-brace kit, I printed for days without it but it really helps. This will also help you understand and appreciate the difference when you upgrade the hotend :) People run into the connector problem when heating the bed up for ABS and other higher-temp filaments, I have had no issue running PLA. I also never leave the house when it's running, but that's a general distrust of robots thing. Now, with z-braces, allmetal hotend, and a pei sheet, I have had awesome prints every time.
Wanhao i3 Duplicator v2.1 by way of Amazon.
I have two of them, easy to use and improve machine.
Here's a Facebook group dedicated to them.
If you get this printer, this is a highly recommended upgrade. It's a hardened steel nozzle and slotted cooling block kit. Very easy to install, improves holding a given temp in the hot end.
And here is a good deal on filament that's made in America, a grab bag of four rolls for $60, your choice on type.
/u/hupo224 I second this. I have the monoprice maker select v2, and the microswiss hotend is a great part for it. It's a little more expensive at $50 on amazon, but 100% worth it. If not just for the fact that you can print higher temp materials without worrying about the PFTE tube.
Micro Swiss All Metal Hotend with SLOTTED Cooling Block for Wanhao i3 https://www.amazon.com/dp/B01E1HANLS/ref=cm_sw_r_cp_apa_i_LlgdBbFBW6CVE. This should solve your issue.
I recently went through exactly this same situation. I was ready to upgrade to a microswiss all-metal hotend and the catastrophic failure of the print leaving gunk all over my heater block forced the issue. In my case, I opted to replace everything I could including the thermistor and heating element. They are both very inexpensive and you should have a spare laying around anyway in case you need one in a hurry. So...how to clean your heating block...
Fire. Seriously. I used a combination of blowtorch and solvent to remove all the gunk (and mine was a LOT worse than yours...it basically encapsulated one entire end of my heater block, entombing the thermistor, heater and associated wiring).
I used your typical propane torch, holding my heater block in a vise or vise grips. I'd heat it up then quickly wipe away the melted PLA with a clean cloth. Heat, repeat. Then I'd soak the whole thing in some solvent (acetone, MEK, etc). Repeat until clean. Pay careful attention to the tiny setscrew that holds the heater in place...work it free with a hex wrench while it is hot...chances are you got some PLA stuck on there, too. Obviously be super careful when you do this. Ventilation, fire-extinguisher handy, your mom on speed-dial.
When you replace the thermistor and heating element you'll need to do some soldering. This is pretty unavoidable. Those elements come with very long wires attached to them and the Wanhao/MP print heat doesn't need that length. Clip it short, make good solders and use heatshrink over your joints. For the thermistor I simply cut out the center section of the wire and spliced the connector back to the component at the length i needed.
Now, when you put it all back together you will have the option of re-wrapping the heater block with cotton and Kapton tape. People seem split on if this is necessary, but since I'd battled heat creep before I didn't want to introduce any more heat up the block...so I opted to do it. It's a bit tricky if you get the non-punched cotton strips like I did. Luckily I had hole punches handy to make the provision for the hotend and nozzle to get thru the insulation. If you don't have these tools (or don't quite know how to do it), i'd shop around for pre-punched sets.
good luck. Let me know if you need any more help.
here are the parts i used:
https://www.amazon.com/gp/product/B071K8Z9KF/ref=oh_aui_detailpage_o00_s00?ie=UTF8&amp;psc=1
https://www.amazon.com/gp/product/B01N4KY6TR/ref=oh_aui_detailpage_o01_s00?ie=UTF8&amp;psc=1
https://www.amazon.com/gp/product/B076NW3GNH/ref=oh_aui_detailpage_o02_s00?ie=UTF8&amp;psc=1
https://www.amazon.com/gp/product/B01E1HANLS/ref=oh_aui_detailpage_o03_s00?ie=UTF8&amp;psc=1
https://www.amazon.com/gp/product/B01E1HANLS/ref=ppx_yo_dt_b_asin_title_o08_s01?ie=UTF8&psc=1
Had almost the same problem on my Monoprice clone - would stop feeding, changed brands, etc. until finally the filament had fused to the PTFE tube in the hot end. Required a complete tear down to find it. I figured as long as I'm in there, upgrade the extruder plate
https://www.amazon.com/gp/product/B06WVB6CYD/ref=ppx_yo_dt_b_asin_title_o08_s00?ie=UTF8&psc=1
and the thermistor
https://www.amazon.com/gp/product/B07B3ZYBTM/ref=ppx_yo_dt_b_asin_title_o08_s01?ie=UTF8&psc=1
Follow the instructions - do not skip the "tight, then back off 1/4 turn. Heat up to 250 and then tighten the nozzle" steps.
Strip off the Kapton tape (if it hasn't already torn off) and use these instead
https://www.amazon.com/gp/product/B07B9KW1L1/ref=ppx_yo_dt_b_asin_title_o05_s00?ie=UTF8&psc=1
Drop the PLA temp to around 203, add minimum layer time to around 15 sec on Cura. Bed also doesn't need to be that hot with the Buildtak
Use cura 15.04 instead of the Cura the V2 shipped with - 15.04 has way more custom options.
I did the blower fan upgrade for my V2.1: http://www.thingiverse.com/thing:1025471 which helps immensely in overhangs and small details like fingers
Also since your room is cold, consider upgrading your nozzle to all metal: https://www.amazon.com/gp/product/B01E1HANLS/ref=oh_aui_detailpage_o00_s00?ie=UTF8&amp;psc=1
If you choose not to upgrade to all metal, consider using some nozzle insulation: https://www.amazon.com/gp/product/B01LAYCRAA/ref=oh_aui_detailpage_o00_s01?ie=UTF8&amp;psc=1 you will need kapton tape for the insulation
The all metal hot end + insulation will help you maintain consistent temperatures in your cold room
Hotend replacement:
I replaced the stock hotend/PTFE tube setup with an all-metal Micro Swiss hotend ($50):Amazon link to the Micro Swiss all-metal hotend kit: https://amazon.com/gp/product/B01E1HANLS/ref=ppx_yo_dt_b_search_asin_title?ie=UTF8&psc=1
Bed leveling:
Frame Stabilization:
I printed the parts, and purchased the hardware at Home Depot for the Z-brace mod, which stabilized the printer frame:Thingiverse link for Z-brace mod for I3 Plus: https://www.thingiverse.com/thing:1653631(note the original Thingiverse link in comments, which is required for the other Z-brace parts: https://www.thingiverse.com/thing:921948)
Cooling:
I printed a Dii Cooler in PETG and replaced the stock cooler with one of those 24V "squirrel cage" fans, which provided much better cooling for all sides of my prints. Before that it really only cooled the front of prints, leaving the sides and especially the rear of prints looking pretty bad.Thingiverse link for Dii Cooler for i3 Plus: https://www.thingiverse.com/thing:1025471
I invested in an Apera PH Pen https://www.amazon.co.uk/dp/B01ENFOHN8/ref=cm_sw_r_cp_api_i_iPqFDb9NZ885J
It looks like apera makes one that is not as expensive as Oaktons, and has better reviews than both Oakton and blulab. Ever heard of this thing?
Apera Instruments AI209 PH20 Value Waterproof pH Pocket Tester, ±0.1 pH Accuracy, 0-14.0 pH Range, Complete Kit https://www.amazon.com/dp/B01ENFOHN8/ref=cm_sw_r_cp_apa_.RShzb4EVA98F
This is what I replaced my cheap yellow one with, and I couldn’t be any happier with it. It comes with a nice case, batteries, and calibration solution:
Apera Instruments AI209 PH20... https://www.amazon.com/dp/B01ENFOHN8?ref=yo_pop_ma_swf
I just looked into buying one last year. There's not much under 40 that gives two decimal digits with good accuracy. I ended up inheriting this one that is $97. I'm not convinced that 2 digits is necessary for brewing, but I'm very happy with the Hanna.
If you're just getting into water chemistry and are looking to save money, I'd go with something like this. Good luck!
Get this one! Apera Instruments AI209 PH20 Value Waterproof pH Pocket Tester, ±0.1 pH Accuracy, 0-14.0 pH Range, Complete Kit https://www.amazon.com/dp/B01ENFOHN8/ref=cm_sw_r_cp_apa_hxqlzb549NGB6
I use www.fakespot.com for everything I buy on Amazon, this site verifies if reviews are made up or actual people. I love the site. And they say this PH pen is legit
I wanted a scientific grade instrument and found this pen for under 50 bucks and have been using it well over a year now; the only time it lost calibration was when the batteries needed changing. It gives quick readouts and comes with a two point calibration solution system along with a sturdy case with cutouts to hold everything. This is the storage solution I use to maintain the probe.
Apera Instruments AI209 PH20... https://www.amazon.com/dp/B01ENFOHN8?ref=ppx_pop_mob_ap_share
This is a really good Ph pen for around 40 bucks. Better than any of these cheap crappy pens.
In that size tent I'd probably stick with 3 gal. I'm getting ready to do my first autos in a 4'x2' and I'm probably only going to do 2 plants in 5 gal. Because when I did that with photoperiods (vegged 45 days) with lst and scroging my tent was absolutely full. Feel like 3 autos would get too big for the tent. May take a couple of clones in case turns out I have extra room.
You also didn't specify what, I'm assuming soil, but would help with nute recommendation.
Highly suggest getting recharge, even if just a couple cheap sample packs, it helps so much.
Also skip the $10 PH pens. Get PH up and down with the test kit. And get one like this Apera Instruments PH20 or the $80 Blue labs if you want to splurge.
Eeeee.. I have zero experience with kits like that. I use [this one] (https://www.amazon.com/dp/B01ENFOHN8/ref=cm_sw_r_cp_awdb_t1_XV2MDbSQ7ZA6Y) since [the one I bought originally] (https://www.amazon.com/dp/B01N20ZRC5/ref=cm_sw_r_cp_awdb_t1_jX2MDb2AKB2N4) was wildly inaccurate.
I’m on my first grow right now too. Very similar setup the only thing I’d suggest if you have the money right now is a digital PH meter something like this
https://www.amazon.com/Apera-Instruments-Value-Pocket-Tester/dp/B01ENFOHN8/ref=mp_s_a_1_1?keywords=ph20&amp;qid=1555728904&amp;s=gateway&amp;sr=8-1
Don’t be afraid to ask for advice if you run into problems this community is great. Follow your gut too, to an extent. I followed advice early on that was for soil and not coco (letting the coco dry out significantly before irritating again) some people will say this is how you do it, some say don’t, for me personally it was doing harm so I listened to those saying not to let it dry out. So far my plants have been hardier that i figured they’d be!
YOu can pick any ppm meter. That are many solid one.
As for Ph meter. I liked this kit I bought. Extra batteries, lanyard and solution to keep your meter calibrated.
https://www.amazon.com/Apera-Instruments-Value-Pocket-Tester/dp/B01ENFOHN8/ref=sr_1_20?keywords=ph+meter&qid=1555858764&s=gateway&sr=8-20
For the PH meter I am very happy with the Apera and it comes with calibration liquid.
I bought the one you have listed and it wasn’t even useable.
https://www.amazon.com/gp/aw/d/B01ENFOHN8/ref=mp_s_a_1_3?ie=UTF8&amp;qid=1519078771&amp;sr=8-3&amp;pi=AC_SX236_SY340_QL65&amp;keywords=apera+ph+meter&amp;dpPl=1&amp;dpID=31-1THhTjuL&amp;ref=plSrch
Yes the flushing should help. I think the biggest issue with MG is the fact that new growers tend to overwater and such so that would affect the way the nutes are distributed to the plant. For a pH tester I use this . I pH the water before watering and then pH the runoff. I use coco/perlite mix so my pH levels will be diff than the ones you’d need. I also use distilled white vinegar to lower pH if needed instead of the pH test kits.
https://www.amazon.com/dp/B01IIAC2MW/ref=cm_sw_r_cp_api_i_k1bzDbQGXAFZM
Found it! I’m not sure if it’s just a good quality filament or what, but I was really satisfied with the texture.
https://www.amazon.com/ZIRO-Printer-Filament-1-75mm-Marble/dp/B01IIAC2MW/ref=asc_df_B01IIAC2MW/?tag=hyprod-20&amp;linkCode=df0&amp;hvadid=312157487430&amp;hvpos=1o1&amp;hvnetw=g&amp;hvrand=7649072385329420267&amp;hvpone=&amp;hvptwo=&amp;hvqmt=&amp;hvdev=m&amp;hvdvcmdl=&amp;hvlocint=&amp;hvlocphy=9033256&amp;hvtargid=pla-375824825736&amp;psc=1
I'm on mobile, so excuse the formatting:
ZIRO 3D Printer Filament PLA 1.75mm Marble Color 1KG(2.2lbs) - White https://www.amazon.com/dp/B01IIAC2MW/ref=cm_sw_r_cp_apa_i_XlOvCbSP4Z69F
It night be this, there's a couple brands that make a marble PLA.
Haha awesome! I actually tried this first using a special white with black bits PLA filament that creates a sort of marble effect: https://www.amazon.co.uk/dp/B01IIAC2MW/ref=cm_sw_r_cp_apa_nseTAbBMCEK8A
Sadly it must have come unstuck from the bed on the last 20 layers or so (the tip of its nose!). I now use Z-Hop and thicker brims.
ZIRO 3D Printer Filament PLA 1.75mm Marble Color
https://www.amazon.com/gp/product/B01IIAC2MW/ref=oh_aui_detailpage_o03_s00?ie=UTF8&amp;psc=1
Here is what i use!
https://www.amazon.com/gp/product/B01IIAC2MW/ref=ppx_yo_dt_b_search_asin_title?ie=UTF8&psc=1
https://www.amazon.com/gp/product/B01IIAC2MW
I think this would work.
Those are accessories that go with a USB connected borescope like this one: https://smile.amazon.com/Depstech-Endoscope-Inspection-Megapixels-Smartphone/dp/B01MYTHWK4/ref=sr_1_3?crid=1LHYP4QHNEWPP&amp;keywords=borescope+android+phone&amp;qid=1557426890&amp;s=gateway&amp;sprefix=bore+scope%2Caps%2C202&amp;sr=8-3
fiber optic borescope camera (basically a snake)..
&#x200B;
$35 bucks.
https://www.amazon.com/Depstech-Endoscope-Inspection-Megapixels-Smartphone/dp/B01MYTHWK4/
&#x200B;
why not just put it under the door?
Try an endoscope camera: [https://www.amazon.com/Depstech-Endoscope-Inspection-Megapixels-Smartphone/dp/B01MYTHWK4/ref=mp_s_a_1_1_sspa?crid=164P4GSXNLMJH&amp;keywords=depstech+wifi+endoscope&amp;qid=1554679695&amp;s=gateway&amp;sprefix=depstec&amp;sr=8-1-spons&amp;psc=1]
https://www.amazon.com/Depstech-Endoscope-Inspection-Megapixels-Smartphone/dp/B01MYTHWK4
This one
Here is a cheap one that works really well:
https://www.amazon.com/gp/product/B01MYTHWK4/ref=ppx_yo_dt_b_asin_title_o00_s00?ie=UTF8&amp;psc=1
Took these pictures with it:
Imgur
Imgur
No examples (because I'm at work), but I just unpacked my spool of this:
https://www.amazon.com/Filament-Silk-Gold-Printing-Material/dp/B06XRPYXP2
Based on the box markings, and the same cardboard filament stop, I think it's made in the exact same plant as this Kehuashina filament: https://www.amazon.com/Kehuashina-Filament-Printer-1-75mm-Diameter/dp/B07Q5P9XWS
Prints very VERY well on clean glass. The finish is amazing... pearlecent golden color, just like the example pictures.
Ender 3 Pro, 0.4mm tip with 205C hotend, 75C bed (lowering to 50C after first layer).
I've been experimenting with adjusting my designs to try and print only in "vase mode" (continuous Z-axis shift) to avoid the z-seam. Which is more noticeable on any "silk" type filaments.
But...
You gotta keep it dry. I have a eSun eBox dehumidifier, which I ran for 6 hours before trying to print anything beyond Mr Benchy... my print-bed was measuring 47% humidity this morning due to the non-stop rain. :'(
Effectively, all you have to do is add a thermostatically controlled switch to control the compressor. Some have recommended products like this (though I don't have personal experience with it). You plug the unit into your wall, freezer into the unit, put the thermocouple in the freezer and set the thermometer.
Might want to look into a chest freezer and getting a thermostat to keep the temperature in the 60-70 degree range for brewing.
A quick google search shows this thermostat as an example of what I'm talking about.
I'm pretty sure you can use this to turn that "Keezer" into a radically dominant kegerator.
This is what I have been looking into. Hope that helps, and maybe some others can give input.
It was surprisingly cheap. You can buy the necessary converter online or at any brew shop. They should run you about $60. Just search convert freezer to fridge on Amazon etc.
Basically, you plug in your freezer and the controller cuts it on and off to keep it at a fridge temp rather than freeze. Genius.
From there, I took the lid off and built a frame out of 2x4's that I glued to the chest. I used the frame to drill my holes for the taps, hoses, etc. and then re-mounted the lid's hinges to the 2x4's.
My overall cost to set up a two keg system was about $500 for kegs, taps, tanks, etc.
If you are serious and want to do it, just shoot me a message and I'm happy to help.
https://www.amazon.com/Johnson-Controls-A19AAT-2C-Temperature-Controller/dp/B0002EAL58/ref=sr_1_1?ie=UTF8&amp;qid=1523290700&amp;sr=8-1&amp;keywords=convert+freezer+to+fridge
If you want to cellar but don't have a cellar, consider doing what I did:
-get a cheap chest freezer from craigslist
-get one of these
http://www.amazon.com/Johnson-Controls-A19AAT-2C-Temperature-Controller/dp/B0002EAL58/ref=sr_1_3?ie=UTF8&amp;qid=1417031293&amp;sr=8-3&amp;keywords=thermostat+regulator+johnson
(you can control the temp of the freezer pretty well. mine fluctuates between 50-55 degrees)
Finally, and this is not necessary (but I love it), get a raspberry pi , analog thermometer and a breadboard. I have mine tweet me the temperature inside every hour and email me if the temp goes above or below pre set thresholds.
Here you go:
http://www.amazon.com/dp/B0002EAL58?tag=wrightfood-20&amp;camp=14573&amp;creative=327641&amp;linkCode=as1&amp;creativeASIN=B0002EAL58&amp;adid=10456JWVX52RVYXDN1MK&amp;
I use this for my meat curing fridge. Works perfectly.
Nice! How are you regulating the temperature though? I would have thought you would need something like [this temperature controller] (http://www.amazon.com/Johnson-Controls-A19AAT-2C-Temperature-Controller/dp/B0002EAL58/ref=sr_1_2?ie=UTF8&amp;qid=1381762647&amp;sr=8-2&amp;keywords=johnson+temperature+controller) or do you just want your beer that cold?
My local homebrewing store had one in stock that I used to make my freezer a keezer. It doesn't have a temp limit on it (some of the ones I have seen can only do certain ranges).
I don't know if you could convert a freezer for that purpose though, because freezers are designed to blow out that cold air out and I don't know if that would shock your yeast or not.
Anyway, this is the unit I have
I think a PID would work well. I picked up one of these (sorry for the eBay link, I can't find an actual online store). It monitors temperature and humidity, but I haven't tried it yet. It comes with a sensor and has the proper relays built in, so it should Just Work™. I'd like to hook it up to a regular size fridge, but I don't have room in my apartment for a full size fridge dedicated to curing. :(
My freezer controller works in a pinch, but I'm not sure how good it is a regulating the temperature.
I have this guy: https://smile.amazon.com/gp/product/B0002EAL58/ref=oh_aui_search_detailpage?ie=UTF8&amp;psc=1
Works perfectly. Shuts the power off when my fridge reaches 65 degrees.
I've found a fair amount of people that have done it with chest freezers but mostly they used http://www.amazon.com/gp/product/B0002EAL58?ie=UTF8&amp;tag=selfsufficientlife-20&amp;linkCode=as2&amp;camp=1789&amp;creative=390957&amp;creativeASIN=B0002EAL58
I'm not sure if an upright freezer is fundamentally different. In where the coils go and if that would cause the short cycling to be more of an issue. This is just stuff that I've picked up from researching this and don't really know how much is complete bs and how much is legit which is why I posted here in the hopes of someone saying you aren't crazy that makes sense
I have two of these http://www.amazon.com/gp/product/B0002EAL58/ref=oh_aui_detailpage_o02_s00?ie=UTF8&amp;psc=1 and although they work well in the summer and spring they are not going to work well in the winter. Apparently you cannot even buy these black boxes. Wish I would have known.
Also you can get something like this to control the temperature https://www.amazon.com/gp/aw/d/B0002EAL58/
I'm pretty sure this is the one (not hone at the moment [burglars: please don't burgle me]): http://www.amazon.com/gp/aw/d/B0002EAL58
http://www.amazon.com/gp/product/B0002EAL58/ref=oh_aui_detailpage_o03_s00?ie=UTF8&amp;psc=1
Got it in today, will see how it goes. Has plenty of excellent reviews.
oh my goodness!!! what a great little gadget. I had no idea something like this even exists. I checked Amazon Canada but there are so many of these, and the instruction videos shows them sticking it into the hole of the wall plug. Yeah of course it has electricity inside. Will it work on any surface like a lets say a metal countertop that is "live" for whatever reasons???
I am going to buy the one a little expensive because it seems to be a reliable brand as per the reviews. Please let me know what you think and tell me if it will work on any conducting surfaces??
https://www.amazon.ca/Fluke-1AC-A1-II-Volt-Alert-Non-Contact-Voltage/dp/B000EJ332O/ref=sr_1_5?s=hi&amp;ie=UTF8&amp;qid=1518252273&amp;sr=1-5&amp;keywords=non+contact+voltage+tester
How about that one please??
These are great too.
For non contact testers fluke makes one of the best ones.
http://www.amazon.com/Fluke-1AC-A1-II-VoltAlert-Non-Contact-Voltage/dp/B000EJ332O
This one will let you isolate the exact wire in the panel/box that is on, versus other testers that are so sensitive it will tic on wires that are merely around other wires that are hot.
In any case all electricians need to have a non contact tester in their bag, it helps keep everyone alive.
yup, knipex is good. He probably already has a multimeter and hot stick, but I like having multiple hot sticks around as they go bad.
https://www.amazon.com/Fluke-1AC-A1-II-VoltAlert-Non-Contact-Voltage/dp/B000EJ332O/ref=sr_1_1?ie=UTF8&amp;qid=1475250851&amp;sr=8-1&amp;keywords=fluke+hot+stick
https://www.amazon.com/gp/product/B0006Z3GZU/ref=od_aui_detailpages00?ie=UTF8&amp;psc=1
Replacing them is extremely simple. It's just a matter of turning off the power at the electrical panel, unscrewing the plate and switch/outlet, disconnecting the wires from the old switch/outlet, and reconnecting them to the new one. Three way switches just have one extra wire. This video gives a good overview of the process.
The only tool you might want to grab is a non-contact voltage tester to make sure the power is definitely turned off before you start handling the wires. A regular DMM would work as well if you already own one.
I’d want to determine which of those wires is hot and which is neutral. Like with a Non-contact voltage sensor.
I would recommend getting one of these non-contact voltage testers (or similar). They work great and you don't need to have physical contact like a multi-meter. That's very handy if the wires are not exposed.
Mine saved my bacon when I was replacing the outlet in the bathroom. I shut off the breaker for the bathroom, but still tested the outlet to be sure. To my surprise, it was still live (must be a different circuit to handle hair dryers).
Here are two tools that help:
Tells you if an outlit or wire is hot before you touch it:
http://www.amazon.com/Fluke-1AC-A1-II-Volt-Alert-Non-Contact-Voltage/dp/B000EJ332O
Allows you to find the circuit for an unlabeled outlet:
http://www.amazon.com/Sperry-CS550A-Circuit-Breaker-Finder/dp/B000ET403A
I have a a backpack for LD (various MIDI interfaces, USB-DMX dongle, laptops, AA Maglite) or a Bum bag for more hands-on electrics (where I say Knippex, Lindstrom, Fluke. And Maglite.). And a toolbox with the all important hammer (nicknamed "sweetness"), big-ass wrenches and so on.
I try not to forget this, ever.
Also a Wera of sort, but damn this one is elegant, I wasn't aware of it.
That thingy when used responsibly is a huge help, but do NOT use it as a safety controller.
Speaking of which, I tend to get people mad by insisting on using this before starting actual work. 400mA diff NOT working anyone? It happens.
Looking at how things are organised here, I couldn't get it in one bag; long jobs end up filling my car actually: Gels, and spares, and backups, and adapters, and an actual toolbox... And the cordless drill... when I do festivals or street theatre or such, my car end up the Tool-chest, you can't possibly carry it all while on the move, but you can organise your trunk so that everything comes easily at hand.
I used this, an idiot stick apparently lol.
Without knowing what he's already got it's hard to say. He's probably already got all the basics. I'm just assuming he's already got boardsaws, tape measures, screwdriver sets, plier sets and so forth.
I'll list off a couple of things I would rather not live without:
[Irwin wire strippers] (http://www.amazon.com/Irwin-Industrial-Tools-2078300-Self-Adjusting/dp/B000OQ21CA) These are totally awesome.
[Non contact voltage detector] (http://www.amazon.com/Fluke-1AC-A1-II-VoltAlert-Non-Contact-Voltage/dp/B000EJ332O/ref=sr_1_3?s=hi&amp;ie=UTF8&amp;qid=1449993757&amp;sr=1-3&amp;keywords=Non+contact+voltage+detector)
Stubby ratchet screwdriver
I'll parrot my usual recommendation.
Stick it against all sides of a wire, no beep no problem.
http://www.amazon.com/Fluke-1AC-A1-II-VoltAlert-Non-Contact-Voltage/dp/B000EJ332O/
This is a higher quality one and it's still pretty affordable, these would indeed be pretty helpful. Sure, hidden cameras are inherently hidden but they require some basic stuff (Power, a point of view) and based on that you can surmise where they would be should they exist.
Someone who wants to creep you would want to get you naked so bathrooms and bedrooms, aimed at toilet/shower and bed/closet areas, from there you go for POV, where could a camera be that faces these areas. There are ultra small wifi cameras but most people would go with the easiest possible installation (i.e. wired to existing power sources and so on) so it's not as hard as it sounds.
I'll second the call from /u/Cheech47 that you should get a multi-meter. I'll go even further and say you should also get a non-contact voltage tester. The one linked is my preference, but just don't pick up whatever cheapy they have at Home Depot or Lowes. You want one that will work in a marginally crowded box without just going off because *something* in there is hot. =)
Funny you should ask, just wired these up today. I killed the circuit, pulled out the boxes (leave them wired up), turned on the circuit again, turned on the light, and used a non-contact voltage tester (like this: https://www.amazon.com/gp/product/B000EJ332O/ref=od_aui_detailpages00?ie=UTF8&amp;psc=1) to determine which box had no power out when the light is turned on. That's where the companion goes. Now kill the circuit again and follow the wiring diagrams that come with the switches. Note: after wiring it up you may have 2 extra black leads in the companion box - they should be wired together (not to the switch). Also, traveler is generally red. In this set-up the companion is just wired to the master via the red traveler wire (not to the load/light, as with standard 3-way set-ups).
Or, check the labels on the old switches (mine said "two pole" where the master goes but where the companion went it was just a standard switch).
That Klein non contact tester is garbage, go with the tried and tested fluke
http://www.amazon.com/gp/product/B000EJ332O?ie=UTF8&amp;camp=1789&amp;creativeASIN=B000EJ332O&amp;linkCode=xm2&amp;tag=vrefid-20
They measure skin folds, like these accumeasure
You can use calipers, induction measuring, or displacement. Once you have a number for your body fat percentage, you'll multiply your weight by your body fat percentage to get a fat weight (example: 160lb * .2 = 32lb fat) subtract that from total weight to get lean body weight (160 - 32 = 128).
I don't think there's a ton of variability in quality for calipers honestly - anything should work fine. This one is well reviewed.
Use cheap Calipers like these from Amazon
They are pretty accurate and you can find websites and directions online on how to measure points on your body that will give you a very accurate bf%
You can use photos and try to compare to online photo estimates (google images has charts), you can buy a caliper to pinch a fold of skin, some scales you step on can estimate it, all of these options are never 100% accurate. If you have dough to spare you can get a DEXA scan, which shows all of your mass and breaks it down for you into fat, muscle, bone, etc. Some gyms or trainers might have better scales than the home scales, but again that may come with a cost. If money is an issue, get a set of bodyfat calipers on amazon and combine multiple pinch measurements with online photo charts, and try to estimate that way.
Here's the one I have: https://www.amazon.com/AccuFitness-AM99-Accu-Measure-Body-Caliper/dp/B000QURRUK/ref=sr_1_1_a_it?ie=UTF8&amp;qid=1511899912&amp;sr=8-1&amp;keywords=body+fat+caliper
Real talk though, I would rather just get a scan every once in a while. I'm not a competing athlete so frequent metrics I don't care about much.
If you really want to get a more accurate reading on your BF%, try using calipers.
http://www.amazon.com/AccuFitness-Acc-9474-Accu-Measure-Body-Caliper/dp/B000QURRUK
I'd guess 12-13%; its hard tu guess without typical indicator like abs because you don't have a ton of muscle. You should definitely bulk though because you don't have enough muscle to cut into. If you want a better body fat estimate, get one of these "Accu-Measure Body Fat Caliper https://www.amazon.com/dp/B000QURRUK". They are consistent one you get the hang of them.
I'm not an expert on the bulk/cut cycle, but I don't think it's impossible, just easier to do separately. I've lost weight VERY slowly, but I know I've built muscle/strength in my shoulders and arms over the past 6 months. Whether this is the same thing or not, I don't know.
These are calipers. They measure bodyfat percentages.
Here were the directions I was given to use them: (instructions courtesy of /u/theycallhimhellcat )
Measure on the right side of the body:
measure the skin between the nipple and the arm pit (diagonal)
measure the skin by pinching belly button and to one side (horizontal)
measure the skin in the middle of my thigh (vertically)
To measure, you just grab skin with your right hand and pinch, place the caliper about 1/2 inch away from your pinch, and close it till it pops into place. Add up the 3 measurements and plug it in to a calculator and you get your BF%.
I just read your posts below about wanting to gain muscle without actually bulking heavily. With your scoliosis, I think the yoga would help a lot because it focuses on spinal strength and stability. If you get into lifting, the advice I was given for that is lighter weights, more repetitions. You build strength and definition, but not bulk.
Like that: https://www.amazon.com/AccuFitness-AM99-Accu-Measure-Body-Caliper/dp/B000QURRUK ?
>have never measured body fat, but would like to do that
You don't need those fancy digital meters. These do the job and are dirty cheap.
https://www.amazon.com/AccuFitness-AM99-Accu-Measure-Body-Caliper/dp/B000QURRUK?keywords=body+fat+caliper&amp;qid=1540671840&amp;sr=8-8&amp;ref=sr_1_8
http://www.linear-software.com/online.html
Here's a pretty good caliper with the online calculator. It's pretty much as good as it gets for home tests.
A cheap solution to estimate body fat percentage would be to buy a [fat caliper] (https://www.amazon.com/AccuFitness-AM99-Accu-Measure-Body-Caliper/dp/B000QURRUK) and figure out how to use it. From what I've heard, the accuracy is directly proportional to correct usage, so make sure you have a way to get that in. Much cheaper than the complicated tests (like water immersion) though.
http://www.amazon.com/AccuFitness-Accu-Measure-Body-Fat-Caliper/dp/B000QURRUK/ref=sr_1_2?ie=UTF8&amp;qid=1373463591&amp;sr=8-2&amp;keywords=body+fat+caliper
http://www.amazon.com/Singer-96-Inch-Extra-Long-Measure/dp/B000PSA6GU/ref=sr_1_1?ie=UTF8&amp;qid=1373463641&amp;sr=8-1&amp;keywords=cloth+tape+measure Even with these there will still be a margin of error but it will be more accurate than a monitor.
Automatic one.
[The one I bought.](http://www.amazon.com/gp/product/B000QURRUK?psc=1&amp;redirect=true&amp;ref_=oh_aui_detailpage_o03_s00(http://www.amazon.com/gp/product/B000QURRUK?psc=1&amp;redirect=true&amp;ref_=oh_aui_detailpage_o03_s00)
You could use something like this:
http://www.active.com/fitness/calculators/bodyfat
Or just get one of these:
http://www.amazon.com/AccuFitness-AM99-Accu-Measure-Body-Caliper/dp/B000QURRUK
hit the weight room! and don't let the scale rule you. if you want a measurement to track that is a more accurate reflection of your body composition start tracking your body fat %. an inexpensive caliper is all you need.
This can be pretty subjective and without peeling the fat off your body and measuring it there's no way to know 100%. That being said there's a few things you can do to get a general idea.
First, you can compare yourself to some of the pictures out there and try to guess where you fit in. Example
Another option is to get some calipers and measure yourself. I've had these recommended to me and they seem to work pretty well.
At the very least, you can get calipers or a tape measure and keep track of trends, even if you don't have your exact bf%.
My guess would be Body Fat Calipers.
You can use a caliper to ballpark it, or you can find a scale that will tell you your approximate body fat percentage. I personally use the Fitbit Aria Scale.
I also carry a Fitbit One with me wherever I go. The Fitbit gives a pretty good estimate of the number of calories I burn each day just walking around doing stuff, and I can add in the calorie burn from my workouts on the Fitbit website as well. I keep track of everything I eat on the site too, so I can see exactly how much I'm eating vs how much I'm burning.
From my personal experience, I thought counting calories or macros was unnecessary, a pain in the ass, whatever, and that I could just 'eyeball' it and I'd be fine. Truth is I actually had no clue how much I was eating and how many calories I was burning each day. I was way overestimating my burn and underestimating my consumption. I was lifting and getting bigger, but I was putting on fat too.
You might want to look into doing a Leangains cut, a lot of people seem to get great results from it. Start reading here: http://rippedbody.jp/english/introduction-english/
EDIT: Also, have a look at this image:
http://files.builtlean.com/wp-content/uploads/2012/09/body-fat-percentage-men.jpg
See where you fit along that spectrum and it may give you some idea of where you are and where you want to be.
EDIT 2: I think you're also doing way too many reps on the bench. Shoot for 4 sets in the 8-10 rep range. If you want some size to your muscles, stay away from high reps. If your goal is pure strength, up the weight and drop down to about 5 reps per set.
You're probably close to 30% now.
Get these:
https://www.amazon.com/gp/aw/d/B000QURRUK/ref=mp_s_a_1_1?ie=UTF8&amp;qid=1474505140&amp;sr=8-1&amp;pi=SY200_QL40&amp;keywords=fat+caliper&amp;dpPl=1&amp;dpID=31KSLGelZOL&amp;ref=plSrch
I'd guesstimate 25%. I started at 23.3%, down to 20.6%. Got these fat calipers to measure. I had to watch some youtube videos to get it right and I know it's not 100% accurate but it's something. Enter your measurements here.
This is the caliper we got . It works well but you need a second person to help you... Kind of
This is my ph kit. It is well worth the expense.
Oakton ph pen
Storage solution
Calibration solution
problem the cheap ones will drift constantly giving you massive ph lockouts. buy a good one and it lasts forever as long as you take care of it. amazon sells Oakton ph testers for a fair price. http://www.amazon.com/Oakton-EcoTestr-Waterproof-Tester-Range/dp/B004G8PWAU
I guess thats not the path I wanna go than. I was thinking of picking up this meter but I am hesitant.
OK, so you can add any sugary juice that isn't super acidic. If you do want to use a very acidic juice (like lemon or orange) you will need to do something to take it down a notch.
During fermentation, the pH you should shoot for is 3.7 to 4.0, otherwise you risk the yeast activity ending up reduced.
You can either get a pH test kit, but make sure it checks for pH in this range, most pool ones do a different range. Soil or hydro kits should probably be ok.
I bought THIS one and am very happy with it. It was a little more money, but it's not by any stretch expensive.
is this the one you recommend?
http://www.amazon.com/Oakton-EcoTestr-Waterproof-Tester-Range/dp/B004G8PWAU
I have this one and this I have been happy with both also I hear the strips are the way to go if you want the cheapest most reliable
I don't know your level of handiness, but, I can tell you from my own personal experience, these pre made recirculating systems are poorly made and poorly designed. They are essentially 5 gallon buckets with 10" netpots and usually some unknown type/quality plastic tubing. They typically have the tubes too high to properly drain the system for a reservoir change, and, being low quality plastic, are prone to cracking. Also, most of them, at least the ones I have had to replace for friends that foolishly buy these things, don't have adequate drainage solutions, and you have to end up rigging your own drain pump anyway.
For around $150 --PVC, solvent, 5 gallon buckets, a large rubbermade tote for reservoir -- you could make a far superior custom system. Then you just need a $35 aquarium pump, a $25 air pump, and some $5 airstones. Think of all that extra money for lighting and a tent! Hell, you'll have enough to buy CO2 and a RO system (which is highly recommended).
Something else that is mandatory for hydroponics, one of these. I am fairly certain these kits don't come with a quality pH tester.
if you want something simple and insanely well priced when compared to other nutrients then check out dyna-gro.
dynagro foliage pro + pro-tekt and you will be years above most other growers. just focus on your environment which IMHO is the most important thing.
what is good about dynagro is it has everything in it as a base nutrient. with most other products (botanicare, GH, and famously Adv Nutrients) the base leaves out C and MG and micro nutrients.
Protekt is a silica additive that makes the plants noticeably stronger and thicker healthier stems.
If you call dynagro's number you can get a starter kit with a PK booster (used around week 4 and 7 of flower).
If you only want to water once every few days I suggest a hempy bucket https://www.icmag.com/ic/showthread.php?t=98419
You can do a coco hempy bucket too and is very popular as well. if you decide to go that route make sure to grab some botanicare Calmag. So your list would be dynagro foliage pro/dynagro protekt/botanicare calmag.
You will 100% need to buy a PH meter and I strongly advise an EC/PPM meter. These are the ones I use
https://smile.amazon.com/Oakton-EcoTestr-Waterproof-Tester-Range/dp/B004G8PWAU/ref=sr_1_13?ie=UTF8&amp;qid=1479005211&amp;sr=8-13&amp;keywords=ph+meter
https://smile.amazon.com/gp/product/B01FPG89CE/ref=oh_aui_detailpage_o01_s00?ie=UTF8&amp;psc=1
In a hempy bucket and coco always PH to 5.5-6.2
If you were to put the plants in your pic in to a 3 gallon hempy bucket with vermiculite and perlite for the first 2-3 weeks you are going to want to water once every 2/3 days until a little bit of water flows out. Then when they get big once per day.
I would strongly, strongly suggest not using CFL's. It would be a better investment to get a 250-600w HPS. they are really cheap on amazon. If you go with 250w you dont want the plants to get bigger then a foot or so before you flip the schedule to 12 hours on and 12 hours off.
150W - LINK - Grow 1-4 small plants
600W - LINK - Grow 4-6 medium plants
Dont spend so much time on nutrients and what type of grow medium and focus mostly on keeping a good enviornment in terms of temp and humidity and fresh air. You also need to consider when you flower the room needs to be 100% dark. Even a tiny pinhole of light coming in can be very bad
If you have ever used the common march 809 pump most brewers use then you would see how much it sucks. The march 809 is a pain in the ass to use because it must be primed, can easily cavitate, and only works in one direction. A peristaltic pump on the other hand can be run forwards and backwards, is self-priming, and is more easy to sterilize by design. They are used pretty often in labs for all kinds of things especially medical.
Pouring things between flasks is fine for the most part. It was just something to consider.
Buy a nice used on one ebay:
http://www.ebay.com/itm/TESTED-Cole-Parmer-L-S-Masterflex-Peristaltic-Pump-7553-00-HELP-ORPHANS-H-/160833661031?pt=BI_Pumps&amp;hash=item25726ee867
Another thing you need:
Aeration equipment
pH meter w/ 4.0 calibration solution
Such as:
http://www.williamsbrewing.com/WILLIAMS-OXYGEN-AERATION-SYSTEM-P699.aspx
and this:
http://www.amazon.com/Oakton-EcoTestr-Waterproof-Tester-Range/dp/B004G8PWAU/ref=sr_1_5?ie=UTF8&amp;qid=1348059104&amp;sr=8-5&amp;keywords=pH+meter
Veg week 2 of clones obtained from my local medical collective. First nutrient feeding at half strength (3tsp/gallon of Fox Farm Big Bloom). LST started on all plants with the GDP starting 2 days later then the others. Did some minimal pruning after the LST settled to get things out of the dirt and clean out some leaves that weren't getting any light. Growth seemed to slow a bit for a few days, might have shocked them a bit from being rough with them, but they are doing great now. Thinking of extending my veg an extra week to compensate, will wait and see if that will even be necessary.
Noticed some small bite marks taken out of a leaf, so I decided not to take any chances and got some AzaMax and gave the girls a good shower at about 0.4% concentration. I will be following that up with a few more applications over the next couple weeks. I'm debating if I want to do a soil drench as well. I also got a gnat sticks that already caught one of the bastards.
Temps with lights on have remained stable around 79F and the RH about 40%. Lights off with fan at 20% temps get to 67F at the lowest and 50% RH at the highest. Also have some new goodies coming from Amazon in the next few days to improve my setup like an Oakton pH2 and rope hangers with metal internal gears instead of those cheapo plastic ones that came with my lights.
&nbsp;
&nbsp; &nbsp; Strains
Blue Dream - DJ Short x Santa Cruz Haze. 80% Sativa / 20% Indica. 7-8 week flower cycle
Boy Scout Cookies - Girl Scout Cookies Thin Mint x Pre-98 Bubba Kush. 60% Indica / 40% Sativa. 8 week flower cycle.
Darth Vader Haze - 4-way Black Haze Black Cross. 100% Sativa. 9-10 week flower cycle.
Grand Daddy Purple - Big Bud x Purple Urkle. Indicia Dominant. 8-9 week flower cycle.
&nbsp;
&nbsp;
Veg Week 1 Reddit Post - Album
This is the one I bought. I love it, quick and stable readings. I also bought the storage solution but you can store it in tap water (the cap allows you to put some liquid in there)
ninja edit DO NOT let the tip dry out. Keep it wet.
Define cheap.
Oakton pH, and highly reviewed
http://www.amazon.com/gp/product/B004G8PWAU/ref=pd_lpo_sbs_dp_ss_1?pf_rd_p=1944687622&amp;pf_rd_s=lpo-top-stripe-1&amp;pf_rd_t=201&amp;pf_rd_i=B007A3PPIW&amp;pf_rd_m=ATVPDKIKX0DER&amp;pf_rd_r=1JMB9PEC7CV92AK48GYJ
the ph pen i use is a bluelab although ive used an oakton both are good. You'll want calibration solution for it as well.
other gadgets? I like to use a paint stirrer on a portable drill to mix ferts. a couple of quality spray bottles and a pump sprayer is nice to have on hand.
Treat for common pests systemically don't wait for that oh shit moment. I treat all my young healthy plants (before they go into bud) with a combination of OMRI (Organic Materials Review Institute) approved products: Azamax (neem extract for mites),Serenade (powdery mildew and mold) and Monterey Garden Spray (leaf miners and budworms). I use each of these at least once each, often if you wait to treat until you notice problems, it's too late to get optimum results.
A life changer: anhydrous alcohol. Because it’s 99.9% alcohol, it evaporates essentially on contact when compared with ISO you might have used. I clean flat planes to be joined with a dab on a paper towel, then a microfiber cloth, then a quick jet of air. That might sound like a lot, but it’s genuinely less than 20 seconds per joint in cleaning time.
I use acetone on mine.
You can try some anhydrous IPA if you want to try something a bit less harsh.
Try to avoid acetone used for cosmetics, they tend to have things like perfumes in them that will only make your life sad.
Here are links to the fluids I like to use for cleaning:
IPA http://www.amazon.com/dp/B005DNQX3C/ref=biss_dp_t_asn
Acetone http://www.amazon.com/SUNNYSIDE-CORPORATION-84032-1-Quart-Acetone/dp/B000C02AW4/ref=sr_1_8?ie=UTF8&amp;qid=1394475871&amp;sr=8-8&amp;keywords=acetone
Particularly on a hot print bed, make sure you are in a very well ventilated area during use.
http://www.amazon.com/dp/B005DNQX3C/ref=biss_dp_t_asn
alcohol will readily evaporate. Once the alcohol has "extracted" (pulled all the good shit) out of the plant matter, just let it sit out for a day or so. Applying heat will accelerate this process. it will evaporate and leave a gooey resin on your plate (or Pyrex dish). scrape (razor blade) and smoke. your done. Aside from golden grain you can also use this. Just don't drink it.
It could be "bad" ipa. Denatured ipa is not good for print bed cleaning. ( a bit on the subject https://sciencing.com/denatured-alcohol-vs-isopropyl-alcohol-5519636.html)
It is probably denatured with a oil based chemical , or has a weird additive, even a residue in the plastic bottle before filling at the factory.... Try another brand and get yourself some 99% ipa MG Chemicals 824-1L 99.9% Isopropyl Alcohol Liquid Cleaner, Clear , 945 mL (1 US Quart) https://www.amazon.com/dp/B005DNQX3C/
I'm personally curious about using DI water(deionized water) to clean instead of 99% ipa, or maybe a 50/50 mix. We use it at work on the industrial printers and it works really good.
This should work. It's not reagent grade, but I don't think the .09% difference will make a difference in a non-lab setting. The introduced impurities from the q-tip would make it a moot point anyway.
No problem! This is what I use, FYI: https://www.amazon.com/MG-Chemicals-Isopropyl-Alcohol-Cleaner/dp/B005DNQX3C/ref=sr_1_22?ie=UTF8&amp;qid=1491506569&amp;sr=8-22&amp;keywords=isopropyl+alcohol+99
You could probably find it cheaper.
I get this at my local electronics supply store.
https://www.amazon.com/MG-Chemicals-824-1L-Isopropyl-Alcohol/dp/B005DNQX3C/ref=sxin_4_af-pna-1_62923c0178d6e9db158fae689c2f6f4db5144ae2?keywords=99%25+isopropyl+alcohol&pd_rd_i=B005DNQX3C&pd_rd_r=ce7be55f-216b-445b-bbc0-57b6baa56402&pd_rd_w=JFyRx&pd_rd_wg=peUrn&pf_rd_p=3892bc23-5fa8-4a18-8855-22c23bd2e202&pf_rd_r=DJRGCQQGH1Y2PMVP7JP8&qid=1573927863
Everclear will bring through more plant matter because it is only 95% alcohol (or 76% if your state doesnt allow the real stuff). I would highly recommend getting 99% iso from amazon. Dont listen to anyone who says the flavor isnt as good with iso. If you use 99.9%, it all evaporates anyway.
https://www.amazon.com/MG-Chemicals-Isopropyl-Alcohol-Cleaner/dp/B005DNQX3C
If you use everclear, your oil will be an undesireable shade of green due to bringing through the water soluble parts of the plant
Got mine from Amazon, there's also a bigger bottle on that page that's cheaper, but no sprayer on it.
UK Amazon links
http://www.amazon.co.uk/gp/product/B004SPJP5O/ref=s9_dcbhz_bw_d0_g328_i1_sh
http://www.amazon.co.uk/gp/product/B005DNQX3C/ref=s9_dcbhz_bw_g328_i2_sh
https://www.amazon.com/MG-Chemicals-824-1L-Isopropyl-Alcohol/dp/B005DNQX3C
It looks like it was in a flood or fire. Odds are the person turned it on and fried it. Your best bet is to save the cpu, the gpus by stripping them down. The motherboard is cheap to get, the ram is probably indestructible... forget the psu exists. You need to really clean the parts well to get the contaminants off. Head to walmart and get gallon jugs of distilled water, and just clean it really really well.
Do you have access to a large ultrasonic cleaner? Fill it with isopropyl and turn it on outside (so there's no fire and explosion risk).
After you use the alcohol to drive the water out, I would clean the gpus twice as the ram is bga, and get a can of pcb contact cleaner and blast it with that when totally done.
I'm pretty sure you can salvage the gpus if the caps are solid caps.
Keep us posted, this looks like fun.
MG Chemicals 824-1L 99.9% Isopropyl Alcohol Liquid Cleaner, Clear , 945 mL (1 US Quart) https://www.amazon.com/dp/B005DNQX3C/ref=cm_sw_r_other_apa_i_2aZUDbPD21WNS
I cant find the youtube video I watched to fix my controllers.. it seems to be removed. But a few drops of this stuff (safe to use on electronics - it dries very fast) into the base of the joystick. You have to lift the rubber flap with a toothpick while you apply a few drops. Then just swirl the joypad clockwise and counterclockwise for 30 seconds to a minute. I have fixed all 3 of my controllers with drifts using this method.
Then what's this?
And this?
This cleans it in a flash along with coarse sea salt
Enabling the 7x7 mode on my MK3 gave me such good bed adhesion that I don't need to use glue stick anymore. Now I just spray the bed with a some 99% alcohol and then print. https://www.amazon.com/gp/product/B005DNQX3C/ref=ppx_yo_dt_b_asin_title_o03_s00?ie=UTF8&psc=1
Hmm. Your reply isn't showing up in my app for some reason, but I get it from a local warehouse. They get it in huge volume, I get this size bottle (same brand) for $14 CAD. https://www.amazon.ca/gp/aw/d/B005DNQX3C/
Edit: it's not always MG, sometimes it's a different brand but I don't recall the name. I use MG for flux and solder too so I remember the brand.
Hmm. okay. I saw a Youtube video that recommended this product, but that was for making an RSO wax/oil consistency, so maybe he used it because all the alcohol is evaporated off..
Amazon has a quart of VG for $13.47 and PG for $10.95. I believe a lot of vape suppliers use that Amazon seller (Essential Depot) as their source.
Not sure about flavors, I haven't bought any yet.
Make sure your searching for propylene glycol here is a link Propylene Glycol 1 Quart - USP - KOSHER - PURE and here is some pg flavors on amazon that you may also consider there cheaper from their main site though. [here](https://www.amazon.com/s/ref=nb_sb_ss_c_1_10?url=search-alias%3Daps&amp;field-keywords=one+on+one+flavors&amp;sprefix=One+on+one%2Caps%2C159&amp;crid=34XZSVFR8VU73(
You can. I prefer to buy it off Amazon though TBH.
I buy Essential Depot Vegetable Glycerin And Propylene Glcyol
No reason I just like to stick with one company.
Heres The DIY Clone list. The all loved Nana Cream is on there and Im vaping it now and its wonderful. I think enough flavoring to make like 120ml was $10???? Cant remember off the top of my head.
Some comments:
2 You are looking for an Ego Threaded Beauty Ring.
3 You can also buy MUCH better tanks like an Evod for cheap and they have replaceable coils so they are worth the investment. I personally have had better luck with something like a protank or BDC, but anything with replaceable coils will be a big step forward. Also the better build construction means less leaking.
4 PEG-400 is not really an ideal base for any ejuice. It has a bad taste and does not carry flavors very well. You would have much better luck using Vegetable Glycerin or Propylene Glycol.
Propylene Glycol (kosher food grade) is a much much more sensible solution to use for volumetric dosing.
Propylene Glycol - USP - Kosher - Food Grade - USP - Kosher - 36 oz net Weight in a 1 Quart Safety Sealed HDPE Container with resealable Cap https://www.amazon.com/dp/B005F5OJG6/ref=cm_sw_r_cp_tai_w-AGDbHA5WZ71
I get my pg & vg from amazon. great prices. Just mix it in the ratios you want & your good to go. I vape unflavored juice with nicotine because I prefer it, it seems like a lighter less complicated vape than with flavors. Sometimes when I am bored I will put in some menthol for a change
http://www.amazon.com/Essential-Depot-Propylene-Glycol-Quart/dp/B005F5OJG6/ref=sr_1_1?ie=UTF8&amp;qid=1416509782&amp;sr=8-1&amp;keywords=propylene+glycol
http://www.amazon.com/Glycerin-Vegetable-Kosher-USP-43/dp/B004C7MTLA/ref=pd_sim_indust_1?ie=UTF8&amp;refRID=0HC83A0EQFYJHWVJG8HQ
I would get VG and PG from Amazon. It's cheap as dirt and it comes with free shipping with Amazon Prime.
http://www.amazon.com/Glycerin-Vegetable-Kosher-USP-43/dp/B004C7MTLA/ref=sr_1_2?ie=UTF8&amp;qid=1415344197&amp;sr=8-2&amp;keywords=vegetable+glycerine
http://www.amazon.com/Essential-Depot-PROPYLENE-GLYCOL-QUART-Propylene-Glycol/dp/B005F5OJG6/ref=pd_sim_hpc_1?ie=UTF8&amp;refRID=1BJB98Z2KRR4Q4TF48KN
Hmm some of those things aren't really necessary and there isn't enough VG/PG to last a while. I would recommend you piece together yourself everything you need and mix by weight. At first I tried mixing by volume but that was inaccurate and my mixes sucked. Here are most of the supplies you'll need.
VG
PG
Nic - I use Vape Clarity nic myself but their warehouse is being rebuilt after a fire so they're not operational until the end of the month. Here's an alternative I saw in the DIY subreddit.
Scale - Make sure to get the 500g one so that it measures out to the hundredths place.
I use www.bullcityvapor.com to get all the flavors I need in one place.
For bottles, I've just been rinsing out empty bottles my friends give me.
I don't bother with gloves but I use very diluted nic so that's not an issue for me (might want to use them if you have anything over 36mg/ml nic).
Here's the calculator I use and a tutorial.
This is the PG I buy personally, never had an issue with it, not sure about any b&ms though that would sell it. https://www.amazon.com/Essential-Depot-Propylene-Glycol-Quart/dp/B005F5OJG6/ref=sr_1_2?ie=UTF8&amp;qid=1480096297&amp;sr=8-2&amp;keywords=propelyn+glycol
EDIT: You might be able to find PG at a drug store, I forget the exact purpose of it in medical use but if I remember correctly some drug stores will carry PG.
mixing any podwer consist of a carrier and the powder.
DO you have a a fine mg accurate scale. Many of the cheaper scaled aren't accurate until 6 mg or more
Create a sheet with your desired concentration. 100mgs Etiz to 200ML of https://www.amazon.com/Propylene-Glycol-Quart-KOSHER-PURE/dp/B005F5OJG6/ref=sr_1_3?ie=UTF8&amp;qid=1503001430&amp;sr=8-3&amp;keywords=propylene+glycol
equals 1CC equals 2mg of etiz. I advise you not to make strong blends and frankly, you should combine ingredients and shake daily for about three days and they should be blended. I wouldnt worry about heating unless you're jonesing.
Depends on the PG/VG ratio. Seems most "high end" e-liquid don't put this on the label. It looks like they use 30/70 mix, after a quick google search, which might be a little too thick for your tanks. You could always thin it out by adding some PG, but you would be reducing flavor slightly and lowering the nicotine.
If you prefer a 50/50 blend, you could do that too. I bought a quart of VG on amazon for ~$12.
VG on Amazon / PG on Amazon
Or order from a place like Nude Nicotine, pre-mixed (1L of 50/50 is $14)
Here is what I get.
Here is the PG
I get my flavours from wizardlabs
LOL SORRY! I'm a smartass by nature, couldn't resist. Amazon is an excellent source for PG, relatively cheap for a quart that should last a while. I'm sure what you bought is fine being USP, I just prefer products that are marketed for homo sapiens :-)This is what I ordered.
http://www.amazon.com/gp/product/B005F5OJG6/ref=oh_details_o01_s00_i01?ie=UTF8&amp;psc=1
As others have said, food grade propylene glysol. I bought this for ~$15, looks like it's even cheaper now.
http://smile.amazon.com/gp/product/B005F5OJG6
awesome!
figured i'd check for similar stuff on amazon and found this: [Karter Scientific 208U2 Plastic Test Tube Rack for 15/17mm Tubes, Holds 50, Detachable] (http://www.amazon.com/Karter-Scientific-208U2-Plastic-Detachable/dp/B005Z4QWIK/)
from my measurements the WL vials are 17mm so should work great
http://www.amazon.com/Karter-Scientific-208U2-Plastic-Detachable/dp/B005Z4QWIK/ref=sr_1_2/191-6961186-0494741?ie=UTF8&amp;qid=1398464400&amp;sr=8-2&amp;keywords=test+tubes+racks
6 bucks
Not to take biz away from a cool fountain pen company but this looks an awfully lot like a Karter Scientific 15/17mm tes tube rack. You can grab one for $6 from Amazon if cash is tight.
Thanks! Wish I would’ve straightened the labels out more for optimal satisfaction! Lol.
Karter Scientific 208U2 Plastic... https://www.amazon.com/dp/B005Z4QWIK?ref=ppx_pop_mob_ap_share
I started using these recently and love them to keep all the little 8ml vials organized.
Sorry for the mobile link, I'm on my phone.
Karter Scientific 208U2 Plastic Test Tube Rack for 15/17mm Tubes, Holds 50, Detachable https://www.amazon.com/dp/B005Z4QWIK/ref=cm_sw_r_awd_iTanub1TME7EZ
There have been different suggestions for off-the-shelf accessories as well:
https://www.amazon.com/gp/aw/d/B005Z4QWIK/
Goulet sells a similar, if not identical one.
I fill with a syringe unless I am using my lamy 2000. Goulet pens actually sells an ink syringe and test tube rack but I got this one from amazon.
http://amzn.com/B005Z4QWIK
I have http://amzn.com/B005Z4QWIK (the third rack in your first set of links) and it works really well for the small 8ml glass vials. It wouldn't fit anything much larger, though.
Would you recommend having an electrician come and do this capacitor switch?
Also, would this transformer not work for this? Thanks!
Electronix Express Variac Variable Transformer, 300 VAC Max, 0-130V Output, 3 Amp https://www.amazon.com/dp/B006NGI8VS/ref=cm_sw_r_cp_api_rxDcAb0C6JSJD
I️ used this for my vortex 6in.
I see. Then you might consider looking for a variac like this. I only bought one once so other redditors may know better about brands.
congrats OP! I really enjoyed mine but just had too many amps and ended up selling it.
Grab a variac for some really great vintage chunk (very very different than the actual variac mode on the amp BTW)
This one I made using the variac mode on the amp but an actual variac will soften/loosen everything even more.
https://www.youtube.com/watch?v=9Ea9KKuA_y0
I got this one
https://www.amazon.com/PHC-Enterprise-Variac-Variable-Transformer/dp/B006NGI8VS
If your grow space is small, get a variac controller and turn down the fan speed. I have mine at 30%-ish and it’s nearly silent.
Cheaper fan speed controllers are noisy. You get what you pay for.
if the sound is caused by the speed controller, switching to a variac will solve that issue
https://www.amazon.com/PHC-Enterprise-Variac-Variable-Transformer/dp/B006NGI8VS/ref=sr_1_1?ie=UTF8&amp;qid=1482124376&amp;sr=8-1&amp;keywords=variac
Most any dimmer that works on "chopping" the AC cycle can cause buzzing. You'd have to go with a pretty fancy and more expensive one that could generate a cleaner signal if it bothers you.
Something like a variac would give you clean power with no possibility of buzzing.
http://www.amazon.com/Variac-Variable-Transformer-300va-Output/dp/B006NGI8VS
It would be pushing this one right to it's full rating, but this one should work.
Edit- Here's a 5 amp with a little more capacity to be safe:
http://www.amazon.com/Variac-Variable-Transformer-500va-Output/dp/B006NGI2RS/
Don't forget a speed controller! https://www.amazon.com/gp/product/B006NGI8VS/ref=ox_sc_sfl_title_2?ie=UTF8&amp;psc=1&amp;smid=ATVPDKIKX0DER
this one's highly recommended and people say it helps reduce the humming on the inline fan compaerd to cheaper speed controllers.
I'm sure the apollo tents are fine, I've heard slightly better reviews for the vivosun tents. This one's about $12 more than yours i think. https://www.amazon.com/VIVOSUN-Horticulture-Hydroponic-Obeservation-Growing/dp/B01DXYMQ9M/ref=sr_1_2?s=lawn-garden&amp;ie=UTF8&amp;qid=1478889774&amp;sr=1-2&amp;keywords=vivosun+48
The Mars 300 is chill for the price, you probably want to want to get a second one if you're going to have multiple plants in that tent. People say 1 mars 300 per plant should get you good results, almost pushing it with two full plants under a single mars 300.
Also if and when possible, try to invest in a good pH meter. everyone recommends bluelabs! https://www.amazon.com/Bluelab-Ultimate-Solution-Measuring-Temperature/dp/B008R7OWJS/ref=sr_1_3?s=industrial&amp;ie=UTF8&amp;qid=1478889906&amp;sr=1-3&amp;keywords=bluelabs+ph+pen
I didn't PH at first and my plants were dying on me... turns out my tap PH was above 7.0 ph. the PH pen saved grow!
Yes I actually just ordered the fan and filter so I actually dont have it running yet but this fan will be cooling my hood. Im planning on setting it up like this. Ill have the filter hung up in the corner top of my tent, then Ill attach the fan to it, then the hood, then have ducting taking the exhaust outside of my tent. This fan has a low and high speed., 239/333 cfm I believe. You can also get one of these that can help you control your speed as well. Im planning on getting a 4in filter (thats all i need, its cheaper and lighter too) and getting a 4 to 6 in duct converter (just a few buck at home depot)
http://www.amazon.com/Variac-Variable-Transformer-300va-Output/dp/B006NGI8VS
Aside from the recommendation to shuck the drives (I'd transfer data off them one at a time before doing so), you could just put a box fan in front of all of them and run it on low. Or, any smaller "desktop" fan you might find in a local store or online. Anything like that should provide sufficient airflow to keep them cool enough as long as it's right in front of them.
It would follow the KISS principle, and it would only cost ~$15-ish
Oh, and if you want to be able to smoothly dial the speed of a box fan down to any arbitrary point (if "low" is still louder/faster than you want, which has sometimes been the case for me in the past), then what you want is a variac transformer between the box fan and the outlet. A little pricey to pair with a cheap box fan, I know, but I use that with one and it's quite nice since the box fan moves air while being almost totally silent, with no coil whine. You could do the same with a smaller turbine-style fan if you wanted something smaller.
Ig the initial investment will be worth in the future. I scoped this one but I'm not sure how many amps that td-100 pulls
This was in the recommended item list too
Here you go!
https://www.amazon.com/dp/B06XRPYXP2/ref=cm_sw_r_cp_api_i_K4CVCbANRW3N0
it's this filament: https://www.amazon.com/gp/product/B06XRPYXP2/ref=ppx_yo_dt_b_asin_title_o04_s00?ie=UTF8&amp;psc=1
Well a spool of gold filament costs about $25, I'd charge about $20 to print it, and maybe $6 to ship it. Just so you know this thing is pretty large.....about 3 ft long (after assembled).
Thanks! I printed it in this generic silk gold PLA.
Is that this model? This is the lowest I’ve seen them ($399):
ANYCUBIC Photon UV LCD 3D Printer Assembled Innovation with 2.8'' Smart Touch Color Screen Off-line Print 4.53"(L) x 2.56"(W) x 6.1"(H) Printing Size
amazon link
https://www.amazon.com/ANYCUBIC-Assembled-Innovation-Off-line-Printing/dp/B078N2TSYS/ref=sr_1_4?keywords=anycubic+photon&amp;qid=1566830737&amp;s=gateway&amp;sr=8-4
I would get this.. I sill might.. Yeah :) I most likely will.
Did I miss something? Shows $300 for me..
https://www.amazon.com/ANYCUBIC-Assembled-Innovation-Off-line-Printing/dp/B078N2TSYS/ref=mp_s_a_1_3?keywords=photon&amp;qid=1566869998&amp;s=gateway&amp;sr=8-3
Then you'll want to learn something like sculptris.
I just found out about this today, it might be appropriate for you if you want to keep costs down. Traditional FDM printers (what most people have) are better for engineering parts. The only other printer I can think of would be the Form 2/3, which is 2-3k.
https://www.amazon.com/ANYCUBIC-Assembled-Innovation-Off-line-Printing/dp/B078N2TSYS/ref=sr_1_3?keywords=ANYCUBIC+Photon+UV+LCD+3D+Printer+Assembled&amp;qid=1562307287&amp;s=gateway&amp;sr=8-3
Hey all, Im looking to get back into 3d printing. I used to own the Davinci 2.0, great device but it needed a lot of patience. I had to give it up, loved the size and quality of prints werent bad. The bed was always off an axis and its really a full time hobby.
&#x200B;
To the point, Im looking to spend the least possible but my max is around 500. I dont mind building. NYC. Mostly use for parts of my dioramas 12th scale to 64 scale and some figures like boats, cars, hats, guns, maybe even cosplay peices like guns haha.
&#x200B;
What type of filament should i use? Id probably prefer resin but I dont mind if someone else recommends something greater. Ive been eyeing thephoton, especially at 358 right now.
Around $540. You can get it on amazon for $540 but you can also get them on ebay or aliexpress. Anycubic usually has one up for auction every week on ebay and I've seen them sell for $450-$480.
I like the fact that the photon doesn't need to be tethered like the D7 does (unless you spend extra on the control box) though there are a few other advantages like the clear panels to see inside, linear rails rather than rods. The main advantage of the D7 I have seen is the ability to control it using a raspberry pi and, it's more easily modified, and has a taller build volume.
Shows in stock for me: https://www.amazon.com/dp/B078N2TSYS/ref=cm_sw_r_cp_api_Dpl7BbN1082HA
Can this resin printer handle it? https://www.amazon.ca/Monoprice-Resin-Printer-Resolution-Photopolymer/dp/B07BQ2JYLP/ref=sr_1_1_sspa?keywords=SLA+Printer&qid=1558029877&s=gateway&sr=8-1-spons&psc=1
&#x200B;
or this one? https://www.amazon.ca/ANYCUBIC-Assembled-Innovation-Off-line-Printing/dp/B078N2TSYS/ref=sr_1_1_sspa?keywords=anycubic+photon&qid=1558033050&s=gateway&sr=8-1-spons&psc=1
&#x200B;
Prices are quite different but I don't know how they differ in practical applications.
Hey it looks like you're familiar with 3D printing, so you might already know this, but I have an application for this product that has nothing to do with paint!
With resin / SLA printing, there is a bath of resin that is cured with light. This resin can get dust and environmental debris in it, which will cause prints to fail. Also, if there's a problem with a print, you'll get lots of half-cured resin bits floating around.
The expensive resin then needs to be strained so that the entire bath isn't wasted.
The advice from manufacturers is to go buy paint straining equipment! I've done it, and it works, but this comes will all the same problems that straining paint has- it kinda sucks. A screen mesh that sits snug on top of a can would do wonders.
My unsolicited advice here is that you could actually sell a near-identical product, under an entirely different brand name, on a different web site, to capture this small-but-not-negligible market. Would be the most useful if you bundled it with empty paint cans, too.
I think the most popular SLA printers are made by Formlabs, but there's also cheaper stuff coming out that does a pretty good job as well, like the Anycubic Photon.
theres photon on amazon sale
https://www.amazon.com/gp/product/B078N2TSYS/ref=ox_sc_saved_title_4?smid=A1A5FQE7R5RISB&amp;psc=1&amp;pldnSite=1
Are you using US amazon? I see 16 in stock (Prime) https://www.amazon.com/gp/product/B078N2TSYS/
The Photon seems to have pretty good reviews on Amazon.com and reviews elsewhere all seem to be better than average considering the more complicated processes involved. I have been following both printers since release (just ordered a Photon last week) and it has had far less issues than the D7 did on release (which I didn't buy for that reason). Both printers seem to have about the same overall quality control now from following their Facebook groups etc. I have mixed opinions on how the D7 is constantly fixing things and releasing revisions (current printer version is 1.5). It seem great they are improving it but I would not want to buy one and then have to spend $125 a few months later on an upgrade kit to fix issues.
&#x200B;
Anyone got any others?
Hey Omnioji,
I am a big fan of yours, would love to help, but some more info would be needed.
I know you say FDG profile, but some things in those profiles are also kinda fluid and need to be adjusted by you. So in particular, what is your print temperature? What are your retraction settings?
One simple fix which would likely give you some improvement would be to upgrade your bowden tube to a smoother PTFE Tube which causes less friction on the filament and therefor reduces stringing.
Oh I know. I recently replaced mine with a Capricorn Bowden PTFE tube from Amazon. They give you enough to do about 2 or 3 tube swaps.
Mods:
Ended 3 official 1.1.5 from here. All mainboard settings are stock.
Aluminum extruded from here.
Capricorn tubing from here.
Cura 4.1 on Linux
Filament at 210 on hotend, 60 on bed.
i think you forgot this?
https://www.amazon.com/Capricorn-Bowden-Filament-Genuine-Premium/dp/B079P92HN9/ref=sr_1_1_sspa?keywords=ender+3+bowden+tube&qid=1569894105&s=gateway&sr=8-1-spons&psc=1&smid=A1D7NBXHNTHOV9&spLa=ZW5jcnlwdGVkUXVhbGlmaWVyPUFJSUJYQ0tXSkpBRzMmZW5jcnlwdGVkSWQ9QTA0MTM1MjUxNkRURzdBN0VJVUc5JmVuY3J5cHRlZEFkSWQ9QTAxMDQwODYyRFE0U0dKQk82VUc5JndpZGdldE5hbWU9c3BfYXRmJmFjdGlvbj1jbGlja1JlZGlyZWN0JmRvTm90TG9nQ2xpY2s9dHJ1ZQ==
&#x200B;
This seems to be the one everyone uses, and I also have this installed on both of my printers.
All 3 as they are really cheap.
Bowden Tube
Aluminum Extruder
Bed springs
I bought some of this bowden tubing : https://www.amazon.com/gp/product/B079P92HN9/ref=ppx_yo_dt_b_search_asin_title?ie=UTF8&psc=1 for my Wanhao Duplicator clone. I think it makes a difference. (Definitely touches hot end and nozzle in this printer)
Here's my favorites!
Filament standoff arm to keep it from pulling straight down
https://www.thingiverse.com/thing:2917932
&#x200B;
And Complimentary filament guide:
https://www.thingiverse.com/thing:2894097
&#x200B;
Ribbon Cable Clips:
https://www.thingiverse.com/thing:2960375
&#x200B;
I added an SD card ribbon because the micro SD location and size Sucks!
https://www.amazon.com/gp/product/B01D9JIUU0/ref=ppx_yo_dt_b_asin_title_o01_s00?ie=UTF8&psc=1
&#x200B;
Fan cover to get rid of upwards draft, and keep little bits of filament out of the fan:
https://www.thingiverse.com/thing:2935204
&#x200B;
Immediately replace that crappy Plastic extruder with any metal one off amazon.
&#x200B;
Capricorn Bowden Tube:
https://www.amazon.com/gp/product/B079P92HN9/ref=ppx_yo_dt_b_asin_title_o02_s00?ie=UTF8&psc=1
&#x200B;
Powder Coated PEI Magnetic Build sheet! (Priceless!)
https://www.aliexpress.com/item/trianglelab-235-X-235-ender-3-Double-sided-Textured-PEI-Spring-Steel-Sheet-Powder-Coated-PEI/33008374363.html?spm=2114.search0104.3.8.221538feJjwDlN&ws_ab_test=searchweb0_0,searchweb201602_7_10065_10130_10068_10890_10547_319_10546_317_10548_10545_10696_453_10084_454_10083_10618_10307_537_536_10059_10884_10887_321_322_10103,searchweb201603_52,ppcSwitch_0&algo_expid=04b2bf81-a9de-45c6-9ea4-23cf0e249943-1&algo_pvid=04b2bf81-a9de-45c6-9ea4-23cf0e249943&transAbTest=ae803_3
&#x200B;
Change your fans over to Noctua fans, and the printer becomes nearly silent. (amazon)
&#x200B;
I got an EZABL bed leveling kit. Doing BL Touch soon, but The EZABL has pre-configured firmware, which made life easy!
Raspberry pi zero W or 3B+ with octoprint is a must!
&#x200B;
These got me into sexy print land pretty quick!
UPDATE
After cleaning out my bowden tube between the tube itself and the nozzle, and removing the gunked up crud as well as trimming the end of the bowden tube where some filament was partially blocking, I put everything back together as it should be and set another test print for last night. I used the same model I had printed somewhat successfully but changed the following:
.2 less on wall thickness
10% less on density
10 added to Print speed
40 added to Travel speed
10% less on support density
And unfortunately, alittle more than halfway through the print this happened:
https://imgur.com/VbJXFJI
https://imgur.com/LrwHxlB
https://imgur.com/fcVClfZ
&#x200B;
This morning I pulled apart the bowden tube and nozzle again to check for that problem from before but this time everything was fairly clear, no gunk in between tube and nozzle. At this point, I think it may be the extruder or possibly even something to do with the feeding of the filament spool itself since it seems to be a problem occuring around the same height everytime. I ordered an upgraded extruder [aluminum body] and better bowden tube this morning. Has anyone else noticed this kind of problem occurring consistently around the same height?
&#x200B;
&#x200B;
&#x200B;
List of mods on my Ender 3 Pro:
I use Cura for my slicer, and use the default setting there for the Ender 3.
https://www.amazon.com/gp/product/B079P92HN9/ref=ppx_yo_dt_b_asin_title_o07_s00?ie=UTF8&psc=1
Meanwell power supply:
https://www.amazon.com/gp/product/B013ETVO12
Ferrules and crimper:
https://www.amazon.com/gp/product/B07LCF39W9
Stepper smoothers (3-pack):
https://www.amazon.com/gp/product/B0727QT316
Capricorn PTFE tubing:
https://www.amazon.com/gp/product/B079P92HN9
Performance 3-D MK8 Apollo 0.4mm extruder nozzle:
https://www.p3-d.com/collections/duraplat-3d-extruder-nozzles
Glass bed (appears to be produced by creality), ebay seller usbkits :
https://www.ebay.com/itm/Creality-3D-Ender3-Ultrabase-Heat-Bed-Glass-Plate-235x235mm-for-3D-Printer-X6W6/143049426638
Aluminum drive feed, ebay seller creality-3d-direct :
https://www.ebay.com/itm/Upgrade-Aluminum-Extruder-Drive-Feed-Frame-For-Creality-Ender-3-3D-Printer/223095519332
***the tube fitting in this kit did not work well, so I used the fitting from the stock creality assembly and it worked fine.
&#x200B;
THD Firmware:
https://www.th3dstudio.com/knowledgebase/th3d-unified-firmware-package/
For figures you’re going to want to get an SLA 3d printer. Something like this ANYCUBIC Photon UV LCD 3D Printer Assembled Innovation with 2.8'' Smart Touch Color Screen Off-line Print 4.53"(L) x 2.56"(W) x 6.1"(H) Printing Size https://www.amazon.com/dp/B078N2TSYS/ref=cm_sw_r_cp_api_i_B3XKDb4GBGPPH
It makes super smooth prints and since you aren’t trying to build anything huge.
Can you design or model with any of the software out there?? That’s the key for making a new head for your legends, Mezco figs or whatever but I know a lot of people are doing it so maybe you know someone who can hook you up with files and some you can find online but if you want to make your own stuff you’ll need to learn. There’s a lot of tutorials on YouTube.
http://www.amazon.com/AccuFitness-Accu-Measure-Body-Fat-Caliper/dp/B000QURRUK
This one is good
that exists by the way.
https://www.amazon.com/HATCHBOX-3D-Filament-Dimensional-Accuracy/dp/B01092XXD4
you could buy one from amazon for cheaper
Ask away brother.
Don't let people like /u/abdada discourage you from asking questions. Just because the answers are out there doesn't mean that we shouldn't have conversations about them. The world is an ever-changing place, and a sidebar on an internet forum is not the repository for all of the answers in the universe.
And to answer your question, I actually purchased my PG and VG from Amazon. Probably not the best source, but I have no complaints about the quality or price. Essenial Depot is the brand name.