Best leathercraft supplies according to redditors
We found 439 Reddit comments discussing the best leathercraft supplies. We ranked the 246 resulting products by number of redditors who mentioned them. Here are the top 20.
We found 439 Reddit comments discussing the best leathercraft supplies. We ranked the 246 resulting products by number of redditors who mentioned them. Here are the top 20.


Those look like snaps. You'll need a snap tool to apply them or a set like the one below.
https://www.amazon.com/Leathercraft-Punch-Setter-Install-Button/dp/B01ILTJ65G
Clever died when you used a Hermes belt to try your first punch! Next time spend a few bucks on this
https://www.amazon.com/dp/B000NK5VY2/ref=cm_sw_r_awd_bBrcvb0R6XYTE
Congratulations! You've earned one of these!
The skull is great, but the stitching and edges could use work.
I highly recommend you look into getting a set of leather stitching punches like these (I don’t know anything about this brand in particular, just linking to an example). It makes hand-stitching way easier and indistinguishable from a machine stitch in terms of aesthetics.
I just posted another comment so you'd see a notification.
Here's the list! Hope it's not too long. All the tools listed are the ones I bought. If I have other suggestions, I've listed them as well. I've also listed details on the functions of the tools, and why they're superior to some other alternatives. If you look for the same amount of tools in one of those "kits," they would set you back roughly 200-400, depending on where you bought it from. The tools in these kits are usually quite inferiorly made as well. This list is a result of about a week long search and perusal. Tandy is a well known and easily accessible aggregation of tools, but they're overpriced for what they do and their quality is mediocre at best.
*Some of the eBay listings might have ended, but I'm sure you'll be able to find identical tools for the equivalent price or even cheaper.
For me the tools came out to a grand total of roughly $115. You can give or take $20 if you want to improvise your own tools, or switch them out. I'd say this setup works just fine for mid to smaller projects like what I made, or wallets, etc.
As for the leather, Springfield Leather sells some quality leather by the square foot, which is nice for first timers, as most tanneries only sell by the side, like what I had, which usually average around 21-28 square feet. Pretty big investment. Maverick Leather Company sells quality leathers as well as Horween "Seconds", like what I got for a very nice discount. These seconds are full sides with minor defects in the leather, but unless you're making huge bags it's easy to cut around the brand marks/scars etc, and your leather will look spotless. I got a full side of Horween Essex for roughly $130, and I'm guessing if I bought the same straight for Horween it would have run me in the ballpark of $300 or so. Since my laptop case only used about 7-8% of my leather, I used about $10 worth of leather. Quite a bargain if you ask me. If you're looking to do many projects like I am, I'd advise you to invest in a nice Horween side. Can't beat it for value and price.
All told, the laptop case itself cost about $11-12 worth of materials** (leather, fabric, thread, glue) and took the better part of 2 days to complete. Granted, much of that time was spent just sitting and thinking as most of it was improvisation, as you can see by my horrible sketch.
As far as my "learning" went, it was literally just Google. Some youtube videos help, and I glanced through some forums, but overall, as I've often found in woodworking too, nothing beats hand-on experience.
Well, hope this helped you guys out and answered some questions. I know I definitely would have appreciated a specialized list like this when I was starting out.
Sling is just thick cotton grosgrain ribbon, QD Attatchments can be found all over the place, and so can the strap adjustment buckle, all for super cheap.
>The stitching on the strap is a little difficult, but other than that...
Nah man, not at all. The real item obviously uses a machine, however you can achieve similar results with some scrap leather (Buy "Vegetable Tanned" leather for crafting, takes dye well and is very strong, you may even find a "Belt Blank" kit already cut into a nice neat strap) and some "leather lacing chisels" also known as Pricking Irons. Simply lay out where you want your stitch-box, double your leather over, line up the fork, smack it with a hammer (into a wooden backstop), and there you have it, nice evenly spaced stitchable holes. From there, you just dye the leather however you prefer (Leather Dye works great, but in a pinch, wood stain works fine and double-brewed coffee can work too), finish the edge with a little bees wax and an edge slicker and hand sew it together with some Waxed Thread and some robust Leathercraft Needles. (I might even lay down a layer of contact adhesive between the leather-strap-leather sandwich for additional hold while sewing). Just take your time and be patient with layout and cutting and it would make for a great afternoon project. For a tutorial on stitching leather neatly, check this out and this edge slicking tutorial. Bonus; you can dye the leather and buy whatever color grosgrain and hardware you want to match or contrast to your heart's content.
You can buy a cheap rotary punch and do it. It's really easy to use.
A) I have an awl in my craft kit that I usually use. B) If you have a hammer and nail, you can also use that; put something underneath that won't get damaged. C) They do sell actual leather hole punches for pretty cheap.
Uncaging
Marking the holes
Making the holes
Couldnt resist the sns sale on this pair for about $130. and i knew id be blacking out that boost before i bought. (sorry dont see it available any longer, but its on goat and stockx for 120-160ish depending on size.) i wanted to try the full angelus method since heskicks said it lasted on youtube, and it took me 3 days on and off this weekend.
full photo album progress here with comparison pix in different steps of the method and against "OEM" black adidas boost https://imgur.com/a/5RE2d
STEPS
Day 1 – deglaze and dye. Deglazed before dinner, painted dye layer 1, wait 10 mins then dye layer 2. Let dry overnight.
Day 2 – Dye reducer. Feelgoodkicks on youtube said this was important to eliminate cracking and that purpleish sharpie-like tint, so I tried it. Make sure to very lightly roll a Q-tip over your dye work, otherwise else you can completely remove all your work. Later that day I painted with the flat black paint. Waited 10 mins then did a 2nd layer.
Day 3 – Acrylic Paint. Wait 10 mins and do a 2nd layer. Still looked too glossy to me, so I masked the upper and sprayed with krylon later that day. And a 2nd layer a few mins after as the instructions state to get my finished product. Also added alternate laces and gunmetal grey aglets. Didnt end up using the mink oil since Im worried the boost will gloss up, but I still might try some later.
OVERALL TIPS
With any painting, take your time and do LIGHT layers to prevent chipping/cracking as much as possible.
I didnt mask the upper when painting since i went slowly, but paint brushes are actually easier to use very close to the primeknit than the sharpies were. I normally painted that upper edge first, then used a larger brush to paint the main part of the boost.
Krylon spray was a must. Album has a comparison photo with just angelus finish and its super glossy compared to the krylon finish. Using krylon finish alone, however, the paint rubbed off the boost whenever i touched it. so gotta do both
PREVIOUS POST (sharpie method)
https://www.reddit.com/r/Sneakers/comments/7thl9p/iniki_boost_blackout_oil_based_sharpie_matte/
Since the previous sharpie method rubbed off a bit on my fingers, I retouched with the anglus acrylic finish and then krylon again to get it more matte. Seemed to do the job.
I think for the sharpie method id have to add deglazer and angelus finish. so a total of 4 purchases would be good (deglazer, sharpie, angelus acrylic finish, krylon matte finish)
PRODUCT LINKS
Angelus Leather Preparer & Deglazer 4 Oz - $6.60
https://www.amazon.com/gp/product/B00EU322DQ
Angelus Brand Leather Dye W/applicator - 3 Oz ''Jet Black'' - $6.75
https://www.amazon.com/gp/product/B016QV7XIS
Angelus Acrylic 4 Ounce Paint (Flat Black) - $8.49
https://www.amazon.com/gp/product/B00MPXF6XG
Angelus Brand Acrylic Leather Paint Matte Finisher No. 620 - 4oz - $7.59
https://www.amazon.com/gp/product/B00B5W4LX4
Krylon Matte Finish - $3.47
https://www.amazon.com/gp/product/B005ENZ8CS
Heartybay Nylon Paint Brush Set - $5.98
https://www.amazon.com/Heartybay-10Pieces-Round-Pointed-Nylon/dp/B00V4EG6D6
We used snap fasteners in 12.5 mm antique brass. We added two extra layers of black fabric in the collar so they'd have something sturdy to support them. We didn't have the snap fastener tool so we picked up this set.
For the comm badge we just got an iron-on patch from Amazon. Looks like the ones we used are unavailable but just look for the Next Generation style ones that are roughly two and a half inches or so.
Use a wing divider to draw your stitch line.
Leather Wing Divider KangTeer 5.5 inch Leathers DIY Tool Adjustable Craft Edge Creaser Rotating Leathercraft Tool https://www.amazon.com/dp/B07CK2569L/ref=cm_sw_r_cp_apa_.gN1Bb9T67MEM
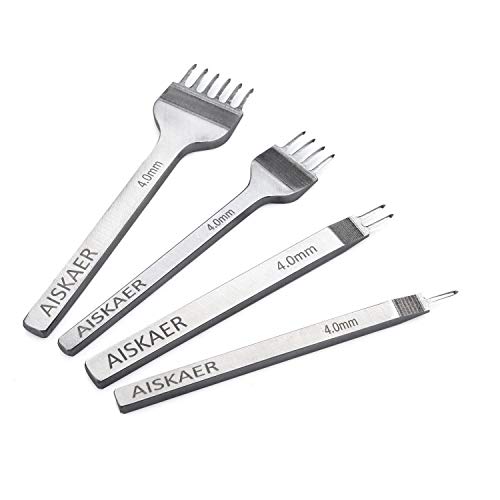
Then, use a diamond chisel to punch your holes.
Aiskaer White Steel 4mm 1/2/4/6 Prong DIY Diamond Lacing Stitching Chisel Set Leather Craft Kits (4mm) https://www.amazon.com/dp/B014549SNG/ref=cm_sw_r_cp_apa_uiN1Bb2NAQ60Z
I use both of these products and have zero issues getting clean stitching.
It's addicting, isn't it? Also great to get a whole closet full of personalized gear at a fraction of the cost!
Some suggestions: When dealing with straps and O-rings, you can use your oblong punch on the top and bottom sides of the strap, so that the part touching the ring is smaller. It gives the strap a more uniform fit and maintains the shape of the ring. I'm kinda bad at describing it, so here's a picture instead.
Also, I can't tell from the photos if you've already learned this, but a beveler and slicker will give your edges a nice, finished look.
Very nice work though! You should try selling some on etsy! It's always nice to have more kinky crafters, and the extra income could buy you even more leather to make more stuff with (it's a vicious cycle). And you should definitely head over to /r/bdsmdiy sometime, lots of very talented people over there to draw inspiration from.
I wanted to give a heads up for those looking to save money with DIY foams. I went through 3 orders of Comply tips over a 3-4 month span. They would literally tear up due to the excess earwax after 2-3 weeks of use(even with the earwax proof version). I got fed up and ordered these
I've been using these DIY tips for a long time and its been amazing.
Puncher
http://www.amazon.com/gp/product/B000NK5VY2/
Tips
http://www.amazon.com/gp/product/B0013A0C0Y
http://www.instructables.com/id/DIY-Noise-Isolating-Earbud-Tips/
I've gone through about 8 pairs of DIY foam tips with my Triplefi v10 and still have tons of spare foam tips left.
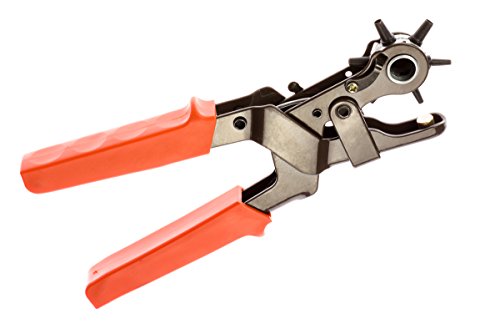
Also, you might want to invest in a belt hole punch. They're about $8-10 on amazon, and its way easier than trying to use a drill to make an emergency hole in a belt at 6 am. Ask me how I know.
Using something like this is a lot cheaper than buying new belts. Works great.
Tried my best to measure with a ruler at work, here's what I found:
[EDIT]
Cheap leather hole punch tool if anyone ends up needing to use it, it works well: https://www.amazon.com/dp/B000NK5VY2/ref=cm_sw_r_awd_Hfhiub0RM4ZS5
amazing work, would love to see the final full pic.
I feel like the build may have been easier if you used pricking irons rather than a hand sewing punch, it helps to keep even spacing and you can make a bunch of holes in one go. https://smile.amazon.com/CrazyEve-Leathercraft-Leather-Stitching-Perforate/dp/B00T17OULI/ref=sr_1_1?ie=UTF8&qid=1468779215&sr=8-1&keywords=pricking+iron
again, great work
Absolutely. I would recommend a few tools to get started - a cheap set of stitching chisels to get you started (these poke the holes for the needles to go in and out of), a cheap wing divider to scribe a straight stitching line, some waxed thread I linked Ritza Tiger 25 in 0.6mm because it's pretty much all I use, there are cheaper options, but this thread is wonderful to work with. Most of the other thread on amazon is going to be thicker and look too chunky with a 4mm iron IMO. Lastly, some needles. I use and like these. Then just look up a few youtube videos on saddle stitching. You'll have it down in no time. It's really not super difficult, there are a few tricks to making it look nice.
Printed in Orange PLA. Uses a Tandy 1240-24 belt clip for gun holsters. Really sturdy. Super happy with the results. I use this to clip my keys to the inside of my pocket which keeps them from bunching up and leave room for other items.
Edit: Sorry for the delay, files are up on grabcad.
Fob: https://grabcad.com/library/nissan-keyfob-belt-clip-1
Belt Clip: https://www.amazon.com/Tandy-Leather-Spring-Holster-1240-24/dp/B0035QW56S/ref=sr_1_1?ie=UTF8&qid=1512148499&sr=8-1&keywords=tandy+belt+clip
Chicago Screws: https://www.amazon.com/Tandy-Leather-Screw-Black-1296-04/dp/B004KFBLV8/ref=sr_1_4?s=arts-crafts&ie=UTF8&qid=1512148549&sr=1-4&keywords=1%2F8+chicago+screws
I'd recommend an edge beveler. It's one of my most-used tools - http://www.amazon.com/Tandy-Leather-Factory-Edge-Beveler/dp/B001QT4XA2/
I'll also recommend the Tandy Safety Skiver like others have said. - http://www.amazon.com/Tandy-Safety-3001-00-Replacement-3002-00/dp/B00IVS667Y/
Edit: You might think about finishing supplies you will want as well. Dye, neatsfoot oil, and I also like the Aussie Leather Conditioner. If you will be dyeing, spend good money on lambswool applicators, they are worth the money. I recommend the standard Fiebing's alcohol based dye over all others.
The cheap route of producing a wallet you'll be happy with:
Sharp knife(exact or utility work) like $5-$10 if you don't have one
Diamond Chisels- $18 3mm https://www.amazon.com/dp/B006OVYU5K/ref=cm_sw_r_cp_api_jo-PBb7M287N4
There are cheaper ones but I've used these so its what I can recommend. You could just use a cheap Awl to punch holes but it won't look nearly as nice since it's your first project. If you go the awl route then make sure you get a small one
Thread- $7 Ritza 25 Tiger thread .06mm at Rocky Mountain Leather Supply. You can cheap thread but it is harder to work with and doesn't look as nice imo.
Needles- Use the smallest needles you have that will fit the thread, if you don't have any needles then get John James Saddlers Harness Needles Size 4, $7.50 at Rocky Mountain Leather Supply
Contact Cement- Dap weldwood like $6 for a pint on amazon as an add-on item.
Those items will let you make a decent product. You still may want something to clean up edges. If its veg tan you might want an edge beveler and you can use a piece of canvas or jeans to burnish. If it's chrome tanned then you'll want edge kote($8) or something similar. Or you can just leave it as is if you like that look since it's your wallet.
Or get a leather punch that costs 9$
https://www.amazon.com/SE-7924LP-Heavy-Duty-Leather-Punch/dp/B000NK5VY2
Check out Ian Atkinson on YouTube, he has a lot of great tutorials.
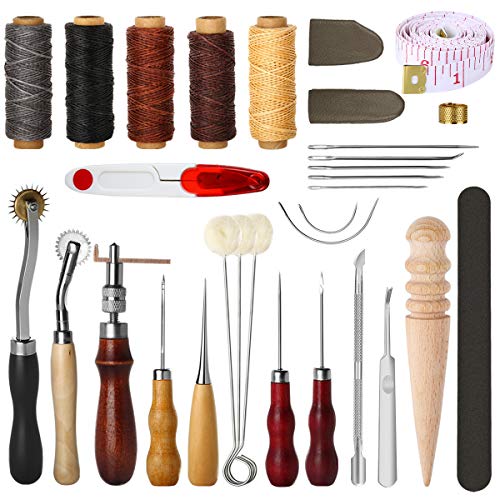
Get a kit like this, it really upped my leather game and allowed me to make much higher quality pieces.
Don't cheap out on leather either. Hobby store scrap bags are OK for really small projects you don't care much about. For more professional items, spend the extra coin to get high quality leather. I get mine at a local saddlery.
For tools (for example, to make a wallet), you would need... anything missing?
Wooden slicker for burnishing (http://www.amazon.com/gp/product/B0048FM2OU?psc=1&redirect=true&ref_=ox_sc_sfl_title_27&smid=A3NY6IRPSQ8J63)
self-healing mat (http://www.amazon.com/gp/product/B0006SDOFO?keywords=self%20healing%20mat&qid=1449180954&ref_=sr_1_8&sr=8-8)
Cement (http://www.amazon.com/Barge-Cement-Rubber-Leather-Glass/dp/B002JL2ZHE/ref=sr_1_2?ie=UTF8&qid=1449180993&sr=8-2&keywords=leather+contact+cement)
Edge dye (http://www.amazon.com/Tandy-Leather-Eco-flo-Professional-Dressing/dp/B00LKMAJQW/ref=sr_1_13?ie=UTF8&qid=1449181034&sr=8-13&keywords=leather+edge+dye)
Sand paper
grover for making stitch grooves (http://www.amazon.com/gp/product/B00OHAHICM?keywords=leather%20edge%20beveler&psc=1&qid=1449180851&ref_=sr_1_1&sr=8-1-spons)
beveler (http://www.amazon.com/gp/product/B00430GAS4?psc=1&redirect=true&ref_=ox_sc_sfl_title_30&smid=ATVPDKIKX0DER)
awl/chisel for making stitch holes (http://www.amazon.com/gp/product/B00CBRVKOK?psc=1&redirect=true&ref_=ox_sc_sfl_title_31&smid=A1EX7LU0M6LM21 http://www.amazon.com/gp/product/B0036LNXEA?psc=1&redirect=true&ref_=ox_sc_sfl_title_29&smid=A2UDNPGKURPVSY)
needles for stitching and thread (http://www.amazon.com/gp/product/B00114RBSI?psc=1&redirect=true&ref_=ox_sc_sfl_title_26&smid=ATVPDKIKX0DER)
Anything else?
I think it's this one through Amazon: Leather Side Piece Veg Tan Split Medium Weight
So based on aColorfulWorld comment, looks like I got exactly what I asked for, just didn't know what to ask. Well, learned my lesson this time around.
Thanks!
yep often a set will come with a 1/2/4/6 set up you can often get a 10 as well. it's nice because the spacing is standardized for each set.
Thanks! Glad you liked it.
As far as leather, this one I got from Amazon that worked out ok:
http://www.amazon.com/gp/product/B006UUHUDO/ref=wms_ohs_product?ie=UTF8&psc=1
Here's a similar one:
http://www.amazon.com/Scrap-Leather-Brown-Cowhide-Piece/dp/B003TCARX6/ref=sr_1_22?s=arts-crafts&ie=UTF8&qid=1410311581&sr=1-22&keywords=6oz+leather
This is a notebook made with the leather I got from Amazon: http://imgur.com/a/3ti5u
Honestly, if you're in the States, I'd recommend checking if there is a Tandy Leather or Hobby Lobby nearby. Tandy will have a much broader, more cost effective selection. Hobby Lobby will have similar pieces to what's linked to Amazon, but at least you'll be able to see it.
He’s using tokonole to burnish the edges and then dye afterwards using a refillable dye applicator (Sorry can’t find a link)
PM me you address and I'll send you one of these.
It looks like this is the same kit on amazon for a couple dollars more. The reviews appear to be mixed.
Rivets
Rivet setter and anvil
There are two Tandy's in Austin so I just grab them in store. Their website doesn't have them listed (like the majority of their inventory) but these should be the right ones
I got a small 16$ set from amazon ( Electop 31 Pcs Leather Sewing... https://www.amazon.com/dp/B07998XNQK?ref=ppx_pop_mob_ap_share )
A small all metal diamond punch set ( Aiskaer White Steel 4mm 1/2/4/6... https://www.amazon.com/dp/B014549SNG?ref=ppx_pop_mob_ap_share )
And a really nice, cheap, knife ( BANYOUR Leather Knife Cutting... https://www.amazon.com/dp/B07LD4PC2D?ref=ppx_pop_mob_ap_share )
They worked for what I needed, especially as a beginner!
In doing my research, I found that the kits on Amazon had a bunch of things that aren't really necessary or particularly helpful. So I opted to build my own.
Instead of a kit, I would walk into a Harbor Freight and buy a wing divider, blow hammer, knife set. Then order a diamond chisel set, skiver knife, and edge beveler. That is a $50 set, that although inexpensive, is going to be better than the all-in-one sets off amazon. You can likely find an old kitchen cutting board, sand paper and ruler around the house (if not a ruler is cheap at Harbor Freight). I grabbed some needles from my mother because she quilts, but you may need to buy a couple of those.
Most sets don't include consumables (leather, quality thread, glue) so I did not include those in the list for comparison. The kits often include items that aren't necessary or are genuinely useless at least for starting out (thimble, groover, multiple of the same tools, 4 different awls, stitch markers when you have chisels, items your not interested in like bad thread, cheap buttons, etc.)
I suggest this style upfront for all hobbies (inexpensive but not crap) so people can get a feel for what they think is worthwhile to upgrade. While some of the items will prove to be plenty sufficient.
Here’s my out-of-the box suggestion: If you can find the style of shoe you like in a light or neutral color, then you can paint the shoe with Angelus brand leather paint in metallic silver. I have done this several times when I have loved a shoe but couldn’t find the right color, with great results. Tape the soles and parts you don’t want painted with frog brand painters tape. Painting is in three steps: apply finisher and deglazer and let dry, apply paint and let dry, then apply finisher and let dry. Hopefully you can find the right color shoes, but I wanted to put this option out there just in case. If you decide to do this, message me and I will be happy to send detailed instructions.
https://www.amazon.com/Angelus-Leather-Preparer-Deglazer-Oz/dp/B00EU322DQ?crid=28ONTX97BK2L&keywords=angelus+leather+preparer+and+deglazer&qid=1540669671&sprefix=Angelus+%2Caps%2C174&sr=8-1&ref=sr_1_1
https://www.amazon.com/Angelus-Acrylic-Leather-Paint-1oz-Silver/dp/B00HRJPVS8?crid=275059PK4ATA&keywords=angelus+metallic+silver&qid=1540669816&sprefix=angelus+metallic+%2Caps%2C150&sr=8-1&ref=sr_1_1
https://www.amazon.com/Angelus-Brand-Acrylic-Leather-Finisher/dp/B00B5W4LX4?crid=28ONTX97BK2L&keywords=angelus+leather+preparer+and+deglazer&qid=1540669751&sprefix=Angelus+%2Caps%2C174&sr=8-3&ref=sr_1_3
Brushes
https://www.amazon.com/Angelus-Paint-Angular-Artist-Acrylic/dp/B072LRHFTM?keywords=angelus+brushes&qid=1540669936&sr=8-2&ref=sr_1_2
I actually prefer the Heavy Duty ones from Ohiotravelbag.com They also come sized instead of one size fits all.
This is the Baby one:
https://ohiotravelbag.com/T-1384/Baby+Cap+Jiffy+Rivet+Tool
Go to website and search "jiffy rivet tool" to see all the sizes.
Also get a Rivet anvil too to do double sided caps.
https://ohiotravelbag.com/T-1607/Eyelet+%26+Rivet+Anvil
I don't like the kits where you can do different ones by buying one kit. The Ohio Travel Bag setters are pretty heavy and easy to hold makes setting rivets smooth. I wish I was at my office and could take a picture of the good ones along side a cheap Tandy one. The good one is the circumference of a finger where the others are the crcumference of a pencil.
Like this one:
https://www.amazon.com/Tandy-Leather-Factory-Rivet-Setter/dp/B00N7SSICO/ref=asc_df_B00N7SSICO/
I'm looking into these, but they are 8-9 stitches per inch. I'm doing 6-7 stitches per inch, so that might be too much for me. I'm searching ebay for other options.
Hey bud... get one of these for the next time you want to punch a hole in your leather. Not expensive and makes a much cleaner cut for the leather!
Kind of looks like a leather punch to me.
The one I am linking to rotates, however.
http://www.amazon.com/SE-7924LP-Heavy-Duty-Leather-Punch/dp/B000NK5VY2
A strop can get you an even keener edge. A steel helps to align a rolled edge which occurs with knife use.
This seems like a pretty good strop. You'll also need a fine abrasive compound such as a paste, wax, or emulsion to help the stropping process. The recommended green block compound looks pretty good. I havent used it myself, since just about anything will work. I personally use red and green razor strop pastes and they get me to a nice mirror finish.
Tools List:
Diamond Awl Chisel
Cutting Mat
Scratch Awl
Channel Groover and Beveler
Gum Tragacanth
Stitching Needles
Burnishing Tool
Rubber Mallet
Please note: These are all "bargain" options. They will get you started and will do its job.
Yeah no problem. It rides in my back pocket like a 'deep pocket clip' styled knife, you might only be able to see the bottom edge of the sheath. I really need to get a picture to help illustrate this, but when I first got it I just bent a heavy paperclip into a hook and wired it to one of the 2 holes on the bottom of the sheath. This worked fine but was pretty tacky. I had found the steel clips online but was unwilling to pay the approx $5 or more to get one to my door, so I just kept an eye out when going to the craft store with my wife. I got one there for like $2. It ended up being much longer than my paperclip solution and would bottom out in some of my pockets when attached the same way. So, I actually drilled 1 of the 2 rivets near the top of the sheath, and mounted the clip upside down through it with Chicago screws, at that position, the fold of the clip hangs sticks just below the bottom of the sheath, which makes it hang upside down in the pocket quite nicely.
I think the Rhino looks awesome, but I too was concerned about how I would like a sheath knife that small, or if I would even carry it, so I chose to spend a little less on my experiment. I think, though it doesn't look as good, the gnome might actually have a slightly more useful shape for its size, the nice curve along the top is a great place to put your pointer finger while making cuts. Overall I really like it. I don't carry it all the time, but that's more a function of other, nicer knives that I've since bought as well.
I bought this. I'm only doing the part between the screws. I don't see the value in doing the whole face.
Also I've got some strop material
You might be better off using some smaller pieces put together if you are try to save money. Regardless, 12x24 for ~$20 or 36x36 for ~$50 on amazon:
http://www.amazon.com/Leather-Medium-Weight-Inches-Square/dp/B004ZRHGP6/ref=sr_1_1?s=arts-crafts&ie=UTF8&qid=1425668199&sr=1-1&keywords=leather+36
http://www.amazon.com/Leather-Medium-Weight-Inches-Square/dp/B003X3VZA0/ref=sr_1_1?s=arts-crafts&ie=UTF8&qid=1424660216&sr=1-1&keywords=leather+remnants
That size
All you need is a hole punch and an eyelet setter. I use 3/16" eyelets which are a little on the smaller side but still fit most leather laces.
Way, WAY below your budget but I got one of these plus a strop and it’s my best purchase yet next to my KS Blade pricking irons
Good question, and it pains me a bit that I have a small box of unused tools that were purchased when I began. I'm sure I missed a few things, but here you go:
If links weren't provided then I already had the item.
For belts, have you considered ordering custom-made ones such as from this site? Alternatively there are guides for making your own that can be found in /r/malefashionadvice and it seems to be pretty easy and cost-effective. I also love my leather hole punch, which I got for less than $10 on Amazon. Hope you find that helpful!
Oh I'm way in already! :))
It was a person who was cleaning the house and just happened to have scraps, it wasn't a shop. He had 2 pieces left but now the link isn't working so I assume he sold them both? However I don't think I'd do it again, I paid quite a lot in the end (around £7) and the piece I got was just enough for the cover, just had to cut it straight. I think in shops you can get a lot more than that for the price!
However there's things like this if you're interested :)
http://www.amazon.com/gp/product/B006UUHUDO/
I got these needles: https://www.amazon.com/gp/product/B001687P3U/ref=oh_aui_detailpage_o00_s00?ie=UTF8&psc=1
and these punches: https://www.amazon.com/gp/product/B00T17OULI/ref=oh_aui_detailpage_o01_s00?ie=UTF8&psc=1
I use a King 250/1000 and a strop with some buffing compound.
http://www.amazon.com/gp/product/B00CBRVKOK/ref=s9_simh_gw_p201_d0_i2?pf_rd_m=ATVPDKIKX0DER&pf_rd_s=desktop-1&pf_rd_r=1PVZED59D6F03DF8X880&pf_rd_t=36701&pf_rd_p=1970559082&pf_rd_i=desktop
I think this might work better if you're interested in trying.
Here is the mobile version of your link
The set you have is for snaps. This is what you need for the rivets.
Amazon.com: Tandy Leather Factory Rivet Setter Plus Anvil Set
https://www.amazon.com/Tandy-Leather-Factory-Rivet-Setter/dp/B00N7SSICO
Leathercraft Tool Punch Snap Kit Rivet Setter with Base for Punch Hole and Install Rivet Button (Pack of 11) Die Punch Snap Kit Rivet Setter with Base for Punch Hole and Install Rivet Button https://www.amazon.com/dp/B01ILTJ65G/ref=cm_sw_r_cp_api_343KAbMFZB4W4
This is the set I have, am I just using the wrong handle?
Great! Thanks for the feedback. As for the finishing, I also picked up a leather preparer and deglazer that should remove any coating on the boots before I use the actual paint.
Stitch Chisels 4mm
Wax thread
Saddle stitch
Here is the link to the kit (Electop 31 Pcs Leather Sewing... https://www.amazon.com/dp/B07998XNQK?ref=ppx_pop_mob_ap_share)
The needles suck though and I got this as well (Jdesun Wooden Needle Case with 40... https://www.amazon.com/dp/B07MKK1R85?ref=ppx_pop_mob_ap_share)
hey guys there is this
Clip From Amazon
I live in South Carolina and I love the rolling thunderstorms we have. The hard intense rain with the low rumbly thunder is really soothing to me and the best weather to take a nap in ever.
Don't like the heat though, not one bit.
These craft spikes would be cool, they are under $8 with free shipping (no prime needed either). They are on my "Art Stuffs" list
Thanks for the contest and welcome to RAoA! :)
Get this tool:
http://www.amazon.com/Leather-Hole-Punch-Tool-Heavy/dp/B000NK5VY2/ref=sr_1_1?ie=UTF8&qid=1321287194&sr=8-1
$6.68 + FS w/ Prime.
I use this for the fauxdoris I make
https://www.amazon.com/dp/B006UUHUDO/ref=cm_sw_r_taa_-.4qxb5HFSV31
http://www.amazon.com/SE-7924LP-Heavy-Duty-Leather-Punch/dp/B000NK5VY2
Not to endorse a specific vendor, but I just ordered this:
http://www.amazon.com/Scrap-Leather-Medium-Brown-Cowhide/dp/B006UUHUDO?ie=UTF8&psc=1&redirect=true&ref_=oh_aui_detailpage_o00_s00
and made a sheath from it today.
Having done this a few times, my best recommendation to you is to get 6-7 oz leather of whatever color floats your boat.
What kind of stitching do you do? I use an awl with two needles, per the instructions in this book: http://www.amazon.com/Art-Hand-Sewing-Leather/dp/1892214911/ref=sr_1_sc_1?s=books&ie=UTF8&qid=1464597294&sr=1-1-spell&keywords=hand+stiching+leather
I recently got into leatherworking too. I was kind of in the same boat as you looking at tools. I found this kit on Amazon it took about 3 weeks to reach me in the states. No guarantee that these are the best tools but so far they have worked well for me!
You can buy a leather puncher at Hobby Lobby for $20 ($10 if you use a coupon). Here is one for $7 off Amazon. One of the best purchases I've ever made!
I use a regular ole japenese skiving knife and also a "safety skiver"
https://www.amazon.com/dp/B00IVS667Y/ref=cm_sw_r_cp_apa_i_VQKoDbN9DVCAK
With the safety skiver I would definitely say you need some practice on scrap and to be careful because you can easily go all the way through thin leather like that.
I dont have a picture right now, but this link is pretty much What like what I used. https://www.amazon.com/Leather-Medium-Weight-Inches-Square/dp/B003X3VZA0/
If you look at the picture of the end of the roll you can see the sides better. It is kinda like what you are saying. It is fleshy and softer on one side, but a little slicker and like sandpaper on the other.
Ive got some left over leather so ill do some experimenting with it.
Looks pretty good. Always come in at least 3/16 of an inch from edge for stitching. Get yourself a stitching groover too. It cuts a groove in the leather both to help heep stitches straight, and so your thread doesn't sit proud if the leather. Especially for an item that will be in and out of your pocket. Get a set of diamond stitching chisels too to help you with spacing, and clean up your stitches. https://www.amazon.com/dp/B014549SNG/ref=cm_sw_r_cp_apa_i_1.CJDb1VV85PN
Other than that. I would personally do this with a thicker veg tan leather, obviously you have what you have. But thicker veg tan allows you to better finish the edges of the leather and use an edge coat to both make it pop, and to protect the edge of the leather which is what will surely start to wear first on this item. You dun good, though, just need to practice!
Yeah the Tandy #2 takes off too much unless you are working on like 6oz or thicker. Worked fine on some 8oz
Here is an edge beveler like mine. Mine just came in one of those kits of basic (most of it was junk) kits of leather tools.
This one does the job, but will be upgrading it asap.
7 in 1 Adjustable Pro Stitching Groover and Creasing Edge Beveler Leathercraft Sets to Sew & Crease Leather https://www.amazon.com/dp/B00OHAHICM/ref=cm_sw_r_cp_apa_i_grqACbWMTQX45
Here's a look at assembly and such
Foldover wallet https://imgur.com/gallery/OKTX59t
I recognize the value of good tools but I'm taking an introductory leatherwork course and although it's really interesting I don't know whether I'll be pursuing this craft anytime soon. The classroom has a skiving machine but only the teacher can use it. Would an inexpensive knife work or would it be uncomfortable or even dangerous? I saw these two on Amazon. Please bear in mind I'm one of the least dexterous people you'll ever meet.
​
https://www.amazon.com/Stainless-Leathercraft-Cutting-Skiving-Accessories/dp/B01N9HDKEA/ref=sr_1_4?s=arts-crafts&ie=UTF8&qid=1540603103&sr=1-4&keywords=skiving+knife
​
https://www.amazon.com/Safety-Skiver-3001-00-Replacement-3002-00/dp/B00IVS667Y/ref=sr_1_6?s=arts-crafts&ie=UTF8&qid=1540603103&sr=1-6&keywords=skiving+knife
Studs or spikes are always a fun way to add shine that are "devilish".
Mirror squares are also a bit more unique too.
Disc sequins are a fun alternative to regular little sequins.
And one of the cheapest options, cut up old Mardi Gras beads, individual beads are pretty shiny when paired with other embellishments.
Edit: formatting
Yeah, no problem. The sandpaper is just from Home Depot. Just use one or two to work your way to about 1200 grit. Just try to get things as smooth as possible.
The edging iron is the most unique of the tools. I have a vintage one I bought off eBay for about 30 bucks. You heat it and rub it on the raw edge of a sole to close up the leather fibers and make them more waterproof.
Then I used my finger to apply some Gum Tragacanth that helps you slick the side of the leather to a burnish / polish.
This is the wooden edge slicker I use. I use the long flat side of the handle and rub very vigorously on the leather until it has a nice depth of shine. You can use the top curved part to polish the corner of the welt. Really, though, it's just a piece of wood. You can probably use a wooden spoon handle in a pinch (though it may discolor the spoon). The important part is that it's a hard, dense wood.
Oh, and this is the edge beveler I use to take off the corner.
After using the wooden slicker I then polish it up with a canvas glove, rubbed very vigorously. You can use any piece of canvas, but the glove was convenient for me.
Nice job on the first try with some veg tan. You did a nice job on everything. One little suggestion that would improve the overall look on the edges would be to do some burnishing using a wood slicker like this and either gum tragacanth or tokonole as a burnishing agent. These burnishing agents really help matte down the fibers and give a nice and polished edge look. After the burnishing you can still add wax like you mentioned in the post. I'm sure your daughter will love it!
I'd be very happy on Monday if I knew I was getting these spikes in the mail so I could work on a DIY vest project!
Seiwa Tokonole Leather Finish Burnishing Gum 120ml Clear Leathercraft https://www.amazon.com/dp/B017X8GL9A/ref=cm_sw_r_cp_apa_gOPTBbV7ZBSMT
Congrats! Soon you'll need a punch
I'm a big fan of Rocado's Whisky Shell. I've been using it for a few watch straps and wallets myself lately. The boots look great, but I'd really like to see a more dressed edge at the top of the boot. Shell Cordovan burnishes so nicely and so easily that it seems like a waste to leave it unfinished like that. If you're feeling up to it, order some Gum Tragacanth and burnish that edge yourself! Apply it all along the raw edge and then rub it with a piece of cloth until its smooth and polished. If you decide to give it a try, let me know if you need more help!
This is what that exact leather looks like after I gave it a quick burnish.
By hand. I bought these chisels http://www.amazon.com/Vktech-Stainless-Steel1-Diamond-Leather/dp/B00CBRVKOK
I got one of these and have used it to make 6 new holes in my belt!
https://www.amazon.com/SE-7924LP-Heavy-Duty-Revolving-Leather/dp/B000NK5VY2
You ever use Tokonole or gum trag? I prefer it over the slight tacky feel of beeswax
https://www.amazon.com/Seiwa-Tokonole-Leather-Burnishing-Leathercraft/dp/B017X8GL9A
Nice work, really well done.
Here is an inexpensive punch I have used for years that works well: SE 7924LP Heavy-Duty Leather Hole Punch Tool, 2.0 - 4.5 mm https://www.amazon.com/dp/B000NK5VY2/ref=cm_sw_r_cp_apa_exDxybKCYTQBP
I would suggest this kind of device http://www.amazon.com/SE-7924LP-Heavy-Duty-Leather-Punch/dp/B000NK5VY2 better them knife cause it doesn't tear material as much so holes might stay (read not completely tear) longer.
You can then reinforce holes with this http://m.instructables.com/id/Reinforced-fabric-hole-Old-style-button-hole-or-ey/
Ideally you should use something like this.
http://www.amazon.com/SE-7924LP-Heavy-Duty-Leather-Punch/dp/B000NK5VY2
might have to make 2 holes side by side. if you Cut the rubber, it will continue to rip along that cut and tear. If you use a hole punch you are creating a round hole and it has no place to tear.
If you have a farm store or hardware store close by where you live they might have one on the shelf.
Even better solution
Get a leather hole punch for best results, they are cheap. I've cut down a couple belts. Then I just used a pair of good scissors to trim off the excess leather.
I think I've helped enough beginners with that little thing on the side bar....
But whatever, I'll play this game and set him up for immediate success and long term success for when he outgrows the old shitty leather belt strop.
Smiths Coarse and Fine 4" diamond stone for 14 bucks- I will personally attest to the quality of this thing, while the fine side is about 750 grit, it does a fantastic job. I own and use this piece of kit daily, works just fine.
Or this Norton Crystalon or whatever coarse and fine stone for as cheap as 10 bucks-I've used this one too to very good effect.
Green buffing paste 3 bucks-Chromium oxide buffing paste, I use the shit sometimes on my buffing wheels and once upon a time on strops. It works fine.
Paddle strop for 10 bucks-Should work just fine, and it's made to be a strop, the leather is tanned to be a strop, and it'll be better for the dude to learn on equipment appropriate for the task, as that's what it was manufactured for and not ghetto rigged.
This is how you're supposed to do it -
http://www.amazon.com/Leather-Hole-Punch-Heavy-2-0mm/dp/B000NK5VY2/
With one of these
Gotcha. Does it stretch or move a lot when you cut it?
Yeah that’s not the best way to mark stitching lines so I recommend a wing divider. This will be cost effective and will help tremendously with your stitching.
I bought these two when I started and still use them.
https://www.amazon.com/dp/B0779R5FCJ/ref=cm_sw_r_sms_c_api_i_A727AbF4N33A3
https://www.amazon.com/dp/B014549SNG/ref=cm_sw_r_sms_c_api_i_a827AbKEF359B
They work great for me and will eventually upgrade to some quality tools like KS.
For nicer, neater holes
I used cheap stitching chisels from amazon (https://www.amazon.com/gp/product/B00T17OULI/ref=oh_aui_search_detailpage?ie=UTF8&psc=1) to punch the holes preassembly. Then glued everything and stitched it up. I don't have a small diamond awl but that would definitely make things a lot easier. I put a bunch of needles through the corner holes to keep them lined up but they naturally fell out of line (because of the outside curve vs the inside curve) so I had to back stitch one side to realign them.
Thanks so much for the response!
Hmmm maybe that's it. What do you mean by casting? Also, I wonder if my needle is too large. I find that to really get it through the holes, I need to push an awl through and the original diamond shape is somewhat lost. As far as ensuring the slant, I think I'm doing this correctly. It's hard to tell from this picture as the stitches rest in a stitching groove, but they had a slight slant, and the backend definitely looked ~ok~ (though a bit messy like you see in the picture as far as looking a bit "twisted")
I agree about the thread gauge too-- maybe it's too thick.
Thread
Needles
Punches
This is my first attempt at any sheath and wet forming. That is the reason I decided to test it out first with a scrap piece. I liked the minimalist idea and this is what I came up with. I also tested my new diamond chisels and I love them but if the stitches look a little off it's because I just eyeballed the whole project. I used 5-6 oz veg, .7 mil Kevlar thread, and finished it with olive oil then tried my burnishing wax as a water repellent by melting some over the whole thing with a hair dryer then rubbing it in while hot. I like the look of it. As for the burnishing wax I used equal parts bee and paraffin wax. I tried it on a really rough edge and used nothing but the wax and I think it works great. Any comments or suggestions would appreciated. Here are the chisels I used. It makes 8 stitches per inch.
I own them.
Check here
Here is the mobile version of your link
This is just my second wallet, heavily inspired by /u/sgircys (thanks for the awesome tutorial). The leather is 2-3 oz Oak Leaf from Tandy. I've given it a couple of coats of neatsfoot oil and left it in the sun for a day. The tread is 0.8 mm black tiger thread. Chisels are these cheap ones from amazon. I've used the 6 prong one to do all of the holes in the wallet.
Another side question, if I want to get a dye would you guys recommend the oil based ones or water based?
I use these to actually punch the holes on thinner leather: https://www.amazon.com/gp/product/B00T17OULI/
For projects, you can do slightly larger bags, dop kits, etc if you go for a fabric lining, duck cloth or canvas would add good reinforcement.
Gonna try this out. Japanese style cheap knife. https://www.amazon.com/gp/product/B01N9HDKEA/ref=ox_sc_act_title_1?smid=A4V6KRCAH7YC8&psc=1
Finished this up the other day, and really pleased with how it came out.
It's a six-card bifold with two hidden pockets. For the exterior, I used a natural shell cordovan, which I finished with a coat of Tokonole and then Atom Wax.
The interior used some unglazed olive harness leather from District Leather Supply. A little darker than the picture let on, but it goes well with the whiskey shell.
This was the first time I've made a bifold with straight t-slots, and I was pretty pleased with how well it creased, giving a more professional look than some of my other pieces.
Some details: used 3.38mm Wuta Irons, stitched with .06mm Cream Ritza thread, and edges were finished with Tokonole and beeswax.
If you got this far, thanks for giving this a look!
Being a cheap sucker I decided to make my own holster instead of dropping $30-$50 on one. I got all my materials from Amazon and all my education from youtube. Links below:
Leather
Kydex
Clip
Screws
Video 1
Video 2a
Video 2b
I picked up a piece of scrap leather off of Amazon. The description stated it was about 1/8 in. thick, so a little over 3 mm. I had to stick it under some heavy boxes for a few days to have it stay closed without the band around it.
It's stiff, but not terribly so. Definitely still relatively pliable. I wouldn't consider getting leather any thicker-- 3 mm was already a pain to cut (though I'm very inexperienced with leatherworking) and I suspect beyond that it would be much less pliable.
It looks good! If you have ~$20 to spend you can get a groover ( https://www.amazon.com/gp/aw/d/B074YD8DXY/ref=mp_s_a_1_5?ie=UTF8&qid=1506701984&sr=8-5&pi=AC_SX236_SY340_FMwebp_QL65&keywords=leather+working+tools&dpPl=1&dpID=51qIiFoZwYL&ref=plSrch ) and stitching prongs? I'm not sure of the technical term ( www.amazon.com/gp/aw/d/B00T17OULI/ref=mp_s_a_1_1?ie=UTF8&qid=1506702124&sr=8-1-spons&pi=AC_SX236_SY340_FMwebp_QL65&keywords=leather+stitching+punch&psc=1 )
try this one
leather punch
I bought it about a month ago, did the job well on 4 different belt so far, super easy.
Cheap trick: all you need to do is reduce the surface area / coupling of the speakers to the desk.
You can do this with a small piece of wood and a few glass pebbles. The bean shaped ones are the best since the surface touching the board will be reduced as well as the surface on the counter... if you're not near a crafts store you can use aquarium pebbles as well, if you're closer to a pet shop...
If you want to make it fancier, use these:
http://www.amazon.com/100pcs-Silver-Spikes-Screwback-Rivets/dp/B009M12D44/ref=sr_1_1?ie=UTF8&qid=1406070706&sr=8-1&keywords=metal+spikes
And screw those through the board. That's probably the least surface contact you can get. Some good speaker stands are spiked on the floor.
"There, there... now, that's a good girl. Take off for Daddy."
"Look at those sweet nipples, so soft and pretty. Who wants to watch me pierce them with a leather awl and string 'em together?"
"No screaming now. You know the rules. Tears 'n whimpers only."
"Go ahead, slide the pants off too, pet. You know you want to... it's so needy, isn't it?
"Spread those legs wide. You know how to spread. Open wide for Daddy."
"Good slut! Look at you! Such a pretty pussy. Look at the way that little clitlet throbs. Just begging for special attention, isn't it?"
"Bet it would just love to dance along the edge of the straight razor..."
"Shhh... no talking or begging."
"Now then. Looky here... See what Daddy brought just for you, sweetness?"
https://www.amazon.com/Electop-Leather-Stitching-Groover-Thimble/dp/B07998XNQK/ref=sr_1_3?hvadid=174287964859&hvdev=c&hvlocphy=9014002&hvnetw=g&hvpos=1t1&hvqmt=e&hvrand=16568547114374764370&hvtargid=kwd-5662362647&keywords=leather+sewing+kit&qid=1554526175&s=gateway&sr=8-3
​
"Now, what's that face? "
"Say, babygirl. You don't really need to be walking around for the next couple days, do you? 'Cause you're really not going to want to move much.
​