Best manual sanding products according to redditors
We found 84 Reddit comments discussing the best manual sanding products. We ranked the 31 resulting products by number of redditors who mentioned them. Here are the top 20.
We found 84 Reddit comments discussing the best manual sanding products. We ranked the 31 resulting products by number of redditors who mentioned them. Here are the top 20.


Get some Scotch-Brite Pads (Not necessarily that really big box). I use them to remove discoloration from ejector pins that I surface grind that can be near 70 HRC.
Just get to rubbing, add some oil and you can polish pretty nicely with the stuff. Even better, if the stuff is round, stick it in a lathe and power rub
I feel you. What an awful bitch. May I suggest hiding your tp and replacing it with a roll of sandpaper?
I thought I was the only one with this experience! My Ndad would only take horrifying, nasty dumps in my bathroom, too. Even worse? He had to walk through my bedroom to get to it, would leave the door open, and would consequently stink up my bedroom.
He also loved to "borrow" my car for road trips when I was a teenager. He believed he was entitled to it, as he paid for the insurance (he forbade me to pay for my own insurance, despite my attempts to do so). He would completely trash the interior with food, garbage, and mud, and would leave cups or bottles of pee in it amongst the garbage. OPEN containers of urine in a car when we lived in the South and regularly experienced 90+ degree weather. That jackass made my car smell like foul, fermented piss for weeks at a time, a smell that lingered even after I meticulously cleaned my car. The one time I told him HE should clean my car since HE trashed it, he vehemently lectured me about respecting him and said I needed to practice responsibility by keeping my own car clean. Yes, he continued to "borrow" my car and my brainwashed self was too scared to say anything about it again.
I did get back at him somewhat. If I got warning (advanced notice was rare) that he'd be using my car, and I was feeling a little brave, I'd run out, tune my radio to the local rap station, and crank the volume and bass to maximum. The resulting boom of sound and surprised shrieking when he started my car were totally worth the eventually blown speakers.
Seriously, though: sandpaper. Like so:
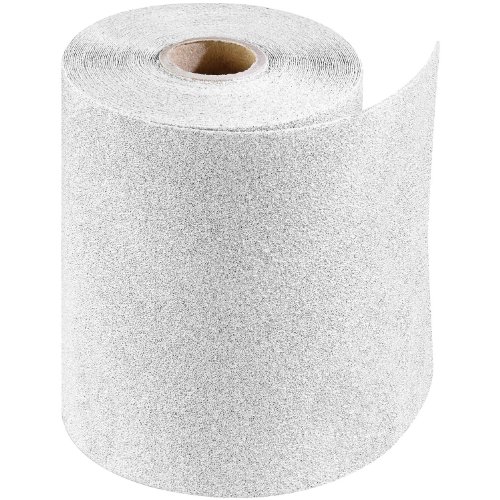
PORTER-CABLE 740000801 4 1/2-Inch x 10yd 80 Grit Adhesive-Backed Sanding Roll https://www.amazon.com/dp/B0000223SI/ref=cm_sw_r_cp_apa_0xc6ybA32TXSX
Edit: clarity and formatting
I use these guys
https://www.amazon.com/dp/B000CDR5K8/ref=cm_sw_r_cp_apa_i_VEyBCbTMWC1TE
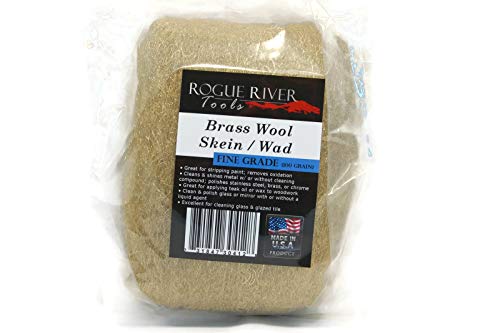
DO NOT USE STEEL WOOL!!! Even 0000 can scratch the finish. Use brass as the brass is softer than the steel and won't scratch the finish.
Brass Wool- Skein Pad Wad (Fine Grade, 100 Gr.) https://www.amazon.com/dp/B01CTGGGIM/ref=cm_sw_r_cp_api_i_PHKTCbAMH0TY6
Well I’m personally a MG builder, and would want to recommend you an MG, but they can be complex for a new builder so an HG might be a better choice. I hear the 1/144 HGUC Gundam Revive is a easy starter kit. If you’re feeling up for an MG (or want a bigger sized kit) the Gundam X is a great starter.
As for tools you’re going to need a decent pair of nippers. The Gundam Planet Nippers are the best bang for your buck. Known as the second best nippers around. Besides that the Tamiya nippers are ok compared to those.
After that you’ll need a hobby knife. This Is the one I use. Comes with a lot of replacement blades, and it’s pretty cheap.
The next thing you’re gonna want is panel lining pens. Here is a decent priced set.
It’s also recommended to get a good sand paper set. Get a 600, 1000, 1500, and 2000 grit paper. Here Is a pretty good set. You don’t have to get this right away, but if you don’t want nasty nub marks this is a must.
Those are the bare minimum things you need to start. There’s other things you’ll want down the line like top coat to make your kits look nicer, Gundam markers to paint small details, a kraft mat to build on/cut decals out on, mark setter/softener to make water slides look better, and an airbrush for serious painting. Those are all more advanced thing you don’t have to think about until later when you want to pursue them. For now the things above are starter essentials
Things happen, so light scratches are normal. Some folks like it "gives character, tells a story" and some think of polishing, no right answer. I've used these Polishing pads from Amazon with some success for light marks. I only use the last two finest grades.
​
Invest in some good side cutters and some sanding sticks. . Don’t stress if you make mistakes, just do your best to finish the model. You’ll learn a lot just by getting it finished as best you can. Then try another kit.
I'd guess it was used as a dispenser for sandpaper or other materials that came on a roll https://www.amazon.com/Sandpaper-Dispenser-Furniture-Restoration-Automotive/dp/B07457VPWY
If the pieces are pretty far off I would make a router sled
https://i.imgur.com/A6y2Zae.jpg
lots of youtube videos showing how to make and use these. I have flattened and thicknessed planed many boards with mine.
​
If you only need a little bit of flattening, or want to clean up a board that you just routed down: Order some adhesive sandpaper roll
https://www.amazon.com/PORTER-CABLE-740001201-2-Inch-Adhesive-Backed-Sanding/dp/B0000223SK
Obtain a flat strip of granite from a local marble countertop place, they gave me a leftover for free. 4x30". Apply the sandpaper to the granite. Pencil cross hatches onto your board and sand until they all disapear.
I use CA finishes a lot on smaller turned items, but I hate wearing gloves. As a consequence I have new fingerprints all the time.
If you want to take that to the next level, wet sand with micromesh up to 12,000 grit then hit it with some HUT Ultra Gloss plastic polish
Of course! All those canvases usually say they are “primed” which means gessoed HOWEVERRRRR once you do it yourself you’re gonna be like “what are they even talking about this canvas isn’t prepped at all” lmao. I was shook in college when I learned all this stuff. A good one is Liquitex gesso. You can honestly just buy the gallon of it if you end up liking it. It’ll last foreverrrrr
Gesso: Liquitex Professional White Gesso Surface Prep Medium, 32-oz (5332) https://www.amazon.com/dp/B000KNPLXI/ref=cm_sw_r_cp_api_i_6OUBCbYGG08ZG
Brushes: Value-Pack 10-Pc Foam Paint Brush Set - Wood Handles by Industrial Tools https://www.amazon.com/dp/B003UHJDAS/ref=cm_sw_r_cp_api_i_WPUBCb9GYJ791
Sand paper: Sanding Sponge,Coarse/Medium/Fine/Superfine 4 Different Specifications Sanding Blocks Assortment,Washable and Reusable. https://www.amazon.com/dp/B0752VGHG6/ref=cm_sw_r_cp_api_i_rQUBCbQ2295YF
And then eventualllllllyyyyy, way off in the future:
Stanley Hand Tools 20-600 Clamping Miter Box & Saw https://www.amazon.com/dp/B0791J472B/ref=cm_sw_r_cp_api_i_uUUBCbAX7GEM0
Stanley TR45K Light Duty Staple Gun Kit https://www.amazon.com/dp/B000NIFL80/ref=cm_sw_r_cp_api_i_xVUBCb1HTF3N9
Art Alternatives Canvas Pliers 8in https://www.amazon.com/dp/B004MASEW0/ref=cm_sw_r_cp_api_i_9XUBCbJF0J5ZC
Nasco 1100424 Fine Arts Unprimed Cotton Canvas Roll, 6 yds x 62" https://www.amazon.com/dp/B00EJSJKFK/ref=cm_sw_r_cp_api_i_hZUBCb3PN5W7Y
Also, occasionally I like to go to a thrift store, find a wacky printed dress or dress shirt, and stretch that over a wood frame. For that, or if you paint on wood, you can use clear gesso (my personal favvyyyyy as I almost always paint on wood and looooove wood grain to be incorporated into my paintings...or on canvas stretched over wooden boards)
If you work with XPS a lot, a hot-wire table is a big convenience. It's certainly not a requirement though.
Really though, all you need is the 'obvious' stuff. A straight edge of some sort and a utility knife is sufficient for most cuts. The same knife will work for whatever other carving you'll be doing. Beyond that, the rocks and wire brushes others have mentioned are good for adding texture.
A couple small, cheap things I find handy:
They look good. Well done. If I could suggest something, give these a go for the next kit
Ya know, if you really wanna take off sprue marks, that's not that hard. I recommend these micromesh pads. Start with the roughest pad, work until you cant feel the sprue (being careful not to take off any additional material.) Then work your way through the pads from coarse to the finest. The grit on the fine grit pads is so fine it will essentially polish as you go. They're handy to have for anything plastic-y.
​
If you want to be more frugal, a carefully used fingernail file, along with some polish after could work fine too. That's how I did warhammer minis for a while, although I benefitted from applying paint after the sanding.
I have one but they're a little rough for model kits.
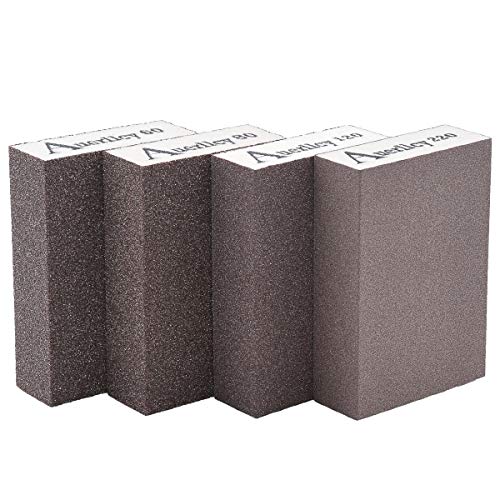
I use something similar to these: http://www.amazon.com/Squadron-Products-Value-Sanding-Stick/dp/B000CDR5K8
Files are okay but I preferred filing sticks staring with coarse and then moving up through till you get to a fine finish
Sanding stick set Coarse Medium Fine Extra Fine Tri-grit # 30506 https://www.amazon.co.uk/dp/B000CDR5K8/ref=cm_sw_r_cp_api_i_k.TvCbVEXY7JZ https://i.imgur.com/HBIUU8r.jpg
These may be of some use to you.
Be gentle sanding as well, you dont want to take off any detail. Ive done that :(
Yes, there were a few parts that just took way too much sanding to get to size. I updated those parts to reduce the amount necessary and will be paying close attention to feedback from those building it to see if there are any parts I missed.
There were other surprises too, but none that required design changes (that I recall). One was that I initially was using a flat black paint for automotive that I got from the auto parts chains that I had a lot of trouble with. At first I thought it was environmental or my skill, but I eventually tried a flat black Krylon from a hardware store that worked beautifully.
I used Bondo spot filler putty to fill gaps, a filler primer to fill in layer lines that were left after sanding, many different grit levels of sand paper (mostly 120, 320, 400, and 1500 -- the last two used with wet sanding), and matte and gloss clear coats. I really liked the sanding sponges I used for wet sanding https://www.amazon.com/gp/product/B003ELH7AI/
I have found that the easiest (and cheapest) way to up your model kit game is to panel line them. It makes the color separation pop way more, and helps define the proportions of a kit much better. A three pack of the panel linking markers are on Amazon for 5-7$ usa (link below). I recommend using the gray marker for white parts, brown for red orange gold and yellow parts, and black for blue gray and silver parts. The markers last a very long tine as well.
Another way is to buy some sanding sticks (10$ roughly for a 4 pack) and work on carefully removing nub marks. It will really improve the final presentation on the finished model. Start with a lower grit stick to remove the nub, and then increase the grit to polish away the scratches. If done correctly (I'm still working on this too) it will look like the nub was never there.
I Hope this helps, from one modeler to another.
Panel lining markers:
GSI Creos Gundam Marker Value Set -GM01&02&03- (Black, Gray, Brown) https://www.amazon.com/dp/B00HY93GHY/ref=cm_sw_r_cp_apa_i_xt-2DbKF7CZZR
Sanding sticks:
Squadron Products Value Pack Sanding Stick https://www.amazon.com/dp/B000CDR5K8/ref=cm_sw_r_cp_apa_i_AC-2Db3ZFSJ3K
Edit: also the panel lining will help the paint job pop. In addition I'd saw use multiple coats from the gundam makers if possible.
Thanks for the tip, I’ll keep that in mind. Right now, I’m starting at the feet and working my way up.
As for the sanding sticks, they’re Squadron brand . They’re inexpensive but they’re fantastic. The only downside is that they don’t have a grit rating on them. But it comes with a Coarse, Medium, Fine, Extra Fine, and a Tri-Grit, which is good for finishing. The amazon pack shows that it comes with a finishing stick, but it doesn’t. It instead has an Extra-Fine grit stick. I find myself using the medium, fine, extra-fine, and tri-grit sticks pretty often. I’ve yet to need the coarse one.
I’d highly recommend the brand. They’ve served me well and I plan to get more when these wear down.
I ordered some sanding stick but it only say medium fine and coarse https://www.amazon.fr/Sanding-stick-Coarse-Medium-Tri-grit/dp/B000CDR5K8/ref=mp_s_a_1_1/259-8678765-4734753?__mk_fr_FR=ÅMÅZÕÑ&qid=1549117488&sr=8-1&pi=AC_SX236_SY340_QL65&keywords=sanding+stick
Btw will it remove the stress mark too?
I could be wrong but there is a product they sell that has a compound in the scrubber that when you wet it and scrub it comes out and works on the item your scrubbing. I used some stainless steel scrubbers i bought. there didnt seem to be anything in them, and they didnt seem to do anything to my pans at all. they were little balls of silver stainless steel. I searched for scotch brite aluminum oxide. this is what i found: https://www.amazon.com/Scotch-Brite-Production-Aluminum-Length-Maroon/dp/B00EW7MCCQ
this is what i used: https://www.amazon.com/Scotch-Brite-Stainless-Steel-Scouring-Scotch/dp/B00MNPDYHQ/ref=sr_1_11?s=industrial&ie=UTF8&qid=1501072309&sr=1-11&keywords=stainless%2Bsteel%2Bscrubber&th=1
Amazon Link
80 grit self adhesive sandpaper would cover it.
Definitely get a good pair of hobby side cutters. This is what I use, and I've had it for a year and a half and it's still really sharp and leaves almost zero stress marks right against the plastic. There's cheaper ones out there, but you'll need to cut farther away from the piece and then use an exacto knife. Then use sanding sticks to get everything flush.
Sorry if you know all this, just saw the nail clipped comment and they're definitely not the best idea on a kit, especially if you just spent 80 bucks on one.
All the crappy farm tables and diy projects on r/woodworking a your post gets removed, wtf.
I have a rikon half speed 1850 rpm 8" grinder with a 80 grit CBN cubic boron nitride wheel and a veritas tool rest. Shapton ceramic 320, 1000, 5000, 12000 stones. A 36"x6" 3 cm thick piece of granite and use adhesive backed sandpaper rolls. I wax the granite to allow the paper to come off the granite easily.
grinder
cbn wheel
tool rest
stones
320 g
1000 g
5000 g
12000
sand paper
You'll want to get a full set. Here's a link to the Micro-Mesh 3 x 4 Soft Touch Pads that I use. Wet each pad and go over the stems one pad at a time from coarse to fine. I like to finish with obsidian oil as a protectant.
I use these sanding sticks a lot. I also use foam sanding blocks which make it a lot easier. I use really coarse like 80-100 grit and a light touch to knock down the layer ridges. Then I prime with the filler-primer and go back with 120 and then 400 grit paper.
Wet-sanding can get you an almost glass-like finish if you want, but it's a lot more time.
I generally sand/prime/paint individual pieces that are seperate colors. I leave some PLA exposed for some two-part epoxy which is AMAZING for holding PLA.
I've linked to AMazon but Home Depot/Lowes will have the sanding blocks and your local hobby-shop will have the epoxy, sanding sticks ad two-part epoxy.
For wood PLA I had to go a little lower than usual with my nozzle, it printed really well at 190°C and I had to print slow about 30mm/sec.
Use some fine stainless steel wool to create your own pad and then put that into a normal basket screen. Another solution would be to use SS mesh wire meant for buiding RDA coils and create a concentrate pad out of that.
If you do pursue diamond stones, here is a list of what I have.. I am not sure if this the be-all-end-all, and I can definitely recommend trying lots of things, because sharpening seems to be something so personal. Just wanted to collate in one place what I have settled on thus far.
This is one of the cheaper setups. I think it would be interesting to try ceramics at the top end, and better leather for a multi-strop setup.. Just ran out of funds after trying several failed other methods ;)
OP gave you some good advice about research. I'd add that if you can somehow find someone local who can show you what sharp really is, that would be a big bonus. I haven't found that person yet myself, because I am a hermit.
Stones:
Paddles:
Stropping:
Sandpaper:
I don't use the same topcoat you used so I can't say how many coats is enough. Because of issues with odors, I only use water-based products like polycrylic. I use seven to eight brushed on coats. But I've been doing this for more than a decade so I know how to rub it out and I know the things I can be tempted to do while sanding that's going to make big trouble for me. I would do the rubout and go as high as you can (1200). If you aren't satisfied with that, then buy the higher grit abrasives. Abralon used to sell a mixed package of one each 360, 500, 1000, 2000 and 4000. Here it is on Amazon https://www.amazon.com/Mirka-Abralon-Assorted-Silicon-Polishing/dp/B014Q3EAXO/ref=sr_1_2?ie=UTF8&qid=1492993178&sr=8-2&keywords=abralon . You could hand sand with these. Please note that this is what I do on the product I make; it is what works for me. I am not saying it is the way everyone should do things or that these are the products they should use.
Contact Adhesive - super glue.
basically, you get super thin CA. Use a folded piece of paper towel below the pen and dribble CA over the top (make sure you lay something over the lathe base to protect it). After you have applied the coat spray a very light activator (aerosol that causes the CA to instantly harden). I do about 10 coats of this.
Next, use ~200 grit sandpaper and sand it until it is flat (you will see "clear" marks in the sanding if there are troughs, this means you need to keep going). Next take whatever sand series you use (I use these) and sand the coat until it is crystal clear.
What you'll end up with is a crystal clear coat that shines, and is extremely durable.
I've built a Traditions flintlock pistol and followed these videos to get my bearings on what to do. part 1 part 2. Here is a different series of videos I referenced: part 1
Your kit does not look radically different from the level of completeness from the Traditions, so give those a watch to get a sense. Remember that getting it functional is not difficult, and you can spent as much time finishing it to perfection as your patience allows. By hours, you're looking at shaping the stock to fit your separate parts.
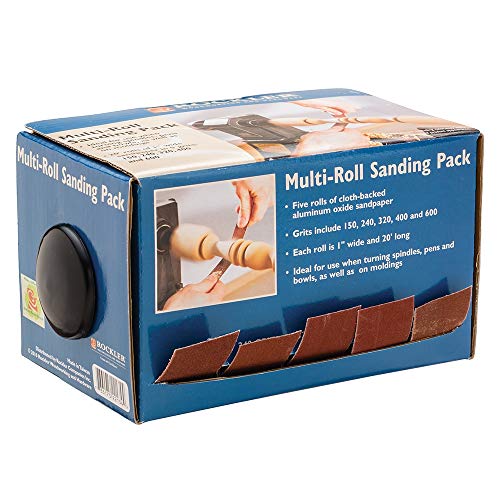
When you get sandpaper, I found a wood turning box where you rip off what you need as you go was handy.
Good luck!
Here is the mobile version of your link
You can combat this with these. I use a 600 grit that I get from a local hobby shop, then in this pack, I use the fine stick, and then the ultra fine stick. It brings back that glossy sheen.
​
Also, keep in mind that a matt top coat will hide a lot of these sanding marks.
I've seen the x-acto chisel blades recommended for nub removal. The standard diagonal ones have been a bit less effective than I'd like. Should I just bite the bullet and go with sandpaper/sticks though? And if so what should I get? There's the sanding stick set here that I've seen used, and the sandpaper set recommended on the link on this wiki's lowest grit is 1000, where I've seen starting with 400 and working your way up on nubs recommended, so should I look at a different set?
I've seen polished to a mirror using super fine sandpaper
First I'll answer your last question, no, there is nothing wrong with not painting or going all out on a model. Like you said, you have only been at this for a few months and it is always best to start small. If you keep at it, who knows, months down the road you may be making your own custom models. That being said, lets see what I can suggest for getting the best out of your model without putting a ton of time (or money) into it. The first few things I would pick up are:
http://www.amazon.com/Elmers-XZ3601-X-ACTO-Knife-Cap/dp/B005KRSWM6/ref=sr_1_4?ie=UTF8&qid=1451350392&sr=8-4&keywords=hobby+knife
http://www.amazon.com/Squadron-Products-Value-Sanding-Stick/dp/B000CDR5K8/ref=sr_1_2?ie=UTF8&qid=1451350756&sr=8-2&keywords=squadron+tri+grit
http://www.amazon.com/Uni-Pin-Fineliner-0-05mm-Black/dp/B00A7BSEKK/ref=sr_1_fkmr2_2?ie=UTF8&qid=1451351047&sr=8-2-fkmr2&keywords=uni+pin+.5+fine+liner
http://www.amazon.com/Krylon-53530-Acrylic-Interior-Exterior/dp/B001C42OXY/ref=sr_1_1?ie=UTF8&qid=1451351086&sr=8-1&keywords=flat+top+coat
The most important part is have fun with it, and do what you like.
Using a flat needle file is easier on you fingers and a lare of primer before paint will even it out. If you plan on doing a OOB using sanding sponges works just fine. Links:
Files: https://smile.amazon.com/gp/product/B00CE3L96K/ref=oh_aui_search_detailpage?ie=UTF8&psc=1
Sponges: https://smile.amazon.com/gp/product/B00MCM21P6/ref=oh_aui_search_detailpage?ie=UTF8&psc=1
5 Pack Veriety 500-4000 Grits Here
Here's the set I bought
The sanding tools I use are Squadron sanding sticks from Amazon. They are a god send. Careful sanding should be able to finish off the residual rectangles you're seeing.
TIL synthetic steel wool is a thing.
https://www.amazon.com/3M-10119NA-Synthetic-Steel-Wool/dp/B00004Z4AE
Here is an example of a "side cutter":
https://www.amazon.com/Integy-Hop-ups-Precision-Modelers-Plastic/dp/B00W4172V8/ref=sr_1_2?ie=UTF8&qid=1505567090&sr=8-2&keywords=side+cutter
Liquid glue (random sales listing I chose, unsure if cheapest):
https://www.amazon.com/Tamiya-87038-Extra-Thin-Cement/dp/B000BMYWYC/ref=sr_1_2?ie=UTF8&qid=1505567173&sr=8-2&keywords=tamiya+extra+thin+cement
Example of sanding sticks (prices will vary, more than one brand available probably):
https://www.amazon.com/Squadron-Products-Value-Sanding-Stick/dp/B000CDR5K8/ref=sr_1_4?ie=UTF8&qid=1505567224&sr=8-4&keywords=sanding+stick
I use hard Wave sticks too and love them. They sand very flat (something I liked files for) but are quite gentle on the plastic in terms of deap scratches. BUT for some reason the 800 grit is disconnected like in your link. Anyone know where else you can get it?
In terms of files I have the Tamiya basic , Tamiya fine basic , and a (hopefully) nicer plastic hobby file on order just to try. Files are nice for larger jobs like serious molding flaws (not common in Bandai kits) and the fine ones are OK for nubs but still quite rough compared to any sanding stick. Although, as you know I'm sure, files last forever and require much less effort and time to chew through plastic. I'm hoping the plastic file is the Holy grail and is a good balance. I bought a set of needle files and diamond files from harbor freight and they blow. The trash just don't grip or cut don't waste your $3.
And as a reference I own Revell, squadron , nail buff sticks, and have made my own sticks from automotive sand paper. The nail files are way too rough imo, making my own is a pain, and while the squadron sticks are nice I mainly only used the tri-grit while I used all the Revell except the roughest and are probably the best value imo. I still use the other more flexible kinds but dramatically prefer wave. Wish the 800 grit still were available.
Long post sorry. Hope it helps
Edits: spelling, phrasing, and lots of links
Sure! I am no expert, but I like my results. Here is what I did.
The whole evolution took less than 20 minutes.
I use these sanding sticks. Starting with medium then working my way up to the super finishing stick. Then I use a scrap tshirt swatch to buff.
So something like these? https://www.amazon.ca/Squadron-Products-Value-Sanding-Stick/dp/B000CDR5K8
Mirka Abralon 8A-241 Assorted Silicon Carbide Sanding/Polishing Pads, 5-Pack https://www.amazon.com/dp/B014Q3EAXO/
This is the answer. Worth every penny. These are soft pads that conform to the shape of the tubing and leave an even finish.
When I refinished my stock that was poop I just used Citristrip and then I wanted a darker wood so I used a stain conditioner then stain, followed with shellac I mixed up from Shellac.net. Lightly sanded at the beginning just to knock down a rough edge.
Another rifle got the same treatment but ended up using Linspeed for that one since it was a Yugo Mauser. Didn't like how shiny it was so for the last coat I knocked down the shine with some 0000 Synthetic Steel Wool, really happy with how that came out.
My Typical nub removal process looks like this:
It takes a bit longer, but it typically gets rid of all of the stress marks and nubs and you avoid cutting too deep. I just had to refinish my Denial Gundam because of deep cuts I made 6 months ago when I just used a knife.
yea i don't plan on painting, i might do a clear gloss or clear pearl gloss though later one. so do you think it is worth sanding still even if i don't plan on painting?
​
is there a sandpaper stick pack you recommend then? is the following link better? like i said i don't want to paint aside from the clear coat i might get later on
​
https://www.amazon.com/TAMIYA-Sanding-Sponge-Sheet-4-type/dp/B00MCM21P6/ref=sr_1_2?keywords=tamiya+sanding&qid=1564010996&s=gateway&sr=8-2
​
what grit would i start and end with in that one if you think its good?
Would this 3K-5K SiC sandpaper work for the CC4 and this 7K to 15K SiC sandpaper work for a Spyderco ceramic or maybe 2?
There are one pound rolls of copper wool available for $45 on Amazon. Not as dense as braiding, but more flexible.
Best sandpaper grit to prep parts before painting?
So I looked at a kit I snapped together some time ago, and want to paint it -- but it has some imperfections. Small nubs, etc.
What grit sandpaper/sanding sticks would I need to smooth out the surface for it to be good enough to paint. I don't care for stress marks or anything like that -- just has to end up looking nice when it's painted.
I also found this product, and wonder if the grits are fine -- https://www.amazon.com/TAMIYA-Sanding-Sponge-Sheet-4-type/dp/B00MCM21P6/
Thank you!
so im looking to start seem line removal and i have checked a few tutorials as well as the sticky, and i cant seem to figure out what types of sandpaper/ sanding sticks to get. this has good reviews on amason. do yall think thos would be fine ? Squadron Products Value Pack Sanding Stick https://www.amazon.com/dp/B000CDR5K8/ref=cm_sw_r_cp_apa_N4gpzbYNR9N5S
Need a hard backing and some way to keep your sandpaper pulled as tight as you can. I have one of these and it works pretty well but I also made sort of a hand sanding block out of some oak with some u-bolts I can tighten down. It's also important have fairly clean lines going into hand sanding.
https://www.amazon.com/dp/B01F7Y384S/ref=cm_sw_r_other_apa_i_ibuZDbZJRN3CP these are what i used
I use Amazon.
https://www.amazon.com/Mirka-Abralon-Assorted-Silicon-Polishing/dp/B014Q3PKSI/ref=sr_1_2?ie=UTF8&qid=1492278736&sr=8-2&keywords=bowling+ball+sanding+pads
I would get a sheet of plate glass and a long strip of sandpaper. Then as long as your lumber is reasonably flat to begin with it shouldn't take too much to clean up the surface/make it flat for gluing. I haven't actually done this, but I think it would be worth a try.