Best meat thermometers & timers according to redditors
We found 789 Reddit comments discussing the best meat thermometers & timers. We ranked the 167 resulting products by number of redditors who mentioned them. Here are the top 20.
We found 789 Reddit comments discussing the best meat thermometers & timers. We ranked the 167 resulting products by number of redditors who mentioned them. Here are the top 20.


Lasers are for surface temperature, for thick meat you want to be able to measure the inside. An electronic monitor with a probe that you can leave in is the best, then you don't have to keep opening your oven to check the temperature. Something like: https://smile.amazon.com/ThermoPro-TP-16-Thermometer-Stainless-Standard/dp/B017613C3C
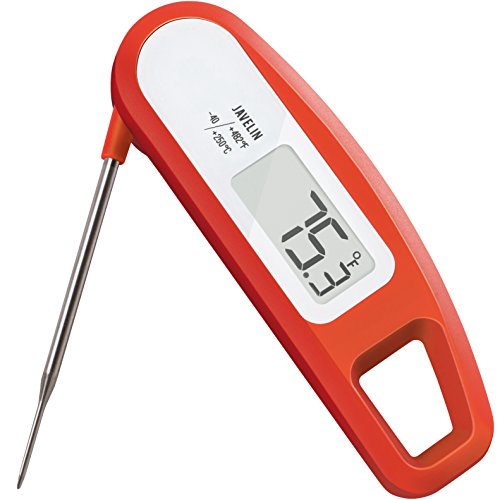
I bought a Thermapen and I love it. But back when I was living with my folks, my mom also really liked using it from time to time. For Christmas I bought her a Lavatools Javelin because it was cheaper but still looked good. I also found that I liked that thermometer as well. Plus, it has a magnetic back so it hangs out on the fridge, so I found that more often than not I was reaching for it instead.
Again, I love my thermapen, and it's absolutely worth its price, but for those balking at the cost, that $25 Javelin is a really good buy.
Some gift ideas that have gone over well in the past:
Also, here's my link to a review on here of Etsy/ArtfullyWalls/Society6 artists in case you want to shop for yourself/others with the upcoming sales.
Sir please sit down and let go of my hand, I'm here to help. That's a Thermapen by Thermoworks, it's one of the world's fastest and most reliable digital thermometers, but it comes at a price. - a cheaper option is the Thermopop, and an even cheaper option is the Lavatools Javelin - I haven't tried it myself, but the reviews on Amazon are stellar.
There are lots of other things I use daily:
etc.
But the point I guess I'm making is that you can get lots of good, cheap stuff to start with.
I've only made canna caps a few times so I'm still tweaking things but here's what I've got so far.
Ingredients:
• 1oz bud - your choice of strain.
• 8oz (1 cup) coconut oil or butter. I prefer coconut oil.
• 1.5tb soy lecithin
Directions:
Pre-heat your oven to 215° F.
Chop up your herb finely.
You can grind it but I've found it's easier to strain if chopped.
Sprinkle evenly into a small oven safe dish.
Cover well with aluminum foil, crimping up around the edges.
Place in oven for 30-45 minutes.
After 30-45 minutes, remove the dish and let it cool, WITH the foil still on. Letting it cool down slowly, allows any vapors to settle back into the material (theoretically).
Note: for the extraction process I prefer a Nesco 6-Quart Roaster Oven. I prefer this over a crock pot because it has temp control.
I used this in combination with a Digital Cooking Thermometer which comes in handy not only for more accuracy but also because you can set an alarm on it if the temp gets too high - in which case you'd just add some water to the mixture.
While you wait for the container to cool, Melt your coconut oil or butter in a pan on low heat.
Once cool, remove the foil lid from the pan and place the decarbed herb into the roaster/crock pot.
Pour enough distilled water over the herb to float it, then add the oil or butter over your herb and stir it up.
Set the temperature between 200 and 220 Fahrenheit and let cook for 12-18 hours, stirring occasionally.
Note: this step is where that digital thermometer with temperature alarm comes in particularly useful. Set it and forget it.
After 12-18 hours turn off heat and and strain the oil from the herb using a stainless steel mesh strainer, pouring the extract into a class or ceramic dish.
Note: I prefer a steel strainer but it's possible to use cheesecloth. Coffee filters do not work. Also, I don't throw away the herb. I let it dry as much as possible, grind it finely and put it in capsules also.
Place dish in refrigerator over night or until the oil or butter has hardened.
Once solid, separate oil/butter from the water, discarding the water.
Place solid extract in an oven safe dish and heat at low temp until liquid.
Once liquid, add 1.5tb of soy lecithin to the extract and stir gently until homogenized.
You now have cannabis extract ready to be used for cooking or for filling capsules.
Here are some things that I used that may help you.
1,000 Herbal Oil Capsules - Size "00"
Size 00 Capsule Holding Tray
Soy Lecithin Powder - 1 Lb
Glass Eye Droppers
Hope this helps. Happy cooking :)
Generally speaking around here the Thermoworks Thermapen (and the other Thermoworks products) is considered the gold standard. And there is no reason why it shouldn't be. It is accurate and fast. But it is also somewhat pricey. Especially for people just getting into grilling.
Personally, especially for people just getting serious about grilling, I tend to recommend the LavaTools Javelin ( https://smile.amazon.com/Lavatools-PT12-Javelin-Thermometer-Chipotle/dp/B00GRFHXVQ/ ). The price is nice and low and the performance is fairly comparable to the Thermapen. (source: http://www.brewunited.com/index.php?blogid=150 ) Note that the tester ( u/sufferingcubsfan ) thought he was testing the PRO model when in fact he was just testing the standard.
While the testing wasn't exactly vigorous or scientific journal worthy, it was enough in my book to save myself the $75 and go with the Javelin. That was @ 1.5 years ago and I haven't looked back yet. I've also given it as a gift to friends that either grill or brew beer (or both) and haven't heard a complaint yet.
yes, it does. You can use all your dowsing rods and meat-ruining techniques if you want, but an accurate thermometer will tell me that the middle of my steak is exactly 143 degrees, ready to be eaten after a small rest, with nary a puncture in the middle. That's the secret to always delivering exactly what somebody asked for, without cutting into it 3 times making sure it's an even pink throughout. Or getting a good breaded chicken breast to exactly 160, so it's not dried out but moist and flavorful, while still being thoroughly cooked.
same thing with making desserts -- you want 160 degrees to "cook" eggs when you're making custards. Much higher and they start clumping/solidifying, and you will start scalding dairy products.
Also, a good thermometer can be left in an oven with a base unit reading temperature. So, making a perfect prime rib roast is as easy as setting an alarm temperature (all the good thermometers do this), and taking it out at that point. Same thing with boiling water, if you're busy. Stick the probe in the water, set a temperature alarm of 212 degrees, and walk away. It'll beep when it's ready.
Personally, I have 4 different leave-in thermometers. don't spend a lot of money, a simple 20 dollar one from amazon will do you just fine.
This one, I think. I have it too.
http://www.amazon.com/Polder-Original-Cooking-All-In-One-Thermometer/dp/B0000CF5MT/ref=sr_1_4?ie=UTF8&qid=1367934782&sr=8-4&keywords=probe+thermometer
These thermometers read accuratley in about 1 second and also leave a very small, non leaking hole.
I'm a huge Kenji fan myself. I've cooked nearly half of the Food Lab book, and dozens of his recipes from the website, great stuff!
My thoughts on gifts
Lavatools PT12 Javelin
A Nice carbon steel wok
A good Dutch Oven
A torch for searing, or Creme Brulee
An awesome knife
Another awesome, but cheaper and well rounded knife
The list could go on, and on, and on....just some thoughts though.
I just picked up one of these bad boys. Tape one probe to the motherboard and the other to any hard drive. If you don't have tape I'm sure a magnet will do the trick. Clip the receiver onto your belt and head home.
https://www.amazon.com/gp/product/B01GE77QT0/ref=oh_aui_detailpage_o00_s00?ie=UTF8&psc=1
/s
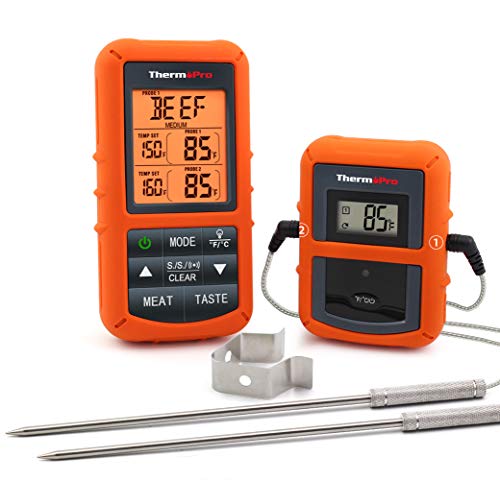
I have this one and I like it a lot. The two probes are handy and it's got a bunch of pre-set meat and doneness temps so it's easy to use for anyone who doesn't already know what temp they want their meats to be cooked to.
I'd highly recommend getting an instant read thermometer. You will never overcook a steak again. Here is the one I use. Pull your steaks off at about 130-135 degrees for medium rare.
Also, let them rest for 5-10 minutes before you cut into them. Also, salt them generously about an hour before you cook and pat off any excess moisture on the surface before you throw them on the grill. They will be a lot juicier, and you'll get a better sear on the outside this way.
The Thermapen is awesome, for sure, but I'm not entirely convinced most cooks need it when something like this can give similar results at maybe a second or two slower and fractions of degrees less accuracy for 1/3 or 1/4 of the price.
Just looked at your thermometer. That would be safe in a slow cooker and probably stay visible through the glass.
For an oven, I can't recommend getting a digital probe thermometer like this enough.
I use one literally every time I cook meat or bread in the oven or on the grill.
Yep. Not OP, but this is what I use: https://www.amazon.com/dp/B0000CF5MT
https://www.amazon.com/ThermoPro-TP20-Wireless-Meat-Thermometer/dp/B01GE77QT0/ref=sr_1_3?ie=UTF8&qid=1524846443&sr=8-3&keywords=thermopro
After a year of thinking about it I finally decided to get an in oven meat thermometer and I don't regret the purchase! Last night I tested it out by cooking a few ribeyes that I picked up on sale last week, used the reverse sear method, and I finally got a perfect med. rare steak at home!!!
Hey. This recipe is a great starting point and is very detailed: http://amazingribs.com/recipes/porknography/perfect_pulled_pork.html
Before you get started, the most important thing you need is an accurate thermometer. The best ones are any of the remote ones so that you can leave the smoker alone for long periods of time. Anything like this: https://www.amazon.com/ThermoPro-Wireless-Digital-Kitchen-Thermometer/dp/B014DAVCP4/
Otherwise you need: charcoal, charcoal chimney, wood chunks of your choice (for your smoker chunks or even small logs are better than chips).
I'll let the recipe do most of the talking but here are the basic steps:
Good luck!
If it goes to shit, remember you can always finish it in the oven! Keep that in mind if it ends up taking too long.
Get a thermometer for your meats. I use this one at home.
Stop caring about grill marks. You're not cooking on a grate. You don't need to make it look like you are.
Cut back on the oil. Commercial restaurant appliances are very different than what you're working with in a dorm.
One thing I would strongly suggest (if you haven't done so already) is going out yet today or tomorrow and obtaining a remote-probe thermometer with alarm - something like this. Try Target or Wal-Mart or BBB, or somewhere that sells a decent selection of kitchen supplies.
Secondly, consider employing a reverse-sear technique if time permits (it takes hours, but yields great results) . See this article.
Thirdly, if one of your company likes medium-well/well-done and you can't disinvite them (j/k), I agree with the slice-and-sear method mentioned by /u/AlabamaAviator.
Homebrew Materials:
Vacuum Pump Oil
Vacuum Tubing
1/4" Barb x 1/4" NPT Male Hose Fitting
1/4" Male x 1/4" Female NPT Extension Hose
Vacuum Pump
Filters
Spatulas
Magnetic Stir Bar
Digital Hotplate with Magnetic Stirrer
Nitrile Gloves (Better than Latex)
Empty Capsules (Buy Separated unless you hate your life)
Capsule Machine (If you value your sanity, buy more than a 100... I hated my life doing this)
Mohr Pipets
Pipette 10ml
Mortar and Pestle (If you're doing orals, get this... Otherwise, you're playing Russian Roulette with your doses and liver)
Funnel (For pouring into small places)
Alconox (For clean your shit)
Temperature Gun (How hot is my shit?)
Graduated Cylinder (If you measure with beakers, you're a fucking idiot... And you should consider Volumetric Flasks)
Beaker Set
1 Liter Beaker (Because brewing en'masse is better)
Scale (I have a 2kg one, too)
Calibration Weight Set
Calibration Weight 100g (Because you need two for the scale linked)
Vacuum Regulator (Unless you want to filter 9001 times due to broken shit)
Oil (Any USP grade, filtered or unfitlered)
BB
BA
Butyl Stoppers
Flip Top Seals
Crimper
Vials (Unsealed)
Autoclave (Cheaper than an oven, why are you using an oven?!)
Weight Boats (Buy a million of these. They're cheap and useful)
Did I miss something? Probably. Yes.
your heating system and temperatures are a problem. your equipment to monitor your temperature and humidity is a problem. your humidity maintenance is a problem. your log hide is a problem. your small water dish is a problem. your lid clips are a problem.
my advice is to ditch the tank and start over. it's possible to make glass tanks with screen lids work for ball pythons, but it requires a lot of modification and maintenance. many of the tricks to increase heat will decrease humidity, and it becomes this domino effect you have to balance properly or everything falls to pieces. a plastic setup is your best bet right now. plastic is a better insulator for heat, and with a tub you have 100% control over the air flow [and therefor 100% control over the humidity] because you have to drill your own air holes. here's a list of basic necessities for a low budget:
Purchased the Lavatools a couple months ago and have used it on a handful of brews since. Perfect choice for my needs. https://www.amazon.com/Lavatools-PT12-Javelin-Thermometer-Chipotle/dp/B00GRFHXVQ/ref=sr_1_20?ie=UTF8&qid=1488199480&sr=8-20&keywords=kitchen+thermometer
You should get an instant read thermometer to check for doneness so you don't have to cut into them like that.
People like this one, but I haven't used it. I use a Thermapen:
https://www.amazon.com/Lavatools-PT12-Javelin-Thermometer-Chipotle/dp/B00GRFHXVQ/ref=sr_1_1?ie=UTF8&qid=1499449239&sr=8-1-spons&keywords=instant+read+thermometer&psc=1
I actually used to do this. Now I have a digital probe thermometer that I can leave in the meat while it's cooking.
I have the Javelin by Lavatools, (amazon link) that is currently $25.99. I've had it for over a year, use it for brewing and cooking (with good sanitation practices) and haven't had an issue. Some report the hinge breaking though. Lavatools also makes a stick version for less than half the price and has the same precision.
Speed/accuracy, but cheaper alternatives are catching up quickly.
I have not used the one you linked to, but I use this guy and it is only slightly slower than a thermapen and plenty accurate. A couple years ago, thermapen was by far the fastest "instant" read thermometer. That is no longer really the case, and now they are overpriced compared to the competition.
eh, its probably a throw away. I personally use the Lava Tools Javelin, both for brewing and grilling.
https://www.amazon.com/Lavatools-PT12-Javelin-Thermometer-Chipotle/dp/B00GRFHXVQ/ref=sr_1_1?ie=UTF8&qid=1496853976&sr=8-1&keywords=lavatools+javelin
A heads up for people shopping for meat thermometers on Amazon. There's a lot with fake reviews that make them look better than they are.
Use a site like Fakespot to make sure the reviews are legit. I found this one that has honest reviews and works great.
I actually bought this yesterday haha
A great and cheaper alternative to the above mentioned thermapen is the Javelin Pro Duo. They can be had for about half the price and if you keep your eyes peeled often around $40.
Heres the deal with the weber smoker:
If you aren't filling up that top grate with 3 racks of ribs, or even filling the bottom grate there is honestly no point in using it unless you just want a fun hobby thing to do.
If you only want to do 1-2 racks of ribs, go grab a weber 22 inch kettle off craigslist. I got mine for 20 bucks.
It's ROI for charcoal use and time is very high compared to other smokers. Here are some tips that have gotten me lots of rave reviews on bbq using ONLY this smoker:
The weber is a great backyard cooker. Many people win LOTS of competitions with them. It will serve you for MANY, MANY years if maintained well.
> In addition to a Thermapen, I want to purchase...
Here, I saved you $80. That's the price of a mill on sale, so now you can get both.
I'm not OP, but I just bought a meat thermometer that goes in the oven and lets you know when your chicken is internally 165 degrees Fahrenheit by setting the temperature. You just stick it in the thickest part of the chicken. It takes out ALL the guesswork. Just cook your chicken in the oven with a little olive oil and preferred seasonings. I prefer salt, pepper, paprika, garlic salt, garlic powder (I really like garlic).
You can use it with any meats, but I prefer to eyeball my steaks. But chicken only really has one temp where it works (165) haha. This isn't the exact one I bought, but it's pretty close. You want one with a cord that will let you put it in the oven.
I purchased a ThermoPro TP-07 back in October. One the first use it was great. On the 2nd use, it stopped working but I am convinced that it is because i left the probe on the grill and it got too hot. There is a max temp allowed. I emailed the seller and told them the truth that i may have done it but i didn't realize it couldn't work that way; so they replaced the probe free of charge. I've used it numerous times since and it's been great.
https://www.amazon.com/gp/product/B014DAVCP4/ref=oh_aui_detailpage_o07_s00?ie=UTF8&psc=1
thermpro tp07
It's not the best in terms of interface, but my Maverick dual probe has worked well enough for me for 4 years now.
Here it is for $35.
I've heard good things for the thermpro TP08. Here it is for $46.
You need the Javelin Pro, it's great and very responsive. It's a non-sale price of $50 for a thermometer that has magnets built in, waterproof so it's not the end of the world if you drop it in the mash and backlit display for easier reading.
I like a dual probe thermometer (example). One probe for the meat internal temp and one for the smoke chamber temp. For the smoke chamber temperature, I just lay the probe on the grate.
An advantage of having a wireless thermometer is that you can set alarms. So if either one of the temperatures varies outside a given range, it will alert you no matter where you are around the house. That way you'll know if the smoker needs fuel, if it's caught on fire, if the meat is almost done, etc.
ThermoPro TP20
Most people use a different type of dual probe thermometer for smoking. One gets attached to the grate right next to the meat so that you can fine tune your smoker temp. The other is placed in the center of the meat for the duration of the cook.
Nice ones like this one are wireless, so you don't have to sit by the smoker and you can set alarms if the temp gets to low/high on either probe.
>making himself sick with anxiety over whether some I prepared were fully cooked (spoiler alert: they were).
I was the one who was always anxious about whether meat was fully cooked... I finally bought an instant-read meat thermometer (I previously had one of those older ones with a probe and a long cord. I never really used it because it took too long to get a reading and was awkward to use) . Now I know the precise cooking temperature. I have a note on my fridge with safe cooking temperatures for each type of meat. Nobody has gotten sick and I'm no longer stressed out about some pink in the middle of my beef or pork.
​
Edited to add: This is the thermometer that I have- https://www.amazon.com/gp/product/B01HV5AL9G/ref=oh_aui_search_detailpage?ie=UTF8&psc=1 ... $6 is a cheap price for peace of mind.
Cooker: Kingsford Barrel Grill (Not technically a smoker, but I've learned to BBQ on anything).
Time: 3 1/2 hours for whole chicken and 2 hours for wings.
Temp: 250F
Wood: Hickory
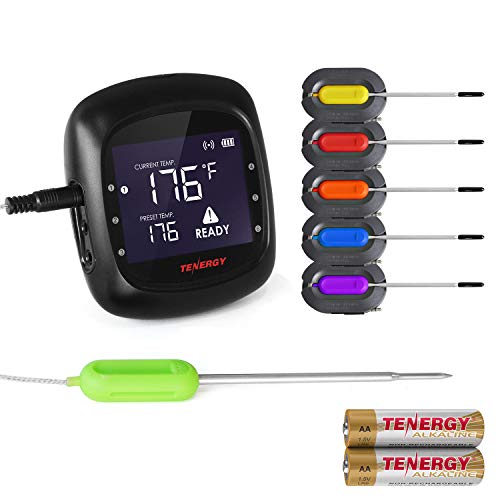
Equipment: Tenergy Solis Digital Meat Thermometer w/6 probes. This was my first time using it after I bought it and I was very impressed. Used 1 probe to read cooking chamber temp and one for the whole chicken. Worth the $54 and uses a Bluetooth app.
Edit: link to thermometer: https://www.amazon.com/dp/B077821Z4C?ref=yo_pop_ma_swf
you did mention that you went straight from the fridge to the pan. that means the meat is starting out cold in the center and will take longer to heat up. he started with a steak that had been left to warm up to room temperature.
i agree with /u/AManAPlanACanalErie that using a thermometer takes a lot of the guesswork out. if your steak isn't hitting the internal temperature that you want after searing on each side for 1.5min or whatever, you can toss into a low heat oven to finish off. i have a thermometer like this that i stick in the steak as I'm finishing the sear. If it is still below the temp I want, I throw it in the oven for a bit to finish it off, leaving the thermometer in it. You want to make sure the tip of the thermometer is in the thickest part of the meat.
You plug the headphone-jack type thing into a part that will usually have a digital display of some sort that will show you the temp of wherever you have put the spike part. You would typically put the spike in meat that is in the oven and have the digital reader part on the counter.
Here's a picture of one!
I've had this one for a year and it hasn't failed me yet. Not sure if it's quite what you're looking for, but I love it. (also, I got it because it's what Alton used a lot in earlier episodes)
http://www.amazon.com/Polder-Original-Cooking-Timer-Thermometer/dp/B0000CF5MT
thermapens are great if you use them all the time, but expensive if you're only using it once in a while. Seriously a $15 digital probe like this one should be just fine for cooking steaks.
Agreed with the other parts of the comment though. I prefer stovetop to oven, but you can do it all stove top if your pans aren't ovenproof. Just turn down the heat a bit when you flip it and pull your steaks off the heat ~5-10 before your desired doneness temp (10 if you're going to tent it with foil)
The major advantage of the oven method (IMO) is the decrease in smoke and it's much more forgiving time wise.
Also, you might try the frozen steak method which is pretty forgiving.
Okay, so a while ago I said I was going to make a gummy bear tutorial and I never did so I thought it was about time I at least made a write up for them. This recipe will get you right around 200 gummy bears.
Tools:
Ingredients:
Decarbing
Pre-heat your oven to 250F - 260F, use the digital theremometer to keep an eye on the temp to make sure it stays around there and does not get above 260F. I like to place my concentrates into the small pyrex dish and decarb in that. Put the dish with your concentrates in the oven for 30 minutes. You can check it around the 30 minute mark and see if it is fully decarbed. Look for it to be pretty clear of all little "carbination" like bubbles. When those are mostly gone you are done decarbing. It will take around 30 minutes. Go a little longer if you want couch lock / sleepy time gummies.
When it is done decarbing pull it out and set it to the side for a minute.
Infusing the coconut oil
Grab your medium sized pot and put a few inches of water in it. get it to a boil then turn the temp all the way down to a very low heat. When the water is ready place your dish with the freshly decarbed oil into the water bath and add the 1 Tbsp of coconut oil to the dish.
Let the two mix for a few minutes until they are nicely combined. It shouldn't take long maybe 10 minutes max.
Grease your molds
At this point if you dont have silicone molds (I do and I still grease mine for precautions) grease your molds so you don't forget to do it before adding your gummies.
Preping fruit juice (or water)
In the second small pyrex dish pour your real fruit juice / water or whatever base liquid you are using for your gummies. I havent tried much besides fruit juice and water but you can experiment with other liquids, but don't do an experiment on a batch with THC in it just in case something doesn't work out.
To the fruit juice / water add 1 tsp of soy lecthin and stir with the fork. Place the dish in the fridge for 5 minutes or so and stir again. Let it sit in the fridge stirring occasionaly until the soy lecthin is fully desolved.
This liquid mixture NEEDS TO BE COLD for the blooming process to work so make sure to keep it cold.
Mixing the dry ingredients
In your small non-stick pot mix the following together: 85 grams of Jello, 5 Tbsp of Gelatin, 1/4 cup of sugar. Completely mix them all together and dont let any of them get wet yet. Stir and stir until they are completely mixed.
Blooming
Take your mixed dry ingredients and pour in your friut juice (water) soy lecthin mixture. Stir it and get everything evenly mixed and make sure there are no lumps. When everything is evenly mixed place the lid on the small pot and let it sit for 10 minutes.
This is called "blooming" the gelatin and allows the gelatin to absorbe the water. The water needs to be cold because gelatin activates at about 120F and after that will start to set when it cools. We don't want it setting right now.
Since I have a set meal plan, I cook most of my food on Sunday evenings to eat for lunch and dinner throughout the week. I usually bake four chicken breasts at a time. Been doing it a while now, and I've gotten really, really good at it.
Here's how you do it:
Additional Notes:
TL;DR -- Buy one of THESE. You're welcome.
Edit: Formatting
If you absolutely have to stay under $50 then go with this..
http://www.amazon.com/Maverick-Remote-Smoker-Thermometer-ET-73/dp/B0000DIU49
If you want to spend a little more get this one...
http://www.amazon.com/dp/B00FM8DJHQ?psc=1
I own that first one and i've never had any problems with it. It's the older model (that's why it's cheaper) but the thing has been rock solid for me. You cant go wrong with Maverick. They're commonly recommended for a reason.
Whatever you choose make sure it's a wireless one. I can sit my ass on the couch and watch the game and know exactly what's going on outside. It's great!
Now that I do BIAB, I would highly recommend everyone starts at BIAB over extract, personally. It's not much harder, and requires barely any extra equipment, if any. And you get much more control when you want it.
Well, where do you plan to brew? Can you do an outdoor propane burner for 5 gallon batches, or are you limited to your stove? If you have to stick to the stove, I think you can really only do 2.5 gallon batches.
I personally do 5 gallon batches on a propane burner, so I can give you a rundown of what I use, at minimum:
Boil Kettle: 10 gallon minimum. I have an 8 gallon, get 10 or bigger
Propane burner (like a turkey fryer)
Propane tank
Thermometer, digital prefered. I have the Javelin
Stainless steel spoon or mash paddle
6.5 Gallon Glass Carboy, but you can start fermenting in buckets
Bottling bucket
Auto siphon
bottling wand (spring tip recommended)
Wing capper to start, bottle capper if you keep brewing
Bottles and bottle caps
StarSan sanitizer
PBW cleaner
Hydrometer w/ test tube
Other: hose for siphon/bottling wand, airlock, funnel,
https://www.amazon.com/Lavatools-PT12-Javelin-Thermometer-Chipotle/dp/B00GRFHXVQ
I like this one. Gets the temp fast and not as expensive as the Thermapen. I checked it in ice water and boiling water when I got it and it was accurate.
I agree. I have this one and love it.
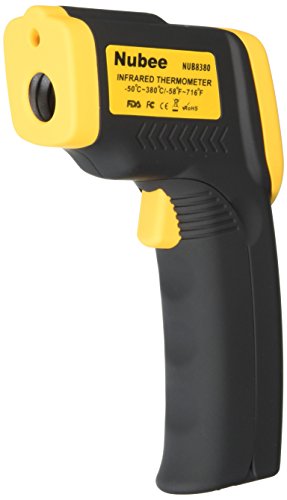
An infrared thermometer, closely-followed by a Polder probe.
Take the guesswork out of cooking, and use these so that you aren't afraid to apply heat!
Sorry for another essay, but I'm trying to help you out so you avoid spending money twice.
10 gallon batches offer a number of unique challenges, outside of the obvious need for larger equipment.
Firstly, you don't need to buy Blichmann to make quality brew. It certainly is high quality, and I would venture to say it is top-of-the-line when it comes to brewing equipment. However, a kettle is a kettle, is a kettle. There's no reason to spend $400 on a 15G kettle, when you can get one off Amazon for $150.
In addition, for the brew kettle you don't really need a thermometer and a sight glass. You'll find lots of fancy expensive kettles with extra bells and whistles, but more expensive doesn't mean better. Typically you'll find these options:
Sight Glass: Let's you see the volume of water/wort in the kettle, the Blichmann boilermakers have markings so you can get a good idea just from looking on the side. It's a nice to have, but not really necessary if you measure properly. If you really want one, you can install one onto a vanilla kettle by purchasing a kit from Bobby @ brewhardware.com - still cheaper than a boilermaker. You can also just mark up a piece of wood, or a mash paddle, then use it as a dip tube to get your volumes.
Thermometer: This is nice to have on a mash tun, if you are mashing in a kettle. I wouldn't recommend it, however, as the thermometers are all analog and don't react quite as quickly. You are typically going to want to double check your readings with a digital thermometer like a thermapen, or something like this. Especially when it comes to a boil kettle - the only thing you're doing in it is boiling. You don't need a thermometer to tell you when your wort is boiling.
Ball Valve: With 5 gallon batches, this is optional. With 10G+ batches, this is more of a necessity in my opinion. Water/wort weighs 8-10# per gallon. When you are working with a 10G batch, you are looking at lugging around 85-100# of liquid at any given time. You don't want to be lifting 90# of boiling hot wort, unless you're itchin to send yourself to the hospital.
This leads me to the challenges I referenced... It's a little harder to move 10G of water/wort around than it is to move 5. Lots of folks with 10G systems use some kind of brew stand, or a system of pumps and hoses to pump water and wort from vessel to vessel. (Good) pumps, either March or Chugger, are about $125/each. You can buy pre-fab brewstands from morebeer.com but that would put you out of your $2-$3k budget. I think their cheapest 10G system is $2,900 - and that's without kegging equipment. You don't need all that, but if you're brewing alone you're going to run into some problems just lifting, dumping, transferring etc...
Then you have to look at the mash tun. The systems you linked, if you'll notice, are using kettles as mash tuns. That's all well and good because it's certainly easier to find a 15G kettle than it is to find a 15G cylindrical cooler (they don't exist, as far as I'm aware). The problem with that is temperature control. For the mash, you want to keep it at a specific temperature - within a degree or two - for an hour. A kettle is not inherently insulated, so you'll need to do something to maintain temperatures. Not that this will be hard, you can do something as simple as throwing a blanket over the kettle during the mash, but it's just an additional challenge. It would be better if you have some kind of regulated temperature control, like a RIMS or HERMS, but that offers a whole other level of complexity.
Your other option, which doesn't really fit into your "no-DIY" requirements, would be to build a mash tun. If you want to make 10G batches, the highest OG you can probably go with a 10G mash tun is about 1.060 according to this chart. The OG of that recipe you linked is 1.090 - there's no way that grain bill would fit in a 10G mash tun. You would need a 15-20G mash tun to do this. So I mentioned the issues with using a kettle already. Your alternative is using a cooler, but as far as I'm aware, no one sells a pre-made 15-20G cooler mash tun. You'll have to build one using a rectangular cooler, and then building a copper or CPVC manifold, or using stainless steel braiding.
> How do I learn heat levels?
You can't trust the heat settings on your stove, as they can vary alot among different models. For example, 5 on my stove is a little cooler than what most would consider "medium heat".
You have to play it by ear and adjust. Practice something simple like just dicing and sauteing an onion. Watch how it reacts to different levels of heat. Don't even worry about the final product, just throw it away when you're done. Onions are cheap, and if you're learning from it then it's not a waste of food. Pay attention to the moisture levels in the pan, which is one of the key things you need to control as a cook.
> Does it really matter what size a pan is?
Sometimes. The pan should be big enough to comfortably hold all the food you're cooking, and also the right shape for the job. More surface area = more evaporation. I once messed up a Filipino adobo by using a dutch oven instead of a regular saute pan (the liquid couldn't evaporate fast enough and it tasted gross until I removed all the meat and reduced the sauce down—definitely wasn't as tasty as it could have been).
> Another thing is storing and taste. Lets say I make fries, how should I keep them from being soggy the next day?
Fries are just never going to be as good the next day, but it's mostly how you reheat things that matters. You could bake em in the oven and they'd retain at least some crispiness. Most important thing in food storage is to keep things out of the "danger zone" (40°F-140°F) for any longer than necessary—especially if the food is low-salt and low-acid (like homemade stock). Almost everything can safely be covered in plastic film and refrigerated for up to a week, or frozen for many months. Tight wrapping/tightly lidded tupperware will prevent weird flavors from seeping in/out of your leftovers.
As far as which hardware you need, I'd suggest the following, which should allow you to make basically anything:
> I could learn some healthy stuff
Buy veggie, steam it. Buy meat, sear it on high til the outside is brown, then bake it until your thermom says it's done. If you wanna get real fance, make a pan sauce. I can have this weeknight dinner cooked, eaten and cleaned up in under an hour.
You really need an infrared temperature gun for just this reason. This would detect surface temperature. It's a snake owner staple.
Edit: this is the one I have, and it works great
Get one of these: http://smile.amazon.com/gp/product/B00CVHIJDK/ref=oh_aui_detailpage_o02_s00?ie=UTF8&psc=1
I think I actually paid $12 a couple of weeks ago.
Wait, Home Depot sells homebrewing specific items? Awesome! And congrats on the first brew, looks great. Welcome to the addiction!
Edit: for the thermometer, I highly recommend a Javelin or Javelin Pro. Great thermometer and significantly cheaper than the competition. You'll find other folks on here singing their praises as well. I love mine.
Charcoal grilling is great! The only additional purchase I would make is for a chimney starter, if you haven't already. Weber makes a great one that will last you a while and is like $15. You can use newspapers, balled up paper towels, or the little chimney lighter cubes to start the chimney, whichever is easiest for you. I like the cubes, they're very consistent and easy.
This article from Serious Eats talks about several different two zone charcoal setups. They're all fairly basic, but they are good to know.
When you purchase charcoal, don't buy any of the stuff with the lighter fluid on it. And don't add lighter fluid. If you get the chimney starter right you'll never need it. It imparts a yucky chemical flavor in the meat. I prefer briquettes. They are more consistent for me and they are much cheaper where I live. Lots of people love lump charcoal but it's a lot harder for a beginner I think.
Learn where your grill vents are. They're much more important to charcoal grilling since they are how you control the heat.
These are all great resources that have been posted. Read through them and keep coming back here! This is a great community.
Edit: If you don't already have an instant read thermometer, you should definitely buy one. It's one of my most used tools in the kitchen and on the grill. There are a ton out there. I've had the Lavatools Javelin for a while now and love it. It reads the temp quickly, it isn't crazy expensive, and it looks nice. It really stepped up what I was pulling off the grill.
I have this one.. which works very well and is 1/6th the cost of a thermapen.
https://www.amazon.com/Lavatools-Javelin-Digital-Thermometer-Chipotle/dp/B00NMQGAT4
This one meets all your requirements, it is the one I use and love!
Get a "Brew in a bag" bag, if you want to do BIAB. They're resilient and worth the extra money. You won't find them on Amazon.
If you want to start going to all grain you can buy a large Coleman / Igloo cooler (60 quart is what I use, can do up to 10 gallon batches). Ball valve and fittings, some pipe tape too. Don't forget a pulley to help get the bag out of the cooler!
You can get a flask, stir bar, and everything else you need to start making yeast starters.
Grab a large spoon and/or a flask wisk to help mashing.
Amazon also sells immersion chillers to help with the post boil. I bought mine for $50 and I think it's the 25' one. Works like a charm for 5 gallon batches.
Get a good pair of insulated gloves for your brew day!
Amazon also sells thermometers to help track mash temperatures. I have this one and this one. They're both great. An IR thermometer is great to have for yeast starters too...but definitely not needed. Would put that at the bottom of my purchase list.
Oh! A sterile siphon is also awesome. Bought that from Amazon too.
And so I don't keep rambling, Homebrewfinds as a good list of filler stuff from Amazon. Things like campden tablets, hop bags, pieces to make hop spiders....etc. http://www.homebrewfinds.com/homebrewing-related-amazon-fillers
Buy a good instant read thermometer like this and cook everything until it's 170 degrees and you'll kill virtually everything that could ever make you sick. Many things can be cooked below 170 and still be very safe and more delicious, the FDA has your back on cookng tempatures.
I have this one. Pretty inexpensive and no problems yet! https://www.amazon.com/dp/B014DAVCP4/ref=cm_sw_r_cp_apa_Vz7jzbA4YPXEK
A tad over 8# shoulder. Rubbed down with horseradish mustard, pepper, and garlic. Lightly injected with cajun butter.
Put it on about 8:30 p.m. at 225°, with apple juice in the water bath. Did two rounds of smoke with Pecan chips, then let it go all night. Set the alarm for 200°.
Woke up to the alarm about 8:45 the next morning. Pulled it, and let it rest for about an hour and a half in foil. Pulled apart like a dream, and was moist throughout.
I found the MES30 local on CL for $80, missing nothing, without even a full season on the inside. I am a fire fan, but a man can get used to set it and forget it.
I'll go ahead and point out that for less than the price of a bag of beans you can buy a decent digital thermometer.
The one I use is $7
the thermapen is fantastic if you have 100 bucks to spare. nist certified and delightful to use.
after my thermapen broke i bought this and it's about 80-90% as good for 1/4 the price https://www.amazon.com/Lavatools-PT12-Javelin-Digital-Thermometer/dp/B00OXHQL3Q/
Of course! Happy to help! Definitely recommend an instant read thermometer as well (I have this one: https://www.amazon.com/gp/product/B00OXHQL3Q/ref=oh_aui_search_detailpage?ie=UTF8&psc=1)
I typically remove the chicken at about 160f because meat will actually continue cooking after you remove it from the oven, so you'll get up to 165f by just letting it rest for 5-10 minutes after taking it out.
Here is a decent one with a 10% coupon that puts it just above your limit.
ThermoPro TP-07 Wireless Remote Digital Cooking Turkey Food Meat Thermometer for Grilling Oven Kitchen Smoker BBQ Grill Thermometer with Probe, 300 Feet Range https://www.amazon.com/dp/B014DAVCP4/ref=cm_sw_r_cp_api_i_AwhyCbB0D19T7
https://www.amazon.com/gp/product/B014DAVCP4/ref=oh_aui_detailpage_o02_s00?ie=UTF8&psc=1
Pretty cheap right now, excellent thermometer. You can hook it on a handle and go in the house and see live updates in temp.
Not sure what you consider affordable, but the ThermoPro TP07 has great reviews on Amazon, is only $35, and Amazing Ribs gave it a silver medal, saying the only negative was that it didn't announce when it lost signal.
If I didn't already have one I received as a gift, that's definitely what I would buy.
I’m about to buy a thermopro tp08. Friend has one, works great. It’s just Bluetooth though.
https://www.amazon.com/ThermoPro-TP-08-Wireless-Thermometer-Grilling/dp/B014DAVHSQ
I have this and it has served me well. Does what I need it to do without spending crazy money. The more important thing to have though is an instant read probe like this.
I gave up my other grills for a weber kettle and have been happy with the choice ever since.
For slow cooks, look up the snake method. It's fantastic for things like a pork butt for holding a lower temp for hours. I picked up two things that made it much easier for me do the cook without as much stress.
The first is a Thermapro 2 probe wireless thermometer so I can monitor the grill temp and the meat temp. So i can basically ignore the grill while it smokes the meat and enjoy my company instead of focusing on the grill.
The second is Tip Top airflow regulator. This sits on top of the exhaust and uses a temperature sensitive coil to open and close the vent to help control airflow. Takes a little practice to get used to, but when you do, it really helps with my temp stability.
(Those should not be affiliate links but I wouldn't know one if I saw one)
250 is way too high. I guess you got it from ribs/brisket smoking recipes, but sausages are not supposed to be smoked under higher than 170F-175F temperatures. You are right that you cook the fat off. It will give you dry sausage without nice glossy surface. Get a meat thermometer to make sure that you won't overcook your sausage. 155 internal should be OK. I invested $50 recently in these guys. Very convenient. You can monitor both temp of your smoker and internal. Highly recommend.
Got a link? I've gone through a ton of cheap instant read thermometers so I was considering pulling the trigger on a Thermapen.
Right now I'm pretty happy with this ThermoPro dual probe though.
I can't speak to this particular product, but I use their wireless thermometer all the time for smoking meats. It's a great product that works really well, and I would hazard a guess to say that this thermometer would be great, too.
This is what I have from them: https://www.amazon.com/gp/product/B014DAVHSQ/ref=oh_aui_search_detailpage?ie=UTF8&psc=1
Yes it is! Im using the one that came with the smoker. I am also using this one. It works pretty well and has an alarm that lets you know when the meat is at the temp you set it to alarm you at. I found that only having one meat thermometer was only good for me if I was only smoking one thing at a time, but I quickly realized that if I have the smoker out I might as well do more than one thing.
Yes, the amount of coal you add is the determining factor. You might want to buy a [digital thermometer] (https://www.amazon.com/ThermoPro-Digital-Cooking-Thermometer-Stainless/dp/B017613C3C/ref=sr_1_14?ie=UTF8&qid=1491328348&sr=8-14&keywords=BBQ+thermometer) to monitor the temperature.
Masterbuilt 20071117 30" Digital Electric Smoker https://www.amazon.com/dp/B01JGF97D0/ref=cm_sw_r_cp_api_fNe8ybZJZSQ2M
That's the one I have, got on sales for $170.
ThermoPro TP16 Large LCD Digital Cooking Kitchen Food Meat Thermometer for BBQ Oven Smoker Built-in Clock Timer with Stainless Steel Probe https://www.amazon.com/dp/B017613C3C/ref=cm_sw_r_cp_api_ZQe8yb6JGYF04
Also get a digital remote thermometer with a temperature alarm. Just set it to the ideal temp and wait for the beep.
Pork butts/shoulders are super forgiving to start out. Anything pork is pretty easy. Also poultry is pretty easy as it doesn't benefit from a slow cook (pro-tip: brine). I've smoked a turkey for the last three years and they are amazing!!!
Happy to answer any questions if you decide to invest.
It doesn't sound like a likely scenario, but if you have access to a oven thermometer like this I'd be curious if it's always 100 degrees under. An over will rarely sit at the right temperature and instead fluctuates to hit an average temperature. Again, 100 degrees is a pretty huge dip so I don't think that's the case, but might be worth checking.
I've made Alton Brown's roast turkey recipe every year for five years running, no regrets! It comes out amazingly flavorful and moist!
Don't forget a quality probe thermometer either if you don't already have one! It WILL make or break a good turkey - don't rely on those silly plastic pop-up things that come with them!
Get a digital meat thermometer, makes a huge difference in how easy it is to monitor internal temperature.
https://www.amazon.com/gp/product/B017613C3C/ref=oh_aui_detailpage_o00_s00?ie=UTF8&psc=1
https://www.amazon.com/Lavatools-Javelin-Ambidextrous-Thermometer-Chipotle/dp/B01F59K0KA
I love my Lavatools Javelin Pro Duo.
https://www.amazon.com/Lavatools-Javelin-Ambidextrous-Thermometer-Chipotle/dp/B01F59K0KA/ref=sr_1_2_sspa?s=home-garden&ie=UTF8&qid=1543507488&sr=1-2-spons&keywords=lavatools+javelin&psc=1
Do you have a good thermometer system? If not, you need to get one.
I did and it changed the way I smoke and dramatically changed the way I grill. No more guesswork and I have a remote sensor which is great.
The results with this new method on the grill are astounding!
I can't recommend this enough.
this is what i have
I bought the ThermoPro. I really like it. Sadly the probe clip that comes with it is pure nonsense, so I had to order a different one from Amazon but that's a small price.
https://www.amazon.com/ThermoPro-Wireless-Digital-Cooking-Thermometer/dp/B01GE77QT0
I used an electric smoker until the heating element burnt out. You can smoke good meat on it but I definitely prefer my charcoal smoker with wood chunks. Find a decent quality lump charcoal to use. I order fogo from Amazon but it is a bit pricey, avoid the cowboy brand... It is the only lump charcoal I've thrown away for bad flavor. This is a good resource for lump charcoal reviews, even if the web site looks like it is from 1992.
Get some decent temperature probes, one you can put on a small clip and attach to your grill and another to get internal temp of meat. Something like this.
A cheap boning knife like this is great for trimming meat. If you plan on doing brisket I'd consider it a necessity for fat trimming.
Get kosher salt and use it liberally on your meats. I usually try to rub everything a day before I cook it with salt, like a dry brine. If not a day at least a few hours.
Use hickory or oak to start out. They are really good for all around smoking and have great flavor.
An electric charcoal starter is also handy if you are going to cook frequently.
Franklin's YouTube channel is a great resource for smoking.
I think amazingribs.com is a good resource for when you are looking to cook a meat you've never cooked before.
Unfortunately, no. If you’re completely new to developing and haven’t yet done black and white, there’s a bit of an initial expense. I’m going to just list off everything I use for developing. It’s actually pretty compact, I’ve thrown it all in my car on impulse and developed C41 at friends’ houses a few times. I store it all in a small cooler which I also fill with water while developing. Since the developer needs to be 102°F with moderated precision for the duration of the developing time, it helps to have a larger body of water that won’t lose temperature as quickly. So first step for me is to fill this cooler slightly upwards of 102° to put the tank in while I’m not agitating. If you’ve got a cooler, great; if not:
---
---
I think that’s about it! You can definitely go cheaper if you look around. The one thing I wouldn’t cheap out on though is the tank/reels. I started with a really cheap stainless steel setup. My reels came pretty bent up and took ages to load, like half an hour at times. I’d often have film stick to itself. I tried C41 with it one time and got blix everywhere, plus it was leaking in the cooler underwater. Everyone says Patterson is the way to go, and I haven’t tried much else but it’s served me well.
This is the one I use: https://www.amazon.com/dp/B075L7V6NZ/ref=cm_sw_r_cp_apa_i_v1-6CbA0ZJVD9
If you have two, why don't you do one as a perfect standing rib roast and play with the second one?
I'll get to the playful ideas for the second hunk of meat later.
Part One - an instructional on making prime rib:
Keep in mind, for some of my less essential estimations, I'm totally guessing. Just use your brain.
My procedure was born from the standing rib roast episode of Good Eats. I couldn't find the whole episode for you online, but [here's a clip from it] (http://www.foodnetwork.com/recipes/alton-brown/dry-aged-standing-rib-roast-with-sage-jus-recipe/standing-rib-roast.html) in case you're interested.
Basically, the trick is to take your time with it. This method is foolproof if you're patient and if you give your meat a day to hang out in a salt and pepper rub-down, a couple hours to get to room temperature, and a chunk of time to roast in a very low oven.
Why a low oven if you can reach medium rare in less time with a hot oven? Because a low oven will help keep the whole mass of the meat at roughly the same temperature while it cooks. The thermal assault of a hot oven would decimate the roast's outer inches before beginning to cook the raw center. Look at [one] (http://www.heroacres.com/heroacres/PrimeRib.jpg) and [two] (http://literalminded.files.wordpress.com/2012/09/prime_rib.jpg).
As for special equipment, you'll need [something like this] (http://www.amazon.com/Taylor-1470-Digital-Cooking-Thermometer/dp/B00004XSC5/ref=sr_1_1?s=home-garden&ie=UTF8&qid=1411674292&sr=1-1&keywords=digital+thermometer+probe). Don't rely on interrupting the cooking and sticking it every 20 minutes once it gets close. This isn't a horror movie. The less you stab it, the less blood, the better.
So here's how it'll go:
A day or two before your dinner (I prefer two), season the meat.
Rub the meat (giggity) with salt, pepper, and whatever else you want. I like garlic and mustard powder. Classic flavor combos exist for a reason. Wrap it in saran and toss it in the fridge to let that salty/savory crust develop. The seasoning needs to support the otherwise monotonous roast, so don't miss this opportunity as step 1 to getting an A+ crust on there.
When you wake up the day of your prime rib dinner, take it out of the fridge. Let the roast come to room temperature (about 2 hrs), rub it with a mix of non-extra-virgin olive oil and some good mustard. This'll help that crust we've been talking about.
Insert the meat thermometer at center-mass. Set the device to alert you at your desired temperature. Count on about degrees of carryover cooking once it's out of the oven. I set mine last time to 127 I think. Put it in your favorite ovenware, cover it with foil to aid even-heating, and put it in a cold oven. Set that oven to 200 degrees, or 250 if you're feeling pressed for time.
Once it beeps, let it sit on the counter. You'll notice there isn't much juice for gravy. That's cause being gentle kept the proteins intact and the juices inside. Fear not, gravy and Yorkshire Pudding lovers-- juices will flow soon. When you're an hour away from dinner, crank your oven to 500. Turn it on convection mode if you have it.
Once it's up to temp, stick the roast in and keep your eye on it. It helps if your window is clean, cause opening and closing will partially reset the searing process (you want to leave the inside at perfectly medium rare). Start checking after 5 minutes, then every 2. Once you get that golden-brown/brown, you're there. Pull it. Let it rest for another 15-20. Enjoy.
Part Two - playing with your meat:
Lots of cool ideas on this thread already. This will speak to some of that.
If you wanted to go the Korean bbq or Philly Cheesesteak route, a nice trick is to partially freeze the roast so that your knife can slice it thinly. It's a restaurant trick for carpaccio, but it's super-useful here. Then have fun on YouTube and Google, weigh the pro's and con's of all your options, and learn how to make the most kickass cheesesteak possible. Then tell me about it. Or don't. Not like I've told youanything about food.
The other obvious route is to make steaks. If you wanna make that a project, try dry-aging the roast in your fridge and cutting steaks out of that. I love dry-aging my own beef. If you have a beer fridge in the garage or basement like I do, it's a pretty damn easy task. Just put it on a non-reactive rack and let it sit in the open air.
I have no idea if it helps, but I generously sprinkle salt under the rack to make sure any excess moisture is being sucked out of the air instead of feeding mold.
It'll smell a little beefy and maybe a little funky, but that's fine. Trim the crusty edges and treat them like normal steaks. Be careful, cause their reduced water content (flavor dilution, as dry-aging aficionados know it) make them cook faster.
Have fun!
Learn how to cut up a chicken. This saves you tons of money, I bought a whole chicken for $4 last weekend, enough for 3 meals for my wife and I.
here is a really good short how-to.
Get a good digital thermometer, preferably one of the ones with a probe that can go in the oven. A lot of recipes tell you to cook until "done" or the internal temperature reads something. A good thermometer will help keep you from over or undercooking things, especially meats. This is a decent one.
I completely agree with this. I only had my machine about a month before I went to the Auber PID. Early on I attached a multimeter thermocouple to the base of the boiler to get an idea of what the temps were doing near the grouphead.
The PID is great because you get a live temp reading in the well on top of the boiler and it changes instantly. Since the PID, I added a grill thermometer to take a temp reading on the top of the grouphead. The thermometer has an alarm I can set so I know when the machine is up to temp. It also has a stopwatch so I can time my shots and everything is on the screen at once. I did a ton of searching to find a thermometer with all of these functions displaying at once and in a small size. Definitely recommend it.
You're welcome. It's definitely one of the easiest ways to cook a perfect steak if your new to it. It's hard to go wrong, unlike if you were cooking solely on a grill/in a pan.
The two most important things to remember here are cook on a rack like this, not flat on a cooking sheet.
And use a meat thermometer like this one. Don't just guess at the temperature.
Strange. That's exactly how mine behaved when it got wet. If it were me, I'd throw it in the oven just to satisfy my curiosity. Also, are you sure the part that plugs into the base isn't getting wet? Mine has a huge warning about that, but I haven't personally experienced what happens when it gets wet.
Anyway, if you continue to have problems, you might try this thermometer. It's cheap, but mine has held up through 18 batches and survived a drop into my sparge water despite not being labeled as waterproof.
> Fresh meat is better than the discounted stuff near its pull date.
Dry aging.
But a probe meat thermometer meant to stick into the oven is a worthy investment for roasts, especially.
https://www.amazon.com/dp/B0000CF5MT/
I think this is the same probe as the other poster suggested. Works great for me. Sometimes I will wrap the wire around the kettle handle once or twice to keep in somewhere in the middle of the wort. You can set alarms when you hit temps so it keeps me from constantly staring at the wort like watching paint dry.
This is the one I have.
http://www.amazon.com/dp/B0000CF5MT/
Heh.. Indeed, you can buy any level of quality / price / technology in a probe thermometer, the above referenced example, I'd place on the high-end of the scale. I own, and use 2 remote probe thermometers (with alarms) and have gone through a few others in the previous years. This Polder model ( http://www.amazon.com/Polder-Original-Cooking-Timer-Thermometer/dp/B0000CF5MT/ref=sr_1_4?ie=UTF8&qid=1450201255&sr=8-4&keywords=remote+probe+thermometer) can be found at local mega-marts usually, or another brand of roughly the same quality for ~$20. The Amazon sellers have them as cheap as $14 or $15. They're fairly cheap, very convenient, and typically accurate within a degree or two. (I have a Nanmac factory calibrated type C thermocouple, on a eurotherm 2704 3 loop PID controller to reference with..) /u/Blog_Pope has a very practical solution to "police" your Anova, that will alert you if there's indeed a problem... Its just that theres considerably cheaper probe thermometers than he linked to.
Plus, they're great to have around for any other cooking you may be doing.. Say butt-can chicken on the grill, or Thanksgiving Turkey, or Christmas Ham, or Tuesday night Meatloaf... Having a constant temp reading on what your protein is doing in the cooking environment, can help you avoid dry, over-done meat. Set the temp alarm for a little under your target temp, and you dont have to worry about it until the beeps! :-)
For a beginner who wants his steak cooked right, a thermometer is a must. A thermometer will not ruin the steak. Especially if you use a probe thermometer and put it in the steak before cooking. Those hand and face tricks are bullshit.
https://www.amazon.com/gp/aw/d/B0000CF5MT/ref=psdcmw_289812_t1_B000P6FLOY
Got a shipment in from amazon containing a long spoon, a Fridge thermometer, and a pen thermometer. All stuff ive kinda just needed and never got yet.
Also, I have a Chocolate milk stout sitting in secondary, stuck, not hitting my desired FG. It was stuck in primary (2 weeks), so I reracked it hoping to move it along, and here we are. Not sure what to do about it next :/
OG: 1.056
Current Gravity: 1.041
I have this one. It's pretty quick.
Get an IR Thermometer so you can measure the surface temperature. The surface temperature can sometimes be surprisingly higher than the ambient air temperature.
I have an Oneida digital thermometer that I find indispensable, both for keeping tabs on the water temp for my yeast starter, as well as taking a final must temp reading, etc.
As much as I like it, i'm kinda dying to try out one of these bad boys.
I'd do it like this for 100ml
10g test 20g tren 20g mast
Displaced fluid: 9.43 + 18.18 + 15 (used .75 for mast displacement via google)
2ml BA
16 ml bb
60.61 ml from above
I'd make the rest like this
(39.39ml)80% EO + (39.39)20% oil if it doesn't mix completely
80% EO + 3-6% guaiacol (start with 3 add more if needed) + rest oil
Feel free to tell me if I'm wrong about anything cause I'm learning still :)
Also if you plan on using heat I'd get one of these to keep it Gucci for tren
Nubee Temperature Gun Non-contact Digital Laser Infrared IR Thermometer https://www.amazon.com/dp/B00CVHIJDK/ref=cm_sw_r_cp_api_SWlfzb838KAS7
something like this
This is why I got one of these
Chamber and pump - $235
Glass extract tube that holds 60 grams - $40 A larger tube may be necessary, I don't know how big your pants are but Amazon has tons of different sizes to choose from.
25 micron Mean Screenz - $20
Thermometer gun - $17
PTFE sheet to blast onto - $20
I use these rubber gaskets to attach my screens on and tighten a hose clamp over the gasket - $15 So the order will be glass tube, screen, gasket, hose clamp.
Presto griddle - $23
This gives you a total of $370 with plenty room for shipping, butane, and anything else you may need.
I have a different redi chek and the range is huge I think it is like 100m (300ft), way more than I ever need. I have the smoker on the back deck and keep the receiver with me in the basement on the other side of the house and rarely lose signal
This is what I have (I only paid $60 for mine)
But it looks like there is a new version out HERE
I have the Lavatools Javelin. Absolutely no complaints a year in.
https://www.amazon.com/Lavatools-Javelin-Digital-Thermometer-Chipotle/dp/B00GRFHXVQ
https://www.amazon.com/Lavatools-PT12-Javelin-Thermometer-Chipotle/dp/B00GRFHXVQ
Ive got these but it looks like they're not on amazon anymore. I think most well rated quick read thermometers should be just fine though. I'm not a huge fan of the fork style, they don't seem as quick as the ones like I just linked. this one looks great, but ive never used one
For grilling or cooking in the oven I use my iGrill all the time. I had an original and it broke on me, but then I picked up the 2 after seeing them at CES (before Weber bought them) and hearing how it was all new etc. etc. and its been rock solid for me since. Ive picked up a few minis for friends for Christmas as well and they all unanimously love them. I see the 3 is out now, but I have no experience with that.
Edit Looks like the igrill 3 is just crappier and only works with some grills. How dumb is that. If you're going to get one in that case, get an iGrill 2 or a mini
I use this quick read one. It’s similar to ThermoWorks, which is what people with money to spend buy. It’s just a little slower and less fancy I guess.
https://www.amazon.com/Lavatools-PT12-Javelin-Thermometer-Chipotle/dp/B00GRFHXVQ
For long smokes though, I will admit, I use a Fireboard. And it’s the Cadillac of wireless temperature monitoring.
Buy this: http://www.amazon.com/Accurate-Water-Resistant-High-Performance-Digital-Thermometer/dp/B00GRFHXVQ
Use it.
Damn near as good as a Thermapen costs like 1/4th the price on Amazon.
If your meat's not juicy, it's almost certainly because you are overcooking it. As others have pointed out, cubed chicken takes very little time to cook. It's probably better to cook them as larger pieces and then cut them up.
BTW, cooking to correct temperature doesn't mean that long cooking times are bad. For example, when stewing beef or chicken, it's entirely possible (and sometimes required for tougher cuts of beef) to cook for hours at a time - but the key is that this is done at a low simmer.
For burgers, you want to cook them at a relatively high heat so the outsides get a nice brown crust while the center is a nice medium rare. Some people will say "only flip it once", but I think that is a myth. I've flipped steaks and burgers multiple times without any ill effects. In fact, my preferred method of cooking steak is to use a lot of oil, flip it every 30 seconds while basting it continuously in the oil with a big spoon.
Another important point if you are forming your own burgers. DON'T OVERPACK THEM. If you are squishing them together very firmly, you will end up with hard bricks of meat. Just enough pressure to hold them together (at least a half inch thick. I like them thicker) and you will get nice juicy crumbly burgers.
Lastly, let the burgers rest for 5 minutes (longer for big cuts of meat). Otherwise, a lot of the juice will leak out when you cut into it.
Get something like this thermometer to help you cook steaks and burgers.)
Edit: I've never read this book, but America's Test Kitchen is an awesome resource. LINK. I think I'll buy this myself!
When I was looking for a new digital thermometer, I was a little put off by the price of the Thermoworks. I think they are great devices but I just didn't want to spend $100. I also was weighing the difference between the models, like you.
But then I found the Lavatools Javelin.
https://www.amazon.com/gp/product/B00GRFHXVQ
It had everything I wanted and was only $25. I gave it a shot and it's been in my pocket while cooking ever since.
I've got one, but it's from back when they called it Thermowand. Got it in 2014 and it's still doing fine.
Oh, and the price seems to be down to $25 on Amazon now.
Honestly, my best advice is to get a probe thermometer like this and stick the probe in the meat when you put it in the oven. I've done this a few times so I know about how long it takes in my oven for my steaks, but your mileage may (and probably will) vary.
This is what I did for four years. You can also use the scale to weigh your pot..
I might also recommend a timer & thermometer combo. Convenient when you use it every day, and the thermo for if you feel like dialing in your temperature.
http://www.amazon.com/Taylor-1470-Digital-Cooking-Thermometer/dp/B00004XSC5
Oh I also had a cheap electric grinder for those days when you wake up just before class starts but you're not willing to go without a fresh cup. Not gonna stand there for 2 minutes grinding when 15 seconds will produce okay results.
That recipe sounds absolutely terrible, man, no wonder they tasted like shit. Get yourself a meat thermometer and do this thing:
Rub some olive oil and sprinkle some Old Bay on it, bake at 425F until it's 159F in the thickest part, let it rest at least two minutes. Perfect every time. Chicken breasts are all different thicknesses, never do a whole breast recipe based on time if you want it to be cooked right. Cook it until it's done in the middle, and no longer.
If it has skin on it, even better, but make sure you cover it (cut some vent holes in the foil for steam) because the fat renders out and goes eeeeeverywhere and will splatter down onto the heating element and smoke up your place. But crispy chicken skin rocks, and it makes the chicken a little bit juicier.
What's it called? Do you have a link?
Edit: Nevermind, I found it... http://www.amazon.com/Taylor-1470-Digital-Cooking-Thermometer/dp/B00004XSC5
This one is $11 used on amazon. Taylor Digital Cooking Probe Thermometer and Timer https://www.amazon.com/dp/B00004XSC5/ref=cm_sw_r_cp_apa_sYMZAbDDV8MME
I have an older version. Love love love it. When I'm roasting, I can stick the meat and set the temp alarm and let it go until it reaches temp.
> Will any kind of cooking thermometer do?
Have used a variety of thermometers. In the drawer is an OXO and an inexpensive Thermoworks pocket.
I'd recommend a ThermoWorks DOT probe-style oven thermometer. This way you can insert the probe into the chicken and bake/roast it to the temperature you want without opening the oven door to check. You don't have to go with the DOT. I started out with something similar to Taylor Digital. (I no longer have it because I burnt the probe over a grill hot spot.)
You can put the boneless chicken in a baggie or fold over plastic wrap. For a recipe/instructions, have a look at 101 Cooking for Two's Pan Seared then Oven Roasted, Skinless Boneless Chicken Breast.
= = = = Edit to add
You might like to read through this post on Baked Chicken Breasts at ThermoWorks
Get a digital meat thermometer with an alert that you can leave in while the roast is cooking (like this one), and it becomes basically impossible to fuck up a roast. The method in this video looks delicious, but you can also just slap some salt and pepper on a roast and as long as you take it out of the oven at the right time and rest it, it will be some good eatin'.
I've had this one for years.
Everything I hear is that those things aren't the best for brewing...
I got this Taylor Digital Cooking thermometer with probe for $20 at Target a year ago and it works amazingly. Here it is on Amazon for $2 less with free shipping.
The probe is linked to the unit via a 4' long cable capable of withstanding oven broil temperatures, very durable. You can set timer alerts and temp alerts to let you know when your mash/wort has reached a certain temp.
The unit is magnetic so you can stick it to your brew pot or oven (you can use it for baking and stuff too) and it's brought my grilling to an entirely new level. I've gotten really good at grilling steaks and pork chops thanks to this thing.
Your budget is pretty low but for 45$ here's what you can get that will set you up correctly
Fry/candy thermometer (Alton's favorite): 10.00
Instant read (the same one use by chefs everywhere): 19.00
Alarm Thermometer ( the good old Taylor): 16.00
And if you want to invest more change the alarm thermometer to something more serious like the chef alarm. But it's 60$ just for that.
Chili - the first time I made this, I just used ground turkey, which is why that's in the recipe... I've also made it with pork and bison/beef and it's good. Whichever you prefer. Sometimes I use pureed tomatoes instead of diced. You can use both, if you like. If the chili is too liquidy, put a few tablespoons of cornstarch into a glass with a little water, mix until it's blended, and then add to the chili, and cook - this will help thicken in up a bit.
8 strips (half a package) of bacon
1 red onion
1 small bulb of garlic
3 to 4 tablespoons tomato paste
2 lbs extra lean ground turkey
1 large can diced tomatoes
1 can baked beans
1 can mixed beans
2 tablespoons maple syrup
1 tablespoon chili powder
1 tablespoon Sriracha hot sauce
1 teaspoon paprika
1 teaspoon cayenne pepper
1 teaspoon cinnamon
salt and pepper, to taste
.
Chop bacon into small bits and cook in a large pot. Add chopped onion, saute until clear, and add minced garlic. Add ground meat, and cook until it's done (sometimes I add some of the spices now). Add tomato paste, tomatoes, and both cans of beans to the pot, as well as the spices and maple syrup. Simmer for at least half an hour, but an hour is ideal. I tend to cook this a day ahead, and then reheat and simmer for another 20 minutes or so - I find it's better the next day.
Jamie Oliver's Guinness Pie is amazingly delicious.
Also, a digital thermometer - like this - is your best friend when cooking meat.
If you're a fan of breakfast food, check this out. It's so good.
Edit: Cornbread goes wonderfully with chili. I leave out the green chile peppers, and replace with chopped green onions. Sometimes I put about a tsp of chili powder in, and sometimes a little cayenne to give it some kick.
Thermometer: https://www.amazon.com/gp/aw/d/B00004XSC5/
If you have access to a stovetop, try searing the chicken on medium/med-high heat for 2 mins~ a side then transfer it to the oven for 10-15 mins til cooked through. The sear is delicious and really beats the pants off plain baked breasts. I suggest a meat thermometer to help with not drying the hell out of your dinner! You can go stupid simple or a little more complex. I have both of these thermometers and use them both often.
I also highly recommend this recipe for bone in chicken.. I've done legs, breasts and wings (on grill and the oven) and it comes out fantastic.
Wings are really cheap and are damned good. Chicken breasts get boring and expensive! Wings, I do at 425 degrees for 20 mins, flip them, then do 15 mins more. If you want a good buffalo wing recipe, these are great.
You can try different things for marinades/rubs. Lemon pepper, Tony Chachere's, Adobo (or just buy Goya brand...it's salty as hell. though), etc. Marinades are fun too. Salad dressings, bbq sauce, apricot preserves, Trader Joe's Soykiaki, and so on. Just remember that if there's a lot of sugar in them, you're probably going to have sticking/burning issues. Best bet is to cook the chicken to 5 mins before done and then brushing on bbq sauce/sticky marinade. Also, if there's any acid in your marinade (vinegar, citrus), don't marinate for more than a couple hours or the acid will "cook" the chicken. Poultry ceviche isn't good eats!
My diet is very protein heavy and I just can't make a decent steak to save my life. I get sick of eggs & tuna so I've made chicken LOTS of different ways and have changed it up a lot so I don't get bored. I hope this helps! Sorry it's long. heh
TL;DR -- Vary your seasonings, buy a thermometer and get a good sear. Links and suggestions provided.
I noticed that the Polder timer/thermometer was cheaper out of Amazon.ca for us Canadian shoppers.
http://www.amazon.ca/Polder-Original-Cooking-Timer-Thermometer/dp/B0000CF5MT/ref=sr_1_1?ie=UTF8&qid=1332974970&sr=8-1
I've never added the probiotics, and I've had it turn out fine. Choose the plain version of your favorite yogurt, and you'll make a yogurt that tastes similar - you'll be adopting the same culture mix. Try other yogurts if you don't like how your first batch turns out.
My technique for keeping it warm is to put the yogurt in mason jars in a cooler with a heating pad. I fill any unused space with more mason jars filled with hot water. I have a probe thermometer sticking in there to make sure it's staying at around 100 degrees.
Alton Brown did a good episode of Good Eats on yogurt, and he had some really good tips.
Butterball.com has tons of info on turkeys. Get a probe thermometer with an alarm, put the probe between thigh and breast and set to 170F. I dry the turkey with paper towels and coat with melted butter and Adobo, if you can't find Adobo, kosher salt will do. I don't measure, but don't go too heavy on the salt. Get a silicone roasting rack too which lifts the turkey above the liquids in the pan. Add celery, onion and carrots chopped up to the bottom and add some chicken broth. Put the turkey breast down, this allows juices to go thru the breast and juice it up. Brining is a pain and unnecessary to me, I've done it and don't get any big difference. Be sure to have the turkey rest or all the juice will come out , you cover with foil on the counter and make the gravy will waiting.
You don't stuff the bird because you have to overcook the turkey to cook the stuffing. Dressing on the side is just as good. If you can't find premade stuffing bread, just bake some stale bread till it is dried, online you can find details. I use a wok, but a good skillet will do. I weigh some ingredients, because what is a large onion? I use bouillon, but you can use broth.
A saucier pan has rounded corners for easier mixing, but a regular sauce pan is okay. You can use only poultry drippings if you have more. You strain the pan dripping and then reduce by half for better flavor. You should get a fat separator cup to get rid of the fat.
I've made a lot of turkeys and tried many things and this is my way of getting a great turkey. As to looks, I don't care what a turkey looks like when done, I am going to eat it, not have a photo session with it!!! LOL! As for carving, any good knife will work for the breast and a boning knife is great for the legs and thighs. Wings you eat off the bone.
~<DRESSING - GOOD OLD COUNTRY-BASIC >~1-12oz bag-6C herbed dry stuffing bread.........4 oz crushed Ritz crackers.......6 oz bulk breakfast sausage.......8 oz ground pork......4 large stalks celery, chopped......1 large onion-212g, chopped......1 1/2 cup chicken bouillon......1/2 cup water.......1 tsp salt.......1/2 tsp freshly ground black pepper.......1 1/2 Tbsp dried sage or 6g fresh........1 1/2 Tbsp dried parsley or 6g fresh......1 Tbsp poultry seasoning.......2 eggs, beaten......1 stick-8 Tbsp butter........2 large loaf pans
Preheat oven to 350 degrees F.
PREPARE INGREDIENTS - Put everything in separate bowls:
Chop celery.
Weigh out onion and chop.
Grind crackers.
Put herbed bread in 12 qt container along with ground crackers.
Beat eggs and add to bread mixture, stir.
Grind parsley and sage.
Put parsley and sage into small bowl, add poultry seasoning, salt and pepper, mix.
Saute sausage and pork in large wok.
Add browned meat to container and mix.
Add butter to wok and when it melts add celery and onion with sage, poultry seasoning, salt and pepper mixture..
Sauté until transparent, 5 to 10 minutes. Pour over bread mixture and stir.
Add bouillon slowly to bread mixture, stir.
If needed add water.
Pour stuffing into a greased pans. Bake at 350 for 25 minutes or until thermometer reads 165F.
https://www.amazon.ca/Polder-362-90-Digital-Oven-Thermometer/dp/B0000CF5MT
https://www.amazon.ca/Sundlight-Silicone-Roasting-Microwave-Bakeware/dp/B07VC3FXYG
&#x200B;
~~~~~< GRAVY - POULTRY >~~~~~
3 Tbsp butter.....1/4 tsp sage.....1/4 tsp sage.....3 tsp flour.......1 cup poultry broth or bouillon.......1/2 cup saved poultry drippings(opt)..............Salt and Pepper to taste........2 tsp wine or 2 tsp cup cider and 1/4 tsp cider vinegar or 1/4 tsp lemon juice
Set heat to 3 and in saucier pan melt butter, add spices.
Keep cooking butter till it is popping, you want water to boil off about 5 minutes.
Slowly add flour. Cook until brown, 10-20 minutes.
Add wine or cider mixture, stir.
Add poultry drippings and stir.
Add stock a little at a time till you get the right consistency. Should stick to bottom of spoon.
https://www.amazon.ca/OXO-Good-Grips-Fat-Separator/dp/B0002YTGIQ
The Brewpal iPhone app.
Refractometer
Digital Thermometer w/ timer
Immersion Chiller
I generally just saute with a little olive oil or butter to get fried results that aren't completely dried out without all the oil.
If you really want to bake it instead, get yourself one of these - http://www.amazon.com/Polder-Original-Cooking-All-In-One-Thermometer/dp/B0000CF5MT/ref=lp_289810_1_1?s=kitchen&amp;ie=UTF8&amp;qid=1420663578&amp;sr=1-1 - you can set an alarm for it once the right temperature is reached. All you need to do is google what temp whatever cut of meat you're baking is safe to eat at and there you go. Just plug the thermometer into your meat and leave the other part hanging out of the oven door. Alton brown does it all the time :D
What I used this morning.
(https://www.seattlecoffeegear.com/pasquini-moka-espresso-grinder)
That's kind of tough because several things on your list could run you upwards of $100/each.
I'd definitely advise starting with the knife and spending money to get a high quality one. You should go test them in store because one of the most important things in a knife is balance and one that feels right in your hand.
After that I'd go: thermometer (I like this one, you don't need an expensive one for most things), whisk, paring knife, dutch oven, food processor (again, spend the money to get a good one), cutting board, bread knife, ramekins, prep bowls
I think you can definitely live without the digital scale (until you are really into baking breads you can wing it), mandoline (a good knife is easier 90% of the time), salad spinner, blowtorch, vegetable peeler (you can peel with a paring knife)
A couple of good places to start would be a restaurant supply (whisk, china, prep bowls), a discount store like TJ Maxx (dutch oven)
Good luck!!
You definitely should get an instant read thermometer. It's an absolute life saver.
You don't have to spend much for one either. My crappy non-instant read was overpriced at $10 from a grocery store but this is the one I should have/will get.
That's unfortunate.
If you end up needing a replacement, decent ones can be had inexpensively.
Or you can Splurge and get the ferrari of all probe thermometers.
I'm Canadian, so it's not really inexpensive. But thanks for the recommendation.
A few things from the top of my head that will hopefully be fresh advice:
Analyzing nocoffeesnob
A Probe thermometer is one of the best purchases for your kitchen you can make.
I just bought this one for brewing and frying. I really like it.
a simple analog probe thermometer is usually $5 or less.
You can also spring for a nicer one that has a cable so that you can leave it in the oven, it'll start to beep once the temp hits your desired setting.
I use something like this when cooking things in the oven: http://www.amazon.com/CDN-DTP482-Programmable-Probe-Thermometer/dp/B00046YFHE
I don't think you necessarily need to go lower than 275, but you definitely can if you want. That being said, I would never wing it by trying to time the temperature. Pick up a probe thermometer, they're cheap and take all the guessing out of the reverse sear (and any cooking of meat in the oven), here's the one I have. I was freaked out to have that cord in the oven while it was on, but trust me, that's what they're made to do.
I do mine in the oven at 275 until the inside temp is about 125 for medium rare or about 135 for medium. Once it's at my desired temp, I pull it out of the oven and let is sit for 15 minutes. At 12 minutes, I start to heat a pan to get it as hot as possible. Any pan should work, but I like to use a cast iron skillet. I sear each side for about a minute and a half, then serve that sucker piping hot.
I know you didn't ask for this, but thought it might be helpful.
Something that took me WAY too long to figure out is that when cooking stuff on the stove, use lower heat than you think you need. It's hard to get things to come out right when you're using too high of a heat setting. Like grilled cheese will go from not done to burnt in no time - so use pretty low heat, then bump it up toward medium if it's really not cooking.
Also, to check if meat is done, there is nothing better than a thermometer. No need for guessing, and no chance of food poisoning! This one looks good and has good reviews. I have a similar one but not waterproof (wish mine was).
Here's a simple recipe that cooks in the oven that gives you plenty of leftovers:
Meatloaf
Preheat oven to 375. Beat eggs in large bowl. Add meat, stuffing, water, and 1/4 cup barbeque sauce, ketchup, or a combination. You can also add onions, mushrooms, or anything else you want. Mix using your hands, then shape into a general loaf shape in a 13x9 pan. You can use any size pan that it will fit in, as long as it has sides to keep the fat/juice from spilling over the edge. Spread 1/4 cup of ketchup/bbq sauce on top. Stick it in the oven for about an hour, or until the internal temp is 160.
Another simple meal is pasta, sauce, and meat. Gives tons of leftovers if you make the whole box of pasta.
If you're feeling slightly fancier, try Super Easy Chicken Parmesan
Not using enough salt. Salt pasta water. Rub salt into meat. Season everything appropriately, especially baked goods.
Moving meat or fish and failing to caramelize. If you're cooking a steak, sear it on each side on as high of heat as possible. Fish, cook medium high until it's done 2/3 of the way through, flip and finish the other side.
Having too much water in, or on the surface of, whatever you're cooking. Meat should be dry before browning. Vegetables should generally be as dry as possible when processing (for example you want to remove the water from potatoes before making potato pancakes, things like that)
Overcooking. Shoot for medium rare with steaks, chicken etc. What really helps is a good digital thermometer. I have this one and I think it's the best value.
Learn to balance tastes and flavors. If something has a lot of fat, try adding an acid. Always make sure there's the right amount of salt. Salt balances sweet etc...
Use a non-contact thermometer to check the temp of the ceiling radiator:
https://www.amazon.com/Nubee-Temperature-Non-contact-Infrared-Thermometer/dp/B00CVHIJDK
If it IS getting hot, then a reflective radiant barrier behind the pipes could send more heat towards you, and less into the ceiling. A simple fan blowing on the pipes could help, as well.
If it is not getting hot, then that should be addressed.
I have a similar one. It works very well.
Buy a small one, at walmart, for like 30-40 bucks. Use it outside. More expensive fryers are mostly for aesthetics and in my experience dont fry any better. You might however like name brand stuff that has your favorite "Kitchen aid" logo that you would like to match to the rest of your kitchen. If this is you, then spend the extra money if you want. I personally just want bang for the buck, and i don't leave my fryer out on my counter as a showpiece or anything. Others might tell you im full of shit and their $80 or $150 dollar fryer is much better, which is fine but unless you plan on frying a ton of stuff, and you need a ton of room to fry large batches of stuff, a small reasonably priced fryer will do just fine if you maintain it well and keep it clean. Here are some examples:
Reason? Well, a small fryer lets you fry in small batches. Unless you have a large family and need to fry a ton of stuff, this is the way to go. Sure, you might have larger temperature changes due to the size ( when you drop food in it drops the temp sometimes complicating or even ruining your cooking ) but the small size lets you change the oil easier, clean it easier, and store it easier.
Because lets face it, hopefully your not planning on eating a TON of fried food. Sometimes making some cheese sticks, jalapenos, mushrooms, french fries, wings, etc is great, but it shouldn't be a majority of your eating experience. Unless you don't care about personal health.
ProTip: use it outside. Reasoning: Your house will smell like a french fry. Plus, grease flies out of the fryer and gets on everything, and it will get on everything in your house. The stench will permeate your couch, carpets, clothes, and more. You will leave home to go to work, run errands, etc... and you'll come home to that nice, greasy egg roll smell as you open the front door.
Its not pleasant. I learned this, and started frying outside. I also got a small fryer that had great reviews and wasn't super expensive. The parts, except the heating element, are all dishwasher safe. Also you will save money by not buying, or buying INTO, the whole sealed fryer with carbon filter blah blah blah. If you plan on keeping a fryer that features that indoors, it'll still smell. You still have to open the fryer at some point while cooking, which again, makes your house smell. And I HATE that smell in my home. Ive had a $120 dollar fryer and it performed just like my $30 dollar model, just looked super snazzy which i don't give a flying f** about since its not a counter-top item that gets daily use in my household.
My .02 anyways. I hate the house smelling like a french fry, and a small fryer is easy to store in your garage, easy to clean and operate. Plus i have a small 2 year old daughter and since i only use it outside on the porch, shes never around it which minimizes any injuries ( that could be catastrophic... grease burns / fires are serious biz )
At the end of the day, a fryer is a simple device. Heating Element, temp knobs, bucket for grease, and a basket with a lid. There are more expensive options, but your paying for brand name, looks, and you might want to drop 75-100 bucks for one that has a digital readout that can* be more accurate.
I myself have a digital thermometer in my kitchen i use for steaks and such ( any good cook should have one imho ) but it also helps me verify temp. With that said, i have i think the $30 dollar model i posted and its temp control is spot on. If you do want a digital one, i personally would just get a non digital one, then invest in a thermometer since you can use it for SO many things, including your new deep fryer. I also have a "laser thermometer" that works as well and can be used again for many many things in your home.
http://www.amazon.com/Comark-Instrument-Digital-Thermometer-Accuracy/dp/B001U59MDA/ref=sr_1_1?s=home-garden&amp;ie=UTF8&amp;qid=1418957150&amp;sr=1-1&amp;keywords=comark+PDT300
I have both styles of thermometers, and i use my pen style a lot ( its like the bottom one, but mine is white and i got it at a local grocery store for about 10 bucks... has a hold button but is pretty much the same deal )
Hope I helped you. Good luck and be safe!
I've read that Kale is supposed to be used sparingly, it's not the bulk of her diet. I pick out the spinach and romaine from the spring mix. I am looking for endive, dandelion greens, and edible flowers now. I have a temperature gun for testing temperature.
I hope the infrared works fine, I wanted a bulb that would work at night in case the apartment gets cold. If needed I can switch that out though. I have a UV light also that is on for a 12hr cycle.
The middle of mine are a bit soft, but not unpleasantly so.
I use a pizza stone in the oven, and I pre-heat it till the stone gets to ~400F (takes like 40 minutes). I have an infrared thermometer I use to read the temp of the stone.
I'm assuming you're using a torch and a titanium domeless nail. The best and most precise way to take low temp dabs is to buy yourself an infrared thermometer and measure your temps that way.
(http://www.amazon.com/gp/aw/d/B00CVHIJDK/ref=mp_s_a_1_1?qid=1421443336&amp;sr=8-1&amp;dpPl=1&amp;dpID=51yFyraWgJL&amp;ref=plSrch&amp;pi=AC_SY200_QL40)
Another method (sighting) is just to heat up your nail to a slight red, then allow it to cool. This takes trial and error. Time how long it takes to cool (5, 10, 15 seconds) and then take your dab, cap it. Check if there's any oil left on your nail, if so then your nail is too cold and you should take your dab sooner. If you took your dab too soon, the you'll get a slight burn and diminished flavor in your dabs.
I find waiting 8-10 seconds after torching is the best for me, but everyone's nail is different.
I usually do my spatchcock chicken direct on the grill. But I do have a raised grate. I made mine by welding up a ring to some legs, but this place has them. You can see in the naked whiz spatchcock recipe he uses fire bricks to raise the grill. Raising the grate makes it easier to do everything and doesn't reduce the heat. I only cook steaks at the lower level when I want a good sear.
Some good first cooks-
Pork butt (shoulder) should be your first smoke. Its hard to screw up.
My Recipe-
-Slather pork butt with yellow mustard
-Rub with your favorite. I use 1 part bad byrons butt rub to 4 parts brown sugar
-Egg at 225-250 platesetter legs up with drip pan
-Butt goes on the grill. Between 1.5 - 2 hours per pound
-Remove when internal temp is 195
-Cool and pull apart for sandwiches
Atomic Buffalo Turds (ABT)
Great party snacks
-Cut the top off 20-25 jalapenos and core them
-Crumble and Cook up some chorizo sausage (should be like ground beef). Optionally use bacon or other sausage
-Mix sausage with 1 bar cream cheese
-Stuff peppers with cream cheese mix
-Wrap each one with a piece of bacon. Use toothpick to secure
-Use your favorite BBQ rub on the outside
-Put on egg, direct 350 until bacon is crispy
When you can get the temp up, crank that baby to 600+ and sear some nice ribeyes.
Go get a Maverick Thermometer and a Thermapen
This is the one I have while I try to figure out if I want to build one myself or buy a much nicer one. Plus I'm not sure if I want to stay in this house for a while, so I haven't done jack shit yet, lol.
Got it from Wally World for $130 (I think it's listed for $160 or so on their site, just find a coupon).
Grab some lump charcoal and some wood chunks, for pork I recommend apple or cherry, and you'll need two temp readings, one for the pit and one for the meat.
I bought one off of Amazon. similar to this one But IIRC I got it for ~$25 during their "flash sale" around Christmas time)
For recipes, google is your friend. For temps and all that, google is DEFINITELY your friend. (Or just PM me.)
It looks identical to the one I have except mine says "redi check" instead of ivation. Just went to look at my amazon cart and I bought on jan 8th 2014: "
Maverick ET733 Long Range Wireless Digital Thermometer
Set - Dual Probe - Remote BBQ / Smoker / Grill / Oven / Meat /
Thermometer - Perfect for Thanks
the link now goes to:
https://www.amazon.com/gp/product/B00FM8DJHQ
which is the exact one you linked to.
ie - it's a Maverick ET733, rebranded.
Yes, I am quite happy with it and remember reading reviews before buying. It's well regarded.
The Maverick is a great choice for a "leave in" thermometer than monitor your smoker and meat temps independently. I also like Pthe Javelin instant reads. Almost as fast as the ThermoPen and a third the price.
https://www.amazon.com/Maverick-732-Remote-Smoker-Thermometer/dp/B004IMA718/ref=sr_1_4?ie=UTF8&amp;qid=1483915378&amp;sr=8-4&amp;keywords=maverick+thermometer
https://www.amazon.com/Lavatools-PT12-Javelin-Thermometer-Chipotle/dp/B00GRFHXVQ/ref=sr_1_1?ie=UTF8&amp;qid=1483915319&amp;sr=8-1&amp;keywords=javelin+thermometer
If you can't spring for that though, the Lavatools Javelin gets pretty good marks, and it's only $25.
The only downside is the probe is only 2.75" long.
In tests, it's about .5 seconds slower than the thermapen in a baked chicken test, although a full 5 seconds slower for a boiling water test, so it may not be the best choice if your primary use is frying.
Nice set up! I've been oggling pour over supplies for forever but haven't bit the bullet yet. We use this thermometer. It's a knock off thermapen. It's probably a few miliseconds slower, but it's been more than fast enough for us and is also significantly cheaper.
http://www.amazon.com/dp/B00GRFHXVQ
> What kind of spices go with what? Right now, I'm just putting some salt, MSG, soy sauce, garlic powder, and red pepper flakes into most all meats I make because I really enjoy it. I'd like to know what else is good and for what purposes. Also I'm really sad that I haven't been able to use my cinnamon.
http://www.spicesinc.com/p-510-what-spices-go-with-what-meat.aspx
>Why does my chicken get sticky when I cover the skillet while it's frying? It's great and all, but I just want to know why and whether or not I can apply the same principle to other meats.
Not sure what you mean, generally what happens when you put a lid on is that your chicken starts steaming and frying at the same time. The excess moisture in the air would make the chicken skin go soft. Perhaps that is the 'sticky' you are talking about? I will often put the lid on something that isn't cooking well in the pan and needs heat from all sides. It is fairly rare I will ever put the lid on frying meat. I will usually put the lid on sauces to stop them evaporating more water and thickening.
>Right now I'm limited to ground beef and chicken breasts for meats. I was wondering if anyone could recommend some cheap/quick recipes using those that I could steal to diversify my cooking.
Steak is easy, sausages are easy, fish fillets are easy, cubed chuck for stews/curry/casserole is easy, slow cooker recipes are generally really easy (foolproof) and come with excellent results. Just google recipes, if the picture looks delicious then read the recipe steps and if you think you can do it then give it a go. Cooking is fairly forgiving of mistakes so don't be afraid to try.
>Also, does anyone have any good guides to dealing with dough? I've been meaning to experiment and have fun with dough (noodles, breads, pastries?).
I don't like making dough so I'll let someone else field this one.
>And a guide for pork. My better-cook-than-I-am friend keeps telling me I'll literally die if I don't cook pork right, but he's a pansy, and I like pork.
Pork is fine. Get yourself an instant read thermometer and use that to avoid over and under cooking meats. After a while you'll just be able to tell it is cooked by poking the meat with your finger. Use the thermometer until then.
http://www.amazon.com/Fastest-Accurate-Water-Resistant-High-Performance-Thermometer/dp/B00GRFHXVQ/ref=zg_bs_289809_4
http://www.fsis.usda.gov/wps/portal/fsis/topics/food-safety-education/get-answers/food-safety-fact-sheets/safe-food-handling/safe-minimum-internal-temperature-chart/ct_index
>Is there a way I can use potatoes in my frying pan adventures? From all that I've read, people seem to want to boil them before using them for anything.
Generally a good idea to bake/boil/parboil before frying. There are some dishes you don't need to do this like a potato latke. They are easy and yummy. Look up recipes on google.
Oh dude. Get a thermometer. I like this one.
Without a decent instaread thermometer in your kitchen your hands are tied. You will find a million uses for this. You can get your oil hot enough (I don't think you're frying hot enough. 325-350f for chicken, depending on cut and what kind of crust you're going for. I go more towards 325 on the oil temp and cook my chicken towards 160-165 at the bone), you can test all your meats for correct doneness. It's an essential tool. I can make do without a decent chef's knife or a good spatula, but the thermometer? I carry that one with me when I go visiting.
Also get a kitchen scale. They cost about the same 20-25 bucks.
This is the one I use.
https://www.amazon.com/Lavatools-PT12-Javelin-Thermometer-Chipotle/dp/B00GRFHXVQ
I got a Lavatools PT12 for $25 which is like the budget version of a thermapen. It's accurate to +/-1F and has a 3-4 second read time. Its probably got everything you need from a food thermometer and more, no reason to spend double the price for something marginally better.
Time to upgrade! Go digital, you'll be glad you did. After going through a few cheapo $10 digital thermometers from the grocery store, I got one of these and couldn't be happier. https://www.amazon.com/dp/B00GRFHXVQ/ref=cm_sw_r_awd_ByCXub1Z946FX
If anyone is interested, I have owned both and this thermometer is better (more water resistant) and cheaper too
https://www.amazon.com/Lavatools-PT12-Javelin-Thermometer-Chipotle/dp/B00GRFHXVQ/ref=sr_1_3?ie=UTF8&amp;qid=1501868342&amp;sr=8-3&amp;keywords=javelin+thermometer
Go with the Lavatools Javelin. You really can't beat its price/performance.
http://www.amazon.com/dp/B00GRFHXVQ/
They also have a pro version which is a bit larger and even faster.
http://www.amazon.com/Lavatools-PX1-Javelin-Thermometer-Chipotle/dp/B00NMQGAT4/
Javelin thermometer, best thing in my kit and I use it though out the kitchen
https://www.amazon.com/dp/B00GRFHXVQ/ref=cm_sw_r_cp_apa_rE8VAbF1HFB4G
Any NSF dial thermometer should be suitable but you will need to calibrate an analogue thermometer in ice water. It's not difficult, you just need a pair of pliers. That said, this is the best thermometer I've ever used and you can use it in your kitchen for other things: https://www.amazon.com/Lavatools-PT12-Javelin-Thermometer-Chipotle/dp/B00GRFHXVQ/ref=sr_1_1_sspa?ie=UTF8&amp;qid=1505350802&amp;sr=8-1-spons&amp;keywords=lavatools+javelin&amp;psc=1
Last minute effort? Defrost in cold water (running water will make them defrost even faster). Marinade for 30 minutes; I usually do a combo of olive oil, S&P, lemon juice, chopped garlic/garlic powder, chopped onion/onion powder, and oregano or thyme. Grill or pan fry on medium-high heat, reduce heat to low when you've achieved your desired outside sear and cook until 155-160. Invest in a thermometer, it's definitely worth it... I love this one: http://www.amazon.com/Ultra-Accurate-High-Performing-Digital-Thermometer/dp/B00GRFHXVQ/ref=sr_1_8?s=kitchen&amp;ie=UTF8&amp;qid=1426294198&amp;sr=1-8&amp;keywords=meat+thermometer
I'd recommend an inexpensive thermometer like this, rather than the probe--I'm not sure quite how warm a probe can get, but I'd be surprised if it's over 100 F. https://www.amazon.com/gp/product/B00GRFHXVQ/ref=oh_aui_search_detailpage?ie=UTF8&amp;psc=1
https://www.amazon.com/gp/aw/d/B00GRFHXVQ/ref=mp_s_a_1_15?ie=UTF8&amp;qid=1473558392&amp;sr=8-15-spons&amp;pi=AC_SX236_SY340_QL65&amp;keywords=Lavatools&amp;psc=1
We have this one and it has worked perfectly for us. Relatively low cost, accurate, and will give you your temp in seconds. We have tested it with outside temperature against what the weather is and it is always correct. We also tried inside versus our thermostat and there to it is correct. For 25 dollars you can not beat it. Have had it since fathers day so I can not attest to years of use, but you could buy multiple and it would take a while to equate to the same cost as a thermapen.
Picked up this probe therm for $15, orig $24.99: Lavatools PT12 Javelin Digital Instant Read Meat Thermometer (Chipotle)
I almost bought it previously but didn't love the price. Put it on the Honey drop list and received an email notification today.
or this
Good
Better
Best
Personally I have the Weber, and I'm quite happy with it. It's accurate, and quick enough for my needs. The other two are supposedly faster but honestly the difference between 3 and 10 seconds isn't that important to me.
I take it in several spots, using this: https://www.amazon.com/gp/product/B00NMQGAT4/ref=oh_aui_search_detailpage?ie=UTF8&amp;psc=1
I never take it in the middle of chunks or side, i try to take it where there's mostly a uniform settling of grains (round cooler) so it goes down a few inches from the surface, then I also have a digitial 12 in probe to take some measurements further down but that particular probe doesnt respond as fast as the one as I linked which is what i use for my checks
pizza stone
I'd also suggest:
https://www.amazon.com/dp/B00OXHQL3Q/ref=twister_B00GGMFK9M?_encoding=UTF8&amp;psc=1
save your thermapen money and buy this. It works great for a LOT less money.
https://www.amazon.com/Weber-7203-iGrill-2-Thermometer/dp/B01MG2CNDL/ref=sr_1_3?ie=UTF8&amp;qid=1498510072&amp;sr=8-3&amp;keywords=igrill+2
http://www.kickashbasket.com/store/product-detail.php?product_id=1
https://smokeware.com/products/stainless-steel-vented-chimney-cap
I've got opinions on a couple of these:
-1. pork butt is super forgiving...next closest I would say is a prime rib roast. It's a nice big chunk of tasty meat that smokes up nicely. Turkey breast is another tough to screw up option.
-3. You'll want a wireless like a Maverick and a decent instant read unit, the Lavatools Javelin is a very good and inexpensive option
Lavatools PT12 Javelin Digital Instant Read Meat Thermometer (Sesame) https://www.amazon.com/dp/B00OXHQL3Q/ref=cm_sw_r_cp_apa_RyKjzb86EEJHW
It's about $25 bucks but it's instant read and it's made for this stuff. If you have a lot of money($100)a thermapen MK4 is great.
The thing is you can smoke on near anything once you know how to actually smoke. You didn't say how much food you were looking to do at one time but you can smoke on a basic cheap charcoal grill. This one would work fine - http://www.homedepot.com/p/Aussie-Walk-A-Bout-Portable-Charcoal-Grill-4200-0A236/100164850
Or just go to craigslist and see if you can find a used cheap charcoal grill. After that, go to a website like amazingribs.com and read everything in there until your brain melts. Smoking isn't any kind of secret, it all comes down to time, temperature, humidity control. Once you get that down pat you could smoke in a 55 gallon drum if you wanted to. What is more important than the actual smoker itself is your thermometer. You have to have a good thermometer if you want good results. Click this link, for the money, you can not get any better. It's not a thermapen, but it's 99% of what a thermapen does for a fraction of the cost - https://www.amazon.com/Lavatools-PT12-Javelin-Digital-Thermometer/dp/B00OXHQL3Q/ref=sr_1_1?ie=UTF8&amp;qid=1496441176&amp;sr=8-1&amp;keywords=lava+tools
So, I have a thermometer already, but it's awful, slow, and not very efficient. It does the job, but it could use replacing. On my kitchen WL is a new meat thermometer that would be really helpful in my kitchen endeavors. I prefer the black one, but any color would be okay!!
Thanks for the contest. This is a great idea!!!
Fast & Accurate, Water-Resistant, High-Performance Digital Food/BBQ Thermometer - Lavatools Thermowand® (Sesame) https://www.amazon.com/dp/B00OXHQL3Q/ref=cm_sw_r_awd_u2JGub0X5JC9Z
I have this one. It works great.
Here is a great review of the popular ones comparing them.
This is the one I use: https://www.amazon.com/gp/product/B00OXHQL3Q/ref=ppx_yo_dt_b_asin_title_o06_s01?ie=UTF8&amp;psc=1
I've had it for two years, use it weekly. Still works great and is as accurate as I need it to be.
Here's the link to the one I got. I think Christmas may have increased the price.
Famili MT004 Digital Kitchen Food Meat Cooking Electronic Thermometer Probe for BBQ, Oven, Grill, and Smoker with Timer/Alarm and Large LCD Display https://www.amazon.com/dp/B013A81VW4/ref=cm_sw_r_cp_apa_myctyb31YXAFF
I find one of these oven thermometers handy when heating water to strike temperature. Easy to get distracted, not so easy to ignore the incessant beeping. Or whatever the wireless ones do, I don't have one of those.
You do have to be careful not to put the probe too deep in the water, if it gets through the point where the probe is crimped to the wire you'll probably need a new probe.
A less expensive option is the ThermoPro, which I’ve been using for a few months. I’m not in love with it, but it does what I expect it to (accurate readings, wireless, reliable), and for only $37.00. What I don’t love is that the screen flashes different colors toward the end of the cook to indicate you’re close to target temp. Great for steaks, but not great if it’s on your nightstand for an overnight brisket cook, and you can’t turn it off. Still, for the price, I’m happy.
ThermoPro TP07 Wireless Remote Digital Cooking Food Meat Thermometer for Grilling Oven Kitchen Smoker BBQ Grill Thermometer with Probe, 300 Feet Range https://www.amazon.com/dp/B014DAVCP4/ref=cm_sw_r_cp_tai_DYI.zbKH1R9K6
The bluetooth part is just so the main gadget can talk to the handheld gadget I take with me through the rest of the house. It's like this...
https://www.amazon.com/ThermoPro-Wireless-Digital-Kitchen-Thermometer/dp/B014DAVCP4/ref=sr_1_5?s=kitchen&amp;ie=UTF8&amp;qid=1496335234&amp;sr=1-5&amp;keywords=meat+thermometer&amp;refinements=p_72%3A2661618011
It probably isn't bluetooth....but they talk to eachother.
I have the Oklahoma Joe Highland and I like it. Fairly heavy construction for a low price. It weighs about 200lbs. It eats a lot of fuel but it is easy to maintain temperature and everything I have smoked on it has come out delicious. I generally have to feed it charcoal every 2-3 hours to keep it at temp so it requires some maintenance but not too much.
The only modifications I made to mine was some self stick seals for the doors and some food grade high temp sealant for the joints between the firebox and the barrel. Without those it leaked a lot of air/smoke.
I would also recommend a thermometer because the one built into the lid always reads 25-50 degrees hotter than the temperature at the grate where your food is. I use this one and it works great. Just glance at it every now and then to check if I need to add more fuel.
What thermometer is this and how much did it cost?
Found this on amazon, looks close if not the same:
https://www.amazon.com/ThermoPro-Wireless-Digital-Kitchen-Thermometer/dp/B014DAVHSQ
I bought this one. Not much frills, but it does everything I need for a great price.
ThermoPro TP-08 Wireless Remote Digital Cooking Meat Thermometer.
https://www.amazon.com/dp/B014DAVHSQ/ref=cm_sw_r_cp_apa_dVm3AbXZDXJ56
The thermometer makes a huge difference. A programmable meat thermometer is sooo great to have and they’re fairly inexpensive. Just set to alert you to the temp and you can be sure you won’t overcook it. Something like this is all you need: ThermoPro TP-08S Wireless Remote Digital Cooking Meat Thermometer Dual Probe for Grilling Smoker BBQ Food Thermometer - Monitors Food from 300 Feet Away https://www.amazon.com/dp/B014DAVHSQ/ref=cm_sw_r_cp_api_i_YVWZCbTKW68T5
I don't mean to sound like a salesman, but the ThermoPro was an easy choice for 45$ from Amazon. It's been great!
Smoker: Camp Chef Smoke Vault
Thermometer: ThermoPro TP-08
I kept water in the pan throughout the cooking. I have a dual probe thermometer so I had one in the thick, meaty part of the butt (not touching bone) and the other on the same rack as the butt but 5-6 inches away.
I had the butt positioned on the second highest rack. The recipe I followed didn't specify where it should be placed, but maybe that was an factor for the long smoke time?
I’ve been using this .
I just bought this $18 one for all my holiday cooking and it's been working great
ThermoPro TP16 Large LCD Digital Cooking Kitchen Food Meat Thermometer for BBQ Grill Oven Smoker Built-in Clock Timer with Stainless Steel Probe https://www.amazon.com/dp/B017613C3C/ref=cm_sw_r_cp_api_-dEqybE7MZRB9
I preheat my cast iron to 475 in the oven for a good half hour - then bring it up to my stovetop. I keep it on a medium high heat on my stovetop - I have an electric stove and set it to setting 6 on a 1-10 scale.
But most importantly - pickup a meat thermometer: it takes the guessing work out. I got one on amazon for $17. Pull my steaks at 115 and let them rest for 10 mins and they always end up a perfect medium rare.
https://www.amazon.com/gp/product/B017613C3C/ref=oh_aui_search_detailpage?ie=UTF8&amp;psc=1
This! freaking awesome product. Also, I stop cooking the chicken right before it hits 165^(o)F. I put them in a bowl so they keep cooking for a bit.
You can pick up an oven probe thermometer for less than $20.
https://smile.amazon.com/gp/product/B017613C3C/ref=oh_aui_detailpage_o06_s00?ie=UTF8&amp;psc=1
You can set a temp alarm so you know when you've reached strike temp (or just below, if you want to nail accuracy), which I find very convenient.
My crappy stove/oven came with a thermometer, which disagrees with the dial by 40-75° (not even consistently). I don't know which or both is wrong though my money is on the oven.
Does anyone know if this kind of thermometer would accurately measure an oven if it's not stuffed into meat?
In-oven thermometer gets liquid in the probe and that causes it to read very wrong results, don't use it in wort. How do I know - I tried to use mine :)
The infrared is also probably influenced by evaporation and it measures the surface temps which could differ from the liquid temperatures.
Like people said Thermoworks is good.
I got myself Lavatools one and can't be happier - https://www.amazon.com/Lavatools-Javelin-Ambidextrous-Thermometer-Chipotle/dp/B01F59K0KA?ref=ast_p_ep.
It reads in several seconds, the screen flips if you flip the thermometer, there is also light in it, so it lights up when dark, it doesn't get foggy from the vapor.
I like it better than the straight thermometer because you can sanitize it and put it on it's back and keep measuring the temperature without re-sanitizing (I do it while chilling wort).
Got a Thermopro TP20: https://www.amazon.com/dp/B01GE77QT0/ref=sspa_dk_detail_0?psc=1&amp;pd_rd_i=B01GE77QT0&amp;pd_rd_wg=aREHz&amp;pd_rd_r=NVP6BR8RQH15JD89K8G0&amp;pd_rd_w=p3Fqm
Works fine, and I've been really happy with the reception--from anywhere I am on my property (small city lot) it works great.
However, I was disappointed that there is no way to calibrate the probes. I've taken to just buying spares to replace the old ones when they stray. Is there any device out there that allows calibration? Is this a good feature? Or is replacing probes the best way to deal with this?
Yep with the Smokey the minion method is the way to go - it can run a long time without needing any help - much longer than it takes to do a pork butt.
As far as temp, I would recommend getting something like this -- you just put the probes in and kick back inside and relax until it reads 200. I usually put the probes in when I foil it up a few hours in.
I've got one of the ThermoPro and works fantastic. Also, works great for checking fermenter temps without having to look for your thermometer strip, probe it, etc. Just leave it sitting and you can check it from anywhere in the house. Not a salesperson for these guys, but I like it. https://www.amazon.com/ThermoPro-Wireless-Digital-Cooking-Thermometer/dp/B01GE77QT0/ref=sr_1_2?ie=UTF8&qid=1498228391&sr=8-2&keywords=thermoworks
I went with the Thermo Pro TP-20 when i was looking for a thermometer. I did an ice bath when i got it to make sure that it was on point, and it was. It has preset meat temperatures, but i always end up using the program or BBQ settings. The sending unit at the smoker has a nice hook on the back so you can hang it from a handle. In rain i just put sandwich bag over it to keep it dry. The receiving end, i can walk anywhere in my house and receive the temperatures. I am very happy with this unit.
Pick up a thermpro tp20. One probe for ambient, one for meat. No need to open up anymore.
https://www.amazon.com/ThermoPro-Wireless-Digital-Cooking-Thermometer/dp/B01GE77QT0/ref=asc_df_B01GE77QT0/?tag=hyprod-20&linkCode=df0&hvadid=198091107028&hvpos=1o1&hvnetw=g&hvrand=17816983443184717330&hvpone=&hvptwo=&hvqmt=&hvdev=c&hvdvcmdl=&hvlocint=&hvlocphy=9004338&hvtargid=pla-379519116602&psc=1
I have a Flame Boss 300, its amazing.....keeps my KJ within ~3F of the set temp. A little pricey, but well worth it.
You can get a Thermopro TP20 with the clip to mount a probe to the grill, and a meat probe for $50
As far as your question, you can....just be mindful of where you are taking your reading. Don't use internal walls or the heat deflector, to get a good reading youd need to get it from something on the grill surface, or if you are doing indirect, maybe a drip pan or something right under the grill (I use a 16" cast iron skillet as a drip pan, sitting on my accessory rack in my KJ)...its far enough above the heat deflector and close enough to the grill that I feel comfortable with the reading
If he's into grilling and smoking, does he already have a wireless temperature probe? It's a lifesaver for me. https://www.amazon.com/ThermoPro-Wireless-Digital-Cooking-Thermometer/dp/B01GE77QT0/ref=sr_1_4?ie=UTF8&amp;qid=1481037076&amp;sr=8-4&amp;keywords=wireless+temperature+probe
I have one and like it a lot. One thing I will say is that you'll need to get a thermometer because the built in one is garbage. Mine runs between 60-80 hotter than what built in one says. It ruined my first few cooks, but once I got the extra thermometer I was set. This is the one I got and I like it, but use whatever you feel like: https://www.amazon.com/gp/product/B01GE77QT0/ref=oh_aui_detailpage_o08_s01?ie=UTF8&amp;psc=1
You absolutely MUST use this technique! It is called a reverse sear. Search "Guga foods" on YouTube
(Or click here, he talks about pan frying in the beginning too, and the reverse sear is around the 15 min mark, a fun video regardless and cast iron plays a role)
https://youtu.be/4oLnJiYN_GE
Also, get a nice thermometer, you won't regret it. I just got this one from Amazon:
https://www.amazon.com/gp/aw/d/B01GE77QT0/ref=sspa_mw_detail_0?ie=UTF8&amp;psc=1
I'm dealing with lipase for the second time now. Scalding adds a step to your pumping routine but it really does work. Get an instant read thermometer to make your life easier. You can scald on the stovetop or, even better, using a bottle warmer. With a bottle warmer you're at no risk of forgetting about it and accidentally boiling it (I speak from experience), you can just set it and forget it once you figure out how much water to use. Also, the bottle warmer is good for scalding on the go if you have to do it at work/school.
I am not sure of what you already have or what you would need, I am listing a few things on top of my head:
> Sure, so basically lots of salt + pepper on the piggie.
Always a good idea! I would do that 12-24 hours in advance to give the salt time to penetrate the meat.
> Then, on a roasting tray, fry some fennelonions and garlic.
I like that flavor profile.
> Add the piggie (skin side up as it is chopped in half) to seer the bottom, then add white wine all around it and into the oven at 180 ºF for 3-4 hours.
That's a braise, not a slow roast. You should get one of those probe thermometers that you put the probe in the meat and the cord goes out of the oven to a temperature indicator like this:
https://www.amazon.com/ThermoPro-TP-17-Digital-Backlight-Thermometer/dp/B07477NMF4
> I can maybe use the broiler at the end to give the skin some color.
You can bring the pig out at about 160F and let it rest tented in foil, I would give it a minimum of 30 minutes, but an hour would be better. Then crank the heat as high as it will go in the oven on bake/roast, not broil, and put the pig back in to sear it.
https://www.seriouseats.com/2011/12/the-food-lab-how-to-roast-a-whole-suckling-pig.html
Stopping the cooking process at or around the minimum safe to consume temp will probably help you appreciate your food more.
Get an oven probe thermometer like this and an instant read thermometer like this and bake some chicken thighs or breasts that you remove right at 165 or even a couple degrees lower. They will be delicious with only some oil salt and pepper but add whatever you like. Easy as hell and can be used in all sorts of things.
I know there are higher end models of thermometers but if you are looking for something on a smaller budget, I got this from Amazon a few months ago. I've done a bunch of cooks with it and haven't had an issue.
Thermo Pro TP-17
I bought this guy:
https://www.amazon.com/gp/product/B07477NMF4/ref=ppx_yo_dt_b_asin_title_o01_s00?ie=UTF8&psc=1
It works great but the clip is more made for a grill rather than the side of a pot. I figured out a way to hang it off my kitchen cabinet for cheese making and the cord on the probe is plenty long enough.
I also have to say that it is fabulous for smoking a brisket, if you want something that serves more than one purpose and are into that kind of thing.
I have the ChuGod from Amazon, love everything about it and comes with 2 long probes but my only complaint is bluetooth range. If its on my grill on the back patio, i can't get readings in one of my chairs in the front room (maybe 50ft?) but if i sit on the couch 10 feet closer to the back patio i get the signal.
edit: https://www.amazon.com/Thermometer-Bluetooth-Grilling-Carrying-Included/dp/B075L7V6NZ/ref=sr_1_4?crid=22IHIGM9N5D90&keywords=chugod+smart+wireless+bbq+thermometer&qid=1564173024&s=gateway&sprefix=chugo%2Caps%2C193&sr=8-4
I've been using this one and am very happy with it: https://www.amazon.com/gp/product/B075L7V6NZ/ref=oh_aui_detailpage_o00_s00?ie=UTF8&psc=1
It comes with two probes but will handle up to six if you buy extras so you can measure ambient temp as well as multiple pieces of meat. There's an app on the phone where you can program alarms for different temps for each probe and a cool graphing feature that allows you to watch the rate that the heat is rising. Handy for figuring out when to start the side dishes so everything finishes at the same time.
yeah thats what i had and hated it too. idk how those get so recommended. its noisy and had a terrible interface
i replaced it with some chinese white-label thing with 6 probes thats been way better. https://www.amazon.com/Tenergy-Thermometer-Controlled-Bluetooth-Stainless/dp/B077821Z4C/
the app is way easier to program and use and it doesnt beep incessently. the cables have metal braiding which seems nice but they tend to kink up, though that hasnt effected functionality at all. i still use my instant-read to verify things but its good enough to track cooking
It looks like it's pretty much the same guts as every other bluetooth thermometer, at least judging by the fact that it's using the exact same app (just rebranded for Inkbird vs. something like Tenergy Solis or any number of other rebranded versions of the same). If someone hacks any one of those, they'll all effectively be hacked.
Here's a link to the probe I bought. Its amazing, there's an app that you download on your phone and it can send you alerts. The temp is way more accurate than the one on the smoker itself, cant recommend this enough.
https://www.amazon.com/gp/product/B07MVVK5JK/ref=ppx_yo_dt_b_asin_title_o06_s00?ie=UTF8&psc=1
https://smile.amazon.com/gp/product/B07MVVK5JK
I got this: http://www.amazon.com/gp/product/B00GRFHXVQ/ref=oh_aui_detailpage_o02_s00?ie=UTF8&amp;psc=1
It's much cheaper than a thermapen and works just as well.
I recommend this bad boy http://www.amazon.com/Lavatools-Javelin-Digital-Thermometer-Chipotle/dp/B00NMQGAT4/ref=sr_1_2?ie=UTF8&amp;qid=1457629909&amp;sr=8-2&amp;keywords=lavatools its only $50 and works just as well as the thermapen
Well, I know you already have a good one now ... but if you are ever in the market for a secondary check out the lavatools javelin. I'm sure it's not quite as good as thermapen, but it's $25 and is the best digital thermometer I've ever used. Miles ahead of stuff that's in retail stores.
https://www.amazon.com/dp/B00OXHQL3Q/ref=asc_df_B00OXHQL3Q5025793/?tag=hyprod-20&amp;creative=395033&amp;creativeASIN=B00OXHQL3Q&amp;linkCode=df0&amp;hvadid=193129986239&amp;hvpos=1o1&amp;hvnetw=g&amp;hvrand=5333425379398329994&amp;hvpone=&amp;hvptwo=&amp;hvqmt=&amp;hvdev=m&amp;hvdvcmdl=&amp;hvlocint=&amp;hvlocphy=9013526&amp;hvtargid=pla-335441705164
Updated list of sale items, I will update this throughout the day:
Instant Read Digital thermometer for $19.99
1800-Watt Portable Induction Cooktop for 71.99
Digital Pocket Kitchen Scale for 13.99
[Pop-up Canopy] (http://amzn.to/2Bi53E0) for 191.73 - for those outdoor brewers
If you want a cheap alternative to the thermopen, here is a knock off of it: http://www.amazon.com/gp/product/B00OXHQL3Q/ref=oh_aui_detailpage_o00_s02?ie=UTF8&amp;psc=1
You should get an instant read thermometer and make sure that you're not cooking the chicken to death. The industry standard Thermoworks is about $100, but I have one from Amazon that was $25 and it works great. http://amzn.com/B00OXHQL3Q
I bought a cheap one from amazon and thread the wire through the gap on the hinge side of the door. I put the probe on a shelf above the meat
Famili MT004 Digital Kitchen Food Meat Cooking Electronic Thermometer Probe for BBQ, Oven, Grill, and Smoker with Timer Alarm and Large LCD Display https://www.amazon.com/dp/B013A81VW4?ref=yo_pop_ma_swf
Do you guys know of any thermometers that have a wired probe that I would be able to have a continuous display of the temperature?
https://www.amazon.com/dp/B013A81VW4/_encoding=UTF8?coliid=IEY1MSEMJ2YHZ&amp;colid=2JOZX62QOQJ54
I like the idea of this one but I'm not sure if the probe wire could take the constant heat of the brew. Ideas?
Something that I use all the time when cooking is a digital thermometer that you leave in the meat while cooking (I'm not endorsing this specific one, it's just an exemplar and is inexpensive) like this one. It can take a lot of the guess work out of cooking meat and let you hit the safety zone without over doing it. I got mine after I saw Alton Brown using it a lot.
Also, I highly recommend watching "Good Eats" reruns wherever you might find them. Even if you might not like the specific dish he's making that episode, he is great at teaching you the whys and why-nots of cooking and baking. It's more of a teach to fish vs give a fish kind of show.
Pump? Oven? Cellar? These things don't normally go together.
I take it that English isn't your first language, and that's OK, but it's really hard to figure out what you're after based on what you've written.
If all you want is a remote thermometer, there's a thousand ways to do that -- most of which don't even involve the complexity of a computer like the Raspberry Pi.
What about a thing like this that you just extend the wire on?
Thanks for your reply! I'm thinking about getting this one - I can't imagine being able to successfully monitor the doneness without having a leave-in thermometer. I don't see it written explicitly for that item, but I'm pretty sure it's a leave-in.
get one of these: http://amzn.com/B013A81VW4
works fantastic! Goes up to mid 400's so you can use it to check the temp of your oven too and as a candy thermometer.
Odds are you will be fine, chicken has a parasite (forgot the name, doesn't matter) that doesn't die at 145 like bacteria do but at about 160. If you tested the internal temp and got above 140 then the outer parts would have hit this temp so at least 1/2 the chicken would be completely sterile. Odds of the rest being contaminated by the parasite is low.
IF you aren't sure, look at the fibers of the meat. they should be tight. If they are loose and ill defined you could toss them back in or a stint in the microwave.
Tough to say really, I use a wireless temp probe. At 2.5lbs each probably 4 hours or so? I guess I'm not sure. I always use the probe and cook by temp, not time. It takes out all the guess work.
I just ordered this and have uaed it a couple times. It claims to have a 300 foot range but I didn't test that.
ThermoPro TP07 Remote Wireless Digital Kitchen Cooking Food Meat Thermometer with Timer for BBQ Smoker Grill Oven, 300 Feet Range https://www.amazon.com/dp/B014DAVCP4/ref=cm_sw_r_cp_apa_SBNuxbQ236HTT
I use the ThermoPro TP07. Honestly, I got it because it was cheaper than the others, and I didn't know how much I'd be really using it. Now that I have it, I use it ALL THE TIME for everything. I even use it when I make bread. It's been used a ton since I got it last October and I haven't had to replace the battery yet. It works great although it feels a bit cheap. That doesn't bother me since it gets the job done at a fraction of the cost of the other ones. We will see how long it lasts. Might invest it a nice one if this guy ever dies since I do use it a bunch.
I would get this one. It's way more popular and thermopro is a reasonably established brand
https://www.amazon.com/gp/aw/d/B014DAVCP4/ref=mp_s_a_1_1?ie=UTF8&amp;qid=1509497150&amp;sr=8-1-spons&amp;pi=AC_SX236_SY340_QL65&amp;keywords=digital+meat+thermometer+for+smoker&amp;psc=1&amp;smid=ASOOYMPIKYKXM
I have friends with ones like these and they love them
ThermoPro TP-08 Digital Wireless Remote Meat Thermometer with Dual Probe for Kitchen Cooking, BBQ Smoker Grill Oven - Monitors Food Temperature From 300 Feet Away, Batteries Included https://www.amazon.co.uk/dp/B014DAVHSQ/ref=cm_sw_r_cp_apa_oE1JAbHDPFJHD
Looks like you also have this
Looks like the same specs, (heck the guts may come from the same Chinese factory).
It was actually just an ambient temperature probe. We just sat it right behind the ribs so that it would be close to what the temperature of the ribs cooked.
http://www.amazon.com/Famili-Wireless-Digital-Thermometer-Cooking/dp/B01CTZ17QO
That is the one I got. It appears to be a rebranding of this one.
http://www.amazon.com/ThermoPro-Wireless-Digital-Kitchen-Thermometer/dp/B014DAVHSQ
I have heard that this is also a good one
http://www.amazon.com/Maverick-732-Remote-Smoker-Thermometer/dp/B004IMA718
I didn't use the food thermometer because I wasn't really concerned with the temperature because I was able to keep it low enough on the grill to get a good smoke going. I kept it between 240 to 280 for most of the smoke.
I only had to use the bend test to figure out when they were done.
http://amazingribs.com/tips_and_technique/are_they_ready.html
Yep. This is the one I have https://www.amazon.com/ThermoPro-TP-08S-Wireless-Thermometer-Grilling/dp/B014DAVHSQ/
The older ThermoPro TP-08S is about $15 less than the TP20 and comes with an ambient heat probe with clip instead of two standard probes.
Anything like this works. do not wash the probe in a dishwasher, or soak in water, clean by hand.
https://www.amazon.com/Taylor-Digital-Cooking-Probe-Thermometer/dp/B00004XSC5/ref=sr_1_13?gclid=Cj0KCQjw_absBRD1ARIsAO4_D3tpSRCT7fe9Xc1KjO4E7kx1aBCAiombNRw1V8uRgLiFcWTRFdm0SeIaAhJCEALw_wcB&hvadid=241567707765&hvdev=c&hvlocphy=9030029&hvnetw=g&hvpos=1t1&hvqmt=e&hvrand=1892287846665362991&hvtargid=kwd-573895322&hydadcr=28576_10704709&keywords=digital+thermometers+with+probe&qid=1569379975&s=gateway&sr=8-13
Something like this will give you the best temperature, since it checks temperature at the grate, as well as the meat. If you do not smoke that much, you could buy a cheap oven thermometer and calibrate it in hot water and just set it on the grate.
https://www.amazon.com/ThermoPro-TP-08S-Wireless-Thermometer-Grilling/dp/B014DAVHSQ/ref=sr_1_14?crid=N6C4AIL1BP61&keywords=maverick+thermometer&qid=1569380102&s=gateway&sprefix=mavrick+them%2Caps%2C191&sr=8-14
I'm not sure it's really necessary... I have one of these I use when BBQing which I guess could work. Set a high and low temp alert and it will let you know if the sous vide has stopped.
ThermoPro TP-08 Digital Wireless Remote Meat Food Thermometer with Dual Probe for Kitchen Cooking, BBQ Smoker Grill Oven - Monitors Food Temperature From 300 Feet Away, Batteries Included https://www.amazon.co.uk/dp/B014DAVHSQ/ref=cm_sw_r_cp_api_i_lS3ZBb59TEG0Z
Needle probe
https://www.amazon.com/ThermoPro-TP-08S-Wireless-Thermometer-Grilling/dp/B014DAVHSQ/ref=mp_s_a_1_fkmr3_2?ie=UTF8&amp;qid=1538423301&amp;sr=8-2-fkmr3&amp;pi=AC_SX236_SY340_QL65&amp;keywords=needle+probe+remote+thermometer
Weatherstrip Foam Tape (any kind that is ok for marine use is ok in water)
https://www.amazon.com/Gourd-Elasticity-Adhesive-All-Climate-Weatherstrip/dp/B079NM8758/ref=mp_s_a_1_4?ie=UTF8&amp;qid=1538423423&amp;sr=8-4&amp;pi=AC_SX236_SY340_QL65&amp;keywords=weatherstrip+tape&amp;dpPl=1&amp;dpID=51TZsf6d9SL&amp;ref=plSrch
VacMaster Bulk Bags (split the order with a friend, haha!)
https://www.amazon.com/gp/aw/d/B00AZ7SPBO/ref=mp_s_a_1_43_a_it?ie=UTF8&amp;qid=1538423597&amp;sr=8-43&amp;keywords=vacuum+sealer+bags+bulk&amp;dpPl=1&amp;dpID=41naTidMejL&amp;ref=plSrch
Buy a nice thermometer like this if you don’t have one, two even. https://www.amazon.com/ThermoPro-TP-08S-Wireless-Thermometer-Grilling/dp/B014DAVHSQ?ref_=bl_dp_s_mw_8074453011
Make sure the heat shield is in the right position to get the best heat distribution and limit hot spots. A laser temp gun makes this easier.
Setup an ambient temp probe near the meat to monitor temperature. My grills internal sensor is not always accurate. So I’ll just manage the temp with a few extra probes I set up.
Low and slow and you’ll be fine. Don’t go off time, use a meat probe and cook until it reaches temp. I second amazingribs.com. A brisket will take awhile depending on size.
I have both the Maverick et-732 and the thermpro tp-08s and I prefer the thermpro.
Easier to set up and cheaper. I haven’t had any wild readings.
https://www.amazon.com/dp/B014DAVHSQ/ref=cm_sw_r_cp_api_UcOTBb8KGRXAB
$45 on amazon and it looks like there is an 8% coupon available right now.
https://www.amazon.com/dp/B014DAVHSQ/ref=cm_sw_r_cp_api_w8DTzbK1DB3B
I just got this remote thermometer and it is awesome.
Radio frequency. The range is usually 300ft line of sight. Or like half that if not.
https://www.amazon.com/ThermoPro-TP-08S-Wireless-Thermometer-Grilling/dp/B014DAVHSQ
The two devices are connected via radio signal. My smoker is in a spot of my backyard where the wifi is spotty/doesn't connect, and bluetooth would have no chance of staying connected to my phone when I'm inside.
Of course it's all preference. I like having the 2nd device with the temp in front of me at all times versus it being an app on my phone.
I have 2 of the therm pro wireless ones. Each one has 2 probes that I have placed around. I adjusted for the smoke today and its much better at least. Will need to keep practicing to dial in the temp settings on this thing.
The ribs turned out great. Flavor was perfect just cooked a little to fast so did get the clean bone pull.
This one: https://smile.amazon.com/ThermoPro-TP-08-Wireless-Thermometer-Grilling/dp/B014DAVHSQ/ref=sr_1_4?ie=UTF8&amp;qid=1527528095&amp;sr=8-4&amp;keywords=therm+pro
If you plan on doing any true, low'n'slow BBQ, I'd recommend a wireless, [dual-probe thermometer unit] (https://www.amazon.com/ThermoPro-TP-08-Wireless-Thermometer-Grilling/dp/B014DAVHSQ/ref=sr_1_1?ie=UTF8&amp;qid=1525888495&amp;sr=8-1&amp;keywords=dual+probe+thermometer&amp;dpID=51uS-%252BVKAfL&amp;preST=_SY300_QL70_&amp;dpSrc=srch). In my, opinion, these are essential. You can't trust the lid-top thermometer, and you need to know where your meat temp is at.
ThermoPro TP16 is the best I've ever owned.
I think s/he meant humidifier. With airflow, it might act like an evaporative cooler (swamp cooler.)
My idea is that I would freeze cans of water and put those in there... Probably just because I just made yogurt by putting a jar of boiling water in a cooler with my yogurt culture, to keep it hot enough. So I don't know if it would work the other way, but I'd get a space blanket (it's like 90+% hear reflective) and try it. You could control airflow using a space blanket.
Another thing I do, to keep the temp at 105, is use a remote thermometer so I'm not letting heat out by opening it too often. like this. https://www.amazon.com/dp/B017613C3C
I like the ones like this. They're nice as you can just stick the probe in your meat, put in the oven, and get an alert when it reaches the perfect temperature. I have one by a different brand that great for this as well as using it like a regular instant read thermometer.
i have a probe thermometer similar to this one
and the smoker has a built in meat probe that i can track/be alerted via bluetooth, or by a readout on the smoker.
thanks for helping me to sort all this out. this meat is mostly for me and a couple friends that understand its my first time, so if i screw up, i will still have hopefully learned something.
I use [one of these probes ](ThermoPro TP-16 Large LCD Digital Cooking Food Meat Thermometer for Smoker Oven Kitchen Candy BBQ Grill Thermometer Clock Timer with Stainless Steel Temperature Probe, Standard, Silver https://www.amazon.com/dp/B017613C3C/ref=cm_sw_r_cp_api_i_U-ECDbJSCB8HJ) and set it to ding at 118 if I’m looking for a rarer steak or 125 if I’m looking for more medium-rare. Works like a charm! I set my air fryer to 350 and flip it after 5-7 minutes, then I eat when it dings!
I bought a thermocouple for my multimeter.
If I didn't have the multimeter I'd have went with something like this.
Here This is the one I use. I had gotten a cheaper on originally with a silicone cover over the wire and it lasted for about a year before the wire started backing out of the probe and it wouldn’t read correctly. I’ve had this one since and it seems much sturdier.
https://www.amazon.com/dp/B017613C3C/ref=cm_sw_r_cp_api_pZ0rzbYDWKENS
A probe thermometer with a cord is fantastic for a newbie cook unsure about getting meat to the right temperature. You just stick it into the middle, set the timer to the temperature you want, and it beeps at you when it's done. No guesswork, no cutting it open to check, no dry overcooked meat.
You will need a meat thermometer to do this, but you should own one anyway for safely roasting things.
I’d go w/ something like this... much easier to work with
https://www.amazon.com/ThermoPro-TP-16-Thermometer-Stainless-Standard/dp/B017613C3C/ref=mp_s_a_1_3?keywords=remote+oven+thermometer&amp;qid=1557443792&amp;s=gateway&amp;sprefix=remote+oven&amp;sr=8-3&amp;utm_source=share&amp;utm_medium=ios_app
>You’ll know exactly when it’s done
Not really, though. A probe thermometer would do that job better-https://www.amazon.com/dp/B017613C3C/ref=sr_1_5?keywords=thermometer+with+probe&qid=1551351419&s=gateway&sr=8-5
Ah, alright! I think I'll just use my home oven then. This is probably a dumb question, but I heard that the digital oven thermometers (the ones with probes) are more accurate, but I'm not really sure how to use them. Do I put the probe in next to my sculpture, or do I need to insert it into the sculpture?
This is the kind I'm talking about: https://www.amazon.com/ThermoPro-TP-16-Thermometer-Stainless-Temperature/dp/B017613C3C/ref=sr_1_1?s=home-garden&amp;ie=UTF8&amp;qid=1537636872&amp;sr=1-1&amp;keywords=Digital+oven+thermometer&amp;dpID=41StbFDF60L&amp;preST=_SY300_QL70_&amp;dpSrc=srch
Get a new meat thermometer i use this https://www.amazon.com/dp/B017613C3C/ref=cm_sw_r_cp_apa_8gxVAbQGBP14A
Check the thickest part of the meat.
Next time use a probe thermometer that you can leave in the roast with the temp gauge outside like this
https://www.amazon.com/ThermoPro-TP-16-Thermometer-Stainless-Standard/dp/B017613C3C/ref=mp_s_a_1_3?adgrpid=56143345636&amp;gclid=Cj0KCQjw8svsBRDqARIsAHKVyqEc7A7Bx34kYrVG4mob9kO0stg7W9M4FRBCWuHwEReZBqdlkQtc9l8aAu5dEALw_wcB&amp;hvadid=274708372980&amp;hvdev=m&amp;hvlocphy=9003357&amp;hvnetw=g&amp;hvpos=1t1&amp;hvqmt=e&amp;hvrand=8239971173128604548&amp;hvtargid=kwd-6198397217&amp;hydadcr=14889_10218911&amp;keywords=probe+thermometer&amp;qid=1569928012&amp;s=gateway&amp;sr=8-3
They are pretty cheap and a great tool.
Dark meat should be cooked till it’s at 175° F internally, to insure its cooked thoroughly while remaining tender and juicy. For your oven temp, I’d go anywhere between 400° to 450°. If you have an instant read thermometer like this one then you can insert it into the drumsticks and set an alarm for the correct temp.
Don't remember which one since it's old but something like this should work for you. Don't get the cord wet as it will short out the probe. I kink the cable so that it won't drop into the liquid past the solid metal. It's not going to give give you the fractions of a degree but I figure just being able to generally track the temp throughout is good enough.
If you don't already have one, a leave-in meat thermometer: https://www.amazon.com/gp/product/B017613C3C/ref=oh_aui_search_detailpage?ie=UTF8&amp;psc=1
yeah thats the one. thats a must have
this is the probe i have. https://www.amazon.com/dp/B01GE77QT0/ref=asc_df_B01GE77QT05384829/?tag=hyprod-20&amp;creative=395033&amp;creativeASIN=B01GE77QT0&amp;linkCode=df0&amp;hvadid=198091107028&amp;hvpos=1o9&amp;hvnetw=g&amp;hvrand=9749761970972023902&amp;hvpone=&amp;hvptwo=&amp;hvqmt=&amp;hvdev=c&amp;hvdvcmdl=&amp;hvlocint=&amp;hvlocphy=9021400&amp;hvtargid=pla-379519116602
i love the monitor you can take with you so you aren't constantly checking on the temperature.
I usually split my briskets between the point and the flat.
You dont have to do that. However I always put the temp prob in the smallest cut of meat. When its done move the probe to the next largest.
Fat melts at a specific temperature. I get cooking steaks to a feel however unless you cook the same size and cut regularly getting it right isn’t going to happen.
I was a line cook for years. Cooking to feel is easy when you make 30 steaks a day. Really hard when you cook a few briskets a month. And if you are wrong, getting a brisket back to temp is a bitch.
Tp20 is a cheap remote probe available on amazon.
https://www.amazon.com/dp/B01GE77QT0/ref=cm_sw_r_cp_api_theeAbZ6JXVWA
but almost any will do fine. Having multiples could help a lot. Alternatively if you are confident in your built in smoker thermometer you could use the second grill temp probe in another piece of meat.
As for trimming or separating aaron franklin from Austin, TX, an award winning bbqer, has shared quite a few of his processes on youtube and at bbq university. The audience in the second video is made up of bbq restaurant owners and competitive bbqers looking to up their game. Im sure there are a few hobbiest in the bunch but not a lot at the price of it.
Trimming
https://youtu.be/VmTzdMHu5KU
Brisket Camp 2015
https://youtu.be/yaMgt1Altys
Best of luck! Im sure it will turn out great!
Yes, aside of ribs, I always pay attention to IT instead of time, aside of when I'm grilling burgers, I'll let a certain amount of time pass when flipping each side before I put a thermometer to it. Time is just a guide/rough approximation for me otherwise.
There are many, many temperature monitoring options - bluetooth, WiFi, etc., but here's the one I use, been using it for 2 years now, and only have the occasional glitch on one probe (a new probe is probably in my future): ThermoPro TP20
When I start getting close to IT on the ThermoPro, I use the following instant read: Javelin Pro
Tp20 for the win: https://www.amazon.com/dp/B01GE77QT0/ref=cm_sw_r_cp_api_i_ZNPGDb37F702H
I picked up some 6.7lb brisket from a local thriftway with a fair fat layer and then followed this after brushing it with salt, pepper and some random bbq seasoning. http://www.traegergrills.com/recipes/beef/traeger-brisket
I just skipped the refrigerator part and took it to 196f. Slice and eat.
I used this wireless temp probe. https://www.amazon.com/ThermoPro-Wireless-Digital-Cooking-Thermometer/dp/B01GE77QT0/ref=sr_1_1?ie=UTF8&amp;qid=1498303959&amp;sr=8-1&amp;keywords=wireless+temperature+probes
I think I clocked in 5 on smoke, wrapped in foil then 3.5 more in foil at 225? I'll admit it looks overdone but everybody liked it. (I invited random friends over with the warning we might have to resort to hotdogs)
I'd highly recommend a remote thermometer. I have this one which Amazon tells me I bought in November 2014. It still works great and I think it's a rebranded Maverick which is highly recommended on AmazingRibs. Apparently this Thermopro is the best seller on Amazon for $20 more and has a couple more bells and whistles.
The lid is a bad place to measure temperature, it's often much hotter up top than it is where the meat is cooking. A more useful measurement is at the cooking level.
&#x200B;
Analog bi-metal thermometers are notoriously inaccurate.
&#x200B;
Consider purchasing a digital remote probe thermometer, and installing a probe at the grate level. Something like this:
https://smile.amazon.com/ThermoPro-Wireless-Digital-Cooking-Thermometer/dp/B01GE77QT0
&#x200B;
Looks like you're off to a good start! If you don't have one already, pick up a wireless grill thermometer with two probes - one for the brisket temp, and one for the grill temp.
The grill temp should be right around 230 f, and the brisket should hit that temp by the time you're done.
As the brisket cooks, it loses water. Losing water via evaporation cools it, so you get this strange effect where the temperature of the brisket stops rising, aka "the stall". Don't freak out, just keep smoking that brisket. It will eventually lose enough water to the point where it no longer has enough to cool itself via evaporation, and the temp will start to rise again.
Something to note is that a brisket tends to absorb as much flavor from the smoke as it can in about 4-6 hours of smoking. If you're tired, you can cheat by pre-heating your oven to 230 F, pull the brisket off the smoker, wrap it in foil and toss it in the oven. It tastes fantastic and you don't have to keep getting up every few hours to add fuel to the smoker. On the downside, the bark won't be quite as crispy. On the upside, you'll be well rested!
As far as rubs go, salt, pepper and a decent amount of brown sugar are what I use. Having sugar to caramelize is what really makes the bark pop.
If you have the room and can find a decent place that sells hardwood suitable for smoking on Craigslist - pecan, mesquite, etc, definitely shell out for an offset wood-fired smoker. It makes a world of difference in the flavor, and kicks the butt of any pellet fired smokers.
A great book to read on the subject is from a notable Austin BBQ joint, Franklin's - https://www.amazon.com/Franklin-Barbecue-Meat-Smoking-Manifesto-Aaron/dp/1607747200
This is the thermometer I use, has a good range on it and it's dead on accurate - https://www.amazon.com/gp/product/B01GE77QT0/
I just got a Daniel Boone non WiFi last weekend and am using this to monitor temps. Seems to work pretty well so far.
It just takes a little practice and building up confidence... while getting to eat way better BBQ than you get at most restaurants and way more fresh.
If you don't already have one, you really need to get a digital thermometer like this one.
And I highly recommend this book for some great recipes - smoked meatloaf was really good. The mac n' cheese recipe is ridiculous.. family/coworkers know me for it. It has a lot of other great tips for the WSM too.
Welcome to the club, it's such a delicious hobby.
Well, I have no idea what your price point is, but there are a couple really nice options that I have my eye on:
A nice 'Cold Smoker' will allow him to smoke cheese, salt, or anything else that might melt if too much heat hits it.
How about a wireless thermometer (definitely need a wireless one, not blue tooth) so he can keep watch on his grill from inside
Maybe a real nice skewer set with an elevated cooking system?
or maybe a portable smoker so he can tailgate?
OR.... how about a new Grill with all the works?
The options are limitless
thermapen and/or one of these
Are you looking to manage the controls via your phone or portable device that comes with? Here's an option that's on sale today. Might be somewhat closer to what you're looking for and wont break the bank
I agree with above comments on being able to smoke on these. I honestly use my Weber kettle more than my WSM. Pick up one of these bad boys and don’t worry about adding a thermometer to the grill itself (they aren’t as accurate anyways because they’re positioned at the top-where all the hot air is). ThermoPro TP20 Wireless Remote Digital Cooking Food Meat Thermometer with Dual Probe for Smoker Grill BBQ Thermometer https://www.amazon.com/dp/B01GE77QT0/ref=cm_sw_r_cp_api_i_ggTSDbJ65VRF0. You can put a probe in the meat and one on the grate and bob’s your uncle. Made many a fine Boston butt/rack of ribs on my kettle. You did good.
Forgot to mention-set it up indirect. I bought the Weber charcoal baskets to hold the charcoal. You’ll also want one of those grates where the edges lift up so you can add coals on a longer smoke. Weber Hinged Cooking Grate https://www.amazon.com/dp/B000WEPHKW/ref=cm_sw_r_cp_api_i_1jTSDbAVXC5C3
I was looking at this one on amazon...https://www.amazon.com/dp/B01GE77QT0
is that the one?
It looks like I was wrong about the price but here is mine.
https://www.amazon.com/gp/aw/d/B01GE77QT0/ref=yo_ii_img?ie=UTF8&amp;psc=1
You can get these in the $30 range but typically with just I probe or something like that.
I personally do not like the Bluetooth versions that talk to your phone because their range is so bad.
https://www.amazon.com/gp/product/B01GE77QT0/ref=oh_aui_search_detailpage?ie=UTF8&amp;psc=1
https://www.amazon.com/gp/aw/d/B01GE77QT0/ref=mp_s_a_1_4?ie=UTF8&amp;qid=1523075369&amp;sr=8-4&amp;pi=AC_SX236_SY340_QL65&amp;keywords=grill+thermometer&amp;dpPl=1&amp;dpID=51tNzl-vQ0L&amp;ref=plSrch
This [one] (https://www.amazon.com/gp/aw/d/B01GE77QT0/ref=mp_s_a_1_3?ie=UTF8&amp;qid=1496333916&amp;sr=8-3&amp;pi=AC_SX236_SY340_QL65&amp;keywords=thermoworks+thermometer&amp;dpPl=1&amp;dpID=51G%2B2FvaMDL&amp;ref=plSrch) seems decent, no ?
I love my ThermoPro TP-20. 300 foot range means I can attend to other things anywhere in my house or yard while brewing (or barbecuing, where the second probe comes in handy).
this one :) https://www.amazon.com/dp/B01HV5AL9G/ref=cm_sw_r_cp_apa_qahBybCN1653N
Basically gonna echo most of the answers already posted, but just to pile on:
Cookbooks
Nothing inspires cooking like a good cookbook collection. The great news about cookbooks is that they're often bought as gifts or souvenirs and they make their way onto the used market cheap and in great condition. Here are my suggestions for a great starter shelf:
Sorry for the delayed response, busy week. It is funny you mention filtering your water. When I first got my fish I was buying gallons of distilled water from the grocery store and I live in Washington which has some of the best tap water in the world.
Ok so here we go:
When you ready to spend a bit more $$$ I highly suggest a Python water changer (https://www.amazon.com/25-Foot-Python-Aquarium-Maintenance/dp/B000255NXC/ref=sr_1_1?ie=UTF8&amp;qid=1487866713&amp;sr=8-1&amp;keywords=python+water+changer). It connects to a sink faucet and uses your water pressure to syphon the tank super easily and makes it so you can refill straight from your sink tap (no carrying water anywhere). A note: when applying seachem prime to your new water when using a changer, you can just dump the dose of prime right into your tank and fill it with the tap water as Prime acts almost instantly. For good measure I generally turn my filter off for a few minutes just to avoid chlorine potentially getting in the filter somehow.
(NOTE ON CATFISH: They are naturally schoaling fish. This means they like to be kept in groups and if they are not they will not really know how to act properly and won't be "happy". Both the Corydoras Julii and the Otocinclus will stay very small throughout their life. I would say 3 bare minimum with 4 or 5 being better if you have the space.)
Finally in regards to bioload, wait to add any more fish period until you can tell that the tank has been cycled. This will simply make it easier to keep a more controlled environment and keep the stress levels down.
Further, since you are cycling the tank right now, that inevitably creates stress for your fish. Even the slightest ammonia or nitrite spike is not fun for them. Until your tank is fully cycled, he is going to be grumpy and may spend a lot of time acting differently than you did when you first got him. Once the tank is cycled then I would be more aware of monitoring his behavior.
My older betta spends the ENTIRE DAY either sleeping on his plant leaves, hiding behind his filter, sitting on the thermometer or sitting in a pineapple. He is such a lazy jerk. This is also the fish that lived through like 6 months of pure neglect as I had no idea what I was doing when I got him. He was sitting in unchanged water for months at a time :( and is the whole reason I undertook trying to get better at this.
TL:DR - Yes, just let him rest :). Keep up on the water changes, and buy a thermometer as soon as possible. When the tank is stable, get 5 more tetras and 3-4 Corydora Julii or Otocinclius Catfish and a couple shrimp :).
And if you're not sure and don't want to drop $70+ on a nice one, there are cheaper options like this out there.
I've had this little one for almost two years now, and it gets the job done. It doesn't have any special features, you can't keep it in the meat while it is in the oven or grill, it doesn't read the temperature instantly, but it gets the job done and my steaks come out how I want them.
https://www.amazon.com/dp/B07477NMF4/ref=psdc_289810_t1_B017613C3C
&#x200B;
Is what I use. Probe connections are long enough you can set the display on the counter to the side. Beeps when it reaches the set temperature.
Purchase an oven safe digital probe thermometer. I have this one. The alarm goes off when it reaches the appropriate temp and there are guidelines written in the thermometer itself. No guesswork.
I've got the Chugod which you can get from Amazon.
It's bluetooth only, but has decent range. I can still have it connected from the third story of my apartment. It can carry 6 probes as well.
My only gripe with it is that I can't figure out how to nickname each probe, or if you can at all.
I have this and it hasn't let me down yet.
https://www.amazon.com/Wireless-Thermometer-Bluetooth-Grilling-Supported/dp/B075L7V6NZ/ref=sr_1_1?ie=UTF8&amp;qid=1519331864&amp;sr=8-1&amp;keywords=chugod
BBQ Meat Thermometer, Bluetooth Remote Cooking Thermometer, Digital Oven Thermometer with 6 Probe Port for Smoker Grilling (Carrying Case Included) https://www.amazon.com/dp/B075L7V6NZ/ref=cm_sw_r_cp_api_i_zQQgDbEGGYN64 I just got this. I’ve only used it once, but it does what you’re looking for. I have a Smokey mountain too, usually zip tie the actual unit to the lid handle.
My MES doesn't have an internal thermometer, nor do I know if you can calibrate yours.
What I DO know is that I bought this kit https://www.amazon.com/dp/B075L7V6NZ/ref=cm_sw_r_cp_apa_i_A71RCbMMK1248 off of Amazon (with extra probes), and it's been amazing to me. It must be accurate enough, because everything I've cooked with it so far turns out damn near perfect. I highly recommend buying this, even if it's just for the convenience of getting alerts via BT on your phone.
I picked up a 6 probe digital not to long ago for $60
Seems there out of stock now but they have a 2 probe for $27
I had the same trouble with that same unit. I gave up and bought this
I picked up one of these on an Amazon special for about $30. It has 6 probes and I use one for ambient grill temp on my Kamado.
Tenergy Solis Digital Meat Thermometer, APP Controlled Wireless Bluetooth Smart BBQ Thermometer w/ 6 Stainless Steel Probes, Large LCD Display, Carrying Case, Cooking Thermometer for Grill & Smoker
https://www.amazon.com/dp/B077821Z4C/ref=cm_sw_r_cp_apa_i_lmyYDbFXHJQYF
Keep watching other sites as we approach Black Friday - there's bound to be sales...
Really, really like this one. Bluetooth with an app and 6 probes with lengthy cables, in case if you're doing a lot of different meats.
https://www.amazon.com/gp/product/B077821Z4C/ref=oh_aui_detailpage_o02_s00?ie=UTF8&amp;psc=1
There is an app called Easy BBQ, which seems to be used on a lot of Bluetooth thermometers. I got this Soraken one from Amazon and had the exact same problems /u/ibrewbeer had.
Easy BBQ app crashes constantly and resets the graph data. Was a real bummer. I've been doing extensive research this morning and most of the smaller BlueTooth thermometers use the Easy BBQ app. So I'm trying to stay away from those.
I'm going to save up for a Fireboard eventually, but I'm going with the Weber iGrill 2 in the meantime. It doesn't use the Easy BBQ app, it has it's own app, Webber iGrill. The reviews are pretty positive for both the unit and app, and a Webber rep has reached out on Amazon and the Google Play store to those who have frequent disconnects or problems and had them return the unit for a new one, thinking defective hardware is the issue. That's solid customer service for me.
I'd stay away from any thermometer that uses the Easy BBQ app though. I'll see how this Weber iGrill does while I'm saving up for the Fireboard!
Might think about grabbing an external temp gauge that can track temperatures. That way you'll be able to compare fluctuations and averages to the installed GMG temp probe. I have one of these and it works well enough - there are better thermometers available but for the price and number of probes this one is pretty good. The app isn't the greatest in the world but it'll chart temperature fluctuations over your cook time.
I had a ThermPro that failed, just replaced it with this:
Wireless Meat Thermometer for... https://www.amazon.com/dp/B07MVVK5JK?ref=ppx_pop_mob_ap_share
Use a meat thermometer and cook until the center of the thickest part reaches 165 F (solid technique whether baking, pan frying, grilling, whatever).
I use a fancy one with a remote probe that you can insert before you cook and leave it in, like this:
https://www.amazon.com/Wireless-Thermometer-Grilling-Bluetooth-Barbecue/dp/B07MVVK5JK/ref=sr_1_15?keywords=meat+thermometer+digital&qid=1555608154&s=gateway&sr=8-15
Or get a simpler one like this:
https://www.amazon.com/ThermoPro-TP01A-Thermometer-Digital-Meat/dp/B078KPHKZD/ref=sr_1_13?keywords=meat+thermometer+digital&qid=1555608283&s=gateway&sr=8-13
and test it occasionally (don't leave this one in the oven - just stab the meat to check it from time to time).
https://www.amazon.com/dp/B07MVVK5JK/ref=cm_sw_r_other_apa_i_Li0ODbSTM9ASA
6 probes, $47
You know, that exact same style is available from multiple manufacturers.
http://www.amazon.com/Taylor-1470-Digital-Cooking-Thermometer/dp/B00004XSC5
http://www.amazon.com/ThermoWorks-Original-Cooking-Thermometer-Timer/dp/B0019R4HQQ
I wonder whether they're all the same probe/curcuit board/LCD panel
You can get those. You leave the probe in the meat (for chicken/turkey you put it in the thickest part of the breast, off to one side). and a wire connects it a monitor outside your oven. Something like this. You can set the temp (or cook time, but really, use the temp option). When it reaches your desired temp (I would cook chicken to at least 162-ish so that residual cooking gets it to 165) it will beep, and you take it out.
Well, there are always these options:
this or this
The only problem is the lack of temperature control, it's basically hit boil and it stops. If you care about temperature control, then I recommend buying an instant thermometer(I recommend this one because it will beep when it reaches the desired temperature, make sure to set it to like 180 if you want 185) along with those kettles.
So if you purchase the the cheapest electric kettle and the thermometer, then you don't even break $30.
Alternatively you can always buy a normal kettle and microwave the water but control management would be more difficult.
Yeah my oven keeps the temp pretty consistent, usually within a few degrees of 150. I guess it just depends on your oven. I measured the "warm" setting on my oven to see what the temp would be. Here is the exact probe thermometer I have. It's nice because you can set an alarm if it gets to a certain set temperature.
I use a leave-in cooking thermometer all the time for meat in the oven, in my opinion it's worth the $15 bucks to get the right type of thermometer. I would be worried that a standard probe thermometer would end up reflecting the heat of the slow cooker or get damaged from the moisture. http://www.amazon.com/Taylor-Precision-Products-Digital-Thermometer/dp/B00004XSC5/ref=sr_1_5?s=kitchen&amp;ie=UTF8&amp;qid=1464048847&amp;sr=1-5&amp;keywords=kitchen+thermometer
this kind of thermometer have extremely slim wire for the probe, it should not skew the cooking temp / time that much
also, just cook chicken or any other protein the simple traditional way. hard pan sear for color / crust and throw it in a low temp oven (225 - 250) with the probe thermometer and let the temp rise to 145 and rest.
I used an digital cooking thermometer. The meat was cooked to an internal temperature of 165F. I set the alarm for that threshold and pulled it out right when it hit it. Used this recipe for its simplicity.
First, the hats look great! I have always dropped a digital thermometer in one of the top vents and has seemed to work well. As rocketspank pointed out, just make sure it isn't touching any of the pit or grill and you should get a good reading.
This is going to be my first year going with this recipe. But I would assume for a turkey that is almost half the weight of the prescribed turkey, I would cut the time in half. I always use a digital thermometer (that is oven safe) that I leave in the turkey so I can see how it is doing as it cooks. I use something like this: http://www.amazon.com/Taylor-1470-Digital-Cooking-Thermometer/dp/B00004XSC5/ref=sr_1_1?ie=UTF8&amp;qid=1416934813&amp;sr=8-1&amp;keywords=digital+oven+safe+thermometer&amp;pebp=1416934815131
I hope that helps!
The thing is, you're looking for a high/low alarm, where you want to know if it's out of a range. You can certainly get a cheap $16 model with only a high notification alarm, but it doesn't sound like that's what you want.
I have a Thermapen and one of their meters, and ThermoWorks has very nice stuff.
http://www.amazon.com/Taylor-1470-Digital-Cooking-Thermometer/dp/B00004XSC5/ref=pd_sim_k_4
For well done it's unnecesary, just cook it until it's (almost) a charcoal.
Almost every episode of Good Eats
Watch them all, even the ones that deal with non paleo foods because the techniques are all solid. There are three basic cooking methods you need to worry about. On the stove, in the oven and in the microwave.
For the stove, all you need is a good cast iron skillet, but I recommend having a teflon pan as well. The iron will cook everything you can imagine. I like having the teflon for eggs mainly, iron will do eggs as well, but it can take some practice getting the temperature and lubrication levels correct. Teflon is much more forgiving. I have not used any of the newer nonstick pans so I cannot comment on those.
For the oven, get a aluminum half sheet pan and a oven safe cooling rack. Also get some sort of glass dish or casserole. Always wrap your sheet pan in aluminum foil, or line it with parchment paper when you cook with it. Makes clean up so much easier. Always grease your casserole dish. Baking, roasting, broiling are all pretty simple. Follow the recipes, and keep your eye on it. Get a probe thermometer and it'll tell you when your meat is cooked to your desired doneness.
For the microwave, all you need is a microwave safe plate, plastic wrap and some parchment paper. You can steam so many vegetables just using the microwave, it's ridiculously easy.
I hope this helps out, feel free to PM any questions. Don't forget a good sharp knife too. I still can't stress enough to just watch all the Good Eats episodes, they really have a lot of good techniques and explain the science behind it all. And if you ever want and/or get to cheat, there are some pretty awesome cheats there too.
EDIT: Forget to add this It is a great article on some really cheap tools you should pick up.
I use a probe thermometer with a cord similar to this
I stick that sucker in the meat and then put the meat in the oven (the cord is oven-proof). As long as you aren't probing it multiple times in multiple locations, you shouldn't have any issue with losing juices.
Tangentially related, I would get his books as well:
http://www.amazon.com/Im-Just-Here-Food-Version/dp/158479559X/ref=sr_1_4?s=books&amp;ie=UTF8&amp;qid=1291527138&amp;sr=1-4 (This one is about cooking)
http://www.amazon.com/Im-Just-Here-More-Food/dp/1584793414/ref=sr_1_6?s=books&amp;ie=UTF8&amp;qid=1291527138&amp;sr=1-6 (this one is about baking)
Read through those and you'll feel much more confident.
If you are cooking meat, I'd suggest getting a probe thermometer: http://www.amazon.com/Taylor-1470-Digital-Cooking-Thermometer/dp/B00004XSC5/ref=sr_1_2?ie=UTF8&amp;qid=1291527262&amp;sr=8-2
You'd be amazed how good any kind of meat tastes just with some salt and fresh pepper cooked to the exact right temperature tastes...
you get one of these ;)
&#x200B;
https://www.amazon.com/Taylor-Digital-Cooking-Probe-Thermometer/dp/B00004XSC5
I noticed that too. It looks like a digital meat thermometer to me.
This instant read thermometer is really nice. It's what I use.
Also, this thermometer has temperature/alarm settings which, though I've only used for brewing beer, would work equally as well for coffee or tea.
After checking the temp a few times you'll get an idea for when to pull the pot off the stove or how long to let it sit to get down to the right temp.
Here is a little explanation on a [dry brine] (https://www.youtube.com/watch?v=QkaslYP1Ruk&amp;list=PLDmXPQGZmiCGEvCF-XztLdo1boZWkXSqK). Also butter under the skin. The most important thing is to make sure you don't over cook the turkey. So I use a thermometer that allows me to keep an eye on the temp without having to open the oven. Good luck with the turkey
I have had
http://www.amazon.com/Polder-Original-Cooking-All-In-One-Thermometer/dp/B0000CF5MT
for over a year now and it works great and also has a timer.
The Polder is a good quality tool, I've had this one for years.
http://www.amazon.com/Polder-Original-Cooking-All-In-One-Thermometer/dp/B0000CF5MT/
Do it oven first, then sear. That way there is no need to rest it afterwords as the oven evenly heats it and the moisture remains evenly distributed. That way your steak is the right doneness, but at the highest temperature so it's nice to eat. Get something like this so you can set an alarm for when it hits the temp you want it to be while it's in the oven. It seems that the consensus is 350f oven temp. If you're unsure about if your oven is getting the temp right, one of these will come in handy.
I have two of these: http://www.amazon.com/Polder-Original-Cooking-Timer-Thermometer/dp/B0000CF5MT/ref=sr_1_2?ie=UTF8&amp;qid=1422105644&amp;sr=8-2&amp;keywords=polder
Work perfectly and easy to operate. Oh, and they are magnetic so it's easy to just stick them to the side of something for storage.
This is kind of neat, but you can just get one of these for under $20, and it will beep at you when your ham is done. Bonus: this thing is designed to go in the oven so won't melt and poison you if the oven gets too hot.
The kind I used was a little white square with an LCD display, with a metal tip on a 3 foot metal cable. Cheap.
Like this, but you can find cheaper ones. The cable makes it easier to keep it in the pot, and handle: https://www.amazon.com/DIGITAL-IN-OVEN-THERM-TIMER/dp/B0000CF5MT
Polder meat thermometer. I love it. It's been the longest lasting probe type thermometer I've ever owned, and I've gone through a fait number.
If you're going to make a habit of grilling and BBQ, it's good to have both an insta-read, and a "leave in" thermometer.
If you can't even get close enough to the meat to even take a temp with the insta-read, it's either an awfully short probe or you're grilling over very high heat. And it's not an exact science. Reward is correct when he says grills have hot-spots. Also the meat may not cook evenly given the fat content and distribution, any bone that may still be in it, or inconsistent thickness.
They are insanely cheap. $15 from Amazon. It can pay for itself in not ruining a single piece of meat. Bonus, they have alarms, so you can set it at the temp you want and cook undistracted.
Not sure what your budget is like, but you can get inexpensive meat thermometers for $10+. Many people overcook their meats without realizing it. A thermometer allows even a n00b to cook meat perfectly. When baking or roasting meats, I use something similar to this because the probe stays in the meat while cooking so I don't need to keep opening the oven, plus I can estimate how much longer the meat will need to cook (so I can time the side dishes to finish at the same time).
Cabled puncture probe thermometer connected to a display outside of the oven. Test the recipe a few times in the oven (different times and temperature settings) with the probe stuck in the centre of the meat, and observe the temperature dynamic and end temperature. Then record what works and what doesn't. Repeat as necessary until archiving perfection.
Edit: like this http://www.amazon.com/CDN-DTP482-Programmable-Probe-Thermometer/dp/B00046YFHE
Would you recommend this for use with an air popper? I currently have [this guy](CDN DTP482 Programmable Probe Thermometer/Timer
http://amzn.com/B00046YFHE) sitting in my Amazon cart, but if I would actually benefit from running an actual chart versus just a spreadsheet of manually recorded times and temps (me roasting, wife recording), then it may be worth the cost of an actually air roaster to get a thermometer.
Honestly, best investment ever if you plan on cooking your own proteins!
I felt the same way with 2 different analog meat thermometers. I decided to risk $20 and purchased a digital thermometer from amazon: http://www.amazon.com/Epica-Ultra-Fast-Digital-Meat-Thermometer/dp/B0089O0W1G/ref=sr_1_2?ie=UTF8&amp;qid=1421357270&amp;sr=8-2&amp;keywords=meat+thermometer&amp;pebp=1421357270153&amp;peasin=B0089O0W1G
After getting one of these, I noticed the ability to get more consistent reads. I was fairly certain that I was using the analog thermometers correctly, but I highly recommend a digital one. I noticed less effect from heat sources (grill) and the fast reads are simply easier and more convenient.
I hear Thermapen is the best thermometer. They're a little pricey though. I use this one and it's worked pretty well for me.
This thermometer has served me well for some time. I use it to check my water temperature before mixing dough as well as checking the temperature of the dough to make sure it's in the range I want.
Buy a laser (IR) thermometer to get some objective data. I use mine daily. It's invaluable for lots of common chores
http://www.amazon.com/Nubee%C2%AE-Temperature-Non-contact-Infrared-Thermometer/dp/B00CVHIJDK/ref=sr_1_2?ie=UTF8&amp;qid=1395321491&amp;sr=8-2&amp;keywords=laser+thermometer
Perhaps an infrared thermometer? I have never seen this used for brewing, and I'd be concerned with accuracy, but it's a relatively cheap option that you may want to look in to.
Edit: this one in particular claims to be up to 2% or 2°C off in either direction. It probably wouldn't be useful.
Really, any temp gun (I use IR guns) will work well, so just use whatever. Mine was a low cost one from amazon (I think I went with this one and look, it's on sale).
And the best solution to heat issues if you end up having them with UTH and don't want to remove it is to buffer with more materials. Obviously, the thicker the material the less heat conducive it is. Newspaper works well because it's easily replaced and insulates fairly well while still being hard to dig under. You can also use a felt type fabric (Zoo Med and Zilla sell "reptile carpet" but it's just felt) as it can be removed and washed and is thick enough to buffer heat.
That's really too bad I was interested to see some folks get this working. Something like this might have been helpful for you.
Nubee Temperature Gun Non-contact Digital Laser Infrared IR Thermometer
https://www.amazon.com/dp/B00CVHIJDK/ref=cm_sw_r_cp_apa_i_95lqDbPT49VRA
Yes, these are far more precise. You can get a very accurate reading of the surface tem0 so exactly what your leo will be touching. Very useful
https://www.amazon.com/dp/B00CVHIJDK/ref=asc_df_B00CVHIJDK5092658/?tag=hyprod-20&amp;creative=395033&amp;creativeASIN=B00CVHIJDK&amp;linkCode=df0&amp;hvadid=167130978684&amp;hvpos=1o12&amp;hvnetw=g&amp;hvrand=5427555998887861370&amp;hvpone=&amp;hvptwo=&amp;hvqmt=&amp;hvdev=m&amp;hvdvcmdl=&amp;hvlocint=&amp;hvlocphy=9030005&amp;hvtargid=pla-314644480709
If you're that concerned get one of these:
http://www.amazon.com/Nubee-Temperature-Non-contact-Infrared-Thermometer/dp/B00CVHIJDK/ref=sr_1_1?s=home-garden&amp;ie=UTF8&amp;qid=1418826347&amp;sr=1-1&amp;keywords=infrared+digital+thermometer
Or something similar.
I checked my duct work and most of it was the same ambient temperature as the attic itself. If it was badly insulated (and it was in a few spots) then it would register as cooler than nearby wood and such. Most of the attic was 125 degrees in August. A few bits of duct registered as 100 where the insulation was bad. The highest point of the attic was 145 degrees but that temperature was reached very suddenly. Most of the way up it was still 125.
if your heat is on and your house isn't retaining it, i would certainly double check the insulation.
buy this Nubee® Temperature Gun Non-contact Infrared Thermometer w/ Laser Sight it cost about $16 on amazon. with it you can track your heat loss.
I walked around my basement sealing up all the windows with Seal N Peel in a caulking gun...it's a removable silicon caulk, and i found a lot of GAPS between the cinderblocks where you could SEE outside. SO i filled them all up with Spray Foam Insulation.
The Infrared Thermometer will help you find drafts, you can even walk around outside and aim it at your windows and eaves and doors. (mind you the further you are away the less accurate)
I blocked off my entire second floor this winter because i need to reinsulate the back stairs. the 1st floor has old blow in insulation that has settled. so next year i will add more.
Those are just my 2 cents and you can find a lot of information on the subject online and I don't claim my way is better than someone else's.
Tempering with a kitchen oven or a toaster oven can be a bitch. Mine overshoots a lot, so I got a thermometer gun for $10 and I put the oven on bake with no convection and i wait that the temperature stabilizes a little and I keep an eye on the colour knife with a flashlight. I set my temperature at 175 on my toaster oven to give you an idea. I do 3 times 20 minutes and cool down to room temperature for my 1095 steel which should be about the steel that you are using. Tempering depends a lot on the thickness of the metal you're using.
Just a thing to keep in mind. Short blades are less likely to snap off than longer ones and therefore, they need less tempering. For my short blades I aim a temperature of 350-380 degrees (When the metal starts to turn straw yellow at the edges, i turn the toaster down a bit to not over shoot).
Here is just to give you an idea what I use to track the oven and knife temperature. http://www.amazon.com/Nubee-Temperature-Non-contact-Infrared-Thermometer/dp/B00CVHIJDK/ref=sr_1_1?ie=UTF8&amp;qid=1421003684&amp;sr=8-1&amp;keywords=thermometer+gun
I like the shape of the blade of your friction folder. I tried to make a folding knife, but I abandoned :P.
If it can help, I agree with you the thumb lever should be moved outwards and the edge shouldn't go past the pivot point. Try putting your knife on a sheet of paper, put a nail where the pivot hole is then draw the shape of your handle and interior cuts with dotted lines.
Happy Crafting!
Get an IR temp gun like one of these to check it before you place material on it.
Theres a guide on the sidebar to the right that should cover most of the basic care requirements. It will take him some time to get used to his new environment, so its ok if he seems extra skittish for a while and uninterested in food, just keep handling to a minimum for now. They can be very timid when they are still young too. They use their tail as a fat reserve and can go a while not eating. Generally a nice plump tail is a sign of good health and they will spend most of the day sleeping anyway.
Tiles are great flooring, safe and easy to clean. You dont need a thermometer stuck to the side of the tank as the floor temperature is more important than the air temperature. The floor temp needs to be around 90 F on one side and about 75-80 on the cooler side so they can regulate their body temp if the get too warm. Above 95 is too much. They need the 90 to be able to digest their food so it is important. Grab a cheap infared one like this to check your temps with. They are super cheap, more accurate than the pet store ones, and you can spot check temps around your tank instantly. It will make your life much easier.
A 10 gallon tank is ok for now, but a 20 gallon long will suit him much better as they can be pretty active at night and will appreciate the extra floor space to explore. It also helps in achieving a heat gradient which is hard to do with something as small as a 10 gallon.
Typically the best way to heat the tank is a heating pad under the tank controlled by a thermostat to keep it at a steady temp. The heat mat should cover about 1/3 the floor of the tank. This setup is usually simpler and cheaper than lights that the stores will try to sell, more reliable temperatures too. Heating lamps arent really necessary because they are not basking animals and prefer to hide all day then come out on the warm rocks at night, but they are ok to help give hem a day/night cycle if the room is dark and you can use a regular light bulb if its cold where you live to raise the temps just a little.
What are you feeding them? You did make sure to grab the proper calciumand multivitamins right?
Treat yourself: http://www.amazon.com/Nubee-Temperature-Non-contact-Infrared-Thermometer/dp/B00CVHIJDK
You could buy one of these babies and measure each panel before and after turning it on:
https://www.amazon.com/Nubee-Temperature-Non-contact-Infrared-Thermometer/dp/B00CVHIJDK
It’s even possible you could do that from the ground otherwise you’d have to climb up there.
Get some 190 proof Everclear / Golden Grain / Pure Grain Alcohol.
This stuff is made for human consumption, so I would use that. Then for bud, you would wash the herb a couple of times quickly in fresh alcohol.
Then you get a small cheap crockpot from Target for like $12 and use that to evap off the alcohol.
You still need to decarb the herb, so you can do that in two ways. Get a temperature gun from Amazon -- they are super useful. This one is less than $20 and should work fine.
Then you want to decarb the THC. Do this either before you wash the herb in alcohol or you can decarb the tincture after you have made it. You turn the crock pot on high and that will put it around 230 degrees f, and you decarb it for an hour or two. If you decarb the tincture after you have made it, then all the alcohol will evaporate and you will want to pour fresh alcohol into the crock pot.
Make sure to use the crock pot in a drafty place if you are evaporating off any alcohol -- you don't want a fire or explosion to happen, so you need fresh air.
THC dissolves very easily in alcohol, so making a tincture this way is easy and pretty fast, except for decarbing.
Order one of these, it should help you figure out when the pot is evenly hot. One sale now :)
This one. A lot of the reviews are complaining about the accuracy, but this is within a degree of two other thermometers that I use
I have no complaints about it at all. I've had it for a few years, I use it every day, I have never had to change the battery, and it's accurate. Probably the best $20 I have ever spent.
Damn, you went high-end. I bought this one: http://www.amazon.com/gp/product/B00CVHIJDK/ref=oh_aui_detailpage_o00_s00?ie=UTF8&amp;psc=1
Those dial thermometers are notoriously inaccurate. If her tank and/or basking spot is too hot or too cold, that could cause appetite issues and lethargic behavior. This infrared thermometer on sale right now (not sure for how long) at Amazon that is $11 (after applying the coupon code NGUN6OFF). Too bad there isn't free shipping, but maybe you've got Amazon Prime. :)
Looking back at your previous reply, it escaped my notice that the dial thermometer is reading 85-90 on the cool side of the tank. It's difficult to tell, but I think your tank might be too hot. You might try raising the basking bulb or using a lower wattage bulb and see if she improves.
How often are you bathing her or giving her water orally?
I get into decorating my tanks, but I am pretty boring with my backgrounds. I just get a desert scene aquarium background and tape it to corrugated cardboard (which helps insulate the tank, and presumably leads to slightly lower electricity bills for me). For a long time, I've wanted to make a cool background with ledges and caves.. If you are the DIY type, you might like this site and here is an inspirational thread.
Not quite the same but the ET733 is one sale on amazon.ca for $69.99: http://www.amazon.ca/Maverick-Range-Wireless-Smoker-Thermometer/dp/B00FM8DJHQ/ref=sr_1_1?ie=UTF8&amp;qid=1395533783&amp;sr=8-1&amp;keywords=maverick+et+732
Better grab them soon. That's the older version. (Nothing wrong with it, just pointing it out).
I just bought the [newer one] (http://www.amazon.com/Maverick-ET-733-Wireless-Smoker-Thermometer/dp/B00FM8DJHQ/ref=pd_sbs_lg_3?ie=UTF8&amp;refRID=1457FKKPAPZXSEDTKA99), last week.
I have one and it works great. I recommend it. I also have a Lavatools thermometer for those instant reads, also works great for probing meats like brisket.
The best way to cook a thicker steak on the grill is to set up two heat zones, an indirect zone and a direct zone. With coals, simply place the coals on one half of the grill and nothing under the other half. On a gas grill, light only half of the burners and keep the others off.
Don't bother oiling your steak. Start the steak on the indirect side, again using a thermometer to keep an eye on the temperature. once the temp reaches 110-115, move the steak over to the direct side to finish with a sear, flipping the steak once per minute (yes, it's completely okay to flip your steak multiple times, it promotes more even cooking; leave for at least one minute per side to promote the maillard reaction).
Unless you plan on cutting into it immediately, you will need to take carryover cooking into account which can increase the internal temperature another 5-10 degrees, so for a perfect medium rare, remove from the grill once the internal temperature reaches ~125-128 (perfect medium rare is ~132). If you are going to cut immediately, you can remove it once it reaches to 130-132 degrees. Keep in mind that carryover cooking is more pronounced on thicker cuts because they hold onto to more heat energy.
One great thing about having the thermometer is being able to observe carryover cooking for yourself. Simply keep the thermometer inserted after you remove the steak from the heat and you'll see the temperature continue to climb!
I have had a great experience the past 9 months using the Lavatools Javelin thermometer which is 1/4 the price of a ThermoWorks thermometer (considered the bees knees) and still reads temperatures very fast.
https://www.amazon.com/Lavatools-Javelin-Digital-Thermometer-Chipotle/dp/B00GRFHXVQ
thermoworks thermapen is usually considered the best but it $99 however their thermopop (http://www.thermoworks.com/ThermoPop?tw=WIRECUTTER) is also very good or the Lavatools Javelin (https://www.amazon.com/Lavatools-Javelin-Digital-Thermometer-Chipotle/dp/B00GRFHXVQ?ie=UTF8&amp;ascsubtag=SH47&amp;linkCode=xm2&amp;tag=thesweethome-20)
Ribeye is great (as long as there are no bones, meat cuts with bones are harder to cook in a pan as the meat shrinks away from the bone and it makes so the heat is less even) Other cuts are NY strip, "Flat Iron" (shoulder cut) cuts and tenderloins (usually filet) small tri tips (usually sold as grilling tips) or the eye of the round/chuck eye round. I just found this chart which is useful http://cdn.foodbeast.com/content/uploads/2014/07/beef-cuts.jpg
If you are getting your steaks at a grocery store try and find a butcher in my experience they are usually the same price for the same quality of meat the leaner the meat or the lower quality the harder it is to cook and in generally just isn't as good. So if you're getting select grade meats using more lubrication when cooking will help and cooking it more towards rare will help make it softer. The lower grades do not have that nice marbling of fat which helps lubricate the meat while it's cooking also fat is flavor so less fatty meat less flavor. (http://www.primesteakhouses.com/how-usda-grades-beef.html) If you have the budget prime is the way to go, if your on a budget then skip the NY strip/ribeyes and go for those flatirons (depending on how it's butchered some flatirons will still have parts of tendon in them taking them out is a good idea before cooking) tri tip grilling tips or the chuck eye, all those cuts are generally much cheaper contain more fat and for me they turn out better than the select grade of the more expensive cuts.
I own the thermopen classic and the lavatools javelin. imho, the thermapen is a ripoff, just spend the $25 for the lava tools and never look back.
https://www.amazon.com/Lavatools-Javelin-Digital-Thermometer-Chipotle/dp/B00GRFHXVQ/ref=pd_sbs_79_1?ie=UTF8&amp;psc=1&amp;refRID=J39PSH82RS9TPKGZNCHM
Behold, he who feasteth upon the fowl known as Chicken! Thy prayers soon are to be answered, for thou shalt NEVER again cook this bird to any temperature other than perfection. I show you the path to the Javelin of Gefjun. She is the goddess of agriculture and tamed beasts, and this, her magical weapon, always reveals the internal temperature of any animal it skewers: Gefjun's Javelin, forged by the Dwarves of the Lave Tools
&#x200B;
There are other more affordable weapons for this task, as are there other more expensive ones, but Gefjuns is perfect for the swoldier that demands quality and value.
&#x200B;
Brother, thou will never be disappointed if thou use this lance. Thy chicken shall always succulent be, and they belly filled with joy as they muscles excess to swole!
Fermenter
If you like glass fermenters and have a power-drill get this or something like it. I absolutely love mine, makes cleaning my glass ones a cinch
Heating Element
Water proof and cheaper than any "brew belt" with same power density: Seed Germination Mat such as this one
Gloves
What you linked to are generic vinyl-dipped or nitrile gloves. I'd go for silicone barbecue gloves such as this for more insulation from the heat
Thermometer
If you're on a budget and Thermapen/MK4 is not an option, most reviews conclude this is the best bang for your buck: Lavatools Javelin
Slow cooker is a good choice. I use mine a lot for stocks, sauces, soups, chili, etc.
Electric Roasting Pan is nice.
Good knifes- others have commented on this. Don't forget about wood cutting boards and oils for those. Can't have enough.
Peelers are generally overlooked. Get good ones.
Anything teflon or non-stick... return. Don't ask for. Get them cheap as you can and plan on tossing them out every year and replacing.
A good timer and meat thermometer also.
A good oven thermometer is cheap and get it yourself. You can usually find a good one online.
Lastly- depending on where you live, a year subscription to a Chef Warehouse or Restaurant Depot can save you a lot, you can pick up gear cheap, and maybe meet and talk with a few chefs. That'll be worth the price!
edit: formatting
I don't see the exact model I have for sale anymore, but I have a Lavatools Thermowand which is accurate and only takes 1-2 seconds. The model they're currently selling is on Amazon for $27.
I'll echo the other comments - you're basically already set up to do BIAB. You'll need to buy a bag (a 5-gallon mesh paint strainer works great) and ingredients. A small kitchen scale (at the gallon level being off a few grams on your hops can mean big changes in IBUs) and a quick-read thermometer (https://www.amazon.com/Lavatools-PT12-Javelin-Thermometer-Chipotle/dp/B00GRFHXVQ) will be good purchases as well.
I tend to buy in bulk because it's hard to justify shipping on 1 gallon's worth of ingredients. Crushed grain won't last as long as uncrushed, but if you keep it sealed and dry, I don't think you'll have an issue keeping it for a few months. If you have a local shop, it'll be a little easier. If possible, get your grain double crushed - it'll help with efficiency.
You can make a pretty good beer with a couple pounds of Maris Otter, an oz of Mosaic (~30 ibus at 60, 1/2 oz at 0 min and the rest at dry hop), and some US-05. I'll add 1 gallon of water to my pot (use a ruler to mark the height of the water so you'll have 1 gallon into your fermenter) and begin heating this to strike temperature - I've found about 162*f will get my mash temp to about 150-152. Go ahead and treat this water and about a 1/2 gallon of sparge water with campden to remove any chloramines in your water (no one told me about this when I first started, and it's one of the best things you can do for your beer. Maybe you are already adding campden, but if not, it's time to start). Put the mesh bag into your pot, add your grains, stir, and then stick the mash into the oven for an hour. I preheat my oven to 170 and then turn it off when I put my pot in there. You want just enough heat to keep your mash from dropping in temperature.
After an hour, pull your grain bag out and place it into a second bucket or pot to sparge. Repeat the rinse / drain / squeeze sparge process until you have 1 gallon of wort in your main pot. Boil as you have done previously, occasionally adding sparge water to the boil in order to maintain 1 gallon of wort. I find this much easier than trying to account for boil-off by starting the boil with excess wort.
Also, remember that a pack of yeast is meant for 5 gallons. It's maybe not the most sanitary practice, but I'll pitch 1/4 packet and then save the rest by folding, taping, and storing it in a plastic bag in the fridge. It's an easy way to save a couple of dollars per batch.
I can go first:
$27 - Digital meat thermometer, very useful...not necessary if you've got a wireless thermometer already but very good if you don't - Amazon link
$15 - Bear paws - good for making pulled pork. Amazon Link
It's a little over your budget, but I have this one and love it.
Lavatools PT12 Javelin Digital Instant Read Meat Thermometer (Chipotle) https://www.amazon.com/dp/B00GRFHXVQ/ref=cm_sw_r_cp_apa_G-2Kyb17PTGZY
You didn't mention a budget but since others have recommended kettles in the mid to high price range, I'll suggest something in the low price range that performs just as well:
Fino Pourover Kettle
https://www.amazon.com/Fino-Pour-Coffee-Kettle-4-Cup/dp/B000EVPGSQ
And to go along with it:
LavaTools Instant Read Thermometer
https://www.amazon.com/Lavatools-PT12-Javelin-Thermometer-Chipotle/dp/B00GRFHXVQ
I've used both since I got into specialty coffee and don't have any complaints.
Here's the cheapest one I'd recommend that has prime shipping.
Lavatools Javelin
https://www.amazon.ca/Accurate-Splash-Resistant-High-Performance-Digital-Thermometer/dp/B00GRFHXVQ/ref=sr_1_2?ie=UTF8&amp;qid=1488218440&amp;sr=8-2&amp;keywords=javelin
I bought this one and have been happy with it:
https://www.amazon.ca/Accurate-Splash-Resistant-High-Performance-Digital-Thermometer/dp/B00GRFHXVQ/ref=sr_1_1?ie=UTF8&amp;qid=1488233018&amp;sr=8-1&amp;keywords=lavatools
It's 25, but should be good. http://www.amazon.com/Lavatools-Javelin-Digital-Thermometer-Chipotle/dp/B00GRFHXVQ/ref=sr_1_1?ie=UTF8&amp;qid=1458858087&amp;sr=8-1&amp;keywords=thermapen
You know what most people don't do? Tap it when you want to take a reading. I'm a calibrator and temperature is one of my specialty areas. You have to tap it and you'll be suprised at how much some move. Anyways, the freeze method is better then the boiling method. A lot of inaccuracies can be attributed to the boil method.....ie. elevation, immersion depth, and how close are you to the burner or metal sides of the pot your boiling in.
Just buy one of these for $20 and you're good (I calibrated mine at work and it met manuf stated accy, which is comparable to the over priced thermapen):
http://www.amazon.com/Accurate-Splash-Proof-High-Performance-Digital-Thermometer/dp/B00GRFHXVQ
Here's something very similar with great reviews that won't break the bank: https://www.amazon.com/dp/B00GRFHXVQ/ref=cm_sw_r_awd_8DkUub1GMQ9J7
I have one myself and have found it absolutely invaluable to cooking any meat.
Lavatools PT12 Javelin Digital Ultra Fast Instant Read Meat Thermometer for Kitchen, Outdoor Grilling, BBQ, Brewing, and Frying (Chipotle) https://www.amazon.com/dp/B00GRFHXVQ/ref=cm_sw_r_cp_api_i_ixLNDbGP637GB
Am professional, use these exclusively
It's a lot cheaper than the next best one, but it does the job just fine: https://www.amazon.com/Lavatools-PT12-Javelin-Thermometer-Chipotle/dp/B00GRFHXVQ
You could make a sourdough starter. It'll take about 1-2 weeks so hopefully if you start now it'll be ready once you need it. You can follow these directions: https://www.theperfectloaf.com/7-easy-steps-making-incredible-sourdough-starter-scratch/ That starter has a higher percentage of water than FWSY's, but you can just switch to the feeding method in the book once the starter becomes active.
You could also make sure you have all the supplies necessary. At a minimum you'll want:
Nice to haves:
Note that he has a section in the book on equipment, so you could wait to read that before spending money, but all the items linked above have worked well for me.
I have a Thermapen at home but bought a Lavatools to use at a friend's house, and it's just as good. The Thermapen is a bit faster, a bit easier to read, and a bit bigger, but given the price difference I'd recommend the Lavatools.
https://www.amazon.com/Lavatools-PT12-Javelin-Thermometer-Chipotle/dp/B00GRFHXVQ
Has anyone tried this one?
http://www.amazon.com/Accurate-Splash-Resistant-High-Performance-Digital-Thermometer/dp/B00GRFHXVQ
I personally would get the following way sooner if I was building my kitchen all over again.
Also if there is a place you can get bulk spices near by I would go there for your spices, because if you havent already noticed spices are pricey at your local megamart.
Lavatools Thermowand - Same form factor as the much more expensive thermopen but at 1/3 the price.
Lodge cast iron skillet - great for searing meats or as a good starting pan.
OXO Bench Scraper - Makes prep work much easier and safer as you don't use your knife to scrape your food off the cutting board.
Immersion Blenders - When you dont want to use your big blender or want to blend something in your pot or pan.
Stainless Steel Cookware - Has a little bit of a learning curve but is great after the fact.
Aeropress - Life is too short to make shitty coffee.
Edit: added a thermometer/spelling
Has anyone tried the Thermowand? It seems to be a fairly new product marketing itself as a lower-priced competitor to the Thermapen. The reviews on it seem pretty positive. I really would like a good thermometer, but just can't bring myself to spend so much on a Thermapen.
What makes it better than, say, this one? Both are 2-3 second response.
This is the style of one that I have that I've seen recommend a few times around here. If you have a thermopen you should be fine. Those things are pretty awesome (and pricey).
I just got this for cooking. It works pretty well.
https://www.amazon.com/gp/product/B00004XSC5/ref=oh_aui_detailpage_o01_s01?ie=UTF8&amp;psc=1
This product is garbage. I suspect that my first batch of my Honey Wheat Ale mashed too high (BIAB method). As such, I fear that not enough starch conversion happened, and yeah.
So I learned, always have iodine on hand. I did not, so I will not be able to tell the full damage for 3 weeks at least. But I have iodine now.
I also really learned that brewing beer is forgiving as hell. I may not have perfect cleaning and sanitizing methods like the big boys do in the industry, but my first batch of beer came out pretty damn good. And I already have ideas to tweak that kit recipe further.
I also learned that it only takes 1 or 2 yeast cells to propogate properly and ferment. I had an incident where I spilled half of my rehydrated yeast if not more, and that was my first batch. Came out absolutely delicious, but was worrying because of the slow start to fermentation, but it worked.
I was also worried that my first batch was going to come out wrong somehow, because I was not able to test my Original Gravity, because some idiot in the room forgot to purchase a hydrometer. I own one now, and my Final Gravity readings were on par. I did something right!
Brewing Beer is a forgiving hobby, compared to most. There is truth in the statement "Relax and have a homebrew."
Reverse sear
I ain’t no master, but mine come out pretty good.
Gonna sound like a lot:
• Lay steaks over a wire-rack overnight, seasoned with fine-grain salt (table salt) all over, put paper towel or something beneath.
• Pre-heat oven to 220-250°F.
• Put steak rack on baking sheet (could have already had it on it in the fridge.
• Season with garlic and onion power.
• Put steaks in for 40-70min (depending on temp and thickness).
• Pull out at ~120°F internal temp. I use this thermometer, their flagship gets a lot of praise, but I ain’t spending >$50.
• Right before pulling out, heat up cast iron on stove at medium-high heat, with a touch of grapeseed or avocado oil (do not use EV olive oil, way too low of a smoke point, canola oil is a bit better, but grapeseed is a lot better). Directions say “ripping hot”, so I tried on max stove heat and it burnt the crust in like 15sec.
• Take steaks out and use a shit ton of paper towels to get them dry.
• Put steak(s) in pan, lay flat for ~1min.
• Flip.
• Put knob of butter in and use a spoon to baste (scoop melted butter/oil onto steak).
• Season with medium-grain freshly ground black pepper, both sides.
• Flip and repeat until steaks look awesome.
• For cuts with fat caps (ribeye), turn onto side and tilt pan to bathe the side in juices.
• Finish with finishing salt.
• Cut into strips, you need to use force, it should be done in one forward and one backward stroke.
____
Lots of people talk about aromatics, but I ain’t got twigs if this laying around.
I have a sous-vide, but the insides always came out a bit mushy, no real bite; I think it works better on less fatty cuts.
The appliance is much bigger than those three instruments? You don't need the thermometer, although I'll grant that until you have the experience they are helpful. Reasonably accurate ones are only $10. All three pieces together cost way less than $100 and take up half the space of a standalone appliance. Each piece also has dozens of other uses beyond deep frying alone, while excelling at that particular task.
I can't really argue against "I don't wanna," but the arguments you're putting forward don't hold water.
Edit: I dug a little deeper and looked at a different 5 Qt dutch oven on Amazon. It has a larger capacity, takes up less than half of the space, and weighs only 7 Lbs, 8 if you include the diffusion plate. Cost for the dutch oven and plate are ($20+$15) $35, which leaves you a whopping $65 for a thermometer of your choice. I personally use a javelin which is ~$20, but this guy costs $35 and would be a lot easier for deep frying. Saves you $30 over the appliance, takes up significantly less space, weighs significantly less, and can be used for many more kitchen tasks.
I was the same way for a long time, but I got one of these. So you brown on both sides in a skillet, about 4 minutes each side, put them in the oven at 350 with the probe. When it goes off, they're done.