Best outdoor cooking replacement parts according to redditors
We found 172 Reddit comments discussing the best outdoor cooking replacement parts. We ranked the 78 resulting products by number of redditors who mentioned them. Here are the top 20.
We found 172 Reddit comments discussing the best outdoor cooking replacement parts. We ranked the 78 resulting products by number of redditors who mentioned them. Here are the top 20.


This could definitely trip a breaker or cause a bad fire.
If I was in this situation, I'd use a piezoelectric starter from a BBQ or something. Or ya know, just the spark from the lighter.
They're like $10.
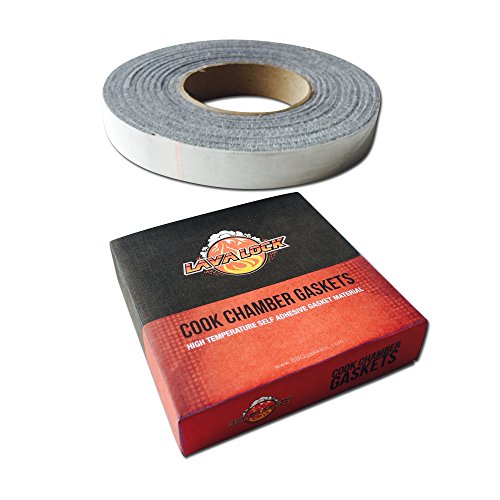
If they purchased the proper gasket tape its fine. Its called fireblack or lavalock depending on the company you purchase it from. It's used to seal smokers and grills. With Charcoal or stick burner grill/smokers you don't want any additional air getting in from cracks that could fluctuate your temperature. If you are trying to smoke a brisket you want to keep the temp even, steady, and low and the additional air will cause your fuel to burn hotter and produce black acrid smoke that will make it taste poorly. If the gasket tape isn't directly in the flame it shouldn't burn. The ambient heat shouldn't cause it to off gas chemicals.
​
https://www.amazon.com/LavaLock-Performance-gasket-smoker-STICK/dp/B01F9FE60K/ref=sr_1_3?keywords=smoker+gasket&qid=1557500727&s=gateway&sr=8-3
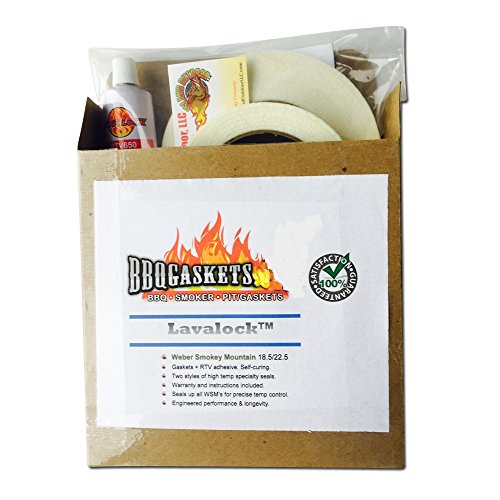
Weber Smoky Mountain 18.5" version
Also known around here as a WSM. Get some of the gasket liner to put around the door. Mmmmmmmmmmmmmmmmmmmmmmm.
Lavalock/fireblack self adhering gasket
Edit: this LavaLock 12 GREY High Performance BBQ gasket smoker seal SELF STICK https://www.amazon.com/dp/B01F9FE60K/
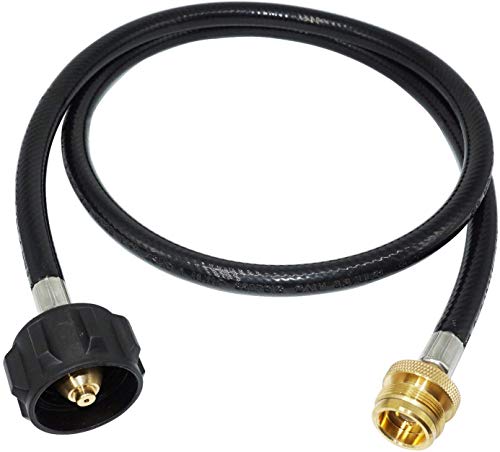
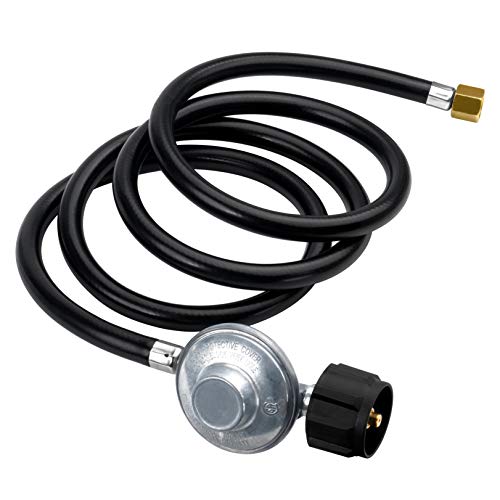
propane extention hose.
https://images-na.ssl-images-amazon.com/images/I/613qgMqLlyL._SL1010_.jpg
https://www.amazon.com/Camco-59043-Propane-Extension-Hose/dp/B00192QBPQ
You can upgrade the ash pan to the enclosed one, just buy the part and snap it on the legs. Weber 65143 Ash Catcher Assy for 2015 22.5" One Touch Grills https://www.amazon.com/dp/B00MMIKZWQ/ref=cm_sw_r_cp_api_UqUKBbJWBD193
They do not sell the carts, you’ll need a side table or you can build a cart if you’re inclined. That’s what I did, didn’t want to buy a brand new grill just for that.
You can also upgrade with a slow n sear, the Weber gourmet grate and accessories.
Yea I was aware of that. I noticed the only real arguments were "swirl" and the fact of dead space. But I figured once it was to temperature, the radiant heat would give me what I wanted. I had this square tube on hand locally, so I figured I'd roll with it and eventually make another. I made extra burners for that exact reason.
Yes they're 3/4" burners, with 1" running T's for the air intake. I actually just looked this morning at Alumina shelves from a local place as a disposable floor. I will probably grab two 6x6 shelves thanks for the reminder.
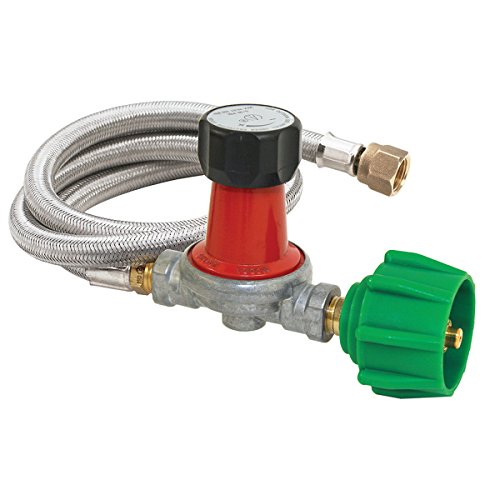
Link to the regulator: https://www.amazon.ca/gp/aw/d/B007PS0938/ref=yo_ii_img?ie=UTF8&psc=1
Also look into a nomex gasket for the lid, it will help with heat retention.
LavaLock 12 GREY High Performance BBQ gasket smoker seal SELF STICK https://www.amazon.com/dp/B01F9FE60K/ref=cm_sw_r_cp_apip_XhIENDB3GkMj3
With this you can cook everything from amazing tuna steaks, to slow cook brisket.
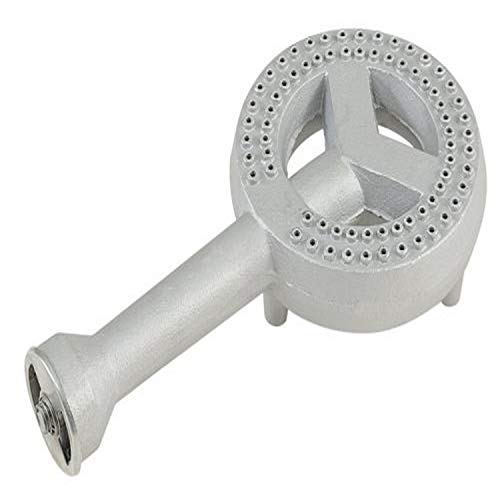
Yep. Sometimes the quality of the burner just isn't that great either. I actually just took out the burner from my dark star stand and bought this: https://www.amazon.com/Pressure-Cast-Iron-Burner-Fitting-Orifice/dp/B06XCS6GPB/
It works really well for what I need. I'm doing 5 gallon batches with a 10 gallon kettle.
That is a pretty nice find OP.
If you want to make it a little more efficient, find some heat resistant gasket (like this on amazon) and use it to seal around the lid. If I remember correctly, these grills are known for having small air gaps between the lid and body.
Just in time for 4th of July too, happy BBQing OP
You can order an adapter hose off Amazon (pretty sure I've seen them in Walmart too) that hooks a standard grill tank to those little bitty grills. Cost like $8, and a 20lb refill is a hella lot cheaper in the long run if you have the space to store a bigger tank
I bought a 5lb propane tank earlier this year to run my coleman stove when car camping. I fuckin' love it. No more green canisters to worry about, and it's cheap to fill (5lbs is just over a gallon of propane, like 1.2). It's been on a 9 day camping trip, a weekend in Yosemite, ran a full size BBQ for a few meals in Big Bear and it's still not empty.
Edit: You'd need this to hook it to a coleman stove.
DozyAnt Universal Safest Propane Refill Adapter for Throwaway Disposable Bottle - 100% Solid Brass Regulator Valve Accessory for All 1 LB Tank Small Cylinders https://www.amazon.com/dp/B019CND6J2/ref=cm_sw_r_cp_apa_i_45ZYDbESA4J8Z
https://www.amazon.com/GasOne-Propane-Adapter-Converter-Certified/dp/B073KV4WLJ
Don't brine a butterball. It's been factory brined. No need to inject it either. Look at its salt content on the wrappings. If you want to play in that arena, get a fresh turkey from a local butcher, not a frozen one from the super market. I run my temps by the thigh of the turkey as it will take the longest to come to temp. For poultry, you are almost always going to achieve a better result by cooking it at 325 degrees or higher. You can do an hour at 225 for more smoke, or even lower if your smoker can do it and then kick the heat up.
Dry rubs are personal preference. I used cajun last year but this year I'm probably going with an herb butter. I've spatchcocked and I also have a turkey cannon. Again, it's all preference.
I've used this to help seal up my smoker. https://www.amazon.com/gp/product/B01F9FE60K/ref=oh_aui_detailpage_o00_s00?ie=UTF8&psc=1
I have the same grill, just got it at Christmas and I really like it. Here are some of the accessories I got to go with mine:
 
Thermal Blanket (for those cold/windy winter days)
https://greenmountaingrills.com/products/new-parts/accessories/gmg-thermal-blanket/
 
Cover (protection from rain/snow)
https://greenmountaingrills.com/products/new-parts/accessories/gmg-grill-cover/
 
GMG G-Mats (work well with wings and probably other stuff I haven't tried yet)
https://greenmountaingrills.com/products/new-parts/accessories/gmg-g-mats/
 
Grease Tray Liners (easy cleanup)
https://greenmountaingrills.com/products/new-parts/accessories/gmg-drip-ez-grease-tray-liners/
 
ThermoPro T20 (I like to have two probes in the meat and one for smoker internal temp)
https://www.amazon.ca/gp/product/B01J173EAA/ref=ppx_yo_dt_b_asin_title_o07__o00_s00?ie=UTF8&psc=1
 
Lavalock (I haven't installed this yet, but I plan on sealing the cover so no smoke escapes)
https://www.amazon.ca/gp/product/B01F9FE60K/ref=ppx_yo_dt_b_asin_title_o08__o00_s00?ie=UTF8&psc=1
 
Magnetic Lights (for night smoking)
https://www.amazon.ca/gp/product/B077PNF2WB/ref=ppx_yo_dt_b_asin_title_o05__o00_s00?ie=UTF8&psc=1
 
Hellfire BBQ Gloves / Claws
https://www.amazon.ca/gp/product/B00JYOAM7O/ref=ppx_yo_dt_b_asin_title_o04__o00_s00?ie=UTF8&psc=1
https://www.amazon.ca/gp/product/B07CB26G7G/ref=ppx_yo_dt_b_asin_title_o04__o00_s00?ie=UTF8&psc=1
 
Happy smoking!
Cheap fix from Amazon
I assume your burner has a BG10 burner. Replace it with a BG12, you'll thank me later. It burns MUCH cleaner, and also speeds up your boil time. I made the switch a while back with my last burner (I've since upgrade to the Edelmetal burner which has a BG14 style burner) and I was extremely happy with the result. Also, for a $20 upgrade, it won't break the bank.
Still need a hose and regulator though...
Congrats! Something I wish I'd done sooner is add some insulation around the lid. Cheap and effective way to keep smoke (and heat) from billowing out the sides. Helps reduce pellet use and lessen temperature fluctuations.
https://www.amazon.com/dp/B01F9FE60K
Some comments and suggestions to the others with the same smoker. Its a Dynaglo and it comes in two sizes, the one pictured is the small one. I have the larger size, and it would probably accommodate 2 turkeys... I don't have to cut my rib slabs or briskets or anything down to size with the large one, it all fits - the smaller ones you might have to cut up your larger pieces of meat to make it fit.
The inside right side is all a hot spot, even heat distribution is difficult. I added these things across the bottom shelf that helps with heat distribution:
https://www.amazon.com/Grill-Greats-4806-45-Briquettes-Grilling/dp/B00FIX8QA0
I've also seen people make heat shields/baffles to try and get the heat moving to the other side. This is probably a much bigger problem with the large version though.
As OP stated, get some food grade RTV and seal it up real well, large version comes with oven door rope style seal on main door and 2 buckles to close it up tight, so it seals well. You may also want some heat seal like this for the doors on the smaller version https://www.amazon.com/LavaLock-Performance-gasket-smoker-STICK/dp/B01F9FE60K/ref=sr_1_11_sspa?s=lawn-garden&ie=UTF8&qid=1522606446&sr=1-11-spons&keywords=bbq+door+heat+seal&psc=1
Im also assuming OP added his own water pan, as I dont believe either size comes with one - the large one does not however.
Digital Thermostat Kit for Traeger Pellet Grills by Ortech https://www.amazon.com/dp/B00N109ZPM/ref=cm_sw_r_cp_api_i_ZsPDDbGYKX54D
That ortech works well. I used that before when I had my Traeger.
https://www.amazon.com/LavaLock-Performance-gasket-smoker-STICK/dp/B01F9FE60K/ref=mp_s_a_1_4?ie=UTF8&qid=1538611524&sr=8-4&pi=AC_SX236_SY340_QL65&keywords=smoker+gasket&dpPl=1&dpID=51e7vKA6yML&ref=plSrch
They make a gasket for the fire box too
Get a brass T valve and some hose. Or maybe you already have the valve? Post a picture.
Something like this is what i would traditionally use to seal a fireplace or smoker. There's cording out there too, but the flat sealer would probably work better if you have an offset with a curved lid.
[Ignitor ](http://www.Surefire.com/ Piezo Igniter / Grill igniter w/ 30,000 16v Piezo Ignition Sparks w/Special Introductory Price https://www.amazon.com/dp/B019JEI7AW/ref=cm_sw_r_cp_apa_9qB6ybJ8V7GTZ) from Amazon.
Degrease and wire brush the box then paint with high temp grill paint. Don't worry about the burner being rusted as long as you are still getting an even flame.
If there is any sign of dry rot on the gas line, replace it. Better to be safe than dead.
Run the racks through the dishwasher then hit them with some steel wool. Rub them with some peanut oil until they get good and greasy from some pork.
I don't see a water pan or chip tray, so you'll want to check out the manufacturer website for a replacement.scratch that, they're in there on second look.Don't have a compressor, jelly, or high heat paint. And it seems like buying all of those would be more than the $20 to just buy a new burner
If you go with the WSM (Weber Smokey Mountain). The 2 issues it has are the door and the lid.
So for next years BDay you can get him
https://www.cajunbandit.com/WSM-Access-Doors-s/141.htm
and
https://www.amazon.com/Smokey-Mountain-WSM-smokers-BBQ/dp/B00NI1CRFY
Get a roll of gasket sealing foam and put it all around the edge of the opening of the door:
​
https://www.amazon.com/LavaLock-Performance-gasket-smoker-STICK/dp/B01F9FE60K/
For those interested, here's a pic of the inside.
Here's a list of my mods.
Thanks for the video. I'll be traveling for 8 weeks next summer in a 2016 palomino, and looking for ideas. My camper is about 2" too long to shut the tail gate so I usually leave it at home so no back porch, and I don't have the inside access to the truck bed, did you put that in your self or did it come that way?
I also am looking to add or bring a 2nd LP tank, you mentioned a 1 lb backup, is this the coleman campstove version? Is there an adaptor?
Edit: I think I found the adaptor
I got the hose and use the big tank.
I put this on the lid (rather around the barrel where the lid closes) on my Pit Boss and am thrilled with the difference in smoke going out of the chimney rather than the lid.
​
https://www.amazon.com/gp/product/B01F9FE60K/ref=ppx_yo_dt_b_asin_title_o05_s00?ie=UTF8&psc=1
This has nothing to do with heat retention, but the hinge is well worth the investment. Haven't installed mine yet, but definitely solid build quality. https://www.amazon.com/gp/product/B00NI1CRFY/ref=oh_aui_detailpage_o00_s00?ie=UTF8&psc=1
I've never had a problem with temps being hot using the "minion method". Quite a few people recommend using "play sand" in the water pan to regulate temps as well (for convenience this water pan cover is nice if you choose that method https://www.amazon.com/gp/product/B01DE6NC0Q/ref=oh_aui_detailpage_o01_s00?ie=UTF8&psc=1 )
Also the best tool by far is a Dual Probe thermometer if you don't already have one.
It actually does still fit. I installed this lid hinge: https://www.amazon.com/exec/obidos/ASIN/B00NI1CRFY/thevirtualweberb
Gasket: http://www.amazon.com/gp/product/B00CI6WFCU/ref=oh_aui_search_detailpage?ie=UTF8&psc=1
Door:
http://cajunbandit.com/wsm-parts-mods/
That page shows both 18 and 22 doors among other mods they have for the WSM.
And if you go that route, the gasket and new door are too thick for the stock latch, so you'll want to pick up one of these: http://www.amazon.com/gp/product/B002DHHDEY/ref=oh_aui_search_detailpage?ie=UTF8&psc=1
It starts to get pricey :)
Something like this:
https://www.amazon.com/gp/aw/d/B01F9FE60K/ref=mp_s_a_1_1?ie=UTF8&qid=1491776316&sr=8-1&pi=AC_SX236_SY340_FMwebp_QL65&keywords=smoker+door+gasket&dpPl=1&dpID=51e7vKA6yML&ref=plSrch
Not OP but this hose is what I use.
This is a double-burner stove that comes highly recommended. I have a Coleman single-burner stove.
Line your doors/covers on your smoker with https://www.amazon.com/gp/product/B00TLB75MA/ref=ppx_yo_dt_b_search_asin_title?ie=UTF8&psc=1
Keeps the smoke in better.
Lava lock gasket from the looks of his other lava lock equipment. Link
If it hasn't been suggested yet get yourself a Needle gauge Propane regulator.
I've got a smoke vault as well, although a different model, and the dial on the front is absolute shit. This addition is by far the best thing I purchased for it. My trial run first smoke of a pork butt my temperature was between 200-300 and the only way to really tell if you were making an adjustment was to open the door. losing all of your heat and smoke in the process. Smoke number two after dialing it in before the meat when on I was 265-280 for the entire cook. Fantastic change which was much more consistently timed.
This is what you want:
https://www.amazon.com/Gasket-Weber-Smokey-Mountain-gasket/dp/B00CI6WFCU
I'm speechless, what a serious wealth of knowledge. I have some coins left over to give you gold but I'm not sure how, I'll have to do it at a computer I think. You definitely earned it. Thank you so much!!!!!
I will probably have a few questions for you soon but for now I just wanted to say thank you for assisting a random stranger from the internet. Gonna break her in with a large amount of atomic buffalo turds and a pork shoulder!!!
Edit: LavaLock 12 GREY High Performance BBQ gasket smoker seal SELF STICK https://www.amazon.com/dp/B01F9FE60K/ref=cm_sw_r_cp_apa_i_LPwvDbFG37KJX
Was this the seal you bought?
Did a quick search, this one looks like it should work:
https://www.google.com/url?sa=t&source=web&rct=j&url=https://www.amazon.com/Digital-Thermostat-Traeger-Pellet-Ortech/dp/B00N109ZPM&ved=2ahUKEwi4iKP5lP_jAhV-HDQIHXUvD-sQFjAOegQIBxAB&usg=AOvVaw0qgStR_YNhjXiq1gCJG_pq&cshid=1565675854223
Nice report and looking forward to the pictures of smoked meat. If you see smoke leaking from other then the vents on the lid, an inexpensive enchantment is to put [smoker seal tape] (https://www.amazon.com/LavaLock-Performance-gasket-smoker-STICK/dp/B01F9FE60K/ref=sr_1_fkmr2_1?ie=UTF8&qid=1510017549&sr=8-1-fkmr2&keywords=weber+smoker+tape) around the top lid, bottom coal bowl and the door. Some interesting article can be found virtual weber bullet. Enjoy the WSM experience.
Hmm, in that case I would honestly recommend just buying a cheap propane burner like this. Cost wise it would be about the same, though if you need more gas than what is in a 1lb bottle, you need an adapter that connects to a standard 5 or 20 lb tank (not at all expensive and easy to find at walmart).
I found these were recommended with the burner that you currently own. http://www.amazon.com/Bayou-Classic-Adjustible-Regulator-Assembely/dp/B007PS0938/ref=pd_bxgy_lg_img_y
I'm not sure the one posted would work only for the fact that the burner only accepts a 30 PSI regulator. The one you posted doesn't have the regulator posted from what I can see.
THe burner shoudl come with a 1/4: Mnpt X 3/8" MFP (flared fitting). You should split the gas lines at the regulator side, and have the 2 hoses go to each burner separatly, using these to control the flow (with the regulator opened up all the way) http://www.amazon.com/Bayou-Classic-Brass-Control-Valve/dp/B0016IZZZU/ref=pd_sim_lg_10
I think you should also buy this
http://www.zorotools.com/g/00056438/k-G1193446?utm_source=google_shopping&utm_medium=cpc&utm_campaign=Google_Shopping_Feed&kw={keyword}&gclid=CJihlvP37rcCFfBaMgodZAoA1A
which you can then screw the original hose into one side of the Tee, then buy this, http://www.amazon.com/Bayou-Classic-7906-Pressure-Connector/dp/B000C1UBSS/ref=pd_sim_lg_5 which should connect to the bayou burner
If you buy the BG 14", it comes with the 1/4" MNPT (Male National Pipe Thread) X 3/8" FIP (flared ends, not tapered threads), it is called "brass orrifice"
Honestly, if you can't figure this out yourself, have a friend who knows their shit (like a paintball player, or a mechanic) come make sure you're sealing the threads correctly, otherwise, you might burn yourself.
I believe the stove you purchased might have been intended to RV or campers that have a low pressure regulator and use the 20 or 30 pound bottles. I had a similar stove that hung on the side of my Pup up camper with the same plug.
if this is the case it might not be worth the extra effort and parts to buy.
the propane connectors you want on your stove should look like this.
http://www.amazon.com/Camco-59043-Propane-Extension-Hose/dp/B00192QBPQ/ref=sr_1_5?s=sporting-goods&ie=UTF8&qid=1409927879&sr=1-5&keywords=lp+hose
this is not the hose you need to buy, but what normal propane camp stoves use.
I would recommend trying to rerun it and get a Coleman 2 burner Lp stove
or the best camp stove ever, the Weber Q
http://www.amazon.com/Weber-386002-189-Square-Inch-Liquid-Propane-Discontinued/dp/B000WOTUCI/ref=sr_1_1?s=sporting-goods&ie=UTF8&qid=1409928096&sr=1-1&keywords=weber+baby+Q
The refillable ones you can have filled at any propane place, they are legal to refill. The disposable ones you have to do yourself, using something like this.
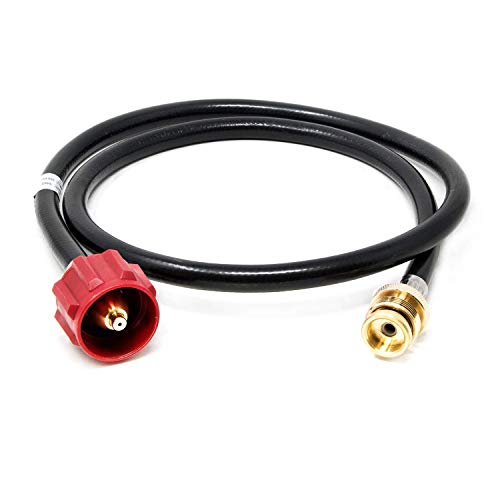
You need the hose with the regulator. https://www.amazon.com/dp/B000UC7966/ref=asc_df_B000UC79665430442/
You have to keep the tank outside anytime you use anything other than the small canisters per Mr. Heater's recommendations.
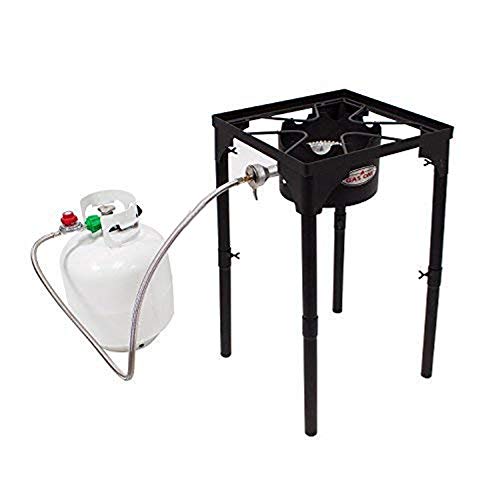
I am using a Gas One 100K BTU propane stove. [LINK](http://www.GasOne.com/ Portable Propane 100,000-BTU High Pressure Single Burner Camp Stove & Steel Braided Regulator with Adjustable Legs Perfect for Brewing, Boiling Sap & Maple Syrup Prep https://www.amazon.com/dp/B074GXFLX5/ref=cm_sw_r_cp_apa_i_VwxBDbD6V2YZ1).
You have the option of using a round or flat bottom wok. You don't need a wok ring for it to work. It feels like an F16's afterburners.
Only con is that it's an outdoor stove.
Yep! These are all good tips. Also you might think about some Lavalock to seal up the door and lid a bit better.
https://www.amazon.com/LavaLock-Performance-gasket-smoker-STICK/dp/B01F9FE60K/ref=sr_1_1?ie=UTF8&qid=1495038103&sr=8-1&keywords=lavalock
Ok, yeah I see it now. Not sure what state your in, but here in Texas we don't use slip on hoses for propane - it is against code. So, I'd see if that black fitting in your picture can be unscrewed - if it can then you just need a flare fitting similar to this: https://www.amazon.com/FASPARTS-Male-Adapter-Connector3-Tube/dp/B017L54D5O/ref=sr_1_4?ie=UTF8&qid=1537890364&sr=8-4&keywords=copper+flare+adaptor&dpID=41aOPsRVKzL&preST=_SX342_QL70_&dpSrc=srch to replace it. Then you need a hose and regulator similar to this: https://www.amazon.com/GASPRO-Regulator-Certified-Appliances-Horizontal/dp/B01M2DKPX0/ref=sr_1_5?ie=UTF8&qid=1537890467&sr=8-5&keywords=low+pressure+propane+regulator+and+hose&dpID=41VT96zjimL&preST=_SY300_QL70_&dpSrc=srch.
The tag on your cooker calls for 37 mbar gas pressure (37mbar = 14" W.C.) So you need to get a low pressure regulator that puts out 11" - 14" W.C. (Don't get a red regulator or one with a red knob for this - those are for high pressure).
Thanks so much for the reply! I am actually in Texas also, and I definitely know it's against code, but I'm going to have to break code to get it to work because that slip on hose fitting is welded to the internals.
If I was to get the one you linked, and then just cut the fitting off the end and use a clamp to put it over the fitting, would it "theoretically" work?
As long as its a smooth-ish surface it should work. I think this stuff is what I used but figure out how wide it needs to be since the rolls come in diff widths
I mainly need the portability, I always have the option to bolt it up to a 5 gal propane tank. The price for the hose is on the steeper end, but here is a cheaper alternative: https://www.amazon.com/DOZYANT-Pressure-Propane-Adjustable-Regulator/dp/B01J63DYI6/ref=sr_1_9?s=lawn-garden&ie=UTF8&qid=1549377248&sr=1-9&keywords=Propane+Hose+and+Regulator+High
It should "settle" after sitting for a while properly assembled. But even when it's perfectly flush I would still suggest a gasket kit. This should solve any problem you may have with the seal.
The door is another sore spot. I would recommend replacing it with something that seals better, especially if you're going to be doing a lot of cooking at really low temps like 200-225.
Adjustable regulator similar to this:
https://www.amazon.com/DozyAnt-Pressure-Adjustable-Regulator-Appliances/dp/B01J63DYI6/ref=sr_1_3?ie=UTF8&qid=1497169658&sr=8-3&keywords=adjustable+regulator
I have the little Tex Elite and I sheared off the temp control knob by accident so I figured it was time to try a new controller. I got this one.
Digital Thermostat Kit for Traeger Grills by Ortech https://www.amazon.com/dp/B00N109ZPM/ref=cm_sw_r_cp_api_6Cj.BbBP4FX0K
Definitely a tighter temp control than the Traeger built in one.
Also just general tip keep your Traeger clean from dust. It runs wild if not cleaned regularly.
https://www.amazon.com/Gasket-Weber-Smokey-Mountain-gasket/dp/B00CI6WFCU
This is the one I got. Super sensitive.
https://www.amazon.com/dp/B01J63DYI6/ref=cm_sw_r_cp_apa_i_-Kw2CbWWN69EJ
I see a lot of folks shitting on Treagers for some reason. I have a old one (BBQ70) and it's rock solid. It HAD the old switch the OP talks about but after I changed that controller to an Ortech Digital Controller a few years ago, I couldn't be happier.
$70 vs $1,000 was a no brainier.
Why not just use something like this pre-built, and cheaper?
http://www.amazon.com/Bayou-Classic-Adjustible-Regulator-Assembely/dp/B007PS0938
I bought a second hand smoker that didn't line up too well and leaked heat/smoke everywhere until I found a sealant.
https://www.amazon.com/LavaLock-Performance-gasket-smoker-STICK/dp/B01F9FE60K/ref=sr_1_1?rps=1&ie=UTF8&qid=1498888297&sr=8-1&keywords=smoker+tape&refinements=p_85%3A2470955011
I used that on the lid (on the smoker and the lid) along with some latches that locked the lid down to keep it sealed up real good.
Latches: https://www.amazon.com/Accessbuy-Stainless-Spring-Pack-90mm-Overall/dp/B01MR126O6/ref=sr_1_3?ie=UTF8&qid=1498888397&sr=8-3&keywords=spring+latches
If my explanation doesn't make sense, let me know and I will make a quick video.
I have the 22.5 as well, and I got this gasket kit:
http://www.amazon.com/Gasket-Weber-Smokey-Mountain-gasket/dp/B00CI6WFCU
It's made it MUCH easier to control the temperature, especially to keep it low.
Actually, my in laws purchased one of these. It is very sturdy and the price is amazing. The burner is also similar to the BG 14 if i'm not mistaken. Link
> The way I see it, the alternative is to unbolt the tank and give it a shake for liquid sloshing around, so the gauge at least beats that, right?
Nope, you can't shake a propane tank to see how full it is. A neat trick is to pour hot water over the tank and you'll see line where the propane is.
That said, for BBQ'ing, I have a 1lb > 20lb hose that I just hook up to a normal 20 lb tank.
EDIT: 20 lb, not 30 lb.
Didn't mean to take so long to respond back, sorry about that.
I just use this adapter. The heater has an internal fuel filter already, so no need to get a hose with a filter. You could get a filtered hose, the benefit would be you migrate where the dirt gets collected or otherwise increase the life of the filter at the appliance. Might be a good idea to have an external tank filter if you have a lot of propane appliances and a permanent to semi-permanent tank system setup. A mostly mobile setup though, I wouldn't and personally don't bother with filtered adapters.
This
https://smile.amazon.com/Stanbroil-Replacement-Induction-Traeger-Pellet/dp/B06Y4JS496/ref=sr_1_10?crid=1PLMLLGFSXJU9&keywords=traeger+parts&qid=1555100212&s=gateway&sprefix=Traeger++parts%2Caps%2C242&sr=8-10
​
There's the induction fan, You can also get it from Traeger if you want to pay twice the price. The old 3 temperature controllers aren't easy to find any more. Why not get a digital board? It's a plug in upgrade.
https://smile.amazon.com/Digital-Thermostat-Traeger-Grills-Ortech/dp/B00N109ZPM/ref=sr_1_3?keywords=traeger+parts&qid=1555100920&s=gateway&sr=8-3
I recently purchased a welding blanket that perfects goes around my Pro 34 that helps insulate and WAY cheaper;
3' X 3' Tillman Panoxidized Felt... https://www.amazon.com/dp/B005H2N9DQ?ref=ppx_pop_mob_ap_share
They make high strength magnets that will help keep the blanket attached.
Also felt lined the lid so no smoke escapes but also obviously insulates it;
LavaLock 12 GREY High Performance... https://www.amazon.com/dp/B01F9FE60K?ref=ppx_pop_mob_ap_share
Lastly and really the first mod was I got a handfull of firebricks and put them at the bottom of the drum. Help fill dead space and reflect heat upwards (while also a heatsponge). Found some for cheap at a local tractor supply. Think home depot sells a 6 pack for $30 or something free in store pickup otherwise. 6 would be more than enough.
I did this stuff to help maximize my smoke but also reduce pellet use. I figure if you help the drum keep heat with less auger feeding you're going to get MORE smoke as a side effect as it isn't burning them up.
I've had the same temperature swing issues with my 'newish' Traeger. I've tried everything and Traeger support wasn't able to resolve my issue. I decided to take matters into my own hands and purchased a new controller. I just installed it this afternoon. I'll be testing it out tomorrow afternoon on a few racks of ribs. I'll report back and let you know if it was worth the cost/effort.
This is what I bought in case you are curious.
https://www.amazon.com/gp/product/B00N109ZPM/ref=oh_aui_detailpage_o03_s00?ie=UTF8&psc=1
I got this last fall, and used it all winter. It took my single car garage and got up to near 65 degrees while it was in the teens outside. Highly recommend also getting the long hose that goes out to a 20lb tank. Note: Keep your tank outside and run the hose through a door.window.hole.
Mr. Heater F274830 MH18BRV Big Buddy - https://www.amazon.com/gp/product/B01DD6C4TC/ref=ppx_yo_dt_b_search_asin_title?ie=UTF8&psc=1
Hose & regulator - https://www.amazon.com/gp/product/B000UC7966/ref=ppx_yo_dt_b_search_asin_title?ie=UTF8&psc=1
The struggle is so real. My garage looks like a coal mine elevator from this weekend. I ordered this burner replacement i am figuring the guy sold it to me for 20$ bc it is in rough shape. The next brew should be OK but idk if ill still be scrubbing at that point lol
Buy some thermal tape (example) and seal up the door and other joints. It's crazy how much heat and smoke can escape on some units.
We went the route of black iron header and copper flex piping from the valve to the orifice. I found it less of a pain than hoses, which come in so many lengths (often too long), ends, prices and sizes.
First maybe make a mock up PVC header, with 1/2" pipe, caps, elbows, tees or what ever it takes. Once you have a good mock strapped onto your stand, then go to Lowes or such and have them cut and thread 1/2" black iron pipe to the lengths that you figured in your mock, and buy the black iron fittings in the same place. Don't forget a good old roll of thread sealer tape, but make sure to purchase the tape in this area of the store, that is generally yellow in color, and is thicker. It should say on it "For Gas Fittings".
Then head over and get yourself a roll of 3/8" copper flex, a tubing cutting tool (a must) and a tubing flare tool, and a tubing bending tool. All of these tools can be had on the cheep at Harbor Frieght, maybe with the exception of the flare tool... not sure.
I ordered my valves from Amazon. I used these which will thread one side into the 1/2" BIP header, and the other is flared for your copper line.
Also to connect a regulator such as this one that I used to the header, use a simple brass 1/2" pipe thread to 3/8" flare adapter. You will also need two 3/8" brass flare nuts per length of flex copper. Find these in Lowes or HD near all the odd "Watts" plumbing fittings.
Ok, so now start by building your BIP header from the regulator end to the other end, one piece at a time, making sure to use thread seal tape at each joint, always wrapping it in a clockwise direction of the male end of the fitting (to prevent it from backing off when assembling). You can also use some thread seal paste with it as well if you are concerned. Have a buddy help with a few small pipe wrenches.
At the Tees, thread in your control valves. These are not needle valves, but I have found them to be quite sufficient with a soft touch to get tickled down to a tiny flame, or full blast.
From your burner orifice to the valve, cut yourself a chunk of your flex copper. DEBURR both ends of the tubing, if you think you are done, deburr more and more. Without doing this well, when you go to flare the ends, you will find a poor surface, and you will have a leak. Watch this video and this video... there are quite a lot of videos that explain how to flare copper. Don't forget to put your flare nuts on first, before you flare.
Then it is just a matter of bending them with the bender, and hooking them up! Pressure test, and spray each joint with a soapy water solution to check for leaks.
Check out this album of our build for some visuals.
I added the enclosed ash catcher to my Weber Kettle a couple years ago. My kettle was about ten years old, but was new enough that the upgraded catcher popped right in. I seem remember having to remove the clean-out handle to get the enclosed catcher installed, but I could be wrong. If your clean-out fins are rusty or worn out, you might want to replace those at the same time.
Here's the ash catcher unit I ordered: https://www.amazon.com/gp/product/B00MMIKZWQ
I am using this regulator in mine - 0-30 psi regulator . Works great, im using a burner from this guy - Lionel No idea how many BTU its rated at, but i can tell you it will melt aluminum no problem and it makes a hell of a racket when its running - he also has the dimensions if you want to make your own.
I use a GasOne burner. Super cheap and it works great.
https://www.amazon.com/gp/product/B074GXFLX5/ref=ppx_yo_dt_b_search_asin_title?ie=UTF8&psc=1
I have the same model and absolutely agree with everybody that said seal it first. Use the high temp rtv on the mating surface between the firebox and the smoker and the two pieces of the firebox. Then use the gasketing tape on both doors. I even went a step further and prep the surface with the flap disc on my grinder first. Lastly and I highly highly recommend start a large very hot fire in the firebox before you do any cooking and burn off the coating of paint on the firebox. You don't have to get it all off but most of it otherwise there will be a very noxious smoke coming off while you cook. I used a block of wood and scraped it off when it gets all melted to speed up the process a little bit.
https://www.amazon.com/gp/aw/d/B01LRLELK0?psc=1&ref=ppx_pop_mob_b_asin_title
https://www.amazon.com/gp/aw/d/B01F9FE60K?psc=1&ref=ppx_pop_mob_b_asin_title
Links to the two products I used
For the WSM, but it would work with ANY smoker/grill.
http://www.amazon.com/gp/product/B00CI6WFCU/ref=oh_details_o02_s00_i00?ie=UTF8&psc=1
I actually don't. But I can post a bit more info. So, I made a MOCKUP in Sketchup using the dimensions I figured would work for me. I will say that due to the sizing of dimensional lumber, adjustments had to be made during the building process. Not really a big deal, but something to consider. Oh and the front two 2x4s were supposed to be 2x6s, but I ran out of those so I improvised and actually feel it's better since there's more room between the sections.
Building the frame is fairly straight forward, set everything up and screw stuff in. I screwed most of the column pieces in at an angle since while I did have screws they were only about 2.5" long. I didn't bother with pre-drilling with a jig or anything since I'm not really concerned with looks. Once that was done, I tested it by standing on it and moving up an down to put some pressure on it. It is VERY sturdy.
I picked up a roll of aluminum sheeting from the roofing section and just nailed it in on the sides that would be taking most of the heat from the flame. Heat sheilds were picked up from Brewer's Hardware as I said above, and are pre-drilled to fit THESE Banjo burners. The heat shields just screw right into the sides.
For the manifold, I went as simple as possible. I picked up a couple of 12 inch pieces of Iron pipe and the rest of the fittings you see in the PIC, couple of valves and some propane hose I found in the garden section of Lowes. I was only able to find the iron pipe at Lowes, my local Home Depot doesn't seem to carry it. I fit everything up with a hearty helping of gas (yellow) teflon tape and tested to make sure there were no leaks.
That's pretty much it. I will mention this is for an electric HERMS setup, so I only really needed 2 burners. They're going to supplement my heating since I only have a 110v line outside and didn't really feel like throwing in a 220v.
https://www.amazon.com/gp/aw/d/B00MMIKZWQ/ref=mp_s_a_1_1?ie=UTF8&qid=1526183349&sr=8-1&pi=AC_SX236_SY340_QL65&keywords=weber+ash+catcher+22.5
Shouldn't, once it's mortared in. If there's seepage around the hatch, it's nothing a little grill gasket can't handle.
Ok helpless internet user. Here is a link to a 12ft adapter hose with regulator:
https://www.amazon.com/12ft-Big-Buddy-Hose-Regulator/dp/B000UC7966
They have lots parts that can be paired depending on your needs. Give thep customer service a call/email/online chat with information on what you are looking to set up and I'm sure they can offer assistance.
http://www.mrheater.com/contact-us/