(Part 2) Best plumbing supplies according to redditors
We found 1,193 Reddit comments discussing the best plumbing supplies. We ranked the 613 resulting products by number of redditors who mentioned them. Here are the products ranked 21-40. You can also go back to the previous section.


Ok, I'm going to go on a bit of a tangent, but I swear I'm headed somewhere.
Here in the US, especially in the South, we have a fast food restaurant called 'Sonic'. Sonic is a drive-in (like what was common in the 50's), where you pull into a stall and order from an intercom. Now, it's widely accepted that Sonic has the best ice. People that love Sonic's ice have their own FB page, and Sonic has even started selling their ice by the bag at many restaurants. The type of ice they sell is pellet ice. (FYI, While searching for Sonic Ice, I came across this at-home icemaker.)
What I'm suggesting is more of a DIY pellet ice. You can get food-grade plastic tubing from Amazon for $9 in the US. Plug one end, fill with water, and freeze. After it's frozen, remove from the fridge, move it around to break up the ice, and dump it out (some air input may be required to force it out). Then enjoy your pellet ice.
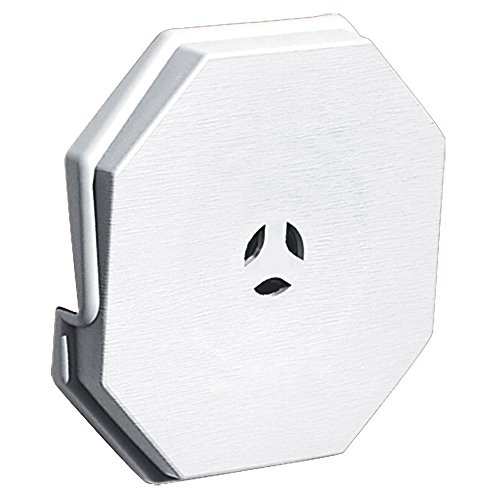
Hi. They make lamp mounting kits for vinyl siding.
Builders Edge 130110006001 Surface Block 001, White https://www.amazon.com/dp/B0041NT7D8/ref=cm_sw_r_cp_api_AV9RAbVRZCPWS
There are different colors. Find one that has the right amount of steps for your type of siding.
Use a outdoor silicon to seal around the edges and there are foam pads you can use between the junction box to the siding cover plate. Hopefully they put a junction box in there, the lamp mount attaches onto the box. If they didn’t, install an outdoor box in there too.
Here is another
Arlington 8141-1 Vertical Siding Lamp Mounting Kit with Built-in Box for 1/2 Inch Vertical Siding LAP https://www.amazon.com/dp/B002W6ZOCO/ref=cm_sw_r_cp_api_4V9RAbFQ3P1Z4
Hope that helps. Turn off the breaker before wiring.
I did this at my house! But much cheaper!
I bought one of these:
https://www.amazon.com/BACOENG-Stainless-Motorized-Control-Electrical/dp/B00PVR7P6O/
And plugged it into a normal zwave switch.
Whenever it loses power it closes. The valve was around $70 and the outlet was about $30. $100 for the parts.
I posted this the other day but a Reddit user suggested I paint it black to have it absorb more heat so I figured I'd post up the finished product. If anyone is interested here's the materials I used, just cut the rubber hose attached to a new clean insecticide sprayer, attach adapter, put on your hose and boom, camp shower with fairly decent water pressure.
https://www.amazon.com/gp/aw/d/B002SAO7XQ/ref=yo_ii_img?ie=UTF8&psc=1
https://www.amazon.com/gp/aw/d/B001GZZFXA/ref=yo_ii_img?ie=UTF8&psc=1
https://www.amazon.com/gp/aw/d/B0039EEN0M/ref=yo_ii_img?ie=UTF8&psc=1
i got a pair of kegs during AIH's sale as well and i'm also new to kegging.
On your first question, here's what I'm doing:
and of course the two 5 gallon ball lock kegs from AIH.
Homebrew Materials:
Vacuum Pump Oil
Vacuum Tubing
1/4" Barb x 1/4" NPT Male Hose Fitting
1/4" Male x 1/4" Female NPT Extension Hose
Vacuum Pump
Filters
Spatulas
Magnetic Stir Bar
Digital Hotplate with Magnetic Stirrer
Nitrile Gloves (Better than Latex)
Empty Capsules (Buy Separated unless you hate your life)
Capsule Machine (If you value your sanity, buy more than a 100... I hated my life doing this)
Mohr Pipets
Pipette 10ml
Mortar and Pestle (If you're doing orals, get this... Otherwise, you're playing Russian Roulette with your doses and liver)
Funnel (For pouring into small places)
Alconox (For clean your shit)
Temperature Gun (How hot is my shit?)
Graduated Cylinder (If you measure with beakers, you're a fucking idiot... And you should consider Volumetric Flasks)
Beaker Set
1 Liter Beaker (Because brewing en'masse is better)
Scale (I have a 2kg one, too)
Calibration Weight Set
Calibration Weight 100g (Because you need two for the scale linked)
Vacuum Regulator (Unless you want to filter 9001 times due to broken shit)
Oil (Any USP grade, filtered or unfitlered)
BB
BA
Butyl Stoppers
Flip Top Seals
Crimper
Vials (Unsealed)
Autoclave (Cheaper than an oven, why are you using an oven?!)
Weight Boats (Buy a million of these. They're cheap and useful)
Did I miss something? Probably. Yes.
Okay. I'll play. You CAN go "cheap". I breed the little fuckers by the hundreds. But essential is a subjective word in this discus world. Give me a minute and i'll post what I think is essential.
For me: The essentials are
1. THE WATER (keep it clean for discus if you want them to grow)
The water in the aquarium has to be initially ideal. For me, this means using RO water. Super soft which the fish love and less than 200 microsiemens on my EC/TDS meter. You can definitely go cheaper, but I own this to see how my RO is doing and to see the water hardness. Discus like less than 200 microsiemens from my experience.
Despite what most people will tell you about RO's, I've had pretty great experience with one I bought off of craigslist. The most important piece is the membrane, which you can always replace. I think I paid 45 for the 5 stage one I have and 30 for the membrane AFTER year of having it just because I wanted to changed it. I filled 2 of the 3 first stages with Catalytic activated carbon that I bought in bulk. I thought I'd need to replace it every 3-6 months with how often I do water changes, but its been trucking along about a year now with the initial fill. Again, you should check your own refuse water for chlorine periodically to make sure your membrane isn't getting damaged when your carbon does eventually get old and ineffective.
I have a big 30 gallon skinny trash can with the filtrate from the RO emptying into it through a float valve.. When the thing gets full the RO is shut off. You also want to think about getting a pump inside the trash can to send the cleaned water to the aquariums easily through a hose or something. The extra "waste" water is carbon filtered but not membrane filtered, so its very alkaline. I often will add some of this water back into the aquarium via gallon bucks if I think the alkalinity is off or the TDS is too low. I shoot for 150ish but never more than 200. Eggs get more fertilized if they are laided in low TDS water.
2.SUMP AND THE BIOFILTER (Its like the liver of your system)
Do not go with HOB or canister filters. Invariably you will forget to change the carbon or clean the canister and it will go to crap suddenly.
You could go with expensive acrylic wet/dry systems that are prebuilt, but my FAVORITE and never ever leaked or over filled sump has been a 25lbs dog food container I got from the container store. It fits perfectly under my aquarium in the cabinet. That is only good for holding your water though.
You still need a place for your bacteria to grow inside of this container. I used bioballs, but i've experimented with lava rocks and other more naturally available media. Bioballs are easiest to move around or clean. I put them inside of little baskets that I ziptied together. The top basket is filled with filter floss (the crap some pillows get stuffed with) to capture floating debris. They are relatively small to my trash can sump so that I could easily see the pump at the bottom of my sump or move them around. This setup with aerate your water. You can get an airpump for emergencies, but you don't really need it. On the other hand you might want to enclose it a little bit since water likes to evaporate.
3. WATER FLOW PUMP and VEINS
A good pump on the floor of my sump. I can't remember if I used the 4000 or the 5000. Either way that brand is pretty quiet and dependable IF YOU DON'T run the water level low in the sump or suddenly have a leak somewhere else. Its simple. Just pump the water from the sump into the aquarium. Try not to have any right angles so you don't slow the flow.
You have to read up on wet/dry filters to see if you want the learning curve headache of dealing with routing water flows. What you want essentially is a system where the water will drain out of the aquarium as fast or a little slower than it comes into the aquarium, but not so fast that you end up with a sucking sound in your drain pipe that will drive you mad.
OUT
My latest SUPER CHEAP "overflow" has been a series of PVC pipes shaped into U's fitted with an aqualifter pump. I got the instructions from here essentially while modifying it to fit my needs. These little pumps are cool because if I loose power or siphon in my overflow, they will pump out the air and keep on pumping water without breaking down. Very useful little discovery. Never again have I had to jump start my siphon do it manually. I put a strainer over the pvc pipe in the aquarium just to keep it from catching any fish. Just lead the water into floss to catch junk.
As to how much water flow, I've seen breeders with as low a 2 turn overs per hour to as high as 5 or 7. Just experiment with your setup.
EXTRAS
IF you change your water often and keep it out of strong light for a while the bacteria will adapt to eating organic waste. IF you don't want to do that or ever worry about it, you can get a UV sterilizer from ebay and also a nice set of lights. I buy mine from topdogsellers, BUT you should know that my UV sterilizer started leaking about 6 months in. I had to place it into that big sump I mentioned earlier to keep it from leaking on the floor. Still works like a champ despite its leak. Its submersible so whatevs.
I keep a bare aquarium spare the place to lay eggs because its easier to drain the aquarium that way of crap. You can go to homedepot and buy a 30 foot acrylic tube and fit a pvc pipe into it to suck up the bottom of the aquarium out into your yard or bath tub. I'm sure you will figure it out.
You might not NEED a water heater depending on where you live, but I highly recommend it. Discus are often imported and hence come from places with parasites. Water temperature can help kill quite a few of these while boosting fish growth and encouraging good immune responses. Salt ( IN LESS THAN 200 microsiemens) can also help. Eventually you will learn all about prazi and other meds like Clout. I recommend this water heater since it won't shatter if you make any sudden changes to water temperature which you should strive to never to but may at some point need to .
Food can be made from beef heart and if you can train your fish to accept it your pocket book will thank you. Water changes will be important if you go this route as it can messy up quite a bit. If you are filthy rich feed them blackworms from california. Look it up. They are clean of parasites and don't die and dirty up your water. Fish LOVE them.
Let me know if you have any questions.
Built my own using an electric ball valve, zwave outlet, and water sensors spread around the house.
Here is the valve I used:
BACOENG 1" DN25 110VAC Stainless Steel Motorized Ball Valve 2 Way/Zone Valve With US Plug(NC CR202 2 Wires Control Electrical Ball Valve)
https://www.amazon.com/dp/B00PVR7P6O/ref=cm_sw_r_cp_tai_.6I1Ab0EHAN41
Also available in 3/4 inch.
http://www.amazon.com/dp/B0052AU0HQ/ref=cm_sw_r_udp_awd_50Futb1YQ5H2J
Ok dude I got you bro...I want you to check 2 thinks for me. Check to make sure that the plastic duck work from the mass air flow sensor to the throttle body is all attached properly and secured. Play close attention to where it is hooked up to the throttle body with that 8 mm hex on the gear clamp on the driver side that you have to fish through with an extension to tighten. if that all looks good, I want you to take a look on the passenger side front of the valve cover and you will see a small plastic hose that goes forward into the plastic ductwork. Where that hose attaches to the plastic duct the nipple breaks off and then you get a vacuum leak. I would be very surprised if that was not your problem. If that plastic nipple has broken off, go to the hardware store and get a threaded 1/2 inch Barb that you can put a half inch hose onto, heat it up, and twisted into where the plastic piece broke on and then install the hose. like this, but 1/2"
I personally use clear Poly tubing from amazon for my barrels. It's a hair larger ID than cpvc, great for stefans and half lengths but a bit too tight for stock darts.
https://www.amazon.com/gp/product/B000OMJ4YW/ref=oh_aui_detailpage_o01_s00?ie=UTF8&psc=1
Plumber here, buy [this pump] (http://smile.amazon.com/Zoeller-Mighty-mate-Submersible-Sump-Pump/dp/B000H5PYR2/ref=sr_1_1?ie=UTF8&qid=1416936374&sr=8-1&keywords=zoeller+sump+pump) . They are very tough and last a long time. If your old on edoes not have a check valve, buy this one to go with your new sump pump.
That's why I'd get one of these
https://www.amazon.com/BACOENG-Stainless-Motorized-Control-Electrical/dp/B00PVR7P6O/
Automatically shuts off if you lose power.
Had this same issue with an older DJ controller and a laptop... it's a grounding problem with the outlet.
Get yourself a Ground Loop Isolator and the buzzing should disappear.
What kind of pump is it? I had a 5 year old big box store tether pump that would wake the whole house. Upgraded to a Zoeller m53 which cost me $125 on Amazon and is whisper quite. Don't forget to add in a check valve, which it doesn't look like yours has.
These are what I bought:
http://www.amazon.com/Zoeller-Mighty-mate-Submersible-Sump-Pump/dp/B000H5PYR2/ref=sr_1_1?ie=UTF8&qid=1452683726&sr=8-1&keywords=zoeller
http://www.amazon.com/Zoeller-30-0181-Check-Valve-Inch/dp/B0009WD1L4/ref=pd_sim_60_1?ie=UTF8&dpID=41tvTOSrD7L&dpSrc=sims&preST=_AC_UL160_SR160%2C160_&refRID=1DQ4X69H0CMEEQG9T9PN
I've shared this here before and it's worth mentioning here too.
I take lawn/garden pressure sprayer and replace the end with a sink sprayer. You'll also need a fitting to connect them which is likely this but you can't know for sure until you have the garden sprayer in hand. This gives me very simple, one handed control over a relatively low flow water sprayer that's designed for rinsing soap off of things.
It's simple, cheap, it doesn't take any electricity and works really well. I can take a full shower including shampoo and conditioning long hair with less than a gallon of water.
106 Buna-N O-Ring, 70A Durometer, Black, 3/16" ID, 3/8" OD, 3/32" Width (Pack of 100) https://www.amazon.com/dp/B000FMYR48/ref=cm_sw_r_cp_awd_1jW7wbE84R639
These were the ones recommended from the wiki
I had the same problem in an E46, you need a ground loop isolator: https://www.amazon.com/JacobsParts-AFILTER-B-2-Channel-Stereo-Isolator/dp/B00TED5T64/ref=pd_lpo_vtph_lp_img_2/133-3835736-2006417?_encoding=UTF8&psc=1&refRID=84VZ705Z8YVY9PYJ6HF0
Monoprice uses really cheap non-standard parts, sorry yours broke. Mine did the same thing a couple weeks ago.
What you really should do is buy this metal extruder assembly for $7, as the 3D printed ones I tried just didn't work well, and I tried several.
You'll also need these new connectors, they're cheap and you can also replace the crappy one on the other end of the Bowden tube while you're at it.
After removing the grub screw on the old extruder gear, use some heat, like a heat gun or a hair dryer, to help you pull off the old extruder feeding gear. Trust me, it's worth it. This new one is million times better. No skipping, no jams, no underextrusion. I suffered with that problem for ever! It all came down to cheap parts.
You should re-callibrate your e-steps, as it's honestly super easy. I think 100 was the number I used. The default is 92, so if you don't want to it won't be that far off.
Edit: /u/Karzdan, this will 100% fix your issue. My print quality really improved, this small upgrade made a huge, huge difference for me. This new spring is much stronger, and the new teeth really grip the filament.
Have you ever seen a wedge block for vinyl siding?:
https://www.amazon.com/Builders-Edge-130110006001-Surface-Block/dp/B0041NT7D8
I had to break this into another comment due to per comment character limits.
The following previously belonged to the above comment, but was moved here due to the above mentioned limts.
> Something you can do now: Build a filament drybox. Seriously, some filaments such as certain Nylons can go bad in just a few hours, depending on ambient humidity levels. All filaments are susceptible to moisture absorption, and ideally should be kept in something like a Spannerhands holder, even while printing, but at worst you should store them in a big plastic tub with silica gel beads to keep them dry.
> If I had to give one last tip, don't stock up on too much filament yet! Seriously! I thought I would be printing mostly in PLA but now that I've had a few weeks to work with it, I've learned I prefer PETG more, and now I have so much extra PLA! I'm sure I'll find something to do with it, but for my final tip I would add "And get a good variety!". Services like MakerBox (referral) let you try a bunch of different filaments on the cheap. It's not a ton of each filament (about 50g), but I love the variety of materials and colors.
Original second level comment begins:
Final Tips: Bonus Round!
There are tons of other accessories you can get ahead of time. None of these are necessary, but are small things you might end up using (or wanting to try :P), and should help get you started getting a wishlist together. Besides the ones mentioned in this comment (and the one that precedes it) already:
Edit: Upon rereading my comment I realized I have a problem.. I own every product I just listed..
^^Except ^^for ^^the ^^nozzles ^^kit ^^so ^^it's ^^not ^^that ^^big ^^of ^^a ^^problem, ^^right?... ^^Right?!
For what it's worth, here's how I solved the small tank problem:
https://i.imgur.com/ESjNxmv.png
I bought a check valve from amazon:
https://smile.amazon.com/gp/product/B010JAQZK4
How this works: normally, the tank is full of water. That water goes through the finishing filter and to my fridge, icemaker, and faucet upstairs. When I open the valve shown in my picture there, RO water starts to flow into my kettle. It runs (with the same system you have), at about 1.5-2 gallons/hour. Because of the check valve, the tank stays full, and the fridge, icemaker, and faucet upstairs CONTINUE to have a full supply of water while my kettle fills. Unless I use 3 gallons of water from the fridge/faucet upstairs while the kettle is filling, (I don't use water that fast), my wife and kids never notice the service interruption. Finally, I use a float valve, mounted to a stick and clamped to the side of the kettle, to ensure I don't overflow. This way I can fill at 1.5 gal/hr over night.
Now - the water in the kettle doesn't go through the finishing filter, but all that filter is meant to do is remove off flavors from the water having sat in the tank. Since the kettle water never hits the tank, no worries. It tastes perfect, and measures nice and low on TDS, (in fact, my brewing water has lower TDS than my tank water, because the tank water suffers from TDS creep)
Sure thing! Here's a list of the main equipment:
Lighting - Finnex FugeRay Planted+ Aquarium LED Light Plus Moonlights
Light Risers - OEM FINNEX LIGHT RISERS FITS PLANTED+, RAY2, FUGERAY, ETC.
Filter - EHEIM Classic 250
Co2 - Tank / Diffuser / Drop Checker
Heater - EHEIM Jager Aquarium Thermostat Heater
Addon - Finnex Breeder Box with Light
Hey, just a friendly heads up you may wanna switch to food grade silicon tubing instead of vinyl (as that appears to me). I had once used a vinyl tubing until I read that when heated it releases chemicals that when inhaled can be extremely detrimental to the lungs over time. Not the worst thing once in a while I'm sure, but the food grade tubing will accomplish the same task as other tubes without the negative side effects. It's also a bit more flexible so it's easier to maneuver after a few rips! Looks AMAZING otherwise! Be safe and enjoy (:
Edit: here's the link to the one I used! It also fits around the glass stem of a MLFB perfectly so you can "Vong" (vape/bong!) if you have one (: sorry for the long link, I'm on mobile: https://www.amazon.com/gp/aw/d/B000FOWGG2/ref=ya_aw_od_pi?ie=UTF8&psc=1
read my other reply re: health risks and why I'd personally rather not risk it.
this is the tubing I use.
Try these O-rings.
Edit: The size 008 of these is a bit softer.
Hey mahm0udin
I use the 5 gal version now, but I think the 10 Gal would be perfect for both methods because you get a healthy grain bed for filtering when brewing big or small.
You will want to install a Weldless ball valve with a Nipple on the inside of the mash tun.
You will also want one of these false bottoms and a piece of silicon pipe to join it to the internal ball valve nipple
Woo, that was a lot of links :) This is my setup and it works a treat :)
When you replace it you really need to add one of these
here
So what I would do is, remove that union, connect the check valve and PVC down to the pump (I'd drop in one in the sump). You'll need a threaded adapter on the pvc to the pump and any 45 or elbow as needed.
Basically, you need a tank, a regulator some airline, a bubble checker would be good to have and a diffuser. Also, you'd like a timer of some sort as you really do not need to have co2 running 24/7 nor would you probably want to.
My setup:
$23 dollars on Amazon - though I would have still needed to get it filled at paintball shop for $5 which brings it $28. $2 more - i think it's better at that to support the local shop and plus I didn't want to wait for the tank to come to my house as that would have arrived later than anything else.
Price for this setup: $109
If you need a timer, there's plenty of options. I already had one, but you can find them on Amazon.
Though in the end, you would need a timer and if you already have one then you won't have to buy one. Or if you have extra smart switches either that you can set a schedule on.
Other tanks:
Instead of the paintball tank you can get a regular co2 tank:
Of course, that's just buying the stuff to build the system.
You can watch videos about it on Youtube like Aquarium Co-Op's Co2 guide but I can still try to break it down.
Get tank and properly secure it to the regulator.(I'd recommend watching a video on that as the regulator does need to be open for this part apparently). If using the paintball tank, secure the adapter to regulator first. DO NOT secure it on the paintball tank first. If you do it with the way the adapter is built, I'm guessing you'd be losing a bit of co2. Though, I haven't tried it, I'm logically thinking that it ain't good. If you use a 5lb tank or larger, there's something about some disc or gasket or something that is supposed to help keep it from leaking. I'm going to refer you to youtube on that one. I didn't use any on my paintball setup except for the gasket already on the tank. I did use some plumbers tape on the adapter to regulator though. I'm just hoping I don't have a leak and I'd be pretty confident to assume that I don't as I still have CO2 in my tank after a couple of weeks.
All you need to do now is to attach the airline hose(some people will say to use co2-proof hose to prevent co2 loss, but I decided to skip that and you can decide what you wish to do as I might be right or wrong on that part along with other people who claim airline tube is sufficient) to the regulator. So after you attach the hose to the regulator, attach the bubble counter somewhere along the line before the aquarium(I think I did that right). Of course, if you use the 5lb or larger tank, you should be able to use the bubble counter that came with the regulator as it would stand vertical. The line eventually gets connected to a co2 diffuser which will break up the co2 into smaller bubbles to easily be dissolved better into your water. Of course, there are other ways to get the co2 into your tank, but this is the way I do it. Youtube can show you other ways, or other redditors for that matter. One thing to note is that you should also have a check valve to prevent water from going from the aquarium to your system. It should most likely be closer to the water than the co2 system. The bubble counter I use, also has a check valve for whatever that one is worth. Some diffusers come with bubble counters and check valves as well. Speaking of diffusers, i forgot to add that to my price. but that can run anywhere from $5 on up. Also the diffuser might have to be cleaned due to algae once and awhile.
The system should be ran using a timer to coincide with your light cycle and should run basically when the lights are on. I turn my co2 on 1 hour before the lights turn on and turn it off 2 hours before the light turn off. Hypothetically, you can run it 24/7 however it's better not to as the risks are a bit too much for putting something in your tank that is not being used as the plants typically don't use co2 with the lights out and you can risk running into a situation where you deplete the oxygen in your fish.
Overall, I think it's worth it at least for me. But also be cautious that adding too much co2 might be detrimental to your fish. If you are running it and your fish are all gasping for air, you definitely are putting too much in but you should never get it that far which some way to check it would be a good purchase for this. I just use the method of figuring out the ppm of CO2 based on pH and KH. I'm not sure how accurate it might be but it has been stable and my fish are doing fine as well as my plants and the algae is at bay. There's also what's called a CO2 drop checker that you can purchase to measure this.
If you really want to get into this, I'd recommend researching it further yourself and maybe wait on some other more "experienced" redditors to answer as I might and could be wrong on some things. I know I've read some people don't think the ph/kh calculation method is good and to buy a drop checker, but I'm pretty confident in using it for my tank but I might be undosing the co2 for all I know. Though on the flipside, I could be overdosing, though my fish are not showing any signs of symptoms of said overdosing. But I could be wrong on that. If I am, please let me know. :) Definitely do your own research, like you should on anything. :) At least, get a good footing and confirmation from other sources.
I have/had the maker select. I fought it about ever other print I did on it until it finally became more expensive to troubleshoot than buy a new printer. Thats when I got the ender 3. I honestly think the ender 3 prints way better than the maker select ever did for me. Dont get me wrong the maker select was a good printer when it printed but I think the ender 3 outperforms it.
Yes the whole myth around resin being so expensive I think stems from a couple years ago when it was waaayyy more expensive and the only players in the game were selling $3000 printers. It has come way down and just realize every single time someone say that it is 10x more than FDM they are either misinformed, lying, or an idiot lol. I think the fact that you have to but it $60-$150 at a time instead of $17 (what a cheap roll of filament costs) really confuses some people. I have done the calculations though since I print for commissions and my resin volume per mini is usually between 4ml to 7ml. Resin can be bought all day for $0.08 per ml. I love it when people try to argue with me on it though :)
[Here are the connectors I bought](https://www.amazon.com/gp/product/B01MQYJ9T6/ref=oh_aui_detailpage_o09_s00?ie=UTF8&psc=1) you probably could find a smaller pack but this is the size you need. The connecter on the hotend side is a different size, but I didnt have any problems with that one so I only replaced the one on the extruder.
Never heard of it. But here's the parts to do that.
Carbonation cap with fittings.
Mini CO2 regulator with adapter
Co2 Tank
Tubing
Hose clamps.
Either get them from amazon or WASD. WASD has options for softer o-rings which are quieter. The ones from amazon are hard, but give a crisp feel IMO ( i have the amazon ones). here: the dash-size is 008
http://www.amazon.com/008-Buna-N-O-Ring-Durometer-Round/dp/B0052AU0HQ/ref=sr_1_1?s=industrial&ie=UTF8&qid=1368113366&sr=1-1&keywords=o-ring+mechanical+keyboard
or WASD:
http://www.wasdkeyboards.com/index.php/cherry-mx-rubber-switch-dampeners.html
I use this with sleeving for a hookah-like vapor-bong experience, very flexible and works well. You can probably find 'medical grade' or something of the sort in the same size if that is something you care about but this type of tubing is used in drink dispensers and whatnot and is safe to 500f so I figure they are safe enough for vaporizer use.
I just bought some O rings (https://www.amazon.de/gp/product/B008ASXS76/ref=oh_aui_detailpage_o00_s00?ie=UTF8&psc=1) and put them under and over the FC(http://i.imgur.com/80icq5W.jpg) If you got not enough space it might be enough to put them just under it
I suggest this Gates Fuel Line Hose instead. It's top quality reinforced hose. I also suggest these hose clamps. That petcock seems OK. It should be replaced because it will likely go out while you own it, and this might be why the scooter stopped running suddenly.
What is you plan for a mash tun? I went with a 10g Home Depot cooler and something like this: https://www.amazon.com/Quick-Weldless-Stainless-Bulkhead-Nipple/dp/B00JHMRH2Q
This is the cooler: https://www.homedepot.com/p/Rubbermaid-40-qt-Orange-Water-Cooler-FG1610HDORAN/202260809
You’ll also need a screen or false bottom. I think the screen is a ver economical option https://www.amazon.com/Stainless-Steel-Bazooka-Screen-Fitting/dp/B003ISY2DC
This video does a good job illustrating the basics.
The key is getting the components to fit as tightly as possible so you don't need to use glue. The 1/8" ID airline tubing seems to fit most Ety models well.. Then pick your favorite earplug material for softness and NR rating.
https://www.amazon.com/dp/B00PSX6ZV2?psc=1
The key is getting a round hole of the correct size in the foam earplug, getting the earplug cut to length properly, and fitting the whole thing over the sound canal of your Ety drivers. There's no fancy tool required, you can use anything from a sharpened metal tube to a soda straw or coffee stirrer. The key is to get a properly centered hole that grips the airline tubing and will fit comfortably in your ear.
I believe you need a PC4-M6 PTFE tube connector.
Buna O-Ring, 50A Durometer, Round, Black by Small Parts http://www.amazon.com/dp/B0052AU0HQ/ref=cm_sw_r_udp_awd_TIjxtb0EZTBM2
Model 008 (3/16 ID - Inner Diameter)
$8.25 currently
Just put these on my Brown switches and really like them. Hopefully that helps!
$10 12V Solenoid valves from amazon. These do the job and it would cost you $640. http://www.amazon.com/12V-Solenoid-Valve-3-4/dp/B007R9U9BM
Super easy, need just a screwdriver to remove the old one. Its the thing mounted a bit higher in the PVC pipe. Get one that matches the size of the pipe. Here is one as an example.
https://www.amazon.com/Zoeller-30-0181-Plastic-Check-Valve/dp/B0009WD1L4
Here is the valve I have: https://www.amazon.com/gp/product/B007R9U9BM/ref=oh_aui_detailpage_o05_s00?ie=UTF8&psc=1
I double checked and the direction is correct, still same issue. Is it possible that the pressure from the tap is too high?
The problem seems to be that the ones that really reduce travel distance also seem to be the mushiest. Seems like most people who are installing o-rings are doing it for sound not how far your keys depress :(
I've only found one real "review" on o-rings in general and the guy was using blues not reds so not sure how much it will tell me. At $20 a pop for a set it's kind of a sucky "guess and check" situation I feel like.
--------------------
Edit: I think I found my answer: 70A... the number is a measure of hardness not size! Now I just have to find the right thickness in them...
Edit 2: Found them! 70A O-rings on amazon. Code 008 for the 1/16" and code 106 for the 3/32". At $2 a pop I can actually guess and check with these.
I don't know why my google-foo was sucking so much last night. I must have been tired.
I found polycarbonate tubing to work well for Men Gun darts, and the 6MILES darts are of similar shape. The tubing has a .509 inch diameter bore.
Pressure gauge:
https://www.amazon.com/gp/product/B006VE306A/ref=ppx_yo_dt_b_asin_title_o03_s01?ie=UTF8&psc=1
Cloche:
https://www.amazon.com/gp/product/B0797GVSXJ/ref=ppx_yo_dt_b_asin_title_o04_s00?ie=UTF8&psc=1
Silicone:
https://www.amazon.com/gp/product/B01C4YQ4TU/ref=ppx_yo_dt_b_asin_title_o06_s00?ie=UTF8&psc=1
Vacuum Pump:
https://www.ebay.com/itm/3-5-CFM-Rotary-Vane-Vacuum-Pump-1-4HP-HVAC-R134a-Air-Refrigerant-Conditioning/131845616776?ssPageName=STRK%3AMEBIDX%3AIT&_trksid=p2057872.m2749.l2649
Vinyl-flex tubing:
https://www.amazon.com/gp/product/B00E6BCV0G/ref=ppx_yo_dt_b_asin_title_o03_s01?ie=UTF8&psc=1
​
​
​
http://www.brandtech.com/articles.asp?artid=13
get a valve.
Honestly... I went with a more expensive oil less vacuum pump. Those things are dirty. You need to be careful about potentially contaminating your brew with the oil spewing out of the pump.
If you're going to go this route I would recommend rigging up some sort of glove box to do the vacuuming in (make sure it's sealed from the exhaust of the pump... aka caulk some joints for the hoses to connect to - aka seal something like this (I didn't check the pipe sizes of any of this shit so figure that out) http://www.amazon.com/dp/B002SAO7XQ/ref=cm_sw_r_tw_dp_lmIrub1RDNX7Y into this: http://www.instructables.com/id/DIY-Glove-Box/
here's a good video to illustrate what I'm talking about with the valve (you need a 3 way splitter to allow air into the vacuum line - the top example)
https://www.youtube.com/watch?v=DZe61UyL0lM
You can also turn it off/on and there's relay circuits for that (but they're more expensive). Honestly you should be ok with a valve I believe. Technically you should need more pressure as it filters as the filter gets more jammed up. So you wont be in a situation where it overloads it when you aren't paying attention (tho you need to watch it).
I'm not joking about the glove box. There's a reason they recommend oil less vacuum pumps for lab work (and they aren't cheap).
Hey! I’ve got the same vape and I was just about to clean it. Thankfully I read your post first! I’m also curious about how to clean the whip. I do know that someone told me that they sell that type of piping at Home Depot for SUPER cheap. Maybe cut it up to scrape in smaller pieces and buy a new long piece? Arizer sells a 9ft one too. Good luck!
Edit: here’s the link to some on amazon. I’d read reviews but someone used it with the exact same vape in the pics! link here
If it's the stock tube (which it probably is if you haven't replaced it) then its vinyl. Vinyl will degrade in ISO. Order some silicone tubing as its alcohol safe and more flexible. I used this when I had an EQ. You want 5/16" interior 7/16" outer. https://www.amazon.com/dp/B00DYAFIU0/ref=cm_sw_r_cp_api_Lb4-yb3RTJ243
This is the one: https://www.amazon.com/Builders-Edge-130110006001-Octagon-Mounting/dp/B0041NT7D8/ref=asc_df_B0041NT7D8/?tag=hyprod-20&linkCode=df0&hvadid=198097951144&hvpos=1o1&hvnetw=g&hvrand=17773540549136269974&hvpone=&hvptwo=&hvqmt=&hvdev=c&hvdvcmdl=&hvlocint=&hvlocphy=9002254&hvtargid=pla-403882341727&psc=1
Sure no worries, when you get your mind made up
I'll hook you up with what you need, This is very good tubing.
Have you not seen my Videos & Pics.
Tell me exactly what you want to hook up to where, ok. Happy to help if I can
Whip tubing food grade heat to 500 Autoclave-able washable
https://www.amazon.com/gp/product/B00DYAFIU0/ref=oh_aui_detailpage_o01_s00?ie=UTF8&psc=1
What glass connects do you need to what?
These are the ones I use on my QFR with browns. They make a big difference in noise level since I can't seem to learn not to bottom out.
008 Buna O-Ring, 50A Durometer, Round, Black by Small Parts
http://www.amazon.com/ss/customer-reviews/B0077RAX4W/ref=?_encoding=UTF8&*Version*=1&*entries*=0
I used this, and added another air tank the same size to it, to ensure that the water in the tank would have enough pressure to close the valve all the way. I've seen some people that used an electronic version that just tripped closed when the water hit a certain level.
For any lurkers who might be interested in exploring this more:
ejaculating dildos often come with the type of syringes you're describing, you can buy them individually on Amazon, too without all of the medical ends & attachments and with a thicker exit hole to accompany the tubing that goes through ejaculating dildos. Here's a link to a solo 100ml syringe with the tubing so you can explore that particular section of syringes: https://www.amazon.com/gp/product/B00J26U3R8/ref=oh_aui_detailpage_o01_s00?ie=UTF8&psc=1
A small one could hold a couple shots of cum, easily. I use this 100ml one for pee-fetish stuff. Liquid always looks like it's got a greater volume than it actually does when it's outside of the container.
Generally, there's only a couple top tier mod types.
Then you have your budget builds,
Rivals,
_
But yeah, most people a 3S Stryfe mod is plenty for most players.
https://www.youtube.com/watch?v=Jn5ze5w_Zhc
Just get yourself a bunch of 18 mags, and a condor 3 fold dump pouch, or vism chest rig.
Also me personally I usually run an ammo pouch, with a large ziploc bag, with 2 vertical pieces of duct tape on one side, and then 2 cuts for belt loops.
I think you're on the right track. I've been searching for mounting block covers for siding and came across this.
I'm not 100% sure it will work simply bc of the position of the existing box and the way that cover is designed to fit over the siding. Seems like the current junction box wouldn't be centered under the cover. But at least I feel like I'm on the right track.
Thanks for the suggestion.
8gal should be plenty for a kettle. I bought my stainless steel kettle from AIH and I believe they start at 69 with 1 spout. You will need to buy the ball valve and barb fitting but those can be around $15-$20 on amazon. I have another kettle that s aluminum with a spout that was dirt cheap on amazon. They go on sale sometimes for $40ish for 8-10gal, I dont remember which.
The darkstar burner from northern brewer is $a reasonable $50. If you wanted to get something cheaper you would need to scour craigslist.
I am pretty new to brewing still but I stayed away from glass fermenters just because of all the horror photos I have seen on here and HBT. I have 3 plastic fermenters but I haven't yet had 2 going at the same time. If you are in NorCal I would gladly give donate one to you.
As for the rest of the smaller stuff, I would try and find a LHBS. Prices shouldn't vary that much from online. Or you could spring for a kit from nothern brewer that should come with everything.
I have yet to keg so no info on that, but I like bottling. It makes it easier to share with friends and is more portable.
Haven't had any hands on experience but this might work. Is suppose to have an interior diameter of 1/2" instead of the 15/32" that the cpvc seems to have.
I wouldn't recommend elites for this though, foam is just too squishy.
Timer and pump or [valve] (http://www.amazon.com/12V-Solenoid-Valve-3-4/dp/B007R9U9BM/).
One thing I would say that might help is to move the check valves lower. They should be very close to the pump itself. Yours are so high that a lot of the water that gets pumped up comes right back into the sump. So they work more and the water level stays higher.
Make sure they are working when you move them. If not or suspect get a Zoeller 30-0181
http://smile.amazon.com/Zoeller-30-0181-Plastic-Check-Valve/dp/B0009WD1L4
I had the same issue, lost track of how many times I flooded my grow space forgetting the water barrel. Ive been using this one in my barrels for years now with 0 issues. Easily handles home water pressure. Use it with a hose to 1/4" adapter and good to go for cheap.
http://www.amazon.com/Kerick-Valve-MA252-Float-Adjustable/dp/B0077RAX4W?ie=UTF8&psc=1&redirect=true&ref_=oh_aui_search_detailpage
https://www.amazon.com/ATP-Vinyl-Flex-Plastic-Tubing-Length/dp/B00E6BCV0G/ref=sr_1_7?ie=UTF8&qid=1523453164&sr=8-7&keywords=100ft+of+food+grade+pvc
here is a correct size but its out of stock right now
I just finished up a fruit beer a couple weeks ago. To filter out the particles I used an aquarium micron bag and clamped it onto the end of the hose with one of these. All in all, it worked out pretty well.
I'm looking to purchase the parts for a 2 tap sankey kegerator and wanted some feedback on before I go ahead and order. everything is through amazon because I have a large amazon gift card.
I already have 2 intertap flow control faucets
coupler-kegco KTS97D-W x2
beer line assembly x2
10 feet of gas line
20# luxfer co2 tank
taprite dual regulator
intertap shanks x2
I'm hoping to pick up a used chest freezer on craigslist. Anything I'm missing? Anything I should change?
Sounds like a ground loop problem... through the USB wire... and it sounds different between your laptop and desk top because one is probably shielded better..
You could modify your equipment to give it proper chassis ground..
You can buy one of these.. but they impact sound a bit.. https://www.amazon.com/dp/B00TED5T64/ref=cm_sw_em_r_mt_dp_U_f2NxCbQQ83BBX
Do some research to find out which solution would be better for you.
It's not 250ml but I have one of these. Here is a 150ml from another vendor.
Obviously way more than you need, but here's 10' 1/4ID 3/8 OD for $9.
https://www.amazon.com/dp/B000FOWGG2/ref=biss_dp_t_asn
Minimum Setup is only 3 items
Tank
regulator
Diffuser
I'd recommend either of these -
https://www.amazon.ca/Mityvac-MVA6851-Fluid-Extractor/dp/B00MPQ8RBG
https://www.amazon.ca/Yobett-Large-Plastic-Syringe-tubing/dp/B00J26U3R8/
Thanks! That is the 1/2 HP pump I was looking at instead of the 3/4 HP one if I decided to go with a water powered backup solution. However, I think I may go with battery backup instead.
​
This Wayne WSS30V is 1/2 HP all-in-one combo with battery backup and also has an alarm built in. I think this is what I'm leaning towards at this point. I was also looking at that Mighty Max for the battery, or this Duracell Ultra Deep Cycle Battery for 12V Sump Pump if it's okay to use (let me know what you think).
​
I ordered one of these Zoeller PVC Plastic Check Valves. Do I need two on the combo unit, or is just one okay?
​
I have this Basement Watchdog Dual Float Sump Pump Switch with Controller on my current pump and was just going to transfer it over to the new one using the metal clamp it came with.
​
Any other suggestions or information is greatly appreciated. Thanks again for all your help!
Sure, that should work. Just make sure that you clamp down all your hoses and double- and triple-check for leaks. Keep some extra hose clamps on hand. They should be super tight, but not so tight that they cut through the tubing.
Would this be acceptable? http://www.amazon.com/12V-Solenoid-Valve-3-4/dp/B007R9U9BM
5/16" I.D. x 7/16" O.D. Silicone... https://www.amazon.com/dp/B00DYAFIU0
Smugthy,
Currently I do not have any supplies. I plan to order them within the next couple of days.
Here is a few links of what i plan to order.
I'll add you to the list!
Thanks!
Edit: Also im looking into getting a labeler, but no guarantee.
https://www.amazon.com/Eowpower-Pneumatic-Straight-Fitting-Connector/dp/B01MQYJ9T6/
1-Get yourself a grinder, got one? Go to 2
2- Grind a quantity of your stash (drier is always better), ground? Go to 3
3- Turn it on,I prefer 165°C for an energetic buzz, 200°C for a body high (results may vary)
4- Using the whip? Go to 5. Bagging it? Go to 8
5- Elbow pack that bad boy. Google elbow packing extreme Q or https://www.youtube.com/watch?v=07mIhuyDdTY&feature=youtube_gdata_player go to 5
6- Place elbow on cyclone bowl, let it heat for 2 minutes
7- Two deep breaths, one slow DEEP pull, hold it in for 5-10 sec
8- Fill your cyclone bowl loosely, no higher than the bottom of the black heat guard on the bowl
9- Assemble cyclone bowl + elbow + bag
10- Let it heat up for 5 minutes
11- Turn fan on 2. You should be able to see your hand through the bag's vapors. Thick vapors? Fan on 3, Thin vapors? Fan on 1
12- enjoy
P.S. You should look into changing your plastic tubes for this: http://www.amazon.com/dp/B000FOWGG2/ref=biss_dp_t_asn or something alike (I did and it is worth it). Non-toxic, heat resistant and can be cleaned with iso-alcool
P.P.S Also look into purchasing a straight glass reducer (standard 14.4mm labware reducer I think) instead of the elbow, reduced restriction = easier draw and faster bag fill
Non-mobile: These are probably the hardest and thickest
^That's ^why ^I'm ^here, ^I ^don't ^judge ^you. ^PM ^/u/xl0 ^if ^I'm ^causing ^any ^trouble. ^WUT?
Hmm, ok, I might try some of these because I am not sure if I have enough room in my setup because of the spacers my frame adds already to then bottom make the rest of the build on top quite tight.
I bought these https://www.amazon.com/gp/product/B008ASXS76/ref=oh_aui_detailpage_o00_s00?ie=UTF8&psc=1
Add some of these and thank me later! Just be sure to get a keycap puller. I am currently typing from the exact setup and it is a dream.
http://www.amazon.com/Black-Rings-Sealing-Gasket-Washer/dp/B008ASXS76/ref=sr_1_5?ie=UTF8&qid=1415484297&sr=8-5&keywords=o+ring+2mm+mechanical
Found this.
IDK as far as damage, but I imagine you'll get some slipping at the very least. Very well could damage it, but I have no idea.
Worse, draining it will probably be a pain in the ass with no drain plug. You'll end up with something like this to suck it out.
https://www.amazon.com/gp/product/B00J26U3R8