(Part 2) Best power drill parts & accessories according to redditors
We found 1,182 Reddit comments discussing the best power drill parts & accessories. We ranked the 628 resulting products by number of redditors who mentioned them. Here are the products ranked 21-40. You can also go back to the previous section.


I removed the recoil for the pull start. It was 4 small bolts. If you've ever had to fix the pull rope then you've done it before.
When you get that off, you'll see that there's a nut that the recoil was turning. Find a deep well socket that fits that nut. Then you'll need something like this so that you can put the socket on the drill.
https://www.amazon.com/SE-7503SD-Power-Extension-Bit/dp/B0002TW1D8/ref=sr_1_2?adgrpid=59148646213&gclid=CjwKCAjw44jrBRAHEiwAZ9igKAT3jMtbld0tEIJ37YkqehiUYYbUsiPZDf9AmzgEnJg3aWuRCMzMlBoCvygQAvD_BwE&hvadid=295656596052&hvdev=m&hvlocphy=9016188&hvnetw=g&hvpos=1t1&hvqmt=e&hvrand=4724770542817919199&hvtargid=kwd-383813721561&hydadcr=20342_9690425&keywords=drill+attachment+for+sockets&qid=1566766883&s=gateway&sr=8-2
After that you just push the primer a few times and then use the drill to turn the motor clockwise until it starts. Be ready to let go of the drill. It might want to spin out of your hand.
https://youtu.be/SRd6A8jkZgA
And u/laspyra
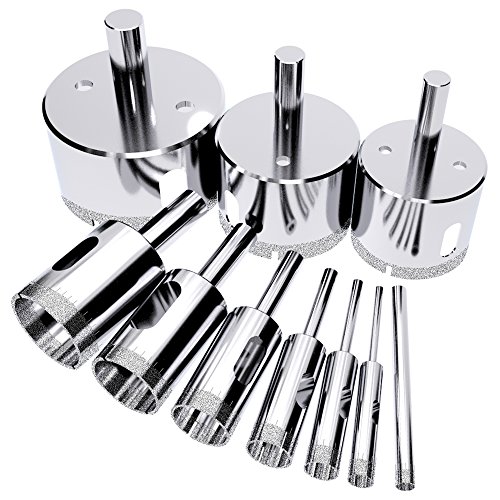
Get a diamond tile drill bit! Then you can drill a drainage hole in everything!
Used a diamond drill bit with a little water drizzling from the kitchen sink. The hardest part is just holding the drill in place while it makes it's first marks.
Edit: fixed link
So hit the local hardware store and buy a diamond tipped hole bit like these. Do this at an angle to start to keep the bit from walking (and scarring your glass) while having running water on it. If you need a friend to help with the hose or spray bottle then use them. Heat will cook the moderately expensive bit and well as crack your project. After you get an edge to bite work your drill to 90* and keep the water coming. This will cool and lubricate the hole your making. Wear safety glasses, you're essentially chipping tiny pieces of glass, ceramic, or clay. If the end turns blue/purple from heat, the bit is cooked and throw it away.
Source; granite installer/ tile guy x 5 years
Bong maker from vases like 15 years
Hey folks, for less than $10 you can get a 5/8" diamond hole saw at most hardware stores and make your own bottle bongs.
That's what this subreddit is all about, engineering your own smoking devices. It's really not difficult.
3 Pcs SET Diamond Hole Saw Drill Bit Set Granite Glass Tile - Tools 3 Piece Diamond Dust Hole SAW Drill BIT for Ceramic Tile Marble Rock Porcelain - 1/2" -3/4" - 1" Inch In https://smile.amazon.com/dp/B00DRRDFXC/ref=cm_sw_r_cp_apa_i_aakxCb1KKKR9K
I use this set from Drilax. I think anything smaller would be useless for drainage. I borrow my boyfriend's drill. Watch YouTube videos on how to do it, but essentially you want to squirt some water at the drill site, having it wet constantly so it doesn't overheat. You don't need to put all your weight on it, but you will need at least a little pressure. What helps me is putting pressure only on one side of the bit (it's a miniscule slight angle) whenever drilling, and switching/rocking occasionally from different sides. It really helps deepen the cuts. This also helps when you're starting to drill (keeping it on an edge rather than directly flat down), otherwise your bit will bounce all around the bottom of the pot (you'll still need your other hand to steady the drill for the beginning cut... Maybe even your feet to stabilize the pot, lol).
I know when I'm about to break through, because the water I squirted onto the pot will suddenly run through. And because I'm drilling at a very slight angle, I only have a semicircle hole, and I just have to rotate my pressure on the other side now. It's a rather gentle finish and I've never broken a pot!
I hope some of that made sense. Sorry for the wall of text. Good luck! It's super fun!
I was being nosy and I think someone had posted here of these drill bits. They came with different sizes.
drillax bits
Surely you use one of these then!
Don't listen to /u/Brian373k, unless you want to put a huge hole in your wall that you have to patch. They make drill bits specifically for doing this sort of work. The bit is long (72 inches in this case) and flexible so you can feed it into your existing hole, down the wall cavity, and drill though the cross member while keeping the drill outside the hole. You can get a handle for the bit that help you keep it bent and hold it without chewing up your hand. These are available at Home Depot or Lowes in the electrical section with the fish tapes, often for less than amazon is asking. Check out the pictures and videos here for a demonstration on how they work. The handle isn't necessary, but does make it easier.
Ask him for a cost breakdown. $200 a can seems high unless you live in a gated subdivision
Do you have attic access above your kitchen and living room?
You can order these.
TORCHSTAR 12W 6 Inch Ultra-Thin Recessed Ceiling Light with Junction Box, 5000K Daylight, Dimmable Can-Killer Downlight, 850lm 100W Eqv. ETL and Energy Star Certified, Pack of 12 https://www.amazon.com/dp/B07FFPYWHJ/ref=cm_sw_r_cp_apa_i_H2UsDbGWZF79Z
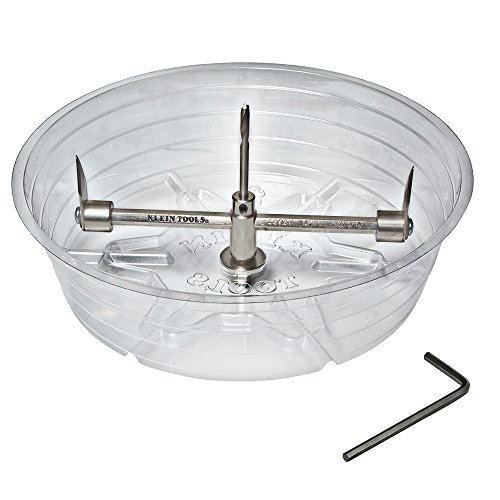
Drwayll hole saw to cut the hole.
Adjustable Hole Saw Klein Tools 53731 https://www.amazon.com/dp/B00529WW6O/ref=cm_sw_r_cp_apa_i_A3UsDbCWYE5ZT
Then some 14/2 nomex to daisy chain them.
You can just try the kitchen or loving roo. Which ever one is easiest. What do you have to loose? And $2000 to gain.
You need this in your life: https://www.amazon.com/Werkzeug-Stripped-Extractor-All-Purpose-Extension/dp/B07VFM3Q5Y
You don't need an adapter when the drill bits are formed like these
You said hand tools .do you mean hand tools or hand power tools? But I’ll give you my list of things you should pick up if you have a minimal amount of space. keep in mind that you will need to develop a lot of skill to make up for not being able to rely on things like fences.
I will also try to give you tools that do multiple things so that will cut down on space
A dremel or similar tool - every one who does any kind of making or creating should have one. with the amount of bits you can put in there to do things they are very useful
A worx axis saw - this is a battery operated saw that will cover most saws for you. You can use it as a jigsaw or a reciprocating saw. It takes both kinds of blades. I have this tool and I love it it’s so useful
https://www.worx.com/power-tools/saws/20v-axis-recip-jig-saw-wx550l.html
A circular saw- a circular saw can do everything that a miter saw or a table saw can do it just takes a bit of practice. If your trying to do straight cuts then this is what you want
A cordless impact driver - and only a cordless impact driver. Some people say that they prefer to have a driver and a drill because they think that the drivers Chuck is limiting to them . It’s not limiting if you buy the Chuck attachment on amazon so it covers both tools
I don’t have a recommendation for drivers but if you want a cheap one go for the harbor freight one
Here’s a good attachment I was talking about
Neiko 20754A 3/8" Drill Chuck with 1/4" Quick Change Hex Shank | Convert Impact Driver and Wrench to Drill https://www.amazon.com/dp/B0051AE85W/ref=cm_sw_r_cp_api_i_-cPXDbT1M8D3T
A router - you said you wanted fancy routers will help you do fancy.
The bits that can go into these things can accomplish quite a lot from edges to cutting to shaping to jointing
That I would say is the bare minimum that could cover a wide range of things but extra power tools that would help are
A belt sander ,palm sander an electric hand planner or a
Now for the hand tools you should get. I’ll try to keep this as organized as I can.
Measuring and layout
Speed square-use full for quick angles. Read up on how to use one they are surprisingly versatile
Combination square- very nice for a 90 degree or 45 degree line. The blade is also adjustable so you can mark a line from an edge at a set distance
Sliding t bevel - nice for angels but that’s about it
Carpenters square or framing square- it’s those big l shaped squares that you see in stores. I learned from the old school craftsman on this one, and they used this to lay out rafters,stairs ,straight lines , circles ovals you name it . Also get yourself some stair gauges to go with this one you’ll thank me
Tape measure- of course
Level - of course
Shaping
Files - get a two cut and a rasp of each variety (rat tail ,flat , half moon )and you should be fine or just get one of the 4 in ones if you wanna cut down on something
Chisels - wonderful tools ,get a good couple sizes. You can also buy a cheap general pack to start with and see what you need from there. Keep them sharp and remember that if you flip the chisel over you can accomplish something different
Spoke shave - a bit extra but still worth is since you said you wanted to do chairs
Cutting
Japanese pull saw - has both a coarse and fine blade and flexible for flush cuts
Coping saw - nice if your adding trim or just trying to get that really tiny precise cut
Bits
Spade bits - cheap and come in many sizes . Also once you see the tip come out the one side pull out and start the drill again from the other side so you don’t blow out the hole
Twist bits - cheap comes in many sizes especially smaller
Driver bit set - useful for dealing with screws and such
Plug cutters - useful for hiding screws
Counter sunk bits - useful for keeping screws flush or just flush below the surface
Finishing
Sand paper - get every grit you can and when you sand,sand the daylights out of it !!! That always helps . Also look up wet sanding. I’ve made a wooden mirror with wet sanding. And remember to climb your grit ladder
Sanding block - so you don’t hurt your hands sanding
Misc
Hammer- self explanatory for putting in nails
Tack hammer - used for tiny nails or for tiny areas
Dead blow hammer - put pieces into place without damaging or marring your piece
Clamps - you can never have enough clamps
And that’s my list I hope it helps you with what you’re doing. I hope the chairs turn out well
Yup.
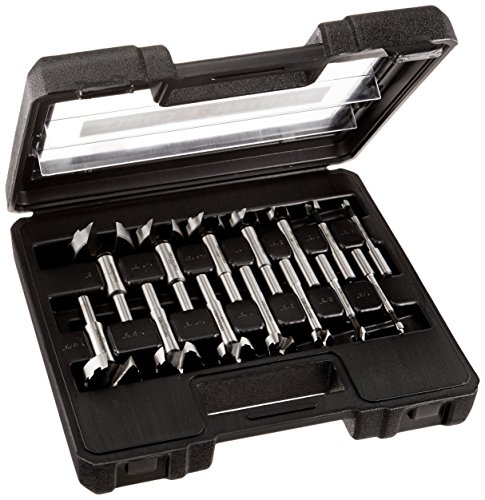
Porter Cable
Freud
CMT
Mibro
I own the Mibro set and have used a Freud set. They both worked well. The other two were just highly rated on Amazon so I stuck them in there for options. Read the reviews and decide what you want.
I've never had a situation where I've needed anything more specific than a 1/8" increment with a Forstner bit (or perhaps more accurately, I design my projects so that I don't need anything more specific than 1/8" increments) so I'm not sure how useful having tons of different sizes, such as with the PC pack, would be.
Turbo charged: https://www.amazon.com/Planet-Waves-Drill-Bit-Winder/dp/B008BPI2OW
I use 1/8" magnets for my Crisis Suit weapons. They are basically the maximum size that will fit in the weapons. You could probably go a bit smaller and use 3/32" magnets and have some more wiggle room.
​
100 1/8" for $14 with prime shipping: https://smile.amazon.com/MagNetSol-Magnets-Drill-Combo-100pcs/dp/B0753M1ZYQ
​
3/32" for $15 with prime: https://smile.amazon.com/Primal-Horizon-Magnets-Drill-Combo/dp/B00CA58RJY
it came with this drill chuck https://www.amazon.com/Neiko-20754A-Change-Convert-Impact/dp/B0051AE85W but Both Milwaukee and Dewalt have their own version. https://www.amazon.com/DEWALT-DW2298-2-Inch-Square-Adaptor/dp/B001BZ9YZU/ https://www.amazon.com/Milwaukee-48-03-4410-Shockwave-2-Inch-Adapter/dp/B002KKBBR4
I have built several sets for my friends, somehow I have become the local cornhole guy, so here is some honest critique.
For reference, here is a set I made earlier this summer.
Redskins Cornhole
Redskins Pic 2
I am not trying to be a dick, but you asked for critique. So now I am going to provide some advice. Here is what I do-
If you really want to stain, then stain the whole thing to an even tone and then layout and paint your logos on top. Then polyurethane.
Check out this forum, go to building and customization for lots of great tips.
You don't need a lot of tools, I build mine using a miter saw, hand drill, orbital sander, hole saw, an x-acto knife and paintbrushes. Be careful, if you get good at making them, all your friends will want one.
I've made a ton of corn hole boards. Get yourself one of these for the holes: https://www.amazon.com/gp/product/B000YC1XUK/ref=oh_aui_detailpage_o05_s01?ie=UTF8&psc=1
Using a jigsaw for the hole looks like shit if you don't do it perfectly
https://www.amazon.com/Neiko-20754A-Change-Convert-Impact/dp/B0051AE85W
Then use any bit you want.
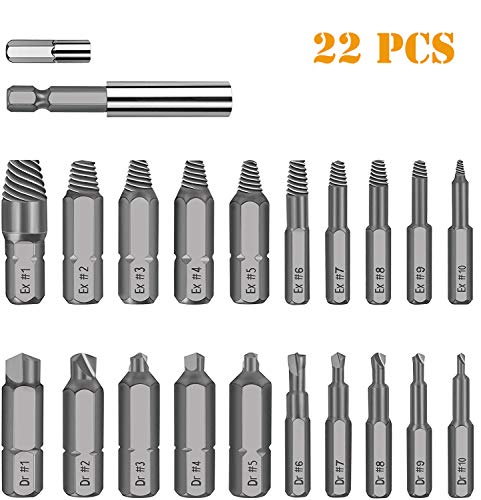
Werkzeug Damaged Stripped Screw Extractor Set for Broken Screw, All-Purpose HSS Broken Bolt Extractor Screw Remover Set with Magnetic Extension Bit Holder & Socket Adapter (22 PCS ) https://www.amazon.com/dp/B07VFM3Q5Y/ref=cm_sw_r_cp_api_i_QzLtDbZ749E3P
These seem to get pretty good reviews from a bunch of frustrated people
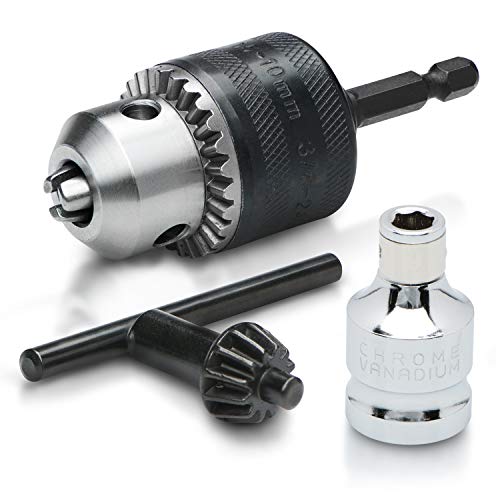
That is a 'drive socket' for a 4mm hex bit. The 'bit' is actually the hex. This is made so people with a socket wrench can use (in this case) 4mm metric allen fasteners.
To use this sort of bit with a drill, you need a socket adapter for a drill. Here is a set with the most common socket sizes. You are possibly better off getting a regular 6mm bit set and a bit holder.
I use this set of drill bits I saw suggested on this subreddit. I have used them for several pots with no issues or breaks so far. https://www.amazon.com/dp/B00DRRDFXC
I bought this exact set about 6 months ago for $9.99, free shipping, I love the bits, they cut so smoothly.
https://www.amazon.com/dp/B00PUWXRU8/ref=cm_sw_r_cp_awd_YOW9wbS41FJHP
Planet Waves make one. http://www.amazon.com/Planet-Waves-Drill-Bit-Winder/dp/B008BPI2OW
Don't cut an opening between the garage and basement, that's supposed to be a rated fire wall.
Also, be wary of an exhaust fan in a room with fuel-burning appliances -- it is very easy to get the balance wrong and suck air in via the flues, which of course is air that contains the dangerous products of combustion. Make-up air needs to come from somewhere, so the door should be undercut or have louvers.
If it's the layout I think it is, you've got a concrete or block wall for the basement level, and the laundry room is far enough from the garage entrance that it is largely underground. If you make a ceiling-fan sized hole in the ceiling drywall within about 8 inches of the outside wall, you will find that you can drill a small hole through the rim joist and siding to outside, and then work from that hole to center a hole saw with Arbor. Then you can mount your bath fan and vent to the outside.
I apologize... I mis-remembered the cost of the kit. It was actually $16. Sorry.
https://www.amazon.com/gp/product/B00CA58RJY/ref=oh_aui_detailpage_o01_s01?ie=UTF8&psc=1
That chuck only accepts 1/4" hex bits. You'll need something like thisin order to use twist drills, or you can buy 1/4" hex/"impact ready" drill bits like these.. The other style you are used to is called a keyless chuck.
> how do you run wire through something like a 2x4 perpendicular to the framing in the middle of a wall? I can't imagine having a 5' long drill bit would help... Would it?
There actually is a long flexible drill bit designed just for that:
https://www.amazon.com/MAGBIT-777-72-0816-2-Inch-72-Inch-Fish/dp/B005M29JN0/ref=sr_1_2?ie=UTF8&qid=1469277163&sr=8-2&keywords=flexible+drill+bit
There is a bit of an art to using those, which I have never done, but if you Google around I am sure you can find some tips, videos, etc.
There are some "hand drills" that may be close to what you're thinking of. Most of them are cheaply made from China, and most of them only have 1/8" chucks and are meant for light duty stuff.
A quick search yields something like this and this, And of course you can always get a 1/4" to 3 jaw chuck adapter like this.
Ratcheting tap wrench is an interesting idea, although they don't have 3 jaw chucks, they're typically 2 jaw chucks with square recesses that probably don't grip anything well that's not a square end tap.
I have a stripped screw remover for these situations.
https://smile.amazon.com/dp/B07VFM3Q5Y
They bite into the metal and remove the screw. Slightly safer than drilling out the screw... but still some potential to damage the device if done wrong.
Good luck!
This isn't exactly mine, but I have one like this and I love it.
If you have a drill, there's a drill bit you can order online that makes the process really easy.
http://www.amazon.com/Planet-Waves-Drill-Bit-Winder/dp/B008BPI2OW
ok since no one here has said it yet, yes glass drill bits buuuut, it works waaay better if you get glass hole drill bits like this, http://www.amazon.com/Diamond-Tipped-Ceramic-Glass-Drill/dp/B00899COJY/ref=pd_sim_hi_5?ie=UTF8&refRID=0T0HMMZKXMAB7BVHZQ18 i actually bought the 14 mm but i will warn you now, 14mm glass downstems are only approximately 14mm, its closer to 14.6 or something so you give it like a millimeter so the rubber grommet can fit
Go to your local hardware store and look for a 5/8" diamond hole saw bit. This will make holes that can accommodate standard 1/2" glass/metal downtubes with a bit of room to fit a rubber grommet. A 1/2" hole saw will work, but you'll have to enlarge the hole slightly. You can use these bits with an electric drill or a Dremel.
If you don't have access to a headshop in your area for downtubes and bowls/funnels, you might want to order online. Otherwise, you're going to need to start looking for aluminum or steel 1/2" tubing with screw threads.
don't use that adapter, you need a holesaw arbor betwee your holesaw and the drill chuck. it will look something like this.
that's what the two holes on the holesaw are for.
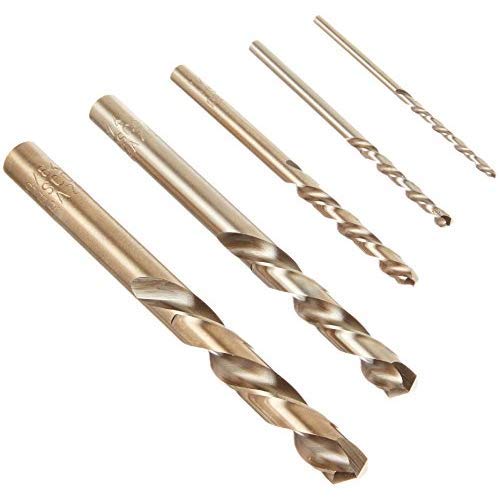
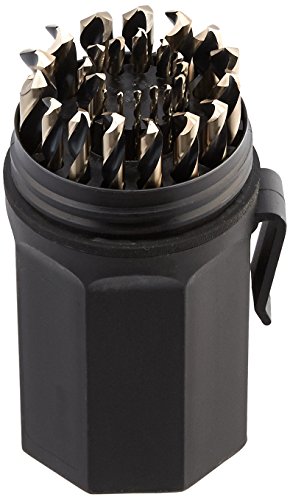
Yes, HSS is fine for the majority of materials. If you hit up local hardware stores, stay away from any of the coated junk, it's useless. If you want good quality at a good price, pick up either a Norseman or Drill Hog 29pc set in whatever composition you prefer (M2, M7 hi-moly, M35 Cobalt, M42 cobalt hi-moly). The prices don't vary too much in that range so it probably comes down to preference. If you're in a production environment and will be drilling thousands of holes, yeah, go with cobalt. If not, go with an M7 set.
https://www.amazon.com/Norseman-44170-240-UB-Degree-Premium/dp/B00627C8ZU/
http://www.ebay.com/itm/Drill-Hog-29-Pc-Drill-Bit-Set-Index-Molybdenum-M7-MADE-IN-USA-Lifetime-Warranty-/181651567209
If the 29pc set doesn't suit your needs or you just want individual sizes
http://www.norsemandrill.com/
http://stores.ebay.com/Drill-Hog
Note: My guess is that both Norseman and Drill Hog are identical and manufactured at the Norseman facility in St. Paul, Minnesota. (oh and Viking are probably also the same drill bits)*
I got these and they have been perfect for adding drainage holes to my ceramic pots. https://www.amazon.com/dp/B00DRRDFXC/ref=cm_sw_r_cp_apa_9L.SBbP50KN83
Any cute pot can be functional with a drill and a hole saw bit. .
Adding on to what rachahany said, it's really up to you. Easier to tile before hanging everything else, but then you gotta deal with the tile. I'd be over the moon if I didn't have to cut around everything.
If you install the brackets first, and ensure there's enough blocking behind the plasterboard then you can roughly cut around them and avoid frustration cutting around the installed units. A few holes is nothing if you have the gear.
I tend to use these holesaws for porcelain, they're nothing special but they work well. Use with a wet sponge and start from an angle.
https://www.amazon.com/dp/B01MR1HTLH/
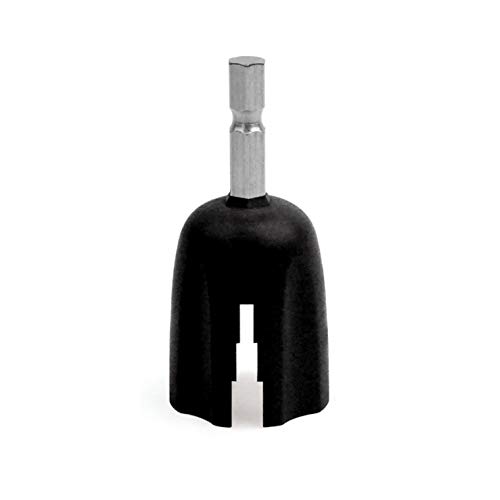
What brand are they? The easiest method I have found for hollow Ever-Readys is:
If you want to keep the knot, try the steam method.
I can't vouch for your particular situation, but these puppies have punched through anything I've thrown them at. Toughest I've used them on was stainless industrial kitchen equipment and they went through like butter.
https://www.amazon.ca/Norseman-44170-240-UB-Degree-Premium/dp/B00627C8ZU
They are Primal Horizon 3/32” x 1/16”. I got mine at my FLGS. Amazon has them with drill bits. Mine didn’t come with the bits. https://www.amazon.com/Magnets-Drill-Bits-Combo-Pack/dp/B00CA58RJY
I glued one into the head of the AT-RT where the guns would be glued. I used my hand drill to put a hole in the peg for each gun. I then used some picture hanging nails and clippers to cut a little metal post I could glue into the gun pegs.
http://www.amazon.com/Amico-Diamond-Tipped-Ceramic-Glass/dp/B00899COJY/ref=sr_1_1?ie=UTF8&qid=1341464150&sr=8-1&keywords=diamond+tipped+16mm
I just use metal hole saws, you also need the Mandrel to attach it to your drill. The best way to do it when working with metal is to but the hole out of a piece of wood first, clamp the wood down to your case and then use it as a guide so you get an even cut. It works with acrylic case windows too but you have to be gentle.
If you only have one guitar and restring it once a year, no. That said, they are so cheap that even then, I would have one. I think I own about 5 by now, though I don't have one of the powered ones yet.
I love my string winders and would never be without one.
Cheap one
Mid-priced
Fancy with cutter (but kind of unwieldy)
Drill attachment
Power winder
There are cheaper ones than I listed and more expensive ones. But this is a decent representation.
I've got a set of Norsemen that are great. http://www.amazon.com/Norseman-29pc-16-1-Black-Gold/dp/B00627C8ZU the cheapy big box store bits don't last long enough
In mechanics, I'd use a drill bit that spins counter to tight. So, in the typical case that's a left-hand bit. These are fairly specialized and aren't the kind of thing you'll find at Home Depot. Amazon can help.
Use cutting fluid to keep the bits cool. Start with a bit that's smaller than the broken screw shaft and drill slow and successively use larger bits until you either drill out the broken screw or the screw rotates out.
Most of the time, the bits loosen the shaft and eventually just spin out the screw without having to drill it all the way out. Thing is, with the head off the screw, there's no tension holding the threads in place. Just need to spin it free.
This: https://www.amazon.com/gp/aw/d/B0002TW1D8/ref=pd_aw_fbt_469_img_3?ie=UTF8&psc=1&refRID=X2J5087G07862V1EEK8N
Plus whatever socket wrench you need...
I got one of these for my electric screwdriver.
It's a godsend when I'm restringing a few guitars and basses at the same time.
I can't see the video but based on the comments, is this it?
http://www.amazon.com/gp/aw/d/B00529WW6O/ref=mp_s_a_1_1?qid=1412992191&sr=8-1&pi=SY200_QL40
Sorry, on mobile
http://www.amazon.com/gp/aw/d/B005M29JN0/ref=mp_s_a_1_1?qid=1420153393&sr=8-1&pi=AC_SY200_QL40&dpPl=1&dpID=11Gy7Qi7O2L&ref=plSrch
"Flex Bits" might get you a bit more results. They also sell them in Home Depot with the electrical tools in the electrical section as opposed to the standard hardware area.
An easier solution would be to check out wire mold that you can mount to the wall and run the wire in. Alternatively you could simply paint the wire.
I'm looking to get some forstner bits; I'm just a new hobby woodworker so they won't see excessive abuse. With that said I'm wondering if it is worth spending more for Fisch, Freud, or Lee Valley offerings or something like this Porter Cable set that gets really good reviews will be sufficient ( https://www.amazon.com/gp/product/B004TSZEB4/ref=ox_sc_saved_title_3?smid=ATVPDKIKX0DER&psc=1 )?
Also, looking for some brad point bits as well. Any brand recommendations there? And is it worth getting a full set or will something like 1/8-1/2" in 1/16 increments be enough? I have a full set of non-brad point bits already.
Thanks!
This woman's kimchi is super spicy. I only used 1.5 cups of hot peppers. Anyway, I've gotten used to how hot it is and find myself craving it. I eat 2 tablespoons of it with every plate. And I drink kefir milk or kefir water. Kombucha sometimes, but that takes 2 weeks to get good. The kefirs take 2 days and are pretty strong.
I mention kefir because if you make milk kefir in a Fido jar for say a day and a half at room temperature. The curds and whey will separate and you strain that whey into a jar with either olives, baby cucumbers, hardboiled eggs and beet juice, asparagus, cabbage (kimchi and sourkrout), pear onions, salsa, Brussels sprouts, garlic, and I'm sure more. You use the curds you made with the milk kefir grains to make fermented hard cheeses, yogurt (awesome for ball jar parfaits, cream cheese,
If you want to get really crazy you can buy a 5\8" glass drill bit off amazon for 6 dollars. Drill holes in the lids. Use either rubber grommets or a drilled airlock grommet and airlocks to let the CO2 buildup release without letting fresh air back in. The company that makes and sells them call them Pickl-It jarsImage. They look identical to what you can make for much cheaper. This isn't necessary but it costs about 5 bucks to do to each jar and the result is that you now have a 40 - 120 dollar fermentation crock.
Buy this jar: http://www.crateandbarrel.com/fido-5-liter-jar-with-clamp-lid/s495151?a=1552&device=c&network=g&matchtype=&gclid=CJ7Whp7ZkroCFabm7AodOmkAHQ
Or at surlatable if you want more than 1 jar, and want 1.5 liters like the legit picklits. I found 3 liter Fido jars at hobby lobby for $5 each. I suppose just look for clamped glass jars with italy stamped on the bottom, not china.
The dehydrated food you weigh after and portion out into serving sizes. If I'm packing them as a lunch I separate atleast the meat from fruits and vegetables. Match each serving of meat with what used to be one or two cups of kale. A solid ammount of tomato chips and mango, peaches, apples or banana leathers. (Go easy on the mango) Blend and fruit rollup your berries. I'm not a nut and grain person, but a granola bar probably wouldn't be bad in there. I suppose you could stuff all these bags into a food saver bag and have like a cheap, fresh and healthy MRE all set and ready. No cooking required. I'm not sure how long the meat would last. So I wouldn't let it sit too long. Plus make sure your jerky sits in a brown paper bag for a few days first. To draw out any more moisture before vacuum sealing it.
The holes were made with forstner bits and a drill press. The corners were chamfered with a #4 1/2 smooth plane.
Forstner bits make flat bottom holes: http://www.amazon.com/gp/aw/d/B004TSZEB4/ref=mp_s_a_1_1?qid=1373367265&sr=1-1&pi=AC_SX112_SY192
Hand plane used:
http://www.lie-nielsen.com/catalog.php?sku=4_5
I just recently bought these after getting some recommended to me from Home Depot that did NOT work. I also used this guide that advises using water to keep the drill bit cool and to start at an angle so it doesn't dance around. The drill bits work in 5-10 minutes even going super slow. My plants are now in various coffee mugs and things I normally would reject as they don't have drainage.
You bought a drill with a shitty 1/4 inch hex chuck. What you should have bought is a drill with a real drill chuck. You can buy something like this http://amzn.com/B0051AE85W but its going to suck if you ever need to drill a real hole with a larger bit.
Dude what tinkering. There's like 2 minutes and 45 seconds of effort there, max.
Get a 5/8" diamond hole saw at a hardware store or home improvement store, and some 5/8" rubber grommets. Then you can drill bottles to your heart's content, and the holes will fit a standard 1/2" downstem, glass or metal.
Don't even fucking mess with plastic for a smoking device, ffs.
Drill bits: our Canadian leader has good things to say about: Norseman bits. https://www.amazon.com/dp/B00627C8ZU/
If you have a drill, a grinder, a vice/clamp, and something like this you might be able to sharpen the socket yourself. This might be a terrible idea, just sharing some brain rain.
Edit: Tape between the socket and square adapter could be used to make socket more stable for grinding.
Miter saw is a must have too! I dont know what I would do without it. You definitely want to sand as well. All of the sharp edges can tear apart some bags (been there done that). Also, here's a cheap hole saw that I have used with very good success. Although, you need a pretty high powered drill to make it work correctly. I am on my second one, but I have cut probably 25-30 holes before needing a new one. I dont make my own bags anymore, but I did buy some corn from Tractor Supply.
You can probably get them out pretty easy with a left handed drill bit. These Irwin bits are pretty baller. Just use a self centering punch or a small pointy punch and mark the center, then start with the smallest or second smallest one.
The idea is that the bit will catch the bolt and spin it out.
They also make this set that has spiral flute extractors, just in case the left handed bit doesn't catch.
You should use a torque wrench if you're not (I've totes broken bolts when torquing to spec before, so no hate if you are), a small 3/8" wrench that does inch lbs. Those bolts are probably supposed to be between 80 in lbs and 110 in lbs. Torque wrench will a) ensure you're not over-torquing and breaking bolts, and b) it's even all the way around, so you're not pinching the gasket weird in some spot.
I've seen someone on youtube drill a hole in a piece of wood to hold these bits still & he had great luck drilling holes in bottles & glass!
https://www.amazon.com/BLENDX-Diamond-Drill-Bits-Extractor/dp/B01MR1HTLH/ref=sr_1_4?keywords=glass+hole+drill+bits&qid=1565072268&s=gateway&sr=8-4
Where I previously worked, all the techs were equipped with the following before going out in the field:
We also experimented with carrying compressed air cans but that stuff gets used too much. Where I currently work, we use this electronics duster/blower and even though it is quite loud, it works really well.
Most of it (except for the spart parts of switch, router, power supply, ethernet card and USB wireless card) fit into a tool bag. I don't think I forgot anything. If I remember, I'll add it to the list.
Get a set of left handed drill bits (Amazon link) then take the smallest one from this kit, press it against the screw head, and turn the drill counter clock wise slowly.
You're trying to get the bit to bite into the head, grab a hold and unscrew it. You can apply a bit of presure.
THIS plus this. These things were a lifesaver bolting together a massive swing set / playhouse combo for the grandkids last Christmas.
i've got this picked out for my Mr. for father's day.
Thanks for hosting a contest!!
fortissimo !!
for the rear, lift under the differential (use a hockey puck between the jack and diff cover if your jack doesn't have a pad) and put a jack stand on each side of the car on the frame just in front of where the LCA meets the chassis.
Then lower the jack under the axle which will let you push down the axle so that the springs just fall out.
don't lift the car at the LCA's. They don't seem like they are designed to bear that much pressure on that chassis joint but I could be wrong.
Camber plates are not really needed until you hit about a 2" front drop.
Here's a short list of the most common tools I carry when working on someone's car
Torque wrench
Deep sockets that can take a beating from an impact gun
Extensions (pro tip: if you ever have to change your starter, you will need about 15+ inches of extensions)
And this is the spring compressors I use
http://www.amazon.com/gp/product/B000CMDPLM/ref=oh_details_o00_s00_i00?ie=UTF8&psc=1
I also have a 90 something piece craftsman set with most of the 1/4" and 3/8" drive bits and swivels/boxx wrenches, etc but usually use the 1/2 stanley sockets get grabbed first.
These are also super handy if you have a power drill (better yet, a power drill with impact setting)
Mustangs don't really have a whole lot of random tools needed to work on them so unless you have a foreign car, your tool set shouldn't ever really get too complicated.
It's typically when you get blindsided by some small little issue like a rusted or rounded off bolt that can turn a 2 hour job into a 2 day job. I worked on a guy's old fox body to help him replace a clutch and he had 2 stripped transmission bolts. I had these handy which were more or less the only way we could have gotten that done (besides calling a tow truck to take it to a transmission shop)
http://www.amazon.com/Irwin-Industrial-Tools-394001-Bolt-Grip/dp/B0000CCXVZ/ref=sr_1_2?ie=UTF8&qid=1406576108&sr=8-2&keywords=stripped+bolt+remover
Treat yourself to a set of left hand drill bits. The bits usually start drilling and end up catching and un-threading the stripped/stuck screw.
I'm trying to cut 6" wooden circles out of 3/4 to 1" thick pine boards. I purchased a hole saw and shank to use with my drill press, but am having issues with it.
It takes ~10 minutes to cut one disc because of how slow (vertically) I have to take it. If I use more pressure than the slightest increment down, it jams instantly. I've tried speeds as low as 700 RPM all the way up to 2300 RPM with little difference. Also, even when it hasn't jammed, the cut is very poor. It's ripping a lot of the grain causing me to have to do a lot of sanding to produce a finished edge.
I think maybe the issue is the quick swap shank. The retractable pins don't swivel, which means I can't screw the saw on quite all the way. It has a slight wobble because of this, which I think might be too much for a 6" saw to function properly. I'm thinking of trying this hole saw instead, hoping it fits together more snugly and cuts better.
Before I buy more tools, does anyone have any thoughts on the best way to cut 6" circles 1" thick?
No, it will not work, sorry. You need this for the 3.5 hole saw:
https://www.amazon.com/DEWALT-DW1803-16-Inch-Change-Mandrel/dp/B00004RGZQ
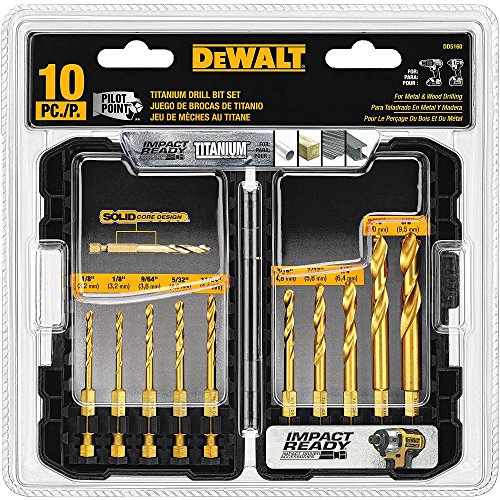
Make sure the bit is fully seated into the chuck--with small bits, this is a particular problem because sometimes you need a longer drill depth. I prefer to use hex shank drill bits like, say, these: https://www.amazon.com/DEWALT-DD5160-Impact-Ready-Titanium/dp/B017KUENH8/ -- they'll never slip.
All I used was a drill and [one of these diamond drill bits] (https://www.amazon.com/BLENDX-Diamond-Drill-Bits-Extractor/dp/B01MR1HTLH/ref=sr_1_6?ie=UTF8&qid=1494215602&sr=8-6&keywords=diamond+drill+bits). I just wet the bottle down in the sink and drilled slowly at first to establish a groove then it's pretty easy to just keep it in place until you're through. If you already have a drill you can drill any bottle with just some of those bits.
Okay quick PSA on drilling!
> http://www.amazon.com/Diamond-Tipped-Ceramic-Glass-Drill/dp/B00899COJY
I use this style of drill bit, which are avialable in 16 and 19mm. They work great because they don't have a central point of pressure like other types, and it has file etching on the side of the bit as well as the tip. when you drill, you submerge the piece in water and allow it to fill almost all the way. I like to wrap it in a water soaked rag to dampen vibration in the bottle and to shield my hand in case of shattering. certain surfaces are harder to drill on than others, such as rounded areas and or things with texture and design. It's simply a matter of getting that established nitch in the glass to do this I demobilize the piece as much as possible under water, and at a high drill speed give my desired spot a series of sharp taps. be as precise as possible while the bit establishes a nitch in the glass. once it gets going, drill at a medium to slow speed. when you see bubbles it means that you have begun to breach through. this is a good time to stop and check your whole. at minimal speed and pressure, drill through the remaining glass and remove the displaced piece of glass. next using the etching on the side of the bit, wear down the glass on the upper outer part of the whole, and then do the same to the lower inner part of the whole. this will allow your down stem to tilt downward more. Once you have your whole you need to fit a downstem in the most airtight fashion possible. I've used puddies, sealants, glues, and such but I'm personally a fan of a good old fashion rubber grommet. If your hole is good enough, you should be able to get a relatively air tight seal and your can avoid the risk of harmful chemicals. most head shops will carry a rubber grommet compatible for downstems and you can also find them online. Hope this was helpful, let me know if you have any more questions.
Use left handed drill bits, it’ll pull it out.
A little more expensive than some, but good tools are their own reward.
www.amazon.com/dp/B0002NYBJG/ref=cm_sw_r_cp_api_i_IXsPDbX4H7CPB
The main application is putting in self tappers. Using the impact for drilling is just an efficient/lazy compromise. Here. Look.
Extractor kit
Werkzeug Damaged Stripped Screw Extractor Set for Broken Screw, All-Purpose HSS Broken Bolt Extractor Screw Remover Set with Magnetic Extension Bit Holder & Socket Adapter (22 PCS ) https://www.amazon.com/dp/B07VFM3Q5Y/ref=cm_sw_r_sms_apa_i_OzJLDbEN7DKMD
I've used a drill bit like this one before (Amazon.com Magbit) and been able to get up most walls with it. I have cut out the hole where the wall jack will do and then drill down with this and run that cable through the newly created hole.
​
Obviously stay away from any wall that might have electrical in it unless you know exactly where it is.
http://www.amazon.com/Amico-Diamond-Tipped-Ceramic-Glass/dp/B00899COJY/ref=sr_1_2?ie=UTF8&qid=1346041752&sr=8-2&keywords=amico+16mm+diamond
works a treat
http://420armory.com/home/product/glass-hole-saw-bit-large/ This company offers the rubber grommet and downstem to fit the hole as well, but the hole saw itself is $10.
You can probably get a 5/8" hole saw for $5 or less at your local hardware store. https://www.amazon.com/uxcell-Diamond-Coated-Cutting-Silver/dp/B0087Y81MU/
https://www.amazon.com/Norseman-44170-240-UB-Degree-Premium/dp/B00627C8ZU/
>I don't have a star-shaped allen-wrench
Those are usually called Torx (actually a brand name) or Star bits. If you don't have some I'd recommend getting a precision screwdriver kit. It's well worth the $12 investment.
No I bought on of these to permanently leave on the shaft.
Neiko 20753A Keyless Chuck Conversion Tool | 1/4-Inch Shank https://www.amazon.com/dp/B007TCHKXW/ref=cm_sw_r_cp_tai_bYXZzbJ6KP7XJ
You need a damaged screw extractor. Something like this: https://www.amazon.com/Werkzeug-Stripped-Extractor-All-Purpose-Extension/dp/B07VFM3Q5Y
I haven't used that set personally, so I can't speak to their quality, but they are well reviewed and go pretty small.
Depending on the size hole you want to cut, get this type: https://www.amazon.com/Diamond-Hole-Drill-Granite-Glass/dp/B00DRRDFXC/ref=pd_lpo_469_bs_lp_img_2?ie=UTF8&psc=1&refRID=GEGR9BY5JSS4KGAVHABX
Most glass cutting bits will be diamond coated, and they aren't expensive. I got a 1/2 inch size bit for cutting holes in bottles, and the type I linked handled that far better than the normal style bits (also diamond coated) without cracking or chipping the glass.
The important thing is to take it slow, and don't press too hard on the glass, let the bit do all the work, and have it supported underneath to avoid cracking and chipping.
Invest in this. It is a pain with a jig saw and very hard to get a perfect cut. I have spent many cursing hours cutting holes with a jig saw.
Non-mobile: http://www.amazon.com/dp/B00529WW6O/ref=redir_mdp_mobile/176-0955244-5348615?fp=1&pc_redir=1427534361
^That's ^why ^I'm ^here, ^I ^don't ^judge ^you. ^PM ^/u/xl0 ^if ^I'm ^causing ^any ^trouble. ^WUT?
I use left handed drill bits to extract broken bolts, usually works really well and doesn't require multiple steps
Cheap drill bits are absolute crap. A lot of the odd fractional sizes aren't even properly hardened because they don't expect them to see much use. Buy them from people who actually make drill bits, not just companies that slap their name on whatever products they can rebrand (Millfuckee and Default do this shit too). Cry once by spending some money, or cry every time you use the cheap shit.
both have been linked in this thread.
you yourself found the hex shank bits:
> I’m assuming my only option is impact ready like this DEWALT DD5160 Impact Ready 10 Piece Titanium Drill Bit Set https://www.amazon.com/dp/B017KUENH8/ref=cm_sw_r_cp_api_i_BH57AbSDWFX1B
and the top comment linked you to the keyless adapter:
> That chuck only accepts 1/4" hex bits. You'll need something like this in order to use twist drills, or you can buy 1/4" hex/"impact ready" drill bits like these.. The other style you are used to is called a keyless chuck.
I’m assuming my only option is impact ready like this DEWALT DD5160 Impact Ready 10 Piece Titanium Drill Bit Set https://www.amazon.com/dp/B017KUENH8/ref=cm_sw_r_cp_api_i_BH57AbSDWFX1B
I just use normal torx bits in my mini grip. I have this screw driver kit and it works fine: http://www.amazon.com/gp/product/B000MF754W
Quick question as I want to get a basic toolset, would one of the following be good for novice-level car maintenance (the things you listed above), and what additional things?
Stanley 60-piece toolset vs. Maxtech 32-piece toolset
Hello friend,
I just got into magnetizing and have done all my research and my models came out great. The best magnets to get are made by "Primal Horizon".
My final note, and this is my BEST piece of advice! ALWAYS CHECK POLARITY! I cannot tell you how many times I had everything set, magnets on both ends of what I was trying to adhere together and then arrrggghhh.... wrong polarity. The best approach to this I found is keeping the magnets stacked and stuck together... kinda like this > [[[[] I hope that crude picture helps haha. What I would do is keep them stuck to a piece of metal that has a good surface area, place my first magnet into the arm socket of the model while they are still stacked and then let the first magnet settle and dry. After that, remove the tool in which the magnets are stuck to and with the other piece you are trying to attach, just simply put the magnet on the opposite end into the hole on the piece in which you are attaching. This will ensure polarity is correct. I am sorry if that was a crude way of explaining it, but I would be happy to take photos and link them to explain this process.
Most of all, have fun! There is no better feeling being able to swap out all my Dread weapons, melee weapons on squads etc... I also put some magnets on the torso of my Dreads to give it some nice movement and rotation (almost makes it feel like a ball bearing). If you have anymore questions or need any clarification please let me know and I would be happy to help ya out, upload photos etc..
Good luck, have fun!!
I have the same year MBP and did the swap like you mentioned. Looked around on Amazon and ended up buying this set...it has both screwdrivers needed to tear apart the lid and dock.
http://www.amazon.com/gp/product/B000MF754W
Narex Chisels
Porter Cable Forstner Bit Set
Eclipse Coping Saw
Countersink Wood Drill Bits
Narex Marking Knife
Bessey F-Clamps from Home Depot. 4 pack for like $20.
Bessey 3/4" pipe clamps from Home Depot. $12-ish. Black pipe is about $1 a foot.
http://www.amazon.com/gp/aw/d/B00529WW6O/ref=redir_mdp_mobile/176-0955244-5348615?fp=1&pc_redir=1427534361
Awesome tool when doing loads of can lights!
I can appreciate the criticism if you started with a solution first then moved onto that.
But for someone who had been doing machine work for years and has never seen left-handed bits "reverse bits" or whatever... Makes me suspect anyway. https://www.amazon.com/Tools-Cobalt-64-Inch-Assortment-30520/dp/B0002NYBJG
All that being said I appreciated his solution in the end.
Ok. I dunno what tools you've got or how brave you are feeling.
I can see several approaches: