Best power tool parts & accessories according to redditors
We found 5,665 Reddit comments discussing the best power tool parts & accessories. We ranked the 2,619 resulting products by number of redditors who mentioned them. Here are the top 20.
We found 5,665 Reddit comments discussing the best power tool parts & accessories. We ranked the 2,619 resulting products by number of redditors who mentioned them. Here are the top 20.


It's not a standard screwdriver, you'll need a torx TR9 security screwdriver I believe, they are cheap. I have heard of people using small flat heads and having success but for best and easiest results get the torx. I clean my PS4 every 6 months it's a launch day console and still pretty quiet.
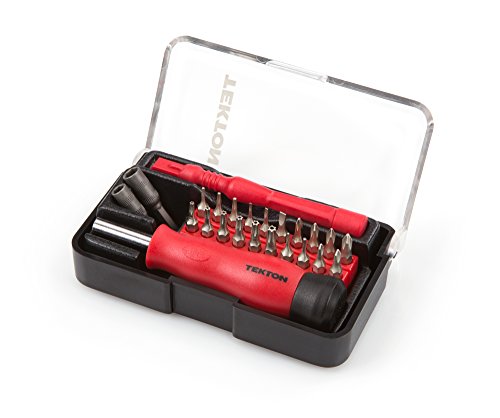
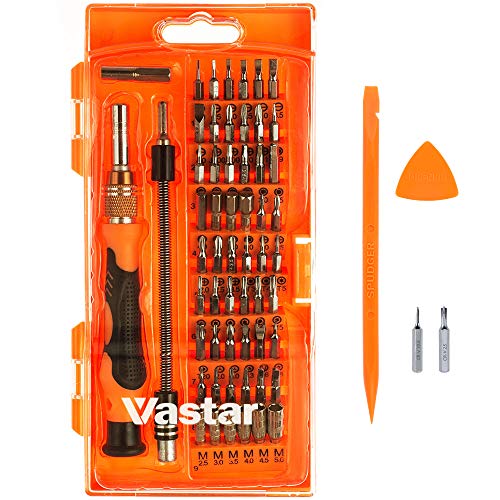
I bought this set for 15 bucks a few years ago love it comes in handy for electronics and small screws Amazon link.
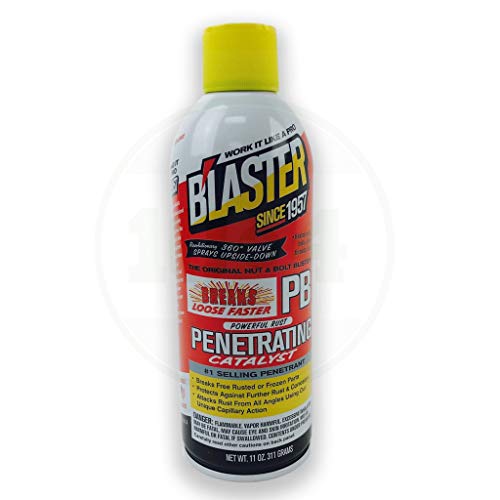
[PB Blaster] (http://www.amazon.com/Blaster-16-PB-Penetrating-Catalyst-oz/dp/B000I2079E)
Really soak those screws good - leave it alone for about 15 minutes, come back and tap on it with a hammer on each screw - you can tap it pretty good, you'll be loosening that rust.
Spray it again and repeat this process like 3 or 4 more times. After a little over an hour of doing this, tap on it with a hammer, and then try to unscrew it. If it still doesn't turn, repeat previous process again. Eventually it will turn, it just takes patience.
You can get PB Blaster at any hardware store usually. Second choice would be Liquid Wrench, but PB Blaster has always worked better for me.
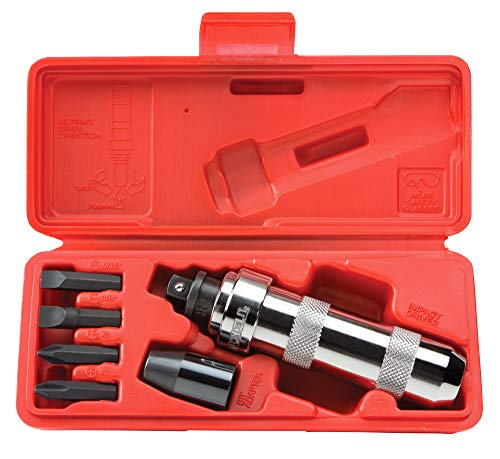
Impact screwdriver. Note: I'm thinking the one that you hit with a sledge, not the one you'd use to install drywall screws or something..
This is one of many examples. Be aware that they can also usually be used for TIGHTENING, so make sure it's set right before whacking it.
https://smile.amazon.com/TEKTON-2905-8-Inch-Manual-7-Piece/dp/B000NPPATS/ref=sr_1_3?crid=3Q0ZTN8MJTHOX&keywords=impact+screwdriver&qid=1558795291&s=gateway&sprefix=Impact+sc%2Caps%2C148&sr=8-3
Also comes in handy for removing Honda brake rotor screws!
I had success using the guide referenced here by u/BooB398, but honestly the majority of the dust buildup was along the side vents which I cleaned with Q-tips and did not require any disassembly. Also make sure you get the TR9 Torx Security bit if you are going to get in there (I ordered a kit on Amazon for like 14 bucks https://www.amazon.com/gp/product/B01E16J6RQ/ref=oh_aui_detailpage_o01_s00?ie=UTF8&psc=1)
>So I've given up and have booked it in to the workshop, but I just hate how I cant seem to accomplish the simplest of mechanical tasks, I'm really just venting here. fuck my useless mechanical ability, I just ruin things like screw heads when I try >:( >:(
Few pointers from a guy whose been wrenching for a long time:
So what do you do?
For those soft screws that love to strip: You use an impact screwdriver to break it loose and/or a good creeping lubricant to break the rust (PB blaster, Kroil).
Once you munge a screw up badly, you will need an extractor set. I recommend you learn this skill by deliberately ruining a few screws that yo have screwed into a board and use the set to get them out.
Here is one example of an extractor kit:
http://www.amazon.com/SpeedOut-Damaged-Screw-Extractor-Bolt/dp/B00IRL3WP4/ref=sr_1_1?ie=UTF8&qid=1414453572&sr=8-1&keywords=screw+extractor
My advice to you:
EDIT: Thanks for the gold, whoever sent that. Totally unnecessary but I appreciate it and gold helps reddit avoid selling out completely to advertisers. Cheers!
I have a Weller WES51 Analog Soldering Station, and I highly recommend it for just about any kind of work. https://www.amazon.com/gp/aw/d/B000BRC2XU/ref=mp_s_a_1_3?ie=UTF8&qid=1518809457&sr=8-3&pi=AC_SX236_SY340_QL65&keywords=weller+wes51&dpPl=1&dpID=41WVs6AdNqL&ref=plSrch
The slightly more expensive digital version doesn’t solder any better, it just has buttons and a display instead of an adjustment knob.
If you’re working on tiny components, then you’ll just need to buy a few smaller tips, but there are plenty of sizes and shapes out there for Weller irons. I’ve always just bought cheaper knockoff tips, like the ones where you can get a variety pack of 10 for ~$30 on amazon. I don’t think tips are really worth spending a premium for the Weller brand, unlike the iron itself. Something like this: https://www.amazon.com/gp/aw/d/B00VFYPKN2/ref=mp_s_a_1_fkmr2_2?ie=UTF8&qid=1518809384&sr=8-2-fkmr2&pi=AC_SX236_SY340_QL65&keywords=weller+replacement+tip+set+wes51
I’d also recommend a good vise or workstation to hold things steady, because there’s nothing worse than trying to use crappy little helping hands or just solder on a bench top. I use a Panavise like this, just as an idea, but there are probably some decent cheaper options out there: https://www.amazon.com/gp/aw/d/B00011QA0M/ref=mp_s_a_1_1?ie=UTF8&qid=1518809613&sr=8-1&pi=AC_SX236_SY340_QL65&keywords=panavise+350&dpPl=1&dpID=41smUr9QAlL&ref=plSrch
If you search "flexible drill extension" on amazon there's a bunch, just not as cheap.
Buwico makes this cheapo one for $7.99
Dremel makes a nicer-quality one for $25.99, which seems to be the going price for all similar products
It you are mechanically inclined, brakes are an easy way to save money. Watch a video for your specific car before attempting though. Some times that rotor is held on with the rusted phillips screw from hell, and you don't want to attempt removing that without the right impact tool.
If you wanted to get the wheels moving again, this specific thing and brand is your best chance.
WD-40, for the most part, is piss poor at doing anything well. It is over marketed, over hyped at what it does. It is a lubricant, a poor one. It is also a rust penetrator, a poor one. In the shop, we called it monkey piss, because you might as well have used monkey piss to get that rusty rotor that has seen 10 salty Midwest winters, off the hub.
It works as a jack of all trades (kinda), which makes it handy for the home owner that wants one can that can do many things. In reality, if you want a lubricant, get a proper one. If you want a rust inhibitor, there are brands available that do the job much quicker, that foam up, penetrate and stick to the rust (instead of dripping off) where you can see the rust pulled away and fall off. Go to your auto parts supplier and ask the guys who do wholesale for the local shops, and they'll point you to what is used. If they recommend WD-40, walk out.
Edit: Thanks to DrCockenstein for reminding what we used, PB Blaster. Here's an Amazon link to the product.
I can't recommend it enough if you are trying to loosen something rusty.
https://www.amazon.com/Blaster-16-PB-Penetrating-Catalyst-11-Ounces/dp/B000I2079E/ref=sr_1_1?ie=UTF8&qid=1483636915&sr=8-1&keywords=pb+blaster#customerReviews
TLDR: WD-40 is garbage, a proper lubricant should be purchased.
I feel like every plant lover should have a set if these. Or if you don't know what to get your plant loving friend... Get them these.
I find awesone pots all the time for cheap at ross, or goodwill, then just drill my own holes! Free yourselves from the agony of a beautiful pot at a great price with nooo holeeesss.
Woodworking - the barrier to entry can be intimidating at times but in reality you can build a good amount of projects with a saw and some screws. Lots of people make impressive things using just a Kreg Jig and Skilsaw
Meh, you'd probably be better off with some jeweler grade sandpaper. Plus that seems pretty specific to countries that use monopoly money for currency.
Don't even need the soda stream - get a carbonation cap, a Co2 regulator, a ball lock gas coupler, and some 5/16" tubing. Also probably get some tubing clamps from the hardware store to help keep everything together.
With that setup, you can carbonate anything you want in a regular plastic soda bottle. Screw on the cap, snap the coupler to it, and pressurize it directly from the Co2 tank. You don't even need to limit yourself to carbonating liquids. Cut up little pieces of fruit so they fit into the soda bottle and you can carbonate them too.
Also, if you're buying a Co2 tank, don't get a new one. Look on Craigslist, old welding tanks are fine. When you take a tank to be "refilled" at a welding shop (or even a homebrew shop), you don't get the same tank back. They just swap it out for a full one. So if you bought a shiny new one, that's just a waste of money.
Another vote for Wiha. I have this set which includes torx and some other often needed bits.
If you enjoyed the process of making this and see real value in the higher quality results compared to buying flatpack particleboard furniture...
For you next one you night consider buying specialty plywood that comes with a nice hardwood veneer on one side (oak, maple, walnut, cherry, etc). You could also buy a cheap pockethole jig and build a hardwood face frame for the front (for fun). But as long as it's not getting really beat on, the veneer edge banding lasts pretty well.
Hmmm.....
If you go to Home Depot, see if there are any scraps of pressure treated lumber you can pick up for cheap. If you can get, say, a 12" length of 4"x4" (actual: 3.5"x3.5"), and if we assume your tubes are 10mm outside diameter (about .4") then you can put...(does math stuff)...128 tubes into it.
Fair warning: I'd have to fucking kill you if I found this cache.
Pick any of the four "long" faces of the wood. Parallel to each edge, draw a line 1/4" from the edge. The large middle area will be 12" long by 3" wide. In that space draw a 3/4" grid; that'll give you a 4x16 grid. At each intersection inside the grid (not along the edges) drill a 1/2" hole straight down 1" into the wood. (The diameter of the hole should be slightly larger than the diameter of the tube so as to fit the tube and the glue that will hold it in. I'm assuming a 10mm tube, but if the tube diameter is different then the hole diameter should be different too.) That'll give you 45 holes.
Flip the wood over and repeat the process for another 45 holes.
Now turn the wood on its "side" (one of the two sides that have no holes) and repeat the process again — only this time drill only the middle column of 15 holes. (You can't do the other two columns because they'll intersect the previously-drilled holes.)
Flip the wood over and repeat for another 15 holes.
Stand the board on end (so you're looking at a cut end). Parallel to each 3.5" edge, measure out and draw lines 1 3/8" from each edge. You should have an out-of-proportion tic-tac-toe board. At each of the four intersections, drill another 1/2" hole 1" deep.
Flip the wood over (so you're looking at the opposite cut end) and repeat for another four holes.
Sand the surfaces lightly to remove all of your lines, and blow out any dust from the holes. Spray a bit of water into each hole, pour a couple of drops of Gorilla Glue inside, then press a tube into it. Repeat for the other 44 holes. When you're done flip it upside-down, put a weight on top of it, and let the glue set. Repeat for each of the other sides and the ends.
Make one (1) log scroll and put it randomly into a tube. Make 127 other scrolls that say nothing but "NOPE!" or "WRONG ONE!" or "SORRY!" or "TRY AGAIN!" and use them to fill up the other tubes. (Make sure the type is big and fat enough — and printed on both sides — so that people can't use them as logs to sign.)
Hide, publish, and prepare for (more) death threats.
EDIT: Call the cache "16 Bytes" because it has 128 bits in it. :-)
That... That's actually kind of terrifying.
I'd suggest going into the Apple store to see if they'll do anything. They have been known to replace computers out of warranty. Just tell them what you told us and hope for the best, I guess.
If that doesn't work out, you need to decide wether or not you should replace it with something else. This could be based on the specs of your computer. Does it run slow? Is it not doing what you need it to do?
If you're not happy with its performance anymore, I'd suggest going to a MacBook Air if you want to go portable. But if you just need it to work as a media center PC like your current MacBook is, just get a Mac Mini.
If you just want to replace the battery, check Amazon or your local hardware store. They're likely to have the screwdriver you're looking for. As to size, you'd be looking at a Tri-wing Y1, according to this article. The battery can be found all over the internet from plenty of reputable sources.
here's what it is!
I daily carry a GORUCK GR1. I chose this pack because of how ridiculously overbuilt it is. Prior to getting the GR1, I carried less and I generally still couldn't go more than 6 months at best without ripping or destroying my packs. I also like that it doesn't have much built in organization. I prefer to create my own organizational system rather than use the one mandated by the pack. This is the primary reason I chose this over similar high quality options such as the Tom Bihn Synapse 25.
Also, I know there is a serious lack of cool hacking tools. Unfortunately I am currently in a more defensive than offensive cybersecurity position, so I don't really carry a lot of stuff around with me like I used to when I was red team.
On the front you can see that I have a Grimloc biner in case I need to attach anything to my pack. I also have a Gonex water bottle pouch and a large water bottle. On the back of the pack I have a pouch with my EDC Zebralight on the shoulder strap for easy access while wearing the ruck.
Opening the pack up, I have my tool pouch attached to the internal MOLLE webbing at the top as well as work gloves, a waterproof pack cover, rain coat, and umbrella. Additionally, I have a packing cube full of clothes. The packing cube isn't a usual part of my EDC, but I had the bag packed for an overnight trip so I thought I'd leave it in the picture to show what a few days worth of clothes looked like packed in the bag.
Under the flap on my admin pouch and inside the admin pouch you can see my primary toolkit. It's designed to have just about anything I would need for basic repairs throughout a day. I'm not handyman or anything, but I like to be able to solve just about any basic problem with just what is in the pouch. If I'm away from home or my car where I have more in-depth toolboxes, I can still solve most issues I run into.
There are two inner pockets. The mesh pocket has several micro USB and USB-C charging cords, an HDMI cable, cigarette lighter charging plug, and a wall charging plug. The top pocket, as well as the outer slant pocket are filled with assorted items that I want quick access to.
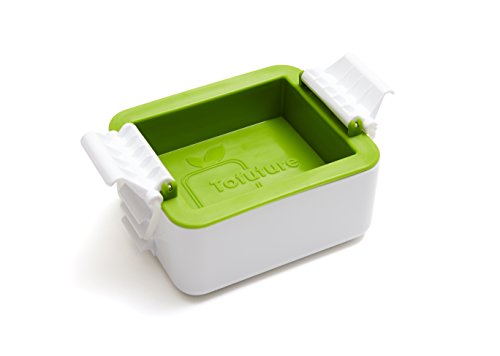
Honestly, I bought myself a tofu press and I use it so often...it really does make pressing tofu easier.
GC here who specializes in decks/rails.
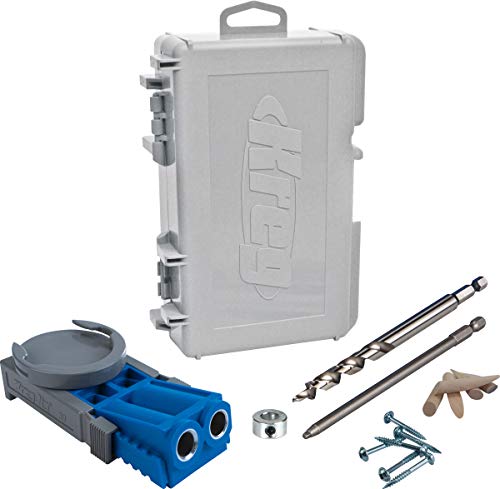
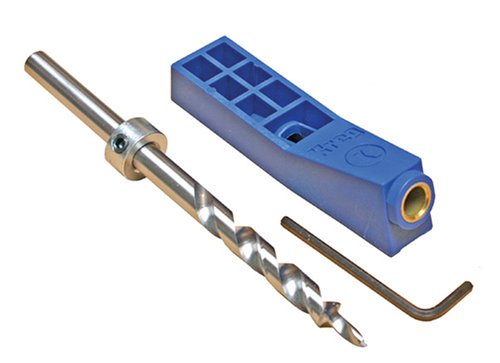
First, get yourself this Pocket Hole Jig (this things is worth every freaking penny), and get some blue kreg 2-1/2" pocket screws from home depot/lowes.
Then add one more layer to your current picture. So you should have 2x4 on bottom, then 1x2, then pickets, 1x2, 2x4 on top, then optional 2x6 for something a little nicer. Doing it this way allows you to place the bottom 2x4 first, then assemble the pickets/1x2s as one unit that you can place on top of 2x4, with final 2x4 on top. Use the pocket hole jig on the ends of the 2xs to attach to posts. this will create an amazingly strong railing. attach pickets to 1x2s using 3 or more 15/16 guage trim nails.
Pic 1
Pic 2
Pic 3
If you zoom in on pic 2 enough on the top, you can see the pocket holes. I filled these in with plastic plugs made by kreg, if its being painted, you could also use their pine ones which make an almost invisible seam.
Also, I HIGHLY recommend using KDAT (Kiln Dried After Treatment) wood. if you don't, the wood will expand/contract after installation causing all of your joints to come undone. its also paint ready as soon as youre done. no need to wait until it dries. Find a specialty retailer for good woods, I'm particular to Madison Woods, pricey, but worth it.
I bought a special tool called a pocket hole jig which essentially drills a diagonal hole into the wood that hides the screw. I had never heard of it until this project, but it's pretty handy.
http://www.amazon.com/Kreg-MKJKIT-Mini-Jig-Kit/dp/B00065WPP2/ref=sr_1_2?ie=UTF8&qid=1375465882&sr=8-2&keywords=pocket+hole+jig
This is the one I use at work and it's great.
Drill them yourself!
I use this technique with drill bits like these.
I had the EZ tofu press for a while and then I upgraded to this one
Tofuture- https://www.amazon.com/dp/B01698J0RU/ref=cm_sw_r_cp_api_i_AsrqDb9Y5TGHK
I like it more because the tofu water gets squeezed into its own little compartment instead of just out the sides.
Spray, let it soak in, repeat.
A lot of good suggestions for pens, I think the many different Chinese pens from Wing Sung and Moonman are good options, and you can price them to match what you want. I think the Moonman 80s, both standard and mini sizes, are also good options. Nib sizes are generally 0.5mm, but you can swap in Parker 45 nibs if you want, so could grab an accountant nib and put that in the Moonman for a very fine line.
Bot I think the biggest thing is to take the advice of /u/DontTakeMyNoise and read up on nib tuning. It is a simple thing that will make your fountain pen life much better. I would skip the brown paper bag though, and just get micro-mesh or a micro-mesh nail file. It just works better. For example, https://www.amazon.com/MICRO-MESH-SOFT-TOUCH-SANDING/dp/B000H6EC4C would do all the smoothing you would need, and in general, this https://www.amazon.com/Pink-Lizard-Sanding-Polishing-Bending/dp/B01ING00ZM would be all you need to finish polish a nib. Be sure if you look at nail buffers that the one you get has a 12000 grit side.
As a cheap student, you have lots of time to learn this, and it will give you more joy out of the pens you have. I would still recommend some of the others here, the Wing Sung 601, 698, the Moonman 80s are all great pens, and the Wing Sung 3008 or 3009 4 packs are amazing deals for their price. But make the ones you have work well too.
Grab yourself a can of PB Blaster, let it sit on the connection for 15 minutes, then try again with the channel locks.
If you're in an area subject to freezing, I would also consider replacing that hose bib with a frost free hose bib. Much better than forgetting to close the shutoff valve in the basement/crawl space.
You can get a smaller version of the Kreg jig for $40. http://www.amazon.com/Kreg-R3-Pocket-Hole-System/dp/B000J43A7W/ref=pd_cp_hi_2
Takes a little more finagling, but I've used mine a ton. Once you've gone pocket screw, you don't really ever want to go back - it is so easy!
With a piece of 1-micron lapping film and a piece of polished granite tile (or a scrap of slab) (total cost $5-10) you can touch up your own blade. For another $5 or so you can get a full progression of films and hone razors you find in the wild.
Edited to make sense and add link.
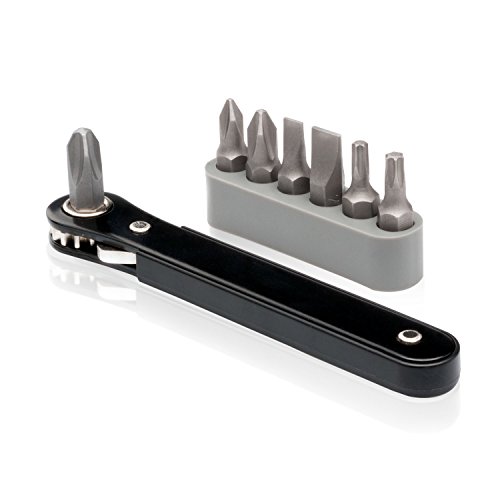
Victorinox Cybertool is always an option,
albeit without the pliers. It's aimed at IT sort of work. You might also consider a mini bit set like this one I have that and it's really nice. Wide selection of drivers and great quality, especially for the size. Though also minus the pliers.If you want long lasting screwdrivers, I'd highly recommend anything from Wiha.
I just picked up this little guy for my bag.
http://amzn.com/B002PJ3IYE
I kind of assumed he'd use a belt sander cleaning block like this, which is basically just a big eraser. That's what I did before I sold my Landyachtz Evo.
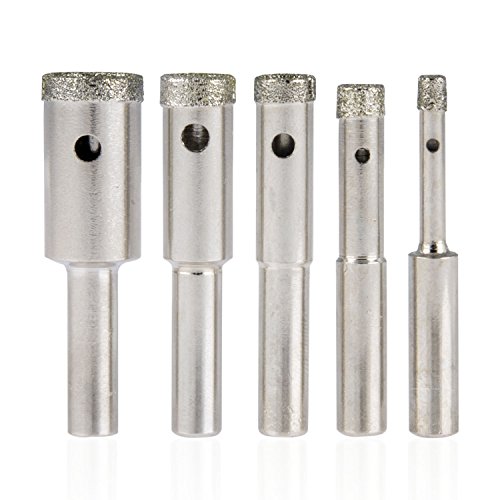
As everyone is pointing out the need for drainage, it can be done very easily by anyone with just a regular power drill and one of these kinds of bits.
Pour a little water on the surface you're drilling into and wear eye protection (as you should be doing when you're drilling anything anyway!) Let the bit do the work and you'll get nice, clean holes pretty quickly.
I've had better luck with this type: https://www.amazon.com/Neiko-00823A-Diamond-Drill-Piece/dp/B00ODSS5NO
​
I haven’t tried yet, myself. I’m going to get some of these , I think. Also, as I understand it, you want to go slow & frequently cool things down with water. Good luck!
There are other kinds/brands of bits that can do the job, but I'm a fan of these.
Not sure if you're looking for extra frugality, but you can make your own SodaStream for cheap. Only problem is that it's ugly as sin. That said, you can also buy a paintball co2 canister and an adapter and hook that up to your SodaStream to replace the stupid expensive little cartridges.
EDIT: Found the instructions to do it, don't remember where they're from though.
Don't even need the soda stream - get a carbonation cap, a Co2 regulator, a ball lock gas coupler, and some 5/16" tubing. Also probably get some tubing clamps from the hardware store to help keep everything together.
With that setup, you can carbonate anything you want in a regular plastic soda bottle. Screw on the cap, snap the coupler to it, and pressurize it directly from the Co2 tank. You don't even need to limit yourself to carbonating liquids. Cut up little pieces of fruit so they fit into the soda bottle and you can carbonate them too.
Also, if you're buying a Co2 tank, don't get a new one. Look on Craigslist, old welding tanks are fine. When you take a tank to be "refilled" at a welding shop (or even a homebrew shop), you don't get the same tank back. They just swap it out for a full one. So if you bought a shiny new one, that's just a waste of money.
I'll probably get run out of town for saying it, but, if you're going to do more of this kind of a project, get yourself one of these or one of these.
No pocket screws aren't as strong as joinery, but for these kind of projects they're fast and work well enough and they'll last longer than the plates/L brackets you used.
You need to invest in a Kreg Jig and fix that jenky-ass book shelf! :P
Invest into a Impact Driver.
Seriously these things are awesome. Your local hardware store should have them.
Other than that try a little heat around them. Stick a screw driver on it and bang the end while trying to twist.
if all fails you most likely have to Drill them out.
I have it. The bit sucks. It'll make a hole but it won't be very clean. The jig mechanism is alright but is not as intuitive to set up like the kreg. The screws it comes with are Philips head instead of the typical Robertson. Not that it matters much since you will run out of the ones you need pretty quickly.
In all reality most of my pocket holes are made in 3/4 or 1-1/2 inch material and ive found myself using my kreg mini instead of breaking out the whole jig. Clamp it down, and go to town. It comes with a way sharper bit also. I never use the HF bit anymore even if I'm using the HF jig.
If youve never used the Kreg jig before then I'd say go for HF and save some cash. Id recommend shelling out 10 bucks for a Kreg bit though. So you're slowly creeping up on that higher price.
If you know what you'll be missing then spring for the Kreg. Like I said, 99% of the time I'll just use the mini since it is super simple to set up and get a move on with the project.
Edit: a good middle ground is the kreg R3. My dad has it and it is a sweet little unit!
First I would try a real penetrating oil like PB Blaster. It will suck into those threads and start dissolving the rust and also lubricate between the threads. Give those nuts a little tap with a wrench or something lightly after you spray it. Give it about 20 minutes to work. Also make sure you're not using one of these.
WD-40 is sort of a general purpose chemical. It's decent at a lot of things, but not really great at anything.
Yeah that's easy. PB Blaster...by far the best stuff I've ever used at removing bolts or other severly rusted/stuck things(far far better than WD-40)
Just read these reviews...
http://www.amazon.com/gp/aw/cr/B000I2079E/ref=mw_dp_cr
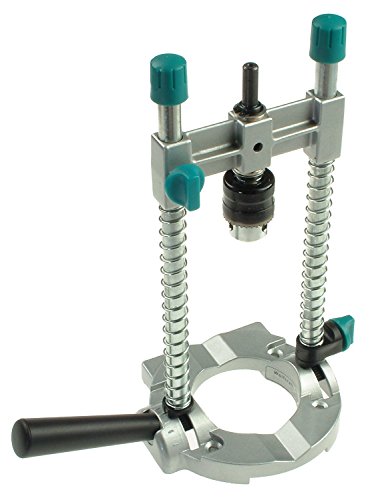
this drill press attachment looks like your best option for me. Since you are doing a grid a standard drill press will not work. I'd say its either this for $25, or a cnc for $2500.
http://www.amazon.com/Wolfcraft-4525404-Attachment-4-Inch-8-Inch/dp/B000JCIMEA
You'd be better off with a guide like this:
Wolfcraft 4525404 Drill Guide Attachment for 1/4-Inch or 3/8-Inch Drills https://www.amazon.com/dp/B000JCIMEA/ref=cm_sw_r_cp_api_alA0xbMA692QH
A drill guide like this will work. They lack the absolute precision of a drill press, and definitely not built for daily use, but for an occasional DIYer who can't justify drill press, it gets the job done.
Get one of these or a similar model at your local parts store.
https://www.amazon.com/TEKTON-2905-8-Inch-Manual-7-Piece/dp/B000NPPATS/ref=mp_s_a_1_3
You hit it with a hammer and the internal mechanism turns the screw at the same time.
3 things happen. The hammer blow causes sever vibration which lets the threads break loose. The impact keeps the bit firmly in the screw. The turning motion backs it out.
Anybody talking about any other method is wrong.
I would recommend this tool.
Have you tried an impact driver?
https://www.amazon.com/gp/aw/d/B000NPPATS/ref=mp_s_a_1_4?ie=UTF8&qid=1484171834&sr=1-4&pi=AC_SX236_SY340_FMwebp_QL65&dpPl=1&dpID=51Lgq16i3YL&ref=plSrch
These things are life savers.
A little mini ratchet set solves these problems well. Usually if you need an offset screwdriver you also don’t have much room to work with.
Neiko 03044A Mini Ratcheting Offset Screwdriver and Bit Set, Pocket Size Close-Quarters ,1/4-Inch Drive https://www.amazon.com/dp/B000XYOUS6/ref=cm_sw_r_cp_api_i_kzjtDb51B093W
I have found the ball end T-Handles to be capable of damaging the bolts. There is less surface for engagement and can lead to slipping and rounding the socket of the bolt. Hex bits and a bit ratchet are good for those hard to reach situations.
Go to a model/hobby store and get some plastic polishing paper, it's like 3000 grit sandpaper, but shines up plastic model parts.
Also online
https://www.amazon.com/Zona-37-948-Polishing-11-Inch-Assortment/dp/B001BHGC7G
Play around with it. I found FL studio pretty intuitive. Theres a number of good "FL Studio for beginner" videos on youtube. The way i learned things was by googling for an answer after 5 or 10 minutes of fiddling around with no luck...couldn't figure out the most efficient way to sample? I'd just youtue "how to sample in FL Studio" and i've been using said method since then.
I'm pretty sure there is a $200-$300 version of FL studio that has most of what i you use/will use.
I've only ever mixed in FL studio, imo, my tracks come out well enough that they don't require mastering.
You either need Jam origin or a decent mic to record guitar. I had a friend use a vocal mic and play his acoustic guitar into the mic. He sound proofed the area and made sure the apartment was quiet. Again, jam origin works.
Estimating all costs, you'd could get everything you need for $350 maybe? FL Studio, a basic sound interface (Basic as in this, used Akai MPK, and either a decent small pair of studio monitors or studio headphones (The $30 AKGs from Guitar Center will work for now_
https://www.amazon.com/Wiha-75093-System-Slotted-Phillips/dp/B002PJ3IYE
As far as remote disconnections with the V2, I've never had it lose connection once.
The only other suggestions I would have are to pick up some bash guards from flatland-3D to preserve the ends of your board, and compressed air to clean hard to reach areas on the board.
Hope that helped! Have fun!
It is a disassembly set. Has the pry tools and security torx and whatnot: https://www.amazon.com/dp/B015F734P0
A set like this?
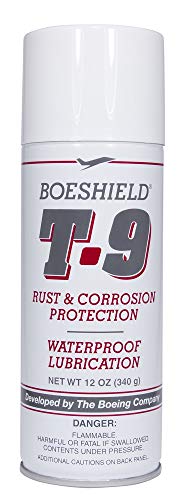
Boe-shield is the industry standard for inside a steel frame
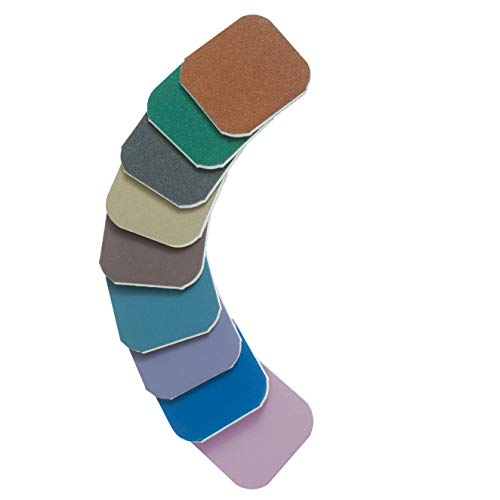
3M Micron Papers are my personal preference - they are much more consistent than regular sandpapers and achieve much finer finishes - best used with some patience, going stepwise from the larger micron sizes and working through the finer papers (in one direction, of course with the grain of the finish) until you've reached what you're happy with (a set of 6, each color is a finer and finer abrasive down to 1 micron) -
With one big caveat:
Practice first, understand that literally nothing you can do at home will ever exactly match the factory finish without knowing which wheels/abrasives/techniques they use, and if you're too aggressive you'll turn one scratch in an otherwise nice finish into a complete mess.
Or just live with it... or take it to a good jeweler/watchmaker. Even they may not be able to exactly match a given watch' factory finish since there are so many different variables for brushed finishes...
If you are looking for an audio only media center, take a look at Volumio or Pi MusicBox, or maybe Rune Audio.
If you are going to use HDMI for Audio, you are good. If you you want to use the 1/8 inch audio out, it's time to look at a separate DAC. This one is my favorite.
You need a USB phono preamp. It's a box on which you can plug your turntable. You then plug that box on your computer via USB and it will show up as an audio interface / sound card.
Example.
I don't think you'll need any software (unless you want to record).
Probably not what you want to hear, but you'll probably need to get a new stickbox (desoldering the old one, soldering a new one). It's a straight forward process and hard to mess up, but the cost can be a big factor if you don't already own the equipment.
Video for reference.
Other option would be to just buy another controller off Ebay, open that controller and swap the guts with your old controller.
You can find a bunch of results for analog stick boxes on Ebay.
Best of luck!
As long as its still grippy it should be fine. I've had some ugly ass grip before, mud and dirt stuck everywhere but it still worked so I kept it.
The Grip Gum u/tangoRhubarb mentioned can be found for cheap if you look up "Sanding Belt Cleaner".
Here's it on amazon: https://www.amazon.com/POWERTEC-71002-Abrasive-Cleaning-Stick/dp/B00AJW0CY8?ref_=fsclp_pl_dp_1
someone here recommended these to me. I just got them in the mail but haven't had a chance to try them yet.
https://www.amazon.ca/gp/aw/d/B00ODSS5NO/ref=oh_aui_i_d_old_o0_img?ie=UTF8&psc=1
That gave me a great idea! What if I bought all 5 of these items and rigged them up in order onto a 12 oz soda bottle:
I got a Tofu Press after somebody recommended them recently. There are cheaper models but this one comes with a compact way to collect the unwanted water.
Had my first tofu meal from it the other day after leaving it to press in the fridge overnight and it crisped up really nice after frying. I just need to learn how to season it now!
On the topic of ramen. If there's any UK supermarkets supply chain staff reading this sub for ideas about what to acquire. I'm interested in miso paste and nutritional yeast. Using veggie stock and yeast extract to add the savory flavour to sauces gets a little dull when compared to my old meat eating chicken/lamb/beef/pork/etc stock options.
I have one! This one to be exact! I really recommend it if you like the convenience/eat a bit of tofu. It does take more time than using books but no more paper towels/towels. It's easy to clean and I never have to worry about my Harry Potter books falling off the counter.
My Vega Sport vanilla protein powder ran out, so I decided to try the chocolate one this time. Pretty disappointed.
I have been vegan for almost two years and FINALLY got an actual tofu press. You guys, what the hell took me so long? In all the vegan food blogs I've read, they act like it's not a big deal, and you can just wrap it in a tea towel and smoosh it under a heavy pan and it will be the same as using a press. This is just WRONG. If you eat tofu, get a fucking tofu press. I have this one and can recommend it, although I'm going to need to buy a second because I'm cooking for four people and one block of tofu is generally not enough.
Also, just got a new cook book that I am LOVING, so I thought I would share: America's Test Kitchen: Vegan for Everybody
I liked this bike shelf. But it costs more than $1200, and I wanted one that could hold two bikes.
Bought myself a $20 pocket hole jig and some pine boards, and had a double decker together in an afternoon.
Edit: another pic
Here's the answer
for polishing plastics to optical clarity
Invest in some of this, kicks the shit out of WD-40 for breaking things lose:
http://www.amazon.com/Blaster-16-PB-Penetrating-Catalyst-oz/dp/B000I2079E
As someone working through this but a few years ahead of you, I'll pass along the list of stuff I've bought and/or wish to buy...
Hand Tools
Power Tools
Also, there are fluids to consider
Of these, I'd focus on the hand tools, fluids, and the Dremel. You can always ask someone to buy you a saw for Christmas. If you have these things on hand, there probably won't be a job come along that you can't handle at some basic level. I'm assuming you don't need yard grooming tools, because that's an entirely different list.
Buy some rust remover and use it after you have manually removed most of it with a wire brush. it will get into all the nooks and crannies and dissolve it away and leave you with a totally clean surface. if the rust is really deep it may have pitted the surface, but that shouldn't really be a problem for a jointer unless it's severe. Once the rust is gone you will know for sure what you need to flatten and true up.
The knives almost certainly need to be replaced and re-set, there are probably just a couple of set screws to adjust the cutter height on that model. Don't forget to finish everything with a coat of wax so it all glides smoothly.
Oh, and if any of the adjustment handles are rusted and stuck, B'laster is magical.
No, it's a jig for creating pocket holes. I own it, and it works really great. Lets you put in hidden screws that pull pieces together just about anywhere.
http://www.amazon.com/Kreg-R3-Pocket-Hole-System/dp/B000J43A7W/ref=sr_1_3?ie=UTF8&qid=1396413078&sr=8-3&keywords=kreg+jig
It really depends on what you want to start building? Any ideas of what your first 5 projects are? For woodworking, I'd get the following.
a) Circular saw. It will make fast work of cutting sheet goods, it's possible to rip boards with decent accuracy, and you can cross cut as well. Super versatile because you can make several jigs and use different blades for hardwoods, plywoods, and even tile. For light, occasional work, you won't notice a difference between a $50 Skil model and a $120 DeWALT model. Just don't drop it.
b) Jig saw. You can also cut plywood and hardwoods with a jig saw, but the results will not be as good. The benefit of a jig saw is that you can make circular (or any shape really) cuts. You can make a low more artsy stuff with a jig saw.
http://www.amazon.com/PORTER-CABLE-PCCK602L2-Lithium-Tool-Combo/dp/B00CM7Z2KW/
I'd suggest a a drill and impact driver set. You can get away with just a drill and use it to drive screws as well. However, with the combo sets, I was able to pick up an impact driver and a flashlight with a carrying case that uses the same batteries for about $20 more than just a drill and 2 batteries alone. The impact driver will allow you to drive 3-1/2" screws into studs like butter.
http://www.amazon.com/Kreg-R3-Pocket-Hole-System/dp/B000J43A7W
This bad boy has made furniture makers out of many that wouldn't be able to in the past. You'll need a good clamp to use with it. Just search YouTube for videos about building stuff. Ana White uses pocket holes on every thing and she makes decent stuff.
"A woodworker never has enough clamps." Everyone knows this.
http://www.amazon.com/Jorgensen-3724-HD-24-Inch-Heavy-Duty-Steel/dp/B00005R1HY
http://www.amazon.com/Irwin-Quick-Grip-Clamp-Set/dp/B00A9KMARW/
I have 6 of the 24" clamps, 8 of the Irwin Quick Grip clamps, and a handful of spring clamps. I've been able to build just about anything with that many clamps... but I've wanted more. If you use the pocket hole system, you'll want to clamp pieces together before you drive the screws.
I went to a Habitat for Humanity ReStore and picked up an old particle board desk that is about 300 lbs for $20. That's what I use. Otherwise, you can build one from 2x4s with the tools above and build your skills.
Squares, Drill bits, Driver bits....
I usually pick up something new for every project I start.
That's about $500 worth of tools and is the barest of bare bones I'd suggest someone to start with if they want to build bookshelves etc. The most important thing you can have is knowledge and YouTube/Reddit is the best place to get it if you don't have a woodworker to physically teach you.
I have a 2008 BMW 335i. It has the N54 twin turbo 3.0L engine. I bought the car with 51k miles almost 5 years ago. It now has around 88k. Here's a rough list of what I've done so far:
In general, I will say that I've managed to DIY just about everything on this car, with the exception of the air conditioner evaporator. That I had done at my local A/C shop, but I've since seen someone on the e90 forums do it themselves.
I have had to buy quite a few tools and accessories along the way: a battery trickle-charger for the water pump bleed process, media blaster for the carbon cleaning, torx and e-torx bits/sockets, steering hub spreader for shocks (forgot this in the list above), impact hammer thing for brake rotors, extended low-profile jack, and so on and so on.
The most frustrating thing though was getting the BMW software to work. It's necessary for registering a new battery (so that it charges properly), or for installing new fuel injectors (they have individual flow rates and tolerances).
OH. I almost forgot. The waste gates on my turbos are rattling, and I'm out of warranty, so I'm looking at ~$1500-$2000 for new turbos some time this year. After that, it'll be new front wheel bearings. As soon as things stop breaking, I'll maybe have some time for upgrades and/or tune. =)
I should add, that the only reason I am even willing to do this stuff is because my wife and I commute to work together, so my car can be in pieces for weeks at a time if it needs to. Were that to change, I'd probably have to ditch this car for something more reliable.
Edit: After I finish all of the above, I'm going to polish and seal my headlights. I pretty much have to do this, since I'm sure as shit not going to pay $1k per light. >8|
I kind of got off topic. You asked about the feasibility of maintaining a car like this on your own. It's definitely possible, but it helps to know what you can expect down the road.
I’d use a hand impact driver. ( and I have various air tools). They are about the only things that work on slotted screws like that. https://www.amazon.ca/TEKTON-2905-8-Inch-Manual-7-Piece/dp/B000NPPATS/ref=asc_df_B000NPPATS/?tag=googlemobshop-20&linkCode=df0&hvadid=292995173425&hvpos=1o2&hvnetw=g&hvrand=4683897586214222232&hvpone=&hvptwo=&hvqmt=&hvdev=m&hvdvcmdl=&hvlocint=&hvlocphy=9001423&hvtargid=pla-420785539586&psc=1
Edit( the force of hitting it with a hammer helps to drive it out)
I'd hit it with the penetrating oil (not sure what kroil is) a couple times waiting a few minutes in between to give it time to work.
Grab one of these as well. Is the old style impact driver. You whack the end with a hammer which is what turns the mechanism. It can go left or right so make sure you have it set to the correct one.
https://www.amazon.com/TEKTON-2905-8-Inch-Manual-7-Piece/dp/B000NPPATS/ref=mp_s_a_1_8?keywords=impact+driver&qid=1550950294&s=gateway&sr=8-8
If those are standard size screws, you can change to Allen screws which can be easier to remove. Just make sure you don't over torque. And consider putting a little anti seize on there when installing.
An impact driver alone is probably adequate. But as raoulduke25 points out, unlikely a drunk chav is stumbling about armed with one of those.
8 bucks on Amazon. Its the dickens (is that British enough?) too.
https://www.amazon.com/03044A-4-Drive-Mini-size-Ratcheting-Screwdriver/dp/B000XYOUS6
Yes, Allen/hex keys are retarded to use. You can use a powered screwdriver and a nice one is this:
https://www.amazon.com/Bosch-PS21-2A-2-Speed-Batteries-Charger/dp/B003BEE12U
Add bits, start with the little 1" ones that you use a holder with:
https://www.amazon.com/Titan-Tools-16061-61-Piece-Bit/dp/B002YKBDO6
Get a bit ratchet for real tight spots:
https://www.amazon.com/Neiko-03044A-Ratcheting-Screwdriver-Close-Quarters/dp/B000XYOUS6
Also a tip: with particle board furniture like Ikea's, use a bit of wood glue in the screw hole and on the screw before insertion. It makes it go in easier ;) and also keeps the particles from breaking apart. It doesn't form a permanent bond so disassembly is still easy.
yes buy this for tbe back wheels
​
https://www.amazon.com/gp/product/B000XYOUS6/ref=ppx_yo_dt_b_asin_title_o05_s00?ie=UTF8&psc=1
Actually this is wrong. Aluminum is highly corrosive, which is actually a good thing, well mostly. It quickly oxidizes forming a thin "skin" that protects the underlying material from most weather and chemicals.
In the aviation world corrosion is a big concern and we generally deal with it through use of zinc-chromate primers or sometimes plating which has various approaches. You can even use wax if you really want to, think BoeSheild T-9 or ACF-50.
As for why it is good for bicycles. Probably the biggest two factors are low cost and the ease with which it can be extruded, milled and machined into usable shapes for bicycles. All things being equal if I was building a bicycle out of a metal it would be Titanium hands down. If I was building to a price point however, Aluminum wins.
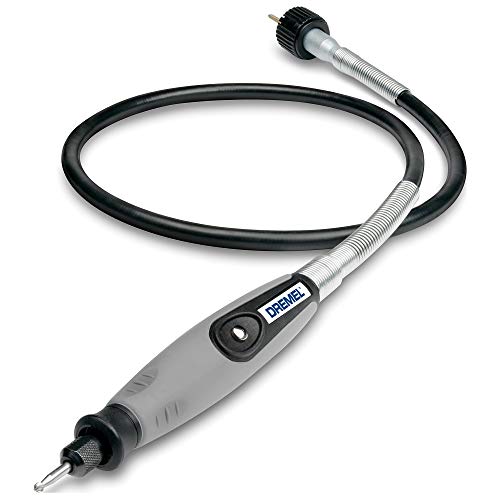
Dremel 225-01 Flex Shaft Attachment https://www.amazon.com/dp/B0000302Y8/ref=cm_sw_r_cp_apa_i_V263Bb572K5XA
Best tool I've ever bought for my dremel ever
PanaVise 350 Multi-Purpose Work Center.
I would avoid those plates, they never seem to hold things tight enough, and they leave sharp corners everywhere, but if you insist on using them get some flat head (that refers to the shape of the head, not what kind of screw driver you use) or oval head screws.
There are a couple of ways I would approach this, depending on how you want it to look at the end. If you don't mind some screw heads in the top, attach a piece of lumber crosswise underneath, like picnic tables are built. Glue everywhere wood touches wood, and screw down through the top into the crosspieces. Depending on the tools you have available you can do anything you want with the crosspiece, angle the ends, round the corners, its up to you.
If screws in the top is a concern, then I would recommend a biscuit joiner. They're not the cheapest tool in the world, and they aren't a tool you'll use every day, but nothing beats them when you want to join two pieces of wood without visible fasteners.
If that's too much money you could consider a pocket hole jig, some woodworkers swear by them, some swear at them, personally I'm not a huge fan but they are cheap and if you glue the joints too it should work fine for your job.
Whatever you choose, get a sanding block and be prepared to sand those joints smooth. Some methods (biscuits) will make smoother joints than others, but they still need sanding to remove the tiny bump that will inevitably remain between the boards.
Edit Oh also, for clamping (which will only really be required if you do the biscuits), tremendous pressure is not required unless you are trying to straighten one of the boards when you clamp it. Put some cardboard or plywood on the edges to protect your tabletop, tie a rope around it loosely, then use a stick to twist the tied rope and put pressure on the joints. Leave the stick in and put something heavy against it to keep it from un-twisting. You'll probably want several of these for the length of your table.
Agreed, but you'd at least one this guy it comes with the proper bit.
If he was planning on making more than one I'd suggest the full jig, it makes things a lot easier and you don't have to measure every time to get the proper depth... well worth the hundred bucks IMO
hell, with the 40 brackets he used he probably could have paid for the jig and screws...
get some micro mesh pads, soak it in a mix of water and oxiclean and then go at it with those pads in ascending grit order. Then dab a cleaner in the oil and rub it in. Remember a dab will do you. Keep oiling it every so often to keep it nice.
It's hard to beat micro mesh pads for cleaning up a stem.
https://www.amazon.com/dp/B000H6EC4C/ref=cm_sw_r_cp_awdb_kgQzzb3WXJ24T
I don't know the ins and outs of pipe restoring, but this website has all the info you'll need:
http://rebornpipes.com/
/u/Flatticus, /u/scriptonic and /u/federalmng are the best restorers I can recall on this sub (sure I'm missing others though). Hopefully one of them will see this.
The stems on quite a few pipes are heavily oxidised. The only way to fix that is by sanding them back as far as I know. There's a solution that is used to help in the process, I know it's on rebornpipes but I can't remember it (can't get the right product in Australia so I didn't make a mental note of it).
Some other good products for the stems are:
A good quality polishing cloth (also available on 4noggins) will be great too, but you might have a bit of trouble polishing them up to a nice shine without using some oil or wax.
Sorry I can't be of more help. Try messaging the runner of rebornpipes or the other users I mentioned. Good luck! And please post updates.
I spent $40 on a pocket hole jig specifically for this project. It was more expensive than I wanted, but in the end, I think it was worth it for the results it provided.
It sets you up to drill the pocket holes at the right angle, at the right depth, for whatever thickness wood you're working on
There are a couple ways to do this.
If you want to do it quickly and don't really care about how the details look, get a Kreg jig (I use this one) and put it together with pocket holes.
If you want something that looks nicer than pocket holes, use a sliding dovetail for the top joint and a lock rabbet for the bottom.
Are you going to put a back and/or a face frame on this? As it appears now, you're not going to have a very strong piece. Adding either or both would add strength.
For that last part, they make the hand impact drivers that does exactly this.
https://www.amazon.com/dp/B000NPPATS/ref=cm_sw_r_cp_apa_i_s1QPCbJW6THVR
There's a flat driver in that set, slot it into the slot, get a good grip, and hit it with a hammer. It simultaneously impact the bolt to break the rust while at the same time turn the bolt out.
No need to take wheels off just get this https://www.amazon.com/Neiko-03044A-Ratcheting-Screwdriver-Close-Quarters/dp/B000XYOUS6
I picked up this tiny little thing which I like because it is literally as thin as you could make it, the back of the bit goes straight to the other side.
I'm not an expert, by any means, when it comes to SRs, but I believe a 12K-15K stone is all you need to maintain a razor.
I use lapping film to maintain the two vintage straights I have. Both were dull when I got them. I had to set the bevel, using the film, to make them them shave-ready. It worked well.
This vendor sells it, but you'll need a ,3m to ,5m for finishing.
I'll start with the basics.
First - decide on what you actually want to do. Plan out your mods and your paint job. If you're having trouble getting inspiration, Google image search the name of your blaster + "paint job" for ideas. That what I did, and I saw this among the images.
It's Coop772's steampunk DoubleStrike. I decided to base my paintjob off of that one, but using a heavy helping of bright cobalt blue.
Next - Open up your blaster. I like this guy's method of sketching out the blaster and placing the screws approximately where they were, so they don't get mixed up or lost. You can tape any internal parts that aren't getting modded or painted to this sketch as well, to keep them safe.
I suggest either taking detailed pictures of the dis-assembly, or finding some photos online so that you will be able to put your blaster back together correctly later.
Then - Do any modding you are going to do, and sand off the warning text and logos if you want to. You will also need to sand off any paint that is on the blaster that you want to paint over! The base coat we are going to use will NOT stick well to painted surfaces.
Nerf blasters are made of a fairly soft plastic, so I started by using a pocketknife to scrape off the mold lines and much of the text & logos, then moved to sandpaper. Don't use anything coarser than 120 grit. My process was 120 grit - 160 grit - 200 grit - 240 grit - 300 grit - 600 grit polishing paper. I highly recommend the 3M polishing paper; it’s way more flexible than normal sandpaper. You can probably skip the 160 and 240 grit if you don't have them.
After that - Wash all of the parts that are going to be painted. Use hot water and dish soap, and let them dry completely. This is really important, don't skip it. It gets off all of the mold release chemicals, sanding dust, and any grease from the interior of the plunger or from your fingers. If you're in a big rush you can wipe down your parts with 99% rubbing alcohol instead, but be sure to do it outside.
Lastly - Tape off any areas you don't want painted. Blue painter's tape is best here tho regular masking tape will also work, it will just be harder to remove afterward. You don't want paint on the insides of the blaster or any moving parts if you can help it. You can also use the tape to mask out simple designs with the original colors. just be sure to pay attention to where the edges of your tape are and press them down firmly.
FINALLY ON TO THE ACTUAL PAINTING!
The base/primer coat I used is Duplicolor Vinyl Dye. This stuff is amazing, it has solvents that allow for a penetrating bond with the sort of plastic that Nerf uses for their blasters, and it dries to a paper-thin, rock-hard but flexible finish. It's hard to go wrong with the flat black, but if your paintjob is going to be close to one of the other colors then get that one instead. You can find the paint at most auto part stores.
The downsides to vinyl dye are that it is pretty expensive, it will not adhere well to painted surfaces, and it will only work on vinyl-type plastics. The harder plastics - usually ABS - that Buzz Bee and other knock-off use won't work with it. For those I recommend sanding the whole blaster with 600 grit and using a Rustoleum primer.
You want to do this on a warm, dry day. Apply the primer in very, very thin coats. By that I mean that my first coat was just a layer of speckles. Wait a couple of minutes for it to dry between coats. Yes, this will take a while but this paint runs like crazy if you try to put down a solid coat. If you rush it's going to look awful.
When you have good coverage over most of the pieces, concentrate on hitting the areas that are not solidly covered. Once you have full coverage, let the parts dry for a few hours.
If you are going to use any other colors of spray paint, re-tape as necessary for your design, and paint similarly to the basecoat. Drying times will depend on the paint you are using. Once the paint is dry, carefully pull off the tape from anywhere you want to be painted metallic.
Now for the beauty coat! I use acrylic paints in a number of different brands. Generally it's whatever I happen to have around the house (Which as a 34-year old with an art degree, is quite a lot). Despite that, I'll try to give some suggestions for what to buy.
Liquitex are the big boys of the acrylic paint world, and I recommend their paints above anything else. They literally invented the modern water-based acrylic paint. Keep in mind that different colors are made with different pigment substances, so prices may vary by color. If you can't afford their professional-grade paints, the BASICS line are still quite good - for the purposes of painting blasters I recommend the BASICS Matte if you can find it, since it dries to a flat, matte consistency while the Satin stuff tends to hold its texture as it dries. That's useful for fake wood handles but not much else. You should be able to find Liquitex paints at craft/hobby stores as well as dedicated art supply stores.
If you're really too broke for Liquitex, craft paints like Folk Art or Americana are alright, but you are more likely to need many coats or have inconsistencies. Don't buy anything cheaper than that - you'll regret it.
Some general painting tips: For solid colors, paint thin coats and let dry before re-coating. Red and yellow are going to need multiple coats, no matter what. The best bright red and yellow pigments aren't opaque, so it takes several layers to reach opacity.
Keep in mind that mixed colors are always going to be muddier than pure colors out of the tube. You can make a color lighter by adding white but it will lose saturation, becoming more pastel. Likewise, adding black will make it darker but also duller. I suggest small amounts of the complementary color as an alternative to black.
The main painting technique I used here was drybrushing. Drybrushing is great for creating a metallic look. Here are two very good guides to the technique.
The three most important tips - Don't use your favorite brush - drybrushing has a tendency to ruin brushes. Make sure your brush doesn't have any water in it. And if you can still see paint while you are wiping your brush off on the paper towel, you have too much paint on the brush. Keep wiping. Just remember, you can always drybrush more, but once you've done too much, you have to completely repaint the base color and start over.
Drybrushing is messy, so do those parts first. Use metallic paints over your black base coat for "metal" parts of your design. You can do a very light drybrushing of edges for a worn black oxide look, or you can drybrush several layers of metallic paint to get more of a dirty metal effect. (I'm not a huge fan of the mixed-metal steampunk look but it's a good example.)
Let the paint dry. It shouldn't take long since drybrushing uses very thin layers of paint.
After drybrushing your metallics, wash out your brushes, dump out your water, wash out your water cup and get a new palette (or wash it if you're using something reusable). Metallic flake gets into EVERYTHING.
Now pull off the rest of the tape, and lay down a layer of solid color for any other areas. You can also drybrush them to bring out the detail; just use a lighter color than the rest of the area. I don't suggest using white unless the color of that area is very light.
You can also use washes of diluted paint in dark colors to increase the contrast in spots that should be in shadow. I tend to apply it with a brush, and then smear it around and wipe it away from the places it shouldn't be with my fingertips. This is pretty messy, and you might prefer to use a clean, dry brush or a scrap of paper towel.
After all that messy painting, if there are any raised motifs you want to paint, or designs like vines or flames or lettering, it's now time for that. Go ahead and use a good brush - one that can hold a nice flat edge or sharp point - to carefully paint your designs.
Once you are happy with your paintjob - or just sick of messing with it - let it dry overnight.
LAST STEPS! Now that your blaster has a beautiful paintjob, you need to protect it! Once again, I want to suggest Liquitex for this. They have varnishes in both gloss and matte, in both brush-on and spray varieties. In any case, I DON'T recommend Krylon. Their clear coat always has an awful pebbly texture.
Go ahead and give the whole blaster several layers of gloss varnish. Once again, thin layers and patience in letting them dry between coats will ensure a good finish.
If you are using a brush-on varnish, apply it slowly, and just a little at a time. If you notice bubbles, rinse your brush out, dry it off on paper towels, wipe the bubbles off, rinse and dry again, and then get a fresh brushful of varnish to keep going.
Once there is 2-3 coats of gloss varnish on the whole blaster, use a matte or satin varnish on any parts you don't want to be shiny.
Let the blaster dry overnight again.
You're done painting! Use a razor or exacto blade to carefully scrape paint off places it shouldn't be - like the mating edges of the shell - and reassemble your blaster. Don't forget to re-lube the plunger.
Any questions?
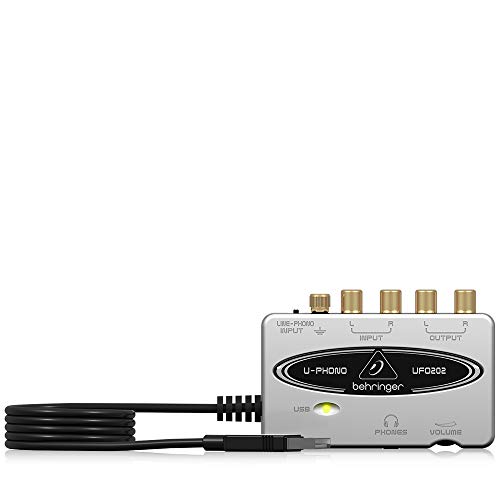
Yes, that should work, but I would highly recommend a different Behringer, the UFO202. It has the phono preamp, as well as a DAC for stereo input, and stereo output, and a headphone amplifier. I have been using an earlier version since the Pi 1B days.
Just plug the turntable into it, and it's USB into the Pi.
If you have patience and a steady hand, I'd say try to repair it. You can likely find the parts you need on Amazon and tutorial videos online. I've had to repair the R-button and control stick on my 3DS on two separate occasions. It was easier to do than I expected and, overall, much less expensive than getting a new system. The only other thing you would need is a precision screwdriver kit. I purchased this one for the job.
Super easy! With this set of bits , At first I used one from the hardware store that was expensive, but made small holes and took FOREVER.
https://www.amazon.com/gp/product/B00ODSS5NO/ref=oh_aui_detailpage_o02_s00?ie=UTF8&psc=1
I just have like a 30 dollar drill from Walmart. I put the piece on my door mat on my porch, pour a little water (You don't need a hose but I have about a cup of water and add a little as needed) I start the drilling at an angle and then slowly raise it up until its straight up and down. Having a sticker on the bottom helps to have something for the bit to grab into. I'll try and do a video as it's way easier than the videos I saw on Youtube. You do want to have your hand on the piece though, the only thing I broke was because the drill went through the bottom and swung the piece around, that's before I was doing it on the mat to help with slippage.
I bought the SS carb caps after my plastic one cracked and started leaking: https://www.amazon.com/Stainless-Carbonation-Barb-Drink-Bottles/dp/B00V334SME
Haven't had any issues, they work great for me. They're also awesome because they fit both gas and liquid QDs. So I also use them to flush my lines after a keg kicks.
https://www.amazon.com/gp/product/B015F734P0/ref=oh_aui_detailpage_o07_s01?ie=UTF8&psc=1
Used this one for about 2 years and I do all types of projects. There are plenty out there similar to this as well. Really great.
There are several other kits on Amazon that are almost identical around the $10.00 mark, I've been using this one for ages. Still a good price for a solid kit, but nothing to jump at.
Such a generous offer.
https://smile.amazon.com/dp/B01698J0RU/?coliid=I1JG4DHCSIL8M2&colid=28H3LQ6WV3WB4&psc=0&ref\_=lv\_ov\_lig\_dp\_it
My favorite thing is press it and then fry it on medium heat with equal parts rice wine vinegar and soy sauce. It's not 100% WFPB but there's no oil and the sugar in the rice wine vinegar is pretty minimal if you don't use a ton.
If you want it more crispy, bake it in the oven. You can then use it immediately for hot dishes or let it cool and toss it into a salad.
If you get soft tofu you can cut it (no pressing needed) and toss it into miso soup broth.
A lot of people make tofu scramble (kind of like scrambled eggs) but I haven't personally tried it yet.
Sometimes when I'm craving something crispy I'll press it, toss it in cornstarch and fry it in oil. Obviously not WFPB approved but it's my occasional treat.
Edit: a tofu press isn't necessary but totally worth it if you plan to eat tofu often. I have this one. https://www.amazon.com/gp/aw/d/B01698J0RU/ref=sxts_1?ie=UTF8&qid=1504284431&sr=1&pi=AC_SX236_SY340_FMwebp_QL65
I wouldn’t buy an ifixit kit. There’s better kits for cheaper (better grips, more bits, no fancy case but oh well) and you can get the 1 screwdriver you’ll ever need for building a pc at Lowe’s for like 5 bucks.
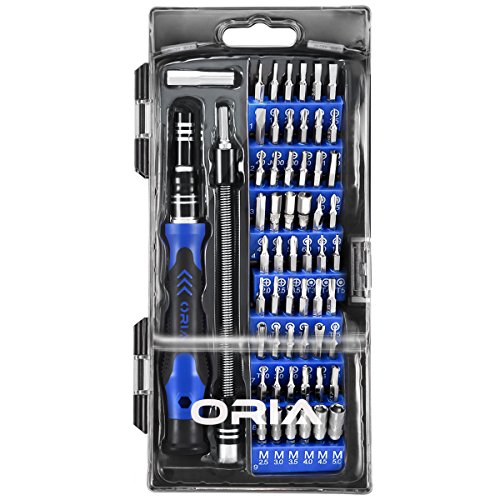
Edit: for an example I have compared ORIA Screwdriver Set, Magnetic Driver Kit, Professional Repair Tool Kit to my friend’s $80 ifixit kit and omg the screwdriver is so much nicer.
The ifixit kit comes with all the tools to fix phones screens and shit but the screwdriver is awful and you gotta use the cross piece to get ANY leverage to turn it.
This $13 kit has every tiny bit you’ll ever need and the screwdriver has a built in extender. Grips so that you can turn it without fiddling with another piece and all sorts. Super nice for the price imo
I've used paste wax and GlideCote, both are susceptible to occasional rust. I may try T9 at some point. http://www.amazon.com/Boeshield-Corrosion-Protection-Waterproof-Lubrication/dp/B001447PEK
I think for a hand plane, a simple solution would be to store it wrapped up in a cotton cloth. If the only time it was out in the open is when it's being used, that might have a serious impact on oxidation.
Zona 37-948 3M Wet/Dry Polishing Paper, 8-1/2-Inch X 11-Inch, Assortment Pack One Each 1, 2, 3, 9, 15, and 30 Micron https://www.amazon.com/dp/B001BHGC7G/ref=cm_sw_r_cp_api_29AYxb62FZ12A
I used them all that came in the pack. That's probably not necessary. Just keep going until you're happy with the look. I may take it back to a brushed look someday. Can always polish it back to shiny.
Try these, I use them on my refinishing projects. It's basically very fine sandpaper and will definitely accomplish what you're after.
You might also consider steel wool, if the above doesn't work, but be gentle. It's possible that you might mar what looks like an otherwise nice finish, and it would be a shame to have to re-polish the area.
Keep a really close eye on those sections in the near future, too, once the rust has been removed: it's possible that the rust may come back quickly in those spots now, since there's probably more surface area (and thus more chances for oxidation) under the rust spots now.
If that happens, it may be in your best interest to pick up some polishing paper and run the finer grades (I find the 30 micron paper leaves small scratches that I can see - start with the 15) over the area to help even things out.
Hey /r/audiophile! Three questions for you today.
I have seen the Behringer UCA202 recommended on here a few times for a DAC, but I am considering the UFO202 instead because I want to also be able to record vinyl to my computer. Is this the right choice? Will I still be able to use the UFO202 as a DAC for playback?
Also, if I plug a 3.5mm to RCA cable from the headphone jack of my computer to the AUX input of a receiver (Yamaha CR-450), will I get any additional benefit from adding a DAC, or does the receiver serve as a DAC?
3rd question: If I were to use that same 3.5mm to RCA cable to go from the headphone jack of the UCA/UFO202 to the receiver, would that be just as good as getting an RCA-RCA cable, or would that throw away some or all of the benefit of the DAC in the first place?
Thanks!
What do you need USB in for? There is no such thing as a "small" receiver. There are slimmer receivers but they are still long devices. The art phono plus has usb to connect to your computer but I'm not sure it's what you're after. A similar device is the behringer uphono if you want to buy a seperate phono preamp.
For an amp you can get a very small 2 channel amp like an smsl. If you want small you will have to sacrifice a lot of features. Receivers have sooo many features at the cost of size. They are really the only option if you want all-in-one.
EDIT: the black smsl is sold out but there are other colors available if you are trying to buy right away.
The 222 does DSP effects. I wouldn't bother.
Look at the UF0202 for vinyls if you need a pre-amp.
Here are a few to consider:
BEHRINGER MICROPHONO PP400 http://amzn.com/B000H2BC4E
BEHRINGER U-PHONO UFO202 http://amzn.com/B002GHBYZ0
Pro-Ject Audio - Phono Box MM http://amzn.com/B000YEK1AQ
Little Bear Tube valve Phono Turntable RIAA MM Preamp preamplifier amplifier Ver2.2 http://amzn.com/B00H0FIGUO
Your bag may or may not be EDC by definition but here is a quick pack outline.
Bag: Vertx EDC Gamut
This is a CCW oriented bag, search LoadedPocketz and Youtube for reviews and the bag in action. There's a ton of organization in it for carrying lots of stuff, plus it's loaded with Velcro so you can either use Velcro add-on's or use their Tactigami to convert anything Molle to attach to their velcro.
Organizers - The Gamut is great but you might want to throw in something like a Maxpedition EDC/Beefy/Fatty to organize tools and supplies as needed, plus you can take them out of the bag if you want to be more mobile. E.G. leave bag in car but take IT toolkit with you to a site.
Tools:
Small light with multiple settings you so can use low settings for close up work with minimal reflection, or full brightness for other uses. Lots of lights will work for this purpose, headlamps work even better for hands-free but you'll look like a dork.
Then you have the EDC items you'll hear most people say:
I've got something similar, but it's a Wiha: http://www.amazon.com/o/ASIN/B002PJ3IYE?tag=adapas02-20
Very easy to carry it around.
Bought this set years ago and it's covered pretty much every small electronic device I've had to work on.
Has TR6-TR9, TR15 along with small Phillips, Tri-wing (Nintendo), and Pentalobe (iPhone) bits.
https://www.amazon.com/TEKTON-2830-Everybit-Precision-Electronic/dp/B009MKGRQA/
Harbor Freight on North Cunnigham in Urbana usually has this set in stock, and it includes a P5.
The ECE Supply Center (https://my.ece.illinois.edu/storeroom/catalog.asp) looks like it probably has a set or two that has a P5, but I don't know if it'd be open on Labor Day or not.
Sold out, Amazon is an option - anyone find anything else? A kit with all this stuff would be nice but Amazon is only showing me T9 rather than the TR9 when it comes to the kits they sell
Edit: bought this bad boy
I have this set. Great little set.
I am still waiting on my kit but I like you did some research and was told to make sure you have a 4mm hex bit along with the proper size screw driver. This is the tool kit that was recommended:
https://www.amazon.com/gp/product/B009MKGRQA/ref=oh_aui_detailpage_o01_s00?ie=UTF8&psc=1
Just did this myself.
A couple tips.
Here's the clear shell: https://smile.amazon.com/gp/product/B075JJ2KH5
Get this screwdriver kit: https://smile.amazon.com/gp/product/B009MKGRQA
Precision tweezers also help a lot.
You'll need 3 bits out of that kid and the little plastic tool that comes with it.
That's it!
Not really sure what your budget or needs are, but a palm sander (also called corner or detail sander) might work for you. They are relatively inexpensive and the sanding pads are too. I've used a Harbor Freight one almost daily for many years for many different types of projects.
Here's a decent one from Amazon
Whatever sander you decide on, an essential add-on is a gum rubber sandpaper cleaner. I went for years always replacing the sandpaper when it got clogged until I discovered that I could clean them over and over, and save a lot of money.
Hope that helps!
I use a dry, stiff-bristled brush to get the big chunks, and one of these for the rest.
Soap and water would probably be ok if you're careful about it, but it's kind of unnecessary.
Agreed. You get more for your money, e.g.: https://www.amazon.com/gp/product/B00AJW0CY8/ref=ox_sc_act_title_1?smid=ATVPDKIKX0DER&psc=1
You can get special bits on amazon. Like these https://www.amazon.com/Neiko-00823A-Diamond-Drill-Piece/dp/B00ODSS5NO/ref=sr_1_6?keywords=drill+glass&qid=1569519750&s=gateway&sr=8-6
https://www.amazon.com/dp/B00ODSS5NO/ref=cm_sw_r_sms_c_api_HU8-yb2HD7P35 these have been perfect! Just stop every minute or so or if you hear squeaking and pour water on the area you're drilling and you're good to go.
Unless your wet saw has an actual specified "glass blade", you might find it will chip the glass as well as the backer paint. Not to mention being really slow. You'll find a Score and snap tile cutter much easier to cut that glass with. Cleaner cuts and way quicker.
Start in any corner. Throw the odd level line on with a pencil as you go up. And don't use mastic (glue). Use a white thinset with a 3/16ths" V-notch.
Use one of these bits to drill your holes. Hold a wet sponge against the bit as you drill. Shouldn't take more than 30-60 seconds per hole.
Yes! Do it. I was riding that high for days drilling holes in everything. I know for a fact my boyfriend is hiding mugs and glasses from me but cant prove anything yet.
I bought a big glass fishbowl, drilled a hole and put my fern in it.
You can drill holes in the rims of pots and hang them with twine and s hooks. I’m still realizing the full potential.
For reference, I bought a $40 black and decker hand drill and these drill bits:
https://www.amazon.com/Neiko-00823A-Diamond-Drill-Piece/dp/B00ODSS5NO
I start the drill out on full blast with barely any pressure and then apply greater pressure gradually. Always keep water on it as others mentioned. Hope that’s helpful and good luck :)
I have this bit set which was super cheap on Amazon, and I have used those to put drainage holes in TONS of ceramic pots! It's super easy, I spray water on them to keep the temp down while drilling, and take it at a medium speed.
My tip for starting the hole (that's the hard part), is to start at an angle, get a groove in it, and slowly tilt the drill up until the circle is flat on the surface. I haven't broken or cracked one yet. :)
Do you struggle to finish an entire growler? I'm trying to understand how 4 pints of beer is hard for a group of people to finish. Getting past that point. What are you trying to accomplish by having a pressurized growler? Prevent oxidation?
There are carbonation caps which you can do almost what you want. Although I'd use a 2 liter soda bottle and put a pickup tube that goes down to the bottom.
https://www.amazon.com/Happybrew-325-Stainless-Carbonation-Bottles/dp/B00V334SME
My setup is something like this:
Homebrew shops generally carry the tanks, and can fill them for you. You're probably looking at $120-$150 initial cost, but your cost per carbonation is pretty close zero: just the cost to refill the tank.
With this setup, you carbonate directly in plastic soda bottles. I generally use seltzer bottles, since they don't have any residual flavors in them, and they're designed to hold the pressure.
Transfer whatever you want to carbonate into a plastic bottle (about 3/4 full). Get it as cold as possible: for sodas, that's as close to 32-F as you can get; for cocktails, it's maybe 20 to 25-F. Squeeze the excess air out, screw on the carbonator cap, attach the gas hose, and shake the hell out of the bottle. Release the pressure (carefully; some mixtures can foam a lot), and repeat once or twice if you want really strong carbonation. For water, I usually carbonate around 35 psi. For cocktails, closer to 45 psi.
To bottle cocktails or sodas once they're carbonated, you can use 187ml champagne bottles and an inexpensive bottle capper. Your local homebrew shop probably carries both.
I always bring a few items to every show I do to prevent those "oh shoot!" moments:
Ninja edit for links and more detail.
Tofu press!! Like this one . Works way better than paper towels with none of the waste.
Edit: scratch that first link the UK version is like £40!!! This one is more reasonably priced the only downside is that it presses less tofu at a time.
I have this one and it’s great and makes no mess. It’s easy to drain and works well. Tofu Press - a unique and stylish tofu press to transform your tofu by Tofuture https://www.amazon.com/dp/B01698J0RU/ref=cm_sw_r_cp_api_i_5ui1Cb3J8XBHC
This will save you more trouble beside a PS4 .https://www.amazon.com/Oria-Precision-Screwdriver-Professional-Electronics/dp/B01E16J6RQ/ref=sr_1_3?ie=UTF8&qid=1494717438&sr=8-3&keywords=screwdriver+kit
This ORIA Screwdriver Set, Magnetic Driver Kit, Professional Repair Tool Kit, 60 in 1 with 56 Bits Precision Screwdriver Kit, Flexible Shaft, for 8, 8 Plus/Smartphone/Game Console/Tablet/PC https://www.amazon.com/dp/B01E16J6RQ/ref=cm_sw_r_cp_api_i_hr0vCbWAS8NP4
Amazon sells a ton of sets like this for cheap. I keep one in my gun toolbox and one in the 'junk drawer'.
https://www.amazon.com/Oria-Precision-Screwdriver-Professional-Electronics/dp/B01E16J6RQ
This is the kit I used, comes with everything and more for a fraction of the price.
You could probably buy the two as a set on eBay for like $7. Or for double that you could get yourself a nice screwdriver set. This is the one I have.
If you do electronics stuff fairly regularly, I'd recommend one of the ifixit kits. They're kinda pricy but really high quality bits.
You can get cheaper ones that are still pretty good like this screwdriver kit for $15, https://www.amazon.com/ORIA-Screwdriver-Professional-Precision-Smartphone/dp/B01E16J6RQ/ref=sr_1_4?ie=UTF8&qid=1525454044&sr=8-4&keywords=Screwdriver+kit
Or if you want one with every little tool you could ever possibly need this is a good deal for $35. https://www.amazon.com/ORIA-Precision-Screwdriver-Magnetic-Electronics/dp/B06Y2N568J/ref=sr_1_2_sspa?ie=UTF8&qid=1525454044&sr=8-2-spons&keywords=Screwdriver+kit&psc=1&smid=A2FOADTO08BQD0
Just don't get one of the sub $10 kits that come with all sorts of extra junk, those bits and tools are really low quality in my experience.
You can fix them yourself easy, the disconnect problem isn't a bad antenna, it's the fact that there's nothing to insulate the antenna from interference. Takes just a few minutes to fix.
Here https://youtu.be/qzM1gqrRoqA If you have a little piece of conductive foam you can use that, this guy uses a piece from a different part of the joycon, which is super convenient, or you can use a new piece if you have some, or you can use a little piece of foil wrapped in electrical tape, that's what I did. But following this guy's video should work the same. I did this fix over a year ago, and have had no lag or sync issues since then.
I used this tool kit https://www.amazon.com/gp/aw/d/B01E16J6RQ
You need a flexible shaft rotary tool and a place to use it that you can gently run a trickle of water on the area being cut. I've seen a shower stall pan used, it has a large flat surface with a drain in the middle. http://www.amazon.com/gp/aw/d/B0000302Y8/ref=redir_mdp_mobile
[panavise 350] (http://www.amazon.com/PanaVise-350-Multi-Purpose-Work-Center/dp/B00011QA0M)
I use them for work and once I picked up the hobby got one for home use. Not too big for a desk, able to solidly grip even big locks, adjustable angling, built-in tray for picks and wrenches. Highly recommend!
Get a nice panavise: http://www.amazon.com/PanaVise-350-Multi-Purpose-Work-Center/dp/B00011QA0M/ref=tag_dpp_lp_edpp_ttl_ex
Great choices! Although I might be biased, lol.
That's a good selection of padlocks as well.
I'd recommend visiting a thrift store/habitat for humanity/etc to see if you can find a really cheap double-sided deadbolt for less than $10. You can take the pins out and play with it in a configuration that only has 1 pin, then 2 pins, then 3 pins, etc. That will help a lot as you first start to learn and understand feedback.
Vises are really nice, but definitely not necessary, especially for padlocks. I started picking locks 7 or 8 years ago and I only just bought my first vise, a Panavise 350. At $89.99, it is not cheap, but dang it is nice. There are cheaper vise options, but I would have to let someone else chime in.
If there is clearance on the bottom for the plates this is a good option. Otherwise, if you have a drill you could get a small Kreg jig for doing pocket holes and use that for the but joints.
amazon link
You're willing to spend over $100 on the multple 3/4" plywood sheets for the build but you can't spend $20 on the jig to put it together?
Check this out http://www.amazon.com/gp/aw/d/B00065WPP2/ref=mp_s_a_1_1?qid=1419211383&sr=8-1&dpPl=1&dpID=41E7C63NTJL&ref=plSrch&pi=AC_SX200_QL40 . its not a super fine woodworking tool, but its simple and will allow you to join boards cleanly.
Surface corrosion, as you've already figured out, can usually just be polished away. Rather than putting toothpaste on your guitar consider getting a set of micromesh sandpapers that go from semi-coarse all the way up to a leathery smooth 12000 grit. Use blue painter's masking tape to cover up the wood between the frets and get to polishing until they shine like mirrors. Preferably after leveling and recrowning to get the most out of the effort to mask off the neck.
As to WHY this is happening I couldn't say for sure. I've never experienced any FRET corrosion before but some people have issues with string corrosion simply due to their own biological chemistry. If your sweat and skin oils are especially acidic they will eat strings for breakfast. The bass player in one of my bands used to play rhythm electric in the group and he can look at a guitar from across the room and get the strings to start corroding. I helped him restring his guitar once and the strings were BLACK. Not dirty. BLACK.
Either that or you're just in a really humid environment and there's moisture in those gig bags. As has already been commented here just let them breathe out of the bags.
Anyway... ah... if that's your deal you can just try washing your hands before you play and make a point to wipe everything down when you're done before you put it away in the case. And also don't store your guitars in a chemical refinery next to all the caustics.
I agree with the sandpaper but then you can follow it with these pads called micro mesh that go from 1,500-12,000. It should be pretty smooth after that.
> The Lathe:
Sounds like you've got this well under control.
> The Tools:
There are very split camps on tools: replaceable carbide tips vs traditional tools. Personally I think both have a place, but I do feel it's best to start with traditional tools to learn the how and why tools work the way they do. My personal opinion is always to spend the real money on good tools. They don't have to be expensive, but the right tool of the right quality (sharp, of course) will make all the difference in the world. Every try to dig a post hole with a hand trowel? :)
Also don't feel bound by just one brand or type of tool...most of us have lots of tools!
You can go with carbide-tipped tools such as Easy Wood Tools, Simple Woodturning Tools, or other brands. You can make your own for a fraction of the cost to buy.
There are a few of good entry-level HSS sets out there for about $80, such as this frequently recommended set of Benjamin's Best. I also like Hurricane brand tools which I feel are excellent entry-level HSS tools for the money. Either of those would serve you well through the learning curve and a good ways into your turning career.
If you wanted to pick just two higher-end tools, I feel Crown's Pro PM are good for the price. I own several, they're nice, but the handles are a bit short for my knuckle-dragging frame! All you really need for the projects you listed is a skew chisel and a spindle gouge.
Lastly, you could buy some of the popular "buy it for life" tools like Thompson Lathe Tools or D-Way Tools. These are widely considered the upper end of turning tools with each tool running between $55-200 (handles sold separately). Many people who get serious about their hobby end up with these tools because the harder tool steels are more durable.
> The Bench Grinder:
The Rikon 80-805 is the most common good deal for a grinder. Occasionally some other Asia-import will pop up on the scene for a little while, but the Rikon is pretty predictable about going on sale. Also, it comes with two decent wheels to get you started; not all import grinders come with decent wheels.
Eventually you might want to invest in CBN wheels to replace the frangible wheels that come on the grinder, but that's probably down the road for you.
Lots of people use that grinder, I've not heard anything outright bad about it (although some people prefer one with more HP).
> Drill Press?
A cheap drill press will get you there just fine.
The most common alternative is to purchase a 4-jaw chuck, such as the Nova G3 (which requires the appropriate insert), and also a set of pen drilling jaws and a drill chuck for the tailstock. That lets you drill blanks entirely on the lathe (and with better accuracy than a drill press IMO).
The downside is that the 4-jaw chuck, insert, jaws, and drill chuck collectively will cost damn near $200, which is a lot more than a cheap drill press. The upside is that the chuck is exactly what you will need if you decide to get deeper into turning and want to try bowls, boxes, and other things. Many of us already owned or planned to own a chuck, so the only real cost addition was the pen drilling jaws and the drill chuck.
> Pen turning attachments
If you plan on using something else for the finish, make sure you buy what you need.
These two things and some tape are all you need for beautiful headlights. You go through the levels from coarse to fine sanding in alternating directions, vertical with one pad then horizontal with the next. You only need to use 4 or 5 pads, I went through the whole set the first time and found the last couple to be too fine to do much. Clear coat after they're sanded and dry and your good to go for years to come.
2 inch by 2 inch Micro Mesh Soft Touch Sanding Pads
https://www.amazon.com/dp/B000H6EC4C/ref=cm_sw_r_cp_apa_i_TuITCbWP205TA
Meguiar's G17804 Keep Clear Headlight Coating
https://www.amazon.com/dp/B01M4RVVX6/ref=cm_sw_r_cp_apa_i_6wITCbNGG9B7W
I noticed that the writing edge has a slight curvature to it. Did you use a squishy surface like a "pad" to do the grind or something with a solid surface like a stone? I've found that pads don't make the writing surface fully flat and you might want to try with a solid grinding surface in case you want to try on a steel nib in the future. I've found my results to be far better on my whetstone compared to my micromesh pads
Soak it up really well with a penetrating lubricant. I'm fond of PB Blaster and Knock 'er Loose. Soak it well over several days. Then, gently heat the outer section with a torch, and twist.
Alternatively, you can use a jack to separate them. You'll need a way to attach to both sections, with a grip of some sort, then just use the jack to drive them apart.
Say hello to my little friend.
WD-40 is great for some things, like moisture displacement and cleaning rust. It is not a penetrant, so it won't eat it's way into the corrosion (if there is much) on the threads.
PB Blaster is technically a penetrating catalyst, it's entire purpose is to penetrate into things and allow you to break them loose more easily. It actually pulls itself into the crevices and lubes things that WD-40 would never get to.
You drill into it with a reverse (left handed) drillbit, running your drill in reverse. That will probably bring the bolt out, but if it doesn't you use an Easy Out screw extractor to screw it out. Here is a kit with both left handed bits and extractors. You can get individual tools at a local hardware store. Soak it well wit PB Blaster first.
Also, soak the bolts in PB Blaster. I swear that stuff is straight magic.
http://www.amazon.com/Blaster-16-PB-Penetrating-Catalyst-oz/dp/B000I2079E
A lot of people are saying leverage, which will work. Alternatively, go with a power tool! Find the right sized bit (no idea if any of that set matches) and an impact driver and you should be able to unscrew it without much difficulty (after much soaking in penetrating oil).
Seriously, replace them for your boat kit. There's a lot of overlap with rock climbing, and any safe climber will tell you that exhausted gear like this should be retired from your active kit because someone might inadvertently use it.
I know the situations where you'll need a 23kN carabiner on the river are vanishingly small, but you don't want to risk it. Corrosion is insidious, too, and you might not be able to tell how much strength has been lost by visual inspection. If you've got a biner on the river or crag, it should be able to be used for all original purposes (even if it's marked) so that you don't accidentally use a bad biner in a critical situation.
If you're going for non-survival use, PB Blaster is insanely useful, as any mechanic working on cars in cold-weather climates can tell you.
Conceivably, if you're a dab hand with a blowtorch, heat and vicegrips could get the job done, but you really, really, really can't use them for anything safety related if you do that.
Read up on freeing stuck bolts on cars; I think it's your best bet. Don't use those biners in your gearbag, though.
Try some pb blaster on all the moving metal joints. They could be rusted or otherwise frozen with grime.
What tools do you have?
For longevity target rust. Sand, grind, scrape it down and paint it with hightemp paint. You can replace the grates if you want just search cooking/grill grates on Amazon and you'll probably find something that fits. Personally I'd replace the handles. I hate a grill that feels like it wants to crush my hand when I'm taking a peek or sticking in a temperature probe.
IF I were cleaning it up I'd take this to it, inside and out, and repaint the whole thing. If you don't have an angle grinder a Drill version works (preferably with a cord, batteries don't last that long). I'd remove/replace all wood (handles particularly), hardware, screws, bolts, anything that comes off. Maybe something with the hinges, probably some PB Blaster to break up that rust then some WD40 to coat/lubricate whats left.
To use it, clean off the grates and smoke something, it's usable as is. Get it nice and hot then bring the temperature down and let it go. You may find that it is to big/small for you. People underestimate the charcoal and wood required to keep a smoker this big going. I personally couldn't use one this big, smoking 3 times what you eat sounds good til you throw away good brisket or ribs a week later. If you want to smoke as much as possible get the smoker that makes it easy, not the one that feeds your extended family once a year. For free, just use it and see before you invest time/money.
At the time I thought this was an "experimental" cabinet. I had never built a cabinet with drawers before. I used the cheapest slides available, these things.
Don't do what I did. It's not a good place to save money. Instead, spend a little more and get some sexy ball-bearing ones.
My drawers open and close fine, but they have a cheap feel to them, and I suspect that they won't work as well in the long run. Additionally, they were a massive pain in the ass to get adjusted correctly.
Also, I used 3/4" (ish) pine ply because I couldn't find maple at my local home depot, but doing it again I'd look harder and use maple. Again, I wanted to use the cheap stuff because this was my first cabinet, but it was a silly place to save money.
The sweat that goes into making your own cabinet, even a cheap one, is well worth spending a little more on better materials.
That being said, I'm proud of mine. Which reminds me-- I should probably empty them out and put a few more coats of poly on there.
All of the cuts were made with my Festool track saw (it would have been easier with a table saw, but I don't own one) and the "handle" holes were drilled with a forstner bit and the joinery was done with the Kreg Jr. pocket jig and screws.
It probably would have gone just as well with a nail gun and glue, if you don't mind putting a little putty in the nail holes.
EDIT: I just posted a gallery of my process pics. It's not super comprehensive, but I'll be happy to explain anything that doesn't make sense.
The other commenter is right on - this is the Jon Sine Desk.
A few things I’d note:
Hope this helps. Happy to help with any additional questions you might have as you get into it. The project was a lot of work but has a very rewarding end result :-)
Here are things from my wishlist (past and present)
Wera Screwdrivers
https://smile.amazon.com/dp/B0085NTQJK/
Oscillating blade set:
https://smile.amazon.com/dp/B0109SELWA/
Clamp multimeter:
https://smile.amazon.com/dp/B00NWGZ4XC/
Kreg Jig Jr.:
https://smile.amazon.com/dp/B000J43A7W/
Angled Long Nose Pliers:
https://smile.amazon.com/dp/B00N3VSS4S/
Groove Lock Pliers:
https://smile.amazon.com/dp/B000FK1R0W/
11 ft wifi endoscope:
https://smile.amazon.com/dp/B01MYTHWK4/
non contact voltage tester:
https://smile.amazon.com/dp/B001UAHZAM/
claw nail puller:
https://smile.amazon.com/dp/B0015YPJMY/
Workmate portable work bench:
https://smile.amazon.com/dp/B000077CQ0/
Cable snake fish tape:
https://smile.amazon.com/dp/B000BP7WBO/
9 Outlet metal power bar:
https://smile.amazon.com/dp/B00F8ZQY5M/
Spade drill bit set:
https://smile.amazon.com/dp/B00099E7WE/
36" bubble level:
https://smile.amazon.com/dp/B000UKMWMO/
Neat! I already have a Kreg R3 Jr. but now I wanna print this just to have another one!
For most hobbyist level users an r3 jig will be plenty good enough. Unless you are making cabinets all day you don't need the full size jig.
You'll probably want a c-vise grip, kreg makes one or you can get an r3 deluxe kit that comes with it, but harbor freight has one that's just as good for like $6.
I have both the k5 and r3 kreg jigs. I probably actually use the r3 more and there is nothing the k5 does that the r3 can't, the k5 is just faster if you need to drill a hundred pocket holes for a cabinet or something.
Get an 18mm or larger forstner bit and a depth gauge or drill guide. http://www.rockler.com/jig-it-drill-guide or like this https://www.amazon.com/Wolfcraft-4525404-Attachment-4-Inch-8-Inch/dp/B000JCIMEA/ref=sr_1_1?ie=UTF8&qid=1484608162&sr=8-1&keywords=drill+guide
and one of these: https://www.amazon.com/CMT-537-180-31-Forstner-32-Inch-Diameter/dp/B000P4HLGC/ref=sr_1_1?ie=UTF8&qid=1484608191&sr=8-1&keywords=18mm+forstner
It might be worth while getting a bit slightly oversized for epoxy squeeze out or magnets with holes for screws in the center to hold everything in place.
Not the best option, but, it is relatively inexpensive, and will get to you in 2-days:
Wolfcraft 4525404 Drill Guide Attachment for 1/4-Inch or 3/8-Inch Drills https://www.amazon.com/dp/B000JCIMEA/ref=cm_sw_r_cp_api_i-ptxb4CC034N
Perhaps this will get me flamed here for doing things the wrong way but it's working for me on my table-less setup (currently making a router table and saving up for a table saw so I can avoid relying so heavily on these techniques in the future).
A table saw is probably what you need to do this properly but this is sort of a "poor mans fence".
My current workaround is to draw my cut line, and then clamp a straight edge ruler (or other material that's perfectly straight) 1" to the side. When I make my cut I know it will be perfectly straight if I keep the metal guide flush to the clamped piece the entire time.
This is also how I'm using my router with straight bits to make dado cuts (measure up 2 3/4" from the center line for my router guide)...I know there are probably better ways to do this but again, no table saw so I'm making due with what I know and what I've got.
http://www.amazon.com/dp/B007K5HIFS/
http://www.amazon.com/dp/B000JCIMEA/
Those are both probably tools/adapters which are not going to be better than a table saw or drill press but they're also appealing for those with limited budget or limited work space.
https://www.amazon.com/Wolfcraft-4525404-Attachment-4-Inch-8-Inch/dp/B000JCIMEA
Impact driver?
https://www.amazon.com/TEKTON-2905-8-Inch-Manual-7-Piece/dp/B000NPPATS
Impact screw driver, it's a tool you put a bit in (i.e Phillips or torx in BMW's case) set the direction, and give it a whack with a hammer. 99% of the time the rotor carrier screw comes loose. Here's one on Amazon
Big tip - only cars with wheel studs (Germans and now FCA vehicles) need the screw re-installed.
Domestic and Japanese using wheel nuts, use the screw to hold the rotor in place while the vehicle is being built, (so a rotor doesn't fall off the car and hit a factory worker) apart from that it doesn't really serve a purpose.
You can get away without using it on the German cars too, but you have to make sure if the bolt snapped that it's flush with the hub.
It's really annoying trying to get the stud through the wheel then the rotor and then to the hub with out the screw holding the rotor in place.
You need one of these: https://www.amazon.ca/dp/B000NPPATS/ref=cm_sw_r_cp_awdb_t1_MbX3Bb9Y8YFD0
May be too late now that you've drilled it, but for next time these are magical.
TEKTON 2905 3/8-Inch Drive Manual Hand Impact Driver Set, 7-Piece https://www.amazon.com/dp/B000NPPATS/ref=cm_sw_r_cp_apa_i_rp.ZDb3MSFFNV
You need one of these.
Not op, but it is not hard at all. Just takes some common sense and the proper tools. I highly recommend this pocket ratchet off Amazon. It is very helpful with the tight spaces. https://www.amazon.com/dp/B000XYOUS6/ref=cm_sw_r_cp_apa_i_LnC6Cb0ZVA1PR
There's this, slightly more sleeker: https://www.amazon.com/Neiko-03044A-Ratcheting-Screwdriver-Close-Quarters/dp/B000XYOUS6/ref=sr_1_7?ie=UTF8&qid=1502386666&sr=8-7&keywords=bit+driver
Or, if you don't have a multi-tool yet, grab a Skeletool or Wave and the Leatherman bits.
I use Boeshield T-9 pretty frequently. It does a fine job. Of course it would be a bit time consuming to treat everything with t9 everyday. So I also keep scotch brite pad with my gear to knock off the rust that inevitably appears here and there.
For rust prevention - I use Boeshield T-9 on all my iron tops (actually, on anything that rusts) - it is a good deal easier to put on, lasts longer than wax and is very effective.
I do use paste wax over the top of the T-9 to make it more slippery.
> WD-40 is not a lubricant.
So many people don't understand this.
I've been using Boesheild T9 for years after a friend recommended it. He races bicycles and this is what many riders use on their chains. The waxy finish doesn't get flung off like wet lubricants and it doesn't attract dirt.
Yea it's electric. It's not really a nail filer though... more of a rotary tool for general use. This is the model I have. It comes with a lot of different attachments: wire bushes, sanding drums, grinding stones, grinding wheels, small rotary files or burrs, maybe some more stuff so it's pretty useful around the house too.
My mom got me into it because she's involved with greyhound rescue groups and their nails are in really bad shape when they come off the tracks. Using clippers, they had way too many blood-spraying, dog-helping-in-pain-accidents. Clippers are easy to overshoot your intended cut and cut the quick and they're also known for splitting nails in half or muliple pieces, either right when you cut it or if they snag a small piece on the carpet it can rip off the splintered part of the nail.
My mom swears by [this extension](
http://www.amazon.com/Dremel-225-01-Flex-Shaft-Attachment/dp/B0000302Y8/ref=pd_bxgy_469_2?ie=UTF8&refRID=0HS02GVFVQ5Z8AQDSF7G) that allows the noise of the electric motor to be a few feet away. I don't have one these.
Then when you run out of sanding drums that came with your dremel, you can but a lifetime supply for [$8.99]
(http://www.amazon.com/TEMO-sand-coarse-Mandrel-dremel/dp/B00564U22G/ref=pd_sim_469_10?ie=UTF8&dpID=41G2GNphVlL&dpSrc=sims&preST=_AC_UL160_SR160%2C160_&refRID=0YAGTNM5J58CC1PVN0B9)
Edit: Dremel must have caught on, they now sell a specific pet grooming model. I can't speak for it but it looks quite a bit smaller than mine, I'll admit mine is a little overkill but I use it for other things too.
What are you doing with the Dremel? The only time I use it like a pen is for engraving & I use the flex shaft attachment. Anything else is either a vertical or horizontal grip & not at all pen-like.
I know Foredom is (or was) the "go to" option for woodcarvers and others doing similar work - but like all high-end tools, it comes with the price tag. Likely to last forever, but also might be overkill for model-making.
I ended up getting the flex shaft for the Dremel:
https://www.amazon.com/Dremel-225-01-Flex-Shaft-Attachment/dp/B0000302Y8
Does the job, and easier than holding the Dremel for fine work. You can get the adjustable 3-jaw chuck on there, otherwise it has a chuck with interchangeable inserts.
Does all I need it to do in terms of sanding, grinding, drilling, etc - and was a cheap option as I already had the Dremel, which may not be a factor for you. You then have the option of using the Dremel as a handheld tool for other jobs.
Wow! At first I thought the branch was real until I read your comment about the leaves being maple with green sharpie.
Do you ever use one of those dremel flex shaft attachments? Like these: https://www.amazon.com/Dremel-225-01-Flex-Shaft-Attachment/dp/B0000302Y8/ref=sr_1_3?keywords=dremel+attachment&qid=1557652236&s=gateway&sr=8-3
there are at least 2-3 of this (almost) exact model with different brands floating around on Amazon, most likely sourced from China.
The one good thing this has is a "flex shaft" which I've purchased individually and higher quality versions of.
It is really helpful for getting impossible to reach spaces (like inside a PC case) or anything around your house.
And for you Dremel fans, Dremel has a nice flex shaft extension:
https://www.amazon.com/Dremel-225-01-Flex-Shaft-Attachment/dp/B0000302Y8/ref=sr_1_5?ie=UTF8&qid=1491852439&sr=8-5&keywords=flex+shaft
A dremel maybe? I'd make a little jig for the extension cable (see amazon ) but there's Dremel brand adapters & tools you might be interested in.
> Acastus Knight Porphyrion
I'm not sure about that one. It's a mighty big model, but it's leg assembly seems to be more like a knight titan, than a cerestus or warhound. It doesn't have the inverted knee like the other knights do. No idea what cabin assembly is like either. The warhound cabin is a bunch of huge pieces, I don't know of anything that can prepare you for it. I used about 20 rubber bands while I was building, to make sure it all held together and looked good before gluing. There is a pic of my warhound WIP below, you can see how it's legs have 3 segments, making a forward joint, and reverse joint. Standard Knights and the porphyrion only have a forward, and Cerestus only have a reverse. The only non +warhound models I know of with similar 3 segment opposite joint style assembly are the decimator and I believe the kytan daemon engine.
For pinning big ass models, I still use paperclips. However instead of pinning straight across a joint, like you might on infantry, I go through the joint from the outside. You can see some paperclips under the warhounds foot. There is one in each toe that goes all the way through, so if the warhound wants to move, the pin must be pulled out. That is the only place I pinned the warhound though. I used big ass magnets on the head, torso, and arms so I could do this to transport it.
My knight titan has 3mm neodymium magnets in each arm. They are the same ones I use on marines, dreadnoughts and just about everything. They hold knight weaponry up decently, but some people prefer larger ones. You can get bulk magnets on ebay much cheaper than the hobby store, but if you don't want to wait, go to a hardware store, as they are still cheaper than hobby store.
I believe this dremel is the new version of the one I have. The flex shaft attachment makes life so much easier. A basic drill bit set is good for getting started, but make sure it has the same size as the magnets you use. I've started using jewelry bits for mine, and they are insane good. However the larger ones (1.5mm-3mm set) are difficult to use, as they cut more than bore. Just last night I couldn't keep a handle on the arm bit I was drilling, ended up flying across the room. On resin they are easier though. I bought a set of cutter bits from the hardware store. It was all spherical tip and tube tip of various sizes. It has been very useful for battle damage, and the tube tip is how I widen holes for giant ass magnets.
The real MVP of a dremel for hobby conversions and building has been the circular saw bits I got mine from a wood carving magazine, and they are paper thin. Not 100% about these ones, but they are great for precision cuts and removing chunks of resin.
Flush cutters. This pair and this pair are the industry standard workhorse. Absolutely essential tools.
PanaVise clamps are a must have. This one and this one are my favorites.
A manually operated solder sucker will be an important buy as well.
Thanks! Here’s a link
It's a PanaVise 350 I bought of Amazon: PanaVise 350 Multi-Purpose Work Center https://www.amazon.com/dp/B00011QA0M/ref=cm_sw_r_cp_api_SDawzbDDR5TEB
Hope that helps...
The Panavise 350 that Bill uses is on Amazon for about $90. It comes with the tray base for that.
PanaVise 350 Multi-Purpose Work Center https://www.amazon.com/dp/B00011QA0M/ref=cm_sw_r_cp_apa_3nHOAbAD0Q7GR
There are other, cheaper models of Panavise on Amazon, one for $26 and another for $50 if I remember correctly.
The BosnianBill special - Panavise 350.
http://amzn.com/B00011QA0M
Spend a few bucks on a pocket hole jig. You want to avoid screwing into end grain on most places. A basic jig will be about $20 and will work just fine.
A square clamp is also handy, but not necessary.
Sand the pieces before assembly will save you some trouble of sanding in the corners.
Wood glue will add a lot of strength, spread it evenly, screw the pieces together. Then use a rag with a little white vinegar to wipe off any glue that presses out before it dries.
Kreg MKJKIT Mini Kreg Jig Kit https://www.amazon.com/dp/B00065WPP2/ref=cm_sw_r_cp_apa_xvrIAbVMZ9N52
Can-Do Clamp https://www.amazon.com/dp/B000LJNJNU/ref=cm_sw_r_cp_apa_6xrIAbVATMDX4
You can't rent a pocket hole jig, but they run about $20 for the cheapest one. You'll also need to get a locking clamp situation, and you can get some ideas on clamps here. The one Kreg hocks is most ideal, and it runs around $30.
I don't know if Home Depot rents circular saws, but you can check. Considering that their rental tools are always beat to crap, you may be better off getting the cheapest Ryobi they offer, which is about $40.
I know this flies in the face of this subreddit, but if your goal is to have something like that stand for pretty cheap, I'd just buy the stand you posted or get something similar you like from Ikea. There's an entry level cost to building anything. I know, it sucks. You can fit this whole design onto a half sheet of MDF, the sides and top just won't be as thick, and it will run you around $19. But I'd still get a full sheet so you can make that circular saw jig. I'll tell you, though, that making a piece of stable furniture out of MDF is going to be a task in and of itself since it's basically a big sheet of compressed and glued sawdust.
You're better off doing it with plywood and screws, and there's a cost to be had with the screws and whatever paint you use.
Hopefully that helps! Maybe! Possibly!
You really don't have a lot of choice in order to support a desk that tall, the leg joints will have to be the strongest part of the desk. L Brackets won't work.
You don't need fancy joints, but you do need strong ones and you will need bracing on the legs. You could get a Pocket hole jig like this This allows you to join to panels fairly easy and strong (use glue also).
You could build a desk like this without the drawer only using the pocket joints.
Here ya go: http://www.amazon.com/gp/aw/d/B00065WPP2?pc_redir=1405319666&robot_redir=1
I've gotten a couple set s of this over the years.
I honestly dont make them myself, i have just watched a bunch of videos. But this guy is amazing at resin work. He recomends Micro Mesh and i know it would be perfect for this. Bit pricy though, but it will SHINE!
Afraid I didn't take any, but these are the sanding pads I used.
https://www.amazon.com/MICRO-MESH-SOFT-TOUCH-SANDING/dp/B000H6EC4C
Other than that, it's nothing fancy, just some light pressure and fast movement.
It's normal. Happens on more expensive watches too. Yes, you can try to polish them out, but you may need something more aggressive than cape cod. (I've used small jeweler's polishing pads like these to great effect https://www.amazon.com/dp/B000H6EC4C/ref=cm_sw_r_cp_apa_i_q8RMDb9WW3A5Q)
I reccomend you be more aware of your watch and try to not bump it if these concern you.
I'm not a fan of buffing the peen job. Too easy to heat the pins and collars. Worse case is they get hot enough they melt into scales.
Even if get a little warm, they pull into the scales, loosening up the pivot pin. Now all the work to make a tight pivot is lost.
Also the washers/collars are thin metal. Often a collar loses a little metal. That leaves a collar that is not a true circle.
What I do like is MicroMesh. If not familiar, it is sort of like sand paper from 1300 to 12000. Just kiss the media to the heads for about 30 seconds on each head. Leaves a very crisp looking pin, with no distortion. If scales are scratched, do the complete scales.
If any delicate adornments on the scales, you might not want to do the scales.
Edit-they make a kit that has liquid polish to be used at 12000 and a soft polishing cloth. On the phone, so can't find the complete kit right now, but here are the pads alone
http://www.amazon.com/gp/aw/d/B000H6EC4C
If you are trying to free up sticky, the best thing I have found is PB Blaster Penetrating Catalyst http://www.amazon.com/Blaster-16-PB-Penetrating-Catalyst-oz/dp/B000I2079E. Be sure to have a pair of rubber gloves and lots of ventilation. Be very careful not to let this get on plastic. I'd spray a little bit down where the typebar goes into the element and work the key until it is smooth up and down. Wipe off the excess and let it air out for a day or so. You should be good to go. A little goes a long way. This has freed every sticky machine I've ever dealt with. Regarding lubrication, I guess I'd say the lighter the machine oil the better - http://www.amazon.com/Liquid-Bearings-EXTRA-LONG-synthetic-movements/dp/B00CD814RA/ref=sr_1_4?ie=UTF8&qid=1396799365&sr=8-4&keywords=clock+oil+kit
My first job as a mechanic was working on mostly pre-'86 cars and trucks. My boss handed me a can of this awesome stuff called PB Blaster and since then, I always give rusty bolts a good soaking in it before making attempt. I have never broken a bolt off since and all I work on are '60's and '70s Mopars and frequent junkyards. I hope this helps
Make sure you are using a screw driver where the head fits nicely into the screw. If you use one that doesn't fit well it will be much more likely to strip it.
Use pb blaster. WD40 is junk.
Another thing you can do is to put the screw driver into the screw and tap it with a hammer. The idea is to break loose rust or other stuff holding the screw in place.
These 2 things are from years of fixing cars. the other thing I do with cars is to apply heat. Usually with a propane torch. This expands the metal and breaks any rust holding it in place. but I have a feeling that it wouldn't work well with nintendo's plastic case. ha
https://www.amazon.com/Blaster-16-PB-Penetrating-Catalyst-11-Ounces/dp/B000I2079E
https://www.amazon.com/Blaster-16-PB-Penetrating-Catalyst-11-Ounces/dp/B000I2079E
https://www.amazon.com/Blaster-16-PB-Penetrating-Catalyst-oz/dp/B000I2079E
This is your friend on vehicles with rust. There's a few variants of this, but this is on the the better more available ones, that isn't stupid expensive
PB B'laster. Cheaper than WD-40. Its got a hell of a warning label on it so you know it's good. Not to be used by pregnant women.
http://www.amazon.com/Blaster-16-PB-Penetrating-Catalyst-oz/dp/B000I2079E
Its a pretty good penetrating lubricant. you can find it pretty much anywhere. its what I have on my shelf at home, but your choice of penetrating lubricant would probably be just fine.
The hood latches tend to seize up over time, especially if you don't lubricate them occasionally. Had the same problem on my Mk5 Jetta. If it's seized and not a broken cable, you can generally fix it pretty easily.
You need three things: a small screwdriver, a can of lightweight break-free lube like Liquid Wrench or PB Blaster penetrating oil, and a can of spray lithium lube.
Pop the safety latch and prop the hood. Locate the hood latch assembly. Using the precision tube on the spray lube, saturate the inside of the latch and latch plate with the penetrating oil (try to keep overspray from rubber parts). Let sit for 30 seconds or so, and then press on the open side of the latch with the screwdriver until the latch plate releases and locks. Pull the hood release in the cabin to reset. Repeat several times until the latch snaps closed freely when you press on it with the screwdriver. Respray with penetrator if necessary.
Use a shop towel to mop up as much penetrating oil as you can and spray the entire inside of the latch assembly with as much spray lithium as it will hold. Work the mechanism a few more times to get it into the pivot and latch plate as much as possible. Re-saturate with lithium grease and button up.
Every time you change your oil, you should relubricate the hood latch with spray lithium to keep this from happening.
EDIT: Linkies.
or PB blaster.
Well, it beats the basin wrench that many articles recommend. Apply some PB Blaster and go out for lunch before returning and applying torque. It really is amazing how suddenly the nut comes loose. Be careful not to spill it, as it's about as aggressive as paint remover.
I'm in about the same situation as you. I'm making really small/simple stuff right now. ex, a planter box outside, a super simple and plain book case. Thus far, the most useful thing I've found is a Kreg Pocket hole jig. it's like $20-40 and it makes joining lumber at right angles soooo much easier. Dowel joints and biscuits are a pain and I'm in the same situation as you as far as buying a router and table or a table saw. Plus I'm in an apartment so space is a huge issue and storing a table based tool is just not feasible.
https://www.amazon.com/Kreg-R3-Pocket-Hole-System/dp/B000J43A7W/ref=sr_1_1?ie=UTF8&qid=1465410628&sr=8-1&keywords=Kreg
Check out a pocket jig kit. They are about $40 on Amazonhttps://www.amazon.com/Kreg-R3-Pocket-Hole-System/dp/B000J43A7W?th=1&psc=1
Add a drill, some wood glue, and a few clamps and you can build a nice flat desk that shouldn't buckle or warp. bottem of my desk.
Good luck
Kreg pocket screws would work: http://www.amazon.com/Kreg-R3-Pocket-Hole-System/dp/B000J43A7W/ref=sr_1_1?ie=UTF8&qid=1419825381&sr=8-1&keywords=kreg+pocket
Or you could drill holes from the outside of the frame and countersink screws in that way.
Circular saw and a Kreg jig will go a long way to help her make a bookcase.
hey OP, i'll try to answer a few questions for you if i can. i've got a handful of years of experience building custom cabinets, but am no doubt not the foremost on education in this field :)
working with wood is a lot different than working with steel, but it shares some common similarities, as i am sure you know already :)
in all simplicity there are 4 main components of a cabinet, i will use the following as reference in my reply:
a) the main cabinet or box.
b) the face frame
c) the back
d) any removable shelves/doors/etc
1) joinery
when building cabinets, etc i always start with the box
tools required: router, straight cut bit at T" or in this case 3/4", clamps, straight-edge, wood glue, compressor and brad nailer
most material used in cabinetry is usually 3/4" thick, so T=3/4"
once you have all your box material cut to size (there is an easier step you can do, i'll explain in a bit), you'll want to mark all side pieces at proper measurements of non-removable shelves at top of shelf - T. (this usually consist of a top and bottle, but in your multiple cases you'll have a few boxes with hard-fastened shelves in between)
the next step is cutting groves into your side panels for the non-removable shelves to set it.
set your free hand router up so it's cutting 1/2 the depth of T, in this case it will be 3/8". find out how far it is from the fence to the edge of your bit, practicing on a piece of scrap wouldn't hurt.
run the router along the fence cutting groves in each location.
you probably don't want the bottom of the cabinet to hit the floor, i always raise my bottoms so the bottom shelf is flush with the top of the face frame, so make sure to measure twice! :)
anyways once you've done this, you'll have a nice grove to fit your cross-shelves into
glue and nail accordingly.
as far as the intermediate up and down structures, such as the middle in http://i.imgur.com/TG9hwh.png?1, you don't require such groves.
ok moving right along, let's jump to face frame joining
tools required: miter saw, screw gun, pocket hole jig, wood glue, clamps
after you've got your box, you'll be ready to build your face frame
since you don't have a ton of money (who does?) to buy an expensive face frame joiner, Kreg has a nice pocket hole jig which i've used regularly for a while now. http://www.amazon.com/Kreg-R3-Pocket-Hole-System/dp/B000J43A7W
cut and rip your face frame components to size, turn over and clamp the jig, drill your pocket holes.. once this is done for the outer-frame, clamp and screw them together using wood glue and some pocket hole screws, kreg provides a few in the kit to get started, and Lowe's will well the kit and the screws you'll need to complete your project.
once you've done the outer frame, move into the inner frame, etc and rinse & repeat.
it's best to do this on a flat level surface you can clamp the two pieces down so they won't move, but don't worry if you're a fraction off from being flush and sticking up a hair, you can fill that with putty and sand down to flush later.
once you've built your face frame and cabinet boxes, you're now ready to glue and nail them together.
2) what wood to use.
a) for cabinet boxes and shelves
if you're going to stain it, you can probably find a decent price on red oak at your local lumber yard, this should range from $40 to $50 a sheet, depending on area
if you're going to paint it or just don't care if you stain it and doesn't have to look fabulous, you can use a cheaper paint-grade Birch plywood, often available from $20 to $40 per sheet and location
b) face frame wood you can use some select grade pine (usually stains and works well even with red oak plywood, of if you find it cheap enough (improbable) some red oak which is usually really pricey)
3) structure
if you groove the main non-removable shelves like i suggested, you won't have a problem.
if this unit were being mounted to the wall you could add some extra "nailers" but that won't be necessary in your situation
i think i've gone over the basic questions you've asked so far. if i've missed something and if you have any questions on anything feel free to ask so i can elaborate more.
it's a really interesting project you have and i'm sure you'll have fun with it.
once again, feel free to reply to me and i will answer as best i can :)
EDIT: oops, i forgot to mention the backs :)
when you're routing the groves in for your shelves, you'll want to provide a grove for the back material as well.
this isn'tnecessary, but it will provide a clean look when viewing the finished piece from the side, as you won't see the 1/4" back material.
a simple 3/8" grove 3/16" deep the length of the sides will suffice
when you mount the back, you can use 1" or less brad nails or a pneumatic stapler if you have one available.
and mount the back BEFORE you mount the front face, frame, as mounting the back is a sure way to square up the unit
you'll mount 1 side first, then 1 bottom to square.
All the boards on the top look mis aligned. It looks like just used one screw from the top so they will all turn (and always keep turning is my guess...unless they are glued, but then they are glued crooked :) )
I came to say invest in a pocket jig
It would have helped in a lot of places on this project, and this model has a countersink height (which many people have mentioned)
the legs are joined to the "apron" pieces with pocket hole screws. then there are pocket holes facing up in the apron pieces to attach the table top from underneath. A pocket hole jig is typically required to drill the holes for these types of joints; it's very easy to use, and leaves you with no visible fasteners.
The better/proper way to join the legs to the apron pieces would be using dowels or mortise and tenon joints.
Totally worth the money:
A drill that will actually drill holes. I bought a POS drill (50 bucks) and it had no power to it. I finally dropped 250 on this and well worth every penny:http://www.amazon.com/gp/product/B00DG7SYYI
If you're doing any type of wood working and you want to join peices of wood securely and have it look nice look into the Kreg Pocket Hole Jig:
http://www.amazon.com/gp/product/B000J43A7W
I also purchased this guy to help clean up the massive extension cable that I have in my garage. Totally worth it as well:
http://www.amazon.com/gp/product/B00005A1K1
Also invest in a good pair of safety glasses and dust mask.
I use this:
https://www.amazon.com/Wolfcraft-4525404-Attachment-4-Inch-8-Inch/dp/B000JCIMEA/ref=sr_1_1?ie=UTF8&qid=1466287521&sr=8-1&keywords=drill+press+attachment+for+hand+drills
Use one of these.
That, with the proper speed (too slow is better than too fast) and some oil and you'll be fine.
http://www.amazon.com/Wolfcraft-4525404-Attachment-4-Inch-8-Inch/dp/B000JCIMEA/ref=sr_1_2?ie=UTF8&qid=1416019787&sr=8-2&keywords=sontax+drill
No comments on drill bushings, but I have something nearly identical to the linked guide, and with a better (corded) drill I think it'd be fairly accurate. I've only used it for rough work (deliberately). Might be worth considering. Certainly cheaper than bridge city stuff.
https://www.amazon.com/wolfcraft-4525404-Muilt-Angle-Attachment-Drills/dp/B000JCIMEA
I used this guide for a project a few years ago. I wasn't thrilled with the build quality of this model when I opened it but it got the job (6, ~1.5"x6" deep holes 90deg to the surface) done.
https://www.amazon.com/dp/B000JCIMEA/
OK FINALLY got it right.
I will post this here and in a new thread. This is my final stand and it is a good one. It is the FINALLY formula with a small tweak.
See below for links to all products.
Employ the JimOakey set up. Wear protective gloves and eye wear.
Very nice, comfortable high. Should last at least 4 session depending how intense you huff.
JimOakey's set up please go find it and do as it says. I re-posted it here: https://www.reddit.com/r/popperpigs/comments/3k1i6j/adventures_in_popper_production/ Those who do; I will give enough details so you will not need to review the posts.
Sodium Nitrite here:
http://www.amazon.com/gp/product/B00L74HO5M?psc=1&redirect=true&ref_=oh_aui_detailpage_o03_s00
Isobutyl alcohol. http://www.amazon.com/gp/product/B009S08MB2?psc=1&redirect=true&ref_=oh_aui_detailpage_o02_s00
Battery Acid: http://shop.advanceautoparts.com/p/autocraft-battery-acid-cycle-acid/2030000-P?searchTerm=battery+acid
Mixer device: http://www.amazon.com/Wolfcraft-4525404-Attachment-4-Inch-8-Inch/dp/B000JCIMEA/ref=sr_1_1?ie=UTF8&qid=1452057063&sr=8-1&keywords=portable+drill+press
Put in a plastic container like this:https://images.search.yahoo.com/images/view;_ylt=AwrB8qAYo4xW_WUAdiMunIlQ;_ylu=X3oDMTIzdWtmaWIxBHNlYwNzcgRzbGsDaW1nBG9pZAMzMTBmNWZjMzU4NDAwY2Q1ZGM4NWE1YjRjMzQ2YzE0NgRncG9zAzIwBGl0A2Jpbmc-?.origin=&back=https%3A%2F%2Fimages.search.yahoo.com%2Fyhs%2Fsearch%3Fp%3Dplastic%2Bbottles%26fr%3Dyhs-mozilla-001%26fr2%3Dpiv-web%26hsimp%3Dyhs-001%26hspart%3Dmozilla%26tab%3Dorganic%26ri%3D20&w=500&h=500&imgurl=cdnll.freundcontainer.com%2Fimages%2F500%2F3390B01NAT-Condiment-Bottles.jpg&rurl=http%3A%2F%2Fwww.freundcontainer.com%2Fplastic-condiment-bottles-ldpe%2Fp%2Fv3390B01NAT%2F&size=11.9KB&name=%3Cb%3EPlastic%3C%2Fb%3E+Condiment+%3Cb%3EBottles%3C%2Fb%3E+-+LDPE&p=plastic+bottles&oid=310f5fc358400cd5dc85a5b4c346c146&fr2=piv-web&fr=yhs-mozilla-001&tt=%3Cb%3EPlastic%3C%2Fb%3E+Condiment+%3Cb%3EBottles%3C%2Fb%3E+-+LDPE&b=0&ni=21&no=20&ts=&tab=organic&sigr=12cmkin1v&sigb=14a3rnv76&sigi=125l9qmk1&sigt=11eiodf26&sign=11eiodf26&.crumb=pIsY04NLJw4&fr=yhs-mozilla-001&fr2=piv-web&hsimp=yhs-001&hspart=mozilla
Lots of option here. From the incredibly simple (and not as accurate for a very deep hole) to the more secure to the more intricate setups where there is a separate chuck and you can set angles if you want to. Look around a bit and figure out what the easiest way for you to securely clamp the drumstick is gonna be then I guess decide from there what option you want to go with, that will also give you enough travel to be able to drill out the full length of the stick.
Edit: also something to keep in mind is the longer the hole, the more resistance you are gonna get so depending on the size of your hole the drag might get a bit excessive.
... nope...
An impact driver imparts not only a rotational force but additionally a linear force along the axis of rotation of the fastener. You're just hitting a wrench with a hammer.
This is what a manual, or as you said "analog", impact driver looks like
Edit: I'm full of shit don't listen to me
If you can find someone with one of these, they will work.
For oil change, a standard socket set, a drain pan and maybe an oil filter wrench is all you really need.
Depending on what you’re doing with your carbs, you might invest in an impact hammer set like this one: TEKTON 2905 3/8-Inch Drive Manual Hand Impact Driver Set, 7-Piece https://www.amazon.com/dp/B000NPPATS/ref=cm_sw_r_cp_api_i_8VjCCbNQD190X. This will prevent stripping the screws during disassembly.
You might also want to do a valve check which will require some feeler gauges. If you wanna cheap out on a valve adjustment, you can use some sand paper to bring your shims into spec. Otherwise you’re gonna need to buy some replacement shims.
When you get around to it you should definitely treat yourself. Hex ratchets are total game changers. They work super fast and they are way better for hard to reach bolts. They also make assembling IKEA furniture a breeze.
This one is only $9 and gets good reviews. No tire lever but totally worth having in the toolbox.
Not reading all of the comments but pick up a nanodriver. Used the hell out of mine today upgrading turbos on a 535.
https://www.amazon.com/03044A-4-Drive-Mini-size-Ratcheting-Screwdriver/dp/B000XYOUS6/ref=pd_bxgy_469_img_3?ie=UTF8&refRID=B45R4EVNHYNTR9NPAERZ
I like these a lot. They are quite handy because you can change the bits. https://www.amazon.com/Neiko-03044A-Ratcheting-Screwdriver-Close-Quarters/dp/B000XYOUS6/ref=mp_s_a_1_3?adgrpid=55650310786&gclid=Cj0KCQjwkK_qBRD8ARIsAOteukD89A_TSwzoF-BxcrW5Uad5wt-F7E5qkiQd_HYTf4KygStUlugYLIoaAv_VEALw_wcB&hvadid=274682060829&hvdev=m&hvlocphy=9030230&hvnetw=g&hvpos=1t1&hvqmt=e&hvrand=11339089793462780458&hvtargid=kwd-301900027570&hydadcr=20349_9348757&keywords=ratcheting+bit+driver&qid=1565309677&s=gateway&sr=8-3
Neiko 03044A Mini Ratcheting Offset Screwdriver and Bit Set, Pocket Size Close-Quarters ,1/4-Inch Drive https://www.amazon.com/dp/B000XYOUS6/ref=cm_sw_r_cp_api_i_GSTDDb04N34PC
This little thing made the whole process much easier. And all the screws are torn bits size 15 and the wrench come with the bit you need.
Dunno what country you're in, but the appropriate name for the tool to hit these screws is called a "Close quarters ratcheting screwdriver", and can be had for ~$10 for a pretty good one.
I have one like this.
https://www.amazon.com/Neiko-03044A-Ratcheting-Screwdriver-Close-Quarters/dp/B000XYOUS6
Really?! Is this what the instruction say to do? Those should have been allens if that's the case.
​
This will do the trick if you have to go buy something.
Backs are easier than fronts... but make sure you have something like this to screw in the backs.
The part the instructions didn’t help:
After I figured out how the S clips go on in the most illogical way, everything else is easy... also, don’t forget the spacers in the front!
I used a 90° screw driver like this to avoid taking the wheel off.
Simple Green is your friend.
http://www.amazon.com/gp/product/B0017D1GG6?ref_=wms_ohs_product&redirect=true&psc=1&pldnSite=1
This ^ will last you a long time. I clean my discs with it to remove the squeak also.
This http://www.amazon.com/Park-CM-5-2-Cyclone-Chain-Scrubber/dp/B007HDNOT2/ref=sr_1_cc_1?s=aps&ie=UTF8&qid=1398709921&sr=1-1-catcorr&keywords=park+tool+chain+cleaner plus simple green = a super chain cleaning.
Also a little car paint detailer keeps it shiny shiny.
http://www.amazon.com/gp/product/B0009IQXAE?ref_=sr_1_cc_2&s=aps&qid=1398709624&sr=1-2-catcorr&keywords=meguires%20detailer&pldnSite=1
Just spray it into a rag and not directly onto the frame to prevent over spray on the discs/pads.
As others have mentioned, a good lube (Boeshield T9 for example) should be matched to your riding conditions and applied.
http://www.amazon.com/Boeshield-Corrosion-Protection-Waterproof-Lubrication/dp/B001447PEK/ref=sr_1_1?s=sporting-goods&ie=UTF8&qid=1398709998&sr=1-1&keywords=boeshield+t-9
I've actually just got my first table saw this week as well. After doing a lot of research before putting it all together, here's what I've found:
Watch this video and there are several other good videos on YouTube:
https://www.youtube.com/watch?v=lxRSarTJLMU
As far as the cast iron top, remove any oil with WD-40 or mineral spirits, then protect with Boeshield and a paste wax. Johnson seems to be the common choice, but any should do as long as it's silicone free.
Read this: http://lumberjocks.com/topics/105746 (Boeshield mentioned in replies 12 and 13)
Boeshield: https://www.amazon.com/BOESHIELD-Corrosion-Protection-Waterproof-Lubrication/dp/B001447PEK
You could also use a spray on dry lubricant like this:
https://www.amazon.com/Bostik-10220-Aerosol-Top-Cote/dp/B0000223UD
As far as waxing the blade, this link helped me realize I wasn't cleaning my blades on other saws and that would help a lot as well. It goes off topic but the first response mentions using a spray on "Topcote" like what I linked to just above on the blades after cleaning.
http://lumberjocks.com/topics/41371
For transparency sake: I haven't set it up yet. I'm picking up most of what I linked above today on my way home and I'll be doing all that stuff tonight.
I found this sharpening kit is a necessity when using a mortising machine. HUGE difference even with a new chisel and bit. I also will lube the drill bit with a couple of drops of Boeshield to keep the screeching sound to a minimum.
WD40 is good at removing rust, not so good at preventing it.
You would want something like this https://www.amazon.com/BOESHIELD-Corrosion-Protection-Waterproof-Lubrication/dp/B001447PEK
Thanks, I hadn't heard of Boeshield. Yes, it will be exposed to humidity and condensation. Is this the correct product?
http://www.amazon.com/Boeshield-Corrosion-Protection-Waterproof-Lubrication/dp/B001447PEK
These are absolutely incredible for removing rust. I always put a coat of Boeshield for rust protection on surfaces that might rust. It works like a charm. rub on some paste-wax and buff it off and you have a slippery tabletop that wont need any attention for months!
If you don't feel like taking the time to spray paint them, I'd say go with this.
http://www.amazon.com/gp/aw/d/B001447PEK
It sprays wet like wd-40, but dries to a thin waxy film that last months.
3M Polishing Papers. What everyone else here is recommending is graduated in "grits" but 3M Polishing Papers are graduated in microns.
Glass nail files. They do not give like metal files so you can get real control over your nail shapes.
Some kind of super-high grit sandpaper or micro mesh. I got this in 2016 and have used less than half of the sanding surface of each pad. By the time you get to the last sheet your nails come away like glass.
Sandpaper, I went up to 320. Then I went down to 1 micron with these
Sorry, I was trying to trim out all the referral data and other annoying garbage. It's fixed now.
The stuff is called lapping film, polishing paper, crocus cloth, or probably a dozen other things but it's essentially high quality superfine sandpaper.
http://www.amazon.com/gp/product/B001BHGC7G
I actually only used polishing paper! Amazon Link
I use an app called Radiofonic, but any internet radio app or even Safari works fine. I’ll let you know when I get a Tutorial together. This is the preamp I’m using: BEHRINGER U-PHONO UFO202 https://www.amazon.com/dp/B002GHBYZ0/ref=cm_sw_r_cp_api_KN9RBbD4TJ0MK
I don't think the phono pre amp will help for your particular use case, while you may need a pre amp, its not going to help with the mixing of sounds. If I understand correctly you want computer sounds mixed with the vinyl player output. Some have recommended a line mixer which I'm sure is a valid option however it is another thing cluttering up the desk. Something most people don't consider is that windows has a way to do this natively. If you were to hook up your record player via usb (if it has it) or through a phono USB interface like that you can listen to that recording device, mixing it in with windows sounds.
The new X version Audio-Technica AT-LP60X is on sale for $69. The only upgrade for it is from the stock conical to elliptical LP Gear CFN3600LE stylus $29.
Behringer Headphone Amp is a cheap option to use for earbuds. Or Behringer U-Phono adds a USB output.
If you only have a small room, PreSonus Eris E3.5 $99 speakers have a headphone jack or look for larger speakers for a medium size room or larger.
Better headphone amps start around $100.
Better turntables with adjustable tracking force and a better cartridge:
I use this one by behringer which is nice because it has a built-in phono pre-amp so you can also use it to record vinyl to mp3.
Just make sure you have it going through a mixer with a pre-amp to bring the phono up to line level. Alternatively, something like this might be useful if you don't have anything else with a pre-amp.
For those interested in doing this, but don't have the equipment, here are several audio interfaces for capturing vinyl to digital:
The Behringer UCA202 would be good for setups with an external preamp, output through the monitor function (tape out) of a receiver with built-in phono preamp, or a turntable with a built-in preamp.
The UFO202 has a built-in phono preamp and would be good for connecting the turntable directly to the computer -- no external preamp or receiver needed. The ART USB Phono Plus would be the same, except you will get a definite upgrade in clarity and presentation with it's phono preamp.
All of these interfaces max out at 16 bit / 48 kHz, so they are not high-res (24 bit / 88.2 kHz or higher), but they are going to capture at CD or better quality, which should be fine in most instances.
I don’t recommend this. Unlike the line-in that used to exist on previous models, you would be recoding to a monophonic input and totally trash the sound quality.
The best solution would be to pickup something a little more costly, but could actually preserve the remaining quality of the cassettes.
https://www.amazon.com/dp/B002GHBYZ0/ref=cm_sw_r_sms_c_api_i_QNS-AbVSPPWG1
p.s. this torx set is the shiznit!
Wiha Tools makes the best micro screwdriver bits around, and some of their products are available on Amazon. If I were in your shoes I'd buy this
My personal solution is to keep a Leatherman Wave with a Leatherman pocket clip in my EDC backpack along with a Leatherman Bit Kit that I've modified with a Nite Ize pocket clip and some gorilla tape. Anytime I need to do some screw driving I just clip the wave and bits onto my pocket and they're incredibly accessible.
Get a Wiha Torx Set and never worry again.
Lots of knives. Bedroom stuff. A lighter. A box of matches. This awesome microdriver.
First i'd snag this, every dude needs a good set of tools anyway
https://www.amazon.com/gp/product/B009MKGRQA/ref=oh_aui_search_detailpage?ie=UTF8&psc=1
with that you can unscrew the bottom case and then just aircan everything/ look at the vents to see if there is lint.
WARRNING*** Air cans are an endothermic liquid reaction. Dont be an idiot and point the can upside down as then you'd just be spraying subzero liquid all over your computer.
When you shoot compressed air at the fan/ vents you'll usually see a cloud of dust if its been a few months.
https://www.amazon.com/Dust-Off-Compressed-Gas-Duster-Pack/dp/B00DZYEXPQ/ref=sr_1_1?s=electronics&ie=UTF8&qid=1474916670&sr=1-1&keywords=air+can
This is your laptop https://linustechtips.com/main/uploads/monthly_2016_04/Dell-XPS-15-9550-Disassembly-1.jpg.19236a764c57f928c6aefa7ca5b8b72f.jpg
Air can everything, why not, but focus on the fans/ the vents leading out of the fans. and scoop out any visable lint. also dont aircan the fans into them spinning craizly that's a good way to fuck up the fans because you can actually spin them up to some crazy rpms if you go full retard.
Just a suggestion, [this:] (https://www.amazon.com/TEKTON-2830-Precision-Electronic-27-Piece/dp/B009MKGRQA/ref=sr_1_6?s=videogames&ie=UTF8&qid=1468693084&sr=8-6&keywords=tekton+tools) is a good investment. I've used it for smartphones, laptops, DSLR cameras, Xbox remotes, and more, but like others are saying, on ebay you might get lucky and find a listing with a screw driver included, or just flat out find it cheaper.
This kit comes with lots of tips, extenders, a case, and another tool which I haven't found a use for yet, all for $11. You might even be able to find it cheaper somewhere else!
I believe that the newer models uses a pentalobe 1 head, and yeah you can just screw them back in.
I would recommend buying this
I bought this tekton screwdriver kit and it's worked beautifully for everything I've needed so far. If you ever need more, the iFixit Mako is worth every penny.
This is what I used along with a set of tweezers and a magnet to magnetize the bits, I'm sure they have sets that aren't that much more expensive with both included.
TEKTON 2830 Everybit (TM) Precision Bit and Driver Kit for Electronic and Precision Devices, 27-Piece https://www.amazon.com/dp/B009MKGRQA/
http://www.amazon.com/TEKTON-2830-Everybit-Electronics-Precision/dp/B009MKGRQA
I've got this one.
Best? Probably not. We've been firm believers in the Husky ones where I used to work: http://www.homedepot.com/p/Husky-8-in-1-Precision-Slotted-and-Philips-Screwdriver-Set-71281H/204664388
I used to take laptops apart for hours every day, it always seemed to do me well. I slighly preferred their older style (looked like this)
Basically they work well until they get lost, and they're cheap enough to just repurchase.
I also used this at another job: http://www.amazon.com/dp/B009MKGRQA
Not amazing quality, but I liked the selection of bits. Also cheap.
You won’t need that.
Also tons of kits, all over the price range. Here is an example.
TEKTON 2830 Everybit (TM)... https://www.amazon.com/dp/B009MKGRQA?ref=ppx_pop_mob_ap_share
Will most likely only need one.
Should get this little guy though, super handy.
Buy this: http://www.amazon.com/gp/product/B009MKGRQA/ref=oh_aui_detailpage_o04_s00?ie=UTF8&psc=1#
Just bought this set to use to install some SSDs in my MBPs works great and cheap.
http://www.amazon.com/gp/product/B009MKGRQA/ref=oh_aui_detailpage_o04_s00?ie=UTF8&psc=1
I got this one: http://amzn.com/B009MKGRQA
Now I can open up my knives as well as my Apple electronics.
POWERTEC 71002 Abrasive Cleaning... https://www.amazon.com/dp/B00AJW0CY8?ref=yo_pop_ma_swf
Been using this works great. Little elbow grease and one of these and the tape will be looking brand new.
Recently got this and it works awesome!!
I had dried bourbon (don’t ask) that I thought stained the grip tape but this pulled it right off.
POWERTEC 71002 Abrasive... https://www.amazon.com/dp/B00AJW0CY8?ref=yo_pop_ma_swf
POWERTEC 71002 Abrasive Cleaning Stick for Sanding Belts & Discs Natural Rubber Build | For Woodworking Shop Sanding Perfection | A"Must Have" Sanding Accessory https://www.amazon.com/dp/B00AJW0CY8/ref=cm_sw_r_cp_api_i_eSVSDb217ERJ1
Get this, you will never use all of it and it’s only 10$
Highly recommend you get a stick to clean ur tape. You'll be happy you did 😁 I use that stick to get the gunk off and add a little water if it's really in there.
POWERTEC 71002 Abrasive Cleaning Stick, 8-1/2" https://www.amazon.com/dp/B00AJW0CY8/ref=cm_sw_r_cp_apa_i_NQ68AbRJG701J
Give one of these a try.
Get this (same as Grip Gum) to clean the grip tape: http://amzn.to/2qu0iSr
You just run it over the grip tape like an eraser and it removes embedded dirt.
Bits like these, plus lots of patience and hand cramps.
I bought one of these https://www.amazon.com/Stainless-Carbonation-Barb-Drink-Bottles/dp/B00V334SME
I just have to disconnect one of my other gas post ball locks from a different keg and I'm good to go.
Second this! It's actually really easy to make at home. Forget about that overpriced landfill-saturating Soda Stream. Go to your local gas dispensary, get a 5lb or 20lb tank of "food grade" CO2, a regulator, some tubing, and a carbonator cap. It's crazy easy, and you end up saving big in the long run. Pennies per gallon instead of dollars per pint. My regulator caps out about 45PSI. I'd recommend maybe 60PSI given my results.
You can hook up your CO2 tank directly to a 2L soda bottle, and bypass the whole Sodastream machine.
Just get one of these hoses with a ball valve adapter to connect to your regulator, and [one of these ball valves to screw onto your soda bottle].(https://www.amazon.com/Stainless-Carbonation-Barb-Drink-Bottles/dp/B00V334SME/ref=pd_bxgy_328_img_3?_encoding=UTF8&psc=1&refRID=53SWD2Y7DFRQ6TR07RPB)
Quick and simple guide: http://www.popsci.com/diy/article/2012-06/how-make-your-own-home-carbonation-system
Carbonation cap: https://www.amazon.com/dp/B00V334SME/
Hose and quick disconnect: https://www.amazon.com/dp/B0064OI77Y/
Pressure regulator: https://www.amazon.com/dp/B002UZUJ22/
For the tank, contact a local welding shop and ask them to price a pure CO2 cylinder. Tell them what it's for if they ask about grade. Make sure you find out cylinder cost as well as refill cost. I could have gotten a cheaper cylinder on Amazon apparently, but I didn't overpay by much. Mine's a 20 pound, but you can get 5 and 10 as well.
Something like this (random from google for example): https://www.amazon.com/Happybrew-325-Stainless-Carbonation-Bottles/dp/B00V334SME
Just need any bottle, any regulator to fit that bottle, beer tubing, a soda keg disconnect, and something called a "carbonator cap". The stainless ones can be found on amazon.
https://www.amazon.com/Stainless-Carbonation-Barb-Drink-Bottles/dp/B00V334SME/ref=sr_1_4?ie=UTF8&qid=1482679787&sr=8-4&keywords=carbonation+cap
Probably not that one. Get one that says it works for both liquid and gas posts like this one. Some do. Some don't. Dual use post allows you to use the bottle for cleaning and maybe it has other uses.
Edit: changed link to the better carb cap that I bought, which includes a barb on underside.
Any SSD will be an upgrade. I believe the late 08 can go to 8gb of RAM, if it can, I'd do that with the SSD, you'll extend it a few years easily, though you're stuck at El Cap, I believe.
480 GB SSD for 130
https://www.amazon.com/SanDisk-240GB-SDSSDA-240G-G26-Newest-Version/dp/B01F9G46Q8/ref=sr_1_8?ie=UTF8&qid=1491107037&sr=8-8&keywords=480gb%2Bssd&th=1
Screwdriver kit (if you don't have one, you'll need a Phillips #0 and a Torx T5 or 6 for the hard drive nubbins, skip if you have one!) for 15
https://www.amazon.com/gp/product/B015F734P0/ref=crt_ewc_img_dp_1?ie=UTF8&psc=1&smid=A13PRKMVKLJGWH
IDE/SATA to USB (if you want to copy data from old HDD to the SSD. Ignore if you want to start fresh) for 11.
https://www.amazon.com/Generic-Adapter-Converter-Optical-External/dp/B01J7MWD4M/ref=sr_1_18?s=electronics&ie=UTF8&qid=1491107469&sr=1-18&keywords=ide+sata+to+usb
Yea "Superdrive" is an old Apple term for the CD/DVD drive. I would get a magnetic screwdriver set like this one:
https://www.amazon.com/Vastar-Magnetic-Precision-Screwdriver-Smartphone/dp/B015F734P0/ref=sr_1_2?ie=UTF8&qid=1503856698&sr=8-2&keywords=magnetic+screwdriver
I dropped tiny screws multiple times and I definitely wished I had bought one myself when I did it lol.
Have you opened up a laptop to upgrade RAM or hard drive before? If not study a few YouTube videos to see if it's something you'd be willing to undertake.
https://www.amazon.com/dp/B015F734P0/
Grab something like this,l have a couple just like this and they have almost everything you could need
This is a selection of what I keep in my tech go-bag. You'll build your kit as you learn and build experience, or realize you could have helped a customer out of a jam quicker if you had that tool with you.
Various extra parts I've accumulated over the years like screws, ATX Molex Power to SATA Power Adapters, ATX Molex Y splitters, SATA cables etc..
Good luck and some tools overlap like multi tools and pliers so if budget is low, go with the tool that covers the most jobs.
Edit: I noticed your bag is kind of expensive compared to something like a Dewalt tool bag. I use a plain Dewalt bag which is not as cool as the one in the link, but it's just as tough. This might be a good and less expensive consideration for you if you don't require the look of a briefcase for your tool bag.
Edit 2: You may want to mark your tools with a wrap of some crazy bright color electrical tape to be able to recognize them when they walk away.
I may be a bit preachy with it, but this is one of the best kitchen gadgets I've bought: https://www.amazon.co.uk/dp/B01698J0RU/ref=cm_sw_r_cp_apa_TPHGAbWW8W7YM
This is the one I have. My parents got it for me for Christmas and holy fuck do me and my boyfriend eat so much more tofu now. My parents did their research and passed on to me that the trick to this one is always start on the first rung and move it down every few hours till you’re on the last rung
This ones better: https://www.amazon.com/Tofu-Press-stylish-transform-Tofuture/dp/B01698J0RU/ref=mp_s_a_1_4?ie=UTF8&qid=1541244902&sr=8-4&pi=AC_SX236_SY340_QL65&keywords=tofu+press&dpPl=1&dpID=31jkeGeCX-L&ref=plSrch
I use these food service towels that are meant to be reused but they have a limited life span so they can be thrown away. And I put paper towels in between the food service towels and the tofu. It’s not as environmentally friendly, but I haven’t had moldy smelling tofu.
Also, there’s the tofu press that I SO desperately want.
It gets easier the more you do it! You can always change up what you're adding as well, it definitely doesn't have to be an exact science.
Liquid smoke is a concentrated liquid, you can get it from most grocery stores or somewhere like Amazon. I like it because it adds a little bit of smokiness / depth to the tofu.
If you're going to be eating tofu, you will definitely want a dedicated press. [This one](Tofu Press - a unique and stylish tofu press to transform your tofu by Tofuture https://www.amazon.com/dp/B01698J0RU/ref=cm_sw_r_cp_api_i_UZa3DbYMNSGMX) is my personal favorite. There are others out there that are good at getting rid of the liquid in the tofu, but they tend to smash it and change the shape. I like this one because it keeps everything together, while still squeezing out all the liquid. I've used it for almost a year now and I'll never switch to anything else personally, haha.
Yesss. I use my grill pan. Buying two tofu presses was the best decision I ever made. The ToFuture ones are great because after pressing you can marinate in the same container. I make two blocks at a time because it’s kind of a process and I like to have leftovers.
I don’t! I place firm tofu on a plate between two paper towels and then place a heavy pot on top. However I have seen this one recommended by vegan cook-related Youtubers: https://www.amazon.com/dp/B01698J0RU/ref=sspa_dk_detail_0?psc=1&pd_rd_i=B01698J0RU&pd_rd_wg=oL1BZ&pd_rd_r=0MDQRS4BC4M9VHY7FXGQ&pd_rd_w=tMdS3
However, you should really only press firm tofu! Silken and soft tofus don't need and shouldn't be pressed because they would completely break apart.
For recipes like this, I cut a block of pressed tofu into small cubes and bake it until it's a bit crispy, then mix it in once the rest of the dish is cooked.
I'd recommend getting a Tofuture press. It seems like it's a bit expensive, but it's way more convenient and thorough than just using a plate with heavy cans, or one of those presses where you turn a knob. Use firm or extra firm, dump out the liquid once after about ten minutes and then let it press over night and dump out the liquid again.
For baking, use a silicone mat.
I bake the tofu cubes at 400F for about 25-35 minutes (depending on the size of the cubes and the desired crispiness).
They'll be lightly crispy but still tender on the inside. There's no need to marinate them either, as they'll get coated in whatever sauce you've got in the dish you're adding them to.
\^ This.
I hate when people say things like what I am about to say but in this case it is true.
If you don't even have the tools to open the drive, this is not the project for you. Opening a hard drive yourself to recover data is a really terrible idea when you are talking about exposing the platters. There is a reason data recovery is so expensive and it isn't just because they have high profit margins.
In the event that there isn't any data on there that you care about and you want to give it a go as an academic exercise....that is a horse of a different color.
A T9 is actually pretty big. In my bag with me I have a kit that includes a T3 through T8 and it wouldn't surprise me at all if your drive required something in that range.
If you live near a Micro Center you can pick up something like this kit. It is quite usable.
http://www.microcenter.com/product/441261/54_bit_driver_kit
I actually have the Inland "ufixit" generic version from Micro for under $20 and it's really handy.
http://www.microcenter.com/product/486365/uFixit_Bit_Driver_Kit_-_54_Pieces
If you don't have a Micro Center nearby, try something like this on Amazon?
https://www.amazon.com/ORIA-Screwdriver-Professional-Precision-Smartphone/dp/B01E16J6RQ
I've used both of these cheaper kits by ORIA and they've been fantastic! Not sure about UK availability, but might be worth a look.
https://www.amazon.com/ORIA-Screwdriver-Professional-Precision-Smartphone/dp/B01E16J6RQ/ref=sr_1_6?ie=UTF8&qid=1536259932&sr=8-6&keywords=screwdriver+kit
https://www.amazon.com/ORIA-Screwdriver-Professional-Precision-Cellphone/dp/B01IVKPTP6/ref=sr_1_21?ie=UTF8&qid=1536259932&sr=8-21&keywords=screwdriver+kit
I have this, the ifixit and another one from ORIA that was on sale a few days ago (https://www.amazon.com/ORIA-Screwdriver-Professional-Precision-Smartphone/dp/B01E16J6RQ/ref=sr_1_7?ie=UTF8&qid=1541607353&sr=8-7&keywords=computer+tool+kit).
​
If you want to buy this one and have it as a backup or keep it at a secondary area like your car, home or work, its a great deal. But if you want one that you want to use as your main toolkit, go with the Ifixit. I had this one and the ORIA one I sent the link of first, and they were great. But once I tried the ifixit, I was more than pleased.
FWIW I bought the set linked below when I needed to open up my Nexus 9 to replace the battery. It has quickly become my favorite kit for everything, in particular the hex bits are nice for not having to go hunting around for an allen wrench.
https://www.amazon.com/ORIA-Screwdriver-Professional-Precision-Smartphone/dp/B01E16J6RQ/
I'm not positive, but I think a stripped screw might equal a D. Odd it stripped, unless there was loctite added. Bummer you couldn't get it out even if ruined, cause benchmade would send a screw, I think.
I recommend this bit kit. Wiha are expensive but great. I've had great luck with this one myself and have recommended it to others who have liked it. Really great handle. https://www.amazon.com/gp/product/B01E16J6RQ/ref=ppx_yo_dt_b_search_asin_title?ie=UTF8&psc=1
Yeah, I didn't think so, re: WD-40.
Anti-seize will probably help on the threads, but I'm wondering if there's anything I can coat on wheel bolt that'll actually stay put when exposed to the road, and offer protection without interfering with the threads. I have some Boeshield T-9...my mechanic recommended it for keeping my coilover threads from getting gummed up, so I'm thinking this will work.
there are some SUPER fine grit papers. SO fine that you can barely even tell they're sandpaper. You can use these to smooth out nibs that just aren't quite right on the paper yet. I have some 362L 9 micron that I picked up somewhere, but this looks like it may be a good assortment on Amazon Although I have no idea: I've never used these.
Polishing sheets
www.amazon.com/dp/B001BHGC7G/ref=cm_sw_r_udp_awd_oJMttb14VTZ9R
Simichrome
http://www.amazon.com/dp/B0002YUQ4E/ref=cm_sw_r_udp_awd_jKMttb1EX6ENW
Renaissance Wax Polish 65ml
http://www.amazon.com/dp/B003AJWN62/ref=cm_sw_r_udp_awd_RKMttb1YM5YXC
arnauba Wax
http://www.amazon.com/dp/B0009IQXCM/ref=cm_sw_r_udp_awd_NMMttb1MPHYVW
Sandpaper.
You can get a set of decent sized sheets for 20 dollars, and it'll have all the grit progression to take you from safety-scissors dull to scary sharp.
Try these
https://www.amazon.com/Zona-37-948-Polishing-11-Inch-Assortment/dp/B001BHGC7G/ref=sr_1_4?ie=UTF8&qid=1546215593&sr=8-4&keywords=flexible+polishing+papers
$13 for an assortment of all the grits. I've done everything on this entire guitar and have used less than a quarter of any given single sheet. The coarser grits tend to gunk up a bit with the finish I'm using (which is just some consumer-grade water based poly, not catalyzed).
I haven't used any rubbing or polishing compound at all and it still reflects wonderfully. If you need something cheap and easy, it's the way to go. Definitely cheaper than buying all the grits of sandpaper that you'd need to achieve the same result. Works both dry and wet.
Also, they are incredible for polishing frets.
Figured I'd also mention if you're all about the fine sanding you should give these a try. They can supposedly polish watch crystal. - http://www.amazon.com/Zona-37-948-Polishing-11-Inch-Assortment/dp/B001BHGC7G/ref=sr_1_1?ie=UTF8&qid=1450485387&sr=8-1&keywords=micron+sanding
These are amazing, but essentially the same thing as micromesh. I usually start on the 9 micron and work my way down to the 1 micron. If you are opposed to any abrasive "removal" smoothing, I have also had some luck with glass... I use an old Galaxy S3's screen, but I've also heard of people just using a window pane.
Although on earlier MacBook Pros the audio jack had both output and input contacts, on the 2018 (which I own) it is only listed as a "headphone jack" and not under inputs. I thought I might have read that they changed this at some point. So I have some doubts as to whether you can get audio in through the headphone jack.
If you find a cable that makes it work as an input, then I am wrong about that. But there are other things to consider.
Traditional turntables output an RIAA signal which is not suitable for normal line input. Those require a "phono preamp" to transform the signal into line level for Line In ports on audio equipment (and for Macs that have a real Line In). But if you have a turntable with a built-in phono preamp or already connected one, ignore this paragraph. If you need one, they are relatively inexpensive.
If you find out that you can't use the headphone jack as an input, your other option is to use a USB audio interface. This would have analog audio jacks for the incoming signal, and a USB port to connect to a USB port on your Mac. It would show up as an input source in your Mac Sound system preference pane. While there are many USB audio interfaces out there, if you need a phono preamp make sure that is included.
If you realize you need a USB audio interface, this is an example of what I mean and it's less than $30. I do not know how good that one is becaue I have a different brand that cost about the same price, but the reviews are positive.
As far as software, GarageBand should be able to do it, if you want something more focused, Audacity is free and widely used for these types of conversions.
Or use one of these $30 devices and you'll also be able to record playback to your PC via USB.
https://www.amazon.com/Behringer-UFO202-BEHRINGER-U-PHONO/dp/B002GHBYZ0/ref=sr_1_1?ie=UTF8&qid=1468898427&sr=8-1&keywords=behringer+u-phono+ufo202
Super cheap and versatile. This is not for audiphiles!
Are you just playing a few songs for the wedding and want the cool factor? If so, sure, get the portable player. One or 2 plays of your records isn't going to hurt them. If you mean you plan to have the reception music DJ'd old school with vinyl, I think you're really going to want some kind of traditional setup with 2 decks and someone to manage them. You absolutely do not want your friends messing around with the equipment and your records. Without 2 decks you'll have big gaps in the music.
Or, save the $80, get one of these for $30 and start ripping your vinyl now. Put the Crosley on display and play a few of the special dances on it, but then shut it down and switch to your ripped collection and other digital music.
http://www.amazon.com/Behringer-UFO202-Audio-Interface/dp/B002GHBYZ0/ref=sr_1_1
I'm thinking it's doable for around $1,000. Thanks for asking /r/ZeosPantera!
----
What about using basically a karaoke system? Would that work for my needs? It's not going to be the high quality kind of thing you guys normally talk about here, but it may fit what we want.
If so, the best seem to be the Roland B-55 (Amazon link) or the Hisonic PA-687S. They only support two wireless mics at a time, but I could probably make that work. The key reason why I like them is because they support line out. Which I could then plug into a computer via an adapter (like the Behringer UFO202 Audio Interface). I honestly don't know if this would actually work though.
Could I use a mic/amp and audio interface setup like this as audio for software like Skype? I just don't want to spend this much money and find it doesn't work.
^Edit: ^Added ^the ^second ^amp/speaker ^option
My gut reaction is that it's an issue with your stereo and not with using the headphone jack itself, but it's difficult to say based on your comments. Have you tried plugging another source (ipod) into your stereo? Is the auto quality the same?
If you think it is the audio output out of the computer you can try a cheap external sound card like this.
I'm a bit surprised to find that something like that exists on amazon.co.uk here but it's a bit out of your budget.
Instead, you might look at this separate headphone amp and connect it to this phono preamp.
Finally, you could see if the Behringer UFO202 can be used for playback in addition to recording which is it's primary function. The headphone output on it is pretty sub-par on low impedance headphones.
The Q2N can function as a 720p USB webcam, though it's quite wide-angle (like a go-pro) so it would need to be closer than you'd think to get a good shot.
Your budget really is too low for anything other than webcams really, though you can get some pretty decent webcams for that price.
Hve a look at the Logitech C920. You'd have enough left over for a USB audio interface so you could run an output from the desk into your streaming package.
The thing is though, webcams don't have zoom. The zoom/pan that is done by software is simply blowing up the image so you're not gaining any detail, so things will just look blurrier when you zoom in.
Ideally, you'll need to reduce the distance between the camera and the stage somehow. You could, for example, suspend the camera from the ceiling, or mount it on a desk at the front of the bar?
However, if you're streaming at 720p or lower resolution, then you could potentially zoom in on the video in your streaming package without losing quality (don't use the webcam software, use something like OBS).
The Zoom Q2N would work as it can function as a USB webcam, but it's got a go-pro like wide-angle lens on it so it would need to be even closer than a normal webcam.
Really to pull this project off well, you'd need to spend at least a few more hundred dollars. A consumer camcorder like a Canon Vixia, plus a HDMI capture device like a Blackmagic Web Presenter would be the ideal budget setup.
Of course. OP can go cheap and get a Behringer U-Phono. Won't record hi-res, but can do 16/44, which is plenty.
http://www.amazon.com/Behringer-UFO202-BEHRINGER-U-PHONO/dp/B002GHBYZ0/ref=pd_sim_267_6?ie=UTF8&dpID=41MOgnznR%2BL&dpSrc=sims&preST=_AC_UL160_SR160%2C160_&refRID=1PKPY1C6X97XKX7RG62X
Yes, you will need a mixer of some kind. A USB mixer will be your audio interface.
If your turntable doesn't have a preamp, you will need one. I have been using one of THESE for years and it's great. You can use either the analog outputs into your mixer or connect it directly to a USB port on your computer to bypass the mixer.
Are the Cassette and Turntable separate device, and I mean separate from the amp? If they are you might have a better chance with Behringer USB Interfaces. Behringer makes one that is specifically for turntables.
Let me see if I can find it -
https://www.amazon.com/Behringer-UFO202-BEHRINGER-U-PHONO/dp/B002GHBYZ0/
It has a switch so you could use LINE for the Cassette and PHONO for the Turntable.
The Scarlette 2i2 would only work if you have standard Line Level inputs to the device, either Unbalanced (RCA) or Balanced (XLR).
If the Cassette and Turntable are built into the unit, then you are somewhat screwed, but there are some devices that can drop Speaker Level down to Line Level.
Let's see if I can find some of those -
https://www.amazon.com/Mr-Ho-2-Channel-Converter-Adjustable/dp/B07BBM1M5Z/
https://www.amazon.com/Massive-Audio-Hi-Low-Speaker-Converter/dp/B0045F1F0U/
https://www.amazon.com/Kicker-KISLOC-2-Channel-Speaker-Converter/dp/B00I4EF1BC/
https://www.amazon.com/s/ref=nb_sb_noss_1?url=search-alias%3Daps&field-keywords=speaker+level+to+line+level+converter&rh=i%3Aaps%2Ck%3Aspeaker+level+to+line+level+converter
u/housecat420 I dunno if you're still looking for an answer to this, but roughly seconding the answer above. I'm running my turntable into this Behringer USB/Audio interface with phono preamp, into a USB OTG cable with power, into an old Android (in this case a OnePlus One) running AirAudio. The phone isn't fully rooted, just developer options set to allow AirAudio root access. AirAudio source set to mic like u/goodhur mentioned. Works really well so far.
Another thought I just had, if you connect the bx5 to you computer, you could use one of these: http://www.amazon.com/Behringer-UFO202-BEHRINGER-U-PHONO/dp/B002GHBYZ0 to playback records. That may be your cheapest option.
You can connect the ground wire to any casing screw. You will need a pre amp if your stereo does not have a phono input. You can connect to your computer using a usb audio interface. Something like this has both things you are looking for. I don't have any personal experience with this particular item. You can also find seperate phono pre amp and usb interfaces.
Edit: In the case where your receiver does not have a phono input and you are adding a pre amp, connect the turntable ground to the pre amp. There will be a connector screw.
All you need is a [Behringer UFO202] (http://www.amazon.com/Behringer-UFO202-BEHRINGER-U-PHONO/dp/B002GHBYZ0)
Behringer UFO202 is only $40 but honestly it's a piece of junk.
302USB for $50 might be a little better. Never used it so I couldn't tell you.
This Lexicon Alpha unit for $60 looks decent for the price. Has balanced TRS outputs as well as a couple of inputs. Again, never used it so not sure how good it is.
Here's the thing, you bought a great pair of studio monitors, but any of these three options will likely output less than the potential quality of those Rokits. I really recommend spending the extra money on something comparable to the Audiobox I mentioned in my first comment to get the most out of your investment. If not, that third link would be my next choice. TRS will provide better quality than an RCA connection, hands down.
To find more options, just look up "audio interface." Add "usb", "firewire" etc to get more specific results based on your setup.
I would think you would have noticeably better sound with a $35 Behringer dac. UCA202 I think it is. Or if you got this one instead you wouldn't need a preamp to play a turntable as it works as a phono preamp as well. Cheap and probably not a long term solution but great while your broke.
If you aren't aware, that is sarcasm.
I would avoid getting a usb turntable as most of them are shit. Instead, I'd try to find a nice used turntable, receiver, and something like this. What is your local craigslist?
You can replace the preamp + RasPi set up with one of these if you want USB audio. I assume it should be relatively close quality-wise since it's by the same manufacturer as the preamp at a similar price point.
As for the turntable, just scour Ebay and Craigslist for deals. /r/vinyl and other audiophile forums have a lot of reviews of older turntables so you can at least get an idea of the quality. Ideally if you can see the turntable in person you should try it out and see if you like how it sounds before you buy it.
Just bear in mind that (just like cars) your setup will only be as good as its worst component.
http://www.amazon.it/gp/product/B002GHBYZ0?psc=1&redirect=true&ref_=ox_sc_act_title_1&smid=A3JULAK39SLJ94
Ho visto che mi serve questo, ma se la rileva come scheda audio non mi conviene prenderla esterna per poi attaccarci il giradischi?
Sono confusissimo
This is also a nice wiha set. Wiha 75093 Micro Bit Set with ESD Safe Handles, Slotted, Phillips and Torx, 16 Piece
https://www.amazon.com/Wiha-75093-System-Slotted-Phillips/dp/B002PJ3IYE
I have a Wiha Micro Bit Ratchet Set on my "Expensive Shit" Wishlist. It would make my life easier when I'm working on whatever laptop/desktop/gadget/etc. I have in front of me. I've been wanting something like this for a while, but haven't had a chance to buy it yet.
I already have this tool, but the ratchet set has way more going on! PLUS, getting the ratchet set would allow me to give this to someone I know who needs one.
Win-Win!
Thanks for the contest!
I highly recommend the Wiha 77790 Ultra Driver Multi Tool. Be sure to read the comparison chart to understand the different bit combinations available. I use the Tradesman model.
If you need something a little smaller consider the Wiha 75093 16 Piece System 4 ESD Slotted, Phillips and Torx Micro Bit Set either on its own or in addition.
If you’re looking for a good set of precision drivers I recently acquired the Xiaomi Wiha Precision Screwdriver Set, 24 Magnetic Driver Bit Set, Pocket Screwdriver Tool Set, Mini Screwdriver Kit, Repair Tool Kit for Electronics and am very pleased with them. If you’re willing to wait and run the risk of receiving a counterfeit product, you can also find this set (as I did) on Ali Express for a few less dollars.
FWIW I carried pocket knives on the NYC Subways for over 20 years without once attracting attention.
if you want to stick with wiha and get a bit of other bits
cheapest wiha set
[this is what I used a for along time, the other bits come in handy for random jobs but it's a cheap metal that will warp sometimes. I mainly use the micro bit holder for my wiha bits now]
(https://www.amazon.com/dp/B07GYM7W6L/ref=cm_sw_r_cp_apa_i_UcmTCbSMSF3KB)
the cheapest micro bit holder, they other bits probably suck but the holders are usually fine, I mean, how can you really screw that up
It's not the cheapest, but this Wiha set is what I use. A good torx set will go a very long way.
And Nano Oil.
http://www.amazon.com/gp/aw/d/B002PJ3IYE/ref=mp_s_a_1_3?qid=1408634558&sr=1-3
This is it. It's an awesome screwdriver. The bits aren't magnetic which I thought would be bad but they are so good they don't need to be.
I've personally used the following kits:
Kit Option 1
Kit Option 2
Both are great. The second kit adds a few tools for mobile device repair/fat finger support.
Yup, I just replaced it and its been working fine ever since. There are various youtube videos on replacing the power supply, its easy. You'll need a TR8 screwdriver. I bought a set that costs around 15$ CAD. Power supply cost about 55$.
​
https://www.amazon.ca/TEKTON-2830-Everybit-Precision-Electronic/dp/B009MKGRQA/ref=sr_1_7?crid=3I5S4DKEMKDAF&keywords=tekton+screwdriver+set&qid=1566453570&s=gateway&sprefix=tekton+sc%2Caps%2C153&sr=8-7
​
https://www.amazon.ca/ADP-240CR-Replacement-Playstation-CUH-1100A-CUH-1115A/dp/B07GYJWXZ7/ref=sr_1_3?crid=2CIXD4AMOGG25&keywords=ps4+power+supply&qid=1566453593&s=gateway&sprefix=ps4+power+supply%2Caps%2C134&sr=8-3
There are tons of guides and videos on youtube to help you out. Its not complicated. There are around 7 screws(4 on the back of the PS4 and 3 holding the power supply in) you gotta take out. Unplug it and pull it straight out while trying not to bend the prongs. Pop your new power supply and screw everything back up. Took me about 10 minutes. I hope that fixes your issue because if it doesn't, then it might be the logic board and you might need professional help.
In other words, if you've mastered the tool, you probably own it. If you can't be arsed to spend $11.11 on this and wait two days, then I wouldn't recommend you go "exploring". If you have done the basic research, you can't be kept out of anything. It isn't cryptography, for fuck's sake; it's a somewhat uncommon screw, the bits for which are easily available.
Here are some links for the product in the above comment for different countries:
Link: this
|Country|Link|
|:-----------|:------------|
|UK|amazon.co.uk|
|Canada|amazon.ca|
This bot is currently in testing so let me know what you think by voting (or commenting).
Get this. It has everything you need to fix and assemble most 3D printers.
TEKTON 2830 Precision Bit and Driver Kit for Electronic and Precision Devices, 27-Piece https://www.amazon.com/dp/B009MKGRQA/ref=cm_sw_r_other_apa_npFlxbKGM4BG9
That SONOXY is probably fine, sorry I missed it on your list.
For precision something like this https://www.amazon.com/gp/product/B009MKGRQA/ref=s9_dcacsd_bhz_bw_c_x_1
or if you are cheap https://www.amazon.com/dp/B014X1KMWW?psc=1
for normal size screw driver, because I accidentally leave mine places all the time, I just get a cheap basic one. Used to get nice $30 ones but I just lose too many. I've never purchased tools from amazon either and not used to USD so kind of tough. As long as it has philips and flat head, square or whatever it's call you are a good. Any will have those.
I bought this set years ago - Tekton 2830 - and it's my go-to for all small electronics.
It has the PH00 you need for the DS4 and also the TR9 bit if you would ever want/need to fully open up your PS4.
Also has a bunch of special bits that are needed for iPhones, Wiis, Xboxes, and pretty much any other small electronics.
I bought this for fixing up Gamecube controllers because it has 2 triwing tips plus all kinds of other screwdriver heads - and the screwdriver handle is hollow with a cap so you can store the screws in there while you work. Highly recommend.
You'll need to go to a micro center or specialty computer store to get the screwdrivers, since they won't be available at a regular hardware store. You'll need a small phillips head for the back case and a star bit for the hard drive.
The difficult one is the tri-wing screwdriver that you need for the battery. This is a pretty cheap set that should cover all of the bits you will need
Hope this helps!
If you don't already have a set, you could try something like this maybe? I have the larger set (Seems pricey compared to the CDN price) which I am going to use to mount my block.
https://www.amazon.co.uk/TEKTON-2830-Everybit-Precision-Electronic/dp/B009MKGRQA/ref=sr_1_1?ie=UTF8&qid=1496867590&sr=8-1&keywords=tekton+everybit
I bought this one off amazon a little while ago and it works wonders for me. It has T-1 through T-10 which will cover all the hardware you're going to encounter. Plus it's cheap
if you're talking about the rubber on the joystick, you find find replacement joysticks on amazon: http://www.amazon.com/Gamecube-Replacement-Analog-Yellow-Replaces-Controller/dp/B004H7P0B6/ref=sr_1_1?ie=UTF8&qid=1421534140&sr=8-1&keywords=gamecube+joystick However, in order to open the controller, you need a tri-wing screwdriver: http://www.amazon.com/Tri-wing-Screwdriver-Nintendo-Gamecube-Gameboy/dp/B000S6AG9G/ref=sr_1_1?ie=UTF8&qid=1421534165&sr=8-1&keywords=triwing+screwdriver Although, I would recommend not getting if from this seller (Just wanted to show the type of screwdriver needed). While it is cheap, a lot of people have waited 6+ weeks for it and nothing from the seller (me included). I would recommend buying this handy tool kit: http://www.amazon.com/TEKTON-2830-Everybit-Electronics-Precision/dp/B009MKGRQA/ref=sr_1_2?ie=UTF8&qid=1421534165&sr=8-2&keywords=triwing+screwdriver replacing the joystick isn't that hard, everything fits into place
It depends on the quality. I have a couple sets from Wiha ranging from $15-50, but you certainly don't need to buy ones that nice. I bought a couple of these sets to give to people last year. I kept one for myself and it is percectly fine.
I have liked this Tekton 27 piece set for a while. I mostly like it because it comes with both size pentalobe bits, if you're doing any apple repair stuff. It comes as part of their 135 piece set too, which I think is a good deal. Reach isn't very long is the only real downside.
I have a MBP 2009, and i just replaced my battery: No bullshit, easiest thing i've ever done.
I bought this THIS Battery from Amazon and THIS toolkit for the Y-1 screwdriver (side note: you need this screwdriver; i opened up my MPB and saw the screws holding the battery in place and said "WTF IS THAT?" Checked Lowe's, Home Depot, and Radio Shack…none of them had it).
Take the plate off of your MPB, unscrew the two Y-1 screws, disconnect the battery cord (do not pull it out; there's a tab where in connects to the motherboard?…push it), plug in your new battery, screw it back in, put your cover back on, and BAM.
That was three weeks ago…no problems since.
Make sure you ground yourself first.
A new screen and back cover would be $68 from eBay, I just replaced the battery in mine and it's awesome, went from around 4 hrs of screen on time to 8 hrs. You can get a new screen and frame from eBay here for $57.66, and you can get a new back cover from $10.33-$19.51 (depending on color) here is Metallic Red, Black, and here's Ballistic Nylon Black, and Blue. I'm also assuming that you haven't replaced your battery either so here's the battery from Amazon for $12.98 if you want that too. If you don't have small screwdrivers/bits then you'll need to buy a cheap "mobile" work kit, I used this one from Texton for $9.24. It might seem easier to just buy a new phone, but there's nothing that really compares to the Turbo, I would also watch this video from JerryRigEverything on repairing the device before purchasing anything. The fact that the screen comes with the frame will make replacing the screen easier and you won't have to worry about applying adhesive or removing the frame from the old display, and there's a lot of adhesive holding the back cover on, when I replaced the battery I removed all of it and nothing is shaking around or loose. So for a new screen, frame, back cover, battery, and tools, it would be $90.21.
POWERTEC 71002 Abrasive Cleaning Stick for Sanding Belts & Discs Natural Rubber Build | For Woodworking Shop Sanding Perfection | A"Must Have" Sanding Accessory https://www.amazon.com/dp/B00AJW0CY8/ref=cm_sw_r_cp_api_i_r2xGDbVMCGHSE
https://www.amazon.com/POWERTEC-71002-Abrasive-Cleaning-Stick/dp/B00AJW0CY8/ref=sr_1_1?ie=UTF8&qid=1499737629&sr=8-1&keywords=belt+sander+cleaner
Yup a big ass rubber stick and a bunch of sweat brings most of it back, some mud/dog shit spots(uncleaned Boosted #2 with 4k miles) won’t come out but it looks pretty good. I’ll take a pic of both boards I just cleaned them the day I posted the wheel comparison picture.
I recently purchased this cleaner: https://www.amazon.com/dp/B00AJW0CY8
I was able to clean dirt and mud from my grip tape in around 10 minutes and make it look like new ;)
For $9.5 you will get probably like 20-30 through cleanups of both pads.
Abrasive cleaning sticks are pretty commonly used https://www.amazon.com/gp/product/B00AJW0CY8/ref=oh_aui_detailpage_o00_s00?ie=UTF8&psc=1
I just ordered this and I'm finally gonna make my Vodka Spirit Bong into the bong it's been waiting to be transformed into. Probably gonna need a grommet and I'd like to find a way to make a perc although I'll probably buy a downstem with either slits or a tree perc
I just drilled my own holes for the first time yesterday! I was in the same spot, so many pretty pots but no drainage. I bought this set off Amazon https://www.amazon.com/Neiko-00823A-Diamond-Drill-Piece/dp/B00ODSS5NO/ref=mp_s_a_1_3?keywords=diamond+drill+bits&qid=1564513905&s=gateway&sprefix=diamond+dri&sr=8-3
I drilled 3 different pots yesterday and it was super quick and easy. The world will be your oyster!
Will this https://www.amazon.com/gp/product/B00ODSS5NO/ref=oh_aui_detailpage_o01_s00?ie=UTF8&psc=1 hole saw set fit directly onto a tool like this https://www.amazon.com/BLACK-DECKER-BDCS20C-Lithium-Ion-Rechargeable/dp/B00TM2T9C2/ref=sr_1_1?s=power-hand-tools&ie=UTF8&qid=1478632498&sr=1-1 without any other drill bits or adapters? I plan to make holes in glass with this.
I bought these. You've really got to follow the instructions that the one commenter mentions but the hollow ones work way better than the drill bits that are really only for drywall.
You can drill through ceramic with a diamond bit. Drill slowly, irrigate, and you need to use a sacrificial plate of some kind to prevent blowout/chipping on the exit point (unless you're not too concerned with cosmetics). Glazed is a little trickier to work with.
Drill bits for glass. $10
https://www.amazon.com/gp/aw/d/B00ODSS5NO/ref=mp_s_a_1_1?ie=UTF8&qid=1472698385&sr=8-1&pi=SY200_QL40&keywords=glass+drill+bit&dpPl=1&dpID=51NxO3dp4lL&ref=plSrch
I bought these: https://www.amazon.com/gp/product/B00ODSS5NO/ref=ppx_yo_dt_b_asin_title_o07__o00_s00?ie=UTF8&psc=1
They work great, just remember to spritz with water often while you drill so you don't strip the bit! I'd suggest watching a few youtube videos so you can get a good idea of how to do the actual drilling part, but it's super easy and I have yet to wreck a pot while drilling a hole.
I like this version of the carb cap. The barb on the underside let’s you connect tubing for a few extra uses: https://www.amazon.com/dp/B00V334SME/ref=cm_sw_r_cp_api_i_rrkACb3FQHYP7
It's not classy, but I like to use a 2L soda bottle, filled through a carbonation cap with a tube to minimize CO2 loss. Cheap and effective, if sketchy-looking.
I have this hooked up to a submersion pump (Mark II keg/carboy washer). I just hook the ball lock to it, slip a half inch silicone hose over the tap and lay it in the basin to recirculate.
I use the stainless carb cap with a barb on it https://www.amazon.com/dp/B00V334SME/ref=cm_sw_r_cp_awdb_.jT8ybMVS3DKG
I put a piece of vinyl tubing on the carb cap barb and stick that inside 1/2" silicon tubing as an a reducer of sorts. The pump has a barb that fits 1/2" tubing.
I don't know if you have a craft brew set up or not, but a bottle of co2 and a carbonation cap like this will let you mix up, oxygen purge and keep, essentially for ever.
Yeah, put the regulator on low to fill the balloon. I used one of these things to fill it, have ball lock QD attached to regulator, but many configurations are valid. I think I've seen the barb-qds cheaper on Ebay
Laptop: On-site warranty
Printers: Outsourced service / toner
Cisco IP Phones: Smartnet
It's not worth the time of our staff (both IT and the non-IT staff affected) to troubleshoot hardware issues. We just swap it out with a spare, then call in service or RMA the hardware.
Re: screwdriver sets... I wouldn't spend the extra money on the iFixIt brand stuff--it's pretty much the same as the Amazon link. Personally I've found most of them are the same... it just depends on the case you get and the case included with that is pretty crappy (it's essentially the VASTAR one but colored blue.. once that plastic insert gets lost or damaged [it'll probably arrive damaged, too] those bits are going to be flying all over the place and be impossible to close the case). I'd go for something like this: https://www.amazon.com/exec/obidos/ASIN/B00QZLV03O/ezvid02-20
A magnetic screw driver set helps out a lot.
I got this one
An ESD mat
and wrist strap are strongly recommended, though not required. There are other ways to ensure that you're grounded.
Thermal paste Along with some >90% alcohol to clean off the old thermal paste if needed.
And lots of patience. I assembled and disassembled my PC multiple times until I was happy with my cable management.
Got this one which I use on airs pros etc
I'm generally a bigger fan of plastic spudgers for disassembly.
I'm also a big fan of iFixIt, but this is a decent cheap screwdriver set. I have one of these in my car and in my laptop backpack at all times.
I also highly recommend a magnetizer/demagnetizer tool.
Found the one I mentioned in other post. This is what I have.
https://www.amazon.com/dp/B015F734P0/ref=cm_sw_r_cp_api_i_OjW4BbDNZGZ60
Unfortunately, I can't tell you what kind of screws and which sizes are used. I don't believe there is a "standard" - so it might vary from manufacturer to manufacturer.
One of these should have what you need, for sure. https://smile.amazon.com/Vastar-Magnetic-Precision-Screwdriver-Smartphone/dp/B015F734P0/
Yeah but I would buy a whole kit, you will always need an assortment. This kit will be with you until you die, also it has magnetic tips so the tiny screws won't fall in a crack and disappear.
Vastar 62 in 1 with 56 Bit Magnetic Driver Kit, Precision Screwdriver Set Smart Phone Repair Tool Kit with Cleaning Cloth https://www.amazon.com/dp/B015F734P0/ref=cm_sw_r_cp_api_mvT9ybKWNRJJG
/u/MrVinceyvince
if the bit isn't in this kit I wouldn't know what to do myself...haven't found one yet....there is very few "electronic" security screw bits this does not have if any.
best $12-14 you will ever spend towards taking things apart.
Amazon
Vastar 62 in 1
https://www.amazon.com/Vastar-Magnetic-Precision-Screwdriver-Smartphone/dp/B015F734P0/ref=sr_1_6?ie=UTF8&qid=1503977321&sr=8-6&keywords=electronic+screwdriver+set
>> -64 bit iFixit kit(laptops and other small PC work)
> This is a solid piece of kit
Even then, most of those obscure bits he isn't going to use that often if ever. I've bought a kit similar to this one and that was at least 3 or 4 years ago and I still don't really have any major complaints about it other than the crappy tweezers that were in my kit but even those still do the job and don't really slow me down using them.
I believe the reason you're search isn't coming up with much is because it is the handles themselves which are magnetic, and it is passed through the bits. I would look into a kit like this, or possibly a magnetic ratcheting T handle and driver set.
http://www.amazon.com/dp/B015F734P0?psc=1
This may seem dumb, but would you guys recommend this over the Vastar set? I was thinking having the flexible shaft and a few more bits might be useful in some of my builds.
I got this one for half the price (originally just for the torx security bits) and it has held up well: https://smile.amazon.com/gp/product/B015F734P0/
If you're still on this, I bought this screwdriver set and it's juuuust barely long enough to reach into the handle to unscrew the two in there.
https://www.amazon.com/gp/product/B015F734P0/ref=oh_aui_search_detailpage?ie=UTF8&psc=1
Just get one of these. It includes that bit, and I've never had to buy another screw driver again.
No mate you won't need any additional cables, the motherboard willo come with SATA cables and your power supply will come with the necessary power cables. Do have a screw driver set such as this one: https://www.amazon.com/gp/product/B015F734P0/ref=oh_aui_detailpage_o03_s00?ie=UTF8&psc=1
It has a number of attachments that can always prove handy and more so, it's magnetized and will make your life easy when dealing with the little screws. And no a magnetic screwdriver such as that one won't damage anything, the magnetic field is too mild!
Good luck on your build and do write in again if you're stuck at any point. Cheers!
Tofu is pretty easy to put in everything if you know how to cook it and is a better source of protein than meat on a per oz basis. And it's inexpensive also, you can get a brick of tofu for like $2 and it contains +40g of protein and only like 360 calories. A cheap tofu press will pay for itself the first time you use it, only real requirement for cooking with tofu. I have this press and its really nice, because you can keep increasing the strength of the press as more water drains, and the water just sits in the basin on the bottom so there is no mess. The power towel and heavy object trick is tedious and I don't recommend it.
Personally, asian style tofu dishes are the fastest to make imo.
Press and cube the tofu, then toss it in corn starch. Put about maybe 1/4 cup of high heat oil (I use canola) in a pan and get it real hot, then fry the tofu. If the tofu looks dusty still, add a bit more oil. The outside of the tofu should be nice and golden and crispy when its done, takes about 4-6 minutes. Turn the heat off, and then put your favorite choice of sauce on, using the heat left in the pan to reduce the sauce. Eat. If you want to get fancy you can add rice or veggies like lightly steamed broccoli into the mix. Assuming you let the tofu press sit while you did other things, the actual prep & cook time is less than 20 minutes. The oil, sauce, and corn starch obviously add some calories.
Burritos with imitation Chipotle sofritas are also a fav of mine, but that takes more time and planning since beans are involved (please see my recent PSA of why you should never rush bean prep lol). You can cheat the intricate recipes for sofritas mix with straight up pulling the pressed tofu apart with forks, then mixing taco seasoning (I recommend medium or hot), some lime juice, a bit of black pepper, and a tiny bit of vinegar, a bit of water, then letting it simmer. It doesn't taste as legit, but requires WAY less time and ingredients.
Or if you are feeling real lazy and don't mind boring foods, quinoa and a bit of brown sugar go a long way also for good macro split meal that is also on the cheap.
I am gluten intolerant so I’m really thankful for Beyond Meat being the popular option as well. Especially for their plant based sausage and their chicken when cooked right.
Its really frustrating that the few unique vegan options around me feature seitan so I can’t eat it. Happy for others obviously, it just looks so good! 😭
Oh gosh, I hope it rises in popularity in Australia so it’ll be less expensive. I’m in the states so, its not too much. But I am trying to make better use of tofu as its really delicious. I like a redditor’s comparison of tofu with flour.
Mix it with the right ingredients and you have something amazing, you don’t eat it as is to get the most out of it. I read some people actually eat it raw, but I’m saving all of mine for the meal I’m making.
This is the link to the tofu press I got
I had the same dilemma for a long time! I highly recommend buying one, as it's so much more convenient. I recently got this tofu press, and it's been great!
My goto lately has been either tofu "eggs" or scramble, which I make by combining a seasoning mix to coat the outside of pressed, not previously frozen firm tofu. I just eyeball it, but it's mostly nutritional yeast, with a few dashes of turmeric, some onion and garlic powder, some ground mustard, salt, pepper, and about a Tbsp of corn starch mixed well. I just cut a hunk of tofu into four equal sized flat planks and coat them well and throw them in the skillet with veggie sausage, onions, peppers, sometimes vegan cheese, and always hot sauce. Super easy, and super tasty!
Tofuture
It may need cleaning, or if it’s a pro and has reflective surfaces enabled (I think that’s the setting) or other Pro settings turned on it can add some more strain initially loading things in.
Mine was doing the same, clleaning out the PS4 of all the dust helped tremendously. It still gets somewhat loud, but not nearly so bad, with the Pro settings enabled at first, but then dies down.
To clean it you need some tools. These are what I used. ORIA Screwdriver Set, Magnetic... https://www.amazon.com/dp/B01E16J6RQ?ref=ppx_pop_mob_ap_share
Also I really recommend not just stopping at cleaning the fan, but getting all the way down to the heat sink. That can get clogged really badly with dust. I never thought about it until my PS4 kept shutting off due to overheating when playing God of War and the new Spider-Man. Once I got the heat sink cleaned I saw a ton of improvement and it stopped shutting down. Now I just make sure to clean it every 4-6 months and keep the side vents well dusted every week.
Hope that helps. :)
https://www.amazon.com/ORIA-Screwdriver-Professional-Precision-Smartphone/dp/B01E16J6RQ/ref=sr_1_3?ie=UTF8&qid=1511977685&sr=8-3&keywords=oria
I work in a computer repair shop. We found this set last year and I highly recommend it. The build quality is great, the screwdriver is extendable, and all the bits are magnetic. They saved money on the part the bits sit in being formed plastic but I have not found another tool set that can match it for price to quality!
Edit: For spelling and format.
ORIA Precision Screwdriver Kit, 60 in 1 with 56 Bits Screwdriver Set, Magnetic Driver Kit with Flexible Shaft, Extension Rod for Mobile Phone, Smartphone, Game Console, Tablet, PC, Blue https://www.amazon.com/dp/B01E16J6RQ/ref=cm_sw_r_cp_api_i_wDfADb9JXTR73
This is what I used and I was able to put everything together but all really need a good screwdriver and some bits but the kit I linked has everything you need and more
I have this screwdriver set. ORIA Precision Screwdriver Kit, 60 in 1 with 56 Bits Screwdriver Set, Magnetic Driver Kit with Flexible Shaft, Extension Rod for Mobile Phone, Smartphone, Game Console, Tablet, PC, Blue https://www.amazon.com/dp/B01E16J6RQ/ref=cm_sw_r_cp_api_i_xYMFDbYJVBT4Z
I’ve used the 2.0 on the other screw and it worked fine, but when i went to do it with the other (which i’ve tried with some of the one that didn’t fit cause i’m a moron) the screw head was that damaged, any advice or video will be appreciated
Thx
And also sorry for my bad english and terminology. I’m from Argentina and speak spanish
I only have the screwdrivers to take the screws of the back casing off. To get to the hinges I assume I need different drivers. Do you think that this set would suffice?
https://www.amazon.com/Oria-Precision-Screwdriver-Professional-Electronics/dp/B01E16J6RQ/ref=pd_sbs_469_3?_encoding=UTF8&psc=1&refRID=E3NPMTTM2ZQC8SXNW32C
ORIA Precision Screwdriver Kit, 60 in 1 with 56 Bits Screwdriver Set, Magnetic Driver Kit with Flexible Shaft, Extension Rod for Mobile Phone, Smartphone, Game Console, Tablet, PC, Blue https://www.amazon.com/dp/B01E16J6RQ/ref=cm_sw_r_cp_tai_PY5MDbR6F2XXD
It's just a screwdriver. Don't need to get fancy.
ORIA Precision Screwdriver Kit, 60 in 1 with 56 Bits Screwdriver Set, Magnetic Driver Kit with Flexible Shaft, Extension Rod for Mobile Phone/Smartphone/Game Console/Tablet/PC, Blue https://www.amazon.com/dp/B01E16J6RQ/ref=cm_sw_r_cp_apa_i_wzBXDb7BF4ANY
Something like this suffices, I like the options for a variety of devices not just PC. You'd use maybe 2 heads out of all of it for PC building but for the price you can't beat that. You're building a pc here so smaller heads are needed for all the small screws you'll be tinkering with.
https://www.amazon.com/dp/B01E16J6RQ/ref=cm_sw_r_cp_apa_i_1V2XDbDHRJKVW
This is the kit I use. I highly reccomend it as having magnetic tips is a godsend and just having multiple sizes it general makes it so you don't strip the screws.
I bought a blue kit from Amazon a few months back and it has really came in handy, iPhone, switch, PS4 controller. It’s usually around 11-15 dollars and it comes in a blue or orange color scheme.
Something like this
ORIA Screwdriver Set, Magnetic Driver Kit, Professional Repair Tool Kit, 60 in 1 with 54 Bits Precision Screwdriver Kit, Flexible Shaft, for iPhone 8, 8 Plus/ Smartphone/ Game Console/ Tablet/ PC, etc https://www.amazon.com/dp/B01E16J6RQ/ref=cm_sw_r_cp_api_kscMAb2HB4TF1
I remember reading about that. Ironic that my Zeus is all jacked up right now with a grub screw that won't come out and I've tried everything. I ordered this from amazon today because I'm done with these shitty tools they send you: https://www.amazon.com/ORIA-Screwdriver-Professional-Precision-Smartphone/dp/B01E16J6RQ --- I've tried everything including 20 minutes in the ultrasonic, gorilla glue etc... I just got rubber bands a few minutes ago from the store which would be funny if that worked out of all the crazy stuff I tried.
The T3 is for grub screws and it should have the right fit for that too I would think.
Honestly, if I were to buy another precision set, I'd go with this that I just found on Amazon. But if you just want the one type of bit, the name of what you're looking for is Torx bits.
ORIA Screwdriver Set, Magnetic Driver Kit, Professional Repair Tool Kit, 60 in 1 with 56 Bits Precision Screwdriver Kit, Flexible Shaft, for 8, 8 Plus/Smartphone/Game Console/Tablet/PC https://smile.amazon.com/dp/B01E16J6RQ/ref=cm_sw_r_cp_apa_i_.1fXCbBAV24QJ
As far as tools and such, you'll need a splitter cable for the fans (which should be included with the Noctua fans) as well as this: https://www.amazon.com/GELID-SOLUTIONS-PWM-Adapter-Cooler/dp/B005ZKZEQA
That adapter is to connect the bottom mounted fans to the gpu, so you can control the fan speeds using MSI afterburner (overclocking/fan profile program). Besides that, just a screwdriver, microfiber cloth, 99% isopropyl, and these pads if you decide to go the Accelero route: https://www.amazon.com/gp/product/B00UYTTLI4/ref=ppx_yo_dt_b_asin_title_o02_s00?ie=UTF8&psc=1
You should also invest in a screwdriver set with small bits, as some of the screws will strip if you try to use too big of a bit. Something like this should be ok: https://www.amazon.com/ORIA-Screwdriver-Professional-Precision-Smartphone/dp/B01E16J6RQ/ref=sr_1_3?keywords=electronics+screwdriver+set&qid=1555887517&s=electronics&sr=1-3
The isopropyl and microfiber cloths are to wipe the cpu/gpu before applying thermal paste to ensure a completely clean surface, as well as clean up already applied thermal paste. DO NOT use paper towels as they will leave residue on the cpu/gpu.
All the things you mentioned about watercooling are why I didn't go that route. Not only maintenance concerns, but if something is installed improperly, you run the risk of destroying your components. It just takes one mistake or loose fitting to potentially destroy everything. Not to scare you from trying it or anything, but that was always a risk I wasn't willing to take.
I have my rear fan mounted to the case as intake, with the U9S blowing air toward the front of the case. I know it sounds stupid to vent hot air into the case, but this is how I get the best temps out of my setup. You might be better off aiming it upward, but I didn't want the bottom fans to be completely starved of air, so I put another 120mm intake fan on the front part of the side bracket to help cool the air coming from the cpu.
I also had the same concerns as you about the feet, and after several days of using the stock feet, I noticed how hot the table was getting underneath the case. I bought some custom feet from here: https://mnpctech.com/ncase-m1-mods/ncase-m1-black-silver-replace-feet/
They are a bit pricey, but I've heard of people buying feet meant for speaker amps that will work as well. They just need to use M3 screws to fit into the stock feet holes on the M1.
Edit: for the second fan, you would mount one on the back of the M1, directly to the case. The second fan would be mounted directly on the cpu heatsink, above the ram. If you're dead set on having that ram, you can always mount the fan a little higher so it clears the ram. Shouldn't be a big deal. If you plan on pointing the U9S toward the top of the case, then it doesn't matter what ram you have.
Edit2: wow thanks for the gold!
It’s like $15 on Amazon
I used this toolkit for the install: https://www.amazon.com/gp/product/B01E16J6RQ/ref=oh_aui_detailpage_o02_s00?ie=UTF8&psc=1
I ended up ordering this precision kit
https://www.amazon.com/gp/aw/d/B01E16J6RQ/ref=chk_gwtyp_product?smid=&psc=1
Yeah, I used this kit on my joycons
https://www.amazon.com/gp/aw/d/B01E16J6RQ/ref=yo_ii_img?ie=UTF8&psc=1
The one you're looking at looks pretty much the same.
Drilling under water with a diamond bit and with a towel at the bottom of the sink works well. Glass breaks pretty quick sometimes when it gets hot and vibrates. The water limits the Dremel/drill vibration and cools the glass. The towel is not just for smacking the bottom (which you will do), but also for leverage. I used one of these attached to the dremel.
*edit for formatting
>Flex Shaft
https://www.amazon.com/dp/B0000302Y8/
You could have saved if you got everything off Amazon:
Dremel 4000 = $73
15 100mm x 3mm brass rods = $8
36 Sheets of sandpaper = $8
Flex Shaft = $20
12 Euro Tools Needle Files = $14
2 Day trial of Amazon Prime (Includes free 2 day shipping) = $2
The files are more expensive than the $3 ones you find in Harbor Freight but you get two of every nice and sharp profile Including the Knife that helps you to get into tight spaces to make things like ASSA Gin Spools!
Engraving bits
Flex Shaft attachment
EZ Lock cutinng wheel kit
This. They sound super handy but in actuality mine spends most of its time in a drawer. But, I have many other tools like an actual angle grinder, pneumatic cut-off tool, sander, etc. so if I didn't already have these it might see more use.
The flexible shaft attachment has saved my butt a handful of times when I needed to grind/drill off something in a tight area.
You might try getting the flex shaft attachment. It's far enough away that it doesn't freak my dog out, and makes life generally easier
I don't see anything called a "dremel pen". Maybe you mean something like this?
Dremel Flex Shaft Rotary Tool Attachment with Comfort Grip and 36" Long Cable- 225-01- Engraver, Polisher, and Sander- Ideal for Detail Metal Engraving, Wood Carving, Sanding, and Jewelry Polishing https://www.amazon.com/dp/B0000302Y8/ref=cm_sw_r_cp_apa_i_QG-JDb0MBRBF1
I would totally say "OMG YAAAAAAAY!!!!" if I were to receive either Cards Against Humanity or this great Dremel Flex Shaft attachment for my Dremel, which would help me with my etsy orders! :D
Thank you for the contest! Yay! :D Keep on being awesome!
Thank you for submitting to /r/SmallYTChannel. You have spent 3λ to submit here, making your current balance 0λ.
/u/Dave_Ipsen, please comment
!givelambdato the most helpful advice you are given. Youwill be rewarded 1λ if you do so. For more information, read the FAQ.
Video data:
Field|Data
:-|:-
Title|Making A Tiny Viking Sword From Pieces of Scrap Metal
Thumbnail|Link
Views|66
Length|05:58
Likes/Dislikes|15/0
Comments|13
Description|In this week's video on The Ideas Guy, I take some pieces of scrap metal and forge, grind, sand and polish them into a tiny viking sword. Besides the adorable size (it's adorable, seriously) it accurately shows how many viking swords did actually look in history. Join me in making a tiny sword for all the tiny vikings of the world lol :)⤶⤶If you are interested in some of the tools I use in this video, follow these links to buy your own!⤶⤶Dremel 3000 Tool:⤶https://amzn.to/2Jot7tq⤶⤶Dremel Flex Shaft Attachment:⤶https://amzn.to/2JBaYbY⤶⤶⤶#theideasguy #tinyviking #modelviking #vikingsword #scrapmetal #imadeit
Channel Data:
Field|Data
:-|:-
Name|The Ideas Guy
Thumbnail|Link
Subscribers|205
Videos|23
Views|3449
^/u/SmallYTChannelBot ^made ^by ^/u/jwnskanzkwk. ^PM ^for ^bug ^reports. ^For ^more ^information, ^read ^the ^FAQ.
I don't know if many lockpickers have tried it, but I have seen a dremel vice that looks like it would be very decent for an entry level vice as it is much cheaper (30$) than the vice you are looking for which usually runs about 75-100$. As for the vice you are seeking, I think this is it, the PanaVise 350 which is pictured in your first link(with the jaws reversed).
PanaVise 350 Multi-Purpose Work Center
its a bit of overkill for what he's using it for, but its more general purpose than the circuit board attachment
I use the thing Bosnian Bill uses. I will link it for you.
Edit. Here, this things is pretty nice and I have used it for other things
Thanks for this...I had this in my cart, but am wondering which jaws might be more versatile.
https://www.amazon.com/dp/B00011QA0M/?coliid=I9WQ4IH9W2YM4&colid=7QT3HBCPKJOP&psc=0&ref_=lv_ov_lig_dp_it
BosnianBill uses the PanaVise 350.
So I think I'm only a handful of people who uses a PanaVise. In particular, I have the 350
Works well and I know it will last forever since they're still being used at work. My only gripe about any of the vacuum base styles is the potential that if it's poorly treated the rubber could start to decay. That and how the surface needs to be super good in order to use the thing. Not knocking on anyone who uses those types of vise, but it's something I considered when I purchased mine.
Anyways, a vise is a vise and as long as you're not cranking down on it hard, it'll last. Also, if you don't plan on using the vise for anything else, then the cheaper ones will do just fine.
For Soldering Irons if you go Hakko or Weller just remember that they come with conical tips which are not very good at most jobs.
Get a chisel tip and save your soul
Panavise makes board holders. The 350 is my favorite, despite the cost it will probably never need to be replaced.
http://www.amazon.com/PanaVise-350-Multi-Purpose-Work-Center/dp/B00011QA0M/ref=sr_1_4?s=industrial&ie=UTF8&qid=1324882350&sr=1-4
The only good 3rd hand commercially that is probably a step above is one for jewelers. They are expensive
You can cope with the cheap ones, but I have been eyeing this instructable
http://www.instructables.com/id/Third-Hand-A-multi-use-helping-hand-for-electro/
Here's the exact PanaVise I ordered, it's $89 w/Amazon Prime.
Ok, here are some plans for you: Modular shelving plans
If you have any questions, let me know.
These require the use of a pocket hole jig. If you don't have one, get one. This one is the most basic kit.
Yes! A few options...
Hope that helps!
>d say unless I already had the jig, for this project I'd make do with finish nails or brads and have a plenty strong joint once glued.
It will take longer than the more expensive option, but you can a block that you clamp to the board with the drill bit for under 20 bucks. Its a single hole, but handy for fixing stuff. Also, there is another jig that has a better system than the kreg IMO out there... Armor something. Adjustments are single and easy. I have had mine for several years and used it some. I like, but finding myself using a mix of techniques for different reasons. Mostly because I can't hid the pockets or I'm going for a different look. Also exploring different joinery.
This a box of screws would be pretty cheap to build it.
https://www.amazon.com/Kreg-MKJKIT-Mini-Jig-Kit/dp/B00065WPP2/ref=sxbs_sxwds-stvp?keywords=kreg+jig+drill+guide+block&pd_rd_i=B00065WPP2&pd_rd_r=e7de3652-f32f-4107-8fc5-29fda08a97ff&pd_rd_w=WpBs2&pd_rd_wg=jqJxf&pf_rd_p=a6d018ad-f20b-46c9-8920-433972c7d9b7&pf_rd_r=SNJX6VEMAQQYQE2J1DA9&qid=1562688841&s=gateway
Get a pocket hole jig and you'll get the same thing without having to buy brackets.
Kreg MKJKIT Mini Kreg Jig Kit https://www.amazon.com/dp/B00065WPP2/ref=cm_sw_r_cp_api_i_8ZSHDbRY2XENK
I don't think you need much more out of a pocket hole jig than that. Unless you're a production shop that is making a ton of cabinet face frames, I think a pocket hole jig should be unintrusive, flexible, and convenient.
Actually, I think this one is better because you get much more flexibility in how you can use it. It's easier to make holes at weird angles to the edge, and to fit into tight spaces.
sorry about the delay, I couldn't find it & then I forgot.
I'm guessing you have already found a solution, but you are welcome to this https://smile.amazon.com/Kreg-MKJKIT-Mini-Jig-Kit/dp/B00065WPP2?sa-no-redirect=1 minus the bit.
Kreg MKJKIT Mini Kreg Jig Kit https://www.amazon.com/dp/B00065WPP2/ref=cm_sw_r_cp_api_i_RBZ4Cb55MTRYJ
https://youtu.be/zxMqtmoOVbY
Obviously drill the holes on the inside facing edge
I would highly recommend a Kreg Jig. This little thing is super useful for making quality furniture. If you dont want to get that I would recommend clamps. You always need clamps.
Is this the sort of thing you mean? Just clamp it in place and screw it together?
The picture looks like it has an allen key too, what is the purpose of it?
You could always buy a Jig. Something like this
Edit: To be clear, I'm not recommending this specific Jig, just pointing out that such a tool exists
Used Micromesh https://www.amazon.com/MICRO-MESH-SOFT-TOUCH-SANDING/dp/B000H6EC4C/ref=sr_1_1?ie=UTF8&qid=1483716043&sr=8-1&keywords=micromesh
You're only going to 600 grit. You can use [Micro mesh] (http://www.amazon.com/MICRO-MESH-SOFT-TOUCH-SANDING/dp/B000H6EC4C) sanding pads starting from there.
These pads will give you a very glossy finish by themselves you could use carnuba wax as a protective finish but even though carnuba is very hard (for wax) it won't give you the same durability as a CA finish.
I usually and to 220 or 320 then start layering on the CA. Give that 10-15 minutes to cure then start in with the Micro mesh for a super glossy, durable finish.
The PSI micromesh sanding pads work fine, and you can definitely get great results with them, but I've had much better luck with this style. Definitely worth trying when it comes time to replace your current pads.
Here is the desktop version of your link
I tend to want to stay away from vapor polishing.
I prefer prime and sand. If you don't want paint though: Get what's called "micromesh". They're little sponges that comes in small/large pads, sticks, files, and other shapes and range from like 1000 grit to silky smooth 12,000. You just soak them in water then sand your way up through the grits. You can get a honest to goodness mirror finish on your parts that way.
I got this set and they're great
Would these be considered better for nibs than the ones Amazon sells for $10? If so I'll order these instead.
Again, let's divide these into three groups:
Use some micromesh like this: MicroMesh and then some nice plastic polish after you go through the grits to keep them shiny.
Granted I haven't done this on any dice but I've removed scratches from plexiglass and acrylic this way and its pretty good all said and done.
If you live in the states its going to be a ton easier to get ahold of, but they sell these bigger ones for 20$, which work really well to cut into 4 squares
living in Canada im pretty much stuck getting the smaller ones for 40$ unless I can stand waiting the longer shipping times for the larger ones from the states.
a single bigger set will definitely last you a few sets of keys especially if you cut it into 4. Its also worth noting they last a really long time if you can use them with water, sometimes when using them on wood with an oil finish, i cant use water without ruining the finish so they tend to get kinda clogged up and dont last super long, but with plastic and using water to lubricate they will last you a very long time.
I had really good luck with light sanding, and then burnishing with the aluminum handle of an x-acto knife.
I've also had SUPER smooth results with the wood-fill using sanding/polishing sponges. (https://smile.amazon.com/MICRO-MESH-SOFT-TOUCH-SANDING/dp/B000H6EC4C)
Thanks! :-)
The micro mesh can be a bit hard to find...any specialty wood working store should carry it, but it's available online.
http://www.amazon.com/MICRO-MESH-SOFT-TOUCH-SANDING/dp/B000H6EC4C
http://www.amazon.com/MICRO-MESH-SANDING-SHEETS-INTRODUCTORY/dp/B000H6HIK2
http://www.leevalley.com/en/wood/page.aspx?p=62127&cat=1,42500
A cheaper method would be to start with a very fine steel wool, and then use a nail buffer, which is essentially a nail file with micro mesh on it...the "shine" side will be the finest. Both of these could likely be found in Walmart, etc.
So, I also try to avoid progressive sanding. My process is to use a heavy cutter to remove parts from the runner, a fine cutter to take the nub down almost flush. I trim the leftovers flush with an X-acto knife, with a little scraping if needed. To get rid of the scratches, I use a 12000 grit micro mesh sanding pad.
I use the same combination of scraping/micro mesh for removing mould lines.
The results are clean enough that airbrushing isn't needed.
http://www.amazon.com/MICRO-MESH-SOFT-TOUCH-SANDING/dp/B000H6EC4C
It's $5 at Gouletpens https://www.gouletpens.com/goulet-micro-mesh/p/GP-10014 but I got some from Amazon https://www.amazon.com/MICRO-MESH-SOFT-TOUCH-SANDING/dp/B000H6EC4C/ref=sr_1_2?ie=UTF8&qid=1502855608&sr=8-2&keywords=micromesh
Looks like oxidization, and the smell is a normal part of that process.
Soak it well with alcohol (cover any logos/painted areas on stem with vaseline), then start to sand off the oxidization using micro-abrasive pads. You can get a set from amazon that works well. For bad oxidation, maybe start with some 600 grit paper and then go to the pads. Once you work up to the highest grit, and the oxidation is all gone, the stem will look and smell new.
They are a great tool for restoring old, oxidized pipes.
But if you don't want to do that, then I'd just return the pipe if possible.
Here is the mobile version of your link
Yes it is very possible; I just picked up this set of sanding pads up off Amazon and they work wonders. The smoothest grit actually polishes the plastic. I would very much recommend them!
Take the time to sand down the nubs with progressively finer grits. I find these are convenient, http://amzn.com/B000H6EC4C
I also noticed a difference when going from no panel lining to simple pen lining, http://amzn.com/B00GRKPNUE
but similarly, there was a step up when going from pens to wash.
Edit: I also just came across this video; https://youtu.be/hOqkJA4G7HI?t=35m57s
http://amzn.com/B01871I5HS or super thinned enamel paint.
Know what I don't keep in my car? Candles. Know what I do? PB Blaster. Instead of using pinterest inspired gimmicks I do what actual adults do. Buy PB Blaster (or any other version of penetrating oil) and use it like it is intended.
It is not expensive and works wonders on everything. If you aren't in a hurry you can get it for $3.64 on Amazon Prime Shipped.
If you need it today then hit up your local Autozone or Wal-Mart or whatever place you have around you that deals with automotive stuffs. They will have it. It's everywhere. Know what they don't have in that aisle? Candles.
http://www.amazon.com/Blaster-16-PB-Penetrating-Catalyst-oz/dp/B000I2079E/ref=sr_1_1?s=automotive&ie=UTF8&qid=1394596607&sr=1-1&keywords=p+blaster
I use a stripped screw extractor kit. Very handy for under $20; I've had good luck with them.
Don't forget to spracy the screw with a penetrating oil first!
I have some of this. I'll give it a try. I feel like I was hitting it pretty hard but I was definitely afraid of damaging something. I could definitely hit harder. Thanks for the response.
locksmith here. I dont see any lock on the door. No dial at least. Is it key operated? It could just be a hatch of some kind thats rusted shut. Try lubricating the crap out of it and using something like pb blaster or a similar penetrating oil. let that sit for a while than try opening it.
Oh, and in the future try PB Blaster instead when you're trying to free something that is seized up. It is far superior to WD-40 for that task.
This stuff is your friend when it comes to rust. One can has lasted me awhile.
Spray that on the rusted area and let it sit for a day or two for best results. Get a wrench that fits on the bolt, and take a hammer to the end of the wrench. There are better and safer ways to break free a rusted bolt (impact hammer/wrench) but this is the cheap way.
As for your stripped screw problem, i had the same problem on my Acura. I have a fatty flathead screwdriver, probably 5 time normal. I dremeled a notch into the head of the screw, sprayed it with blaster, let it sit for a bit and cursed and put a fair amount of weight into it and it broke free.
I had to replace the front passenger hub assembly on my wife's minivan. The bearing nut came off with no problems and I thought that was going to be the bear. Nope. One of the brake caliper support bolts would NOT budge even with my impact and a half a can of PB Blaster. Eventually got it off after heating up the housing around the bolt with some
MAPPpropylene gas. That thing was ON there.Great job! You might try PBlaster next time you have seized screws, it does a much better job than WD40. I used it this weekend cleaning up a Disston D-15 Victory saw. Same store had a few stanley planes but they were too far gone for saving.
https://imgur.com/a/ZCANI -- Saw ended up good enough for me to use. Might watch that Paul Sellers video on sharpening them, I think it's sharp but who knows.
Apologies for the odd angles - uploaded from Imgur mobile and didn't see where to flip the image. Guessing saw dates somewhere between 1928 and 1945. The victory symbol changed to a "V" around then by the eagle.
Try using PB Blaster to penetrate the gunk. I had this issue with a old VW and PB Blaster helped. Also tried using the blow torch/impact wrench. that failed but PB Blaster and this methods combined worked. HTH
You've never heard of PB Blaster? This stuff is magic
https://www.amazon.com/Blaster-16-PB-Penetrating-Catalyst-11-Ounces/dp/B000I2079E/ref=pd_all_spx_5/146-4021135-0122059?_encoding=UTF8&pd_rd_i=B000I2079E&pd_rd_r=69018b96-57a5-11e9-8bb5-4d66d06308ae&pd_rd_w=Z79rJ&pd_rd_wg=BI4pX&pf_rd_p=181658a1-8c8b-49ea-9a7c-d3e4ca5d6a8c&pf_rd_r=1V3R7SNX7NNC1CXHCBE8&psc=1&refRID=1V3R7SNX7NNC1CXHCBE8
Try a different lube, like PB blaster
Try to intentionally apply pressure in the "ON" direction. Sometimes it will break free enough while tightening to come loose.
Try hitting the crank arm while trying to loosen/tighten. A rubber mallet or deadblow would be best.
If the above still does not work only then would I start methods that may cause damage... like more force or heat.
You need to use a screw extractor.
If you've lead a good clean life (and it looks like you haven't) it will come right out.
If you don't want to buy the tool or don't have the drill to use it with just go to your LBS. Any competent one should be able to do this for you for a rather small charge.
If you have reason to suspect the screw is in there real good start applying PB Blaster or other penetrating oil now. Do whoever will be removing it a favor and get penetrating early. WD-40 is not a good penetrating oil.
http://www.amazon.com/Kreg-R3-Pocket-Hole-System/dp/B000J43A7W/ref=wl_it_dp_o_pC_nS_nC?ie=UTF8&colid=11849T9OC3D6G&coliid=IUHIVR4L8ZJCO
The easy but expensive way is to use a bracket like this. Expensive not only because you have to buy one for each joint, but it also doubles the number of fasteners you need. And since you're being wise and using stainless steel fasteners only on your cedar fence, that cost adds up.
Cheaper would be to drill pocket holes into the end of each rail. Put the pocket holes in the face side that will be covered up by the pickets. This does two things: the pocket screw is angled into the meat of the post rather than the side and here you can get away with using cheaper coated screws because they'll be somewhat protected by the picket and if they do bleed, the picket will be in front anyway. Plus it's a much cleaner look.
I like the Kreg K3 for basic homeowner tasks. It's especially great for this because it's easy to move it to the long rails. Pair it with a cheap face clamp and you're set. Throw a little polyurethane construction adhesive in the joint (mostly to keep the water out).
This is how I built my fence. 3 years later and the rails are as tight as ever. I have every confidence that they'll make it to 15 years just fine. Or, rather, if something breaks on this fence, it won't be the rails.
You could use wood glue and pocket holes for extra strength on the corner along with the metal brackets.
Kreg R3 Jr. Pocket Hole Jig System https://www.amazon.ca/dp/B000J43A7W/ref=cm_sw_r_cp_apa_i_mG9iDbCNN2HRF
Something like this?
Wow! Thanks for an awesome reply. Unfortunately I'm not in a position where I can spend much money so I'll have to see if I can find some flea markets near me to buy some stuff at. All this stuff is great info that I need to look at better when I have time where I don't need to be asleep. But while I'm here I want to ask you one thing: What do you think of the Kreg jig? I'm using it to hold on the back of some floating nightstands and also used it heavily on my desk, although on my desk they aren't really load bearing whereas on the nightstands all the weight is going through that backplate first.
Thanks again for the awesome reply :)
I'm in the same boat. Apparently Lowe's has sales all the time on the Kreg jig.
The Kreg R3 Jr. seems to be the best option for broke asses like myself. It will probably be what I purchase to finish some of the projects I have around the house.
Take your pick:
Home Depot
Lowes
Amazon
I used this system - http://smile.amazon.com/Kreg-R3-Pocket-Hole-System/dp/B000J43A7W/ref=lp_552488_1_2?s=power-hand-tools&ie=UTF8&qid=1422105125&sr=1-2.
I really liked it as it also allows you to set your depth and distance and just go - all of my pocket holes were made in one sitting. I used it with an Irwin 6" Clamp (http://smile.amazon.com/IRWIN-Tools-QUICK-GRIP-6-inch-546ZR/dp/B00002244S/ref=pd_sim_hi_1?ie=UTF8&refRID=0BGS8N79X833JZTM4W81)
Kreg Pocket Jig is a little guide that lets you drill and secure a board to another board using pocket screws. This means that if you have two sides of an arcade cabinet, in your awesome arcade shape, you'll be able to affix boards to the inside face of the sides easily. So basically you'll be able to easily and sturdily connect your two sides together, making your frame.
Text will not do the job here, you should look up Kreg Jig on youtube and watch it in action, it will be worth a thousand words.
My assumption is you're going to make shaped sides from plywood (with a jigsaw or similar), then connect them with trusses, using pocket screws, then cover the trusses with plywood. That will give you your cabinet, though the screen and electronics mounting won't be trivial, and I (unfortunately!) can't help you with the electronics.
I strongly suggest looking into the Pocket Screw jig systems. There are many jigs available from makers like Kraig (expensive) to Harbor Freight. (cheap but functional if you are careful) Amazing for both carcass and face frames. Lost of videos on the Tube about this.
Built custom oak cabinets in a professional shop for several years and we used a Kraig Jig. The sweet thing is that once you glue up and screw down the joint, you can take the clamps off and use them on the next setup.
(Links for example only - NOT affiliate) https://www.youtube.com/watch?v=jvzaGtMsQyY
https://www.amazon.com/Kreg-R3-Pocket-Hole-System/dp/B000J43A7W/ref=sr_1_3?ie=UTF8&qid=1482774269&sr=8-3&keywords=pocket+hole+jig+kreg
+1 for pocket holes.
http://www.amazon.com/Kreg-R3-Pocket-Hole-System/dp/B000J43A7W/ref=sr_1_1?ie=UTF8&qid=1449595585&sr=8-1&keywords=kreg+jr
Hey man, looks way better than anything I could build at 15. But since you're asking for some constructive criticism, I'll give a few suggestions.
The one thing I really don't like is the screws on the bottom legs. There are lots of different ways to do this, with varying levels of difficulty.
First would be just counter sinking the screw then filling the hole with wooden buttons. You can pick up a usable set of counter sink bits at harbor freight for $7
Second might be pocket holes. You can get a jig for ~40 bucks. Honestly, this might not be the best option for you. For the price, you could get a lot of other more useful tools.
Third might be a [mortise and tenon joint] (https://www.youtube.com/watch?v=aBodzmUGtdw&t=3s). You can make these by hand with a decent hand saw and some chisels, and square. But it its very hard to do without a vise, which is pricey. Also takes a bit more effort and skill. You can also make them with power tools.
You could have made the cutouts for the seat slats a little cleaner. If you get a combo square and chisels. You don't need fancy chisels. These are decent starter chisels if you learn [how to sharpen] (https://www.youtube.com/watch?v=Ki8tt-VjwqI).
Amazing work sir! It turned out fantastic.
EDIT: Check out the Kreg Jig . $40 and well with it! Also on Amazon.
The casual user can get by just fine with the $40 Kreg pocket hole jig. I do a decent amount of woodworking and it works well.
http://www.amazon.com/gp/aw/d/B000J43A7W/ref=mp_s_a_1_1?qid=1458056617&sr=8-1&pi=SX200_QL40&keywords=kreg+jig&dpPl=1&dpID=41auGxMjmXL&ref=plSrch
They might like something like this:
http://www.amazon.com/gp/aw/d/B000J43A7W/ref=redir_mdp_mobile/186-2134268-4492466
Depends on the material the face plate is made of. If it's metal get a step bit, a decent drill and a drill guide
https://www.amazon.com/Neiko-10194A-Titanium-Drill-Speed/dp/B000FZ2UOY
https://www.amazon.com/wolfcraft-4525404-Muilt-Angle-Attachment-Drills/dp/B000JCIMEA/ref=sr_1_5?s=hi&ie=UTF8&qid=1519142267&sr=1-5&keywords=drill+guide
those should work.
If it's plastic I'd get some forsner bits depending on what size buttons you want
Too late for this, but easy outs are NOT for use with seized screws. They are only for use with screws whose head is buggered.
I wrote this up a while back, you should give it a read:
Best tools for removing broken or stripped screws.
As for getting the easy out OUT, there is another option, but you need some crazy tools. Mainly a drill-press stand for your hand held drill, and a hollow, diamond coring bit, like what you would use for drilling a hole through glass or ceramic. If you can cut around the easy out with the coring bit, then you can break it free. Next, you finish over-drilling the hole, and then insert a threaded insert to bring the hole back down to the correct size.
Parts I'm talking about:
Drill guide The drill guide is important because the coring bits will walk all over the place since they don't have a center point. The guide can be fastened, held, etc. in place better, and help guide the bit to where it needs to go.
Core bit
You can also use a more standard bimetallic hole saw, just without the pilot bit installed.
Threadsert (Choose the ID of the original fastener, and find it in SS, not carbon) Don't use a Helicoil, those things are shit. (Speaking from LOTS of experience here...)
Two taps that match the outside threading of the threaded insert. One a taper tap, and one a bottoming tap.
Forstner bit as mentioned, and one of these is key for making the hole level, straight, and better than by hand:
https://www.amazon.com/Wolfcraft-4525404-Attachment-4-Inch-8-Inch/dp/B000JCIMEA/
I would probably try to make a jig that incorporates a drill guide.
Basically, use scrap wood to knock together some kind of cradle to hold your blank perfectly horizontal, then find a way to mount the drill guide onto the cradle, rigidly and at perfect right angles, then drill away.
Also - I don't have a drill press, so I'm considering getting one of these drill-holder-guides from Milescraft or Wolfcraft in order to control the drill during this operation.
You can buy an attachable jig for a hand drill like this one
I did use a drill press. And even then not all the holes lined up perfectly. I be to do some fine tweeks at the end. I'd say either find a buddy with a drill press or save up and buy one. Some aren't all that expensive. Drill presses come in handy. Good luck with you build. This Or This
It's a little small. It has a 208 mm swing, which is 8" in Freedom Units. That means its maximum depth is 4", which is too shallow for some bridge posts.
If you're looking to go cheap, and you're building from scratch instead of performing repairs and general shop projects, a cordless drill attachment will work for you.
There's only 6 or 8 holes to drill on a standard 6-string guitar, so while a drill press is very useful, it's not an absolute necessity.
That being said, having a drill press is awesome, and it's worth paying for a larger used one if you decide to invest in one. I have a used one with a 14" swing and it's an ideal size.
Not to mention if you're going to be working on a bike being able to remove stupid JIS or Phillips screws without stripping them is invaluable. Buy this and move on with your life. JIS tip not included.
You can find one of these at most auto parts stores.
TEKTON 2905 3/8-Inch Drive Manual Hand Impact Driver Set, 7-Piece https://www.amazon.com/dp/B000NPPATS/ref=cm_sw_r_cp_api_kdr2AbZP86E84
Need a hammer and just be carful. If this doesn’t work you’ll need to drill out the screws. I have ideas about that but try this tool first.
These do a great job also until the head is fully rounded out
TEKTON 2905 3/8-Inch Drive Manual Hand Impact Driver Set, 7-Piece https://www.amazon.com/dp/B000NPPATS/ref=cm_sw_r_cp_api_i_b0OkDbAQAGG1H
You need an impact driver,
TEKTON 2905 3/8-Inch Drive Manual Hand Impact Driver Set, 7-Piece https://www.amazon.com/dp/B000NPPATS/ref=cm_sw_r_fm_apa_i_VVNsDbWB1P6WT
Some like this are cheap, nicer ones are out there but if you only need it once it might not be worth it.
I have had to use one on my first bikes brake reservoir, and 3 of my friends... they come in handy.
https://www.amazon.com/TEKTON-2905-8-Inch-Manual-7-Piece/dp/B000NPPATS/ref=sr_1_1?ie=UTF8&qid=1511535850&sr=8-1&keywords=manual+impact
Get a manual impact for that. Every hit on it turns the driver, so you have maximum force on each turn.
/u/dhroknoobx
Get you an impact screwdriver. https://www.amazon.com/TEKTON-2905-8-Inch-Manual-7-Piece/dp/B000NPPATS/
And you absolutely need one of these!
TEKTON 2905 3/8-Inch Drive Manual Hand Impact Driver Set, 7-Piece https://www.amazon.com/dp/B000NPPATS/ref=cm_sw_r_cp_apa_i_BpUDDbSQB0RGV
Impact Screwdriver
> As an aside, just bite the bullet and drill those damn screws out.
If the heads haven't been ruined yet, on a 2010 they should come out pretty easily with an impact screwdriver, which you can sometimes rent from auto parts stores.
The hollow sound definitely makes me think there's either a dented dust shield or a piece of debris stuck between the shield and rotor. However, I had a grinding noise sort of like this once that turned out to be one of the pad clips having slightly cracked and warped such that it could rub the rotor under braking.
You could try buying an impact driver and using that, which could deliver more torque to the screw than you can with just a regular screw driver.
This is what I mean
There is a manual impact driver that will work better than any electric driver. You basically put it on the screw then hit it with a hammer (preferably a dead blow hammer for best results) and it will literally break any screw loose, I’ve used one for many years in the navy on gun mounts when the screws were seized in place due to the rust.
The benefits are that it won’t strip the screws out and it’s cheap enough that you can pick it for about $20 or less at places like harbor freight.
The down side is that it can be hard to use sometimes when in a tight spot while trying to hit the head and it’s not as fast as an electric impact.
If I were you I would use the manual impact to break them loose then use the electric impact to speed up the removal. Here’s a amazon link so you can see what it looks like TEKTON 2905 3/8-Inch Drive Manual Hand Impact Driver Set, 7-Piece https://www.amazon.com/dp/B000NPPATS/ref=cm_sw_r_cp_api_i_pxIZDbMCYSWGE
I can't tell if you have room, but if you do, I'd try one of these along with a hammer.
https://www.amazon.com/TEKTON-2905-8-Inch-Manual-7-Piece/dp/B000NPPATS/ref=asc_df_B000NPPATS/?tag=hyprod-20&linkCode=df0&hvadid=312003160272&hvpos=1o1&hvnetw=g&hvrand=12452659071865179839&hvpone=&hvptwo=&hvqmt=&hvdev=c&hvdvcmdl=&hvlocint=&hvlocphy=9016344&hvtargid=pla-420785539586&psc=1
This thing is more of what i'm talking about.
amazon
Start with tons of lube(I like Kroil and LiquidWrench), then use an impact driver with the correct size bit.
You might want to consider, depending on how tough the thing you're working on is, a manual impact driver.
Alright, no offense to the first commenter but we need to clearly define what we are talking about.
There isn't an "impact driver drill" I believe your talking about something like this that is a cordless electric 1/4" impact driver. It accepts 1/4" hex driver bits notice the special cut out at the base of the bit, that's what keeps it from falling out. It functions like a drill/driver until it encounters sufficient resistance then it impacts, giving increased torque(rotational force), it does not produce a hammering force(along the axis of the bit).
Now this is an impact wrench it too functions like a drill/driver until it meets resistance then it impacts adding rotational force but not hammer force. What are the differences between this and the driver we looked at earlier? First is obviously size, the wrench is bigger, and stronger, and heavier. But that's not what makes it a different tool, what makes it different is the tip, it's a square, like for putting sockets on, in this case 1/2" sockets but they make 3/8", 1/4", 3/4" and much larger!
So could you use the first tool in place of the much larger second tool? Yes! Use one of these adapters
Here's the problem tho, the first tool, the driver, makes at most 117 ft-lbs, and I believe that's stretching, the second tool, the wrench, makes 700 ft-lbs. To remove a rusty, crusty, stubborn lugnut you will need the bigger badder tool, sometimes it still won't be enough, and you'll need a breaker bar with a cheater pipe.
Now what the other commenter mentioned, the hammering force, that can be made with a few different tools. Let's start with the handheld impact driver yes it's confusing, two different tools, both called impact drivers, but this one we'll call the handheld, you hold it with one hand, and hammer it with a hammer. It has a cam mechanism that takes some of that axial force and imparts a slight (like 1/16 of a turn) rotation. It's good for stuck screws especially Phillips heads.
Another, more common tool is the hammer drill it is essentially a drill, it grips with three jaws onto the same bits as our first impact driver, or onto completely round bits, like your common drill bits but when you engage the hammer mechanism it will push its chuck forward and back rapidly, and the pressure you apply to the back of the drill hammers the bit into the material your drilling, useful for concrete/masonary work. But for real drilling power into concrete you want an SDS rotary hammer drill this bad boy only accepts SDS bits, provides it's own rotary and axial forces and will drill thru reinforced concrete like non reinforced butter.
Ok I think that about covers it, if anyone would like to add on I'd appreciate it. And remember:
Always use the right tool for the job, a hammer is the right tool for every job, and every tool can be used as a hammer!
Obviously that was sarcasm.
What you are describing sounds like this:
GearWrench 9008 1/4-Inch Combination Ratcheting Wrench by Apex Tool Group http://www.amazon.com/dp/B0002NYD44/ref=cm_sw_r_udp_awd_YDS0tb09EZ2G5
But this may be a better fit:
Neiko 03044A Mini Ratcheting Screwdriver and Bit Set, Pocket Size Close-Quarters ,1/4-Inch Drive by Neiko http://www.amazon.com/dp/B000XYOUS6/ref=cm_sw_r_udp_awd_8FS0tb012H4Q2
Hope this helps!
Not a dumb question at all. I’m really bad with cars even though I love them and I was able to handle the install. YouTube videos showed people removing the rear wheels. While that would probably make it a bit easier, I was able to do it without taking the wheels off.
For BRZ/FRS ‘13 - ‘16, there shouldn’t be any drilling needed. The 17’s however will need some holes drilled. Best of luck.
Btw, this tool came in super handy since the space was really tight:
ratcheting right andgle screw driver
Might be handy:
https://www.amazon.com/Neiko-03044A-Ratcheting-Screwdriver-Close-Quarters/dp/B000XYOUS6/ref=sr_1_45?keywords=pocket%2Bscrewdriver&qid=1563846629&s=gateway&sr=8-45&th=1
You will need to remove the gearbox and pop the right side selector cover off to do it. I use a ratcheting screwdriver to tighten them so I don't have to pop the cover off. I would put loctite on it to prevent it from backing off again.
The Classic Army MOSFET has 3 QD connectors to remove it from the gun. I have a video on taking the CA skirmish guns apart.
I cannot fathom what you are trying to describe, but maybe this tool will help?
I am reluctant to out myself by connecting /u/pbjamm to me IRL but I will gladly answer any questions you have. Here is a post I made when I finished the first half of the project. After talking to Bus Depot about this they suggested I might have to loosen the top corners of the tent up a bit. I undid them and pulled the top front as tight as I could and screwed it back down. Be sure to do that the first time as it was a total bitch to get that back up into place with the bottom connected already but not impossible. The extra 1-2cm was enough to get the bottom tacked down in the back. Working in the bottom back was by far the hardest part of the project. There is so little room to work I could barely see what I was doing. I highly recommend a ratcheting screwdriver for getting into the tight places. As I said before the finished project is tight, like a drum head. I was genuinely worried when I popped the top the first time, but it can stretch. I dont think I have any in process photos as I was too busy sweating and cursing to work the camera.
If you need to screw at a right 90° angle where a normal screw driver wouldn't fit
Edit: he made a make shift one of these https://www.amazon.com/dp/B000XYOUS6/ref=cm_sw_r_other_awd_k5jBwbZ7BV9GH
something like this https://www.amazon.ca/Neiko-03044A-Mini-Size-Ratcheting-Screwdriver/dp/B000XYOUS6/ref=pd_rhf_gw_p_img_1?_encoding=UTF8&psc=1&refRID=AMBN4FAN905EVY73C3J5
Eh, there are tons of offset screwdrivers out there.
I've used this guy plenty, as long as you don't have to put too much torque on it, it works fine https://www.amazon.com/Neiko-03044A-Ratcheting-Screwdriver-Close-Quarters/dp/B000XYOUS6/
I have an update on my own blend door problem. Because I'm a glutton for punishment I went ahead and bought the Dorman replacement that I mentioned in my other comment and did it myself instead of taking it to Ford. I can confirm that the Dorman part is significantly heavier, physically thicker and higher quality than the OEM unit. The gear set is in a slightly different arrangement and the gears themselves are more robust. I can also confirm the overall shitty quality of the OEM part.
The install wasn't quite a nightmare, but it was challenging. I used this video as reference though I didn't have to take the driver's seat out. I also had this handy mini ratchet which was absolutely perfect for the job along with a T20 bit. Now the tricky part which I wasn't quite sure of going in: I switched the car on and turned off the HVAC assuming that doing so would put the actuator in some sort of parked position. This probably isn't necessary since it likely goes back to the same position when the car is turned off. Anyway, after removing the OEM blend door I noted which position the output shaft was in. There's a little arrow on the casing that part of the gear lined up with. The new unit's output shaft wasn't in the same orientation. So, I plugged the Dorman unit in but didn't install it, turned the car on and switched the HVAC on and off to put the new unit in the same position as the OEM one. After that I noticed the output shaft still wasn't in the correct orientation. So, I had to open it up and take out one of the drive gears so I could reorient the output shaft. Once I did this the new unit slid into position pretty easily and I tested it out and BAM, no noise and the climate control works as expected. Now to see if this one lasts longer than 13,000 miles but after seeing the two parts together I really think it will. Hope this helps someone!
Edit: So I've got everything in one place for people stumbling across this here's the link to the Dorman part. It is Dorman 604-400 Air Door Actuator replacing OE part BE8Z19E616B
Amazon link for those in the US.
You use a 90° racheting screwdriver to get at those. That's an example of a fancier one. There are cheaper ones.
Boeshield T9 spray
We used this on everything in the cabinet shop. Spray on, let it dry a few minutes then wipe it off. Table saw tops, miter saw slides, blades, plane soles, chisels, everything. I had used white lithium before but it honestly don't hold a candle to T9. Kinda expensive but a can will listi you a couple years.
https://smile.amazon.com/BOESHIELD-Corrosion-Protection-Waterproof-Lubrication/dp/B001447PEK/ref=mp_s_a_1_3?keywords=boeshield+t9&qid=1562926091&s=gateway&sprefix=boes&sr=8-3
Its my basement. During the winter it was fine. In the summer though, the moisture level is really increasing. I try to stay really vigilant checking my planes and table surfaces, and of course... this stuff http://www.amazon.com/Boeshield-Corrosion-Protection-Waterproof-Lubrication/dp/B001447PEK
I use Boeshield T-9 to protect my woodworking tools from rusting. Its a bit expensive but it lasts a long time. I reapply it once a year. http://www.amazon.com/Boeshield-Corrosion-Protection-Waterproof-Lubrication/dp/B001447PEK
Sure! I am no expert, but I like my results. Here is what I did.
The whole evolution took less than 20 minutes.
I actually like the way aluminium goes when it dulls down. This also, conveniently doesn't need maintenance.. However a guy here:
http://www.finishing.com/3600-3799/3674.shtml
recommends this stuff (Boeshield T-9):
http://www.amazon.com/dp/B001447PEK/ref=nosim?tag=finishingcominc
to keep the shine, disses on Carnauba wax.
Best way to check it is to just spin the cassette with your hand. Does anything feel crunchy? Is it smooth? Is there any (significant) play or looseness?
Unless you notice anything wrong you're pretty much good to go. If you thinking the bearings need some lube you could spray a bit of T-9 in the hub-no disassembly required.
Tbh shimano hubs are pretty bad imo and if the freehub (or any other part of the hub) is starting to fail on you it would be prudent to just go ahead and replace the whole hub. Possibly the whole wheel as that would likely be cheaper, especially if you go used. Deore hubs are very low end and they have terrible terrible loose ball bearings. Not even worth fixing most of the time.
Frame Saver is fine, but sort of a waste of money. Boesheild T-9 works better, comes in larger bottles, and is cheaper by volume. It also has more applications than Frame Saver, so there's added value there, too.
boeshield T-9
I think a better choice would be Boeshield T9.
http://www.amazon.com/Boeshield-T-9-Waterproof-Lubrication-aerosol/dp/B001447PEK/
I can find this https://www.amazon.ca/TEKTON-2830-Everybit-Precision-Electronic/dp/B009MKGRQA/ref=s9_simh_gw_g469_i2_r?pf_rd_m=A3DWYIK6Y9EEQB&pf_rd_s=&pf_rd_r=Y7SAJN4RS2ECV8VFAKNY&pf_rd_t=36701&pf_rd_p=b06971ce-9992-44c1-9ee0-eb9792e71b5e&pf_rd_i=desktop but it seems to be same bits
Try using an impact driver, something like this:
https://www.amazon.com/dp/B000NPPATS/ref=cm_sw_r_cp_api_i_qzCBDb9KRYWE8