Best powersports fuel system products according to redditors
We found 116 Reddit comments discussing the best powersports fuel system products. We ranked the 80 resulting products by number of redditors who mentioned them. Here are the top 20.
We found 116 Reddit comments discussing the best powersports fuel system products. We ranked the 80 resulting products by number of redditors who mentioned them. Here are the top 20.

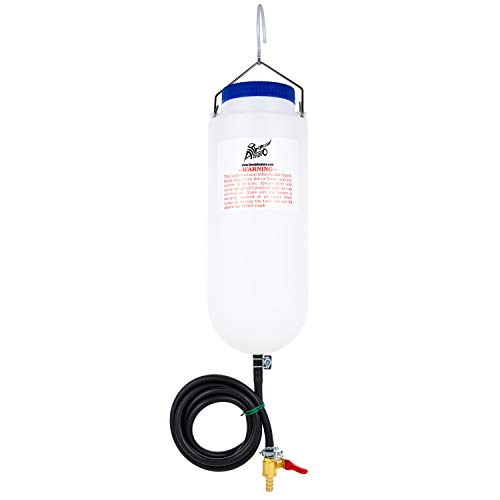


Auxiliary Gas Fuel Tank
https://www.amazon.com/dp/B004NV42PQ/ref=cm_sw_r_cp_apa_i_gD3QDbCDVGF4Q
Edit,
For many years my test tank at home for carb work was just a 1qt gear oil bottle upside down, with a coat hanger punched through the sides to make a hanging loop, a hole cut in the bottom of the bottle(now the top) to fill and a clear fuel line pushed onto the gear oil spout.
[Here's a kit on Amazon.](HHO Dry Single Cell Kit Pro 1 Hydrogen Generator With HHO Latest VP15 Volo Chip & Pwm Super Complete Kit Guaranteed Results https://www.amazon.com/dp/B07NVV8718/ref=cm_sw_r_cp_apa_i_VkoJDb1JYZVXB) It's not really suppressed tech, it's just people don't know about it, or don't trust it to work. The only real limitations are that you have to use gas or diesel, and the HHO generator as a type of auxiliary fuel to the intake. It can't run by itself, but I do know a guy who has one on a 1998 Suburban, and it gets around 30 mpg on the highway with it.
Specifically a Uni-syn carb synchronizer.
I use an old-school Uni-Syn Sync tool to balance them and then a Gunson Colortune to get the mixture set right. It actually seems to stay fairly well tuned and I only have to fiddle with them about once a year or so.
Sync Tool like this one: https://www.amazon.com/Uni-Syn-Carburetor-Synchronizer-Synchronizing-Balancing/dp/B073RPZKBX
Colortune: http://www.gunson.co.uk/products/Colortune
You can buy similar devices online, although most shadetree mechanics I know usually just hack something together. I used to use an abomination I bodged from a mic stand, a water bottle, and an old petcock--and my friends considered that unnecessarily elaborate.
I can understand your confusion because There is also a needle looking part in some types of carbs, like a constant velocity carb.
Take a look at this image of carb rebuild parts
Rebuild Kit for Harley Davidson Sportster https://www.amazon.com/dp/B07TLB594H/
On the bottom right, above the row of orings, the right-most fat silver item is the needle that seals the fuel tank off from the bowl when the bowl is full, and is attached to the float. Moving 4 items to the left from there is an adjustment screw, which definitely looks needle like, right? And moving 3 more items to the first long silver item is the CV "needle" which helps regulate fuel flow based on vacuum. I may not be using the right terms for those last two parts but I wanted to show you why I can see how you are confused.
My motorcycle also has a CV carb and it's quite annoying to adjust right.
Not an expert, but
I'd focus on the drive train issues first, get all those tires working, might be a lost cause before going any deeper, but others will have to help with that, I take that kind of stuff to my mechanic.
Brake pedal could be that it's low on brake fluid, or one of the brake calipers is stuck.
My quad has a foot brake like that and a hand brake, but the foot brake only brakes 1 tire. That tire has two brake calipers on it's roter, one to the foot break and one to the hand brake. So the hand brake is all 4 wheels, and the foot brake is 1 wheel. There is a master cylinder on my hand brake and another on my right rear tire (foot brake). If my foot brakes master cylinder runs low or springs a leak, my pedal goes through the floor like in your pic but I'll still have brakes on the hand brake. It's like a double/emergency braking system. If my hand brake goes out I can down shift (engine brake) and lay on that foot brake to brake and not hit a tree...
___
Fuel wise, it's likely carburetor being old. The carburetor should have a primer on it that injects gas into the carb when you press/pull it. Those generally have a diaphragm in them (rubber) that tends to go bad over time and cause a fuel leak.
If you can find a diagram of the carburetor that would help emensely.
Really though, you should take the whole carburetor off, take it apart and give it a bath in carb cleaner (no plastic/rubber in there) and clean all the jets out.
Also, they make rebuild kits for most carb's that come with all new jets, and pilot screw etc. See if you can find one. I typically just replace them all, easier and then I have spares.
Also, inspect the carb's vent hose and make sure it's intact and not clogged. Check the fuel line too, for damage/rot.
You should also remove the gas tank and clean it out. Take the petcock off and inspect the filters and valve, then clean the whole gas tank out so there's no dirt/bad gas in there.
Then check/change the spark plug(s). Before running it though, I'd check the valve clearance on the valves, guides on that online.
Once all that's done, it should run good and not leak gas.
Then you can address your other issues.
Pending how old it is, there are some parts I might replace just because:
If the current ones are working, call them spares.
Starters and solenoids are cheap, voltage regulators OEM are expensive, but you can buy a few after markets pretty cheap to have spares.
Tool wise, I can recommend at least the following:
Then your typical ratchet sets, air tools, impact guns, etc.
And socket extensions (long ones) because getting to some things is a royal pita.
I have a set coming in for pilot and main. Cannot wait till they get here. If the tune calls for it, definitely going bigger!
Oh, and Here is the Amazon URL
Carb synching is pretty straightforward, and can be done with or without a carb synch tool. I have a CarbTune Pro as I wanted one that did not use liquid.
Without a carb synch tool, you can do a "bench sync." A bench sync means you remove the carbs and adjust the butterflies manually so they open at exactly the same time. You can accomplish this by either filling the carb (where the butterfly is) with gas / brake clean / etc. and adjusting the adjuster screws so when the throttle actuator BARELY opens, the fluid begins to drop at the same time. Alternately you can do it by eye, or use a thin piece of wire or something similar that's held by the butterfly while the throttle is closed and falls upon opening. The biggest issue you want to address is to get them both to open initially at the exact same time.
A carb tune simply helps you adjust this whilst on the bike w/ the bike running and you can verify things are good at various RPM ranges.
> https://www.amazon.com/Yellow-Fuel-Gas-Can-Vent/dp/B00SEK6XN6/ref=sr_1_3?ie=UTF8&qid=1537934599&sr=8-3&keywords=gas+can+vent
>
> and +
>
> https://www.amazon.com/EZ-Pour-Gas-Can-Replacement-Spout/dp/B06WRRXG1X/ref=sr_1_8?ie=UTF8&qid=1537934599&sr=8-8&keywords=gas+can+vent
>
> thank me later
Modern anti evaporating gas cans spouts area pain. If you add an air vent you can empty the jugs in about 1/3 the time, and I guarantee this will be the cheapest solution.
I can't stand the new EPA gas cans. I bought a few of these off amazon and put them in all of my cans... they work flawlessly.
https://www.amazon.com/Yellow-Fuel-Gas-Can-Vent/dp/B00SEK6XN6/ref=sr_1_1?ie=UTF8&qid=1466089282&sr=8-1&keywords=gas+can+vents
They can be rebuilt, mostly replacing a few small o-rings, but there are model/year specific kits available. Replace it maybe?
www.amazon.com/Performance-Petcock-Switch-Valve-Nighthawk/dp/B07KYDY2S3/ref=sr_1_12?keywords=1982+honda+nighthawk+450&qid=1567443699&s=gateway&sr=8-12
Gas cap: https://www.amazon.com/Gas-Can-Cap-Replacement-Coarse/dp/B00NB3UUDK/ref=sr_1_1?ie=UTF8&qid=1467600364&sr=8-1&keywords=gas+caps
Vent: https://www.amazon.com/Yellow-Fuel-Gas-Can-Vent/dp/B00SEK6XN6/ref=sr_1_3?ie=UTF8&qid=1467600371&sr=8-3&keywords=gas+vent
Spout: https://www.amazon.com/N2-201-8604-EZ-Pour-Old-Style-Fueling/dp/B00W4G3WSK/ref=sr_1_7?ie=UTF8&qid=1467600377&sr=8-7&keywords=gas+spout
http://www.amazon.com/motorcycle-shop-auxiliary-fuel-tank/dp/B004NV42PQ/
$25 on amazon, also at every online bike parts store
I was going to build something, but the parts to include a cutoff, hanger, hose, etc and make it gas-proof cost more than the real deal.
plus, I got to buy another doodad for the shop!
Not sure the years, but any EFI sportster tank. 2010 and up should be safe. The hole should be on the left side of the bottom of the tank if the tank is sitting normally. Carbed tanks have their hole on the right.
Something like this should work:
http://www.amazon.com/Bikers-Choice-EFI-Sportster-Tank/dp/B00JDPVJG2
If you want official, the part number for a 3.3 gallon off of a 2015 '883 is 61348-07, but they're 500 just primed.
Go here: http://www.shopronniesharleydavidson.com/
And click on the parts micro fiche. They don't have '16 48s there yet, but you should be able to use 2015.
Wait, cone filters? I wonder if the carbs have been rejetted to factor that in. If those cones are restricting air then that's why you're running rich. If the jets have been upgraded too large of a size then that's another reason. I'd find out what your stock carb's jet sizes are supposed to be, then I'd use an online calculator or ask a website that sells jets what size you should have given the mods you've got. And compare that with what you actually do have. So you're still gunna have to pull your carbs to check your jet values. You might even have a clogged air circuit in your carb bodies so cleaning is still imperative.
You could try making your own sync tool but if you have too strong of a vacuum then whatever liquid you're using will get sucked in. This is expensive, but a 'cry once buy once tool': http://www.amazon.com/Vacuum-Carburetor-Synchronizer-Carb-Gauge/dp/B004MSJ7E6
So is his buddy, I'm not sure if you need this for your carbs, I need it for mine: http://www.amazon.com/Motion-Pro-Carburetor-Adjusting-Tool/dp/B001DDH2ZY/ref=pd_bxgy_263_img_3?ie=UTF8&refRID=00QXJ3CH1BBWNM7K2FPZ
You could sync the side carb bodies with a regular screw driver and wrench, but once you move to the center 2 bodies that becomes almost impossible.
Here is a link to your manual that deals with the carburators: http://www.honda4fun.com/pdf_man_officina/pdf_manuali/CB350-400/CB350-400_04.pdf
I would take pictures and notes while doing this. There's not a huge wealth of information for 1972 CB350F carbs unfortunately.
You should register at this forum. Any questions you have they can help you out with: http://forums.sohc4.net/
I'd also pick up this ultrasonic cleaner from harbor freight: http://www.harborfreight.com/25-liter-ultrasonic-cleaner-95563.html Go to the dollar store, dollar general or whatever the cheap store in your area is called and buy a large bottle of LA Awesome and a gallon of diluted water. Stuff makes the dirtiest carbs come out brand new. Maybe be a total scumbag and return the ultrasonic cleaner for a full refund as soon as you're done with it. Should take a day to clean all the parts once your carbs are completely dismantled. Then spray a light hit of WD40 on the metal and polish it off with a paper towel to prevent corrosion.
This is another cool tool to have: http://cdn1.bikebandit-images.com/blog/images/2015/carb-cleaner-kit.jpg If you have an air compressor use a basket ball filling needle to blow all the passageways clean. Or a can of air. This goes without saying but carb cleaner will eat rubber, brake cleaner is almost as strong but safe for rubber.
Random tidbit here is an awesome trick for polishing the float needle seats on a carburator: https://www.youtube.com/watch?v=zlez_hdoWYk when they're dirty it can cause them to stick.
In closing this is going to be a good amount of work and money (Unless you return everything shamelessly) Rubber consumables on your carbs appear to be float bowl gaskets and a few orings, maybe some rubber fuel lines. Nothing too pricey.
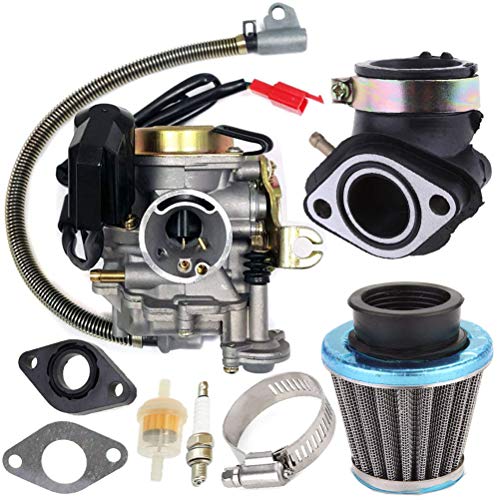
Seafoam is a stabilizer that can prevent the fuel from clogging the carb jets. But once a jet is clogged, it often requires actual scrubbing with a carb cleaner to break it up. Gasoline can become like solid paint lacquer. It can be cheaper to replace the carb on a scooter than the labor required to clean it. You can find them on Amazon for $20-30 like this one. You may have to know how to tune the new carb when you get it, but often it will work out of the box with the factory jets and settings. The one I listed has good reviews and has verification that it has an adjustable slide pin, which helps for tuning if needed. This carb is for a 150cc GY6 or GY6B.
Thanks.
After a few beers...
I pulled the trigger on it as well as a new intake manifold, a gasket, a Keihin carb, (I just bought a carb but could always use a better quality one). A gang of tools. This kit arrived as well as 3 different hi flow air filters due to some order confusion.
I hope all this, when installed and tuned, at least gets me to 38/40mph faster with good throttle response and is reliable. I'm not looking for top end speed so much.
This was just supposed to be something to learn how to 'wrench' on, but lately I've been wanting to fix it up all sporty like and actually use it as transportation.
i would probably get a carb sync tool and go from there. are the rpms all over the place too?
edit: and how did you tune the carbs?
Most 75 and 76 US spec 400Fs (400F0 and 400F1) have the flat handlebars as well. My 75 has them. Didn't think the US spec got the high handlebars and forward pegs till 77 (CB400F2).
I agree the starter switch is likely the cause of the headlight problems. The current for the headlight actually flows over that switch. Here's a link to a relay kit that will fix that.
Also the yahoo CB400f group has a set of pictures that show you how to repair the switch if its salvageable. You can also find NOS switches on ebay if you look hard enough.
Good Luck on sorting out the issues and getting it back on the road. I have a good deal of work to put into mine as well.
Some more useful CB400F links:
Electronic Ignition kit.
Honda Sohc4 forums
Honda Service Manuals and Parts Lists
3000 mile maintenance:
May need to rebuild carbs if jets are badly varnished.
Carb sync tool
11mm master cylinder thread on sohc4.net.
I'm sure you could do it without the adjuster tool but the tool makes it so incredibly easy. Here's a kit with everything you need for $50:
https://www.amazon.com/P1-Tools-Motorcycle-Synchronizer-Synchronization/dp/B07MJZ1RFB
Also, the vacuum test ports are on the intake runners, not the carbs.
And lastly, why aren't my comments showing up on the main thread? Weird.
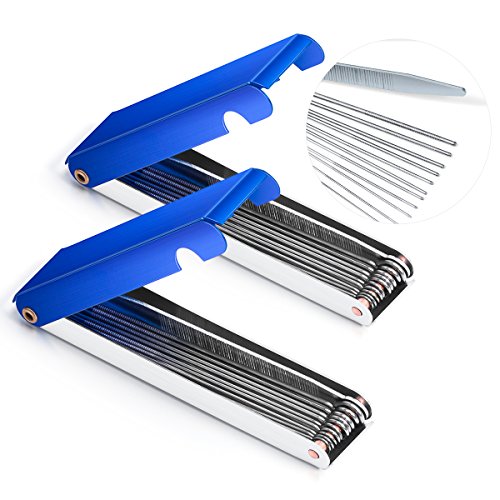
They remind me of tip cleaners used for welding/carburetors.
https://www.amazon.com/dp/B076HMF3DM/ref=sspa_dk_detail_1?psc=1&pd_rd_i=B076HMF3DM&pf_rd_m=ATVPDKIKX0DER&pf_rd_p=f52e26da-1287-4616-824b-efc564ff75a4&pf_rd_r=4VXEYMT6PJFT4FAHBYRK&pd_rd_wg=VYUU5&pf_rd_s=desktop-dp-sims&pf_rd_t=40701&pd_rd_w=ihA2C&pf_rd_i=desktop-dp-sims&pd_rd_r=42fefff4-b975-11e8-be59-db2f2d1fb2cc
​
https://www.amazon.com/gp/product/B00UCY60GW/ref=oh_aui_detailpage_o03_s00?ie=UTF8&psc=1
I haven't taken apart the carb because I thought the fact that it was new means i didn't have to deal with it
labwork New for Suzuki LT125 1983-1987 Carburetor Carb Rebuild Kit Repair LT 125 https://www.amazon.com/dp/B07N673TF2/ref=cm_sw_r_cp_apa_i_ykjrDbFAWFMD6
For sure man, thank you. The oil seal will be the last thing I check and only if the problem isn't resolved by the carb replacement and a good cleaning and probably a new belt. I'm looking at this kit if you have any input on it.
I can't seem to find any airleaks. I've sprayed starter fluid all around where there could possibly be one while the scooter was running and I didn't hear any differences.
​
Can you explain a little more what you mean about the throttle slide being impeded?
​
And this is the carb I bought on Amazon. I have a 49cc IceBear. I still have my old carb, so what should I look at to compare the two to make sure the new one is correctly compatible?
Click the link I provided. They're also on Amazon for 20. https://www.amazon.com/Carbhub-697190-Carburetor-Stratton-14-5HP-21HP/dp/B07JQH5BTC/ref=sr_1_fkmrnull_2?keywords=Carburetor+For+Briggs+%26+Stratton+Intek+792171+Nikki+795366&qid=1555516947&s=gateway&sr=8-2-fkmrnull
I checked the kit and it appears to be all OEM parts - I'll use it to compare to what's jammed in there.
I also just got a choke cable eliminator (it's such a pain on KLRs when you're taking the carb off): https://www.amazon.com/gp/product/B07KXQYJHF/ from what I understand, it's kind of the same - it fits, but you have to use the spring from the original choke assembly for it to fit/work correctly.
Same thing.
https://www.amazon.com/Carburetor-Cleaner-Torch-Welder-Motorcycle/dp/B076HMF3DM
You can take the float off and shake it to listen for liquid sloshing inside them. And here’s the tool...not this exact one but something similar. It’s a crude way, but it’s good enough.
>A throttle body sync sounds quite in depth as well, but I will look into it.
It really isn't too bad, but is made infinitely easier by having the right tools. There are a lot of $5 solutions that folk use, but unless you really know what you're looking for then the majority won't be able to figure it out
I'm a huge fanof this device. It's not cheap, but it makes it super clear how your sync is looking. You can use it on any bike, including if you ever get a 4 cyl.
It's a bit of an investment, but still cheaper than having a shop do it. Plus I loan it out to friends for a 12-pack now, so it'll pay for itself many times over
> Morgan Carbtune Pro
where do you think is the best place to purchase one? does this look right? https://www.amazon.com/CARBTUNE-PRO-4-W-Pouch/dp/B018UTHGPE
Do you think this one would work. I mean it looks pretty similar to the one currently in my scooter. The one in my baby has the tamper resistant screws, so buying a new one is much easier than dealing with those.
Here is the carb if you were wondering
Nice bike yourself! I love the Guerilla exhaust on there. The tires ride really smoothly, although she lags on the turns (as expected). I've found that she resists leaning at first, but once you get into the turn she wants to go over more and more quickly. I stopped noticing it after a few trips.
The tank is a Biker's Choice EFI (Indented Style). I got it for around $200 on Amazon, so you can't beat the price:
http://www.amazon.com/gp/product/B00JDPVJG2?psc=1&redirect=true&ref_=oh_aui_detailpage_o07_s00
Edit: the Amazon photo doesn't show the indentation on the tank, but you'll see it in my photos. They also offer another version with smooth sides.
I have an auxiliary fuel tank like this.
Carbed motorcycle gas tanks often have 3 or 4 lines running to/from them depending on whether the petcock is vacuum-operated or not. There's the fuel feed, the vent, the overflow, and on a vacuum-operated petcock, the vacuum line from the carb(s).
To hook up an auxiliary fuel source, you'd plug the vacuum line (if present), hook up the fuel feed into the carbs to the aux tank, and just pretty much ignore the others.
Thanks! The problem is that the float bowl is putting pressure on the screw. I can reach the screw, but can't turn it because the bowl prevents it x_x.
I hooked up my gauge to cylinder 1 and no matter where I have the mixture screw the vacuum stays the same. The only time the vacuum changed slightly was when the bike reached operating temperature. I tried adjusting the screw again after this and it maintained a constant vacuum the entire time. No adjustments changed the vacuum - at least not at a level readable by the gauges. :(
https://www.amazon.com/gp/product/B004MSJ7E6/ref=oh_aui_search_detailpage?ie=UTF8&psc=1
That's the tool I'm using.