Best screw & bolt assortment sets according to redditors
We found 48 Reddit comments discussing the best screw & bolt assortment sets. We ranked the 33 resulting products by number of redditors who mentioned them. Here are the top 20.
We found 48 Reddit comments discussing the best screw & bolt assortment sets. We ranked the 33 resulting products by number of redditors who mentioned them. Here are the top 20.


Here's the composition of the rack:
Elsewhere in the house/other useful parts:
Useful things I learned:
Here
I hate to break it to you but I'm gonna throw this out there. If you're the kind of person who can't find "assorted nuts and bolts" on Amazon when provided with a search bar, perhaps you're not as handy as you think and nobody is gonna be coming to you for nuts and bolts in the first place.
I WANT to trust Raspberry Pis, I do.
But even on UPS power, bumping the power cable killed the last one I relied on for key services (SD card of course). That was the longest it had made it too, like 4 months.
What are you using for DHCP/DNS on that Pi? Just Bind+ISC? I really wish there was a more complete-ish GUI solution for that on Linux ala the AD-DNS/DHCP.
I'm wanting to separate that stuff out, so it'll probably end up on my N3700 or maybe even an old D525 I have sitting around.
***
I do know exactly what you are talking about. A month or two ago everybody was out of the house for a day. So I wanted to kill the rat's nest of cables that had developed from plugging, unplugging, moving around, etc.
After pulling all the cables, and at the tail of being incredibly pissed off by Ubiquiti, the US-16-XG in particular, I had enough:
So I had started out the day wanting to clean up the cables. Ended up completely redoing my switching and moving 3 servers and ten drives.
It honestly depends on your budget, how much are you willing to spend?
Here is a great list of prep and upgrades you can do to bring success to your prints:
-Get Vibration Dampners: I can not express how much joy these things have brought many users. The make your machine quiet and greatly decrease ringing in your prints since they ABSORB the vibration coming from your stepper motors. You really only need Two of these for the X and Y axis however you can get another two for the Z-axis drives if you plan on doing a lot of z-hopping.
-BUY FILAMENT IN ADVANCE: get some PLA/ABS/PETG or whatever you want to try printing with. The filament you get with the printer for the most part is garbage HOWEVER I recommend dialing in those settings first then throwing on some nice filament, it'll feel soooo nice. Some commonly accepted/appreciated brands are: eSun PLA+, Hatchbox, Solutech and more
-Get a PEI sheet: Seems like you mentioned this in your post but PEI sheets eliminate the use of gluesticks/tape/hairspray and provide excelent adhesion while making it easy to remove the part after it's cool. This things like to be hot though so increase your bed temp a little at first
-Buy New Fans: The stock hotend/power unit fans are Loud, Noisy and Inefficient. I recommend getting 1 new conrol box fan, 1 new hot end fan and 1 new part blower fan.
You will need 1 40mm fan, 1 50mm fan and a Blower fan or another 40/50mm fan depending on if you print a new hot end mount like a fang.
-Tighten every screw on the printer: You would be surprised how many screws initially are lose either from prior testing or such. Also make sure to test your belt tensions on your printer whne you get it. You want everything tight BUT NOT TOO TIGHT. Give it a snug fit then let it be. Also make sure your belts are 'pluckable' like a guitar string but not tought
-Get some bearings: You may want to get a few ball bearings for when you print out a new filament holder, the stock filament holder is terrible
-Buy some fasteners: M3 bolts and nuts are commonly used on the CR-10S having spares or additional fasteners for adding on parts/printed components to your printer is awesome to have on hand
-Replace the Hotend: This can get a bit frustrating but it can be worth it. If you want you can replace the hotend with something like a volcano or an all metal hot end to print at higher temperatures. With this you can also add on autoleveling if you have the correct mount printed
-Octoprint: I am not very familiar with octoprint since I don't use it myself however I know it can run on a CR-10S. If you want look into how to install octoprint on stock firmware, I know it's pretty easy to use a raspberrypi to remote into your printer as well using octoprint.
-Squash Feet: Replacing your stock machine 'feet' with squash balls or squishy gold balls can also help absorb vibrations from your machine to your table or where it is located. This helps a bit with part quality but it's mostly to reduce the noise carried through your furniture.
-Solder on connectors: If you want you can get some pin connectors to make your fans/electronics easy to switch out depending on your material you are printing, maybe you need a strong part fan or maybe you need a weaker one. It is easy to swap out if it's using a 4pin connector.
-Make an Enclosure: What could be nicer for your printer than a stable environment. Making an enclosure for your printer can help if you live in a rough climate area or if you want to reduce the noise as well.
-Get some Handtools: I'm not sure if you have any or not but some great tools to have are a screwdriver, hexwrenches and a soldering iron depending on how much work you want to be doing on your printer.
For convenience I've added some of the parts mentioned via an Amazon link for prices. I'm not saying buy these things exactly they are just a starting point for reference:
Nima Vibration Dampners:https://www.amazon.com/Stepper-Rubber-Vibration-Dampers-Printer/dp/B073FRZTDX/
40mm Fan (Noctua Brand): https://www.amazon.com/Noctua-NF-A4x20-FLX-premium-quality-quiet/dp/B072JK9GX6/
Blower Fan (Part Fans):https://www.amazon.com/SoundOriginal-Humidifier-Aromatherapy-Appliances-Replacement/dp/B071WMHNG5/
PEI Sheet/Printer Surface:https://www.amazon.com/CCTREE-Printer-Surface-Creality-300x300mm/dp/B07543KHCT/
Squash Feet: https://www.amazon.com/PrideSports-Practice-Balls-Count-Yellow/dp/B00466W9X0/
M3 Bolts/Nuts:https://www.amazon.com/280Pcs-Grade12-9-Socket-Assortment-Storage/dp/B0742DDLQ1/
Raspberry Pi 3 for Octoprint: https://www.amazon.com/Raspberry-Pi-RASPBERRYPI3-MODB-1GB-Model-Motherboard/dp/B01CD5VC92/
Ball Bearings: https://www.amazon.com/625ZZ-Shielded-Groove-Precision-Bearings/dp/B01LWMT95S/
Hope this helps, have fun tinkering!
Ok, I'll let others comment on the quality of your build list. However, after just going through my first build, I will give you a list of extra little things that you will probably need but haven't thought of yet because this is your first build. It's annoying to get all of your parts in just to realize that you're missing some battery connectors or you don't have a tiny hex screwdriver for some screws on your frame. You will probably need the following:
That's about all I can think of right now.
Congrats on the new build!
You can buy the m.2 screw kit off Amazon https://www.amazon.com/ZRM-Motherboard-Mounting-Accessories-Screwdriver/dp/B07BVRGVWY/ref=asc_df_B07BVRGVWY/
my guess is they'd be even cheaper off eBay you don't mind having them shipped from China and waiting a couple of weeks to get it.
Pretty much all rack mount stuff. The box itself I made. You can get the AV Keystone jacks and 48 port plate at Monoprice. The rails, screws, additional plates and rack mounted power supplies from Amazon.
http://www.monoprice.com/category?c_id=104&cp_id=10426
http://www.monoprice.com/product?p_id=8630
http://www.amazon.com/Technical-Pro-PS9U-Supply-Charging/dp/B0057RL6DQ
http://www.amazon.com/Reliable-Hardware-Company-RH-6-SRR-Space/dp/B00JQYUI7G
http://www.amazon.com/Reliable-Hardware-Company-RH-RMSET-25-Washers/dp/B00JQYUAQU
http://www.amazon.com/16port-Blank-Panel-Keystone-Jack/dp/B00PEKNW2Y
http://www.amazon.com/kenable-Cable-Management-Universal-Cabinet/dp/B004HTHL20
http://www.amazon.com/CNAweb-Blank-Spacer-Mount-Filler/dp/B01B1T0RZG
http://www.amazon.com/Odyssey-APV01-Space-Panel-Accessory/dp/B0002DV0CW
I had a pile of the keystone jacks from a previous purchase a couple years ago so I did not have to get a whole lot of them. The toslink keystone jack has a issue of popping out which is solved using a zip tie to hold it in.
Take out a screw
get a thread pitch gauge OR go to hardware store with the screw
measure pitch
buy more screws
it's that simple - no secret sauce in the JL set screw, it's just a set screw. Probably like m3/m4 or something. You can get 666 of them in various sizes for $20, or you can be an ass and walk out of the store with a couple in your pocket.
I highly recommend getting a set of nylon nuts, bolts and standoffs. Great for quick crash repair and variable spacing of plates. They can be used as sacrificial parts so you don't break your arms or frame in hard crashes.
Also, extra servo connection wires, miscellaneous battery plugs & adapters, extra wire, hand tools for working with M2 & M3 hardware.
When you do get FPV going, right angle rp-sma connectors and stubby cloverleaf antennas for the video transmitter.
Just a few of the things I found useful.
Thank you! I knew there were kits out there like that, I just wasn't using the correct search terms I guess lol.
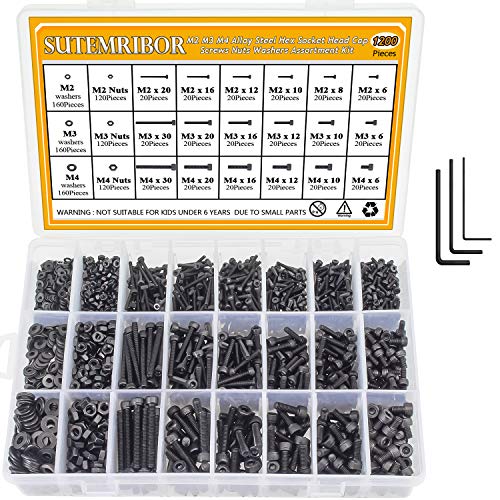
https://www.amazon.com/Washers-1200PCS-Sutemribor-Assortment-Wrenches/dp/B07H4MG7TC/ref=mp_s_a_1_5?keywords=m3+assortment&qid=1569691906&s=gateway&sr=8-5
Found this, seems it should cover most things, until I run into something designed for m5 screws, but I'll cross that bridge when I get there lol
I expect you could have some washers and m3 or m4 pan or cheese head screws on the inside, then have two handles to spread the 12 KG load across 10 holes and 10 washers.
Spring Loaded Surface Mount Handle with Rubber Grip Zinc
It might work with one handle, if you used larger washers.
Edit:
300pcs M3 Black Alloy Steel Assortment Kit (Set B Button Head)
[This] (https://www.amazon.com/gp/product/B075QKT1RF) is the exact kit I bought. Only down side to them is that they aren't magnetic and won't stay on to any screw bit. M2x4mm and M2x6mm work in my case.
I bought this shallow mount rack to house everything, these rack shelves, and this hardware pack. It comes with a lock and two keys - very convenient for when everyone's gone from the house or when we throw a rager.
I actually did not realize they include the mast, if they do that, then its about equal, my apologies - here's my parts list which will yield at least an equal functioning antenna, and probably have some spares left over.
500' of stranded 14 awg bare copper in a pvc jacket, $83
Stainless steel for radial plate and driven element plate $18 - you have to cut it up, see my post about DIY 1/4 wave verts
so-239 $7
Hardware $13
cutting board $13 (to fabricate wire standoffs)
MFJ-1910 33' mast $89
So at the current exchange rate they are dead equal in cost.
I'd be surprised if they weren't in the box. There should be a riser and a screw.
ZRM&E 2 Sets M.2 SSD Screw Kit for M.2 Drives General M.2 Support Motherboard Mounting Accessories Screw + Hex Standoff Spacer+ Screwdriver https://www.amazon.com/dp/B07BVRGVWY/ref=cm_sw_r_cp_apa_i_wCMiDbVR46AC2
Ii bought this off amazon and figured I could use it for my printer it’s self and small projects or prints that require screws.
Adiyer [340-Pack] Metric M3 Screws... https://www.amazon.com/dp/B077BBJX6Z?ref=yo_pop_ma_swf
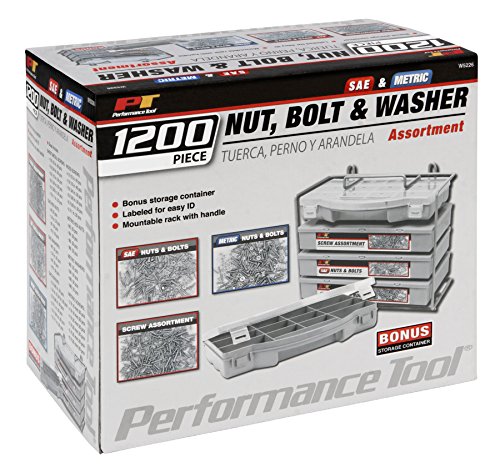
Good point on the bearings! Didn't think of that. I'm actually eyeballing this guy for screws and whatnot:
https://www.amazon.com/Performance-Tool-W5226-1200pc-Assortment/dp/B000N35MMA/ref=pd_sim_60_2?_encoding=UTF8&psc=1&refRID=R8F1DNXT3TW51XTWFGZ5
I'd really just like to one and done instead of getting a little kit, only to find out I've got to run out to Home Depot to grab a fistful of some oddball size.
> So I should be able to pick some of those up at Lowes or Home depot?
Maybe.
You'll probably have better luck at a proper hardware store where they sell them individually. Especially for metric screws.
Option C is Amazon. Just buy a box and never worry again: https://www.amazon.com/VIGRUE-300Pcs-Assortment-Internal-Stainless/dp/B07M7CLTLT/ref=mp_s_a_1_1_sspa?keywords=set%2Bscrew%2Bassortment%2Bkit&qid=1568084041&s=gateway&sprefix=set%2Bscrew&sr=8-1-spons&psc=1&spLa=ZW5jcnlwdGVkUXVhbGlmaWVyPUE1TTFKNE9RQjE0T1UmZW5jcnlwdGVkSWQ9QTAyMzY1NzcyRElXQkRGNDZOWUxGJmVuY3J5cHRlZEFkSWQ9QTA2NTc1NTcyWUFYREtHM0JFTjYwJndpZGdldE5hbWU9c3BfcGhvbmVfc2VhcmNoX2F0ZiZhY3Rpb249Y2xpY2tSZWRpcmVjdCZkb05vdExvZ0NsaWNrPXRydWU&th=1
I bought...
K Kwokker 1080 Pieces Stainless Steel Screws and Nuts, M2 M3 M4 Socket Head Screws Hex Bolt Nuts Washers Assortment Kit with Storage Box Professional Tools https://www.amazon.com/dp/B07K141VFD/ref=cm_sw_r_cp_api_i_P2LUCbENR6BDJ
Been treating me pretty well. The case they came in is terrible but I’m in the process of designing and printing a new case 😃
If that one doesn't need extra hardware, that's cool. Makes things easier.
The one I use does need some metric hardware for the threads. The nice thing is the threads are quite fine, so you make small adjustments in height.
I didn't feel like running to the hardware store sporadically to buy individual metric hardware for designs I found online and was printing. So I bought this $21 socket head cap screws assortment set from Amazon, with M2, M3, and M4 in different lengths:
https://www.amazon.com/gp/product/B07H4MG7TC/ref=ppx_yo_dt_b_asin_title_o06_s00?ie=UTF8&psc=1
I could buy a bunch of hardware as-needed for $21, but this gives me a lot of the common sizes that people seem to use in their designs.
Yes, I will be using plastic standoffs and screws and stuff, but don't I need to connect the motherboard to ground ?
I just want to sit at home and get what I want. It took awhile to find this trick but search on Amazon for "assorted". Pick the assortment size you want. There are also packets of the same size. The only problem is the Amazon search sucks, so the part description needs to be read very carefully. I only get those on Prime because of free shipping and usually getting good quality.
Machine screw assortment
Another assortment
I've yet to find a hardware store that carries tiny metric screws. Micro quads use lots of M1 and M2 screws, maybe M3. it's the diameter or the rod before they use the die to thread it.
you can get assortments of small metric screws on Amazon or Ebay. they don't include every size, tho, so you might end up ordering a lot, say 50 pieces of M2x7 (7mm thread length) to get what you need. screw length for mounting motors and props is critical, you need enough threads engaged to hold, but not collide with the coils inside the motor.
Also, there's different head types. Flatheads are for counter-sunk holes where the surface must be flat, socket-cap for counter-bored holes and Button-top for most everything else.
Dude I am so sorry. I thought I was still logged in, but I wasn't so I never saw the response. My bad.
I put 2 below to give you some options. Depending on the amount you need 1 is just like 4 and other is a larger set. I use these on my NAS with all of those HDDs as well as versions of the case fans. I also got 2 drive bays that slide in my case so the HDDs are not bolted directly to the case. Helps a ton.
https://www.amazon.com/Lamptron-HDD-Rubber-Screws-Black/dp/B003U3TPK0/ref=sr_1_3?ie=UTF8&qid=1506437431&sr=8-3&keywords=hard+drive+rubber+screw
https://www.amazon.com/dp/B003MAAYLU/ref=sxbs_sxwds-stvp_2?pf_rd_m=ATVPDKIKX0DER&pf_rd_p=3171424582&pd_rd_wg=2odlQ&pf_rd_r=WYSX2QHE4MMFX465TYH5&pf_rd_s=desktop-sx-bottom-slot&pf_rd_t=301&pd_rd_i=B003MAAYLU&pd_rd_w=qCkQo&pf_rd_i=hard+drive+vibration&pd_rd_r=FNP5NYMZ3C51NWHENYC0&ie=UTF8&qid=1506437622&sr=2
Not local, but amazon has a good selection
https://www.amazon.com/Nylon-Plastic-Machine-Assortment-160pcs/dp/B073F6Q66G
I had this same issue and my only fix was to buy new standoffs. The ones that came with my case just would not work when the motherboard was on top of them. I also removed the ram sticks and put them back in then put the board on the new stand offs so I assumed either one of those two things fixed my problem.
https://www.amazon.com/gp/product/B01FWEX90Q/ref=oh_aui_detailpage_o04_s00?ie=UTF8&psc=1 here is the screws I bought.
Yea you can buy them separately online or possibly at a local hardware store. 6-32 is the threading type and 5mm is the length of the screw.
Personally I'd just spend the extra $ and get a full kit like this. That way you'll always have extras.
https://www.amazon.com/Self-drilling-Toggle-Drywall-Anchors-Screws/dp/B016TYQXGU/ref=sr_1_7?s=hi&ie=UTF8&qid=1526593309&sr=1-7&keywords=toggle+anchors
slap some of these on it and anchor it like that, 2-3 along the top and 1-2 in the middle so do it i think
Those are nice.
These are my favorite.