Best single board computers according to redditors
We found 2,398 Reddit comments discussing the best single board computers. We ranked the 551 resulting products by number of redditors who mentioned them. Here are the top 20.
We found 2,398 Reddit comments discussing the best single board computers. We ranked the 551 resulting products by number of redditors who mentioned them. Here are the top 20.


A little more on the prices, I was able to obtain the following for the mirror at these prices:
I did not really have a lot of woodworking things, I had to buy clamps, wood glue, and the screws which resulted in the cost of the project being a bit higher. The plexiglass was obtained from a friend who works in a printing company. Plexiglass however is not expensive and can be obtained for a rather low cost.
In actuality, I believe this project could have costed under $110.
A few things I wished to have changed/done differently:
Edit: Added hyperlinks so people can check out what I bought/used.
You can buy a credit card size pc called a raspberry pi for $35 plus SD card plus power cable. You can then install pi hole which blocks ads on your home network. So your cell phone won't see ads your pc won't see ads. Your dad's best friends roommate from college who is on your network won't see ads. Pretty fucking sweet.
edit some links
pi hole https://pi-hole.net
Raspberry pi with power and case https://www.amazon.com/gp/aw/d/B01C6EQNNK/ref=mp_s_a_1_3?ie=UTF8&qid=1496894828&sr=8-3&pi=AC_SX236_SY340_FMwebp_QL65&keywords=raspberry+pi+3&dpPl=1&dpID=61Kje-Jv3AL&ref=plSrch
SD card https://www.amazon.com/gp/aw/d/B010Q57T02/ref=mp_s_a_1_3?ie=UTF8&qid=1496895065&sr=8-3&pi=AC_SX236_SY340_FMwebp_QL65&keywords=class+10+micro+sd+card&dpPl=1&dpID=41f2SZSqv6L&ref=plSrch
Just to BUILD an HTML site requires no hosting or domain! Once you have a built site that you want to display to the public though:
First, get a domain:
Second, find hosting:
Third, figure out how you want to make the site:
Other stuff:
EDIT:
A few more things you can play with:
I thought it'd make sense to list all this information in one place:
EDIT: I realized in hindsight that this kit runs with
256mb512M of RAM. For the same price, you canget theanother 512M version, here.Note: the games for these consoles are very likely to be copyright material, so it's up to the reader's discretion on how to go about attaining them.
EDIT: Setting up the controllers seems to be the most common question asked in this thread. I personally went in via ssh (or F4 if you have a keyboard connected) to home/pi/RetroPie-Setup/RetroPie-Setup.sh to configure the RetroArch controllers. From there you can also find the button values which map to your controller, and add your advanced emulator functionality (quit game, save/load state, etc) to your /opt/retropie/configs/all/retroarch.cfg file like I did here. People looking for more help can find a more detailed thread (which sets up the controllers differently, mind you) at /r/raspberry_pi , here.
New EDIT: If for some reason this button mapping doesnt work (perhaps for someone else that has another controller type, for example), I've heard that the retropie-setup.sh script has been broken with the newest RetroPie Images (2.3). What the setup script essentially does is call the retroarch joyconfig binaries and saves the output as your controller config . As a workaround, we can hardcode your retroarch.cfg file with your controller. Type the command:
> sudo /opt/retropie/emulators/RetroArch/installdir/bin/retroarch-joyconfig -o /opt/retropie/configs/all/p1.cfg -p 1 -j 0
and then follow the instructions that appear on screen. Afterwards use the command below to take that config file and append it to your retroarch.cfg file:
>sudo cat /opt/retropie/configs/all/p1.cfg >> /opt/retropie/configs/all/retroarch.cfg
You should now have the button mappings in retroarch.cfg to use for your advanced emulator functionality. Note, you'll want to do this for each controller you have (change '-p' and '-j' accordingly).
Update (1/10): Looks like RetroPie v2.4 is out. The change log suggests that the controller config issues have been resolved (but I haven't tested it).
Nintendo's "strategy" led me to successfully build a RetroPie using a RaspberryPi starter kit. Now I have a NES mini and an SNES mini all in one with just about every title ever released for both systems. And I can play Quake on it.
it's bare. if you add the $10 power adapter and $3 heatsinks, you're at $39 which is $5 off of the normal price for that on amazon: https://www.amazon.com/CanaKit-Raspberry-Micro-Supply-Listed/dp/B01C6FFNY4/
I prefer ordering from there where it's always one day free shipping for me and if I have any issues I know they'll take care of it.
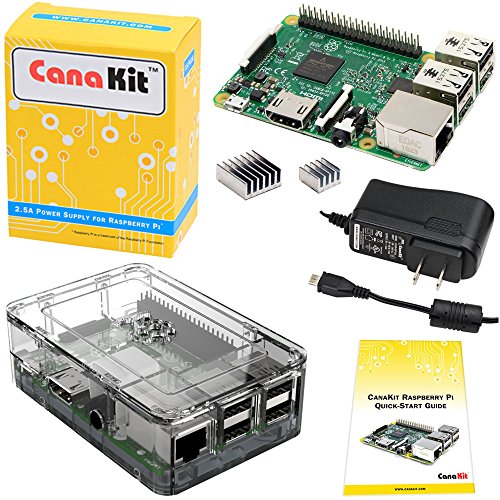
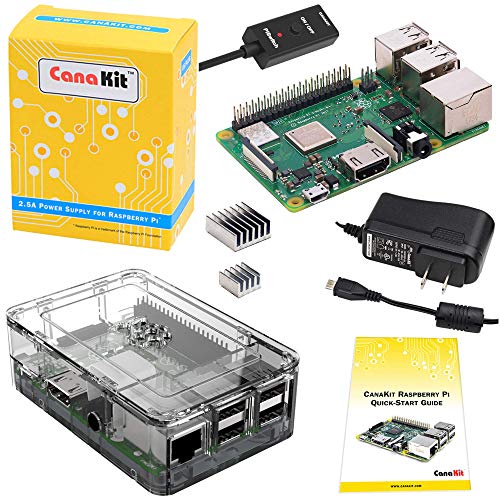
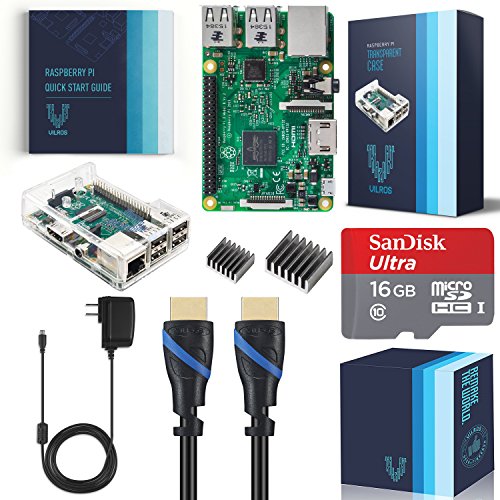
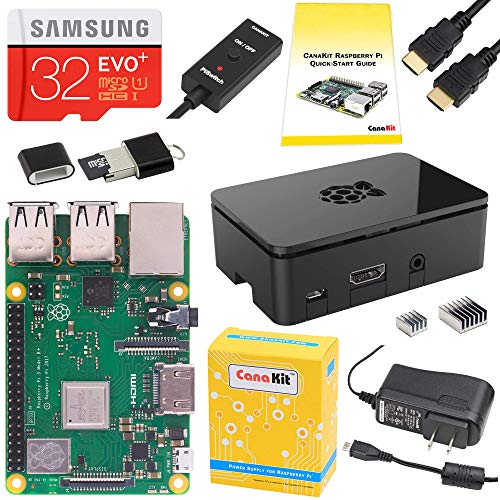
Some of the kits on Amazon are great, specifically the ones by CanaKit. They usually come with everything needed to get started (Pi, power adapter, sdcard, case, etc.) Some kits have more items than others.
As for which Pi, there are only really two options: the Pi 3 or the Pi Zero W. The other models are older and slower or lacking wifi/Bluetooth/etc. The Pi3 is more powerful and requires less adapters to make it plug into your TV, use USB devices, etc. The Pi Zero W requires some adapters and isn't as powerful but it is cheaper and a lot smaller so it is great for projects where you want it as small as possible. Both are great.
Overall, I'd recommend a Pi 3. More powerful, less messing with adapters, and still pretty small. This kit covers all the bases: CanaKit Raspberry Pi 3 Complete Starter Kit - 32 GB Edition: https://www.amazon.com/dp/B01C6Q2GSY/
Pi 3, case, power, SD card, HDMI cable, SD reader, and heatsinks.
Edit: Here is a similar kit for the Pi Zero W if you want to go the smaller/cheaper route: CanaKit Raspberry Pi Zero W (Wireless) Starter Kit with Official Case https://www.amazon.com/dp/B06XJQV162/
The SD card isn't as large and you don't get a card reader but you do get the needed HDMI and USB adapters.
Hope it helps!
>The Atomic Pi is available on Amazon US for US$34 and can be shipped worldwide
Ya but it's not
Also this implementation looks janky af, the power supply is on a separate board? No chassis of any kind available?
I'd be really interested in one of these if I could buy one with a basic little chassis and a power supply, but from the Digital Loggers site it seems like the best they have to offer is the unit itself with a separate power supply board so it accepts a 2.5mm power adapter which you appear to have to supply yourself. Why is the 2.5mm jack not on the board itself? Why can't I buy a compatible chassis and power adapter at the same time?
At first I was surprised as well, but the more I think about it, it makes sense.
The NES Classic is selling like hotcakes because of hype. When the hype dies, the sales fall off a cliff. I really don't know anything at all about their supply chain, but it seems that Nintendo has been increasingly reliant on "off-the-shelf" hardware ever since the Wii. For example, there was a little "ATI" logo stamped on the Wii because Nintendo used a regular graphics card for that console, and so ATI "owned" part of that device.
So I'm guessing they don't have a ton of vertical integration for hardware manufacturing. Compare that to Apple, which has been aggressively working to own as much of their hardware manufacturing process as possible, even going as far as to manufacture their own CPUs (iPhones have an "A9" chip or whatever, while other smartphones just buy hardware from companies like Samsung, AMD, nVidia, Qualcomm, etc).
The downside of 100% vertical integration is that if Nintendo wanted to make a new Zelda, they would have to control, manage, and pay for everything that Zelda runs on-- the silicon, the enclosure, the LCD screens, the joysticks, even the plastic game cases and printing of brochures. It's insane when you think about it. The upshot is that when you have complete control over everything, you can "stop the presses" at a moment's notice.
So Nintendo doesn't do vertical integration. Again, I have no insider info, but it's become increasingly clear simply by Googling around. For example here's a Polygon article that shows the NES classic is just a bunch of off-the-shelf hardware crammed into an offically trademarked plastic box. And this makes perfect sense. It's also notable that the Nintendo Switch is also completely outsourced, from the nVidia graphics to the USB-C port, microSD slot, Bluetooth, HDMI, etc.
It makes sense for them too-- they're a software company that happens to be in the advantageous position of being able to make such incredibly high quality software that people are willing to buy custom hardware just to play it. Imagine if EA Games tried to sell a console, and it was the only way to play games featuring their intellectual property. Holy shit, that would be their single biggest blunder.
But I digress: The NES Classic is "Nintendo" only in terms of IP. They're just buying electronics from various hardware manufacturers, gluing them together, installing an emulator, and slapping their logo on it. It's a fun product, but we all know it isn't going to last. And here's the thing: Nintendo surely gets a better deal on all this third-party hardware than you or I would, but only because they're placing massive bulk orders.
And that's the kicker, in my opinion. They might have sold a ton of NES Classic consoles, but the holiday season is over and the hype is sure to die soon. Say they placed an initial order for 500 million "Mali400MP2" GPUs to build all these cute little consoles, and they got a quote from the manufacturer saying it would cost 50 cents per unit. Good news: They recovered that 250 million cost by completely selling out! But they know the hype is going to die, and buying another 500 million seems like it might be overkill. Maybe they order 250 million. Except now that the order is smaller, the cost per unit has jumped up to 75 cents per unit (I am completely making these numbers up).
So it's a gamble that gets increasingly risky the longer you play. They already made a ton of money from the NES Classic, but as the hype dies, they'll have to make smaller orders and the cost per unit is going to increase. My guess is that they're still licking their wounds from what happened with the Wii. Those things sold shockingly well, until they woke up one morning and suddenly nobody wanted a Wii anymore. I bet that there was a very specific "oh shit" day at Nintendo HQ when they saw that Wii sales had plummeted while they had millions of optimistically-built units sitting in their warehouses.
To me, cancelling the NES Classic is a good example of "quit while you're ahead". I can't imagine how much the Wii is still burned into the memory of every executive at Nintendo. They built something so popular that it became a global social phenomenon, and then suddenly it just died, and they had their worst fiscal year in ages. Because they'd bought and assembled a bunch of Wiis that would never be sold.
I'll admit that this is way too long of a response to "WHY!?!?" but I do find it interesting. I'm only just starting to understand terms like "vertical integration" myself, but it does help to clarify why certain things are the way they are. Comparing Nintendo to Apple is very illuminating. Both companies have insane brand recognition, but they do business very differently. Ever since Steve Jobs died and Tim Cook became the CEO, people have been predicting the death of Apple. Instead, their stock price has more than doubled since the day he died. Jobs was the charismatic leader, but Cook is the king of the supply chain. He's pushed for vertical integration, and it's been working beautifully. Apple makes a crap product like the Watch? They just scale back production.
Because of vertical integration, Apple can fine-tune their manufacturing to such a precise degree that they'll keep selling Apple Watches right up until the last profitable watch is sold, even though it's clearly a failing product. On the other hand, Nintendo sells products that they don't build, so they have nowhere near the degree of granularity when it comes to predicting how their things will sell tomorrow. Neither company can predict the future, but Apple can change everything in a relative instant, while Nintendo has to make an educated guess about how the world is going to look 6 months down the line.
Also, I'm guessing the cancellation of the NES classic is going to conveniently correspond to a sudden influx of Classic NES games being sold for the Switch on the Nintendo eShop, along with various limited-edition consoles and themed peripherals. That being said, I fucking love Nintendo and hope I can die without seeing them go out of business. People who claim that the Switch is currently a $350 Zelda game are basically right, and I don't give a flying fuck. 100% worth it.
On a final note, if you wanted an NES Classic and couldn't get one or don't want to get price-gouged from a hoarder-reseller, I'd do this:
Total cost (including the NES controllers and the microSD card) rounds up to $85. And a cheaper Pi will play NES games just fine, nor do you HAVE to buy the $20 NES-themed plastic case I just randomly found on Amazon. Plus you're not limited to the games that were included on the NES Classic, and once you get bored with playing 30 year-old games there are plenty of other things to do with a Pi... Like write unnecessarily long Reddit posts, which I've just finished doing!
And for those that want the look too here's a case like the snes for the pi. SNES case
Also a NES version NES Case
No, that's pretty over priced.
https://www.amazon.com/dp/B00G1PNG54/ref=cm_sw_r_awd_RCsDub130VHMH
Here is a set with almost the same stuff for much cheaper.
Now they do: Old Skool NES case for Raspberry Pi 3,2 and B+ https://www.amazon.com/dp/B01M4OOY4U/ref=cm_sw_r_cp_apa_5kPNybPEQMM1D
Have it myself and looks great
I recommend the Canakit.
https://www.amazon.com/CanaKit-Raspberry-Complete-Starter-Kit/dp/B01C6Q2GSY
For $70 everything is included. I put an RPie together last Christmas and instead of relying on the wife and family to find the parts as gifts, I just sent them to that link. Super easy, and it's been running non-stop all day since then.
Did you not actually go to the site? It lists specifically what the money goes to, and says the total is around the same price you mentioned. There's no monitors, but there's about another $100 in shipping / taxes / handling.
The final ≈$100 is listed as "Suggested donation to help DonorsChoose.org reach more classrooms." If you hover over the "?", it lets you know this is optional.
>Most kits are $50-$70 x 5 is still only $350.
From the site:
>CanaKit Raspberry Pi 3 Complete Starter Kit - 32 GB Edition: $74.99 x 5 = $374.95
They also have 5 "learner labs":
>OSOYOO Raspberry Pi 3 DIY Starter learning Lab Kit (22 in 1) For Beginners: $29.99 x 5 = $149.95
That brings the total to $524.90, lower than your estimate. They then add about $90 of other fees on. The rest is a suggested donation.
>Also the prices for the CanaKits and OSOYOO DIY Kits don't match up either.
Yes, they do:
https://www.amazon.com/CanaKit-Raspberry-Complete-Starter-Kit/dp/B01C6Q2GSY
https://www.amazon.com/OSOYOO-Raspberry-Starter-learning-Beginners/dp/B01ICNY0FW
>The goal is rather specific to not offer specifics that they want.
How much more specific can they get? They even separated each type of fee.
Awesome!
Couple of resources for ya:
buttons , joysticks and controller, were about 60
http://www.ebay.com/itm/2-Player-USB-Mame-Arcade-Kit-w-2-Joysticks-4-8-way-16-HAPP-Push-Buttons-60-in-1-/221281135290?hash=item3385622aba:g:eZUAAOSw~OdVWpbB
pi is about 40 bucks
http://www.amazon.com/Raspberry-Pi-Model-Project-Board/dp/B00T2U7R7I/ref=sr_1_3?ie=UTF8&qid=1450134136&sr=8-3&keywords=raspberry+pi
I got this, it's not exactly a NES Classic case but close enough.
This is my parts list from Amazon, I just googled Retro Pi installation guide and used one of the top results;
CanaKit Raspberry Pi 3
Samsung 32GB EVO (storage is entirely based on your budget and how much space you think you will need)
Raspberry Pi Case (lots of options)
Wired Controller (lots of options)
Card Reader (If your PC doesn't have one already)
Add in an HDMI cable if you don't have an extra laying around.
I've started to get into electronics myself, and I can say that soldering is easy, but you need the right tools for the job.
You'll need an adjustable temperature soldering iron and 1/2 milimeter iron/lead solder as the bare minimum.
I suggest grabbing some tip tinner, solder wick & vacuum, and some cheap boards to practice soldering.
This video shows how to do the actual soldering, while this video covers the tools you'll need and explains their use. These videos are made by EEV Blog and explain soldering in GREAT detail, which is how I learned to do it.
As far as making actual circuits, you have to have an idea AND parts to fulfill your idea. The Arduino UNO is a great way to program and test circuits. It's essentially a small comptuer designed to repeat whatver task you give it over and over. Alternatively, there's the Raspberry Pi, which comes in a few different models. The difference between the Pi and the Arduino is that the Pi is essentially a mini computer. You can literally hook it up to a monitor via hdmi and slam an operating system into it.
Both boards typically come in kits like this one for the Ardunio, or this one for the Raspberry Pi. The Ardunio kits with come with a lot of peripherals, like sensors and LEDs that actually do things, while you'll have to invest more with a Raspberry Pi. These kits come with detailed instructions, code you can copy and paste, and are a great way to learn how circuitry works, and is exactly what I'm doing right now. I'm no expert by any stretch of the imagination, I've just done a decent amount of research to find out what's what.
There are two ways to hook up circuits - temporarily and (somewhat) permanently. Breadboards are used to prototype circuits without having to solder anything, typically using these wires to link different parts of the circuits together. Soldering components to those green boards I linked earlier is what you'd do when you have your circuit up and running and want to move it to something more permanent. I say "more" permanent because you can usually de-solder stuff if you needed a component for something.
Adafruit has a decently sized library of projects you can try. They often sell stuff in kits where you get everything you need to make something -- for example, this DIY MIDI controller.
Sparkfun has a great series of articles that explain the very basics of circuits and electricity
Hopefully I've explained everything enough so that you can venture off on your own. Feel free to ask questions!
I like this the super starter kit by SunFounder there videos are very good and they give you the code for all there projects.
Also, they are fairly inexpensive.
Here's a link
https://www.amazon.com/gp/aw/d/B00D9M4BQU/ref=mp_s_a_1_4?ie=UTF8&qid=1504912825&sr=8-4&pi=AC_SX236_SY340_QL65&keywords=sunfounder+arduino&dpPl=1&dpID=61kZ9XQzgxL&ref=plSrch
My friend got this one and I was pretty jealous
https://www.amazon.com/gp/aw/d/B01D8KOZF4/ref=mp_s_a_1_2
I'd go with a Canakit, but not the complete one. This version is only the case, Pi, and power cable for $50. Your complete starter kit comes with a generic SD card and HDMI cable for an extra $20 which you can get better versions of for around the same price or cheaper (or you have an HDMI cable laying around).
More Pics
Over the past several weeks, I've installed some LED strips throughout my Kitchen Cabinets.
I used ESP8266's and diyHue to control WS2812B LED Strips in my Kitchen...
Missing a few capacitors at the moment.. Will install soon!
Onto the bathrooms next with much smaller PSUs...
​
For those wandering..
Here is a general list of what was used here:
​
I have used 330ohm resistors in the data line, in the past, with other WS2812B installations. They seemed to mess up the signal flow when using them with the ESP8266's, but I could have gotten a bad batch of them.
Using resistors in lighting data lines has always been recommended.. Resistors in lighting data lines generally "terminate" the line.. They can drown-out and prevent feedback, essentially.
That is exactly what got me here... can someone confirm this as a decent option? For now I just want to do older sims up to SNES, I realize I would probably need an upgrade for PSX/N64/Wii.
https://www.amazon.com/gp/product/B01C6Q2GSY/
How about a good controller option?
https://www.amazon.com/iNNEXT-Nintendo-Controller-Raspberry-Windows/dp/B01MYUDDCV/
Guarantee it? Easy! Build something better:
Congratulations! You now have a:
That is ~2.5 inches wide, ~3.5 inches long and ~1 inch high.
Otherwise, get in line at a Best Buy about a month in advance.
Yes I know, sorry the video is vertical. And I know there's a lot cooler ones out there but I sunk a lot of time into this so I thought I'd share. If anyone is interested I've got a fritzing diagram of the wiring for everything. I used an Arduino Mega, and pretty much everything else used came in this kit. The color sensor I used was here. Pretty much everything else to actually build the mechanical portion was found in one of my groupmate's garage.
300 isn't that bad a price really.
Just jumping on amazon getting:
Raspberry pi 3 starter kit
Raspberry pi 3
5 inch touch screen
That alone comes out to 90 bucks.
Skip the battery the mouse, the nifty case for it and a couple lesson plans.
I could cut corners on the case and the switchs etc, but I'm not exactly a normal "customer"
https://www.amazon.com/dp/B07BCC8PK7/ref=cm_sw_r_cp_api_PTy9BbDD7NWB1
This is the full package
Like u/Jack_Bohlen said - the documentation is really good and you should be able to find answers to most of your questions. Being able to read and follow instructions carefully is important, especially if you get into doing anything from the command line.
If you can follow directions, you should have very few problems going from a box full of components to a basic working system in a short time.
Here are the instructions I gave a friend recently:
Oh, and I guess you want to have a USB keyboard handy just in case. But it is a really easy process to get started.
I just got the Atomic Pi SBC from Amazon for $35 which has Intel Z8350 + 2GB + 16GB EMMC. Should be fine for some Reddit, Youtube and some coding.
https://www.amazon.com/Atomic-Pi-High-Speed-Peripherals/dp/B07N298F2B/ref=sr_1_1?keywords=atomic+pi&qid=1558243139&s=gateway&sr=8-1
It's not really SFF but I think the heatsink can be replaced with a smaller one to make it more compact.
I'm trying to get Windows To Go on this working right now.
When I first purchased my raspberry pi 3 I used it for emulators with retro pi, I purchased my pi from the link in that guide and bought a power supply from cana kit.
If this is your first pi I recommend this small kit -> Linky
It comes with a nice case a power supply and some heat sinks which are sorta useful with a pi3, of course it also includes the pi3.
You would need a micro sd card preferably around 8 gigs the higher the class the better and an HDMI cable. You most likely already have some of those lying around somewhere (I know I had).
As for a controller you can use an Xbox 360 controller if you have one and I believe ps4 controller also works.
As for the guide I used this one by adafruit (just ignore the tft things if they come up) -> Linky
Have fun.
Edit: added controller bit
This 100%
https://www.amazon.com/NES-case-Raspberry-Pi-Skool/dp/B01M4OOY4U
This is the one I'm using for mine, its $10 and even though I dont really use the Pi anymore (the novelty runs off after you play like 30 classic games) and it looks really cute on my desk. Theres also a SNES one on amazon thats good too.
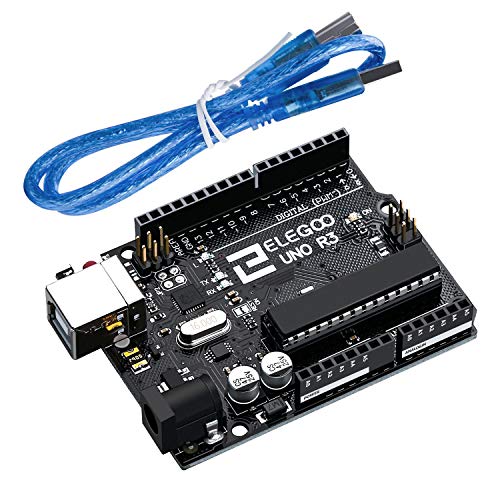
Sure, it's way easier and cheaper than you think. First, pick up an Arduino Leonardo. It's $9.99 from Amazon US This is the microcontroller that will plug into USB. Use the Leonardo as it's the easiest to set up as a keyboard. Also order a breadboard and some resistors, a simple beginning electronics kit would be good too and give you lots of projects if you have a bit extra to spend.
Once your Arduino arrives follow the basic button tutorial. And learn how to upload code to the Arduino using the IDE.
Once you have a simple button circuit working (a button switches on LED light for example), take a look at the [Keyboard library.] (https://www.arduino.cc/en/Reference/MouseKeyboard) You should now be able to get your button to send a letter to your PC which is identical to pressing a keyboard button.
Congrats you have built a custom interface. Just add more buttons and a nice box, maybe lights if you want to get fancy.
Built one this week, actually. Here's the guide I followed:
https://arstechnica.com/gaming/2017/04/one-upping-the-nes-classic-edition-with-the-raspberry-pi-3-and-retropie/
I bought my raspberry and 2 controllers off of Amazon. Cost me about $100 total. Canakit makes starter kits for around $80 that comes with all the hardware you need to make it ready to load games. Took about an hour to have it ready to load all your games. I have around 2k games from 5 different systems and they all fit on a 32 gb card.
Edit: I found the kit I bought. It was $70
https://www.amazon.com/CanaKit-Raspberry-Complete-Starter-Kit/dp/B01C6Q2GSY
Here?
https://www.amazon.com/dp/B01M4OOY4U/ref=cm_sw_r_cp_apa_f0u8yb0RRNB3G
this was posted the other day from amazon but was sold out. here's the direct link.
Also
Amazon Link
Looks to be unavailable from both.
Edit: back in stock!
interesting idea, taking someones 3d model, printing it, and installing a free OS on it and charging so much for it.
i think people tend to just go for something like this
https://www.amazon.com/dp/B01M4OOY4U
Edit: sorry man rage, just noticed you post these all the time and get comments like this all the time. I notice you just copied the case, not customised the original. And you are actually charging for the time it takes you to 3D print and put it all together.
Either way, if people are buying them, great but just seems like there are other better solutions out there
If you could mass produce you'd make a nice profit. Currently this is the only console case that I found on Amazon.
Amazon also has this: https://www.amazon.com/dp/B00G1PNG54/ref=cm_sw_r_awd_4iDoub0F7FHVY
> I believe he's using the Raspberri Pi 3 not the zero
Same here. Tried to be honest but Nintendo shipping 10 total minis to each store in Anchorage (insanity) pushed me over the edge. Amazon. Do it. https://www.amazon.com/CanaKit-Raspberry-Complete-Starter-Kit/dp/B01C6Q2GSY/ref=sr_1_3?s=pc&ie=UTF8&qid=1484331052&sr=1-3&keywords=raspberry+pi+3 that's the one I ordered. Complete kit. Join the resistance
Just a few ideas...
It's pretty easy to build a Raspberry Pi for retro gaming. I have built 3 of them recently: 1 for myself, and 2 for family members.
First thing you'll need is the Raspberry Pi itself. You can get it for as cheap as $35, but that's just the system board. No power cord, SD card, or even a case. So I recommend getting this kit for $70.
https://www.amazon.com/CanaKit-Raspberry-Complete-Starter-Kit/dp/B01C6Q2GSY
It comes with everything you'll need: the system board, a case, 32 GB SDcard, HDMI cable, etc. This is the latest model, the Raspberry Pi 3. It has 4 USB ports for controllers, wifi, ethernet, even bluetooth. You'll also need controllers. The Raspberry Pi works best with Xbox and Playstation controllers. You'll have to use USB controllers, but I've read that the new Xbox One S controllers work with Bluetooth. Hell, you can even use your phone! If the Raspberry Pi is connected to your Wifi, just open up Chrome, enter the IP address, and BAM! Touch screen controller.
Next, you'll need RetroPie. This is a pre-made image for the Raspberry Pi. It has all the emulators and GUI you'll need. All you do is supply the ROMs. You can download the latest RetroPie build from here.
https://retropie.org.uk/
Next is the ROMs. I downloaded all the ROMs from EmuParadise.
https://www.emuparadise.me/
This part will take some time since you need to download the game individually, but you can find any game you are looking for. Even rare prototype versions of unreleased games for any system you can think of.
Finally, here's a good tutorial for putting it all together. Hope this helps!
http://lifehacker.com/how-to-turn-your-raspberry-pi-into-a-retro-game-console-498561192
This post warms my old, dead heart.
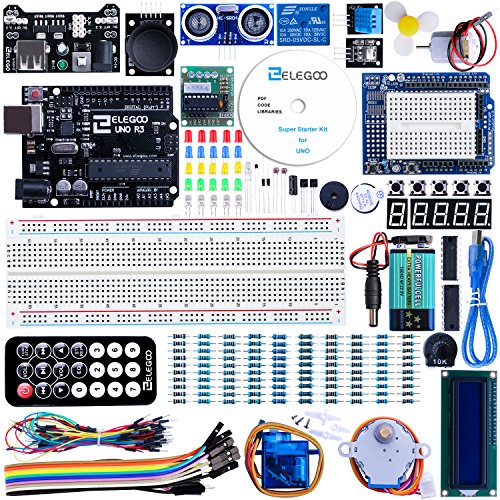
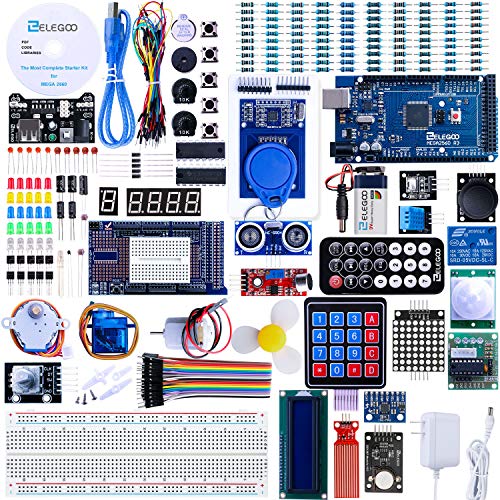
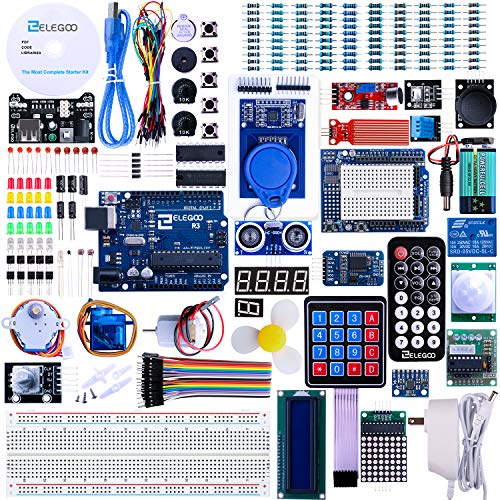
Buy him this: https://www.amazon.com/Elegoo-EL-KIT-008-Complete-Ultimate-TUTORIAL/dp/B01EWNUUUA
It is an Arduino kit that will give him a ton of projects to create, hack, and experiment with. All without burning down the house or electrocuting himself.
As the world becomes a more connected place, being able to make smart devices is going to be an invaluable skill. Get him this kit, get him excited, and watch his imagination run wild.
>Unless you want it to display on your shelf there's no reason to buy one of these.
https://www.etsy.com/market/snes_raspberry_pi
https://www.amazon.com/dp/B01M4OOY4U
I dunno... I'd swap from the clear case my PiTendo currently has if I didn't think it looked neat "naked" as it is.
Try an Elegoo starter kit to get a jump on Arduino-related projects to play with. Amazon offers several kits of different components and boards. I like this one for beginners: https://www.amazon.com/ELEGOO-Project-Starter-Tutorial-Arduino/dp/B01D8KOZF4
Pick up an Arduino Starter Kit. Tons of fun for few $$$ and you'll get a taste of a different kind of programming as well as some electronics experience.
You just need a couple things!
I have answers
Even after seeing this?
https://www.amazon.com/dp/B01M4OOY4U/
Using prime, you could have the whole thing done in 3 days.
If you're willing to commit a bit of money, then I heartily recommend getting a small raspberry pi and installing pihole.
Network wide adblocking on all devices and even in apps. It's fantastic.
Well the control panel he used is this but you could build your own control panel for cheaper by using one of these. If you wanted to only run MAME games then you could easily get by with a Raspberry Pi. Next you want the actual cabinet... There are a few routes you can go. You could buy a kit, you could buy some sheets of plywood and build one yourself using these plans, OR if you're lucky you could find an old broken arcade cabinet on craigslist for super cheap. Once you do all of that you'll have to get the software running on the raspberry pi. So going back on the cost... You could spend anywhere from $500 to $3000 all depending on the specifications you want.
Source: Built one myself
Of course :)
Vital parts -
Raspberry pi: https://www.amazon.com/gp/product/B01C6Q2GSY/ref=oh_aui_detailpage_o01_s00?ie=UTF8&psc=1
Controls: http://www.ebay.com/itm/251913055189?_trksid=p2057872.m2749.l2649&ssPageName=STRK%3AMEBIDX%3AIT
Monitor: https://www.amazon.com/VIZIO-D24-D1-Class-Smart-Black/dp/B01A0LGS7W
Extras -
Amplifier (for the 3-way speakers): https://www.amazon.com/gp/product/B01HRR5AWQ/ref=oh_aui_detailpage_o06_s00?ie=UTF8&psc=1
LED lights (there's a glow below the controls): https://www.amazon.com/gp/product/B01H6O6LA0/ref=oh_aui_detailpage_o06_s01?ie=UTF8&psc=1
For the speakers I just tore apart some Fluance 3-way tower speakers I had laying around.
That looks like an excellent all-in-one option for him.
There are many projects for the Pi that are well-developed and documented, and although most of them are network or computer-oriented, plenty use the GPIO as well. You might consider getting a starter kit that includes jumpers and solderless breadboards, resistors, and LEDs for more free-form projects in the future.
Without the GPIO, a 14 year old might like:
A delicious snack for guestsWith the GPIO:
There are many things available with the Pi and some basic tools. This CanaKit includes most of the basic bits (assuming you don't have general electronics components around the house). You might consider adding on a few basic electronics tools down the road (maybe birthday gift or whatnot).
Overall, I've found the RasPi community to be friendly and fairly open to new learners, so you can feel fairly safe turning him loose on /r/raspberry_pi or #raspberrypi.
I think this might be able to handle it.
Does anyone have thoughts about the best way to generate keys in Windows IoT or Linux on a Raspberry Pi?
I ask because it's possible to build a brand new dedicated off-line touchscreen computer + HP printer to create cold storage wallets for less than the cost of a Ledger Nano S. I own a LNS and it's great. I am just using it as a reference because it's become something of a standard and many people ask about even more secure alternatives.
$30 - [computer] (https://www.amazon.com/Raspberry-Pi-Model-512MB-Computer/dp/B00LPESRUK)
$22 - touchscreen
$30 - printer
____
$82. (vs. $85 LNS)
Even better, AdaFruit has a $10 Raspberry Pi with no networking capabilities - ideal for an air-gapped system. Using your own monitor and keyboard puts the price at $40, including the printer of course.
Once you have a print out of your keys from an air-gapped system, you can transfer them to other materials for very minimal cost. Photoresist film + acid or sand can be used to etch keys and qr codes into metal tags for long term storage. It's not difficult. More like a craft project. The result is relatively fireproof, waterproof, shock proof, etc. Private keys can be covered with tamperproof seals.
This is all pretty well known but hopefully it helps a few people. If anyone has any thoughts on software, it would complete the package. I have everything ready to test but I don't want to waste time solving the wrong problems with the wrong application.
Parts List:
Power Adapter
Raspberry Pi
USB Super Nintendo Controller (This is the best one I have found so far)
HDMI Cable
WiFi Dongle
Other Items you will need:
USB Keyboard
Monitor or TV with HDMI Support
Now you dont have to use these parts exactly, there are plenty of other parts you can use. I am pretty sure that you can play Roms up to Playstation 1.
There is also a new Raspberry Pi 3 that is compatible with the RetroPie software which has WiFi and Bluetooth integrated into the board.
Helpful Video's to tackle technical issues with your RetroPie:
https://www.youtube.com/playlist?list=PLtht1mv6ty8xMBwgHX9RCkplqeSRxyHiC
Here is the Case I found on Etsy. There are plenty of other sellers but this guy was great!
My favorite kit is this one:
CanaKit Raspberry Pi 3 Kit with Clear Case and 2.5A Power Supply https://www.amazon.com/dp/B01C6EQNNK/ref=cm_sw_r_cp_apap_He7LFsgm1pGXE
$50 for a $35 Pi3, an $8 case, a $10 PSU, plus some cheap aluminum Heatsinks.
This provides you with the bare minimum hardware, a good PSU, and a nice tool-free case, for cheaper than you could buy the individual components.
Add a good SD card (SanDisk or Samsung SDXC Class 10) and an HDMI cable, and you're in business.
get a raspberry pi 3 running attract mode put it in this case and install this theme, problem solved
hell you can even have the power button trigger a sudo shutdown now command for a nice safe sd card safe power solution
Here you go: https://www.amazon.com/CanaKit-Raspberry-Starter-Premium-Black/dp/B07BCC8PK7/
If you have Prime, it'll arrive in two days.
>I was going to get a Pi Zero W, but then read that there's less latency if it's done over ethernet
There is less latency, but you will never notice it (milliseconds). I have four Pi-Holes on my home network, in pairs. Each pair is a 3B+ (ethernet) with a Zero W (wireless). DNS performance between the two platforms is indistinguishable.
A 3B+ is nicer to work with from an interface standpoint (the processor is just faster) and it has double the memory if you plan to block a few million domains.
>Should I buy a raspberry pi starter kit (like this?) If so, what do you recommend?
In my experience, the Amazon kits are overpriced and full of stuff you don't need. I reommend Adafruit.
Get the Pi you want, perhaps a case, a good quality power supply rated for that perticular device. Then go to Amazon and pick up a 32 GB Sandisk Ultra microSD for about $8 US.
Then follow this guide to set it up: https://www.reddit.com/r/pihole/comments/9y9e9w/simple_guide_to_setting_up_a_pi_zero_w_and/
For sure!
Kit from Amazon
https://smile.amazon.com/gp/product/B01C6FFNY4/ref=oh_aui_detailpage_o00_s00?ie=UTF8&psc=1
Controllers
https://smile.amazon.com/gp/product/B002B9XB0E/ref=oh_aui_detailpage_o00_s00?ie=UTF8&psc=1
Case from Etsy (2 options)
https://www.etsy.com/listing/212989839/3d-printed-nes-inspired-raspberry-pi?ref=shop_home_feat_2
https://www.etsy.com/transaction/1212076216
>The Raspberry Pi Starter Kit features a 3 Model B, 8GB NOOBS SD card, a case, 2.5A multi-region power supply, HDMI cable, optical mouse and keyboard, and a copy of Adventures in Raspberry Pi Foundation Edition.
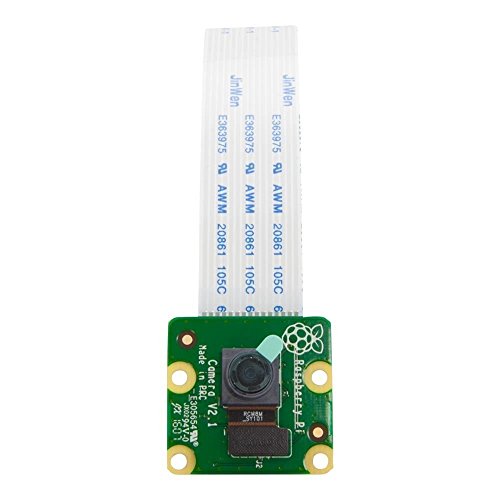
>You Can Now Connect a Camera to Raspberry Pi Zero
Initially available online in the UK.., the £99 ($132) collection will roll out to the rest of the world over the coming weeks.
That is an approx 50% increase to the deals I've seen around. You only really need the raspberry pi, an sd card, and a 5v 2.5a power cord.
Most people already have HDMI cables, a mouse/keyboard. A case is nice but my media center pi just hangs out with it's components out, all naked on the media center table. It doesn't need no stinkin case.
Here's the Amazon kit @ 74.99
Adafruit throws in some more tinkering components for 89.95
Sparkfun also has that deal at 89.95
edit: spl
I wanted to show off an arcade cabinet that my brother in-law and I built.
Imgur Gallery
We designed the cabinet in 3d to make sure everything would fit. Then cut out everything using a CNC router. We used wood glue and wood putty to put everything together. For the monitor we used a Dell 17" (we had lying around) mounted portrait. The guts of the arcade are
In all it took us a couple of weeks to design in 3D. My brother in-law did all this work. He also cut out everything and assembled the shell. I did all the internal wiring and software side of things. It is running RetroPie 4.0.2. The only really PITA is that this is a cocktail arcade. Most if not all the games needed a custom shader to correctly implement the rotation and dual flipped screens. A big shout out to hunterk from (libretro.com)[http://libretro.com] forums for helping me with this. It turns out that NES, SNES, Arcade, etc... needed their own shader to correctly display the image to both users. Also, the mame emulator has the ability on some 2 player games, to set cocktail mode. That way, when it is the 2 players turn, the screen auto rotates so they can play on their side.
We were pretty impressed with ourselves when we finished. We built it to give away at a foundation raffle a couple of weeks ago and the winner was very excited to win it.
I'll be glad to answer any questions you guys/girls have about the build. I plan on putting the glsl shaders on my github so others using the RetroPie OS in cocktail mode can use them.
In case anyone is considering this, if you know absolutely nothing about computers and want a little something to get your small child interested in technology, this can work as long as you have the cash to spare. However, it is a huge rip off otherwise. If you have any competence with computers, just get a Raspberry Pi 3 kit and plug it into your HDMI capable TV. It'll cost you a fraction of the price and have much more ability to grow with the child.
This is the type of stuff that Raspberry Pi was invented for. It's a low cost, small (credit card sized) PC that runs a distribution of Linux. Something like that is perfect if you're learning Java and don't already have a PC.
https://www.raspberrypi.org/
You can get a starter kit with the Pi, case, SD card, and power supply for like $70 on Amazon: https://www.amazon.com/CanaKit-Raspberry-Complete-Starter-Kit/dp/B01C6Q2GSY/
Only other thing you'd need is monitor, mouse & keyboard. I have a few of these, they're pretty good, and would be more than enough for learning on.
The guide is for a Raspberry Pi, which you can connect to from a windows machine, yes.
Make sure you grab some wires to connect everything if you don't already have some.
I used these which worked great
https://www.amazon.com/gp/product/B01EV70C78/ref=oh_aui_detailpage_o07_s00?ie=UTF8&psc=1
My wife bought me this 2 years ago, I'm still finding cool new things to do with it.
Elegoo EL-KIT-008 Mega 2560 Project The Most Complete Ultimate Starter Kit w/TUTORIAL for Arduino UNO Nano https://www.amazon.com/dp/B01EWNUUUA/ref=cm_sw_r_cp_apa_Zii.BbGM9Q76Y
On amazon: Link
> I'm new to all of this, and I have zero experience with coding/programing/etc.
Do not feel intimidated. This isn't difficult. It'll take some time and patience, but it's very rewarding getting your system up and running.
--------------------------
> I was thinking of getting an all in one kit like this oneIs there any downside to this?
Do not buy that over-priced garbage. The biggest gripe to the kit is the unknown PSU, and small/generic memory card.
What you'll need:
Again, there are some very optional parts above. It can be as cheap or expensive as you want.
--------------------------
>So If I get this kit, I can just hook it up to my tv with an HDMI, add my ROMs via SD card, and plug in my USB controllers and I'm good to go?
If you go the route of piecing together your own kit from higher quality parts, the only thing missing is the RetroPie image on the SD card.
At a very high-level:
--------------------------
If you live near a Micro Center, they sell the Pi2B for the regular price. Actually, right now mine shows it for $30.
EDIT: Yes, you do need to live near one. That's why I said it. If not, you can always pay a few extra dollars for one on Amazon. (Currently only $3 more, and should be free shipping.)
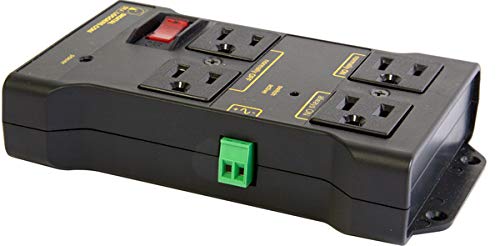
I am a huge fan of this little box: Iot Relay - Enclosed High-power Power Relay for Arduino, Raspberry Pi, PIC or Wifi, Relay Shield https://www.amazon.com/dp/B00WV7GMA2/ref=cm_sw_r_other_awd_efNjxb4112FRV
https://pi-hole.net/ + https://www.amazon.com/CanaKit-Raspberry-Starter-Premium-Black/dp/B07BCC8PK7
If you are technically inclined and want to block ads network wide in the home.
First step is to get a raspberry pi 3:
https://www.amazon.com/CanaKit-Raspberry-Starter-Premium-Black/dp/B07BCC8PK7?crid=2D8OZM8I79C3Z&keywords=raspberry+pi+3+b%2B&qid=1536687201&sprefix=raspberry+&sr=8-1-spons&ref=mp_s_a_1_1_sspa&psc=1
Then install Home Assistant using these instructions:
https://www.home-assistant.io/hassio/installation/
The install the Abode component:
https://www.home-assistant.io/components/abode/
Then install the HomeKit component:
https://www.home-assistant.io/components/homekit/
Voila!
Get something like this or this, it should arrive pretty fast and give you a good idea of what you can do with arduino. Once you have the basics down you can order more specific parts and go from there. This is better than buying components in that it all comes together as one and you won't be missing any parts right off the start in order to get led's blinking etc..
Just get this: https://www.amazon.com/dp/B01D92SSX6/ Buy the HDMI cable and MicroSD card separate and forget about the USB stick. You can have a 64gb card rather than a 32gb one of questionable quality.
RetroPie setup
EDIT: Also, for extra nostalgia:
SNES Pi case W/fan
SNES Pi case W/O fan
PSOne Pi case
And of course, NES Pi case
Somebody posted this case a few comments up.
I love my old skool nes case for my retropie!! Hey, why don't you include a link to the product and maybe an image?! Show people how awesome this little case is.
Amazon:
Old Skool NES case for Raspberry Pi 3,2 and B+ https://www.amazon.com/dp/B01M4OOY4U/ref=cm_sw_r_cp_api_PBI9ybVWN3C4N
I just got a pi 3 and loaded it up for my wife's birthday. She was wanting the nes mini, and I absolutely refuse to pay the $250 asking price for a secondhand one.
Here's what I purchased:
https://www.amazon.com/gp/product/B00IVPU786/ref=oh_aui_detailpage_o03_s00?ie=UTF8&psc=1
https://www.amazon.com/gp/product/B01CK3XTIE/ref=oh_aui_detailpage_o03_s00?ie=UTF8&psc=1
https://www.amazon.com/gp/product/B01C6FFNY4/ref=oh_aui_detailpage_o03_s00?ie=UTF8&psc=1
https://www.amazon.com/gp/product/B002B9XB0E/ref=oh_aui_detailpage_o03_s01?ie=UTF8&psc=1
No USB keyboard needed. I loaded a disk image of RetroPie onto the SD card with my notebook. Then I connected the pi to my router via Ethernet cable and used PuTTY to configure the wireless adapter.
I'm not saying to give up. Buy this:
https://www.amazon.com/CanaKit-Raspberry-Complete-Starter-Kit/dp/B01C6Q2GSY
You get a larger SD card, the best Raspberry Pi on the market. It takes maybe 3 minutes to assemble. Comes with a USB microSD card reader so you can load RetroPie. The only thing missing would be a controller or keyboard.
Get yourself this kit
and put Retropie on it
I had plans to buy the Mini NES for my dad's birthday but when i showed him the list he was bummed at how many games we used to own that wasn't on there so it made me look for an alternative, this is probably one of the best decisions i've ever made, this thing kicks ass the only thing it fails to run well that i've tested so far is N64 where there are stuttering issues and awful fps drops but for anything pre-N64 it works like a charm
Scroll at the bottom to see a list of supported systems
RetroPie is a retro gaming system for systems like SNES, Atari, N64, Genesis, Game boy, & etc.
. Most people install it on a Raspberry Pi. It's glorious.
Here's all you need to get started. You may want to get a wireless keyboard and a game controller, too.
If you do decide to go with a kit I recommend this https://www.amazon.com/gp/aw/d/B01CZTLHGE/ref=mp_s_a_1_1?ie=UTF8&qid=1487129320&sr=8-1&pi=AC_SX236_SY340_QL65&keywords=elegoo+complete+starter+kit&dpPl=1&dpID=61kMrFJImZL&ref=plSrch
The Elegoo is a knockoff, but completely works with the Arduino IDE and has more components than the equal name brand kid.
Raspberry Pi 2: $35
SNES controller adapter: $11
32 GB MicroSD card: $10
Power Supply: $10
Case: $7
RetroPie: $0
The ability to play your favorite games forever: Priceless
Someone asked me for a parts list via PM. I am a lazy man, so this is a 100% Amazon Prime build:
https://www.amazon.com/gp/product/B00CJGIWIA/ref=oh_aui_detailpage_o00_s00?ie=UTF8&psc=1
https://www.amazon.com/gp/product/B00T0BH8WS/ref=oh_aui_detailpage_o02_s00?ie=UTF8&psc=1
https://www.amazon.com/gp/product/B001Q13BIU/ref=oh_aui_detailpage_o04_s00?ie=UTF8&psc=1
https://www.amazon.com/gp/product/B00H95C0A2/ref=oh_aui_detailpage_o05_s00?ie=UTF8&psc=1
https://www.amazon.com/gp/product/B007OYAVLI/ref=oh_aui_detailpage_o05_s01?ie=UTF8&psc=1
https://www.amazon.com/gp/product/B007OYAVLI/ref=oh_aui_detailpage_o05_s01?ie=UTF8&psc=1
https://www.amazon.com/gp/product/B004FHO5Y6/ref=oh_aui_detailpage_o05_s01?ie=UTF8&psc=1
https://www.amazon.com/gp/product/B00T2U7R7I/ref=oh_aui_detailpage_o05_s01?ie=UTF8&psc=1
https://www.amazon.com/gp/product/B00DYQYLQQ/ref=oh_aui_detailpage_o05_s01?ie=UTF8&psc=1
https://www.amazon.com/gp/product/B00TIY5JM8/ref=oh_aui_detailpage_o05_s02?ie=UTF8&psc=1
https://www.amazon.com/gp/product/B00ZHF3RHQ/ref=oh_aui_detailpage_o01_s00?ie=UTF8&psc=1
https://www.amazon.com/gp/product/B018JWCX8M/ref=oh_aui_detailpage_o01_s00?ie=UTF8&psc=1
Hey, I use the GPIO to control this IoT relay power switch!
It was super easy to set up!
> I'm not interested in a hard wired switch to the Raspberry Pi's GPIO pins; controlling mains power directly seems entirely too dangerous.
I do that, but using one of these, which eliminates any concern about electrocuting yourself. (I got it for about $17 but it's currently $28.) It's basically a two-outlet power strip with surge protection and safety breaker, controlled by the Raspberry Pi.
There's an OctoPi plugin that will turn off the power when the printer is idle, after a configurable delay, and when the temperature has reached a configurable threshold. It also lets me turn on/off the printer and a lamp by clicking its toolbar icon. Edit: this plugin is called PSU Control.
As a bonus, there's another OctoPi plugin that will use the same mechanism to turn off the power if excessive heat-bed or extruder temperature is detected. Edit: this plugin is called Temperature Failsafe.
Let me know if you need any help with this.
Yeah I think that kit would be a little too basic for an 18yr old. Ok but you will quickly outgrow it.
I'd get an Arduino Uno starter kit instead. Uno are plenty advanced to do lots of fun projects. The Mega 2560 kit Ox linked is bit more than you would need.
https://www.amazon.co.uk/dp/B01D8KOZF4/ref=cm_sw_r_cp_apa_i_H7t1DbGFGF317
The arduino uno is a great kit to start with. you can get one here.
Check this out for $35. There's also a 'complete' kit for $52 I believe.
https://www.amazon.com/gp/aw/d/B01D8KOZF4/ref=psdcmw_3015426011_t1_B01DGD2GAO
EDIT: Link der
Do you have $50 and Amazon prime? You can get a Raspberry Pi and plug it into your TV with an existing HDMI cable, then attach any USB keyboard and mouse, which you can find at a thrift store for $1 each.
https://www.amazon.com/Vilros-Raspberry-Clear-Power-Supply/dp/B01D92SSX6
You can probably find a used or older model Raspberry Pi for even less. All you need is a power cable, SD card, HDMI cable, keyboard, and mouse.
Full parts list with links to each product:
Camera:
$36 - Raspberry Pi 3
$30 - Raspberry Pi Cam v2
$9 - 8GB SD card (class 4 or higher)
$3 - M3 hex nuts
$8 - M3 screws 16 mm
Iphone Lens x0.67
$20 - Male/Female Header Pins
$12 - Resistors 10k x 2 + 220 O x 2
$7 - Jumper Wires
$7 - LED Buttons x 2
$35 - Adafruit 2.8" PiTFT x 1
$8 - Pogo Pins
$7 - Clear Red 3mm LEDs x 3
$20 - PowerBank
$6 - Resistors - 2x 10k (included in price before) & 2x 100k
$30 - TowerPro MG92B Servo x 1
$8 - Neodynium Magnets 6X2 mm (8 pieces)
$10 - Micro USB Breakout x 2
$7 - Micro USB Cables x 2
Gif Cartridge:
$26 - Raspberry Pi Zero W x 1
$9 - 8GB SD card (class 4 or higher) x 1
Resistors 10k x 1 + 100k x 1 (included in price from camera parts multi pack)
$3 - Momentary Switch x 1
$35 - Adafruit 2.8" PiTFT x 1
$13 - 3.7 v LiPo 400mAH Battery x 1
$20 - Power Boost 1000C x 1
Tools you may need:
Soldering Iron, Desoldering Gun/Solder Sucker, Screwdriver set, Crimping tool, Pliers, Exacto Knives, Sand Paper(400-1200 grit), Tweezers, Acrylic Spray Paints (Black and White) Krylon or Montana Gold
Github Repo for the code: https://github.com/shekit/instagif
Github Repo for the eagle files, STL files: https://github.com/shekit/instagif-hardware
Total Cost: $369
+ iPhone Lens which varies greatly
Normally they're like the #1 sold case for pi on Amazon but looks like they are currently unavailable. You can still buy them on Old Skool Tools' site though. Of course you still need to put a Pi inside.
It's the Kintaro NES case, and I picked it up on Amazon.
(Got the Pimoroni Blinkt from my local Microcenter and for anyone looking to use the Blinkt with this case, know you'll need a 90 degree header adapter, I used this one from Adafruit. )
Here is a parts list for those interested
Nema 5-15r To C14
Voltmeter Analog Panel Meter
Shrink Tubing
32GB MicroSD
Raspberry Pi 3 + Power Supply
MCP4725 Breakout Board
TCA9548 I2C Multiplexer
RJ45 Extender
22AWG Wire
Plastic 2U Box
Not a fan of the vitrolos case from Amazon. Bought one myself and it had no ventilation. Only box I've ever gotten a high temp indicator.
I'd recommend the canakit stuff off Amazon. If you want it all in one they have a kit that isn't too bad of a value, perhaps a the SD card is a little bit overpriced. But for friends that want to have me make something for them (like a retropie setup or whatever) I just point them to this as it's easier:
CanaKit Raspberry Pi 3 Complete Starter Kit - 32 GB Edition https://www.amazon.com/dp/B01C6Q2GSY/ref=cm_sw_r_cp_api_qEWfzbMVV9W7S
Otherwise you can pick a board, power supply, case, and heatsinks if you want, and if you have an hdmi cable and extra SD card you can get out a little cheaper.
I bought the elegoo super starter kit off Amazon and I've been SUPER happy with it. For less than the price of an official arduino you get a knockoff board and a ton of electronics to play with. Also arduino is open source so it's completely legal to make knock offs.
Elegoo EL-KIT-003 UNO Project Super Starter Kit with Tutorial for Arduino https://www.amazon.com/dp/B01D8KOZF4/ref=cm_sw_r_cp_apa_CvMWAbFQQHAP4
I would recommend either a Raspberry PI with an accompanying Python book like Learn Python The Hard Way or an Arduino electronics kit. Both of these are relatively cheap options and are a great way to teach someone about electronics and programming. Here are the links for the Arduino and Raspberry Pi
https://www.amazon.com/gp/aw/d/B00BT0NDB8/ref=mp_s_a_1_2?ie=UTF8&qid=1480518215&sr=8-2&pi=SL75_QL70&keywords=arduino
https://www.amazon.com/gp/aw/d/B01C6EQNNK/ref=mp_s_a_1_3?ie=UTF8&qid=1480518364&sr=8-3&pi=SL75_QL70&keywords=raspberry+pi+3
https://www.amazon.com/CanaKit-Raspberry-Micro-Supply-Listed/dp/B01C6FFNY4/ref=sr_1_6?s=pc&ie=UTF8&qid=1496416244&sr=1-6&keywords=raspberry+pi+3
I got this one https://www.amazon.com/gp/product/B01C6FFNY4
I wanted a different case and already had a lot of the other peripherals.
Also look into getting an SD card like Samsung or something. I keep seeing other people say the one that comes with the kit is substandard.
Amazon. Pi 3, power adapter, heatsinks, free shipping, all for $55.
http://www.amazon.com/gp/aw/d/B01C6FFNY4/
[This is the kit I got] (https://www.amazon.com/CanaKit-Raspberry-Complete-Starter-Kit/dp/B01C6Q2GSY/ref=sr_1_3?s=pc&ie=UTF8&qid=1484331052&sr=1-3&keywords=raspberry+pi+3)
You can make one all inclusive for about $70 or so. It's relatively simple. You'll need the Pi (~$35), a power chord(~$5-10), a microSD card, an HDMI chord, and USB controllers(~$10-15 each). I highly recommend getting a case, although it's not 100% necessary.
Retropie setup guide: https://learn.adafruit.com/running-opengl-based-games-and-emulators-on-adafruit-pitft-displays/retropie-setup
Kit example: https://www.amazon.com/CanaKit-Raspberry-Complete-Starter-Kit/dp/B01C6Q2GSY
I would make sure and use a power supply specifically made for the Pi, but if you have a spare HDMI chord, microSD adapter, and decent microSD card laying around you can save a few bucks and get a kit without them.
After you set up RetroPie, download the games you want to install (Warning: Nintendo, Sega, etc games are copyrighted, so they're technically illegal to download. Your chances of repercussions for doing so are very low, but I've included fair warning now). Install the downloaded games and enjoy.
Raspberry Pi 3 is the way to go. You can have both a retro game system, and kodi.
edit: Suggest this kit
CanaKit Raspberry Pi 3 Complete Starter Kit - 32 GB Edition https://www.amazon.com/dp/B01C6Q2GSY/ref=cm_sw_r_cp_apa_LYZ3yb9CEMZ6P
From a technical standpoint, if you read this and understand everything you shouldn't have any problems.
As far as actually putting it together, just buy this and you'll have everything you need except a controller. You can use just about any USB gamepad, including a wired Xbox 360 controller. The trickiest thing about the assembly is probably getting the micro SD card inserted in the USB reader correctly and then in the Pie itself correctly, which isn't very difficulty.
CanaKit Raspberry Pi 3 Complete Starter Kit - 32 GB Edition https://www.amazon.com/dp/B01C6Q2GSY/ref=cm_sw_r_cp_api_ghuvybV3YWTGG
Hello,
I have been wanting to start playing around with a raspberry Pi 3. So I was shopping around and found some kits for sale that were interesting.
I was wondering if someone with more knowledge could help. Would buying the board at this price be better than buying one of these kits from amazon with prime?
https://www.amazon.com/CanaKit-Raspberry-Complete-Starter-Kit/dp/B01C6Q2GSY/ref=sr_1_3?s=electronics&ie=UTF8&qid=1504673256&sr=1-3&keywords=raspberry+pi3
https://www.amazon.com/CanaKit-Raspberry-Ultimate-Starter-Kit/dp/B01C6Q4GLE/ref=sr_1_11?s=electronics&ie=UTF8&qid=1504673256&sr=1-11&keywords=raspberry+pi3
https://www.amazon.com/Vilros-Raspberry-Basic-Starter-Black/dp/B01DMFQZXK/ref=sr_1_9?s=electronics&ie=UTF8&qid=1504673256&sr=1-9&keywords=raspberry+pi3
https://www.amazon.com/Raspberry-Essentials-Kit-board-Connectivity/dp/B01LWVVMUI/ref=sr_1_10?s=electronics&ie=UTF8&qid=1504673256&sr=1-10&keywords=raspberry+pi3
If I just bought the board now, I would need to buy:
Edit: Formatting
HDMI Cable, and make sure that SD card is compatible (Needs to be class 10). You should just follow the official guide here. It has a list of hardware.
https://github.com/RetroPie/RetroPie-Setup/wiki/First-Installation#hardware-needed
Or buy this and the controller. https://www.amazon.com/CanaKit-Raspberry-Complete-Starter-Kit/dp/B01C6Q2GSY/ref=sr_1_4?s=pc&ie=UTF8&qid=1479150434&sr=1-4&keywords=raspberry+pi+3
On/Off Button (2 Pack):
https://www.amazon.com/dp/B077JYXZLL?ref=yo_pop_ma_swf
Full “RetroPie” or “Raspbian” starter kit (“CanaKit”):
https://www.amazon.com/dp/B01C6Q2GSY?ref=yo_pop_ma_swf
3.5 Inch Screen (includes the case that I’m currently using):
https://www.amazon.com/dp/B075JFHLQD?ref=yo_pop_ma_swf
SNES controllers: I also have N64 Controllers; any type of controller you need, you can find on Amazon
https://www.amazon.com/dp/B01N7ANDLC?ref=yo_pop_ma_swf
ADDITIONAL ITEMS (found around the house; or stores near me)
Power source: I used a simple phone charger; just attached it to the bottom of the system.
Zip-ties: I used them to bundle up the cables in the back; over all it condenses the whole thing without having to “splice” and reconnect cables.
“Mighty-Putty” (I got the off-brand called “Tack-Putty”): Used to connect the battery pack to the bottom of the device. Originally was going to use Velcro to have the added ability of attaching and detaching the battery pack at will. (But the putty has a really solid seal; no problems so far)
I think that’s it; happy building!
https://www.amazon.com/gp/product/B01C6Q2GSY
I bought this and took me like an hour between opening the box, putting together, configuring, and adding ROMS.
I also have no comp exp.
Look up elegoo parts on Amazon. I know they sell a set with a (very good, EACTLY the same knockoff) Uno and a TON of parts. It's called the "Elegoo super starter kit". You end up with two unos, but that's not a bad thing in case you fry one. I think it's around $40 with shipping.
I'm sure they sell other parts too. Check them out on Amazon. IMO it is the best bang for your buck.
EDIT: it also contains a PDF with instructions on how to build projects with them. How to do the wiring and they explain the coding too. They do it in a way that they build off of what you learn.
https://www.amazon.com/Elegoo-EL-KIT-003-Project-Starter-Tutorial/dp/B01D8KOZF4
It's listed as the #1 seller for electronic kits. Its $35 and it has a 4.5 out of 5 stars.
Here is a kit with just boards.
https://www.amazon.com/Arduino-Raspberry-kuman-Projects-Tutorials/dp/B016D5L5KE/ref=sr_1_5_sspa?s=industrial&ie=UTF8&qid=1518807393&sr=1-5-spons&keywords=Elegoo+parts&psc=1
Elegoo also has these kits.
https://www.amazon.com/s/ref=sr_gnr_aps?rh=i%3Aaps%2Ck%3AElegoo+kits&keywords=Elegoo+kits&ie=UTF8&qid=1518807370
There are a lot of them, so go through each and see which parts you like.
Buying with Elegoo is way way cheaper than through Arduino.
------------------------------------------
I also found this really cool car that you can make
Elegoo EL-KIT-012 UNO Project Smart Robot Car Kit V 3.0 with UNO R3, Line Tracking Module, Ultrasonic Sensor, Bluetooth Module https://www.amazon.com/dp/B0746DVP1J/ref=cm_sw_r_cp_apa_goZHAb3MFJF93
.I would build the car first and have fun with it. Then I would take off the ultrasonic sensors and replace them with IR sensors. Then try to program it to solve a maze.
If you're interested I have a website that takes you through every step on how to make a maze solving robot car with Arduino.
It's really a good tutorial. He teaches you everything and explains everything. You build the basics of the car first and get it running then he tells you how to tweak and add things to the code to make it better at solving mazes.
you're gonna be "missing" parts depending on the projects you're working on. the most basic things you can get, though, are what you mentioned: a breadboard, wires, leds, resistors, etc. what i've done so far is looked for the parts i need on amazon... there are all kinds of sensors you can get separately and very cheap in general.
I recently got an arduino and, like you did, I thought the starter kit was pretty expensive. So I actually got a Leonardo by itself and got this on amazon: http://www.amazon.com/dp/B00DGNZ9G8
This kit also comes with a few buttons you can use to practice and then you can buy more later or something.
that kit was definitely cheaper than getting the official arduino one and it comes with almost everything i've needed so far. There are other kits on amazon that have different things that you might be more interested in, like this one: http://www.amazon.com/dp/B00D9M4BQU I've also seen light sensors for $7-$9 on amazon.
other parts I've gotten separately are diodes, more leds, a bigger breadboard, shift registers, etc... but, like i mentioned, those i've purchased because of the nature of the projects i've been working on. I came to know of the parts i've purchased through other people's projects, google, blogs, youtube, etc.
also, in terms of programming, i'd suggest learning some c or c++. but you might not need to spend too much time on that since you're good with sketches, it's just in case you want to get into more advanced projects, i guess.
Hmm I think this is a good game to play. I would like to open this up to everyone and have them comment on the exact model of what I have in my picture. I'll edit my post with the confirmation and links of what everything is. Clues: look at old version of my battle stations
Go!
Laptop: [Dell XPS 15 L521X] (http://www.amazon.com/Dell-XPS-XPS15-9062sLV-15-Inch-Laptop/dp/B009FX7BWS/ref=sr_1_1?ie=UTF8&qid=1414022233&sr=8-1&keywords=l521x) [System Specs] (http://i.imgur.com/x4VrjFg.png)
Laptop Stand: [Cooler Master Ergostand] (http://www.amazon.com/Cooler-Master-NotePal-ErgoStand-Adjustable/dp/B003GCQ1YI/ref=sr_1_2?ie=UTF8&qid=1414022264&sr=8-2&keywords=cooler+master+ergostand)
Webcam: [Logitech C/B 910] (http://www.amazon.com/Logitech-960-000683-B910-HD-Webcam/dp/B0040508OY/ref=sr_1_2?ie=UTF8&qid=1414022290&sr=8-2&keywords=logitech+910)
Speakers: [2 pair of Dayton B652] (http://www.amazon.com/Dayton-Audio-B652-Bookshelf-Speaker/dp/B002RMPHMU/ref=sr_1_1?ie=UTF8&qid=1414022347&sr=8-1&keywords=b652)
Keyboard: [CM Storm Trigger Black Switches] (http://www.newegg.com/Product/Product.aspx?Item=N82E16823129009)
Mouse: [Anker Gaming Mouse] (http://www.amazon.com/Anker-Programmable-Gaming-Cartridge-Switches/dp/B00CDINUTK/ref=sr_1_1?ie=UTF8&qid=1414022458&sr=8-1&keywords=anker+5000+dpi)
USB Hub: [Anker 13 port USB 3.0 hub] (http://www.amazon.com/Anker-Aluminum-13-Port-Charging-VL812-B2/dp/B00GSLMTQ8/ref=sr_1_2?ie=UTF8&qid=1414022483&sr=8-2&keywords=anker+10+port+hub)
Computer screens: [2 of LGE2242] (http://www.amazon.com/LG-Electronics-EB2242T-BN-22-Inch-LED-Lit/dp/B007XNRAQY/ref=sr_1_1?ie=UTF8&qid=1414022508&sr=8-1&keywords=lg+e2242)
Monitor Mount: [Vivo Monitor Stand] (http://www.amazon.com/Monitor-Mount-Stand-Adjustable-Screens/dp/B009S750LA/ref=sr_1_1?ie=UTF8&qid=1414022540&sr=8-1&keywords=vivo+stand)
Receiver: [JVC 703VBK] (http://i.imgur.com/LvoOg2x.jpg)
Hexagonal device: [Moto Stream] (http://www.amazon.com/Moto-Stream-Wireless-Music-Adapter/dp/B00L4VZZFE/ref=sr_1_1?ie=UTF8&qid=1414022672&sr=8-1&keywords=moto+stream)
Subwoofer: [Yamaha YST-SW012] (http://www.amazon.com/Yamaha-YST-SW012-8-Inch-Front-Firing-Subwoofer/dp/B000TQ4D8K/ref=sr_1_1?s=electronics&ie=UTF8&qid=1414023087&sr=1-1&keywords=yst+sw012)
Headphones: [Monoprice 108323] (http://www.amazon.com/Monoprice-108323-Premium-Hi-Fi-Headphone/dp/B007SP2CO2/ref=sr_1_1?ie=UTF8&qid=1414022699&sr=8-1&keywords=monoprice+headphones)
Hard drive: [Seagate 3TB expansion drive] (http://www.amazon.com/Seagate-Expansion-Desktop-External-STBV3000100/dp/B00834SJU8/ref=sr_1_2?s=electronics&ie=UTF8&qid=1414023141&sr=1-2&keywords=seagate+3tb)
Cased device on top of hard drive: [Raspberry Pi B] (http://www.amazon.com/Raspberry-Pi-Model-512MB-Computer/dp/B00LPESRUK/ref=sr_1_1?s=pc&ie=UTF8&qid=1414023042&sr=1-1&keywords=raspberry+pi)
Chair (this is a hard one): I forget
A suped up quad core. May not be quantum enough though.
In Canada, here's the kit I picked up off Amazon:
CanaKit Raspberry Pi 3 B+ (B Plus) Starter Kit (32 GB EVO+ Edition, Premium Black Case) https://www.amazon.ca/dp/B07BCC8PK7/ref=cm_sw_r_cp_apap_kkAqsSvlhTafy
There are videos on YouTube that show you how to assemble, and the kit itself comes with decent enough instructions. The kit includes
For $30 bucks it’s hard to go wrong with this one if you’re just starting: www.amazon.com/ELEGOO-Project-Tutorial-Controller-Projects/dp/B01D8KOZF4
Has more stuff than you could use in a year of learning projects. Highly rated. Has a 24 lesson getting started CD. I’ve never had a problem with stuff from Elegoo. There are cheaper kits by them also.
"Best" in what aspect? Price, size, weight, options, resolution? You need to be more precise than that.
The only mainstream camera available is the Pi Camera module: https://www.amazon.com/Raspberry-Pi-Camera-Module-Megapixel/dp/B01ER2SKFS
sure thing!
Parts needed: Arduino Uno, 5V 1A power adapter, relay board. Wire the 5V power the Arduino "5V" and "GND" pins. Also wire 5V power to the relay board "Vcc" and "GND" pins. 5V/Vcc is positive, GND is negative. Connect Arduino pins 5,6,7 to relay board IN1,IN2,IN3, respectively. You can use jumper wires like these for these connections, and you'll probably have to do a little soldering to make the power connection wires.
Wire the relays to your stoplight. To avoid burning down the house use a qualified electrician and a safety rated electrical enclosure for the mains wiring (relay board to stoplight).
Program the Arduino with the following code. To do this you'll need to install the Arduino IDE on a computer, plug the Arduino board into the computer with the USB cable, load the code, select the Arduino board, and eventually hit the download button. That will store the program into the Arduno. Then disconnect the Arduino from the computer, connect it to your 5V power and stoplight relays, and it should work.
// Firehouse stoplight controller for Arduino Uno
// arbitrary digital output pins - connect these to relay board IN1,IN2,IN3
// the relay board uses negative logic (LOW turns on relay)
define RED_PIN 5
// arbitrary digital input pin - connect to incoming call sensor
define SENSOR_PIN 8 // negative logic (LOW when call is present)
void setup()
{
pinMode( RED_PIN, OUTPUT );
digitalWrite( RED_PIN, HIGH );
pinMode( GREEN_PIN, OUTPUT );
digitalWrite( GREEN_PIN, HIGH );
pinMode( YELLOW_PIN, OUTPUT );
digitalWrite( YELLOW_PIN, HIGH );
}
void loop()
{
// turn on red
digitalWrite( RED_PIN, LOW );
// wait for incoming call
while (digitalRead( SENSOR_PIN ) == HIGH) ;
// start launch sequence
digitalWrite( RED_PIN, HIGH ); // red off
digitalWrite( YELLOW_PIN, LOW ); // yellow on
delay( 10000 ); // delay 10 seconds
digitalWrite( YELLOW_PIN, HIGH ); // yellow off
digitalWrite( GREEN_PIN, LOW ); // green on
delay( 2*60000 ); // delay 2 minutes
digitalWrite( GREEN_PIN, HIGH ); // green off
}
You'll probably need some additional parts to accomplish the speaker circuit to Arduino connection.
Get some arduinos, steppers, sensors, and just miscellaneous odds and ends and see if you can try to make, or make part of the breakfast machine from the first few minutes of back to the future.
The obstacle avoidance robot is great too. They can be built with an arduino and $35 in misc parts. Try adding different constraints to it. I had a project in college to build a robot that would avoid obstacles, seek out light, react to a specific frequency of sound, and do all that making sure it didn't cross outside of a tape line. Another way you could go is to throw bluetooth module on it, and make a quick and dirty cellphone app to control it.
Something I did that might be fun for a group of kids. I took apart a Keurig single shot coffee maker, and using minimal extra parts made it into a tea maker that would heat water to a user selectable temperature, then steep the leaves for a specific amount of time. (thats a thing kids love, right?)
​
I second what a lot of people have said, buy some arduino kits (or offbrand, it's all the same) and from there you can build nearly anything you want. Something like this https://www.amazon.com/EL-KIT-008-Project-Complete-Ultimate-TUTORIAL/dp/B01EWNUUUA/ would be money well spent.
​
edit:editorialized about kids making tea.
Here
I grabbed on a while back when they were restocking. They were out of them a long time >.<
You could even get a case so it looks legit
https://www.amazon.com/dp/B01M4OOY4U/ref=cm_sw_r_cp_apap_1VFt9UoLUdrml
$200+ is a whole lot to pay for nostalgia, unless you are playing the collectibles market... If you are just looking to game and have some fun, dude just get a set of usb SNES pads (or whatever) and a raspberry pi 3 / zero W and dump retropi rom on a card.
here is a cute case, controllers and a pi for price point Ref.
https://www.amazon.ca/case-Raspberry-Old-Skool-Tools/dp/B01M4OOY4U
https://www.amazon.ca/Raspberry-Pi-RASPBERRYPI3-MODB-1GB-Model-Board/dp/B01CD5VC92
https://www.amazon.ca/iNNEXT-Nintendo-Controller-Raspberry-Windows/dp/B01NCX7VZT
or a generic case and pi zero should do fine with snes/ nes emulation
https://www.amazon.ca/CanaKit-Raspberry-Wireless-Official-Supply/dp/B071DVLBC1
loads of fun, very capable lil computer, lots to play around with on it too there are lots of video guides on setting up retropi and a network share to dump roms on it over the network, EZ
Elegoo makes a starter kit with a lot of fun stuff in it.
$27.99 on Amazon.
https://www.amazon.com/ELEGOO-Project-Starter-Tutorial-Arduino/dp/B01D8KOZF4?ref_=bl_dp_s_web_14833109011
&#x200B;
The best advice I can give is to leave at lunch and run them back to school, then they can brag to their friends about how great it was, AND your coworkers will thank you
Um RaspberryPi com camara e uma bateria de 20Ah, a fazer stream por WiFi aguenta entre 4 a 5 dias de autonomia; sem o wifi (a gravar para ficheiro), deve aguentar um pouco mais (talvez umas horas a mais).
---
Bateria portatil
Raspberry Pi
Camara para Raspberry Pi
Camara para Raspberry Pi sem filtro infra-vermelhos
this is a bit involved but is a good way of doing things as it doesnt require extra hubs/apps
and you now have everything you need to flash tasmota
which will allow you to connect these sonoff smart switches directly to HASS and make smart extension leads
also youtube sonoff tasmota, theres plenty of videos explaining it
good luck!
I'm trying to make a large LED grid (23x10 with 4inx4in squares), and I've been experimenting with what the cheapest way to do it is. I can make one of these for around 75 cents USD. The layers are:
It's pretty easy to construct (the hardest part is soldering on the connectors), but I have several complaints I'd love cheap alternatives to.
The ones that work the best are the tracing and nylon, but it's still not great.
Happy to talk about the project, and would love advice if anyone has done something similar!
&#x200B;
Edit: I just tried making the housing thicker (from 0.5in to 1.5in) and it made it a LOT better. I think I'm happy with it now as long as I can find a way to clean up the edges.
You start by going through courses in calculus and physics, as those are the foundation for every engineering field.
Focusing on them and transferring with a rock solid foundation will serve you far better than getting your feet wet in actual engineering content.
Beyond that, there are a ton of resources online where you can dive in for free or cheap. edX, Coursera, and Udemy to name a few.
If you really want to dive in, don't worry about jumping ahead in your studies and instead get some practical hands on experience. Get a part time job doing something technical or at a hardware store, get some beginning kits that let you put small projects together, or buy an old junk car and start working on fixing it up.
https://www.amazon.com/gp/aw/d/B01EWNUUUA/ref=mp_s_a_1_1?ie=UTF8&amp;qid=1482315917&amp;sr=8-1&amp;pi=SY200_QL40&amp;keywords=elegoo+mega&amp;dpPl=1&amp;dpID=61L212kl6FL&amp;ref=plSrch
Give them a try, more stuff for cheaper price. It's a Arduino mega also. I bought this kit and another Arduino from them and it's been a blast. Used it for many many projects and it's still holding up.
Literally the first Amazon link. Do at least one Google search before posting something ok m8? Thx
https://www.amazon.com/Old-Skool-NES-case-Raspberry/dp/B01M4OOY4U
Amazon has a bunch. Some with functional power and reset buttons. I have this one for $14. NES case for Raspberry Pi: 3,2 and B+ by Old Skool Tools https://www.amazon.com/dp/B01M4OOY4U/ref=cm_sw_r_cp_api_iCWPAbZKY27X1
I recommend getting a Raspberry Pi. There are a ton of projects you can do that involve a little bit of circuitry. You'll also need to know how to program with these (there are a ton of tutorials all over the internet).
I recommend getting one of these kits:
http://www.amazon.com/CanaKit-Raspberry-Ultimate-Starter-Components/dp/B00G1PNG54/ref=sr_1_1?ie=UTF8&amp;qid=1418544342&amp;sr=8-1&amp;keywords=raspberry+pi+kit
http://www.amazon.com/Raspberry-Ultimate-Includes-Essential-Accessories/dp/B00MR2HR6O/ref=sr_1_9?ie=UTF8&amp;qid=1418544342&amp;sr=8-9&amp;keywords=raspberry+pi+kit
Also, subscribe to /r/electronics.
a Canakit has a lot more to start with. Pretty much everything you need to make simple projects right out of the box.
Oh! My SO and I got each other almost exactly the same gift (we're nerds who are very alike sometimes)! I got him a Raspberry Pi B+ Ultimate Starter Kit, and he got me a Raspberry Pi B+! It was awesome. :)
You could probably replace it with something actually functional for $40 and save money in the long run saving money on your electric bill.
https://www.amazon.com/Raspberry-Pi-Model-Desktop-Linux/dp/B00T2U7R7I/ref=pd_lpo_147_lp_t_4?_encoding=UTF8&amp;psc=1&amp;refRID=YJ30C16PCJ25YTJ040NX
If you have an extra $3, you could get an old version of the Raspberry Pi. An extra $7 gets you the next model.
Raspberry Pi Model B 756-8308 Motherboard (RASPBRRYPCBA512)
Raspberry Pi 2 Model B Project Board - 1GB RAM - 900 MHz Quad-Core CPU
Here's a decent buy.
Didn't say it had to be good.
I have mild experience in this field (organized video game and tabletop game rooms for cons, well connect with local game center people, curated at a Board Game cafe for a bit)
First off the board game part is gonna be hard depending on your patrons. If its mostly people in their 20s then you have a chance at making the board games work. The "default" stuff is usually pretty bad and not good for bar environments. Monopoly? Wack and way too long. Scrabble? Wack as fuck. Of the "default" board games I would say the only one that really works here would be Uno or Jenga.
But I should stress right now its up to you to supply the board games, people aren't gonna bring their own. What the customers are paying for would be the table to play and the game selection. And if the selection is big enough you don't need to worry about queues, people will just play other games. I think the only time where queue's have been an issue for me was at a con when Dark Souls the Board game came out literally the week of and there was only one copy of the game in the game room. But it was never a big deal.
Monopoly is way too long and boring what you should pick up are the casual games for people that play board games if that makes sense. Gonna recommend a few here:
All of these games work perfectly in the bar kind of casual environment ESPECIALLY Skull cause it was designed to be played in bars. They're all short, very easy to learn, and mad fun. Could also pick up something good thats based on a licensed property like Game of Thrones or Bloodborne for people that want something familiar. Also most of these games allow for a fuck load of people to play so anyone can jump in
Party games like Channel A, Exploding Kittens, or Cards Against Humanity also work well in a bar but Cards Against Humanity suffers greatly from the game being only as fun as how funny the players are (which they usually aren't).
Ticket to Ride, Dominion, and Settlers of Catan are also probably the most well known "introductory" board games. I'm not too big on them but they are worth picking up since there was always someone asking to play any version of Catan. I mainly watch Shut up and Sit Down for info on new board games, definitely recommend their channel.
As far as the video game stuff goes if fighting games are your target then you need to reach out to your local scene. Find out what days they play at other spots and shoot away from those spots. Advertise tournaments if you want but I would stress that you don't make them too serious. What you should do regardless though is advertise to your local FGC on facebook that you're having casual sessions open and whatever day that doesn't clash with their existing local events. I definitely wouldn't make just current fighting games the focus though if you're trying to be a barcade.
What usually is a good idea is setting up a couple raspberry pi with RetroPie installed for emulation. One of em set to a familiar multiplayer game for everyone like Mario Kart, Mario Party, or whatever. The other Pi would just have bunch arcade games on em ranging from beat em ups like The Simpsons or Turtles in Time to fighting games like Super Turbo, Vampire Savior, whatever. Pi's are cheap as hell and not too hard to set up for emulation. A Pi 3 is about $40 and a Pi 2 is even cheaper. Unless you trying to emulate Dreamcast I think a Pi 2 would be fine. Cana Kits usually include everything you need. A Pi is a VERY good replacement for an multigame arcade cabinet if you're on a budget.
At the very least I would try to setup something to play Turtles in Time, The Simpsons, X-Men, or the D&D beat em ups. Beat em ups tend to be good to just pick up and play while drinking and usually let you play with a fuck load of people. You don't really need to track people playing them too cause there's gonna be a lot of open player spots and people usually just stop playing a beat em up when they die or get board.
For the gaming stuff keeping track of "turns" has never been a issue here, usually people just say they have next regardless if its a fighting game, Mario Party, or anything. Unless your customers are very shy you shouldn't have to worry too much about turns. The brackets idea you have just sounds very confusing for people. If you have enough people that they need to be rotated out that often then getting more setups for games should be a priority over something like a bracket. I definitely stress though having setups with games that have 4 or more players to get as many people in as possible especially if you have only one setup. Mario Party, Mario Kart (especially the newest one that lets you have a fuckload), X-Men Arcade, Overcooked 2, stuff like that. Hell even Smash Bros just cause it has 8 players, but I would enforce it as a casual setup.
RPGs have a place in a board game bar but if you want people to join with randoms then thats a bit difficult. You'll have to reach out to GMs and have some kind of dry erase board where the GMs can advertise they want players and whatever other info they wanna put. If you can reserve an area specifically for RPGs then thats perfect. That area would also work with big box or longer board games like War of the Ring, Tales of Arabian Nights, Arkham Horror, Dark Souls etc. if you wanna have those.
I rambled on for a bit there but in short you should be fine in terms of managing queues or anything. If there's more setups or more board games you definitely don't need to worry about turns. If you got any questions feel free to ask away
That's pretty close. I just did a build, so here's some recent prices:
Pi 3 with 5v 2.5A power supply and heat sinks - Was $49.99, now $46.99
32GB MicroSD - Was $9.99, now $11.99
This plain case, which I put custom stickers on - $6.99
Two SNES-style USB gamepads - $12.20 each
I didn't include an HDMI cable because I had several laying around, so your minimum cost is about accurate.
Edit: Oh, and this case to keep it organized while traveling.
This one? Hmm, seems pretty good, and a power supply for that specifically would be nice anyway. Thanks
You can get the Pi and heatsinks and power cord for $45
This one is the bestseller on Amazon, but when I bought the BF a Pi I got him the barebones Pi by itself so he could build his own case and stuff. Depends on what your brother's interested in doing, I imagine.
You're welcome.
I'd say stop focusing on certifications and start focusing on learning how to do things.
How extensive is your Home Lab?
Have you built out any VM's yet?
Have you built a Windows domain yet?
Have you built a Squid proxy on Linux yet? (Not that Squid is super-useful anymore, but its a decent project with clear results.)
Have you built a pfSense firewall yet?
Have you bought a Raspberry Pi yet (the cheapest Linux Server on the planet)?
When you apply for that next-level job you have in mind, in the interview I am not going to ask you questions that might appear on a certification exam. I am going to ask you questions related to real-world scenarios of problems I think you are likely to encounter in the job under discussion. And I need to see how well you are ready to deal with them.
-----
"I can't afford any of those things..."
If you are trying to learn everything on just one computer or laptop, that's certainly a problem.
But if you have a second PC, just a $300-500 clunker, it changes everything.
CentOS Linux is free.
KVM Virtual Machine manager is free.
Linux Foundation - Intro to Linux for Free
Linux Foundation - Online Course Catalog - some free some paid
DigitalOcean Linux Tutorials
Docker Self-Paced Training
Windows Server 2012R2 Evaluation is free.
Windows 10 Professional Evaluation is free.
Microsoft Virtual Academy
Microsoft MSDN Product Evaluation Center -- Free Downloads
Microsoft TechNet Product Evaluation Center -- More Free Downloads
If you only have a single computer, and cannot afford a second computer, you still have options:
Amazon Web Services has a free offering for you to build virtual machines to play with:
https://aws.amazon.com/free/
If you want something a little more permanent, Amazon Light Sail now lets you build low-end virtual servers for as low as $5/month:
https://amazonlightsail.com/pricing/
Microsoft also has some free offerings for virtual servers:
Microsoft Azure Cloud Services Free Trial Center
Microsoft Training Info Center
Microsoft Ignite Training Convention Video Center
Microsoft MSDN Video Training Portal
-----
In my opinion:
If you think you are likely to apply for some Government or Contractor positions that require security clearances, go ahead and complete the Security+.
But I think you might want to focus a little more time on combining technologies into scenarios where you learn how to perform business operations tasks, rather than add another narrow-focused skillset.
I also encourage you to make yourself gain comfort with Linux.
YES: you will need to learn a whole new world of syntax and terminology, and learn to do more with syntax and less with icons.
But the benefits are real, and significant.
Buy one of these:
Amazon: Raspberry Pi 3 Complete Kit $75
That's a complete Linux Server. Just add a USB keyboard, mouse & HDMI monitor.
Watch two or three of these videos, and observe that all of the biggest players working on the sexiest of technology projects are all doing it on Linux:
USENIX Site Reliability Enginering Convention 2014 Presentations - Free
USENIX Site Reliability Enginering Convention 2015 Presentations - Free
USENIX Large Installation System Administration Conference 2014 Presentations - Free
USENIX Large Installation System Administration Conference 2015 Presentations - Free
-----
> [MCSA]... But again, how far can I really go trying to learn this with home equipment? I'm sure I could install a Server OS, but I don't know if I can play with the inner workings on a home network enough to familiarize myself with the content.
If you have a small home server, you can install Windows Server 2012 R2 evaluation on it, and add the Hyper-V service, and run at least 2 virtual machines on it.
The Server could become a domain controller. Then you add a guest server and a guest client using Windows 10 evaluation and another Windows server eval license.
Now you join them to a domain together and start writing GPO policies and playing in the Forest...
That can also be done in Azure cloud with virtual machines. The challenge is the short duration of the free period in Azure cloud.
Yes it can run Netflix and Youtube. The software for it is already a simple package but if you don't learn how to install it you might struggle to use it. It's not simple plug and play. It's Linux. That being said, RaspberryPi was designed to teach children how to use computers. You can do this. There is plenty of support because tons of people have come before you and asked all the questions. All the answers are already laid out so you won't need to make any more reddit posts to get it going. Just do it.
Here's the hardware kit:
https://www.amazon.com/CanaKit-Raspberry-Complete-Starter-Kit/dp/B01C6Q2GSY
Here's the software:
https://retropie.org.uk/
Edit: don't use wireless controllers. Any USB device will do.
CanaKit Raspberry Pi 3 Complete Starter Kit - 32 GB Edition https://www.amazon.com/dp/B01C6Q2GSY/ref=cm_sw_r_cp_awd_QI-2wb9A3S0AH
8bitdo SFC30 Wireless Bluetooth Controller Dual Classic Joystick for IOS / Android Gamepad - PC Mac Linux https://www.amazon.com/dp/B00Y0LUQFE/ref=cm_sw_r_cp_awd_KK-2wbVKCTTT9
And thousands of ROMs...
If i were to buy a kit on amazon would this be the right one?
https://www.amazon.com/dp/B01C6Q2GSY/ref=psdc_3015426011_t1_B01C6EQNNK
also the usb thing is very confusing to me...
CanaKit Raspberry Pi 3 Complete Starter Kit - 32 GB Edition
https://www.amazon.com/dp/B01C6Q2GSY/ref=cm_sw_r_cp_api_aYlczb608NGEF
>>What hardware do I need to start running home assistant?
Learn from my experience and just pony up for a Raspberry Pi 3. I tried running HA for a while on an old Win7 laptop. Getting Python to run was a huge PITA. Then I tried running it with Docker on a Synology NAS. Nearly as bad. Then I purchased this CanaKit. A dream come true. A few days later I spent some quality time kicking myself in the rear for not having gone that route in the first place. SO MUCH BETTER.
I'm running Hass.io now and definitely recommend it for just about anyone... but later. First I'd suggest installing Hassbian because, although the water is a little deeper, you'll have easier root access, and you'll be able to learn the basics much more quickly. You may decide to keep that environment -- it's great. Or you may decide to move to Hass.io which, with the exception of enabling SSH, is really very easy. Just back up any .yaml files that you've customized, wipe the Pi's SD card, and install Hass.io. After booting a couple of times to get the "vanilla" environment initialized, put your .yaml files back, enable SSH server, Samba share, and maybe Bluetooth. You'll be back in business right where you left off.
Like I said, SSH wasn't exactly easy when I was first setting up Hass.io. But I documented the process I went through here, so maybe that will help.
Just get a Pi 3 through a standard channel (this is considered reputable by Retropie: https://thepihut.com/products/raspberry-pi-3-starter-kit or https://www.amazon.com/gp/product/B01C6Q2GSY/ ), and follow this guide: https://github.com/RetroPie/RetroPie-Setup/wiki/First-Installation
Haven't built mine yet but everything is arriving today and I should be set.
$70 - Cannakit (Includes raspberry pi 3 and everything you need to set it up. You can gets things a little cheaper if you order them separately but this is simple and works for me) https://www.amazon.com/gp/product/B01C6Q2GSY
$10 - SNES Style USB Controller 2-pack (not necessary if you already have USB controllers) https://www.amazon.com/gp/product/B01KJS4ILY
$16 - Keyboard mouse for tv thingy (this is not a requirement but you need some form of USB keyboard and mouse to config things or you have to use SSH for everything) https://www.amazon.com/gp/product/B00KF9IVKC
So $96 total. A lot more than the $35 people try to sell you on raspberry pi's for but I think it will be a nice setup though could've gone cheaper. We'll see.
Overpriced. He built that using a $5 Pi Zero.
Personally, I bought this: https://www.amazon.com/gp/product/B01C6Q2GSY
It's about 10x more powerful and can play many more types of games. Has Bult-in WiFi and Ethernet.
Download RetroPie disk image from the official site.
There are a ton of videos out there to help you set it up.
I use my Xbox 360 Controllers.
https://github.com/retropie/retropie-setup/wiki/First-Installation
So far, so good. I recommend the CanaKit Raspberry Pi 3 Complete Starter Kit - 32GB Edition for $69.99 with free Prime shipping from Amazon. It's the latest model and includes all the important parts. Just add keyboard, mouse and monitor.
&nbsp;
When setting things up, I found these links to be useful:
&nbsp;
PIVX-related
How to update your PIVX linux wallet to the new version using the command line
How to: Staking with the command-line wallet
&nbsp;
Raspberry Pi and Linux-related
How to give your Raspberry Pi a Static IP Address - UPDATE
How to clear bash history completely?
Also, you should Google how to setup a headless Raspberry Pi which involves turning on SSH and/or VNC
&nbsp;
Good luck!
These Arduino kits on Amazon are a pretty great value
Elegoo UNO Project Super Starter Kit with Tutorial, 5V Relay, UNO R3, Power Supply Module, Servo Motor, 9V Battery with DC, Prototype Expansion Board, ect. for Arduino https://www.amazon.com/dp/B01D8KOZF4/ref=cm_sw_r_cp_apa_CbCCyb4YGFY9H
There are hundreds of tutorials on the web for how to get started with the basics, but sparkfun and adafruit are really good places to look
Unless you're in a very wealthy community, don't get that one. It's so expensive for what it is, not to mention most people will never use a shift register or some of the more obscure items. Look at something like this: Elegoo EL-KIT-003 UNO Project Super Starter Kit with Tutorial for Arduino https://www.amazon.com/dp/B01D8KOZF4/ref=cm_sw_r_cp_apa_cv4WAbQY1592X
an Uno is enough for many projects, and it saves the cost and complexity of a MEGA. They can always upgrade as they need it. Get them to blink an LED, turn a servo, stuff like that. After they're able to do that, get some community components for a workshop and let them solve a problem.
That depends on how early you want to start. There are a lot of different components at play here, but each one is using the bare minimum of each.
Personally, I would start simple with building a base Home Assistant server.
Once you have your equipment, install Hass.IO using the Raspberry Pi 3 instructions.
Home Assistant does a great job of walking you through the steps. It is really easy, especially if starting with a fresh install.
From here, you now have Home Assistant running and you can play around with installing all of the various components. I highly recommend taking some time to learn the basic mechanics of adding equipment.
From there, I have done a ton of trial and error in JavaScript and HTML using W3Schools. My suggestion: come up with what you want to do, start small, and build from it.
In my case, I wanted two separate websites on one screen. DAKBoard on the top, and my Home Assistant front end on the bottom. This told me iframe, so I started here, which allowed me to do live trial and error. Eventually, I built myself up to using Repl.it for trial and error, but that's jumping ahead.
Once I got my iframes working out, I actually used Dakboard's instruction on how to build a wall display that automatically boots into a webpage.
The final step is to put your new webpage on Home Assistant's built in web server. Simply create a folder "www" under your "config" folder, add your new html page there, and direct your new wall panel to it's address.
tl;dr - start small, come up with a goal, and build up to it in pieces trying different things along the way.
They are on Amazon now, just hurry. Atomic Pi - High Speed SBC with Peripherals https://www.amazon.com/dp/B07N298F2B/ref=cm_sw_r_cp_apa_i_iyA2Cb7WR2BT0
> Now go do the math on how much CPU/GPU it would cost to transcodes for just that one moment.
$140
https://www.ebay.com/itm/ZOTAC-Geforce-GTX-1050-2GB-Fire-Storm-Low-Profile-Game-ready-drivers-NIB/113778532891?epid=14026724690&amp;hash=item1a7dbaa21b:g:DjIAAOSwVcFc~ssB
Just do this for unlimited transcodes. https://www.reddit.com/r/PleX/comments/ahf0l1/tutorial_on_setting_up_unlimited_transcodes_for/?utm_source=BD&amp;utm_medium=Search&amp;utm_name=Bing&amp;utm_content=PSR1
Hell an Atomic Pi can do hardware accelerated transcoding for $43 and you get a whole ass computer.
https://www.amazon.com/Atomic-Pi-High-Speed-Peripheral/dp/B07N298F2B/ref=sr_1_3?keywords=atomic+pi&amp;qid=1562591495&amp;s=gateway&amp;sr=8-3
Edit: I'd much rather be able to transcode should I ever need to. Chrome transcodes basically everything for some reason. I use iOS, Android, Rokus, and various web browsers. My users have a Vizio smart TV, Rokus, Apple TVs, iOS, Android, Xbox ONE, PS4, web browsers, and probably more I'm forgetting. You're always going to run into stuff that won't direct play. I'll bet many of your users get irritated because it happens to them when trying to watch stuff from your server.
Either that or you are storing multiple versions of files with different codecs and you're paying for it in storage already.
Get a 3 B+ kit with everything you need (aside from the keyboard, mouse & screen) for $80: https://www.amazon.com/dp/B07BCC8PK7/ref=psdc_3015426011_t1_B07BC6WH7V
No soldering required and you can be up & running in <5 mins.
What's not a stand-alone device? The Raspberry Pi is a stand-alone device as long as it has an SD card.
If you're looking to move away from Google, keep in mind that hosting your own data means that you're responsible for data redundancy, backups, up-time and configuration. For beginners, it means that you might sometimes lose data if you're not able to keep your info in more than one location (hard drive, building, etc.) or if you make a mistake configuring something. That being said, /r/selfhosted is all about trying new things!
What /u/Allistakn said is the right place to start. Go to NextCloudPi and read the instructions for how to install on a Raspberry Pi.
You can get a Raspberry Pi 3 B+ at Amazon with a case, power supply and heat sinks included. Or you can buy one from adafruit directly, but you'll need to get a power supply and case separately, and shipping is extra.
Here is a great video on YouTube that walks you through all the steps necessary to get it setup once you have your Pi.d
After that, it's simply setting up a port forward on your router to your pi and you can access your data from anywhere!
Good luck and welcome to the world of self hosting! Feel free to come back and ask more questions when you're ready (domains, dns, reverse proxies, virtualization and containerization, etc.)
These are x86 Pis (Atomic Pis): https://www.amazon.com/Atomic-Pi-High-Speed-Peripheral/dp/B07N298F2B
It's part of the package.
I think I'm similar to you in skill level and I was able to do it. I bought a canakit like this one...
https://www.amazon.com/CanaKit-Raspberry-Starter-Premium-Black/dp/B07BCC8PK7/ref=mp_s_a_1_6?ie=UTF8&amp;qid=1540821578&amp;sr=8-6&amp;pi=AC_SX236_SY340_QL65&amp;keywords=pi+3b%2B&amp;dpPl=1&amp;dpID=51QERaUXmBL&amp;ref=plSrch
It comes with an SD card with noobs (operating system) installed. At that point setting up pihole was just running a command line and following a few prompts be and it was all set up.
It's probably not the cheapest or best way to get started, but for me paying a little extra cash to ease my way into working with pi was a good trade-off. Overall I think it was like 30 minutes from opening the box to having pihole functioning on my network.
I'm pretty sure you could do something similar with a pi zero. I bought the 3b+ bc I wanted to explore pi and it's potential and again the $80 wasn't a big deal.
I've started with the CanaKit 3 model B (not plus) and just built my setup from there (formatted SD card, downloaded, flashed, and configured RetroPie, then transfer the ROMs). It has everything you'll need minus controllers (you'll have to provide those yourself)
This is the kit that I found that has the basics. https://www.amazon.com/CanaKit-Raspberry-Starter-Premium-Black/dp/B07BCC8PK7/ref=mp_s_a_1_2?ie=UTF8&amp;qid=1540165862&amp;sr=8-2&amp;pi=AC_SX236_SY340_QL65&amp;keywords=canakit&amp;dpPl=1&amp;dpID=51QERaUXmBL&amp;ref=plSrch
i just got this kit last week and i'm extremely happy with it: http://www.amazon.com/gp/product/B00D9M4BQU/ref=oh_details_o01_s00_i00?ie=UTF8&amp;psc=1
Note that your going to have to buy an Arduino separately.
I got this one: http://amzn.com/B00D9M4BQU
It's half the price of the one you linked and seems to have a lot more of the basic stuff you should learn in the beginning. The book that comes with it is good in the sense that it has great starting projects. You start with really simple ones like turning an LED on and off with code, then moves on to using a knob to set the brightness of the LED, and so on and so forth.
As far as explaining how and why it works it does a decent job but I always found myself YouTubing things just to understand them more. I always took things apart my whole life and I've seen the components countless times. One by one you finally learn what each thing is called and what it does and things start making a lot more sense.
The sensor box I got was this one: http://amzn.com/B009OVGKTQ and it's $25. I know a lot of the reviews say that things are not labeled properly but hey fixed that. This comes with a CD that I think only has the C++ classes for each module. It doesn't have an instruction manual on how to use each one BUT it tells you what each module is and its name and you can google it and find detail info on it and videos explaining them.
With the money you were going to spend on the kit you linked, these two kits end up being the same price together and I think you'd get a lot more for your buck buying these two as a starting point.
the usb bus is iffy? so if i wanted to get one, and plug an ODAC into it, it would not work (as long as the OS was ok with it)? or just be shitty?
http://smile.amazon.com/CanaKit-Raspberry-Ultimate-Starter-Components/dp/B00G1PNG54/ref=sr_1_2?s=pc&amp;ie=UTF8&amp;qid=1409879942&amp;sr=1-2&amp;keywords=raspberry+pi
http://www.hifiberry.com/products/digi-connect-your-external-dac-2/
http://volumio.org/
Hi there, sorry for the late answer I was out for the week-end!
It will depends highly on what you expect him to do with it, and also your budget. But for the more standard it will be at least:
Then there can be:
And I confirm, it can be a pretty cool gift for a friend to build :)
They're not really a gaming thing, but I think most any tech savvy person would appreciate it and could probably find some use for one. Maybe they could set it up to play some simple old school games like pong or something (I haven't actually used one myself, so I'm not sure of their limitations). That sounds like a great idea actually.
Edit: Something like one of these seems like it would be pretty neat.
I'm an ECE that got into Raspberry Pi about a month ago. I work in microelectronics (chip design), and wanted to use it to get back into larger scale electronics hacking and to do some more hardware oriented programming and projects.
As such, I had to basically reform my electronics gadget supply at the same time since I ditched my college collection a while back when moving to a new house.
Here's some of the key things I bought to go with my Pi that I felt I needed. I'm assuming you're like me and want to work on electronics hardware (lights, switches, etc).
Beyond those basic starter components, the rest is up to your imagination and what you want to do next. In my case, I plan to drive higher current components, so I'll be using optocouples and relays eventually. And I plan to make my own PCBs to snap onto the Raspberry, so I have PCBs, headers, and soldering stuff.
If you're new to the Raspberry, there's online resources out there. I also got this book off Amazon as a starter as well, which I've been coupling with online resources.
On the Arduino side, that's my next purchase since I may find it easier to have the software and server side of one of my projects on a Pi, and the hardware interface on an Arduino. I'm just going to get an R3 board to start since I have the rest of the stuff they usually include in a starter pack listed above.
This blog did a nice writeup comparing some Arduino R3 starter kits:
https://www.pretzellogix.net/2014/10/09/three-arduino-starter-kits-compared-and-reviewed/
Maybe something like this?
http://www.amazon.com/CanaKit-Raspberry-Ultimate-Starter-WiFi/dp/B00G1PNG54/ref=sr_1_fkmr2_3?ie=UTF8&amp;qid=1450379419&amp;sr=8-3-fkmr2&amp;keywords=raspberry+pi+tor
There's a lot of Raspberry Pi kits on Amazon that come with wires, a breadboard, some LEDs, and other electronic components. The CanaKit Ultimate is one such kit that's a good price for what it contains. In addition to the Pi kit get him some books with interesting projects.
These are all pretty good books and have interesting projects. If your son is actually interested in engineering don't let him just stick XBMC or RetroPi on the thing and call it a day. While those projects might be interesting in their own right you're not really learning much if you're just assembling a video player or video game emulator.
If he puts together some interesting projects with the Pi get him a Radio Shack gift card for his birthday. They're trying to get back to being the electronic hobby retailer of choice so they're carrying Pis, Arduinos, and stocking more electronic components.
What's nice about a good kit is a lot of the components will be useful in other types of projects. Breadboards and good wires work just as well on an Arduino as they do on a Raspberry Pi.
I've ordered about 50 of these
http://www.amazon.com/Raspberry-Complete-Starter-Quick-Start/dp/B00L87YMGM/ref=sr_1_4?s=electronics&amp;ie=UTF8&amp;qid=1415820344&amp;sr=1-4&amp;keywords=raspberry+pi
From Canakit. They have everything I need to deploy a project. The price is very good, quality is great. Comes in a single box which is great for storage. yes you could save a few bucks searching around, but their support, ease, and not having to go searching a dozen options is worth a few extra bucks
I just got this kit from Amazon for $60 with a Raspberry Pi plus case, power supply, preloaded SD card, wifi, HDMI cable, and heat sinks.
I have a Vilros kit, seems pretty good.
This is the one I have, it's more for computing: http://www.amazon.com/Raspberry-Complete-Starter-Quick-Start/dp/B00L87YMGM/ref=sr_1_1?ie=UTF8&amp;qid=1422173960&amp;sr=8-1&amp;keywords=vilros&amp;pebp=1422173986857&amp;peasin=B00L87YMGM
This one is for electronics, etc: http://www.amazon.com/Raspberry-Ultimate-Starter-components--Raspberry-Kingston/dp/B00LAAZKXQ/ref=sr_1_2?ie=UTF8&amp;qid=1422173960&amp;sr=8-2&amp;keywords=vilros
I got my kit for $85 from amazon (raspberry pi and antenna), and you could even get it cheaper if you wanted. Here's fr24's instructions, although you may need some more help like I did setting up the raspberry pi.
If there are any in your area then you can also put cash/change in Coinstar machines with no fee for Amazon gift cards and use that to buy one on Amazon.
I'm a LiveATC streamer (KDAL). Get a Raspberry Pi. That's what most streamers are using these days. It's small and uses very little power. Configured properly, it's pretty much bulletproof. Plus, if it were to get zapped, you're only out $40. Feel free to PM me any questions...
Well if you have no experience with programming I would recommend the Gentoomen library to get some free books to help you learn. The Gentoomen library is the biggest compilation of computer books I've ever seen. Thousands of individual books totaling almost 40 gigs and totally legal (I think... its been around for six years and its still up so...). Everything you'll ever need to start programming from electrical engineering to calculus to c++ to networking is on there. You can find more books on google using filetype:pdf, or on torrent sites (if you're serious about hacking you cant be expected to buy your own ebooks.) Unless you want to end up being a script kiddie then you're gonna want to have a very solid grip on how computers work and how to program one. After that you can learn techniques on sql injection or DDOS or whatever you want to use.
I would start learning C languages first. C languages are the basis of computer languages, every programmer has to have some experience with them. C languages are what you called 'compiled', which means they get put into binary instead of being saved as a text file and decoded by the computer. Not to mention C++ is probably the most powerful language there is even though some may disagree with me. Its height was in the 80s and 90s, but its still a crucial part of understanding software and how it works. Once you've familiarized yourself with C languages you'll want to learn other crucial languages like Java, Javascript, PHP, SQL, maybe python.
Once you've learned to swing a sword you can learn some tactics. You can write 17-line keyloggers, build ghetto phiser websites, 'lulz' viruses that just bug people; built mainly to see how many computers you can infect. You can learn how to evade antiviruses, replicate and distribute your virus, and transfer it through emails or LAN. Don't try anything stupid until you've gotten familiar. The important thing here is to use your VPN to secure your anonymity and not get fined (chances are pretty slim you'll actually get imprisoned) which I'll explain later
Two things you're gonna NEED; Linux, and a VPN. Linux is what you call 'open source' meaning it has no corporate ties, and you can mold the software in any way you want. It also has no monotized executable like windows' 'exe' file. You can run any script you want as long as its marked as executable in the preferences in linux. Ideally you'd want to get familiar with Kali which was built for 'pentesting' or hacking, but more realistically, if you've never used linux before, you'll want to start with Ubuntu or Mint which are more beginner type OSs. You can read books on linux or watch videos. The important thing here is to not get discouraged by its foreign nature. When I started using linux I had no idea what was even going on, but now I'm a liscenced terminal ninja, I have to liscence my keyboard as a legal weapon. You don't need a bulky computer to learn linux either. You can just buy a $25 raspberry pi off of amazon. They're meant to familiarize people with programming with minimal costs. There are serveral models ranging from $15 to $35, I'll leave the choice up to you. You can also just install linux on a windows/mac machine for free. Some linux operating systems are corporate like redhat or suse, but you don't need to worry about those. For all intents and purposes in your case, linux is entirely free unless you want to donate. Windows 8 does this thing called 'secure boot' to try to disable deadly viruses that deploy before the operating system. So you have to do a bunch of things to run the live usb (a live usb is basically an install CD on a usb drive) before the operating system boots.
Now for a VPN. When you browse the web your computer sends requests to your router, the router then relays the signal to the hardline to your ISP, which requests data from the server and runs the process back until your webpage shows up on your screen. The problem with this lies within its transparency. You can get what's called a VPN or "Virtual Private Network." What happens when you're connected to a VPN is your computer sends an encrypted information through your ISP to the VPN server wherever that is. The servers then un-encrypt the information and get the data from the actual servers such as reddit.com. Once the VPN obtains all the necessary information for the webpage or download it encrypts the information and sends it back to your computer where its un-encrypted locally. This way anyone including government or your ISP has no idea what to make of the encrypted mess that they log on their comptuers. Now, you can get free VPNs, but they're not a good idea. They may log their traffic which counteracts the point, and they're known for infecting computers (not good). I use private internet access. You can get access to their network for 3.99 to 6.99 a month depending on if you pay month to month or yearly. The important thing with them is a; they're the cheapest (good) VPN and b; they don't log their traffic. They're also fast. Most VPNs will slow you down, but pia is very fast, I cant seem to notice a difference in internet speed between unencrypted connection and an opneVPN connection on my desktop.
Really you shouldn't need to spend much money much less $600. If all you buy is a raspberry pi and a few months of VPN services you'll only get run up about $40. If you have a computer you're pretty much good. You could learn to hack on a school supplied laptop. You don't need a water cooled, overclocked, 12 core, 3 GPU, lit up like a christmas tree PC in order to learn to program. Any computer made in this decade will be more than fast enough to process the kind of things you'll be executing, hell, you could run this stuff on your phone.
When you've learned to program, I would consider investing in a good computer. But if you have no experience with computers at all then you should really try to get around the stuff first and see if you even like it. Hacking isn't exactly typing green text at 300 wpm as I'm sure you know. It can get pretty boring in my experience albeit with rewarding outcomes at times. Oh, and don't go dicking around until you at least know how to not get caught. Once you've got a solid grip on this stuff there are various ways to reap the fruits of your labor. You can get email addresses and sell them in bulk (im talking millions at a time), harvest bank accounts and sell them on the dark web, make adware and get paid to put ads in your virus, there are even hire-a-hacker services on the deep web. The one thing you do NOT want to do is break into bank accounts unless you REALLY know how to a; hack and b; launder money and c; not get fucking caught. This is some pretty shady shit and this is one of the few things that can get you locked up.
tl;dr Download this, read it, get Linux,, and make sure you have a computer to run it on, secure your anonymity with a VPN, read the books and learn to program, after that you can experiment with small scale, harmless operations and work your way up to some pretty shady shit. I hope that was helpful it took me forever to type.
depende do raspberry PI né?
na amazon.es tem vários:
31,90 euros:
http://www.amazon.es/Raspberry-Pi-Desktop-Tarjeta-Broadcom/dp/B00LPESRUK/ref=sr_1_9?ie=UTF8&amp;qid=1452257474&amp;sr=8-9&amp;keywords=raspberry+pi
39,95 euros
http://www.amazon.es/Raspberry-Pi-Model-Placa-Quad-Core/dp/B00T2U7R7I/ref=sr_1_3?ie=UTF8&amp;qid=1452257474&amp;sr=8-3&amp;keywords=raspberry+pi
66,75 euros
http://www.amazon.es/Raspberry-Pi-Official-Desktop-Starter/dp/B015OJ5B8C/ref=sr_1_4?ie=UTF8&amp;qid=1452257474&amp;sr=8-4&amp;keywords=raspberry+pi
e tantos outros.
pesquise nas amazons (ES/UK/DE/FR/IT) e tambem no ebay.co.uk
do you have a little bit of $$ to invest in learning? buy a raspberry pi--that is pretty much a whole computer on a chip (minus like the screen and keyboard and mouse) and install linux on it. try playing around with the GPIO (there's lots of tutorials online about how to do all kinds of stuff with rasberry pi)
If you want an even smaller scale, you might prefer an arduino instead.
"learn more about hardware" is very vague so hard to know just what you have in mind. what kind of applications did you have in mind?
Happy to answer that.
Bought one of these off amazon
http://www.amazon.com/gp/aw/d/B00LPESRUK
As well as a memory card to install the operating system (this one was perfect because it's a 2 in 1)
http://www.amazon.com/gp/aw/d/B00200K1TS
The OS I used is raspbian and can be dled for free.
I hooked up the pi to my tv via hdmi cable and used a wireless usb keyboard and mouse for it.
Downloaded the offline files from bitaddress.org and transfered them to the raspberry pi via usb drive.
I could then open the site on my tv screen and generate a private and public key which has never touched the Internet. Wrote them down in a notebook and that's basically the only place the private key exists. I could then send Bitcoin to the public address and the network recognizes and records this. It's pretty wild that the network knows a public key is real even though it's never been online. I guess that's the magic of cryptography. The only way I could use the funds is if I load up the private key into an online wallet but then it will no longer be completely secure.
Here's a pic I took while setting it up feeling like Neo: http://i.imgur.com/zkYuWOa.jpg
Steam Link isn't a bad idea, but I've been considering getting a Raspberry Pi and installing Retropi. All in all, I don't expect to spend more than $75.
Emulation Station
Raspberry Pi Model B
USB SNES controller
32Gb MicroSD w/ adapter card for storage
If you or know someone who has a 3D printer, you can print your own case for the Pi
Edit: Just realized you said "my pc hooked up to the tv" - skip the whole getting a Pi part
I think the convenience of a bundle and free 2 day shipping will make a lot of people overlook an increase in price.
And buying all these components separate its only looking at like a 6 dollar increase, for your 56 dollars are you buying the same things?
http://www.amazon.com/Raspberry-Pi-Model-Project-Board/dp/B00T2U7R7I/ref=sr_1_3?ie=UTF8&amp;qid=1449350224&amp;sr=8-3&amp;keywords=raspberry+pi+2b
http://www.amazon.com/CanaKit-Raspberry-Case-Heat-Sinks/dp/B01188HGT0/ref=sr_1_5?ie=UTF8&amp;qid=1449350251&amp;sr=8-5&amp;keywords=raspberry+pi+canakit+case
http://www.amazon.com/Kootek%C2%AE-Supply-Charger-Adapter-Raspberry/dp/B00NL7WK2U/ref=sr_1_1?ie=UTF8&amp;qid=1449350270&amp;sr=8-1&amp;keywords=raspberry+pi+ac+adapter
http://www.amazon.com/SanDisk-MicroSDHC-Standard-Packaging-SDSDQUAN-008G-G4A/dp/B00M55C0VU/ref=sr_1_1?ie=UTF8&amp;qid=1449350290&amp;sr=8-1&amp;keywords=8gb+micro+sd+card
http://www.amazon.com/Edimax-EW-7811Un-150Mbps-Raspberry-Supports/dp/B003MTTJOY/ref=sr_1_1?s=pc&amp;ie=UTF8&amp;qid=1449350308&amp;sr=1-1&amp;keywords=wifi+dongle
http://www.amazon.com/HDMI-High-Speed-Cable-Supports/dp/B017TEUC66/ref=sr_1_12?ie=UTF8&amp;qid=1449350332&amp;sr=8-12&amp;keywords=hdmi+cable
Thats 77 dollars. I'm sure you could find it for cheaper, but those are all comparable to whats actually in that kit (or exactly whats in that kit)
Personally, I wouldn't mess with mains voltage going through a relay board like this.
I would run the 12 volts to something like this: https://www.amazon.com/Iot-Relay-Enclosed-High-Power-Raspberry/dp/B00WV7GMA2/
It takes anything between 3 and 48 volts DC to activate.
You can plug your things directly into it. That way, you won't have to strip mains voltage and splice in this relay with wires exposed.
https://www.amazon.com/Iot-Relay-Enclosed-High-Power-Raspberry/dp/B00WV7GMA2
You can use the 5V power from a USB port to trigger the relay on a switched outlet.
https://www.amazon.com/Smart-Enabled-Google-Assistant-HomeKit/dp/B01NBI0A6R/
https://www.amazon.com/dp/B00WV7GMA2/
I have the nc400 kits from Hypex as well and use this triggered power strip.
Better yet though, the SMPS600 power supply has a standby trigger input which would be easy to expose through the chassis on a panel mount 3.5mm jack.
I've done something similar - I had a IOT relay outlet ( https://www.amazon.com/Iot-Relay-Enclosed-High-Power-Raspberry/dp/B00WV7GMA2 ) I cut the end off a USB cable, plugged it into my server, and hooked the power lines from the cut end into the input of the outlet strip.
Then I plugged my MD1000 into the outlets. That way when my server was on, the MD1000 was too. If my server shut down (ie after a few minutes on UPS in an outage), my MD1000 would shut off too.
I found this on Amazon a while back. You can use the 12v trigger as an input to turn devices on/off.
I highly recommend a proxy or VPN. [BTGuard.com] (http://btguard.com/) is my service. I just pay for the proxy service (7$ a month), that gives a step by step on how to link it to your utorrent program. So I use [utorrent] (http://www.utorrent.com/intl/en/), link my proxy, and have never received an email from Comcast (and I did before I set it up years ago). Then go to sites like piratebay and you can find tons of great old stuff that's virtually out of print.
Me and my friends love B movie nights and im the one who is tasked with locating the movies they want to watch. Its a great method of watching what you want, when you want.
PS, get a [Raspberry PI] (https://www.amazon.com/CanaKit-Raspberry-Premium-Supply-Listed/dp/B01C6EQNNK/ref=sr_1_11?s=pc&amp;ie=UTF8&amp;qid=1469206885&amp;sr=1-11&amp;keywords=raspberry+pi) and link it with your tv (I like to use [This] (https://www.amazon.com/gp/product/B00224ZDFY/ref=oh_aui_search_detailpage?ie=UTF8&amp;psc=1) remote to control it like a dvd player) to enhance your viewing experience. Load the files onto a flash drive and plug into the raspberry pi.
This is almost literally what I'm building tomorrow. This is the Pi kit I'm getting. It comes with a case, power supply, and heat spreaders for the Pi's chips (how important are these?). I already have the exact controller in the Arse article, or one that looks just like it, and I have a couple extra HDMI cables around. I don't have an extra microSD card, so I'm buying a 128GB one, and trading my wife for her 64GB model. I don't think I even need 64GB, not for RetroPie. I might put a couple PS1 games on it, depending on how well they can run. But I need more buttons than that controller offers, so it will mainly be for NES/Super NES/Genesis games. And then mainly the first two. Never was a big Genesis player, but ToeJam & Earl, Sonic, Altered Beast, Golden Axe, Phantasy Star... there are some real classics there. $50 for that kit makes it $10 less than the NES Classic... which was never sold here (middle of nowhere, NC).
For beginners (i.e. you have nothing yet), start with this one. It's $70, but it has a 32GB memory card and an HDMI cable, plus a case, the Pi, and a power supply. Oh and a microSD card to USB converter. For microSD card use I would actually recommend getting a USB 3.0 card reader. They're not much. And then you just need a controller.
I don't mean to imply I am not a beginner myself — I have never done this before. But I've played with Linux, I've modded Android (ran custom ROMs, firmware, and rooted four different Android phones by three manufacturers). I also build computers, though I'm only on my fourth built PC in 13 years. I'm kind of a little wet behind the ears, but I have some experience. I don't think you need that much to actually install and set up a RetroPie kit, but it helps to understand what is going on behind the scenes, in case anything goes wrong. And of course any seasoned geek will tell you, Google is your best friend, and from there, threads on Reddit, StackExchange, and Tom's Hardware are some of the best resources. Those are the search results I usually click on, in any case.
Also, not affiliated with CanaKit. I'm pretty sure theirs are the Pi kits RetroPie recommends. Or maybe it was a guide I saw. And then even before, looking to buy a Pi, I saw them on Amazon. There is another Pi kit company and their prices seem comparable, but they don't appear to have the full $70 kit (I may be wrong!), just the $50 case/power/Pi starter kit. I'm sure they're both (that brand and CanaKit) fine as long as the Pi itself is. The rest is probably just standard off-the-shelf stuff.
SD Card: http://www.ebay.com/itm/122666926962
CanaKit Raspberry Pi 3 Kit with Clear Case and 2.5A Power Supply https://www.amazon.com/dp/B01C6EQNNK/ref=cm_sw_r_other_apap_Ho9w8DaJ48wXk Use the heat sinks it comes with. Mine got a little warm yesterday but I was using it for a few hours, nothing crazy though. I don't think you will need a fan, the case has an open rim around the top.
Classic USB Gamepad https://www.amazon.com/dp/B06XWD8QQJ/ref=cm_sw_r_other_apap_c5kHfMyYKj5hu
AmazonBasics USB 2.0 Extension Cable - A-Male to A-Female - 6.5 Feet (2 Meters) https://www.amazon.com/dp/B00NH136GE/ref=cm_sw_r_other_apap_rspym691O9zjf The controller cord is pretty long but I bought this because my couch and TV are really far apart, you probably won't need it.
You will need a keyboard to set up the controller for the first time, I borrowed my boyfriend's but I ordered this: Tripsky T9 2.4GHz Backlit Wireless Mini Keyboard, Handheld Remote with Touchpad Mouse for Android TV Box, Windows PC, HTPC, IPTV, Raspberry Pi, XBOX 360, PS3, PS4(Black) https://www.amazon.com/dp/B06XTF17JT/ref=cm_sw_r_other_apa_qLBPzbH96P1AG It is supposed to work with Pi but I'll have to get back to you when it gets here tomorrow.
I already had an HDMI cable but it's an Amazon Basics cable.
I was super pissed about not being able to get the SNES last week but this came out to around the same price for tons more games, plus Kodi. I don't think I'd be able to build it myself, so the card was awesome.
Power off by hitting quit on the main menu, then shut down. Wait until it's off (disconnected from TV screen) and unplug the power cord. Some people add buttons but this works just fine.
(When you load a game it says press any button to configure before it comes up, DO NOT PRRSS ANYTHING. It will do it on its own and start, you don't have to do any of that. I messed up and pressed it and didn't know how to get out.)
There are plenty of tutorials out there. Use CR2032 for longer run times. Honestly though these are aimed at young kids, all you can really do is make the LED turn on, it's not very exciting after the first few minutes.
Have a look at Velleman kits. The MK150 Shaking Dice or MK112 Brain Game MiniKit would give him something to do and you can both use them once finished.
If he's interested in learning basic electronics you could go for a kit like this or this They normally start out with a basic LED and battery and end up with tone generators and flashy lights. If you buy a extra breadboard you can both make projects at the same time.
You could also get an Arduino starter kit. They are really cool, the projects also start at flashing led but end up with much more interesting and complicated projects like ultrasonic distance measurement, moving parts and robots. Just be aware it's not as social and you'll lose him into the computer and programming for hours at a time.
https://www.amazon.com/dp/B01D8KOZF4?aaxitk=dfLkaId6ZuFZo4yNDC4DTA&pd_rd_i=B01D8KOZF4&pf_rd_p=3ff6092e-8451-438b-8278-7e94064b4d42&hsa_cr_id=1247439260401&sb-ci-n=price&sb-ci-v=28.00&sb-ci-m=%24
This is what I started with. If you're not short on money you could get the arduino mega kit, the extra input pins is going to be really useful.
As for videos, jeremy blum has a great playlist to get started.
https://youtu.be/fCxzA9_kg6s
Pretty sure there's a free pdf textbook somewhere. Everything else just look in forums and guides.
Good luck!
Along the same lines as nudemonkey's suggestion, you could get a cheaper one such as:
https://www.amazon.com/Elegoo-Project-Tutorial-Prototype-Expansion/dp/B01D8KOZF4/
Or even https://www.amazon.com/dp/B01DGD2GAO
Then buy whatever sensor kit you're most interested in https://www.amazon.com/s/ref=nb_sb_noss_2?url=search-alias%3Dcomputers&amp;field-keywords=Sensor+module+kit
I wouldn't expect much tech support from the discount vendors on Amazon or eBay though so if you think you might vendor help then Sparkfun may be a better choice.
In any case the main suggestion I'd have is get yourself enough stuff to keep yourself occupied and then start ordering individual stuff from China using aliexpress with free (slow) shipping. That way you'll get a little "present" from China every few days.
Don't expect any help from the seller with anything ordered that way though.... You're pretty much stuck with just searching part numbers and reading data sheets, but someone has probably posted code for just about everything on a blog somewhere at this point.
Getting a resistor, capacitor, transistor, diode, led assortment pack is highly recommended. They can be extremely inexpensive if ordered from China. I also recommend ordering some extra breadboards and jumper wires.
I recolonize the parts, they come in the Elegoo Uno kit.
To follow up on what the above user said, I bought the Elegoo Arduino UNO kit on Amazon, the whole kit costs less than most official Arduino UNO units and this specific kit comes with a whole bunch of micro controller projects on a cd and the relevant components to complete them with enough spare components to experiment with.
I’ve actually since bought a second one because I felt like it was good value. Hope this helps!
I got an Arduino Kit and it came in the kit with a bunch of other stuff. You can get them pretty cheap(the joysticks)... I think...
Take an free online free course!
I recommend a programming course "python for everybody" on Coursea. It is being taught by Dr. Chuck from University of Michigan. Its an awesome starter course to get into program. Of course you have code academy and etc.
If you can, buy an ardiuno kit from Amazon and build what you can from it. Most kits have instruction manuals on what to build from the kit.
This is the kit I bought: Elegoo EL-KIT-003 UNO Project Super Starter Kit with Tutorial for Arduino https://www.amazon.com/dp/B01D8KOZF4/ref=cm_sw_r_cp_apa_i_w.tdBbSBN6C7N
I just bought this l. I’m a computer engineer major. Elegoo EL-KIT-003 UNO Project Super Starter Kit with Tutorial for Arduino https://www.amazon.com/dp/B01D8KOZF4/ref=cm_sw_r_cp_api_i_uys.AbJ98HNDX
Absurdly priced.
The pictures show a Raspberry Pi 2, which is the last-gen model with a slower processor and no WiFi/Bluetooth. It also lists a 16GB SD card, which is so small and cheap that they're actually getting hard to find from quality product lines.
There you go, matched or beat this thing in every possible way for $75 with Prime shipping.
Is it worth $55 to you for someone else to copy files on to a SD card? Because that's literally all they're doing otherwise. I would never recommend anyone buy anything like this.
I bought this one because it has 4.8/5 stars with 760 reviews, I have Amazon Prime, and multiple memory cards floating around. It'll be here tomorrow along with this controller. I'm super excited for this little project!!
I will give you my top 5.
1.The hard yellow springs $5 and you will have extras. These will help your bed stay level longer. I think I need to check mine once every.. 10 prints or so or every other week, maybe longer. https://www.amazon.com/dp/B013G5I4US/ref=cm_sw_r_cp_apa_i_vkE6Cb8SHNBVG
2.Glass bed. Lowes for $3 cut 2.5mm. Ender 3 bed known to be warped.
3.Pick up a Raspberry pi ~$50 and install octopi/ octoprint.. free, and a mini b to USB cable $5. Now you don't need the to fiddle with micro SD and can manage everything from PC. https://www.amazon.com/dp/B07BC6WH7V/ref=cm_sw_r_cp_apa_i_olE6Cb8J91Q1J
And
https://www.amazon.com/dp/B00P0GI68M/ref=cm_sw_r_cp_apa_i_umE6CbPGSR7T4
4.Raspberry pi cam $25 and longer cable $3 to go with your Raspberry pi octoprint. Now you can monitor prints while "away" .. aka relaxing in your lazy boy watching YouTube vids on how bad season 8 of GOT was. https://www.amazon.com/dp/B01ER2SKFS/ref=cm_sw_r_cp_apa_i_noE6CbXTHCPDS
And
https://www.amazon.com/dp/B00M4DAQH8/ref=cm_sw_r_cp_apa_i_ipE6Cb9RK6QNR
5.Bowden tube $11. Only if you plan on printing hotter then 240c. So petg, abs.. ECT ECT . https://www.amazon.com/dp/B079P92HN9/ref=cm_sw_r_cp_apa_i_KjE6CbDMX6SGE
Hope this helps.
I'm liking this one so far, although I might try switching over to this one. Since they're mounted to the build plate, they make the model stationary in the frame so only the head is moving around (instead of everything moving everywhere). (Edit Note: you will need an M3x10mm screw to replace the M3x8mm screw on the bottom of the bed so the camera mount can be screwed in too.)
I do like the design that randomperson linked to, but I've got the Multi Material upgrade coming whenever it releases, and that location is needed for motor mounts; so for now I just have a little bracket that hangs over the arduino case to keep everything together.
For hardware, I'm using:
Pi w/some peripherals
Pi Cam 2
Pi Cam extended cable
If you bought the Arduino Uno, you'll have female pins and you're good to follow the tutorial. If you bought the Arduino Nano, you can use jumper wires like these: https://www.amazon.com/Elegoo-EL-CP-004-Multicolored-Breadboard-arduino/dp/B01EV70C78/.
If you bought an Arduino Nano without the pins soldered into it, you may buy some headers and solder it yourself, then you'll have a Nano with female pins, although I'd be cautions soldering into Arduino since depending on the power from your soldering iron, you may damage the Arduino itself.
Jumper wires are your best bet, since these are super cheap and usually sold in tens. As they're simple wires, if you find them too long, you may make it short by cutting then putting it together with some tape.
The motherboard switch cable is just a standard 2 pin jumper cable. Can buy some electronics cables to extend it.
https://www.amazon.com/Elegoo-EL-CP-004-Multicolored-Breadboard-arduino/dp/B01EV70C78/ref=sr_1_3?ie=UTF8&amp;qid=1539481769&amp;sr=8-3&amp;keywords=header+pin+cable+male+to+female
I also recommend this. There is a deal on Amazon right now for a really nice Arduino kit with lots of extra components and a lab manual with 35 experiments for $50. Regular price is $60 so you're only missing out on $10 savings if you miss the deal.
Arduino Mega kits are a good place to start off with for beginners.
https://www.amazon.com/Elegoo-Complete-Ultimate-TUTORIAL-controller/dp/B01EWNUUUA/ref=sr_1_1?ie=UTF8&amp;qid=1481883771&amp;sr=8-1-spons&amp;keywords=arduino+mega+kit&amp;psc=1
If you want to get into digital electronics, learn about all the logic gates, and how you can combine them together to make more complex stuff, like Adders, Multipliers, Barrel Shifters, Comparators, etc. Put all that stuff together and you got an ALU. Add some busses and registers and stuff and you've got yourself a CPU.
There are several free simulators for digital circuits which allow you to draw circuits and simulate them, but if you want to get serious about digital circuits then learn a Hardware Descriptor Language like Verilog and pick up an FPGA and get cracking.
You can get a used Basys 2, which uses a Spartan 3E or something, for like 50 bucks, which will be more than enough for a novice. And you can use it with Xilinx ISE, which allows you to describe your circuits in an HDL !!AND!! schematic capture so you can physically draw your circuit.
If you want a more modern Xilinx FPGA like the Artix-7 on the Basys 3, you're stuck with Vivado, Xilinx' new software which doesn't support old FPGAs, is an abomination with the interface written with Java Swing, so it won't scale properly on a high DPI screen, and overall just sucks.
I have this and I highly recommend https://www.amazon.com/EL-KIT-008-Project-Complete-Ultimate-TUTORIAL/dp/B01EWNUUUA/ref=sr_1_5?keywords=elegoo&amp;qid=1572165340&amp;sr=8-5 however if you don't want the hardware and only care about the code you can get it here https://www.elegoo.com/download/
Other people suggest not using arduino IDE. I partially disagree. I prefer using vs code as my ide but I disagree because you are writing actual embeded code even if it's "on easy mode" as others may put it. It's actual embeded hardare and it runs on my portable USB for many hours using very little power
yeah you could do this in hard circuitry but an arduino has a bunch of inputs and examples that could do what you want easily for about ten bucks(some of those esoteric chips will probably add up to more and have less flexibility).
https://smile.amazon.com/Elegoo-EL-CB-001-ATmega328P-ATMEGA16U2-Arduino/dp/B01EWOE0UU
Awesome find, thank you!
Wish NES console case would go on sale: https://www.amazon.com/NES-case-Raspberry-Pi-Skool/dp/B01M4OOY4U
I grew up with NES. Wasn’t allowed to get SNES since I already had a gaming system
Well, I can only speak for myself here, but were I in your shoes, this would also influence my decision.
I got this one instead as its not printed https://www.amazon.com/Old-Skool-NES-case-Raspberry/dp/B01M4OOY4U#immersive-view_1492498184069 - even received it a week early from US to UK
Still like your style though
https://www.amazon.com/Old-Skool-NES-case-Raspberry/dp/B01M4OOY4U
Look at /r/retropie - it's more focused on these projects.
At minimum, you'll want: a [Raspberry Pi 3 ($35)](
https://www.amazon.com/dp/B01CD5VC92/ref=cm_sw_r_cp_api_Sb.pzbAZKNASG), a case ($7-$20), a power supply ($10), an HDMI cable ($7), one or two controllers ($15-$30 each), and a micro SD card ($22 for a Class 10 64 GB). There are a lot of threads about which controllers are best - I'm a fan of the wireless 8bitdo SNES30 / SFC30 (usually cheaper on eBay).
You don't need any programming experience to set it up, though you may need to edit some configuration files to set certain things up properly. I've built 2 of these to date - they play anything up to and including PlayStation 1 consistently well. N64 is very hit and miss, though Mario Kart 64 and Kirby 64 work well.
Yeah, I just built two of these for my dad and his brother (twins) for Father's Day. Used this case. It's overpriced and the production quality is not great, so I would much prefer Nintendo's box, but not at 80+ a pop or whatever scalpers are charging. They didn't mind anyway.
You're not the only one. I've bought most of these multiple times over the last 25 years, the only real appeal is the finished version of Starfox 2.
Me, I'm building a Raspberry emu system and sticking it in one of these.
I would highly recommend these for a true (NES) retro look.
https://www.amazon.com/dp/B01M4OOY4U/ref=cm_sw_r_cp_apa_NAYuzbJ3VX88Q
https://www.amazon.com/dp/B01LW7JJPJ/ref=cm_sw_r_cp_apa_bBYuzbDAJX59J
You can also buy an NES shaped/colored Raspberry Pi Case
Amazon link
Raspberry Pi is super simple to set up, plus you can get a nifty case to make it look like an NES or a SNES, and there are even USB Adapters that let you use your original controllers (or pick some up on ebay). 10/10 would absolutely recommend as long as Nintendo refuses to make enough stock to meet demand.
Here is a list of the parts I used, from Amazon, to make an NES Mini.
Raspberry Pi
Case
Power Supply
Controller
Micro SD
You would also need an HDMI cable if you don't have one already. Some people use wireless Bluetooth controllers, (the PI has Bluetooth and WiFi built in), but I don't know how well they work, latency wise.
Here's one that looks like a mini-NES. It's good quality, though kind of pricey at $20-ish.
The only thing I don't like are the HDMI/power ports are on the side, USB/Ethernet under the NES cart flap, and no access to GPIO without modification. Those are minor things, though, and the "That's dope" factor is high.
I paired it with this bluetooth gamepad which is surprisingly good.
I would reccomend this kit:
CanaKit Raspberry Pi 3 B+ (B Plus) with Premium Clear Case and 2.5A Power Supply https://www.amazon.com/dp/B07BC7BMHY/ref=cm_sw_r_cp_taa_Kgj.BbQJVBE8P
You'll just need to add a microSD card.
Have fun!
If he's been talking about getting one, then you can't go wrong with a really basic kit. There are some kits with the micro-sd flash card but IMHO they charge too high of a premium for those. Here's a 32GB micro sd card I've used with no problems and very cost effective. From there, you will have to figure out what he wants to do with it. If he wants to run a media server for instance, you'll want to get a bigger micro sd card or get an external usb hdd. There are literally over 100 different sensors that can be used in Rpi projects so having some idea of what he wants to try would really help. Popular projects are things like pet feeders or light controllers or "magic mirrors". You can google and find detailed instructions and shopping lists for these types of projects. You can get him a starter set of common sensors like this or this for home automation. These kits are good if he doesn't know what he wants to do and just wants to tinker around but if he knows what project he wants to do, then it's better to get the basic kit and an amazon gift card so he can buy exactly what he needs.
A kit I always thought would be a cool gift for someone interested in Raspberry Pi is a retro gaming kit which will run old arcade games. The kit I linked has a usb drive with the game ROMs included but at a $10 premium. You can opt for the cheaper kit and download the ROMs from various sources online. This give him a something fun to start with and he can always pull the Rpi out and buy another flash and use it with sensors or other projects in the future.
Start small. It'll save you money, let you get your feet wet, and help you learn how to grow better, and then you can buy bigger.
My "starter package" is:
https://www.amazon.com/gp/product/B00SWGYYWO
https://www.amazon.com/gp/product/B01I4NY8KW
https://www.amazon.com/gp/product/B00F8ZQYHA
https://www.amazon.com/gp/product/B0098R0600
https://www.amazon.com/gp/product/B004Q2ER5C/
https://www.amazon.com/gp/product/B006NGI8VS
https://www.amazon.com/Smart-Pots-5-Gallon-Soft-Sided-Container/dp/B002JUOWB2
https://www.amazon.com/FoxFarm-FX14053-12-Quart-Organic-Potting/dp/B001I49Q98
https://www.lowes.com/pd/Garden-Treasures-15-31-in-Rust-Plastic-Plant-Saucer/50445000
https://www.amazon.com/gp/product/B004PS4B08
So for about $420 (heh), you can get your foot in the door and start growing. This is a nice setup too, you can probably save $100 by shopping around, buying used, or doing-it-yourself. I've left off a few odds and ends like dryer duct, Fiskers for trimming, weed fabric pins for low-stress training, pitcher for watering, Mason jars for storage, but you can likely find those or suitable replacements around the house without spending money.
I also have a Raspberry Pi 3 ($43) with Sense Hat ($37) and metal case ($15) in each of my grow tents to log temperature/humidity and other things. I'm interested in eventually using the GPIO functionality to water my plants too. Not critical, but definitely a nice thing to have, especially if you're the hacker type. If you go this route, you might look at raspiviv.com too.
https://www.amazon.com/gp/product/B01C6FFNY4
https://www.amazon.com/gp/product/B014HDG74S
https://www.amazon.com/gp/product/B0722L338Q
I'm glad I bought a good intro setup because I still use it now that I've upgraded. I now have a 3' x 3' GG Shorty tent with HLG 300 LED for flower, a 2' x 2.5' GG Shorty tent with two 400W Roleadro COB's for veg, and my "intro package" is now my germination/cloning tent (and drying tent too since several people suggested that too). Being able to have three tents (germination -> veg -> flower) working simultaneously is increasing my output quite sharply. I'm doing this to help a relative with cancer, so you may not need to go quite as crazy as I did.
You mentioned using 35+ gs (~1.25 oz) a month. You probably aren't going to be able to grow that much given the constraints of tent size and light wattage (plus being a first-time grower! You'll learn a lot!). So once you get used to it, you'll probably want to buy more stuff. Marijuana isn't addictive, but growing marijuana absolutely is.
Once you've got your hardware, the variable cost is seed (~$10), soil (~$5), nutrients (~$20), and electricity (~$30). From that, I'm going to estimate you can grow ~1.5 ozs (you can do more as you learn more though). So you're looking at ~$40/oz after you've made the initial hardware investment.
Hope this helps. Depression, cancer, and everything else can just go suck it.
I bought one of the Amazon kits for about $40, I think the only thing it was missing was a case. Considering you are buying this for a 3D Printer, you can probably save $10 and print yourself a case (there are hundreds on Thingiverse)
Edit
Here is the one I bought, it is $42.99 but may as well save a few bucks
I think certain bundles are a good deal. The pi 3 bundle below is a good example- it comes w case, computer, and power. It’s cheaper to buy HDMI and SD card separately and you can get better controllers than the ones included in packages.
I’d use these bundles to get a sense of what you need to buy for the whole package and then buy those items a la carte.
https://www.amazon.com/dp/B01C6FFNY4/ref=cm_sw_r_sms_apip_8CVunakHrbo3A
Even if you're buying components separately as I did I'd recommend the Canakit Pi 3 + power supply bundle since it was a few bucks cheaper than buying the two separately
If you just buy what you need separately it will come out a bit cheaper. Except start with the base Cana-kit, because you get the power adapter plus the little heat sinks for less than buying together. My kit was only $39.99, looks like price went up $3.
Comes out to $65.50 (and less if you don't need an HDMI cable). You save $10 over the $75 kit, plus you get brand name SD card.
Pi + Power cable ($42.99) https://www.amazon.com/CanaKit-Raspberry-Micro-Supply-Listed/dp/B01C6FFNY4/
32gb card ($9.99) https://www.amazon.com/Samsung-Select-Memory-MB-ME32DA-AM/dp/B01DOB6Y5Q/
Clear case ($5.48) https://www.amazon.com/SB-Components-Clear-Case-Raspberry/dp/B00MQLB1N6/
HDMI if you need one ($6.99) https://www.amazon.com/AmazonBasics-High-Speed-HDMI-Cable-Standard/dp/B014I8SSD0/
Same price on Amazon directly.
CanaKit Raspberry Pi 3 with 2.5A Micro USB Power Supply (UL Listed) https://www.amazon.com/dp/B01C6FFNY4/ref=cm_sw_r_cp_apa_i_6Se7AbAT9WDCB
EDIT: Oops. Amazon doesn't include the case. Thanks /u/AlexDanault.
great gift!!! Python and rpi are super easy to learn. If he needs help, have him post here... but he won't need it.
+1 re pi3 builtin wifi FTW.
+1 amazon/canakit.
I recommend something simple to start, e.g.
http://www.amazon.com/gp/product/B01C6FFNY4/ref=s9_acsd_al_bw_c_x_3
it has python builtin - nothing to install or do, just connect a keyboard/monitor, power it up, and type "python at the command-line!
the much bigger thing is to have a specific project in mind, and ideally one that's motivating. Otherwise, the pi is silly when python is easily run on any laptop. For me, I used pi's for a couple of real world business applications: a people counter for a retail store and a "smart" refrigerator with webcam, also for retail.
A specific project also ensure that "success" means something.
i.e. the pi is half the present -- the other half is a project you'd like him to do! :-)
If you are comfortable following the RetroPie install instructions, then build your own. It will be far more rewarding.
I just bought the components to put together a RetroPie system.
Honestly it cost me the same as those prebuilt systems but I went with a 64GB UHS-3 SD Card and only 1 Controller (I have a USB 360 controller already).
To give you an idea (I cannot provide a recommendation on these products as I have not used them yet) this is what I ordered:
Samsung Evo Select 64GB
Buffalo Classic USB Gamepad
CanaKit Raspberry Pi 3 with 2.5A Micro USB Power Supply
Flirc Raspberry Pi Case Gen2
The only things missing from this order is a HDMI cable and SD Card Reader (I have both already).
They have a few kits on Amazon.
Pihole for Raspberry Pi is pretty simple, and straightforward. I'm not a networking guy myself, managed to get it up and running in an hour or two. Just requires a Raspberry Pi kit (I have this one) and a network cable. /r/PiHole is a big help.
https://pi-hole.net/
Like /u/JohnScott623 recommended, you'll need a few things. I recommend buying something like this:
http://www.amazon.com/CanaKit-Raspberry-Complete-Starter-Kit/dp/B01C6Q2GSY
Edit: I know it's a bit overpriced, but it's convenient...
My wife actually got me one of these kit last year, and it's a great starter kit!
You can also find them on amazon here as well.
Thanks! It came out to around $150, but that's mainly because I got the Raspberry Pi kit on amazon that had the case and other bells and whistles. I'd suggest the Canakit one if you're going with a Raspberry Pi, this eBay seller for cheap buttons and joysticks, and this site for button layouts so you can print it out and drill through it.
I think you may be right about the power issue, but I'm not sure how to check if that's the cause. Both are physical platter drives, both made by WD. Below are links to product pages for the drives (not exact, but very similar).
Drive 1 (external power): amazon link
Drive 2 (usb power, drive with issue): amazon link
Finally, the Pi is powered by a 2.5A wall adapter. I purchased this kit which had the adapter.
https://www.amazon.com/CanaKit-Raspberry-Complete-Starter-Kit/dp/B01C6Q2GSY/ref=sr_1_2?s=pc&amp;ie=UTF8&amp;qid=1487393281&amp;sr=1-2&amp;keywords=rasberry+pie+3
Running
https://github.com/rg3/youtube-dl/blob/master/README.md#readme
and a script to run this script every 5 minutes.
The pi has to always be on.
I have an extra laptop as well running the same process (also linux) just in case one or the other happen to break.
Here's my setup:
This allows you to use your Pi not only as a RetroArch machine, but also a general-purpose media center machine running Kodi. Seeing as I have multiple machines like this around the house, I serve up my ROMs and Save Game data off a server via NFS, so that I can play a game on one box, then move to another one and pick up my saved game from there. This is a far better setup than the shit Nintendo is releasing.
Yes it is possible, I don't have my pi with me currently but I have hundreds of NES, SNES, game gear, master system, and Genesis roms all saved on my micro SD card with the retropie setup. If you haven't bought your pi yet I would suggest buying the whole package off Amazon, it's what I did and it was helpful.
CanaKit Raspberry Pi 3 Complete Starter Kit - 32 GB Edition https://www.amazon.com/dp/B01C6Q2GSY/ref=cm_sw_r_cp_apap_nZ8l33jxmjhpy
The monitoring app was inspired by this excellent post by /u/MaryJannieSmith
I am a rails guy so I decided to go against the python grain for raspberry pi and build the app on rails, and I'm very happy with the result.
You can find the code here:
https://bitbucket.org/tinyplantas/growtent
I'll do my best to help anyone get this setup locally, but be warned that it took me a lot of trial and error. Setup instructions can be found in the readme.
As for parts, I went with the raspberry pi 3 canakit, standard raspberry pi 5mp camera board, and the uxcell temperature and humidity monitor.
> All i'm really looking for is something that I can plug in and play some old games on for a little while here and there.
You do realize it's not plug and play like the NES classic right? There's still some light software intallation involved with the Rpi. In fact it is illegal to sell/distribute a rpi with preloaded roms.
To answer your original post question, the price of the product is way to high for what you're getting. Taking 5 mins on amazon can get you much cheaper items especially with prime.
I still think this is too expensive, but it's still cheaper than the ebay link:
https://www.amazon.com/CanaKit-Raspberry-Complete-Starter-Kit/dp/B01C6Q2GSY/ref=sr_1_4?s=pc&amp;ie=UTF8&amp;qid=1501389466&amp;sr=1-4&amp;keywords=raspberry+pi+3
You just need to source your own controller which you can get here:
http://www.8bitdo.com/nes30pro-fc30pro/
Best controller you can buy for $30. Which in total is still cheaper than the ebay kit.
Here you go, Raspberry Pi
pi 3 canakit from amazon with some 8bitdo sfc30 controllers.
https://www.amazon.com/CanaKit-Raspberry-Complete-Starter-Kit/dp/B01C6Q2GSY/ref=sr_1_1?ie=UTF8&amp;qid=1503430263&amp;sr=8-1-spons&amp;keywords=pi+3+canakit&amp;psc=1
RetroPie has disclaimers in the software saying it's illegal to sell their software on a homemade device, especially with pre-loaded ROMs, just build one for yourself, you can do it for $80, I built one yesterday. This kit has everything you'll need to make your own home retro console in a couple hours. No tools required
https://www.amazon.com/CanaKit-Raspberry-Complete-Starter-Kit/dp/B01C6Q2GSY/ref=sr_1_1?ie=UTF8&amp;qid=1481844368&amp;sr=8-1&amp;keywords=canakit+retropie
Rasperry Pi 3 Starter Kit. It's a powerful, tiny computer that is great for tinkering with. I imagine if he likes coding and pet projects, he'll find lots he can do with this.
I agree. Speaking of which, does RetroPi support save states? Almost to the point where I think it'd be worth it to just make my own:
https://www.amazon.com/CanaKit-Raspberry-Complete-Starter-Kit/dp/B01C6Q2GSY/
https://www.amazon.com/8bitdo-NES30-Pro-Controller-Carrying/dp/B01LW7JJPJ/
https://www.amazon.com/Super-Tinytendo-Raspberry-Model-Cooling/dp/B074JJRWHH/
Little more expensive, but it'd be PS Classic, SNES Classic, NES Classic and more all in one...
I'd buy a Cana Kit since it has everything you'd need to have a complete pie.
https://www.amazon.com/dp/B01C6Q2GSY/ref=cm_sw_r_apa_Lc5Zzb0280WWW
That's the most full featured Pi3 kit they have but there are other more affordable options.
There are tons of tutorials online but I suggest you look up ETA Prime on YouTube because he helped me a lot with setting up Emulation Station and getting tons of games on my Pi.
As for controllers, the wired iBuffalo ones are great but if budget concerns aren't an issue then get the 8Bitdo SNES30. It's a Bluetooth SNES controller with a 1 to 1 look and feel. It's pricey but you really won't regret it.
Good luck and have fun! Hope she enjoys it!
Edit: As a side note you want to invest in a case with a fan! There are ones that look like a tiny NES or SNES and seem neat but have next to no ventilation so your pi WILL overheat. I made this mistake and wasted $20.
https://www.amazon.com/CanaKit-Raspberry-Complete-Starter-Kit/dp/B01C6Q2GSY/ref=sr_1_1?ie=UTF8&amp;qid=1504721644&amp;sr=8-1&amp;keywords=rasberry+pi+starter+kit
Does this set have everything that you need to make a NavPi of your own? Also where can I download the NavPi software?
+1 for Canakit
I've bought 3 so far.
https://www.amazon.com/CanaKit-Raspberry-Complete-Starter-Kit/dp/B01C6Q2GSY
I'd suggest analyzing your purpose to wanting this. Is it because you want to learn how to start doing raspberry pi/circuitry...or do you just want a GBA-cased emulator?
If you want to start learning circuitry, soldering, and raspberry pi, I suggest first starting to learn the basics of how circuitry works. Here are some amazon links for some recommended purchases, the same things I bought to start learning.
https://www.amazon.com/gp/product/B01C6Q2GSY/ref=oh_aui_detailpage_o04_s00?ie=UTF8&amp;psc=1
https://www.amazon.com/gp/product/B00P2E9W30/ref=oh_aui_detailpage_o00_s00?ie=UTF8&amp;psc=1
https://www.amazon.com/gp/product/B014KK89BW/ref=oh_aui_detailpage_o03_s01?ie=UTF8&amp;psc=1
These will teach you the basics, and from there, I'd suggest learning from people who have done the project, and can provide you with the knowledge from there.
If your goal is just to have a GBA emulation toy, I'd suggest just buying one from someone who has made them - check etsy, or similar places. Lots of people have what's called a 'retropi' for sale, prebuilt. Just look for one that catches your eye.
I bought [this] (https://www.amazon.com/gp/aw/d/B01C6Q2GSY/ref=mp_s_a_1_1?ie=UTF8&amp;qid=1469372205&amp;sr=8-1&amp;pi=SY200_QL40&amp;keywords=canakit+raspberry+pi+3&amp;dpPl=1&amp;dpID=61LxoDAa3PL&amp;ref=plSrch) one on sale during Prime Day. Has worked great so far.
Edit: words
I just bought this one: https://www.amazon.com/gp/product/B01C6Q2GSY
It was cheaper than buying the parts individually. I also had to purchase a controller seperately
PRI3 has wifi built in, while you can set it up headless and access it via SSH if you are new to Linux you will want a USB KB\Mouse and an monitor with a HDMI port and a hdmi cable for your first few times.
This is a great starter kit.. it included everything to get started.
https://www.amazon.com/gp/product/B01C6Q2GSY/
That would do the job, but you can find kits with a wider variety of input and output devices in other places for the same money.
Amazon, for example.
The branding on the kit is less important than the variety of things you can do with it.
I can't vouch for anything, but I just ordered this kit. Not sure if it's available to you, but has pretty good reviews, seems like a really good deal. Excited to get started on whatever the fuck this stuff is. Looks like it's having a lightning special offer right now too. Damn.
I'm about your age and taking CS and Engineering courses. The only way to find out is by trying. One quick and inexpensive way of getting your feet wet is by learning some basic coding online (for example, Harvard's CS50) and doing the first few electronics projects with an Arduino kit (like this one).
Then, I recommend doing lower-division prerequisites at community college to get a taste of the engineering curriculum. Specifically, you should take at least one programming class, Calculus 1, Physics 1, and an engineering class or two (hopefully one that is project-based or has a hands-on component). With these, you should have a good introduction to the different directions you can take.
You should also think about why you want to take Computer Engineering. CpE is a good major, but if your interest/goal is to work in software, Computer Science will be a more flexible major and usually have fewer requirements (read: you can graduate sooner). Don't get into the major just because of the engineer moniker, get into CpE because you want to have more flexibility in your career in working with hardware, software, and electronics. CS will give you a better background for a broad career as a software engineer, with more elective options. There are something like 10x more software jobs than hardware jobs. You can work in software with CpE, but the major itself can be pretty focused on electrical engineering, circuits, and hardware. This depends on your school.
Once you've taken the classes I suggested, you should be able to better decide what you're most interested in and how much math and physics you want to take. If you don't mind taking more math and physics fundamentals, then CpE can be a good fit for you. Depending on how you feel about your programming courses and hands-on engineering courses, you will have more clarity on whether you want to have more focus in hardware, software, or neither.
My strong recommendation would be to buy a cheap Chinese Arduino starter kit. Get one that includes some interesting sensors (ultrasonic range finder etc), as well as a stepper motor, DC motor and servo. The ones from Elegoo are quite good. The tutorials typically assumes very little initial knowledge, include example code, and will talk you through connecting and controlling all the parts in the kit. Once you have gone through the tutorial, you will pretty much understand all the basic principles, and can then figure out how to connect to almost any sensor, or control most motors / actuators.
This one looks ideal. https://www.amazon.com/ELEGOO-Project-Tutorial-Controller-Projects/dp/B01D8KOZF4/ref=sr_1_4?keywords=arduino+starter+kit&qid=1566681139&s=gateway&sr=8-4
buy this kit for $50
it includes the chip, case, and power.
the main thing you will need besides that is a microSD I'd recommend at least a 64gb. so that's about $22.
if you have a HDMI cable, and ps3 controller laying around, your pretty much done. so about $75 total.
I bought one of the raspberry pi 3 starter lots on Amazon first of all:
https://www.amazon.com/gp/aw/d/B01C6EQNNK/ref=mp_s_a_1_1?ie=UTF8&amp;qid=1488163575&amp;sr=8-1&amp;pi=AC_SX236_SY340_FMwebp_QL65&amp;keywords=raspberry+pi+3
(You'll have to have a micro SD card handy as well)
Then, I just followed the instructions in this thread and haven't had to touch a thing since it started up. I get passes at home all the time without having to even think about it, and I believe it goes through a whole lost of addresses on its own:
https://www.reddit.com/r/3DS/comments/5anc74/raspipass_homepass_software_for_raspberry_pi_3/?sort=top
This is my bartop arcade that I built and I really happy how it came out.
I used the following parts from Amazon:
Raspberry Pi 3 Kit
Joystick and Buttons
Monitor
I used 3/4'' MDF to build the structure and had a buddy who owns a print shop design and print the decals for me including the marquee. Most of the hardware used for electrical was bought at a local hardware store (Lowes, Home Depot, etc.)
Took about 15 hrs to build and was so much fun as is it to play with it. I mainly built it for my daughter which is just discovering retro gaming.
Maybe I will upload a video in action but everyone knows what it looks like and how it functions for the most part.
If there is anything you guys have a question about let me know in the comments.
Album not link?
Or better yet spend a couple extra bucks for a pi3 kit and have it hardwired to your network.
Hmm... I see that now. But I think you're right. Even at $90 now, I cannot imagine them lowering it much
https://www.amazon.com/dp/B01C6Q4GLE/
I saw this as a non-prime day lightning deal yesterday for $62, down from $70. Was tempting, but I didn't need most of the crap in it.
https://www.amazon.com/CanaKit-Raspberry-Complete-Starter-Kit/dp/B01C6Q2GSY/
I ended up buying this one that seemed cheaper than buying the RP3 and power supply separately. $43 total.
https://www.amazon.com/gp/product/B01C6FFNY4
Are you using a raspberry pi compatible power supply? A year ago I was using a phone charger for my raspberry pi 3 then all of my files got corrupted. I then switched to this power supply: https://www.amazon.ca/CanaKit-Raspberry-Micro-Supply-Listed/dp/B01C6FFNY4 I haven’t had issues with corruption since and it seems to run faster. If you don’t want to deal with Pi problems or would like home assistant to boot faster I have heard lots of people are using intel NUC. I’m not using my Pi for home assistant anymore because I have a server now
Any recommendations for heatsinks?
EDIT: Would the ones that come with this work fine? http://www.amazon.com/CanaKit-Raspberry-Micro-Supply-Listed/dp/B01C6FFNY4/ref=sr_1_2?s=pc&amp;ie=UTF8&amp;qid=1459043028&amp;sr=1-2-spons&amp;keywords=raspberry+pi+3&amp;psc=1
Better case option: https://smile.amazon.com/Old-Skool-NES-case-Raspberry/dp/B01M4OOY4U
Then this: https://smile.amazon.com/gp/product/B01C6FFNY4
This controller: http://www.ebay.com/itm/292059658304
Spending the same amount of money, but it looks a lot cooler this way.
This is the one I used. Seems good so far.
That is not bad, the numbers I was running had it up to three hundred dollars, which is my ceiling for this project.
I did find a nice pack from canakit after hearing the suggestion from the other user.
https://www.amazon.com/CanaKit-Raspberry-Micro-Supply-Listed/dp/B01C6FFNY4#customerReviews
Pi 3 B+ with power supply and two poorly adhesive heat syncs for forty-three dollars. Your estimate of the pack was pretty good.
Thanks a bunch! If I do not blow out my router with this project I might get around to letting you know how I did.
Just buy a raspberry pi, mini cd card and plug it into your router
https://www.amazon.com/CanaKit-Raspberry-Micro-Supply-Listed/dp/B01C6FFNY4/ref=pd_lpo_147_tr_t_3?ie=UTF8&amp;psc=1&amp;refRID=JFNNXC8FM2KNWK91741C
I use mine wifi to connect a printer to the network and run Pi hole. works great and never see ads.
Just got my first Pi, bought this and this as I already had some micro sd cards laying around.
Do you have a Sd card reader ?
Buying this kit will https://www.amazon.com/gp/product/B01C6FFNY4/ get you the same power Adapter and Pi for 2 dollar cheaper and some free heatsinks
Just the latest Pi 3 model B
> http://www.ekt2.com/products/productdetails/412_RASPBERRY_Pi_3
Kit that doesn't include MicoSdcard or HDMI
> http://www.ekt2.com/products/productdetails/412_RASPBERRY_Pi_3_KIT
Amazon CanaKit that I ordered from abroad using Aramex, that includes everything you may possibly need
> https://www.amazon.com/CanaKit-Raspberry-Complete-Starter-Kit/dp/B01C6Q2GSY
Total price after import was $105 which is a bargain compared to local alternatives, but this is if you're interested in gaming on the Pi
Good Luck
No problem!
https://www.amazon.com/CanaKit-Raspberry-Complete-Starter-Kit/dp/B01C6Q2GSY/ref=sr_1_1?ie=UTF8&amp;qid=1485199499&amp;sr=8-1&amp;keywords=raspberry+pi+3+bundle
If you buy that you'll have everything you need and more to be able to run any software you like and pretty much do anything you want :)
https://www.amazon.com/CanaKit-Raspberry-Complete-Starter-Kit/dp/B01C6Q2GSY
Get this if it's available. Then buy your own SNES controllers. Most are trash. iBuffalo and 8bitdo appear to be the only companies that make good ones.
This is the exact kit that I bought. It includes everything you'll need: The Pi Unit, Case USB / MicroSD Card reader, 32Gig MicroSD, HDMI Cable, and Power Adaptor. There are some kits that are cheaper but don't come with everything.
I got a canakit with the B, I feel like I’ve seen that there’s issues with Retropie and the B+, but maybe I’m thinking of something else... mine came with a sandisk microusb. Used etcher on my Mac to format and write the retropie image. I got the innext controllers and I think they work well (two for $14.99 on Amazon). In the future I may buy a case with a fan built in, but that’s just something I’m interested in, not too worried about it.
This is what I got and it came with everything as listed
https://www.amazon.com/CanaKit-Raspberry-Complete-Starter-Kit/dp/B01C6Q2GSY
I’ve had a lot of fun with it, hope it works out for you
https://smile.amazon.com/CanaKit-Raspberry-Complete-Starter-Kit/dp/B01C6Q2GSY/ref=smi_www_rco2_go_smi_2609328962?_encoding=UTF8&amp;%2AVersion%2A=1&amp;%2Aentries%2A=0&amp;ie=UTF8
I purchase this one for my friend
Worked great. Problem is it didn't have an on/off button. Also remember Youtube is your friend when you want to set it up.
This is the kit I have - includes everything you need except a remote/kb/m. It also comes with 4 different distro installers preloaded on the SD card, so on first boot all you have to do is select OpenELEC and it will install Kodi and erase the other distros. Then it's just configuring.
> So, what are my options if I don't want this internet connected / PC controllable?
That seems like an odd question. What exactly do you mean you don't want it internet connected? Do you just mean you don't want to have to rely on the cloud services. In other words do you just want to be sure your HA system will continue working if your internet goes out?
If thats the case i would go with a
raspberry pi
https://www.amazon.com/CanaKit-Raspberry-Complete-Starter-Kit/dp/B01C6Q2GSY/ref=sr_1_2?s=pc&amp;ie=UTF8&amp;qid=1483394601&amp;sr=1-2&amp;keywords=raspberry+pi
A zwave usb stick
https://www.amazon.com/Aeotec-Aeon-Labs-ZW090-Stick/dp/B00X0AWA6E/ref=sr_1_cc_1?s=aps&amp;ie=UTF8&amp;qid=1483394649&amp;sr=1-1-catcorr&amp;keywords=zwave+usb+stick
And then from there just start grabbing some zwave switches/outlets
You can choose whether the system is accessible outside of the network while still having access to the system through your phone/tablet/pc/switches/remotes from in the home.
https://www.amazon.com/CanaKit-Raspberry-Complete-Starter-Kit/dp/B01C6Q2GSY
That was the kit I used. Turned out it was a rip-off, but it was convenient.
I don't really remember the resources I used (90% sure I also used retro pi), but I think you just put the program on an SD card, and boot it. Then you have to take the card back out and put the ROM's on. Or at least thats what I did.
If you're going to go with a Retron solution, you might as well explore a RetroPie:
https://retropie.org.uk/
https://www.amazon.com/CanaKit-Raspberry-Complete-Starter-Kit/dp/B01C6Q2GSY/ref=sr_1_3?ie=UTF8&amp;qid=1487601834&amp;sr=8-3&amp;keywords=retropie
That's the first step!
Here's the guide
Here's a complete starter kit with everything you need, hardware wise, to get started. You'll have to supply your own monitor and keyboard for the initial setup, but any HDMI monitor and any USB keyboard will work.
Here's a bit more high-end controller
Here's a couple cost-effective controllers.
The only thing not included here are the ROMs, which can be found with a google-type search for such things, but as with any legally gray area, enter at your own risk.
EDIT: some more resources
another guide
/r/RetroPie
I want one of these little things. That said, if I can't find one locally I ain't searching.
Incidentally, this complete Raspberry Pi kit, this authentic-feeling wireless SNES controller, and RetroPie can give you a similar experience for a similar price. Plus you can put every SNES game ever made on there, plus NES, Master System, Genesis, and PSX games.
Just saying we have a lot of alternatives to paying scalpers.
https://www.amazon.com/dp/B01C6Q2GSY/ref=cm_sw_r_cp_awdb_bJFuzbJ8NW7JR
There you go
Why is this so expensive?
Here's the same thing without the controller for $70:
https://www.amazon.com/CanaKit-Raspberry-Complete-Starter-Kit/dp/B01C6Q2GSY
Good call on the RPi though, I have one and it's amazing.
Thanks everyone! Thoughts on this for a Home Automation setup?
CanaKit Raspberry Pi 3 Complete Starter Kit - 32 GB Edition https://www.amazon.com/dp/B01C6Q2GSY/ref=cm_sw_r_cp_apa_zjz6BbN552P3Y
Thanks everyone for the replies, I'll just get the Pi 3. Probably in a kit so I don't have to mess with anything.
https://www.amazon.com/CanaKit-Raspberry-Complete-Starter-Kit/dp/B01C6Q2GSY
We can only use what came in our kit and a monitor, keyboard, and mouse
Are you talking about the Plex client add-on or a server? I just bought a Raspberry Pi 3B kit and installed LibreELEC for Kodi, and I found the Plex extension to work great with it for 1080p. Not sure about 4K.
I went with this kit for $70 to get the board, the case, heat sinks, and that neat little MicroSD adapter.
This is cool! :)
I've got a Raspberry Pi3 with Home Assistant already set up, but I found that I didn't really have a good use for it, so now it's just a dust collector. I originally got it just to try to use Dash buttons for home automation, but that was underwhelming and there really isn't a lot of good uses for them. Maybe I'll fire it up and give it a shot again.
For anyone wanting to go down this road and spend lots and lots of hours and frustration figuring this stuff out, you can buy this kit on Amazon and follow all the directions in the relevant videos on YouTube from BRUH Automation. http://www.bruhautomation.com/
I have the standard case that came with the CanaKit sold at Amazon (https://www.amazon.com/CanaKit-Raspberry-Complete-Starter-Kit/dp/B01C6Q2GSY/ref=sr_1_9?s=pc&amp;ie=UTF8&amp;qid=1503624521&amp;sr=1-9&amp;keywords=raspberry+pi+3).
I'm not very good at code or mod, but I found some guides and bought a small fan and made a script that control it. I fixed it at the case cover. When it is on it gets a little noisy for sure. Without a script it will be always on, but with the script it will turn on only when the Pi gets to certain temperature that you can set. As soon as it get below it, the fan turns off.
Works great for me!
This is the guide that I used to set the fan on the hardware side (https://hackernoon.com/how-to-control-a-fan-to-cool-the-cpu-of-your-raspberrypi-3313b6e7f92c) you will need a resistor for that. It's not hard tough. As I said, I'm a total noob and I actually did it.
The script that I use is this one (http://www.instructables.com/id/Automated-cooling-fan-for-Pi/)
One problem that I had is that the script, when started by crontab would not work properly for some reason. Solved by adding to the crontab a command to kill the script before it restart it. Can give you more details if you go trough this road.
https://www.amazon.com/CanaKit-Raspberry-Complete-Starter-Kit/dp/B01C6Q2GSY
Here's a 32 GB canakit package with case, power supply, HDMI, etc. Pretty much everything but the controllers. You save little by buying individually, and I've had good experiences with these (made about 12 thus far).
iBuffalo is the king of wired SNES controllers: https://www.amazon.com/BUFFALO-BSGP815GY-Classic-USB-Gamepad/dp/B06XWD8QQJ/ref=sr_1_2?s=electronics&amp;ie=UTF8&amp;qid=1503628239&amp;sr=1-2&amp;keywords=ibuffalo
8Bitdo gear is the way to go for wireless, but if your recipients aren't tech savy, wired might be better: https://www.amazon.com/SNES30-Game-Controller-PC-Mac-Linux/dp/B00VAQG5GQ/ref=sr_1_1?s=electronics&amp;ie=UTF8&amp;qid=1503628269&amp;sr=1-1&amp;keywords=snes30
I'd really stay awaay from controllers not made by those 2 brands. Everything else tends to be shit unless you're using an old Wii, Xbox, or PS controller.
https://www.amazon.com/CanaKit-Raspberry-Complete-Starter-Kit/dp/B01C6Q2GSY/ref=sr_1_3?s=pc&amp;ie=UTF8&amp;qid=1482762011&amp;sr=1-3&amp;keywords=raspberry+pi
Raspberry pi 3's are nice because they have built in wifi, but the starter kits are going to run you about $75 for everything and even the one I've listed here doesn't include a monitor, keyboard, or mouse, which are also necessary.
https://www.amazon.com/CanaKit-Raspberry-Complete-Starter-Kit/dp/B01C6Q2GSY/ref=sr_1_1?s=pc&amp;ie=UTF8&amp;qid=1480634957&amp;sr=1-1-spons&amp;keywords=raspberry+pi+3+starter+kit&amp;psc=1
Honestly though, learning to code and learning to build full fledged computer are two different things. If you're looking at building standard desktop computers the process is going to be a lot different than building a Pi or soldering together parts to make hats.
It might be better to look at getting a cheap chrome book.
The base model can be had for $35, but then you have to source your own power supply and memory card. You can go the lazy route and spend a bit more, and buy a full kit from Amazon.
https://www.amazon.com/CanaKit-Raspberry-Complete-Starter-Kit/dp/B01C6Q2GSY/ref=sr_1_3?s=pc&amp;ie=UTF8&amp;qid=1478994080&amp;sr=1-3&amp;keywords=Raspberry+Pi
Then just search youtube for "Retro Pi" and you'll find install instructions.
It'll work with any USB controller (bought the niece a USB SNES controller, use a wired 360 controller myself).
All of the needed ROM files can be easily found on the web (CoolROMS was the source of most of mine).
That sucks! I was hoping to get hold of one but it sounds like I'm going to have to wait a while. If he's into DIY computing you could get him the components to make a RetroPie setup. A raspberry pi kit like this one has what you need except for the controller, but you can use a wired xbox controller if you have one or i'd recommend a classic snes controller. It takes a bit of work to get it set up, but it's not too much trouble if he's computer savvy.
If that's no good, here's some geek/gamer recommendations from my site expertly chosen. Good luck!
Your better off saving your money and building your own. I would suggest checking out ETA Prime on youtube or DrewTalks. I've watched those two explain how to ustom build my retropie unit from scratch. I've also provided a link here with the extact unit I got. Anything else would be a rip off.
https://www.amazon.com/CanaKit-Raspberry-Complete-Starter-Kit/dp/B01C6Q2GSY/ref=sr_1_2?ie=UTF8&amp;qid=1525143583&amp;sr=8-2&amp;keywords=raspberrypi
Built my wife a RetroPie setup for Christmas. The kids have been enjoying the old NES games, and Sonic on the SEGA. The wife plays Calstevania every chance she gets. Still working out a bit of input lag, but it's a fantastic setup.
https://retropie.org.uk/
https://github.com/RetroPie/RetroPie-Setup/wiki/First-Installation
https://www.youtube.com/watch?v=xvYX_7iRRI0
https://www.amazon.com/gp/product/B01C6Q2GSY/ref=od_aui_detailpages00?ie=UTF8&amp;psc=1
Canakit Starter Kit
for the Raspberry Pi 3. I have this one and I love it. I bought several sd cards so I can just swap as needed. One has RetroPie gaming station, one has Kodi Media Center, and the other just has the default os so I can build Python things and Reddit/Twitter bots.
A lot of the "value" they tack on is stuff you could do for free, they're just offering it up with their own tutorial videos. The complete Pi 3 Canakit is $75 on Amazon. If you want some extra stuff to play with they have an ultimate edition for $90. I got my complete canakit pi 2 for $65 on sale before the pi 3 was out.
Edit: to be fair it's not a terrible price considering they spent the time and money making the videos. The "lol" was more about their original price.
If you don't already own a Pi, this is a good starter kit. For programming, I personally found it easiest to learn out of a book, so I'd recommend getting some. Maybe try python, it's really useful on the Pi.
https://www.amazon.com/gp/aw/d/B01C6Q2GSY/ref=mp_s_a_1_3?ie=UTF8&amp;qid=1494265704&amp;sr=8-3&amp;pi=AC_SX236_SY340_FMwebp_QL65&amp;keywords=raspberry+pi+kit&amp;dpPl=1&amp;dpID=61LxoDAa3PL&amp;ref=plSrch
I'm using a 3 B. This kit specifically.. https://www.amazon.com/gp/product/B01C6Q2GSY
Kit
Instructions
I am a stupid fucking moron when it comes to tech and and I break nearly everything I touch, and even I was able to get it all set up in an hour's time. You can definitely do it.
When I first heard about the Nintendo classic I went out and bought a raspberry pi kit for $75 and loaded the entire NES,SNES, and Genesis library. it has over 6000 games in total. It took a little time to setup, but it's well worth it.
Edit: https://www.amazon.com/gp/aw/d/B01C6Q2GSY/ref=mp_s_a_1_5?ie=UTF8&amp;qid=1492130303&amp;sr=8-5&amp;pi=AC_SX236_SY340_FMwebp_QL65&amp;keywords=raspberry+pi+3&amp;dpPl=1&amp;dpID=61LxoDAa3PL&amp;ref=plSrch
Pi 3 Model B. I got this kit!
Here's the case and the kit
Is this a good deal?
https://www.amazon.com/gp/aw/d/B01C6Q2GSY/ref=mp_s_a_1_1?ie=UTF8&amp;qid=1506645113&amp;sr=8-1&amp;pi=AC_SX236_SY340_QL65&amp;keywords=rasberry+pie+3&amp;dpPl=1&amp;dpID=61MAJaKWgkL&amp;ref=plSrch
The one I have now was purchased in October 2018 (from Amazon in the US) and died yesterday sometime. I haven't had time to look into whether it's the card or the Pi that went bad, though.
I'll have to check into the high endurance card. Thanks!
Edit: It's in a case; do you think that could be part of the problem? The case has ventilation holes in it, but could it still be overheating? This is the kit that I am currently running: https://smile.amazon.com/gp/product/B01C6Q2GSY/ref=oh_aui_search_asin_title?ie=UTF8&amp;psc=1
Here is a link to an Arduino hobby board kit with a bunch of different sensors, LEDs, motors, and accessories. They usually ship with a book, but I found the book Exploring Arduino: Tools and Techniques for Engineering Wizardry to be a nice explanation beyond the high level dumbed down examples they give you in the "instruction manual" shipped with the kits. It teaches about communication protocols, power, timing, and basic embedded techniques. It also uses step by step examples which you can replicate from materials in that kit.
link
here is a really good starter pack for 50 dollars
https://www.amazon.com/Elegoo-Project-Complete-Starter-Tutorial/dp/B01CZTLHGE
As someone who has mainly dabbled with Arduino during university courses... I have no idea how is your tool any different than any of the ones I have used during classes or what makes it stand out. It's not unique.
Which I assume is part of why it sells poorly online - if I type "Arduino kit" on amazon I get hundreds of options and some seem both cheaper and more interesting than yours at a first glance, eg. this one.
Amazon URL Truncation Tip:
https://www.amazon.com/dp/B01D8KOZF4
https://www.amazon.com/ELEGOO-Project-Starter-Tutorial-Arduino/dp/B01D8KOZF4/ref=sr_1_4?crid=1XKZW5D924YS1&keywords=arduino+starter+kit&qid=1562014512&s=gateway&sprefix=arduino+starter%2Caps%2C239&sr=8-4
This one seems to be very good.
A quick Amazon search: Sunfounder Project Super Starter Kit; looks like SunFounder has a few kits like this. I haven't bought from SunFounder, so can't vouch for them, but this looks like it might fit your needs.
That said, I would recommend not buying a kit, but rather picking up a few component selections (resistors, capacitors, etc), and then ordering a bunch of stuff from Tayda or similar. You will typically end up with a better selection for cheaper, and you can pick and choose based on what you want to do.
Basically, the stuff you need is not a big list; the stuff that you might want for a specific project is darn hard to predict.
edit: also, SainSmart has a couple kits on Amazon that look reasonable and don't include an Arduino.
Mit RaspberryPi kenne ich mich leider überhaupt nicht aus. Geht ja auch mehr in Richtung Informatik also wäre das schon was für dich.
Arduino ist ja im Grunde nur ein Microcontroller zu Steuerung und Regelung von Hardware, wie Motoren, Sensoren usw... wenn deine Projektideen nicht in diese Richtung gehen, dann wirst du wahrscheinlich auch keinen Lötkolben und Co brauchen.
Ich hab mir über ein, zwei Monate unter anderem folgendes geholt:
Lötstation 15€
Dritte Hand 5€ (absolut unabdingbar beim Löten!)
Arduino Starter Kit 36€ (Preis finde ich angemessen und man bekommt einen guten Einstieg in die Arbeitsweise eines Arduinos und den Umgang damit)
Die Frage ist ja (sry wenn ich mich wiederhole) was ist das Ziel deines Projektes?
Möchtest du konkrete Hardware steuern wie z.B. per Händeklatschen deine Jalousinen hoch und runter fahren?
Dann reicht dafür ein Arduino und du musst dann ein wenig löten oder vill. auch nur ein paar Steckverbindungen setzen.
Möchtest du einen kleinen Homeserver einrichten oder von deinem PC Daten auf einen kleinen Monitor in der Küche streamen oder, was ganz cool ist, einen Magic Mirror für den Korridor basteln?
Sowas ist dann mehr Richtung RaspberryPi. Für Robotik kannst du auch beide benutzen oder nur deinen PC wenn es dir nur um das Programmieren geht. Ich persönlich würde gerne einen Robotor Arm selbst entwerfen, bauen, verkabeln und dann damit programmieren.
Wenn du das alles aber schon weißt, bitte nicht sauer sein, ist nur ein Ratschlag ¯\_(ツ)_/¯
If you already have an Ardunio this set is the one we use at our school. (Although, full disclosure, I don't live in Singapore) On top of that, of course the Ardunio Cookbook...
Hope that helps.
Yes I am as well.
Well, there's Conrad, Reichelt, Pollin and such, and of course Amazon and ebay.
There's no real alternative price-wise. I order a lot at Aliexpress and similar sites for school workshops. :-) It takes 2-6 weeks, but it's really great if you are in no hurry. And it's not like most of the parts are any different than what the electronic stores here offer.
At Amazon you can find the Sunfounder and similar kits, but these are basically the same "no name" stuff.
http://www.amazon.de/SunFounder-Starter-Learning-Beginner-Utilizing/dp/B00O0NM9GG/ref=sr_1_3?ie=UTF8&amp;qid=1452268587&amp;sr=8-3&amp;keywords=uno+rfid+kit
http://www.amazon.de/SunFounder-Project-Starter-Arduino-Mega2560/dp/B00CXMMDZI/ref=sr_1_4?ie=UTF8&amp;qid=1452268639&amp;sr=8-4&amp;keywords=uno+kit
http://www.amazon.de/SunFounder-Project-Starter-Arduino-Mega2560/dp/B00D9M4BQU/ref=sr_1_2?ie=UTF8&amp;qid=1452268639&amp;sr=8-2&amp;keywords=uno+kit
.
http://www.ebay.de/itm/Starterkit-Arduino-UNO-R3-inkl-komp-Board-RFID-Dev-Kit-und-vielen-Modulen-/181965808319?hash=item2a5e01e2bf:g:qFIAAOSw1S9Wc9qo
It really depends on what parts you need and what are you willing to spend. In general, you pay three to ten times as much for some of the modules.
Oh yeah, the Pi would be great for that! It has a set of metal pins sticking out that you can use Python to program for specific functions, set voltage levels, all that fun stuff. You can plug these into a breadboard to connect to other chips, that's basically what you want. It supports all the big names, SPI, I2C, etc. even regular old serial. You can also connect remotely via SSH if that's your thing.
EDIT: I neglected to fully answer your actual question: Yes, I recommend just diving in, that's how I learned. A breadboard and some basic components can be had for fairly cheap. Combine this with the PI, and you have a pretty nifty setup going. Google can help with a lot, and anything specific, feel free to PM me at any time. And remember, just have fun!
For those interested:
A good starter kit for $70:
http://www.amazon.com/dp/B00DG9D63A
A deluxe starter kit (do a lot more than XBMC) for just $10 more:
http://www.amazon.com/CanaKit-Raspberry-Ultimate-Starter-Components/dp/B00G1PNG54
A good remote controller will run you $25, but if you have a smartphone or tablet you can download the official XBMC remote control app free:
iOS:
https://itunes.apple.com/us/app/official-xbmc-remote/id520480364?mt=8
Android:
https://play.google.com/store/apps/details?id=org.xbmc.android.remote
Hope I'm not stepping on Agiss' toes here.
The rpi b+ takes a microsd. The model b and lower takes a regular sd card. An ethernet cable will work in place of a wifi dongle, but the dongle does make things a bit more movable. (cordless. Also they are pretty inexpensive.)
GPIO stands for general purpose input output. These pins allow your raspberry pi to interact with things like LEDs and other external electronics.
I'm not sure if your phones power supply is ok, but the recommended power supply for an rpi is a 5v DC microusb cable.
More information on the rpi's hardware can be found on the wiki here
If you aren't keen on searching around for exactly what you need, canakit has a couple of starter kits that include basically everything you need. (Just as a note, if you do go with the canakit route, make sure you have a microsd slot or adapter for your computer, since some of them come with just a microsd card.)
Edit: here is the kit I have, which came with everything but a microsd->sd adapter (it also came with supplies for getting started using the GPIO pins.)
http://www.amazon.com/CanaKit-Raspberry-Ultimate-Starter-Components/dp/B00G1PNG54/ref=sr_1_2?s=electronics&amp;ie=UTF8&amp;qid=1417843485&amp;sr=1-2&amp;keywords=Raspberry+Pi
You and I have a lot in common OP as a 23 year old male software engineer who enjoys video games and fantasy type stuff. I just moved out of my parent's house this past March and like another commenter said, you will get hammered with expenses you might not have thought of. I had to go out and get all sorts of kitchen cookware and dishes and linens etc. So depending on your timetable I would HIGHLY recommend either asking for that stuff now or for gift cards to places you can get that stuff at. I'm asking this Christmas for kitchen stuff because i still haven't got around to getting everything I need.
Do you drink beer? What about pint glasses with Game of Thrones or World of Warcraft logos? Hell, check out other things on thinkgeek.com, there is a load of stuff on there that is pretty neat.
You mentioned you like DIY projects but are limited on this? Do you mean in terms of space and tools? What about things like Arduino or Raspberry Pi kits that don't take up tons of room or extra tools? You can develop some pretty cool DIY applications with those.
Does your girlfriend play video games? Recently my girlfriend has gotten into games more so I am always on the lookout for games we can play together, especially couch co-op type games. Or maybe check out some board games, there are some pretty cool RPG type games you can get into that you both can play together. Or maybe movies or TV shows you can watch together.
Do you sit at a desk at your job? You could always ask for little things to put on your desk or in your office/cubicle, whether it be small posters or a unique stress ball or something. Last year my girlfriend got my a little Hobbit lego set I have set up on my desk along with a football shaped stress ball. Maybe something like that depending on your work/job situation?
I am still trying to think of more stuff but hopefully this helps, let me know!
CanaKit Raspberry Pi 2 Ultimate Starter Kit with WiFi https://www.amazon.com/dp/B00G1PNG54/ref=cm_sw_r_other_awd_KGVNwbGX9M0MR
Wireless Keyboard and mouse, as well as a Raspberry Pi Zero.
The Raspberry Pi by itself is just a board. Like a PC, you need other stuff to make it work -- at the very least, a power supply and an SD card on which to install the OS. A kit like this gives you the power supply and a case, or you can go bigger and get a kit that includes power, case, wifi, hdmi cable, and a preloaded SD card. For htpc purposes, you don't need a kit like this, which includes a bunch of components that you aren't going to use (LEDs, breadboard, breakout cables, wires, etc -- stuff that you'd use if you were going to use the pi to build projects, but is unnecessary for a media player).
Don't bother with any heatsinks or fans. The RPi doesn't need them even for overclocking. Case quality can vary, but even the cheap cases are generally decent. You'll want at least a 2A power supply, especially if you intend to plug in external HDDs that don't have their own power source. And if you don't go with a kit that includes an SD card, make sure you buy a good quality card instead. That's your only storage on the device, so you want it to be as reliable as possible. Which means no bargain basement, "10 for a dollar" cheap SD cards. Go with name brands like Samsung.
And finally, /r/raspberry_pi. They're big on the Zero right now, but I'd suggest you go with a 2 B instead (quad core and more RAM makes it worth the extra cost).
If you had a keyboard and monitor at your disposal, or are very crafty, you could make a Raspberry Pi work for those purposes.
Other than that, I have no idea.
Raspberry Pi 2 Model B
Get one of the more complete kits on Amazon and you're all set. The only real limitation is the 10/100 Ethernet, but that should still be fine for most home broadband connections if you connect it directly to the router.
You can also add a gigabit ethernet USB dongle if you really want more bandwidth, but that would only get you to just over 200 Mbps due to limitations in the USB 2.0 shared bus system. Again, though, you likely won't have that much bandwidth with home broadband connections anyway.
Kit:
http://www.amazon.com/gp/aw/d/B00G1PNG54
Faster Ethernet info:
http://www.midwesternmac.com/blogs/jeff-geerling/getting-gigabit-networking
Sure...
Awesome thanks for the info and enjoy the gold!
So i'm looking at the "complete starter kit" here because it has HDMI and WiFi enabled, both of which will be super convenient when setting it up:
http://www.amazon.com/Raspberry-Complete-Starter-Quick-Start/dp/B00L87YMGM/ref=sr_1_2?s=electronics&amp;ie=UTF8&amp;qid=1416436112&amp;sr=1-2&amp;keywords=raspberry+pi+b%2B&amp;pebp=1416436121474
I was kinda confused that you couldn't just order one from the main web page so not sure if Amazon is the best place to order.
And I'm also under the impression that you have to install the ROMs yourself?
That Complete Starter Kit Should be just fine. Unless he wants to do some custom circuitry, then go for the ultimate. I started putting a list together, but the price is roughly the same, so you aren't getting ripped off.
Sure.
So I used this as a guide.
The petRockBlog and /r/raspberry_pi were also helpful resources.
I bought a Raspberry Pi B+ Complete Starter Kit, 2 Buffalo Classic USB Gamepads, and Zune A/V Output Cable. The A/V cable has to be compatible with a Zune, some A/V cables like this won't work. I learned that the hard way. I also bought a Mini Wireless Keyboard. A keyboard is required for the setup (any keyboard will do). I got the mini keyboard so I could have a keyboard in my car to troubleshoot potential issues while on the road. It's optional, but I recommend it.
Then I just followed the guide (mentioned above) to set up the RasPi with RetroPi, then plugged in all the cables, and bam I had a retro game console in my car.
NOTE: Instead of the 2.5A Power Supply included in the kit I used a standard micro usb cable plugged into a USB slot in the center console to power the RasPi.
Oh that's fine then, because the thing already comes with a SD card.
I think I'm going to get the starter pack: http://www.amazon.com/Raspberry-Complete-Starter-Includes-Quick/dp/B00L87YMGM/ref=pd_cp_pc_2
I wish I could tell you! He plays games on his computer so maybe game? I see the B+ and would go for that but wanted to get a starter kit so he could mess around with that, but there are a few options on amazon. Like this or this.
Hiya,
ok so ive put together a bunch of amazon link of what you need (US amazon as im in the UK)
Raspberry PI B+:
http://www.amazon.com/Raspberry-Pi-Model-512MB-Computer/dp/B00LPESRUK/ref=sr_1_3?ie=UTF8&amp;qid=1458167372&amp;sr=8-3&amp;keywords=raspberry+pi+b%2B
Case:
http://www.amazon.com/Mudder-Protective-Cover-Screw-Raspberry/dp/B01AVT9IWK/ref=sr_1_2?ie=UTF8&amp;qid=1458167372&amp;sr=8-2-spons&amp;keywords=raspberry+pi+b%2B&amp;psc=1
Snes Style USB Controller:
http://www.amazon.com/Retro-Nintendo-Controller-Windows-Purple/dp/B016MEFRFU/ref=sr_1_4?ie=UTF8&amp;qid=1458167421&amp;sr=8-4&amp;keywords=usb+sneshttp://www.amazon.com/Retro-Nintendo-Controller-Windows-Purple/dp/B016MEFRFU/ref=sr_1_4?ie=UTF8&amp;qid=1458167421&amp;sr=8-4&amp;keywords=usb+snes
HDMI Cable:
http://www.amazon.com/gp/product/B00870ZHCQ?psc=1&amp;redirect=true&amp;ref_=ox_sc_act_title_3&amp;smid=ATVPDKIKX0DER
MicroUSB Power Supply:
http://www.amazon.com/NorthPada%C2%AE-Charger-Raspberry-Android-Samsung/dp/B00OY7HR1U/ref=sr_1_4?ie=UTF8&amp;qid=1458167495&amp;sr=8-4&amp;keywords=micro+usb+2a
8GB SD Card:
http://www.amazon.com/SanDisk-Memory-SDSDUN-008G-G46-Newest-Version/dp/B00M55BS5O/ref=sr_1_2?ie=UTF8&amp;qid=1458167735&amp;sr=8-2&amp;keywords=8gb+sd
SDHC Card Reader:
http://www.amazon.com/Transcend-Information-Card-Reader-TS-RDF5K/dp/B009D79VH4/ref=sr_1_1?ie=UTF8&amp;qid=1458167758&amp;sr=8-1&amp;keywords=sdhc+reader
All together that comes to $75 and will play games from the Atari, NES, SNES, Master System, Genesis, Gameboy etc. If you buy that SD card then I have an 8Gb image file already put together for it with over 4000 games that I could put up for you to download, you then just write it to the SD card, pop it in the Pi and plug it in, it will auto boot to a nice menu controlled by the control pad, select your game and play, then just press "Start + Select" to go back to the menu to select another game/system. It's very easy to use as all the hard work of aquiring the games and artwork has already been done.
You can get the more powerful Pi 2 or 3 and a bigger MicroSD to have more roms but that pushes the price up and will need more work to setup.
I have aspergers and my wife is type one so I understand some of the difficulties your son faces, I hope you can use this to help make him happy. My sister has an autistic son also and I put together one of these and he loves it, she got him to write a one sentence review and score out of 10 for each game. It became something they could do together and talk about, and also helped to convince him to do things liek help with cleaning his room etc so that he could do "one more review before bed" as she thinks it important to always push him that little bit to give him the best chances later on in life.
Anyway, here is a video showing the system in use so you can see what you think:
https://www.youtube.com/watch?v=PDWebx6D2Zc
Also with the addition of another SD card, usb keyboard and mouse and it also works as a computer with web browsing and programming tools for kids (Scratch).
Hope this helps, let us know if you want the 8Gb SD card image uploaded for you to download (not to be re-distributed though)
Regards
DJH
Eu am Raspberry Pi B+ si chromecast. Folosesc destul de mult raspberry-ul. Este cam incet dar vad filme din retea (NAS) cu xbmc - am si xbmctorrent (un plugin) si pot sa vad fara sa downloadez ceva in prealabil. Sunt multumit.
Despre chromecast nu prea pot sa comentez pentru ca nu l-am folosit la multe. Am facut cast de pe youtube, mirror la android sau mirror la chrome tab (sa ma uit cu altcineva pe reddit :) ). Intr-o zi am stat si am incercat sa pun filme de pe nas (din retea) dar trebuiau sa fie encodate mp4 (sau asemanator).
Later edit: Vezi ca acum a facut si amazon un dongle care mi se pare interesant.
use a raspberry pi and set up OpenVPN
Pi
OpenVPN tut Rasbian is debian based just like ubuntu so this will work
> microcontroller development board with a codec
If I do manage to build one, my plan was to get a Raspberry Pi. Would this be even close to what I would need?
>look at peripherals such as I2C, I2S, some form of DMA controller
Come again?
What is the difference between the B+ and 2? Which would be better for beginners/give the best performance?
All I could find on Amazon is the Raspberry Pi 2 Model B and the Raspberry Pi B+. Are these the two you are talking about? In the first link what is the difference between the 2 options? Does the $54 option just include a MicroSD card? Will he need one to do anything or does the base model start with some memory?
Also what accessories would you recommenced I buy for someone who is just starting out and doesn't know what they want to do with it yet?
Is there any sort of buyers guide online?
I'd get a raspberry pi. That should give me plenty of money left over to build a system.
They have the equivalent in CA?
Raspberry Pi 1 Model B+ (B PLUS) 512MB Computer Board (2014) https://www.amazon.com/dp/B00LPESRUK/ref=cm_sw_r_cp_api_i_yf1bBbZ51FWRB
Most of the time the processor just needs to be capable of rendering .H264 codec (.mkvs and shit) so most things can do that, you're just using the Pi as a media renderer. I have streamed 1080p content in my house through the RPi, it handles it very well.
I only have Netflix on the PS4 now, and I rarely use it. I found this guide and it mentions Netflix/Hulu etc, so I'd give this a read. The latest RPi is pretty beast, you can get HATs for them that add extra things now as well (like higher audio DAC HATs, LEDs, breakout cables for the pins, built in IR receiver).
EDIT : They are actually very cheap and super versatile, I'd say if you've got £30 to spare then get the latest one and have a mess around with it. You can't really lose much, if you've already got an SD card knocking around and a USB keyboard/mouse, then you're there.
You can preorder CHIP.
Raspberry Pi 2 on Amazon.
Here are various versions of the Cubox-i at Newegg.
PS. I'm looking to sell my Cubox i4pro if anyone is interested.
Officially added the Raspberry Pi to my WL
I bought from Amazon.com (BuyaPi user) and it came to $55 CAD all in. http://www.amazon.com/Raspberry-Pi-Model-Project-Board/dp/B00T2U7R7I/ref=sr_1_1?m=AYY3UP8OL9FV8&amp;s=merchant-items&amp;ie=UTF8&amp;qid=1426252129&amp;sr=1-1
I tried looking a few months ago and ended up buying one online. The Raspberry Pi manufacturers only directly sell to large online retailers, so even if you did find one, it would be at a marked up price.
If you order from Amazon before tomorrow afternoon you can have it by Monday, free shipping.
http://www.amazon.ca/gp/aw/d/B00T2U7R7I/ref=mp_s_a_1_2?qid=1449186719&amp;sr=8-2&amp;pi=SX200_QL40&amp;keywords=Raspberry+pi&amp;dpPl=1&amp;dpID=4133JwedpXL&amp;ref=plSrch
I got an IOT relay for Christmas. I plan on doing something similar with some of my machines once I find the time. Using a Pi-zero you're looking at $25-$30 for the 2 pieces.
https://www.amazon.com/Iot-Relay-Enclosed-High-power-Raspberry/dp/B00WV7GMA2
I'd say, it depends on what it's for. A 7W heat pad sounds like maybe a heater for a terrarium?
If you aren't 100% comfortable with the mains wiring, but want to do the electronics, there are some enclosed relays equipped with standard outlets, such as this:
https://www.amazon.com/Iot-Relay-Enclosed-High-Power-Raspberry/dp/B00WV7GMA2
&#x200B;
Short of this fully enclosed type of device, I am a fan of keeping the AC side of my designs confined to a DIN rail, with mounted relays such as these:
https://www.mouser.com/ProductDetail/Phoenix-Contact/2903356?qs=sGAEpiMZZMtrMkCunk6IWjKYC2uVZ%252B%2FVoM3QlUW2qpWVQJcUpmRMTw%3D%3D
maybe this is overkill, but I think about worst-case scenarios: a lot of water being splashed on the design, or some kind of fire damage. PCBs that handle both mains voltage and DC, such as a power supply, have a lot of design features including milled notches and quality conformal coatings, that I'm not equipped to do. I'd rather keep any voltage completely away from my controller or similar parts.
&#x200B;
Aside from the direct electrical hazards, I'd consider other possibilities of your device failing. Would there be harm if this heat pad were to be stuck on or off for a long time? Could it be damaged if it were to be rapidly switched on and off over a long period of time? Both of these conditions could be caused by a bug in code or a faulty electronic part. Just things to consider in your design.
I'm assuming that the Pi would be connected to a screen. If you are comfortable with soldering, I would go for this because it is cheaper than a Makey Makey. Either way, I would write a Python script (considered the easiest to learn, and has compatibility with everything) that controls everything.
You could go with /u/EkriirkE's suggestion, or an alternative would be to buy something like this that handles all of the HV electronics, so you have no risk of dangerous things happening (not including sticking a wire in a plug, of course).
The Python script could probably use PyGame for the display, and either waits for keys or uses Adafruit's code for the capacitive touch HAT.
why not just use something like this? https://www.amazon.com/Iot-Relay-Enclosed-High-power-Raspberry/dp/B00WV7GMA2/ref=sr_1_2?ie=UTF8&amp;qid=1466113573&amp;sr=8-2&amp;keywords=iot+power+relay
I will leave this here.
https://www.amazon.com/Iot-Relay-Enclosed-High-Power-Raspberry/dp/B00WV7GMA2
This enclosed IoT power strip might be what you’re looking for. They have documentation showing lots of different inputs (including 120v AC) you can provide to trigger the outlets.
Iot Relay - Enclosed High-Power Power Relay for Arduino, Raspberry Pi, PIC or WiFi, Relay Shield https://www.amazon.com/dp/B00WV7GMA2/ref=cm_sw_r_cp_api_Tzt0BbAK4FKZF
TOTALLY forgot the Thingiverse project there includes these two items (May be different in Germany) but no plans on how he would use them:
https://www.amazon.com/dp/B00WV7GMA2/ref=wl_it_dp_o_pC_nS_ttl?_encoding=UTF8&amp;colid=6T7GYD6MLIXG&amp;coliid=ISX3Y7OVC4WJG
https://www.amazon.com/dp/B01F2X3VY6/ref=wl_it_dp_o_pC_S_ttl?_encoding=UTF8&amp;colid=6T7GYD6MLIXG&amp;coliid=I1RX0NNSX35Z92
The plan is to use an arduino to monitor for smoke with the sensor, ad if it senses any trip the relay to kill power to everything including itself. Then some of those fire extinguisher cans to handle any flames. Still wrking out how I'll do the sensor exactly. I'm familiar with Arduino code my my concern is having a print fail due to a false positive. The other is making sure the power stays off once the arduino senses smoke. I'm THINKING since the relay has a Normally Off plug I basically use that to make a "dead mans switch" of sorts. As long as the arduino is on and outputs a +5V signal, circuit stays on. The sensor senses smoke and triggers the 5V signal to go to 0, relay cuts power and nothing can turn it on. That would honestly even work out well for a fire since flames would predictably kill the electronics which in turn would/should cause the relay to trip. The point is have the sensor detect smoke BEFORE flames.
https://www.amazon.com/Iot-Relay-Enclosed-High-Power-Raspberry/dp/B00WV7GMA2
I bought this. It's awesome. Simple to setup. Just cut a USB cable in half and you have a relay that turns on when I start my computer.
I built a cabinet for the noise isolation, since I work in the same room as my printer. I only print PLA, but it's definitely been worthwhile just in the noise reduction alone. Pics here: http://imgur.com/a/5ik2k
Parts:
Cabinet exhaust fan (not installed yet, but will be able to monitor the temp in the cabinet, and if it gets too high, the fan can kick on and start removing some of the hot air): https://www.amazon.com/gp/product/B009CO543S
Shelf legs:
https://www.amazon.com/gp/product/B015R2NIHC
Relay box (rPi controls power to lights and printer via GPIO):
https://www.amazon.com/gp/product/B00WV7GMA2
Door hinges: https://www.amazon.com/gp/product/B01BFW3FA8
Door: http://www.ikea.com/us/en/catalog/products/90291858/
Lights: http://www.ikea.com/us/en/catalog/products/20119418/
I can't seem to find the Stuva cabinet that I bought. They used to have two sizes - one that was shallow and one that was deep enough for the Maker Select. The latter is no longer on their site, but basically just go to Ikea and pick out a cabinet that will accommodate your printer. The rest is really just porcelain to make things a tad nicer for you.
I used a step bit & drilled original hole big enough to pull plug through then used this iot relay, plugged to the PI and the pi plugged to the stock power switch. When PI is powered on the monitor and amp are turned on. I'm also using a 1 to 3 Power Splitter cable from the stock A1Up power to power monitor, lcd control board and amp.
The thought of leaving my homebrew printer running while away frightens me, this is a setup to ease my fears of burning the house down.
There are multiple redundancies built in but the basic idea is simple:
Yesterday I came up with an easy way to reboot or turn off the Pi using the relay, basically have the Pi ground hooked up to the 4 channel relay using the normally closed side of a channel, then to reset/shutdown simply switch the relay so the ground is no longer connected.
Note: The fans and lights are controlled via SPST switch not SPDT.
I'm using this to power everything. I modified it so that the "normally on" outlets are "always on", rasp pi plugs in to always on, lights and printer get powered by the 'normally off' outlets which get triggered by GPIO on the pi.
EDIT: link https://www.amazon.com/gp/product/B00WV7GMA2/ref=oh_aui_detailpage_o08_s00?ie=UTF8&amp;psc=1
The most basic Canakit includes a case, so if you want a different case, you may be better off buying your RPi as parts rather than a kit. The Flirc case does a great job cooling with no noisy fans or moving parts.
$50 for Raspberry Pi 3 kit (tiny computer)
$45 for Aeotec ZStick
~$40 for GE Smart Switch
It's a bit of a pain to set up, but it's completely configurable. You can get motion/temperature/humidity sensors, door/window sensors, water sensors, tons of sensors...and set up triggers/logic to do about whatever you want. Amazon just released these guys and people are talking about putting them all over their house for voice activated automation.
Currently, our bedroom light turns on at 6:43 a.m. on weekdays because we should definitely be awake by then but if not it will help us get up. If the light is on at some time after we should be at work, it will automatically turn off. Our other smart switch controls the living room light and when motion is detected in there after sunset the light will turn on at ~10% brightness as a night light, then turn off again after ~5 minutes.
People wire up their garage doors, if you really want to spend some money you can have automated blinds/shutters on your windows, there are smart locks that you can enter security codes into remotely...but we are starting pretty small.
Oh, and as my original post suggested, lights and whatnot can be controlled remotely. Turns out our router have a service that lets me fairly easily VPN in so I can access lights and whatnot from just about anywhere.
Well, using something like Nord is typically a different use-case. Using a VPN like Nord, Proton, or PIA is mostly for privacy and security from snooping hackers, companies or governments.
A PiHole can block a lot of tracking stuff, but you have to know what domains do that. There are lists that you can add to accomplish this easily.
PiHole isn’t difficult if you are willing to sit and learn Linux for an hour or two. Do you know basics of how DNS works? And how computer networking works? If not, that may add time, complication, and potentially frustration into the mix.
First you should buy a Raspberry Pi kit (from amazon or wherever you choose). Get a reliable microSD card over 16GB.
Some of the kits have a pre-imaged SD card that will walk you through installing the OS and getting it booted up.
Then go to http://pi-hole.net ...
you buy a raspberry pi kit, install retropi, and you find game roms on roms sites
https://www.amazon.com/dp/B01C6EQNNK/ref=psdc_3015426011_t2_B01C6Q2GSY
https://retropie.org.uk/
I won't link sites to roms since those lie in a grey area of legality, but google 'game roms' usually brings up the legit sites.
As for controllers, any usb or bluetooth controllers will work with some configuration (some might work right out of the box)
I got the CanaKit, best reviews and price!
https://www.amazon.com/CanaKit-Raspberry-Clear-Power-Supply/dp/B01C6EQNNK/ref=sr_1_5?s=pc&amp;ie=UTF8&amp;qid=1498677036&amp;sr=1-5&amp;keywords=raspberry+pi+3
You can use either Retropie or Recalbox for all your emulation needs. Lots of documentation on their respective wikis.
https://www.amazon.com/dp/B01C6EQNNK?psc=1 , along with this you'll need to decide on a micro sd card, 8/16/32/64 gb, and a game pad (this is the one I use)
https://www.amazon.com/Buffalo-iBuffalo-Classic-Gamepad-BSGP815GY/dp/B06XWD8QQJ/ref=sr_1_1?s=electronics&amp;ie=UTF8&amp;qid=1499213488&amp;sr=1-1&amp;keywords=buffalo+classic+usb+gamepad+for+pc
Not sure about how/what the emulator can do beyond running the game roms. You're gonna have to research that one
Oh yeah, analysis paralysis is very real with rpi kits and arduino kits. The good news is that as long as you get a raspberry pi and a power supply, you'll be fine. A kit that adds a heatsink, case and memory card is probably the right starting place.
I suggest this kit. Solid, everything you really need and affordable.
RetroPi Software
Setup instructions
RaspberryPi Hardware. This is just one of many kits available.
Has built in wireless/bluetooth so you can use something like an Xbox or Playstation controller with no issues.
I'm not going to link game ROMS to load but they are easy to find online.
Well, that depends. Are you willing to pay for the convenience of getting everything you need at once? Then sure it is. If not, then the price seems kinds high to me. $40 for this PI kit, $7 for this HDMI cable, $9 for this controller, and $15 for this 64GB SD card gets you in at $71 + shipping. $80 + shipping with a second controller.
This first one is right under $70 with Amazon Prime.
Here is a second one a little cheaper.
Not OP, but here's a comment I posted a few days ago in another subreddit on setting up a Raspberry Pie as a console to hook up to a TV and play the games. Not all the parts I list below are needed(such as the USB Controller) if you're building it into an arcade cabinet
---
https://www.amazon.com/dp/B01C6EQNNK?psc=1 - Raspberry Pi 3, this kit comes with almost everything you'll need. The computer, power supply, and a case.
Also required is a Micro SD card, an HDMI cable to hook it up to your TV, and a USB controller - this is the one I use https://www.amazon.com/Gtron-Retro-USB-Super-Classic-Controller/dp/B00FFL7WRS/ref=sr_1_3?ie=UTF8&amp;qid=1478912652&amp;sr=8-3&amp;keywords=usb+snes
For initial setup you'll need a USB keyboard and mouse, and a MicroSD reader for your computer for use installing the software onto the MicroSD card for the Pi.
Here's a guide on the software that is the popular one. https://www.youtube.com/watch?v=xvYX_7iRRI0 Also you'll need to get ROMS for the games, but that's not something I can link to here since it's copywrited meterial.
All in all, if you just need the Pi kit, the SD card, and the controller, you're spending about 75 bucks.
You could look at getting an Atomic Pi.
Do note that it's a little more involved than just a raspberry pi, especially when it comes to powering.
Atomic pi x86 @$43 https://www.amazon.com/Atomic-Pi-High-Speed-Peripheral/dp/B07N298F2B
Any differences between a 3 B and a 3B+? Im looking at this.
https://www.amazon.com/CanaKit-Raspberry-Starter-Premium-Black/dp/B07BCC8PK7/ref=cm_cr_arp_d_product_top?ie=UTF8 for $80.
Than there's this for $70 dollars https://www.amazon.com/dp/B01LWVVMUI/ref=olp_product_details?_encoding=UTF8&amp;me=
Price History
CamelCamelCamel │ Keepa
_
Always check the prices. The savings can be Knight and day.
^(Developer) ^| ^(Inquiries) ^| ^(Support) ^| **[^(Report Bug)](/message/compose?to=The_White_Light&subject=Bug+Report&message=%2Fr%2Fbapcsalescanada%2Fcomments%2Fbfkzqu%2Fsoc_raspberry_pi_3_b_highest_model_starterkit%2Feleh3li%2F%0D%0A%0D%0A%0D%0A%0D%0APlease+explain+here+what+you+expected+to+happen%2Fwhat+went+wrong.)**
Thank you a ton for your response, very helpful! I was wondering though, will the Power Supply that is included in this CanaKit work well enough to run 2-4 Controllers and with this case? Sorry once again, I'm new to this whole thing and haven't had much experience with stuff similar to this in the past.
You could built something DIY pretty cheaply if you're inclined.
You could get a Raspberry Pi, set it up with the audio out going to your little speaker, rip the crackly music from youtube and load it on to the pi, and set up some scripts to auto play the music on loop forever whenever the RPi boots up.
Some people are asking how I ended up spending over $700 on this build. well, it comes down to poor planning, budgeting, and new tools. And I guess it could be argued that I shouldn't include the cost of the new tools into the cost of building this system since I could reasonably reuse my new tools on later projects. I wasn't perfectly strict on tracking all of my purchases but here's what I did track.
&#x200B;
|Description|Price|
|:-|:-|
|Cabinet|$50.00|
|Wood Putty|$12.40|
|Wood Putty (other supplies and tools) didn't buy enough wood putty the first time. Includes 30 mm Forestner bit, and 5/8 in hole cutting bit. Also includes a slot cutting router bit and arbor.|$61.93|
|Black Paint|~$5.00 (guessing on price.)|
|Control Panel Buttons & Joystick (Bought this kit: https://www.amazon.com/gp/product/B07K1BHPG1/ref=ppx_yo_dt_b_asin_title_o00_s00?ie=UTF8&psc=1|$42.89|
|1/2 MDF sheet, plexiglass, quarter round molding|$47.41|
|27" Monitor (used off classifieds website)|$62.00|
|Silhouette Vinyl Cutter (used to create the "Reboot" logo) Wife and Kids wanted to name it that. Bought used of classifieds website|$50.00|
|DVI-to-HDMI adapter, Raspberry Pi (bought this kit: https://www.amazon.com/gp/product/B07BC7BMHY/ref=ppx_yo_dt_b_asin_title_o02_s00?ie=UTF8&psc=1 )|$82.56|
|32 GB Micro-SD card|$13.00|
|Arcade T-Molding (bought from twistedquarter.com) They sell for 34 cents a foot which I thought was a good deal, but their shipping is horrendous and nearly doubled the cost of the order.|$20.85|
|Arcade T-Molding (didn't buy enough the first time and they require 20 ft. minimum purchase. Now I have a bunch extra.)|$20.85|
|Polycrylic, Hole cutting saws. (didn't end up using the hold cutting saws though)|$32.08|
|Polycarbonate sheet, red spray paint (for the light banner at the top)|$13.71|
|New Ryobi router and Jig Saw|$140.00|
|Flush cut router bit (probably shouldn't include this since I didn't end up using it.)|$21.42|
|Black Spray Paint (high gloss for the control panel)|$6.42|
|Molding for custom monitor bezel.|$13.30|
|Wire, electrical box, wire nuts, lamp fixture with red LED bulb (to give that red glow behind the cabinet), miscellaneous cable and wire management.|$57.00|
|Audio Amp (bought this guy to hook up to the existing speakers: https://www.amazon.com/gp/product/B07MLWJDGD/ref=ppx_yo_dt_b_asin_title_o06_s00?ie=UTF8&psc=1 )|$17.15|
|Arcade Cabinet Power plug (looks like these: https://www.amazon.com/gp/product/B01IJ9Y0HM/ref=ppx_yo_dt_b_asin_title_o05_s00?ie=UTF8&psc=1 )|$3.21|
|5V 1A wall wart Power Supply (intend to use this to illuminate the coin slot lights)|$7.07|
|TOTAL|$780.25|
This stuff adds up quickly and it looks like we're actually closer to $800.00!
You could preload a program onto the Arduino and focus on the electrical hookup aspect of it. For instance if you picked up something like this: https://www.amazon.com/Elegoo-EL-KIT-003-Project-Starter-Tutorial/dp/B01D8KOZF4
It comes with a PDF file detailing a bunch of projects - simple motor control, hooking up an LCD, LEDs, speakers, ect. So maybe you could have a class on a particular project and already have the arduinos loaded with the code. You could then do a presentation on how the code is written and what its doing and even develop the code in class - just load it offsite and use it in a later class. A lot can be learned by working through those projects.
I bought a couple kits on Amazon that come with PDF manuals on CD. Things like this. I got this book which really helped me understand sketches instead of just modifying other people's code.
I got into arduino because I had these two kits:
https://www.amazon.com/Make-Electronics-Components-Pack-1/dp/B00T0UCLIK/ref=sr_1_2
https://www.amazon.com/Make-Electronics-Components-Pack-2/dp/B00T0UCLF8/ref=sr_1_3
Which are meant to go with this book (although I think they might be meant for the first edition of the book). It's awesome, this guy explains how most basic components work as he guides you through several projects.
Finally, go to your local Radio Shacks today and get some components on the cheap. Look for resistor packs, LEDs, capacitors, toggles (switches, buttons, etc.), battery holders, hookup wire, heat shrink tubing, logic chips, timer chips, transistor packs, DIP sockets, PCB, project boxes, any arduino boards, motors, servos, solder, tools (like precision screwdrivers, soldering irons and accessories, IC extractors, wire cutters/strippers). If you get into this hobby, you might regret missing this clearance sale.
I’d get a starter kit with a 3rd-party arduino clone. Here’s one on amazon that I’d get if I were looking.
Look into some of the Arduino Uno starter kits on Amazon. Once you've got the basics of the Arduino down you can move onto more complex integration with SBCs like the raspberry pi if you want. The learning curve is going to be a bit steep because you don't know any programming languages. On the upside, by starting with the Arduino you won't be piling a lack of Linux experience onto that as well.
So if you want to go into the more mechatronics robotics get an arduino kit and start playing with it. Something like this Amazon's Choice
https://www.amazon.co.uk/Project-Complete-Ultimate-TUTORIAL-controller/dp/B01IUY62RM/ref=mp_s_a_1_1?ie=UTF8&amp;qid=1542370027&amp;sr=8-1&amp;pi=AC_SX236_SY340_FMwebp_QL65&amp;keywords=arduino+kit&amp;dpPl=1&amp;dpID=61YSjGAXaaL&amp;ref=plSrch
Or this which is the same kit with less stuff
https://www.amazon.co.uk/Elegoo-Project-Starter-Tutorial-Arduino/dp/B01D8KOZF4/ref=mp_s_a_1_2?ie=UTF8&amp;qid=1542370027&amp;sr=8-2&amp;pi=AC_SX236_SY340_FMwebp_QL65&amp;keywords=arduino+kit&amp;dpPl=1&amp;dpID=61fQsYALc3L&amp;ref=plSrch
And just try and play with them and learn stuff. Check out arduinos website as they go through everything
I think that's what I'll do. I think I'm going to pick up this kit, on sale for $26.50, so I have a common platform and a few bits and bobs to experiment with. Hopefully, I'll graduate to something a little more complex soon enough. Do you happen to have a favorite resource for learning the ATMega328p, or would I be better off just be reading the datasheet and figuring it out for myself.
https://www.amazon.ca/Elegoo-Project-Starter-Tutorial-Arduino/dp/B01D8KOZF4
I bought the upgraded kit a few weeks ago (this one) - it comes with a pdf which includes a lot of tutorials running through the sensors/peripherals that come with it. I was pleasantly suprised by what I received and if you overlook the occasion 'Engrish' it should suit your needs.
I personally like the Uno. The Mega is cool and all because of all the pins but you don't need them. Something I sort of fear with newbies is that by getting the Mega you might not think about things like pin efficiency when your projects start to get large, the mega often acts as a crutch instead of making proper design choices. But that's just my cynical opinion, you'll have a blast with whatever you get and that kit will be great.
ps: This is the kit I got a few summers ago that's kept me quite busy
From the PS4 I think he wanted one of the newer Kingdom Hearts games. This or this. Also you just look up Arduino or rasperry pi kits and there's usually some game kind of deal.
Also here's some PS4 stuff. 1 or 2. If you do two check the sellers for best ratings and stuff. But 1 seems the way to go because of the game. Also if you do just end up getting him a PS4 no game get the kid kingdom hearts remaster (not the 2.8).
But if you go aruino go with this and this and this. Those three are cheaper than the PS4 and he'll learn more.
Also all this is from the perspective of a guy who's had to buy his own games and stuff.
I appreciate the kind words! I got started by getting the Elegoo UNO Super Starter Kit from Amazon.
I'm a Computer Science major but I've always had an interest in hardware and electronics so I just bought this and now I'm having all sorts of fun, especially since I get to combine both my interests: software and hardware. Like you said, you get a great feeling when putting things together, so I would highly recommend you pick up a kit if you have the slightest interest!
This one to be exact.
Elegoo UNO Project Super Starter Kit with Tutorial for Arduino https://www.amazon.com/dp/B01D8KOZF4/ref=cm_sw_r_cp_apa_SpsGzbZG58A27
I personally have really enjoyed/continue to enjoy this kit. For the price it’s unbeatable!
ELEGOO UNO Project Super Starter... https://www.amazon.com/dp/B01D8KOZF4?ref=ppx_pop_mob_ap_share
I googled for a beginner kit and saw this one, I have no experience with it specifically.
The components I see are quite a wide variety,
$36 ELEGOO UNO Project Super Starter Kit with Tutorial and UNO R3 Compatible with Arduino IDE
https://www.amazon.com/ELEGOO-Project-Tutorial-Controller-Projects/dp/B01D8KOZF4
The only thing I don't like is that they use a 9V battery and connector to power the arduino.
To me, to make the board portable, that is just silly; a better way is to use a USB power bank
For example
https://www.amazon.com/Samsung-2100mAh-Universal-Battery-Pack/dp/B01AUT8CRI/
also a USB cable
https://www.amazon.com/C2G-28101-USB-Cable-Printers/dp/B000FW60E8/
Just for grins, I went to their download page, searched for "super" and downloaded their ZIP
https://www.elegoo.com/download/
Elegoo 2.8 Inch Touch Screen User Manual V1.00.2018.09.19.zip
In "English" folder is a PDF, that explains installation and gives projects. I'd suggest reviewing that file.
I found these links, maybe reading them will give you some more insight.
Elegoo vs Arduino: Which Will Your Kids Love Most?
https://www.allhomerobotics.com/elegoo-vs-arduino/
Elegoo vs Arduino – Which should you choose?
https://techttech.com/2017/11/17/elegoo-vs-arduino-choose/
"These boards don’t support the non-profit Arduino project."
This means that the original makers who invented and open-sourced the design, don't get part of your $$
Elegoo UNO R3 Project Complete Starter Kit Review
https://techttech.com/2018/06/02/elegoo-most-complete-kit-review/
I would look into something like an arduino. I got this kit on amazon and so far I've learned a lot. https://www.amazon.com/dp/B01D8KOZF4/ref=sspa_mw_detail_0?psc=1
I have two elegoo arduino unos, I got kits on amazon that came with all sorts of peripherals and it was a great deal, less than 20 bucks for the cheaper one. Have used these boards for all kinds of fun projects for about a year now.
I got this one:
https://www.amazon.com/Elegoo-EL-KIT-004-Project-Starter-Tutorial/dp/B01DGD2GAO
and then this one a little later:
https://www.amazon.com/dp/B01D8KOZF4/ref=sspa_dk_detail_0?psc=1&amp;pd_rd_i=B01D8KOZF4&amp;pd_rd_wg=nqNDZ&amp;pd_rd_r=KJJDMWS7ZPRQ9FMJFJKZ&amp;pd_rd_w=dl0ip
Elegoo, if you see this pls send advertiser money.
https://www.amazon.com/gp/aw/d/B01D8KOZF4/ref=mp_s_a_1_3?ie=UTF8&amp;qid=1511756164&amp;sr=8-3&amp;pi=AC_SX236_SY340_FMwebp_QL65&amp;keywords=arduino
I just bought this 2 days ago and tbh you don't need anything more than what is included. Even though its not an official arduino it works very well and is soldered and made very neat. It is like an advanced beginners pack.
I am currently a physics student, and I need to code a fair bit. If you want to start coding, especially as a way to build tech skills for a job, you could buy yourself an Arduino. These little microcontrollers are nice because you can use a combination of electronics and software to interact with the physical world. One of the biggest difficulties of getting people interested in coding is that it all feels so meaningless when you start. It can be tough to learn things that are actually practical.
Buying an Arduino solves this (somewhat) by letting you build a physical object right away, and they are extremely powerful. You can just Google "cool Arduino projects" and you'll get a zillion hits. The community is fantastic and welcoming, there a zillion tutorials for beginners online, and everything is open source. There's really not enough good stuff to say about it. For you personally, another benefit would be you learn the coding skills AND electrical technical skills for a job.
I would recommend starting with this Arduino clone starter kit from Amazon. One project I saw basically made cocktails for you. Just tell it what you want and it mixes the appropriate amount of each ingredient. Point is the possibilities are endless and you can build technical skills along the way.
I honestly get so excited by this stuff, so feel free to PM me if you are curious about more stuff.
$50 solution, OpenELEC for Raspberry Pi 3
or if you prefer OSMC:
Install KODI OSMC On Raspberry pi 1 , 2 , 3 , Zero The Easy Way
ETA PRIME
I looked up Pitendo and my god is that a ripoff, there's maybe 60 bucks worth of things there. Here, look:
This
https://www.amazon.com/Vilros-Raspberry-Basic-Starter-Kit--Clear/dp/B01D92SSX6/ref=sr_1_2?ie=UTF8&amp;qid=1469219491&amp;sr=8-2&amp;keywords=raspberry+pi+3
https://www.amazon.com/SanDisk-microSDHC-Standard-Packaging-SDSQUNC-032G-GN6MA/dp/B010Q57T02/ref=sr_1_1?ie=UTF8&amp;qid=1469219519&amp;sr=8-1&amp;keywords=32+gb+microsd
And whichever one of these you want https://www.amazon.com/s/ref=nb_sb_noss?url=search-alias%3Daps&amp;field-keywords=usb+controller
Is all you need, and you can honestly go for a Pi 2 Model B if you want to, and a smaller sd card maybe. Everything but the most demanding Dreamcast and N64 games work great on a 2, and N64 hardly works regardless of the model.
Honestly it's not a difficult set up, at least in my opinion. There's some troubleshooting you can do if you try and work out some more advanced things, but the basic set up is a breeze.
All you do is download the RetroPie image from the site, download Win32DiskImager, and write it to the card. It takes about 30 seconds to set up and maybe 3 clicks total.
After that, you put the microsd card into the pi, plug in your controllers, boot it up, follow the on screen controller config, and you're good to go.
Adding roms is as easy as putting in \\Retropie into any explorer window on you computer, if the pi is on your network, and dropping them into the console's folder. Everything else should be auto-configured and require little to no work on your end.
I use both a Rpi2 , and Rpi3. I use the Rpi2 as my backup, in case I need to format the Rpi3. Recently, I installed an addon or update that prevented my Rpi3 from booting. When you need to format a sdcard and start over, it is convenient to have a backup.
I bought two of the velros kits on amazon because they are cheap. Whatever you decide, just know that for Kodi you don't need all of the bs included with the more expensive kits.
Buy a good sdcard and format it.
If you want to use your tv remote with Kodi, buy a Flirc. Super easy to setup, and now you only need one remote. Configure the flirc on your pc.
Install Noobs on the sdcard and decide which option you prefer OSMC or Libreelec for Kodi. I use OSMC. You can also skip noobs and install OSMC directly.
Go through connecting to your network. Note: Wifi will work but I would recommend you use an ethernet connection, especially for streaming higher bitrate/blu-ray files.
You are ready to start customizing Kodi (skin/addons, etc.) The whole process takes a few hours, then it's mostly making small tweaks.
Once you are done configuring the skin and addons, download the official Kodi remote app from the App Store or Google Play for your phone/tablet. No need for the keyboard.
Good luck!
Everything you jest about is a requirement now! Here's what you can do:
>turn off your gps, phone microphone
Remove all permissions from apps that don't require access to gps or microphone
Disable gps while not in use
>stop using google
Use Duckduckgo, Startpage or [SearchEncrypt] (https://www.searchencrypt.com)
Also if using Android try to alternatives to Google apps. Disable or freeze as many Google services as possible. For example on my rooted device, the only Google app running is Google Voice Assistant (which is heavily locked down by Xprivacy.
Xprivacy can also feed fake info to apps that request it. For example, gps coordinates, phone number, IMEI etc.
> dont use social media
If you have Facebook, you should really consider [deleting it] (https://www.nytimes.com/2018/12/19/business/delete-facebook-account.html)
If you need a messenger type app to keep in touch consider using Signal or Telegram
> always vpn when online.
Solid advice if you can afford it.
If you use Android you can use a free VPN based firewall app, NoRoot Firewall which lets you control all network access for each app along with global filtering rules.
Fire it up and goto the access log, you'd be amazed to see how chatty your phone is when it's sitting idle!
Unfortunately it cannot block WebRTC but you can use browser addons to disable in Chrome, Firefox or Opera
I also noticed disabling Google Carrier Services stopped WebRTC pings every few seconds (thousands of requests a day!) but what does it do?. Answer: probably nothing as your ISP has thier own solution.
Other things to consider:
Get a RaspberryPi
Set up a Pi-Hole for blocking ads and tracking on your home network.
Set up DNSCrypt to encrypt all your DNS traffic on your PiHole
Hell, you can even setup your own VPN using piVPN
sorry to my Apple friends but iOS system is heavily locked down unless rooted; I haven't used since 10. Maybe some Apple expert can add iOS options?
When I built my RetroPie I bought everything individually. When I built one for my neighbor I went with this to cut costs for her.
As ePaperWeight mentioned, your shopping list would have a lot to do with what you plan on doing with it.
Keep in mind that the Pi Zero is very cheap partly because it does not have nearly as many ports as a full size Pi. It also has a less capable CPU than a full Pi 3. That being said, it's still impressive that its CPU and RAM are in line with older Pis that were used in all sorts of projects.
The lack of ports means that if you want to connect to USB, HDMI, Ethernet, or Wifi you will need adapters.
For the bare minimum for getting started I would suggest the items included in this kit (not necessarily suggesting the kit itself, these are all standard parts):
https://www.amazon.com/CanaKit-Raspberry-Zero-Starter-Kit/dp/B01N3XNPAM/ref=sr_1_1
This will allow you to get a Zero to boot up and display on a monitor. The single USB port will limit what you can connect, but a wireless keyboard / mouse dongle will at least give you standard input devices.
In order to connect Wifi or Ethernet in addition to a keyboard you will need a USB hub; preferably a powered hub.
To connect a Pi Camera you'll not only need the camera module, but an adapter ribbon cable (the Zero's port is slightly smaller).
The GPIO header does not include pins. This is more configurable, but means that you'll need to solder your own.
As you can see, all this can quickly add up. The Pi Zero really highlights the value of a full Pi. So if you're considering the Zero in order to save money run the numbers. You might not be saving much.
The size and lower power requirements of the Zero make it great for embedded projects. Anything that runs on a battery or needs to fit in a small case would benefit from using a Zero. Even then, the faster speed of a Pi 3 means that it will be a smoother experience to program on the 3 even if you plan to migrate the software to the Zero.
Other links for reference:
TLDR; Pick a project and work backwards to figure out a shopping list. Otherwise you'll spend way too much or your new Zero will probably live in a desk drawer.
I have done this before and it worked great.
I used these sensors:
Digital Temp/Humidity Sensor: https://learn.adafruit.com/dht
Camera Module: https://www.amazon.ca/Raspberry-Pi-Camera-Module-Megapixel/dp/B01ER2SKFS/ref=pd_lpo_sbs_147_img_1?_encoding=UTF8&psc=1&refRID=42WJV9KTPP19ZG6EQWN9
don't' just limit yourself to pla, the mk2s can print all kinds of stuff.
others have already told you about the rpi3 and wifi. You might consider the rpi cam v2 for your camera. Here's a good video about it, how to mount it, enclosure files, etc
which leads me to my next suggestion, spend 7 weeks watching youtube videos from people like Angus and Tom. There's tons more like Jat.mn, 3D Maker Noob, 3D Printing Nerd, Nillabean, etc... These guys have a lot to teach and you can learn a lot in 7 weeks just watching their videos and participating in their live q&a streams on youtube and twitch.
other things you could buy are endless, but I'm going to throw out there a UPS so you don't lose a 30hr print to a power fluctuation or brown out, a heat gun to get rid of stringy bits, and a rotary tool for cleaning up parts among other things.
I know that you said you want to use what you already have lying around. So this isn't really the answer you're looking for. But if you do Rpi projects often, you should definitely get Pi Cam. They aren't expensive and they're easy to use. Also there's a ton of project tutorials already out there that use the Pi Cam. If you get yourself one now. Then you'll have one handy the next time your 10 year old has a cool project idea.
Raspberry Pi Camera Module V2-8 Megapixel,1080p https://www.amazon.com/dp/B01ER2SKFS/ref=cm_sw_r_cp_api_qP-5Bb1PYBXDY
You get one of these https://en.m.wikipedia.org/wiki/Raspberry_Pi
The v3 raspberry pi has integrated wifi, I suggest that one.
Then you get one of these https://www.amazon.com/Raspberry-Pi-Camera-Module-Megapixel/dp/B01ER2SKFS
Then you install Linux on a SD card for the raspberry pi, and use the camera use the camera to take pictures. For that you can follow the instructions here https://www.raspberrypi.org/learning/infrared-bird-box/
The birdhouse guys are using IR to take night shots but I didn't know how that would affect flower at night so I just use a regular pi cam and dont install the IR lights
Hope that gets you started, if you want extra credit you can hook up temp and humidity sensors to the raspberry pi too. You can check out a guide for that here https://www.raspberryweather.com
Let me know if you need any help!
[edit] here's a shot of my temp sensor / pi, and the pi camera dangling by the ribbon cable underneath
http://imgur.com/raFO92J
The PI's are 8MP.
https://www.amazon.com/Raspberry-Pi-Camera-Module-Megapixel/dp/B01ER2SKFS
The issue is the software behind them + lens.
I have had my Di3+ since February, and have installed the following upgrades;
I also went ahead and bought the following;
Using the Raspberry Pi and Octoprint (http://octoprint.org/) I can start, pause, cancel prints and control the printer from my PC in the living room; I can also monitor it from outside the house after port-forwarding my router to my Pi and using noIP (https://www.noip.com/).
Hope this info helps you! Can't wait to see the finished, upgraded printer!
I've used these (and similar connectors) for all the connections on my guitars for years. It allows me to easily change or reconfigure components, pickups, or routing in minutes.
The main components are the LEDS, the controller, and a 5V power supply (usually drone batteries+converter).
Setting up the LEDS: https://learn.adafruit.com/adafruit-neopixel-uberguide/overview
The controller: https://www.pjrc.com/store/teensy32.html https://www.amazon.com/Teensy-3-2-with-pins/dp/B015QUPO5Y/ref=sr_1_2?ie=UTF8&amp;qid=1499135540&amp;sr=8-2&amp;keywords=teensy+3.2
Arduino (the Arduino IDE programs the teensy): https://www.arduino.cc/en/Guide/HomePage
Teensyduino to make the arduino IDE work with teensy: https://www.pjrc.com/teensy/teensyduino.html
FASTLed: http://fastled.io/
I would get one strip of LEDS (https://www.amazon.com/s/ref=nb_sb_ss_c_1_3?url=search-alias%3Daps&amp;field-keywords=ws2812b&amp;sprefix=ws2%2Caps%2C379&amp;crid=365H5OUOTHHLJ) and a controller and play around with it. There's pre-built examples that are pretty plug-and-play without modding any code that you can mess around with and learn. Pretty flexible what you can do with them. You'll also need a soldering iron and general electrical wire too (https://www.amazon.com/Elegoo-120pcs-Multicolored-Breadboard-arduino/dp/B01EV70C78/ref=sr_1_4?ie=UTF8&amp;qid=1499135864&amp;sr=8-4&amp;keywords=ribbon+cable). They are pretty sweet though.
Why doesn’t anyone use breadboard (Arduino) wires, 3 red and 3 black and put them in a barrel jack that has screw headers? It should be easy to find a high current 5v power supply with a barrel jack.
universal barrel jack
breadboard (Arduino) wires
power supply for reference
Here's a decent video explaining how and why to update the firmware:
https://youtu.be/aQIg9zxuCvM
> EDIT: If you do use the Marline 1.1.9 firmware, instead of the TH3D Unified FirmWare mentioned below, make sure you make some modifications.
> I posted some of those here:
> https://www.reddit.com/r/ender5/comments/b989yk/xy_not_working_past_a_few_mm_after_marlin_119/
>
> One not mentioned very well in that thread is the auto home settings
> Those are mentioned here:
> https://github.com/MarlinFirmware/Marlin/issues/12074
>
> All in all I'd suggest using UFW as I believe they sort out most of the above problems. But I haven't moved to that yet so can't speak to it too much.
>
> END EDIT
You can buy an arduino uno for pretty cheap, they are off brand mostly but have drivers scattered around the web. TH3D has a unified firmware (UFW) that I will be updating to once I get their EZABL (auto bed leveler) and they have the drivers in their download for the UFW.
Here's a link to the UFW:
https://www.th3dstudio.com/knowledgebase/th3d-unified-firmware-package/
For flashing the boot loader as a part of the firmware update you will also need dupont connectors, you can make these if you have the patience or just buy some. I bought this pack:
https://www.amazon.com/gp/product/B01EV70C78
I've purchased a lot of the upgrades mentioned in this thread from TH3D. I can't speak for their quality as I haven't received them yet but they seem a decent USA shop.
One thing I highly recommend based on discussions in this thread is something you can do without the need to purchase anything and that is to de-tin the wires on the power connector. The heat passing through those connectors can melt the solder causing a fire hazard near the plastic connectors. Simply detach the power connectors all around the main board. Here's a video explaining that (also has instructions on how to flash it using their UFW I think):
https://youtu.be/T5lef0FrV_c
For any other upgrades mentioned here I've purchased mine from TH3D's Ender 5 upgrade list. I have yet to install them but from the discussions here and their videos I'm hopeful that they will be high quality:
https://www.th3dstudio.com/product-category/printer-upgrades/ender5/
In the classes that I took we did very simple logic circuits that would take inputs with switches and perform simple actions like add the numbers represented by the switch and display the answer using led lights, or count how many times you pressed a button, or... stuff like that (it's been 25 years, I don't remember exactly what the projects were). We used these big wooden boxes that basically had a power supply and bread board and assembled the projects, or would "wire-wrap" them on a board to make them a little more permanent.
If this interests you, there are cheap and easy kits available that are much more advanced and interesting now. I bought one for my teenage son and we had a lot of fun building little projects:
Something like this (quick search, not a recommendation per se):
https://www.amazon.com/Elegoo-Complete-Ultimate-TUTORIAL-Mega2560/dp/B01EWNUUUA
Comes with motors, servos, etc. No low level logic chips (you probably don't want to play around at that level anyhow, of 1 AND 1 = 1, 1 XOR 1 = 0, 1 OR 1 = 1), but still really fun and you can do much more interesting stuff very quickly with the programmable Arduino.
I would suggest buying one of those Arduino kits from amazon. It’s a great starting point as it includes a ucontroller board (typically an uno or ATMega 2560) along with a bunch of sensors you can tinker around with. Good ones have a piece of paper enclosed within the kit with a link to PDF schematic files, example codes etc..
Once you have gained enough experience using the basic sensors, you can start incorporating Arduino board shields, multiple ucontrollers and what not. The possibilities are literally endless!!
Edit: This is the first kit that I bought while starting out
https://www.amazon.com/ELEGOO-Project-Starter-Arduino-Mega2560/dp/B01EWNUUUA?th=1
Around 50 bucks
This is a kit my wife just got me for Valentines day.
https://www.amazon.com/Elegoo-Complete-Ultimate-TUTORIAL-controller/dp/B01EWNUUUA/
I've been pretty happy with it so far. It's had everything I've needed to get started.
Just buy a starter kit from Amazon that has components in it that you want to experiment with and go through the examples. It's the best way to trip and fall into the rabbit hole of microcontrollers!
I usually tell people to get a kit with a MEGA2560 in it, since it gives you more options as your skill set increases. This one would be a good start:
https://www.amazon.com/EL-KIT-008-Project-Complete-Ultimate-TUTORIAL/dp/B01EWNUUUA
I don't really wanna post the code for ethical reasons (I started with some basic Adafruit code for bluetooth and turned it into a full OS). But here's a feature list:
I used u8g2's u8x8 mode for the screen drawing, as it requires no ram.
&#x200B;
Here are my parts:
Voltage regulator (takes 8.4v down to 5v)
22pF capacitors
16MHz Oscillator (required for standalone board)
DIYMall blue OLED
Knockoff Arduino Uno
Adafruit UART-Capable bluetooth module (makes sending data easier)
Spare ATMega 328 processors
Li-Ion" 9V" (8.4v) batteries (rechargeable)
Switches
9V battery clip
Soldering Kit
Elegoo prototyping PCBs
Jumper wires (makes life easier & tidier)
Elegoo Starter Kit (Comes with LEDs, resistors, and buttons)
So I think I am still a little confused on which atmega32u4 to go with. Would this one work? Just use male to male jumpers. I guess I am not sure of the difference between analog and digital inputs and which can be used for buttons.
https://www.amazon.com/gp/product/B01EWOE0UU/ref=ox_sc_act_title_1?smid=ATVPDKIKX0DER&amp;psc=1
or something like this, has more inputs. but is not a u4 board.
https://www.amazon.com/dp/B00D9NA4CY/ref=pd_luc_rh_sspa_dk_huc_pt_sub_1?psc=1
Very basic instructions.
You will need;
The NFC module comes with a pin header that you'll need to solder onto the board.
The NFC module pinout is labeled (the actual PIN numbers may differ per module), so hook up the following wires on the NFC to the corresponding pins on the Arduino;
|RC522 Pin|Arduino Pin|
|:-|:-|
|RST|9|
|SDA(SS)|10|
|MOSI|11|
|MISO|12|
|SCK|13|
|3.3V|3.3V|
|GND|GND|
With the hardware out of the way you can then follow the software guide here; https://github.com/konstantin-kelemen/arduino-amiibo-tools/wiki/Create-amiibo-clones-with-Arduino
Be aware that the way that the NFC tags have to be written means that they become read-only, so if something goes wrong the tag is useless (I've had one failure in 5, so far).
This video shows you how to with rbpi3:
"https://youtu.be/hbX8Qu-QLnI"
This is what i did with an arduino:
"https://youtu.be/fIl5X2ffdyo"
This is the arduino i purchased:
ELEGOO UNO R3 Board ATmega328P ATMEGA16U2 with USB Cable Compatible with Arduino IDE Projects, RoHS Compliant "https://www.amazon.com/dp/B01EWOE0UU/ref=cm_sw_r_sms_apa_i_GtjDDbY01YY8P"
I saw it in the summer, in July. You must go there, the guy who picked up the phone may not know what it is. Below is a link to the an arduino on their website. its quite a ripoff but if you need it then at least this is a good place to buy it.
http://ekt2.com/products/productdetails/412_ARDUINO_ZERO_ORG
Alternatively, you can ask a friend to bring it with from the US for MUCH CHEAPER. i have bought many off of amazon, the link below is a cheap good quality one that i have.
https://www.amazon.com/Elegoo-ATmega328P-ATMEGA16U2-Compatible-Arduino/dp/B01EWOE0UU/ref=sr_1_5?ie=UTF8&amp;qid=1486427055&amp;sr=8-5&amp;keywords=arduino
Finally AliExpress sells them for even cheaper if you are willing to with some more .
Hope this helps and good luck.
The $11.86 solution is use an Arduino as an interface between the SPI slave and the PC. SPI between slave and Arduino, USB Serial between PC and Arduino.
There are also a lot of other methods that are simultaneously more complex and more expensive. Depends on what your requirements are I guess.
Materials:
Links provided for the sake of example.
The actual wiring and coding is pretty trivial. Also, you can do it without the audio shield but the shield simplifies things significantly.
Wouldn't an Arduino be a cheap replacement for stuff like that?
Well genuine Arduinos kick around $30. But it's an open source project, so you can find them cheap by other companies. The one I used here is made by a company called Elegoo; got it on sale for $10.
https://www.amazon.ca/gp/product/B01EWOE0UU/ref=oh_aui_detailpage_o05_s00?ie=UTF8&amp;psc=1
Here you go!
NES case for Raspberry Pi 3,2 and B+ by Old Skool Tools https://www.amazon.com/dp/B01M4OOY4U/ref=cm_sw_r_cp_apa_5SZhzbKTB7NJF
raspberry pi 3: $33.53
power supply: $7.99
case: $19.99
32GB SD Card w/ adapter: $12.31
2pk SNES USB iNNEXT Controllers: $16.99
So that's $90.81 before tax and shipping. Plus no choice in custom color of top and bottom of case, having to put it together yourself, download an image and configure it. So for a non-technical person it might be worth it since they'd be paying an extra $15 - $20 in this case for the labor/time involved.
(and yes, those controllers are garbage, but at least they can get replacements easily after the fact)
FYI all, this will be back in stock on Feb 14. @ $20/ea Get your orders in. https://www.amazon.com/dp/B01M4OOY4U/
It sounds like he'll have no problem grasping any of the steps needed to get it working, and this sort of thing is right up his alley. As far as emulating, yes that is one of the more common uses for it too, though it can't emulate more modern high end systems like PS3/4, Xbox, etc. It can really only handle systems from the 90s like the NES, SNES, I think maybe the PS1 and N64 but don't assume I'm right on that one. The procedure for those is identical. Downloading the operating system from the internet, in this case find a site that has say, a Raspberry Pi NES operating system file, flash it to a microSD card using that program I recommended, put the microSD in the Pi and turn it on. There are also a lot of cool little Pi cases that are made to look like old school console boxes. like this NES case
Why not get the real one? https://www.amazon.ca/case-Raspberry-Old-Skool-Tools/dp/B01M4OOY4U/ref=sr_1_1?ie=UTF8&amp;qid=1500486743&amp;sr=8-1&amp;keywords=pi+nes+case
Is this really yours /u/OldSkoolTools ?
Here's Another
This was my post! Yea currently unfortunately it’s unavailable but here’s the amazon link::
NES case for Raspberry Pi 3,2 and B+ by Old Skool Tools https://www.amazon.com/dp/B01M4OOY4U/ref=cm_sw_r_cp_api_vUCMzbN1R4SYF
I followed the instructions here which recommended debian GNU/Linux. I also bought a [NES solid case] (https://www.amazon.com/gp/product/B01M4OOY4U/ref=oh_aui_detailpage_o00_s00?ie=UTF8&amp;psc=1) which came with the two required heat sinks. I did run into various issues but all were resolved by googling. If you do decide to go ahead, continue posting here with any issues you run into and will do my best to respond.
Merry Christmas. Here the link. I bought this same case about 3 months ago.
https://www.amazon.com/gp/product/B01M4OOY4U/ref=oh_aui_detailpage_o08_s00?ie=UTF8&amp;psc=1
I happen to know a guy.
amzn.com/dp/B01M4OOY4U/
Good luck :)
It's just Amazon defaulting the price to the first person who has them in stock at this moment.
Give the original 3rd party seller time to restock and the price will drop back to 20.
They're all the basically the same price, and they get progressively more powerful the later the model, so you might as well just get this.
CanaKit Raspberry Pi 3 B+ (B Plus) with Premium Clear Case and 2.5A Power Supply
https://www.amazon.com/dp/B07BC7BMHY/ref=cm_sw_r_cp_apa_i_6BJzDbDJWWRCE
That has everything, just grab octoprint from the website and flash it to the SD card.
>ZipaMicro, a popular smart home hub developed by Croatian firm Zipato
Popular? Has anyone ever heard of them? For reference: they say they are used in 20K households in 89 countries (that is about 225 households per country). Good luck finding someone using this device even on a forum to ask for help or able to professionally set it up or service it.
When I search on Amazon I see a bunch of over-priced low-power controllers, IP cams and etc. in cheap-looking cases. Literally you can get a Raspberry Pi 3 or 4 with a decent case (or a kit) for a fraction of the price. What's the point of buying this over a Raspberry Pi?
Controller HDMI+VGA+DVI+Audio Input LCD... https://www.amazon.com/dp/B06X9NJ2NR?ref=ppx_pop_mob_ap_share
CanaKit Raspberry Pi 3 B+ (B... https://www.amazon.com/dp/B07BC7BMHY?ref=ppx_pop_mob_ap_share
Kinter MA170 12V 2 Channel Mini... https://www.amazon.com/dp/B007TUSXEY?ref=ppx_pop_mob_ap_share
Samsung 128GB 100MB/s (U3)... https://www.amazon.com/dp/B06XWZWYVP?ref=ppx_pop_mob_ap_share
EG STARTS 2x Arcade DIY Kit Parts... https://www.amazon.com/dp/B01M7R7YW3?ref=ppx_pop_mob_ap_share
Easyget 4 Pcs/Lot 5V LED... https://www.amazon.com/dp/B01N5Y8E2Z?ref=ppx_pop_mob_ap_share
TecUnite LED Maple Garland LED... https://www.amazon.com/dp/B00A7J1ANA?ref=ppx_pop_mob_ap_share
Pyle Marine Speakers - 4 Inch 2... https://www.amazon.com/dp/B078JF26LF?ref=ppx_pop_mob_ap_share
Car Interior Lights, CJRSLRB APP... https://www.amazon.com/dp/B073DZQRZC?ref=ppx_pop_mob_ap_share
LDKCOK USB 3.0 Mount Cable –USB... https://www.amazon.com/dp/B076DPQFZB?ref=ppx_pop_mob_ap_share
You'd want the raspberry pi 3 B+.
If your goal is to learn, you could probably learn more by investing $50 or so into a raspberry pi setup. All your really need is the pi, a power supply and a micro SD card w/ reader, but you might already have that since you mentioned you do photography, etc.
But like I said, you could get that PC there running something like pihole, but you're limited overall. You really wont be able to do an effective NAS setup on that machine.
CanaKit Raspberry Pi 3 B+ (B Plus) with Premium Clear Case and 2.5A Power Supply https://www.amazon.com/dp/B07BC7BMHY/ref=cm_sw_r_cp_apa_i_Wr32CbTCTE6DC
I highly recommend this kit, but make sure you get a micro SD card for it.
George R. R. Martin
writesused to write on an original DOS PC with a monochromatic display. I guess now he uses Wordstar 4.0 on a DOS emulator due to his 30+ year old museum piece failing on him.If you read George R. R. Martin's blog or follow him at all, you'll see he is an easily distracted individual. Football, side projects, and all number of other things keeps him from writing, so he has devised a way to focus on his writing while eliminating these distractions. He sits in his personal library in front of a(n)
ancientrelatively modern PC running Dosbox, but like his old retro machine he's not connected to the Internet. He doesn't have his phone with him. He can't check scores to see if the Giants are winning and he can't binge Netflix or listen to Pandora. It's just him, and the keyboard.You can put DOSBox on your regular modern PC and see if that works out for you, if you can resist the temptation to Alt-Tab over to Reddit. You can get DOSBox for your phone if you feel so inclined and run it there. Some newer Samsung devices even have a Desktop kind of mode where you hook it up to a monitor and turn it into a desktop kind of experience. You can get yourself a Raspberry Pi computer kit, install RetroPie and build a tiny DOS emulator workstation this way with a spare monitor and USB keyboard, preferably away from other distracting influences in your life.
&#x200B;
Alternatively, if you're a little crazy (Like some of us here.) you can go scour the thrift stores, Ebay, yard sales, attic, and dumpsters in search of original hardware, and build yourself an entire pre-Internet 1980s style DOS workstation. Of course then if you are in search of distraction free writing you'll have to avoid the temptation to just play a bunch of Commander Keen on it.
Get the cabling done. There's really no substitute. Then, you'll want these...
UniFi Security Gateway router
2-4 UniFi AP AC Lites. Start with one per floor, add more if needed. They work best when ceiling mounted. If you have any devices that support more than two 5 GHz streams, you'll want at least one NanoHD for them to reach full speed.
A switch of some sort, ideally a PoE one. Ubiquiti's is the best choice, but is expensive. You could instead go with a cheaper PoE switch, or even a non-PoE one and use the PoE injectors supplied with the APs to power them. The cheapest way to have both PoE and lots of ports is to get a small PoE switch and a big non-PoE one and connect them together.
Optionally, a Raspberry Pi. This will be for running the UniFi Controller, which manages all the UniFi devices, and Pi-Hole, a whole-network adblocker. You'll need a MicroSD card for it as well.
Unconditionally I have no personal experience of where to start to learn electronics online because my low level knowledge of the subject is from university courses.
A idea might be to look at https://www.khanacademy.org/science/electrical-engineering that have free lecture on a lot of subject but I have listen to there elections lectures
For practical stuff look for Arduino that is a simple micro controller platform you can program and interface with external component. They are excelnt to use to learn and to try stuff on your des. There is a lot of instruction online and component you can get at a low cost.
Something like this for $36 give you the Arduion and component you can use to build stuff. The link is just to the first starter kit I found on amazon and there might be other that give you more stuff at a simian cost.
&#x200B;
For how a computer work look at https://eater.net/8bit that build a 8 bit CPU from discrete circuits. It give a good base understanding how a CPU can work. The design is more complicated on a desktop CPU today but the ultimate function they preform is the same. So if you understan a simple design you can start to understan more complex.
Buy an Arduino starter kit. Comes with tutorial manuals
To follow up on Zouden's comment, I started with the official starter kit, partly because I do normally like having a nice-looking, physical book to refer to.
However, I quickly realized that all of the code for the Starter Kit Projects is already included the Arduino IDE, and that the Arduino founders created video tutorials for each project as well -- for example, the spaceship project. You can even find a couple of the chapters of the book on the Arduino site -- again, like the spaceship project.
The Arduino site even has detailed tutorials for all of the IDE's built-in example code. Look at the button tutorial -- that's about as good as any of the projects that are in the book, just stripped down and without the conceptual/imaginative layer ("spaceship interface," "love-o-meter")
Again, typically I prefer a physical book -- but I paid around $75 for the starter kit. Looking back, I probably would've gotten the plain-plastic-box $25 kit that the store had and used the Arduino website and videos to learn everything-- I bought the $25 kit later just to have another Arduino and extra parts, and it seemed like it had all of the components the Starter Kit did, just without the book or fancy packaging.
Not sure that that $25 kit is a typical thing - it was an official Arduino project kit, but I don't think I've seen any others but the one I bought. But you can get kits like this Elegoo one and have many of the same parts you'd get in the official Starter Kit - plus some cool other parts like the ultrasonic sensor.
If your friend loves physical books and nice-looking packaging, and has the money, they should go for the official Starter Kit. But if they'd like to save some money and read equally good tutorials online, they should buy a less expensive kit and use the Arduino website for learning.
[Edited some typos]
I would get a simple starter kit like so: http://www.amazon.com/Elego-Project-Tutorial-Prototype-Expansion/dp/B01D8KOZF4/ref=sr_1_3?s=pc&amp;ie=UTF8&amp;qid=1459103307&amp;sr=1-3-spons&amp;keywords=arduino+starter+kit&amp;psc=1
And then some extra motors etc
That seems like a decent kit, though it doesn't include a lot of intermediate level stuff. So you would probably get bored after a month or so. Also, several people in the comments complained about broken boards. I've heard a lot of people speak really well about this kit, it might be a better value!
https://www.amazon.com/dp/B01D8KOZF4?psc=1
The Arduino is plug and play when it comes to learning to program though. You can do 100X more with the $35 Arduino Starter pack(https://smile.amazon.com/Elegoo-Project-Starter-Tutorial-Arduino/dp/B01D8KOZF4/ref=sr_1_1?ie=UTF8&amp;qid=1498590782&amp;sr=8-1-spons&amp;keywords=arduino&amp;psc=1) than you could with the Raspberry Pi.
If you can't afford a real computer and just want to stream movies or play NES games, sure the Raspberry Pi is the right thing to use. If you want to learn to program, the Arduino is perfect for beginners.
Everyone here is saying all the right things but I'm writing my own comment to further emphasize the comments regarding learning C and playing with an arduino. It is true embedded systems touches upon many topics as listed by captain_wiggles but a lot of what he's saying is overkill at this point for you.
i don't know how hard it is to get arduino stuff in ghana, but there exists arduino starter kits that comes with basically everything you need to get started. here's an example of what i'm talking about. Arduino Starter Kit
get your hands on one of these kits, watch a ton of arduino tutorials on youtube and learn C/embedded systems at the same time. you can get a feel of how much you like embedded systems or if you have misunderstood any of it in literally 2 weeks of just casually playing around with it.
if it's something you like, then dig deeper and choose two years of coursework relevant to embedded systems.
as a side comment that's meant to encourage you in your pursuit and not to discount the complexity/difficulty of embedded systems, but embedded systems is in my humble opinion one of the easier sectors to get into and also the most fun. the hardware/software is not as complex as x86 microprocessor and you can get a lot done very quickly.
tldr: just get an arduino starter kit and watch youtube tutorials as a summer project. if you like it then come back and ask more questions.
edit: You can learn Arduino in 15 minutes.
I would not suggest the Raspberry Pi. If they are a tech lover, it's likely they already have one. I would suggest this particular Arduino set: (https://www.amazon.com/gp/product/B01D8KOZF4/ref=ox_sc_sfl_title_2?ie=UTF8&amp;psc=1&amp;smid=A2WWHQ25ENKVJ1). It has lots of nifty pieces that they can do a lot with.
Another thing I noticed on EpicGifts list is the Amazon Echo - If they have prime and are a big amazon person, then go with the Echo, or Echo Dot. However, if they are more integrated into google, I would recommend the Google Home (https://store.google.com/product/google_home).
Other then that, I would be careful on different gadgets (Phones/Watches/Tablets/ect). Most tech lovers are bias to specific brands, and like to do a lot of deep research before purchasing an electronic. So might want to ask them some general branding questions first.
Outside of that, if none of that interests you, tech lovers love random gadgets. For example, if they have pets - maybe something like the petcube would be great for them (https://www.amazon.com/Petcube-Camera-Video-2-Way-Built/dp/B00JGWN8O8/ref=sr_1_1?ie=UTF8&amp;qid=1481486893&amp;sr=8-1&amp;keywords=petcube).
Just browse a bit and keep those things in mind. Best of luck!
I've had a lot of fun with this Elegoo kit. (There are more with more stuff on amazon, including one with a mega)
https://www.amazon.com/Elegoo-Project-Starter-Tutorial-Arduino/dp/B01D8KOZF4/
The elegoo clones are basic but seem to be very well made. (Everything labled well. No funky off-brand serial chips at least on the Uno)
Learned a lot in a hurry from the included tutorials. Now e-packets full of other boards, breakouts, sensors, parts are arriving in my mailbox every week.
amazon has kits at pretty much every price point, just search arduino kit. make sure it's got an arduino uno clone, a breadboard, breadboard wires, basic stuff like leds, buttons, resistors, potentiometers, a couple transistors, stuff like that. plus some cool things like sensors and lcd displays.
something like this, although it might not be the best one at that price point https://www.amazon.com/ELEGOO-Project-Tutorial-Controller-Projects/dp/B01D8KOZF4/ref=sr_1_3?keywords=arduino+kit&amp;qid=1574021245&amp;sr=8-3
this one has a lot of good stuff too https://www.amazon.com/EL-KIT-001-Project-Complete-Starter-Tutorial/dp/B01CZTLHGE/ref=sr_1_7?keywords=arduino+kit&amp;qid=1574021245&amp;sr=8-7
i'm sure somebody can link one with a slightly better spread of parts, but in general if he doesn't have specific projects in mind any kit will do well enough to get started
how much are you looking to spend specifically? 30ish is a good price point, but there's options below and above that. i'd say stick to amazon kits instead of buying more expensive kits or individual parts if you don't know what you're looking for.
i'm not sure, it came with this kit: https://www.amazon.com/ELEGOO-Project-Tutorial-Controller-Projects/dp/B01D8KOZF4/ref=sr_1_5?keywords=elegoo&qid=1574150134&sr=8-5
It's Seeedstudio... but I don’t find much right now on Amazon for them... this one looks not bad actually. The Uno is actually a socketed chip so you can use it as a programmer for the chip itself later, if you want.
You could assemble a kit yourself, too, with parts from AliExpress...
Do you think this one is a good place to start? How about this one, which looks like it has more stuff, but also a bigger board?
Works just as well as the official ones. This was my first kit https://www.amazon.com/gp/product/B01D8KOZF4/ref=oh_aui_detailpage_o01_s00?ie=UTF8&amp;psc=1 Best damn $30 I've spent on open source hardware. This should get you started for a great deal of the beginner projects.
Would you say this is a good alternative/choice?
Thanks :-)
I get to combine my two hobbies - electronics and aquariums, which is awesome.
FYI electronics is a great hobby as it doesn't cost a lot to get into and there's loads of help out there. If you are ever interested I highly recommend buying an Arduino starter kit like this:
https://www.amazon.co.uk/gp/aw/d/B01D8KOZF4/ref=mp_s_a_1_3?ie=UTF8&amp;qid=1494889424&amp;sr=8-3&amp;pi=AC_SX236_SY340_FMwebp_QL65&amp;keywords=arduino+starter+kit&amp;dpPl=1&amp;dpID=615S0N50XHL&amp;ref=plSrch
And having a play :-)
https://www.amazon.com/gp/aw/d/B01608II3Q/ref=yo_ii_img?ie=UTF8&amp;psc=1 is the servo
https://www.amazon.com/gp/aw/d/B01D8KOZF4/ref=yo_ii_img?ie=UTF8&amp;psc=1 is the arduino clone I bought
I'll take a look when I can. It might be unbranded since it comes with a kit but I'll check.
I originally started with one raspberry pi zero, but it quickly ballooned to numerous pi zeros and pi 3s.
When you get bit by the raspberry pi bug, you'll start finding all sorts of fun things to use it on. I was working on a wifi bell and camera system, and that took 2 pi zeros and 1 pi 3. I digress.
I'd probably get one pi 3 as a main, for breadboarding, experimenting, and if a project needs a pi running 24x7, evaluate if it can be suitably replaced by a zero.
If you like to program and tinker, you'll probably want to get an arduino electronics kit for parts and a cobbler to hook the raspberry pi to a breadboard.
Also, eBay is your friend for all the cheap components. Be prepared to wait a little over a month for them though.
I've never dabbled with Arduinos before, so got this pack from Amazon, which has a great selection of stuff to fiddle with, then got an extra load of the piezo sensors from Ebay for about £2 (I'm British). Making one again would likely be far cheaper, just getting the individual electronics.
Oh that's great, thank you. I may take you up on that one of these days. I grabbed a chinese starter kit (this) off Amazon and a multimeter tonight (this). I've been wanting to get into this for years. I'm already a developer, the electronicy bits just elude me and I can't stand it anymore, I feel like I'd excel at this and I always have ideas I can't execute on without the knowledge. I'm 37 but your high school level material is just what I need at the moment.. haha.
I chose the kit to keep the cost down and learn the basics. Need to start budgeting my hobbies better. But if there's anything that would be a big benefit to have in addition, I'm all ears
I just got my first Pi. This kit. The case is super similar. https://www.amazon.com/Vilros-Raspberry-Basic-Starter-Kit/dp/B01D92SSX6/ref=sr_1_3?s=pc&amp;ie=UTF8&amp;qid=1483759141&amp;sr=1-3&amp;keywords=Raspberry+pi
Been looking these up... try getting https://www.amazon.com/Vilros-Raspberry-Clear-Power-Supply/dp/B01D92SSX6/ref=cm_cr_arp_d_product_top?ie=UTF8
and add a micro SD card and hdmi cable you might have lying about or buy one for cheaper.
https://www.amazon.com/Vilros-Raspberry-Basic-Starter-Kit/dp/B01D92SSX6/ref=sr_1_5?s=pc&amp;ie=UTF8&amp;qid=1481362079&amp;sr=1-5&amp;keywords=raspberry+pi + microsd card
This! I just got a Raspberry Pi 3 and loaded RetroPie on it and it's amazing! Cost $50 and blows the Classic NES away.
Eh. I was trying anything I could.
The kit I got was 50$
Vilros Raspberry Pi 3 Basic Starter Kit - Clear Case https://www.amazon.com/dp/B01D92SSX6/ref=cm_sw_r_cp_apa_5WTyybB2ZJ4WW
Like this?
Vilros Raspberry Pi 3 Kit with Clear Case and 2.5A Power Supply
Which joycons come with the full package btw?
I actually just updated my list I sold my last copy of cuphead. I do have the other 2 available (20 for RoR2, 14 for wargroove is what I was selling them at)
Pi3 would be ~ 40 (link to kit I bought linked below though is together)
3DS (this is a ballpark) around $100.
Would include SD card with both 3ds and PI (believe its a 32 in the pi and a 64 or 128 in 3ds.. would have to double check). The 3ds also comes with a third party charger.
And please don't feel compelled to make a deal with me if you would prefer to hold out for a full cash deal (or would like to wait a bit).
https://www.amazon.com/Vilros-Raspberry-Clear-Power-Supply/dp/B01D92SSX6/
Thanks. I'm not sure what you are talking about with the thin copper sheet.
here
is the package I bought. I don't think the heatsinks will come pre-installed, I'll have to do it myself.
Power supply, I bought this kit:
https://www.amazon.com/gp/product/B01D92SSX6/
I have this: https://www.amazon.com/gp/product/B01D92SSX6/ref=oh_aui_detailpage_o00_s00?ie=UTF8&amp;psc=1
with a 16GB SD card and fan I haven't installed. Literally took out of the packaging, never turned it on or anything. Shoot me an offer via PM if interested, I'm not really in a rush to sell it, I'm just working on other projects currently and if I can sell it for close to what I payed I probably would do so.
Edit: Just realized this is a month old, that's my bad. If you're still looking though you're welcome to PM me, sorry for any inconvenience.
I agree with making things easier. I just picked up a pi 3 with a case, power supply and heat sinks for 50 bucks on Amazon.
https://www.amazon.com/gp/product/B01D92SSX6/ref=oh_aui_detailpage_o00_s00?ie=UTF8&amp;psc=1
I used these two walkthroughs as guides:
Total estimated cost is ~$500 based on:
I had this problem with Recalbox, so I tried installing Retropie. Well, still getting the same issue. Here's a video of it from Recalbox, but it's basically the same thing.
I tried forcing HDMI audio out, I tried switching the emulators to run Super Mario World (I'm using PiSNES), even tried redownloading the rom from somewhere else. Still having the issue.
It really makes it unplayable just because it's so irritating. By all accounts, the game is playable, I just don't want to play it.
Any ideas?
Also, I'm using Pi 3 B.
Vilros Raspberry Pi 3 Basic Starter Kit--Clear Case Edition [Includes Wifi & Bluetooth Connectivity]
- ref link
Non-ref link
Headless, but comes with everything you need for a basic setup. Comes with two heatsinks for the board.
Cooling doesn't seem to be an issue, no fans, although I haven't consistently maxed it out and taken readings.
I haven't worked with screens yet, so no input there.
My build instructions
Unboxing and assembly
Cool. I think I used these steps.
Most people don't run it on a Windows machine so sometimes I'd have to wrestle with platform-specific problems where the community would sort of say "eh, probably a Windows thing, sorry mate". Sometimes that was a dead end and other times it meant I had to burn a few more hours solving it myself.
I've never run into that since moving to raspberry pi. That said, my main motivator was to get it off my main PC. Since I'm cheap, if I had a spare laptop laying around I probably would be using that still. It worked well enough.
Anyway, enjoy the rabbit hole. Great community.
Edit: I might add your kit seems overkill. I got mine for close to 50 USD and it didn't come with all those other hardware doodads. Maybe that other stuff will be fun and useful eventually though. https://www.amazon.com/gp/aw/d/B01D92SSX6/ Actually I had to spend another $13 on a 32 GB SD card so more like 65 USD total.
Its going good. I have 2 setups now and we have a #siaberry channel in Sia Discord. Also heres a parts list if your interested in getting one.
http://amzn.to/2g8nc0R -32GB USB
http://amzn.to/2wr6JLu - RPI Kit
http://amzn.to/2xvPvJU - 32GB MicroSD
http://amzn.to/2w0K5IU - 8TB Hard Drive
I have been working on Siaberry a lot and it has been going pretty good.
If you are interested in Hosting on the Siacoin network this is a real good entry point.
I just launched another Siaberry a few days ago and its been running with 100% uptime. Here you can check and see if its running right here https://siahub.info/host/5675
http://amzn.to/2ggJScM <-- Pi 3
http://amzn.to/2gMHtrc <-- Temperature & Humidity Sensor
Exactly that is what we kind of had set up. Think I would like to get the computer away from the girls since I have read they can be sensitive to magnetic fields.
I bought a bundle from Amazon that came with a case and charger because it was cheaper to do it that way. Other kits I looked at weren't, so you may just have to shop around.
Here's the one I bought: https://www.amazon.com/gp/aw/d/B01D92SSX6/ref=yo_ii_img?ie=UTF8&amp;psc=1
I've got a Raspberry Pi 3B (Vilros bundle). I bought it for my son hoping he'd want to tinker, but unfortunately no. Still in the box. It's this one (https://www.amazon.com/gp/product/B01D92SSX6/ref=od_aui_detailpages00?ie=UTF8&amp;psc=1). If you're still looking for one, I'll sell it for exactly what I bought it for ($49.99)
Not exactly. A lot of lower cost items get that way because they were:
The closest to what you want is going to be the Raspberry Pi 3 and the Raspberry Pi Camera Module V2. This camera is rolling shutter, which may introduce artifacts into the system under motion.
The RPi3 does have an onboard GPU (called the Broadcom VideoCore IV VPU) which as of a few months ago now has an OpenCL implementation.
The GPU is capable of 24 Gflops peak, but is often around 4-8 Gflops because the cost-reduced memory design limits bandwidth to about 120 MB/s.
Your comments are VERY useful. Thank you for taking the time.
It looks like all the pi zero kits are out of stock, and I'd like to work on this within the next week or so. I actually have a pi model B (not B+) that I can re-purpose for this. I was leaning towards buying a new pi 3 mostly because I don't have one yet. But with your power consumption math, it looks like a lower power device is really needed here.
I could only find mention of the pi B (non B+) taking 220mA with a usb wifi adapter, without a camera.
So perhaps I'll purchase the official wifi dongle and the new camera module to use with my pi model B to get started. I may also bump up to a 4-panel, 28 watt solar. Then, when I can get my hands on a Zero (maybe next summer!) I can re-work things.
It's a standard Raspberry Pi camera mounted on an arm that I cobbled together after the bed mount broke. You can see it in the lower right of the first picture here.
Sure! This is the specific one I have: https://www.amazon.ca/Raspberry-Pi-Camera-Module-Megapixel/dp/B01ER2SKFS
How tech savvy are you? This could be done with a raspberry pi and rpi camera for about $60. You would need to make a waterproof case yourself. And you would need to script the pattern you wanted.
https://www.amazon.com/CanaKit-Raspberry-Wireless-Official-Supply/dp/B071L2ZQZX/
https://www.amazon.com/Raspberry-Pi-Camera-Module-Megapixel/dp/B01ER2SKFS/
Raspberry Pi 3
Raspberry Pi Camera Module V2
5V 2.5A Power Supply so you have enough power to run the Pi and camera.
Micro SD card for uploading the Octoprint image and storing files.
Beyond that the only other things you may need (and are recommended) are a mouse, keyboard, a mini HDMI to HDMI cable or adapter, and a monitor to plug it into (TV with HDMI works). These will come in handy if you need to troubleshoot things or want to do other things with your Pi.
EDIT - oh yeah you'll also need to add a micro USB to USB cable or adapter to plug the Pi into the printer's controller.
So I bought a rasberry pi and the standard rasberry pi camera (https://www.amazon.com/Raspberry-Pi-Camera-Module-Megapixel/dp/B01ER2SKFS), along with a mini usb cable to connect it to the printer. You need a micro usb cable to power the pi (along with an outlet plug). Other than that, you should print a case for it, then you'll be good.
Another thought I'm having is would it be possible to use a reference library for comparing and counting? example: I have a library of a few hundred edge shots of glass and it compares likeness and creates a count for each likeness in an image or video? the camera I plan to use is this one that can shoot 720p at 180fps. This should reduce motion blur and I would only use every 7th frame to be about 24fps extraction. Accuracy is the most important thing. But the whole time frame for processing and counting shouldn't exceed 45secs. Best would be under 15sec. Is this wishful thinking?
Standard raspi cam edit: this one.
I recently purchased the Ender 3 Pro, and these are the things I've done so far:
Thingiverse: Ender 3 Tool Holder
Thingiverse: Ender 3 Filament Guide
Amazon: Nozzles in 0.2mm, 0.3mm, 0.4mm, 0.5mm
Thingiverse: Nozzle Case
Thingiverse: Ender 3 V-Slot Tool Holder Tray
OctoPrint (OctoPi) on Raspberry Pi 3 B+
Amazon: Raspberry Pi Camera Module v2
So I followed this purchase list guide already and got everything minus the camera because I have an old Logitech webcam I'm gonna use.
But it doesn't mention what's needed for the BLtouch. So I bought the BLtouch but didnt get anything else with it. The BLtouch doesn't come with the Pin 27 board? And also, what will the 6ea female-to-female jumpers be for? I didn't see that mentioned anyhere.
Edit: I bought both the 27 Pin board and a big pack of jumper cables. They were actually one of the cheapest on Amazon and have a variety so, that's cool I guess.
Thank you for all your input. I will be referring back to everything you said when I'm confused as hell in a couple days trying to set all this up. Lol. Btw, while I got your attention, the rotary encoder on my control box completely seized up and wouldn't move. I bought a replacement and desoldered the old one out. But, will I even need to use the control box anymore after having all this Octoprint installed?
Mine just end up everywhere...Though, I have ordered several sets of these, so when I try to organize them I need a much bigger box.
I also picked up a set of crimpers, pins, and housings, so I make a lot of my own.
These are the good type.
Elegoo EL-CP-004 120pcs Multicolored Dupont Wire 40pin Male to Female, 40pin Male to Male, 40pin Female to Female Breadboard Jumper Wires Ribbon Cables Kit for arduino https://www.amazon.com/dp/B01EV70C78/ref=cm_sw_r_cp_api_i_BS0WCb139RSM7
As a general item I stock for my projects THESE ribbon cables work great. I dont know the actual pitch spacing measurement offhand but it matches those used on the RaspberryPI GPIO pins
Here's what my cart looks like so far
https://www.amazon.com/gp/product/B01EV70C78/ref=ox_sc_act_title_1?smid=A2WWHQ25ENKVJ1&psc=1
&#x200B;
https://www.amazon.com/gp/product/B007R9TUJE/ref=ox_sc_act_title_2?smid=A2GTSJRNFEVVSP&psc=1
&#x200B;
https://www.amazon.com/gp/product/B003XZSZWO/ref=ox_sc_act_title_3?smid=A388EF2JRGUUQ3&psc=1
&#x200B;
https://www.amazon.com/gp/product/B07QHFP8L6/ref=ox_sc_act_title_4?smid=A2Z8WR05TMKSB9&psc=1
Yes, Dupont connectors. I like to buy these packs (m/m, m/f, f/f)
That's the case I was using prior to the combined case. I used a 6" USB cable to the einsy and it worked nicely. My reason for switching was to eliminate the power cable for the pi and have the webcam USB lower and out of the way. You could still do that with that case if you wanted. (I used these https://www.amazon.com/gp/aw/d/B01EV70C78?psc=1&amp;ref=ppx_pop_mob_b_pd_title) I am also considering the MMU2 as well once things shake out.
Most games that have engaging content are fairly hard to code and thus I wouldnt recommend without background knowledge.
Look into an Arduino and they can learn the coding language and you can make cool projects to boot along with learning real life applications.
More than enough: https://www.amazon.com/dp/B01EWNUUUA/ref=cm_sw_r_cp_apa_i_Cf34Ab4P7VW98
Their code is open source and on their website:
https://www.arduino.cc/en/Main/Software
https://www.amazon.com/ELEGOO-Project-Starter-Arduino-Mega2560/dp/B01EWNUUUA?th=1
I ended up getting this kit (~$50), which is just this board (~$15) with a bunch of extra toys. Both have good reviews so I'm looking forward to it!
Here you go :)
It's a fun hobby. Biggest learning curve is learning how to code. I didnt know a thing when I first started but the arduino community (link below) is really helpful with the process. They will even go over code you've written if your having issues.
Arduino community forum:
https://forum.arduino.cc
Book for learning arduino program language:
https://www.amazon.com/dp/1430247762/ref=cm_sw_r_cp_apa_jqgLBbP544HBT
A good starter kit. Comes with alot of goodies like the program used to write the code and compile it, the arduino itself, super sonic sensor, DC motors to name a few as well as data sheets for each piece:
https://www.amazon.com/dp/B01EWNUUUA/ref=cm_sw_r_cp_apa_krgLBbN85GPHF
Book recommended to me that helps with the more complex builds: https://www.amazon.com/dp/1259587541/ref=cm_sw_r_cp_apa_UrgLBb7STEDSA
My first project I made/wrote was to make a couple LEDs blink in specific intervals. May not seem like much but like I said, biggest learning curve is learning to program the arduino itself.
Good luck
If he’s into cyber security stuff I suggest some computers like these for him to mess around with
http://www.newark.com/raspberry-pi/raspberry-modb-512m/raspberry-pi-model-b-board/dp/68X0155?src=raspberrypi
https://www.amazon.com/gp/aw/d/B01EWNUUUA/ref=mp_s_a_1_2?ie=UTF8&amp;qid=1520212477&amp;sr=8-2-spons&amp;pi=AC_SX236_SY340_QL65&amp;keywords=arduino&amp;psc=1
But this is what I’d love and I have a lot of the same interests
https://www.bestbuy.com/site/lenovo-star-wars-jedi-challenges-ar-headset-with-lightsaber-controller-and-tracking-beacon-black/6010802.p?skuId=6010802
Thank you all for your answers. I'll buy then. I just want to know, which to buy, if Arduino's at all, because I see many comments about how "expensive" it is. Can you direct me which kit to buy?(I know, that's expensive, but I want to get an easy start. The rest of the parts, sensors etc I'll get from eBay/Aliexpress)
https://www.amazon.com/Elegoo-Complete-Ultimate-TUTORIAL-Mega2560/dp/B01EWNUUUA/ref=sr_1_2?s=electronics&amp;ie=UTF8&amp;qid=1504512661&amp;sr=1-2-spons&amp;keywords=arduino&amp;psc=1
https://www.amazon.com/Arduino-Starter-Kit-English-Official/dp/B009UKZV0A/ref=sr_1_6?s=electronics&amp;ie=UTF8&amp;qid=1504512661&amp;sr=1-6&amp;keywords=arduino
https://www.amazon.com/Elegoo-Project-Complete-Starter-Tutorial/dp/B01CZTLHGE/ref=sr_1_14?s=electronics&amp;ie=UTF8&amp;qid=1504512661&amp;sr=1-14&amp;keywords=arduino
Or if you have something else to show, I'll be happy..
https://www.amazon.com/EL-KIT-008-Project-Complete-Ultimate-TUTORIAL/dp/B01EWNUUUA/ref=sr_1_5?keywords=robotics&amp;qid=1556203927&amp;s=gateway&amp;sr=8-5 check this out
Something like this might be a good xmas present for him. It's Arduino but it's similar. Relatively cheap for what you get, I got it for one of my nephews and he loved it, was trying to automate everything once he got the knack of it. It's got everything you need, CD of the setups for the components, drawings of pin layouts, it's fantastic.
Honestly I think that is the best route, is to show them a bunch of different options to get the gears in their head going of how to apply it to what they're interested in. There are so many things to do with the raspberry pi it's difficult to pinpoint where to find the best tutorials. Best thing to do is show him some of the most popular components and see what path that takes them down from there. Like "Oh so that's what a stepper motor does...I wonder if I can open the blinds with it...Holy crap it works!! I can probably make something to scare the cats with this" lol.
In my experience, my nephew had the most fun with home automation though. I think it's because they can see a direct and practical result to what they've created and provides a huge sense of accomplishment. Even something simple like turning lights on and off is amazing since he can annoy his siblings with it. He likes the Bruh Automation guy. Generally though, Youtube, Stackexchange, Rpi forums and the like is the best bet for turorials. But yeah, just pinpoint the interests and find how the Rpi can be incorporated into that. I'm sure if you edit/elaborate on them this sub would be happy to help.
Change out the Ethernet cable so a quick disconnect switch (item 1) sits connected to it. Then hook up two servo motors (items 2A and 2B) to an Arduino micro controller (item 3). Program the Arduino to actuate the servos to disconnect the internet then turn it back on about 15 seconds later, program it to do this about every 10 minutes nonstop. He will not get through a single game without disconnecting. Connecting items 2a and 2b to item 1 will require hot glue and or duct tape. Just tape item 3 to the back of item 1
Item 1
https://www.amazon.com/Internet-CUT-OFF-Kill-Switch/dp/B00RQVFHZ4
Item 2a-b
https://www.amazon.com/ElectroBot-Micro-Helicopter-Airplane-Controls/dp/B071KJV7DD/ref=mp_s_a_1_2?keywords=servo+motor&amp;qid=1563946830&amp;s=gateway&amp;sr=8-2
Item 3
https://www.amazon.com/Elegoo-EL-CB-001-ATmega328P-ATMEGA16U2-Arduino/dp/B01EWOE0UU/ref=mp_s_a_1_5?keywords=arduino&amp;qid=1563947177&amp;s=gateway&amp;sprefix=ardui&amp;sr=8-5
Yes, I'm using a sort of knock-off Arduino Uno. Wikipedia says the ATmega238 (the MCU on the board) can operate at 20 MHz, which I think should be plenty.
I found an interesting fact when playing around with the code. At first I had the code run every 3 - 5 milliseconds. I Then took that constraint away to have it run every loop and it didn't change a whole bunch. I then had a line print to the serial monitor cause I was timing how fast the loop was, and it seemed that the serial printing added just enough delay to make the oscillation very very close to being stable. The oscillation was there but it didn't grow to be unstable, it was just constant. So, somehow adjusting how fast the MCU is computing the input based on the state helps with the oscillations. That leads me to believe I'm definitely having a noise issue in how I'm calculating the derivates. I think the Kalman filter suggested above will be a good thing to implement and hopefully settle that oscillation
Arduino:
https://www.amazon.com/ELEGOO-Board-ATmega328P-ATMEGA16U2-Compliant/dp/B01EWOE0UU/ref=mp_s_a_1_6?keywords=arduino&amp;qid=1570048422&amp;sr=8-6
Arduino blink tutorial:
https://www.arduino.cc/en/Tutorial/Blink
Control LED with transistor:
https://www.youtube.com/watch?v=NlyV_AHYGcM
Robot:
https://www.instructables.com/id/Arduino-wall-avoiding-robot-FabLab-NerveCentre/
These are probably good to get you started. I think robotics and controls in general are a good place to start.
Where are you seeing $25? Even full sized prototyping arduino uno's can be found for < $10. You might want to get one for prototyping and then build the final version using the arduino pro mini for size reasons.
https://www.amazon.com/IEIK-Board-ATmega328P-Cable-Arduino/dp/B00P2FX9WY/
https://www.amazon.com/Elegoo-ATmega328P-ATMEGA16U2-Compatible-Arduino/dp/B01EWOE0UU
https://www.amazon.com/MakerBest-Quality-Compatible-ATmega328P-Development/dp/B00Q6ZW4NO/
So I've been playing a lot with my 2010 and 2016 Fords, especially involving the camera.
Two different things can be checked, unfortunately both requiring a little computer kmow-how and some parts off Amazon.
Just keeping a quick note, if yours is the same as my 2010, the gear messages should be ID 3B0, with Reverse having a data of 0x01.
If you go with an aftermarket camera, it's entirely possible to make it display on the navigation screen -- any standard composite camera will work.
Are you thinking of the elegoo uno?
https://www.amazon.com/Elegoo-Board-ATmega328P-ATMEGA16U2-Arduino/dp/B01EWOE0UU/ref=pd_sim_147_3?_encoding=UTF8&amp;pd_rd_i=B01EWOE0UU&amp;pd_rd_r=Y6TFPDEH4SJ1SGFXGK96&amp;pd_rd_w=4tmqu&amp;pd_rd_wg=nJTtj&amp;psc=1&amp;refRID=Y6TFPDEH4SJ1SGFXGK96
The simple implementation would just involve peristaltic pumps and a simple arduino board to turn it on/off. You'll need a drive shield since arduino logic pins max out at 40ma at 5V. Seems like it's possible to make a simple one for under $25. You'll also need to be able to write some basic programming logic.
pump: https://www.amazon.com/Gikfun-Aquarium-Cooled-Diaphragm-EK1856/dp/B0744FWNFR/
drive shield: https://www.amazon.com/HiLetgo-Driver-Shield-Compatible-Duemilanove/dp/B01DG61YRM/
arduino: https://www.amazon.com/ELEGOO-Board-ATmega328P-ATMEGA16U2-Compliant/dp/B01EWOE0UU/
Nothing yet. I've been toying with the idea of doing a quick DIY on RX8Club.
I've got a pair of modified banjo bolts tapped with 1/8 NPT fittings in them. I have a K-type thermocouple intended for EGT measurement installed in the bolt on the front cover and a 150 psi pressure transducer in the return line. A second 150 psi transducer is installed in an Aeromotive fuel line adapter. A MAX6675 thermocouple analog-to-digital adapter lets the Arduino Uno measure the temps. A 20x4 LCD displays the values numerically.
I taught myself how to code the Arduino and make everything work in about 6 hours on a Saturday. The hardest part was trying to figure out the LCD and MAX6675 connections. I can upload the libraries and sketches somewhere if you want to copy my work.
Edit: look at that, it was already on my google drive... https://drive.google.com/open?id=19xV31SIuhSC76IQSWpr959vSRQg1Xekv
&#x200B;
Edit2: Wow, looking at my code... I even documented things like what each line does and where to connect wires. I don't remember doing it but if drunk me wants to be a good programmer, I'm okay with that.
Already, looking at the parts i got, i'm going to need some bread
board(s) as i dont think what i bought comes with any :/
https://www.amazon.co.uk/gp/product/B01IJLGH8K/ref=oh_aui_detailpage_o00_s00?ie=UTF8&amp;psc=1
https://www.amazon.co.uk/gp/product/B01EWOE0UU/ref=oh_aui_detailpage_o00_s00?ie=UTF8&amp;psc=1
https://www.amazon.co.uk/gp/product/B01EUVJYME/ref=oh_aui_detailpage_o00_s00?ie=UTF8&amp;psc=1
any other stuff i should get. common parts that break? or need replacing due to use? or used a lot ?
any tools that would be useful? I have a multimeter.
Having some issues getting mine set up, anyone able to help a brotha out?
I noticed you used ws2812b led strip but I have Different wires and I cant get my led strip to light up. I feel like such a noob. I tried following the imgur guide but i guess I'm a little slow and cant figure it out.
Here's what I bought....
Lights
https://www.amazon.com/gp/product/B07B5ZPCTC/ref=oh_aui_detailpage_o02_s01?ie=UTF8&th=1
Power
https://www.amazon.com/gp/product/B01M0KLECZ/ref=oh_aui_detailpage_o01_s02?ie=UTF8&psc=1
Arduino
https://www.amazon.com/gp/product/B01EWOE0UU/ref=oh_aui_detailpage_o01_s00?ie=UTF8&psc=1
As some else mentioned, it's not as detailed, but it's pretty cool.
https://www.amazon.com/case-Raspberry-Old-Skool-Tools/dp/B01M4OOY4U/
https://www.amazon.com/dp/B01M4OOY4U
Have one myself and it looks (and works) great. Front panel flips up and that's where you plug in the controllers (USB).
Can switch from SNES to nes to n64 to genesis etc without dropping the controller.
And it works with PS3 and I believe PS4 controllers via Bluetooth as well as retro controllers.
Looks like it's just for 2, 3, and B+ models:
https://www.amazon.com/Old-Skool-NES-case-Raspberry/dp/B01M4OOY4U
you mean something like this?
https://www.amazon.com/case-Raspberry-Old-Skool-Tools/dp/B01M4OOY4U/ref=sr_1_1?ie=UTF8&amp;qid=1498509314&amp;sr=8-1&amp;keywords=raspberry+pi+nes
doesn't really matter. just make sure it has:
-2 heat sinks (just look on youtube how to install them. a toddler could do it)
-the circuit board
-the case- the standard cases are a bit boring so you might want to skip that and buy some awesome custom nes case like this
Anything else you need you can buy at walmart
I built mine using a RPi3 Canakit.
(https://www.amazon.com/dp/B01C6FFNY4/ref=cm_sw_r_cp_apa_hHnnzbCECS54V)
In an "Old Skool" NES style case.
(https://www.amazon.com/dp/B01M4OOY4U/ref=cm_sw_r_cp_apap_mVsAPqbClQwS9)
You'll need a micro SD card for the RetroPi and a flashdrive to install games. I used this guide to set it up. (https://github.com/retropie/retropie-setup/wiki/First-Installation)
Using this power button kit, installed the button on the back of the case using a drill to punch the hole and a Dremel to widen it, the space was too tight for me to turn the nut so I held the nut in place and turned the button on the outside. (https://www.amazon.com/dp/B0170AJ98G/ref=cm_sw_r_cp_apa_rKnnzbQWBJ5RJ)
Using instructions from, you must enable SSH in the RetroPi settings before starting. (https://youtu.be/4nTuzIY0i3k)
I recommend the NES30 for solo play up to N64, Note: Do not buy two of these controllers they do not work if two are connected to a RPi3.
(https://www.amazon.com/dp/B00NBN1NA4/ref=cm_sw_r_cp_apa_6InnzbXRHHNNB)
For Player 2 and any future N64 play I'm using a standard XBox One Controller with a cable.
(https://www.amazon.com/dp/B01LPNKGGI/ref=cm_sw_r_cp_apap_LbO19o2yyPade)
I thought this case looked pretty decent.
https://www.amazon.com/case-Raspberry-Old-Skool-Tools/dp/B01M4OOY4U/
NES case for Raspberry Pi 3,2 and B+ by Old Skool Tools
What about this one?
I bought a raspberry pi 3, installed RetroPi and dropped it into [This Case](Old Skool NES case for Raspberry Pi 3,2 and B+ https://www.amazon.com/dp/B01M4OOY4U/ref=cm_sw_r_cp_api_jTm-ybS3ZDNRR) Its not official but I'm very happy!
Should have used this: [Old Skool Rpi Case] (http://www.amazon.com/Old-Skool-NES-case-Raspberry/dp/B01M4OOY4U/)
If you can't get an NES shell they do sell these.
If all you want it to do is come on when the pi turns on, all you need is a 10k resistor, led and some wire. I did it just the other day to make a light light up in my new NES case. Check out the top user review here for pictures and a how to:
https://www.amazon.com/gp/product/B01M4OOY4U/ref=oh_aui_detailpage_o03_s00?ie=UTF8&amp;psc=1
I built one of these with a raspberry pi, found a good injection molded case on amazon https://www.amazon.com/gp/product/B01M4OOY4U/ref=oh_aui_detailpage_o02_s00?ie=UTF8&amp;psc=1
The people who make the case send very detailed instructions on how to set it up including all of the steps needed for setting up the emulator on the raspberry pi I could not give this a better review. My wife was mad thinking I had paid the big bucks buying one off ebay because we had been watching them there.
I used the case from Old Skool Tools and I was pleased with it. However, were I to go back and do it over, I would probably go for this Lego design
I understand. I'm not a fan of 3D prints.. They just don't look good to me.
Have you checked this out? https://www.amazon.com/gp/product/B01M4OOY4U/ref=oh_aui_detailpage_o09_s00?ie=UTF8&amp;psc=1
I'd recommend this case: https://www.amazon.com/gp/aw/d/B01M4OOY4U/ref=ya_aw_od_pi?ie=UTF8&amp;psc=1
The old skool one which is now kintaro is popular, but known to make the pi hotter. I put a fan in it and run it fine with overclock.
small nes case
There's a another china one that's interesting and gained popularity. It has function power buttons, spot for a fan. NES style as well. Have to wait for in stock again though. Both run for $20
NESPi Case
I used this, though I don't like the port alignment:
https://www.amazon.com/gp/aw/d/B01M4OOY4U/ref=mp_s_a_1_2?ie=UTF8&amp;qid=1503508848&amp;sr=8-2&amp;pi=AC_SX236_SY340_QL65&amp;keywords=nes+pi+case&amp;dpPl=1&amp;dpID=312T2BZR9oL&amp;ref=plSrch
What kind of Hub do you recommend? Pi 3 B+ and load Hass.io?
Something like this? https://www.amazon.com/CanaKit-Raspberry-Premium-Clear-Supply/dp/B07BC7BMHY/ref=sr_1_4?keywords=pi+3+b%2B&amp;qid=1562715095&amp;s=gateway&amp;sr=8-4
Here’s a $50 raspberry pi with case power supply etc.
CanaKit Raspberry Pi 3 B+ (B Plus) with Premium Clear Case and 2.5A Power Supply https://www.amazon.com/dp/B07BC7BMHY/ref=cm_sw_r_cp_api_i_kvVADb8SRYGSD
I bought this and this. The card comes pre loaded with the boot program for Raspbian. If you wanted something cheaper, I believe I remember reading a pi zero w will work as well.
The Arduino website is very helpful, especially the language reference page for help on all the default functions you can use. The getting started and examples pages are great places to start (who knew?). I found the best way to get into it was to dive right in. I ordered a Arduino Uno board and a starter kit from Amazon. Then I made all the different devices work by using the breadboard and simple code. A bigger project is just lots of little parts all working together. If I needed help, I googled "<part I'm trying to get to work> Arduino" and was able to find someone who did it previously. The Arduino Forums and /r/Arduino are also very helpful!
I started with a Sainsmart Uno compatible kit which cost about £30 from Amazon. It has some good bits and some parts I will probably never get to use, but certainly it was more than enough to get started.
At a minimum, I would suggest a few LEDs and some resistors around 100R, some pressbutton switches, a breadboard and maybe an LED panel. All of this can be bought cheaply, but once you add that up, then you might as well buy a cheap kit!
Don't waste money on books - there is more than enough info online, and since most of the starter kits contain the same basic components, there is no shortage of tutorials you can use.
I just found this kit which has some nice parts that were not in my kit, and leaves out some of the less useful things. It doesn't contain an arduino itself, but those can be bought cheaply enough, so for well under £30 you could have a few great starter projects!
Thanks again for your answer.
I think I decided I will pick up my Arduino from here: https://www.conrad.de/de/arduino-leonardo-platine-65163-192458.html
and one of the starter kits you linked me: http://www.amazon.de/SunFounder-Project-Starter-Arduino-Mega2560/dp/B00D9M4BQU/ref=sr_1_3?ie=UTF8&amp;qid=1452268693&amp;sr=8-3&amp;keywords=arduino+starter+kit
Thanks for your help, I really appreciate it!
------------------------------
In welchem Bundesland macht man denn in der Schule workshops mit nem Arduino? Wenn's es das mal zu meiner Zeit gegeben hätte...
Those kits are really really awesome! I got this one https://www.amazon.com/gp/product/B00D9M4BQU/and it ships in a plastic tacklebox you can use to store the parts. You have to get the Arduino board separately, though, so you'll probably only be able to get about 15 of them total with your budget.
Here's the one i ordered, but there are a lot o other options.
http://www.amazon.com/gp/product/B00D9M4BQU/ref=oh_details_o00_s01_i00?ie=UTF8&amp;psc=1
Good advice. I was planning on using Google a lot to guide me, and pick up some simple starter projects to get my feet wet.
I decided to get the board and kit separately, since I couldn't really find a complete kit that mixed everything I wanted. Went with this board and this kit. Is that good value, altogether?
Would've liked to have gotten one of the more expensive kits with the more interesting sounding projects, but money's tight right now and I'm sure I can find plenty to do with what I got.
[This] (http://www.amazon.com/gp/aw/d/B00D9M4BQU/ref=mp_s_a_1_3?qid=1417558207&amp;sr=8-3&amp;pi=AC_SY200_QL40) is a robotics starter kit with instructions and tools to make different robotics projects.
That seems to be a fairly easy and cheap starter project for Arduino. For example this starter kit should have everything you need for the bomb.You can find cheaper ones, but this was the first I found on Amazon.
I am probably on a list of some kind now.
> I don't even know which OS to use, I've never used Linux before.
Don't worry, the Arduino IDE works just fine on Windows. There are plenty of resources for Arduino projects that will help you learn, and most tutorials are aimed at those who have zero programming or electrical engineering knowledge.
Something like this might be a good idea, as it includes everything to get started with basic projects (including the Arduino itself), as well as an instruction booklet. You could also further augment it with this kit.
Well, I've been running Raspbmc for 4 or 5 months now. You pointed me here in my other post. I have an SD card (not sure on the class - it came with the Amazon starter kit) and a USB drive. That's as far as I've gotten, though. Hah.
So, to clarify - I'll be using an SD card AND USB flash drive?
A. this is not /r/raspberry_pi
B. buy this today for less and avoid random websites.
I meant to plug it into a windows PC to see what chipset it has. I just Googled CanaKit, and it appears to be a raspberry pi starter kit which ships with a Ralink RT5370. I don't know much about Ralink, as I've never owned one, but it looks like there are plenty of people having issues with it under Linux and various solutions that show up with Google. It looks like most of the solutions involve making sure lsmod shows the module as being loaded (and possible updating with a ethernet cable connected), and then configuring wpa_supplicant manually. Since this requires the system to be installed it doesn't really solve your issue. You might be able to get around some of this headache by creating a completely unencrypted connection on your router until you can set everything up and then lock it down once you're done.
Alternatively, you could download the OS image and load it onto your SD card from another computer, and then configure it.
I'm sure someone may have a better idea, I'm just going by 5 minutes of Googling.
if you get him a breadboard kit with it he can do alot of python programming for home made electronics, like at grage door controller for his smartphone, a weatherstation, a airborn drone, etc.
here is a link for a good kit: http://www.amazon.com/CanaKit-Raspberry-Ultimate-Starter-Components/dp/B00G1PNG54/ref=lp_3015426011_1_1?s=pc&amp;ie=UTF8&amp;qid=1409750864&amp;sr=1-1
BTW, your officaly a Good Girl Gina
I'm thinking Raspberry Pi + LEDs, a bag of cotton balls, and a hot glue gun. And Flirc if you absolutely have to have an IR remote, but a web page via phone would be a more robust controller.
http://www.amazon.com/CanaKit-Raspberry-Ultimate-Starter-Components/dp/B00G1PNG54/ref=sr_1_2?ie=UTF8&amp;qid=1404306198&amp;sr=8-2&amp;keywords=raspberry+pi
Would this include everything I need to create the emulator or is it overkill?
save some bucks
http://www.amazon.com/CanaKit-Raspberry-Ultimate-Starter-Components/dp/B00G1PNG54/ref=sr_1_1?ie=UTF8&amp;qid=1417105983&amp;sr=8-1&amp;keywords=raspberry+pi+kit
This seems to have everything you are talking about and a bit more (no speakers). It does come with the Pi too so maybe OP could give their parents the extra money it costs.
How about a Circuit Scribe set? http://www.amazon.com/s/ref=bl_sr_toys-and-games?ie=UTF8&amp;field-brandtextbin=Circuit+Scribe&amp;node=165793011 or a Raspberry Pi Starter Kit? http://www.amazon.com/CanaKit-Raspberry-Ultimate-Starter-Components/dp/B00G1PNG54/ref=sr_1_1?s=pc&amp;ie=UTF8&amp;qid=1418652530&amp;sr=1-1&amp;keywords=raspberry+pi&amp;pebp=1418652534564
There isn't much difference there. The make and model of the SD card and the WiFi adapter are different, but they should perform the same. The Canakit shows, but doesn't mention the heat sink. The differences I see: the Canakit comes with a black case and a 2.5A power supply where as the Vilros kit comes with a clear case and a 2A power supply.
Non-mobile links: Canakit and Vilros, in case anyone else wants to look.
Depending on what accessories you want to add, you may need to utilize a powered USB hub, even with the four (4) ports on the B+ due to (potential) power issues. I think 2A is probably going to be plenty for most setups.
That brings it to the case...clear or black?
I've gotten stuff from both Canakit and Vilros and there have been no issues with any of it.
---
> What sort of limitations should I expect with this project? Thinking along the lines of certain emulators not working well (if at all), as well as streaming certain forms of content via Kodi.
I don't think I've had many, if any issues with SD (480p) and HD (720p) video content, but FHD (1080p) does seem to push the Pi. I've heard that a slight over-clocking could correct some of this. I also think there are some issues with higher end and "fancy" audio processing, but for me those issues are pretty much non-existent. For my media needs I use OpenELEC.
I have only started working with emulators on the Pi and so far things have worked pretty well. I followed a Lifehacker post and a post in DIY about setting up RetroPie and it seemed to cover most things. I have only tried NES, SNES, and Genesis and I have been happy with those. There are some of the higher-end emulators that may have issues (N64 is one that gets mentioned), but I haven't tried any of those other options, yet.
Honestly, I'm not sure what projects I want to do yet, and this kit seems to come with all that stuff-
http://www.amazon.com/CanaKit-Raspberry-Ultimate-Starter-Components/dp/B00G1PNG54/ref=sr_1_2?s=pc&amp;ie=UTF8&amp;qid=1421673263&amp;sr=1-2&amp;keywords=raspberry+pi
It's definitely not "necessary" in the thought that "If I don't have the dongle, the pi won't work". It helps make things wireless. If you are near an ethernet port (or even have one), you can always use that too. The main things the internet helps with (on the pi), is downloading updates, downloading some files, and a few other minor things. It's like your laptop; "I can walk around with it without wifi and it's fine. If I need to download something, I just plug it in or turn wifi on".
That being said, there are two kits from Canakit that come to mind. This one is great, and pretty much has everything you need to get started.
This second one comes with more things like LED's, a breadboard, some other computing components, and leads to connect things up. I'm not really sure what he wants to do with all of this, but either kit will suit him fine. This also gives you an idea of what other things he might want with the pi
normally I would agree with you, but since its the sale it looks like it would be worth it, so I figured I would ask. Here is the breakdown.
Kit - 69.99 on sale
Individual - 74.55 (didn't bother including the manual or hdmi)
So, objectively, it would be cheaper, unless i wanted to swap out specific parts (but I'm a noob, so I'm not sure what I need yet). So, instead of buying it individually, should I go for the normal wifi kit or the deluxe kit?
I was watching this thread and found out that RPI kits are currently on sale on amazon. Pretty killer deal, and a lot of the other components I needed for emulation were on sale too. I was able to put together everything I need for a portable (and cordless) emulation station for about $170 shipped.
Edit: This includes the 7" monitor that will be mounted on the carry case.
Currently two cheap options from two different sources. I ended up going with the CannaKit version. The differences I spotted in the two that might make the price increase reasonable are:
-Cheaper: Kingston memory v Canna: Samsung memory
-Cheaper: No listing on power source rating v Canna: listed rating for RPI B+
-Cheaper: Clear case v Canna: Black case
-Cheaper: smaller profile wifi dongle v Canna: a bit bigger.
Otherwise components will probably be exactly the same. There are other kits from both companies with less or more options. This package seemed like a good starting point for a lot of different projects.
http://www.amazon.com/gp/product/B00LAAZKXQ/ref=oh_aui_detailpage_o01_s00?ie=UTF8&amp;psc=1
http://www.amazon.com/CanaKit-Raspberry-Ultimate-Starter-Components/dp/B00G1PNG54/ref=sr_1_2?s=electronics&amp;ie=UTF8&amp;qid=1422629217&amp;sr=1-2&amp;keywords=raspberry+pi
Non-mobile: http://www.amazon.com/dp/B00G1PNG54
^That's ^why ^I'm ^here, ^I ^don't ^judge ^you. ^PM ^/u/xl0 ^if ^I'm ^causing ^any ^trouble. ^WUT?
http://www.amazon.com/gp/aw/d/B00G1PNG54/
Something like this. Check out Adafruit or Sparkfun for similar kits.
Something like this?
http://www.amazon.com/gp/product/B00G1PNG54
Here is a link to Pi Kit on Amazon, I personally wouldn't buy a kit though.
http://www.amazon.com/Raspberry-Model-Plus-Complete-Starter/dp/B00L87YMGM/ref=sr_1_2?s=pc&amp;ie=UTF8&amp;qid=1410720723&amp;sr=1-2&amp;keywords=raspberry+pi+b%2B
I learned all on my own. Granted I don't do a whole lot of object-oriented programming on a day to day I do write scripts 75% of my time, mostly in PowerShell, some in VBS and even Python.
Python is HUGE in IT. If you look up any job at Google/Microsoft/Pixar/Rocksteady gaming/etc. right now, they prefer you know Python. There are a ton of free tutorials all over the web to browse through but I learned off Codecademy because you can code on screen as you learn.
The bad thing about graduate degrees for people like us that realize what we want to late is the prerequisites. Most graduate programs require you to have a certain amount of mathematics, entry level programming, or equivalent experience before you're accepted, if not a CS undergrad degree. You may have to take classes that don't count towards the degree just to get into the program which, to me, isn't worth the time/money.
I did find a MCIS (Masters of Computer Information Systems) program through Colorado State University (online) that looked slightly promising for me. It does require a certain undergrad GPA, and a GMAT test however but will consider those close. All that being said, I still don't have a Masters and I'm debating going for one like the above. I only really want one because I'm 29 and feel like I'll start losing brain power if I don't consume everything now, like a mid-early-life crisis for nerds I guess lol.
The biggest thing that I could tell you to do right now is to stay motivated. Maybe find an entry level position somewhere and while you're there start working on your programming skills. Don't limit yourself to strictly programming but learn electronics and how software, hardware, and electricity work together. Maybe invest in a Raspberry Pi (like this one) and build something neat using these tutorials. All the while you're gaining a ton of IT and IT Custom Service experience (which you'll never get out of, even as a programmer).
Please feel free to hit me up anytime for any help. :)
EDIT: Sorry so long o_O
If you are looking to go as inexpensively as possible, consider this for $59.99 with prime, includes RPi B+, power, MicroSD pre-loaded with NOOBS, WiFi, HDMI cable, and case:
http://www.amazon.com/CanaKit-Raspberry-Complete-Original-Preloaded/dp/B008XVAVAW/ref=sr_1_2?s=electronics&amp;ie=UTF8&amp;qid=1415822400&amp;sr=1-2&amp;keywords=raspberry+pi+canakit+starter
EDIT: another option, but basically the same:
http://www.amazon.com/Raspberry-Complete-Starter-Quick-Start/dp/B00L87YMGM/ref=sr_1_4?s=electronics&amp;ie=UTF8&amp;qid=1415820344&amp;sr=1-4&amp;keywords=raspberry+pi
+1 for the MCM starter kit. I bought that one even though I didn't really need the other bits because that was the fastest way to get a RasPi3 when everyone else was sold out. However, the shipping was only $10, so I'm not sure what you mean by "load on top".
If you have an Amazon Prime membership, you can get [this kit which isn't terrible] (http://www.amazon.com/Vilros-Raspberry-Complete-Starter-Kit--Clear/dp/B00L87YMGM/) and free shipping.
No, I wish I worked for Amazon! I just love the FireTV.
As a side note, if you are feeling like a good DIY, easy project to be able to emulate anything you want, have a look at getting a Rasberry PI and using the RetroPie image. It was made especially for emulating games and it great. Takes a little while to get configured, but for $60 dollars you can get the whole kit on Amazon, all parts included. You would just need to set it up and provide the Roms:
http://lifehacker.com/how-to-turn-your-raspberry-pi-into-a-retro-game-console-498561192
Kit: http://www.amazon.com/Raspberry-Complete-Starter-Includes-Quick/dp/B00L87YMGM
Resources:
http://blog.petrockblock.com/
http://supernintendopi.wordpress.com/
I'm confused about your starter kit links. The first one you posted is a b+ v1.2, the second is a b+ v1. They both run with 512mb RAM according to the raspberry pi tech specs. Wouldn't I want this kit: http://www.amazon.com/Raspberry-Complete-Starter-Includes-Quick/dp/B00L87YMGM because its a newer revision?
This, for example. NEW B+, case, sd card, wifi, usb, and hdmi for $60.
I'm pretty new to it too, and for me, buying the kit (power cable, hdmi, preloaded microSD, etc.) was a good route. Then you have a choice to make - is it a tiny linux server for you, or do you want to play with making stuff? I am pretty new to it all, but the Raspberry Pi T-cobbler + ribbon cable + breadboard kit (transistors, leds, wires, etc.) was the right combo for me to start learning. From another newbie, the best advice i can give is to watch your voltages!
My Pi: https://www.amazon.com/gp/product/B00L87YMGM/ref=oh_aui_detailpage_o06_s00?ie=UTF8&amp;psc=1
The add-ons:
https://www.amazon.com/gp/product/B00N0R6EVE/ref=oh_aui_detailpage_o07_s00?ie=UTF8&amp;psc=1
https://www.amazon.com/gp/product/B009NC8OS6/ref=oh_aui_detailpage_o08_s00?ie=UTF8&amp;psc=1
https://www.amazon.com/gp/product/B00N4SHO5O/ref=oh_aui_detailpage_o08_s01?ie=UTF8&amp;psc=1
https://www.amazon.com/gp/product/B00D9MK150/ref=oh_aui_detailpage_o08_s01?ie=UTF8&amp;psc=1
More storage:
https://www.amazon.com/gp/product/B00DTZA5S0/ref=oh_aui_detailpage_o03_s00?ie=UTF8&amp;psc=1
With all of that, plus an outlet/box/misc wire from the hardware store I'm now able to control an electrical outlet remotely - pretty basic, but a huge deal for me.
Or get a complete setup, case, wifi, hdmi, power, micro-sd card (loaded) for $49 shipped. I like Make and the Maker Shed, but their prices are just too high.
http://www.amazon.com/gp/product/B00L87YMGM/
Hey there! Just noticed you just joined the subreddit. Welcome, by the way. My name is Andrew, and I'm about to finish high school while being dual enrolled in a vocational school for Computer Networking. Afterward, I plan on getting my BS in Computer Science at a college near me. This is an item I've been wanting for a long time on my wish list, because I have a Raspberry Pi, but no case for it and that's not too safe for the little board. I'll be using it at school a lot to save work on, and I just can't afford a lot of these things. Here's a link to the case.
One thing I think you should get is a Raspberry Pi yourself. You can build retro gaming systems. If you love gaming, then you'd love to play the older games by simply turning a Raspberry Pi into a small retro gaming system. There are tons of free ROMs to download and play online, you just need to figure out how to set it up and it's a wonderful project to start. Here's a link to the Raspberry Pi, Model B+ (512MB).
Thank you very much for hosting this contest. It is very much appreciated!
Probably. I'm guessing that case isn't worth $40 (considering the B+ is only $40 by itself).
Laptop: Dell XPS from 2012
Laptop Stand: [Cooler Master notepal ergostand] (http://www.amazon.com/gp/aw/d/B003GCQ1YI?pc_redir=1413429733&amp;robot_redir=1)
Webcam: Logitech B910 HD Webcam
Speakers: Dayton B652 x2(extra pair upside down)
Keyboard: CoolerMaster Storm Trigger
Mouse: Anker Programmable Mouse
USB Hub: ORICO P10-U2 10 Port?
Computer screens: LG 22" EB2242 x2
Receiver: JVC Something?
Hexagonal device: [Moto Stream] (http://www.motorola.com/us/accessories-headphones-speakers/Moto-Stream/moto-stream.html)
Subwoofer: Dayton Sub-1500?
Headphones: Monoprice 108323?
Hard drive: 750GB WD Black? Not sure
Cased device on top of hard drive: Raspberry Pi with clear case
Chair (this is a hard one): You win
Cheers dude - so this is the one that you're referring to then?
If you want to make a dogeatm, I am down to help out where possible. here is my idea so far:
one of these, for printing the temporary wallet adresses one of these for transferring moneys
in a fancy waterproofing case with some sort of input system for entering adresses. I want to build an doge ATM. but am wondering how to convert dollar bills back into doge, if anyone has any input please do tell, I would like to place a few of these around to increase visibility.
You have done a lot to support the doge community, WOW, recruiting 14 shibes is an impressive feat, and that is what we need.
You could also purchase a Raspberry Pi B+ and learn C development on it. It's a full fledged Linux computer for $40.
You also don't need Linux to learn C. You can get a compiler here.
Or if you're on OSX, just download the developer command line tools from Apple's developer site.
Here's a YouTube video of doing your first C program on a RPi
http://www.amazon.com/Raspberry-Pi-Model-512MB-Computer/dp/B00LPESRUK/ref=sr_1_1?ie=UTF8&amp;qid=1417700281&amp;sr=8-1&amp;keywords=rasberry+pi+b , no wifi though.
Just Breathe!
This will help me relax because I'll be happy kidding it and doing things like running a server or using emulators with it!
It's on my public wish list, should be at the top! :)
mira, aca esta en amazon, el tema es como hacer para que pase en argentina... ahi no conozco tanto...
My setup consists of 5 different cameras.
1x Raspberry Pi B+s running MotionPie with 2x 1080p webcams, 1x Foscam FI8910E POE Camera, 1x Zyxel 720p Camera, and 1x Trendnet IP Camera . All cameras dump footage into iSpy, a windows based free surveillance software. It runs on my server (Windows Server 2008r2 running inside ESXi on a Dell Poweredge R210), saving videos into my Google Drive (uploading them very quickly to "the cloud" for safe keeping, and allowing me to view them remotely or share the storage with neighbors interested in viewing footage). After ~ 2 weeks videos are archived from my google drive onto my 3U SGI Rackable SE3016 (16x2TB Hard drives in RAID6 attached to an LSI 8888ELP passed through to my 2008r2 VM via VT-d) . Everything is powered by a UPS to keep it rolling in the event of a power outage which is why I needed cameras with built in POE or that could use a ghetto POE Splitter with, and my "router" (Zentyal VM) is configured with WAN failover to FreedomPop 4G in case I lose my Comcast.
TLDR: I wouldn't bother trying to mirror my setup, epic amounts of nerdery has gone into it. Instead, I would probably get a Preconfigured Surveillance DVR kit . They offer some rad features without needing the amount of time I put into my setup.
Mine is a small computer thing that's 40 USD and about the size of a credit card. It's called a Raspberry Pi and you can code it/program it to do tons of stuff. People have made cameras to be put on weather balloons and sent into the sky, home automation things, robots, all sorts of things. I plan to use mine (when/if I get one) to make a video game console emulator.
So do I just get a "board"? I don't need to get any sort of accessory or anything to use it? Like [this] (http://www.amazon.com/Raspberry-Pi-Model-512MB-Computer/dp/B00LPESRUK) would be okay?
you can get an RPI on amazon for like 31.77. http://www.amazon.com/Raspberry-Pi-Model-512MB-Computer/dp/B00LPESRUK + http://www.amazon.com/Kingston-microSDHC-Memory-SDC4-8GBET/dp/B00200K1TS/ref=sr_1_1?s=electronics&amp;ie=UTF8&amp;qid=1422336435&amp;sr=1-1&amp;keywords=8gb+micro+sd
~36.76 on amazon.
> How do they use less space?
PoS minting can (at least for most coins) be done on a RaspberryPi which is tiny¹ compared to an ASIC miner.
In addition to not using much physical space a RaspberryPi doesn't consume much energy at all (typical less than 3.5 W).
And Peercoin doesn't need much space on a disk to write the block chain. But that has not much to do with Peercoin being a PoS coin, but with Peercoin's protocol². That makes it ideal for being stored on a RaspberryPi - you don't even need a big SD card for that.
In difference to several thousand USD you might pay for top-notch ASIC miners, you get a RaspberryPi for less than $40. You might be able to use an old mobile phone charger as power supply, if it has enough power (> 700 mA). And you need an SD card of 4 (better 8 GB) size; that's it!
Even if you don't have an SD card and a suitable power supply, you get complete kits for under $60.
¹ 85.60 mm × 56.5 mm (3.370 in × 2.224 in) – not including protruding connectors
² Peercoin has a fixed tx fee of 0.01 PPC/kB transaction size that disincentivizes frequent transactions. In roughly 2.5 years the whole block chain is still smaller than 400 MB (compared to e.g. Litecoin's 4 GB, Dogecoins 9 GB or Bitcoin's 33 GB!)
Amazon seems best...this was what I bought just the other day to get started:
The case is a little bit average I reckon, but it is cheap and does the trick. Plus its really easy to put together.
This is just what I bought, and I'm no expert, so I might have made some bad choices. But this got me up and going and having fun in no time :)
$10 covers insured shipping because its electronics.
Amazon sells them...Amazon Pi's
I have a rasberry pi with a fancy case and everything that I would be willing to trade if you are interested. It is the Model B+ version with an 8gb SD Card, a case, and a micro-usb cable.
I won it at a conference and will probably never use it. I totally want a pebble though :)
So your current set up, does it only do 1 at a time or do you have multiple units? Because you could get these devices, and hook them up to some Raspberry pi's http://www.amazon.com/gp/product/B00LPESRUK?keywords=raspberry%20pi&amp;qid=1451514724&amp;ref_=sr_1_5&amp;s=pc&amp;sr=1-5 and just have it dump into a shared server location with a time stamp. Raspberry pis are the shit!
My proposal is Raspberry pi 2:
Price $36.88
http://www.amazon.com/Raspberry-Pi-Model-Project-Board/dp/B00T2U7R7I
Advantage is that it is versatile and can be used for many other things.
My overview for what I am using it:
http://www.matusbankovic.com/my-raspberry-pi/
Raspberry Pi 2 B+ (Older versions are barely powerful enough for streaming 1080p): http://www.amazon.com/Raspberry-Pi-Model-Project-Board/dp/B00T2U7R7I/ref=sr_1_3?ie=UTF8&amp;qid=1452140774&amp;sr=8-3&amp;keywords=raspberry+pi+2+b%2B
RaspiCam: http://www.amazon.com/Raspberry-5MP-Camera-Board-Module/dp/B00E1GGE40/ref=sr_1_1?ie=UTF8&amp;qid=1452140727&amp;sr=8-1&amp;keywords=raspicam
Extra cable for the camera: https://www.adafruit.com/products/2144
This camera holder: https://www.adafruit.com/products/1434
This flexible camera mount: http://www.amazon.com/gp/product/B00MWNYGUS?psc=1&amp;redirect=true&amp;ref_=oh_aui_search_detailpage
Follow the steps here: https://www.reddit.com/r/raspberry_pi/comments/2ahzp2/raspberry_pi_encoder_live_streaming_to_youtube/
The most important step is to download ffmpeg crosscompiled for arm from here: https://drive.google.com/file/d/0B0OC20ApqKZ_YVB3NHF6VU9XTUE/edit?usp=sharing
Then you can use my script:
./video.sh "Your custom message can go here"
!/bin/bash
SERVER="rtmp://a.rtmp.youtube.com/live2"
KEY="YOUR YOUTUBE KEY GOES HERE"
while true; do pkill -9 raspivid; pkill -9 ffmpeg; raspivid -o - -t 0 -ISO 100 -ev 0 -w 1920 -h 1080 -fps 25 -b 5500000 -g 50 -awb off -awbg 1.7,1.8 -st -ae 64,0xff,0x808000 -a "$1" -a 1025 | /home/pi/arm/bin/ffmpeg -re -ar 44100 -ac 2 -acodec pcm_s16le -f s16le -ac 2 -i /dev/zero -f h264 -i - -vcodec copy -acodec aac -ab 160k -g 50 -strict experimental -f flv $SERVER/$KEY; done
You should be able to do that fairly easily off an Rpi, this Rpi2 model B most likely can perform on par or better than your P4 assuming everything you use is ported to ARM.
Rpi A+ might fit your budget a bit better, though it may not be able to do as much at once, you may need a large SD card or USB drive with some swap space.
This PCduino is probably the cheapest you'd want to go.
Double check your current normal use against what each of these boards offer so you don't end up spending money on something cool that isn't capable of doing what you need it to.
the best rpi hardware wise is http://www.amazon.com/Raspberry-Pi-Model-Project-Board/dp/B00T2U7R7I/ref=sr_1_4?s=pc&amp;ie=UTF8&amp;qid=1449084171&amp;sr=1-4&amp;keywords=raspberry+pi
if you are willing to spend this much thats great. if not i wouldnt go with the one you linked either (the 512mb B+) which is only slighty cheaper but more or less outdated, instead try to get the new zero, https://www.raspberrypi.org/products/pi-zero/ for the novelty factor of being a 5$ computer
it is hard to come by currently but cheaper.
In either case the person needs a usb power adapter and a sd card to be able to use it. this is not something you necessarily have to gift as well and he/she probably already owns these things
check out /r/raspberry_pi for more information
Maplin doesn't have a broad selection of Raspberry Pi components (and 2 out of 3 stores don't have any Pi in stock, just their own expensive bundles).
Plus, they are indeed more expensive than buying from Amazon.
I'd suggest to buy from Amazon, and have them shipped to your place (free delivery is an option if you can wait).
Just a comparison will give you an idea of why Maplin is "not cheap"
Maplin store: http://www.maplin.co.uk/p/raspberry-pi-2-model-b-quad-core-1gb-mainboard-n02eb
Amazon UK store:http://www.amazon.co.uk/gp/product/B00T2U7R7I
https://www.amazon.in/gp/aw/d/B00T2U7R7I/ref=ox_sc_act_image_1?ie=UTF8&amp;psc=1&amp;smid=ADVWD83UUU443
More Info on my train of thought.
I believe that this is the GitHub repository. My ideal concept would be to run HypriotOS on a Raspberry PI on a shelf at home with Docker running your web container. With a LetsEncrypt TLS certificate set to renew every 2 months.
Welcome to a TNO email model. You can now encrypt your emails to anyone on any vanilla SMTP server and you don't need to install apps anywhere and you can trust your own webserver as much as you can trust your ability to host a secure Raspberry PI.
Side note:
If you think that hiding your email from Google is going to stop them from seeing the bits and bytes eventually you're kidding yourself. So if you can't beat em use em!
My concerns:
Edit: readability and clarity
http://www.amazon.com/gp/aw/d/B00T2U7R7I/ref=mp_s_a_1_1?qid=1449554166&amp;sr=8-1&amp;pi=SX200_QL40&amp;keywords=raspberry+pi+2+model+b&amp;dpPl=1&amp;dpID=4133JwedpXL&amp;ref=plSrch
There is also http://www.amazon.co.uk/gp/product/B00T2U7R7I which is in stock in the Amazon warehouse so should ship pretty quickly
Additionally I had an IoT power relay connected to the GPIO pin 14 in order to switch the humidifier on when the humidity drops below 80%. Upon disconnecting the relay, the BME280 sensor ran stable all day long (previously the I2C bus crashed after a couple hours). The IoT power relay only draws 2-3 mA at 3v3, and I am now successfully running the BME280 sensor off of a GPIO pin 17, so the total mA between the relay and sensor should be way less than 50 mA. I'm not sure why the relay causes the I2C bus to crash.
The BME280 sensor seems to run fine off of GPIO pin 17, being switched on for 2 seconds before taking a reading and switched back off. I think this setup may be advantageous, because it should prevent the sensor from heating up and giving inaccurate temperature readings.
Any updates from inventables on the app? You can have the router turn on and off thru easel just need a relay
Iot Relay - Enclosed High-power Power Relay for Arduino, Raspberry Pi, PIC or Wifi, Relay Shield https://www.amazon.com/dp/B00WV7GMA2/ref=cm_sw_r_cp_api_FUY-zbBTQD5GY
Could have used one of these and saved some time:
http://www.amazon.com/Iot-Relay-Enclosed-High-power-Raspberry/dp/B00WV7GMA2?ie=UTF8&amp;psc=1&amp;redirect=true&amp;ref_=oh_aui_detailpage_o04_s00
Oh, it's "sump pump".
Maybe toss an inexpensive relay module into the mix. Code the relay to close at a temperature around 90F so when you surround it with your hands the relay clicks. You can explain the relay can be connected to a fan or HVAC control to start cooling.
Edit: Or, if you have ~20 USD to spend pick up one of these guys and actually have a fan turn on! Note: This is certainly not the cheapest way to accomplish this!
You can do the same this with a Sonos Connect by adding a 12V trigger using one of these:
https://smile.amazon.com/Bobwire-Trigger-Compatible-ChromeCast-Amplifiers/dp/B07QS89MZG/ref=sr_1_1?keywords=dat1&qid=1567801760&s=electronics&sr=1-1
&#x200B;
Yes there are a few options for AC power outlet switched by 12V. Here are a few:
EU:
https://www.amazon.de/VOCOMO-Schalt-Steckdose-AV-Verst%C3%A4rker-Standby-Killer-Zwischenstecker/dp/B01CJOZYUU/ref=sr_1_1?keywords=12V+vocomo&qid=1565907878&s=gateway&sr=8-1
&#x200B;
USA:
https://smile.amazon.com/Niles-AC3-FG00242-Voltage-Triggered/dp/B00086IDDC/ref=sr_1_3?keywords=niles+ac+switch&qid=1567801822&s=electronics&sr=1-3
https://smile.amazon.com/gp/product/B00WV7GMA2/ref=ox_sc_act_title_2?smid=A3D4241373L385&psc=1
Like this?
https://smile.amazon.com/Iot-Relay-Enclosed-High-Power-Raspberry/dp/B00WV7GMA2
BTW, the trigger on the Port is meant for just amps in general, not the AMP, which is the Sonos amp.
Cheers.
Here's another option: https://www.amazon.com/Iot-Relay-Enclosed-High-power-Raspberry/dp/B00WV7GMA2
I agree, if you knew what you were doing its actually a pretty simple system. I could handle the entire control surface pretty well through a Pi running node-red and GPIO 3.3v control of some 15A relays...
On the other hand, I'm NOT an EE, and dealing with real 120v through circuits I would design would make me afraid I was going to burn my house down. There are pre-rolled addressable power strips that I could do this with, but price-wise I think it'd hit a LOT closer to an Apex price at that point. There's stuff like this out there too that might be closer to price though.
I considered this as it's basically how my home-automation system and custom alarm system function, but I'm punting to ZWave for actual switch control. It makes me wish I felt more comfortable around 120v circuit design like this, because I'm pretty sure I'd like the control afforded by this approach.
I used one of these:
Iot Relay - Enclosed High-Power... https://www.amazon.com/dp/B00WV7GMA2?ref=ppx_pop_mob_ap_share
Along with the powerblock hooked up to the on/ off switch.
https://blog.petrockblock.com/2015/07/04/powerblock-another-power-switch-for-the-raspberry-pi/
I bought this (https://www.amazon.com/Iot-Relay-Enclosed-High-Power-Raspberry/dp/B00WV7GMA2/ref=sr_1_1?keywords=Iot+Relay&amp;qid=1571166495&amp;s=electronics&amp;sr=1-1) to plug my AV rack fans into. Uses the 12V trigger from the receiver to energize the appropriate outlets on the brick. I also got this (https://www.amazon.com/gp/product/B004GIGTQ6/ref=ppx_yo_dt_b_asin_title_o04_s00?ie=UTF8&amp;psc=1) to simply wire the trigger to the brick.
I have the same concern, so I'm getting:
The smoke detector will be mounted inside the printer's enclosure. The SM120X relay will turn on the Iot Relay box via it's normally closed contacts. The printer and accessories are plugged into the Iot relay. Thereby, if the smoke detector goes off, which should happen pretty quickly given the small enclosed space, power will immediately be cut to the entire printer.
As a phase two, I'm going to add a CO2 suppression system:
I'd plug the solenoid into and additional Iot relay, this time wired to the normally open contacts of the SM120X relay.
In the final system, any smoke would cause the printers power to be shut off and the enclosure filled with CO2. Given the amount of CO2 (~40 cubic feet in a 10 cubic foot enclosure, it would not only smother any actual fire, but cool down the printer significantly.
Iot Relay - Enclosed High-Power Power Relay for Arduino, Raspberry Pi, PIC or WiFi, Relay Shield https://www.amazon.com/dp/B00WV7GMA2/ref=cm_sw_r_cp_api_i_rFMTCbZKWEWY0
look at the Volts and watts and amps. needed.. The pi gpio pins can only supply a little bit of power.
9V .48W, the fan specs say.
https://www.element14.com/community/thread/20982/l/raspberry-pi-gpio-pin-max-current?displayFullThread=true
gives the max Amps from a gpio in milliamps. at 3.3V or 5V.
short answer: you are not going to be running those fans from a gpio pin directly.
https://howchoo.com/g/m2qwmte5nzk/how-to-use-a-relay-with-a-raspberry-pi
so it is going to be a matter of how fancy you want to get.
Look around for other relay solutions also.
personally I use this to turn on big things...
Iot Relay - Enclosed High-power Power Relay for Arduino, Raspberry Pi https://www.amazon.com/dp/B00WV7GMA2/
I had to make some modifications to where the extruders sat to make it functional but this is my enclosure. I use OctoPrint and this Power Strip to remote control powering on and off the printer and lights. It's got a couple fans and some activated charcoal batting to help with any smell.
get this instead https://www.amazon.com/gp/product/B00WV7GMA2/ref=ppx_yo_dt_b_asin_title_o01_s00?ie=UTF8&psc=1
Zwave operates at 900mhz in the us...the one i posted will hook to your wifi for control..... control is an app on my android pjone/tablet..... you can get cheaper hubs in it $50 range when i got mine, but they are not internet connected or app controlled...... a hub is required to do zwave..... but not all sensors connect to all hubs.....
Saw this today....with it, a RPi, and a smoke detector that has a digital output you could do the same... or use a cheap pair of temp sensors... one for ambient temp, the other above the printer... have it read both every second and if the top one rises super high and super fast assume a fire.. might be able to wire directly from detector to control circuit.....
https://smile.amazon.com/gp/product/B00WV7GMA2/ref=ox_sc_act_title_1?smid=A3D4241373L385&amp;psc=1
I also use these.. turns off the water in case of a leak...or tells me i left the garage open....working on a circuit to let me remote close it and 'accidentally' lock the wife out...j/k
https://smile.amazon.com/gp/product/B01LXR0B8Q/ref=ppx_yo_dt_b_search_asin_title?ie=UTF8&amp;psc=1
https://smile.amazon.com/gp/product/B01JGMZNNG/ref=ppx_yo_dt_b_search_asin_title?ie=UTF8&amp;psc=1
https://smile.amazon.com/gp/product/B01JGMZNNG/ref=ppx_yo_dt_b_search_asin_title?ie=UTF8&amp;psc=1
Hey thanks! This is basically what I was thinking of. I did a little more research on it and found this for cheaper, and has more outlets:
[Iot Relay Amazon](
https://www.amazon.com/gp/aw/d/B00WV7GMA2/ref=mp_s_a_1_1?ie=UTF8&amp;qid=1481761087&amp;sr=8-1&amp;pi=SX200_QL40&amp;keywords=iot+relay&amp;dpPl=1&amp;dpID=51UkBI6%2BtmL&amp;ref=plSrch)
Me too, I have one of these relay power strips controlled by the XController. Both the spindle and vacuum are digitally controlled so they shut off when the cut is done.
https://smile.amazon.com/gp/product/B00WV7GMA2/ref=oh_aui_search_detailpage?ie=UTF8&amp;psc=1
I have a webcam pointed on the XCarve. The XController itself is plugged in through a WeMo switch. I occasionally start a long cut and can't sit there and babysit it. I broke a bit and ruined a piece of work once, which sucked. Now I can remotely monitor the workpiece and if something goes wrong I can remotely shut off the power to the XController, which both stops the movement of the stepper motors but also via that relay shuts off both the spindle and the vacuum.
Being in the room is safer, and you should never ever leave a machine running... but I have kids and a day job and finite time, so I figured out this adequate workaround.
I got the canakit, a Bluetooth controller, and 32gb micro sd. Around $70 give or take.
CanaKit Raspberry Pi 3 Kit with Clear Case and 2.5A Power Supply https://www.amazon.com/dp/B01C6EQNNK/ref=cm_sw_r_sms_c_api_56HJybVC09JWK
Matricom G-Pad BX Wireless USB Rechargeable Bluetooth Pro Game Pad Joystick (Samsung... https://www.amazon.com/dp/B015YF3YZ8/ref=cm_sw_r_sms_c_api_H4HJybFKP1YC5
Samsung EVO 32GB Class 10 Micro SDHC Card with Adapter (MB-MP32DA/AM) https://www.amazon.com/dp/B00IVPU786/ref=cm_sw_r_sms_c_api_G7HJyb7D59XN7
Here's a kit that includes a raspberry pi, a case, a power supply and heatsinks: http://www.amazon.com/dp/B01C6EQNNK
In addition to that, you'll also need a microSD card for the OS. The size depends on how much data you intend to store on it, but 32GB is a good start: http://www.amazon.com/dp/B010Q57T02
Once you have the microSD card, you'll want to download LibreELEC: https://libreelec.tv/download-temp (grab the "RPi2 and RPi3 Build" image from the "New install" section)
And then write it to the microSD card: https://wiki.libreelec.tv/index.php?title=Installing_LibreELEC_on_the_RPi
This Retrowiki explains everything and also helps with troubleshooting. I would use This Kit. Then a microSD card, HDMI cable, any USB controller(s).
Canakit and Adafruit are reputable U.S. vendors. You might also try Amazon. I got the Canakit Complete Starter Kit from there awhile back, no problems.
Partly it depends what you have on hand and what you need. Do you have a bunch of spare HDMI cables or micro SD cards hanging around? You may find it cheaper to buy a la carte. Will your project involve extensive use of GPIO? Maybe a big starter kit will work for you.
If you're like me, and have several Pis scattered about doing mostly single jobs (e.g., Pi Hole) then maybe you don't need lots of HDMI cables or big SD cards, and might instead lean towards simpler kits like this and buying SD cards in bunches. It really depends on what you're going to do. Of course, just because you don't use something from your starter kit in your first Pi project doesn't mean it won't get used in your next!
Snarky answer:
Yes. Namely, https://www.google.com/chrome, https://www.getfirefox.com, or do Google searches for Opera, Brave, Chromium (Chrome minus the Google tracking crap) or Waterfox. Optionally (to keep keychain management going and even allow export outside of macOS) https://keepass.info or https://macpassapp.org and and follow these tweaks to these instructions. For an even briefer switch, go to the Apple App Store, grab your choice of Chrome or Firefox, optionally grab MacPass if it's on the Apple Store, and follow the instructions on how to import your keychain. Then install uBlock Origin (and optionally Nano Defender), install a browser extension (like MacPassHTTP) that works with MacPass, and there you go (even if it isn't QUITE as pretty as Safari, sorry, I can't help with that, functional ain't always pretty, let this be a life lesson).
If you insist on sticking with an insecure, unsecurable browser because of Pretty, go to Amazon and get a basic Raspberry Pi 3 starter kit, go to https://pi-hole.net/, and set up a nice portable firewall for your Macs. And never, ever connect to the Internet unless it's through that PiHole. No, not even at Starbucks.
Not at all snarky, but more in depth answer pointing out WHY this issue exists and why pretty much the ONLY fix is switching browsers (tl;dr: It's Apple's fault):
Apple, after about fifteen years of actually trying to embrace the fact that macOS (and Safari) were based on open source/free software with a lot of proprietary hints and kinks for Pretty and User-Friendliness, has decided to go back to the bad old days of going Full Walled Garden (largely in the name of integrating macOS and iOS code and business models--especially the latter--iOS has always been quite a bit of a Walled Garden, and a Profitable Walled Garden, and Apple very, very much wants to do the same with its flagship NetBSD derivative, and as of late Apple has been working very, very hard in turning what was formerly a nice serviceable PPC-then-Intel-containing, NetBSD-derivative-running, series of Good Boxen into an A-whatever-based glorified iPad Pro with delusions of grandeur).
In the case of Safari (at this point, the sole remaining Webkit-based browser that is not for a smartphone) this actually goes to multiple levels that, for all intents and purposes, actually now make it literally impossible for anyone but Apple to actually develop a secure adblocker:
a) Starting officially with macOS Catalina, and apparently unofficially with latest releases of Mojave, Safari is completely doing away with its old format of extensions. Normally this would not be a huge problem (Firefox pretty much did the same thing with Firefox 57, which is why Waterfox exists) except for the following things:
b) Pretty much all new extensions can't be installed externally--you have to get them from the Apple App Store, and there is apparently a Charge to do so. This explicitly includes all extensions with adblocking or script-blocking capabilities.
c) Unlike in the past, extensions for Safari have to be written in Swift (Apple's own proprietary Objective C fork that is heavily, heavily optimized towards iOS nowadays) for certain types of functionality--and the way Apple has redone extensions means that the new way of doing "extensions that block content" actually doesn't block all of it, because (among other things) the tools to even do the blocking no longer exist for third-party developers to use. The actual import of blocklists would require at least a second extension (more on this below) and blocking of hostile scripting may be all but impossible in the new model (because apparently actual content blocking by lists is ONLY done by Safari, and Safari adblockers in a post-Safari-12 world have to pretty much compile a list of Bad Things To Block and then send that on to Safari's internal content blocker in JSON).
d) Apparently Apple also has a completely undocumented 50,000 entry limit per blocklist, which means that multiple blocklists have to be imported, and even Adguard has had to resort to some very kludgy methods to get around this (from multiple "daughter extensions" to injected scripts that will work until Apple closes that hole).
Suffice it to say that in a post-Safari-12 world uBlock Origin would require so much recoding (for actually less functionality) that it wouldn't be uBlock Origin anymore, and that's why uBlock Origin has effectively been an abandonware extension since April 2018.
In my opinion (as a network engineer, as a security engineer) the only things that a browser that cannot have proper adblock functionality should ever be used for are to download browsers that can be properly secured and for OS-specific stuff that ONLY allows connections with the default browser shipped with a device. (Make no mistake: surfing "naked" is dangerous. I've had to clean up more than one infected computer at a workplace where (due to a site's heavy use of ActiveX) someone HAD to use IE, and managed to get infected even from ads from the likes of CNN and Bloomberg News. Hell, the advert networks of CNN and Amazon (among others) have in past been hijacked for ransomware droppers; if I can't trust ad networks to keep their sites clean, I just don't trust advert networks by default.)
In the bad old days I gave that advice for IE (as the old Rick and Morty meme goes: The purpose of life of IE is to download Chrome) and in the post-Safari-12 era that's pretty much the explicit advice I give for Safari--its purpose in life is to go to the App Store and to download one's choice of a securable browser. In this case, it means something derived from Chromium (Chrome, Opera, Brave, plain-jane Chromium, and approximately a half billion other browsers based on the Chromium code), Quantum (Firefox and Waterfox alpha 68), or Gecko (Waterfox and about half a billion other derivatives). Apple in their infinite lack of wisdom (which tends to creep up about, oh, every 20 years or so--ask any old Apple geek who remembers the 90s) has denied adblock creators the tools to actually effectively block ads and malicious scripts in Safari, so it can no longer be considered secure.
It's really easy to put together a Raspberry Pi 3 kit, put Retropie on it, and load ROMs onto it. I've put together 2 in the last month, as well as one of those Pi Carts (pi zero with retropie in a nes cartridge).
I used this kit. Just be aware there might be extra tabs. I crushed a USB port on the last one, as I wasn't paying attention. You can snap the plastic tab off easily before installation. I may just attempt to solder a new set of ports to it.
on a side note. your most inexpensive way to get playing third strike while learning the programming part, before making a big commitment to the cabinet parts would be to buy the raspberry pi (canakit) and hook it up to a TV until you have the software where you want it. Then you can build a cabinet around it and you know it will work.
if you want to go this route you will need
RP3 canakit
SD card you dont need one this big but it will allow you to upgrade your library forever. I bought 3 cards on the way to this one. Should have got the big one to start
and any controllers. PS4 controllers work best in my experience, although i have used ps3 as well. You can check a thrift shop or buy these sweet controllers although i have not personally tested them
If you do get one get this first
CanaKit Raspberry Pi 3 Kit with Clear Case and 2.5A Power Supply https://www.amazon.com/dp/B01C6EQNNK/ref=cm_sw_r_cp_api_i_xqF5CbW15W52K
[Rasberry pi, heat sinks, Power Supply, Case] (https://www.amazon.com/gp/product/B01C6EQNNK/ref=oh_aui_detailpage_o02_s00?ie=UTF8&amp;psc=1)
Memory Card 32GB
Total is $63 . Then you can find a bluetooth controller or a wired USB one like this 2-pack for $13
So in total your spending close to $73. But unlike the NES Mini this will play Atari, Gameboy COlor, Gameboy Advance, Sega, Snes, PS1, N64(results vary). If you want more PS1 and N64, maybe look into a bigger SD card. If you want SNES and below the 32GB is more than enough.
ALso Retropie has some cool ports build right into the OS you can install very easly.
Alright, here is how to install RetroPie (to play classic games)
For the raspberry pi, get this set and a class 10 micro SD card.
Buy a Raspberry Pi kit. Install Pi-hole. No more ads on any devices on your network.
Sorry man, easter.
Here is a dece kit that comes with the raspberry, a power supply, and a case.
SD card for it
SD card reader if you don't have a micro sd slot on your pc/laptop
USB controller of choice - I like my xboxone plugged in with usb (haven't gotten bluetooth to work) but if you want a rec on a cheap one let me know.
Retropie getting started guide
edit: I already had psus, sd cards etc, and got some cheaper stuff in bulk but the kit etc makes it a little easier on you. coolrom.com and emuparadise.me are reasonably trustworthy for roms.
Canakit with a Pi 3 on Amazon for $42 without case or $49 with case
https://www.amazon.com/CanaKit-Raspberry-Premium-Supply-Listed/dp/B01C6EQNNK/ref=mp_s_a_1_3?keywords=canakit+raspberry+pi+3&amp;qid=1569846975&amp;s=gateway&amp;sprefix=canakit+&amp;sr=8-3
Solely between the two, I would say get the first one (5.25v, 2.4A). The raspi is very sensitive to small fluctuations in power, so I recommend a power supply with a ferrite bead (the thick cylindrical thing on this cable)
Here's the power supply I've been using for the past few months (amazon). If you're not getting a starter kit, I'd recommend this as your power supply.
This $43 kit is a link to a <$50 "bare essentials kit" on amazon. My reddit secret Santa actually sent me this kit last week: no complaints(:
this $50 kit is the same as the above, but includes a case
Ok....the $45 throws me a bit. My first thought was annova immersion circulator. It's $99-150 and works with the iPhone/android. It keeps water at exactly the temp you want to cook the food to. Think of it like a super exact crock pot.anova
Another option is a raspberry pi. [raspberry pi 3 kit](CanaKit Raspberry Pi 3 Kit with Clear Case ahttps://www.amazon.com/dp/B01C6EQNNK/ref=cm_sw_r_cp_api_Ovdryb4F5Q4ZB)
The kit is $50 but you can get a standalone for $35. Mini computer great for DIY or tech ideas. I'm getting one to make a retro gaming console like the Nintendo classic.
Yeah. For example this is the kit I originally first bought. It's just the very basic kit. RPi3b pcb, case, psu and two heatsinks.
[Edit] oops wrong link.
Here’s a good starter kit: [Amazon](CanaKit Raspberry Pi 3 Kit with Premium Clear Case and 2.5A Power Supply (UL Listed) https://www.amazon.com/dp/B01C6EQNNK/ref=cm_sw_r_cp_api_i_gqx2DbKBTWK1Y)
Note that you’ll need a Micro SD card as well.
Some may say a Pi 2 is good enough for Volumio, but a 3 is more versatile if you plan to not stick with it for your music server.
We understand that Homebridge is daunting for people who don't know Linux, or even heard of it. HOOBS is trying to change that.
We make documentation for HOOBS, but most of it applies to Homebridge as well. This set of docs https://github.com/hoobs-org/HOOBS/wiki/2.5-Installing-from-Scratch will help you setup the system for HOOBS or Homebridge.
---
However if you don't want to setup Linux. You can purchase a Raspberry Pi, case and power supply on Amazon https://www.amazon.com/CanaKit-Raspberry-Premium-Supply-Listed/dp/B01C6EQNNK/ref=sr_1_4?keywords=raspberry+pi&qid=1572280456&sr=8-4
Then you can download and flash an image to a micro SD card. You can download or purchase an SD card from our website https://hoobs.org/. If you don't wish to donate and simply want to download the image, it is on GitHub https://github.com/hoobs-org/HOOBS/releases.
You can flash the HOOBS image using the balinaEtcher. https://www.balena.io/etcher/
---
We also sell the HOOBS Box. It is a Raspberry Pi with Homebridge pre-installed and ready to go. You can also find that on our website. https://hoobs.org/
Okay so I don't actually think it's waterproof but I found this listing:
CanaKit Raspberry Pi 3 Kit with Clear Case and 2.5A Power Supply https://www.amazon.com/dp/B01C6EQNNK/ref=cm_sw_r_cp_api_w9GoybRBC3EF8
My husband recently bought a Raspberry Pi and is having a field day with it. It isn't really my thing, but this is what he went with. Something like this might be of interest for him.
https://www.amazon.com/gp/aw/d/B01C6EQNNK/ref=mp_s_a_1_1?ie=UTF8&amp;qid=1493003373&amp;sr=8-1-spons&amp;pi=AC_SX236_SY340_FMwebp_QL65&amp;keywords=raspberry-pi&amp;psc=1
Raspberry Pi kit will be fun too. Tell him to set up a Pi Hole or Retro Pi.
Thanks for the offer! I may just take you up on it. I decided to order THIS from Amazon with a 32gb MicroSD card the other day. Still have to get ROMs and do more research, but that is this evening and tomorrow before Easter Sunday. Will probably just use my PS4 controller for the time being, but I really would like to get a classic looking NES/SNES controller for the aesthetics. I really want the kids to have the same sort of experience I had.
Basically I am just looking for the classics, and your link to Racketboy looks real useful. I have seen a few rom packs out there with basically every NES and SNES game out there, but I am always worried about authenticity. I was reading one site earlier this morning and it mentioned that some of the bigger games like Zelda were in spanish, which is a problem. Looks like there is a lot of work to get all this done, so I may have a few questions.
I run it on a Raspberry PI I bought on Amazon
https://www.amazon.com/gp/product/B01C6EQNNK/ref=oh_aui_detailpage_o07_s00?ie=UTF8&amp;psc=1
I saw that one and it seemed to have more than I wanted which is why I was leaning towards https://www.amazon.com/gp/aw/d/B01C6EQNNK/ref=mp_s_a_1_3?ie=UTF8&amp;qid=1482893142&amp;sr=8-3&amp;pi=SY200_QL40&amp;keywords=raspberry+pi+3&amp;dpPl=1&amp;dpID=61Kje-Jv3AL&amp;ref=plSrch
Does the pi really need heatsinks?
Eh, you don't need the lights unless your planning on using the GPIO pins to do projects like robots or other things. The Board had a built in power led already. I'd recommend this one if you already have unused SD cards laying around or go the next step up with 32GB SD included. It came with a USB micrsd adapter that has been really handy.
https://www.amazon.com/gp/aw/d/B01C6EQNNK/ref=mp_s_a_1_3?ie=UTF8&amp;qid=1503337276&amp;sr=8-3&amp;pi=AC_SX236_SY340_FMwebp_QL65&amp;keywords=canakit&amp;dpPl=1&amp;dpID=61Kje-Jv3AL&amp;ref=plSrch
Buy
($6)Wires:For the MOFSET mod
($1o)MOFSET
($6)Wire spades:For the MOFSET mod
($8)Assorted M3 Bolts:You need some for a few mods and for the bolts you will inevitably strip on this
cheapwonderful machine($13)Longer assorted M3 Bolts:For a few mods
($9)M4 Bolts:For one of the mods
($9)Metric allen wrench set:Had to order one of these since metric tools aren’t common round these parts
(~$20) PLA of preferred choice- You’ll run out of the sample bit quick so go ahead and order a roll or two to be prepared. You will note some upgrades require ABS so a small spool of that to your order will also help.
($6)M3 Lock nuts:Critically needed for a simple mod
($10)Threaded rod and nuts:Please note that this item seemed difficult to find online. I recommend going to your local hardware store and getting two 5/16” rods of at least 16” in length. They should have an assortment of threaded rod in various lengths available. Also note that the pitch of the threading matches the nuts you buy. Further instructions regarding this can be seen in Azza’s Z-Axis braces below.)
($6)9mm Wrench for the nozzle: Don’t wait for your first clog, go ahead and have this on hand to remove/change the nozzle. Note to only tighten/loosen the nozzle when heated.
Below is the order of printable upgrades I recommend but I suggest you mix in a few other prints along the way because this is a hobby after all and you should be having fun. It helps to have your quality as tuned in as much as possible for some of these so be patient and keep trying if you need to.
Print
Spool holder- temporary : Until you can mount your spool on top of the enclosure or any other personal preference.
Belt tensioner- print x2
Z-brace
Shielded stop button
Cable relocator : It’s a pain, but if you spend the time to do this and turn your extruder motor 90 degrees then you can get the full Z height without ruining your cables. It does involve opening all the cables to the PSU and feeding a few extra inches back through the cable chains.
Cable shroud : Looks nice if you do the cable relocator.
The following need to be printed in ABS:
M3 Bed Nut retainer: 10/10 upgrade. I know they look worse than the nice metal stock ones, but these help keep your bed level longer.
CiiCooler
Glass bed Holder
Now that the first major round of printed upgrades is done it’s time to shift to a few more supplies to pick up to really fine tune the machine.
Buy
($5)Radial fan: For CiiCooler
($5)Glue sticksThis and a glass bed is magic
($25)Borosilicate glass 8” x 8”
($26)Y-Carriage plate upgrade: This has been a nice upgrade as I now only need to relevel the bed every couple weeks instead of every print. Check out this guide for a ‘how to’ as well as a free upgrade by shifting your Y pulley over.
($15)rechargeable dehumidifier: For keeping in the bin with your opened filaments
($9)Extruder gears: Might be able to hold off on these, but will need eventually. If for some reason you have a Maker Select with metal X-axis blocks (V1 and V2, but not V2.1) then this is a must. You can follow this guide for a how to.
($28)Metal extruder plate and lever: Not needed, but nice.
($14)Noctua 40mm fan: Not needed, but makes the printer a lot quitter. A LOT quieter.
($50)MicroSwiss All Metal Hot End: The destruction of my PTFE tube by this point pushed me to doing this upgrade. If needed you can follow this guide for replacement. Remember to tighten/loosen when the nozzle its hot.
($6)Ceramic cotton: Tore off the stock one when replacing for the all metal hot end by accident. At least its thicker than stock
Now that the printer is in its final form, its time for the enclosure which is a stacked Ikea Lack hack.
Print
Spool holder
Pi Case
120mm fan cover
Fan grill
120mm fan PSU modification: I edited this to fit upside down since my PSU is mounted on the underside. This was nice since I blew the 40mm fan anyways so it made everything a lot quieter than before.
IKEA Lack filament guide
Webcam holder: This is one I designed specifically for the webcam I happen to have lying around. The camera mount piece can be changed out no problem though for what ever webcam you have or buy. The SketchUp file is included on Thingiverse for such purpose.
Buy
($20)2x Ikea Lack: Luckily there is one right down the street from me. I am located in North America though, so we do not have the STUVA, if you live literally anywhere else you may check in to this as an alternative.
($80)Plexi glass for enclosure: Could be cheaper alternatives, but it looks cool
($9)Foam pads for feet
($42)Raspberry Pi3: For OctoPrint. I also suggest using a different USB cable than the stock one provided by Monoprice or you will have issues.
($9)2x 120mm fans: Used for the power supply cooling and enclosure
($6)Rocker Switches so that the enclosure fan can be on for PLA, but off for ABS
($15)Dimmable LED lights
($10)8mm LED light connectors
Total:
$250 printer + $452 upgrades/parts + ~$80 PLA/ABS to date
Get a Raspberry Pi 3 B, or 3 B+(the B+ just has better wifi, and alittle more overclocked CPU), a 5 volt 2.5+amp power supply, and micro SD card is the minimum to get it all working. I would also invest in a case of some sorts, you should be able to pick a case up for around $5 more.
Here is a 3 B+ kit on Amazon, without case, and here is a 3 B kit on Amazon. You would just need to add a 4+ gig micro SD card to get either working.
You could get away with a Raspberry PI 0, but you would need some adapters for USB, and HDMI, which might save you a few $$, but it can also increase the headache level as some adapters do not play well.
Can't beat AMAZON Pi3 w/power supply for $43 shipped not going to find a better deal than that.
A really fun Raspberry Pi project. My goal was to keep as much of the soul of the Atari 2600 as possible. It was important to me to keep the mainboard in the unit. Unfortunately both the chips for the Television Adapter Interface and the CPU had to be removed so that the HDMI connector would fit. I mounted the chips inside the body to still be present.
It cost a little more to build it this way but I'm extremely happy with the result. My total came to just over $150, with the majority of the expense being the Raspberry Pi 3 and a 256 GB Micro SD Card. I guess I’m an idiot because I meant to buy a 3B+ but just now noticed I got only a model 3. Oh well.
There are 3 USB ports and 1 HDMI port extended. The power switch for the Pi was wired to Game Reset switch since it's a momentary switch. A wireless keyboard with touchpad is connected directly to the Pi.
I'm currently running the 256GB VIRTUALMAN-PLAYBOX! v2.0-4.4.11 RHODIUM RETRO-PARADISE image.
The stuff I bought to build this mod:
Well, you're using an external HDD to host an OS which is already not ideal. I'd suggest you look into virtualization...
https://www.youtube.com/watch?v=prP2HWenpmQ
This way you can run linux in a window while still being in windows. Another option is a raspberry PI. which is also quite convient and theres more projects you can do with it. If you don't want to carry an extra mouse/keyboard/monitor. You can use SSH to remote into your PI (This will be command line only)
Yes, that is exactly what I have. It is the one that comes with the Canakits that I got from Amazon.
https://www.amazon.com/gp/product/B01C6FFNY4/ref=oh_aui_detailpage_o00_s00?ie=UTF8&amp;psc=1
this is the kit i bought. https://www.amazon.com/gp/product/B01C6FFNY4/ref=oh_aui_search_detailpage?ie=UTF8&amp;psc=1
get this, it is just the Pi, a 2.5A power supply, and two heatsinks. Your really paying for the beefy power supply and the Pi, the heatsinks are just kinda .. bonus.
http://smile.amazon.com/gp/product/B01C6FFNY4
You don't need another micro sd card, you have the one from the dead Pi, and if you have a case on the dead Pi, remove it and put it on the Pi 3. The Pi 2 and Pi 3 have the same case layout and form factor, so it will fit.
Theoretically, all you'd need is this, though you'd have to provide your own controllers.
If you game at all though, you've got a bunch of PS3/Xbox360/PS4/X1 controllers around. If not, you can get cheap controllers pretty much anywhere.
Once you have the kit, go to RetroPie and install following their instructions. You'll have to find the ROMs and CD images yourself, but if you have the VIMM and vigor to find it, I'm sure you'll manage.
You basically buy one of these, proceed to connect it to my pc with a USB to sdCard thing I bought for $5, then use Win32DiskImager with the EmulationStation image and just get a wireless keyboard + 8bitdo bluetooth controller, an XBOX controller, a Steam controller or one of the wired controllers (Bluetooth on Raspberry Pi is trash so only 8bitdo works right). Run it then get some ROMs and either connect via WinSCP to the ftp folder and put them in there or just connect to the device and put the files in the SDCard. There is a thing called Selph's scrapper which automatically scans a database and puts the name of the game with images and descriptions including user ratings next to all the emulated roms.
It will probably require a day of assembly unless you get one premade with games, I made a 32gig image and just made like 10 of these things for 'reasons' which took no time to just copy and store.
The r/raspberry_pi subreddit and youtube tutorials exist, but I have a more complex one that is designed to be pluggable into just about anything with carrying case and 4 traditional SNES turbo controllers. I jammed it with all known games from every console including handhelds and even obscure stuff like Dragon32 OS games or Vectrex and SG-1000.
https://www.amazon.com/CanaKit-Raspberry-Complete-Starter-Kit/dp/B01C6Q2GSY/ref=sr_1_1?s=electronics&amp;ie=UTF8&amp;qid=1483931991&amp;sr=1-1&amp;keywords=Canakit
The kit I got plus 2 Logitech 310 controllers. Well worth it!
You could try this.
Price isn't too bad for all it gives you, and it'd set you on the right track.
which of these kits would be better:
https://www.amazon.com/CanaKit-Raspberry-Complete-Starter-Kit/dp/B01C6Q2GSY/ref=sr_1_2?s=pc&amp;ie=UTF8&amp;qid=1483774244&amp;sr=1-2&amp;keywords=raspberry+pi+3
or
https://www.amazon.com/LoveRPi-Raspberry-Backlit-Keyboard-TouchPad/dp/B01LYBWO7H/ref=sr_1_74?s=pc&amp;ie=UTF8&amp;qid=1483774396&amp;sr=1-74-spons&amp;keywords=raspberry+pi+3&amp;psc=1
This is the easiest kit to buy.
That price is just for the board. RP3 would be about $80 all in. Power, Case, Heatsink, Cords, SD card
https://www.amazon.com/CanaKit-Raspberry-Complete-Starter-Kit/dp/B01C6Q2GSY/ref=sr_1_5?s=electronics&amp;ie=UTF8&amp;qid=1466444456&amp;sr=1-5&amp;keywords=raspberry+pi
I recommend this CanaKit.
http://www.amazon.com/CanaKit-Raspberry-Complete-Starter-Kit/dp/B01C6Q2GSY/ref=sr_1_1?srs=3020163011&amp;ie=UTF8&amp;qid=1465083298&amp;sr=8-1&amp;keywords=pi3+kit
uh, not really, this is the kit I bought (kinda randomly chosen, really)
Actually, I bought the one with the 16GB microSD, and no sd->USB adaptor, but from the same guys (same heatsink, case, cables, etc). Obviously not affiliated with those guys or anything like that
I bought a Canakit for Retropie and it gave me everything I needed.
Edit: this is the kit I got
https://smile.amazon.com/CanaKit-Raspberry-Complete-Starter-Kit/dp/B01C6Q2GSY/
Is this good??
CanaKit Raspberry Pi 3 Complete Starter Kit - 32 GB Edition https://www.amazon.com/dp/B01C6Q2GSY/ref=cm_sw_r_cp_api_DL4fAbQB8MGPP
When you start looking as low as $200 you have to really know what you are looking for in the laptop, as conventional laptops do begin to compete in this price range with other devices. As /u/Orangematz said, used/refurbished is definitely a good fit for you, unfortunately I don't know that I could give any specific suggestions in this area. However, if you want to buy new, you may want to consider a Chromebook. You can't run Audacity on a Chromebook natively, but there are some alternative apps available to make this work (see this list for some options).
Alternatively, you mentioned an external hard drive. Do you already have one or would that be included in the budget? If you already have it, you can use this for storage and install Linux on your Chromebook to use Audacity natively (Having an Intel processor in your chromebook is necessary if this is your plan).
If you are feeling very adventurous, you could purchase a Raspberry Pi like the one here. This runs Linux natively and should be able to handle Audacity without issue, although it may take some tinkering to get up and running the first time, especially if this is your first foray into Linux. The Raspberry Pi 3 is missing three things that laptops have, keyboard and mouse, and display. That display only comes with a cigarette lighter power adapter, so you would need a 12 V adapter. Note that this solution has a lot of parts compared to one laptop, and the display is smaller and lower resolution than you are likely to get in a good laptop, so this is really a nifty solution to your problem that adds in a bunch of extra functionality (your display can play audio/video from USB/SD and can be mounted to the back of a headrest while your computer is a neat little hobbyist device that can have a bunch of different uses besides just computer), but not really recommendable if you aren't enthusiastic about those things.
For something along the same vein but slightly less adventurous if you don't feel comfortable with Linux would be to replace the raspberry pi in the previous solution with an Intel Compute Stick (comes with windows). Alternatively, the display can be replaced with a significantly better or somewhat better and significantly cheaper monitor if portability is something you are willing to compromise on (the Raspberry Pi/Compute Stick would still be very portable, but you would need to find an HDMI-enabled display to plug into).
In conclusion, buying used/refurbished is a good idea, but if you are open to it, the "microcomputer" market segment is starting to come up to par with laptops in this price range and could offer some interesting alternative solutions for you. Wow, that was a long comment.
We use a Raspberry Pi 3 plugged into the back of a normal 50" TV as a Wallboard. It takes it's power from the PC's USB port and connects wirelessly to our server for production stats. It's uses SSRS for report generation. The Pi's small enough to just be velcroed onto the back of the TV. We use VNC if we have to log into it for any reason.
It cost us less than £40 (approx $60-70).
You could use a very similar setup, obviously using a slideshow rather than an SSRS report.
I actually got mine used on ebay for cheap but I think something like this would work and give you decent space. You can also just piece these out and need the Pi3 board,hdmi cord,power supply,sd card with some sort of reader for your pc and a case of your choice.
Actually it’s about equal and I would prefer a cloud key as it’s the better choice than some jacked together pi kit running the software. For example: CanaKit Raspberry Pi 3 Complete Starter Kit - 32 GB Edition https://www.amazon.com/dp/B01C6Q2GSY
I had great results with this. The only other thing you need is a controller and keyboard.
Here is the complete starter kit with everything you need for $75
or
You can also buy it on Amazon for a bit less.
The only thing you will need that's not in the kit are the ROMs and controllers. The ROMs you can find practically anywhere online.
For controllers, I splurged on a couple of Buffalo USB SNES controllers for the nostalgia, but any bluetooth or USB controller will work.
Sure, here's what I got:
https://smile.amazon.com/gp/product/B01GU76T2O
It doesn't come with the SD Micro card you need though. A lot of people go with one of the CanaKits though. This one has everything including the SD card:
https://smile.amazon.com/CanaKit-Raspberry-Complete-Starter-Kit/dp/B01C6Q2GSY
Thank you for your reply. Based on what you've said, I think I will go with this 32GB Canakit here. I would like to see how well the Gamecube emulation works.
You seem to be experienced, so I hope you don't mind me asking a couple other questions real quick:
Thanks for all your help!
You could consider building a RetroPie emulation console to let them play games from many different older consoles. It's a Raspberry Pi 3 computer that is running the RetroPie operating system.
Tablet charger is probably fine. I'm not aware of an "official" charger. I bought this one though: http://www.amazon.com/CanaKit-Raspberry-Supply-Adapter-Charger/dp/B00MARDJZ4/ref=sr_1_8?ie=UTF8&amp;qid=1458158418&amp;sr=8-8&amp;keywords=cana+kit
Side note, I spent $50 shipped on a PI3 from Adafruit, $6 on a 8 GB uSD card, $10 on a power supply and $5 on heat sinks. $71 total. I'll need to print an enclosure for it. In hind sight, I wish I had spent $75 on this: http://www.amazon.com/CanaKit-Raspberry-Complete-Starter-Kit/dp/B01C6Q2GSY/ref=sr_1_2?ie=UTF8&amp;qid=1458158418&amp;sr=8-2&amp;keywords=cana+kit
Is there a reason you prefer the K400 over the K400 Plus? Amazon told me there was a newer model, and it's $15 cheaper.
Do you have any thoughts on the CanaKits? I saw this on Amazon also. If I can get the whole kit for $80 including SD, AC Adaptor, a couple heatsinks, case, and HDMI cables, that might be the way to go for a user unfamiliar with Raspberry Pi in general.
I think my investment might be the CanaKit, K400 Plus keyboard, and an external 1TB hard drive. Connected to my TV, would I be able to use Kodi or OSMC to run a media center?
Travel is a strong motivator to bring some kinda of travel gaming device and I can see a case to be made for the Switch on the go. However, allow me to suggest an alternative...
For 75ish$ you can get a complete Raspberry Pi kit and you could put Retro Pie (/r/RetroPie) on it and play your favorite old games with a bit of DIY?
I carry mine with me and hook it up to hotel TVs all the time. Carry a controller or your favorite fightstick and you are good to roll.
If you want to get crazy with it, you can put a screen on the Pi itself and play on the go with a bit of work.
It's not the most elegant solution, but play a ton of retro games on the go and waiting to see what Nintendo does seems like the better option in my eyes.
It probably doesn't cost much at all. Alternatavely you could buy this and load retro pi on it. It would be compatible with a Bluetooth controller. You could load every SNES game on it and it would cost you about the same price as the SNES classic...
I've done a project just like this, what you'll want to do is buy the CanaKit set for the Raspberry Pi 3 on Amazon: https://www.amazon.com/CanaKit-Raspberry-Complete-Starter-Kit/dp/B01C6Q2GSY/ref=sr_1_4?s=pc&amp;ie=UTF8&amp;qid=1498681064&amp;sr=1-4&amp;keywords=raspberry+pi+3 and then install a software called "RetroPi" https://retropie.org.uk/, there are some great tutorials on YouTube. You can connect it to your home WiFi network and use a client like FileZilla to wirelessly send ROM's over to your Pi.
I got the Raspberry Pi 3, in a lazy man's kit on Amazon. I had pre-loaded some ROMs and the RetroPie OS to my computer beforehand, so when I got the Pi it only took about 30 minutes to get it working.
I also got these.
The entire shebang cost me $93. I am still pleased with the purchase. lol
https://www.amazon.com/CanaKit-Raspberry-Complete-Starter-Kit/dp/B01C6Q2GSY
Could I just run OpenHab off of my mac without the rasberry Pi? What are the downsides to the Mac vs the Pi?
EDIT: Was thinking of going with this kit. Should be sufficiant and provides me every OpenHab site says I need... Pi
RASPBERRY PI
Just found a PI3 on Amazon! Everywhere else I looked it was sold out...
http://www.amazon.com/CanaKit-Raspberry-Complete-Starter-Kit/dp/B01C6Q2GSY/ref=sr_1_2?s=electronics&amp;ie=UTF8&amp;qid=1457369528&amp;sr=1-2&amp;keywords=canakit
Q Acoustics 3050 - $600
Cambridge Audio Topaz AM10 - $300
Raspberry Pi for streaming music - $75, Chromecast Audio replacement
Volumio software
Okay, so I'm looking at a couple of them on Amazon. This one in particular looks to cover all the basics, but I'm questioning if I should buy the parts all separately. I for sure want the black case. Don't necessarily need the HDMI cable. Everything else looks to be essential. This bundle also looks similar, except with a Samsung MicroSD (which I would think is better).
I'm hoping 32GB would be enough, but again, not entirely sure and I can't speak to the quality of that specific microSD in the bundle. My main concern is not having enough space for N64/PS1 games. I'd use my PS3 controller to start off and eventually buy the Buffalo SNES controller.
Idiot here. I used this guide, and purchased this kit. 75 bucks and an hour of work and I have any oldschool game I want.
Yes, it's the CanaKit here:
https://www.amazon.com/CanaKit-Raspberry-Complete-Starter-Kit/dp/B01C6Q2GSY
The tape was already on the sinks. Black in color, if that helps?
Correct, nothing tweaked as in software or settings. It's running all on default settings.
Either get this if you want small form factor or one of these, 2 if you want a bit more processing power. The first one (the pi zero w) will work just fine though, save you about 40% too.
Kit will save a few bucks if you don't mind the brand or parts they give you https://www.amazon.com/CanaKit-Raspberry-Complete-Starter-Kit/dp/B01C6Q2GSY/ref=sr_1_2?s=pc&amp;ie=UTF8&amp;qid=1503627652&amp;sr=1-2-spons&amp;keywords=raspberry+pi+3&amp;psc=1
CanaKit is only the brand for this. You are only looking at a power supply here, you'd still need to buy the actual raspberry pi and a micro sd card at the very least. Raspberry Pi 3 itself cost a minimum of $35, kits will obviously cost a bit more. As others have said, you'll need to search for a starter kit... something like this https://www.amazon.com/CanaKit-Raspberry-Complete-Starter-Kit/dp/B01C6Q2GSY/ref=sr_1_4?ie=UTF8&amp;qid=1501860905&amp;sr=8-4&amp;keywords=raspberry+pi+3+starter+kit
https://www.amazon.com/CanaKit-Raspberry-Complete-Starter-Kit/dp/B01C6Q2GSY
By a raspberry kit. I used this one.
CanaKit Raspberry Pi 3 Complete Starter Kit - 32 GB Edition https://www.amazon.com/dp/B01C6Q2GSY/ref=cm_sw_r_cp_apip_2z3mhrjGo6fDb
Set it up. You might need a spare keyboard and mouse.
Install software.
Tell router to use it as dns provider.
Done.
> Can you program regular stuff on there as well?
Yes sir! They're fully functional computers than can run anything from Minecraft to FTP servers.
I recommend a starter kit. They don't cost much more (landing right in your price range) and they have the basic hardware and peripherals to get started.
A couple suggestions:
Amazon sells a really nice Raspberry Pi 3 kit for not much more than a mini NES and you have the ability to load way more than just 30 NES games on there. I think I'm going to sit down with my son and put together this system as a project for the two of us. He'll get a bigger kick out of doing that then clowning around with a mini NES I think.
Raspberry Pi 3 model B (https://www.amazon.com/CanaKit-Raspberry-Complete-Starter-Kit/dp/B01C6Q2GSY). Comes with noobs that has OE as an option. Everything just works - from unboxing to running Kodi in about 10 minutes!
I am truly amazed at how well this runs. I have replaced all PCs running XBMC with these little Raspberry Pi's running OE. The only issues I have are:
One thing that is better on the Pi than on the Windows 7 box is I no-longer get vertical black bars on playback. It was frequent but, fleeting and I think I was the only one to notice it but, skinny black lines would flicker on random spots on the screen during playback. Since going to the Pi I have yet to see this.
I use the Amber skin but, the Pi had no problem with any of the Nox's. You have to use Confluence to administer the box (mainly to get to the OE settings).
https://www.amazon.com/CanaKit-Raspberry-Complete-Starter-Kit/dp/B01C6Q2GSY/ref=sr_1_1?ie=UTF8&amp;qid=1506192054&amp;sr=8-1&amp;keywords=raspberry+pi
This is a kit that includes everything. All you’ll have to buy is your choice of USB controller
CanaKit Raspberry Pi 3 Complete Starter Kit - 32 GB Edition https://www.amazon.com/dp/B01C6Q2GSY/ref=cm_sw_r_cp_api_a8LZzb17ANRBN
This is the kit that I bought and i can vouch for the quality.
The device has a built-in microcontroller. When a button is pressed, it bridges two ends of an electrical lead, forming a complete circuit, which in turn connects to one of the voltage pins in the microcontroller.
The microcontroller has an infinite loop that essentially listens for voltage changes on its pin. If the pin has a change in voltage, the microcontroller can react to it by, for example, increasing the wattage in the vaporizer.
It's not possible to explain how all of this works in detail, but if you want to build things like this, I recommend looking at Arduino or Raspberry Pi for a small microcontroller that you can program for ad hoc tasks. See the following:
Arduino Starter Kit
Raspberry Pi Starter Kit
You will need to have access to a computer to download the RetroPie image and all the ROMs, a micro SD card reader to load the image, and either a home network or USB stick to transfer the ROMs. Also a USB or bluetooth controller for the actual gaming part. Overall it's pretty easy to do as long as you have everything you need.
EDIT: Link for a good kit with everything you need.
https://www.amazon.com/CanaKit-Raspberry-Complete-Starter-Kit/dp/B01C6Q2GSY
https://www.amazon.ca/CanaKit-Raspberry-Complete-Starter-Kit/dp/B01C6Q2GSY The one included here
Basically, It's a tiny computer you can turn into a console that contains all the old school consoles, NES, SNES, Sega, as well as all the games.
I bought this kit, it has everything you need, except controllers (you also need a usb mouse and keyboard to set up). It walks you through the steps and is easy.
A bit late, I just built one a couple months ago and it's great! As far as the raspberry pi kit/controllers below is what I purchased. Installing retropie was pretty simple as explained in other responses:
CanaKit Raspberry Pi 3 Complete Starter Kit - 32 GB Edition
Controllers
Thanks, I appreciate the help.
This is the set I'm thinking of buying. What is missing besides the keyboard? https://www.amazon.com/gp/aw/d/B01C6Q2GSY/ref=mp_s_a_1_2?ie=UTF8&amp;qid=1519609435&amp;sr=8-2&amp;pi=AC_SX236_SY340_QL65&amp;keywords=retropi&amp;dpPl=1&amp;dpID=61MAJaKWgkL&amp;ref=plSrch
I know I don't need the two flash drives. The 8 GB is for me because I only have one other laying around. It doesn't really need to necessarily be added in the cost. ;) It's for me.
My nephew will be using his ps4 controllers and I think he'll be satisfied with that for a while. I'll give him one of my old retro gamepads as well if he wants.
I'm definitely not putting the whole PS catalog on there but probably quite a few of the games. RE series, some platformers, and the abundance of pretty good RPGs. I know the N64 and dreamcast have their problems but I'll see what his favorite games are on the systems and test them out at least. Yeah, 128 SD card is probably my first cost cut. :)
Edit: Just went with CanaKit Raspberry Pi 3 Complete Starter Kit - 32 GB Edition for $74.99
https://www.amazon.com/gp/product/B01C6Q2GSY/ref=ox_sc_act_title_1?ie=UTF8&amp;psc=1&amp;smid=A30ZYR2W3VAJ0A
Should do the trick, right? Won't get much cheaper for the ideas? The heat sinks shouldn't be necessary but I might as well use them, right? Will it be quieter or noisier with them for this project?
For sure. My cousin is helping me. I ordered this which is almost everything you need other than the games.
https://www.amazon.com/gp/aw/d/B01C6Q2GSY/ref=mp_s_a_1_3?ie=UTF8&amp;qid=1511207579&amp;sr=8-3&amp;pi=AC_SX236_SY340_FMwebp_QL65&amp;keywords=raspberry+pi+3&amp;dpPl=1&amp;dpID=61MAJaKWgkL&amp;ref=plSrch
My cousin said he's going to send a preloaded sd card with all nes, snes, and genesis games. I'll definitely let you know.
I have this one if you are interested? I am in Louisville so could just meet up local.
It's the v3 starter kit purchased on Amazon: https://www.amazon.com/gp/product/B01C6Q2GSY/ref=oh_aui_search_asin_title?ie=UTF8&amp;psc=1
The image is retropie-4.4-rpi2_rpi3.img
I did initially set everything up with the keyboard.
I did just start it up for the first time in months. I have two of the Buffalo USB controllers. One doesn't appear to work at all and I tried multiple USB ports. The other seems to work for navigating around RetroPie but once I get into a game nothing works.
Any ideas? Thank you for the help. I was so excited about this when I first set it up and it's mostly been a disappointment because I can't get the damn thing working.
Well I sent an email requesting to cancel my order. amazon has a bundle including a case, heatsinks, 32gb class 10 mSD card with Noobs on it, power supply and HDMI cable for $80. I was paying $60 for the pi 3 plus a case from MCM.
http://www.amazon.com/gp/product/B01C6Q2GSY?psc=1&amp;redirect=true&amp;ref_=ox_sc_act_title_1&amp;smid=A30ZYR2W3VAJ0A
Yes. https://www.amazon.com/gp/product/B01C6Q2GSY/ref=oh_aui_detailpage_o02_s00?ie=UTF8&amp;psc=1
I got a raspberry pi ($70 but you can find cheaper options) and installed pi-hole. This becomes the DNS server for anything on my home network. When anything tries to lookup a site that serves ads the pi-hole makes it look like that site is dead.
It blocks ads on my computer and on my iphone/ipad. Not only that, it blocks ads on the app my internet provider has for watching cable programs on mobile devices. I've been using it for several months and the only downside is that it slows down the load time of some pages, i.e., a few seconds to load the google news page on mobile.
Highly recommended!
88USD doesn't seem too bad, but I paid 70USD for this kit and 75USD for this one
I'm looking at buying a 3rd, because other other brother saw the retro pie yesterday that I made for our brother, and now he too wants one.Is a kit like this a waste of money? I'm planning on using a Wii U Pro controller, but don't have any of the other parts.
https://www.amazon.com/gp/product/B01C6Q2GSY/
Oh man isn't the pi 3 capable of emulating ps1 too? Wouldn't it be cheaper to just get a pi 3?
Edit: for anyone looking to get a pi, I'd recommend the canakit pi 3 starter pack
https://www.amazon.com/gp/aw/d/B01C6Q2GSY/ref=psdcmw_3015426011_t1_B008XVAVAW
It has worked well for me and all you need apart from that is a keyboard, a controller, and a monitor of some sort (I use an old tv). I'd also recommend using Filezilla to transfer your ROMs onto the pi
I ordered this kit.
https://www.amazon.com/gp/product/B01C6Q2GSY/ref=ox_sc_act_title_2?ie=UTF8&amp;psc=1&amp;smid=A30ZYR2W3VAJ0A
My TV is an older one and doesn't have HDMI.
Will this cable work or is there a different cable I would need to make everything work on TV that doesn't have HDMI and only has RCA.
https://www.adafruit.com/products/2881?gclid=CLf7vM659NACFZSMaQod0zUJfg
Thank you for this post! Tons of great information to help me get started. In regards to kit, what do you think of this kit? It has a bit more parts than the ones linked and it is within my budget.
Check out this one.
It comes with tutorials on how to use all of the sensors and input devices with both example code and illustrations of all physical connections.
It looks like this kit contains the NFC Shield and Arduino. I saw the kit you linked contained the same setup as mine below and an additional NFC shield.
Do I need to order anything extra besides the kit below?
Elegoo UNO R3 Project Complete Starter Kit with Tutorial for Arduino MEGA2560 NANO (63 Items) https://www.amazon.com/dp/B01CZTLHGE/ref=cm_sw_r_cp_api_RpOOyb14D8BE8
People generally frown upon kits here but I think they were key to my development. Here is a VERY unofficial starter kit that has some typos and may have a defective part or two, but it is filled with parts and is very cheap. Here is a companion set full of sensors that may inspire you to start a project you are passionate about. Lastly, here is a cheap LCD screen that will be cheap enough to play around and get good with at least until you are ready for something bigger. You will definitely not make use of every part in these kits but they will each give you a different idea of how basic circuit components can come together to make cool projects. They come with sample code that needs a little debugging here and there (actually, this may be a good thing so you learn how to troubleshoot your projects!). I would also recommend buying another arduino uno at some point to learn about interfacing. Others may disagree and encourage you to start with a project or something, but everyone learns differently, and I have done well with these kits and found them to definitely be worth the money.
EDIT: Also, all of these products are available on Prime and will ship in 2 days, unlike most eBay products that take upwards of a month.
The document is not worth much. It's just a copy/paste of the list of the components found on the Amazon page for the Elegoo super starter kit (https://www.amazon.com/Elegoo-EL-KIT-003-Project-Starter-Tutorial/dp/B01D8KOZF4) with the prices I found for each component sold separately.
Elegoo EL-KIT-003 UNO Project Super Starter Kit with Tutorial for Arduino https://www.amazon.com/dp/B01D8KOZF4/ref=cm_sw_r_cp_api_rlGIAbZA2G66P
Is this the one? I’m a developer and have wanted to break into arduinos for a long time for this and house projects.
ELEGOO UNO Project Super Starter Kit with Tutorial, 5V Relay, UNO R3, Power Supply Module, Servo Motor, 9V Battery with DC, Prototype Expansion Board, ect. for Arduino https://www.amazon.ca/dp/B01D8KOZF4/ref=cm_sw_r_cp_api_i_TyFkDb80PR1RV
I have the Elegoo Super Starter Kit. This one: https://www.amazon.ca/Elegoo-Project-Tutorial-Prototype-Expansion/dp/B01D8KOZF4
I have found a few definite typos and errors in it so far so I thought I would ask.
This is for the Arduino starter kit.
This is just the distance sensor.
I'm working on an arcade1up mod using linux mint and retropie on the "Atomic Pi" x86 sbc ($40).
https://photos.app.goo.gl/DQnRKGDkdztzrmHTA
It's not easy playing with one hand :)
&#x200B;
Atomic Pi SBC https://www.amazon.com/Atomic-Pi-High-Speed-Peripheral/dp/B07N298F2B
Breakout Board (small) https://www.amazon.com/Breakout-Adapter-2-5mm-Barrel-Supply/dp/B07RPQN1Z7/
Power Adapter https://www.amazon.com/SMAKN-Switching-Supply-Adapter-100-240/dp/B01N4HYWAM/
Arcade1up Killer Instinct Graphics kit https://www.escapepodonline.com/collections/arcade1up/products/arcade1up-killer-instinct-complete-art-kit
optional* Arcade1up Street Fighter control deck https://arcade1up.com/collections/control-decks/products/street-fighter-control-deck
note* lcd controller, joysticks, buttons, audio amplifier can be used from other retropie/arcade1up guides.
I bought this.
power supply came with the set.
https://www.amazon.com/CanaKit-Raspberry-Premium-Clear-Supply/dp/B07BC7BMHY
https://www.amazon.com/Buffalo-iBuffalo-Classic-Gamepad-BSGP815GY/dp/B06XWD8QQJ
https://www.amazon.com/SanDisk-Ultra-microSDXC-Memory-Adapter/dp/B073JYVKNX
https://www.amazon.com/AmazonBasics-High-Speed-HDMI-Cable-1-Pack/dp/B014I8SSD0
If you can't already access microsdcards from your PC:
https://www.amazon.com/Anker-Portable-Reader-RS-MMC-Micro/dp/B006T9B6R2
Would buying this to set one up be fine?
https://www.amazon.com/CanaKit-Raspberry-Premium-Clear-Supply/dp/B07BC7BMHY/ref=sr_1_4?keywords=raspberry+pi&amp;qid=1551291704&amp;s=gateway&amp;sr=8-4
https://www.amazon.com/CanaKit-Raspberry-Premium-Clear-Supply/dp/B07BC7BMHY?ref_=bl_dp_s_mw_3020163011
Is this what you mean? Good luck.
The thing with the heatsink is an atomic pi. It's a SBC that has an intel atom x5 and 2gb of ram. It can run win10 but I have lubuntu installed.
https://www.amazon.com/Atomic-Pi-High-Speed-Peripherals/dp/B07N298F2B
Here are 2 possibilities in how you could achieve this goal.
1 There's a version of Celeste available for the Pico-8 which is available on the Raspberry pi. You have to pay $15 for the Pico-8 on top of the price of the Raspberry Pi and the Pico-8 version of Celeste is obviously going to be more limited than the full desktop version is.
The biggest pros of using this method are that you'll be able to make a lighter weight handheld that doesn't use up nearly as much battery life as the other option I can think of. Pico-8 Celeste can be found here
2 You could get an Atomic Pi which is a $40 SBC that has an X86 CPU, meaning it's capable of running Windows and x86 linux distros, which would both be able to run the full desktop version of Celeste.
The biggest issue with this is that this would most likely be more expensive than the previous option and would require a much beefier battery in order to get a decent amount of game-time on it.
I hope this helps!
Well, a quick duckduckgo search found this in regards to that device: https://www.reddit.com/r/youshouldknow/comments/2c5qok
So I'm going to say I really wouldn't use that going forward with automation or security. Other than that, it doesn't look like something that can run Linux.
If you have a spare computer, you can get started with home Assistant on that. You can also go get a raspberry pi for $35, but if you feel you're going to need more power I'd recommend a PC.
I use the atomic Pi. $33, works much better than the Raspberry Pi 3, at least.
Atomic Pi - High Speed SBC with Peripheral ICs https://www.amazon.com/dp/B07N298F2B/ref=cm_sw_r_cp_apa_i_ftpJDb5C6ARHQ
I just built one with the $43 Cana kit on Amazon and bought two Logitech Gamepad F310 controllers. I ordered the mini sd and USB storage separate from the kit but they make kits that include it. The cana kits are great starting points for a build.
EDIT: $54 kit actually here's the link. https://www.amazon.com/CanaKit-Raspberry-Premium-Clear-Supply/dp/B07BC7BMHY/ref=sr_1_3?keywords=cana+kit&amp;qid=1555599714&amp;s=gateway&amp;sr=8-3
Have you considered swapping your GPU with this:
https://www.amazon.com/dp/B07BCC8PK7
I use it for my high performance rig, not sure if you’d get the most out of it though if you’re not utilizing full performance potential. Maybe try looking up what overclocking is. I always use at least a 150 block render radius but I’m not really mining casually
https://www.amazon.com/gp/product/B07K1BHPG1/ref=ppx_yo_dt_b_asin_title_o02_s00?ie=UTF8&psc=1
https://www.amazon.com/CanaKit-Raspberry-Starter-Premium-Black/dp/B07BCC8PK7/ref=sr_1_1_sspa?crid=L17CKYNU4ESX&keywords=raspberry+pi+3+b%2B&qid=1557542195&s=electronics&sprefix=rasp%2Celectronics%2C160&sr=1-1-spons&psc=1
https://www.amazon.com/gp/product/B06X9NJ2NR/ref=ppx_yo_dt_b_asin_title_o00_s00?ie=UTF8&psc=1
&#x200B;
That should be the basic's of getting it up and running, you can always swap out Raspberry Pi case or other items, but that link is for everything all together. let me know if you have any other questions. Happy Modding!
Thank you for the reply !!! Is this what you are referring to https://www.amazon.com/CanaKit-Raspberry-Starter-Premium-Black/dp/B07BCC8PK7/ref=mp_s_a_1_1_sspa?keywords=raspberry+pi&amp;qid=1556851287&amp;s=gateway&amp;sr=8-1-spons&amp;psc=1 ? Do you just install that in your computer some how ? I am an idiot when it comes to technology like this , thanks 🙏
I noticed no one else suggested that. A model 3b+ kit is about $80 --this one comes with a power switch and a 32GB card-- then add a cheapo 1366x768 or 1080p monitor, with a cheap Logitech mouse/keyboard combo. All of that should be around $200.
This one
It seems the same in terms of power supply, the other just has a switch on it. The only additional thing I was going to get was usb controller and I was thinking this. Do you happen to know if retropie works well with multiplayer games like mortal kombat or dr Mario for example?
So something like this on amazon? Would appreciate a recommendation if you have one.
Thanks again for the help!
Don't use OBS. A Pi4 or atomic Pi running linux can use ffmpeg to stream directly to twitch: https://wiki.archlinux.org/index.php/Streaming_to_twitch.tv
Thank you Jeff, I’m buying my first Pi Tomorrow. Does this Amazon Canakit Pi look decently priced? What else would I need? (https://www.amazon.com/dp/B07BCC8PK7/ref=cm_sw_r_cp_api_UWTXAbXG895A8)
Atomic Pi's run psp really well and are great for desktop computing and Plex as well.
https://www.amazon.com/Atomic-Pi-High-Speed-Peripheral/dp/B07N298F2B
/r/atomic_pi
Yes it is. There are multiple sellers.
You can buy it from AmeriDroid or from Amazon.
https://ameridroid.com/products/atomic-pi
https://www.amazon.com/Atomic-Pi-High-Speed-Peripheral/dp/B07N298F2B
Or here from Digital Loggers
https://dlidirect.com/products/atomic-pi
Your best bet is probably going to be an Atom (or even i3) SBC, running windows, instead of a Pi.
https://www.amazon.com/Atomic-Pi-High-Speed-Peripherals/dp/B07N298F2B/
this guy will run windows OK without much hassle (Don't try to put 10 on it, as of the last time i poked one. anyway. it runs fine, but drivers are a problem)
There are other x86 SBCs as well.
https://www.amazon.com/CanaKit-Raspberry-Starter-Premium-Black/dp/B07BCC8PK7/ref=mp_s_a_1_6?ie=UTF8&amp;qid=1524873343&amp;sr=8-6&amp;pi=AC_SX236_SY340_FMwebp_QL65&amp;keywords=raspberry+pi+3+b%2B&amp;dpPl=1&amp;dpID=61R901JBa2L&amp;ref=plSrch
Well, I had no idea what I was doing. Neither have I ever heard or seen Rapberries. :) I figured I'd buy it w/ all the bells and whistles (it came w/ A LOT of crap, resistors, all kinds of connectors, circuit board, wifi dongle). Next time I'll buy one, I'll make sure to shoot you a PM for an advice. :)
http://www.amazon.com/gp/product/B00G1PNG54/ref=oh_details_o00_s00_i00?ie=UTF8&amp;psc=1
Sneaky reference in there. :P
Edited to add the non-referenced link because I am an asshole: http://www.amazon.com/gp/product/B00L87YMGM
http://www.amazon.co.uk/Raspberry-Pi-Model-Desktop-Linux/dp/B00T2U7R7I/
It can be done, if you know the right pinout and need an adapter like breadboard jumpers. In this case you would set it to 1 or 2 HD120 fans in iCUE, as they have 12 LEDs/fan. If you reverse the polarity, then you can blow a SMD fuse in the LNP. I speak from experience.
I don't know the pinout of the strimer, but the LNP is 5v+, data, ground. The 5v is denoted by the key/notch.
Elegoo EL-CP-004 120pcs Multicolored Dupont Wire 40pin Male to Female, 40pin Male to Male, 40pin Female to Female Breadboard Jumper Wires Ribbon Cables Kit for arduino https://www.amazon.com/dp/B01EV70C78/ref=cm_sw_r_cp_apa_YeFXBbQRACNBS
[This is the one I bought.] (https://www.amazon.com/dp/B01C6FFNY4/ref=cm_sw_r_cp_apip_rCyWFRqtJtAC8)
I picked up this kit from CanaKit because the price was reasonable. Includes a power supply and a couple heat sinks. I did the free shipping which will take a little longer, but I'm in no rush. Right now only showing 6 in stock, so move quick!
I recommend customizing your build but this will give you an idea of what you need.
https://www.amazon.com/CanaKit-Raspberry-Complete-Starter-Kit/dp/B01C6Q2GSY/ref=sr_1_1?s=electronics&amp;ie=UTF8&amp;qid=1503973853&amp;sr=1-1-spons&amp;keywords=raspberry+pi+3+kit&amp;psc=1
Raspberry Pi with LibreElec and Kodi media center Link, plus a Flirc Link so that you can use any IR remote to control it. Right at $100. Now you can fill USB hard drives with shows and they just plug them in to the USB port.
.
Edit: Looks like Flirc has a new version that isn't out yet. You can still find the original one on ebay.
.
Set up couldn't be easier. Put it together, choose your OS, let it download and install. You will need to program the Flirc on your PC/Mac.
Why are any of you worried about it? Honestly? Go to amazon.com, order a raspberry pi kit for 65$, install retro pie on it, put every video game ever created up until the PS2 was released and enjoy. I have a 64 meg SD card in mine and I have all systems from atari to PlayStation. Nintendo forces us to pirate their games, its not our fault the CFO didnt take any economic classes in college, but it is what it is. https://www.amazon.com/CanaKit-Raspberry-Complete-Starter-Kit/dp/B01C6Q2GSY/ref=sr_1_2?s=pc&amp;ie=UTF8&amp;qid=1503497197&amp;sr=1-2-spons&amp;keywords=raspberry+pi+3&amp;psc=1 <--- This is how you retro game. Fuck Nintendo.
Would you say this is a good deal?
r/retroPie
I just bought this off of amazon:
https://www.amazon.com/gp/product/B01C6Q2GSY/ref=oh_aui_detailpage_o00_s00?ie=UTF8&amp;psc=1
https://www.amazon.com/gp/product/B014QP2H1E/ref=oh_aui_detailpage_o00_s00?ie=UTF8&amp;psc=1
There are cheaper controllers, but that one comes very highly rated.
That contains everything you need. Just look on the sidebar of the subreddit I linked and it will have step by step instructions on how to load RetroPie on your Raspberry Pi. You will just need to find the Roms, which shouldn't be to difficult if you know where to look.
AAARRR MATEYS ;)
Edit: Something to note, you can save ~10$ if you want to buy the pieces that come in that kit individually and you dont need something like the HDMI cable, or the micro SD to USB adapter.
Here is the desktop version of your link
https://www.amazon.com/Atomic-Pi-High-Speed-Peripheral/dp/B07N298F2B
This purple case: https://www.amazon.com/Zebra-Case-Raspberry-Grapeshot-Heatsinks/dp/B011JA4D2U/ref=sr_1_1?ie=UTF8&amp;qid=1496281905&amp;sr=8-1&amp;keywords=raspberry+pi+3+purple+case
With these Super Nintendo purple button controllers: https://www.amazon.com/Wireless-Bluetooth-Controller-Classic-Joystick-Android/dp/B014QP2H1E/ref=sr_1_4?s=videogames&amp;ie=UTF8&amp;qid=1496281936&amp;sr=1-4&amp;keywords=8bitdo
Or this rainbow case: https://www.amazon.com/Pibow-Rainbow-Case-Raspberry-Pi/dp/B00LUX7NEC/ref=sr_1_2?ie=UTF8&amp;qid=1496281920&amp;sr=8-2&amp;keywords=raspberry+pi+rainbow+case
With these Super Famicom rainbow button controllers: https://www.amazon.com/8bitdo-Wireless-Bluetooth-Controller-Joystick/dp/B00Y0LUQFE/ref=sr_1_6?s=videogames&amp;ie=UTF8&amp;qid=1496281936&amp;sr=1-6&amp;keywords=8bitdo
Or, if you want to give it an old school Nintendo look, get this case: https://www.amazon.com/gp/product/B01M4OOY4U?pldnSite=1
With these NES style controllers: https://www.amazon.com/gp/product/B00MB6CNN8/ref=s9_dcacsd_dcoop_bw_c_x_2_w
Why not go through Amazon? https://www.amazon.com/NES-case-Raspberry-Skool-Tools/dp/B01M4OOY4U/ref=sr_1_1?ie=UTF8&amp;qid=1503696170&amp;sr=8-1&amp;keywords=nes+pi+case
I wouldn't actually recommend that purchase, go for something like this instead, you want to be making sure you're getting the latest raspberry pi too, here is a kit that looks like a better fit (just make sure the plug matches your country's). https://www.amazon.com/CanaKit-Raspberry-Premium-Clear-Supply/dp/B07BC7BMHY/ref=sr_1_2_sspa?s=pc&ie=UTF8&qid=1542830469&sr=1-2-spons&keywords=raspberry+pi&psc=1
https://www.amazon.com/gp/aw/d/B01M4OOY4U/ref=mp_s_a_1_1?ie=UTF8&amp;qid=1504141687&amp;sr=8-1&amp;pi=AC_SX236_SY340_QL65&amp;keywords=nes+pi+case&amp;dpPl=1&amp;dpID=312T2BZR9oL&amp;ref=plSrch
CanaKit Raspberry Pi 3 Complete Starter Kit - 32 GB Edition https://www.amazon.com/dp/B01C6Q2GSY/ref=cm_sw_r_cp_api_VXbvzbMHRSAX4
Just get a Raspberry Pi, install Retro Pi and put it in this case
To be fair none of that stuff is complicated. A child can figure out how to do that with an Arduino and a little bit or cursory learning.
Seriously.. Get one of these and you'll realize how simple this stuff really is.
Cana kit
You're welcome