Best soldering parts & accessories according to redditors
We found 111 Reddit comments discussing the best soldering parts & accessories. We ranked the 29 resulting products by number of redditors who mentioned them. Here are the top 20.
We found 111 Reddit comments discussing the best soldering parts & accessories. We ranked the 29 resulting products by number of redditors who mentioned them. Here are the top 20.


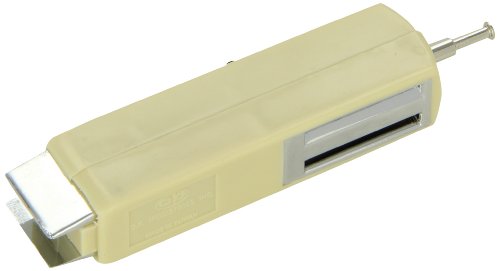


IC inserter
Pictures of the process
https://imgur.com/a/9Ga0sdD
Links to parts and tools used
Thumbstick modules - https://smile.amazon.com/gp/product/B01L7171H0/ref=oh_aui_detailpage_o06_s00?ie=UTF8&psc=1
T8 and T6 Torx Security Drivers –
https://smile.amazon.com/gp/product/B07BGQZPPC/ref=oh_aui_detailpage_o03_s00?ie=UTF8&psc=1
Solder Pump –
https://smile.amazon.com/gp/product/B00L2HRW92/ref=oh_aui_detailpage_o00_s00?ie=UTF8&psc=1
and of course a solder iron and solder
> Knowing next to nothing about assembling something like this, could a complete newbie make one?
Providing you can follow instructions it would be like constructing a more advanced Lego set.
If /u/progidek shares his EAGLE design you can print it onto some double sided copper PCB using a DIY etchant kit and an inkjet printer or finding something similar.
Parts should just be a matter of searching part numbers into Jaycar, Amazon, Sparkfun, Element13 or other similar sites.
Assembly can be done by following pictures, just make sure polarity is correct. Usually one side is different to show the polarity; silver ribbon on 1 side, longer leg, deformed side. This will be the most time consuming step, but mistakes can be undone using solder wick.
Soldering is easy to do, but not so easy to keep as clean as /u/progidek did, it's really quite gorgeous. There are a few youtube tutorials on how to's and improving technique.
You may want to start on a pre-packaged kit to build up some skill
I've been looking into this space (best medium-cost maker/builder/fab tools) over the past couple of months, and here are my recommendations so far...
Now go make some awesome things!
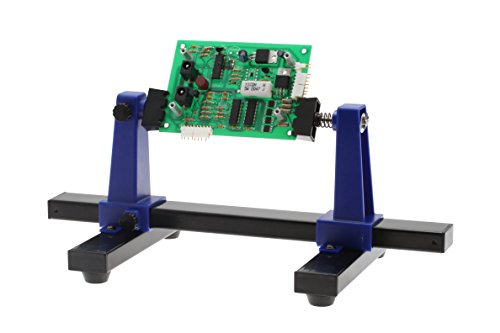
Aven 17010 Adjustable Circuit Board Holder https://www.amazon.com/dp/B00Q2TTQEE/ref=cm_sw_r_cp_apa_mFZ-BbDJWGWJ4
IC Chip inserter. Usually comes in "computer repair kits".
https://www.amazon.com/Electronix-Express-IC-Insertion-Tool/dp/B0195MDEDS
I did a BYOC kit over a year ago.
It can be difficult if you don't have the right tools. I got a board holder that made my life so much easier.
I also suggest getting a very fine/narrow solder tip. The one I used was a little big for the job.
The most difficult part was soldering the switch. Pisses me off just looking at it.
In the end the pedal had a huge volume drop, so I fucked something up along the way.
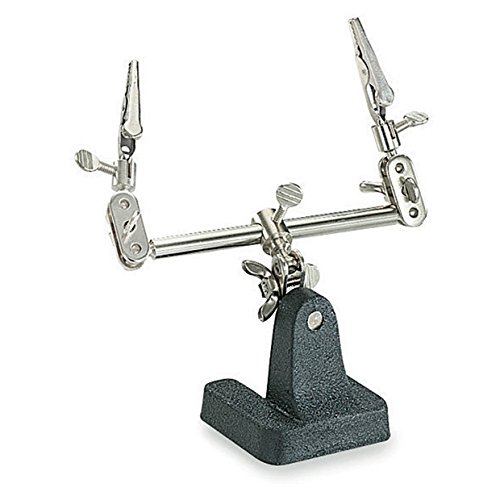
I bought this a while ago, which has been fantastic for filling boards and soldering components. It gets tough if you have components really close to the edges, but that's why I also use a regular old helping hand tool.
It looks like you have a decent soldering station, that is really the main thing. You'll need a small tip, but probably not as small as you think. I like the Weller ETL, but a ~2mm screwdriver style tip works well for SMD in my experience. If you go too small it can actually cause trouble for heat transfer and thermal recovery.
If you've mostly been doing through-hole stuff, you'll want smaller solder. Having small diameter solder makes it easier to feed just the right amount. I like Kester 0.020, some people go even smaller. Of course there are lead-free versions of that, too, if you prefer.
For through-hole, the flux that is inside the solder is usually enough, but for surface mount, you'll need extra flux. You'll probably be fine with a flux pen. You'll probably want some solder wick because mistakes happen, and a solder sucker thingie doesn't work as well with surface mount.
As u/t_Lancer says, you won't need a hot air station and solder paste unless you're planning on doing leadless packages. If you decide to get a hot air station, though, they're pretty cheap. You don't even strictly need solder paste, I've been making do by tinning the pads with regular solder first with my soldering iron before hitting it with the hot air.
For vision, it depends on how your eyesight is. I'm fine eyeballing down to 0603 but I can't read the markings without help. I've started doing all of my soldering under light magnification with the Optivisor DA-3 with a LED attachment which has really helped, but it isn't strictly necessary. You can get those visors with more magnification at the cost of a shorter working distance. Good room lighting and a magnifying glass work fine, too.
And most important thing you need is practice. Watch this video and grab one or two of those SMD practice kits and you'll be knocking out surface mount stuff in no time.
I use the cheapest solder wick I could find on Amazon (like $1.50). The trick is to soak it in flux (which I also got off Amazon).
Edit: The wick I use and the flux.
I've been using this: https://www.amazon.com/dp/B00Q2TTQEE/ref=cm_sw_r_other_awd_K3x8wb1ZQJWX1
It works great. You can easily flip your project over and see both sides of the board. I'm not sure how much smaller it is that the one you're looking at though.
https://www.amazon.com/Electronix-Express-060820-Solder-Desoldering/dp/B00L2HRW92/ref=sr_1_3?ie=UTF8&qid=1486406863&sr=8-3&keywords=solder+sucker
Despite it being cheap, it works insanely well. I have 2 friends that have it and it works very well.
soldering is your only real fix for that. You can get solder and an iron for under $10 on Amazon.
http://www.amazon.com/Aven-17542-Desoldering-2-5mm-Length/dp/B003E48ERU/ref=pd_sim_hi_7?ie=UTF8&refRID=188YPQ34V4XST3F9F6P4
http://www.amazon.com/Sinometer-Watts-Soldering-Iron-listed/dp/B0006NNRW4/ref=sr_1_5?ie=UTF8&qid=1419554378&sr=8-5&keywords=soldering+iron
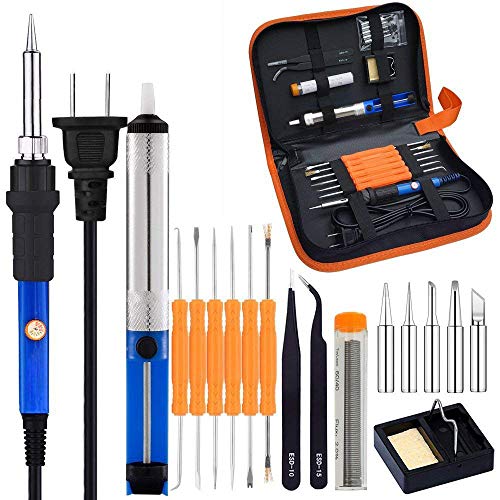
If you're taking your first steps into wiring, then you should get comfortable working with wires and tools. Here is a kit that will introduce you to wiring, soldering, etc.
Along with that, there are a few tools that might be useful to you:
And there are videos on YouTube that will teach you how to properly solder a wire to a soldering point. For that Elenco kit, the main goal is to get both the siren and the flashing lights to work, which it will if you wired everything correctly and used the correct resistors. It can be easy to make mistakes while learning to solder for the first time but most mistakes can be fixed, and it's very difficult to cause enough damage to render the board completely unusable.
Also, one note of caution: soldering irons are extremely hot, as the intent is to liquify the solder and attach it to the soldering points.
I'm still pretty new to this myself, but like you I have some electronics experience in the past. I just got this Weller 40w iron station with a desolder braid/sucker and a solder tip cleaner. Oh and a more precise tip for the solder iron
I'm really happy with it all so far, and couln't imagine needing more for a while. A heat gun would be nice for de-soldering and reflowing premade boards (like modding Boss pedals), but that can also be done with a regular solder iron as far as I know. You can get the above for about $60 total, so it's a nice way to get your feet wet without a huge investment. Then you gotta add on components/enclosures/pots/switches etc. Maybe get a helping hands and/or circuit holder if you need
Oh and get a good multimeter. I went a step up from the $20 ones and got this one which I'm also really happy with.
Might be worth getting a solder wick for when you inevitably screw up. Solder vacuum isn't a terrible idea either. I have both, I use them for different things. A third hand is also useful. I find myself using the glass more than the arms but it's all useful. If the iron you buy doesn't come with one a brass ball is great for keeping your tip clean without cooling it off like a sponge will. Micro-cutter is useful, not sure if angled or straight is better, up to you I guess. Last but not least a pair of angled tweezers. You can get those anywhere.
These are all the things I have within arm's reach when I'm doing a project. Have fun!
Get yourself some desoldering braid, like this, or drop big bucks on a desoldering station. The braid is alright but can require a lot of patience and it needs a big, hot soldering iron.
FWIW, you're conflating soldering and welding. Welding fuses the parent metals and the filler metal together, whereas soldering simply bonds the filler metal around the parent metals.
This maybe, or this. I spent no more than that on mine and it's seen me through 6 builds/rebuilds so far, and it's still working.
A proper soldering station is nice, but you can definitely get by with cheap stuff, especially if you don't plan on using it a ton.
I havent built that model but to answer your second question...Be cautious of build guides (or lack thereof). The one you linked has a really good guide. Step by step, clear pictures, and in color. So far, I've found Befaco, AI Synthesis, and Trogotronic to have really good guides.
Also, take your time. Its better to go slow and be sure of your work than rush. Tape! Tape helps me a lot by holding small pieces in place. If you can, get this circuit board holder. I got this magnifying headband for free (that style, not that specific one) and its been really helpful as well.
Here are my go to recommendations for beginners.
Trogotronic VCA
Trogotronic Power System
AI Synthesis
Unless you're going to do a lot of desoldering then just get a copper wick.
If you are a total noob, I suggest you just get any 60 W soldering iron. Really. This one suits you and cost less than $10. Because getting a FX-888D now is like killing mosquitoes with cannons.
You also may need a stand where to rest the iron when not using it. It comes with a sponge so you can clean the iron tip from time to time (just don't forget to wet it before use).
Finally, you will need some solder. Stay away from lead-free solder, this stuff isn't for amateurs. Get a good-old 63/37 solder with rosin flux core, this one have a 0.3 mm diameter, small enough to even solder SMD components (but don't start with them, they need more practice to be hand-soldered).
Soldering isn't a difficult skill but it requires practice. So you better start small and take easy steps. In no time you will be soldering SMD components. :)
PS: you also want to get some desoldering wick and a hand vacuum pump/solder sucker, those are more useful than you might think.
DISCLAIMER: all these items are just suggestions, buy whatever you think is more useful for you. Just wanted to give you a start point.
I've found that eliminating layer lines isn't too important if you go down to .08mm; the big issue is that overhangs and drooping on fine details can be a killer that overshadows the smooth surfaces. A few tools I've found handy:
Get a good round scalpel handle and a pack of carbon steel 15C scalpel blades. They'll be your go-to for nicking out tiny little stray globs and trimming plastic. Way more precise and durable than X-Acto or hobby knives.
Then get a set of diamond mini-needle files — they'll be useful for smoothing rough spots. Diamond grit may seem like overkill for PLA, but the fine texture of the grit is what matters: it won't leave your models ragged and with care you can actually restore detail that's lost to droopy overhangs, etc.
Finally, get a sharp-edged "soldering pick" and use the needle files to sharpen it to a nice sharp edge. It'll be your go-to for levering out bits of support, and picking away at larger globs of plastic. If you ever find that the scalpel blade bends while you're trying to clean up a defect, go to the soldering pick.
IC Insertion Tool
https://www.specialized.net/tools/hand-tools/other-hand-tools/ic-insert-extract-tools/jonard-ok-industries-mos-1416-ic-insertion-tool-14-16-pin.html
https://www.amazon.com/Jonard-MOS-1416-Insertion-Tool-14-16/dp/B006C4729A
These work wonders.
https://www.amazon.com/Oatey-31400-Bagged-12-Inch-Protector/dp/B0002YU2SY
Technique is everything, though. Keep the flame pointed where you intend the heat to go.
Yep you're correct.
When soldering there are a few basic things you have to consider. The main idea is that you want to heat up the wire and the contact point to the point that the solder will "wick" to the parts. You don't want to just melt the solder on the iron itself and have it drizzle on the parts.
Here are some other basic tips I wish I had been told when I was learning to soldering electronics in no logical order:
But most of soldering is just practice. It's a pretty easy skill to get proficient at. After a few projects it'll be almost second nature.
[That looks like my Apple ][ plus!](http://i.imgur.com/wAx5M.jpg) I've got the same memory card too. I just restored mine in the summer of 2013. Mine booted, but the keyboard decoder was shot, a bunch of keys were busted, and one of the memory chips was bad. The first thing I woulI would recommend you reseat all the chips. Get yourself a good chip puller like this one, don't use a screwdriver, or a puller that looks like this (these are junk).
I use both needle and snub nose pliers. Also tend to use a soldering tool to poke and break then loose. These aren't the exact ones, but the angle and the point both come in handy. https://www.amazon.com/JacobsParts-Professional-Solder-Assist-Accessory/dp/B00PQYCZPI/
This is the tool you need.
Radioshack has them for about 5 bucks.
Look up some tutorials on youtube. A good iron makes a world of difference. I struggled with properly tinning all the irons I've used previously which were just those cheap $8 dollar irons from like walmart. The weller that was in my dad's stuff wasn't much more expensive but they make quality stuff.
The tip tinned very well and everything was fairly smooth. If you don't have a decent stock of soldering supplies I would purchase them before you start.
Here's a quick rundown of what I would recommend:
Simple Weller Soldering Iron
Helping Hands
Desolder Wick
Kester .03" solder
Having the desolder wick saved me a few times when I had some bad flow from the parts not having adequate heat and the solder just clumping on the pin rather than flowing into the connection. You just lay the braid over the solder and press your iron on top and it will soak the solder into the braid and leave your parts clean. You'll probably want something to clean your solder iron tip with. You can buy a Hakko cleaning stand with wire brush for $10 on amazon or you can just wet a scotch brite pad you buy from walmart for a few dollars.
You can use solder you already have if it's a small enough diameter. You want small diameter so that when you touch it to the part (not to the iron) it melts quickly and you dont have to continue to apply heat to the parts. As far as actually handling the solder while you're trying to work I like to cut a small length of solder, maybe 6-8 inches and then wind it in a mini spool around my pinkie finger and leave a length of it sticking out so you have something to hold on to that will give you good control.
How-To Solder Instructable
Once you make the connections look at them, a good connection should typically be shiny and not cloudy. It's likely overkill for this project but those are good practices.
1st, heat the component and feed the solder into it.
2nd, If you have a cheap low wattage solding iron, objects with alot of metal will be hard to solder as it wicks the heat away too fast and doesnt get hot enough.
3rd, strip the wire a bit shorter, too much exposure especially without heat shrink allows for shorts
4th for removing solder as per above, sometimes you can just heat up the solder and tap the object against the table and the hot blob will fall off, i recommend though to either have solder wick or a solder sucker.
5th, for solder, use 60/40 lead - tin flux core solder, thinner the easier it is to work with.
soldering can be done cheap and easy but nothing beats having the proper tools.
Practice, practice, practice.
Although i will say when i was younger i also had joints look like that too.
If you continue to do this alot, here are the tools i recommend
Solder Wick
Solder
Iron and Solder Sucker
although if you really do alot of solder, get a good temp controller one like this
Weller Soldering station
Kester 44 Rosin Core Solder 63/37 .020" 3/4oz Dispense-Pak http://www.amazon.com/Kester-Rosin-Core-Solder-Dispense-Pak/dp/B00AYJ0B7Y/ref=sr_1_7?s=hi&ie=UTF8&qid=1395671772&sr=1-7&keywords=kester+44
Desoldering Wick - 2mm http://www.amazon.com/Aven-17541-Desoldering-Wick-Width/dp/B003E48ERK/ref=sr_1_3?ie=UTF8&qid=1395672458&sr=8-3&keywords=desoldering+braid
No Clean Flux Paste http://www.amazon.com/MG-Chemicals-Clean-Paste-Syringe/dp/B00425FUW2/ref=sr_1_2?ie=UTF8&qid=1395672365&sr=8-2&keywords=flux
Solder Tip Cleaner
http://www.amazon.com/Hakko-599B-02-Solder-Cleaning-Holder/dp/B00FZPGDLA/ref=sr_1_1?ie=UTF8&qid=1395673163&sr=8-1&keywords=solder+tip+cleaner
Clippers
Iron
Tip for iron
Don’t forget, you need one with a tip the size of a pen. Any bigger and you will burn your pcb. This is a decent one that I use
Weller WLC100 40-Watt Soldering Station https://www.amazon.com/dp/B000AS28UC?ref=yo_pop_ma_swf
Weller ST7 ST Series Conical Solder Tip Hobbyist for WP25, WP30 and WP35 Irons, 0.31" https://www.amazon.com/dp/B0002BSP4K?ref=yo_pop_ma_swf
OMorc Desoldering Wick, Solder Sucker & Solder Braid (2.5mm Width, 1.5m Length) – Desoldering Vacuum Pump Solder Removal Tool https://www.amazon.com/dp/B01I14V4X8?ref=yo_pop_ma_swf
Sometimes for the smaller welds, like on LEDs, try adding solder before sucking.
Seconded, also consider this kind of thing: https://www.amazon.com/Aven-17010-Adjustable-Circuit-Holder/dp/B00Q2TTQEE/ - it's invaluable for PCBs. Just populate from one side, add something to hold stuff in place (like gaffa tape, or bend one lead, or clip on a sheet of paper, etc), turn over the PCB and start soldering away. I wouldn't want to miss mine.
Any soldering iron 40+W where you can regulate the temperature should do, I own a nice station but when I don't feel like breaking it out because it'd take longer to set it up than to do the job I use something like this: https://www.amazon.com/ANBES-Soldering-Iron-Kit-Electronics/dp/B06XZ31W3M/ set to 350°C. Just make sure to clean and tin your tip regularly and it will do the trick just fine Oh, but ditch the solder and get a few spools of good rosin core solder of different gauges, it's not expensive but worth it. In my experience, the solder that comes with kits like that mostly works as a deterrent.
If you're not planning on buying all-included kits also get a few spools of stranded core wire of different colors. You could use solid core wires but those tend to break if they're getting bended from movement without showing it. With stranded core some strands may break but as others don't they'll continue to work. Invisibly broken wires (i.e.) inside the isolation) are a *beeeeep* to debug.
Also, a set of tweezers are great to have, especially the kind that holds stuff together per default, like this one: https://www.amazon.com/Curved-Tweezers-Cross-Jewelers-Soldering/dp/B000OVPG9A/ (only an example, I'd get a tweezers set that contains one like that).
In my experience a tool set like this one is great to have: https://www.amazon.com/Haobase-6Pieces-Double-sided-Soldering-Assist/dp/B01DLX6V3C/ - especially the bending tool is great to have, as it allows eg to bend the leads of a LED without running the risk of breaking the LED itself. It's also great in order to clean up mistakes, helps with desoldering and such
Speaking of desoldering: desoldering braid is a must. A desoldering pump can be useful, too. And yes, practice soldering and desoldering until you can do both without destroying anything.
If you're not going to buy pre-drilled enclosures then you very likely want a) a center punch and b) stepping drill bits. Those let you drill holes in all kinds of sizes without having to buy lots of drills.
Last but not least a wire cutter is a must
hammer this in there, use a wrench or ratchet to remove the entire thing whole. Wont snap like an ez out and will grip like no other
https://www.amazon.com/Inside-Nipple-Extractor-Extracting-Removal/dp/B01FOQK22U
Prolly just some solder wick https://www.amazon.com/dp/B003E48ERU/
Other then that everything else isn't really necessary
It's nice to work under LED lights
Could be a few things but mostly likely the wrong wick for the job. If you get wick from the hardware store it won't work well. That wick is designed usually for plumbing size jobs and higher temps.
For PCB size jobs and SMD components getting the right wick is important just like using the right solder. Something like this may do well for you:
MG Chemicals #3 No Clean Super Wick Desoldering Braid, 0.075" Width x 5' Length, Green https://www.amazon.com/dp/B00424S2C8/ref=cm_sw_r_other_apa_Fe5Dzb8XT56FK
I also use this wick and like it:
Aven 17542 Desoldering Wick, 2.5mm Width, 5' Length https://www.amazon.com/dp/B003E48ERU/ref=cm_sw_r_other_apa_9g5Dzb43FFNZ3
As far as technique, clean then tin your tip, heat the solder you are removing, re-tin your tip quickly and heavily, apply the braid and your tip on top. Solder should flow into the braid very quickly now that the solder was pre heated on the bottom of the wick and the tinned iron tip on top heats and flows into the braid sucking up the solder from below the wick.
Soldering iron: Something with a fat chisel tip that can get up to 600° F (315° C), helping hands
Disassembly: Rubber strap wrenches, a heat gun, a pair of snap ring pliers
Try a search for pen size vacuum on Amazon. Don't know if it will work, but they are not too expensive. (https://smile.amazon.com/Suction-L611938-Precision-Component-Placement/dp/B07KV17Q61/ref=sr_1_7?keywords=pen+vacuum&qid=1551237915&s=gateway&sr=8-7)
You can buy small tubes.
/u/alose pointed out that they have smaller tubes! 1 of those should be more than enough for a full board and I'm a big fan of the tubes for convenience sake, since you can hold the whole thing in your hand and it's easier to feed more solder to the contact/iron than the spool unless you have something to hold the spool in place.
The nicest one I have ever used was [this one by Otto Frei.](
http://www.ottofrei.com/Store/Soldering-Stations-Third-Hands/GRS-004-570-Double-Soldering-Station-With-2-Third-Hands.html) I really liked it when I borrowed it to do some wire harness and cable modifications, so much so that I looked it up afterward, but I couldn't handle the sticker shock.
For pedal making/modifying, I would recommend a circuit board holder and a typical helping hand (with or without magnifying glass) so that you have both hands available to use the iron and feed solder.
Soldering iron: https://www.amazon.com/Hakko-FX888D-23BY-Digital-Soldering-FX-888D/dp/B00ANZRT4M
Edit: most people recommend getting a chisel tip for the soldering iron. Big tips for big jobs, small tips for small jobs. Just having the pencil tip and one chisel will get you by for a long time.
Desoldering braid: https://www.amazon.com/Aven-17542-Desoldering-2-5mm-Length/dp/B003E48ERU/
Desoldering pump: https://www.amazon.com/WEmake-WM-SP4-Solder-Sucker-desoldering/dp/B0002KRAAG
You want both the pump and the braid. Get thin solder for electronics. You should probably use lead-free, but I like good old 60/40.
There are a ton of suggestions on multimeters. The exact right one for you depends on what you eventually want to do. Dave Jone's EEVBlog has some good suggestions. As does Adafruit. Anything Adafruit recommends isn't too far off the mark. If you just want a suggestion: Extech EX330 for $45 https://www.amazon.com/Extech-EX330-Autoranging-Multimeter-Thermometer/dp/B000EX0AE4 Cheaper ones will do the job, but this is a better one. The next step up are True RMS meters for about $100.
A small vise or helping hand can be invaluable, if using a helping hand I recommend wrapping the alligator clip hands in a couple layers of electrical tape as they can be quite sharp and scratch up connectors and such. Since there's virtually no risk in damaging components, most soldering irons between 60-120W should work well. Any 60/40 rosin core solder will work, if you're unable to get leaded solder due to local regulations, I've heard the 99% tin stuff is decent, again just make sure it has rosin core. A smaller tip might be beneficial if using smaller connectors such as 2.5mm. A solder sucker and wick is useful if any mistakes are made. Lastly, a DMM is helpful to make sure there are no shorts and that all connections have continuity and low resistance.
Hmmm. Let's see ...
I'd suggest:
http://www.amazon.com/gp/aw/d/B000AS28UC
Plus a smaller tip:
http://www.amazon.com/gp/aw/d/B0002BSP4K
Weller is a highly trusted brand and buying a variable one means you'll likely never need another soldering iron for any job.
Other items:
Solder itself
http://www.amazon.com/gp/aw/d/B00068IJPO
In case you mess up:
Either a solder sucker
http://www.amazon.com/gp/aw/d/B005GIPKOW
or solder wick
Nice but not needed(since that iron comes with a sponge):
http://www.amazon.com/gp/aw/d/B00FZPGDLA
those solder suckers are bulky and a bit akward to use. These (below) work just as well as the bigger ones and can be used with one hand easily enough (https://www.amazon.com/Vastar-Desoldering-solder-Length-Removal/dp/B01ESUKNXG/ref=pd_sim_328_6?_encoding=UTF8&pd_rd_i=B01ESUKNXG&pd_rd_r=1RRJG43KPE2SYH7RZJEX&pd_rd_w=CzypZ&pd_rd_wg=2nk8D&psc=1&refRID=1RRJG43KPE2SYH7RZJEX)
Here’s what I’ve been using. Nice and pointy.
https://www.amazon.com/dp/B0002BSP4K
Well damn it. Thanks a ton for the help. Is this really all I need? https://www.amazon.com/dp/B01ESUKNXG?psc=1
Is there another option where I can purchase it in less quantity? Something like this?
https://www.amazon.com/Rectorseal-14000-1-7-Ounce-Nokorode-Regular/dp/B000G33PAI/ref=sr_1_4?ie=UTF8&qid=1469048395&sr=8-4&keywords=paste+flux
Also, the solder wick I'm using says it has flux in it. Is it the same quality as the paste flux?
Maybe the tip of your iron is Oxidized. If you dont have a properly tinned tip it will have trouble transferring the heat.
Take a bit of solder and try to stick it to the end of your Iron, if it smokes and the solder falls off and you have a dirty tip that is not shiny all this means its oxidized.
You want to polish the tip and then fully retin it. I used a metal polish on a crappy iron to polish the tip and then wrapped the tip with coils of solder and turned it on. When it melts onto the tip you just roll the tip around to get it coated well and then you will have a tinned tip on the iron.
The correct way to remove solder from a pad is to use Solder Wick:
https://www.amazon.com/Aven-17542-Desoldering-2-5mm-Length/dp/B003E48ERU/ref=sr_1_8?ie=UTF8&qid=1510916192&sr=8-8&keywords=Solder+wick
You can if you prefer, most times I just use a watchmaker's screwdriver, but I also have one of these for hard to reach chips.
thanks. something like the Hakko CHP CSP-30-1 Wire Stripper, 30-20 Gauge Maximum Cutting Capacity should work right?
solder wick
fume extractor
All good?
>Copy pasta'ed from my post a few months ago:
After doing some research, here are my top 3 budget soldering iron options. Thoughts?
My $4 Harbour Freight iron's tip is dissolving, and it's time I got a new iron. I don't solder super often, maybe a handful of times a month, so I can't really justify getting a nice $40 Weller soldering station. My budget is around $30. After doing some Google-Fu, and browsing through Amazon and Ebay, here are my top 3 budget choices:
I'm open to suggestions, comments, and questions regarding these choices. The Sywon Soldering Iron kit has nothing I really care about over the Vastar one, aside from a slightly nicer stand and sponge, and of course the carrying case. The Aoyue 469, being the only soldering station on the list, doesn't come with any flashy accessories unfortunately. A solder sucker would be nice, and I'll probably be glad of the extra tips that are included wit the two kit irons. However, if you guys think that the Aoyue 469 soldering station would be better quality, I might be willing to shell out a few bucks more for it, and pick up another tip or two.
https://www.reddit.com/r/Nerf/comments/8bugth/after_doing_some_research_here_are_my_top_3/
I think its pretty funny nobody knows for $2 on Amazon you can order some de-soldering braid used by electronics repair people and never have this problem again.
https://www.amazon.com/Aven-17542-Desoldering-2-5mm-Length/dp/B003E48ERU/
Oboy, I'm probably the wrong person to ask. However, /u/BriThePiGuy recommends Joe Knows Electronics boxes, and /u/NeoMarxismIsEvil recommends the following:
> I would order some cheap assortment kits from people on aliexpress. These are the sort that come with like 10 of most common values of resistor, capacitor, etc.
> Other stuff:
> - WeMos d1 mini or mini pro
> - small i2c OLED displays
> - small LCD display
> - tacswitches (buttons)
> - SPDT switches
> - 74HC595 and 74HC165 shift registers
> - either bidirectional logic level shifter modules or mosfets and resistors needed to make them
> - 7 segment led displays (individual)
> - 8x8 led matrices
> - various environmental and physics sensors (often come as a kit of 20+ different modules)
> - extra breadboards
> - jumper wires
> - male and female header strips (for modules that lack pins)
> - cheap breadboard power supplies
> - voltage regulators (both LDO ICs and buck converter)
> - possibly some 4xAA or 4xAAA battery holders
> - trim pot assortment
> Those are just ideas. Some things like 7 seg led digits are pretty cheap and worth having a few of but not terribly important if you have a real display of some sort.
I personally like the assortment of bits I got in my Sparkfun Inventor's Kit, but found that I wanted more of the following:
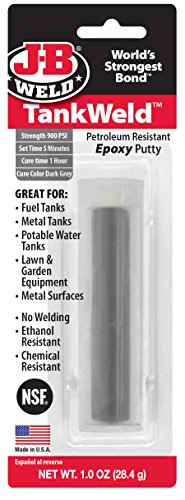
I would not use flex seal. They make epoxy for this type of thing. I have used on gas tanks before and still holding to this day. JB Weld TankWeld Epoxy Putty. Let set for 24hrs. You can mold it like silly putty and drys hard. you can also sand and paint it when it is dry.
​
https://www.amazon.com/J-B-Weld-8217-TankWeld-Repair/dp/B00R2CDUWE
​
​
I got this iron: http://www.amazon.com/Soldering-Station-Features-Continuously-Variable/dp/B0029N70WM/ref=sr_1_7?ie=UTF8&qid=1413223923&sr=8-7&keywords=soldering+iron but for throughhole work a pen is fine.
the elenco soldering kit I got was this: http://www.amazon.com/Elenco-FM-88K-FM-Radio-Kit/dp/B004YHZE0G/ref=sr_1_1?ie=UTF8&qid=1413223964&sr=8-1&keywords=elenco+fm
you can get a flux pen, is that what you're asking? you probably won't need one for throughhole work but this one's good: http://www.amazon.com/SRA-Soldering-Flux-Low-Solids-No-Clean/dp/B008OC0E5M/ref=sr_1_1?ie=UTF8&qid=1413223992&sr=8-1&keywords=flux+pen
solder pump: http://www.amazon.com/Parts-Express-Solder-Sucker--desoldering/dp/B0002KRAAG/ref=sr_1_1?ie=UTF8&qid=1413224011&sr=8-1&keywords=solder+pump
soldering wick: http://www.amazon.com/Aven-17542-Desoldering-2-5mm-Length/dp/B003E48ERU/ref=sr_1_1?ie=UTF8&qid=1413224038&sr=8-1&keywords=soldering+wick
and solder: http://www.amazon.com/Alpha-AT-31604-60-40-Solder-Ounces/dp/B00030AP48/ref=sr_1_3?ie=UTF8&qid=1413224060&sr=8-3&keywords=alpha+fry
> eBay
Thanks. Never heard of that brand before but it looks legit! I have two cheap soldering sets, a gun kind and pen type. They work alright but I imagine they wouldnt compare at all to the Hakko. I will keep my eye out for good deals on them. Wouldnt it be too late if I already purchased it after emailing Hakko the SN? Or would I be doing this prior to buying it via messaging the seller ?
Right now the solder im using is "rosin core 40/60" .
Im not sure if you meant this ratio or the one you said. Im pretty sure this isnt the fine gauge rosin because I have another roll of solder that is like 1 tenth the thickness of this one.
Do you have a link to the best all purpose solder for small electronics or your go to brand? The only reason I got into soldering is because I always end up breaking things and soldering fixes a lot of the things I break lol
Heres the items I have for soldering:
Soldering is a good skill to have, in general.
And if you're careful, there's not much you can screw up.
Watch a YT tutorial or two and you'll be good to go.
For tools you'll eventually want what is in this kit, but probably not that kit itself.
I bought a Weller WLC100 40 watt kit (definitely get a norrower ST2 or ST3 tip as well), a solder sucker tool (you can use desoldering wick, but the solder sucker is worth the money), a Helping Hands and 60/40 rosin-core solder.
In addition, I like using tip tinner, a wire tip cleaner like this because I found that using a wet sponge reduced the tip temperature too much.
Also, solder fumes are not great so only do this is in a well-ventilated area. I like to use a small fan to blow the fumes away from my face.
The only thing you'll need to do is desolder/clip the existing swtich and wire up the replacement. You don't have to mess with the pots or caps unless you want to.
Phostenix Tele diagram page.
edit: fixed solder type
A felt plumbers pad is perfect for this.
Same thing happened to me with a cheap soldering iron kit. I just bought better tips to use as replacements. Did you see a flat metal core in the tip after the other metal wore away?
What happens is the chrome plating on the tip wears out, and under that the metal reacts with solder? and basically dissolves. Not your fault, it's just a cheap tip. Here are some hints for tips:
Mine is similar but has flux in the bottom. I stuff the hot iron in the flux, then wipe it on the brass shavings. Brass is softer than the tip so the tip won't get the chrome layer scratched off. I got this kit and it comes with a tin can of flux at the bottom with a brass "sponge" on top. This is what I used.
This post seems like terrible advice. Getting a pump changed my life, and they're $6.54 on Amazon...
Check out this video on different types of solder and flux:
https://www.youtube.com/watch?v=V1aONINVkSE
These are the things I have in my relatively newish lab I set up:
RA (Rosin Activated) Solder Flux
Flux Applicator
The bottle is just an example. You can buy refillable pens or brushes which many people prefer.
0.075" RMA(Rosin Mildly Activated) Solder Wick
0.032" RA Cored Solder
And finally to clean off your boards afterwards:
Flux Cleaner
You could also use no-clean variations if you like. I recommend doing some research on the different types of solder (look here). The accessories you choose depend on the type of solder you are using. I would try to use RA or RMA wicks and fluxes with RA or RMA solder. Mixing say no-clean fluxes with RA solder will probably just make things messier.
I forgot you mentioned you are using lead-free, in that case you could buy lead-free wick (MG chemicals sells it on amazon). Not sure if there are lead-free fluxes available. However I would recommend you switch from lead-free to leaded solder, your life will be much easier.
MG Chemicals is a good brand. I use it mostly because it is easy to get where I am.
That is a really good idea, I actually have a soldering iron but I need a better head for more precise work. think this will work in a v3 gearbox and this tip good enough for gearbox work? Thanks for your help man
I've been soldering for 20 years and I still can't quite get it down all the time.
Take an evening, beer up and go watch the PACE International soldering tutorial. Get a good soldering iron from a local electronics shop or Amazon; I like the little $30 Weller "student" irons because they're adjustable and have good tip variety for cheap. SMT soldering needs two basic kinds of tip: point and a flat. With some practice, you can easily drag-solder gull-wing packages like the Atmel here.
You also don't seem to have
A small amount of solder wick or just GENTLY dragging your iron across the pins will get the bridged pins cleaned up, just make sure to add some flux when you solder again, if your solder doesn't have flux baked in. Then, the big glob of solder should just
pop off the board -- it isn't wetted to anythingWick off the board.I will agree with whoever said you're using too much solder: you're dripping. That's too much. The PACE videos will get you oriented in the right direction as to when to stop.
Solder wick is cheap to the point Amazon demands you buy it with something else. Get some. It's like a towel for solder. Heat, soak, and repeat.
[Soldering Iron I use] (https://www.amazon.com/dp/B07GJNKQ8W/ref=cm_sw_r_cp_apa_i_fp4PDb7MMWHSY)
[Tip Cleaner] (https://www.amazon.com/dp/B076X1NYBB/ref=cm_sw_r_cp_apa_i_.p4PDbBFGG9GA)
[Flux Core Wire] (https://www.amazon.com/dp/B00068IJPO/ref=cm_sw_r_cp_apa_i_Sr4PDb7JX44SZ)
I was able to complete my mod myself without doing any microsoldering before in my life - it was stressful, but not that difficult. I used these tools and followed Louis Rossmann's video:
https://www.amazon.com/Sywon-Soldering-Adjustable-Temperature-Desoldering/dp/B01E1ISGH0/ref=sr_1_3?ie=UTF8&qid=1503839179&sr=8-3&keywords=solder+kit
https://www.amazon.com/AMTECH-Solder-Flux-NC-559-V2-TF-16160/dp/B01DR62IYO/ref=sr_1_1?s=hi&ie=UTF8&qid=1503839306&sr=1-1&keywords=amtech+nc-559-v2+tacky+flux
Is there anything wrong with a conical tip like this? I soldered and desoldered plenty of switches with this just fine.
If you want to practice wiring, why not just throw some jacks and pots in an enclosure and practice wiring them together in different patterns? Unless you go for two pedals in one enclosure (which I wouldn't recommend until you feel more confident), pretty much any circuit I've come across has extremely similar off board wiring.
If you have trouble stripping wire, you gotta get on of these:
https://www.amazon.com/gp/product/B000IYTCG6/ref=oh_aui_detailpage_o08_s00?ie=UTF8&psc=1
If you're having trouble juggling the wire, iron, and solder with only two hands, definitely get one of these:
https://www.amazon.com/ProsKit-900-015-Helping-Hands-Soldering/dp/B002PIA6Z4/ref=sr_1_2?s=hi&ie=UTF8&qid=1482170946&sr=1-2&keywords=solder+helper
If you just want to see a clear picture/diagram of standard off board wiring, scroll down to the bottom:
https://aionelectronics.com/wp-content/uploads/2013/11/aion-cerulean-bb-documentation-v2.pdf
Just search for Soldering kits on Amazon, there are many. One feature you want is to be able to adjust the soldering iron's heat level. (Example: https://www.amazon.com/Sywon-Soldering-Adjustable-Temperature-Desoldering/dp/B01E1ISGH0/ref=sr_1_6?s=hi&ie=UTF8&qid=1482397099&sr=1-6&keywords=Soldering+Kit)
YouTube has TONS of soldering videos. (Example: https://www.youtube.com/watch?v=BxASFu19bLU).
You also might want to look into some of the more elaborate Raspberry Pi kits, they typically come with a bread board for circuit prototyping as well as a bunch of extra goodies like a Pi Camera module, Arduino boards, etc... (Example: https://www.amazon.com/SunFounder-Modules-Sensor-Raspberry-Extension/dp/B014PF05ZA/ref=sr_1_13?s=pc&ie=UTF8&qid=1482396929&sr=1-13&keywords=Raspberry+Pi+3)
With such a kit, you'll be able to explore a ton of the Pi's functionality.
thanks! this work?
https://www.amazon.com/dp/B01ESUKNXG
If you're just dipping your toe in the water, grab that Weller I linked. It's under $40, but is a well respected budget iron. I personally own a Weller WES51. It's a fantastic iron, but if you're not convinced that soldering things is going to become a hobby, save your money.
Hakko is also a popular brand, but I'm not as familiar with their lower-end gear. If you get an adjustable temp iron from Hakko or Weller, you'll be set for a while.
Some other handy items are:
Other things to consider are goggles, a small fan to pull the fumes away from you (DON'T BLOW ON THE JOINTS), and something to solder on top of. If you don't care about your work surface, it's no big deal. But I use my desk, and sometimes the kitchen table, so I have an old 1 foot ceramic tile that I solder on top of -- the soldering iron base doesn't get hot, but you can drip/splatter solder if you're being careless, and it gives you a hard surface to use that you don't have to worry about getting hot/burned.
Helping hands: http://www.amazon.com/ProsKit-900-015-Helping-Hands-Soldering/dp/B002PIA6Z4
Aven 17010 Adjustable Circuit Board Holder https://www.amazon.com/dp/B00Q2TTQEE/ref=cm_sw_r_other_awd_-VVGwbCQ5C8GA
I got this a while ago and it's pretty good.
Thanks. Here's a link in case helps anyone else. Currently $12.95 and it looks like a gadget that could be used for other one-handed activities. (Now there's a phrase normally used for other activities on Reddit)
Given that this is your first build, I'm wondering whether maybe you're still getting the right tools?
I use this soldering iron from BYOC. It's cheaper than an equivalent Weller, but still works well for me. I previously had a Radio Shack one with a less finely-pointed tip, which was frustrating to use. I also use a circuit board holder from Amazon that makes it easy to put a component in on one side, bend the leads a little to hold it in place, then rotate the board to the other side so I can solder it. I place, solder, and clip the leads for one component at a time. I've tried following some YouTube videos that put in a bunch, tape them down, and then solder through the forest of exposed leads, but that ended up messier than I would have liked.
I'm not sure what you mean about soldering from both sides. Looking at the project doc, it seems to me like all the components (other than the switch and pots) go on the same side. Is it about placing components on one side and soldering on the other?
For an IC socket, I follow these steps:
Given that the Helios has board-mounted pots, you might also find the instructions below (from BYOC) helpful: https://imgur.com/a/6FLzV
DeOxit is popular among vintage home audio collectors, however I'd guess that a pot in a car audio amp is not quite vintage enough to have exposed wipers. I'd replace it, personally.
A desoldering pump/wick is highly recommended.
https://www.amazon.com/Aven-17010-Adjustable-Circuit-Holder/dp/B00Q2TTQEE/
This is a good list.
For a soldering iron, a good one like a Hakko FX888D is invaluable. It may seem expensive, but if you buy one you'll never know the annoyance of having to deal with a crappy soldering iron.
If you're going to be soldering breakout boards (or just soldering in general) an Adjustable Circuit Board Holder is very handy.
Boom. Same here. Only bought it to solder 2 keyboards and it did it's job just fine.
Yes - that Ebay link is probably the same thing. Here's exactly what I bought.
The base rods are steel, so these magnetic arms also work well as helping hands.
The blue uprights of the PCB holder are plastic, and one side is spring loaded. It allows for several different mounting positions. It also allows you to spin the board back-and-forth, which is good for this kind of work. Note that it barely fits the length of the Planck, and if I were doing anything longer I would need to hold it sideways instead, which would mean the flipping wouldn't work.
It's not heavy duty like something from PanaVise, but for this kind of thing and smaller boards it works fine.
you can just use those guys here: http://www.amazon.com/gp/product/B003E48ERU/ref=oh_aui_detailpage_o01_s00?ie=UTF8&psc=1
They are cheap and very effective. Just place a bit of the tape on top of the junction that you wish to desolder and heat it up with your soldering iron. The tape is made of copper so it will suck up all the old solder. Works for me!
Thanks for the tips re: clips and Electrodroid.
Can't picture how using the vice would work... Usually what i do is put the components through, smoosh on the Blu-tack, then use this circuit board holder to spin it upside down for the soldering:
https://smile.amazon.com/gp/product/B00Q2TTQEE/ref=oh_aui_search_detailpage?ie=UTF8&psc=1
Get flux or a wick with flux. Keep your tip clean - don't let old solder hang on.
This kit comes with a desoldering vacuum pump. Usually these pumps are not recommended except in emergencies, because you have to heat the solder up enough with the soldering iron tip instead of a desoldering iron which fits nicely around the work, but I did use that pump successfully to remove MX switches.
https://www.amazon.com/gp/product/B01E1ISGH0/ref=oh_aui_detailpage_o01_s00?ie=UTF8&psc=1
Not too expensive, comes with solder and some other useful stuff. If you don't want to spend big bucks on a Hakko, you can start with this.
Very nice work! Here's a link to the one I got:
https://www.amazon.com/gp/aw/d/B00Q2TTQEE/ref=mp_s_a_1_3?ie=UTF8&qid=1501995047&sr=8-3&pi=AC_SX236_SY340_QL65&keywords=pcb+holder&dpPl=1&dpID=41nBaU-cqqL&ref=plSrch
I got it after starting my Ergodox, and it made it so much easier.
Sorry if the format is off, I'm on mobile.
this little thing has worked great for me.
I've never soldered before, but I was embarrassed by how ridiculously easy it is. I still practiced on a $10 kit first.
Soldering kit
Tip cleaner
Thin solder wire
Solder wick optional, but way easier than a vacuum for a beginner.
Practice kit optional but nice for initial confidence boosting
I meant like the one in the video, but I just realized it's probably not your video :/
I'm a bit slow XD
EDIT: Looks to be custom made, this is the base.