Best spoons according to redditors
We found 139 Reddit comments discussing the best spoons. We ranked the 81 resulting products by number of redditors who mentioned them. Here are the top 20.
We found 139 Reddit comments discussing the best spoons. We ranked the 81 resulting products by number of redditors who mentioned them. Here are the top 20.


There're already things like this in Asia. You can get these spoons from the cultery section of your local asian supermarket.
Here're some Amazon links to them too so you can have some options:
Link 1
Link 2
Link 3
We all just need to buy those tiny tiny glass rammekin bowls to eat out of.
And miniature spoons.
Then we'll have so much cereal... right?
:(
boy do i have good news for you.
https://www.amazon.com/dp/B014QD91JW/ref=cm_sw_r_cp_tai_nBVCybR0ZR5SV
Ive seen same metal colored silverware at Home Goods (US store). They where regular utensil shaped though.
EDIT: Hey I found OP's spoons!
Yup :)
I'd just like to clarify I'm not selling these, I'm not some sort of spoon tycoon, nor am I affiliated with one.
Freakishly Small Wooden Spoon
Amazon link
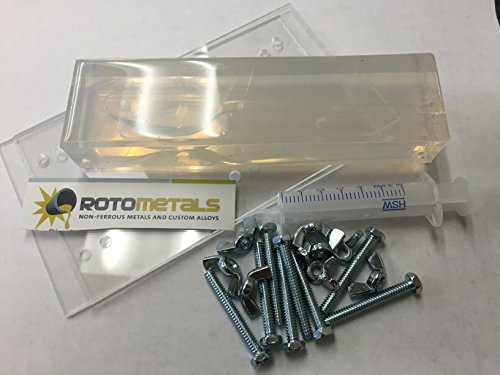
This is Gallium, a metal with a melting point of 86°F. They sell kits where you can pour it back into a mold and do this over and over again.
http://www.amazon.com/gp/product/B004YCTVIW/ref=ask_ql_qh_dp_hza
It appears to have attracted the "amazon trolls" crowd.
although this is also amusingly typical of Teavana. Buy their teaspoon so you can be sure your tea is actually strong enough!
(Also the comment saying this crushes the tea less than a normal spoon. Personally I've used both teaspoons and normal spoons and for anything with any kind of leaf size to it normal spoons work better. Of course usually I just use my hands. Is using your hands to dispense dry tea leaves some kind of tea faux pas?)
Are you just bartending casually at home or are you looking to do it as a job in the future?
Jefferey Morgenthaler's book is great:https://www.amazon.com/Bar-Book-Elements-Cocktail-Technique/dp/145211384X
You'll want to get a jigger, I recommend oxo's graduated jigger, a barspoon, a mixing glass, a strainer, a set of shaker tins (get a small and a large, and seriously splurge for koriko not the other bullshit)
Those are all of the essentials, beyond that everything is fairly unnecessary but there are tons of other things you can buy. I guess a vegetable peeler could be handy for peels but you can just use a sharp paring knife for zest garnishes.
For glassware you can spend as much or as little as you want, depending on how much you care about appearance. When I first starting making drinks at home I had glasses for every variety of drink. I still have those glasses, but basically use these for everything, regardless if it's shaken stirred or whatever. Gimlets taste delicious out of them, manhattans taste delicious out of them.
One little handy thing I've found is these seagram's bottles. Buy a 6 pk of the little glass club soda bottles. Once you use the soda, rinse them out and they're perfect for storing syrups, juices, etc. Plastic caps won't deteriorate like metal will in other styles of bottlees. They're short so they fit in weird parts of your fridge, hold enough syrup for plenty of drinks, etc etc.
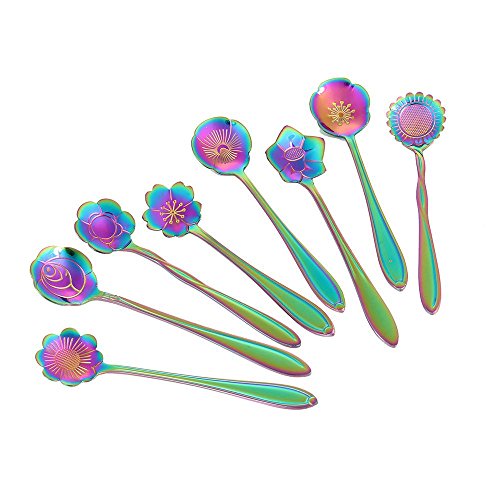
Amazon!!! Flower Spoon Set,... https://www.amazon.com/dp/B076BC1CXB?ref=ppx_pop_mob_ap_share
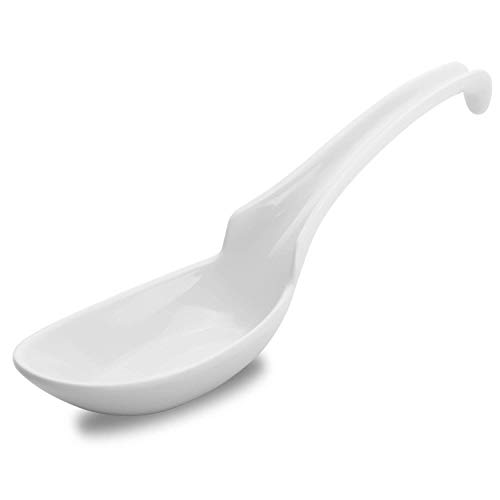
They have a fix for that: Hiware 12-piece Asian Soup Spoons, Rice Spoons, Chinese Won Ton Soup Spoon - Notch and Hook Style, White https://www.amazon.com/dp/B01MCYCJ4P/ref=cm_sw_r_cp_api_i_gxeMDb0C45CTD
Actually 5/7 since you can buy a mold to make a new one:
http://www.amazon.com/Gallium-Spoon-Mold-By-Rotometals/dp/B0061DPTW4
Do NOT get a cobbler. They are a pain to get apart and I haven't used one yet where the top part hasn't all but sealed shut completely. You want a metal on metal shaker. Steel has the best thermal properties and isn't ever going to break.
I personally would advise the following:
Shaker:
https://www.amazon.com/Stainless-Steel-Boston-Shaker-Professional/dp/B06Y2NN5N3/ref=sr_1_5?s=home-garden&ie=UTF8&qid=1501019324&sr=1-5&keywords=boston+shaker
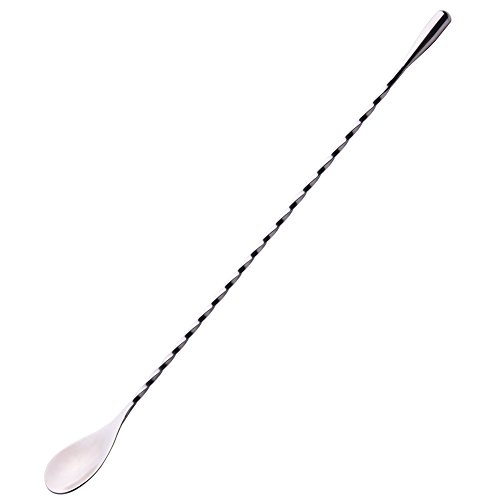
Spoon:
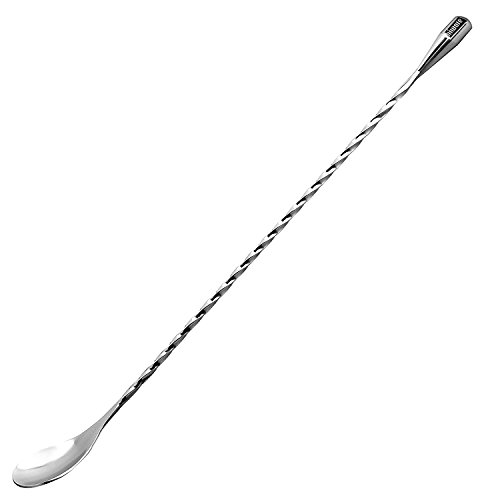
https://www.amazon.com/Hiware-Inches-Stainless-Pattern-Cocktail/dp/B00IRY8CJ2/ref=sr_1_1?ie=UTF8&qid=1501019552&sr=8-1-spons&keywords=bar+spoon&psc=1
Jigger
https://www.amazon.com/Vking-Japanese-Jigger-Stainless-Cocktail/dp/B0126GQ806/ref=sr_1_8?s=home-garden&ie=UTF8&qid=1501019600&sr=1-8&keywords=jigger
Strainer:
https://www.amazon.com/Winco-Stainless-Steel-4-Prong-Strainer/dp/B000H7VF64/ref=sr_1_4?s=home-garden&ie=UTF8&qid=1501019642&sr=1-4&keywords=bar+strainer
Muddler (Edit): https://www.amazon.com/HIC-Muddler-FSC-Certified-Beechwood-8-75-Inches/dp/B00KLHNH34/ref=sr_1_14?s=home-garden&ie=UTF8&qid=1501019848&sr=1-14&keywords=muddler
Barmat (Edit, but HIGHLY recommended): https://www.amazon.com/BonBon-Professional-Bar-Service-Mat/dp/B06X93XN69/ref=sr_1_4?s=home-garden&ie=UTF8&qid=1501019915&sr=1-4&keywords=bar+mat
TBH, most of the bowls I ate out of when I ate at noodle shops in Asia were the large plastic ones. I usually find them at my local Asian mart for like 5ish bucks depending on the size. Don’t forget to grab a couple of proper soup spoons like these too:
https://www.amazon.com/JapanBargain-Brand-Asian-Black-Spoons/dp/B001D22QM4
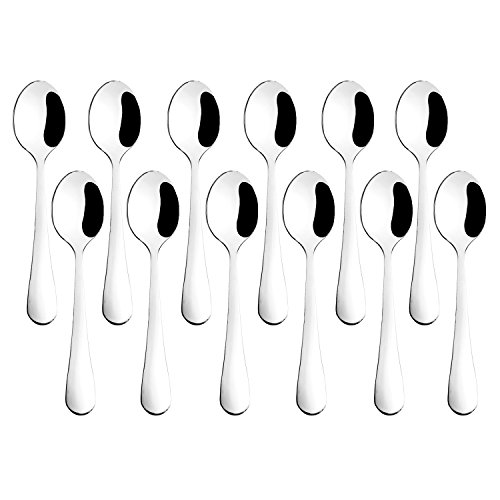
If I had to pick the left one - but I dont like any of them.
The middle one is cheap shit and will tear your hand webbing after a while. The fork one has too small a spoon and the gold one is a square shape which will hurt your hand too.
This is the spoon we use at work and I use at home - its got rounded edges and is nicely weighted.
Since I actually find the links in the sidebar to be fairly unhelpful, at least for someone as detail oriented as me as a beginner, and I'm still enough of a beginner to remember how hard it was to get started, I'll go ahead and give you a start here.
Equipment needed
Equipment Wanted If you think you'll get really into this, here's some equipment that I have that I feel makes life a lot easier.
Ingredients Needed
To Brew a Mead
NOTE If you're making a 1 gallon batch, you can put your batch directly into your jug carboy and shake instead of stir. You can also use a balloon instead of an airlock. I recommend sanitizing a food-grade funnel to put all your ingredients in if that's the case. To make smaller batches - just divide everything in my recipe (except the yeast, always just use 1 packet of that regardless of the batch size) by 6.5x. For example - for a 1 gallon batch you would use 1.5 cups of pumpkin mash instead of 10.5 cups. etc etc etc.
As time goes by
That's the same one I use at home.
At the bar, I like to use what's called an "English Bar Spoon" that has a flat weighted end opposite the spoon so you can give a brief muddle with it, or layer drinks using the flat end to slow the pour at the drink's surface.
CANT BUT ONE FAST ENOUGH
http://www.amazon.com/Museum-Modern-Stainless-Steel-Ramen/dp/B0023T3B0M
Wooden spoons > titanium sporks
https://smile.amazon.com/gp/product/B01E8TQA4S/ <- plus you now have gifts for the whole UL family
Looks like a latte spoon to me -
Hiware 9-Inch Long Handle Iced Tea Spoon, Coffee Spoon, Ice Cream Spoon, Stainless Steel Cocktail Stirring Spoons, Set of 4 https://www.amazon.com/dp/B01E3SS8AI/ref=cm_sw_r_cp_apa_i_uAaMDbT4A0G02
I am seconding the ceramic bowls for ramen. I also recommend trying to find bowls with spoon or chopstick rests like this. I do not have the exact same style but I do like having the chopstick rest in my own bowls.
And I would definitely pass on the steel chopsticks, you'll have noodles slipping all over the place.
If you are looking to get a full set you can find spoons like these to eat the broth with if you are not fans of sipping the broth right out of the bowl.
ETA: This is my personal set. and it has worked well for my husband and I for years.
yah LOL! but get a bartender spoon - we use this kind
Sure, let's talk!
If you're learning how to use a bar spoon, it's easier, IMO, to start out with the thicker bodied ones, since they provide a little more heft and therefore control. The drawback to them is that they don't maneuver in the glass quite as easily, and they're ultimately a little slower. Once you're pretty comfortable with your technique, I much prefer the thinner kind. Not only do that have a sexier look to them, I find I can control the movement of the spoon a lot more precisely.
Here: https://www.amazon.com/Wooden-Salt-Spoons-pack-3/dp/B007GQJNO0/ref=sr_1_1?ie=UTF8&amp;qid=1483570688&amp;sr=8-1&amp;keywords=tiny+wooden+spoon
You could get a large spoon like this or use a mash paddle
The picture has no filter. My spoon is actually that color.
https://www.amazon.com/dp/B01E8TQA4S/ref=cm_sw_r_cp_apa_i_KMdcBbEZCV958
I am a chef too and I order these to keep my carb level down. They are perfect. http://www.amazon.com/gp/aw/d/B00E82OVME
Yeah, if op is bringing that much liquid formula I’m assuming it must be sealed? I know for the formula we feed our little one after it is mixed it is only good for 24 hours if it’s refrigerated (or 1 hour after he starts the bottle). Might be a good idea to call the airline just to verify. Hope you have a great trip!
Edit: Also for making bottles when you’re out and about, we found a formula dispenser and long spoons for mixing helpful. We also kept a sealed water bottle in our diaper bag just in case. It’s still tricky to sterilize the bottles though when you’re out and about.
http://www.amazon.com/Plastic-Tasting-Spoons-Cream-spoons/dp/B00E82OVME/ref=sr_1_2?ie=UTF8&amp;qid=1407277356&amp;sr=8-2&amp;keywords=small+ice+cream+spoons
One of the "hidden" costs of brewing is upgrading equipment. If it's something you really think he'd be in to, getting some equipment that's worthwhile can save you/him money in the long term. I've had a few friends that got in to it, purchased cheap/small stuff, and spent the next year upgrading things again. Buy it once. Now, I'm not saying refit your garage into a full HERMS setup, but getting not-dirt-cheap items & items you can grow with really is invaluable.
When I started, I went with this which has most of what you'll need. The only things left are the kettle, mash tun, propane burner, and a good metal spoon. Here's what I went with, and still use.
Kettle
Spoon
Burner
For the mash tun, I went with a 10g igloo and converted it over following these instructions. I've since upgraded that to a 15g stainless steel pot w/ false bottom, but the igloo definitely served its purpose.
I think these soup spoons are pretty interesting! weird things!
HOUSE GREYJOY <3333
Okay, shipping killed quite a few ideas. But since you seem to like Korean food and I've had a lot of soups, maybe these would come in handy?
WE DO NOT SOW.
https://aliexpress.com/item/32867841684.html
it's a spoon for snorting things up your nose (snuff, coke, etc.)
edit: and amazon link https://www.amazon.com/dp/B07KJ5BHNH/ref=cm_sw_r_cp_awdb_t1_ViJ1DbWFJ3ETP
Asian countries have had this solved for a while now.
Here ya go.
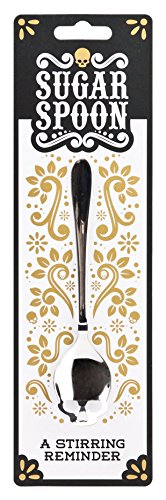
Here's the listing! Only $3 - I'm interested to see whether it hurts or feels weird to eat with, lol, though not enough to hand-wash dishes right now so we'll see! Worst case it can be a sugar spoon, like the listing says.
My shopping list
https://www.amazon.com/gp/aw/d/B00IRY8CJ2/ref=pd_aw_lpo_79_tr_img_2?ie=UTF8&amp;psc=1&amp;refRID=7CJ34053QY4M9818FZMH
https://www.jbprince.com/Bar-Tools/cocktail-kingdom-set-of-koriko.asp
https://www.jbprince.com/Bar-Tools/cocktail-kingdom-koriko-hawthorne-strainer.asp
https://m.crateandbarrel.com/hatch-mixing-glass/s310798?localedetail=US&amp;ps_cid=210&amp;a=1552&amp;campaignid=640063196&amp;adgroupid=29766033536&amp;targetid=pla-352575254124&amp;pla_sku=310798&amp;scid=scplp310798&amp;sc_intid=310798&amp;scid=scplp310798&amp;sc_intid=310798&amp;gclid=Cj0KCQiA0vnQBRDmARIsAEL0M1m3b1PgOd54XUn3Y9AGDrTX7qr4rLHwlaTBicIkEmUujwWZJrLJvpsaAvnuEALw_wcB
World market or Crate and Barrel for glassware. If you want to go all out: https://m.crateandbarrel.com/maxine-bar-cabinet/s554189
You could always bring your own ramen spoon.
If you are doing big melomels, you might want a hydrometer with a high range (I'm assuming the one you linked is standard). Also maybe an 8g/30l bucket. otherwise those items are fine for normal strength meads w/o tons and tons of fruit.
Get the metal spoon, IMO (https://www.amazon.com/Brewing-SYNCHKG011311-Spoon-Stainless-21-Inch/dp/B001D6KF8M/ref=asc_df_B001D6KF8M/?tag=hyprod-20&linkCode=df0&hvadid=222720245886&hvpos=1o2&hvnetw=g&hvrand=9783685370321181631&hvpone=&hvptwo=&hvqmt=&hvdev=c&hvdvcmdl=&hvlocint=&hvlocphy=9061189&hvtargid=pla-384544715503&psc=1)
you don't need the paddle (that's more for mashing grain for beer brewing) - maybe get a wine whip instead?
&#x200B;
--You have 2 buckets there, are you planning on aging in plastic? I'm usually a bit leery of that myself (I prefer steel for aging, so I use kegs but lots of folks like their carboys just fine). 2nd bucket is handy for sanitizer, etc while working though.
--suggestions: get a good gram scale with 1/10 gram resolution. Comes in handy for yeast, nutrients, spices etc. mesh bags are good if you are adding whole fruit and the like.
If you have prime, there's this lovely squirrel rice paddle that's been on my wishlist for a while.
You should replace your spoon with a stainless one, which can be sanitized endlessly and should not stain. Here is one on Amazon that is affordable: Stainless Spoon
Bingo! The preparation is just as addictive (sometime more) than the high. I was thinking about this exact same thing on Friday when I was gathering up all of my tools to prepare. I like to take my time and not rush through it because it’s kinda fun. My first few times I just went in guns blazing and didn’t think about my spun ass making a mess later and forgetting where I put every damn thing (my hands shake already because of head trauma and it’s really bad when I get high). Here’s my “ritual”
Get the trust 12” non-stick pizza pan out and grab a couple extra baggies. Separate out the larger bits from the shake and bag them up. Now it’s time to turn what’s left into a powdered sugar texture. Smash it down a couple times with a credit card and separate into a few piles. Next I use a plastic lid from a travel size sore throat spray. I’ve found that using it as a rolling pin works 10000000% better than the chopping method. Now I have a ton of powdered sugar. Grab the credit card, separate back into a few piles and make a last pass with the lid to make sure every bit of it is powder. Separate out what I am gonna use and put the rest up in my extra baggies with my snuff spoons from Amazon. The pizza pan is portable, none of the product sticks to it, it’s big enough that you don’t lose stuff in the carpet, and it’s really easy to clean!
This is my preferred route.
Equipment
cocktail kingdom shaken set
hiware barspoon
winco wooden muddler
A cutting board (I prefer black plastic ones, wood breaks apart and usually gets all bacterial, yech)
A cheap santoku knife
cocktail kingdom channel knife
There's the most important equipment that should last you awhile at home.
10 Bottles
A lot of the brand suggestions in here are surprising, the other comments are suggesting typical sponsor brands a lot. I would steer clear of brands you are used to seeing at dive bars.
I have one of these! I love it. It's from MoMa ($25).
http://www.amazon.com/Gallium-Spoon-Mold-By-Rotometals/dp/B0061DPTW4
https://www.amazon.com/Hiware-Demitasse-Espresso-Spoons-Stainless/dp/B01KC6A5RY
walmart has 16-Qt Stainless Steel Stock Pot and a Stainless Steel Spoon. I poured a gallon in the pot and used a drimal to mark the spoon at 1-2 - 2.5 - 3 - 3.5 - 4 so no problem knowing the water level.
I want spoon
Spoon! 🥄
This little spoon will be a helpful aide for my morning cup of tea.
Patrick Kane is our hero
Thanks, that's definitely close. But the fact that it's slotted is a big part of its allure as I've found.
Honestly I might just dremel some slots into one of these:
http://www.amazon.com/gp/product/B00B2ZCTPG/ref=ox_sc_sfl_title_1?ie=UTF8&amp;psc=1&amp;smid=A1THAZDOWP300U
http://www.amazon.com/Stand-Paddle-Shamoji-Black-K-386BK/dp/B003B66YRS/ref=sr_1_27?s=home-garden&amp;ie=UTF8&amp;qid=1414535288&amp;sr=1-27&amp;keywords=rice+paddle
This tea scoop from my Fun Stuff wishlist!
I'd use it to dig a hole all the way through to the other side of the earth to climb get off the island! If I then ended up in the middle of an ocean, I'd climb back through, build a tiny raft, carry THAT through to the other side, and use my scoop as a teeny tiny paddle.
Never mind that I was on an island surrounded by ocean to begin with. I'm taking my raft to the other ocean. Just to spite it.
EDIT: Oops, turtles are awesome!! :D
6 oz glasses not in these pics .. Dragon Glassware Espresso Cups,... https://www.amazon.com/dp/B07462824J?ref=ppx_pop_mob_ap_share
2 oz shot glasses .. JoyJolt Javaah Double Walled... https://www.amazon.com/dp/B01N03DSGT?ref=ppx_pop_mob_ap_share
Shakers and stirrer (we do mostly iced drinks) .. Premium Cocktail Shaker Set:... https://www.amazon.com/dp/B073L557JF?ref=ppx_pop_mob_ap_share and Hiware LZS13B 12 Inches Stainless... https://www.amazon.com/dp/B00IRY8CJ2?ref=ppx_pop_mob_ap_share
Happy Sales Melamine Soba, Rice Spoons, Chinese Won Ton Soup Spoon, Asian White, 6 Pack Notch & Hook Style https://www.amazon.com/dp/B014QD91JW/ref=cm_sw_r_cp_api_gY-AzbTGDW658
you're welcome
If deserted on an island, I would use this tea spoon to find fresh water by slowly digging in the ground. It would take me a while, but worth it! TURTLES ARE AWESOME! I used to have one, his name was Franklin. RIP
I've been good I swear!!
If possibly can i get a GC i'm saving up for a big item! if not how about these?
funf
vier
drei
zwei
eins
Hootie gosh those are so darn cute :)
Yes, except they are usually smaller and skinnier than sundae ones.
https://www.amazon.com/Hiware-9-Inch-Stainless-Cocktail-Stirring/dp/B01E3SS8AI
Also known as Cocktail Spoons.