Best tablet replacement parts according to redditors
We found 24 Reddit comments discussing the best tablet replacement parts. We ranked the 15 resulting products by number of redditors who mentioned them. Here are the top 20.
We found 24 Reddit comments discussing the best tablet replacement parts. We ranked the 15 resulting products by number of redditors who mentioned them. Here are the top 20.


Ok!
So it's a late 2018 (December) Ender 3 Pro. I got it from Mech Solutions. They have been super helpful with some warranty stuff. (Magnetic bed delaminated and heat break/throat tube was broken.) https://www.mechestore.com/collections/ender-3-pro
Galactic Empire gears here:
https://www.thingiverse.com/thing:3422334 (I remixed this one!)
https://www.thingiverse.com/thing:3005278
The braided cable stuff is from Amazon, here: https://www.amazon.ca/gp/product/B071WF5NTN/ref=ppx_yo_dt_b_asin_title_o01__o00_s00?ie=UTF8&psc=1
I bought three sizes, 1/4", 1/2", and 3/4". I hated the Pi camera cable, luckily it fits perfectly in the 1/2" stuff. I found uses for all three sizes in different locations. The 1/4" looks cool on the bowden tube. I used heat shrink (or electrical tape) at the ends.
Hotend cooler is Hero Me with a velocity stack (stack purely for my own entertainment)
Hero Me: https://www.thingiverse.com/thing:3182917 - I used the stock 4010 blower version in the end. I was going to do the dual 5015 mod but the two Amazon fans I got were both defective.
Fan is a Noctua 4020 - from here: https://www.amazon.ca/gp/product/B071W93333/ref=ppx_yo_dt_b_asin_title_o07__o00_s02?ie=UTF8&psc=1
** tech note - I added a 12v system running in parallel with the OEM 24v Ender system - more below
Velocity stack:
https://www.thingiverse.com/thing:2211780
Someone spotted it, on the left I have a Raspberry Pi 3B+ running OctoPi (Octoprint):
https://www.amazon.ca/gp/product/B07BD3WHCK/ref=ppx_yo_dt_b_asin_title_o03__o00_s00?ie=UTF8&psc=1
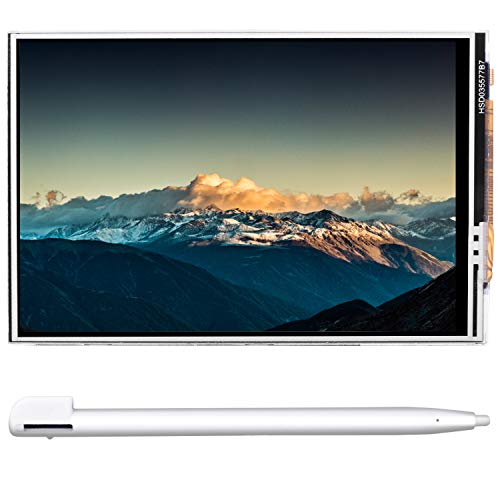
and a 3.5" touchscreen TFT LCD:
https://www.amazon.ca/gp/product/B07KLDKM5D/ref=ppx_yo_dt_b_asin_title_o06__o00_s00?ie=UTF8&psc=1
and a Pi compatible camera:
https://www.amazon.ca/gp/product/B0759GYR51/ref=ppx_yo_dt_b_asin_title_o03__o00_s00?ie=UTF8&psc=1
with longer cables:
https://www.amazon.ca/gp/product/B07DNYM8KC/ref=ppx_yo_dt_b_asin_title_o02__o00_s01?ie=UTF8&psc=1
The camera needed a mount:
https://www.thingiverse.com/thing:2886101
and an off-brand sleeve:
https://www.thingiverse.com/thing:2994762
The Pi needed a mount too, and I found one I love that just happened to fit the screen I bought:
https://www.thingiverse.com/thing:2530258
** user note - this thing is massive, and tricky to print. Worth it, though.
OH. THIS IS A MUST:
https://www.thingiverse.com/thing:2943218 xD
All metal extruder, conveniently in red, from here: https://www.amazon.ca/gp/product/B07JVJWC5B/ref=ppx_yo_dt_b_asin_title_o04__o00_s00?ie=UTF8&psc=1
** tech note: if nothing else, do this upgrade. This, and the one just above it. Mine was under extruding, and I poured hours into trying to calibrate/test/bla bla bla... it ended up being a broken heat break and crappy plastic extruder.
Filament guide (top rail)
https://www.thingiverse.com/thing:3003807
At extruder:
https://www.thingiverse.com/thing:3303562
Z-Axis bar cable management:
https://www.thingiverse.com/thing:2761965
** user note: this is one of my favorites!!!!! I covered it in LEDs, white for the bed, and red for the wall/bowden tube!
Ok, so, something that made getting good fans difficult is the Ender 3 uses 24v fans (except the power suppy, it uses a 12v fan. Bonus.)
To get some 12v power, I used a buck converter to step 24v down to 12v from here:
https://www.amazon.ca/gp/product/B01FQH4M82/ref=ppx_yo_dt_b_asin_title_o07__o00_s01?ie=UTF8&psc=1
and basically I run all the fun stuff off it.
JST and XT60 connectors are all from www.hobbyking.com. Same with 22AWG three wire servo wire, super handy. I already had this stuff kicking around, but hobbyking is good if you need this stuff.
The PSU has some open ports, I added another XT60 cable with 24v service. I made it the same as the OEM, and they are backwards compatible and nothing will fry. One of them goes to my buck converter, the other to the Ender main board.
** tech note: I used a 3.5A BEC from hobbyking to power the Pi, off the 12v side of the buck converter. I ended up cutting the power supply cable that came with the Pi (and added JST connectors to the whole thing so I could reuse it one day.) The BEC steps the voltage down to 5.1v from 12v. 3.5A has been plenty. I think it might use .8A with my giant RGB keyboard plugged into it.
This is super worth it, a must do. https://photos.app.goo.gl/AEXNqvTXE5ZZhnhi8
Oh, the nice little platform the buck converter and Pi cooling fan is sitting on is this thing:
https://www.thingiverse.com/thing:2539545
more below: (above?)
Replace the screen! Check out ---> https://www.amazon.com/Genuine-Screen-Digitizer-Replacement-Nintendo/dp/B01MTKXNZ5/ref=pd_lpo_sbs_147_t_1?_encoding=UTF8&psc=1&refRID=P71HGZP77D0VSC1XAKSW
Try to replace the screen yourself. You have nothing to lose at this point:
http://www.amazon.com/Display-Replacement-Apple-Model-A1432/dp/B00A6VWIXA
If you no longer want it, I would hurry up and sell it before the new ones come out this fall.
Depending on how confident you feel with electronics repair, this is something you can actually fix yourself. All things considered, it's honestly not that difficult. It takes a bit of time, though.
Here is where you can buy the screen with the necessary tools to do the job.
Of course if you don't feel confident in doing this there are many places around Ann Arbor to get this repaired. It is likely to cost more though.
I'm not sure where the best place is. Someone else may have that answer.
Could be a battery issue.
Easy enough to fix: http://www.ifixit.com/Guide/Nexus+7+Battery+Replacement/9895
Can be found cheaper on aliexpress but here's a start: http://www.amazon.com/Google-Nexus-Tablet-Replacement-Battery/dp/B00ERKI9AW
No, that screen will not work directly with any Raspberry Pi. The ribbon cable you see is a 50pin LVDS cable, which would plug into an LCD controller board that provides HDMI out and usually requires 12V power adapter. That would cost you $26.99, around $25 for the controller board, and around $10 for a 12V AC adaptor. At $62 total (without tax or shipping) you might as well spend $80 and get the official 7" Raspberry Pi touchscreen, which connects using the DSI connector, directly to the Raspberry Pi, requires no external power (unless you have power-hungry USB peripherals plugged into the Pi), and works right out of the box without drivers.
Given your example display measures 7", what size are you looking for? Would a 3.5"-4" display be acceptable for your project? If so I have recommendations below depending on your resolution and display speed needs. All of those displays connect via GPIO pins and sit directly on top of the Pi, making case fit very easy. No external power is required and there are some (very easy) drivers to install. However, if you are looking to play emulated games you probably won't be satisfied with the "standard" speed displays.
If you need a high resolution display for actual GUI desktop use I suggest either an an iUniker 3.6" or a HyperPixel 4" display. They are both high resolution (800x480) and high speed displays and work great. I have both and would recommend the iUniker model due to the lower cost, and it looks super crisp at 3.6". Keep in mind the iUniker model is ONLY for Pi 2/3B/3B+ and will not work with the new 4B; they offer a 480x320 version that does work with the 4B, but no 800x480 version yet. I'm not sure whether the HyperPixel works with the new 4B or not.
My recommendation: purchase the iUniker 3.6" 800x480 screen for $30 no matter what your intended use for it.
​
Standard speed/low resolution displays:
High-speed/low resolution displays:
High-speed/high resolution displays:
So these two?
http://www.amazon.com/Mimi%C2%AE-Premium-Quality-Display-iPad/dp/B00MBQMV76/ref=sr_1_2?ie=UTF8&qid=1464728552&sr=8-2&keywords=ipad+air+lcd
http://www.amazon.com/Techorbits-Replacement-Digitizer-Genreation-T-Mobile/dp/B012UFG312/ref=sr_1_5?ie=UTF8&qid=1464728324&sr=8-5&keywords=ipad+air+lcd
Active styluses should work on any capacitive screen which has a digitizer.
Which the Switch does have.
I actually bought this one: https://www.amazon.com/gp/product/B07P7TLLRN/ref=ppx_yo_dt_b_asin_title_o00_s00?ie=UTF8&psc=1
Setup was fairly straightforward and the screen quality seems good, calibration was spot on out of the box as well. The issue I have is that it doesn't have the two mounting screw holes that hang off of it like the Adafruit one does, so I have the pi and screen zip tied to the enclosure to hold it in place. You can see this if you zoom in on the photo. I'm working on a more permanent mounting solution. In hindsight I wish I had spent the extra money on the adafruit version to make mounting easier.
There are [so] (http://www.amazon.com/iPhone-3gS-Screen-Repair-Kit/dp/B002XT355S) many ways to fix these things.
It's a 3.2" inch diagonal ILI9341 tft display. It is touchscreen capable but I am not using that at the moment.
It's a 320x240 display and I spent $16.59 amazon.
LCD Display Module, 3.2 inch 240320 TFT LCD Display Module 4-Wire SPI TFT LCD Screen with SD Card Cage,TFT Display Module https://www.amazon.com/dp/B07KPD4DHD/ref=cm_sw_r_cp_apa_i_ag2SDbE0TNM5D
I like the nextion screen. Nice graphics, easy to program. NX3224K024 Nextion Enhanced 2.4'' HMI Touch Display, for Arduino Raspberry Pi with Acrylic Case https://www.amazon.com/dp/B07KDZZWF3/ref=cm_sw_r_cp_api_i_aJV3CbGYGF44X
You could have magnets attached to latches and use a hall sensor.
this is the screen I used $23 CDN on amazon
​
https://www.amazon.ca/gp/product/B077ZT7S38/ref=ppx_yo_dt_b_search_asin_image?ie=UTF8&psc=1
WELL NUTS, posted in the wrong dang place....
Two of the input pins for the touch screen can be digital or analog, as they just supply 5v. The other two must be analog, since they use an analogRead() to get the resistance reading.
The function that draws any character just takes a bunch of hex values and copies them into memory locations inside the screen chip. It's not that difficult to write a new function in the library to do that.
Here is one clue: the amazon page for that screen ( https://www.amazon.ca/gp/product/B077ZT7S38/ref=ppx_yo_dt_b_asin_title_o02_s00 ) is showing a demo screen that is actually from the Adafruit TFT libraries. So that entire library may just be a pretty close copy of the Adafruit libraries....
If you could zip the library up and post it somewhere online, the rest of us could see it.
Can you help identify which parts I need? There are a few that say GPS antenna, but look different.
GPS Signal Antenna Network Replacement Part for Iphone 6
GPS Antenna Signal Flex Cable Ribbon Replacement Part for IPhone 6
This wifi one looks like the 2nd link?
Any guidance?
This is the conclusion I'm leaning towards, but it also started happening when I switched ROMs (CM to LineageOS) However, it persisted even after switching back.
You didn't indicate you've replaced the battery yourself, so i don't suppose you have any suggestions for a replacement? I've been looking at this but I don't know the reliability of off-brand batteries.
I ordered this screen: https://www.amazon.com/gp/aw/d/B01HZPOTFY/ref=oh_aui_i_sh_post_o0_img?ie=UTF8&psc=1
What I like is that it lays flat on the raspberry pi and uses gpio pins so no need for cables.
Same here -- I didn't go with the official covers. I went with this. It looks average and is very cheap. But it get's the work done very well.
Of course I am in a different country. I am just saying that cheaper covers work well if ratings from others are good. :)