(Part 2) Best thermometer & timers according to redditors
We found 2,238 Reddit comments discussing the best thermometer & timers. We ranked the 447 resulting products by number of redditors who mentioned them. Here are the products ranked 21-40. You can also go back to the previous section.


Good luck to you, but frankly I think you're trying to create a solution to a problem that doesn't exist. Here's how I already solve all these issues:
Like I said, good luck. I hope this is a amazing success and I'm just an outlying laggard. People who want smart home everything, or people addicted to buying kitchen uni-taskers are probably going to be your core customer.
All the best.
I mean, something like this doesn't seem so complex. Latches are great, but sometimes they can be the thing that keeps the door open, and they don't alert you to things like a blown circuit breaker or GFCI.
Which reminds me - we just got a deep freezer and have been meaning to pick up an alarm. Thanks for reminding me!
After a year of thinking about it I finally decided to get an in oven meat thermometer and I don't regret the purchase! Last night I tested it out by cooking a few ribeyes that I picked up on sale last week, used the reverse sear method, and I finally got a perfect med. rare steak at home!!!
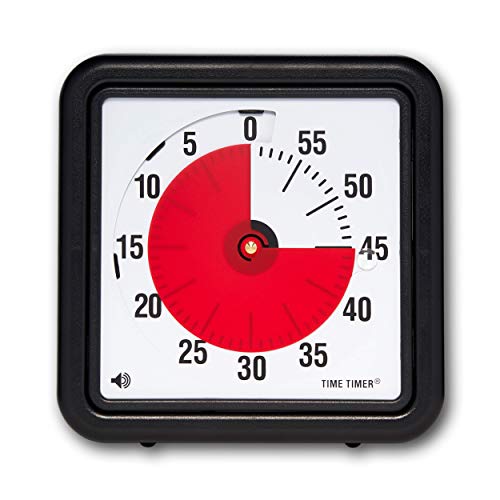
We've been having trouble with naps too (just turned 2.) I haven't bought it yet, but was looking for some kind of visual I could use to say "Okay you have one hour of "quiet time" in your crib" and people recommended this: https://smile.amazon.com/gp/product/B002GTZZ6M/ref=ox_sc_sfl_title_3?ie=UTF8&psc=1&smid=ATVPDKIKX0DER (Versus the 90mins of straight screaming we've been getting.)
I have heard that the 2 year sleep regression can mess up naps, but that potentially it's not permanent. (In case that gives you hope...) If that's the case, I'd think quiet time in bed MIGHT mean he'd nap again at some point? E.g. He might not nap now, but maybe in a few weeks he'd fall asleep again? But at least quiet time would give you abreak...
Invest in an oven thermometer.
Set or hang it in the center of the oven to get the most accurate reading.
Get one of these dealies.
>you can reasonably assume people don't go turn a fridge off.
Firstly it's never safe to make assumptions about human behaviour/mistakes. That's what gets people killed/things damaged.
> The massive cost of having UPS of sufficient size to keep a fridge running for every sample fridge in the CSIRO would be enormous.
Secondly, with that kind of thinking you should fit right in in the public sector. You can get a $30 temp sensor alarm that would have alerted them to the problem. They should have had that regardless in case the fridge became faulty or a fault developed in that outlet/fuse. Idiots can't even safeguard a fridge with millions of dollars worth of samples.
sensor
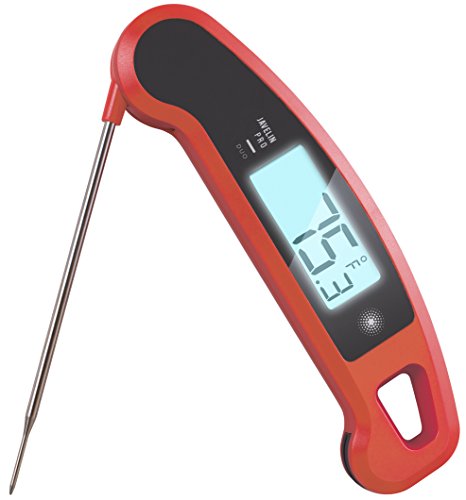
A great and cheaper alternative to the above mentioned thermapen is the Javelin Pro Duo. They can be had for about half the price and if you keep your eyes peeled often around $40.
> In addition to a Thermapen, I want to purchase...
Here, I saved you $80. That's the price of a mill on sale, so now you can get both.
I'm not OP, but I just bought a meat thermometer that goes in the oven and lets you know when your chicken is internally 165 degrees Fahrenheit by setting the temperature. You just stick it in the thickest part of the chicken. It takes out ALL the guesswork. Just cook your chicken in the oven with a little olive oil and preferred seasonings. I prefer salt, pepper, paprika, garlic salt, garlic powder (I really like garlic).
You can use it with any meats, but I prefer to eyeball my steaks. But chicken only really has one temp where it works (165) haha. This isn't the exact one I bought, but it's pretty close. You want one with a cord that will let you put it in the oven.
Get one of these:
https://www.amazon.com/Datexx-The-Miracle-Cube-Timer/dp/B0002U72LS
30 minutes of work, 30 of fun, repeat. Obey it without question.
Then once you have some normal pattern of work vs leisure, expand the work to 60.
Since I have a set meal plan, I cook most of my food on Sunday evenings to eat for lunch and dinner throughout the week. I usually bake four chicken breasts at a time. Been doing it a while now, and I've gotten really, really good at it.
Here's how you do it:
Additional Notes:
TL;DR -- Buy one of THESE. You're welcome.
Edit: Formatting
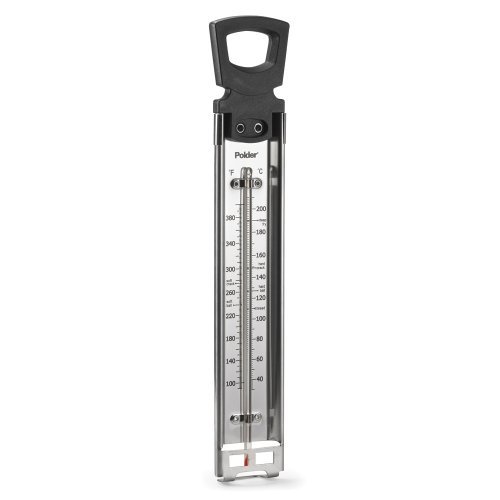
Candy thermometer:
Polder THM-515 Candy/Jelly/Deep Fry Thermometer Stainless Steel https://www.amazon.com/dp/B001FB6IFY/ref=cm_sw_r_cp_api_i_tg1wDbE2PMM4V
... but I just dip my instant read thermometer in once it’s going. I use a spider, basket would probably scratch enamel. I forget your other question.
For what it's worth you can't go wrong with anything from Thermoworks and if you're worried about fakes you can just buy from them directly. Thermopen, Thermopop, ChefAlarm... all great products.
Another option is this Comark which I used for several years before upgrading to a Thermapen. When I worked in the food service industry this is what we all had.
I have a blue comark that reads fast, and is ~8 years old
Edit: link. https://www.amazon.com/Comark-Instruments-PDT300-Waterproof-Thermometer/dp/B001U59MDA/ref=sr_1_1?s=kitchen&ie=UTF8&qid=1482933250&sr=1-1&keywords=Comark
If you absolutely have to stay under $50 then go with this..
http://www.amazon.com/Maverick-Remote-Smoker-Thermometer-ET-73/dp/B0000DIU49
If you want to spend a little more get this one...
http://www.amazon.com/dp/B00FM8DJHQ?psc=1
I own that first one and i've never had any problems with it. It's the older model (that's why it's cheaper) but the thing has been rock solid for me. You cant go wrong with Maverick. They're commonly recommended for a reason.
Whatever you choose make sure it's a wireless one. I can sit my ass on the couch and watch the game and know exactly what's going on outside. It's great!
You need the Javelin Pro, it's great and very responsive. It's a non-sale price of $50 for a thermometer that has magnets built in, waterproof so it's not the end of the world if you drop it in the mash and backlit display for easier reading.
>making himself sick with anxiety over whether some I prepared were fully cooked (spoiler alert: they were).
I was the one who was always anxious about whether meat was fully cooked... I finally bought an instant-read meat thermometer (I previously had one of those older ones with a probe and a long cord. I never really used it because it took too long to get a reading and was awkward to use) . Now I know the precise cooking temperature. I have a note on my fridge with safe cooking temperatures for each type of meat. Nobody has gotten sick and I'm no longer stressed out about some pink in the middle of my beef or pork.
​
Edited to add: This is the thermometer that I have- https://www.amazon.com/gp/product/B01HV5AL9G/ref=oh_aui_search_detailpage?ie=UTF8&psc=1 ... $6 is a cheap price for peace of mind.
Cooker: Kingsford Barrel Grill (Not technically a smoker, but I've learned to BBQ on anything).
Time: 3 1/2 hours for whole chicken and 2 hours for wings.
Temp: 250F
Wood: Hickory
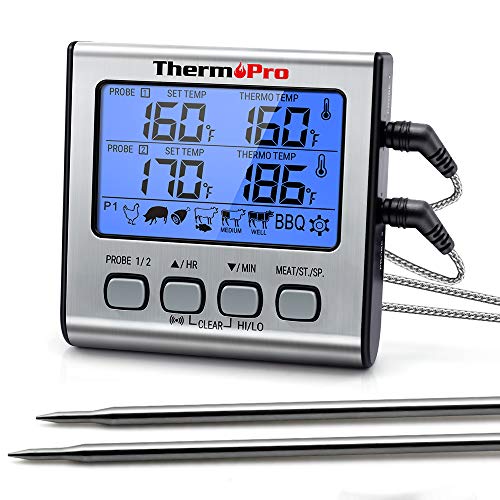
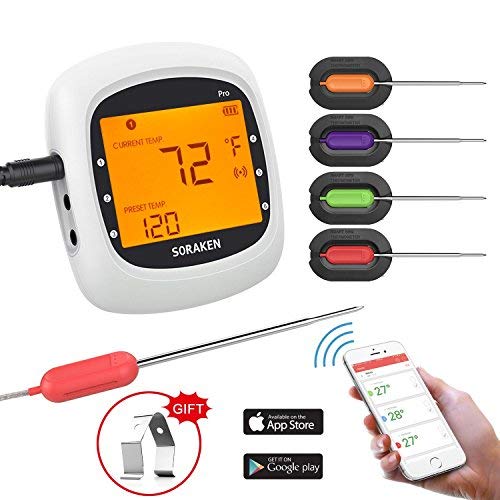
Equipment: Tenergy Solis Digital Meat Thermometer w/6 probes. This was my first time using it after I bought it and I was very impressed. Used 1 probe to read cooking chamber temp and one for the whole chicken. Worth the $54 and uses a Bluetooth app.
Edit: link to thermometer: https://www.amazon.com/dp/B077821Z4C?ref=yo_pop_ma_swf
I gotta be honest, and I'm not a shill - I got a god damn cube of discipline, and this motherfucker is a lifesaver:
https://www.amazon.com/Miracle-Minutes-Management-Kitchen-Workout/dp/B0002U72LS?th=1
Decide what task you want to do, decide for how long, flip the bitch, and just do it. No stopping until the bitch beeps. Really quite effective for us paralysis by analysis types.
Sorry for another essay, but I'm trying to help you out so you avoid spending money twice.
10 gallon batches offer a number of unique challenges, outside of the obvious need for larger equipment.
Firstly, you don't need to buy Blichmann to make quality brew. It certainly is high quality, and I would venture to say it is top-of-the-line when it comes to brewing equipment. However, a kettle is a kettle, is a kettle. There's no reason to spend $400 on a 15G kettle, when you can get one off Amazon for $150.
In addition, for the brew kettle you don't really need a thermometer and a sight glass. You'll find lots of fancy expensive kettles with extra bells and whistles, but more expensive doesn't mean better. Typically you'll find these options:
Sight Glass: Let's you see the volume of water/wort in the kettle, the Blichmann boilermakers have markings so you can get a good idea just from looking on the side. It's a nice to have, but not really necessary if you measure properly. If you really want one, you can install one onto a vanilla kettle by purchasing a kit from Bobby @ brewhardware.com - still cheaper than a boilermaker. You can also just mark up a piece of wood, or a mash paddle, then use it as a dip tube to get your volumes.
Thermometer: This is nice to have on a mash tun, if you are mashing in a kettle. I wouldn't recommend it, however, as the thermometers are all analog and don't react quite as quickly. You are typically going to want to double check your readings with a digital thermometer like a thermapen, or something like this. Especially when it comes to a boil kettle - the only thing you're doing in it is boiling. You don't need a thermometer to tell you when your wort is boiling.
Ball Valve: With 5 gallon batches, this is optional. With 10G+ batches, this is more of a necessity in my opinion. Water/wort weighs 8-10# per gallon. When you are working with a 10G batch, you are looking at lugging around 85-100# of liquid at any given time. You don't want to be lifting 90# of boiling hot wort, unless you're itchin to send yourself to the hospital.
This leads me to the challenges I referenced... It's a little harder to move 10G of water/wort around than it is to move 5. Lots of folks with 10G systems use some kind of brew stand, or a system of pumps and hoses to pump water and wort from vessel to vessel. (Good) pumps, either March or Chugger, are about $125/each. You can buy pre-fab brewstands from morebeer.com but that would put you out of your $2-$3k budget. I think their cheapest 10G system is $2,900 - and that's without kegging equipment. You don't need all that, but if you're brewing alone you're going to run into some problems just lifting, dumping, transferring etc...
Then you have to look at the mash tun. The systems you linked, if you'll notice, are using kettles as mash tuns. That's all well and good because it's certainly easier to find a 15G kettle than it is to find a 15G cylindrical cooler (they don't exist, as far as I'm aware). The problem with that is temperature control. For the mash, you want to keep it at a specific temperature - within a degree or two - for an hour. A kettle is not inherently insulated, so you'll need to do something to maintain temperatures. Not that this will be hard, you can do something as simple as throwing a blanket over the kettle during the mash, but it's just an additional challenge. It would be better if you have some kind of regulated temperature control, like a RIMS or HERMS, but that offers a whole other level of complexity.
Your other option, which doesn't really fit into your "no-DIY" requirements, would be to build a mash tun. If you want to make 10G batches, the highest OG you can probably go with a 10G mash tun is about 1.060 according to this chart. The OG of that recipe you linked is 1.090 - there's no way that grain bill would fit in a 10G mash tun. You would need a 15-20G mash tun to do this. So I mentioned the issues with using a kettle already. Your alternative is using a cooler, but as far as I'm aware, no one sells a pre-made 15-20G cooler mash tun. You'll have to build one using a rectangular cooler, and then building a copper or CPVC manifold, or using stainless steel braiding.
> How do I learn heat levels?
You can't trust the heat settings on your stove, as they can vary alot among different models. For example, 5 on my stove is a little cooler than what most would consider "medium heat".
You have to play it by ear and adjust. Practice something simple like just dicing and sauteing an onion. Watch how it reacts to different levels of heat. Don't even worry about the final product, just throw it away when you're done. Onions are cheap, and if you're learning from it then it's not a waste of food. Pay attention to the moisture levels in the pan, which is one of the key things you need to control as a cook.
> Does it really matter what size a pan is?
Sometimes. The pan should be big enough to comfortably hold all the food you're cooking, and also the right shape for the job. More surface area = more evaporation. I once messed up a Filipino adobo by using a dutch oven instead of a regular saute pan (the liquid couldn't evaporate fast enough and it tasted gross until I removed all the meat and reduced the sauce down—definitely wasn't as tasty as it could have been).
> Another thing is storing and taste. Lets say I make fries, how should I keep them from being soggy the next day?
Fries are just never going to be as good the next day, but it's mostly how you reheat things that matters. You could bake em in the oven and they'd retain at least some crispiness. Most important thing in food storage is to keep things out of the "danger zone" (40°F-140°F) for any longer than necessary—especially if the food is low-salt and low-acid (like homemade stock). Almost everything can safely be covered in plastic film and refrigerated for up to a week, or frozen for many months. Tight wrapping/tightly lidded tupperware will prevent weird flavors from seeping in/out of your leftovers.
As far as which hardware you need, I'd suggest the following, which should allow you to make basically anything:
> I could learn some healthy stuff
Buy veggie, steam it. Buy meat, sear it on high til the outside is brown, then bake it until your thermom says it's done. If you wanna get real fance, make a pan sauce. I can have this weeknight dinner cooked, eaten and cleaned up in under an hour.
Professional chef here. This is the only one I swear by (and other chefs I have known swear by):
Comark Instruments | PDT300 | Waterproof Pocket Digital Thermometer https://www.amazon.com/dp/B001U59MDA/ref=cm_sw_r_cp_api_n0w4ybTHH2APF
There are the thermapens that are $100+, which are supposedly quite durable and nice. However, I wouldn't want something that bulky or expensive to ruin.
6.5gal plastic fermentor - $17.88 (Don't bother with glass fermentors!)
6.5gal Bottling Bucket - $18.81
Hydrometer - $12.99
3 3-piece airlocks - $5.00 - trust me, they'll break.
stopper not needed with plastic fermentor
Bottle filler - $5.09
10 ft 3/8th inch tubing - $10.99
Auto siphon - $8.76
don't need a bottle brush with plastic fermentor
144 bottle caps - $5.78
Use any pure sugar for priming - just calculate it right. I use cane sugar without issue.
Wing bottle capper - $15.48
Dial thermometer not really needed if you're slapping on an adhesive one, but definitely get this for a hot liquor tun if you're doing that.
Wine thief - $11.20
I never used a funnel or fermentor brush - you can use anything to clean but I suggest Oxyclean rinses
32oz Star San - $20.70
Adhesive Thermometer - $4.84
Total Cost: $137.52. Not ridiculous savings BUT you get 32oz of star san instead of 4oz of io-star which will last you years and sanitizer is expensive. You get a plastic fermentor instead of glass which is so much easier to clean and keep light out. Glass carboys are good for aging and aging is good for wine or special beers. Focus on simple ales that don't require it first.
The real savings come when you do all grain and make your own equipment. You can save $137 alone if you buy a big stainless steel pot and slap on a dial thermometer with a ball valve.
https://www.amazon.com/Lavatools-Javelin-Digital-Thermometer-Chipotle/dp/B00NMQGAT4
This one meets all your requirements, it is the one I use and love!
Get a "Brew in a bag" bag, if you want to do BIAB. They're resilient and worth the extra money. You won't find them on Amazon.
If you want to start going to all grain you can buy a large Coleman / Igloo cooler (60 quart is what I use, can do up to 10 gallon batches). Ball valve and fittings, some pipe tape too. Don't forget a pulley to help get the bag out of the cooler!
You can get a flask, stir bar, and everything else you need to start making yeast starters.
Grab a large spoon and/or a flask wisk to help mashing.
Amazon also sells immersion chillers to help with the post boil. I bought mine for $50 and I think it's the 25' one. Works like a charm for 5 gallon batches.
Get a good pair of insulated gloves for your brew day!
Amazon also sells thermometers to help track mash temperatures. I have this one and this one. They're both great. An IR thermometer is great to have for yeast starters too...but definitely not needed. Would put that at the bottom of my purchase list.
Oh! A sterile siphon is also awesome. Bought that from Amazon too.
And so I don't keep rambling, Homebrewfinds as a good list of filler stuff from Amazon. Things like campden tablets, hop bags, pieces to make hop spiders....etc. http://www.homebrewfinds.com/homebrewing-related-amazon-fillers
I'll go ahead and point out that for less than the price of a bag of beans you can buy a decent digital thermometer.
The one I use is $7
I've used one of these for years, I love it. Some jackets have a big enough sleeve pocket for it to fit in
I used the pomodori method and enjoyed it better than straight study marathons.
For a timer, I used this cube timer. Or I'd recommend any kind of handheld kitchen timer.
Using your phone as a timer can be a distraction when you get tempted to open notifications and suddenly you're on a tangent. Plus the cube timer is easy to flip over and continue on or reset. It's a little loud for a library but personal use is fine.
You need to bring the sugar to the hard crack temp or it will never harden. Buy a candy thermometer.
http://www.southernfatty.com/lemon-drop-candies/
Polder Candy/Jelly/Deep Fry Thermometer, Stainless Steel, with Pot Clip Attachment and Quick Reference Temperature Guide https://www.amazon.com/dp/B001FB6IFY/ref=cm_sw_r_cp_apa_i_Tr2CCb7TZ0ZVF
https://www.craftybaking.com/howto/candy-sugar-syrup-temperature-chart
Edit: another link
https://www.marthastewart.com/317054/citrus-zest-lollipops
If you like it medium well, I'd dial the heat down from medium-high (75% strength) to medium (half strength). and once you get the sear on each side, just keep flipping so both sides cook equally. Also, use a thermometer, especially if you're still learning consistency. I use this one. The more you use a thermometer, you'll eventually get to a point where you don't need to rely on a thermometer anymore (though I use mine every now and then as a security blanket)
This was in between medium and medium rare.
I need this because I have an awful oven that doesn't like to cook things properly. Alternatively this because my laptop's fan needs a clean
Both are also cheap so you can gift someone else!
C'mon...gimme. Thanks for the contest <3
Similar to this, I find using a timer to be very helpful as it shifts the “blame” to something automated. You can’t argue with a timer, it isn’t going to change because of your tantrum.
My phone timer beeping is enough for my kid. But some will respond better to a visual timer like this one so they can see time passing.
Time Timer Original 12 inch; 60 Minute Visual Timer – Classroom Or Meeting Countdown Clock for Kids and Adults (Black) https://www.amazon.com/dp/B002GTZZ6M/ref=cm_sw_r_cp_api_Li9SBbM8FWRQ7
For staying on track, we use this: https://smile.amazon.com/Time-Timer-Original-Optional-Management/dp/B002GTZZ6M/ref=sr_1_4?ie=UTF8&amp;qid=1521158440&amp;sr=8-4&amp;keywords=timer+clock
Having some big, obvious, and physical is much better than a timer app.
As the for the rest - what is your interested in tracking statistics? Is it not enough to just say "our meetings are unproductive" at retro and dig in from there?
This is pretty much what you'd want: http://www.amazon.com/Fermometer-FMT_FERMOMETER-Adhesive-Strip-Thermometer/dp/B004B4TS1S
Tape it to the fermenter. Read temp. Success!
For twenty dollars you don't have to guess.
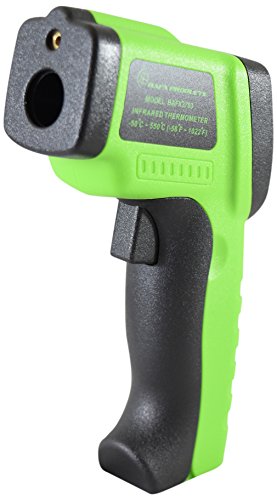
http://www.amazon.com/BAFX-Products-TM-Infrared-Thermometer/dp/B006V4WNYU/ref=pd_sim_sbs_k_3?ie=UTF8&amp;refRID=0ZEPPDSVYSH2Q5NPVKKM
Got a shipment in from amazon containing a long spoon, a Fridge thermometer, and a pen thermometer. All stuff ive kinda just needed and never got yet.
Also, I have a Chocolate milk stout sitting in secondary, stuck, not hitting my desired FG. It was stuck in primary (2 weeks), so I reracked it hoping to move it along, and here we are. Not sure what to do about it next :/
OG: 1.056
Current Gravity: 1.041
I have this one. It's pretty quick.
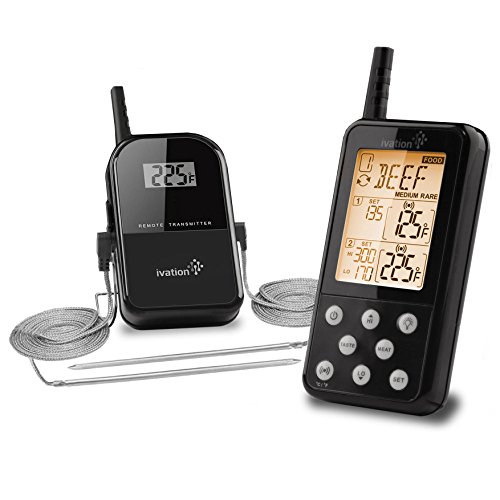
I have a different redi chek and the range is huge I think it is like 100m (300ft), way more than I ever need. I have the smoker on the back deck and keep the receiver with me in the basement on the other side of the house and rarely lose signal
This is what I have (I only paid $60 for mine)
But it looks like there is a new version out HERE
https://www.amazon.com/Lavatools-Javelin-Ambidextrous-Thermometer-Chipotle/dp/B01F59K0KA
I love my Lavatools Javelin Pro Duo.
https://www.amazon.com/Lavatools-Javelin-Ambidextrous-Thermometer-Chipotle/dp/B01F59K0KA/ref=sr_1_2_sspa?s=home-garden&ie=UTF8&qid=1543507488&sr=1-2-spons&keywords=lavatools+javelin&psc=1
Unfortunately, no. If you’re completely new to developing and haven’t yet done black and white, there’s a bit of an initial expense. I’m going to just list off everything I use for developing. It’s actually pretty compact, I’ve thrown it all in my car on impulse and developed C41 at friends’ houses a few times. I store it all in a small cooler which I also fill with water while developing. Since the developer needs to be 102°F with moderated precision for the duration of the developing time, it helps to have a larger body of water that won’t lose temperature as quickly. So first step for me is to fill this cooler slightly upwards of 102° to put the tank in while I’m not agitating. If you’ve got a cooler, great; if not:
---
---
I think that’s about it! You can definitely go cheaper if you look around. The one thing I wouldn’t cheap out on though is the tank/reels. I started with a really cheap stainless steel setup. My reels came pretty bent up and took ages to load, like half an hour at times. I’d often have film stick to itself. I tried C41 with it one time and got blix everywhere, plus it was leaking in the cooler underwater. Everyone says Patterson is the way to go, and I haven’t tried much else but it’s served me well.
This is the one I use: https://www.amazon.com/dp/B075L7V6NZ/ref=cm_sw_r_cp_apa_i_v1-6CbA0ZJVD9
What are you looking to do?
If just walking out to the field and taking temp measurements: Any digital thermometer will work. In my truck, I've got both a temperature gun and a digital instant read (not these exact units, but pretty similar).
If you want crazy cool/hi-tech, you can go with something like John Deere's FieldConnect. It's will give you moisture and temp readings, as well as send the readings to you.
Since it doesn't sound like you're poised to dive into the insanity that is espresso, here's what I'd recommend for a top notch drip setup:
On that list... the grinder is really not optional. You should get one that good or better; it makes or breaks the setup. For the brewer, you could go with any other pour cone or a french press instead of the dripper and get great results. The scale probably isn't optional. The thermometer probably is. The kettle is definitely optional but makes things easier to manage if you're going with pour-drip. (It doesn't matter for press.) The one I linked is the best of its kind.
With that setup and coffee from one of the roasters on that list, I'd say you'll have a hard time finding better coffee anywhere outside your home. As far as how it appeals to someone who likes "caramel macchiato" drinks from *$, I'd add some quality syrups and some good milk to match her taste.
Off the list of roasters I linked, I order most frequently from Klatch, Gimme and Counter Culture, and have loved every single roaster I've tried from that list.
Invest in a cheap Taylor Instruments thermometer. I use a Taylor thermometer at work and they read fast and accurate. As long as the center of the thickest part reads 165F(idk celcius) you are golden
Most other meats only have to hit 145F after resting for a max of 3 minute
(Beef, veal, pork, lamb)
Ground meats should be 160F
This is also a good thermometer that I have at home
Stress is bad, and you need to find a way of managing it (anyone teaching Tai Chi near you?) but this only requires you to be able to put it aside for 30 minutes.
I use one of these: http://www.amazon.com/Datexx-The-Miracle-Cube-Timer/dp/B0002U72LS
It's silly, but it works.
> I can do this with an SCR, but my local hobby store has stopped carrying them. Any help is appreciated
Get one from somewhere else? Digi-key has damn near everything, and if you are willing to wait, still offers free shipping on orders received by SnailMail.
Lighting the LED is easy. Detecting the end of the kitchen timer's countdown is a pain, especially since you haven't described it in any way whatsoever.
Is it an hourglass-style egg timer? A standard mechanical timer? Something electronic and battery-powered? Built into your microwave?
My son is 7 with ADHD. He is currently on focalin XR and does therapy every other week. We have little routines in place that help him "DO THE THING". For example, to get him dressed in the morning, we've taken two pictures one in his pajamas and one completely dressed for school and they are on his wall next to his closet. Visualizing the finished product really helps him get going in the morning. When he gets dressed, he checks his outfit to his picture to make sure he has everything.
I don't know if your son negotiates like my son does but I'm convinced that my son is going to be a lawyer. We use a "magic cube" timer. When he has a task that I want him to do or need him to do, we set his timer and he has to work on it for that long (usually 5 to 15 minutes depending on the task). Then he gets a 5 minute play break. I actually use the magic cube at work also, and it helps with my ADHD tremendously.
If you ever want to bounce ideas off of me, shoot me a message.
Computer and phone alarms are crap. So easy to dismiss without breaking your attention properly.
You could try putting an alarm in another room, with a sticky note next to it for what you will do instead of going back to your game.
You could try having a warning alarm to start drawing you out, give you a minute or two to tie up loose ends so that you won't be compelled to go back "quickly" - and then get sucked back in!
If you want keep your alarm close by, something that requires you look at it, and is visually interesting might help a little. This I think you might even need to pick up to turn it off quickly/easily.
I have a wishlist of under $25 objects and this awesome timer is my favourite!
It's a timer, it counts down to whatever side is up.
https://www.amazon.com/gp/product/B0002U72LS/
I use it when I need to be productive. Flip it to 30, do 30 minutes of work, flip it to 15, do 15 minutes of games/reddit/whatever.
A Probe thermometer is one of the best purchases for your kitchen you can make.
I just bought this one for brewing and frying. I really like it.
a simple analog probe thermometer is usually $5 or less.
You can also spring for a nicer one that has a cable so that you can leave it in the oven, it'll start to beep once the temp hits your desired setting.
I use something like this when cooking things in the oven: http://www.amazon.com/CDN-DTP482-Programmable-Probe-Thermometer/dp/B00046YFHE
I don't think you necessarily need to go lower than 275, but you definitely can if you want. That being said, I would never wing it by trying to time the temperature. Pick up a probe thermometer, they're cheap and take all the guessing out of the reverse sear (and any cooking of meat in the oven), here's the one I have. I was freaked out to have that cord in the oven while it was on, but trust me, that's what they're made to do.
I do mine in the oven at 275 until the inside temp is about 125 for medium rare or about 135 for medium. Once it's at my desired temp, I pull it out of the oven and let is sit for 15 minutes. At 12 minutes, I start to heat a pan to get it as hot as possible. Any pan should work, but I like to use a cast iron skillet. I sear each side for about a minute and a half, then serve that sucker piping hot.
I know you didn't ask for this, but thought it might be helpful.
A cheap analog one from Amazon.
I use two different ones when i am smoking meat.
Maverick Remote Thermometer to measure the temperature at the cooking grate level. It also has a probe you can leave in your meat (or whatever you are smoking) to give you an idea of what its temp is at any moment. Is wireless so that i don't have to be right beside the smoking chamber to check on my cooking process. i've had it for a number of years and it has worked well for me.
I also use a Digital Thermometer so that i can probe the item being smoked in order to get fast readings in multiple locations to ensure i've gotten to the desired temp. This one registers temps accurately in about 4-5 seconds, which is fast enough for me.
And you don’t have to go crazy on a thermometer. I’ve had this for about a decade and it’s worked perfectly. Replaced the battery once so far. It’s the same ones all of the chefs use at my companies cafeteria.
Buy a small one, at walmart, for like 30-40 bucks. Use it outside. More expensive fryers are mostly for aesthetics and in my experience dont fry any better. You might however like name brand stuff that has your favorite "Kitchen aid" logo that you would like to match to the rest of your kitchen. If this is you, then spend the extra money if you want. I personally just want bang for the buck, and i don't leave my fryer out on my counter as a showpiece or anything. Others might tell you im full of shit and their $80 or $150 dollar fryer is much better, which is fine but unless you plan on frying a ton of stuff, and you need a ton of room to fry large batches of stuff, a small reasonably priced fryer will do just fine if you maintain it well and keep it clean. Here are some examples:
Reason? Well, a small fryer lets you fry in small batches. Unless you have a large family and need to fry a ton of stuff, this is the way to go. Sure, you might have larger temperature changes due to the size ( when you drop food in it drops the temp sometimes complicating or even ruining your cooking ) but the small size lets you change the oil easier, clean it easier, and store it easier.
Because lets face it, hopefully your not planning on eating a TON of fried food. Sometimes making some cheese sticks, jalapenos, mushrooms, french fries, wings, etc is great, but it shouldn't be a majority of your eating experience. Unless you don't care about personal health.
ProTip: use it outside. Reasoning: Your house will smell like a french fry. Plus, grease flies out of the fryer and gets on everything, and it will get on everything in your house. The stench will permeate your couch, carpets, clothes, and more. You will leave home to go to work, run errands, etc... and you'll come home to that nice, greasy egg roll smell as you open the front door.
Its not pleasant. I learned this, and started frying outside. I also got a small fryer that had great reviews and wasn't super expensive. The parts, except the heating element, are all dishwasher safe. Also you will save money by not buying, or buying INTO, the whole sealed fryer with carbon filter blah blah blah. If you plan on keeping a fryer that features that indoors, it'll still smell. You still have to open the fryer at some point while cooking, which again, makes your house smell. And I HATE that smell in my home. Ive had a $120 dollar fryer and it performed just like my $30 dollar model, just looked super snazzy which i don't give a flying f** about since its not a counter-top item that gets daily use in my household.
My .02 anyways. I hate the house smelling like a french fry, and a small fryer is easy to store in your garage, easy to clean and operate. Plus i have a small 2 year old daughter and since i only use it outside on the porch, shes never around it which minimizes any injuries ( that could be catastrophic... grease burns / fires are serious biz )
At the end of the day, a fryer is a simple device. Heating Element, temp knobs, bucket for grease, and a basket with a lid. There are more expensive options, but your paying for brand name, looks, and you might want to drop 75-100 bucks for one that has a digital readout that can* be more accurate.
I myself have a digital thermometer in my kitchen i use for steaks and such ( any good cook should have one imho ) but it also helps me verify temp. With that said, i have i think the $30 dollar model i posted and its temp control is spot on. If you do want a digital one, i personally would just get a non digital one, then invest in a thermometer since you can use it for SO many things, including your new deep fryer. I also have a "laser thermometer" that works as well and can be used again for many many things in your home.
http://www.amazon.com/Comark-Instrument-Digital-Thermometer-Accuracy/dp/B001U59MDA/ref=sr_1_1?s=home-garden&amp;ie=UTF8&amp;qid=1418957150&amp;sr=1-1&amp;keywords=comark+PDT300
I have both styles of thermometers, and i use my pen style a lot ( its like the bottom one, but mine is white and i got it at a local grocery store for about 10 bucks... has a hold button but is pretty much the same deal )
Hope I helped you. Good luck and be safe!
Like everyone else is saying, you don't need much to start out. A solid starters kit would include: a good 10" chef's knife (like the 10'' wusthof grand prix chef's knife emehey mentioned), a paring/utility knife ( I use these kuhn rikon ones cuz they're cheap and come with a sheath. I have one of these riding around in my pocket all shift), a serrated blade, good comfortable non-slip shoes ( I've used everything from Danskos to Crocs; I like Crocs the best), a fine-tipped digital thermometer (I like these), a honing steel, and maybe a roll to keep it all in. Also a small notebook and a supply of sharpies and ballpoint pens. I wouldn't spend more than about $300 on all this stuff.
Later on you'll want to start getting your own tools like peelers, microplane, additional knives, etc. but your kitchen will probably have this stuff available, so save the rest of that money to buy these things once you're a bit more familiar with what types of tools you prefer.
Pick up an oven thermometer too.
Since it's summer I think this will come in handy :p
You should also go for this cause you now have me worried that you will get food poisoning.
And (yeah I started a sentence with 'and', so what) lastly you should get this because it is so good that I can't even find the words to begin to describe it other than I've watched 4 times since getting it two weeks ago.
As for me, I would love this as drawing is my new hobby and this book was recommended to me as being good for beginners.
Thanks for the contest. woop-di-woop
Edit - misspelling of raffle phrase. Also well done on the new job.
Does your oven have a window? If so then this.
https://www.amazon.com/CDN-POT750X-High-Heat-Thermometer/dp/B0021AEAIK
Hopefully others will chime in so there's more of a consensus, but this is what we use in our ovens at the bakery to confirm our oven thermometers are working properly. We leave them in most all the time.
https://www.amazon.com/CDN-POT750X-High-Heat-Thermometer/dp/B0021AEAIK
To help with timing, you could try a visual timer too. Like this: Time Timer Original 12 inch; 60 Minute Visual Timer - Classroom Or Meeting Countdown Clock for Kids and Adults (Black) https://www.amazon.com/dp/B002GTZZ6M/ref=cm_sw_r_cp_apa_i_XWfIDbKV9ATZM
Ours is also 5 and we tell her she'll lose out on tablet time tomorrow if she throws a fit about not getting it (she has tasks to do first and has run out of time before dinner in the evening).
This is a little expensive but totally worth the splurge. Its big and bright, hard to ignore and easy enough for even a little kid to understand. It also has a ringer when times up!
https://www.amazon.com/dp/B002GTZZ6M/ref=twister_B06XSZ57B2?_encoding=UTF8&amp;th=1
This timer: https://www.amazon.com/Time-Timer-12-Inch/dp/B002GTZZ6M/ref=sr_1_3?ie=UTF8&amp;qid=1479910548&amp;sr=8-3&amp;keywords=large+timer
First off, get testing accommodations. My first year, I made the mistake of thinking I would not need it. Boy, I was wrong. I almost failed out my first semester. Not only will testing accommodating help you take your exams. It will also provide a basis for requesting testing accommodations for bar exams (which is difficult and frankly a pain in the ass). Once, I got testing accommodations that were a time and half in a separate room, my grades improved to Dean's list. Second, make sure your medications are in check. Third, be careful on who you tell that you have ADHD. Adderall is sought after drug in law school. If people know you have ADHD, they will ask you for meds. Fourth, don't be afraid to ask for help from the very beginning. Law School is completely different way of studying, testing, writing, and preparing. Don't be too proud to think you are above asking for help. All schools have academic counselors. Make sure you become BFF with them. They will be a key resource. Fifth, find past exams and outlines. Time to become friends with some 2Ls. Usually, there is a database of old exams. You would be surprised how much the new exams are based on the old ones. Sixth, make sure you know your study style. How do you learn best? Is it writing everything over and over? Is it making index cards? Everyone will tell you the best way to study. However, everyone is different. I used a time timer. http://www.amazon.com/Time-Timer-12-Inch/dp/B002GTZZ6M/ref=sr_1_3?ie=UTF8&amp;qid=1427824796&amp;sr=8-3&amp;keywords=time+timer
Seventh, ignore the shittalkers. It's true about law school. A lot of people try to psyche you out. They will be bragging about how much work they did or grade they got or how well they know the material. IGNORE THEM. This negative energy will heighten your anxiety and disrupt your work.
Please feel free to PM with any other questions. I'll be more than happy to help you out.
Eddie Izzard always makes me laugh.
I hope you feel better soon.
Laugh You!
Link
It'll happen over a few hours (which is why fermentation chambers work).
Heat will spike more in the early stages of fermentation because that's when most of the work is being done.
Typical assumption is that the beer is about 2-4*F above ambient temp.
Get yourself a simple Liquid Crystal Termometer to put on the side of your fermenter, it'll give you a better idea of the temps inside (but still not 100% accurate)
Have you ever seen a lcd thermometer on the side of a fish tank?
http://www.amazon.com/Fermometer-FMT_FERMOMETER-Adhesive-Strip-Thermometer/dp/B004B4TS1S
the ring has the same material under a plastic "gem", as you wear it, the heat from your fingers warms it and it changes color
https://en.wikipedia.org/wiki/Mood_ring
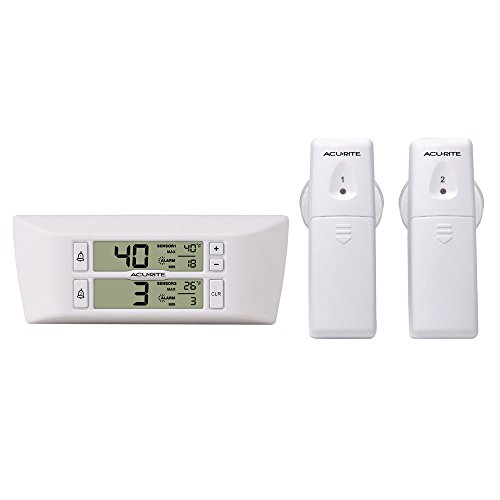
An unnoticeable fridge failure seems like probably once in a lifetime occurrence. I think I would notice if my fridge inched up a few degrees because I like really cold drinks, but that's me. Anyhow, I would just keep using the regular refrigerator, and if you're worried get something like this with an alarm if it gets too warm.
http://www.amazon.com/ACU_RITE-Refrigerator-Wireless-Thermometer-00986/dp/B004QJVU78/ref=sr_1_5?ie=UTF8&amp;qid=1381248602&amp;sr=8-5&amp;keywords=refrigerator+thermometer
Something like this?
Just one cheap example I found. Looking into fridge/freezer thermometers should give you options. Just check the specs to make sure the listed temperature range works for you.
Edit: Didn't read clearly. Not wireless. I found this one instead, which does display 2 temps, but both are remote sensors. Maybe a backyard temp and a greenhouse temp, keep her focus off the indoor temp altogether.
Want to track your fridge/freezer temps while you drive? Try using the AcuRite 00986A2 Refrigerator/Freezer Wireless Digital Thermometer, you put the sensors in the fridge/freezer and you can keep the readout in your truck while driving. Amazon has it here, but I think you can find it cheaper elsewhere for longer shipping times.
I was looking at this myself http://amzn.to/2ukXDzh but haven't bought it yet. Traveling a lot means getting Amazon is a bit tricky..
Something that took me WAY too long to figure out is that when cooking stuff on the stove, use lower heat than you think you need. It's hard to get things to come out right when you're using too high of a heat setting. Like grilled cheese will go from not done to burnt in no time - so use pretty low heat, then bump it up toward medium if it's really not cooking.
Also, to check if meat is done, there is nothing better than a thermometer. No need for guessing, and no chance of food poisoning! This one looks good and has good reviews. I have a similar one but not waterproof (wish mine was).
Here's a simple recipe that cooks in the oven that gives you plenty of leftovers:
Meatloaf
Preheat oven to 375. Beat eggs in large bowl. Add meat, stuffing, water, and 1/4 cup barbeque sauce, ketchup, or a combination. You can also add onions, mushrooms, or anything else you want. Mix using your hands, then shape into a general loaf shape in a 13x9 pan. You can use any size pan that it will fit in, as long as it has sides to keep the fat/juice from spilling over the edge. Spread 1/4 cup of ketchup/bbq sauce on top. Stick it in the oven for about an hour, or until the internal temp is 160.
Another simple meal is pasta, sauce, and meat. Gives tons of leftovers if you make the whole box of pasta.
If you're feeling slightly fancier, try Super Easy Chicken Parmesan
Not using enough salt. Salt pasta water. Rub salt into meat. Season everything appropriately, especially baked goods.
Moving meat or fish and failing to caramelize. If you're cooking a steak, sear it on each side on as high of heat as possible. Fish, cook medium high until it's done 2/3 of the way through, flip and finish the other side.
Having too much water in, or on the surface of, whatever you're cooking. Meat should be dry before browning. Vegetables should generally be as dry as possible when processing (for example you want to remove the water from potatoes before making potato pancakes, things like that)
Overcooking. Shoot for medium rare with steaks, chicken etc. What really helps is a good digital thermometer. I have this one and I think it's the best value.
Learn to balance tastes and flavors. If something has a lot of fat, try adding an acid. Always make sure there's the right amount of salt. Salt balances sweet etc...
I usually do my spatchcock chicken direct on the grill. But I do have a raised grate. I made mine by welding up a ring to some legs, but this place has them. You can see in the naked whiz spatchcock recipe he uses fire bricks to raise the grill. Raising the grate makes it easier to do everything and doesn't reduce the heat. I only cook steaks at the lower level when I want a good sear.
Some good first cooks-
Pork butt (shoulder) should be your first smoke. Its hard to screw up.
My Recipe-
-Slather pork butt with yellow mustard
-Rub with your favorite. I use 1 part bad byrons butt rub to 4 parts brown sugar
-Egg at 225-250 platesetter legs up with drip pan
-Butt goes on the grill. Between 1.5 - 2 hours per pound
-Remove when internal temp is 195
-Cool and pull apart for sandwiches
Atomic Buffalo Turds (ABT)
Great party snacks
-Cut the top off 20-25 jalapenos and core them
-Crumble and Cook up some chorizo sausage (should be like ground beef). Optionally use bacon or other sausage
-Mix sausage with 1 bar cream cheese
-Stuff peppers with cream cheese mix
-Wrap each one with a piece of bacon. Use toothpick to secure
-Use your favorite BBQ rub on the outside
-Put on egg, direct 350 until bacon is crispy
When you can get the temp up, crank that baby to 600+ and sear some nice ribeyes.
Go get a Maverick Thermometer and a Thermapen
This is the one I have while I try to figure out if I want to build one myself or buy a much nicer one. Plus I'm not sure if I want to stay in this house for a while, so I haven't done jack shit yet, lol.
Got it from Wally World for $130 (I think it's listed for $160 or so on their site, just find a coupon).
Grab some lump charcoal and some wood chunks, for pork I recommend apple or cherry, and you'll need two temp readings, one for the pit and one for the meat.
I bought one off of Amazon. similar to this one But IIRC I got it for ~$25 during their "flash sale" around Christmas time)
For recipes, google is your friend. For temps and all that, google is DEFINITELY your friend. (Or just PM me.)
It looks identical to the one I have except mine says "redi check" instead of ivation. Just went to look at my amazon cart and I bought on jan 8th 2014: "
Maverick ET733 Long Range Wireless Digital Thermometer
Set - Dual Probe - Remote BBQ / Smoker / Grill / Oven / Meat /
Thermometer - Perfect for Thanks
the link now goes to:
https://www.amazon.com/gp/product/B00FM8DJHQ
which is the exact one you linked to.
ie - it's a Maverick ET733, rebranded.
Yes, I am quite happy with it and remember reading reviews before buying. It's well regarded.
Go with the Lavatools Javelin. You really can't beat its price/performance.
http://www.amazon.com/dp/B00GRFHXVQ/
They also have a pro version which is a bit larger and even faster.
http://www.amazon.com/Lavatools-PX1-Javelin-Thermometer-Chipotle/dp/B00NMQGAT4/
Good
Better
Best
Personally I have the Weber, and I'm quite happy with it. It's accurate, and quick enough for my needs. The other two are supposedly faster but honestly the difference between 3 and 10 seconds isn't that important to me.
I take it in several spots, using this: https://www.amazon.com/gp/product/B00NMQGAT4/ref=oh_aui_search_detailpage?ie=UTF8&amp;psc=1
I never take it in the middle of chunks or side, i try to take it where there's mostly a uniform settling of grains (round cooler) so it goes down a few inches from the surface, then I also have a digitial 12 in probe to take some measurements further down but that particular probe doesnt respond as fast as the one as I linked which is what i use for my checks
Here's the link to the one I got. I think Christmas may have increased the price.
Famili MT004 Digital Kitchen Food Meat Cooking Electronic Thermometer Probe for BBQ, Oven, Grill, and Smoker with Timer/Alarm and Large LCD Display https://www.amazon.com/dp/B013A81VW4/ref=cm_sw_r_cp_apa_myctyb31YXAFF
I find one of these oven thermometers handy when heating water to strike temperature. Easy to get distracted, not so easy to ignore the incessant beeping. Or whatever the wireless ones do, I don't have one of those.
You do have to be careful not to put the probe too deep in the water, if it gets through the point where the probe is crimped to the wire you'll probably need a new probe.
In-oven thermometer gets liquid in the probe and that causes it to read very wrong results, don't use it in wort. How do I know - I tried to use mine :)
The infrared is also probably influenced by evaporation and it measures the surface temps which could differ from the liquid temperatures.
Like people said Thermoworks is good.
I got myself Lavatools one and can't be happier - https://www.amazon.com/Lavatools-Javelin-Ambidextrous-Thermometer-Chipotle/dp/B01F59K0KA?ref=ast_p_ep.
It reads in several seconds, the screen flips if you flip the thermometer, there is also light in it, so it lights up when dark, it doesn't get foggy from the vapor.
I like it better than the straight thermometer because you can sanitize it and put it on it's back and keep measuring the temperature without re-sanitizing (I do it while chilling wort).
I'm dealing with lipase for the second time now. Scalding adds a step to your pumping routine but it really does work. Get an instant read thermometer to make your life easier. You can scald on the stovetop or, even better, using a bottle warmer. With a bottle warmer you're at no risk of forgetting about it and accidentally boiling it (I speak from experience), you can just set it and forget it once you figure out how much water to use. Also, the bottle warmer is good for scalding on the go if you have to do it at work/school.
I am not sure of what you already have or what you would need, I am listing a few things on top of my head:
> Sure, so basically lots of salt + pepper on the piggie.
Always a good idea! I would do that 12-24 hours in advance to give the salt time to penetrate the meat.
> Then, on a roasting tray, fry some fennelonions and garlic.
I like that flavor profile.
> Add the piggie (skin side up as it is chopped in half) to seer the bottom, then add white wine all around it and into the oven at 180 ºF for 3-4 hours.
That's a braise, not a slow roast. You should get one of those probe thermometers that you put the probe in the meat and the cord goes out of the oven to a temperature indicator like this:
https://www.amazon.com/ThermoPro-TP-17-Digital-Backlight-Thermometer/dp/B07477NMF4
> I can maybe use the broiler at the end to give the skin some color.
You can bring the pig out at about 160F and let it rest tented in foil, I would give it a minimum of 30 minutes, but an hour would be better. Then crank the heat as high as it will go in the oven on bake/roast, not broil, and put the pig back in to sear it.
https://www.seriouseats.com/2011/12/the-food-lab-how-to-roast-a-whole-suckling-pig.html
Stopping the cooking process at or around the minimum safe to consume temp will probably help you appreciate your food more.
Get an oven probe thermometer like this and an instant read thermometer like this and bake some chicken thighs or breasts that you remove right at 165 or even a couple degrees lower. They will be delicious with only some oil salt and pepper but add whatever you like. Easy as hell and can be used in all sorts of things.
I know there are higher end models of thermometers but if you are looking for something on a smaller budget, I got this from Amazon a few months ago. I've done a bunch of cooks with it and haven't had an issue.
Thermo Pro TP-17
I bought this guy:
https://www.amazon.com/gp/product/B07477NMF4/ref=ppx_yo_dt_b_asin_title_o01_s00?ie=UTF8&psc=1
It works great but the clip is more made for a grill rather than the side of a pot. I figured out a way to hang it off my kitchen cabinet for cheese making and the cord on the probe is plenty long enough.
I also have to say that it is fabulous for smoking a brisket, if you want something that serves more than one purpose and are into that kind of thing.
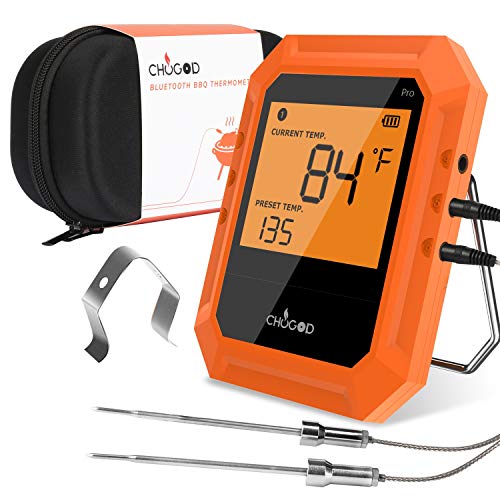
I have the ChuGod from Amazon, love everything about it and comes with 2 long probes but my only complaint is bluetooth range. If its on my grill on the back patio, i can't get readings in one of my chairs in the front room (maybe 50ft?) but if i sit on the couch 10 feet closer to the back patio i get the signal.
edit: https://www.amazon.com/Thermometer-Bluetooth-Grilling-Carrying-Included/dp/B075L7V6NZ/ref=sr_1_4?crid=22IHIGM9N5D90&keywords=chugod+smart+wireless+bbq+thermometer&qid=1564173024&s=gateway&sprefix=chugo%2Caps%2C193&sr=8-4
I've been using this one and am very happy with it: https://www.amazon.com/gp/product/B075L7V6NZ/ref=oh_aui_detailpage_o00_s00?ie=UTF8&psc=1
It comes with two probes but will handle up to six if you buy extras so you can measure ambient temp as well as multiple pieces of meat. There's an app on the phone where you can program alarms for different temps for each probe and a cool graphing feature that allows you to watch the rate that the heat is rising. Handy for figuring out when to start the side dishes so everything finishes at the same time.
yeah thats what i had and hated it too. idk how those get so recommended. its noisy and had a terrible interface
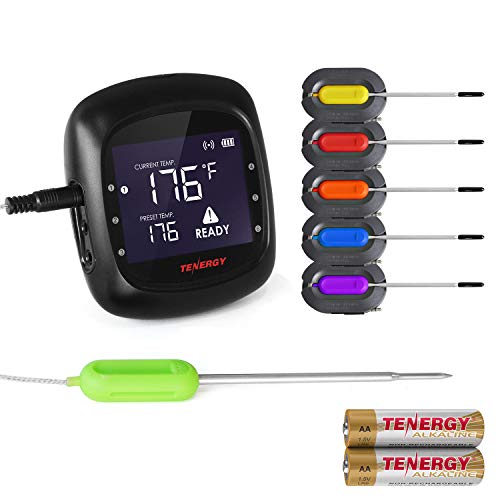
i replaced it with some chinese white-label thing with 6 probes thats been way better. https://www.amazon.com/Tenergy-Thermometer-Controlled-Bluetooth-Stainless/dp/B077821Z4C/
the app is way easier to program and use and it doesnt beep incessently. the cables have metal braiding which seems nice but they tend to kink up, though that hasnt effected functionality at all. i still use my instant-read to verify things but its good enough to track cooking
It looks like it's pretty much the same guts as every other bluetooth thermometer, at least judging by the fact that it's using the exact same app (just rebranded for Inkbird vs. something like Tenergy Solis or any number of other rebranded versions of the same). If someone hacks any one of those, they'll all effectively be hacked.
Here's a link to the probe I bought. Its amazing, there's an app that you download on your phone and it can send you alerts. The temp is way more accurate than the one on the smoker itself, cant recommend this enough.
https://www.amazon.com/gp/product/B07MVVK5JK/ref=ppx_yo_dt_b_asin_title_o06_s00?ie=UTF8&psc=1
https://smile.amazon.com/gp/product/B07MVVK5JK
I've never used that one so I don't have any opinions of it. I used this one and was decently happy with it until I got a Therampen. My Taylor is just collecting dust now.
I bake them.
One of these is your best friend when baking chicken. Don't over cook.
i like digital thermometers. i got an el cheapo instant read probe thermometer (like you'd use for cooking), and just stick the probe into the water. reads fast, easy to read, and lightweight.
I got this one
Personally I use this guy and it works great.
I use one of these Taylor Digital Instant Reads as well as a Oxo dial thermometer of some kind, and my Kettles have thermometers built in. I used to have a Thermapen, which I loved, but don't drop it in to your wort. These other thermometers I have still work within 1 degree or so, I make sure I check them in boiling water as well as ice every few brew days to make sure they're still measuring right. When I see a good deal on Thermapens again I'll get another.
The following products also look good/interesting to help me. I have absolutely no financial interest in these, I'm just keeping track.
A cube for quick 5, 15, 30, 60 minute timer (link).
A popular digital kitchen timer (link).
A pager-like alarm/countdown (link).
I do something I call 15/30. I have these cool timer blocks I set it to 30 minutes and I just play/do what I feel like, sometimes that is laying in bed feeling blah. Then when it goes off I do 15 minutes of "what I don't want to do but can't avoid." Repeat. The basic principal is reward yourself for doing what you can handle one bite at a time. It isn't a silver bullet. It doesn't make you feel like sunshine and butterflies, but at least some of the crap you have to do gets done and off your back. And that helps.
This is a good book if you are looking to explore the concept: Mini Habits (I think it is even free for prime members)
Not sure what your budget is like, but you can get inexpensive meat thermometers for $10+. Many people overcook their meats without realizing it. A thermometer allows even a n00b to cook meat perfectly. When baking or roasting meats, I use something similar to this because the probe stays in the meat while cooking so I don't need to keep opening the oven, plus I can estimate how much longer the meat will need to cook (so I can time the side dishes to finish at the same time).
Cabled puncture probe thermometer connected to a display outside of the oven. Test the recipe a few times in the oven (different times and temperature settings) with the probe stuck in the centre of the meat, and observe the temperature dynamic and end temperature. Then record what works and what doesn't. Repeat as necessary until archiving perfection.
Edit: like this http://www.amazon.com/CDN-DTP482-Programmable-Probe-Thermometer/dp/B00046YFHE
Would you recommend this for use with an air popper? I currently have [this guy](CDN DTP482 Programmable Probe Thermometer/Timer
http://amzn.com/B00046YFHE) sitting in my Amazon cart, but if I would actually benefit from running an actual chart versus just a spreadsheet of manually recorded times and temps (me roasting, wife recording), then it may be worth the cost of an actually air roaster to get a thermometer.
Happy Cake Day! It only has CAE but I couldn't figure out how to make a fancy link lol. And I'll use it to make fudge but it's not cake so I can't even been clever with that..but fudge. Okay? Ok.:)
You you!!! Because I have the same ones!
For me because it's time to get rid of my old ones :(
What about some fudge? It's easier than you'd think, though you do need a candy thermometer.
Pick up a deep from thermometer like this or this.
Once you have a thermometer of your own you can use this, or any other deep cast iron pan as a deep fryer. Alton brown shows how this is done.
Of course for fried chicken, this is the traditional way.
Enjoy your new pan! If you treat it right it shall last you several lifetimes and provide you with many fine meals.
get a digital instant read thermometer, read up on temps for your proteins, never overcook anything again. http://www.amazon.com/Comark-Instrument-Digital-Thermometer-Accuracy/dp/B001U59MDA/ref=sr_1_5?ie=UTF8&amp;qid=1421866650&amp;sr=8-5&amp;keywords=instant+read+thermometer+blue
in the kitchen I work in this is the standard, we all have one and swear by them.
As someone else said, it depends on what one you get. My friend's is nice, mine not so much. It's still good for the price, but the toilet has some issues, there are hardly any lights, and this one time there was a mouse. I called fms and they sent some guy over two weeks later and all he did was set up a couple of traps. I've seen the mouse once or twice since then. Also, I may recommend an oven thermometer (http://www.amazon.com/POT750X-High-Heat-Oven-Thermometer/dp/B0021AEAIK/ref=sr_1_1?ie=UTF8&amp;qid=1407766362&amp;sr=8-1&amp;keywords=accurate+oven+thermometer) because my oven temperature is like 50 degrees high. It's not that bad of an apartment though, just don't expect something like park point or uc. Oh, and I can't seem to stick things to the walls, they always fall off. Kinda strange.
You can try it, or just put it back in the oven at 450F for longer.
Or get an inexpensive oven thermometer and remove all doubt of what the oven is doing.
https://www.amazon.com/dp/B0021AEAIK
Or put the pan on the stove and heat it on high/med-high until it starts to smoke.
Tryna make a nice Peet’s?
https://www.amazon.com/CDN-POT750X-ProcAccurate-High-Thermometer/dp/B0021AEAIK/ref=mp_s_a_1_14?keywords=pizza+oven+thermometer&amp;qid=1574573581&amp;sr=8-14
I personally use thermometers to measure both types of temperature. When I think about it, I actually use way too many thermometers than the normal person would.
I really think a person needs 2 thermometers if they want to turn out good and consistent food...one to measure the grill temp and one instant read to check meat doneness.
The oven thermometer I use looks like this and can be found practically everywhere. I like the thermometers that measure temp down at the cooking surface better than ones that sit on the lid because I've found there is at least a 25 degree difference from cooking surface to lid on my grill.
This is the pen thermometer I use to check meat temp close to the end of cooking. It might be tricky to find Thermoworks products locally but you can find similar stuff at cooking supply stores.
Those 2 types of thermometers above would do the job really well without being horribly expensive. If someone was looking at the next small step up in thermometers, this is the digital probe thermometer kit I have. It comes with the 2 digital probes to measure both grill temp and food temp. The Maverick ET732 has been one of the better purchases I've made recently.
I use this with my students during centers and they love it! http://www.amazon.com/Time-Timer-12-Inch/dp/B002GTZZ6M?ie=UTF8&amp;keywords=clock%20timer&amp;qid=1462485704&amp;ref_=sr_1_4&amp;sr=8-4
caps though many extract kits come with them,
bottles (I'd reccomend asking your drinking friends to stockpile the snap top styles for you) cheaper than buying new ones,
as a cheap quality of life buy a fermometer,
you'll also want to pick up some cleaner (B-Brite or other equivalent),
the wort chiller seems really high priced even without shipping try checking around your local hardware shop you can probably make one yourself for cheaper,
as someone else mentioned a hydrometer and get a cheap turkey baster to use for transferring wort to measure (dollar store item)
relax. there is no rush here. esp if you are using dried yeast it can take forever to get started. get a cheap stick on temperature strip (https://www.amazon.com/Fermometer-863043-Adhesive-Strip-Thermometer/dp/B004B4TS1S) that way you don't have to worry about contaminating the wort by your measurements. once it hits the okay range toss in the yeast. dont see activity within 3-4 days? toss in another packet of yeast. then just wait a few weeks.
>My suspicion is that the yeast died because it was too cold. I have 2 questions:
(1) Has anyone had an experience where the yeast died because the batch got too cold? If so, how did you know?
(2) Can someone recommend a product that can monitor/record what temperatures my carboys have experienced?
Thanks in advance!
To 1) I have not, but I've read plenty of stories of people accidentally freezing their beers during fermentation. That seems to do it, but even then there are cases where people say they have not needed to add more yeast. My guess is it would depend how long it was frozen.
If you haven't frozen your beer though, I really wouldn't worry about killing the yeast. Knocking them out for a while until temps get higher, sure.
For 2) Try something like this.
Far as your under carbonated problem. How much did you bottle, how did you calculate and measure your priming sugar?
For the "secondary" problem. If it does a full on ferment in secondary, you probably transferred too soon. The use of a secondary is generally to bulk condition/add things to it rather than actually ferment further.
If you want to take it to the next level, use an airlock instead of a balloon and a strip thermometer. By keeping the temperature low (55F) you will get a smoother mead with less hot alcohols, but it will take longer to ferment.
best = time + money + features you want
if all you need to do is measure temperature, you can do that very easily and reliably with any of the AcuRite wireless thermometers. Here's a random one with two sensors from Amazon https://www.amazon.com/AcuRite-00986A2-Refrigerator-Wireless-Thermometer/dp/B004QJVU78/ref=pd_sim_86_4?_encoding=UTF8&amp;psc=1&amp;refRID=YXWRSAYM2NAPCQJWSVP8
Acurite has lots of models. Amazon link above can be used to get to the list of the various models they carry. Typically we get them at the local Home Depot or Lowe's type store, but I've even seen them in grocery stores.
If you go the sensor way, you could even run weewx on a pi to aggregate your data and do graphs etc. I do that with an outside building via a pi with a DS18B20 sensor that serves up the data via nginx to a different box inside running weewx.
The ESP8266 way somebody else mentioned looks fun though.
If you don't mind a slightly lesser output than the Sportsman 6000/7500 dual-fuel, I'd recommend:
Champion 100231 dual fuel for $680.
5500/6900W (5000/6250 on propane)
Up to 10 hrs on 6.1 gal (6.5 hrs on 20 lb propane) at 50% load
74 dBA
3 year warranty
TSC link
There is also a similar non dual-fuel for $650 at TSC, Champion 100452 if you don't need dual fuel. I didn't link it but you can search for it on TSC.
If you can go even lower, Champion 100519 for $850.
5000/6250W inverter
Up to 12.5 hrs on 4 gal at 25% load
69 dBA
3 year warranty
Acme preorder
Both generators have a 3 year warranty vs Sportsman 1 year, both are quieter (I think Sportsman is spec'd at 80 dBA), both are mor efficient.
Sportsman would use up 16.5 gal/day (9 hrs @ 50% load on 6.2 gal).
Champion 100231 would use up 14.6 gal/day (10 hrs @ 50% load on 6.1 gal)
Champion 100519 would use up 7.7 gal/day (12.5 hrs @ 25% load on 4 gal)
Up to you to decide what works best.
The non inverters have more output but is louder and the output is not pure sine wave, so some electronics and UPS backups will not run off AC power when hooked up to a non inverter generator. Sensitive electronics won't like it either.
Inverter generators are quieter and more efficient. They are rated at 25% but you have to realize that 25% of 5000W is 1250W. Your emergency backup loads will usually be under that, except when your fridge or well or large loads kick in. You save a boatload of gas going the inverter route. (Example: ethanol free gas @ $4.30 a gallon would be approx. $25 - $30 per day in operating costs when comparing 7.7 gal/day vs 14.6 gal/day). Also think about how much gas you would have to store, you'd need approximately double to go non-inverter with above options.
I know it's not quite apples to apples, so you need to decide what matters to you. Do you want dual fuel (keep in mind running on propane will reduce the output by ~ 10%), does noise level matter, do you want to run as long as you can with the gas that you have at hand, etc.
I had used a 3500/4000 Champion to power a 1/3 or 1/2hp well pump and it handled it with a 32" TV, my linear compressor fridge, some fans, lights. When not running the well, I could run my furnace or a portable 10kBTU air conditioner. That said, I feel like the inverter generator at 5000/6250 I linked above would probably let me run both. If you throw an additional large appliance like chest freezer in to the mix, then I'm guessing you might be pushing your luck and might have to turn one thing off but if you're willing to do that, then the inverter might be a good choice for you.
I put these sensors in my refrigerator and chest freezer to monitor the temps so I could turn off the freezer if needed to run other loads (washer, portable air, etc) which helped me get by with a smaller generator and still make sure my chilled stuff stayed cold Accu-rite sensors
When you say it will be outside where will it be outside?
Also keep the freezer full with water jugs, once the water is frozen it will act as its own battery keeping the freezer cold. Using a freezer alarm will let you know if you are having issues with the freezer so you do not lose all the food, but you should have that for any outdoor freezer.
try one of these:
http://www.amazon.com/BAFX-Products-TM-Infrared-Thermometer/dp/B006V4WNYU/ref=sr_1_2?ie=UTF8&amp;qid=1409058902&amp;sr=8-2&amp;keywords=infrared+thermometer
This is the one I use
A number of engineering projects that I've worked on with a dozen others in the past today could easily don't by a single person. Take an arbitrary electronic device. This could easily be designed and built by one person, outsource the PWB & stuffing/soldering the board. Build the case on solid works and outsource the injection molding. Outsource the assembly and make a website or sell it on ebay.
Make sure your baby doesn't grow up. I think little brother's face when he stares at his sister is priceless.
This is free shipping with prime. It that is too expensive this is cheaper.
Congratulations on the baby.
This one is a great bargain. It's perfect for measuring the high temps in my converted pizza grill.
Remote thermometer with laser sight I have measured the temperature of every inanimate and animate object in our house.
Tiding me over until the FLIR One is available.
Honestly, best investment ever if you plan on cooking your own proteins!
I felt the same way with 2 different analog meat thermometers. I decided to risk $20 and purchased a digital thermometer from amazon: http://www.amazon.com/Epica-Ultra-Fast-Digital-Meat-Thermometer/dp/B0089O0W1G/ref=sr_1_2?ie=UTF8&amp;qid=1421357270&amp;sr=8-2&amp;keywords=meat+thermometer&amp;pebp=1421357270153&amp;peasin=B0089O0W1G
After getting one of these, I noticed the ability to get more consistent reads. I was fairly certain that I was using the analog thermometers correctly, but I highly recommend a digital one. I noticed less effect from heat sources (grill) and the fast reads are simply easier and more convenient.
I hear Thermapen is the best thermometer. They're a little pricey though. I use this one and it's worked pretty well for me.
This thermometer has served me well for some time. I use it to check my water temperature before mixing dough as well as checking the temperature of the dough to make sure it's in the range I want.
Not quite the same but the ET733 is one sale on amazon.ca for $69.99: http://www.amazon.ca/Maverick-Range-Wireless-Smoker-Thermometer/dp/B00FM8DJHQ/ref=sr_1_1?ie=UTF8&amp;qid=1395533783&amp;sr=8-1&amp;keywords=maverick+et+732
Better grab them soon. That's the older version. (Nothing wrong with it, just pointing it out).
I just bought the [newer one] (http://www.amazon.com/Maverick-ET-733-Wireless-Smoker-Thermometer/dp/B00FM8DJHQ/ref=pd_sbs_lg_3?ie=UTF8&amp;refRID=1457FKKPAPZXSEDTKA99), last week.
I recommend this bad boy http://www.amazon.com/Lavatools-Javelin-Digital-Thermometer-Chipotle/dp/B00NMQGAT4/ref=sr_1_2?ie=UTF8&amp;qid=1457629909&amp;sr=8-2&amp;keywords=lavatools its only $50 and works just as well as the thermapen
I bought a cheap one from amazon and thread the wire through the gap on the hinge side of the door. I put the probe on a shelf above the meat
Famili MT004 Digital Kitchen Food Meat Cooking Electronic Thermometer Probe for BBQ, Oven, Grill, and Smoker with Timer Alarm and Large LCD Display https://www.amazon.com/dp/B013A81VW4?ref=yo_pop_ma_swf
Do you guys know of any thermometers that have a wired probe that I would be able to have a continuous display of the temperature?
https://www.amazon.com/dp/B013A81VW4/_encoding=UTF8?coliid=IEY1MSEMJ2YHZ&amp;colid=2JOZX62QOQJ54
I like the idea of this one but I'm not sure if the probe wire could take the constant heat of the brew. Ideas?
Something that I use all the time when cooking is a digital thermometer that you leave in the meat while cooking (I'm not endorsing this specific one, it's just an exemplar and is inexpensive) like this one. It can take a lot of the guess work out of cooking meat and let you hit the safety zone without over doing it. I got mine after I saw Alton Brown using it a lot.
Also, I highly recommend watching "Good Eats" reruns wherever you might find them. Even if you might not like the specific dish he's making that episode, he is great at teaching you the whys and why-nots of cooking and baking. It's more of a teach to fish vs give a fish kind of show.
Pump? Oven? Cellar? These things don't normally go together.
I take it that English isn't your first language, and that's OK, but it's really hard to figure out what you're after based on what you've written.
If all you want is a remote thermometer, there's a thousand ways to do that -- most of which don't even involve the complexity of a computer like the Raspberry Pi.
What about a thing like this that you just extend the wire on?
Thanks for your reply! I'm thinking about getting this one - I can't imagine being able to successfully monitor the doneness without having a leave-in thermometer. I don't see it written explicitly for that item, but I'm pretty sure it's a leave-in.
get one of these: http://amzn.com/B013A81VW4
works fantastic! Goes up to mid 400's so you can use it to check the temp of your oven too and as a candy thermometer.
Odds are you will be fine, chicken has a parasite (forgot the name, doesn't matter) that doesn't die at 145 like bacteria do but at about 160. If you tested the internal temp and got above 140 then the outer parts would have hit this temp so at least 1/2 the chicken would be completely sterile. Odds of the rest being contaminated by the parasite is low.
IF you aren't sure, look at the fibers of the meat. they should be tight. If they are loose and ill defined you could toss them back in or a stint in the microwave.
https://www.amazon.com/Lavatools-Javelin-Ambidextrous-Thermometer-Chipotle/dp/B01F59K0KA/ref=sr_1_fkmr0_2?ie=UTF8&amp;qid=1523561195&amp;sr=8-2-fkmr0&amp;keywords=javatools+javelin
save your money
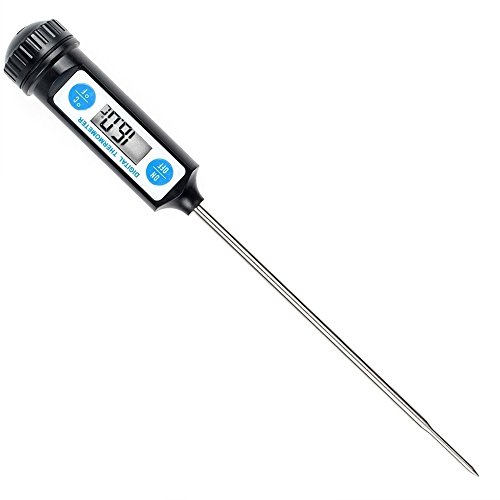
this one :) https://www.amazon.com/dp/B01HV5AL9G/ref=cm_sw_r_cp_apa_qahBybCN1653N
Basically gonna echo most of the answers already posted, but just to pile on:
Cookbooks
Nothing inspires cooking like a good cookbook collection. The great news about cookbooks is that they're often bought as gifts or souvenirs and they make their way onto the used market cheap and in great condition. Here are my suggestions for a great starter shelf:
Sorry for the delayed response, busy week. It is funny you mention filtering your water. When I first got my fish I was buying gallons of distilled water from the grocery store and I live in Washington which has some of the best tap water in the world.
Ok so here we go:
When you ready to spend a bit more $$$ I highly suggest a Python water changer (https://www.amazon.com/25-Foot-Python-Aquarium-Maintenance/dp/B000255NXC/ref=sr_1_1?ie=UTF8&amp;qid=1487866713&amp;sr=8-1&amp;keywords=python+water+changer). It connects to a sink faucet and uses your water pressure to syphon the tank super easily and makes it so you can refill straight from your sink tap (no carrying water anywhere). A note: when applying seachem prime to your new water when using a changer, you can just dump the dose of prime right into your tank and fill it with the tap water as Prime acts almost instantly. For good measure I generally turn my filter off for a few minutes just to avoid chlorine potentially getting in the filter somehow.
(NOTE ON CATFISH: They are naturally schoaling fish. This means they like to be kept in groups and if they are not they will not really know how to act properly and won't be "happy". Both the Corydoras Julii and the Otocinclus will stay very small throughout their life. I would say 3 bare minimum with 4 or 5 being better if you have the space.)
Finally in regards to bioload, wait to add any more fish period until you can tell that the tank has been cycled. This will simply make it easier to keep a more controlled environment and keep the stress levels down.
Further, since you are cycling the tank right now, that inevitably creates stress for your fish. Even the slightest ammonia or nitrite spike is not fun for them. Until your tank is fully cycled, he is going to be grumpy and may spend a lot of time acting differently than you did when you first got him. Once the tank is cycled then I would be more aware of monitoring his behavior.
My older betta spends the ENTIRE DAY either sleeping on his plant leaves, hiding behind his filter, sitting on the thermometer or sitting in a pineapple. He is such a lazy jerk. This is also the fish that lived through like 6 months of pure neglect as I had no idea what I was doing when I got him. He was sitting in unchanged water for months at a time :( and is the whole reason I undertook trying to get better at this.
TL:DR - Yes, just let him rest :). Keep up on the water changes, and buy a thermometer as soon as possible. When the tank is stable, get 5 more tetras and 3-4 Corydora Julii or Otocinclius Catfish and a couple shrimp :).
And if you're not sure and don't want to drop $70+ on a nice one, there are cheaper options like this out there.
I've had this little one for almost two years now, and it gets the job done. It doesn't have any special features, you can't keep it in the meat while it is in the oven or grill, it doesn't read the temperature instantly, but it gets the job done and my steaks come out how I want them.
https://www.amazon.com/dp/B07477NMF4/ref=psdc_289810_t1_B017613C3C
&#x200B;
Is what I use. Probe connections are long enough you can set the display on the counter to the side. Beeps when it reaches the set temperature.
Purchase an oven safe digital probe thermometer. I have this one. The alarm goes off when it reaches the appropriate temp and there are guidelines written in the thermometer itself. No guesswork.
I've got the Chugod which you can get from Amazon.
It's bluetooth only, but has decent range. I can still have it connected from the third story of my apartment. It can carry 6 probes as well.
My only gripe with it is that I can't figure out how to nickname each probe, or if you can at all.
I have this and it hasn't let me down yet.
https://www.amazon.com/Wireless-Thermometer-Bluetooth-Grilling-Supported/dp/B075L7V6NZ/ref=sr_1_1?ie=UTF8&amp;qid=1519331864&amp;sr=8-1&amp;keywords=chugod
BBQ Meat Thermometer, Bluetooth Remote Cooking Thermometer, Digital Oven Thermometer with 6 Probe Port for Smoker Grilling (Carrying Case Included) https://www.amazon.com/dp/B075L7V6NZ/ref=cm_sw_r_cp_api_i_zQQgDbEGGYN64 I just got this. I’ve only used it once, but it does what you’re looking for. I have a Smokey mountain too, usually zip tie the actual unit to the lid handle.
My MES doesn't have an internal thermometer, nor do I know if you can calibrate yours.
What I DO know is that I bought this kit https://www.amazon.com/dp/B075L7V6NZ/ref=cm_sw_r_cp_apa_i_A71RCbMMK1248 off of Amazon (with extra probes), and it's been amazing to me. It must be accurate enough, because everything I've cooked with it so far turns out damn near perfect. I highly recommend buying this, even if it's just for the convenience of getting alerts via BT on your phone.
I picked up a 6 probe digital not to long ago for $60
Seems there out of stock now but they have a 2 probe for $27
I had the same trouble with that same unit. I gave up and bought this
I picked up one of these on an Amazon special for about $30. It has 6 probes and I use one for ambient grill temp on my Kamado.
Tenergy Solis Digital Meat Thermometer, APP Controlled Wireless Bluetooth Smart BBQ Thermometer w/ 6 Stainless Steel Probes, Large LCD Display, Carrying Case, Cooking Thermometer for Grill & Smoker
https://www.amazon.com/dp/B077821Z4C/ref=cm_sw_r_cp_apa_i_lmyYDbFXHJQYF
Keep watching other sites as we approach Black Friday - there's bound to be sales...
Really, really like this one. Bluetooth with an app and 6 probes with lengthy cables, in case if you're doing a lot of different meats.
https://www.amazon.com/gp/product/B077821Z4C/ref=oh_aui_detailpage_o02_s00?ie=UTF8&amp;psc=1
There is an app called Easy BBQ, which seems to be used on a lot of Bluetooth thermometers. I got this Soraken one from Amazon and had the exact same problems /u/ibrewbeer had.
Easy BBQ app crashes constantly and resets the graph data. Was a real bummer. I've been doing extensive research this morning and most of the smaller BlueTooth thermometers use the Easy BBQ app. So I'm trying to stay away from those.
I'm going to save up for a Fireboard eventually, but I'm going with the Weber iGrill 2 in the meantime. It doesn't use the Easy BBQ app, it has it's own app, Webber iGrill. The reviews are pretty positive for both the unit and app, and a Webber rep has reached out on Amazon and the Google Play store to those who have frequent disconnects or problems and had them return the unit for a new one, thinking defective hardware is the issue. That's solid customer service for me.
I'd stay away from any thermometer that uses the Easy BBQ app though. I'll see how this Weber iGrill does while I'm saving up for the Fireboard!
Might think about grabbing an external temp gauge that can track temperatures. That way you'll be able to compare fluctuations and averages to the installed GMG temp probe. I have one of these and it works well enough - there are better thermometers available but for the price and number of probes this one is pretty good. The app isn't the greatest in the world but it'll chart temperature fluctuations over your cook time.
I had a ThermPro that failed, just replaced it with this:
Wireless Meat Thermometer for... https://www.amazon.com/dp/B07MVVK5JK?ref=ppx_pop_mob_ap_share
Use a meat thermometer and cook until the center of the thickest part reaches 165 F (solid technique whether baking, pan frying, grilling, whatever).
I use a fancy one with a remote probe that you can insert before you cook and leave it in, like this:
https://www.amazon.com/Wireless-Thermometer-Grilling-Bluetooth-Barbecue/dp/B07MVVK5JK/ref=sr_1_15?keywords=meat+thermometer+digital&qid=1555608154&s=gateway&sr=8-15
Or get a simpler one like this:
https://www.amazon.com/ThermoPro-TP01A-Thermometer-Digital-Meat/dp/B078KPHKZD/ref=sr_1_13?keywords=meat+thermometer+digital&qid=1555608283&s=gateway&sr=8-13
and test it occasionally (don't leave this one in the oven - just stab the meat to check it from time to time).
https://www.amazon.com/dp/B07MVVK5JK/ref=cm_sw_r_other_apa_i_Li0ODbSTM9ASA
6 probes, $47