Best under-counter fixture mounting products according to redditors
We found 66 Reddit comments discussing the best under-counter fixture mounting products. We ranked the 26 resulting products by number of redditors who mentioned them. Here are the top 20.


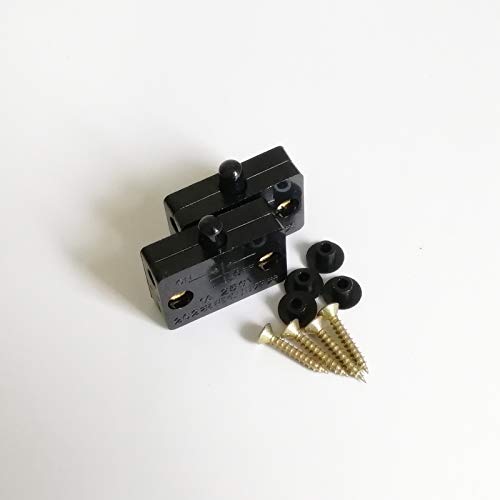


I used these, just last night. Worked great. I recommend these to mount them. http://i.imgur.com/3v4IoBA.jpg
Hey everyone, I didn't have the forethought to take photos as I went along, but here's how I did it. Fair warning; this project requires an intermediate amount of soldering experience. If you have surface mount soldering experience, you'll be golden. If you don't, make sure you can handle sacrificing a few light strip segments for this project :)
If you don't mind going the DIY route, you could probably come in under $100 for parts for the strips:
Instead of the flat channel, you might be better off with angled channel for mounting the strips above the cabinets, since they'll throw more light on the wall, which is what you'll actually see - https://www.amazon.com/LEDwholesalers-Aluminum-Mounting-Installations-1901-V/dp/B00PJSSD7K/
There's a ZWave RGBW controller but it's more expensive than the wifi one and can take some more configuration: https://www.amazon.com/Fibaro-Micro-Controller-Z-wave-Strips/dp/B00P1N68FW/
If you get the snap-on connectors, I recommend putting a small amount of solder on all of the pads where you'll be connecting them on the strips, so that they make a good connection.
As for the puck lights, you could probably get something like this and wire the distributor to the wifi/ZWave controller, instead of plugging it into the controller it comes with: https://www.amazon.com/Changing-Christmas-Furniture-Ambiance-Lighting/dp/B01N2I47VH/ref=sr_1_2
Sorry for the late response!
I bought 40 meters worth of ws2812B LED strips (a type of LED strip that can be programmed). You can get these for pretty cheap of Amazon. Then, I used the adhesive on the back of the LEDs to stick them in these special LED mounting racks that I could mount on to some metal storage shelves.
To interface with the LEDs, I'm using a Pixlite Controller like this one. The cool thing about these controllers is that they can output DMX (DMX is the protocol used to control those big fancy lights you see at concerts) in addition to driving LEDs. Then the programming and sequencing is done in Lightjams. In addition to being the best low budget software for LED pixel programing, Lightjams can also be used to program any DMX fixture.
So I got 5 the cheap DMX moving head lights and controlled them with Lightjams too.
I knew if I wanted to pull of this song, I was going to need lasers, but DMX lasers are stupid expensive. Soooo I had to get a little unconventional. I ordered some sketch cheap Chinese lasers that I wired to a DMX relay. I mounted the lasers to the shelves using camera clamps and controlled them in Lightjams too.
Figuring out how to do all this and building it took me about 6 months. Then, programming took another few months. I am actually working on programing an entire set of songs from the Worlds tour. I am nearly done, and it's about an hour long! I'll be sure to post it here when it's done!
I appreciate the interest, let me know if you want any additional info!
I am in the process of installing the LED strips and controllers below. Tested end to end setup last night and they work as expected. RGB+WW. No surprises. Also included the matching channels with diffusers.
Hope this helps!
LEDENET RGBWW LED Strip 4 Colors... https://www.amazon.com/dp/B00VIKAWWC?ref=yo_pop_ma_swf
Wireless electronic ballast... https://www.amazon.com/dp/B00NMSQ4QQ?ref=yo_pop_ma_swf
LED Aluminum Channel Wide 10-Pack... https://www.amazon.com/dp/B07FDV1RH9?ref=yo_pop_ma_swf
this
I did 2 for my closet as well. liked it so much I got it for my reach under pantry. tap face, screw mount or adhesive (which is basically permanent) and it comes with both. 2xAAs and I just have loads of NiMh. good spread but can be semi directional. on the everything so slightly warmer side. I don't prefer cool lite so these are great.
You can do the whole kitchen using one Hue base/power source (you need at least one $90 base in order to control the lights). I used these Litesessory extensions+splitters:
https://www.amazon.com/gp/product/B01M7XDZ5V/ref=ppx_yo_dt_b_asin_title_o06_s00?ie=UTF8&psc=1
https://www.amazon.com/gp/product/B01N3NTCYU/ref=ppx_yo_dt_b_asin_title_o03_s00?ie=UTF8&psc=1
If you need to cut a strip, use these split end connectors as well:
https://www.amazon.com/gp/product/B07NDHP582/ref=ppx_od_dt_b_asin_title_s00?ie=UTF8&psc=1
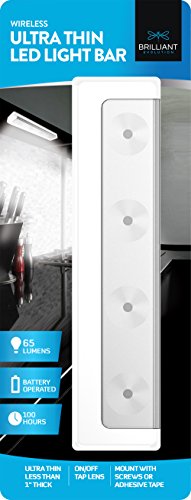
This one has 66 LEDs. Quite bright, IMHO:
https://www.amazon.com/Rechargeable-Wireless-Aluminum-Lighting-Wardrobe/dp/B077G2K26P
I bought a splitter and converter.
https://www.amazon.co.uk/Splitter-Adapter-Compatible-Philips-LightStrip/dp/B01M17KZ04/ref=sr_1_11?ie=UTF8&qid=1492705809&sr=8-11&keywords=hue+lightstrip
https://www.amazon.co.uk/Adapter-Extension-Directly-LightStrip-Controller/dp/B01M0VPNNY/ref=sr_1_17?ie=UTF8&qid=1492705870&sr=8-17&keywords=hue+lightstrip
So I've split the lightstrip straight from the controller. Added a few extensions it works brilliantly.
I used these plastic anchors, spaced roughly 6-8 inches apart.
A royal pain to install, but they've held up for over a year with no issues, and I don't anticipate any problems.
definitely get the single-screw version. It's difficult enough to install them under cabinets without haveing to do two screws for every anchor.
You can get aluminum channels with frosted covers to mount your LED strips in.
https://smile.amazon.com/dp/B01LL2SLME/ref=psdc_14325671_t2_B01MYF2P2I
___
Here is an alternate idea I have been kicking around for a while for creating a cheap and easy LED strip light diffuser, but I have never tried it: The materials are parchment paper and 2" wide clear packing tape. You can probably find both of these at your local grocery store. You will also need a hand saw and a miter box.
Remove the parchment paper roll from its cardboard package and make a pencil mark one inch from the end of the roll. Holding the roll gently but firmly against one side of the miter box, cut off the end of the roll at the mark using a hand saw (avoid power tools for this operation). Unroll the resulting one inch wide roll of parchment paper and secure in place over the LED strip with a length of 2" wide clear packing tape.
Assuming that you don't mind them being controlled by a single controller (and therefore the same colour/brightness), I'd buy:
A 2m lightstrip plus for the two cabinets on the right - https://www.amazon.co.uk/dp/B072R5VQJG/ref=sr_1_2?s=lighting&ie=UTF8&qid=1502294468&sr=1-2&keywords=hue+light+strip,
one of these for underneath the microwave oven - https://www.amazon.co.uk/Extension-Cable-Philips-LightStrip-White/dp/B01M7XDZ5V/ref=sr_1_2?ie=UTF8&qid=1502294300&sr=8-2&keywords=hue+light+strip+extension
Which then bridges the gap to another 1m LED strip -(https://www.amazon.co.uk/Philips-Personal-Wireless-Lightstrip-Extension/dp/B0148NMVJW/ref=sr_1_1?ie=UTF8&qid=1502294300&sr=8-1&keywords=hue+light+strip+extension)
I haven't tried but it seems you'd be able to use this:
Splitter for Philips Hue LightStrip Plus (2 Pack, White) https://www.amazon.com/dp/B01N3NTCYU/ref=cm_sw_r_cp_api_YVPPAbB25SJW0
I had a shelving unit that had built in fluorescent tubes. Now, granted it is an accent shelf, and each shelf was approximately 20" x 18". The fluorescent tubes were on the 20" sides, and there was no lighting on the 18" sides. I used Hue Gen 2 light strips all the way around on all three shelves, and the light (without all the CRI calculations) passed the "wife test". No discernible difference at full power detected. (SCORE!).
I also didn't care for the dots of each LED, so I put the Hue lightstrips into these:
https://www.amazon.com/gp/product/B01NCS0WE8/ref=oh_aui_detailpage_o00_s00?ie=UTF8&psc=1
These are super easy to cut with a handsaw, easy to install, and nicely diffuse the LED light and protect the strips.
Where I needed a non-lit extension (such as between each shelf), I used these:
https://www.amazon.com/gp/product/B01M7XDZ5V/ref=oh_aui_detailpage_o03_s00?ie=UTF8&psc=1
And finally whenever there was a junction, I used white electrical tape to make sure the two strips stayed affixed. Just a small bit to wrap around the joint.
https://www.amazon.com/gp/product/B000FP8HSM/ref=oh_aui_detailpage_o00_s01?ie=UTF8&psc=1
https://www.amazon.com/Rechargeable-Wireless-Aluminum-Lighting-Wardrobe/dp/B077G2K26P/ref=sr_1_4?ie=UTF8&qid=1540847370&sr=8-4&keywords=rechargeable+led+strip+lights
https://www.amazon.com/Wardrobe-OxyLED-Under-Cabinet-Lightening-Rechargeable/dp/B06XXM2C6F/ref=sr_1_5?ie=UTF8&qid=1540847370&sr=8-5&keywords=rechargeable+led+strip+lights
/u/Cynical_Chameleon see above
Recommendations on diffusers? The microwave and above sink and under bar already have diffusers on them, but they obviously are doing a fairly limited job. What I'm currently using are:
www.amazon.com/hunhun-Aluminum-Mounting-Installations-Installation/dp/B07691Y351
Can you not use something like those extensions (and have them go around the windows)?
https://smile.amazon.de/Verl%C3%A4ngerungskabel-Philips-Lightstrip-Plus-Packung/dp/B01MFGL1HR/ref=sr_1_6?ie=UTF8&qid=1509526915&sr=8-6&keywords=hue%2Blightstrip%2Berweiterung&th=1
Maybe to name the company directly that specializes in this: http://litcessory.com
Woah awesome! I'd throw some diffusers on the LEDs though, you can buy channel like this with diffuser strips in it so you don't see each individual light. Really great look by the way. Who did the design?
https://www.amazon.com/dp/B01M17KZ04
I have not personally tried, but the reviews on this indicate that it will work.
Another idea would be to install an led light. there are some designed to work on vibration (and would use batteries. You could also use a switch such as this:
https://www.amazon.com/Light-Switch-Close-Cabinet-Drawer/dp/B07M5YP9PR
Thank you! They remote control under cabinet lights. The exact ones I bought actually look sold out, but there are others items in sponsored that look really similar. BWL Puck Lights with Remote Control,Brightness Adjustable LED Under Cabinet Lighting, Multi Color LED Accent Lights (Pack of 2) https://www.amazon.com/dp/B06X42KKZK/ref=cm_sw_r_cp_api_Nx-DAbKHSTE18
I am about to start cabinet lighting project as well.
I ordered these from Amazon: https://www.amazon.com/gp/product/B06XN5YDT8/ref=oh_aui_detailpage_o00_s00?ie=UTF8&psc=1
and
https://www.amazon.com/gp/product/B01MFGL1HR/ref=oh_aui_detailpage_o00_s00?ie=UTF8&psc=1
I'll let you know how it goes. I haven't soldered in years
How about if i for example need to put the strip along 90 degree corners?
Wouldn't i need something like this?
However, this doesn't seem to be male to male.
Also, isn't it required to solder using the product you linked?
Yeah, that might be a better solution.
If the TV and display are close enough, you might get away with 3rd party cable extensions (Litcessory is the only well-known compatible brand) and two 1m extension strips. But they are expensive and will look ghastly if you can't hide them. And you won't be able to control them separately.
The only other method I can think of is using velcro to fix them to the displays and constantly transferring them, which sound crazy.
https://www.amazon.com/gp/product/B01MRDVZMW/ref=ppx_yo_dt_b_search_asin_title?ie=UTF8&psc=1
I made a simpler version of yours. Also just bent the led strip instead of cutting and splicing sections. Had all kinds of problems getting the connectors to work. It will need more work in the future, but works for now.
https://imgur.com/a/7FHig
Edited to change link to Imgur post.
2nd Edit add, item list:
Top is 3/4" Birch Plywood 24"x 26 1/2" (To fit Battle Map)
Legs are 1" Pine
Hinges: Rockler 32754 Posi-Lock Folding Leg Bracket. They lock in extended and folded positions. A slight wiggle when locked open, but not enough to cause any problems.
Led strip: https://www.amazon.com/gp/product/B01JS298G2/ref=oh_aui_detailpage_o01_s00?ie=UTF8&psc=1
Led strip Mounting clips: https://www.amazon.com/gp/product/B01F4U2K80/ref=oh_aui_detailpage_o01_s00?ie=UTF8&psc=1
Looks like you already got a solution, but I bought this on a lightning deal on amazon during Prime Day and love it. Soft light, transition is quick but not instant, so no "flash" or anything. magnetic mount to a fixed (adhesive/screw) base. Recharges using a mini-USB.
https://smile.amazon.com/gp/product/B077G2K26P/ref=ppx_yo_dt_b_asin_title_o03_s01?ie=UTF8&psc=1
Litcessory (it appears that you could potentially use the OTHER end of a cut piece with this as it states "male end is removable to make female"):
https://www.amazon.co.uk/Single-Double-Splitter-Philips-LightStrip/dp/B01M17KZ04/ref=sr_1_4?s=kitchen&ie=UTF8&qid=1480384660&sr=1-4&keywords=Litcessory+%28Philips+Compatible%29
In my kitchen I have 4 separate cabinet groupings, in which I installed above and below cabinet lighting. I used bichromatic (WW/CW) strip lighting from Amazon, and interfaced it with my UPB and home automation systems. I had the electrician run 110 V AC from the UPB wall switches to the top of each stack of cabinets, then wired in the DC drivers. After the DC drivers I wired in a strip light controller. Before I purchased the controller, I ensured that it would return the lighting to the same color it was set to when it was turned off, and so it does.
I then ran strip lighting in track along the tops of the cabinets for the above cabinet lighting. For the under cabinet lighting, I ran white coated cable down the inside front corner of the cabinets, and ran the strip lighting in track along the underside of the cabinets.
I was able to program all the controllers for the above cabinet lighting to one remote, and all the controllers for the below cabinet lighting to another remote. The lights change color in synchrony. I rarely change the color of the lights, so the remotes sit in a drawer doing nothing for the most part. The lighting works flawlessly, and provides a lot of light without much heat. Because the remotes also function as dimmers, I didn't install dimmer UPB switches. Since I had to use different wattage drivers, I'm not sure if the dimmer switches would have dimmed the strips uniformly, while the remotes certainly do. Like the color, I don't change the intensity often anyway.
I have had no quality issues. I was careful to use aluminum track, and the drivers are all meanwell. Overall, I have a very nice seamless light from minimally visible hardware unless you're looking for it.
In my example, I believe I would need 3 FLS-PP IP Zigbee ballasts ($55ea), 1-2 RGBW LED strips ($17ea), 3 power adaptors ($17ea), a splitter (~$15ea), and 4 ethernet cable adaptors (~$20 total). Grand total ~$268 on the conservative end + tax.
Or I could buy 3 Hue lightstrips ($90ea), splitter (~$15ea), and 4 ethernet cable adaptors (~$20 total). Grand total ~$305 + tax.
I could save ~$40 or bite the bullet and know that my current ecosystem will work seamlessly with the Hue lightstrips. Either way its not cheap but there are trade offs to going the DIY route.
Please disprove my estimates/theory, I would happily pay less for a setup with equal functionality :)
P.S. I'll add links to the items listed above but I'm on the train commuting in and the wifi sucks :/
Hue strips are wider than 12mm, you need 15mm channel like this
https://www.amazon.com/gp/product/B07FDV1RH9/ref=oh_aui_detailpage_o02_s00?ie=UTF8&psc=1
If you want to extend a Hue light strips around something there are extension cables so then you can use only one switch and one controller.
https://smile.amazon.com/gp/product/B01M8Q3T0B/ref=ppx_yo_dt_b_search_asin_title?ie=UTF8&psc=1
I soldered mine but had some experience, however afterwards I discovered there are connectors to be found such as
https://www.amazon.com/Extension-Cable-Philips-LightStrip-Plus/dp/B01M8Q3T0B
I'm sure I saw connector to RJ45 on eBay once so you can connect over distance with standard car cable.
Looks amazing, did you by chance use these for installation?
https://www.amazon.com/dp/B01MAWHKP4/ref=cm_sw_r_cp_api_J.nDybN9MZKE5
My under cabinets aren't flat and I have a corner I would like to have the Hue strips follow. Since the hue strips will only bend one way did you have that challenge and how did you solve it. Thanks!
Thanks! I've been curious about that but haven't been brave enough to separate the strip myself.
For the extra connector, try these: https://www.amazon.com/150mm-Extension-Philips-LightStrip-Compatible/dp/B01FRVS7UQ
Do the Philips Hue LED strips have the same connector width and pitch? If so something like this would solve my problem:
https://smile.amazon.com/dp/B01M7XDZ5V
Something like these work great: https://smile.amazon.com/Wireless-Cupboard-Lighting-Rechargeable-Magnetic/dp/B072LX4LL2/
https://smile.amazon.com/OxyLED-Dimmable-Control-Wireless-Under-Cabinet/dp/B0719Q2B9D/
These are "UL listed," though I'm not certain that means they are for "in-wall" use:
Extension Cable for Philips Hue LightStrip Plus (3ft/1m, 2 Pack, White)
https://www.amazon.com/dp/B01M7XDZ5V/ref=cm_sw_r_cp_api_LOMozbC5RA5R3
Of course LED strips or rope will work, but what about colored spotlights instead? Just throw a few around the yard pointed at the house in various Christmas colors and you are done.
If you do install LED strips, I would consider installing them in LED tracks to keep them safer so you dont have as much maintenance (the glue on LED strips sucks donkey balls) and they will look cleaner.
They come in flat
https://www.amazon.com/Starlandled-Aluminum-Installation-Professional-Accessories/dp/B01LL2SLME/ref=sr_1_3?ie=UTF8&qid=1542417534&sr=8-3&keywords=LED+track
and corner that would work really nicely under rain gutters.
https://www.amazon.com/StarlandLed-Aluminum-Installation-Professional-Accessories/dp/B01LL3S006/ref=sr_1_4?ie=UTF8&qid=1542417534&sr=8-4&keywords=LED+track
If the measurements work for you, there are 3rd party extension cables that would let you span the space occupied by the extractor without having cut/splice/solder any strips
https://www.amazon.co.uk/Extension-Cable-Compatible-Philips-LightStrip/dp/B01M7XDZ5V/ref=sr_1_1?ie=UTF8&qid=1488037366&sr=8-1&keywords=Extension+Cable+for+Philips+Hue+LightStrip+Plus+%283ft%2F1m+-+2+Pack%2C+White%29
Best of luck!
These can help you use the rest of the strip, or you can take the rj45 things to use as a splitter
https://www.amazon.com/Extension-Cable-Philips-LightStrip-Plus/dp/B01FRVS7UQ/ref=pd_bxgy_60_img_2?_encoding=UTF8&pd_rd_i=B01FRVS7UQ&pd_rd_r=F3W3CXJ0TE8J13JFM3ZH&pd_rd_w=ygAAH&pd_rd_wg=dfzRe&psc=1&refRID=F3W3CXJ0TE8J13JFM3ZH
Sorry, I was referring to wire extensions such as https://www.amazon.com/dp/B01MFGL1HR/
I bought these
I used them for anything that was more than a slight bend. They also make kits where you can connect cut ends to cut ends or 6 pin ends. Let me really get the strips the perfect length (just took a bit more effort).
You might like a couple of these since they are shorter: https://www.amazon.co.uk/150mm-6-Pin-Strip-Light-Extension/dp/B01MFGL1HR/ref=sr_1_1?ie=UTF8&qid=1483844055&sr=8-1&keywords=litcessory
And here are the adapters: https://www.amazon.co.uk/Adapter-Extension-Directly-LightStrip-Controller/dp/B01N3JK24J/ref=sr_1_6?ie=UTF8&qid=1483844055&sr=8-6&keywords=litcessory
Are they some kind of standard aluminum LED channel product? If so, the maker could tell you the brand and dimensions so you coudl buy the matching covers. You might be able to adapt something to a custom channel or unknown maker.
This one has the channels and the covers:
https://www.homedepot.com/p/Peak-Products-LED-Strip-Holders-50422/206394137
Here are some cover-only listings, you can find the same items on amazon with the channels and covers together:
https://www.amazon.com/Muzata-10-Pack-Plastic-Aluminum-Channel/dp/B0769CY4Z3
Source
I found https://www.amazon.com/Extension-Cable-Philips-LightStrip-Plus/dp/B01FRVS7UQ/ref=pd_sim_60_2?_encoding=UTF8&pd_rd_i=B01FRVS7UQ&pd_rd_r=H2A41T4TMGXRJVBQRZAT&pd_rd_w=UEu3h&pd_rd_wg=ZMpIh&psc=1&refRID=H2A41T4TMGXRJVBQRZAT
We offer the LEDdrop® Aluminum Channel System on Amazon and on our own shop