Best wood craft supplies according to redditors
We found 481 Reddit comments discussing the best wood craft supplies. We ranked the 197 resulting products by number of redditors who mentioned them. Here are the top 20.
We found 481 Reddit comments discussing the best wood craft supplies. We ranked the 197 resulting products by number of redditors who mentioned them. Here are the top 20.


Edit 2: The guide is available here
-----------
I made these token mini's as an alternative to buying miniatures. They're significantly cheaper and can be made in 0.5", 1", 2", 3" sizes and cost very little (1" and 2" shown).
If enough people are interested, I'd be happy to create a DIY post or video.
Edit: I created a MS Word template (link) for 1", 2", 3", and 4" tokens for anyone that doesn't want to wait until I post my guide.
I use wooden circles as the base - they're available on Amazon in 1", 2" and 3" sizes; /u/ScoutManDan suggested MDF discs.
The tops are epoxy stickers - they're also available on Amazon in various sizes.
When it comes to assembly, this is the order I use:
most definitely possible. you can either use an EF-E mount adapter like metabones or sigma, OR my preferred method to get the best quality (requires some DIY), is to get a set of these, lightly and i do mean LIGHTLY taper out the mount to the right shape of the lens mount. Tapping the end of the tool with one of these, for stubborn spots. Don't worry if you slip a bit and hit the sensor. Anything that shows up in your images, you can crop out in post.
Clean it up and polish it down with this. Best stuff in the business.
​
You'll be 🔪🔪☠KILLING IT 🔪🔪☠ in the photography game afterwards. All you pics will be 🔥🔥LIT🧯🧯!
You don't even need to buy them in bulk. Most stores will have a bunch of free commons from players who are playing draft or sealed in a big box. Just grab whatever you want from there, most sets are going to have at least a few goblins, undead, and beasts.
But yeah buy a 1" hole puncher, some 1" washers from a hardware store or a 1" wooden dowel cut into smaller pieces. Or here 100 1" wooden circles. Get that, a 1 inch hole punch, and some glue.
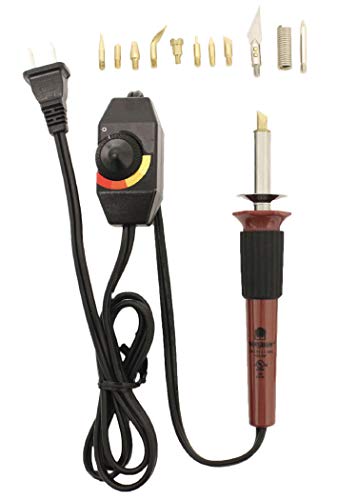
There are 'wood burners' like this: https://www.amazon.com/Walnut-Hollow-Versa-Temp-Temperature-Woodburning/dp/B005P1TRAS
That you use like a marker to burn wood. They're basically a soldering iron with a fat tip.
This is a great idea!
To make it even easier:
1 inch Felt Pads
I inch printable labels
1 inch wooden disks
No cutting required.
Woodburner - I got it for Christmas but here it is on sale now for $28 and it comes with assorted attachments. The carbon paper is less than $10 for 10 sheets, too.
I'm about to make a post about how I built a fully functional DM screen from scratch for about $14, but as far as original content that's it for me. However, here's some links that caught my interest or inspired me if it helps any.
Tips
ProJared: How to be a good DM
DM Support Group
Content Generation
DonJon Inn Generator
[World Gen] (http://rpg.stackexchange.com/questions/14706/rules-for-generating-a-game-world-as-you-go)
Map making
Podcasts
For inspiration
Adventure Zone - A real play podcast with a group of seasoned improvisational comedians. The perfect, I think, blend of fun, fantasy, and storytelling. Certainly not serious, but still has really great storytelling and roleplaying. Griffin is an amazing DM and has really inspired me to create like he does.
Hello from the Magic Tavern - Doesn't play DnD, but lots of lore inspiration...for better or worse.
Dungeon Master's Block - Lots of good idea and discussions.
Materials
[Role 4 Initiative dry erase tiles] (http://www.amazon.com/Dry-Erase-inch-Dungeon-Tiles/dp/B016H1B0RW) - My dungeon master uses these, it is SO much easier than using one giant dry erase playmat. We used to totally cheese things in dungeons because we knew the action must be in the direction of the rest of the empty squares. With the tiles, it's not obvious anymore which doors to take and which direction to go.
[Color coded ball pawns] (http://www.amazon.com/Ball-Pawns-Accessories-Assorted-Colors/dp/B00JOPU3UY?ie=UTF8&psc=1&redirect=true&ref_=oh_aui_detailpage_o01_s01) - I haven't gotten these in the mail yet, but I think they'll work great for marking the player characters. If I even run a longer campaign, I think it would be fun to use wooden peg dolls, painted with paint pens, as player characters, NPCs, most humanoid monsters...and other various wooden things for the bigger and weirder.
[1 inch wooden squares] (http://www.amazon.com/Package-Round-Disc-Unfinished-Cutouts/dp/B00CA1Y878?ie=UTF8&psc=1&redirect=true&ref_=oh_aui_detailpage_o01_s00) - cheap way to make markers for enemies, can write on with sharpie or use a 1 inch circle cutter to use your own color. See the really good guide here.
DM cheat sheets
Ozuro
Ronny Hart
I don't think either of these are perfect; nobody else's DM screens will ever be perfect for how you run a game. I combined these two and added my own notes for my own screen.
Reddit threads I've saved
Overland travel
Sandbox play
Terrain features for encounters
Software
DM Minion - Seems like it would help a lot with organization, certainly not required for success. Can't get it to work with my PC.
Better tool than the one shown in his video, comes with variable temperature knob and flat end and other tips.
http://www.amazon.com/Walnut-Hollow-Versa-Temp-Temperature-Woodburning/dp/B005P1TRAS
Would suggest adding this bits kit to give more hot end shape versatility.
http://www.amazon.com/gp/aw/d/B0024JMIPA/ref=pd_aw_fbt_21_img_3?ie=UTF8&refRID=139FHWPPGW5KYRDHVAQA#immersive-view_1456844011167
Looks like a wood burner tool with some sort of letter attachments (like these maybe). I've never used the letter attachments myself but wood burners are cheap to pick up, pretty easy to get the hang of, and loads of fun. You could burn the letters with the regular attachment too but I guess if you don't have the best handwriting or if the wood you're using is tough to burn evenly then the letters make things simple.
Edit: Really cool project OP. Nicely done and a great idea.
Maybe a hardware store, or any sort of craft store. They are on Amazon too, but it’s for a pack of 50. There is even a comment about DnD in the reviews. lol
https://www.amazon.com/dp/B01CSV14JE/ref=cm_sw_r_cp_api_m5HKBbGA9YAEM
I do the same thing with wood tokens.
https://www.amazon.com/gp/aw/d/B01CSV14JE/ref=mp_s_a_1_1?ie=UTF8&qid=1506542121&sr=8-1&pi=AC_SX236_SY340_FMwebp_QL65&keywords=wood+tokens&dpPl=1&dpID=51mEHnSvQXL&ref=plSrch
And
1 inch stickers
https://www.amazon.com/gp/aw/d/B01DE56YXO/ref=mp_s_a_1_2?ie=UTF8&qid=1506542189&sr=8-2&pi=AC_SX236_SY340_FMwebp_QL65&keywords=1+inch+circle+stickers&dpPl=1&dpID=51o3QxXG4jL&ref=plSrch
It's like one of these.
Here's a collar I made for my dog. Its more legible on lighter colors, my dog'S collar and leash are just plain veg tan.
Adding to all this:
Get a soldering iron that allows you to control the temperature. That made all the difference in the world to my own soldering abilities.
This is the one I've been using lately. Only costs approximately $20USD shipped, and does have a temp dial. Now the placement of the temperature dial is a problem for some people, because it's on the cord close to the iron itself. I have never had an issue of the dial pulling the iron off the table, but am really careful to avoid that scenario in the first place.
Practice safety with regards to any hot tools like soldering irons: turn em off when done, don't leave em unattended until they cool down, and ALWAYS unplug em when not in use. Never depend on an "on/OFF switch on anything in your shop/work space. Always unplug, making sure the cord (and everything else) is safely away from both the hot part of the iron and keep all things from the edge of the table itself.
The helping hands clamping devices on the market today have much smaller bases. I have 2 and the one with the magnifying lens is made useless because of the small footprint of the base. A regular helping hands would probably suffice. I bought a cheap lamp that has a built in magnifying lens which does the job for me.
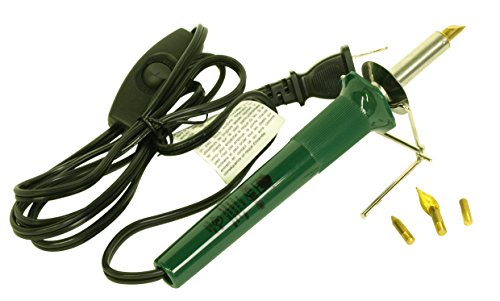
Hi there. If you're looking for a craft, woodburning can be a lot of fun!
I'd recommend picking up a basic woodburning tool at your local craft store or online and give it a try. Most come with some instructions/ideas and a variety of different tips to use. A popular one (which I enjoyed using) is the Versa Tool by Walnut Hollow, since it's inexpensive and you can adjust the temperature. They make an even cheaper one-temp model but if you want to practice shading and such the temperature control is really nice for a few extra bucks.
Other than that, you really just need some wood and you're ready to get started! The craft store will likely have wooden plaques and shapes as well, usually pine or basswood which are easy to burn. But if you just want to practice, any wood will do. I get scraps from local carpenters or lumber yards; driftwood can be fun too. Just be careful you aren't burning wood that's been coated or chemically treated, as you'll breathe in some unhealthy fumes. Just regular smoke from burning can be a nuisance but usually more so when burning larger pieces/burning for long periods of time. So although it may not be necessary for a beginner, down the road I would recommend getting a fan if this becomes an issue.
As for stenciling, I personally use graphite paper to trace designs onto the wood (you'll also find this at the craft store). Carbon paper is a similar option but I find it a bit messier/hard to remove if I've made a mistake. All you do is draw or print off the image that you want to burn. Then you lay the graphite paper (black side down) onto the wood, lay your image on top (I recommend taping to keep it in place), and lightly trace over it. Once you are finished and pull up the papers, the graphite will have transferred onto the wood where you traced and now you have your outline to burn over.
I hope that made sense! I find seeing a visual can often help, so some Youtube tutorials may be a good place to start to learn the basics. There are tons of resources online, and quite a few books on how to do different techniques/use different tips if that's more your style. Or just find some old scrap wood and experiment.
Have fun!
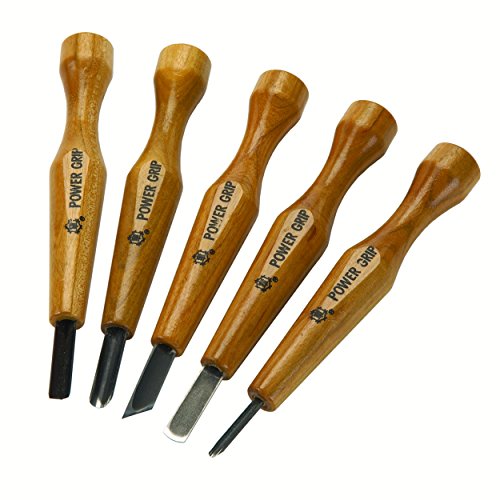
I really like powergrip. You can buy a set of them on amazon. Here's the five piece set.
You can definitely consolidate; I saw something about fitting all the expansions into the Dominion "Big Box" at one point, but can't find it now.
I use these tabs as dividers: http://domtabs.sandflea.org/
and an approximation of this organizational strategy: http://www.theboardgameblog.com/2010/02/step-by-step-fit-dominion-and-its-expansions-in-one-box/
and the original box fits the base game, prosperity and seaside comfortably. Wooden artist boxes like this are also popular: https://www.amazon.com/Walnut-Hollow-Classic-Unfinished-Hobbies/dp/B004I9SLEG.
A strop is only for honing (the final step to achieving a razor-sharp edge), while a whetstone could be used for anything from shaping the initial bevel to honing, depending on the grit.
If you do buy some Flexcut knives, which I highly recommend, you will probably only need a strop if you properly maintain them. In fact, they recommend you never use a whetstone and only opt for a Powerstrop if you neglect them for too long.
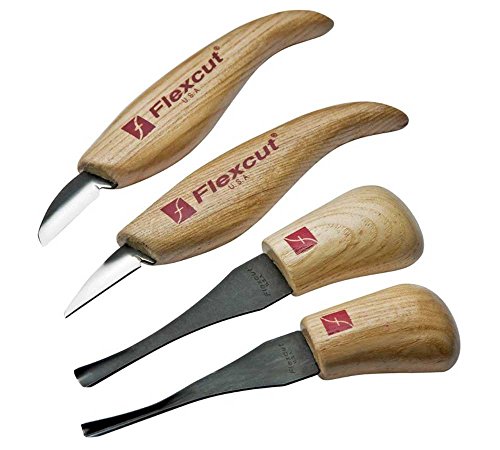
Many sites will recommend you buy tools one by one so you can get what you need, but as another beginner, I was extremely happy I purchased the Flexcut Deluxe Set. It was probably one more knife and one more palm tool than I needed, but it helped me understand what was out there and how to use them. A good, cheaper alternative might be this set.
No matter what you buy, one of the most important things to do from both a safety and usability (and enjoyment!) factor is to keep your tools as sharp as possible. That way it requires less force to move the tool through the wood, which is a common injury mechanism, and it makes it easier to create fun things. For the weird angles with V and gouge tools, I use another Flexcut invention. It works okay, but you can get the same results with folded sandpaper or other methods. I also bought a fullsize knife strop because it really does make a difference and you can get some with a lot more surface area. I haven't needed to buy a whetstone yet.
Also, I've since supplemented my starter set with Dockyard tools, which also come very sharp and keep their edge well. So far I've only used their micro tools, but I understand they have decent sets as well.
Speaking from unfortunate experience, you should definitely pick up a pair of kevlar gloves. I had a pretty serious hand injury (partially severed tendon) because I was just doing some touchups and wasn't using my gloves and got a bit sloppy. It only takes one single wrong stroke, and I had gotten complacent since I'd been so careful in the past. The gloves let me be more reckless and have definitely saved me from cuts, although they wouldn't protect against a stabbing cut. Thumb guards are also popular, but I don't actually like them very much. The gloves are nice because you can get a great grip on the tools.
When you have a knife or a set, you'll need some wood to practice on. I found ebay to be a great resource...just search for "basswood" and pick a few different sizes. 2x2x6 seems to be a good starting point to me. Make sure it is kiln-dried as well. Here is a good assortment that is pretty cheap. Butternut is another good choice, but for a beginner, I'd stick with basswood from personal experience.
Finally, if you are wanting a good book to introduce you to the subject, I'd recommend the Complete Book of Woodcarving. I've bought a number of books on the subject, but it is definitely the best if you are only buying one and need an overview to the entire craft. Old Time Whittling is only 30 pages, but gave some great examples and was very useful to me as well.
I agree with BoonSmith, get an Old-timer for a decent cheap starter. It is a pull carver though (whittler), not really a relief carver (push), yet has decent blades on it. Nice for the price! Bought one for my grand-nephew to get him going.
https://www.amazon.com/24OT-Splinter-Carvin-Traditional-Pocket/dp/B06XRDZ61M/ref=sr_1_2?ie=UTF8&qid=1550579581&sr=8-2&keywords=oldtimer+carving+knife
​
I'm a Flexcut fan myself and bought their's for traveling (use it quite bit).
https://www.amazon.com/Flexcut-Right-Handed-Multi-Tool-Woodcarving-JKN91/dp/B000ZUBDV0/ref=sr_1_2?ie=UTF8&qid=1550579696&sr=8-2&keywords=flexcut+carving+knife
​
​
​
I got this set as a gift, but after doing three projects and burning my fingers on the handle I'd recommend buying a tool like this where you can actually adjust the temperature. For more information and inspiration I'd recommend checking out /r/pyrography and good luck getting started.
Yeah, it is. Flexcut makes great equipment, I've got a fair number of their tools myself. Personally, I'd spend a bit more and get this set, which will really open your options up and make it easier to create:
http://www.amazon.com/Beginner-Palm-and-Knife-Set/dp/B005EG033Y
The flexcut tools are so well made you only need a strop to keep them honed if you take care of them...no need for a sharpening stone(s).
my best advice, as a semi-novice myself in wood burning:
i'd start with a cheaper wood burning tool. can find one at wal mart, home depot, craft store... it'll look like a soldering iron. get one with a few interchangeable tips, maybe one with a heat regulator if you're so inclined to spend the extra money. they can get complex and expensive, so depending on your involvement in the hobby it can get expensive, but you'll definitely see a difference in the heat consistency in the more expensive tools. but for a beginner, something like this is perfect to figure it out: http://www.amazon.com/Walnut-Hollow-Creative-Versa-Temp-Temperature/dp/B005P1TRAS
Should be less than $15 at places like Michaels. Especially with coupons.
Also this: https://www.amazon.com/dp/B000VRTG8Y/
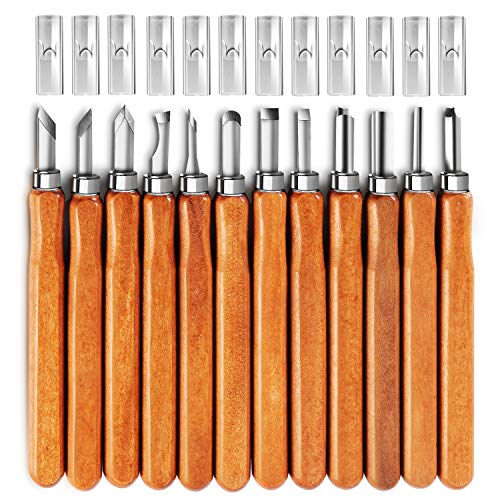
You can go out to any place that sells lumber, home depot, lowes, or just a hardware store. Birch plywood is a good start, but it splinters a lot when cutting it. I would recommend MDF board, it cuts easy and is great for beginners. After that youll just need a set of woodcutting tools, I would suggest getting this set, since its cheap and still pretty good. Use a sharpie to draw/plan out your image and make sure youre cutting out the negative spots, the parts that you want to keep white. You'll also need ink, you can get speedball (its cheap), a brayer, and a wooden spoon to burnish the image on to paper. As far as paper goes, I would suggest using mulberry at first, its thin so you can see what you are doing during the burnishing process.
So the steps as follows:
I always suggest flexcut for beginners for two reasons, they are fairly inexpensive, and they are sharp and hold an edge well. (I would not suggest using them on anything harder than mahogany or perhaps oak)
If you find you like woodcarving, then I suggest move on to more traditional (And fairly expensive tools like Pfeil, Ashely iles, Two cherries, Auriou, Henry Taylor, Robert Sorby etc)
They do have a small set similar to what you're looking for,
https://www.amazon.com/Beginner-Palm-and-Knife-Set/dp/B005EG033Y/ref=sr_1_4?ie=UTF8&qid=1483717685&sr=8-4&keywords=flexcut+set
As for wood, basswood is good for beginners, also butternut. I personally hate basswood and prefer to carve woods with a janka hardness of 1000 and up. That's just me though and many folks love basswood, I just find it too soft for my style of carving.
Cleaning, I just pick up the larger shavings and vacuum the rest.
Some resources,
http://www.wood-database.com/
Database on wood with detailed info on each species.
https://www.toolsforworkingwood.com/store/index.php
Very good supplier of woodworking/carving tools, I use them often and they are usually very prompt in shipping.
http://www.constantines.com/
I order from these guys every so often, usually 12x12x2 mahogany blocks.
http://www.japanwoodworker.com/
Another supplier of tools, they also have wood.
http://www.bellforestproducts.com/
Wood supplier, excellent stock of more exotic lumber, I tend to browse the "Hand pick your board" section often.
Also, ebay is a nice place to find carving wood.
Unfortunately, most cheap sets aren't worth buying. A nice combo set, which has the two most common types of blades and the two most common types of "gouges" can be had for around $55. This, IMHO, is a great starter kit.
Do you think he'd be more interested in carving figures, like whittling, or relief carving, which is like creating scenes on flat panels?
I really like Flex cut knives and gouges. They are a little bit of money but they will last you a life time.
Depending on what you want to do I have found 2 sets This one that is only knives and then This which has a combination of knives and gouges.
Personally if I were you I would go for the second one because it will give you a wider range of things that you can carve.
Well, considering another user just posted that Walnut Hollow Versa Tools are frickin dirt cheap on Amazon right now, I'd get one of those asap. Here's the link. I've used mine for the last 3 1/2 years and it's the only tool you'll ever need if you learn how to use it. This entire piece was done with my Versa Tool
Lightly sketch out the outline of the design you want to burn. Then turn the burner on and just trace the pencil lines. You'll need to just get in there and practice, nothing I tell you will make much sense until you get some hands on experience. Don't wet anything, you use the burner to draw the same way you'd use a pencil.
This is the one to get, Walnut Hollow Creative Versa Tool with Versa-Temp Variable Temperature Control & 11 Woodburning Points (Tips) https://www.amazon.com/dp/B005P1TRAS/ref=cm_sw_r_cp_apa_i_kIZSDbJ6TJ852
this is the exact one
1" Wood discs + Black Primer = instant bases in bulk.
Use painter's tape and put it sticky side up on a cardboard mount - an easy way to do this is wrap painters tape sticky side out around an empty box so it also sticks to itself and stays on the box. Stick rows of wood discs on the tape, spray black. Let dry, flip discs, spray again, let dry. Remove discs, throw box away.
Glue Minis to bases with a couple small drops of crazy glue. Really simple, really fast, nice and neat looking.
I don't have these and I don't carve, but I've seen them recommended here and have them saved for future me:
https://www.amazon.com/dp/B06XBLNRNM/
it's this
i bought it at michaels but much cheaper on amazon
I use this and another one. Sadly I lost all the tips recently and I'm working with just one. Don't loose them, they come in handy when you get better.
It's kind of like a pen with a steel (?) tip that's interchangeable depending on what you're doing. I would suggest getting wood from a craft store (Michael's), heating up the woodburner and trying things out. It can take a lot of patience at first to even do lines. Experiment with how long to hold it on the wood to make a line.
Oh, also if the wood isn't pre-sanded, make sure to get some sand paper and sand it down. At least that's what my grandma always told me to do, so it's now habit. :o
I also trace lightly in pencil what I'm going to do before I actually go and burn something. If you're not a very good artist you can always tape something to the wood and press on the paper and trace. It won't leave a pencil/pen mark, but it will leave an indent you can see and go over with the wood burner.
Afterwards stain it and leave it out to dry for a few hours.
Have a lot of fun and experiment. It's such a fun hobby!
Like the idea. If you have $10, get one of these: Woodburner Really easy to do detailed burns. Just make sure to burn before staining!
A woodburning iron? Any craft store should have them (Michael's, AC Moore), or just buy one on Amazon. Often them come in boxed sets (with some kind of booklet and a bunch of scrap wood) designed for kids.
I've been whittling for a few years now and used a few different knives but I always come back to the first I used: Flexcut Cutting Knife
The shape of the handle makes it extremely comfortable to use and the blade is very good quality. Another essential purchase for a beginner is a strop or some means of sharpening the blade. A dull blade makes the whole process painful.
Some people would recommend safety gloves and a thumb guard too. But in my opinion they're not necessary if you keep in mind where the blade is and where it's going, just keep the wood between you and the blade. Although I do sometimes tape a bit of rubber or paper to my thumb to make pushing the blade a bit less painful when working on harder wood like cherry.
A blade that I've really been considering buying is the Flexcut Carving Jack because I've read a lot of good reviews and it has all the essential blades, although it's expensive and probably more than a beginner needs.
Good luck with the carving. It's a great hooby to take up. Nothing better than sitting outside on a sunny day with a drink and whittling the afternoon away.
Flexcut Right-Handed Carvin' Jack, Folding Multi-Tool for Woodcarving, 4 1/4 inch Closed Length, 6 Blades Included (JKN91) https://www.amazon.com/dp/B000ZUBDV0/ref=cm_sw_r_cp_api_i_ApLRDbCRCAX6V
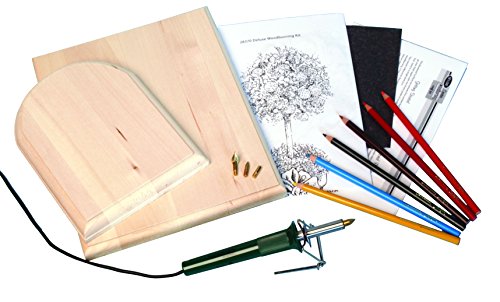
This is a good beginner kit: http://www.amazon.com/Walnut-Hollow-Deluxe-Woodburning-Kit/dp/B0019X78P2/ref=sr_1_7?ie=UTF8&qid=1369851128&sr=8-7&keywords=walnut+hollow+burner
See my post here about the types of wood to use: http://www.reddit.com/r/Pyrography/comments/1d29gw/new_to_pyrography_what_wood_should_be_used/c9md6bj
I guess? I'm using these that I got for Christmas: http://www.amazon.com/Yasutomo-Niji-Woodcarving-Set-set/dp/B0027AGN6Q/ref=sr_1_17?s=arts-crafts&ie=UTF8&qid=1420678584&sr=1-17&keywords=linoleum
They say woodworking but I hear they blow for everything except really soft wood. They cut linoleum like butter though.
Mind you I have only used this stuff to carve this one tiny thing but I figure I can always upgrade to different tools if I stick with it for a while and decide these things need an upgrade. Next time I buy supplies, I’m definitely finding another retailer for larger pieces of Basswood though. The selection on Amazon sucks a bit.
Glove:
https://www.amazon.com/dp/B00IVM1TKO/ref=cm_sw_em_r_mt_dp_U_BN5WCbEJ88Z77
Blades:
https://www.amazon.com/dp/B07P578XFV/ref=cm_sw_em_r_mt_dp_U_zN5WCbWR8JJJA
https://www.amazon.com/dp/B0037MI3K2/ref=cm_sw_em_r_mt_dp_U_mN5WCb9TNQ5A5
Sharpening Tools:
https://www.amazon.com/dp/B00FX9MHIG/ref=cm_sw_em_r_mt_dp_U_iN5WCbFRFMWSY
https://www.amazon.com/dp/B0023W6RS2/ref=cm_sw_em_r_mt_dp_U_lN5WCbSTS92ZX
https://www.amazon.com/dp/B07G2WY7WG/ref=cm_sw_em_r_mt_dp_U_qN5WCbZ70WC0J
Basswood:
https://www.amazon.com/dp/B07L91JK9J/ref=cm_sw_em_r_mt_dp_U_UQ5WCbSS09KD7
I like to give fountain pens as gifts. They are uncommon enough to be novel, but interesting enough to show value beyond what they actually cost. Bonus if you get a vintage pen, since the associated history adds an extra bit of interest. Italic or flexible nibs are great for writing chinese characters, from what I understand. If you can find an american made vintage pen, that is even better as a cultural gift. Also, you can easily find a nice one within your budget.
One good resource for buying professionally restored vintage pens is Pen Agora. The owner, Will does great work and is super friendly and helpful.
If you want to buy ink/paper to go with it, or would rather buy a modern pen Goulet Pens is a great vendor. Excellent customer service and product selection.
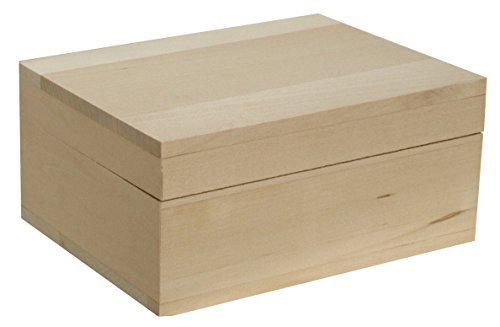
Lastly, if I am giving a special gift and want to add to the presentation, sometimes I buy an inexpensive wooden box off of amazon to package it in (something like this). If you are feeling crafty, you can even stain it or finish it with supplies from a hardware store like home depot. I usually shred some brown butcher's paper as filler.
Hopefully that helps, feel free to PM me if you need advice or suggestions :)
Thank you!
I used this set:
amazon.com/Flexcut-Beginner-All-Purpose-Included-KN600/dp/B005EG033Y/ref=sr_1_1?keywords=flexcut&qid=1568304084&sr=8-1
I also have a micro V tool that I used.
Here is an entry-level knife set with two useful palm gouges
He would also need honing compound to keep them sharp. He'd need to find a strip of leather to glue onto a nice flat board to apply the compound to. You can buy just plain leather all over the place, like here.
I don't know too many people that carve with balsa, never tried it myself either. Most carvers in North America though use basswood or tupelo.
The other friend just stopped talking to me a couple weeks later for reasons unknown. It was a big bummer.
A couple months later, ex-gf contacted me out of the blue to get lunch. I was super excited at the prospect, so I went. She told me she was sorry for not keeping in touch as promised. Her previous breakups were always terrible, but she realized I actually meant it when I said I wanted to remain friends. We kept in touch for a few years and saw each other on occasion. It was nice.
Moral: If someone needs space, do your best to give it to them. It could turn around.
4. [Surprised Crono](http://www.videogamesprites.net/ChronoTrigger/Party/Crono/Crono%20-%20Shocked%20(Front%29.gif), [Lucca casting a spell](http://www.videogamesprites.net/ChronoTrigger/Party/Lucca/Lucca%20-%20Right%20Arm%20(Front%29.gif), emo Setzer - for perlers, of course!
Thanks for the contest!
---
The fact that you are even thinking of doing something like this for people you've never met, especially when it will cost you money that you don't have, is amazing. Never let anyone tell you that you're anything less than great. You've got a good head on your shoulders, and you should be proud of that.
https://www.amazon.com/Walnut-Hollow-Versa-Temp-Temperature-Woodburning/dp/B005P1TRAS
Here this is a good one to start with it has temperature control which is great (its currently on sale so bonus). The kit i started with didn't and its been a hassle.
I have a process down that I love (since I'm not artistically gifted at drawing or writing pretty). I neither free hand, nor draw it.
I use an inkjet printer and print the image, phrase, etc. onto wax paper (but it has to be mirrored horizontally). The inkjet printing on wax paper will not allow the ink to dry. You can then press the paper onto the wood (do some careful measuring and marking to ensure that you get it where you want it). Make sure you do it once and do it right without moving it (otherwise the ink will smear). Then you basically have a printed version of whatever you want to burn on the wood piece all drawn out for you. You can then trace over the ink with a wood burner (see link below for cheapo kit I have used for this method which works great). This saves me from having to be skilled/artistic, and I also find that the ink burns into the wood and helps enhance the blackness of the burn marks.
​
I spent about $150 a couple years ago for a cheap cheap inkjet printer, a ream or two of wax paper, and the wood burning kit and I have gotten a ton of mileage out of it.
​
Link for transferring printed item to wood
https://www.theartofdoingstuff.com/print-on-wood/
​
Cheapo wood burning kit I use
https://www.amazon.com/Walnut-Hollow-Versa-Temp-Temperature-Woodburning/dp/B005P1TRAS/ref=sr_1_7?keywords=wood+burning+kit&qid=1569870300&s=gateway&sr=8-7
I used these to burn the lettering:
Definitely want to sand the finish off the handle first - makes the burning easier. Also need to go slow with it since the curve won't allow you to get the entire letter burned in at once. Kinda have to roll it up and down.
Did the whole thing (including hammer) for about $50
This is the burner I'm currently using, but it's pricy. I started Woodburn initially using this,to see if I'd like it, but the thread for the tips melted with extended use. I invested in the fancy professional one when I felt certain I was going to keep this hobby going, but the first one I bought really worked well for practice and testing out the hobby!
If heft is an issue, you can swap out uncut white dice for wooden cubes. I imagine you could apply the same process OP did - painting and mod-podging - and get results that feel more like a regular die.
They're cheap, too. You can get 50 blank white 16mm dice on Amazon for under $8, which works out to about sixteen cents a die.
These are the dice I bought, set comes with 50 and I have never used all of them in a single game. https://www.amazon.com/gp/product/B00BAKWKP2/
I ordered some Spanish Cedar pen blanks off Amazon, they are very nice.
https://www.amazon.com/dp/B00BYGL0F8
I use these. You might want to consider them as well. Inexpensive and don't take up too much room. And certainly don't smell like stale smoke :)
Take a look at Heroclix miniatures. The Heroclix game has fallen out of fashion so there are a lot of minis available for $1-2 US, which is pretty cheap. You want to search in the Hobbit and Lord of the Rings sections (in the
others" section), mostly - but you can get creative.
Then get yourself some little wooden craft discs, clip the Heroclix minis off at the feet using a wire snip, and glue them to the wooden discs. Congrats, you have a bunch of cheap minis now.
Get some wooden disc's from Amazon or a craft store.
https://www.amazon.com/dp/B01CSV14JE/ref=cm_sw_r_cp_apa_i_p-XVDbR27GSP7
Also get a circle punch of the same size: https://www.amazon.com/dp/B013NESBKK/ref=cm_sw_r_cp_apa_i_vaYVDbEGWXAV3
You can either print out artwork on cardstock or even use common pokemon cards to punch out the art.
Take a tiny bit of Elmer's glue, wood glue or some sticky tack, and glue the art to the wooden discs. Boom. High-quality tokens.
This is a trick used in the Roleplaying community to make tokens for their characters and NPCs without breaking the bank. ~15 dollar investment gets you like 100 tokens.
I reccomend between 1 inch and 1 1/2 inch for the size. Depends on your purposes.
Have fun!
How about wood carving?
I haven’t been carving for long myself, but I recommend investing in a Mora Woodcarving 120 knife. Good for small jobs and is a really handy knife in general. Plus you can take it camping for random carving fun.
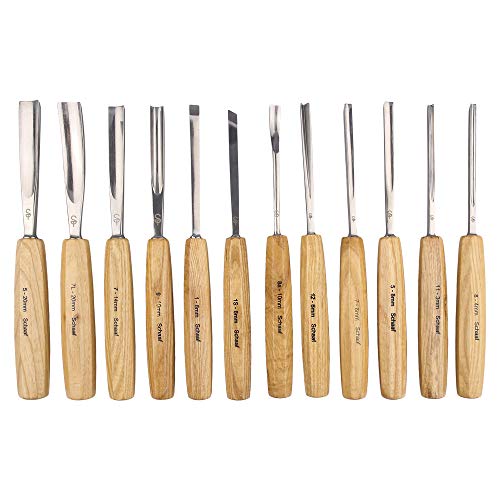
Next, maybe some cheap wood carving chisels. Link is here for a $15 set. They won’t be nearly as good as the expensive ones, but it’ll save you money if it’s something you want to just give woodcarving a go without a major investment. If you don’t like it, no biggie.
Worst thing I see with any hobby is people buying a bunch of expensive stuff they don’t end up using. The best thing i see is when hobbyists buy themselves a really good tool as a reward for sticking with it. Nothing makes you appreciate good equipment than making do with substandard stuff for a while :)
This piece was carved onto a bit of dry twig I found in the nearby park. I use old sun-bleached driftwood too, as it’s super soft. The best, and cheapest way to figure out the different properties of wood is to try out deadfall from local trees. That is until progressing to proper blocks of wood. I’m not there yet at all.
I’m sure some carving maestros will be able to make all sorts of better suggestions but this setup has worked for me so far.
Would love to see pics of any pieces you make, feel free to share!
Oh, and don’t forget: cut away from yourself. And keep a stack of bandaids handy ;)
I bought and used these tools. There are better tools out there, but these are okay to start with. The knives aren’t set perfectly inside the handles so I hammered wood wedges in the sides to keep the blade from wiggling in the handle. The wooden handles are made out of olive wood (I think) and they are a little bulky. I had to carve down a little of the handle myself to fit it in my hand. My biggest issue with this product is that the tool roll they come in is not waxed or waterproofed. So if you get the roll wet with the tools inside, they will rust.
It’s always good to start out with the inexpensive tools first before moving on to the pricier ones.
I still use these knives here.
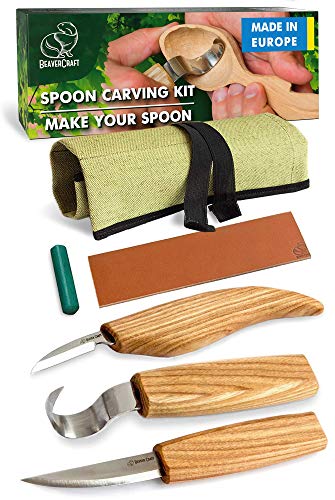
I would start off with Wood Carving Tools Set for Spoon Carving 3 Knives in Tools Roll Leather Strop and Polishing Compound Hook Sloyd Detail Knife (Right-Handed Spoon Carving Knives) https://www.amazon.com/dp/B0792BXHBD/ref=cm_sw_r_cp_api_i_l9wiDbTA50CPG
Oh, wow, that's beautiful. I've been looking at that one in my local store for a while.
Still on the little pen-type burner.
I really want to try my hands at woodburning! I have this tool on my crafts and hobbies wishlist. It can make some pretty cool stuff! LOOK AT THIS! I want! :D
/u/fatalis_vox duuuuuuuuuuuuude let's get creative in herre
https://www.amazon.com/Walnut-Hollow-Introduction-Intermediate-Woodburners/dp/B000VRTG8Y
This is the exact model, though we did get a small pack of various tips as well.
Wood is from Michael's. It's very cheap so get some and try it out!
I used a super basic tool by Walnut Hollow with the universal tip.
https://www.amazon.com/Walnut-Hollow-Introduction-Intermediate-Woodburners/dp/B000VRTG8Y/ref=sr_1_7?ie=UTF8&qid=1487731682&sr=8-7&keywords=wood+burning
I found this one on amazon for $12
https://www.amazon.com/dp/B000VRTG8Y/ref=cm_sw_r_other_apa_i_bggSDbNSYJDR7
One of those, beginner tool (sorry, dunno how to hyperlink).
I've got one of these and I like it a lot, but I recall paying only about $70 for it. Not sure why the price increased so dramatically over the last five years.
The delica is a pretty great option for whittling. It's a high carbon blade, so it holds up to wood fibers and hard use pretty well. It's got a solid lockup and zero blade play, so control and safety are taken care of. But honestly, it's a better EDC tool than a carving knife.
Another good option I'd throw out for you are high carbon mora blades.
You might also dig this. It's specially made for wood work.
I use something similar to this I picked up: https://www.amazon.com/Walnut-Hollow-Creative-Hobby-Tool/dp/B00170I1R6/ref=sr_1_7?s=arts-crafts&ie=UTF8&qid=1536210381&sr=1-7&keywords=hot+knife
It's a huge improvement once the blade heats, goes right through the paper and the foam.
Perhaps you are not scrolling to the bottom of the album images or maybe your browser is not showing it. Here is a picture of it on the album:
https://i.imgur.com/H9C2yrp_d.jpg
and an Amazon link:
https://www.amazon.com/Walnut-Hollow-Creative-Hobby-Tool/dp/B00170I1R6/ref=sr_1_2?ie=UTF8
Hope that clarifies it. Cheers!
This.
Walnut Hollow Deluxe Woodburning Kit by Walnut Hollow http://www.amazon.com/dp/B0019X78P2/ref=cm_sw_r_udp_awd_uvSttb1W8SKB6
Thanks! http://www.amazon.com/gp/product/B001T8IEO6/ref=oh_aui_detailpage_o01_s00?ie=UTF8&psc=1
I bought those after a trial run with a set of 12 for $12. I found that I really only use 1-2 of the gouges anyway. The steel in this set ($33 for 5) is much higher quality than the steel in the $15 range. Eventually I'll save up and get a much better set, but if I keep these sharp they'll last me awhile I think.
wood carving tool, would've been part of a set like this http://www.amazon.com/eBoot-12-Piece-Carving-Chisels-Assorted/dp/B01B7MQR60/r or
this http://www.amazon.com/Yasutomo-Linoleum-Cutting-Assorted-Steel/dp/B0027AGN6Q/
When I first started learning. I looked into what other printmakers first started using through their instagrams. A lot used the power grip set before moving on to a pfeil set. I still currently use them with my pfeil sets. They’re decent quality tools for a cheaper price.
Power grip carving tools
Thanks! I used maximum density fiber wood and these Power Grip tools: Power Grip Carving Tools, Seven Piece Set https://www.amazon.com/dp/B0037MI3K2/ref=cm_sw_r_cp_api_nvh7xbZ8J9V4G
Grab a nice starter knife. https://www.amazon.com/gp/product/B004GATX62/ref=oh_aui_detailpage_o05_s00?ie=UTF8&psc=1
That knife and a few blocks of basswood was enough to make me fall in love in carving. If you decide you like it and want to start carving more details into your works you can grab some chisels.
https://www.amazon.com/Power-Carving-Tools-Seven-Piece/dp/B0037MI3K2/ref=s9u_simh_gw_i4?_encoding=UTF8&fpl=fresh&pd_rd_i=B0037MI3K2&pd_rd_r=BGGJB52PAYA1T0HS96E0&pd_rd_w=rod12&pd_rd_wg=6RHP4&pf_rd_m=ATVPDKIKX0DER&pf_rd_s=&pf_rd_r=1P6DCGHZDPEYM542SBQ7&pf_rd_t=36701&pf_rd_p=781f4767-b4d4-466b-8c26-2639359664eb&pf_rd_i=desktop
I have full size bottles lined up on a shelf I have just for bath and body products. For samples, I get small unfinished wooden boxes (something like this) and decorate them.
...To be honest, I didn't need a storage solution as much as I needed an excuse to buy little boxes to paint. It's so much fun.
I'm a beginner who probably has more money than skill, but I would absolutely recommend a Flexcut set. This would be a great choice on a budget.
Most important thing is to make sure you keep the tools as sharp as possible. Flexcut makes a "variable" strop that works on a bunch of different tools and comes with polishing compound.
If you only want to buy a knife, Mora is a great alternative to Flexcut. A knife similar to the KN12 should be roughly the same cost-wise. You can make your own strop out of an old leather belt glued to some wood, so just do some research online for more info and then all you need to buy is some polishing compound.
Flexcut makes good carving tools at reasonable prices. This is a great starter set, IMHO.
Flexcut Beginner Palm & Knife Set, All-Purpose Cutting Knife and Detail Knife Included, with 2 Palm Tools (KN600) https://www.amazon.com/dp/B005EG033Y/ref=cm_sw_r_cp_apa_i_XORFDb8F3QMA6
$60 on Amazon . 2 knives and 2 gouges. they come sharp and are pretty easy to keep sharp (I bought that brand's slipstrop for sharpening).
Which would be easier to start with? I see the benefit of both. Do you have a rotary tool that you would recommend? I've browsed around and was thinking about the Dremel 4000 here but part of me wants to go the hand route....I can do that inside my house without pissing anyone off as much with a rotary. Any recommendations on knives and micros? What about there and here. I'd like to stay under or around $100.00 on my first go of tools. Thanks again
Heya! Thanks for stopping by.
It can be a bit tricky, depending on what materials and tools he has already.
If he wants more whittling-style knives, Amazon is also a place for this.
If he's the outdoorsy type, then any nice range pocket knife will work (as long as it looks / feels comfortable to hold!). The spirit of Whittling is in the doing, not so much in the materials used.
Other accessories that could go well could be safety gloves (no one wants to cut themselves !), A place for him to store wood, or even a bench perhaps.
Really, it's up to what he already has and his wants. Hope this helps!
This was the set I bought. If you have a Woodcraft near you, that's also a great place to start for buying individual tools and accessories.
Outside of the blades, I'd suggest a thumb guard, slipstrop (or back of an old leather belt), and sharpening compound.
Well, if you are looking for a wide variety of tools: i started with these
Though to start you would probably do fine with just a knife
or if you want to spend a little more you can't go wrong with drake
It's tough to recommend a knife as a starting point though. Obviously I don't want to say "You need to go out and spend a bunch of money, or you'll regret it" Because the truth is you would probably be fine with the knife sets you were looking at before.
I would say 1 good quality knife is better than 5 poor quality knives though. I have no personal experience with the sets you were looking at, but I have seen a few random posts where people have expressed that the sets they found at hobby lobby didn't hold their edges very well, which can be a frustrating experience.
At the same time, spending 10 dollars on a set of knives, might be all you need to decide if you are into the hobby or not and want to spend more money on it. It's tough. I would however go into that situation knowing that if you spend 10 dollars on a set of 5 knives, odds are good in a short amount of time if you decide you are into the hobby, you will feel their lack and want better knives.
Honestly... no. This handgun is as basic as it gets- you'll be able to strip it in 30 seconds. Just buy a bunch of ammo and get rolling. If you're into DIY projects, go ahead and get an [extra grip module] (http://www.selwayarmory.com/shop-by-category/firearms-parts/sig-sauer-parts-and-tools/sig-sauer-p250p320-grip-modules.html) and a wood burning kit. That way you can work on stippling. Practice on a PMAG or something first! You can look into the Apex flat trigger (link in my big comment) as well.
My husband uses rolls of this: http://www.dickblick.com/products/grafix-wrap-dura-lar-rolls/
I forgot to mention that he uses a burning tool with a fine tip to 'cut' the stencil. Like this one
I used this one:
http://www.amazon.com/Walnut-Hollow-Versa-Temp-Temperature-Woodburning/dp/B005P1TRAS?ie=UTF8&psc=1&redirect=true&ref_=oh_aui_detailpage_o02_s00
It worked well for my first project but I will likely be investing in a better tool for future projects.
I use this, and like it quite a bit. Walnut Hollow Creative Versa Tool with Versa-Temp Variable Temperature Control & 11 Woodburning Points (Tips) https://www.amazon.com/dp/B005P1TRAS/ref=cm_sw_r_cp_tai_vm11BbXHK4WMT
Thanks! I got this one off Amazon.
https://www.amazon.com/dp/B005P1TRAS/ref=cm_sw_r_cp_apap_pIoTAxt7fU2iu
What about some cool paint by numbers? Like a cool cow or maybe a neat tree.
I've recently attempted to take up wood burning and fried a couple of wooden spoons, may take some time to actually get the hang of it..or that could just be me....
wood burning
You use a special tool that's basically a soldering iron with special tips. I currently use one of these. The red comes from stain applied after the burning. And thanks :)
This is the exact burner that I use: https://www.amazon.com/Walnut-Hollow-Versa-Temp-Temperature-Woodburning/dp/B005P1TRAS
I just bought mine at a crafts store in the city I live in. However, pretty much all burners are the same, so you can definitely buy a cheaper one and it will probably work just fine. I used to have one that I got for $15, but I upgraded to this one for the temperature control abilities.
This is what I'll be getting. Similar to my old one.
Walnut Hollow Creative Versa Tool with Versa-Temp Temperature Control https://www.amazon.com/dp/B005P1TRAS/ref=cm_sw_r_awd_P5Ufvb1271FZZ
https://www.amazon.com/dp/B005P1TRAS/ref=cm_sw_r_awd_P5Ufvb1271FZZ
I used one of these.
I burn the designs in by hand using an inexpensive wood burner, then stain, seal, and line the bottom with felt.
This is the foam I used. 1 sheet is enough to do both those drawers fully without having to mess with piecing offcuts together. I know, it's pretty expensive for what it is, but once you get used to it there's no going back. It's like power windows or having the ice dispenser in the fridge door.
Optional but highly recommended is cutting the foam with a hot knife. I bought this one and it's decent.
The foam I used has a weird silicone- or wax-impregnated backing so no marker or pencil or pen I tried would write on it usefully, so I had to make all my marks on the backing with shallow exacto cuts, then cut through with the hot knife. It's important to remember that since you lay out the marks on the backing that everything will be mirrored left-to-right from the finished product. I took pictures so I'd be sure everything would be where I wanted it when I flipped back over.
You can get them pretty cheap. This is a pretty decent starter one with temperature control.
https://www.amazon.com/gp/product/B005P1TRAS/
$10 for 50 blank dice, draw on them with Sharpie or wet-erase?
Nakimo 16MM Blank White Dice for Board Games, DIY, Fun, and Teaching, Pack of 50 https://www.amazon.com/dp/B00BAKWKP2/ref=cm_sw_r_cp_api_i_RLMXCb45Q39TJ
You'll want to get any plastic smell out if there is one. Mine was fine so I didn't bother, but most people say you need to do something to clean it out. I'm going to make a post that gives a full run down of my setup soon, but until then I'll tell you what I use. These trays are perfect. Don't get the small ones, only the medium and large ones. Each shelf in the 281 cooler will hold either 1 large tray or 2 medium trays. On the bottom of each tray I have a piece of Spanish cedar that comes out of cigar boxes. I stopped by my B&M and he let me take a handful that he had laying around. I also have some of these Spanish cedar pen blanks in random spots in some trays. Here is a pic of both tray sizes, with one of the cedar blanks in the middle on the left. Here is a large tray on the metal shelf.Here are 2 medium trays on a metal shelf. Here is a frontal pic of my setup. The top 3 shelves each have 2 medium trays, the bottom 3 shelves each have 1 large tray, and another large tray sitting flush on the bottom. Here is a pic of another configuration I was using before when I kept some boxes in the bottom area. Then I have 2 of these hygrometers using their magnetic discs to sit on the front of the metal shelves. I have 2 computer fans and a timer coming tomorrow that I am going to setup in the bottom shelf to aid in circulation. What's great is that the trays have slots in them already so airflow is great in all areas of the wineador, and you can configure the trays any way you want. I am completely happy with the whole thing, you will be too. And what's great is you can upgrade the setup by getting the really nice custom made drawers in the future, as cash permits. I plan on doing that later this year most likely. It's nice to have a setup that is fully functional, holds a ton of cigars, and can be upgraded over time. Win-win!
https://www.amazon.com/Axe-Sickle-100-pcs-unfinished-limitations/dp/B01CSV14JE/ref=sr_1_3?ie=UTF8&qid=1503692960&sr=8-3&keywords=wood+discs bought mine here
One of the better purchases I've made was round wooden tokens. I've bought two sizes, 1.5" and 1". These get used all the time for monster tokens, NPC tokens, to mark important map items, etc. Whatever we want to write on them. I also made a bunch of spell tokens so my younger players could track their spell usage easier. This has been a huge improvement.
I'm not sure if it's the same knife set your talking about, but this set came up once and whoever bought it said it was junk. I'd always be leary if the exact same knife set was pictures under different brand names like this one is.
If you're on Facebook, join some carving groups and lurk. The ones that come up most frequently in the group I'm in are Mora or Morakniv, Opinel, and several smaller knife makers. There are others, but Moras always come up.
What are you interested in carving specifically?
E: Check out spoon carving, Greenwood working and sloyd on Facebook. Lots of equipment talk, projects, and inspiration. A lot of the members are in Europe/Eurasia and they are extremely gifted people.
это basswood (я так понимаю липа).
это фактически моя первая "серьезная" работа по дереву (легко убедиться, нагуглив "резьба по дереву домовой" и сравнив:) ), так что я наверняка что-то делала неоптимально. много времени ушло чтобы срезать лишние куски с бруса и получить примерные очертания, т.к. срезаешь ножичком по чуть-чуть. А сама резьба и детализация заняли ну часов 6 может. Сверху лак.
​
из инструментов у меня обычный набор для начинающих, вот такой. Хотя реально там 3-4 разных ножа использовалось.
I use a cheap ass one off Amazon that's going strong after a bunch of builds. Unless it's somehow crappier than that, I wouldn't worry about it.
I would suggest getting a switch puller if you don't have one. Often listed as an 'IC puller', it still works and it should be real cheap. There are clips at the top/bottom of the switch that hold it into the plate, a puller can release those and help pull the switch out. It makes life a lot easier.
Often I'll just heat up the legs of the switch (both at once, if you have a big enough chisel tip) and gently wiggle it out with the puller, rather than trying to use one of those crappy solder suckers to clear it all out beforehand.
Depends on the size of the masks you want to carve. If they're full sized, you might want to look into full size gouges like these. If you plan on carving smaller, the Flexcut palm gouges. This set is a great beginners set.
Thanks! The two things I tried to improve for #2 were handle and bowl width. The first spoon was very unbalanced (the bowl was too heavy) and I was afraid the handle would snap with just a little torque.
I started the first handle by cutting the very end down to what I thought would be the proper width, and then I started working my way up the handle, trying to match that width. But as I tried evening out each section, the whole thing kept getting thinner and thinner, until it became way thinner than I had originally planned. So with the second handle, I basically worked my way up and down the length of the handle as I went (taking off an 1/8 inch or so at a time). I left it thicker intentionally until the "end" of the project, so that any evening out I did wouldn't cause it to become too thin again.
For the bowl, I just cut closer to the edge on the second try. As u/Ddosvulcan suggested, I tried pushing the limits to see how thin I could get it.
For tools, I got this knife set on Amazon and these wood blocks. I did not have gloves for the first spoon. I picked up a pair of those and really like them (link here). I also sanded and oiled the second one, and that made a big difference aesthetically.
Edit: I almost forgot, this video helped a lot with learning the basic cuts!
This is what I started with and still use. https://www.amazon.com/gp/product/B0792BXHBD/ref=ppx_yo_dt_b_asin_title_o09_s00?ie=UTF8&psc=1
Okay I bought everything needed except woodburner. Do you think this would get the job done? https://www.amazon.com/Walnut-Hollow-Introduction-Intermediate-Woodburners/dp/B000VRTG8Y/ref=lp_262717011_1_3?s=arts-crafts&ie=UTF8&qid=1524884937&sr=1-3
Any chance you could show me what your printed out and how you stenciled? Yeah I am copying you completely.
I'm only experienced with a basic kit, which has a few different tips. Basically, I use 3, a fine point, medium point and a thicker point to fill.
Something like this should work for what you described....
Walnut Hollow Creative Woodburner Introduction Value Pen for Beginners and Intermediate Woodburners https://www.amazon.com/dp/B000VRTG8Y/ref=cm_sw_r_cp_apa_i_tJZkDb8K213ZE
It's basically wood burning. You take a sanded piece of wood and then start drawing (burning) with this tool as if you would with paint. Takes some skill, yes, but the most basic of patterns are very easy to do. Then just apply varnish and let it dry.
I found my pocket bellows to be a perfect tool for directing air flow for burning. I took to this pretty quickly, though I did find it may be easy to burn completely through the piece if you're not careful. I thinned out the bowl of the spoon much quicker than I anticipated.
The rough shaping of the spoon was done entirely with my GB SFA. I then burned the bowl and finished the spoon with my new carving knife.
It turned out crude but pretty, and maybe slightly too big to eat with. A good coffee scoop!
Carving tools to make spoons? Or general whittling. Something like this.
Oh! Exciting! I love surprises so I'll let you choose if I win :D
Perhaps The Old Apartment needs some [Olive Oil?] (http://www.amazon.com/Mission-Space-Sampler-Astronaut-Sticks/dp/B000JUK4OS/ref=wl_it_dp_o_pC_nS_nC?ie=UTF8&colid=2WLDOOM1NJVDW&coliid=I25VM88QKQ07XJ) Hot Knife? or maybe just some Astronaut Ice Cream!
Thanks for the raffle!
Item which would most make you seem like an old posh Englishman from the Office Space list
Most "oh god, I would never be seen with this in public" looking item from Health @ Home list
Most phallic looking item from default Wish List
Most geeky item from default Wish List
Item which would most help you achieve a goal from Dream List!
Best item to bring to a deserted island from Beach! list
Thanks for the contest, guys!!
Maybe a nice wood burning kit?
Example: https://www.amazon.com/dp/B0019X78P2/ref=cm_sw_r_cp_awdb_t1_vam2Ab4TXJC3E
Yeah, those kits are usually pretty cheap too. Way nicer to look at than sharpie, if you've got the time to work on it.
This one on Amazon is under 25 bucks.
This is how I got started! Bought this book at a Radio Shack when I was just a wee one. Soldered my first project with a wood burning iron.
I would like to say that I'm now a millionaire because of that book, but after two BS's I just engineer part time at a start-up.
Thanks for the nostalgia.
Leather pyrography is quite easy and fun, actually. Buy a woodburning kit and do it yourself.
If your lino tools are getting worn out and/or you just want to upgrade, these are excellent and well-priced carving tools. I use them for woodblock carving.
Sounds like dull and or low-quality cutting tools. A sharp tool is a safe tool.
It really shouldn't require much force even with traditional "hard" linoleum. They also make various grades of much softer lino blocks.
One of my best upgrades when doing lino was ditching those cheap big box store Speedball cutting tools. Those things aren't even properly beveled to begin with and they dull super quick. I picked up this affordable set which isn't even like "pro-grade" or anything but good lord those things came literally shaving sharp, hold an edge quite well, and, because they were properly ground from the factory, they're pretty easy to sharpen when dull. The comparison of just that simple upgrade is like carving with a hot knife in butter compared to my Speedball which was like trying to carve wood with a screwdriver.
I started with this then got one of these for removing larger chunks.
*note the irwin one comes with a factory edge meaning it will need to be sharpened...so you'll need one of these and this to get that baby super sharp. then run it over the flat part of this and you'll be in like Flynn.
Also the flexcut slip strop if used every 20 minutes of carving (with any tool) will keep the edges super sharp for longer, meaning you dont have to go to the harsh stone right away. Also, note, when using the stone, to soak for at least 20 minutes before using. There are plenty of great youtube videos out there teaching proper sharpening technique for all sorts of tools with Water stones.
I'd also suggest a wooden mallet and a larger heavier one, or I just use a rubber mallet. Also while you're at it, grab a coping saw to remove large areas of unwanted wood. Make sure you have a vice to hold your wood or some sort of block device.
I'm still waiting on my carving knives from Here. They have a back order of 6-8 weeks! I got a straight (sloyd) knife and a hook knife for spoon carving and such.
So far that's where I'm at. Hope that helps.
I just bought these (arrive today so no report, free shipping through 11/9) trying to upgrade/add on to this which was great to start (super sharp on arrival) with but lacks a bigger gouge.
Does this look like a good start?
He already has a knife but this looks to cover some of his other needs.
My mom has passed, rest her soul, but she was the best mom ever. I nominate myself. I am a mom of 5 wonderful kiddos and have one on the way. They are my life and I don't know what I would do without them. I would love this because I want to try a new Hobby.
Thanks for the contest!
Would this be better since there are more knives?
Yasutomo Wood and Linoleum Cutting Set, Assorted Size, Steel, Set of 12 https://www.amazon.com/dp/B0027AGN6Q/ref=cm_sw_r_cp_apa_2p2wybDH7F3QC
I just want to say how awesome your contest is and thank you for holding it. :)
I'm an interesting and beautiful person, but only because I just got all the supplies I need to finally get back into wood working. NOW, I just need some inspiration to get me motivated again.
Also, because a wood worker can always use more of these or even something like this, both of which I have not had the money/couldn't justify buying for myself just yet.
My other hobbies include voiceover type stuff which you can hear some of my recordings here and I am also a gamer, so you can find me on Steam if you are a gamer as well and are looking for someone to game with... Just nothing to graphic intensive because my computer can not handle some of that stuff unless I get a better graphics card like this one... Either way though, hit me up, listen to my recordings if you want and hell, leave me a request for a recording or give me inspiration to make something with the wood and tools I have! lol!
Hope you have a fantastic day and best of luck to all the other people entering this contest! :D
Get yourself a block of basswood. While it does not have the best grain, it is an excellent and easily carve-able wood--probably the most highly recommended for beginners due to the ease to work with for carving. I've actually seen basswood for sale at the wood working section at Micheal's.
Pick up maybe a beginners handbook with some guides if you want some patterns such as this
Finally, you'll need yourself some tools. There are expensive tools, and not-so-expensive tools. Honestly, I'd go with the inexpensive just to try it out.. if you find yourself more interested invest in something better. This is a really cheap set and will give you everything you need Amazon Link Here
The set your adding too looks like a decent set. It was a set I was looking at but didn't know. What would you say are Pros and Cons of it? and for $7 more would it be worth getting this https://www.amazon.com/Power-Carving-Tools-Seven-Piece/dp/B0037MI3K2/ref=pd_sbs_201_1?_encoding=UTF8&pd_rd_i=B0037MI3K2&pd_rd_r=7PXYZRZ9W80HH1X5P4VQ&pd_rd_w=lS1cE&pd_rd_wg=77k5Z&psc=1&refRID=7PXYZRZ9W80HH1X5P4VQ. same brand, just 2 extra tools.
Amazon actually has wooden boxes for sale that may be appropriate for your purposes. Good luck!
The knife set
The wood
The strop
Okay, thanks. Would this be a good starter set you think? Then if I enjoy it enough and get some more cash pick up some of the north forge ones eventually.
Yeah, it is. I bought it based on a recommendation. Luckily I had cut resistant gloves so I could get a grip on part of the blade and get more accurate cuts. But if you look at my first project, they didn't really require and details. It was just getting the feel of working with the wood.
Here is what I purchased. I prefer the fixed blades as opposed to the ones where you can switch them out. I haven't had a single issue with the knife quality. Both of the gouges work well for me. One is a 70 degree cut and the other is curved.
I've got this one
Great job! I do this as well but I only trace stuff I find online or create on my own. What tools do you use?
I own this:
https://www.amazon.com/Walnut-Hollow-Versa-Temp-Temperature-Woodburning/dp/B005P1TRAS/ref=sr_1_2?ie=UTF8&qid=1469129344&sr=8-2&keywords=wood+burning+kit
In my experience, I find basswood the easiest to work on. I am still very new to this so any advice/links would be greatly appreciated. I have done approximately 6-7 pieces.
I'm assuming you're using one of the cheaper green pens with the three tips. There's another, more robust hobby pen from the same company that comes with a circle-shaped tip to it, that's about the size you're asking. The burns won't be crazy fast, but if you do it right they'll come out as nice black polka dots.
This is the pen I'm talking about
If that doesn't work for you, you should look into getting a more expensive setup or a blowtorch that you can heat that circular tip with more quickly.
I'm a big fan of Pyrography or Wood Burning Art and the amazing art it makes. You should look some up if you have the time. If not just comment and I'll post some links of some cool stuff. You need this puppy to put the art onto the wood. I find the entire process very relaxing. Hope you may considering venturing into this awesome art form.
Oh and...... Stillneverwrong is so groovy
Thank you! I definitely think you should give it a shot. From what I see so far on this subreddit, I use a different tool than most. https://www.amazon.com/Walnut-Hollow-Versa-Temp-Temperature-Woodburning/dp/B005P1TRAS/ref=sr_1_3?ie=UTF8&qid=1466045184&sr=8-3&keywords=wood+burning , but I really like it.
I'd say that I'm somewhat artistically inclined, but in that I like to be creative. I wouldn't say I can freehand well, aside from stick figures. I use carbon paper to help me transfer images.
The tricky part is more in your steady hand and eye for shading than in your artistic ability, I think! I mainly use three tips: one that looks like a pencil, one that's a tinier pencil tip, and one that looks like a leaf (I use that one for the shading and the others for outlining). That's it!
I've been doing this for maybe a year now, and still learning techniques. Give it a shot!
Glad you figured something out, there are these as well:
https://www.amazon.com/dp/B005P1TRAS/ref=cm_sw_r_sms_awd_rnXfxb9BQNTF9
https://www.amazon.com/dp/B00MJW08JK/ref=cm_sw_r_sms_awd_4nXfxbPS230AX
Walnut Hollow Creative Versa Tool... https://www.amazon.com/dp/B005P1TRAS?ref=ppx_pop_mob_ap_share
Actually this one looks like the kit I have -- http://www.amazon.com/Walnut-Hollow-Creative-Versa-Temp-Temperature/dp/B005P1TRAS/ref=sr_1_1?ie=UTF8&qid=1413925846&sr=8-1&keywords=leather+burning+kit
...and it's a bit cheaper, anyway. And I completely know what you mean about tooling and neighbors! That was a problem until I finally got out of an apartment....
No problem!!!
Capital letters:
Walnut Hollow Hotstamps Uppercase Alphabet Branding and Personalization Set for Wood and other Surfaces https://www.amazon.com/dp/B0019N4VSO/ref=cm_sw_r_cp_apip_qZ3nYNo4V4dhs
Lower case letters:
Walnut Hollow Mini Hot Stamps Lowercase Alphabet Branding & Personalization Set for Wood, Leather & Other Surfaces https://www.amazon.com/dp/B01KTBQU3A/ref=cm_sw_r_cp_apip_kDRK8wBD2b4RL
Wood burner:
Walnut Hollow Creative Versa Tool with Versa-Temp Variable Temperature Control and 11 Woodburning Points https://www.amazon.com/dp/B005P1TRAS/ref=cm_sw_r_cp_apip_l5txnwxGFubDB
A pretty ok wood burner is about $28 on Amazon
Here’s the one we have
I've been using a woodburning tool which is an adjustable temp soldering iron type of deal with multiple nozzle attachments when I want to heat smooth any PLA, works great if a little awkward to hold due to the heat shield. I mostly use it for the exacto blade attachment since it slices PLA like the proverbial hot knife through butter and couldn't be happier with that aspect of it and would be kind of lost without it.
​
I picked mine up at a Michael's in the wood crafting section, if you're in the US go there or amazon something like this https://www.amazon.com/Walnut-Hollow-Versa-Temp-Temperature-Woodburning/dp/B005P1TRAS/ref=sr_1_2_sspa?keywords=wood+burning+tool&qid=1559074816&s=gateway&sr=8-2-spell-spons&psc=1 as I think that's my exact model.
​
I also do heat welding/smoothing with a 3Doodler 3dpen with the nozzle removed and a pin vise drill bit embedded in the hot end to conduct heat to a fine pointy tip for super fine detail. About the only use I have for that 3d pen since it's incompatible with my typical filament diameter and I won't buy their proprietary overpriced filament on principle lol. But the little attachement modification I made to it is too useful to return the device so I keep it.
​
This isn't a perfect solution, neither of these are and are going going to be useful in certain circumstances but you can royally mess up your prints with heat smoothing, especially when you're not mindful and the heat shield melts off a giant chunk of your piece. Not to mention toasting the hell out of your fingers from time to time. Anyway it's useful but not a magic bullet. Best way I've got to smooth prints is using filler primer, filling compound and sanding and I stick to the heat tools for cutting and welding these days, but I did try for awhile to perfect this, just not ideal for my needs. Useful tool to have though for this hobby, like I said couldn't do without the exacto attachment it's worth it just for that!
alright just getting an idea of what you used, I was using soldering iron first then got
https://www.amazon.com/Walnut-Hollow-Versa-Temp-Temperature-Woodburning/dp/B005P1TRAS/ref=pd_lpo_21_bs_t_2?_encoding=UTF8&psc=1&refRID=GRGCG1F455C6GW8D7XXJ
and my stippling went from what you got there to PRO looking overnight the variable temp is the way to go. I also did alot of prep maybe too much but i used just sandpaper (120>300>600) grits to get it super smooth, then stipped with a fine or med point. Not telling you that it looks like crap I just want you to know that the wood burner can take it alot farther than the iron ever will without any more practice involved.
Link to Heat Gun: https://www.amazon.com/dp/B005P1TRAS/ref=cm_sw_r_cp_tai_BAHLybZMSVPMZ
Build list:
Zev Dragonfly Slide
Trijicon RMR 06 Type 2
Zev Glock 19 Dimpled Bronze Match Barrel
AmeriGlo GL-429 Suppressor Sights
TTI Spring Kit
SSVi Tyr Trigger
Glock OEM Minus Connector
​
Tools used:
Wood Burner
Dremel Micro Max 8050
Dremel Bit 108 Engraving Cutter
Dremel Polishing Kit
Sand Paper Assortment
Flitz Polish
You could always make shadowed socket holders out of Kaizen foam and place the sockets exactly where you want them. You can use a hot knife, long thin razor knife and/or a hole saw kit to make cut-outs for your sockets.
A wood burning kit like THIS works great on the foam for making finger grip holes and for cleaning up the bottoms of shadowed spots that are less than the thickness of the foam.
FastCap's long nose permanent markers are great for marking out the patterns of your sockets or other tools for you to cut on.
​
Just my two cents.
This is the pen that I used to make this. I taught myself by just messing around on a blank piece of wood and it wasn't too difficult, but I'm sure you could find some good videos on YouTube if you just search "Pyrography".
I use this dial controlled “pyro pen” or wood burning tool for various cleanup tasks, especially removing supports from small bits on figures. The included “x-acto” blade works great. This specific model will dial down pretty low though I’ve never actually measured the temperature.
Walnut Hollow Creative Versa Tool with Versa-Temp Variable Temperature Control & 11 Woodburning Points (Tips) https://www.amazon.com/dp/B005P1TRAS/ref=cm_sw_r_cp_tai_7SkWCbW11FD6E
I bought a 25 dollar wood burning kit off Amazon. Here is the one I used. I really liked it because it had its own temperature control, and a whole lot of different tips you could use to make patterns or thin lines.
I have been using this model https://www.amazon.com/Walnut-Hollow-Versa-Temp-Temperature-Woodburning/dp/B005P1TRAS
> My grandfather was an amazing woodworker, and my skills are limited, but years ago before he died, we worked on a few pieces and I really took to the woodburning. For my birthday that year he bought me a little woodburning kit (cost about $20). About 9 months ago my wife told me to clean out the shed and I found it and thought, "why not." I've been hooked ever since.
It only takes about $20 to get started (http://www.amazon.com/Walnut-Hollow-Creative-Versa-Temp-Temperature/dp/B005P1TRAS/ref=sr_1_1?ie=UTF8&qid=1451521659&sr=8-1&keywords=woodburner)
I picked up the Creative Versa-Tool kit for $29.99 at a local store. It's currently $26.31 at amazon.
Thanks! One thing that I realized while doing this project is that it will require you to a) learn how to draw, or b) find some creative way to sketch a pattern onto the wood for you to trace. I ended up free hand sketching the design on a piece of paper (while looking at a wiki image), overlaying it onto the wood, taking a pocket-knife and poking holes through the paper/onto the wood at the corners of the shapes, playing connect the dots with the resulting holes, and then traced over with the wood burner. However, I'm pretty sure there are easier methods, this is just what was in hands reach.
If you ever get the urge to refinish it, the beeswax can be removed fairly easily, and a good wood burner can be bought pretty cheap.
If it were me, I'd spend $20 or so on a small U-Gouge and use it to cut out the lines you scored originally. Because that gouge is 1.5mm, you should also be able to straighten up any slightly-crooked lines by choosing a good starting point for your cut. Since it's a log, I would use a small paintbrush to brush hot water onto each line a minute or so before you start your cut to soften it a bit. With the gouge I mentioned you shouldn't have to re-sharpen, but you'd need to strop it frequently during the process.
After cutting the lines, use the chisel tip (or a round tip 1mm or smaller) of the wood burner to re-trace the lines to get that nice, dark look to them. The kit also comes with a big, blunt, round tip that is perfect for re-making the dots once you've finished with the lines.
That would hold up better and wouldn't fade in the sun. Of course, that all assumes the wood itself is still in good condition, which it might not be.
Anyway, it's a pretty easy and cheap weekend project you could do to restore that awesome board to have a nice look and playable quality. Wish I had some stumps around here....
Thank you, just a regular wood burning kit. My wife free-handed it with a pencil first and then traced her lines.
Blank dice and stickers. You're going to change things.
Here's 50 blank dice for nine bucks:
https://www.amazon.com/Nakimo-Blank-White-Board-Teaching/dp/B00BAKWKP2
Here's a thousand half-inch round stickers you can print on for six bucks:
https://www.amazon.com/Round-Circle-Labels-White-Printer/dp/B0731Q24NT/
​
Fifteen bucks and you've got perfect tools for prototyping. Bonus: use colored pencils and you can revise as you playtest.
Grab these from Amazon: http://www.amazon.com/gp/product/B00BAKWKP2/ref=pd_lpo_sbs_dp_ss_1?pf_rd_p=1944687462&pf_rd_s=lpo-top-stripe-1&pf_rd_t=201&pf_rd_i=B00BNWGVDO&pf_rd_m=ATVPDKIKX0DER&pf_rd_r=0Q89N3CHZG0FFRZSZCRA
Then print your custom images on something like this:
http://www.amazon.com/Avery-Sticker-Paper-Inches-53202/dp/B000XALDGM/ref=sr_1_4?s=office-products&ie=UTF8&qid=1463150290&sr=1-4&keywords=sticker+printer+paper
And you can make your own custom dice to your hearts content.
So, I was in the same boat not long ago.I only had a small assortment of cigars and threw a boveda in a tupperdore. My readings were all over the place and I was distraught.
First things first. Calibrate your Hygrometer, MAKE SURE it is where it should be. Give this a try
Also, Get some cedar in there. Cedar is great at many things including soaking up some of that humidity and helping keep a nice steady environment. There is a reason real humidors are made of it. I used a couple of these blanks from Amazon
Now, After all this is done, GIVE IT TIME! It will take at least a week or so to settle down to a normal RH. Don't panic and just trust in the Boveda pack.
I didn't have a good printer so I actually ordered it online to be printed on color photo paper. I also ordered these:
https://www.amazon.com/Package-Round-Disc-Unfinished-Cutouts/dp/B00CA1Y878
I used a glue stick and scissors to put these on the discs. Though cutting circles with scissors takes a while so if you want, order a 1 inch hole puncher.
Guess you can ask your players to send you pics of what they want to look like and resize the image into these circles, I have not done this but photoshop should make this easy.
I use these, and print off pictures of goblins/orcs/whatever and paste them on. Its cheap and easy!
I use a wooden disc like this for monster tokens and put letters on them so I can easily remember them in the fights. Not as much heft as a metal washer but works the same way and you can glue pictures to them for custom PCs/NPCs.
VELCRO Brand - Sticky Back - 5/8" Coins, 75 Sets - Clear https://www.amazon.com/dp/B001ASD850/ref=cm_sw_r_cp_apap_k8TPBquZeKOKP
Axe Sickle 1 inches (50-pcs / 100-pcs / 200-pcs) Natural Schima superba unfinished round wood,These round wood coins The limitations are endless!(50-p https://www.amazon.com/dp/B01CSV14JE/ref=cm_sw_r_cp_apap_YA9H1Csn8ANJA
I used these and they work well but the other posted Amazon link looks a few dollars cheaper.
https://www.amazon.com/Gimars-Carbon-Steel-Carving-Tools/dp/B01FGZIVD6/ref=zg_bs_8090896011_1?_encoding=UTF8&psc=1&refRID=WM76TCS0NX15BPYE7770
Ideally you need something like this: http://www.essdee.co/products.aspx?cat=sets
But ordinary knife or "wood carving kit" like this: https://www.amazon.com/Gimars-12-Set-SK5-Vegetables/dp/B01FGZIVD6/ref=zg_bs_8090896011_1?_encoding=UTF8&psc=1&refRID=NMAH7T3D173073ENXREP would be ok.
Some tools will need sharpening, but most of what I've used, even cheap ones, were "make one wrong move and cut your finger" sharp from the box.
"for rubber, small pumpkin, Soap, Vegetables and more "
In order of purchase, here's where I started:
BeaverCraft Carving knife
Strop
Detail knives
Flexcut Cutting knife
Flexcut Detail knife
Mora 106 carving knife (upgrade from the beavercraft)
I started in November last year after getting some wood carving gifts for my birthday. I had never even attempted it before, but I've now found a life long passion hobby. Below are the links to all of the things I was given for my birthday. It's not fancy at all, but it's also enough of a good investment that you can tell if carving is for you without breaking the bank. In all it's around $30. Also, https://bit.ly/2JPID0Z. This article has information on understanding wood grain, something that is insanely important to making the right cuts. The important thing I've found is when you are making your cut, make them small and shallow. Even if you're looking to remove a lot of wood. You will end up digging in too deep and ripping an irrecoverable chunk out of your block if you're too heavy handed with it. Just go with the flow and take your time. But, most important of all...post everything you make here. This community is so friendly, honest and helpful you only stand to improve by sharing your progress!
https://amzn.to/2JS2DjC - Wood Carving tools
https://amzn.to/2qAG364 - Basswood mixed size bag
https://amzn.to/2H7TPYY - 20 minute Whittling Projects book.
P.S Good luck if you do take it up! Go create!
Ahh I see! I'll probably get some switches then! I'm also glad to hear that not all the switches need to be removed.
While I never desoldered or soldered anything in a few years, I like your way and hope that there'll be nothing in the way between the legs. When you say clean up the solder, you mean with a wick? Also, what do you think of this soldering kit?
https://www.amazon.ca/Kuman-Adjustable-Temperature-Desoldering-Anti-static/dp/B01KTICO2E/ref=pd_cp_469_4?_encoding=UTF8&psc=1&refRID=DMAA9A8RW5SQPFHQGVST
Thanks so much for all of your help! :)
Notes and links for self:
Soldering Iron Stand: https://www.amazon.com/s/ref=nb_sb_noss_2?url=search-alias%3Daps&field-keywords=soldering+iron+stand
Kit with cleaning wire: https://www.amazon.com/dp/B01KTICO2E/ref=cm_sw_r_cp_api_RzV.ybM81XSFD?th=1
Kit w/o cleaning wire: https://www.amazon.com/Tabiger-Soldering-110V-Adjustable-Temperature-Welding/dp/B01H1IFT54/ref=redir_mobile_desktop?_encoding=UTF8&dpID=51YRK651M%2BL&dpPl=1&keywords=soldering%20iron&pi=AC_SX236_SY340_FMwebp_QL65&qid=1493103880&ref=plSrch&ref_=mp_s_a_1_3&sr=8-3
What is cleaning wire?
Helping hands: https://www.amazon.com/SE-MZ101B-Helping-Magnifying-Glass/dp/B000RB38X8/ref=sr_1_7?ie=UTF8&qid=1493138401&sr=8-7&keywords=soldering+iron+stand
I needed a cheap 2nd iron recently. I bought this:
8-in-1 Soldering Iron Kit Kuman 60W with ON/OFF Switch Adjustable Temperature, 5pcs Different Tips, Tin Wire Tube, Desoldering Pump, Stand, Anti-static Tweezers and Solder Tip Cleaning Wire w/ a Tool Case https://www.amazon.ca/dp/B01KTICO2E/ref=cm_sw_r_cp_api_RzV.ybM81XSFD
Has everything you should need for starting out. That is a Canadian Amazon link. I'm sure it is a lot cheaper US.
Not adjustable at all, and that much heat is excessive for this, and can get you in trouble quicker.
I have this kit, it's lasted me through several builds and switch swaps.
One other thing I would consider required equipment if you're going to be desoldering is a switch puller, a.k.a IC puller/extractor, to easily release the switches from the plate and pull them out. Iuno where to get it cheap in Canada, I ordered mine off AliExpress. It makes life so much easier.
What kind of carving does he want to do, as there are a ton of different types. If he is wanting to carve spoons and the like from green woods, look for a sloyd knife and a hook knife. If he is wanting to do more relief style carving these schaaf tool rolls are a killer deal! For just your average carving small figurines, any flexcut knife kit should do.
I have pfeil and stubai and a variety of one-off I have bought over the years.
That said there is a new company that does short runs of full-sized tools you’d use for relief carving. I just bought their their 12 piece set and it is the best value hands down in terms of quality of what you get for the price I’ve seen. At $89 they will sell out soon:
SCHAAF Full Size Wood Carving Tools, Set of 12 https://www.amazon.com/dp/B06XBLNRNM/ref=cm_sw_r_cp_api_Q2UOBbT21J0VY
So I was looking at the flexcut deluxe carving tool set and the Narex 12 piece;
Flexcut Carving Tools, Mallet-Carving Chisels and Gouges for Woodworking, Deluxe Set of 10 (MC100) https://www.amazon.com/dp/B000ZU6PNQ/ref=cm_sw_r_cp_apa_i_EE4RDbVMCKT1R
Narex 12 Piece Set Carving Chisels with 2 Knives and 10 Carving Chisels in Wooden Presentation Box 894850 https://www.amazon.com/dp/B0195XY7BU/ref=cm_sw_r_cp_apa_i_9B4RDb0DY4ZR3
But then I saw this Schaaf 12 piece set for under 100 bucks;
SCHAAF Full Size Wood Carving Tools Set of 12 with Canvas Case - Gouges and Chisels for Beginners, Hobbyists and Professionals https://www.amazon.com/dp/B06XBLNRNM/ref=cm_sw_r_cp_apa_i_fF4RDbQJ1V7QP
And finally, I stumbled upon Ramelson, a 12 piece normal handle set and 12 piece palm handle set
https://www.woodcraft.com/products/ramelson-full-size-carving-tool-set-12-piece?gclid=Cj0KCQjw0brtBRDOARIsANMDykbW2SccFOMFWzhj0ANasXecUt9L9B2rWBAEmjYk87bweyGbxLZnjSsaAl0gEALw_wcB
https://www.woodcraft.com/products/palm-handled-carving-tool-set-12-piece?gclid=Cj0KCQjw0brtBRDOARIsANMDykYpPjdEaYymjRNjBw5K3qgttv0HzxBmnkWD3v5AZNyc5_myZyX1ARcaAkKOEALw_wcB
So my questions are, how are the schaaf's of similar quality to the flexcut and Narex sets at 2/3 the cost? I'm already turned off by flexcut due to the sprinf steel, Narex seems better, but I can't tell if schlaaf is just priced very well, or are crappy tools.
Lastly, the Ramelsons. How is their reputation? Worth the money, or overpriced nonsense?
I'd love some pfeifs, but I'm a hobbyist who can't justify the cost. I just bought a Tormek t8 so o figure I can deal with mediocre equipment as long as I maintain it. Crappy equipment is another story entirely.
And input or help is appreciated.
Also, I was planning on grabbing some Narex wooden chisels.(12 or 16 set); bad idea, or are they decent for the price?
https://www.amazon.com/dp/B071WCH6T4?ref=ppx_pop_mob_ap_share
That knife, sandpaper, a pair of needle nose pliers, and boiled linseed oil to finish.
Constructive advice: spend the money to get a legit carving knife, not a general purpose Swiss army knife. Anyways, telling you to be realistic about your expectations about quality and utility is constructive. That's critical life information.
Here's a decent carving knife. https://www.amazon.com/dp/B071WCH6T4/ref=cm_sw_r_sms_apa_i_7xMMDbA2PAP27
Basswood, butternut, and lime are popular choices as all rounders. Pine and all of the softwoods have all also been carved to death. Starting out, cheaper and freer is better because you'll do a mediocre job.
Hop on Amazon and look up "carving knife" and get whatever you want. The "starter" knives all basically look like this.
You need something to sharpen with, so heads up. You can get cheap combination stones that will cover you for now.
/r/carving
Here's a list I put together on Amazon. You can do most everything you would want with these basic tools at right around $150. I listed some alternatives in the comments on each item on the Amazon list. You may have or can find a used saw and small axe or hatchet that would work fine.
Basic Greenwood Carving Tools
If you are just starting out with carving, these are the basic tools that I recommend:
Other:
Folding hand saw - break down wood into more manageable sizes. The folding saws are nice because the blade is kept safe (and so are your fingers!). Any saw will work, though.
Here's the specific kit he recommends.. I've not used these, but this guy is a pretty accomplished carver.
Thanks dude! And, yeah that's an awesome design, I think it'd make a cool deck too.
I'll let you in on a secret that took me forever to figure out: the best way to make masking / stencils is to get yourself some transparency sheets, like the kind used for overhead projectors in school, and then take a marker and draw what you want to spray through (best way to make stencils). Then take a 'wood burning kit' (which is just a low-heat soldering gun pretty much) and use it to "trace" your lines on the transparancy sheet, do it light and quick and it'll cut the parts out that you want - afterwards you'll be left with a mask or stencil that's much stronger than paper, easy to clean, and the wood engraver allows you to make more detailed and smoother cuts than if you were masking with tape, or cutting out of cardboard or card stock.
When you finish your painting, you'll want to give it a light coat of clear spray finish, and when that dries hit it with a coact of actual clear coat - I use minwax - that''s 'satin' (which is their way of saying 'matte') listed there but I prefer mine to be gloss. It's important that you hit it with the spray finish first, because it'll seal the paint, and the minwax may cause it to run if you don't. I use a lot of markers in my paintings and minwax will absolutely make them bleed and run if I don't seal them first.
You also want to seal it because the acrylic will easily chip off the deck
Like I said, also be aware that painting on a deck is A LOT different than painting on canvas, the deck will cause the acrylic to paint much faster than canvas so you lose that 'wet period' you normally have to blend paint.
Good luck, post a picture when you finish it! And feel free to drop me a line if you have any other questions.
https://www.amazon.com/dp/B000VRTG8Y/ref=cm_sw_r_cp_awdb_t1_m.RzCbEG2RY9F