Top products from r/Amiibomb
We found 30 product mentions on r/Amiibomb. We ranked the 38 resulting products by number of redditors who mentioned them. Here are the top 20.
1. GreatestDeals (11x - 100x) NTAG215 NTAG 215 25mm NFC Stickers 100% Guaranteed to Work Perfectly with TagMo (Android) and Placiibo (iOS)! Multiple Sizes Available! (50 Stickers)
Sentiment score: 1
Number of reviews: 3
Highest Rated and Quality NTAG215 NFC Tags on Amazon!! - 100% Guaranteed to work with TagMo and Amiibo Cards. NTAG215 NFC Sticker Pack ships blank ready to program!We stand by our product 100%! If for any reason your tag does not work, has an error, or becomes damaged, contact us immediately for a f...
 Show Reddit reviews
2. 100 Pieces 30 mm Coin Capsules and 5 Sizes (17/20/ 25/27/ 30 mm) Protect Gasket Coin Holder Case with Storage Organizer Box for Coin Collection Supplies (Black) (White)
Sentiment score: 3
Number of reviews: 3
Quality coin capsules: made of high-transparent and thickening plastic material, dust-proof and resistance to oxidation; Can hold not bigger than 30 mm coins, commemorative coinsCrescent opening design: each coin capsule holder has a crescent opening in the outside rim, opening more convenient and e...
 Show Reddit reviews
3. 30x NTAG215 NFC Sticker Tag - Verified Compatible with Amiibo and Tagmo
Sentiment score: 2
Number of reviews: 2
NFC Forum Type 215 Tag (NTAG215)504 bytes of DataCompatible with Tagmo Application for Android NFC Enabled DevicesSame Tags used for Amiibo
 Show Reddit reviews
4. Adeept Arduino UNO R3 with RC522 RFID Reader Starter Kit with User Manual for Arduino Raspberry Pi
Sentiment score: 2
Number of reviews: 2
 Show Reddit reviews
5. Nintendo NFC Reader/Writer Accessory - Nintendo 3DS
Sentiment score: 1
Number of reviews: 1
Tap any amiibo accessory to the near-field communication (NFC) reader on your Wii U GamePad controller to score all kinds of bonuses in compatible gamesThe New Nintendo 3DS XL comes with built-in amiibo support. Just tap an amiibo to the NFC reader on the lower screen and goYou can also use amiibo w...
 Show Reddit reviews
7. SPLF 100 Pieces 30mm Coin Capsules and 5 Sizes (17/20/25/27/30mm) Protect Gasket Coin Holder Case with Plastic Storage Organizer Box for Coin Collection Supplies
Sentiment score: 0
Number of reviews: 1
EXECLLENT QUALITY-Made of high-transparent and thickened plastic material, dust-proof and oxidation-resisting,practical gift for coin collectors to store and protect your favorite coins.SIZE: outside size 33mm x 5mm, inside size 30mm x 3mm.5 SIZES EVA FOAM-(17/20/25/27/30mm) Different EVA foam gaske...
 Show Reddit reviews
8. 10 x NTAG 215 NFC Circular Stickers by Pac Supplies USA
Sentiment score: 0
Number of reviews: 1
504 usable bytes of data , suitable for a full contact or vcardCompatible with NFC enabled devices85.5 x 54 x 0.84 mm standard ISO card sizePAC SUPPLIES USA STOCK & SHIPPINGShipped and Sold Exclusively by Pac Supplies USA ( Scan Pro ) - Brand Registered
 Show Reddit reviews
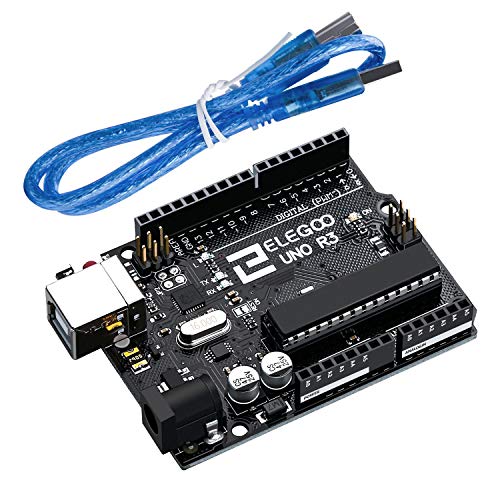
9. ELEGOO UNO R3 Board ATmega328P ATMEGA16U2 with USB Cable Compatible with Arduino IDE Projects, RoHS Compliant
Sentiment score: -2
Number of reviews: 1
NEW IMPROVEMENT: Clear prints on the female header connector, more precise and easier to use the wire.The ELEGOO UNO R3 BOARD now uses an ATMega16U2 instead of the ATMega8U2 chip. Faster transfer rates and more memory.Control using ATMEL ATMEGA328P chip(the same with Arduino UNO R3)100% compatible w...
 Show Reddit reviews
10. Black Lid Capsule Tube & 20 Air-Tite 30mm Black Ring Coin Holders for US Half Dollars
Sentiment score: 1
Number of reviews: 1
Capsule Measurements: Inside Diameter 30mm x Depth 3.17mm, Outside Diameter 44.45mm x 5.4mmTube Measurements: 1.75" / 44.45mm I.D. x 5" H (with Cap)Genuine Air-Tite Holder Brand CapsulesRings are placed inside the capsuleCoins that Fit: US Half Dollars (Seated, Barber, Walking Liberty, Franklin and ...
 Show Reddit reviews
11. CADY Crafts Punch 1-Inch Paper Punches (Circle)
Sentiment score: 1
Number of reviews: 1
1.Spring-action lever makes the punch easier and more comfortable to use and gentle your hands.2.Create stencil shapes, die-cuts, and templates for all of crafting; Use with other nesting punches to create perfectly graduating layers; Punches cleanly every time for consistently great designs.3.Mater...
 Show Reddit reviews
12. Herma 4387 Removable Labels A4 Ø 30 Mm Round White Movables/Removable Paper Matt 1200 Pcs.
Sentiment score: 1
Number of reviews: 1
Self-adhesive labels: round, oval or square, on A4 sheets.With Movables technology: reliable adhesion to all smooth, dry, undamaged and dust-free surfaces, residue-free removal without damaging the subsurface, problem-free repositioning, adhere again several times. Ideal for temporary, short-term la...
 Show Reddit reviews
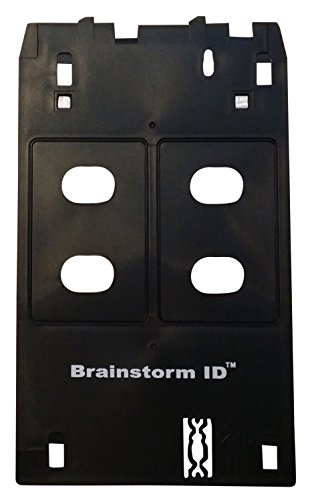
13. Inkjet PVC Card Tray for Canon J Tray Printers - Canon PIXMA MX922, MG7720, MG5420, MG7120, iP7230, and More
Sentiment score: 1
Number of reviews: 1
Replaces Canon J Tray CD/DVD Tray Enabling You To Print on Inkjet PVC CardsCreate beautiful, high quality PVC cards without the need to purchase expensive thermal card printers (such as Fargo, Evolis, Zebra, DataCard, etc)Holds 2 Inkjet PVC Cards - Print 2 cards at a time. (Always place 2 cards in t...
 Show Reddit reviews
14. (25) Air-tite H-32 Direct Fit Coin Holder Capsules for 1oz American Gold Eagles and 1oz Gold Krugerrands & Kangaroos
Sentiment score: 1
Number of reviews: 1
Measurements: Inside Diameter 32.7mm x Depth 3.17mm, Outside Diameter 44.45mm x 5.4mmGenuine Air-Tite Holder Brand CapsulesCapsules are shipped Un-Assembled between layers of foamCoins that Fit: 1oz Gold Eagles $50, 1oz Gold Buffalo, 1oz $100 Platinum Eagle, US Half Dollars (1794-1836), 1/2oz Silver...
 Show Reddit reviews
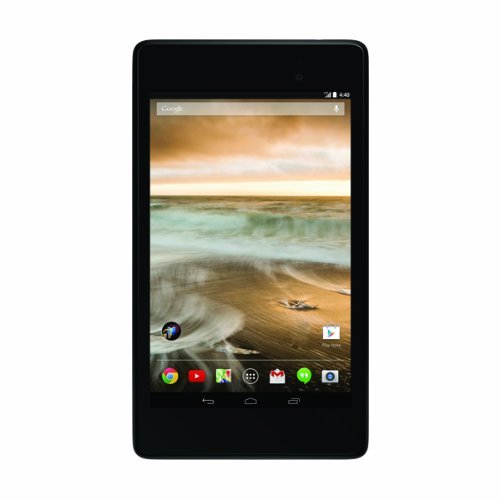
15. Asus Google Nexus 7 16GB Tablet (Gen 2), 7 Inches (Renewed)
Sentiment score: 0
Number of reviews: 1
This Certified Refurbished product is manufacturer refurbished, shows limited or no wear, and includes all original accessories plus a 90-day warrantyWorld's sharpest 7" tablet screen (323 ppi)Quad-core speed and performance, 2GB RAMPowered by Android 4.3, the latest version of the world's most popu...
 Show Reddit reviews
16. 5 Premium NTAG203 NFC Tags from NFCGuyz + Free Bonus Black - Use with Galaxy S5 LG G3 & All Others NTAG203 NFC Sticker (Compatible with All NFC Enabled Devices)
Sentiment score: 0
Number of reviews: 1
Universally Compatible - Waterproof - Flexible - Lockable - Strong Adhesive - Re-writable - Scratch resistant-Includes 1 bonus of our popular black NTAG203 NFC stickerGorgeous design and quality materials with adhesive back and a flexible protective gel coatingLifetime warranty- all NFCGuyz products...
 Show Reddit reviews
17. Canon Office and Business MX922 All-In-One Printer, Wireless and mobile printing
Sentiment score: 1
Number of reviews: 1
Features: Wireless LAN, AirPrint, Google Cloud Print, Wireless, Printing, Mobile Device Printing, USB 2.0 Hi Speed: Plug the cable into your PC for a super fast connection for your data transfersFully-Integrated, 35-sheet Duplex Auto Document Feeder: Easily copy, scan and fax multiple documents with...
 Show Reddit reviews
18. EK Tools Circle Punch, 1.50-Inch, New Package
Sentiment score: 1
Number of reviews: 1
1.5 inch Circle
 Show Reddit reviews
19. EK Tools Circle Punch, 2-Inch
Sentiment score: 1
Number of reviews: 1
Psn L 2 inch Circle
 Show Reddit reviews
20. HERMA Premium - Permanent selbstklebende, Matte Papieretiketten - weiß
Sentiment score: 0
Number of reviews: 1
Self-adhesive labels on A4 sheets, permanent adhesionPerfect for all laser printers and inkjet printers, copiers, colour laser printers and colour copiersSelf-adhesive labels on A4 sheets, permanent adhesion, Perfect for all laser printers and inkjet printers, copiers, colour laser printers and colo...
 Show Reddit reviews
I’d like to thank this sub for all their ideas! I started my amiibo creation journey with a simple sticker attached to a rubber duck for Epona; when I saw my best man’s amazement when I showed him, I knew exactly what I needed to do for his best man gift.
I started by attempting to have a playing card company print some of the amazing card designs found on this sub. After being rejected for copyright because of the amiibo logo, I edited it out (as that’s where I was planning to place the sticker); they then told me the entire set was not going to be able to be made, which sent me into a minor panic. I switched up tactics and went to making coins.
Since there are so many varieties of coin sizes, I was a bit overwhelmed compared to the stock PVC or playing card sizes. After doing some research, I decided on the AIRTITE 30mm black ring coin holders. This was because the inner diameter is 1.55 inches, and I bought a 1.5-inch hole punch for the smallest amount of wiggle room.
I went for a cleaner look (just image of amiibo) which are downloadable from Nintendo’s amiibo lineup website. I wanted the black ring to be shown on the amiibo side but not the back, so I sized them all to fit within a 1.2-inch circle in word, centered within a 1.6-inch circle. I removed the inner guide circle and copied it into GIMP, a free open source program. This is my first time using it, but the best way I found was to paste each image in as a new layer, transform it to the proper size, and move it into place. (I'm sure there are better ways; this was all trial and error).
It is a destination beach wedding, so I found an appropriate Zelda image that wouldn’t look bad in a smaller size or where too much is cut off because of the circular design. The font is a free download, Hylia Serif. I messed up and sized the image to 1.5 inches, not 1.55 (hence the small gaps at the top and bottom). I printed them at home on glossy photo paper using an inkjet printer.
Assembly went bottom coin holder-back image-NFC tag-amiibo image-black foam ring-top coin holder. I added the black ring to center the 25mm sticker, then removed temporarily in order it to put the other image underneath the ring. While it is possible to reopen them, it is very tedious, and I strongly encourage double checking before closing (don’t forget a sticker like I did…). You can program them after you assemble them without any issues.
This is probably too much detail, but a lot of posts show amazing results and I knew I felt unsure of things many times before I ironed everything out. Hopefully this can make creating your own more accessible for future first timers! I’m going to work on cleaning up my coin pdfs but will post them soon! It’s a total of 36 coins (Zelda, Splatoon, and wedding Mario, naturally).
TL;DR:
Materials: AIRTITE 30mm black ring AIRTITE coin holders; 25mm NFC Stickers; 1.5 inch hole punch
Links:
https://www.gimp.org/
https://smile.amazon.com/NTAG215-NFC-Stickers-Guaranteed-Perfectly/dp/B071ZZTT6T/
https://smile.amazon.com/Black-Capsule-Air-Tite-Holders-Dollars/dp/B01EP1YREY/
https://smile.amazon.com/EK-Tools-Circle-1-50-Inch-Package/dp/B0090JVGFU/
https://www.nintendo.com/amiibo/line-up
http://artsyomni.com/hyliaserif
Started creating my own Amiibo coins thanks to some inspiration gained from seeing the work of a few of you on this server. Figured I'd share what I've created thus far in case anyone is interested! Here’s a link to the PSD template. Please forgive the fact that the Super Smash Amiibos aren't all grouped together because I started just creating the BOTW-compatible Amiibos first, then decided to keep going :P
The coins are 1" in diameter. Used a 1” circle punch to cut them out and housed them inside 30mm coin capsules with the included fitted foam inserts. Going to color code the rim of the foam so that I can easily identify the Amiibo series when they're in the case.
Have some 1” plastic counters on the way to provide some rigidity to the images and "fill out" the capsule a little better. Excited to get it all finished up so they can be put to good use!
Being the cheap ass I am, I went looking for a better deal on coin cases...I found this:https://www.amazon.com/gp/product/B07CNDTYC6/ref=ox_sc_act_title_1?smid=AI5NMG8XBYKC1&psc=1
I will let you know if the 30MM works out, and if the cases are any good once I get them. I like that the foam comes in multiple sizes. I only have a B/W printer, so that will have to do...It won't do the art justice, but it's better than what I have now.
And thanks for the awesome guide! Coin cases are a great idea I never would have thought of!
Ill give you the rundown on what I did for mine:
new folders in the root called "Amiibo Keys" and "Amiibo .bin Dump"
Select your Arduino Model. Mine was "Uno (R3)"
Your board is now ready to start creating amiibos, now you just need to get the bin file of any amiibo you want, I recommend downloading them from here.
I'll try and answer all your questions, via this entire thread, in this one post. And maybe give some extra info? I don't, this might turn into a wall of text. I'll do my best to not do that.
I own pretty much every possible way to make spoofed amiibos. From cards, to coins, to the PowerSaves (find it at GameStops), and also the N2 Elite.
Cheaper Alternatives?
The PC program vs phone for the n2 is just... I can load the n2 much faster with the PC. I can make a list, and it is loaded in just seconds. With my phone, I have to add one at a time, navigating to the bins each time. Takes to long. I only use my phone to add 1, when checking bins.
You asked if there was a battery in the n2. There is not from what I can remember when mine fell apart. Just like there is no battery in amiibos. How does it know what one to be on? Don't know, that is the magic of the N2.
Buy it off Wish? That is a big dice roll. If you do, let us know how it works out. I'd not take the chance. There isn't much inside the puk, so you saving a ton of money might just end with you getting an empty puk :3
What should you really do? If you are asking us...well... do you have an android phone that can write NFC? If so, I'd go with making NFC stickers. Get as many stickers as you will need (I have bought these exact ones, from this seller, many times now) and get this coin saver and case . I have an entire set where I zapped the sticker, stuck in inside the coin, and just wrote what it was on the blank side. The added case keeps them in check.
I use my N2 now just to check bins (as I said), if it works right, I make a coin.
Back when I played Zelda, I used the N2 a lot more, because you can also create copies of amiibos, that the game would read each use. So ... I did at one time have 200 "different" Guardian amiibos to gain a toooooooon of arrows :P
If you have more questions, asks. I'll do my best.
a little late, but certain inkjet printers can print pvc cards with special adapters. you'll need pvc cards designed special for inkjet printers.
 
for example:
https://www.amazon.com/gp/product/B00AVWKUJS
with
https://www.amazon.com/gp/product/B00P25H0BA
and
https://www.amazon.com/gp/product/B072FK4RZD
I don’t believe that reader/writer has any supported amiibo software available. If you are going the PC route, you need to use this kit from amazon or source those components separately.
There is an amiibomb writeup with software links in the sub here if you search a little, which will help guide you thru assembly of the writer, installation of the software and a basic guide to reading and writing cards/tags.
This is cool, could you possibly export the images in PNG, I don't have Photoshop, I personally was doing something similar, but i've used these
https://www.amazon.co.uk/gp/product/B000KJREUU
so printed Stickers then stuck them onto each side of the foam disk you get included with these.
https://www.amazon.co.uk/gp/product/B079FMZSHC
the foam disks with centre intact are about 30mm exactly
this means it pretty much a flush as the foam fills the case, hadn't thought to use a Sharpie or something to colour the edges yet. and the images i used are nowhere near as good as yours
Ahh okay thank you, did you make a final template for the 22 Zelda figures? I see all the raw images for it but I don't see them with their backdrops etc. also to others I noticed Amazon has them for $12.50 2 day shipping if you have prime for 25 of them slightly cheaper and much faster than the eBay link seems to be same sellers?https://www.amazon.com/Air-tite-Capsules-American-Krugerrands-Kangaroos/dp/B00LSZMD74/ref=sr_1_3?ie=UTF8&qid=1523060812&sr=8-3&keywords=Coin+Holder+32mm
IDK what size you're punching them, but you can get a pog-sized one pretty cheap (although like I said reviews say these crap out quickly.)
I used this tutorial to create the amiibos in GIMP,
and initialsdrummer even included GIMP and PDF files in a comment there :)Here is a link to the fair quality coin cases I used. Comes with a box and foam inserts to keep the labels flush against the top and bottom of the case. (actual size is like 31.5mm but the inside is 30, make sure your print settings are correct before wasting color ink)
edit: (LINK TO MY TEMPLATE, AS THE ORIGINAL IS NO LONGER UP)
Are the tags rewritable? I believe the answer is no, but just checking.
Found some tags on amazon that say they are rewritable: https://www.amazon.com/Premium-NTAG203-NFCGuyz-Bonus-Black/dp/B00DU45EQ8/ref=sr_1_2?ie=UTF8&qid=1492530441&sr=8-2&keywords=rewritable+nfc+tags
They are cheaper on Amazon.
https://www.amazon.com/NTAG215-NFC-Stickers-Guaranteed-Perfectly/dp/B071ZZTT6T/ref=mp_s_a_1_3?keywords=nfc+215+stickers&qid=1569471327&sprefix=nfc+215+sticker&sr=8-3
The pickup up a refurbed nexus 7
Asus Google Nexus 7 16GB Tablet (Gen 2), 7 Inches (Renewed) https://www.amazon.com/dp/B00HMC2KWA/ref=cm_sw_r_cp_api_i_AFnVCbQ21WQCD
Up until now I wrote the ID on a post-it and left it in the plastic pocket. But for my nephew I ordered printable stickers that will arrive later this week. In the EU I coudn't find any with ID-1 sizes. So I ordered these https://www.amazon.com/gp/product/B004UTZ0V6 (83,8 x 50,8 mm | 3 19/64 x 2") from Germany.
https://www.amazon.com/gp/product/B01N27G9UU/ref=oh_aui_detailpage_o00_s00?ie=UTF8&psc=1
Sand__Panda and I both use the same cases and thoughts, I don't see why 40mm should be any different. These are the cases I got
I used these and they're batting a thousand right now, as none have failed or had an error.
https://www.amazon.com/gp/aw/d/B071ZZTT6T?psc=1&ref=ppx_pop_mob_b_asin_title
Very basic instructions.
You will need;
The NFC module comes with a pin header that you'll need to solder onto the board.
The NFC module pinout is labeled (the actual PIN numbers may differ per module), so hook up the following wires on the NFC to the corresponding pins on the Arduino;
|RC522 Pin|Arduino Pin|
|:-|:-|
|RST|9|
|SDA(SS)|10|
|MOSI|11|
|MISO|12|
|SCK|13|
|3.3V|3.3V|
|GND|GND|
With the hardware out of the way you can then follow the software guide here; https://github.com/konstantin-kelemen/arduino-amiibo-tools/wiki/Create-amiibo-clones-with-Arduino
Be aware that the way that the NFC tags have to be written means that they become read-only, so if something goes wrong the tag is useless (I've had one failure in 5, so far).