(Part 2) Top products from r/CR10
We found 49 product mentions on r/CR10. We ranked the 248 resulting products by number of redditors who mentioned them. Here are the products ranked 21-40. You can also go back to the previous section.
21. URBEST 8mm Detecting Distance Approach Sensor Inductive Proximity Switch NPN NO DC 6-36V Cylinder Type
Sentiment score: 3
Number of reviews: 2
Item Name : Inductive Proximity Switch; Model : LJ18A3-8-Z/BX; Package Qty: 1 Piece SwitchWire Type : DC 3 Wire Type (Black, Brown, Blue);Switch Appearance Type : Cylinder Type; Material : Plastic, Alloy;Theory : Inductive Sensor; Output Type: NPN NO(Normal Open);Diameter of Head : 18mm;Detecting Di...
 Show Reddit reviews
22. Gizmo Dorks PEI Sheet 12" x 12" (305mm x 305mm) 1mm Thick 3D Printer Build Surface Ultem 1000, Made in The USA
Sentiment score: 1
Number of reviews: 2
MADE IN THE USA: Single 1mm thick sheet installs quickly on top of existing flat build platforms (e.g. borosilicate glass)ABS and PLA filaments (along with many other materials) print directly on to PEI surface without the need for additional adhesives, tapes, or slurry.REMOVE FILM FROM BOTH SIDES B...
 Show Reddit reviews
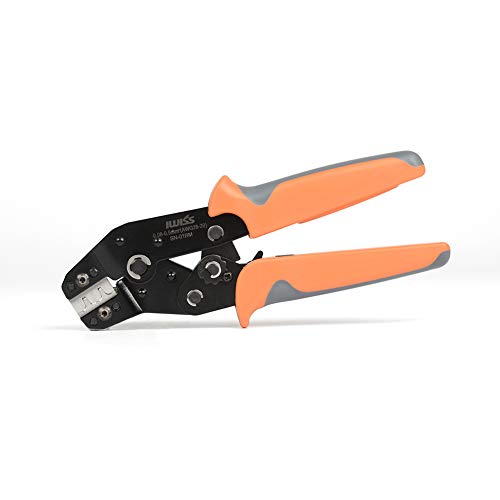
23. IWISS Crimping Tools Works on Mini Connectors XH2.54mm XH3.96mm Dupont D-Sub Terminals JST Pin Crimper SN-01BM Crimping Tools for Crimper Plier for AWG 28-20 (0.08-0.5mm2)
Sentiment score: 1
Number of reviews: 2
Capacity of AWG28-20 ( 0.08-0.5mm2)PRECISE PRESS LINE: Wire-electrode cutting jaw ensure a high-precise crimping result.LABOR-SAVING,COMFORTABLE,DURABLE: ergonomically designed for terminal crimping, labor saving 50%, comfortable grip,durable, firm and easy to useRatchet type pressure line clamp com...
 Show Reddit reviews
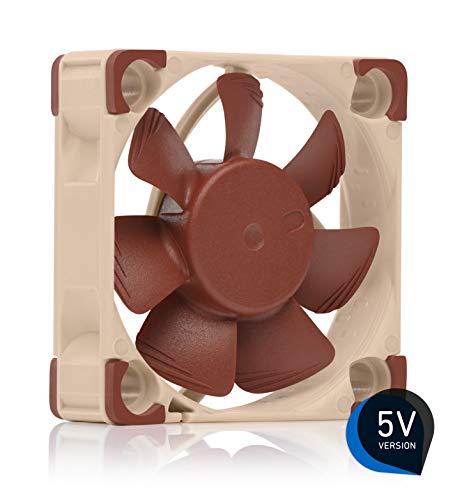
24. Noctua NF-A4x10 5V, Premium Quiet Fan, 3-Pin, 5V Version (40x10mm, Brown)
Sentiment score: 2
Number of reviews: 2
Premium quiet fan, 40x40x10 mm, 5V, 3-pin Molex, 4500 RPM, 17.9 dB(A), >150,000 h MTTFAward-winning 40x10mm A-series fan with Flow Acceleration Channels and Advanced Acoustic Optimisation frame for superior quiet cooling performanceIdeal replacement for noisy or broken 5V 4cm fans in 3D printers, DV...
 Show Reddit reviews
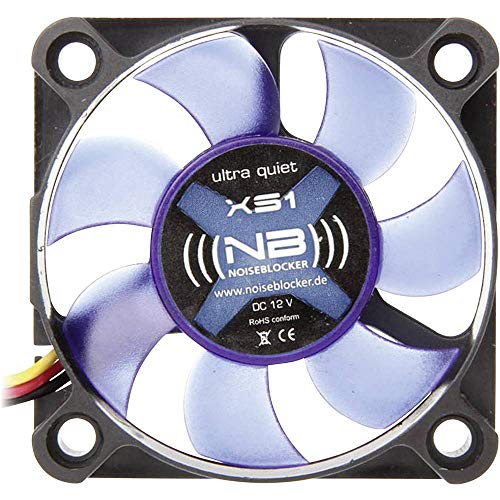
25. Noiseblocker NB-BlackSilent Fan XS-1 50mm x 10mm Ultra Silent Fan, 3000rpm, 3 pin, 16 dBA, 6.77 CFM
Sentiment score: 1
Number of reviews: 2
developed in Germanysilent NB-NanoSLI bearing NEW!; silent NB-EKA P2 Drive NEW!Bayer Makrolon rotor with anti-dust technology;reinforced fibreglass PBT-frameNB-slics for vibration-free assembly3000rpm Fan speed; 16 dBA Noise level; 6.77 CFM; 50mm x 50mm x 10mm
 Show Reddit reviews
26. ANYCUBIC Ultrabase 3D Printer Platform Tempered Glass Plate Durable Build Surface for Large Print Size 310x310mm
Sentiment score: 0
Number of reviews: 2
Excellent adhesion: Ultrabase covered by microporous coating, shows strong adhesion in printing. Easy to take off models by hand or with a little help from the scrapper for very large models.Good Flatness: Ultrabase is glass-based and the critical tolerance is ±0.2mm. (normally within the 0.1mm ran...
 Show Reddit reviews
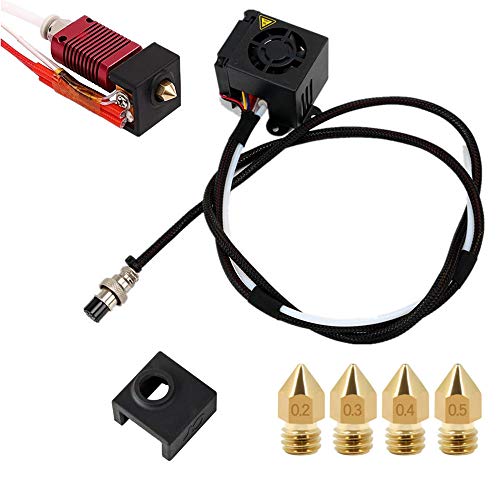
27. CR-10S 3D Printers Original Replacement Parts/Accessories Full Assemble MK8 Extruder Hot End Kits (with Nozzle 0.4mm /0.2mm /0.3mm /0.5mm) fit for Creality 3D Printing Printer CR-10 CR-10S CR10S5
Sentiment score: -1
Number of reviews: 2
Creality CR10 Extruder,100% ORIGINAL CREALITY 3D PRINTING PRINTERS PARTS /ACCESSORIES AND WITH HIGH QUALITYMAIN MATERIAL OF CR10 EXTRUDER IS ALUMINUM ALLOTY /STANIESS STEEL/BRASSCREALITY CR10 EXTRUDER CAN WORK WITH DIFFERENT SIZE MK8 NOZZLE: 0.2MM 0.3MM 0.4MM 0.5MM 0.6MM 0.8MM 1.0MM NOZZLEMK8 CR10 E...
 Show Reddit reviews
28. Mean Well NES-350-12 12V 350 Watt Ul Switching Power Supply 110-240 Volt
Sentiment score: 0
Number of reviews: 2
AC input range selectable by switchProtections: Short circuit / Overload / Over voltage/ Over temperatureForced air cooling by built-in DC fanWithstand 300vac surge input for 5 secondLED indicator for power on
 Show Reddit reviews
29. Sunnest 16.4ft LED Flexible Strip Lights, 150 Units SMD 5050 LEDs, Non-Waterproof 12V DC Light Strips, RGB LED Light Strip Kit with 44Key Remote Controller and Power Supply for Kitchen Bedroom Car Bar
Sentiment score: 2
Number of reviews: 2
Well-Equipped Kit: 1 pcs 16.4ft RGB5050 with 150 LEDs non-waterproof light strip, 1 pcs 44-key remote controller and 1 pcs 12V 3A power supply with a power line are included.Easy Installation: Self-adhesive back tape is easily applied to the dry and flat surface. Plug and play, no wiring connection....
 Show Reddit reviews
30. LokBuild 3D Print Build Surface, sticky back sheet, quick, clean removal of printed parts, versatile (SINGLE PACK 12"
Sentiment score: 1
Number of reviews: 2
 Show Reddit reviews
31. 1.75mm Light Blue PLA 3D Printer Filament - 1kg Spool (2.2 lbs) - Dimensional Accuracy +/- 0.03mm
Sentiment score: 2
Number of reviews: 2
Diameter: 1.75mm; Weight: 1kg/Spool;Dimensional Accuracy: ± 0.03 mm;Vacuumed Sealed With Desiccant;Recommended Extrusion/Nozzle Temperature 180 - 210℃;Recommended Build Platform Temperature 0 -50℃;
 Show Reddit reviews
32. Happisland 5pcs NTC 3950 100K Thermistor with 1 Meter Wiring and Female Pin Head for RepRap 3D Printer Heatbed or Hot End
Sentiment score: -1
Number of reviews: 2
Pack of 5PCSTemperature sensor 100KΩ accuracy of ± 1%Wiring length: 1 meterUse it with heated bed or extruderConviniently pre-wired with 1 meter long high temperature PTFE insulated wiring
 Show Reddit reviews
33. HICTOP Creality Open Source CR-10 3D Printer All Metal Frame 12x12x15.5 Inch Build Volume and Heated Bed Includes Glass Bed
Sentiment score: 1
Number of reviews: 2
EASY ASSEMBLY: Delivery with three sets, just need about 10 minutes to assemble well.PRINTING SIZE: Prints max size of 300X300X400mm. No longer will you be limited to small models.LONG SERVICE LIFE: Imported Linear navigation with low friction. Industrial-grade PCB can continuously print for 200 hou...
 Show Reddit reviews
34. CR-10S Motherboard Newest V2.2 Version/Replacement Control Board Mainboard for CR-10S /CR-10S5 3D Printer
Sentiment score: 1
Number of reviews: 2
Original Replacement Control Motherboard 2019 Version Creality V2.2 Compatible for CR-10S Dual Z-Axis 3D PrinterEASY OPERATE:With USB Interface,Can Work With E/Z/Y/X Axis MotorSupport 12V Power Input: The Circuit Board is Optimized By Circuit, Effectively Solve The Heating ProblemThe Mainboard only ...
 Show Reddit reviews
35. PEI (Polyetherimide) Sheet, Opaque Natural, Standard Tolerance, ASTM D5205 PEI0113, 0.03" Thickness, 12" Width, 12" Length
Sentiment score: 1
Number of reviews: 2
PEI is a strong, rigid plastic that withstands high temperatures and offers excellent electrical insulation over a wide range of temperaturesColor is opaque NaturalMeets ASTM D5205 PEI0113 specificationsNote: The Standard Cut Tolerance on the Width and Length is (+/-) 3/16”
 Show Reddit reviews
36. CCTREE 3D Printer Build Surface with 3M Sticker 3D Printer Heated Bed Sheet for TEVO Tornado Anet E12 Monoprice Maker Pro Mk.1 Creality CR-10 CR-10S 300x300mm (Pack of 3)
Sentiment score: 2
Number of reviews: 2
Size:310mm x 310mm (12.2"x12.2")Build sheet adheres to a print bed to help the filament stick during printing, while also enabling clean removal of the printed part afterwardCompatible with ABS, PLA, HIPS and other filamentSingle sheet design installs more quickly and with fewer bubbles than tape or...
 Show Reddit reviews
37. Wangdd22 3D Printer J-head Hotend with Fan for 1.75mm 12v V6 Direct Filament Wade Extruder 0.4mm Nozzle+Volcano kit
Sentiment score: 1
Number of reviews: 2
Applicability & compatibility: compatible with all 1.75mm E3D V6 Makerbot 3D printer; NTC connector with terminal, easy to intallAnti-leakage & anti-blocking design: extruder nozzle connect connect with the tube seamless, prevent print material from leaking or blockingHeat resistant & ventilation: 1...
 Show Reddit reviews
38. Witbot PC4-M10 Male Straight Pneumatic PTFE Tube Push In Quick Fitting Connector for E3D-V6 Long-Distance Bowden Extruder 3D Printer (Pack of 10pcs)
Sentiment score: -1
Number of reviews: 2
Widely use for connecting Bowden extruder and PETF tubePTFE tubing OD: 4mmThread: 6mmMaterial: stainless steelPack of 10 pcs
 Show Reddit reviews
39. ANTCLABS BLTouch : Auto Bed Leveling Sensor/To be a Premium 3D Printer (With 1M Extension Cable Set)
Sentiment score: 2
Number of reviews: 2
BLTouch is an auto leveling sensor for 3D Printers based on open-source.Simple, Smart, High-precision.It could work with any kinds of bed materials, such as glasses, woods, metals, and so on.Come with 1m extension cable set[Note] Firmware Update: This item requires a firmware update. Please check th...
 Show Reddit reviews
40. IWISS SN-2549 Ratcheting Crimping Tool 0.08-1.0 mm ² 18-28AWG for PH2.0/XH2.54/2.54/2.8/3.0/3.96/4.8/KF2510/JST Terminal
Sentiment score: 1
Number of reviews: 2
Wire Electrical Discharge Machining Cutting jaws with perfect polishingCompatible with PH2.0/XH2.54/2.54/2.8/3.0/3.96/4.8/KF2510/JST TerminalCrimping Range:0.08-0.5/0.25/0.5/1.0mm2The components of the ratchet crimping are made of special steelPrecise crimping die sets and integral lock with self re...
 Show Reddit reviews
It honestly depends on your budget, how much are you willing to spend?
Here is a great list of prep and upgrades you can do to bring success to your prints:
-Get Vibration Dampners: I can not express how much joy these things have brought many users. The make your machine quiet and greatly decrease ringing in your prints since they ABSORB the vibration coming from your stepper motors. You really only need Two of these for the X and Y axis however you can get another two for the Z-axis drives if you plan on doing a lot of z-hopping.
-BUY FILAMENT IN ADVANCE: get some PLA/ABS/PETG or whatever you want to try printing with. The filament you get with the printer for the most part is garbage HOWEVER I recommend dialing in those settings first then throwing on some nice filament, it'll feel soooo nice. Some commonly accepted/appreciated brands are: eSun PLA+, Hatchbox, Solutech and more
-Get a PEI sheet: Seems like you mentioned this in your post but PEI sheets eliminate the use of gluesticks/tape/hairspray and provide excelent adhesion while making it easy to remove the part after it's cool. This things like to be hot though so increase your bed temp a little at first
-Buy New Fans: The stock hotend/power unit fans are Loud, Noisy and Inefficient. I recommend getting 1 new conrol box fan, 1 new hot end fan and 1 new part blower fan.
You will need 1 40mm fan, 1 50mm fan and a Blower fan or another 40/50mm fan depending on if you print a new hot end mount like a fang.
-Tighten every screw on the printer: You would be surprised how many screws initially are lose either from prior testing or such. Also make sure to test your belt tensions on your printer whne you get it. You want everything tight BUT NOT TOO TIGHT. Give it a snug fit then let it be. Also make sure your belts are 'pluckable' like a guitar string but not tought
-Get some bearings: You may want to get a few ball bearings for when you print out a new filament holder, the stock filament holder is terrible
-Buy some fasteners: M3 bolts and nuts are commonly used on the CR-10S having spares or additional fasteners for adding on parts/printed components to your printer is awesome to have on hand
-Replace the Hotend: This can get a bit frustrating but it can be worth it. If you want you can replace the hotend with something like a volcano or an all metal hot end to print at higher temperatures. With this you can also add on autoleveling if you have the correct mount printed
-Octoprint: I am not very familiar with octoprint since I don't use it myself however I know it can run on a CR-10S. If you want look into how to install octoprint on stock firmware, I know it's pretty easy to use a raspberrypi to remote into your printer as well using octoprint.
-Squash Feet: Replacing your stock machine 'feet' with squash balls or squishy gold balls can also help absorb vibrations from your machine to your table or where it is located. This helps a bit with part quality but it's mostly to reduce the noise carried through your furniture.
-Solder on connectors: If you want you can get some pin connectors to make your fans/electronics easy to switch out depending on your material you are printing, maybe you need a strong part fan or maybe you need a weaker one. It is easy to swap out if it's using a 4pin connector.
-Make an Enclosure: What could be nicer for your printer than a stable environment. Making an enclosure for your printer can help if you live in a rough climate area or if you want to reduce the noise as well.
-Get some Handtools: I'm not sure if you have any or not but some great tools to have are a screwdriver, hexwrenches and a soldering iron depending on how much work you want to be doing on your printer.
For convenience I've added some of the parts mentioned via an Amazon link for prices. I'm not saying buy these things exactly they are just a starting point for reference:
Nima Vibration Dampners:https://www.amazon.com/Stepper-Rubber-Vibration-Dampers-Printer/dp/B073FRZTDX/
40mm Fan (Noctua Brand): https://www.amazon.com/Noctua-NF-A4x20-FLX-premium-quality-quiet/dp/B072JK9GX6/
Blower Fan (Part Fans):https://www.amazon.com/SoundOriginal-Humidifier-Aromatherapy-Appliances-Replacement/dp/B071WMHNG5/
PEI Sheet/Printer Surface:https://www.amazon.com/CCTREE-Printer-Surface-Creality-300x300mm/dp/B07543KHCT/
Squash Feet: https://www.amazon.com/PrideSports-Practice-Balls-Count-Yellow/dp/B00466W9X0/
M3 Bolts/Nuts:https://www.amazon.com/280Pcs-Grade12-9-Socket-Assortment-Storage/dp/B0742DDLQ1/
Raspberry Pi 3 for Octoprint: https://www.amazon.com/Raspberry-Pi-RASPBERRYPI3-MODB-1GB-Model-Motherboard/dp/B01CD5VC92/
Ball Bearings: https://www.amazon.com/625ZZ-Shielded-Groove-Precision-Bearings/dp/B01LWMT95S/
Hope this helps, have fun tinkering!
I actually just ordered this inductive sensor from Amazon: https://www.amazon.com/gp/product/B01M1777XK/ref=ppx_yo_dt_b_asin_title_o00_s00?ie=UTF8&psc=1 . In the reviews someone used it with success on our machine and said it was a significant improvement. Looks like an easy install by cutting and splicing the wires near the sensor. Seems like many people have success with this.
​
I'll check out the tinymonsters firmware, that also seems to be pretty popular. Is there any functional difference? Or is it just better behind the scenes?
​
Anyone got any others?
Hi!
Sorry to hear that. You are talking about the parts fan, yes?
Which Fang are you using (Thingiverse link?) Picture?
The original is probably a 40x10mm (that's 40mm square, 10mm thick).
Here's the one I recommend (a bit pricey but one of the best out there and quiet as heck, and a SIX year warranty so it's not some Chinese cr@p)
https://www.amazon.com/Noctua-Cooling-Bearing-NF-A4X10-FLX-5V/dp/B00NEMGCIA
or you can upgrade (if it fits, you'll have to measure) to this:
https://www.amazon.com/Noctua-NF-A4x20-FLX-premium-quality-quiet/dp/B072JK9GX6
That one is 20mm thick but moves more air, usually what you want in a Fang.
One other thought - How did it fry? C'mon, fess up, we all screw the pooch sometimes... :-)
It's a right of passage to put a hex wrench into a fan and snap the blades, you know, LOL.
PuterPro
I bought a Anycubic Ultrabase and have been having really good luck. It sticks great when hot and as soon as it cools to room temperature the parts just fall off. Although from the reviews online it seems like people had mixed results. I just clean it every few prints with alchohol. This is the one I bought https://www.amazon.com/gp/product/B077NY6C55 I will say that you need to wait about 2 minutes after the bed shows its at temperature for the glass to actually get to temperature.
I am planning on adding an LED strip also. I don't have my CR-10 yet, but I have other printers that I have added LED's on. From what I can tell, there is no 12v pins available on the CR-10 board. So you would have to either tap into the power supply or plug it in separately. I saw someone else tapped into the 12v line for the fan that cools the heat break but I don't think that's a very good idea.
You can buy a strip that includes a power supply and a remote control for $17 on Amazon.
If you go with something like this, you need to cut the strip to fit on the CR-10. Then you will need to solder 4 wires to the end of the strip where you cut, and connect them to the control box. Then that plugs into the LED strip and you can turn it on and off with the remote. There are better strips out there than the one above, because those LED's are spaced a little further apart. Here is another but it's more expensive.
Duuuude... good luck! Even if it fails, don't give up. You can slice the remaining that needs printing off the file and print only that, glue it up and never know the diff.
For what it's worth, I rarely have that problem after I switched to this CCTree Build Sheet. Clean in-between each print with a little 70% isopropyl and boy, do supports and prints stick well.
1.75mm Light Blue PLA 3D Printer Filament - 1kg Spool (2.2 lbs) - Dimensional Accuracy +/- 0.03mm https://www.amazon.com/dp/B01CX8ZFJC/ref=cm_sw_r_cp_apa_m0b2Bb42ANP5M
I bought this. It matches pretty well and surprisingly I like the amazon filimant more than I thought I would.
I had issues with both the circulation fans in my Control boxmaking noise so i replace all of my fans. My psu was new so it was quiet to begin with.
Here are the fans i got. The noctua are higher than your range but they are high quality.
Hotend Fan 40x10mm
Control Box Back Fan 40x20mm
Mother Board Fan 50x10mm
Might be able to find these fans cheaper on other websites but they are the right sizes.
Can you show that please?
​
This is what I see:
https://images-na.ssl-images-amazon.com/images/I/71T6c67PviL._SL1000_.jpg
You can buy it here: https://www.amazon.com/Upgraded-Motherboard-Mainboard-Creality-3D/dp/B079H3T983/ref=sr_1_1?s=industrial&ie=UTF8&qid=1540464996&sr=1-1&keywords=Upgraded-Motherboard-Mainboard-Creality-3D
This is also from the Creality site:
https://ueeshop.ly200-cdn.com/u_file/UPAG/UPAG282/1806/photo/7f0390347e.png
https://www.creality3donline.com/creality-upgrades-cr-10s-s4-s5-v21-replacement-mainboard-motherboard-for-cr-10-5s-printer_p0072.html
I hope you like your CROW this morning... ;\^)
I still don't get why you would even begin to accuse me of miss information?
>!I dont know how you would react if I was say give then opinion that x was better than y, because it's my value and opinion. !<
C'mon, put it to rest, I gave an opinion and provided options, is that not what this community is about? Where is the ill intent on my side?
&#x200B;
You need to go very slow with the stock hot end and a .8 mm nozzle. It's just too much plastic for the stock hot end to melt. Though I haven't tried it on the stock hot end, I would think that you can't go faster than 1,500 mm - 2,000 mm per minute.
If you want to print faster I would try a volcano style hot end. I've been using this cheap e3d knockoff with the volcano style heater block for a few weeks now and getting good results.
BTW Even with that hot end I still can crank out prints almost as fast and nicer quality on the .6 mm nozzle based on the fact that I can just run the .6 mm nozzle faster. It seem to me that the melt zone can only handle a given volume of filament in a given time. You can run a .8 mm nozzle at ~2,750 mm per minute or a .6 mm nozzle at 3,750 mm per minute. The end result is that the print takes roughly the same amount of time and looks better on the .6 mm nozzle.
I still use the .8 mm nozzle on vase mode prints. The extra wall thickness makes very nice ridged single wall objects.
Another option is using a PEI sheet (https://www.amazon.com/dp/B0013HKZTA?ref=yo_pop_ma_swf ). I personally use a mirror and PEI. Nice flat surface with great hold. If you don't have an IKEA near you, Home Depot has a 12 pack of mirrors for $20.
These are the ones I used. I have a CR-10 Mini and they fit inside the grooves perfectly, with just a tiny bit of clearance.
You can replace the sensor. This is courtesy of Jason Cook; sign up on facebook for the CR-10S user group and you can read his entire post there!
"Having trouble leveling the CR-10s Pro? Is the leveling sensor not repeatable and leaving you with bad first layers? Here is my solution:
URBEST 8mm Detecting Distance... https://www.amazon.com/dp/B01M1777XK…
The probe is extremely repeatable and does not seem to be significantly affected by temperature or humidity. I have mine set so that it detects the bed 2mm high and then the tiny Machines firmware remembers the offset on a power cycle. It nails the first layer every time and when probing the bed, the nozzle is high enough that it does not leave plastic dots on the bed. I was always having to tinker with the old sensor settings and had a lot of bad prints. Now, I just hit print and it works perfectly every time.
I hope this helps. I love printing with my CR-10S Pro now."
You want to update Marlin
You are going to run into problems
This makes life easier
This fan mod is really really good
There are dozens of variations of these knobs
The stock bed surface can be easily upgraded
These are actually flat
In place of it. Really strong adherence to the surface too, without much heat needed for the bed. I did find I had to tighten the bed a bit more, since there's a bit of give to the surface vs glass.
This is the kind I bought - PEI Sheet from Gizmo Dorks
I use this one it's pretty close. https://www.amazon.com/gp/product/B01CX8ZFJC/ref=ox_sc_saved_title_9?smid=A1XKR8C06OV8W4&psc=1
https://cdn.thingiverse.com/renders/a4/b4/a4/5f/32/6a3706edb6bef6d569d8d8885d8acbbf_preview_featured.jpg
When I was asking about this for the ender 3 /u/robbob2112b gave a very detailed breakdown on what they had done.
> These are what I use on the tevo and when I put the e3dv6 on the ender I'll use them there too....
>I started them about 6 inches back up the wires from the hot end spaced them out so them aren't one big blob.... used different ones for different things so they can't be switched out and if for some reason a wire pulls loose it doesnt short anything... doing it I can swap out the hot end in minutes, do a PID tune and I'm off to the races.
>Connectors and max current rating
>Jst-sm for the fans and thermistor - 3amp
>https://smile.amazon.com/gp/product/B07CTKD7P4/
>Mini Tamiya type b for the heater - 10 amp
>https://smile.amazon.com/gp/product/B06XSD9JJQ/
>Jst-xhp are the white connector for stepper motors - 3 amp
>https://smile.amazon.com/gp/product/B07CTH46S7/
>Dupont for the black on the main board - 3 amp
>https://smile.amazon.com/gp/product/B07CVYPDGS/
>These for heated bed - up to 30 amps - solder only, not crimp
>https://smile.amazon.com/gp/product/B07H54LZN2/
>Crimpers - get the right ones for the pin type in the connectors you buy, you can't use just any old crimper or wing it with these tiny pins and get a good connection that doesn't come apart when things move for hours
>https://smile.amazon.com/gp/product/B01N1RFZZ4/
>https://smile.amazon.com/gp/product/B00YGLKBSK/
>https://smile.amazon.com/gp/product/B00OMM4YUY/
>Since I'm on the subject heated bed wires - large enough to carry the current and with the silicone cover and fine internal strands flexible enough to not break with movement
>https://smile.amazon.com/gp/product/B01M9IXL5Q/r
LokBuild 3D Print Build Surface, sticky back sheet, quick, clean removal of printed parts, versatile (SINGLE PACK 12" https://www.amazon.com/dp/B072MZRM2P/ref=cm_sw_r_cp_tai_oDmNAb1FJ9SK0
Looks like one of these
https://www.amazon.com/LokBuild-Surface-removal-printed-versatile/dp/B072MZRM2P
sorry i commented the wrong price, it was on sale a few days ago but rose to 500. but if your still interested here is the link
Did you get the HICTOP version? I've been considering it since it is prime, and I have almost $400 in credit.
CREALITY CR-10S 3D Printers Original Replacement Parts/Accessories Full https://www.amazon.com/dp/B078MSLF7P/ref=cm_sw_r_cp_api_-y52BbM0FKRZT
There are 3 fans in the control unit. A 40x20mm exhaust fan that's always on max (this is the loudest one), a 50x10mm fan that I think just circulates internally (it points at the control board), and another one sealed in the power supply (I've not opened it up yet). The power supply fan only turns on if the power supply heats up. You might have noticed it spinning up during prints when your bed is heated. If it doesn't turn on when you start your unit (as explained by /u/ZEnterprises), that doesn't mean that it's broken; just that the temperature limit hasn't been hit yet.
I've got a 40mm Noctua fan and this 50mm getting delivered from Amazon tonight. I'm also going to take metal snips to the back of the control unit's enclosure where the 40mm exhausts and then cover the hole with one of these. I'm hopeful that the quieter fans will stop the control unit from constantly sounding like a hive of angry bees. I'll take some pics tonight and make a post.
I did a .8 nozzle on my cr10sPro and was very disappointed in the speed it could achieve. Something like 15-20mm/s max print speed. Any faster and the stock hotend couldnt melt pla fast enough, the extruder was skipping and the prints were under extruded. You can get a whole knock off volcano setup for $15. If you want long something like that long term I would go name brand e3d.
https://www.amazon.com/Wangdd22-Printer-Filament-Extruder-Volcano/dp/B01ESTJUL8
I got these ones off Amazon, and they don't seem to slip at all once I have pushed the tube in. Also they have metal teeth.
Amazon has them for $22. Match with one of these to attach it.
The actual product doesn't have that weird edge, it's just a flat sheet.
This is the BLTouch I purchased: https://www.amazon.com/gp/product/B076PQG1FF/ref=oh_aui_search_detailpage?ie=UTF8&psc=1
You may not want to go with the cheapest as some boards had inferior components which lead to temperature fluctuations.
This one appears to have upgraded components.
https://www.amazon.com/ANYCUBIC-Ultrabase-Platform-Tempered-310x310mm/dp/B077NY6C55/ref=mp_s_a_1_1?keywords=anycubic+ultrbase+310&amp;qid=1562007836&amp;s=gateway&amp;sprefix=anycubic+ultr&amp;sr=8-1
Here cause your Google seems to be broken.
I had this same issue a couple months ago. My thermistor on the extruder was busted (specifically one of the tiny wires to the very tip was snapped, but still making poor contact). 8 bucks on amazon for a pack of 5, ten minute swap, no issues since.
This is what I bought: https://www.amazon.com/dp/B01N4KY6TR/ref=cm_sw_r_cp_apa_i_Kg9qDbKNPFPMQ
Actual nozzle clogs aren't common since they stay plenty hot and typically require contaminants on or in the filament, it's almost always in the heat break above the nozzle (like your pic shows).
There's a known issue with the CR-10 (and other low cost chinese printers) that the push connect fittings supplied with the printer aren't the best quality. They fail to grip the tube enough to keep it from wiggling out of place as the hot end moves. Even if you take during installation, it'll crop up again. Obvious fix is to replace it. (PC4-M10 push-to-connect) Adding a collet clip (is you don't have one already) might work.