Top products from r/FlashForge
We found 29 product mentions on r/FlashForge. We ranked the 23 resulting products by number of redditors who mentioned them. Here are the top 20.
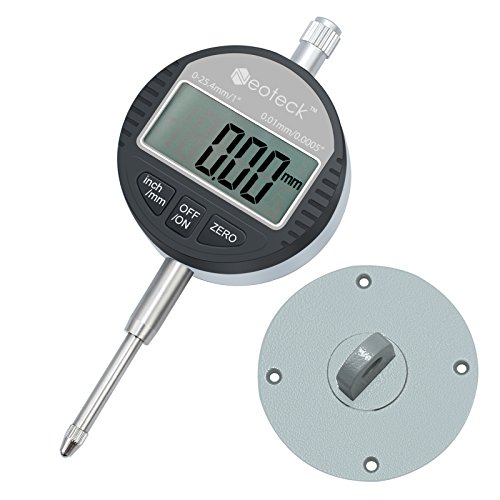
1. Neoteck DTI Digital Dial Indicator 1''/25.4mm | Digital Probe Indicator Dial Test Gauge High Resolution: 0.0005''/0.01mm
Sentiment score: 0
Number of reviews: 2
【Aluminum Alloy Digital Dial Indicator】 Large LCD Display with 4 Digits, Be Used to Accurately Measure Small Linear Distances in Mechanical and Industrial Processes without Reading Errors, An Ideal Tool for Mechanical, Industrial Processes and Laboratory Use【0 ~ 25.4 mm Measuring Range】 Meas...
 Show Reddit reviews
2. Gizmo Dorks 3D Print Removal Tool, 5-inch Blade
Sentiment score: 1
Number of reviews: 1
Simple tool to help remove 3D prints from print bedThin blade profile slides underneath prints5-inch flexible blade to reach different size printsOffset blade allows for a safer angle to protect print and print bedWood handle with grips for superior control
 Show Reddit reviews
3. Neoteck DTI Digital Dial Indicator 1''/25.4mm, Fractions/Inch/Metric Digital Probe Indicator, High Resolution: (1/128")/ 0.0005''/ 0.01mm
Sentiment score: 1
Number of reviews: 1
【Aluminum Alloy Digital Dial Indicator】 Measuring Range from 0 ~ 1 inch (0 ~ 25.4 mm)【High Resolution】 up to (1/128")/ 0.0005''/ 0.01mm; Large LCD Display【Fractions/ Inch/ Metric Conversion】 Switchable between Fractions/ inch/ mm, Suitable for All Kinds of Measurement【Included Rear Cov...
 Show Reddit reviews
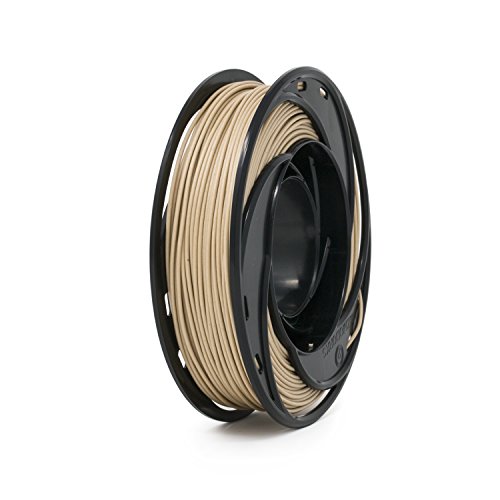
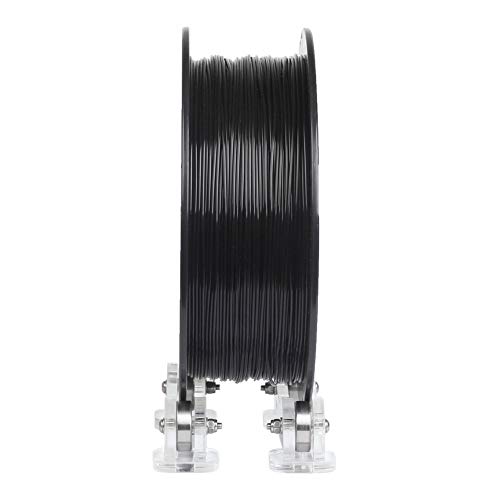
4. Gizmo Dorks Wood Filament for 3D Printers 1.75mm 200g
Sentiment score: 1
Number of reviews: 1
Wood 3D printer filament vacuumed sealed with desiccantExtrusion nozzle temperature: 220 - 230 C; Recommended to use a heated build platform1.75mm filament diameter (Dimensional Accuracy of +/- 0.03mm)Net weight: 200 grams / Spool Diameter: 5.125" / Spool Width: 2" / Spool Hub Diameter: 1.5"Compatib...
 Show Reddit reviews
5. Micro Swiss All Metal Hotend Kit for Flashforge Finder and Flashforge Guider 2 (.4mm)
Sentiment score: 1
Number of reviews: 1
Fits: FlashForge Finder and FlashForge Guider 2 (Older version, without metal plate over the heater block)Nozzle is Plated with TwinClad XT CoatingKit includes: (1) Plated Brass Wear Resistant Nozzle (1) Thermal Tube (2) Jam Nuts To aid in removing old hotendOrifice size: .4mmMade in USA by Micro Sw...
 Show Reddit reviews
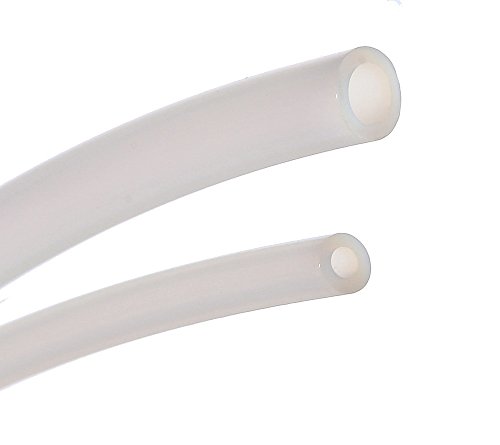
6. PTFE Teflon tubing 5ft- 2mm ID X 4mm OD for 1.75 Filament Bowden 3D Printer -Allen Tech PTFE Teflon Tube
Sentiment score: 1
Number of reviews: 1
ID:2mm(0.079'')/OD:4mm(0.158''),Length:5ft.Material: PTFE(common name:Teflon).For 1.75 filament Bowden 3D Printer,TranslucentTemperature range (Degree F):-454 to 500. Flame rating: UL-224 VW-1(UL-recognized). Density: 2.15-2.20 g/cm3.Excellent resistant to acids, alkali and all kinds of organic solv...
 Show Reddit reviews
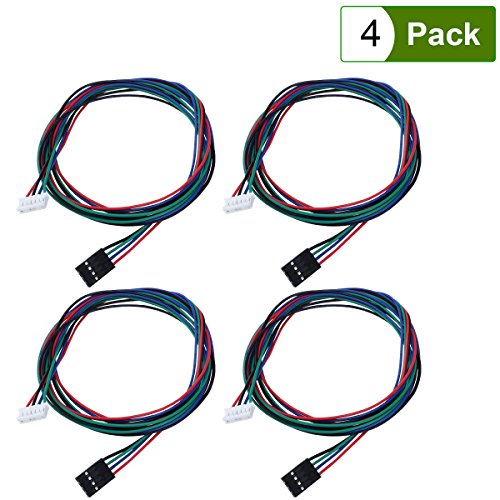
7. UEETEK 4 Pcs Bipolar Stepper Motor Cables 100 cm Long for NEMA 17 used in Reprap 3D Printers CNC Machines
Sentiment score: 1
Number of reviews: 1
1 meter long cable with 2 connectors.6 pin JST connector on stepper side, compatible with many stepper models.4 pin dupont connector of the driver side, compatible with RAMPS board and others.High quality for durable and long-lasting use.Lightweight for portable installation.
 Show Reddit reviews
8. Witbot PC4-M6 Straight Fitting 4mm thread M6 Connector for 3D Printer (Pack of 10 pcs )
Sentiment score: 0
Number of reviews: 1
10 PCS PC4-M6 Pneumatic Straight Fitting for 4mm OD tubing M6 6mm Reprap 3D Printer etcOften used in 3d printers to connect bowden tubing to extruder and to hotendMaterial:Plastic+Metal
 Show Reddit reviews
9. MUYI 10 Pcs 5mm Male Thread 0.16 Push to Connect PC4-M5 for PTFE Tube 3D Printer Connector
Sentiment score: -1
Number of reviews: 1
Item Name: Quick Fittings. Model: PC4-M5.Material: Copper, Plastic. Color: Brass, Blue.Thread Diameter: 5mm. Inner Diameter (Blue End): 4mm.Total Size (Each): 19.8 x 10mm . Weight: 50g.Package Content: 10 x PC4-M5 Quick Fittings. 10 x Black Rubber Seal.
 Show Reddit reviews
10. Witbot PC4-M10 Male Straight Pneumatic PTFE Tube Push In Quick Fitting Connector for E3D-V6 Long-Distance Bowden Extruder 3D Printer (Pack of 10pcs)
Sentiment score: 0
Number of reviews: 1
Widely use for connecting Bowden extruder and PETF tubePTFE tubing OD: 4mmThread: 6mmMaterial: stainless steelPack of 10 pcs
 Show Reddit reviews
11. Creker 3D Printer Filament Holder Extra Smooth 3D Filament Spool Holder with Bearing New Design
Sentiment score: 0
Number of reviews: 1
3D Printer Filament Holder Material: AcrylicFilament Holder Size Height: 1.41 in, Length: 5.47 inUniversal 3D Printer Filament Spool Holder, Suitable for Reprap 3D Printer PLA/ABS Filament Spool HolderNote----Package Containing: Set of 2 pieces holder to hold one filament spool (filament is not incl...
 Show Reddit reviews
12. KNIPEX Tools - Long Nose Pliers With Cutter, 40 Degree Angled (2521160)
Sentiment score: 1
Number of reviews: 1
Precision Grade Performance ToolsThe Number 1 Choice Of Tradesman WorldwideComfortable In Use And Quality Assured DesignFit To Match The Needs In The Shop, At Home Or In The Service FieldEach Tool Is Proven And Tested For Durability And Function In Real World Use And Conditions
 Show Reddit reviews
13. AMX3d PTFE Teflon Bowden Tube for 1.75 Filament (2.0mm ID/4.0mm OD) – White Connector Tubing for 3D Printer - 1.5 Meters
Sentiment score: 1
Number of reviews: 1
IMPROVE PRINTS: Regular Bowden tube cleaning can cause wear, and extruder grinding reduces print quality. Replace your filament tubing to enhance print quality.LOW FRICTION:Made from high quality, durable PTFE, the Teflon Bowden tube allows filament to slide better for smoother results.HIGH SPEC: Wi...
 Show Reddit reviews
14. NTE Electronics 77-4010D24 High Speed Fan, Ball Bearing, Thermal Plastic Wire Lead, 40 mm L x 40 mm H x 10 mm T, 24 VDC, 7000 RPM, 7.73 CFM
Sentiment score: 1
Number of reviews: 1
High SpeedBall Bearings26 AWG Red (+) and Black (−) Leads11.8" (300mm) Lead Length
 Show Reddit reviews
15. GO-3D PRINT 150mm x 230mm Borosilicate Glass Plate/Bed w/Flat Polished Edge for Flashforge Creator & Makerbot Replicator 3D Printer
Sentiment score: 1
Number of reviews: 1
Size: 150mm x 230mm x 3mmTo print with ABS or PLA, lightly spray the surface of the glass with AquaNet hairspray, then install the glass.Flat Polished Edge for safe to handleDesigned by GO-3D Print in California
 Show Reddit reviews
16. BINZET AC to DC 24 Volt 3 Amp Power Supply Adapter Converter Regulator, 5.5mm x 2.1mm DC Plug, 24V 3A 72W Wall Plug Switch for DC24V 10M 5050 LED Strip Lights
Sentiment score: 0
Number of reviews: 1
High quality and new power supply for led strip, led string, Wireless Router, ADSL Cats, HUB, Switches, Security Cameras. Audio/Video Power Supply etcInput: 100-240V AC 50/60Hz; Output: DC 24V/3A72 WattsEasy connection and simplicity to use
 Show Reddit reviews
17. uxcell 200Pcs 20mm x 25mm x 0.12mm Repairing Part Mica Insulator Sheets
Sentiment score: 0
Number of reviews: 1
Product Name : Mica Insulator;Material : Mica, Paper, Silicone ResinSize : 20 x 25 x 0.12mm/ 0.79" x 1" x 0.005(L*W*T)Color : As Picture ShownNet Weight : 36gPackage Content : 200pcs(+/-) x Mica Insulator
 Show Reddit reviews
18. MegaDeal 2" Spring Metal Clamp Wholesale Spring Metal Clamps (20 Pack), 2"
Sentiment score: 0
Number of reviews: 1
Lot of 20 2" inch spring metal Clamps - wholesale bulkMetal spring Clamps lot0.8 inch mouth opening maximum2" long
 Show Reddit reviews

it is remarkable easy to add an easy on glass bed on that model. no clips to bump into..
there us a dual fan duct to fix that deficiency so both extruders get air. I will send you links for the glass bed clips and the duct when I get to my PC.
https://i.imgur.com/9tX2dag.jpg
this is the dreamer but the Pro has the same bed configuration
you are getting a great printer. their slicer (flashprint) has been updated (use expert mode) and works well. I have simplify3d but prefer flashprint.
when you buy a glass bed, dont use cheap glass. get a 20 dollar borosilicate one. especially if you are a bleeder. cheap glass is not a good idea.
I like their blue buildtak and keep spare on hand. both the glass and the blue surface have their advantages.
No problem! A clarification to what u/Seppi449 said; I'm assuming they're actually talking about a hardened steel nozzle. This will allow the students to print with exotic filaments (wood fill, metal fill, glow in the dark, etc) without it damaging the soft brass nozzle. This upgrade is pretty cheap, and it will prevent constant replacements.
I personally would not recommend upgrading to an all metal hotend assembly. The uses for that are pretty small and they can cause a lot more issues for novice users, which I'm guessing many of the students are. When you get a new nozzle, make sure it doesn't specify it's for an all metal hotend. They are different and are not compatible.
You probably ought to also grab a bit of 2mm ID x 4mm OD teflon tubing. You need to replace the little bit of teflon tubing inside the hot end assembly periodically to help prevent jams and keep your printing smooth. The replacement piece is only about 1" long, so a roll like that will last forever. When you replace the existing tube, you want to make sure to keep the length as close to the original as possible, and keep your cuts 90º.
I hope this helps!
I bought this one: Micro Swiss All Metal Hotend I don't know much about it compared to others but it was pretty easy to install and works well.
I used this filament in my Creator Pro, and it worked like a charm. Smelled delightful while printing, too!
I don't recall any of the Finders I've had at the makerspaces I run not allowing prints because of bed leveling issues. In fact, I often will adjust the bed while prints are running if I am not happy with what the auto-leveling software settled on. Usually, it is because the bed needs to be backed away from the nozzle a little bit.
If you want to get real precise with it, I use a dial indictator on my flashforge creator pro that mounts on the X-Axis rods with a 3D printed holder allowing you to level the bed until the dial indictator shows all points on the bed are level. I'm not sure if there is already a model for the finder that exists for this purpose. It'd be pretty easy to make.
Extruder fan? If it's anything like the creator pro, I used this 24v fan.
The bulk bowden ptfe tube is what you need. I bought it from Amazon for my Creator Pro. It seems the ones I purchased precut were a little short so this my best solution.
https://www.amazon.com/gp/product/B01CUPV90M/ref=oh_aui_detailpage_o08_s00?ie=UTF8&psc=1
Gluestick. It works both to keep it to the bed AND to create a bit of seperation to pull it off.
Get a cake frosting spatula, aka print removal tool. I have this (https://www.amazon.com/Gizmo-Dorks-Print-Removal-5-inch/dp/B01DTLWVSU) but this is super popular as well (https://www.amazon.com/BuildTak-BT30185-Spatula/dp/B017XGEDOM/)
For that one you're having problems with now, heat the bed up to 90 let it sit for 5 min or so and you should be able to pry it off.
I'm not sure if the adventurer is the same type or not, but when my Creator Pro wires go out, I just use these on Amazon and chop off the one end, and splice on my connector piece to the wire. Way cheaper. https://www.amazon.com/UEETEK-Bipolar-Stepper-Printers-Machines/dp/B07175F6P7/ref=sr_1_3?ie=UTF8&qid=1549563667&sr=8-3&keywords=stepper+cable
This is way cheaper and works as well
https://www.amazon.com/gp/aw/d/B00VE6OJM4/ref=psdcmw_10967101_t1_B006XIPER2
Sadly it's a blower fan like This which runs at 12v. I'll find it's info when I'm back home.
Some of the best advice I received was to simply use a piece of paper and level your bed only at the leveling screws.
After you are close print one of these.
depth dial holder doohickey
And buy one of these to go into it.
dial indicator
After that you can throw away that annoying piece of paper.
The instructions say to press down the black ring, and while doing that to pull up on the tube. In practice, once you remove the tube, it may not hold properly anymore. You probably want to pick up a pack of PC4-M6 replacements:
​
https://www.amazon.com/gp/product/B01NANKRTD/
Creker 3D Printer Filament Holder Extra Smooth 3D Filament Spool Holder with Bearing New Design https://www.amazon.com/dp/B01FJ9LUO6/ref=cm_sw_r_cp_apa_i_q6pWDb5SSJY7X
here is the mount
and here is the sensor.
Not sure how necessary they are but I use 4 of these:
https://smile.amazon.com/gp/product/B00P00KIJI/ref=oh_aui_search_asin_title?ie=UTF8&psc=1
Also, use a z shim:
https://www.thingiverse.com/thing:440022
My glass is 1/4 inch thick.