(Part 2) Top products from r/MPSelectMiniOwners
We found 60 product mentions on r/MPSelectMiniOwners. We ranked the 307 resulting products by number of redditors who mentioned them. Here are the products ranked 21-40. You can also go back to the previous section.
21. 3D Printer,zorvo 3D Printing with All Metal Frame, DIY Printers with Resume Printing Function 220 x 220 x 250 mm, 2.8 Inch LCD Color Touch Screen
Sentiment score: 0
Number of reviews: 3
✔ FULL COLOR TOUCH SCREEN: It's easier to operate ,Supported operating systems windows 7 and later, Mac OS X, Linux. Monoprice Quality Assurance/Technical Assistance .can support multiple filaments, such as PLA, TPU, ABS and etc.✔ REMOVABLE GLASS PLATE: This 3D printer comes with a flat glass pl...
 Show Reddit reviews
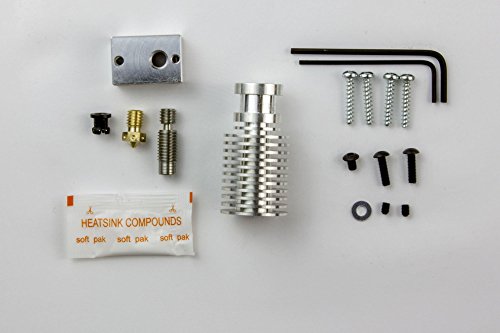
22. E3D All-metal v6 HotEnd Full Kit - 1.75mm Universal - Direct, 12v - Approximately 120mm PTFE (ASSEMBLY REQUIRED)
Sentiment score: 5
Number of reviews: 3
High Quality Printing: We've kept our sharp thermal transition that gives the high quality printing performance users have come to expect from E3D HotEnds. A sharp thermal break gives better control over filament output so you get more immediate start and stops when extruding as well as retracts tha...
 Show Reddit reviews
23. ZUPAYIPA 400mm x 210mm x 0.5mm Silicone Thermal Pad for CPU GPU Heatsink
Sentiment score: 0
Number of reviews: 3
Product Name : CPU Thermal Pad;Material : SiliconeSize : 40 x 21cm/15.7'' x 8.1'' (L*W),Weight : 103gThickness : 0.5mm/0.02''Used for graphics cards, graphic chips and CPU chips.The thermal pad can lower greatly CPU temperature and solve most of the laptop heatsink problem.Package Content : 1 x CPU ...
 Show Reddit reviews
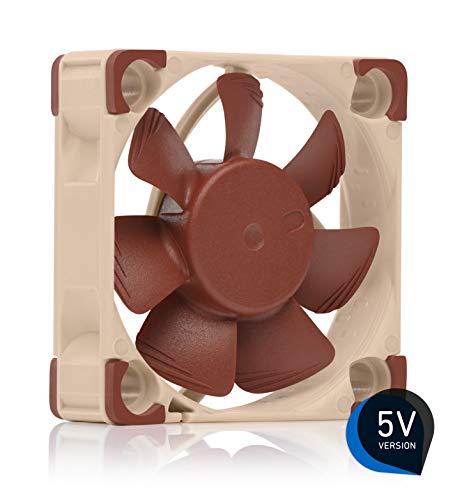
24. Noctua NF-A4x20 PWM, Premium Quiet Fan, 4-Pin (40x20mm, Brown)
Sentiment score: 2
Number of reviews: 3
Premium quiet fan, 40x40x20 mm, 12V, 4-pin PWM, max. 5000 RPM, max. 14.9 dB(A), >150,000 h MTTFAward-winning A-series design with Flow Acceleration Channels and Advanced Acoustic Optimisation frame for superior quiet cooling performance40x20mm size ideal for 1U servers or replacing fans in network a...
 Show Reddit reviews
25. Anycubic NTC 3950 100K Thermistor with 1 Meter Wiring and Female Pin Head for RepRap 3D Printer Heatbed or Hot End Pack of 5PCS
Sentiment score: -1
Number of reviews: 3
Conviniently pre-wired with 1 meter long high temperature PTFE insulated wiringUse it with heated bed or extruderTemperature sensor 100KΩ accuracy of ± 1%Pack of 5PCS
 Show Reddit reviews
26. Redrex Right Hand 1.75mm Filament MK8 Bowden Extruder Frame Block for Reprap 3D Printer Kossel Mendal Prusa
Sentiment score: 0
Number of reviews: 3
Material:Aluminium AlloyCompatible with 1.75mm filamentNema 17 stepper motor is supportedDrive gear bore:5mm, 50teeth
 Show Reddit reviews
27. Happisland 5pcs NTC 3950 100K Thermistor with 1 Meter Wiring and Female Pin Head for RepRap 3D Printer Heatbed or Hot End
Sentiment score: 2
Number of reviews: 3
Pack of 5PCSTemperature sensor 100KΩ accuracy of ± 1%Wiring length: 1 meterUse it with heated bed or extruderConviniently pre-wired with 1 meter long high temperature PTFE insulated wiring
 Show Reddit reviews
28. PEI (Polyetherimide) Sheet, Opaque Natural, Standard Tolerance, ASTM D5205 PEI0113, 0.03" Thickness, 12" Width, 12" Length
Sentiment score: 2
Number of reviews: 3
PEI is a strong, rigid plastic that withstands high temperatures and offers excellent electrical insulation over a wide range of temperaturesColor is opaque NaturalMeets ASTM D5205 PEI0113 specificationsNote: The Standard Cut Tolerance on the Width and Length is (+/-) 3/16”
 Show Reddit reviews
29. BIQU Heat Bed Power Module Expansion Hot Bed MOS Tube for 3D Printer
Sentiment score: 1
Number of reviews: 2
A general add-on heated bed power expansion module for 3D printerCompletely solve the hot bed power is too large and the load current issue. It can work with the Anet A8With this addon module to your 3D printer motherboard you can lead the maximum current up to 15AUnder the premise of normal heat di...
 Show Reddit reviews
30. 1.75mm Black PLA 3D Printer Filament - 1kg Spool (2.2 lbs) - Dimensional Accuracy +/- 0.03mm
Sentiment score: 0
Number of reviews: 2
Diameter: 1.75mm; Weight: 1kg/Spool;Dimensional Accuracy: ± 0.03 mm;Vacuumed Sealed With Desiccant;Recommended Extrusion/Nozzle Temperature 180 - 210℃;Recommended Build Platform Temperature 0 -50℃;
 Show Reddit reviews
31. RepRap Champion Metal J-Head V6 Hot End for RepRap 3D Printer 1.75mm Filament Bowden Extruder 0.4mm Nozzle Kossel Mini Prusa i3
Sentiment score: 2
Number of reviews: 2
 Show Reddit reviews
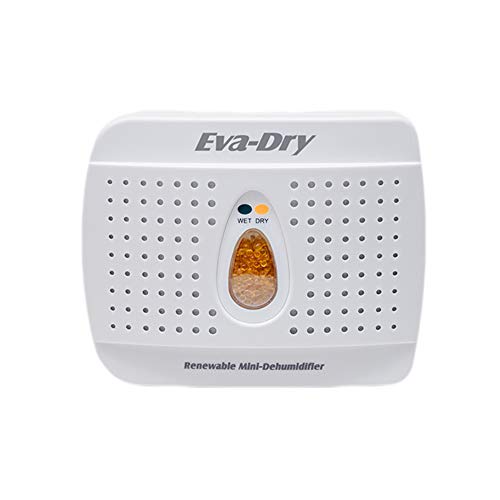
32. Eva Dry Wireless Mini Dehumidifier. Top Moisture Absorber for Small Spaces. Rechargeable & Portable. Perfect for Bedrooms, Closets, Cars, RV & Gun Safes. Removes Humidity & Helps Prevent Mold Growth
Sentiment score: 1
Number of reviews: 2
EASY TO USE: This mini dehumidifier is spill and mess free. Just hang and go! Non-toxic, child and pet safe! Your small rooms will be dry and odor free. Works for areas up to 333 cubic feetMINI DEHUMIDIFIER GOES A LONG WAY: Super dry dehumidifier unit lasts 20-30 days before recharging the silica ...
 Show Reddit reviews
33. Anycubic NEMA 17 Stepper Motor with Integrated 300mm TR8x8 Lead Screw for CNC Mill Router or RepRap 3D Printer Prusa i3
Sentiment score: 1
Number of reviews: 2
Integrated 300mm Nema 17 lead screwLead screw diameter: 8mmMore stable than the traditional one
 Show Reddit reviews
34. Noctua NF-A4x10 5V, Premium Quiet Fan, 3-Pin, 5V Version (40x10mm, Brown)
Sentiment score: 1
Number of reviews: 2
Premium quiet fan, 40x40x10 mm, 5V, 3-pin Molex, 4500 RPM, 17.9 dB(A), >150,000 h MTTFAward-winning 40x10mm A-series fan with Flow Acceleration Channels and Advanced Acoustic Optimisation frame for superior quiet cooling performanceIdeal replacement for noisy or broken 5V 4cm fans in 3D printers, DV...
 Show Reddit reviews
35. OCR 5 Pcs 1M NTC3950 Thermistors for Reprap 3D Printer Extruder or Heated Bed Pre-Wired with Teflon Insulated Wiring
Sentiment score: 1
Number of reviews: 2
For 3D printers: use TEMP_SENSOR 11 in Marlin firmwareUse it with heated bed or extruderPopular low cost thermistor for RepRap 3D printersResistance value at 25°C=100KConviniently pre-wired with 1 meter long high temperature teflon insulated wiring
 Show Reddit reviews
36. Genuine E3D V6 All-Metal HotEnd 1.75mm Universal w/ Bowden Full Kit 12V (V6-175-B)
Sentiment score: -1
Number of reviews: 2
01. Print the Widest Possible Range of Materials02. High Temperature Performance03. Compact04. Easy to Use05. High Quality Printing
 Show Reddit reviews
37. Redrex 310mm T8x8 Lead Screw Integrated with Nema 17 Stepper Motor 1.5A 40Ncm/57.1 oz.in Upgrading Z Axis Motor for Prusa i3,Reprap Corexy,MP Select Mini 3D Printers and CNC Mile Routers
Sentiment score: 0
Number of reviews: 2
High Stability:No shaft coupling needed,integrated with stepper motor and lead screw.High torque Nemga 17 stepper motor:It provides 1.5A 40Ncm/57.1 oz.in holding torque.Easy to plug:80cm stepper lead wire with XH2.54 connector,no soldering or peeling works.Motor rotor is covered by magnetic filling ...
 Show Reddit reviews
38. OctagonStar Hotend Barrel M6x26MM Teflon Nozzle for MK8 Tube Makerbot 1.75mm 3D Printer Extruder Hot End Reprap Prusa I3(5PCS)
Sentiment score: 0
Number of reviews: 2
OctagonStar Hotend Barrel M6x26MM Teflon Nozzle.Brand Listing, If you buy is not OctagonStar brand product, You Can Apply for a Refund and Compensation.
 Show Reddit reviews
39. Signstek 10 PCS Reprap 12V 40W 620 Ceramic Cartridge Heater for 3D Printer Prusa Mendel
Sentiment score: -1
Number of reviews: 2
Cartridge heaters is consist of a cylindrical stainless steel tube and thus provide a high corrosion prevention.Compatible with Creality CR-10S Pro, CR-X, Ender 3, Ender 3X, Ender-3 Pro 3d printer, etc.Widely used for manufacturing plastic and rubber parts in the car industry or in the food processi...
 Show Reddit reviews
No, but if you are going through the hassle of doing the mod it would be better to use a good quality stepper with the integrated screw since they are very 'wobble free' due to the direct connection. If you dont currently have a stepper and 8MM lead screw collecting dust it makes a lot of sense to drop $30-40 for a good quality stepper with a screw that will only require trimming for installation. Keeps it simpler.
FWIW, this option is far superior to the cheaper on that is commonly used, they look similar but they are not. The SainSmart unit at $40 has a much more precise screw and better micro-stepping or just better tolerances in general than the Anycubic option at $30. I sent 2 of the Anycubic steppers back, both were sloppy, but the SainSmart has been perfect. It might just be luck of the draw but IMO it is worth another $10 to not gamble.
Good one: https://www.amazon.com/gp/product/B00JTSEFQY/ref=oh_aui_search_detailpage?ie=UTF8&psc=1
Not as good one:
https://www.amazon.com/gp/product/B019TRKAPO/ref=oh_aui_search_detailpage?ie=UTF8&psc=1
It is also worth noting that both of these steppers are wired differently. Easy enough to sort the pairs with a multi meter. Google it if you are not familiar.
There are lots of options, but for just getting started I suggest:
Hatchbox PLA 3D 1.75 mm. This particular one is black, but get the color(s) that suit your fancy!
I suggest this one because:
There are dozens of brands of PLA and most of them will work just fine. Feel free to experiment. I use $20/kg as my standard "this is an OK price" limit for standard PLA
Be more mindful when switching material types. PLA is forgiving, but hates heat/sun. Its also not overly strong. ABS is apparently strong, but a pain to print on these monoprice printers (requires high temps) and the fumes are toxic. Wood was fun - until it clogged my nozzle. Apparently you need a larger nozzle to print wood without clogging frequently. Whoops!
Anyways, when getting new filament:
Side note: store your filament is a dry place. 3D material tends to absorb water from overly humid air. When the filament does this, it doesn't print as well. I keep mine in air tight storage containers with one of these Renewable Dehumidifiers
You are good, no worries!
I got this guy:
https://www.amazon.com/gp/product/B00NAK9JFO/ref=ppx_yo_dt_b_search_asin_title?ie=UTF8&psc=1
I believe it's genuine, but if not I can at least attest to its validity. Literally ZERO issues over the past year and a half. Prints beautifully.
If you prefer getting it straight from them, here's ya boy:
https://e3d-online.com/v6-all-metal-hotend?gclid=Cj0KCQjwoKzsBRC5ARIsAITcwXHo8yYQOrXG0QXg0n_A2hYDcjYz5T8NXcjrL9MagUbDfNrqgSl04vEaAmc5EALw_wcB
It fits right into the carriage of the old one where it clamps around the heatsink and you put the fan on the front, just like the original.
Two big changes with this.
First:
The new wires it comes with are great, but sadly not the same plastic connectors on the end that fit into the motherboard down in the printer, so I chopped off the old ones and swapped them over to one end of the new wires, so they could be plugged in.
I never soldered before getting this printer, but, as I like to stay... "YOU GON' Learn Ta-day!"
Leave enough old wire there for error (or I did at least, for shrink wrap or electrical tape to more than cover the solder point). The convenience of doing this is the other end of the wires leave connectors right near the hotend for the thermistor and the fan which can be disconnected for any reason you need in the future. (its also a negative I found later- as its a flex point on the wire, my thermistor wore out there due to the constant movement and I replaced it for just 8 bucks. However, this is where those quick connectors near the hotend paid off though, because zero soldering required. I snagged a few extras for longevity.
​
Secondly:
Once it is installed you'll notice it doesn't stick down as far, and when you go to "Home" location, you can't get lower to reach the bed.
If I was home I would snag a picture.. but basically I got longer bed screws (4), 4 spacers (1/4 inch I think?) and incorporated the same springs on top of the spacers (with the longer screws through them). I just took an original screw into a hardware store, found longer versions and spacers that looked like these below:
https://www.grainger.com/product/GRAINGER-APPROVED-Spacer-3ZMA8?cm_sp=Product_Details-_-Products_Based_on_Your_Search-_-IDPPLARECS&cm_vc=IDPPLARECS
You'll need spacers OR new longer springs... your call. Pain in the butt to put it together but once screwed in, works like a charm with the same functionality as it did prior, just higher up where the new hotend can reach it.
​
Feel free to reach out if you have more questions or concerns.
I've had great luck with AIO Robotics PLA sold on Amazon for around $13 per 0.5 kg. The other PLA brands I've purchased work, but the prints aren't as smooth. I believe it's because the tolerance is better on the AIO Robotics PLA (+/- 0.02 mm). The 3D MARS PLA I bought that doesn't print as smoothly has a wider tolerance of +/- 0.05 mm.
Also, I bought a E3D Full clone hotend on Amazon that is way better than the stock hotend (that often clogged on me).
https://www.amazon.com/gp/product/B01GD8LCFO
And here's the mount you'll need to print for it (there are others that are probably better, but this works for me):
https://www.thingiverse.com/thing:1728736
I bought the same thing for my v1:
12"x12" 0.03" PEI
https://www.amazon.com/gp/product/B0013HKZTA/
(6) 12x12" 3M Adhesive Transfer Tape:
https://www.amazon.com/gp/product/B007Y7D5NQ/
At the time there were no practical cheaper/smaller options (although the extra 3M adhesive does come in handy).
... I scored/snapped the sheet into 4 pieces, and I'm still on the first PEI sheet after like 300 hours. It still looks flawless. I only use sharp scraper blades or no tools to remove parts. If you're printing something crazy in a cold room, you can add hairspray, but for the most part, PEI has perfect adhesion on it's own.
I definitely recommend the thicker PEI (0.03"+), as it makes the MPSM bed much more rigid. I don't have to bend the aluminum bed "flat again" anymore. I dont worry about bending the bed when ripping parts off the bed, even with super high adhesion.
Clean it with alcohol, not sandpaper.
Another update in my quest to learn how/why the Noctua fans work with the Monoprice. I started the upgrade process for printer and cut off the stock fan. Before I soldered the new one on, I thought I'd check out if the new fan "just worked." I turned my extruder heat to 100C since I know the stock fan kicks on at 75C, and when I bared back the wires and hooked black to black and red to red... nothing happened. Now I'm confused, because it's a PWM fan like I thought would workl.
I got out my voltmeter and I read 10V coming out of the line. Now, I'm pretty sure the power coming out of the printer is pulsed 12V DC, and I know my voltmeter doesn't have a setting for pulsed DC, so I'm not sure if 10V is the average power or if 10V is the peak or what my meter is reading. But if I touch the leads of my stock fans back to the printer, the stock fan turns out. I touch the Noctua fan leads, it doesn't turn on. Bummer.
So now I'm back in the boat with everyone else and have no idea what's going on. I don't have a capacitor to try out like u/cpr420 just yet (back to Amazon I go). I don't want to just tell it to kick off a print as I'd rather not run the hot end without cooling working properly, so the next plan is to get a bit of gcode written up and force full power at 12V to see if my fan turns on. Alternatively, I think I can hook it up to Pronterface and just tell my printer to turn the fan on. I'm not that familiar with Pronterface just yet.
Anyway, wanted to check in again with new info. I'll post again as I learn more.
I have several upgrades in the queue for this weekend once my M3 hardware kit comes in:
(Note the above designs are all three by USWaterRockets, who seems to have exceptional engineering skills, but I haven't installed them yet. Hopefully, this weekend and I'll post results)
Another one I'm considering next:
Here is the E3D-v6 adapter I currently have on the printer:
Note the above design is just a quick-and-dirty solution; the author even states this. It works and will get you what you need to get things going with the new head.
Other upgrades I've done:
https://www.amazon.com/gp/product/B007Y7D5NQ/ref=oh_aui_detailpage_o05_s00?ie=UTF8&psc=1
https://www.amazon.com/gp/product/B0013HKZTA/ref=oh_aui_detailpage_o05_s00?ie=UTF8&psc=1
Here's the E3D-v6 printhead I bought and it's worked well: https://www.amazon.com/gp/product/B01H4V2QEK/ref=oh_aui_detailpage_o04_s00?ie=UTF8&psc=1
Disclaimer: I'm new to 3D printing. This is my first printer and the learning curve is steep. I may look back on this posting in a year and think "what an idiot I was doing <this>". Take my advice with a grain of salt, as I'm muddling through this whole thing. YMMV
I did the same thing while changing a nozzle. I ordered https://www.amazon.ca/gp/aw/d/B01N4KY6TR and it was a perfect replacement for my v2. Pretty easy to replace too, just involves some unscrewing of the casing and running the new wire to plug it in (no soldering required).
You should use the continuity tester of any multimeter to check the wires before replacing them. You can connect one lead to where the heated bed wire plugs into the motherboard, and the second to where the other end of that wire is on the heated bed. Do that to check all four wires while jiggling them around to check for internal breaks.
If all four wires going to the heated bed are well connected you probably have a bad thermistor. This is that little black thing mounted to the center of the heated bed that measures the temperature of the bed. You can connect an ohmmeter to either side of the little black thing to see if it gives the correct amount of resistance (in the neighborhood of 100k ohms)
I had to replace mine, you just need any 100k ohm glass bead thermistor, it doesnt even have to be the same exact type as the one on the board. I used this one:
https://www.amazon.com/gp/product/B01N4KY6TR
it has leads and a plug that i plugged directly into the motherboard and just taped it to the bottom of the heated bed with kapton tape and works perfectly.
Good luck!
I'm working on this mod: https://gigdigit.com/extended-heat-bed-kits-120-x-250mm-print-area-3mm-thick-select-mini-v1-v2/
The double-sized hotbed takes more power than the stock power supply can put out (especially the newer 7 amp models, which I have)
So I decided to use one of the MOSFET drivers, through the existing power jack, to which I'll connect a beefier power supply. I chose this one: https://www.amazon.com/gp/product/B01HEQVQAK
The top two terminals tap into power as shown here: https://imgur.com/NYOGok9
The bottom two run through the braided cable (joined by the thermistor wires and run to the new platform. The small connector goes to the original board's hotbed connection.
If anyone else has done this mod, or something similar, I have a few questions.
I'll probably have more questions as I go. :-)
Thank you so much!
As for the hot end, if i just wanted to replace the 30mm fan with a Noctua 40mm fan using this, and i didn't want to splice wires, which ones of these two fans should i get? This one (5V) or this one?
I think I have a no-solder fix for the heat bed thermistor replacement. I bought some replacements off amazon that come attached to wires and used some high temperature tape from the hardware store (I think its for fireplace exhausts or something. Rated to over 100 degrees C) Then I just ripped off part of the insulation, taped it down and fed the wires down into the bottom. Then I cut off the original wires, stripped part of them and just twisted them together and hold with electrical tape. I'm on my first print and it seems great so far. No soldering required. I left the original one on there too, just cut the wires short on the bed side. I can't guarantee it is as good as the proper soldering, but it seems good.
Thermistors: https://www.amazon.ca/gp/product/B01ABBUCP0/ref=oh_aui_detailpage_o00_s00?ie=UTF8&amp;psc=1
Not sure if I was lucky or if it is an old image but these I purchased off Amazon actually had the white connectors already attached which plug directly into Mini's board.
https://www.amazon.com/gp/product/B01N4KY6TR
Just removed the old one entirely and replaced it with one of these. Splicing anywhere along the area that travels up and down as well as left and right is going to wear the spice after time. If you do have to splice or solder any of these wires make sure the point of the splice is somewhere inside the Mini's structure and not with the Bowden tube so there is no constant flex on it.
RepRap Champion Metal J-Head V6 Hot End for RepRap 3D Printer 1.75mm Filament Bowden Extruder 0.4mm Nozzle Kossel Mini Prusa i3 https://www.amazon.com/dp/B01GD8LCFO?ref=yo_pop_ma_swf
I’ve only had my printer a short time too (I think it is is 8 or 9 days old).
Sure thing. It ended up being cheaper for me on Amazon with Free shipping, but Newegg also has it.
https://www.newegg.com/Product/Product.aspx?Item=9SIAADY5U14594
https://www.amazon.com/gp/product/B071W93333/ref=oh_aui_detailpage_o00_s00?ie=UTF8&amp;psc=1
> E3d
you mean something like this right????
https://www.amazon.com/E3D-All-metal-HotEnd-Full-Approximately/dp/B00NAK9JFO
I can't seem to find a 12V Noctua 40mm fan. Will this 5V one from amazon work?and will it require any soldering?Edit: Found a 12V Noctua
I'm in Canada as well. I have been using the AMZ3D PLA off of Amazon. I have 8 differnet colors and haven't had any problems.
Like this? It is $60+ on Amazon. E3D All-metal v6 HotEnd Full Kit - 1.75mm Universal - Direct, 12v - Approximately 120mm PTFE (ASSEMBLY REQUIRED) https://www.amazon.com/dp/B00NAK9JFO/ref=cm_sw_r_cp_apa_i_SpqQCbDZASXYV
The collar that holds in the tube exploded for me. I ended up just replacing it altogether with this: https://www.amazon.com/gp/product/B01LO3HKK4/ref=oh_aui_detailpage_o03_s00?ie=UTF8&amp;psc=1
All metal, not likely to break, just reuse the same bearing that's in the old extruder and you're good to go.
do you know which thermistor? If you're just replacing the thermistor you should be okay, never hurts to recheck bed level and clearance though.
I replaced my bed thermistor with one of these when the wires finally snapped. You'll need to splice it onto the wires/connector of the old one unless you happen to have the right connectors and crimp tool laying around.
Looks like one of these:
https://www.amazon.com/Zorvo-Printer-Extruder-Nozzle-0-4mm-filament-1-75mm/dp/B01MQISR7E/ref=sr_1_4?ie=UTF8&amp;qid=1495131676&amp;sr=8-4&amp;keywords=e3d
Noctua NF-A4x20 PWM premium-quality quiet 40mm fan https://www.amazon.com/dp/B071W93333/ref=cm_sw_r_cp_api_dNOUAbSMZ146A
Since they're not a standard version, they are a bit trickier to find. You could always upgrade to something better that uses something more common - https://www.amazon.com/dp/B01LO3HKK4/ref=cm_sw_em_r_mt_dp_U_ifWTDbNDDR30Z
Any of these should work. You'll have to.cut the lead screw of course. Well actually there is a Z-axis extension mod or two that you may want to look into before cutting the lead screw.
Also be sure to check the shipping dates since it may ship from overseas.
Anycubic NEMA 17 Stepper Motor with Integrated 300mm TR8x8 Lead Screw for CNC Mill Router or RepRap 3D Printer Prusa i3
TriGorilla NEMA 17 Stepper Motor for CNC Mill Router or RepRap 3D Printer Prusa i3 + Iintegrated 300mm TR8x8 Lead Screw
Nema17 stepper 210mm or 250mm Tr8*8 leadscrew threaded
I recently had this problem. I used a heat gun on the tube to warm it up and get it out. However if your not VERY careful you melt the liner as well. You can order replacements from amazon
Uses these inserts.. I just got them and they worked perfect.. Plus gigdigit was out if then them
OctagonStar Hotend Barrel M6x26MM... https://www.amazon.com/dp/B01HAG12S0?ref=ppx_pop_mob_ap_share
Is this what you are looking for?
Get a plastic tub and a thing of reusable desicant.
I just did the same thing while making a different upgrade. I'm trying Muffler Sealer to put it back in (hasn't arrived yet).
Edit: also replacing my thermistor with this one.
BKM 130mm X 160mm, 3mm Thick Borosilicate Glass Plate, Select Mini https://www.amazon.com/dp/B07BYJQH79/ref=cm_sw_r_sms_c_api_i_Hjt4DbX7HZZ46
ZUPAYIPA 400mm x 210mm x 0.5mm Silicone Thermal Pad for CPU GPU Heatsink https://www.amazon.com/dp/B01N9HGKR1/ref=cm_sw_r_cp_api_i_Kkt4Db9A34M4M
http://www.walmart.com/ip/2-Pack-Aqua-Net-Professional-Hairspray-Extra-Super-Hold-Unscented-11-0-OZ/47068302
This is the one I have used. [Link] (https://www.amazon.com/dp/B01B41K7OM/ref=cm_sw_r_cp_apap_XvQ258yKiNyW9)
https://www.amazon.com/dp/B01HEQVQAK
I used this one. Good for 15A.
Just a generic chinese knock off E3D V6. I think this is the one I bought. I used it with this bracket (printed in abs)
Amazon. Here is the links:
GO-3D PRINT 130mm x 160mm Borosilicate Glass Plate Bed Flat Polished Edge w/Corners Cut for Monoprice MP Select Mini 3D Print https://www.amazon.com/dp/B075XJ5ZP1/ref=cm_sw_r_cp_tai_-aUxDb3EP28M4
ZUPAYIPA 400mm x 210mm x 0.5mm Silicone Thermal Pad for CPU GPU Heatsink https://www.amazon.com/dp/B01N9HGKR1/ref=cm_sw_r_cp_tai_vbUxDb1VVQ706
Thermal Silicone pad The sheet is larger than you need, cut a piece to fit your bed and place it between the bed and the glass. I don't use clips to hold my glass down, it "sticks" pretty well to just the silicone
120mmX120mm Glass bed I purchased one similar that had cut corners so I could easily access my bed leveling screws but its up to you.
Glass bed Installation Dont worry about when he cuts his own glass. This guy makes a bunch of mod videos for the MPSM and he's through about his instructions and tips.
I used this one:
https://www.amazon.com/gp/product/B01B41K7OM
It wasn't the exact same connector, but it fits fine. Same thermistor, no need to change settings.
No it's a clone https://www.amazon.com/gp/product/B01MQISR7E/ref=oh_aui_detailpage_o00_s01?ie=UTF8&amp;psc=1
Here's the link for the complete E3D upgrade. I have no idea where to get a stock replacement.
https://www.amazon.com/Genuine-E3D-All-Metal-Universal-V6-175-B/dp/B00NAK9L6Q/ref=sr_1_3?ie=UTF8&qid=1526851047&sr=8-3&keywords=e3d+hotend
This is my PLA https://www.amazon.com/1-75mm-Black-PLA-Printer-Filament/dp/B01BZ5ND8O
And yeah Cura does still do,
But only when the surface area is sufficiently large enough (~ > 4 square cm) but when I was printing the cube (Area 1 square cm) or when it's printing some sort of screw or a column that doesn't necessary have a lot of surface area, both Cura and S3D decide to do the infill in two parts. However Cura does the outline all at once, but S3D does the outline in 2 stages.
Do you have any left over bits you can check for a film? Maybe the film was removed when the adhesive was applied, but it still seems odd that PET isn't sticking.
This is the PEI I bought
I bought this stepper motor and followed the HackaDay guide to replace my stepper motor. My original one was slightly bent and was causing z banding. As it shows in the video, when I try to tell the printer to raise or lower on the Z axis, it just makes a thunk-like noise and barely moves. The video shows me using the controls to move the motor three time (twice “up”, once “down”). I have also tried just sending g code with Ponterface.
I unfortunately didn’t test out the motor before cutting it down to size and installing it, but does this look like a bad motor or have I messed up something? I hooked up the original motor and it spins just fine.
Its teflon tube so glue isnt gonna stick to it. I tried. you need a M6 bowden connector and a M6 nut. Print this part https://www.thingiverse.com/thing:2793080 by removing the 2 screws holding the bowden connector down and removing it. Hold the tube in place for the duration of the print with your thumb. It will suck but you can do it, i believe in you. This part will let you attach a regular threaded bowden connector to the new MP select mini v2 with the modified cheap ass bowden fitting. Once that's in place, even only halfway screwed in print the base of this part. https://www.thingiverse.com/thing:2756509 you don't need the arms, just the base. Once that's printed remove your extruder feeder, screw in the new base, using the M6 nut attach the threaded bowden conenctor. Put the old arm on, old screw, etc. You're good to go. How do I know this? Oh no reason. I just did it a few days ago...https://imgur.com/a/SOCXXzn
Or RMA your printer and wait 3 weeks for a new one...your choice. A pair of M6 nuts cost me like $0.49 at the hardware store and 10 bowden connectors was like $8 on amazon. I also tried this "bolt on replacement" and it didn't fit correctly. https://www.amazon.com/Redrex-1-75mm-Filament-Extruder-Printer/dp/B01LO3HKK4/ref=as_li_ss_tl?ie=UTF8&amp;linkCode=sl1&amp;tag=mpsmwiki-20&amp;linkId=da5703adf10e92d89680d3fe34074fc3