(Part 2) Top products from r/bikewrench
We found 75 product mentions on r/bikewrench. We ranked the 1,423 resulting products by number of redditors who mentioned them. Here are the products ranked 21-40. You can also go back to the previous section.
21. 500 Piece Assorted Loose Bicycle Bearing Balls 1/8", 5/32", 3/16" 7/32" & 1/4"
Sentiment score: 2
Number of reviews: 4
Each size is individually packaged and labeled (see photos)Precision grade G25 balls100 balls each of the following sizes: 1/8", 5/32", 3/16" 7/32" & 1/4"AISI 52100 chromium steel
 Show Reddit reviews
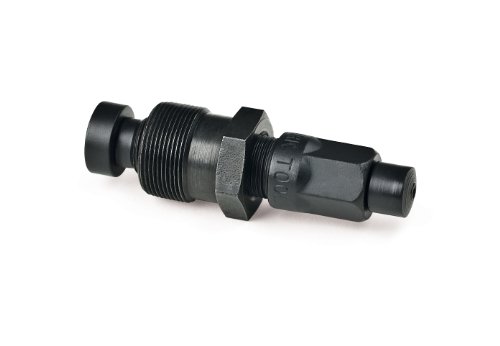
22. Park Tool Compact Crank Puller
Sentiment score: 1
Number of reviews: 4
Universal design will remove both square taper and splined (ISIS Drive, Octalink) crank armsThe CWP-7 is made for the 22 x 1mm threading in the common cranks11.3mm and 16.3mm for both square taper and ISIS Drive and Octalink crank arms
 Show Reddit reviews
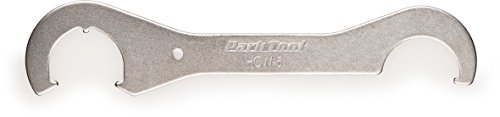
23. Park Tool (109917) HCW-5 Lock Spanner
Sentiment score: 2
Number of reviews: 4
Double sided bottom bracket lockring hook spannerOne side is a single hook, the other is a hook spanner with 3 notches for better engagement in the lockringsThe three-hook end will fit 3-notch lockrings with a maximum outside diameter of 46mm, and minor diameter (in the notches) of 40mmNOTE: The HCW...
 Show Reddit reviews
24. SHIMANO Tourney TX55 6/7 Speed Rear Derailleur
Sentiment score: 0
Number of reviews: 4
Compatible with 6 or 7 speed cassettes and freewheelsDirect Mount
 Show Reddit reviews
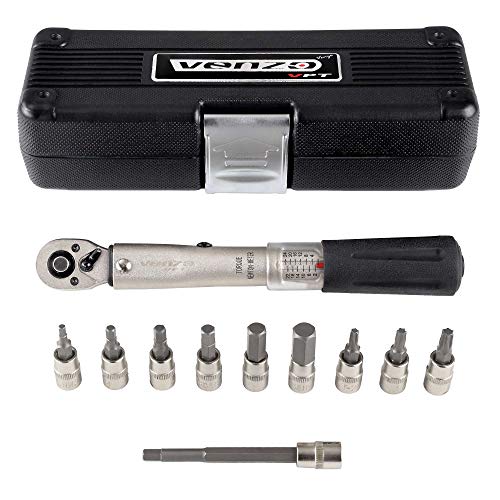
25. Venzo Bicycle Bike 1/4 Inch Driver - Torque Wrench Allen Key Tools Socket Set Kit 2-24Nm - Small Adjustable
Sentiment score: 1
Number of reviews: 4
Comes with Guage perfect for bicycle carbon parts,1/4'' Torque Fix Set, Torque range: 2-24 NM, Tolerance in: Accuracy +/- 4%Allen Keys 3 /4 / 5 / 6 / 8 / 10 mm, plus 5mm Longer Allen Key for easy use, T20, T25 and T30 Torques, High quality. Great for bicycle parts or bolts. (Note: please do not try ...
 Show Reddit reviews
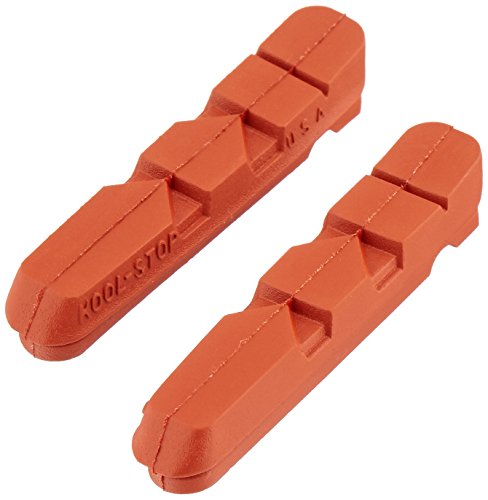
26. Kool Stop Continental, Caliper Pads, Threaded Posts, Salmon, Pair
Sentiment score: 2
Number of reviews: 4
The Continental Is Our Classic Conventional Design, For Use On Older Bicycles Or Brake Systems With Clearance ProblemsGreat For City Bikes And Steel Rims. Internal Backbone. Nyloc Retaining NutNyloc Retaining Nut. Thicker Pad. Weight Per Pair: 41.6 GramsPackage Dimensions: 1" ( H ) x 4" ( L ) x 4" (...
 Show Reddit reviews
27. The Bicycling Guide to Complete Bicycle Maintenance & Repair: For Road & Mountain Bikes
Sentiment score: 3
Number of reviews: 4
Used Book in Good Condition
 Show Reddit reviews
28. Jagwire Black Housing Liner 30 Meter Roll, Fits up to 1.8mm Cables
Sentiment score: 2
Number of reviews: 4
Housing Diameter: 1.8mm<br/>Unit of Sale: Roll
 Show Reddit reviews
29. BIKEHAND Bicycle Bike Chain Wear Indicator Tool Chain Checker - Compatible with Shimano Sram KMC and All Others 7 to 12 Speed Chains
Sentiment score: 2
Number of reviews: 4
This BikeHand ChainChecker Tool is designed and intended for use specifically measuring the state of your chain in relation to the extent of wear it is showing. Now includes some handy multitool functions. Shows When To Replace Your Chain This user-friendly instrument clearly indicates when the warn...
 Show Reddit reviews
30. BIKEHAND Bike Bicycle Repair Tools Tool Kit Set
Sentiment score: 1
Number of reviews: 4
Tyre repair kit.Interchangeable Phillips/flat screwdriver.Cassette remover (Shimano compatible).Small screwdriver (for derailleur's adjustment)8x10mm forged steel open-ended wrench. Freewheel turner (chain whip).30x32x36x40 mm 4-in1 headset wrench.2 steel hub-cone wrenches (13x14x15x16mm)Cotterless ...
 Show Reddit reviews
31. Park Tool Home PCS-9 Mechanic Repair Stand
Sentiment score: 1
Number of reviews: 3
Screw type clamp adjusts to fit tubes of various shapes from 7/8" to 3" (24mm to 76mm)Clamp rotates 360 degrees for easy access to any part of bike. Will also clamp on aero shaped seat postsFolds to 41" (104cm) for portability and storageScrew type clamp adjusts to fit tubes from 7/8 to 3"Clamp rota...
 Show Reddit reviews
32. Pedro's Bicycle Cable Cutter
Sentiment score: 2
Number of reviews: 3
Material: heat-treated steelRecommended Use: cyclingManufacturer Warranty: lifetime
 Show Reddit reviews
33. M-Wave Seat Post Clamp with Rack Mounts, 31.8mm, Black
Sentiment score: 0
Number of reviews: 3
Allows for another fixation point for your rear rackAll the functionality of an M-Wave seat tube clampBlack in color to make it blend in nicely with your bikeEyelets for rear rack, Allen screws includedWeighs less than 35 gramsAlloy seat clamp with threads for luggage carrier fixation37g
 Show Reddit reviews
34. Park Tool Chain Wear Indicator CC-3.2
Sentiment score: 0
Number of reviews: 3
This tool quickly checks chain stretch and wear it will determine if a chain is good or badMade from precision, laser cut steelFits derailleur and one speed chains including 9 and 10 speed
 Show Reddit reviews
35. Hozan Lockring Tool, Headset and Bottom Bracket Dual Radius
Sentiment score: 2
Number of reviews: 3
Lockring Wrench
 Show Reddit reviews
36. Park Tool CC-3.2 Chain Checker for Bicycle Chains
Sentiment score: 1
Number of reviews: 3
Accurately measures wear on all 1/2" pitch bicycle chainsCompatible with most 5-to-12 speed chainsGo/no-go gauge indicates .5% and .75% wear
 Show Reddit reviews
37. Bike-Aid Dri-Slide 4oz. Lube with Needle Nozzle
Sentiment score: 1
Number of reviews: 3
Molybdenum-disulfide
 Show Reddit reviews
38. Shimano SL-BS64 8-Speed Ultegra Bar End Shifter Set
Sentiment score: 3
Number of reviews: 3
Drivetrain Spacing: Shimano/SRAM 8 End Type: Shimano/Sram FD/Shifter Compatibility: Shimano Road DoubleShimano Flatbar Road Triple,Mountain Triple Front/Rear: Set Shifter Compatibility: Ultegra BS64 Shifter DetailColor: Silver Shifter/Rear Derailleur : Shimano Weight: 180g Weight: 83g
 Show Reddit reviews
I was gifted the Big Blue Book of Bicycle Repair at a bike shop I used to work at. Fantastic reference book, good descriptions, good photos. That and/or youtube are good places to learn maintenance.
Now, on to your bike...
>All the spokes are pretty much completely rusted
Stop there, new wheels are required. Determine if they're 700c or 27" the tire should tell you this info, if you can read it. On the subject of new wheels, I'd also recommend new tires/tubes as they've probably sat through the rusting phase.
>rear brake squeaks like crazy and you really have to pull it to get it to work
New brake pads. The current ones are most likely dried out, err on the side of caution here, brakes will literally save your life (Don't listen to Premium Rush on the topic).
>Rear tire slides against rear brake hindering movement slightly
Brake pad adjustment necessary. Will happen when replacing pads.
>Chain and rear derailer seem to be in good shape
Close up pictures required. You could probably just get a chain cleaner, hopefully the "black greasy stuff" protected the chain from corrosion. Rear and front derailleurs could probably benefit from a healthy application of triflow at the joints.
>Brake cables are rusty, definitely need to be replaced
Right on the money here. New cables and housings. Triflow the shifters for good measure. Replace if they don't work after new cables/housing.
>The gear changer on the left handle bar doesn't work
Triflow trick from above, let it soak for like an hour. Do you still hear "clicks" when you press it? Are the paddles stuck? If your answers are no and yes (respectively), replace anyway.
Lastly, if you take the chain off, how smoothly do the cranks spin? "Stuttering" cranks sometimes mean your bearings and/or races are pitted. New bottom bracket probably isn't a bad item to add to the list, the Shimano UN57 (or similar) are relatively inexpensive and will probably outlast the next apocalypse.
It probably can't hurt to put a wear indicator on the chain and cassette to ensure they are still good to go. This could cause for some harder to diagnose issues down the road for home mechanics if they do need replacing. Chain wear indicators are easy to use, cassette wear indicators require a little more finesse and practice.
If in doubt, grease. You can't go wrong with a little more grease on the moving parts on this bike.
You have a loose crank arm there, and what looks like probably a loose bottom bracket too (the part at the bottom of the bike that the crank arms attach to, it spins).
It's very possible that that bottom bracket doesn't need replaced, and just needs taken apart, cleaned out re-lubed and tightened. Then you would clean up those rusty crank bolts with barkeeper's friend to make them shiny again, and put them back on pretty tight.
It depends how expensive the bike is. If it's a $300 or less bike I would bet relubing and tightening the bottom bracket and then just tightening the crank arms would put it back to working like new.
You'd need a bottom bracket wrench to remove the bottom bracket, and a crank puller. For both those tools that's gonna be about $23. These are cheaper ones but you will only use them once so it's fine.
Then you need some marine grease at Walmart for about $4, and some bar keepers friend (at Walmart or grocery store for about $3).
This is a total of about $30 to fix your bike on your own.
You could follow a video on removing the crank arms
And removing and relubing your bottom bracket.
You would take the bolts off your crank arms, pull both crank arms off with the crank puller, and then remove the bottom bracket. You'd clean it out real good with rubbing alcohol or brake cleaner, and then relube it with marine grease, and then tighten everything down. Then you would clean up those rusty crank arm bolts with bar keepers friend and an old tooth brush, and then tighten the crank arms back on. Bike would be good as new for $30. So long as you're patient, careful, and follow the videos. Look around online for things if your not sure.
If you have access to a torque wrench that would be great to follow torque specifications, but you can do without if you follow a video. I mean, your bike will be much safer afterwards than it is now. Fixing it well (instead of perfect) is better than not fixing it at all.
If you are not a d.i.y. fix-it kind of guy, you can go to a bike shop. Not sure how much they will charge. I wouldn't know, I rarely go unless I'm buying a bike. I only wrench at home 🔧
Just curious. You clearly use your large chainring more than your smaller chainring. If you are using the large chainring with the larger (easier) gears on your rear cassette that can exaggerate wear and tear on the chainring itself.
The sharktoothing you are starting to see now is an indication that you will probably need to change your chainring on your NEXT chain. Keep an eye out for very sharp teeth, these are a sign of a worn out chainring and can be dangerous to your leg as-well.
Typically changing a chainring requires changing the whole drivetrain: chain, cassette and chainrings, which typically incurs quite a large expense, but it does also give you the opportunity to tailor the drivetrain to the user (do you want easier/harder gears? looking to drop a little weight? want to color-match or bling out your bike?).
If you are starting to do your own drivetrain work, a chain stretch tool is cheap, easy to use and a good addition to your tool box. Replacing a cassette is also pretty easy, and take only one extra tool (which depends on what your lockring is). Depending on your crank, chainrings are also easy to change and either take an inexpensive chainring bolt tool or sometimes just 2 allen wrenches, typically a 5mm and a 6mm.
EDIT: Here is an article with some more info on the topic
You're welcome. Remove that cable but save it so you can use for measurements. You CAN ride the bike without it but it will be in low (3rd) gear.
Shifting on these goes like this...
1 (1st) is high gear and is the easiest. When used the cable pulls that indicator chain all the way out.
2 (2nd) is normal as if riding a single speed bike. The cable pulls the indicator about halfway.
3 (3rd) is low gear and the hardest to pedal in. Cable doesn't pull at all. Takes a bit more muscle to pedal but you can go really fast.
Once you replace that cable you'll have a nice bike to ride. They are ridiculously easy to maintain once you get the hang of it.
Also, your wheels probably have chrome/steel rims. You will want to replace the brake pads with Kool-Stop Continentals. Get the SALMON (orange) colored ones here. These are the best brake pads for these old wheels. Salmon color only though!
In addition to tools, may I recommend a book such as the Park Big Blue Book or Complete Bicycle Maintenance and Repair. Between a book, sheldonbrown.com, and YouTube, you're pretty well covered for references. Also a good companion for tear-downs: A digital camera. A picture, and a good system for organizing parts that have a specific order will save you some heartburn.
I did this with my 1983 Cannondale a couple of years ago. It's pretty easy.
First, locate some bar end shifters. These Shimanos will probably be your only option because you'll have a 5 or 6 speed rear hub. The package says that they are for an 8 speed cassette, but you will need to flip them into Friction mode. I've tried, and they almost but not quite work in Index mode.
The package will come with new, longer cables, new cable housings, and most importantly, cable stops that will bolt onto the boss on your frame - the section left on your downtube when you remove the d/t shift levers.
There should be some directions in the package. You will need to unwrap your handlebars, remove the shifter from the shifter housing, then insert the shifter housing into the handlebar ends (I snuck the bar tape end along with it) and snug them up. Replace the shifters, feed the cable through , put the first set of cable housing on, and run the rest back to your derailleurs like you would for any other shifter.
They will friction shift, so the adjusting should be easy. Wrap the bar tape so a little housing rides up to the first bend (there might be some plastic stuff to make this easier), and finish wrapping.
Here's what my ST500 looked like when I got it, and here it is with the new shifters and brake levers being installed.
Not quite as technical as the others, but the Complete Guide to Bicycle Maintenance and Repair from bicycling magazine is a great, easy to use reference. Everything is illustrated with photos and there is a ton of good information for both the novice and the experienced.
Take a look at Pedro's tools. They are a little cheaper than Park, but are excellent tools. As /u/singlejeff said, get some basic stuff, but hit up your local co-op for the more expensive tools.
Here is a solid start:
Park Tool ST-3 I use this thing constantly, and Pedro's doesn't have a similar tool.
Pedro's Y Wrench Go ahead and get both the 4,5,6 and 2,2.5,3.
These three tools live in my apron. Absolute go-to tools.
Additionally, get an adjustable wrench(I love my Klein Tools wrench) a set of JIS Screwdrivers so you don't strip out your screw heads,
A good cable cutter
Some important chain tools are the Park CT-3.2 and also pick up the Park MLP 1.2 and CC-3.2(which imo is the absolute easies chain wear checker).
I would also suggest a L Hex wrench set you can pick em up cheaper at Lowes or whatever, but critical for getting stuck pedals off, speaking of which, a Pedal Wrench.
Finally a crank puller you really don't have to go expensive on this thing. I see em as disposable, because as soon as I see thread wear, I shit can em. I stripped out a vintage Stronglight crank and a C Record crankset using a worn out crank puller. No bueno.
All this shit will be expensive, but if bought over time, you will have a solid set of tools eventually. These are my favorite tools, I am sure others have their opinions.
Yes, you can use either one of these, but it looks like you'll also need to lengthen the brake cable. If you get the adjustable one I'm posting, it'll pull the bars back to the rider, giving the same effect, and you might not have to lengthen the cable. all these types of products come in different lengths too. Make sure to measure the stem width, usually 1 1/8th across.
https://www.amazon.com/Suncentech-Adjustable-Mountain-Handlebar-Components/dp/B077JXCKB3/ref=sr_1_7?crid=12BFTSCP9YPP1&keywords=bicycle+handlebar+adjustable+stem+riser&qid=1562554708&s=gateway&sprefix=bicycle+handlebar+adjustable+stem+riser%2Caps%2C230&sr=8-7
https://www.amazon.com/Delta-Cycle-Bicycle-Extender-Handlebar/dp/B000FGYKWS/ref=sr_1_11?keywords=bicycle+stem+riser&qid=1562555126&s=gateway&sr=8-11
I was a student too, but I forked out a bit of money for shifters like this: https://www.amazon.ca/Shimano-SL-BS64-Ultegra-Shifter-8-Speed/dp/B000F5EFOC/ref=sr_1_fkmr1_1?ie=UTF8&qid=1540826780&sr=8-1-fkmr1&keywords=bar+end+shifters+7%2F8+speed
I found some non-indexed shifters for less than $80 on sale and you might be able to as well. They are a LOT nicer than downtube shifters IMO, and they are compatible with any cassette or freewheel (up to a point).
If you're looking for smart internal cable routing ideas, check out the frame on the Cannondale Synapse 5. As far as internal routing goes, it's perfect. In addition to great entries/exits, it passes internally underneath the BB (with internal cable guide). Also, you should use cable liner when routing internally.
Buy tools as needed, no need to stock up with everything right away. Most park tools I buy on Amazon and get them within two days. Tools I would get right away though would be
As for cabling
Universal Brake Cables on Amazon, just make sure you cut of the correct end.
Here is a shift cable set.
As for cutting the cables and housing, do NOT use standard wire cutters. You need a parrot style nosed set of cutters, like this Pedros set. I bought a cheap set of cutters on eBay that work great. When I cut housing I use a little sand paper to flush up the ends.
The 4th hand is not really needed, I get by fine without it.
https://www.amazon.com/BIKEHAND-Bicycle-Chain-Indicator-checker/dp/B00811WQW0/ref=sr_1_2?ie=UTF8&amp;qid=1499380143&amp;sr=8-2&amp;keywords=chain+stretch+gauge
Yes, you can use a ruler, but for $4 it makes the job easier and as long as you use this tool it will save hundreds.
I'm seeing the Park PCS 9 on Amazon for about $120.
http://www.amazon.com/Park-Tool-PCS-9-Mechanic-Repair/dp/B000OZFJTI
I have the PCS 10, but I think the PCS 9 is pretty good too.
That video was super helpful, thanks! I was worried about reverse threading like the pedals have, but the dust caps were just really stuck from age. I was able to remove them and uncover what looks like a square bottom bracket. So I'm gonna grab this tool from amazon to get them off. Does that look right to you?
Not sure what you mean by strange bottom bracket - it looks pretty standard to me. You need something like this to remove the lockring and a large spanner should be able to remove the actual shell.
As for the cranks personally I would just take an angle grinder and cut the axle near the cup, OR after removing the bolts just take it for a nice ride up a steep hill and with caution knowing that the crank arm will fall out. If it doesn't fall out after your ride go again or literally give the crankarm a good kick with the frame on the ground (has worked for me before).
My favorite lock-ring tool:
http://www.amazon.com/Hozan-Bicycle-Bottom-Bracket-Wrench/dp/B0017SE6ZY
You can make a chain whip by drilling three holes in a strip of 1/8" thick strip of steel and tap the chain pins back through the holes:
http://i.imgur.com/bdePDhu.jpg
You can add handles and shaping as above, but just filing or sanding off and sharp edges and wrapping it with some old bar tape or inner tube will work just fine. There was a good thread on chain whips a while back...
Rear derailleur: Loosen the cable. Make sure your H screw is set so the upper pulley is in line with the smallest cog. Tighten the cable. Shift once. If it doesn't make it to the next gear, tighten the cable by turning the barrel adjuster counter-clockwise. If it shifts too far, loosen the cable by turning the barrel adjuster clockwise. Continue in this fashion all the way through the gears, making small adjustments if needed as you go along. When you reach the lowest gear, push on the derailleur gently while pedaling to make sure the L screw is set properly. If it hits the spokes, tighten it a quarter-turn at a time until it doesn't. Shift all the way back down to high gear again. If the shifts are slow, loosen the cable. If the shifts jump down 2 cogs, tighten the cable.
That should do it. If this doesn't fix the problem, you likely need a new cable.
Those are steel rims, so in theory can be hammered out, with the tires removed, but I've never done it myself... Steel rims dent easily, as you've discovered, and they also don't stop well when wet. It's important to keep tire pressure up to the maximum rated on the sidewall to reduce chance of denting.
You could get a new set of wheels, though that bike might not be worth the investment.
As for pads, I'd recommend Koolstop salmon Continentals---
http://www.amazon.com/Kool-Stop-Bicycle-Continental-Salmon/dp/B001SYM690/ref=sr_1_1?s=sporting-goods&amp;ie=UTF8&amp;qid=1373582725&amp;sr=1-1&amp;keywords=kool+stop+continental
Thanks so much for all of the feedback!
I ended up purchasing VENZO Bicycle Bike Torque Wrench Allen Key Tool Socket Set and BIKEHAND Bike Bicycle Repair Tool Kit with the addition of cable cutters.
Last night I watched this guy assemble a bike which allowed me to see which tools were needed:
How to Build a Bike Series
I will keep everyone posted on my progress. All the necessary parts and tools should be delivered by March, 20th! Stay tuned.
Tool kit like that are great but a smaller version is fine to start with.
I also recommend This Book. If you're stuck on a budget buy the book first and figure out what tools you'll need later.
Its an actual textbook by Todd Downs, and very easy to follow. https://www.amazon.com/Bicycling-Complete-Bicycle-Maintenance-Repair/dp/160529487X/ref=sr_1_3?s=books&amp;ie=UTF8&amp;qid=1474757161&amp;sr=1-3 Found mine on a thrift store shelf for 5.00. A very good book.
areas of concern:
the chain may still be good to go. i argue with coworkers who insist that any visible rust means the chain has to be replaced. my philosophy is as long as stiff links can be worked out and you're dealing with a reasonable amount of surface rust, corrosion isn't a big deal.
I didn't read the other response because it was too long. My advice: get a cheapo toolkit for beginners, and replace the tools you use up with nicer ones [1, 2]. These kits won't have everything, but they'll have most of what you need.
Regular maintenance, in decreasing order of frequency:
Reasonable people disagree over the order and frequency, so take these as rules of thumb, not canon.
1: http://www.pricepoint.com/Brand/Titan/Titan-Tool-Kit---21-Tools.axd
2: http://www.amazon.com/BIKEHAND-Bike-Bicycle-Repair-Tools/dp/B006WRWEJU/ref=sr_1_4?ie=UTF8&amp;qid=1427267389&amp;sr=8-4&amp;keywords=bike+toolkit
3: http://sheldonbrown.com/chains.html
They are almost always 1/4" steel bearings. If there are markings on the cups you can verify the brand and find out for sure, but most likely it's 1/4". You can buy them on Amazon or eBay, etc. You might want to get an assortment (https://www.amazon.com/dp/B018B7D05K/ref=cm_sw_r_cp_apa_95naAbB0M2MHC) of sizes and also do the hubs and headset. Don't forget to get grease.
Edit: OP, don't worry about all this talk of micrometers and stuff, there are only a few sizes it could be. Get the assortment of bearings and it'll be obvious which one it is. Then just use the correct size. It's not hard.
You need a lockring tool. This is a good one.
The tool grabs the little notches in the raised ring closest to the camera. Unscrew that.
With the lockring off you should be able to remove the cup and the spindle, like someone else described.
If you've got a few buck left over after replacing the chain and such, buy one of these. Its a chain gauge, and is essentially a little ruler that indicates how much your chain has stretched. It can identify when your chain should be replaced long before it gets this stretched. You'll end up replacing your chain more often, but you'll limit the wear on your gears so they'll last longer.
You stick the curved bit into a link on the chain and the pokey bit on the other end may or may not fit into another chain link. There are 2 sides, one indicates your chain has reached 50% wear, another for 75%. If that side falls into a gap in the chain, it is at least hat far into its life. If it hits a pin and can't be pushed through, it's newer than that indicator. So you can make a good guess at how far into its usable lifespan the chain is.
I’ve been happy with: Venzo Bicycle Bike Torque Wrench Allen Key Tool Socket Set Kit https://www.amazon.com/dp/B00811WQT8/ref=cm_sw_r_cp_api_i_EYx4Cb9SHZ6J7
I have this chain checker. When one side goes in flush, you have 0.75% wear, and when the other side goes in flush you have 1.0% wear. The idea is to replace the chain about the time the 0.75% gets set but definitely before 1.0%.
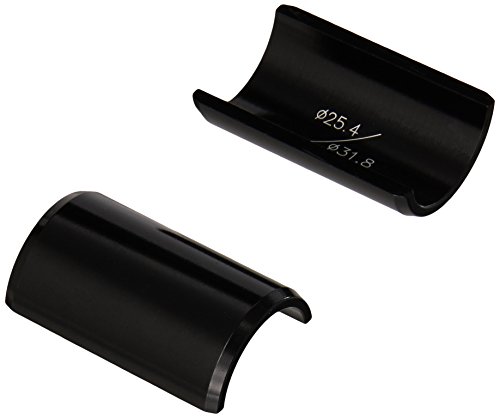
Surly is one of the retro touring brands that still uses 25.4 stems on some of the bikes. Bars made of chromoly steel there's less/no advantage to larger 31.8 clamp
Just had a thought though, you can buy a shim for it so it will work with your current stem like this:
https://www.amazon.com/Wheels-Manufacturing-25-4-31-8-Handlebar-Shim/dp/B000AO5FME
Found the tires x2.
Tubes x2.
Seat is your choice, look for a "cruiser seat" if you want to retain the look of it x1.
Brake pads x2.
Cable kit is above. That should give you a rough outline of what I had to replace on mine, not counting opening up any of the sealed components to clean and regrease.
Just Riding Along.
chain checker will check for pin wear (sometimes called chain stretch. It's one dynamic of wear that can be measure. Lateral slop can't be measured as it were but can affect shifting and performance.
You can spin chain rings and cogs to see if they're straight.
Are you sure? Most BB bearings are about 1/4 in.
In any case, amazon sells them for cheap
Ex: https://www.amazon.ca/BC-Precision-BCBIKE5-500-Piece-Assorted/dp/B018B7D05K/
In broad strokes there are five things you need to consider, in order of importance:
1 - How does the derailleur mount to your frame? If you have a hanger with a threaded hole below the dropout you use the "normal" modern style like so
Otherwise if your dropouts (mostly older frames) don't have a hanger you need to use one like this or get an adapter.
2 - (Again broad strokes, there are exceptions) you need to consider the brand. Don't mix Shimano with SRAM.
3 - You need a derailleur for the number of cogs in your rear cassette / freewheel. A 10-speed mountain rear derailleur won't work with 9-speed mountain shifters, for example. There are, again, exceptions but that gets very complicated very quickly.
4 - You need a rear derailleur capable of taking up all the chain slack your gears will create. The rear derailleur not only shifts the rear, it also uses that long dangling cage with two pulleys to tension the chain. The amount of chain used when in the big chainring up front is a lot more than the amount of chain used when in the small. The rear derailleur doesn't shift those front chainrings, but it does take up the slack. You need a rear derailleur which can take up all the slack your chosen drivetrain can generate. (BigChainring-SmallChainring)+(BigCog-SmallCog)=How much slack a drivetrain generates. The longer the "cage" the more chain slack a rear derailleur can tension, but the worse it shifts (in theory) and the more likely it is to get hit by trail obstacles (because it hangs lower). That's why most people run the smallest cage they can. Cages come in three general length categories: Short, medium, and long. MTB cages are almost always medium or long, and road cages are almost always short or medium.
5 - Clutch or not. Clutch derailleurs are (in theory) harder to shift but they don't bounce around as much off road, preventing the chain from bouncing as much on rough terrain, decreasing the chance of the chain popping off the front chainring.
.
As far as "what's better than what": Longish article on Shimano and SRAM's heirarchies
You can use them together with a shim: https://www.amazon.com/Wheels-Manufacturing-25-4-31-8-Handlebar-Shim/dp/B000AO5FME
You could make such a shim yourself if you have the raw materials around. Brass or soft aluminum would be easy.
> A 1/4" bearing from a "bike specific" company is the exact same thing as a 1/4" bearing from any other company
As long as they're not a terrible grade... Grade 25 is typical for bike use these days and they're cheap enough not to bother with something like a grade 300. There are still grade 300's being sold by bike companies, but like you said, they're more expensive (even though they're lower quality).
You should definitely replace any missing ball bearings, they are pretty cheap and will make the bearings smoother than they would be with some missing. Here are some bearings i got in the past that are good, but you can always just get the individual sizes you need instead.
Well, personally, I like to shower after I ride, but that's me...
If you're talking about maintaining your bike, I bought a copy of this:
http://www.amazon.com/Bicycling-Complete-Bicycle-Maintenance-Repair/dp/160529487X
Yep, this stuff. That's what I'd do if it were my bike.
Do you really have the derailleur hanger? You should post the pic of broken one so that we can make sure.
If you do have the derailleur hanger, I think you can use something like this. Shimano Tourney.
https://www.amazon.com/Shimano-Tourney-TX55-Speed-Derailleur/dp/B003ZM9RDQ/ref=pd_sim_468_10?_encoding=UTF8&amp;pd_rd_i=B003ZM9RDQ&amp;pd_rd_r=X7ESM3A6V3YXM80YCV7T&amp;pd_rd_w=k6Gma&amp;pd_rd_wg=hsYVC&amp;psc=1&amp;refRID=X7ESM3A6V3YXM80YCV7T
I've got a park HCW-5 tool. If it's a stubborn ring, the three tooth end can grab three notches at once and I've been able to pop off all lock rings without too much difficulty. It's cheap and effective.
Park lockring tool is the standard for this kind of stuff. I like the Hozan version of the tool myself since it's forget but the park one works fine. Nashbar and other discount shops should have a similar one too.
You need a little length of 'inner housing' or 'liner' to feed the cable through. Something like this: https://smile.amazon.com/Jagwire-Black-Housing-Liner-Cables/dp/B0029LF1XO/ref=sr_1_1?ie=UTF8&amp;qid=1517855526&amp;sr=8-1&amp;keywords=housing+liner
The rubber bit you have is not ideal since it will 'grip' the cable and add friction to the shfiting. You don't want that.
Do NOT change the way your cable is clamped since that will change the actuation of the derailleur which is specific to the angle the cable approaches the derailleur from the frame.
I also have a Bikehand kit. Same price, but different set. I have this one. I haven't used all the tools yet, but I want to replace the adjustable cup wrench, and crank puller with Park equivalents.
You also have the option of using a seat post clamp with eyelets, for example;
M-Wave Seat Post Clamp with Rack Mounts, 31.8mm, Black https://www.amazon.com/dp/B001V537I0/ref=cm_sw_r_cp_apa_i_iahxDbZMT1YBS
Unless your frame has an integrated clamp, of course.
Love mine
These bars should work with your old components. It's much cheaper to buy new bars than it it is to buy a new brake levers and shifters.
Edit: saw the stem has a 31.8 clamp diamater. Get a shim to.
http://www.amazon.com/Kool-Stop-Bicycle-Continental-Salmon/dp/B001SYM690/ref=cm_cr_pr_product_top
I got this:
https://www.amazon.com/Jagwire-Black-Housing-Liner-Cables/dp/B0029LF1XO
All 30 meters.. More to last a lifetime. I think most of it is going to Blackstone Bikes
I prefer this one because I can use a socket wrench with it and it takes up less space in the bike tool box.
While you have the cable off, squirt some of this into the housing:
https://www.amazon.com/Bike-Aid-Dri-Slide-4oz-Needle-Nozzle/dp/B001F2Y25G/ref=mp_s_a_1_8?keywords=motorcycle+cable+lube&amp;qid=1565823340&amp;s=gateway&amp;sprefix=motorcycle+cable+lube&amp;sr=8-8#aw-udpv3-customer-reviews_feature_div
You don't need much; I've had the same bottle for 5+ years and it's really helped me get a lot of life out of my cables.
I wanted to also mention that it may be the shifters themselves, depending on age and storage conditions. I see a lot of shifters with dried up grease that freezes the small moving parts in them, but that usually takes years of non-use.
If you just need to lube your cables and derailleur pivots, use Dri-Slide. Apply it sparingly, wipe off the excess, and do not get any in your eyes.
To make this fit on your bike, you’re gonna need a few different parts.
First something to fix the rack towards where the seatstay eyelets would be. Something like this;
seatstay rack adapter
Then something to set the rack where the dropouts eyelets would be;
dropout rack adapter
This will work but it is defenitly not the most optimal setting since you bike is not built to carry a pannier rack.
Those cogs look fine man, if you suspect chain wear theres a tool for that
Park Tool CC-3.2 Chain Checker https://www.amazon.com/dp/B000BR3LHQ/ref=cm_sw_r_other_apa_i_BMtSCbQXRJKF6
How is the wear on your chainring(s)? Was your chain excessively worn before it snapped?
If your chain was worn a lot prior to snapping, the chainrings and, to a lesser degree, the cassette would have worn along with it. If that's the case, you'll need new chainrings. If you don't do it already, make sure you monitor your chain wear and replace it when appropriate. Doing so will greatly reduce wear on other parts of your drivetrain and save money in the long run.
don't get the seatpost rack, not nearly strong enough. Try this instead
Any tool set that would have what I need to fix this reccomended? Preferably sometihng that's on amazon prime. Here is some I found. Let me know if any of them have both tools I'll need (the right type of coarse, all of there seems to have crank pullers and lockring tool but not sure if they are compatible)
Also if I am gonna re-lube it any recommendation on lube?
http://www.amazon.com/Best-Value-Professional-Bicycle-Tool/dp/B01C6ZQN02/ref=sr_1_29?ie=UTF8&amp;qid=1465090558&amp;sr=8-29&amp;keywords=bike+repair+tool+kit
http://www.amazon.com/FANTASYCART-Universal-Mechanics-Bicycle-44pcs/dp/B0019J6ZLE/ref=sr_1_30?ie=UTF8&amp;qid=1465090558&amp;sr=8-30&amp;keywords=bike+repair+tool+kit
http://www.amazon.com/BIKEHAND-Bike-Bicycle-Repair-Tool/dp/B00CW911XW/ref=sr_1_5?ie=UTF8&amp;qid=1465090417&amp;sr=8-5&amp;keywords=bike+repair+tool+kit
http://www.amazon.com/BIKEHAND-Bike-Bicycle-Repair-Tools/dp/B006WRWEJU/ref=sr_1_7?ie=UTF8&amp;qid=1465090417&amp;sr=8-7&amp;keywords=bike+repair+tool+kit
http://www.amazon.com/Venzo-Premium-Bike-Repair-Tools/dp/B011NJ5WP4/ref=sr_1_14?ie=UTF8&amp;qid=1465090417&amp;sr=8-14&amp;keywords=bike+repair+tool+kit
In addition to the other advice here, I would recommend picking up a chain wear checker (example). Use it every once in a while, and it'll tell you when you need to replace the chain, before the worn chain tears up the gears too badly.
One set of gears should last 3 or 4 chains if you keep your chains lubed and replace them when they wear out, but if you keep waiting until the chain starts skipping, you're likely to need new gears with every new chain.
It appears to be a cartridge bottom bracket (either square taper, Octalink or ISIS) from the image. The only way to tell which one, since there appears to be no information on the internet (I searched), is to pull the cranks and identify, then measure it.
You will need a crank puller and a cartridge BB tool.
There are a few details that matter for your derailleur.
If neither of the above apply to you, then you can buy just about anything else out there.
If you don't have indexed shifting, or if you do, and you have less than 8 gears in the back, then you can get away with really cheap cables. WalMart and Amazon sell a Bell-branded kit with everything you need for $6.
Take note of the cable routing as you take the old parts off, and use the old housing sections as a guide to cut the new ones (even if you need to make some changes). Also, read this first. You don't really need special tools, but you will need to do some clean-up work on the cut housing ends with a file.
I've extended steerer tubes on several bikes. The I've owned this bike for many years (it has an old style headset).
http://i.imgur.com/Zef8Dlp.jpg
The parts are readily avalable at Amazon or eBay...
http://www.amazon.com/Delta-Alloy-Bicycle-Raiser-8-Inch/dp/B000FGYKWS/ref=sr_1_1?ie=UTF8&amp;qid=1415419343&amp;sr=8-1&amp;keywords=steering+tube+extender
The above comes in a short or long version. I've had these on my bikes for quite some time, and no problems.
The bike shop should have told you the chain was worn when they replaced the cassette (assuming that it was worn at the time).
It's normal to replace the chain whenever you replace a cassette, and if you want to re-use the chain you need to measure its wear to be certain it's OK to keep the old chain.
Are you sure they never asked you if you wanted to replace the chain the first time?
It seems unlikely that the chain and the cogs would wear out in that time period if they were both good at the start, but an old badly stretched chain could certainly cause a lot of damage to a newly installed cassette.
There are some awful reviews. This is something you should only need to buy once in your lifetime.
Check out Feedback or Park brands. Check Craigslist, as I have seen them for sale there. There may be some options on eBay, though I have never checked.
Here's a nice one: http://www.amazon.com/Park-Tool-PCS-9-Mechanic-Repair/dp/B000OZFJTI/ref=sr_1_23?s=sporting-goods&amp;ie=UTF8&amp;qid=1395455365&amp;sr=1-23&amp;keywords=feedback+sports