(Part 2) Top products from r/cosplayprops
We found 22 product mentions on r/cosplayprops. We ranked the 88 resulting products by number of redditors who mentioned them. Here are the products ranked 21-40. You can also go back to the previous section.
21. Silicone Finger Protectors Covers Caps for Hot Glue Gun Wax Rosin Resin Honey Adhesives Scrapbooking Sewing Crafts Ironing Embroidery Needlework Accessories (Black&Red)
Sentiment score: 1
Number of reviews: 1
Protect your fingers: Hydream silicone finger caps protect your finger tips when you do craft with glue gun, allows you work with the hot glue without getting burned.Eco-friendly: Come with full silicone material. Flexible, comfort, easy to put on or take off and easy to use.Safe and heat resistant ...
 Show Reddit reviews
22. Fun Express Bag of Skeleton Bones - 28 Piece Set
Sentiment score: 2
Number of reviews: 1
DELUXE HALLOWEEN BAG OF SKELETON BONESSpooky assortment of bones!Bones measure 6" to 12" assorted.28 Pieces totalPERFECT FOR A HALLOWEEN GRAVEYARD or HAUNTED HOUSE
 Show Reddit reviews
23. BLACK+DECKER Rotary Tool with 27 Accessories, 2-Amp, 3-Speed (RTX-6)
Sentiment score: 0
Number of reviews: 1
Rotary tool includes 27 accessories to perform wide variety of tasks2 Amp, high torque motor provides superior power3 adjustable speeds (12,000/24,000/30,000 RPM) for precision workFlip-Lock system makes for quick and easy accessory change outs2-year warranty
 Show Reddit reviews
24. Bondo Glazing and Spot Putty, Fills Pinholes, Scratches, Minor Dings & Hairline Cracks, 4.5 oz, 1 Tube
Sentiment score: 0
Number of reviews: 1
Versatile formula repairs scratches, pinholes, holes and nickCan be used on paint and primerOne-part application requires no mixingFast drying – sandable in 30 minutesNon-staining to help ensure a consistent paint finishUse during the Fill stage of the 3M Body Repair System
 Show Reddit reviews
25. PerfectCast Casting Material
Sentiment score: 1
Number of reviews: 1
The professional's choice for casting medium.5 times stronger than plaster.2 pounds of professional casting medium and a measuring cup.
 Show Reddit reviews
26. Dupli-Color CP199 Clear Adhesion Promoter Primer - 11 oz.
Sentiment score: 1
Number of reviews: 1
Flash point: -17 degrees_celsius
 Show Reddit reviews
27. Pledge Floor Gloss Liquid, Sealed Wood Protector, Removes Dirt, Polish To Help Keep Floors Shiny, Original Scent, 27 fl oz
Sentiment score: 1
Number of reviews: 1
Ready to useMakes floors look like new againLong lasting shineOriginal scent
 Show Reddit reviews
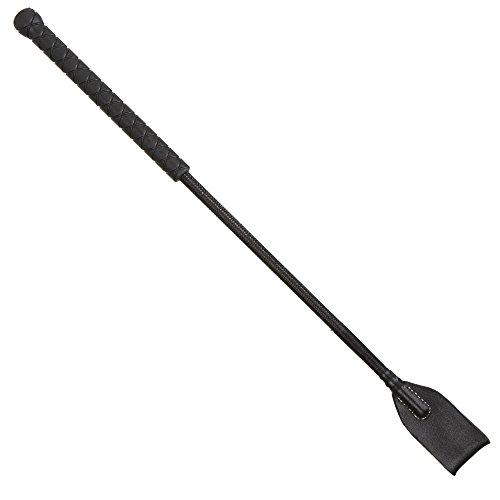
28. Intrepid International Equestrian Jump Bat
Sentiment score: 1
Number of reviews: 1
LIGHTWEIGHT AND COMFORTABLE: Even if you’re required to carry a jump bat, this one will cause no inconvenience while you’re riding. The International Jump Bat is the perfect size, 18” with braided shaft, and leather loop flapper. It’s comfortable and lightweight in your hand.EASY GRIP HANDLE...
 Show Reddit reviews
29. Tao 89862 1.4-Inch Square Digital Picture Keychain (Black)
Sentiment score: 0
Number of reviews: 1
1.4-inch screen with two different viewing modes; holds up to 56 photosLoad photos from PC/Mac with included software: imaging editing, pictures download directly from PC/MacVivid, clear, actual color reproduction photoCharge the internal battery by connecting it to your PC/Mac's powered USB port or...
 Show Reddit reviews
30. Polycarbonate Tubing, 1 7/8" ID x 2" OD x 1/16" Wall, Clear Color 48" L
Sentiment score: 1
Number of reviews: 1
Transparent, rigid tubing for applications subject to high impact or repeated usePolycarbonate for resistance to grease, oil, detergent and impactHigh elasticity for resistance to creepOperating temperature range of -275 to +250 degrees FRockwell Hardness rating of R 73-78
 Show Reddit reviews
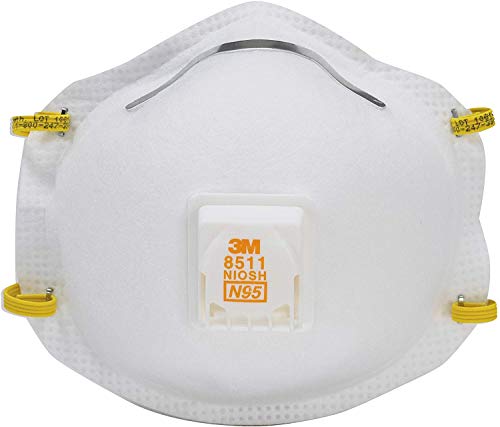
31. 3M 8511 Respirator, N95, Cool Flow Valve (2-Pack)
Sentiment score: 0
Number of reviews: 1
Niosh-Approved N95 for at Least 95 Percent Filtration Efficiency Against Certain Non-Oil-Based Particles and Aerosols3M Cool Flow Valve Helps Reduce Heat Build-Up Inside the RespiratorBreathe 30% EASIER compared to 3M 8200, breathe easier is defined as initial pressure drop.ADJUSTABLE M-NOSECLIP hel...
 Show Reddit reviews
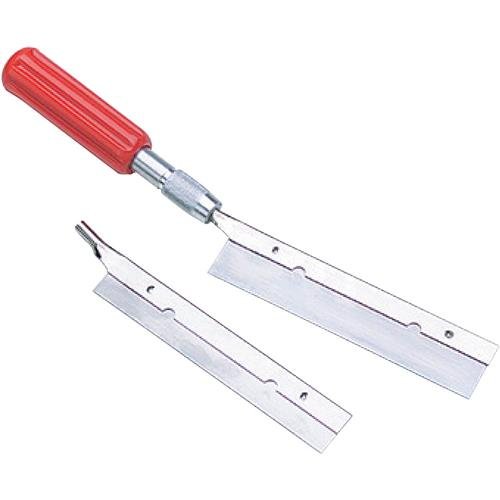
32. Xacto Precision Razor Saw Set
Sentiment score: 0
Number of reviews: 1
Precision Razor Saw SetDelicate Sawing of Models and Railroad TracksGreat For Cutting Metal, Balsa Wood and PlasticComes With Different Blades Types See Description For More DetailsThis is an aftermarket of generic part
 Show Reddit reviews
33. CMS Magnetics Round Base Magnet 35 LB Pulling Power RB50 2" Cup Magnets - 5 Count
Sentiment score: 0
Number of reviews: 1
100% MONEY-BACK GUARANTEE! Our Magnets Are Guaranteed 100% This is a ZERO Risk Ceramic Cup Magnet purchase for you today.TOP QUALITY GUARANTEED-Our Powerful Magnetic Cups Are Forged from Ceramics Using CMS’ Patented Manufacturing Process Under Our Strict Quality Assurance Plans & Quality Control P...
 Show Reddit reviews
34. HeatnBond UltraHold Iron-On Adhesive, 17 Inches x 1 Yard
Sentiment score: 0
Number of reviews: 1
Ultrahold’s no-sew bond is stronger than traditional fusible websSolid sheet adhesive on paper backing provides edge to edge coverage without puckering or bunchingFor use on fabric, but can be used with a wide range of materials such as foil, lame, felt , suede, cardboard, leather and woodNo Sewin...
 Show Reddit reviews
35. ACTIVA CelluClay Instant Papier Mache, 1 pound, White
Sentiment score: 2
Number of reviews: 1
The original instant papier mache; just add water, no paper strip cutting or paste; made from 100% recycled paperOne step; mixes easily, molds quickly and easy to handle; adheres to most any surface; dries remarkably hard and can be sanded, sawn, cut or drilledPerfect for school projects, dioramas, ...
 Show Reddit reviews
36. Testors Amazing Air Airbrush Paint kit, 1, Multicolor
Sentiment score: 1
Number of reviews: 1
Sprays smoothly for great coverage on wood, plastic, metal, paper, canvas and moreSystem mixes paint and air outside of airbrush, so only the clip cap requires cleaning after useFeatures and easy-to-use snap on paint bottle design for fast color switchingIncludes enough propellant to complete severa...
 Show Reddit reviews
37. Apoxie Sculpt - 2 Part Modeling Compound (A & B) - 1 Pound, White
Sentiment score: 1
Number of reviews: 1
PERFECT FOR YOUR NEXT PROJECT - Apoxie Sculpt combines the features and benefits of sculpting clay with the adhesive power of epoxy! Perfect for your next cosplay, craft project, or home décor!NO BAKING - Unlike traditional modeling clay, Apoxie Sculpt cures hard in 24 hours with a semi-gloss finis...
 Show Reddit reviews
38. Color Change Holographic Paint Aerosol 3.5oz
Sentiment score: 0
Number of reviews: 1
Vivid ColorsFlexible FormulaPremium Hobby PaintMade in the USAFor interior RC car body applications, must be backed with High Gloss Black, Black Backer, or other color.
 Show Reddit reviews
39. Funtasma by Pleaser Men's Halloween Walker-130,Brown,L
Sentiment score: 1
Number of reviews: 1
True to size16.375" Calf Circumference16" Boot Shaft Height
 Show Reddit reviews
40. Environmental Technology Mold Builder Liquid Latex Rubber, Off White,16 oz / 473 ml
Sentiment score: 0
Number of reviews: 1
Brush-on rubber for mold makingCast polyester resin, plaster, soap or candle waxDuplicate figurines, sculptures and other items with safe, brushable latex rubberWill not stick to metal, clay, ceramics, plaster, wood or plasticene clayMolds are durable, reusable, and economical to make
 Show Reddit reviews
What kind of paint did you use? Do you have an airbrush? Do you plan to sand with 800+ grit before coating?
There's a lot to learn about paint jobs and sealing them. After a few failed attempts and weird reactions, I tend to keep same brand paint throughout a piece (for primers I hop around, but let it dry completely before top coating).
If you're using a different brand I HIGHLY suggest you wait until it has gassed out (it doesn't smell like paint anymore lol). This can take several days depending on how many coats you used, and whether you applied them too thick.
Sanding allows for better grip of the clear coat to the paint. Wet sanding is best since it removes the debris of paint and prevents most deep scrapes. It is easy to sand through your paint, especially if you only did one coat (which is why you should do 2-3 with some light 600 grit sanding in between)...
I hate sanding before a clear because I suck at it and tend to create a deep scratch or two because I'm too strong for my own good :P What I have found to work wonders is Floor polish/wax.
This is the ONLY one that a lot of modelers suggest:
https://www.amazon.com/gp/product/B000ARPH4C/ref=oh_aui_detailpage_o04_s00?ie=UTF8&psc=1
It was known as "Futures" before, but after re-branding and all that, it is now what I linked. You'll need an airbrush for this. Do a light misting of the entire part you're working with, then apply several thin coats allowing them to dry in between (usually 1-2 minutes or less if you have good air circulation). It smells great, self leveling, you can dip small parts into a little cup filled with this stuff... it's fantastic. It's slightly flexible as well. If you wait 38 hours (i think that's what the bottle says) you can apply a second coat for added protection. Make sure to clean your airbrush with ammonia (I use windex), to prevent it from curing inside it.
Essentially, floor polish is more forgiving, but offers slightly less protection than a well applied clear coat. If you don't have time for all that prepping crap (wet sanding before and between clear coats), then definitely go this route.
Great start man!
Symmetry: Make patterns. Go grab some cardstock to do it with, it will hold up better than regular printer paper. Assuming you cut these out of craft foam, just draw a pattern that looks good, cut it out, and see how it fits. Once you have something you like, you can take that newly cut out piece of foam and lay it BACK onto cardstock and redraw it to get it just perfect. Then, when transferring it to another side, just flip it upside down. Also, make sure all your edges are glued down nicely.
Painting: Something that a lot of people don't take into account is priming their props before painting. A primer is something that allows paint to bind to the object a bit better, and gives a nice layer that wont have things showing through. I like to use Bullseye 1-2-3 and just brush it on, but it does have a spraycan option. Prime, Sand with 200~ grit, prime again, sand with 350~ grit, wipe with a damp paper towel, let dry for maybe an hour or so, then paint for best results. Also, 3-5 light layers > 1-2 heavy layers of paint. Also, if you want very customized colors and are willing to brush it on/airbrush, then you can go to the Paint section at Home Depot, find a color you want, and ask for a sample can of paint in that exact color. It's wonderful for small projects!
Here's some examples of my processes for crafting/painting
https://imgur.com/a/XkQBp
https://imgur.com/a/xcZEU
https://imgur.com/a/VCmsQ
If you have any questions, feel free to ask!
No problem at all!
That top section is just spare insulated electrical wire I had floating about, with those grey blobs formed out of Apoxie Sculpt. If you're not familiar with it, it's two-part epoxy clay that will harden to a rock a short time after you combine the two parts, so you can mold it to whatever shape you like and set it fairly quickly. I just slapped it around the wire and hoped for the best, but another option that might look neater is if you find rubber tubing just large enough to slide over the wire in those sections.
For the anchoring, I'm going to MacGuyver this, mostly because I'm having a brain fart and can't think of a search term for what I actually want, so let's start from the bottom of the construction. Get your bucket lid that you'll be using for the base. Epoxy (or screw, if you're feeling adventurous) a light bulb socket to the center -- this will provide that wide, stable base that I failed at when I was building mine. Scoop out a hollow in your styrofoam round large enough to make it sit around that socket, and cut a hole over the socket part. Glue the styrofoam to the bucket lid once you're sure everything lines up properly. We'll be adding the dowel next, but we need to see how long that dowel needs to be.
Take your mannequin head, and flip it upside down. You should see the hole in the bottom of the neck for conventional use. That will not be nearly deep enough. I speak from experience. If you're using a plastic one, you might need to drill to get past the stoppage at the end, if you're using styrofoam a long knife or screwdriver and some patience should work. Get all the way up into the head if you can, but at the very least get a few more inches to work with. Now take your dowel, and push it in as far as it will go. Mark that point on it, that's one end of the depth. Do the same into the socket under the foam. Measure to those marks and add them together, that is the total length of your dowel, cut it to that size.
The most important part here is getting a solid connection from the dowel into the socket. Epoxy should be strong enough, but whatever you use, make sure that the dowel is not moving, it will only end in tears. Once that's solid, cut a hole in the bottom of your (already colored) bucket and slide it down the dowel, attach to the foam round with epoxy. Volia. You have a solid anchor that's long enough to actually hold the head up. That should be able to handle bobbling around, if rotation becomes an issue and you don't expect to take the head back out, you can glue the head to the bottom of the bucket, but if removal might be needed, velcro should do the trick.
I hope that was clear enough!
Edit: Oh I'm a dumbass, you were probably asking about the part behind the wire at the top. That's actually part of the bucket I used and just painted to match, I went digging and found my old order for it. Not sure if that one in particular is still available, but as long as you have that little lip area where the lid connects, you should be fine.
The problem with using paints or glues is that they require exposure to air to cure, so it will never set under the top layer of skin.
I recommend to go with resin. This mixes 1:1 ratio and dries to a white solid, semi-translucent at the thin areas, plus any bubbles will make it look legitimate. It’s exactly what came to my mind when you mentioned milk:
Alumilite Amazing Casting Resin, 16-Ounce https://www.amazon.com/dp/B0058V9KMK/ref=cm_sw_r_cp_apip_3CBhw6kz94uzW
Alternately (and inexpensively), you can use Plaster or Hydrocal. It will cost under $10 in that case.
Plaster: http://www.walmart.com/ip/DAP-Plaster-Of-Paris-Dry-Mix-4-Lb-Box/190101660
Hydrocal (as perfect cast, get this at Joann and use a coupon): Perfect Cast 2lb Cast & Paint Casting Material https://www.amazon.com/dp/B0006O87CS/ref=cm_sw_r_cp_api_i_xB9wDbPRN1SXD
Thanks! Yes, I have already purchased and used these boots. I recently used them for my Star Wars Jedi Knight costume, they work and fit great! (They were cheaper when I bought them, like 60 bucks not 90!)
Okeydoke! Here's the ones I bought. They have a bunch of different colour choices (vitally important when one is sewing/worbla-forming!)
https://www.amazon.com/gp/product/B07PJ2X65P/ref=ppx_yo_dt_b_search_asin_title?ie=UTF8&psc=1
I went to Amazon and searched for "silicone" in my order history to find that link for ya. Boy howdy, I've bought a lot of silicone crafty items over the years! If you don't already have something like these, you might dig them as well. I use these as a gluing workspace, but I would imagine they might be nice to "worbla" on as well.
https://www.amazon.com/dp/B07DZVRJBZ/ref=dp_cerb_3
Paper mache definitely won't be heavy. You can buy/make paper mache clay that is probably perfect for making bones out of.
​
Here's how you make it: https://www.ultimatepapermache.com/paper-mache-clay
Here's how you buy it: https://www.amazon.com/ACTIVA-CelluClay-Instant-Papier-Mache/dp/B001144SDE
I haven't used the clay before but I would if I was going to make some fake bones. I'd probably add some wires or fibre on the inside to give it some tensile strength.
In the past I've also made bones out of Sculpy with pretty good results.
​
I also have 3d-printed a bird-skull before and it looked good after I did some heat-treatments to remove the ridges from 3d-printing.
​
Another option is to just buy a bag-o-fake bones https://www.amazon.com/Fun-Express-Bag-Skeleton-Bones/dp/B000VGOB8A
​
One thing I would say is - you should make all your bones out of the same thing. Don't mix real bones with fake bones - the fake bones might look passable by themselves but they'll look like shit next to real bones - you'll clearly be able to tell the difference
Unfortunately they don't show the full 48", but Amazon has some 2" OD Polycarbonate tubing. But I think Willy Wonka's staff tapers a bit at the bottom.
Polycarbonate-Tubing-Wall-Clear-Color/dp/B000OMHIIG
Hope that helps.
To add to the iron powder idea, there are actually metalized paints that are basically iron powder in an acrylic binder that you can brush onto parts and then weather with actual rusting solutions. Might consider spraying the piece first with a clear adhesion promoter. One thing to be aware of is that the rust can continue for aaaages, so once you've got it it to a point where you're happy with the look you may want to put some kind of sealer over the thing to lock it in.
These might help get you started.
http://www.amazon.com/SunAngel%C2%AE-Crystal-Ball-60mm-Clear/dp/B015B8A88O/ref=sr_1_1?ie=UTF8
http://www.amazon.com/Intrepid-International-106237-Jump-Bat/dp/B000CQV0TW/ref=sr_1_4?ie=UTF8
http://www.amazon.com/dp/B01E13XQ2K/ref=sxr_pa_click_within_right3?pf_rd_t=301&pf_rd_m=ATVPDKIKX0DER&pf_rd_p=2329824862
They look like this
I got mine at home depot for 2.50 each. They have a magnet inside the metal so one side is magnetic but the other isn't. I'm gluing one inside a button cover for the shoulder clasps for my cape. The 2 clasps should hold the cape on by themselves actually.
Here's an amazon link
https://www.amazon.com/CMS-Magnetics-Pulling-RB50-Magnets/dp/B000WMQFQE/ref=sr_1_26?s=hi&ie=UTF8&qid=1540851817&sr=1-26&keywords=magnet
I would think that unless you're talking about a very small (like jewelry sized) piece, nail polish would be more expensive than something like this, since it would require more than one bottle.
HeatnBond UltraHold Iron-On Adhesive, 17 Inches x 1 Yard https://www.amazon.com/dp/B000Y0083K/ref=cm_sw_r_cp_api_i_6vHYDbVRC12HC
Here is the link for the type I prefer. You can buy a roll if the dimensions need to be larger as well.
If you just want Kandi Cuffs that show a custom image, maybe gut one of these and just wear it around? You could have it 'cycle' through different images of the gif you want to display.
Just another way to skin that cat.
i'm using a sponge and mask
https://www.amazon.ca/3M-Pro-Grade-Precision-2-5-Inchx4-5-Inchx1-Inch/dp/B00OB250I0/ref=sr_1_17?keywords=sanding+sponge&qid=1566286096&s=gateway&sr=8-17
https://www.amazon.ca/gp/product/B000UM13RW/ref=ppx_yo_dt_b_asin_title_o02_s01?ie=UTF8&psc=1
I use this one:
https://www.amazon.com/dp/B0002JM8PY/ref=cm_sw_r_em_apa_i_onGUDbNE1GRZ8
http://www.amazon.com/Builder-Liquid-Latex-Rubber-473ml/dp/B001E1XBLO lots of people use this product as one of the cheaper mold making. are you casting in resin?
Sorry https://www.amazon.com/Xacto-X75300-Precision-Razor-Saw/dp/B00004Z2U4
Dremel is just a brand name that became so common that it's synonymous with the generic term "rotary tool." If someone says "Dremel" they may or may not actually mean a Dremel brand rotary tool. Like Q-tips or Frisbees or Zeppelins.
Dremel makes very good tools, but my rotary tool is a Black & Decker. The B&D is ridiculously over-powered and can be used as a drill and even a jigsaw at need, but it's also heavy and cumbersome. Some people even use dog nail grinders if they don't need a lot of power, say if you're only cutting and filing foam.