Top products from r/dakboard
We found 6 product mentions on r/dakboard. We ranked the 6 resulting products by number of redditors who mentioned them. Here are the top 20.
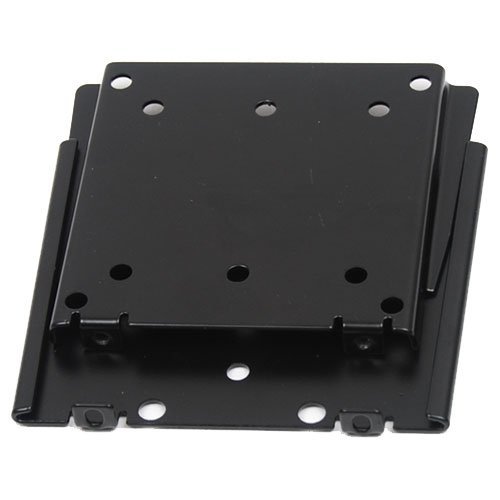
1. VideoSecu LCD LED Monitor TV Wall Mount for 19" 20" 22" 23" 24" 26" 27" 30" 32" Flat Panel Screen Maximum Loading 66lbs VESA 75/100 - Ultra Thin Mount Bracket 1EA
Sentiment score: 1
Number of reviews: 1
Fits TV monitor with VESA 75/100 mm (3" x 3" or 4" x 4") mounting hole patterns up to 66 lbsFits most 19" 20" 22" 23" 24" 26" 27" 30" 32" TVs, some up to 47 inch TVs with VESA 100 mounting hole patterns . (please check VESA)Slim design holds the display only 0.6" from the wall for a low-profile appe...
 Show Reddit reviews
2. Planar PCT2485 Helium 24" Widescreen Multi-Touch Monitor
Sentiment score: 1
Number of reviews: 1
24" LED LCD monitorResolution: 1920 x 1080, 16:9Number of Touch Points: 10,Refresh Rate:56 to 75 Hz (60 Hz recommended)Touchscreen Interface: USB. OS Compatibility- Windows 7, 8, 10 - HID Compliant - no drivers needed for basic touchscreen operationA built-in HD web-cam and microphone connects users...
 Show Reddit reviews
3. FPV Flat Slim HDMI Cable Mini HDMI 90 Degree Angle to Standard HDMI Full Size HDMI Normal HDMI for Canon 5D3 5D2 Panasonic lumix GH3 GH2 Sony nex 5N 5T 5R 7N 90degree DJI Black 50CM
Sentiment score: 0
Number of reviews: 1
Available length: 50CM(Approximate 1.6ft 19.7 inches);Super soft ribbon HDMI cable for brushless gimbal handhold gimbal dsrl gimbal FPV ground monitoring FPV aerial photography and aerial shooting ectsuper soft and very light .only 5g;black;low profile and light weightMini HDMI Male 90 degree angled...
 Show Reddit reviews
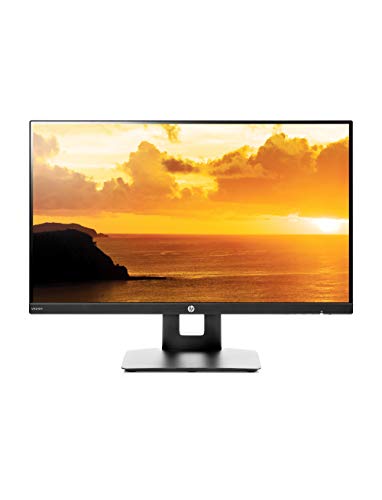
4. HP VH240a 23.8-inch Full HD 1080p IPS LED Monitor with Built-in Speakers and VESA Mounting, Rotating Portrait & Landscape, Tilt, and HDMI & VGA Ports (1KL30AA) - Black
Sentiment score: 1
Number of reviews: 1
Resolution & Panel — 23.8-inch full HD monitor (1920 x 1080p @ 60 Hz) with 16:9 aspect ratio and an anti-glare matte IPS LED-backlit panel (2 million pixels, 16.7 million colors)Response Time — 5ms with overdrive for a smooth picture that looks crisp and fluid without motion blurBuilt-In Speaker...
 Show Reddit reviews
5. Power Supply 5V 3A with Switch UL 2.5A 2A 1.5A 1A Fast Rapid Charge AC Adapter w/ 1.5m Extra Long On Off Power Switch Micro USB Cable for Raspberry Pi 3 Model B/B+ Plus
Sentiment score: 0
Number of reviews: 1
UL APPROVED USB CHARGER - The USB Wall Charger tested by the most authoritative Underwriters Laboratories institute and Reaches the most rigorous safety standards.NO MORE RAINBOW BOX - The MakerSpot 5v3a Raspberry Pi power supply has been specially designed & tested for the new 2.5A Raspberry Pi 3 r...
 Show Reddit reviews
6. Mini Wireless Keyboard,Rii i8X Portable 2.4GHz Wireless Keyboard with Touchpad Mouse, LED Backlit, Rechargable Li-ion Battery-Black
Sentiment score: 1
Number of reviews: 1
Rii i8X 2.4GHz Mini Wireless QWERTY keyboard with Touchpad mouse Combo,Backlit LED with USB interface adapterNew features than i8+:Multi-media buttons,Direction keys ,Power switch,Left and Right Buttons,Scroll wheel.This Touchpad supports multi-finger functions,A single finger click as left mouse cl...
 Show Reddit reviews
No problem! Let me know if it fits your needs. I will say that it takes more space on the screen than the widget. I can see how the traffic widget using the API key would be appealing for its small screen realty, but I feel what you get out of my solution is worth it. Especially if you do what I did, and put it in a scheduled text block set to only show for the hours between waking up and going to work (which is really the only time you need it).
First, with my solution, you see the actual route mapped out, along with the time that it would take you to get there. And it also shows alternate routes, along with their times. The widget only tells you the time it would take on one route. I like having the map, because it gives a far better picture of what's going on. My solution marks the map with yellow or red in the general area where traffic is congested. The widget only says 'moderate traffic on route' or something along those lines. I like seeing exactly where traffic is congested at. If it's closer to my work, it might clear a bit before I get there. If it's closer to my house, I'll likely have to deal with it regardless.
And it can also be zoomed into by pressing CTRL+zoom (the zoom wheel between the right and left mouse buttons). Zooming in reveals more info on the route, which I really like. I know this isn't really useful for most DAKboard setups, as a lot of people do not have a keyboard/mouse setup. But I have some interactive stuff on my page that I like having a key/mouse interface. I found this handheld setup that works beautifully. It's wireless USB. Then I bought this deal to hang it on the wall by the display. Makes the whole setup seem more 'futuristic'. I can set the big calendar to show 8 months, but size the block to show only 4 weeks. Then, I hover over the block on the page and use the red scroll wheel, and I can see the rest. It's been a game changer.
Purchased a 24 in monitor (HP 23.8-inch FHD IPS Monitor https://www.amazon.com/dp/B072M34RQC/ref=cm_sw_r_cp_apa_46cZAb054KP52 )
and the Raspberry Pi Dakboard CPU (DAKboard CPU - For your Photos, Calendar, News, Weather and To-Do. Wifi connected. https://www.amazon.com/dp/B073VCTDDL/ref=cm_sw_r_cp_apa_pddZAbM0J6JEP)
Next to the bathroom mirror running a family calendar link days agenda for shared events.
Wall mount
(VideoSecu LCD LED Monitor TV Wall Mount for 15" 17" 19" 20" 22" 23" 24" 26" 27" Flat Panel Screen Maximum Loading 66lbs VESA 75/100 - Ultra Thin Mount Bracket 1EA https://www.amazon.com/dp/B000VKCIJU/ref=cm_sw_r_cp_apa_nodZAb3DEEZTZ)
Bottom edge of monitor had a white label with monitor specs so I just put a piece of black electrical tape over this to hide it. I'll probably use another small tape piece to cover the monitor on led in the corner of the display too.
Don't forget to copy your custom dakboard url into the settings page once you complete the step by step instructions that come with the Dakboard CPU so when you reboot the Rasp Pi CPU your custom and beautiful screen appears on the monitor.
These could probably make for a great medicine cabinet door replacement too as the positioning would be good. Would be really awesome with an off switch behind a reflective glass so when off the mirror works and when tapped the dakboard display appears.
Sir,
What kind of cable will I need to go from usb monitor to the dakboard cpu? Is there any special usb cable or just a regular one?
Also, I see that it comes with a 6ft power cable. I'm needing a longer cable, can you direct me too the right one?
This is the monitor I bought if that helps:
https://www.amazon.com/gp/aw/d/B00DFB8KRQ/ref=ox_sc_act_image_1?smid=ATVPDKIKX0DER&psc=1
The key thing to look for is a monitor with an IPS (in-plane switching) panel if you ever want to mount yours vertically. It is definitely helpful to find one with power/video ports that are on the side or bottom. I didn't think about it and was going to have to make my case an extra inch or two deeper until I found a right-angle hdmi ribbon cable meant for drones.
Here are photos of my build: https://imgur.com/a/d0CKjRh
I don't remember the exact part numbers, but it's run by a Pi 3B+ that is attached with a combination of zip ties, hot glue, and silicone to to the back of the monitor. My monitor has an external power brick so I added a jack to the bottom of the frame. I had to solder the wiring from the jack to the monitor's own power jack since I had bought one with back-facing ports. To power the PI, I use a buck converter to drop the 19V to 5V (It's the little board on the island of painters tape in the bottom of the picture.
For the buttons, I used five input touch board from adafruit which is the small board at the top of the picture. I control monitor brightness and power over HDMI using DDCUTIL and some python.
One thing not pictured I did after my first SD card crash was to replace the SD card with a tiny spare SSD in a USB enclosure (you can get 32gb and smaller SSDs that used to be sold as cache drives for cheap on ebay). Speed increased noticeably and no more failures.
I initially wanted the thing to stick to the side of the fridge but I underestimated the number of Neodymium magnets needed. They are strong enough to hold it to the fridge while being supported by the countertop.
This is the one I use...no issues with the lightning bolt:
Raspberry Pi 3 Model B/B+ Plus Power Supply 5V 3A with Switch UL Certified Compatible w/ 2.5A 2A 1.5A 1A Fast Rapid Charge AC Adapter w/ 1.5m Extra Long On Off Power Switch Micro USB Cable https://www.amazon.com/dp/B075XMTQJC/ref=cm_sw_r_cp_api_i_HdOpDb49JBGM2