Top products from r/hobbycnc
We found 36 product mentions on r/hobbycnc. We ranked the 101 resulting products by number of redditors who mentioned them. Here are the top 20.
1. HQMaster CNC Router Bits 3.175 Router Bit 1 8 End Mill Flat Nose Carbide Endmill Two Flute Spiral Upcut Milling Cutter Tool Set for Wood PVC MDF Hardwood 10Pcs
Sentiment score: 0
Number of reviews: 3
RANGE OF PROCESSING: For carving/cutting/engraving/milling/slotting/sculpturing in materials like MDF, ABS, PVC, acrylic, nylon, resin, plastics, density board, wood, plywood, hardwood etc. Ideal for three-dimensional sculpture, surface machining, 3D relief sculpturing, etcDIMENSIONS: 1/8" (3.175mm)...
 Show Reddit reviews
2. Diablo D1080N Non-Ferrous Metal & Plastic Cutting Saw Blade
Sentiment score: 2
Number of reviews: 3
Laser Cut Stabilizer Vents Trap Noise And Vibration Keeping It Cool And Reducing Blade WarpLaser cut heat expansion slots allow blade to expand due to heat build-up keeping the cut true and straightDurable micro grain titanium carbide for extreme durability, razor-sharp cuts, and long lifePackage he...
 Show Reddit reviews
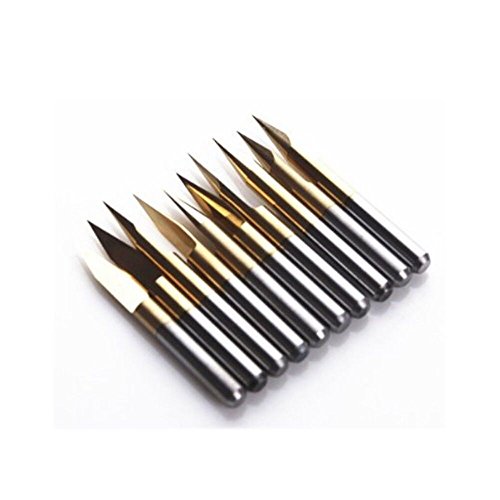
3. SHINA 10x Titanium Coated Carbide PCB Engraving CNC Bit Router Tool 30 Degree 0.1mm 0.2mm Tip (Carbide, Tip: 0.1MM)
Sentiment score: -1
Number of reviews: 2
Degree: 30°Pack size: 10pc in totalSuitable for: Many Kinds of Advertising Materials, MDF, Acrylic, Gypsum Board, Multilayer Board.Cutting edge diameter: 0.1mm ;Shank diameter: 3.175mm;total length: 30mmGuaranty: Within 90 days product quality is not completely satisfied, please CONTACT US, 100...
 Show Reddit reviews
4. Whiteside Router Bits 1550 V-Groove 60-Degree 1/2-Inch Cutting Diameter and 7/16-Inch Point Length
Sentiment score: -1
Number of reviews: 2
Whiteside Router Bits are made with Premium CarbidePrecision ground for proper balance at high RPMIndustrial Quality
 Show Reddit reviews
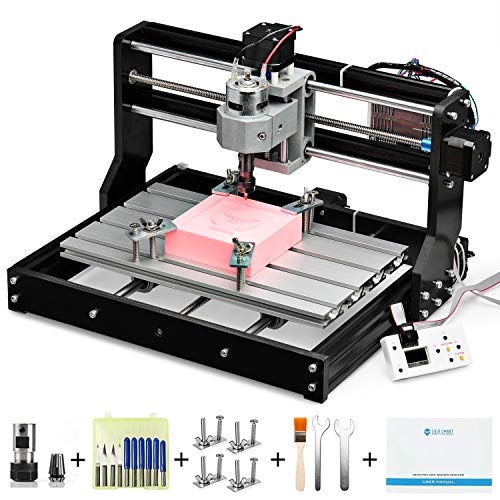
5. Genmitsu CNC 3018-PRO Router Kit GRBL Control 3 Axis Plastic Acrylic PCB PVC Wood Carving Milling Engraving Machine with Offline Controller, XYZ Working Area 300 x 180 x 45mm
Sentiment score: 1
Number of reviews: 2
Premium Power Adapter: The 3018-PRO has brought safety improvements to the adapter, with CE/FCC/UL-approved. Strong built for heavy-duty and long usage performance, making input/output stably even when work for a long time.Integrated: With an integrated mainboard and custom software, communication b...
 Show Reddit reviews
6. Kuman CNC Shield Expansion Board V3.0 Board + A4988 Stepper Motor Driver
Sentiment score: 1
Number of reviews: 2
Latest CNC Shield Version 3.0 board.MCU: ATmega328, USB interface: ATmega16U2.PWM Spindle and direction pins. 4-Axis support. Runs on 12-36V DC.2 x End stops for each axis (6 in total).4Pcs A4988 Stepper Motor Driver with radiator.
 Show Reddit reviews
7. HQMaster CNC Router Bits, 10 Pack Router Bit Single End Mill Set Milling Cutter Tungsten Steel Engraving Carving Tool Kit
Sentiment score: 1
Number of reviews: 2
Range of processing ---- for carving/cutting/engraving/milling in materials like density board, wood, acrylic, PVC, PVC expansion sheet, plastics, MDF etc.High efficiency ---- these bits own sharp edge which is able for fast engraving that makes high efficiency; durable, high precision and not easy ...
 Show Reddit reviews
8. 60-Degree V-Groove Bit, 1/4-Inch Shank, 1/2-Inch Diameter, Carbide-Tipped
Sentiment score: 1
Number of reviews: 1
7/16-Inch Cutting Length, 60 degree Cutting Angle, 2-17/64-Inch Overall LengthMake delicate grooves and incisions with laser precisionRaise bit and produce fine point incision or work the whole diameter to render highlighted lettersNon-Stick Orange Shield Coating, Anti-Kickback Design, Equipped with...
 Show Reddit reviews
9. E-Z Lok Threaded Insert, Zinc, Hex-Flanged, 1/4"-20 Internal Threads, 13mm Length (Pack of 100)
Sentiment score: 1
Number of reviews: 1
Provides a Strong Machine Thread In Soft WoodsIdeal For Use in Pine, Plywood, Composition Board, and MDFDesigned For Use In Applications Such As Ready-To-Assemble Furniture, Drawer Pulls, Display Case, and Shipping CratesSimply Drill the Appropriately Sized Hole and Install with Hex Key or Optional ...
 Show Reddit reviews
10. The Dust Deputy Deluxe Anti-Static Cyclone Separator 5 Gallon Kit
Sentiment score: 0
Number of reviews: 1
INCREASED SUCTION POWER - Now 20% more efficient with Neutral Vane Technology, Oneida Air Systems' patented Dust Deputy cyclone uses centrifugal force to capture and remove 99% of dust and debris from the air-stream before it reaches your vacuum filter, eliminating clogged filters and suction loss!L...
 Show Reddit reviews
11. Wireless Number Pad, Jelly Comb N030 Portable Mini USB 2.4GHz 22-Key Financial Accounting Numeric Keypad Keyboard Extensions for Data Entry for Laptop, PC, Desktop (Wireless, Black and Silver)
Sentiment score: 1
Number of reviews: 1
✔ MULTI-FUNCTION 22-KEYS NUMBER PAD: Numeric keypad supports NumLock, ESC, Tab, Delete etc. With shortcut key which can open the computer calculator directly. The Muli-Function 22 Keys Wireless external number keypad for laptop is more unique than most keyboards.✔ EASY TO USE : This number pad...
 Show Reddit reviews
12. Leviton 80401-NR 1-Gang Decora/GFCI Device Wallplate, Standard Size, Thermoplastic Nylon, Device Mount, Red
Sentiment score: 0
Number of reviews: 1
Accent any wall covering with a wide selection of colors and finishesLimited Ten-YearSmooth face and rounded edges resist dust accumulationMolded thermoplastic for maximum resistance to impact, abrasion, fading and discolorationResistant to mechanical stress associated with high abuse applications
 Show Reddit reviews
13. Leviton 5621-2R, Red
Sentiment score: 0
Number of reviews: 1
Full rated current capacity with tungsten, fluorescent or resistive loads. Motor capacity is 80-percent of switch ratingBack and side-wiring terminals accept both solid and stranded wire to ease installationHeavy-duty impact-resistant thermoplastic construction for long service life in commercial ap...
 Show Reddit reviews
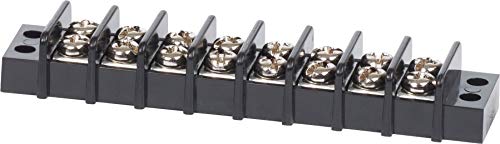
14. Blue Sea Systems 20A - 8 Circuit Terminal Block
Sentiment score: 1
Number of reviews: 1
8 Circuit 20 Amp AC/DC 300V AC/DC Terminal BlockClosed back design completely insulates power from the mounting surfaceEach screw pair is one isolated circuitJumpers allow creation of common circuits (sold separately)
 Show Reddit reviews
15. Kidde HD135F Fyrnetics Hardwire Heat Detector with Battery Backup
Sentiment score: 1
Number of reviews: 1
This product is highly durableEasy to useThis product is manufactured in United StatesInterconnects with up to 24 Kidde devices including smoke and CO alarms9-Volt battery back upQuick connect power harness makes installation fast and easyTest button tests unit's electronic circuitryKidde’s heat d...
 Show Reddit reviews
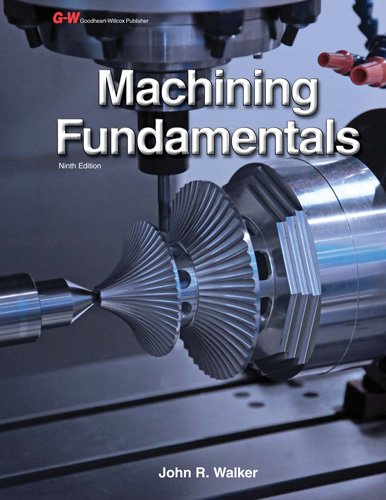
17. Amana Tool - 45210 Carbide Tipped Straight Plunge High Production 1/4 Dia x 1" 4 S
Sentiment score: 1
Number of reviews: 1
Diameter (D) 1/4Cutting height (B) 1Shank (D) 1/4Overall length (L) 2-1/4Flutes 2
 Show Reddit reviews
18. The Hillman Group 180297 Pronged Tee Nut, 1/4 20, 100-Pack
Sentiment score: 0
Number of reviews: 1
Hammer prongs into predrilled holeUsed in any project where small nails are requiredSteel materialCountry of Origin: China
 Show Reddit reviews
19. Grizzly Industrial H3243 - 4" Vise Brake
Sentiment score: 0
Number of reviews: 1
For bending sheet metalPackage dimensions: 3.5" x 4.5" x 2"Approximate weight: 2.2 lbs
 Show Reddit reviews
20. DEWALT Router, Fixed Base, Variable Speed, 2-1/4 HP (DW618)
Sentiment score: 0
Number of reviews: 1
2-1/4 HP (maximum motor HP), 12.0 Amp electronic variable speed motor provides the power to rout smoothly through the toughest hardwoodsElectronic variable speed with full feedback control for constant speed under load from 8,000-24,000 rpm and soft start to reduce start-up torque for enhanced contr...
 Show Reddit reviews
This looks great. One thing I'd recommend from a code perspective is to remove all the functions and store the mapping in a dictionary since your modifier is always the same. It should make it a bit more readable and maintainable if you ever want to move stuff around. I haven't done Python in a while so I'm guessing this won't work quite right, but something like:
Before installing ensure you have python and pip loaded
Hi everyone! If you liked the electronics enclosure you can download the design files here -
And here's the part list!
QUANTITY | COMPONENT NAME | LINK / COMMENT
:---------:|----------|----------
1 | 7I76-5I25 PLUG-N-GO KIT | http://store.mesanet.com/index.php?route=product/product&product_id=215
1 | DROK LM2596 Analog Control Step-down Regulator Module | www.amazon.com/gp/product/B019RKVMKU
1 | DC Fan (120mm x 120mm x 25mm 24V) | www.amazon.com/gp/product/B01FBPQMXW
1 | Mesh Dust Filter for 120mm Fan | www.amazon.com/gp/product/B01M0A2UH0
3 | DIN Rail | www.amazon.com/gp/product/B015E4EIOK
1 | IEC320 Inlet Power Socket | www.amazon.com/gp/product/B00ME5YAPK/
4 | KL-5056 Stepper Motor Driver - 32 bit DSP Based | www.amazon.com/gp/product/B00O6DC8PW
1 | Emergency Stop Button Switch | www.amazon.com/gp/product/B0094GM004
25ft | 4 Pin Cable | www.ebay.com/itm/20M-4-Pin-5050-3528-RGB-LED-Strip-Light-Wire-Extension-Connector-Cable-Cord-Line-/282110056592?hash=item41af11d890
1 | Antek Linear Power Supply - 500W 30V 16A Peak 25A With Passive Filters / EMI-RFI Filters and Suppressors | https://www.ebay.com/itm/PS-5N30-500W-30V-16A-Peak-25A-Stepper-Motor-Antek-Linear-Power-Supply-/371664502398?hash=item5688ee3e7e
3 | Wall Outlets from Home Depot | Find ones you like / feel are safe enough using
16ft | Led Strip Lights | www.amazon.com/gp/product/B01GJ3O0J8/
1 | Misc. Hardware | Nuts, Bolts, Standoffs, Crimp Connectors, Spare Fuses, 2 Extra Limit Switches
2 | Ogrmar SSR-25 DA Solid State Relay with Heat Sink | www.amazon.com/gp/product/B074FT4VXB/
1 | 18 AWG Gauge Stranded Hook-Up Wire Kit | www.amazon.com/gp/product/B00N51OO7Q
~30pc | Heat Shrink Tubing | www.amazon.com/gp/product/B00OZSL8UE
1 | Shop-Vac | www.amazon.com/gp/product/B00EPH63K0
7 | Uxcel 16mm Thread 4-Pin Panel Mount Wire Connector | www.amazon.com/gp/product/B016FCZ5SS
2 | 8 Circuit 20A Terminal Block | www.amazon.com/gp/product/B000S5Q2VS
Best of luck! Feel free to PM me or comment with any questions or feedback!
Another point of reference -- I'm assuming you're using the standard 1.5kw/2.2kw spindle. I've been doing 0.9mm DOC, 1000mm/min at 12000rpm using single-flute 12mm CEL cutters in 6061. The shorter flute length is key -- I went through a pack of 17mm CEL cutters on one part, but then cut almost 10 pieces with slightly more aggressive settings using the shorter tools.
Another very important thing is to evacuate the chips in deep slots. I was mostly doing 1/4" aluminum, and I ended up using an air compressor pointed at the cut to blow out the chips reliably at the bottom. I had to use a ton of WD40 to flush out the chips, which is not economical. Standard isopropanol (rubbing alcohol) actually worked just as well, if not better since the evaporation carries away more heat.
Another thing I've been meaning to try is trochoidal milling for cutting out aluminum plates like that. Should save a lot on tool life.
One last hint I forgot -- you need a VERY STIFF machine to go this aggressively! On my little X-carve clone, the best settings I got was 0.25mm DOC, 800mm/min, 20krpm. The "chips" were basically just aluminum dust. The new machine I'm using is an old retrofitted CNC router with linear rails and servos, and actually cuts nice solid chips at these settings.
Found it:
Freud D1080N Diablo 10-Inch 80 Tooth TCG Non-Ferrous Metal and Plastic Cutting Saw Blade with 5/8-Inch Arbor and PermaShield Coating https://www.amazon.com/dp/B00008WQ38/ref=cm_sw_r_other_apa_Z0pFxbGAPHV0Y
(I think someone else linked it below too)
Works great though. It gives a very smooth and clean finish without any fuss. In fact, I just used it last weekend on some C-Beam from Open builds.
Don't forget to always clamp your work for best results and to account for the blade curf in your measurements
I make signs (including nameplates), and stuff for a small etsy shop I have on the side. I've found that typically, harder woods machine better. I make nameplates for people out of Walnut or Maple usually. Also, I find that using a 60 degree bit for smaller lettering looks really nice.
The nameplates I make are 9in x 3in, and 3/8in thick. I also make a stand for them out of a contrasting wood (if I use maple for the nameplate, I make the stand out of walnut). The stand allows me to set the nameplate at an angle if it will be displayed on a desk.
Here's the bit I use: Amazon Link
Let me know if you have any questions!
Smoke detector might give you lots of false alarms based on the nature of how they work and that dust collection isn’t 100%.
You put a smoke detector in there and you will end up taking it out. There are however heat detectors, they can be a set temp or a rate-of-rise type and they don’t care about dust for activation. Just as an example.
Someone smarter than me could probably tell you how you could to integrate it with a raspberry pi and a relay, or maybe even a more simple method??
I was planning to just use one of those $18 dollar kits from Amazon, but yours might be a better idea it seems when reading the reviews
https://www.amazon.com/kuman-Expansion-Stepper-Heatsink-Arduino/dp/B06XHKSVTG/ref=sr_1_4?ie=UTF8&qid=1521871324&sr=8-4&keywords=arduino++cnc
For most woods, you will want to use a 2 flute straight bit. You won't have enough sfm to use a spiral fluted endmill. I like this one.
Amana Tool 45210 Straight Plunge 1/4-Inch Diameter by 1-Inch Cutting Height by 1/4-Inch Shank Carbide Tipped Router Bit https://www.amazon.com/dp/B000JJPR46/ref=cm_sw_r_cp_apa_ciyOBb0K6DWDQ
I suggest these instead. Winston Moy makes some good points about using these in the added video.
https://www.amazon.com/gp/product/B002KT43MU/ref=oh_aui_detailpage_o06_s00?ie=UTF8&psc=1
https://www.youtube.com/watch?v=kcdAnUnX59s
Start with https://www.amazon.com/dp/1619602091/ to get an idea of what this wacky world of machining is about. Your local library may have a copy.
On the endmill specifics, you'll need the tool diameter, number of flutes, and the chip load (usually in inches per tooth). If you don't have data for your specific tool then look up specs for other tools with the same diameter, number of flutes, and composition (high-speed steel or carbide are most likely). Here's a good overview of calculating speeds and feeds: https://youtu.be/ip2jm_6aUyk
I think I've seen the kinds of blades you are talking about - they look like they are coated with extremely course industrial grit. That is not what icancwhatusay is talking about with an 80 tooth blade. See:
https://www.amazon.com/gp/product/B00008WQ38/ref=oh_aui_search_detailpage?ie=UTF8&psc=1
This is a "standard" 80-tooth blade with normal (carbide?) teeth as you would expect on a saw blade.
Fair enough, would the marketed z travel account for the bit or am I losing a few cm of total travel?
With this, it looks like I can just print a bigger housing and swap in longer rods?
here's the upgraded model
Amazon, it is a 20 AMP Leviton Switch ...
Switch
Switch Plate
I use a Freud non-ferrous blade and it cuts through aluminum extrusion with ease and leaves a very nice finish on the cut.
https://www.amazon.com/gp/product/B00008WQ38/ref=oh_aui_search_detailpage?ie=UTF8&psc=1
There are also cheaper brands that probably cut almost as well.
Step 1. Download MillrightCNC app on your phone / tablet
Step 2. Purchase these bits on Amazon for dirt cheap : https://www.amazon.com/gp/product/B010NI39WO/ref=oh_aui_search_asin_title?ie=UTF8&psc=1
Step 3. Make sure you use T6061 aluminum (it is easier to mill)
Step 4. Use lubricant while it's cutting so the aluminum doesn't melt to the bit! (I use WD40)
Here are the settings I used in the vid:
Feedrate: 770mm/min
Depth of Cut: .6mm
Spindle RPM: 17k
​
Here is a pic of the final result of what I was cutting:
https://imgur.com/kLv9LfZ
THESE are my most used bits...I use them to cut aluminum and MDF all day long. They're cheap, but stay sharp for longer than you'd expect
I use THESE for engraving...and yes, I use them in aluminum as well
For Vcarving, I use THIS I've probably ordered 3 of these in a 1 year time span but cut A LOT of MDF with it
​
In the beginning, don't buy expensive bits....it's a waste of $$$ until you get your feedrate and DOC figured out. I also highly recommend you download the millrightCNC app for your phone or tablet to figure out your feedrate / RPM / Depth of Cut / Chiploads.
I saw amazon has it today for 200 after coupon. My first thought was to come here and see if they are at least decent. Maybe entry level. I did a search and there are 4 results including this one.
​
https://smile.amazon.com/gp/product/B07P6K9BL3/
Cuttable area
Btw I am using the dual endstops I think that is critical for what I am doing
It makes it much easier to split up jobs or change a bit etc
HQMaster CNC Router Bits, 10 Pack... https://www.amazon.com/dp/B07F35WQYG?ref=ppx_pop_mob_ap_share
These are the bits I used so far
They measure 3mm with my calipers
CNC is definitely not a set-it-and-forget-it type of machine. And getting toolpaths (CAM) right is tough.
Winston Moy does a good job of showing his mistakes and various problems of workholding, fixturing, and when good toolpaths go bad https://www.youtube.com/user/krayvis
There are a few things that can go wrong... in my personal experience, workholding is #1 but that depends on what shape and type of materials you are using. I have a XCarve, a Nomad 883, a Tormach mill, a Tormach CNC lathe, a Epilog laser cutter, and a couple 3D printers. They each have their own qwirks of motion controllers.
The Xcarve was by far the worse.. a web based GCode sender alone with a faulty motion controller made for many crashed workpieces and jammed endmills causing lots of chaos. A new motion controller and a home built controller fixed that. I'd suspect the newer models of Xcarve/Shapeoko are better? But my point is they aren't a laser printer.
If you are working in wood, each has their own issues - - some of the nicest and easiest cutting is with MDF type of product that doesn't have a grain and is consistent, but the dust issue needs to be managed with a vacuum system and exhaust or a dust collector like https://www.amazon.com/Oneida-Air-Systems-Cyclone-Separator/dp/B002GZLCHM
There are knockoffs of "dust deputy's" for $25 and you can glue and screw them to a Home Depot pail, or you can just vacuum directly but MDF dust chokes filters and bags really quick.
Overall, with my wood and metal CNC's, I probably spend 3x the time watching them than I do designing in the computer - best case. Sometimes a couple hours designing and CAMing, and the rest of the day babysitting the machines.
You need a metal brake of some kind to do that. These parts are small enough that if you've got a vise with a wide enough throat and you used aluminum instead of steel, you could use a vise mounted brake which is an order of magnitude cheaper than a stand-alone brake.
Foraver 3020 3-axis CNC router but it’s not on the product page any more.
Kuman CNC engraver shield, Arduino and stepper motor drivers This is a clone of the Protoneer CNC shield.
And then various spare ER11 collets, end mills and upcut bits etc. Total cost, not including the controller PC I’m building to go with it, and including a second Kuman kit because it turns out connecting the stepper drivers to the spindle power releases the magic smoke, was around £400.
I have a piece of mdf with holes drilled in it and T-nuts on the back side.
https://www.amazon.com/Hillman-Group-180297-Pronged-100-Pack/dp/B000H61YF2/ref=sr_1_1/180-7989447-8305100?s=industrial&ie=UTF8&qid=1468022702&sr=1-1
I printed a bunch of hold downs on my printer and use 1/4 20 bolts to hold my part.
"Spindle" is probably the wrong tactic. Try "X router motor"
https://www.amazon.com/DEWALT-DW618-Electronic-Variable-Speed-Fixed-Base/dp/B00006JKXB/ref=sr_1_2
https://www.amazon.com/Bosch-1617EVS-2-1-Variable-Speed-Router/dp/B00004TKHV
I use the crap out of these:
https://www.amazon.com/gp/product/B010NI39WO/ref=oh_aui_search_detailpage?ie=UTF8&psc=1
this one for V-carving:
https://www.amazon.com/gp/product/B000ALY4E2/ref=oh_aui_search_detailpage?ie=UTF8&psc=1
For engraving
https://www.amazon.com/Autek-Titanium-Carbide-Engraving-J3-3001Tix10/dp/B00HC98K2C/ref=sr_1_8?s=industrial&ie=UTF8&qid=1542727514&sr=1-8&keywords=cnc+engraving+bit
Also, get a 1/8 and 1/4 compression bit