Top products from r/largeformat
We found 6 product mentions on r/largeformat. We ranked the 6 resulting products by number of redditors who mentioned them. Here are the top 20.
1. Fuji Super HR-T Medium Speed Green 8x10 X-Ray Film
Sentiment score: 1
Number of reviews: 1
8 x 10 inches HR-T GREEN SPEED XRAY FILM .
 Show Reddit reviews
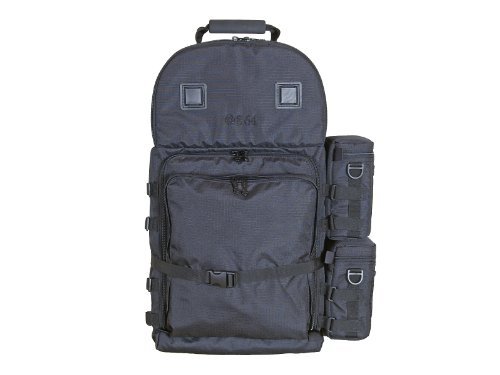
2. F.64 BPX Black - Ex. Large Professional Photography Backpack - for SLR DSLR Multiple Lenses Camera Accessories Water Proof Rain Cover Gear Travel Gadget Padded Waterproof Digital
Sentiment score: 1
Number of reviews: 1
600 denier polyester backpack with high-density closed-cell foam paddingAdjustable padded dividers.Top compartment for lenses and film holders with five dividers. Lower compartment for large format camera with nine dividers.Hideaway rain cover is always ready to guard against the weather.Exterior Di...
 Show Reddit reviews
3. Fotasy 15-26mm M42 to M42 Lens Macro Helicord Adapter, 42mm Focusing Helicoid Extention Tube, 15mm to 26mm, 11mm Max Movement, fits M42 Screw Mount Lens
Sentiment score: 1
Number of reviews: 1
Made of light-weight aluminum alloyMale thread: 42mm; female thread: 42mmThe Length of this Helicoid Tube 15mm(Min), 26mm(Max), it offers a total of 11mm Movement Distance for Lens Focusing."Work with M42 screw mount lenses, such as Carl Zeiss, Pentax takumer lens. If you want to use 39mm enlarger l...
 Show Reddit reviews
4. Fotodiox Pro Lens Mount Macro Adapter Compatible with M42 Lenses for use with Sony E-Mount Mirrorless Cameras
Sentiment score: 1
Number of reviews: 1
Mounts M42 Screw Mount SLR Lenses to Sony E-mount mirrorless cameras; infinity focus or beyond allowedBuilt in macro focusing helicoid provides macro focus on any lensPrecise fit and solid connection; lens has no play, gap or wiggling when mounted on adapter and no adjustments requiredPrecision all-...
 Show Reddit reviews
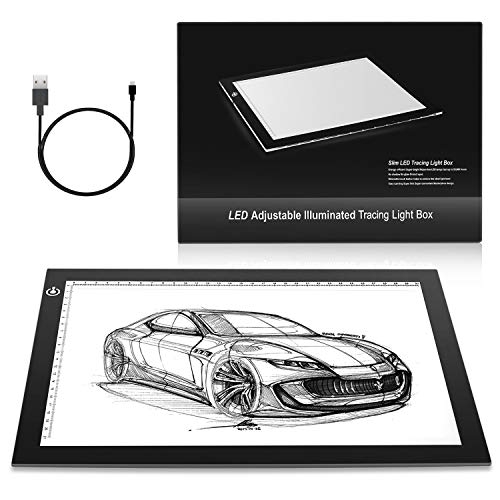
5. ME456 A4 LED Light Box 9x12 Inch Light Pad Only 5mm Ultra-Thin USB Power Light Table for Tracing
Sentiment score: -1
Number of reviews: 1
EASY CARRYING Super thin tracing light up box, super convenient, masterpiece designed drafting table.EYESIGHT-PROTECTED DESIGN. No shadow, no glare. The drawing pad provids the most comfortable lighting environment for animators, designers, art enthusiasts, children and readers.ADJUSTABLE BRIGHTNESS...
 Show Reddit reviews
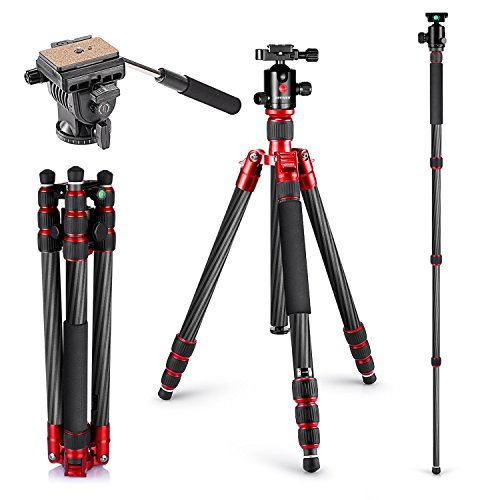
6. Neewer Carbon Fiber Tripod Monopod 63 inches/160 centimeters with 360 Degree Ball Head, Fluid Video Head, 1/4-inch Quick Shoe Plate and Bag for DSLR Camera,Video Camcorder up to 33 pounds/15 kilograms
Sentiment score: 1
Number of reviews: 1
THIS KIT INCLUDES: (1)Portable 63 inches/160 centimeters Carbon Fiber Camera Tripod Monopod,(1)Fluid Video Head,(1)Carrying Bag2-IN-1 TRIPOD: Can be used as monopod and converted into alpenstock when you remove one leg; Can achieve greater performance and maintain image quality for cropping larger p...
 Show Reddit reviews
Yup. I dont like a loose collar and got one shirt with V shape. Black with a rolleiflex print on it, perfect focusing cloth :)
Edit: for a tripod I can wholeheartedly recommend this chinese carbon pod, holds my shen hao ptb (1.3kg) with a 300mm lens at full extension like a champ: https://www.amazon.de/dp/B073R7P8G2/ref=cm_sw_r_cp_apa_1C3SBb8GW2CYA
Simple soft bellows not my camera build but it shows the idea. I know that's also a view camera/studio camera and you want a point and shoot still if your only going to do the 90mm you don't need a great deal of travel soft bellows would work. You would just have to find the right support for the lens.
Thinking point and shoot your lens is so wide shooting 4x5 or larger you could almost do a simple fixed focus camera.
There is a handmade large format flicker group look through the picture pool and in there are some good camera builds. From things that are ruff but functional to elegant ideas.
I would totally be about salvage mechanisms from 35mm or rangefinder lenses. Find a simple lens with a great take apart guide, buy a copy with fungus/missing elements, salvage a helical.
Good luck. Show us what you make and have fun.
Edit: are you married to having a lensboard? You could do Copal 0 to M42 adapter then M42 + helicoid to a mirrorless style camera. Mount to the body using a cut up rear lens cap as a receptacle. I might worry the longer helical would block the edges of the light cone inside especially for such a wide lens. I might worry is too many connectors.
Edit 2: Copal 0 to just M42 helicoid?
8x10 xray film is crazy cheap, like $30 for 100 sheets, cut into 4x5 that's 400 sheets. You can use under a safelight unlike the more popular films. Both sides have emulsion, so careful not to scratch it. I'll make my own notch on it, and once exposed/developed etc, you can remove the "back side emulsion" with water/bleach mixture. Cheap way to learn for sure. Do a search you'll find some good results with it.
As for storage of exposed film, you could source one of the bags that the film comes in, or some manufacturers triple box and have the film wrapped in black plastic inside. Keep your boxes when you buy another pack, makes it easier.
I had a hard time trying to find something that would carry my 4x5 rail camera- I ended up getting this and has worked out well.
Ive bought some extra film holders- they attach to the sides. It’s keep everything pretty safe. Not sure how much you’re lugging around. If you’re curious, I can shoot some photos of my when I get home.
I do this as well, and honestly prefer it - for me, it's much easier and faster than using a scanner. I used to use the (very expensive and fancy) Hasselblad Flextight that my university provides, but found my new method to be far easier and faster while also providing better results.
I use a cheap "tracing pad" from Amazon to illuminate the negative.
I put the tracing pad on a low table, then set-up my tripod above it, so my digital camera is pointing straight down. I use a Sony A7r with a 90mm macro lens, but any digital camera that can focus close enough works. The one key point here - it's very important that the camera is level and actually pointing straight down - otherwise you'll not only get keystoning, but your plane of focus will be off and so your negative will not be entirely in focus.
I stop down to around f/8 and 1/8th or so of a second at the base ISO, and use the 2-second self timer to avoid shake. I keep the camera still and just move the negative on the light table to photograph it in thirds. Takes about 10 seconds per negative.
Then, I use Lightroom's built-in batch panorama stitch to stitch all the frames into a single large .dng. I then open the .dng using Adobe camera raw's default settings in photoshop, and the perspective crop tool makes it really easy to crop to just the negative, including or excluding the frame borders per your preference.
Then I invert the negative using a single adjustment layer and do color correction from there, following the guide from Alex Burke's e-book. But you could also try Negative Lab pro.