(Part 3) Top products from r/projectcar
We found 20 product mentions on r/projectcar. We ranked the 150 resulting products by number of redditors who mentioned them. Here are the products ranked 41-60. You can also go back to the previous section.

42. Build Your Own Sports Car for as Little as £250 and Race It!, 2nd Ed.
Sentiment score: 1
Number of reviews: 1
 Show Reddit reviews
43. How to Build Max Performance Pontiac V8s (S-A Design)
Sentiment score: 0
Number of reviews: 1
 Show Reddit reviews
44. Ferrari Formula 1: Under the Skin of the Championship-Winning F1-2000
Sentiment score: 1
Number of reviews: 1
 Show Reddit reviews
45. Engine Management: Advanced Tuning
Sentiment score: 1
Number of reviews: 1
How To: Enginge Management Advanced Tuning
 Show Reddit reviews
46. David Vizard's How to Build Max-Performance Chevy Small-Blocks on a Budget (Performance How-To)
Sentiment score: 1
Number of reviews: 1
How To Build Max Performance CHEVY Small Blocks On A Budget: CarTech Manual - Softcover
 Show Reddit reviews
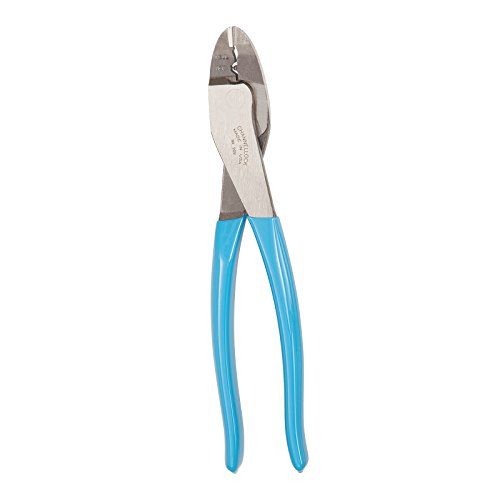
47. Channellock 909 9.5-Inch Wire Crimping Tool | Electrician's Terminal Crimp Pliers with Cutter are Designed for Insulated and Non-Insulated Connections | Forged from High Carbon Steel | Laser Heat-Treated Edges Last Longer | Made in the USA
Sentiment score: 0
Number of reviews: 1
Cuts and crimps 10-22 AWG wireDesigned for crimping of both insulated and non-insulated solderless connections and terminalsLaser heat-treated edges last longerHigh-carbon C1080 steel for superior performance on the job and electronic coating for ultimate rust preventionMade in the USA
 Show Reddit reviews
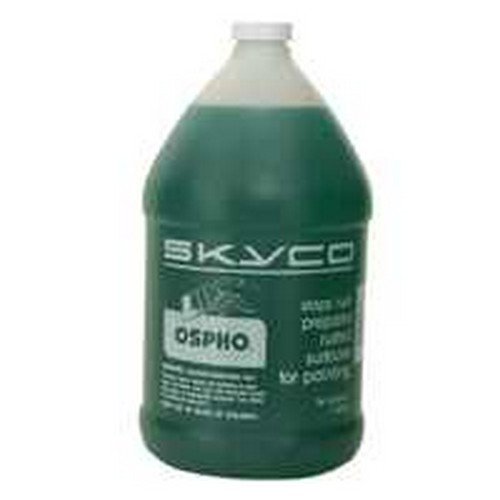
49. Sunpro CP7901 Super Tachometer II - Black Dial
Sentiment score: 0
Number of reviews: 1
Black face tachometer with 3 3/8-in dialHas a 0 to 8,000 RPM rangeInternal settings compatible with 4, 6, and 8 cylinder and 12-volt negative ground enginesCompatible with most automotive ignition systemsIncludes mounting hardware
 Show Reddit reviews
50. GM 90 Temp Sensor
Sentiment score: 0
Number of reviews: 1
Pico welcomes the opportunity to design a tool to meet your specific requirements.
 Show Reddit reviews
51. Loctite 555339 Threadlocker 222 Low Strength Tube, Purple, 6-ml
Sentiment score: 0
Number of reviews: 1
DESIGN. Ideal for fasteners under 1/4-Inches (6 mm) that require occasional adjustment.APPLICATION. Carburetors, relay locks, headlamps, throttle body assembly, choke assembly and fuel injection set screws and much more.RESULTS. Secure, one-piece assembly that will not loosen under stress.SECURE. Lo...
 Show Reddit reviews
52. HELLA 002395301 Vision Plus 165mm High/Low Beam 12V Halogen Conversion Headlamp (HB2)
Sentiment score: 0
Number of reviews: 1
HELLA's Vision Plus conversion headlamps replace the original sealed-beam headlamps in your classic vehicle with a modern, replaceable Halogen bulbBased on European headlamp technology, HELLA’s Vision Plus produces a 50 percent more powerful low beam and a 25 percent more powerful high beam than s...
 Show Reddit reviews
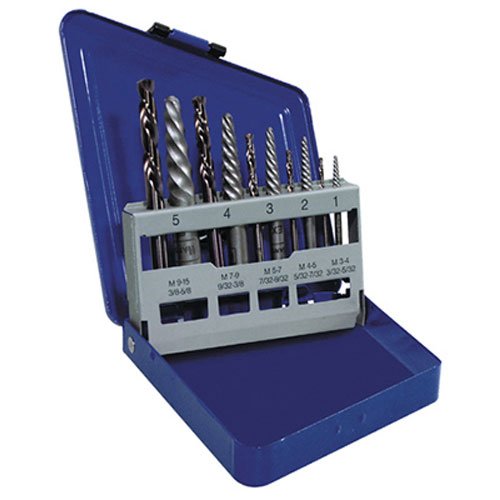
53. IRWIN Screw Extractor/ Drill Bit Set, 10-Piece (11119)
Sentiment score: 0
Number of reviews: 1
Designed to remove broken studs, bolts, socket screws, and fittingsAggressive left hand spiral design for extra gripping powerEasy out style spiral flutes embed themselves to increase grip as resistance increasesExtractor size and recommended drill bit size are etched on each toolSet includes spiral...
 Show Reddit reviews
54. Astro 7874 Pulley Puller and Installer Kit
Sentiment score: 0
Number of reviews: 1
Installs alternator and power steering pulleys including Quad 4Blow molded case keeps the tools organized and easy to transportCase dimensions 9" long x 7 1/4" wide x 2" highCase Dimensions: (L)9 x(W)7-1/4 x(H)2Weight 2 lbs.
 Show Reddit reviews
55. Proform 66516 Pinion Setting Tool
Sentiment score: 0
Number of reviews: 1
Package Dimensions: 10.414 H x 23.876 L x 18.541 W (centimetres)Package Weight: 2.5 poundsFit type: Vehicle SpecificCountry of Origin : Taiwan
 Show Reddit reviews
56. Dorman 800-016 Fuel Line Retaining Clip Assortment - 3 Each - 5/16 in. and 3/8 in., 6 Piece
Sentiment score: 0
Number of reviews: 1
Replace the clip, not the entire fuel fitting, to save time and moneyDirect replacement for a proper fit every timeResistant to brittleness and crackingAlso included in Dorman's Quick Disconnect Retaining Clips Tech TrayBacked by team of engineers and quality control specialists in the United States
 Show Reddit reviews
57. Schumacher SE-82-6 Dual-Rate 2/6 Amp Manual Battery Charger
Sentiment score: 0
Number of reviews: 1
Two-in-one charger provides 6-amp manual and 2-amp trickle charger for 6 and 12 volt batteries2 amp rating is excellent for trickle charging batteries in motorcycles, snowmobiles, lawnmowers and garden tractorsCan be switched to 6 amp medium rate charging for larger batteries in 6-8 hours2 amp trick...
 Show Reddit reviews
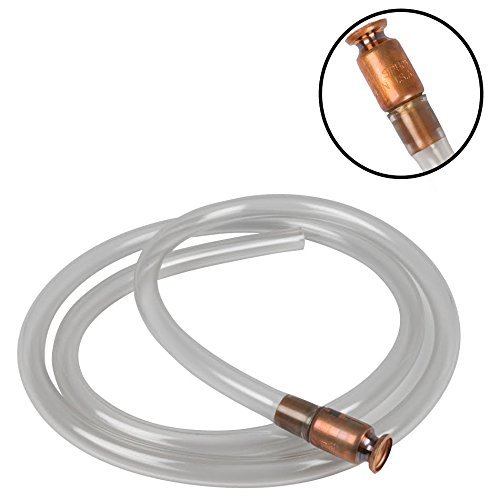
58. Safety Siphon - The Original Safe Multi-Purpose Self Priming Pump By The Original Safety Siphon - 6 Foot High Grade Hose, 1/2" Valve
Sentiment score: 0
Number of reviews: 1
1/2" ID Premium Siphon Has A Flow Rate Of Up To 3.5 Gallons Per Minute - Connects To Garden Hose With 1/2" Adapter100% Pure, Lead-Free Copper Pump With An Industrial Strength Glass Ball And Stainless Steel SpringSafety Siphon 6 Foot Siphon - Pumps 6 Gallons Per Minute - Makes A Great Sump Pump Backu...
 Show Reddit reviews
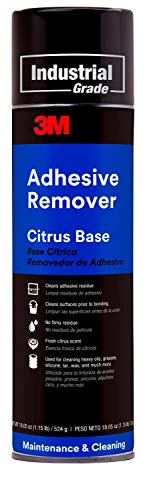
59. 3M Adhesive Remover Citrus Base 6041, Net Wt 18.5 oz, Pale Yellow
Sentiment score: 1
Number of reviews: 1
Excellent for removal of adhesive residueUsed for cleaning a wide variety of industrial materialsCleans gently, removing tape, label or sticker residue without damaging the surface underneath in most casesWipes away with just a shop towel after use, leaving no filmy residueCitrus oil based cleaner n...
 Show Reddit reviews
For rust spots that are rotted through completely, you'll definitely need to cut them out and make patches. This is hard, but with lots of patience and the right cutting tools, a little bit of welding skill, you'll be fine.
Remember that for welding on body panels, the sheet metal is very thin, so weld carefully to avoid putting to much heat in. Too much heat in a body panel will warp the surrounding metal and cause an ugly look when you do body work, making it hard to smooth out the area even with bondo. Try making many small spot welds. If you have an air compressor, a good way to cool down the metal while welding is to attach your 'blowing' attachment and just blow cool air over the region after each weld. Patience is absolutely key. Have a steady hand. Do not just burn through on the body.
When welding on frame pieces or other things that won't be seen, this is not as important, though you should still be careful. A fire is not great.
I would suggest you buy a large sheet of fairly thin steel, a gauge which matches body panels closely. Too thin and you'll burn through; too thick and it will be hard to weld.
For surface rust and that rust which does not rot through panels, rails and other metal completely, use Ospho. Ospho is a compound of phosphoric acid and a few other additives that, when added to rusted metal, causes a chemical reaction which hardens into a kind of undercoat. When using Ospho, make sure that you clean up the area first with a wire brush and, for best results, some sandpaper as well. You'll want to knock off as much scale as you can before applying the chemical so that it works properly. Applying Ospho to scaly surfaces will not allow the chemical to be effective.
Here is a link to the big bottle. I'd suggest it since you can use it again in the future. It is to be applied LIGHTLY. Noting this, it is suggested that you buy a heavy set of paint brushes. Have a dedicated rag. Finally, get a spray bottle that can handle corrosive chemicals. You can find these at your local hardware store.
OSPHO IS DAMAGING TO PAINT. OSPHO IS DAMAGING TO PAINT. OSPHO IS DAMAGING TO PAINT. DO NOT APPLY TO PAINT!
When using Ospho, you must recognize that you are using a corrosive acid. As such, it is recommended that you wear nitrile gloves. Always wash your hands with a good basic soap, like joy or dawn, after using the chemical. This will neutralize the acid. Do not rub your eyes. If you get a little on your skin, you will be ok. Just wash, wash!
If you are not comfortable with bondo, find a good body man. A good body man is hard to find. Choose carefully your body man.
These are some hot tips. If you need help, feel free to message me.
I think you'll be hard pressed to find actual detailed schematics.
http://www.amazon.com/Race-Rally-Car-Sourcebook-Competition/dp/085429984X
That book has a lot of pictures and diagrams of various racecars (both production based and formula style) and discussion about design considerations.
The To Win series by Carol Smith has some wisdom from a man who built a lot of formula cars, but it's mostly technical stuff - not straight up schematics.
The only resource I know of that has full schematics about how to build a car, is Build Your Own Sports Car for as Little as £250 and Race It!, but that's to build a 1960 era Lotus 7. (If you want to check this out, I have a .PDF copy I might be able to upload, as the original is out of print - the book shouldn't cost 1/2 the price of the car they teach you to build IMO, lol).
A while back, I had the same dream - except not a Formula 1 car, just a homebrew of some sort.
To get "practice" at putting a car together, I taught myself a 3D CAD program called SolidEdge (similar to Solid Works, except there is a free academic version that's readily available to almost anyone). I looked everywhere for schematics of real race cars so I could attempt to model one before I started working on my own design. The best thing I could find was that Build Your Own Sports Car book.
Seems like nobody wants to give away their design secrets - even with 50 year old cars...
About 10 years ago a friend of mine got a book about Ferrari's ~2000 F1 car. I think the book cost $250. You could probably build a ~2000 Ferrari F1 car based on the photos and diagrams in that book, but you'd need an extremely well equipped shop to do it, and it would still cost hundreds of thousands of dollars just to make the shell and suspension. I don't even remember what the book was called. I think it might be this one, but I'm not sure.
It sounds like you're comfortable with a carb; if that's the case then EFI should be easy for you. Greg Banish has a few books, this one and this one, that lay it out very well. These are the best how to books on the topic I know of. An Innovate LC2 (or the outgoing LC1 for a bit cheaper) is all the equipment you'll need.
I used to say the same thing about EFI vs carbs... now I can hardly imagine running a carbed car. My '83 Alfa will definitely get EFI, probably the '72 Duster as well. Part of that may be that I'm an engineer in the engine industry, I confess that I probably have certain biases.
This is the book I bought. If you want to learn from someone who loves to shape sheet metal then look no further. I met the author, Ed Barr, and he is the real deal. You will learn a lot from his book.
Edit: it's 300 pages of information that applies to what you want to do
Also, there are car restoration classes at the McPherson College in Kansas. They have a summer session that is open to the public. Each class is a one week session (M-F 8:30-5). The faculty and everyone else there are all friendly! Unfortunately, the classes are over this year, but they run every year in June. I took beginner and advanced sheet metal classes as well as a drivetrain class.
In the metal classes we learned how to TIG, MIG and torch weld sheet metal. Also, learned how to shape and form the sheet metal like bending, stretching and shrinking in certain places to get the right shape for your need. They have all the tools you need for your task. English wheels, bead rollers, metal brakes, hammers, dollies, power hammers etc...you name it and it's there. Plus they are open to students bringing in a manageable piece in to work for your advanced class.
The drivetrain class, we were allowed to take apart transmissions and put them back together. I did a Model A, 63-67 MG A, and a TH400. Someone else did a tranny from an 04 Mustang. We also took apart live axles. I took apart an axle with a Dana differential.
They offer a lot more and I promise you won't leave with a frown on your face!
P.S. A lot of students say they know the ins-and-outs of something until they take one of these classes. Almost everyone learns at least something new.
3M citrus based adhesive remover works great, everyone should have some. then i'd imagine you'd need to do some paint restoration/treatment since the clear coat around the sticker location looks faded
You should be able to find several books on Amazon, check out this one- http://www.amazon.com/Build-Chevy-Small-Blocks-Budget-Performance/dp/1932494847/ref=sr_1_2?s=books&ie=UTF8&qid=1377614427&sr=1-2&keywords=small+block+chevy
I've read several books from that series and they are very helpful.
I actually meant purple. I use it for really small stuff, like RC cars and such. https://www.amazon.com/Loctite-555339-Purple-Strength-6-milliliter/dp/B0002KKTT0
I thought new chargers had to have safety switch by law which makes them not suitable for electrolysis?
I've bought 2 already and both failed, is this the one you are talking about? https://www.amazon.com/Schumacher-SE-82-6-Dual-Rate-Battery-Charger/dp/B0009IBJBM
thanks
"stud socket connector"
Part numbers I have found: 5656C, AC Delco# PT404, GM# 12112171
here's a couple of sources:
http://www.repairconnector.com/products/GM-Ford-Chrysler-Universal-Stud-Socket-Pigtail-.html
https://www.summitracing.com/parts/pco-5656pt/overview/
https://www.amazon.com/Pico-5656PT-Universal-Pigtail-12112171/dp/B0002JN06U
(25 pack) https://www.amazon.com/Pico-Universal-Pigtail-12112171-Package/dp/B01DCJGY5U
A simple crimper is cheaper and will give you more repeatable and reliable results than a vise. That one's made in 'murricah, and it's probably cheaper than the vise.
Use this:
https://www.amazon.com/Safety-Siphon-Safe-Multi-Purpose-Priming/dp/B000BG1X54
https://www.amazon.com/How-Build-Performance-Pontiac-Design/dp/1884089674
https://www.amazon.com/Build-Your-Own-Sports-Car/dp/1844253910/ref=sr_1_1?ie=UTF8&qid=1540663040&sr=8-1&keywords=how+to+build+your+own+sports+car
http://www.locostusa.com/forums/index.php
Proform 66516 Pinion Setting Tool https://www.amazon.com/dp/B000630IFI/ref=cm_sw_r_cp_apa_i_ULQ3Db1AHW8YB
Works OK. Little bit of a pain to setup, but got the job done.
That go on the fuel pump or the lines? I matched up the two pumps when replacing at could’ve sworn the looked identical but maybe I overlooked it.
Edit: https://www.amazon.com/Dorman-800-016-Fuel-Retaining-Clips/dp/B00066UKGM are these what you’re referring to?
This is what you're looking for, screw extractors. Cut the head flat, center punch, drill out, then use the left handed extractor bit to remove the bolt
I did this to a valve cover bolt or two, over tightening them to avoid leaks. It sucks, but it happens. These solve the problem.
Note: some WD-40/penetrating oil and heat can make the process go easier, as mentioned elsewhere in this thread.