(Part 3) Top products from r/Bladesmith
We found 20 product mentions on r/Bladesmith. We ranked the 136 resulting products by number of redditors who mentioned them. Here are the products ranked 41-60. You can also go back to the previous section.
41. The Complete Bladesmith: Forging Your Way To Perfection
Sentiment score: 1
Number of reviews: 1
 Show Reddit reviews
42. Nikey Sports Shorts (S, Red)
Sentiment score: 1
Number of reviews: 1
DSM 5 Abnormal Psychology
 Show Reddit reviews
43. New Edge of the Anvil: A Resource Book for the Blacksmith
Sentiment score: 0
Number of reviews: 1
Used Book in Good Condition
 Show Reddit reviews
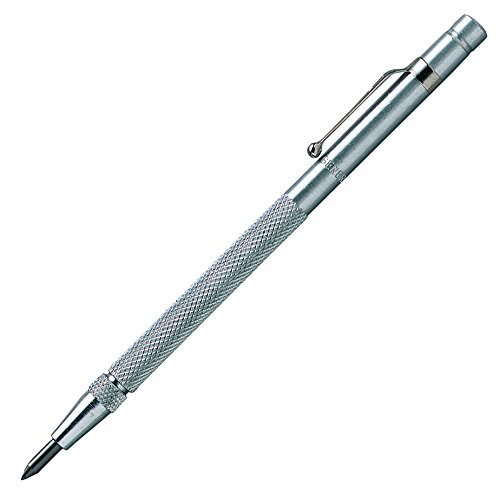
44. General Tools 88 Tungsten Carbide Scriber
Sentiment score: -1
Number of reviews: 1
The General Tools and Instruments 88 Tungsten Carbide Scriber is a great choice for both machinists and hobbyists.This engraving pen comes with a chuck for reversing tungsten carbide point when not in use; this scribe is an essential machining toolThe durable etching point works effortlessly on hard...
 Show Reddit reviews
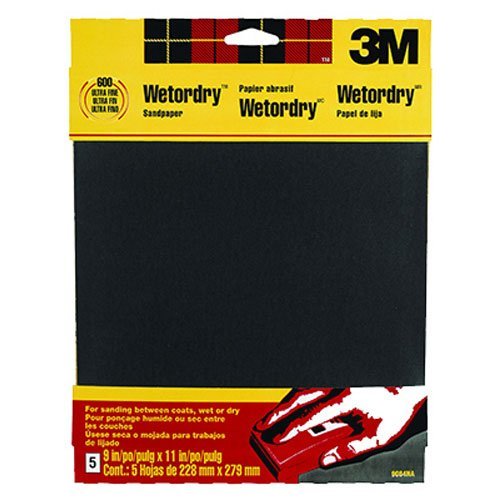
45. 3M Wetordry Sandpaper, Extra Fine 320 Grit, 9-in by 11-in, 5-Sheets (9086DC-NA)
Sentiment score: 1
Number of reviews: 1
320 GritFor sanding between coats of varnish, lacquer, paint and other finishes.Silicon carbide abrasive, a sharp synthetic mineral that cuts fast and smoothWaterproof paper
 Show Reddit reviews
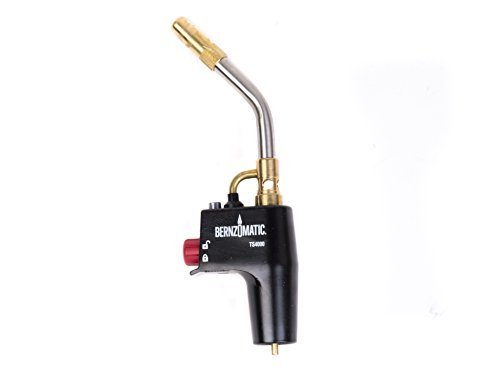
46. Bernzomatic TS4000 Trigger Start Torch
Sentiment score: 0
Number of reviews: 1
TRIGGER START - Trigger start torch for ease of lighting, instant on/off trigger increases fuel savings.DURABLE - Stainless steel burn tube, cast aluminum body, brass burn tip.HIGH PERFORMANCE - Pressure regulation allows the flame to burn in any direction and ensures consistent performance.SWIRL FL...
 Show Reddit reviews
47. Westcott 12" Wood Ruler, Beveled Edge (05011)
Sentiment score: 1
Number of reviews: 1
Westcott wooden ruler is made of selected strong and reliable WoodSealed with a clear lacquer finish to protect its markings and gradations from damage12 inches long with 1/16-inch gradationsBeveled edge for drawing straight lines on common surfaces As well as mark surfaces for cutting or sewingA mu...
 Show Reddit reviews
48. The Master Bladesmith: Advanced Studies In Steel
Sentiment score: 1
Number of reviews: 1
Used Book in Good Condition
 Show Reddit reviews
49. 600 Wet-Or-Dry Sandpaper 5Pk
Sentiment score: 1
Number of reviews: 1
3M9084NASanding Sheets
 Show Reddit reviews
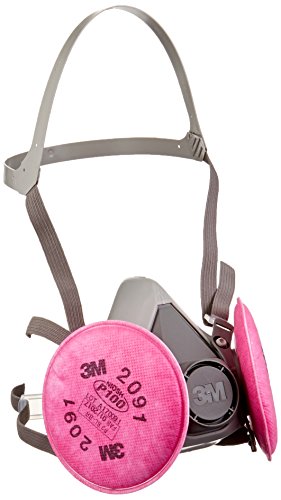
50. 3M(TM) Half Facepiece Respirator Assembly 6291/07002(AAD), Medium, with 3M(TM) Particulate Filters 2091/07000(AAD), P100
Sentiment score: -1
Number of reviews: 1
The lightweight 3M Half Face Respirator 6000 Series offer safety, comfort and ease of useIncorporate the 3M Bayonet Filter Fixing System enabling a wide range of 3M FiltersVersatile systems suitable for many situations, providing filtering protection against particulatesFeatures remarkably comfortab...
 Show Reddit reviews
51. Shun Classic 10” Chef’s Knife with Ebony PakkaWood Handle and VG-MAX Blade Steel; Longer than Traditional Chef’s Knife for Increased Leverage; Higher Efficiency for Personal or Commercial Kitchens
Sentiment score: 0
Number of reviews: 1
The 10-inch Chef’s Knife offers a longer blade than other models, providing increased reach and leverage, which maximizes productivity and efficiency by slicing and dicing larger amounts of foodInstead of a forceful up-and-down motion that rips or tears, push the blade forward and down to cut, the...
 Show Reddit reviews
52. Presto 07039 Professional Jumbo Electric Griddle 22
Sentiment score: 1
Number of reviews: 1
Generous 22-inch size is great for making family-size batches for breakfast, lunch, dinner and appetizersHeavy cast aluminum base is virtually warp-proofGriddle is fully immersible and dishwasher safe with the heat control removedControl Master heat control maintains the desired cooking temperatures...
 Show Reddit reviews
53. Bahco 168-8-5.5-1P Round Chain Saw File with 7/32-Inch Diameter, 8-Inch
Sentiment score: 1
Number of reviews: 1
For sharpening of the cutting tooth on the saw chainIt belongs to the tools categoryIt is of durable quality and highly efficient
 Show Reddit reviews
54. Bahco 1-160-04-2-0 Square File Second Cut 56 TPI, 4-Inch
Sentiment score: 1
Number of reviews: 1
Designed for filing grooves, rectangular holes, inside corners and for fine-adjustments of cutting toolsSurfaces are tapered towards the point and has a double cutIt is of durable quality and highly efficient
 Show Reddit reviews
55. Bahco 1-111-06-1-0 Warding Cut 1-File, 6-Inch, 10-Pack
Sentiment score: 1
Number of reviews: 1
6-Inch fileWidth of 19/32-Inch36 teeth per-InchType of cut bastardDesigned for filing narrow grooves and passages such as filing cuts on keys
 Show Reddit reviews
56. 3M Foam Compounding Pad, 05723, Single Sided, Flat Back, 8 in (203.2 mm), 2 pads per bag
Sentiment score: 1
Number of reviews: 1
Removes finishing abrasive sand scratches and other paint surface defects.3M Hookit Backup Pad - PN05717, 3M Perfect-It Back-Up Pad - PN05718
 Show Reddit reviews
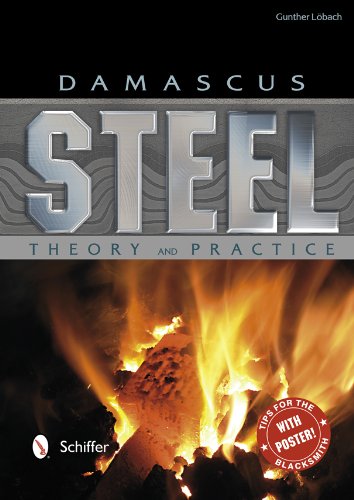
59. Titebond Genuine Hide Glue,4-Ounce
Sentiment score: 1
Number of reviews: 1
Item Weight: 0.3 lbCountry of Origin: ChinaBrand name: TitebondItem Dimensions: 1.0"L x 2.3"W x 5.8"H
 Show Reddit reviews
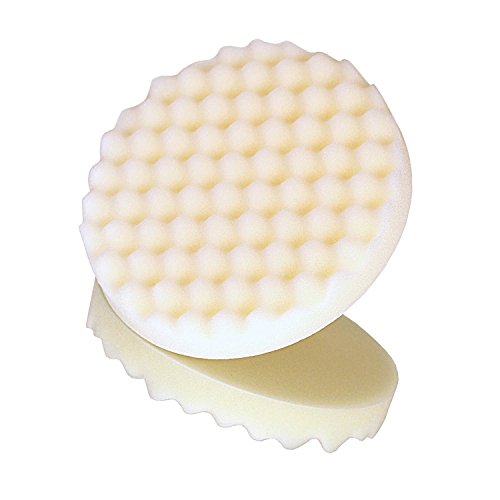
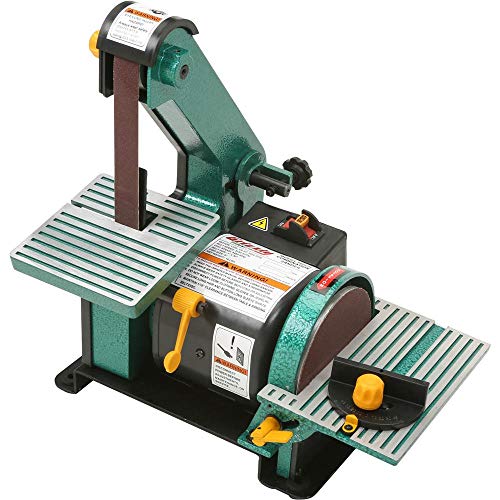
60. Grizzly Industrial H6070 - 1" x 30" Belt/5" Disc Combo Sander
Sentiment score: 1
Number of reviews: 1
1/3 HP, 110V, single-phase, 3450 RPM motorBoth belt and disc sanding tables tilt 45 degreesBelt sander table size, 5-1/8" x 5-1/8"Disc sander table size, 4" x 7-5/16"Removable belt platen and idler roller guard
 Show Reddit reviews
You've thankfully got a lot of resources available online to help get you started. A good beginners tutorial can be found here on how to make your own custom knife from scratch with minimal equipment.
I tend to use Jantz Supply for a lot of my supplies including steel and kydex.
I'd highly recommend joining up for free on Blade Forums and browsing around the shop-talk forums. Tons of useful information by people that are just beginning and people who've been doing it for decades.
There's really tons of material online to help you figure out which steel to use. If you're just starting, I'd recommend sticking with something simple like 1095 high carbon, maybe 440C stainless. Here is a surprisingly good article written about it from an unexpected place. If you get the chance, pick up this book: The Master Bladesmith by Jim Hrisoulas. It's practically the knife-maker's bible.
Good luck and don't hesitate to ask questions!
Okay going to make this short and concise. These are all my opinions to make blades.
Going to need lots of belts for it, here are some. Would suggest getting the 50 grit (please remember he will need multiple amounts of these so get a few of them). I would also suggest grabbing the 120 grit to take some deep scratches out. However the 320 isn't necessary as you can do all that by hand with regular sand paper.
Hopefully in the yard or somewhere he can have a workbench set up because having a benchvise is such a luxury.
Hand sanding paper (The fun stuff)
Also a sharpening stone will be very helpful however i don't have much knowledge as the best way to go with these. After doing some research, This stone seems like it would do the trick for the most part
I forgot about these, 2 should be okay if he doesnt already have some
Assuming you do not buy the 320 grit belts, and buy (5) 50 grit, and (5) 120 grit belts.
The total comes to right around 308.36
I failed you by breaking the budget, but your man is worth the 8 extra dollars :b Make him give you a foot rub and take you out for a nice dinner or something to repay the debt haha. GL and let me know if you have any other questions.
Would like to note that all of this is for making the process easier. You can do all of this with 1 bench vise, 1 hand file, a hack saw and some steel. It would just take a long time and be extra tough! But absolutely doable without all of these gadgets
I know you're not asking for advise on how to do it, but practice, patience, and the right tools are your best bet to get results.
A nice pair of tin snips will make cutting it much easier. Get a cheap electric skillet and use that to heat the kydex. Set it to 300f, wait until it because floppy. Once it's floppy, it's hot enough to mold. A cheap heat gun is also important, and extremely useful. I've only made a couple of sheaths, but using these tools has made it quite easy.
EDIT: Links are provided as examples of the types of each of those tools that I use. I got my skillet from Walmart for 15 dollars, and the linked snips may be available at lower cost elsewhere.
Allright, here goes.
What I would do is aim for [something roughly this shape](https://i.imgur.com/gwSfsSJ.jpg]
What I'd do is cut according to this sort of plan and use an anglegrinder with cut-off disc to chop the tang out (marked in red), then use a dremel (Marked in blue) for the fine cuts. I would then round off the shoulder of the blade with a round chainsaw file to remove the risk of stress raisers.
Once there, I'd use a Warding File to file in the little notch step down at the bottom of the tang, from a rough squared-out cut , to become a round circle along its length. That's going to become your Pein, when the whole thing is assembled.
I'd then put that pein part in a flame - ideally a blue gas flame, wrapping the blade in a damp cloth to ensure its not getting hot. you'll ideally want to get that part glowing red-hot. What that'll do is completely blow the temper on that part of the tang, so its no longer hardened at all. that'll let you pein it over later.
Then I'll take two pieces of steel, curved into arcs and I'll clamp them down, and start to drill the centre - that will depend on the blade of course, but what you want in effect is a slot, for your since its from a blade that's probably going to be a () shape, or maybe even a <> shape.
you'll use that warding file to slowly widen the drilling, taking it from two holes side by side into a rectangle, then widening it and shaping it to match the blade cross-section. Once that's done, repeat on the second one, to sit on the other end of the tang. For it, you will probably want to use a small 4-inch square-cut file to get that to fit. You want to use a square so that the pommel end guard doesnt swivel around at all.
that's then topped off with a little pein block which serves a double purpose - it makes it easier to repair if it ever has a problem (just file it off and put a new, smaller block on) and, as that part of the tang was filed round, you just need a drill to make a round hole, instead of a rectangular hole. (also a small pein is easier to do - just clamp in a vise and hammer over like a rivet. Having softened the metal by getting it glowing red earlier, you can probably do this part cold, so no torches needed.)
lastly, I'd then make a two-piece wooden grip, the bread around the tang in a sandwich, in effect, out of beech or similar hardwood (though poplar should do for that, and its easy to carve out the slot for the tang in.
I'd make that a bit thinner than you expect it to be - over-bulky grips are a common mistake - Glue it together, and wrap it in fine cord with hide glue and then I would follow this fantastic tutorial guide from Peter Johnsson to wrap a section of fine vegetable-tanned leather round it, wrap that in cord, and have a beautiful leather hilt at the end.
Hate to have to say it, but you're being much too ambitious at this point, and it seems like you are trying nearly every one of these techniques for the first time. It would be wise to practice each new technique individually before attempting to combine them into one project, otherwise you will likely become frustrated with the results. Another thing--unfortunately, touting Japanese vocabulary won't get you very far in the bladesmithing world. You seem to be slightly more humble in this post, but if you're not careful you're just going to irritate the more experienced members. Cheers and hope the project works out well, practice makes perfect.
Also, here
Sure thing and, trust me, I understand! I started off using a bench grinder and then bought a 1x30. This one (https://smile.amazon.com/Grizzly-H6070-5-Inch-Sander-30-Inch/dp/B0007D2YAO/ref=sr_1_13?keywords=1x30+belt+sander&amp;qid=1563022667&amp;s=gateway&amp;sr=8-13) served me well for quite a while until I sold enough knives to upgrade to a 2x72. I'm always happy to help and to share anything I've figured out along the way ;)
I see you work quite a lot with ctek, long time ago i was searching for an easy solution to polish it.
This 3M compound with this pad mounted on drill removes scratches and almost polish the surface. If you want perfectly shiny surface you also need to use this compound after (with separate pad). This works with any plastics or lacquered surfaces. Maybe you'll need this one day :)
As /u/Ermott stated, if you've got a few years of free time, there is no shortage at all of information to be found online.
If you specifically want a book for reference, here's the list. (I own and have read, and re-read every book here.)
Stock removal knife macking -
Wayne Goddard's $50 Knife Shop, revised
How to Mack Knives, by Barney and Loveless
When you're ready to move up a few notches in complexity -
The Tactical Folding Knife, by Terzuola
If forging is more your thing -
The Complete Bladesmith, by Hrisoulas
An overview (and extremely interesting) look at how different modern mackers go about macking knives -
Blade's Guide to Macking Knives
And finally, the condensed Q&A for everything the aspiring knife macker could ever want to know -
The Wonder of Knife Macking, by Goddard
The second edition of this books has mixed reviews centering on poor editing, I've read and recommend the first edition, though slightly dated, for it's solid insight into so many areas of knife macking.
I hope this helps you, don't forget to come back and post photos of the knives you mack!
We have quite a library of books about damascus, but this one is the best for me:
https://www.amazon.com/Damascus-Steel-Practice-Gunther-Lobach/dp/0764342940
Pick up a copy of The New Edge of the Anvil. Or go to either Project Gutenberg or the Open Library, search for blacksmithing books, download, and go to town. :)
If I wanted to make a propane forge could I use this propane head ( http://www.amazon.com/gp/aw/d/B00008ZA0C/ref=pd_aw_sbs_2?pi=SL500_SS115&amp;simLd=1 ) and just attach it to the side of the forge or do I need something like a trigger start torch ( http://www.amazon.com/gp/aw/d/B00008ZA09/ref=pd_aw_sbs_3?pi=SY115&amp;simLd=1 )?
I know this is a dumb question but I'm on a budget for my starter setup
Not sure. Customer is a professional chef instructor and chef at one of the top restaurants in Boston. The knife was made to his exact specifications right down to balance point location. This knife is 15" OAL and a 10" blade... Not sure where you are in the kitchen industry but a 10" bladed large chef's knife is fairly common and standard.
Edit: Reading your post again did you think I meant it had a 15" blade? You do realize that when a chef's knife is described as a "10 inch" chef's knife its often 16"+ in overall length, right? Example:http://www.amazon.com/Shun-DM0707-Classic-10-Inch-Chefs/dp/B0000Y7KN6
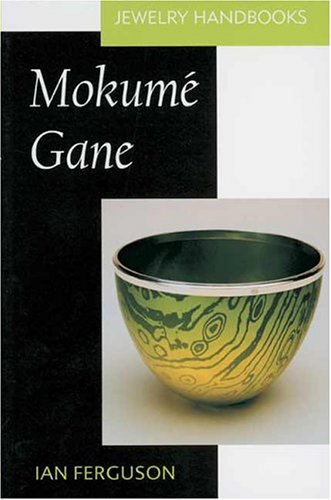
According to Ian Ferguson
Aluminum. . . "due to it's low melting point and ability to form low temperature phases, it is limited in its application with other metals."
https://www.amazon.com/Mokume-Gane-Ian-Ferguson/dp/0873499018
I don't know a whole lot yet about knife making, but I do know that if you are grinding metal you need to be wearing respiratory protection. Metal dust is no bueno for your lungs. In the limited reading that I've done, a standard 3M respirator mask with the P100 filters should be sufficient. [The price is right too] https://www.amazon.com/3M-Facepiece-Respirator-6291-Particulate/dp/B000FTEDMM/ref=sr_1_5?ie=UTF8&amp;qid=1468293781&amp;sr=8-5&amp;keywords=3m+respirator
I know OSHA regulations don't allow for a beard when using an N95 mask and only allows for limited facial hair, IE goatee or mustache, so take that for what its worth, YMMV.
Don't use scrap steel. Go here http://newjerseysteelbaron.com/ and buy some 3/32" 1075 (2) inches wide. Cut out your pattern using some cheap, thin (1/8" thick) A36 steel plate that you can get at a scrap yard. Draw your pattern on paper, cut it out (roughly) and glue it to the A36 with that white glue we used in the first grade. Drill the rivet holes BEFORE you cut out the pattern. Cause once you cut out the pattern it is difficult to clamp in a vice. Once you have the pattern the way you want it clamp the pattern to the 1075 down on your bench and etch around it and mark the holes with this https://www.amazon.com/General-Tools-88-Tungsten-Carbide/dp/B00004T7S0/ref=pd_yo_rr_bia_t_2?_encoding=UTF8&amp;psc=1&amp;refRID=6KE1W903PPP22FSCHQC6 Drill the holes BEFORE you cut it out. Buy some temp ssticks at a welding store. Get 1450 degree and 1500 degree sticks. That way you will know when its hot enough to quench. Canola oil is ok to quench 1075.