Reddit Reddit reviews Anytime Tools Disc Brake Rotor Caliper Digital Electronic Gauge Gage Micrometer 0-2.5"/0.0005"

We found 4 Reddit comments about Anytime Tools Disc Brake Rotor Caliper Digital Electronic Gauge Gage Micrometer 0-2.5"/0.0005". Here are the top ones, ranked by their Reddit score.

Industrial & Scientific
Test, Measure & Inspect
Calipers
Digital Calipers
Dimensional Measurement
Anytime Tools Disc Brake Rotor Caliper Digital Electronic Gauge Gage Micrometer 0-2.5
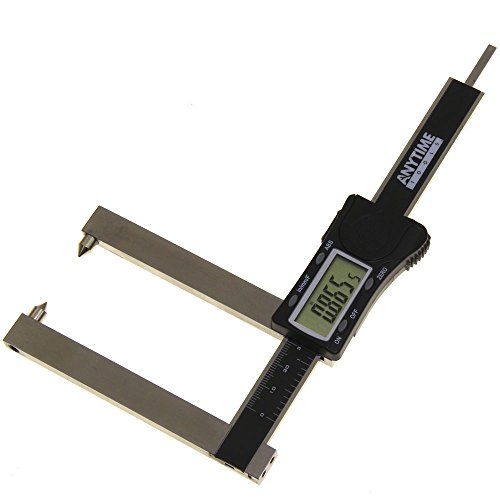
Range: 0-2.5"3.5" jaw depth for larger rotorsReads in INCH / METRIC / FRACTIONSResolution: .0005" / .01mm / fractions 1/64"Direct inch/metric/fraction conversion
Check price on Amazon

4 Reddit comments about Anytime Tools Disc Brake Rotor Caliper Digital Electronic Gauge Gage Micrometer 0-2.5"/0.0005":

u/xc0z · 6 pointsr/CherokeeXJ

Alright... ignoring the fact that your asking how to install gears implies heavily that you don't know the first step... OR the first thing. Here's the basic run down. I'm not going to go into detail on torque specs, or specific procedure... i'd be here all night on a how-to that most people don't give two shits about. I'm also doing this ONLY for the 8.25. DANA 44's are too rare in stock, and DANA 35's don't deserve to be rebuilt.

Tools needed:

  1. Bearing race set tool: http://www.harborfreight.com/10-piece-bearing-race-and-seal-driver-set-95853.html
  2. Clamshell Bearing puller: http://www.amazon.com/G2-Axle-Gear-80-BRGPLLR-Clamshell/dp/B004PHV7DI
  3. Micrometer: http://www.amazon.com/Anytime-Tools-Caliper-Electronic-Micrometer/dp/B006Y1OWKS
  4. Backlash Indicator: http://www.amazon.com/Allstar-ALL96414-0-001-Increment-Indicator/dp/B006K8WANQ
  5. Torque Wrench: http://www.amazon.com/TEKTON-24335-2-Inch-Torque-10-150-Foot/dp/B00C5ZL0RU
  6. 12 ton shop press: http://www.harborfreight.com/12-ton-shop-press-33497.html
  7. Cold Chisel: http://www.amazon.com/TEKTON-6738-Chisel-Punch-12-Piece/dp/B000NPR3IO
  8. Magnet on a stick
  9. Needle nose pliers, or whatever pliers will fit
  10. 3-5lb Maul

    Parts needed:
  11. The gears. duh
  12. Master rebuild kit with TIMKEN bearings.
  13. Gear oil.
  14. Marking compound, if the rebuild kit doesn't come with it... If it doesn't, you bought a cheap kit. shame. SHAME.^SHAME.^SHAME.

    On a 8.25...
  15. Pull diff cover.
  16. Pull pinion yoke nut.
  17. Remove center pin bolt, and pull center pin from carrier.
  18. Push Axle shafts in to the center housing.
  19. Look for the little C clip inside the carrier. Use you stick magnet to pull them out. Repeat for the other axle.
  20. Pull axle shafts out of both sides.
  21. Use your cold chisel to put a mark on the left bearing cap ridge. make one mark. make one mark on the left side housing as well. Make two marks on the right side bearing cap. Make two marks on the right side housing as well. PAY ATTENTION WHEN REASSEMBLING. Bearing caps are side specific, and switching them can result in early bearing failure. Set bearing caps and bearing cap bolts in a clean area.
  22. Pull out main carrier.
  23. Put carrier in a vise, and with your torque wrench, remove the bolts holding the ring gear in place. tap the ring gear evenly around the sides to remove.
  24. Use the Clamshell bearing puller to pull the bearings off the carrier.
  25. Use the shop press to install the new bearings on the carrier.
  26. Put the new ring gear on the carrier. Push it on lightly with your hands, install 2-4 bolts to hold it in place. Count the turns as the bolts catch. install the rest of the bolts with the same amount of turns. Tighten all bolts in a star pattern in even increments to 40 ft/lbs. then to 60 ft/lbs. then finally 80 ft/lbs.
  27. Pull the pinion yoke if you haven't already. pull the pinion. if it doesn't come out, hit it with a hammer. use some wood if you plan on saving the gear set for whatever reason.
  28. Use cold punch to remove bearing races from the rear of the housing. don't fuck up the housing mating surface, or it'll leak no matter how many times you replace the pinion seal.
  29. Install the new bearing races with the bearing race set tool and your maul.
  30. Install the bearing on the pinion.
  31. Measure the old shims with your micrometer. Install the same thickness shims in the pinion to start.
  32. Place the pinion in the housing. New bearing should be in place on the pinion and in the housing at this point. IF not, you need to learn to read.
  33. Measure the thickness of the carrier bearings. Place new bearings of the same thickness to start.
  34. Place carrier, bearing outer races and shims in all at once.
  35. Put old crush sleeve and old bearing on the new pinion. A die grinder to grind out some of the inner old bearing race makes a good setup bearing. tighten the pinion nut.
  36. Place marking compound on 5 ring gear teeth, both sides.
  37. Spin the carrier to determine pattern. consult pattern guide included with your kit. you kit didn't come with a guide? shoulda bought Yukon gears.
  38. If you pattern isn't conforming to the guide, add or remove shims from the pinion or carrier.
  39. Once you think you have a good pattern, setup the dial indicator and measure backlash. Ideal is .8-.12 thousandths. if you're in the .12 or above, or .8 or below, add or remove shims to move the pinion in or out, or the carrier left or right. this can require some time dedication.
  40. Once your happy with your gears, pull the carrier back out. Install new inner seals if you have them.
  41. Remove the old crush sleeve and place a new one. Torque to the recommended spec.
  42. Measure drag on the pinion with the torque wrench. should be ~8-10ft/lbs if i recall.
  43. Place carrier back in the housing.
  44. Replace carrier bearing caps and torque.
  45. Re-torque pinion nut.
  46. Replace axle shafts.
  47. Replace c-clips.
  48. Replace center pin and bolt.
  49. Replace cover. seal well. sitting overnight is ideal.
  50. Fill with 80w-90 gear oil.

    Go for a drive. If everything was done right, you should now have more power, and no rear end noise. if you do... you need to take the rear apart again, and reset the gears to clear the noise.

    I'm sure i forgot something, like thrust washers. Don't crucify me for it. If you want a REAL guide, you need to do more research.
u/Rikers_Mojo · 3 pointsr/cars

Should probably pick up a pair of rotor calipers to measure them accurately so you get the most out of them. Something like this:

Anytime Tools Disc Brake Rotor Caliper Digital Electronic Gauge Gage Micrometer 0-2.5"/0.0005" https://www.amazon.com/dp/B006Y1OWKS/ref=cm_sw_r_cp_api_RvU4yb42MT4DP

u/FireStorm005 · 1 pointr/Cartalk

Smooth surfaces on all rotors, you'll need a rotor measuring caliper to know for sure. There is a specified minimum thickness, which is often stamped onto the rotor, wither the hat (the raised portion where the hub is) or the outer rim of the disc. At the thinnest part the rotors should be thicker than the min specified.

u/theziptieguy · 1 pointr/MechanicAdvice

Thickness caliper and runout tool to determining of the rotor is within specification for thickness and warpage. Visually check for irregularities like cracks, hot spots and glazing. Just replace it to ensure their safety.

Examples for your reference.

Runout tool
Türlen Disc Brake Rotor and Ball Joint Runout Gauge Set Dial Indicator 1"/0.0005" Flexible Arm Clamp Locking Vise w/Case https://www.amazon.com/dp/B01LML96RI/ref=cm_sw_r_cp_api_i_YlrFDbXC49Q24

Caliper gauge
Anytime Tools Disc Brake Rotor Caliper Digital Electronic Gauge Gage Micrometer 0-2.5"/0.0005" https://www.amazon.com/dp/B006Y1OWKS/ref=cm_sw_r_cp_api_i_anrFDb4TBV4CJ