 Reddit reviews Nilight 90012E Heavy Duty Rocker Toggle 15A 250V 20A 125V SPST 2Pin ON/Off Switch Metal Bat Waterproof Boot Cap Cover-5 Pack, 2 Years Warranty
We found 3 Reddit comments about Nilight 90012E Heavy Duty Rocker Toggle 15A 250V 20A 125V SPST 2Pin ON/Off Switch Metal Bat Waterproof Boot Cap Cover-5 Pack, 2 Years Warranty. Here are the top ones, ranked by their Reddit score.
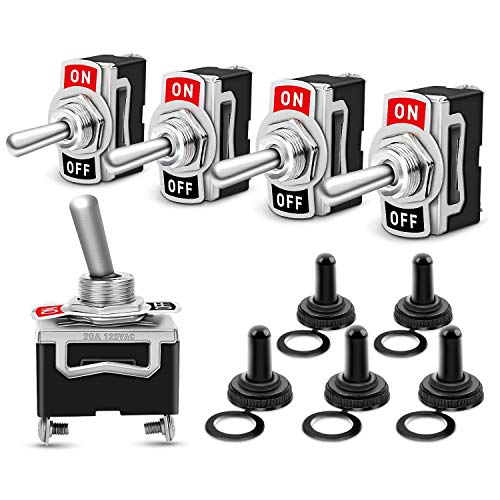
Connector type: SPST, 2 terminal pin on/off. Power: 15A 250VAC/20A 125VACMaterial: plastic and metal. Solid connection switch with waterproof rubber cap, more convenient to operate. Delicate appearance with strong Construction. Look chic and high-end on your equipmentMechanical life: more than 50.000 cycles. Electrical life: more than 10, 000 cyclesEasy to install: Mounting hole diameter: O12mm. Each of the terminals has a machine screw for quick connections, but also easy to be solderedPackage include: 5Pcs toggle switch, 5Pcs waterproof boot cap
12V/5V is nothing for a off the shelf switch. If you want to get semi-fancy, you can take one of our 5 1/2 in bay covers and drill out the appropriate sized whole and install 4 toggle switches. Maybe 5 if you want a master kill switch (space permitting).
Here is a 5-pack for $10: https://www.amazon.com/Nilight-Rocker-Toggle-Switch-Waterproof/dp/B078KBC5VH/
Get some PWM fan header cables (https://www.amazon.com/CRJ-Black-Sleeved-Splitter-Adapter/dp/B075H6HT8J/ for instance). you just need enough extra cable to go from the PWM header on the Mobo to the switch. Make sure the PWM lead (yellow i think?) and Negative is still wired to the fan. You still would like to monitor the RPM I am sure. Simply wire each 12V+ lead to the switches.
Even better, get some switches with an LED so that you can tell when they are on: https://www.amazon.com/Lighted-Rocker-Toggle-Linkstyle-Vehicles/dp/B0776QXX21
Edit: Cant confirm this... But this doc seems to show some or all of the PWM specification if you want to dig further. https://www.handsontec.com/pdf_files/4_Wire_PWM_Spec.pdf
After seeing a couple posts of people's custom button boxes on reddit I knew I had found my next project. I've been doing quite a bit of Arduino and small electronics lately, and this was the perfect fit. So off I went to Amazon, ordered a bunch of stuff I thought might be cool / useful and started piecing things together. Took a few weekends of working on it here and there, the most time consuming part just being tediously soldering and wiring the 38 inputs.
​
Was originally going to set it into some sort of project enclosure, but ended up getting impatient and just mounting it to two pieces of plywood with some feet. It added enough heft to it that I can lift the switch guard and rotate the somewhat stiff selector without issue. Eventually I'll get a better enclosure for it, probably grab one off of Hammond mfg or get someone with a larger 3D printer to make one. The Engine Start and black/red button (that I'm going to use for quantum jump) have leds in them that I don't currently have hooked up to the Arduino, but once we get some sort of API into Star Citizen hopefully I can tie them to engine state and jump spool/ready state.
​
The controls are:
Power on, flight ready, 3 misc buttons, zoom rotary encoder, 3 misc buttons, quantum spool, quantum jump
Hat switch + center for shield distribution and reset, engine, shield, and thruster power switches, power distribution profile selector, misc selector
Flare Fire button, flare select, 7 misc toggle switches, self destruct switch, eject switch.
​
I mapped everything to a button in the Arduino code (no rotary encoder as zoom in this screenshot) so that I can easily bind to functions in Star Citizen. Unfortunately without an API this means the switch positions can get out of sync with the actual ship status easily. If by the time of release / they make an API there still isn't a way to read / set state by API then I'll probably make a new version with only toggle buttons.
​
Code Libraries
PCF8574_library for interfacing with the IO expanders
- https://github.com/xreef/PCF8574_library
ArduinoJoystickLibrary for emulating a joystick on windows
- https://github.com/MHeironimus/ArduinoJoystickLibrary/
​
Useful Instructables
Joystick Library
- https://www.instructables.com/id/Create-a-Joystick-Using-the-Arduino-Joystick-Libra/
PCF8574
- https://www.instructables.com/id/PCF8574-GPIO-Extender-With-Arduino-and-NodeMCU/
​
Parts List
1 Terminal Expansion Board - https://www.amazon.com/gp/product/B07PGDWJ2V
3 PCF8574 IO Expansion Board - https://www.amazon.com/gp/product/B07B95LMLQ
1 Rotary Encoder - https://www.amazon.com/gp/product/B07DM2YMT4
1 4 Position Rotary Selector - https://www.amazon.com/gp/product/B07JN2967L
1 Red Ring Momentary Push Button - https://www.amazon.com/gp/product/B017ILTX60
1 Engine Start Momentary Push Button - https://www.amazon.com/gp/product/B07MK2394L
5 Heavy Duty Toggle Switch - https://www.amazon.com/gp/product/B078KBC5VH
1 12 Position Rotary Switch - https://www.amazon.com/gp/product/B074WMC9C8
1 5-Channel Rocker - https://www.amazon.com/gp/product/B07K5PFPNC
1 Arduino Micro - https://www.amazon.com/gp/product/B00AFY2S56
7 Red/Black Momentary Push Buttons - https://www.amazon.com/gp/product/B07BD2D96W
2 Red Cover Toggle Switches - https://www.amazon.com/gp/product/B07BD2D96W
8 Small Toggle Switches - https://www.amazon.com/gp/product/B013DZB6CO
Something like this would work but you'd have to be able to open the unit and solder in a new switch. This switch would have to be glued in because of the thickness of the wood involved.
Or, this might be easier but not the same form factor.