(Part 2) Best art knives & blades according to redditors
We found 62 Reddit comments discussing the best art knives & blades. We ranked the 41 resulting products by number of redditors who mentioned them. Here are the products ranked 21-40. You can also go back to the previous section.


Well, 150 but this
surgicalcraft knife is brilliantLike any hobby the initial cost to start will always be high. You may be tempted to buy cheaper tools but whats the point if you plan on building Gunpla for a while and will end up replacing them. If you only want to build 1-2 kits then you can get away with 2 dollar clippers and a box cutter but it won't give you good results.
Despite the cost these are still the tools I recommend that EVERY Gunpla owner who doesn't plan on painting their kits purchase
A) Tamiya 74035 Sharp pointed side cutters, worth every penny
B) Xuron 410 Side Cutters, very durable at an affordable cost
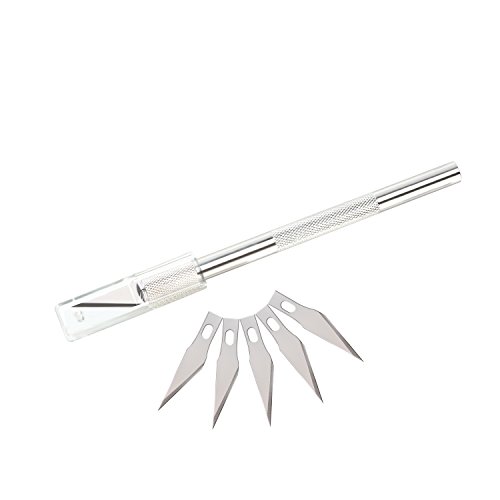
C) X-Acto X3000, Comfort rubber grip, comes with 2 blades
D) 3 Fine tipped Gundam Markers, Black, Grey and Brown
E) Krylon Acrylic Flat Coat, large can for only $5-6
And that's it.
2)Use the Tamiya cutters to cut the remaining nub, with practice you can get it practically flush to the part.
3)Clean up the nub with a hobby knife. You don't need sandpaper or a file if you did the steps above correctly and the flat coat will mask any scratches.
4)Use the Gundam markers for lining
6)Finally finish with a top coat
Total cost with amazon prime is $65. Yes the Initial cost is high but the tools above will last you for 20+ kits (you will need to buy more blades and flat coat). If you really can't afford that you can save up for the Tamiya sharp pointed side cutters and use the Xurons in the mean time (you will have more work to do).
So $38-65 initial investment to me is really not that expensive
If that's the case, it's gotta be the blade. I've been using these, and they work great.
If you have any craft stores that sells oil paint, they might have coupons, or start ordering on amazon now!
Then while you're there too, you should get a few bucket to put it in.
And you're pretty much set, if you have any questions let me know.
I'd love to hear what other folks are using. Ideally, I'd like a case that can fit a total of 16-20 fountain pens, but hopefully with a smaller footprint. The 96-slot Global Art Leather Pencil Case is almost perfect... but they changed their design since I bought mine and they now have only one loop per slot instead of two. (I utilize both loops for smaller things, like pencil leads, wax stamps, etc.)
My current case contains the following items, but as you can see I'm just about out of room!
---
Side A: Pencils
---
---
Side B: Fountain Pens
---
I don't know what to tell you with specifics for Spain, but I can give you some general info that may or may not be helpful to you.
First off, there's this link in the sidebar. It'll give you a bunch of options.
Your hobby knife and mouldline remover will be the same thing. The handles all function the same way. However, I'd recommend picking up some kind of hobby knife set so you get a variety of blade shapes to try and multiple handles to use. #11 blades are the standard, and I prefer X-acto brand, but your mileage may vary. Some larger blade sizes won't fit into smaller handles. Buy in bulk to save money. You can remove mouldlines with the back of a blade, rather than a separate tool.
Any kind of cheap and well-reviewed wax tool / clay tool / dental tool set will work for scupting. Same deal with needle file sets. And with your pin vise. The drill bits will break (for any set), though, and bits can be problematic to replace if you're not sure of exact sizing.
I think the #11 blades are too big. These should work as replacement blades. Just break the small blades off (snapper should come included) and stick it in the holder. The 100 pack will last you forever
Man i would have bought it just for the HI-Tec c Ink cartridge. It's was too expensive for me at the time.
You might want to consider this. I bought it for my brother but the blades are far better than X acto blade and the cap actually stays on plus the grip and quality of the holder is far above any of the x acto offerings.
> Where would i go to find special xacto knife endings and blades?
Amazon. The chisel blade is the only xacto style blade I use on kits now, and are slightly too wide to fit in opening of the No1 xacto handle so I have them in a Fiskar handle. The Olfa blades I use cannot be used on xacto handles.
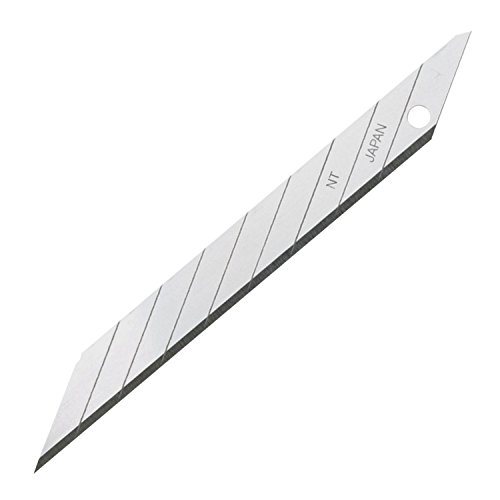
This is the type of blade I use. They can be used on the Tamiya knife, or this NT cutter knife. Olfa has the same
https://www.amazon.com/eZthings%C2%AE-Blades-Cutters-Cutting-Materials/dp/B01G0V2A82/ref=mp_s_a_1_49
similar. small in size. different brand. has the little pocket clip tho
Agreed. It's a craft knife. https://www.amazon.com/FarahTM-Hobby-Utility-Carbon-Blades/dp/B019CLD0OK/ref=sr_1_3_sspa?crid=2HN1JHMG361O7&keywords=xacto+knife&qid=1573830172&s=hi&sprefix=xa%2Ctools%2C142&sr=1-3-spons&psc=1&spLa=ZW5jcnlwdGVkUXVhbGlmaWVyPUFXSFNRMzhDNzNRMU0mZW5jcnlwdGVkSWQ9QTA4NTcyMDAzSTk3VlA4V0IxWUlVJmVuY3J5cHRlZEFkSWQ9QTA2MjAwOTcxTDJJUTlQU1JHUjNFJndpZGdldE5hbWU9c3BfYXRmJmFjdGlvbj1jbGlja1JlZGlyZWN0JmRvTm90TG9nQ2xpY2s9dHJ1ZQ==
Also are these the replacement blades? Seems like there's a few different ones by them.
Hmm, perhaps if it were larger overall, it would make for a better skiving knife. I'm thinking it would be similar to this style knife - https://img0.etsystatic.com/113/0/9637034/il_fullxfull.874424344_svqd.jpg or this one - https://www.amazon.com/Schmedt-German-Leather-Paring-Knife-Right/dp/B00LM7IQI8
I have that Schmedt knife and it suffers from a horrible grinding job which left a giant gouge in the flat side right near the tip of the blade. I've spent hours and hours on it and the only way I could fix it would be to completely grind it back about 5mm, which would take forever and I'd lose so much usable surface area. I really wish these companies would stop selling specialty knives that appear to have been sharpened by narrow buffing wheels.
I use this as my hobby knife & it's got burnishes on the 3 outta 4 tips that aren't knives. Super handy.
(also available in a smaller version without the grips)
(note: one of the links is Amazon & the other is Amazon Canada as I can't seem to get the slimmer one to show up on Amazon.)
I'm very DIY, so I quite literally made stamps by hand two ways...
EDIT: Posting picture of what I stamped with my hand carved stamp for reference.
Yeah you're desk would probably work just fine. It shouldn't make a huge mess, it's not like you're using a power sander haha.
The CLU is just extremely hard to clean off copper, as in it bonds to it. You end up having to use some sort of abrasive to really get it off. With a lapped IHS, or lapped block, you'd probably end up having to "relap" it with some higher grit sandpapers (800+) to return to a clean copper finish.
You can certainly lap the H80 and GPU blocks, but I would take them off and check them with a nice straight edge first. I would also only use the Gelid on those coolers, the H80 and GPU blocks. It will be much easier to clean if future removal is required and Gelid is some highly rated stuff already.
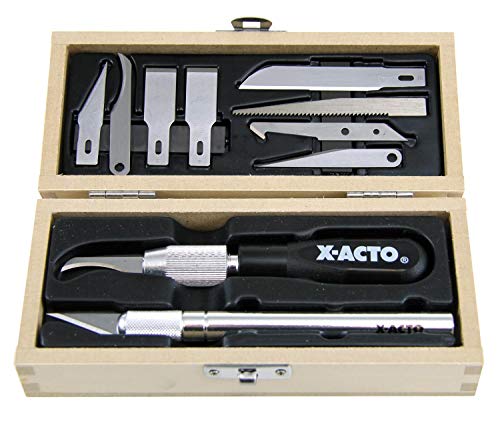
I would seriously recommend using the knife/razor method to remove the IHS. Like the saying it's "so easy, a caveman could do it" lol. Buy an X-ACTO #2 knife handle and their #26 whittling blade. Or one of their kits that includes those since you'd get a lot more for your money if you had other uses. The #26 blade is the perfect length/width that you can easily judge how deep it's slicing through the glue, and long enough that you can hold it along the entire length of one side of the IHS after you cut through the corners.
Here's some crappy paint pics that should help explain the process:
Part 1 - http://i.imgur.com/MvYMYjL.png
Part 2 - http://i.imgur.com/J4Vc3C9.png
The reason I'm recommending the X-ACTO setup so highly is you have much greater control with the size of that blade attached to a real handle. Whereas if you used the typical loose razor blade like this:
https://i.ytimg.com/vi/GWfZ_4BQK7s/hqdefault.jpg
or this:
http://s19.postimg.org/zco5sqnsj/image.jpg
is harder to control, harder on the fingers, and you risk using too much force and pushing through the glue too far. The X-ACTO handle eliminates this imo.
This image really helps illustrate how much glue can be on there, and where the die/transistors are in relation to everything. So use that as a clue when you start your cuts. Like I previously said, the size (width of the cutting edge to non-cutting edge) of the #26 X-ACTO blade helps with visualizing how deep your cuts are getting.
http://i.imgur.com/6or5ATh.jpg?1
Now if this sounds complicated or risky, please let me assure you it's not that difficult. I'm just trying to be as thorough as possible with my explanation to help ease your concern. Using the method I described I had the IHS off in less than 5 min and I had never delidded anything before. The X-ACTO knife is so sharp. I mean it might feel like it takes more force than you'd think to cut through, but once it's off you'll be like "wow, that was easy."
This is the Liquid Electrical tape I used on the transistors after delid:
http://www.amazon.com/Permatex-85120-Liquid-Electrical-Tape/dp/B003ERU04W/ref=sr_1_1?ie=UTF8&qid=1449519375
This is a solid X-ACTO kit that has the blade and handle I'm recommending, but you could buy them separately for cheaper:
http://www.amazon.com/X-Acto-X5028-Xacto-Do-It-Yourself-Set/dp/B000HGMA7I/ref=sr_1_7?ie=UTF8&qid=1449519412
Sandpaper you can get anywhere. I'd recommend the 3M Wetordry stuff. They're usually sold in packs with different grit ranges and sheet quantity. Maybe you could get single 9x11" sheets of individual grits at an auto parts store or something though.
You can find replacement blades for pretty cheap on amazon.
White vinegar and a single razor blade. Also non-ammonia glass cleaner works well. We use razor blades like these for scraping off water spots, poop, sticker residue, food, you name it. Definitely use with a glass cleaner though, as scraping a dry razor blade on dry glass is a sound worse than nails on a chalk board.
-Jen
Looks like a solid start to me! I would recommend not fully assembling your models before you paint them, some places can be hard to reach when fully assembled.
Necessary Hobby Items