Best homebrew filters & strainers according to redditors
We found 67 Reddit comments discussing the best homebrew filters & strainers. We ranked the 18 resulting products by number of redditors who mentioned them. Here are the top 20.
We found 67 Reddit comments discussing the best homebrew filters & strainers. We ranked the 18 resulting products by number of redditors who mentioned them. Here are the top 20.


Looks very nice but I think you could have saved yourself a lot of work and easier cleaning by simply going with one of these: http://www.amazon.com/Bazooka-Kettle-Screen-brew-kettle/dp/B003ISY2DC
Check out /r/Homebrewing and just start saving. Even 2 dollars a day with you and a friend and you could be rolling in a couple months.
edit: also start saving glass bottles that require a bottle opener. Those are reusable.
edit2: Things you'll need. Feel free to find similar products.
cooler with spigot
valve(I'm not sure of the size on that igloo)
bazooka screen
bottles(make sure they're brown)
caps
capper
some sort of gas stove. say a propane stove, a turkey fryer, or a kitchen stove.
a large pot
starsan
I'm probably forgetting things.
Stainless mesh hop strainers are amazing for racking liquid off of fruit. Something like this.
I recently made a melomel with 30# of crushed blueberries and about 18# of honey. It hit about the 5 gallon mark. As you can expect it was pretty crowded in the bucket. I gently finessed the strainer down into the mead, put my racking cane inside the strainer, and racked out into secondary. I doubt a single bit of fruit made its way in there and the siphon didn't get stuck at all.
In the end I was able to get about 2.8 gallons of mead without pressing which is pretty much what I was expecting to get. Pretty impressed!
I use a fine mesh dry hop tube like this: Amazon link
But you can also just buy a replacement dip tube you use for fermenting for $10 at AIH, possibly elsewhere.
I once had a problem even when using a shortened dip tube and the mesh filter - the lid somehow popped off the filter during fermentation and I had lots of hop bits in my mixture. I had to disassemble the liquid side disconnect and remove the spring and plunger to let it flow when I racked it to my serving keg.
In place of the diptubes-- nothing. The valve port is high enough that the trub settles nicely under it after cold crashing. I do dry hop in these stainless mesh baskets, they work great.
I don't use a conical, and I do cold crash...but neither of those matter if you contain your hops in a stainless mesh tube. By tossing your hops in one of these, they'll stay contained in that tube so your transfer can't possibly suck the hop matter in. The metal tube also makes sure the hops sink and get full immersion in your beer, maximizing extraction.
Mine was super easy to build and has served me for about 4+ years now.
The cooler requires no modification. Simply remove the plastic spigot, and install the new ball valve.
The bazooka screen is a bit longer than the diameter of the cooler. Simply bend the end up slightly and it should fit. The new nipple on the ball valve fits 1/2" ID hoses.
Brew days go pretty smoothly, haven't had a stuck mash yet. Filters well as long as you vorlauf and set the grain bed. My efficiency is around 75% currently, using the Batch sparge method.
Possibly, but look at this instead. I just bought one, and it's working out great. Cheaper than the one you linked to, as well.
Morning all,
I recently made the switch to kegging my homebrew and have had a few problems with clogged dip tubes and heavy foaming. I ordered a filter for my next batch, which should be kegged in the next few days. Do you guys have any other helpful suggestions as to how to make beer better for kegging? Also, I am adjusting pressure on the keg rather than changing the line lengths, as my kegerator is a prebuilt unit and I really don't want to mess with lines if I don't have to.
Kegerator is a single tap, inkbird temperature controller, two USB powered fans for draft tower cooling. Inkbird is setup to measure liquid temp and is set to 38F.
This is the filter I purchased.
https://www.amazon.com/gp/aw/d/B00420OIT8/ref=mp_s_a_1_2?ie=UTF8&qid=1486742857&sr=8-2&pi=AC_SX236_SY340_QL65&keywords=water+filter+beer&dpPl=1&dpID=41dx2L-RvGL&ref=plSrch
edit: kegged, not legged.. although some legging could be quite tasty!
What is you plan for a mash tun? I went with a 10g Home Depot cooler and something like this: https://www.amazon.com/Quick-Weldless-Stainless-Bulkhead-Nipple/dp/B00JHMRH2Q
This is the cooler: https://www.homedepot.com/p/Rubbermaid-40-qt-Orange-Water-Cooler-FG1610HDORAN/202260809
You’ll also need a screen or false bottom. I think the screen is a ver economical option https://www.amazon.com/Stainless-Steel-Bazooka-Screen-Fitting/dp/B003ISY2DC
I haven't used coconut in a tincture, so I can't speak to if that is preferable option to what you have.
I have added coconut to the fermenter in a dry hopper to good results. I would suggest using something like that or the muslin bag, because the shredded coconut can very easily clog siphon lines and keg post, which are always a pain to clear. And it unfortunately takes only one little shred to do that.
I recently did a toasted coconut porter and "dry hopped" 12 oz. in the fermenter for over a week and then used the dry hopper I referenced earlier with an additonal 12oz. in the keg itself. Definitely came out coconuty but was well balanced with the porter itself, so wasn't like drinking coconut milk or anything. It did seem to hurt head retention at first, but as I drank through the keg, that seemed to clear up a bit.
I recently got on of these guys Dry Hopper
I used it for a tropical IPA for a party last week, and it went rather well. No hop particles and no clogged dip tube. The top is pretty secure on it, too.
My tool of choice is one of these because it doesn't require any extra pots, you can just rinse it out after and hang it up. Actually less effort than a teabag, and a good enough compromise if you bend it a bit so it sits lower in the cup. I am that lazy, that if I used a teapot, I'd just drink diet coke.
I have this - http://www.amazon.com/Bazooka-Screen-brew-kettle-mash/dp/B003ISY2DC/ref=sr_1_1?ie=UTF8&qid=1380734556&sr=8-1&keywords=hop+bazooca
I had to fold in the end a little to fit in a 10 gallon cooler conversion. Usually get 80% efficiency with batch sparging and have only had one stuck sparge.
I bought a stainless steel dry hopping device for kegs. It works really well.
Alright! So the sparge arm is this connected to this.
I only had to modify the mash tun a little. I had to put a hole in for the thermocouple probe (bigger hole on the outer wall) and a hole in the lid for the sparge arm. Other than that, i just put my bazooka and associated fittings through the existing spigot hole.
As for capping, yes, plain old hand capper. Hopefully I'll be doing more kegging though and won't be required to do so many bottles.
I failed to mention, you'd want to fit the cooler with either a bazooka tube like this http://www.amazon.com/Bazooka-Kettle-Screen-brew-kettle/dp/B003ISY2DC or a false bottom like this http://www.instructables.com/id/Build-an-awesome-Mash-Tun-Less-than-60-Bucks-False/ I've heard the bazooka tubes can clog so I personally went with the false bottom. It would also be prudent to fit a ball valve on the outside of the cooler to attach a hose for draining into your boil kettle.
I recently picked up one of these -- haven't used it yet, but I intend to just drop it in and let it sink. I actually like that it sinks so that I know I am getting complete submersion -- I was always suspicious of how much I was getting out of the socks that would float at the top.
To your inquiry of how will it be fastened -- it won't, but I really can't think of how that could be an issue. Instead of retrieving the hops, I would recommend that you push your beer to an empty corny and leave the hops behind -- way better in concerns of exposure/quality.
EDIT: Looked around on amazon a bit more and apparently some come with a small chain, but you still have a valid question -- not exactly sure what it would be attaching to...
I use a stainless steel corny keg container. I currently have a keg on tap with 3 oz of pellets in it and have had no clogs.
Using two steel kettles like that sounds very expensive. How about an upright cooler with a false bottom? There are kits for converting Igloo-brand coolers in this way, like this.
That being said, if your efficiency is bad with a rectangular plastic cooler and braided hose, I'm not entirely sure that your efficiency will be much better with a different style of MLT. I did find that replacing my braided SS hose with a bazooka screen made things a bit easier since it doesn't get crushed in the grain like my SS braid did.
Stand by:
Ball Valve
False Bottom
10 gallon cooler
False Bottom - Valve adapter
Please shop around. I have no doubt you could get some of this stuff for cheaper. I was restricted in that my only form of currency was Amazon gift cards. Especially the adapter could be built / constructed for much cheaper than I paid.
Additionally, instead of the false bottom / adapter, one could simply employ a Bazooka Screen instead of a false bottom, I have just read that false bottoms are more effective and less prone to problems.
DISCLAIMER - Always do your own research and make sure the parts that you are buying are all compatible and properly sized, etc. etc.
Having said that, the parts I listed above are exactly what I ordered and all fit together perfectly, I just needed to go out and buy a female coupler (to attach the valve to the hose from the false bottom) and a washer (per the included instructions with the valve, which had a additional washer for my configuration).
We've looked at a couple, but decided on this filter as it was a bit more practical. Is this the one you're referring to? http://www.amazon.com/Home-Brew-Stuff-BF-10C-Filtration/dp/B00420OIT8
Water quality is our next big project we're looking at. While our filter performs fine, we'd like to do some more testing and build specific water profiles in the future.
Buy something like these (I'm sure you can find a better price than that, I think they were only about $5 each when I bought them) and put them onto the dip tube in each keg. First time I kegged a beer that I had dry hopped with pellets, it clogged the liquid out post almost immediately (I didn't even dry hop in the keg, I'm just talking about the smaller amount of hop matter that came through when I siphoned into the keg). I cleared the clog, and it happened again almost immediately.
Once I bought those screens, I've never had a problem, and that includes times when I've tossed hops directly into the keg. You will get a clog eventually, if you don't. It might be hops, it might be matter from a fruit/chocolate/whatever addition, but it'll be something.
You sya you don't have the tools to make the mash tun and brew pot. I assemlbe my mash tun, HLT, and brew pot with two 10inch adjustable wrenches, a standard dewalt drill, a carbonate cutting bit, a stepped cutting bit, and some cutting oil. If you have the drill everything else would cost around 50 bucks, then you also gain tools with your equipment. The hardest part is cutting holes in the pot for a thermometer.
Either way to make the Mashtun and MTL you would only need 2 10 inch adjustable wrenches.
Up to you, but here is some all grain kits you could look at:
http://www.austinhomebrew.com/10-Gallon-Igloo-Cooler-Mash-Tun-With-False-Bottom-AND-Hot-Liquor-Tank_p_6699.html
https://www.amazon.com/Gallon-Cooler-Stainless-Steel-Screen/dp/B013KJKAC0/ref=sr_1_9?ie=UTF8&qid=1486068034&sr=8-9&keywords=10+gallon+mash+tun
You can make a 10 gallon mash tun for under 100 dollars:
10 Gallon cooler (~$50)
https://www.amazon.com/Igloo-Gallon-Beverage-dispenser-Dispenser/dp/B000F6SHTK/ref=sr_1_1?ie=UTF8&qid=1486068151&sr=8-1&keywords=10+gallon+cooler
Ball Valve(~$15)
https://www.amazon.com/Eagle-Brewing-Wl301-Stainless-Weldless/dp/B00OC8DXPA/ref=sr_1_sc_2?ie=UTF8&qid=1486068175&sr=8-2-spell&keywords=wedless+ball+valve
Screen (~$8)
https://www.amazon.com/Stainless-Steel-Bazooka-Screen-Fitting/dp/B003ISY2DC/ref=pd_sim_468_4?_encoding=UTF8&pd_rd_i=B003ISY2DC&pd_rd_r=45GNPGH763R20241728C&pd_rd_w=MCZcu&pd_rd_wg=n4Wsv&psc=1&refRID=45GNPGH763R20241728C
1/2 female npt fitting(~$5)
https://www.amazon.com/Stainless-Steel-Fitting-Coupling-Female/dp/B003GSKXUU/ref=pd_sim_328_6?_encoding=UTF8&pd_rd_i=B003GSKXUU&pd_rd_r=SMJAVJR6CYZ7P9ZBQBQQ&pd_rd_w=h6v7j&pd_rd_wg=eclPX&psc=1&refRID=SMJAVJR6CYZ7P9ZBQBQQ
Total: 78 dollars. You can buy 2 10 inches adjustable wrenches for 20 dollars (https://www.amazon.com/Stanley-90-949-10-Inch-MaxSteel-Adjustable/dp/B000NIDIXA/ref=sr_1_1?ie=UTF8&qid=1486068379&sr=8-1&keywords=10+inch+adjustable+wrench)
so even having to buy tools its still under 100 dollars to make the Mash tun. The hot liquor tank will be the same price minus the screen, npt fitting, and tools. I personally made mine even cheaper buy using a 5 gallon htl instead of a 10 gallon and that will drop the price 25 more dollars. There is 0 drilling involved you simply unscrew the old plastic tap and put the weld ball valve in its place, it took me less than 10 min to make my new HTL on Monday.
Also, and this is really important to why I say build yourself, any mash tun you buy is going to be put together the same way it just matters whether you put it together or someone else does, either way the quality will be identical.
If you need a sparge arm for fly sparge you can make that out of pvc pipe: https://www.youtube.com/watch?v=Q-jgmgbwvg4
My two cents, even though you don't believe in you. I do, if you feel like saving money you can absolutely make all this stuff yourself and it doesn't require you be good at anything more than thinking like a logical person.
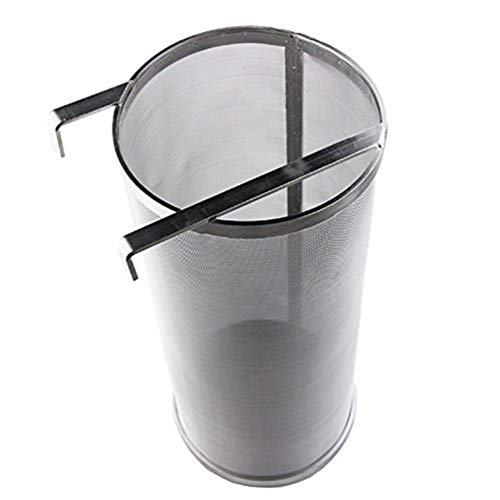
I use this hop spider and hang it on the rim:
400 Micron Stainless Steel Home Brewing Beer Brewing Hop Filter Hop Spider (5.9' x 13.78') https://www.amazon.com/dp/B078RFSQJB/ref=cm_sw_r_cp_tai_qTW4CbAD9QRVS
It’s a bit large and does limit whirlpool motions, but I’m sticking with it. I love to brew hop heavy IPAs and any other approach would be more problematic IMO. I’ll stir the hop spider contents throughout the boil, whirlpool etc to help assure its mixing with the wort. I don’t see any green sediment in my brew kettle when all done.
I’ve clogged my pump only twice in ~16 brews, early on I wasn’t controlling grain ingress below the false bottom. In both cases I blew back into the pump and cleared it up.
https://www.amazon.com/gp/aw/d/B01N5CS1AG/ref=mp_s_a_1_1
https://www.amazon.com/dp/B06XKMLQG3/ref=cm_sw_r_em_apa_i_HV4FDbSW3JM2P
I use this one with my 14 gallon kettle. It just barely touches the bottom of my kettle and works well for me.
I have been using this one for over a year now and would never go back.
300 Micron Mesh Hopper Spider Strainer Stainless Steel Hop Spider Beer Hops Filter Tea Kettle Brew Filter (6.1 x 13.98 Inch) https://www.amazon.com/dp/B01N5CS1AG/ref=cm_sw_r_cp_api_i_dRaGDbHAC8KGF
I batch sparge. I bought this cooler: http://www.walmart.com/ip/Coleman-70-Quart-Xtreme-Cooler/4807332 and a screen like this: http://www.amazon.com/Bazooka-Screen-brew-kettle-mash/dp/B003ISY2DC
The cooler was on sale and cost me $25. (Looks like they might not be selling it anymore). The screen was about $20. They've lasted me a long time and I can do enormous batches (10 gal batches up to OG 1.080 or so without sugar or extract additions, or any strength 5 gal batches). Efficiency sits around 70%.
For batch sparging, the equipment doesn't seem to matter too much. If you don't grind too fine and are careful with your grain composition (not too much wheat) you won't have sticking problems, and there's no point in being fancy with the manifold since it's a batch sparge.
I am not (yet) qualified to speak on fly sparging. I'm trying to figure out a setup for it but it will take a bit more planning.
This is all I use in my igloo, and it works great:
http://www.amazon.com/Bazooka-Screen-brew-kettle-mash/dp/B003ISY2DC/ref=sr_1_1?ie=UTF8&qid=1406924473&sr=8-1&keywords=bazooka+screen
I can vouch for the quality of HomeBrewStuff's products. Their pots are very solid. You can also add the bazooka screen to mash in it as well.
I'm building a new brewing system, and today I built a 10 gallon cooler mashtun using all SS fittings. Having learned from past experiences, I came up with this build, which is just about the simplest way to make a mashtun.
What you'll need:
10 gallon Igloo cooler $41
Bayou Classic 1/2" SS Bulkhead $30
1/2" MTP Bazooka Screen $9
1/2" Male hose barb $8 (you can probably find one of these cheaper at your LHBS, I had one lying around)
Tools: Teflon tape, and a crescent wrench.
Total Cost: $88
I highly recommend one of these. I use it both in the boil and also when I dry hop. It has helped immensely with that.
So I finally put my mash tun together last weekend. I hit a few small snags that I should have seen ahead of time based on reviews of the spigot I bought!
Items
Total Cost: $76
Time to assemble: 15 minutes +- 5 minutes for testing the seal
Main suggestion - get either a false bottom or one of the short bazooka screens. The long bazooka screen is a pain to work with -- it barely fits in the cooler. I also heard there are spigots you can buy that come with a female connector so you wouldn't have to buy the coupling.
Take a close look at the instructions for the spigot - it spells out how to put it together correctly but the diagram was super confusing to me for some reason.
My primary frustration was that none of my local hardware stores had the coupling so I had to get and wait for it from Amazon. Lame!
I have a couple of questions regarding dry hopping in a keg. I am looking for a more efficient and better way to to do this. I purchased one of these https://www.amazon.com/gp/product/B01GHSI9WO/ref=oh_aui_detailpage_o00_s00?ie=UTF8&psc=1 and my plan would be the following:
1-After primary move the beer to a dryhop keg.
2-Insert the tube with the hops in the keg. Give it some CO2 pressure to seal it.
3-Dry hop for 5 days.
4-prepthe serving keg.
5-connect the two kegs.
6-transfer beer to serving keg.
A few questions:
-I should dry hop at room temp?
-I shouldn't carbonate until the beer gets to the serving keg?
-Any other tips?
Thanks.
http://www.amazon.com/gp/aw/d/B003ISY2DC?pc_redir=1409004119&robot_redir=1
I added a Kettle Valve to each of the kettles. I am building a sparge arm out of CPVC that easily connects to the HLT valve. Plan on just connecting a piece of sanitized hose to the valve on the boil tank as needed for moving into fermentation buckets. I also have the screen on the boil tank for helping to remove leftover boil/hop sediment (hopefully this won't plug).
For hops these 300 micron things can serve a similar purpose without clogging:
https://smile.amazon.com/Gooday-Stainless-Strainer-Homebrew-Multipurpose/dp/B01N5CS1AG/
I use bazookas for my mash (I mash in an uninsulated pot with a ball valve. it loses a couple degrees over an hour but whatever) and didn't like what happened with the hops when I tried a bazooka in the boil but these cylinder 300 micron screen things are pretty sweet for keeping most of the hops material from having to eventually go down the drain when I'm dumping the trub after bottling. I get a little paranoid about all the crap I'm running through the garabage disposal and plumbing.
After dry hopping with my hop sock and realizing I can't get the knot undone to re-use it, I've decided to get one of the metal hop spiders like this one. only question I have is that they all seem to have those big holes at the top (like a salt shaker), don't they defeat the purpose of the fine mesh? Do I need to tie this kind of hop spider to the lid of my fermenter to keep it from falling over, because that seems unnecessary when it could just have a solid top
If you're talking about in the boil, you're looking for a hop spider.
I started with the bazooka screen linked below. I have brewed 12 batches with it and have no intention of "upgrading" to a false bottom. Make sure you select the one that is sold by Arbor Fabricating. For some reason it is only $.50 plus $4.99 shipping right now and it is really well made. I actually just bought a backup when I saw how cheap they are. :)
https://www.amazon.com/dp/B003ISY2DC
I was planning to order one custom sized from alibaba, but there’s one on amazon too. the Amazon one only holds about 8 gallons (if my math is right), so it would work for 5 gallon batches if it fits in your pot.
I use one too, with similar efficiency. I don't really want higher than mid-70s because that's what recipes are generally built for. Here's one on Amazon for about the same as what it would cost to build a SS braid filter: http://www.amazon.com/Bazooka-Screen-brew-kettle-mash/dp/B003ISY2DC
Plus, it's 1/2" MPT already, so it should thread directly into the bulkhead you attach for your ball valve. Easy peasy.
One thing is that for the 10gal Igloo cooler the 12" are slightly too long. I just bent the last 1-1 1/2" back on itself.
That's the biggest problem with using the braided stainless steel hose as a false bottom; it has zero structural integrity. I'd recommend buying at least a kettle screen to replace it, though it seems like you've already found a work-around.
This link doesn't work for me for some reason (maybe it's from your mobile?) so here's another link
Looks like the last piece of the puzzle is the mash tun - you need to convert a large cooler (10 gallons is a good size). If you have one with a drinking spout, you can unscrew the spout and install a ball valve. The inside end of the ball valve then attaches to something you use for lautering (filtering the wort out of the mash).
Ball valves are maybe $5 at Lowe's/Home Despot. You need some PTFE tape to seal the threads, and maybe a neoprene washer or two (although you can probably steal those from the existing spout you unscrewed from the cooler).
For filtration, you have a couple options --
I also recommend a thermometer, but honestly I think putting one into the cooler is pointless. Get a digital insta-read version like the thermapen, worth every penny of $100, and you can use it in the mash, on the wort, and while cooking. With a hand-held unit you can take temperature readings at different locations in the mash, and the thermapen probe is about 8 inches long.
>in day 3-4 and then closed transfer to a keg with 3oz loose in the keg
Personally I do mine on day 1 or 2, at high krausen. As for loose, save yourself the hassle of clogged posts and get something like this for keg hopping. Works great. I've never had grassy/off flavors doing this, and I tend to take a solid month or two to kill a keg.
$7 Amazon US.
£90 Amazon UK!
Whaaaaaat!
Let's talk about keg to keg closed transfers. My first transfer experience was successful. My second transfer didn't work due to hop matter blocking the dip tube at the top of the keg. Any reccomendations how to avoid this in the future? Something like this or this?
A hop spider like this would do the trick.
https://www.amazon.com/dp/B01M9FBFS5/ref=cm_sw_r_cp_apa_3L7JzbDA1M7PR
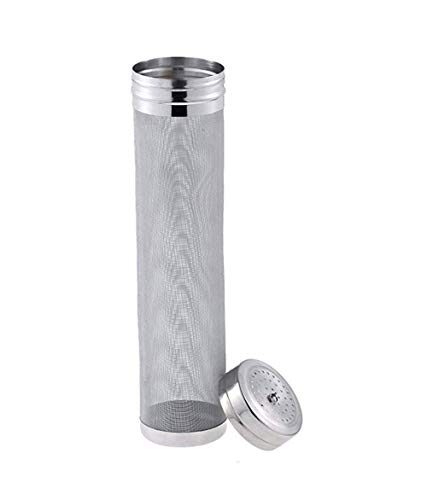
I also dry hop in the keg using this 29x7cm Stainless Steel Homebrew Beer Dry Hopper Filter With 300 Micron Mesh For Cornelius Kegs Corny Keg - Silver (Hopper Filter) https://www.amazon.com/dp/B01MUCE0ZR/ref=cm_sw_r_cp_apa_i_cREDCbN29CR5A
Not sure what your kettle setup it's like but you could consider a bazooka filter. https://www.amazon.com/Stainless-Steel-Bazooka-Screen-Fitting/dp/B003ISY2DC. They have them at most Homebrew shops.
This is the one: https://www.amazon.com/LD-Carlson-4718-Straining-Handles/dp/B06WRTCSCL
Thanks, this does look interesting but it also looks expensive for what it is and I bet all that loose screen is tough to clean afterwards.
I was thinking about doing the exact same thing except with one of the canister hop filters you can buy everywhere. Drill a hole in the top for the dip tube and get a rubber washer/grommet like this has. Then you could dry hop loose and the dip tube would be enclosed by the filter.
Something like this - https://www.amazon.com/Outamateur-Micron-Stainless-Brewing-Homebrew/dp/B07GPX8DL3
What type do you have? I have a pretty standard one that hooks to the side of the kettle. It works pretty well, but you need to use a metal spoon to scrape the bottom and sides occasionally or it will sort of clog up.
This isn't free, and there may be an easier solution but here's one possibility - look into "bazooka filters." They are mesh tubes used in homebrew beer for filtering out grains and hops and work well to keep kombucha scoby from clogging your spigot. They are designed with 1/2" NPT threads to thread onto matching stainless steel ball valves on the inside of homebrew beer kettles. IF the hole in your fermentation vessel is the right diameter though, you could likely swap out the whole spigot for what I'm talking about.
For example, check out this amazon listing for a 6" long filter.
https://www.amazon.com/MRbrew-Stainless-Kettle-Filter-Bazooka/dp/B07122LN4K
See the "Frequently bought together" for the other parts you'd need to swap out all the parts. The nipple on the end of the ball valve they show there is a separate piece that is threaded in so for a more convenient spigot for filling bottles/cups, you could replace that straight nipple with a 90 degree nipple that angles down. Or, you could just slide a short length of flexible food grade tubing onto the end of the nipple and call it a day.
I’d recommend something like this to put the peaches in. You should also keep then in through fermentation. I’d also start with 3 lbs for a 5 gallon batch.
I have one, haven't used it for keg hopping yet, only secondary fermentation. I've heard good things from people using this with a keg, but would definitely look for one with the filter in the cap.
I bought this at a cheaper price weeks ago. It might also be possible to add a screen after the fact